
Clinical Study Guide - PeaceHealth · Study Guide Nursing Student Version: v.4 Version Date:...
41
Study Guide Nursing Student Version: v.4 Version Date: 08/31/2015 Brackett, Shelly Page 1 of 41 Clinical Study Guide Login .......................................................................................................... 3 Login Department ........................................................................................................... 3 Patient Lists ................................................................................................ 3 Starting Your Shift ........................................................................................................... 4 Sign In...................................................................................................................................... 4 Treatment Team ...................................................................................................................... 5 Unit Manager .............................................................................................. 6 Census .............................................................................................................................. 6 Direct Admits ................................................................................................................... 6 Incoming Transfers ......................................................................................................... 6 Reviewing the Chart .................................................................................... 6 Outside the Chart ............................................................................................................. 6 Reports .................................................................................................................................... 6 Inside the Chart ............................................................................................................... 7 Patient Header ..........................................................................................................................7 Activities .................................................................................................................................. 8 Documenting Patient Care ........................................................................ 10 Navigators ...................................................................................................................... 10 Admission Navigator ..............................................................................................................10 Transfer Navigator ................................................................................................................. 12 Discharge Navigator ............................................................................................................... 12 Flowsheets ..................................................................................................................... 13 Flowsheet Templates .............................................................................................................. 13 Flowsheet Workflow ............................................................................................................... 14 Flowsheet Functionality ......................................................................................................... 15 Flowsheet Documentation...................................................................................................... 16 File Flowsheet Documentation............................................................................................... 17 Legend in Flowsheets .............................................................................................................18 Notes ........................................................................................................ 18
Transcript of Clinical Study Guide - PeaceHealth · Study Guide Nursing Student Version: v.4 Version Date:...

Study Guide
Nursing Student Version: v.4
Version Date: 08/31/2015
Brackett, Shelly Page 1 of 41
Clinical Study Guide
Login .......................................................................................................... 3
Login Department ........................................................................................................... 3
Patient Lists ................................................................................................ 3
Starting Your Shift ........................................................................................................... 4
Sign In ...................................................................................................................................... 4
Treatment Team ...................................................................................................................... 5
Unit Manager .............................................................................................. 6
Census .............................................................................................................................. 6
Direct Admits ................................................................................................................... 6
Incoming Transfers ......................................................................................................... 6
Reviewing the Chart .................................................................................... 6
Outside the Chart ............................................................................................................. 6
Reports .................................................................................................................................... 6
Inside the Chart ............................................................................................................... 7
Patient Header ..........................................................................................................................7
Activities .................................................................................................................................. 8
Documenting Patient Care ........................................................................ 10
Navigators ...................................................................................................................... 10
Admission Navigator ..............................................................................................................10
Transfer Navigator ................................................................................................................. 12
Discharge Navigator ............................................................................................................... 12
Flowsheets ..................................................................................................................... 13
Flowsheet Templates .............................................................................................................. 13
Flowsheet Workflow ............................................................................................................... 14
Flowsheet Functionality ......................................................................................................... 15
Flowsheet Documentation ...................................................................................................... 16
File Flowsheet Documentation ............................................................................................... 17
Legend in Flowsheets ............................................................................................................. 18
Notes ........................................................................................................ 18

Study Guide
Nursing Student Version: v.4
Version Date: 08/31/2015
Brackett, Shelly Page 2 of 41
Reviewing Notes ............................................................................................................ 18
Writing Notes................................................................................................................. 18
Writing Notes from Flowsheets ..................................................................................... 20
Sticky Notes ................................................................................................................... 21
Sticky Notes to Physicians ..................................................................................................... 22
Treatment Team Sticky Notes ............................................................................................... 22
Managing Orders ...................................................................................... 22
Collecting Labs and Point of Care Tests ..................................................... 25
Specimen Collection Status ........................................................................................... 25
Work List ....................................................................................................................... 27
Administering Medications ....................................................................... 28
MAR ............................................................................................................................... 28
Messages to the Pharmacy .................................................................................................... 28
PRN Medications ................................................................................................................... 29
Edit an Administration .......................................................................................................... 30
Override Medications ............................................................................................................ 30
LDA’s and Intake & Output ........................................................................ 31
Document an IV Start .................................................................................................... 31
Remove a Line ............................................................................................................... 33
Review I&O .................................................................................................................... 33
Administering IV Medications .................................................................. 34
Patient Education ..................................................................................... 35
Document a Learning Assessment ................................................................................ 35
Document Education ..................................................................................................... 36
Transport a Patient ................................................................................... 38
Ticket To Ride ................................................................................................................ 38
Discharge a Patient ................................................................................... 38
Transfer a Patient ..................................................................................... 38
End of Shift .................................................................................................................... 38
Care Plan .................................................................................................. 40
Learning Home Dashboard ....................................................................... 41

Study Guide
Nursing Student Version: v.4
Version Date: 08/31/2015
Brackett, Shelly Page 3 of 41
LOGIN Login to the workstation using your 3x3 and network password, or badge swipe.
LOGIN DEPARTMENT
1. Launch CareConnect 2. Select the appropriate login department (ask your Preceptor for the DEP ID) or
type the location and click the looking glass to view options. Example:
a. CGMC=Cottage Grove Medical Center b. KEMC=Ketchikan Medical Center c. PHMC=PeaceHarbor Medical Center d. PIMC=PeaceIsland Medical Center e. RBMC=RiverBend Medical Center f. STJN=St. Johns Medical Center g. STJO=St. Joseph Medical Center h. SWMC = Southwest Medical Center i. UDMC= University District Medical Center j. UGMC= United General Medical Center
Note: Badge Swipe In and Log Out. Swiping In and Swiping Out does not
completely End your Active Session.
Note: The System will default to your last Login Department each time you
Login.
PATIENT LISTS Patient Lists is your Default Home Screen.
1. Search Available Lists to view a specific Unit:
a. Open the appropriate Facility Folder (example: Southwest Medical
Center):
b. Open the appropriate Location Folder (example: Units – Medical
Center):
c. Select the appropriate Unit (example: SWMC 4N Med Surg):

Study Guide
Nursing Student Version: v.4
Version Date: 08/31/2015
Brackett, Shelly Page 4 of 41
To Save the Unit in My Lists, right-click on the Unit, select Send To, and select
My Unit.
2. A list of all the Patients in this Unit now appears:
STARTING YOUR SHIFT
Sign In
Nursing Staff must Sign In and Sign Out for their shifts:
1. From Patient Lists, select the Sign In button in the workspace toolbar.
2. Select the appropriate Shift, enter your Contact#, Assign your Role, and select the
appropriate Department:
3. Select
Note: 8 hours is the default selection for this Unit. If your Clinical rotation is for
a partial shift, manually edit the shift times to override the default selections.
This feature will allow auto Sign Out and will End My Assignments when your
shift ends.

Study Guide
Nursing Student Version: v.4
Version Date: 08/31/2015
Brackett, Shelly Page 5 of 41
Treatment Team
Find your Patient assignments and assign yourself to the Treatment Team for each
Patient.
1. Search for Patients using Search All My Patients in Patient Lists.
2. Type partial names to search. (example: Asher Apple can be searched using
App, Ash or Apple, A or Asher).
3. If no results are found, change the search criteria using the SWMC All Pts
button:
4. Right Click Apple, Asher and select Assign Me
5. I will do it again for Apple, Dylan and that is all the patients’ I have been
assigned to for my shift.
After assigning myself to my patients’ Treatment Team, I can speed up my
workflow by using My Lists>My Patients>All My Patients to view only my
assignments.
6. Assigning myself to the Treatment Team allows several advantages:
a. View Only My Patients. This allows the Caregiver to quickly find their
patients and complete documentation without repeatedly searching for the
patient in Patient Lists during their shift.
b. The Treatment Team is viewable to other Caregivers. This allows smoother
and faster communication between specialties (examples: The Pharmacist
and other Providers can contact the RN directly; the RN can contact
Therapists, Spiritual Care, and other referrals personally; Receiving
RN’s can contact the Primary Nurse prior to Transfer of Care Handoff,
Registration, Security and Volunteer Services can contact the RN
regarding Visitation parameters or to put Family Members directly in
contact with the Nurse, etc.,).
c. View the Treatment Team from Summary Activity>Overview Report
d. Use the blue hyperlink Treatment Team to edit members of the
Treatment Team.
Study Guide
Nursing Student Version: v.4
Version Date: 08/31/2015
Brackett, Shelly Page 6 of 41
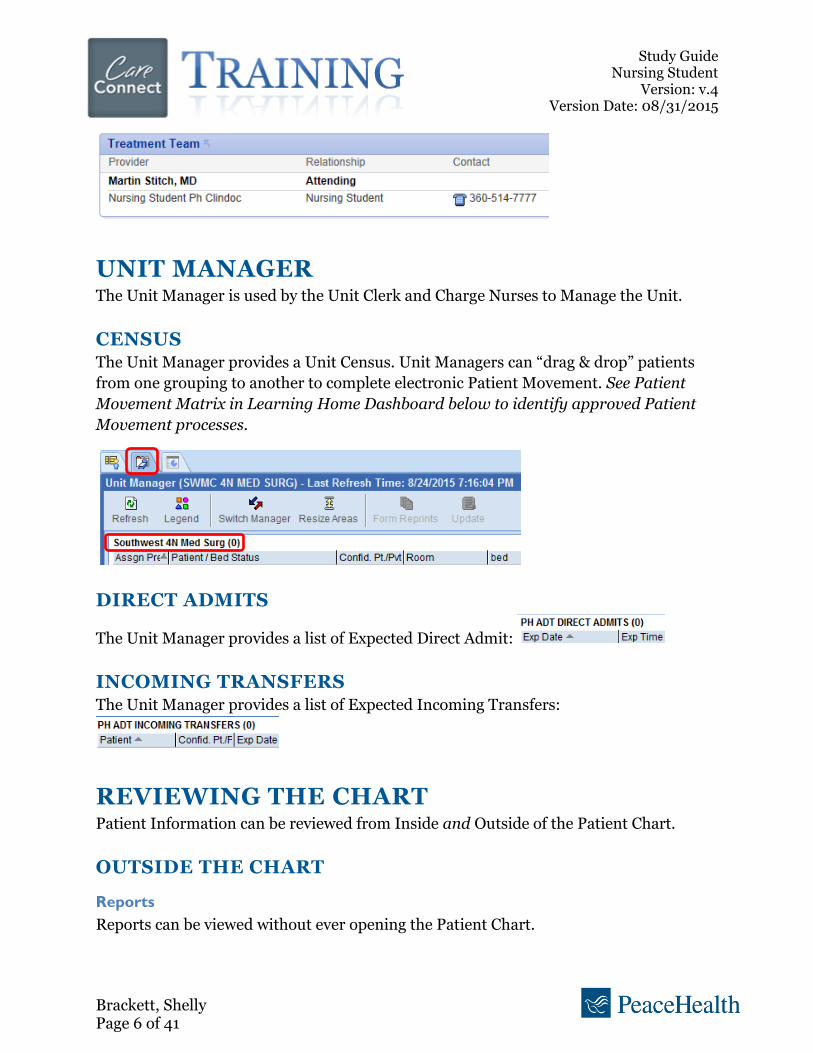
UNIT MANAGER The Unit Manager is used by the Unit Clerk and Charge Nurses to Manage the Unit.
CENSUS The Unit Manager provides a Unit Census. Unit Managers can “drag & drop” patients
from one grouping to another to complete electronic Patient Movement. See Patient
Movement Matrix in Learning Home Dashboard below to identify approved Patient
Movement processes.
DIRECT ADMITS
The Unit Manager provides a list of Expected Direct Admit:
INCOMING TRANSFERS The Unit Manager provides a list of Expected Incoming Transfers:
REVIEWING THE CHART Patient Information can be reviewed from Inside and Outside of the Patient Chart.
OUTSIDE THE CHART
Reports
Reports can be viewed without ever opening the Patient Chart.

Study Guide
Nursing Student Version: v.4
Version Date: 08/31/2015
Brackett, Shelly Page 7 of 41
1. Single Select the Patient in Patient Lists.
2. Review Reports available from outside the Chart:
3. The Profile Report is a high level review of the Patient Profile: Attending
Provider, Allergies, Isolation, Code Status, Height, Weight, Principal Hospital
Problem, Treatment Team Members, and Length of Stay (LOS).
4. Use the Looking Glass to identify additional available Reports:
Use the wrench tool to the right of the Looking Glass to “Wrench In” a specific
Report and “pin” it to your Report Toolbar.
INSIDE THE CHART Additional Chart Review is completed from inside the Patient Chart.
1. Double Click on the Patient to Open the Chart:
Patient Header
The Patient Header is a quick way to review Patient Information:

Study Guide
Nursing Student Version: v.4
Version Date: 08/31/2015
Brackett, Shelly Page 8 of 41
Note: Key Information is highlighted in Yellow (examples: Allergies and Code
Status).
Activities
Activities are available to you along the left side of the Chart. They are an Index that
guides your entire workflow:
1. The Summary Activity provides additional Reports that were not available from
outside the Patient Chart and provides a quick way to review Patient Information
with more detail:

Study Guide
Nursing Student Version: v.4
Version Date: 08/31/2015
Brackett, Shelly Page 9 of 41
a. Similar to the Report Toolbar in Patient Lists, we can search even more
reports using the Looking Glass and Wrench In any applicable reports.
2. The Chart Review Activity allows you to review additional information; not
necessarily associated with the current Encounter:
3. The Results Review Activity provides a Date Range Wizard to allow filtered
Results:
a. Select a Date Range and click
b. Results appear for the designated time frame:
4. The Problem List Activity allows Nursing to review the Problem List for the
Patient, but the maintenance of the Problem List is the responsibility of the
Provider.

Study Guide
Nursing Student Version: v.4
Version Date: 08/31/2015
Brackett, Shelly Page 10 of 41
a. Hospital Problems are being addressed during the current Inpatient
Encounter.
b. Non-Hospital Problems remain in the Patient’s Chart, but are not being
addressed during the current Inpatient Encounter.
c. Chronic Problems are indicated by a Red Push Pin:
d. Mark as Reviewed is for the Provider to indicate that they have verbally
reviewed the Problem List with the Patient or Family Member. The Mark
as Reviewed button provides a Name and Time Stamp.
DOCUMENTING PATIENT CARE Routine Patient Care can be documented in Navigators and Flowsheets. Each provide a
streamlined workflow in different scenarios.
NAVIGATORS Navigators are designed to streamline the workflow. The Navigator Activity contains
multiple Navigators to meet the needs of common workflows:
Admission Navigator
The Admission Navigator is used to streamline the Admission workflow. Each
Navigator provides a Table of Contents to organize your documentation:

Study Guide
Nursing Student Version: v.4
Version Date: 08/31/2015
Brackett, Shelly Page 11 of 41
1. Select the word Vital Signs to document in this section.
2. Alter the date/time of the reading using shortcuts (examples: for TIME; n-15 is
NOW MINUS 15 MINUTES. h-1 is HOURS MINUS ONE. For DATE; t is TODAY,
t+3 is THREE DAYS FROM NOW).
Select the Arrow to View documentation in a specific section.
Select the Topic (Click on the Word) to document in a specific section.
Specimen Collection: Set Collection Status to Unit or Lab Collect
Interpreter Services: Document that an Interpreter was paged or has arrived
Allergies: Review and Update Allergies. Mark as Reviewed
Vital Signs: document the initial set of Vital Signs here. Subsequent sets can be documented here or
in Flowsheets.
Home Meds: Review Prior To Admission (PTA) Medications with the Patient or Family Member.
Validate the Med List Status and Mark as Reviewed:
History: Review and update Patient History as needed.
Alerts to Pharmacy:
Complete Screening Assessments: many of these sections are required documentation.
BestPractice Advisories (BPA’s): BPA’s are triggered from Diagnosis, Problem Lists, and other
documentation. These are recommendations for treatments based on Best Practice (example: Normal
Newborn with a Term Gestational Age has a birth weight of 5100kg. A recommendation to initiate
Hypoglycemic Protocol appears as a BPA).
Sticky Notes:Use Sticky Notes to communicate to other Caregivers that access the Chart. The Sticky
Note is not a permanent part of the Medical Record. There is no way to know who read it, who deleted
it, and when it was removed. Any pertinent medical information should not be documented here.
Sticky Notes are discoverable in litigation.

Study Guide
Nursing Student Version: v.4
Version Date: 08/31/2015
Brackett, Shelly Page 12 of 41
>>>>
3. Select Last Filed to view the last data filed in this section (also viewable in
Flowsheets):
4. Select All Choices to see all available choices as buttons:
5. To File documentation in Navigators:
a. Select Close to close the section:
b. Select Next to move on to the next section:
c. Select another section from the Table of Contents.
Documentation can be completed in Navigators using the Table of Contents as
a guide to streamline the workflow. Following the order of the sections
recommended, but is not required.
Transfer Navigator
The Transfer Navigator is used to streamline the Transfer workflow. Each Navigator
provides a Table of Contents to organize your documentation:
Discharge Navigator
The Discharge Navigator is used to streamline the Transfer workflow. Each Navigator
provides a Table of Contents to organize your documentation:
Med Rec Status: this must be completed by the Provider and must be current to allow any ADT
(Admission/Transfer/Discharge) Event, or any change in the Patient’s Phase of Care (examples:
Pre-Op, Intra-Op, Post-Op).
SBAR Handoff: this can also be found in the Summary Activity and must be used to complete
Nurse review at the Bedside for any Transfer of Care.
Running Infusions, LDAs/Wounds, etc.,: These should be reviewed at Handoff.
Progress Note: A Nursing Note can be written here to document the Transfer of Care and
Report Complete.
Signed/Held Orders: These Orders are not Active and should be released by the Receiving
Nurse after the Transfer is complete (both physical and electronic) to ensure that Orders dispatch
Caregivers to the right location (examples: Pharmacy Medications, Lab Phlebotomists, Xray
Technicians, etc.,).

Study Guide
Nursing Student Version: v.4
Version Date: 08/31/2015
Brackett, Shelly Page 13 of 41
FLOWSHEETS The Flowsheets Activity provides traditional documentation formatting for
subsequent and additional assessments, actions, and interventions not covered in
Navigators:
Flowsheet Templates
Flowsheets are identified by the Tab at the top of each Flowsheet:
Similar to Reports, additional Flowsheets can be searched using the Looking Glass:
>>>
Unresulted Labs: These should be reviewed prior to Discharge and confirmed as appropriate, DC’d, or
completed.
Running Infusions: These should be reviewed here and stop time documented in the MAR prior to
Discharge. Tip: Use the hyperlinks to jump to the MAR.
LDA Removal: Lines, Drains, Airways and Wounds (LDA’s) will largely be removed/resolved prior to
Discharge. Review them here and use the hyperlinks to jump to Flowsheets to complete documentation.
Med Rec Status & Progress Note: See Transfer Navigator outline above.
Discharge Planning: This section should have been completed upon Admission. If Case Management
is not involved, update this section now.
Patient Education: this can also be completed in the Education Activity.
Discharge Instructions Section: document Add Med Detail, Diet, Appointments, Follow-
Ups, Misc Orders, and Instructions to include in the Discharge Instructions that are printed on the
After Visit Summary (AVS).
Discharge Zones: This is required documentation for Core Measures. It will help determine which
Discharge Instructions will print for the patient and should correspond with your selections
(examples:Adult/Postpartum/Pediatric, Ortho/Oncology/Behavioral Health, etc.,).
Emergency/PHI: Complete this section to identify and confirm Emergency Contacts for the Patient
prior to Discharge.

Study Guide
Nursing Student Version: v.4
Version Date: 08/31/2015
Brackett, Shelly Page 14 of 41
They can also be Wrenched In and “pinned” to the Flowsheets you use frequently:
If you do not know the name of the Flowsheet, simply select the Looking Glass
to view all available options.
Selecting the Looking Glass will open a Flowsheet Template window. The default search
is within the Preference List. Select the Facility Pref List to view even more
Flowsheet Templates:
Flowsheet Workflow
Flowsheets provide a Table of Contents to streamline your documentation:
Select Check All or Uncheck All to guide you through your workflow and only view
the sections you want to work in, and hide the sections that you have completed:

Study Guide
Nursing Student Version: v.4
Version Date: 08/31/2015
Brackett, Shelly Page 15 of 41
Flowsheet Functionality
Use the Workspace Toolbar to modify Flowsheets:
1. Use Add Col to add a column for the current time:
2. Use Insert Col to add a column at a previous time:
3. Use blue time intervals to change the flowsheet view:
4. Use Show Device Data to validate and file monitor data streaming from
interfaced devices such as Fetal Monitors, Physiological Monitors and Vents:
5. Use Last Filed to view the last filed values on the right side of the template:
>>>

Study Guide
Nursing Student Version: v.4
Version Date: 08/31/2015
Brackett, Shelly Page 16 of 41
6. Use Req Doc to identify required documentation status:
Flowsheet Documentation
Flowsheet Documentation is completed by selecting the appropriate cell for the Column
(Date/Time) and Row (Subject): . There are different ways to document
within the cell, but the paper icon is always available for a comment. Simply click on the
paper icon to open the Comment Entry Window: and click Accept. The
comment is indicated by lines on the paper icon and the comment can be viewed by
hovering the mouse over the paper icon:
1. Free Text: Type in the cell (example: 98.6F)>>>
2. Looking Glass: click the Looking Glass in the cell to open the Category Select
Window: >>> and click Accept.
3. Details Box: Left-click to “pick” and Right-click to “stick”. When the Details box
indicates that the Caregiver can Select Multiple Options, left-click to select
each option and right-click to complete your selections and move on to the next
cell: >>>

Study Guide
Nursing Student Version: v.4
Version Date: 08/31/2015
Brackett, Shelly Page 17 of 41
a. Use the Details Box to identify parameters such as Within Defined Limits
(WDL), Min/Max, and Warning limitations:
b. The Details Box also provides additional information, such as Value
Information, First Filed Value and hyperlinks to Job Aides.
4. Cascading Rows become available to the Caregiver based on their documentation.
Flowsheet Templates are kept clean and tidy and additional rows open up for
documentation as needed (example: Documenting Continuous in the Pulse
Oximetry Type Row, opens up additional rows for continued documentation).
a. Cascading Rows are indicated by this icon:
b. Documentation occasionally triggers additional rows:
File Flowsheet Documentation
Pink text in Flowsheets indicates that the Documentation is not yet filed (or “saved”).
There are several ways to File documentation in Flowsheets.
1. File button in the Workspace Toolbar:
2. Opening another Flowsheet Template (example: switching from Vital Signs
Flowsheet to Simple Assessment Flowsheet will File all documentation in
progress).
3. Navigating away from the Flowsheets Activity (example: switching from
Flowsheets Activity to Education Activity will File all documentation in
progress).
4. Black Text has been Filed in Flowsheets:

Study Guide
Nursing Student Version: v.4
Version Date: 08/31/2015
Brackett, Shelly Page 18 of 41
Legend in Flowsheets
Use the Legend button to identify unfamiliar icons in cells:
NOTES Use the Notes Activity to review and write Notes:
REVIEWING NOTES
1. Review All Notes or filter by Note Type (example: Progress, Consult, H&P,
etc.,):
2. View the Note in the Notes Activity, on the bottom half of the screen:
WRITING NOTES
1. Write a New Note by selecting the button to open the Note Window:

Study Guide
Nursing Student Version: v.4
Version Date: 08/31/2015
Brackett, Shelly Page 19 of 41
a. Indicate the Type: Nursing Note
b. Search SmartText to pull in Note Templates:
i. Begin typing to pull in specialty or encounter specific notes:
ii. Click Accept to pull in the Note Template:
iii. *** indicates free text.
iv. Use F2 to move through the yellow sections where documentation
must be completed. Drop-down menus will open to speed
documentation.
v. Click to come back to the Note later.
vi. Click when the note is complete.

Study Guide
Nursing Student Version: v.4
Version Date: 08/31/2015
Brackett, Shelly Page 20 of 41
Tip: The Note cannot be Signed until all *** and yellow sections have completed
documentation. Inapplicable sections can be selected and deleted as needed.
2. View the Note in the Notes Activity, on the bottom half of the screen:
WRITING NOTES FROM FLOWSHEETS The easiest way to write a Nursing Note about a specific set of values is to write the Note
in Flowsheets.

Study Guide
Nursing Student Version: v.4
Version Date: 08/31/2015
Brackett, Shelly Page 21 of 41
1. Select the pertinent data by left clicking in a cell, holding the mouse button down,
and dragging to the last desired cell:
2. Right click on the selected data and select New Note:
3. The Flowsheet Notes window appears:
4. Select Insert Data
5. The selected Data is inserted into the Note. Free Text any additional comments
needed to complete the Note:
6. Select Sign:
7. Return to Notes Activity to view your Note:
STICKY NOTES Sticky Notes are viewable in the Summary Activity.

Study Guide
Nursing Student Version: v.4
Version Date: 08/31/2015
Brackett, Shelly Page 22 of 41
Sticky Notes to Physicians
Use Sticky Notes to Physicians to communicate with Providers. The Note can be seen
when the Provider (Attending or Rounding Partner) accesses the Chart. This
communication can be used for non-urgent communications.
Treatment Team Sticky Notes
Similarly, use Treatment Team Sticky Notes for non-urgent communications with other
members of the Treatment Team.
Note: Use Sticky Notes to communicate to other Caregivers that access the
Chart. The Sticky Note is not a permanent part of the Medical Record. There is
no way to know who read it, who deleted it, and when it was removed. Any
pertinent medical information should not be documented here. Sticky Notes are
discoverable in litigation.
MANAGING ORDERS There are several places to view and manage Orders.
Note: Nursing Students cannot take Verbal Orders, Enter, Acknowledge, or
Release Orders. The Nurse assigned to the patient will need to complete these
actions.
1. Summary Activity:
a. Overview Report:
i. The Overview Report will alert Nursing Staff to Signed & Held
Orders in need of Release:

Study Guide
Nursing Student Version: v.4
Version Date: 08/31/2015
Brackett, Shelly Page 23 of 41
ii. The Overview Report will alert Nursing Staff to New Orders that
need to be Acknowledged.
iii. The PeaceHealth definition of Acknowledging Orders is that the
Nurse has acknowledged the Order for appropriateness (example:
An Insulin Order for a Diabetic Patient is appropriate. An
Ambulate Patient Order is inappropriate for a comatose patient
and the Nurse should not acknowledge the Order and instead,
reach out to the Provider for appropriate Orders).
b. Active Orders Report:
i. The Active Orders Report is an overview of all currently Active
Orders for the Patient:

Study Guide
Nursing Student Version: v.4
Version Date: 08/31/2015
Brackett, Shelly Page 24 of 41

Study Guide
Nursing Student Version: v.4
Version Date: 08/31/2015
Brackett, Shelly Page 25 of 41
COLLECTING LABS AND POINT OF CARE
TESTS Collecting Labs and Point of Care Tests on the Unit functions based on the type of
specimen and the Specimen Collection Status for the Patient.
SPECIMEN COLLECTION STATUS Some Units default to Lab Collect and others default to Unit Collect (example: ED and
OB default to Unit Collect). There are 3 ways to set Specimen Collection Status in the
Patient Chart. Review the setting in the Patient Header:
1. Admission Navigator>Specimen Collection

Study Guide
Nursing Student Version: v.4
Version Date: 08/31/2015
Brackett, Shelly Page 26 of 41
2. Flowsheets Activity>IV Assessment Flowsheet>Specimen Collection
Status
3. Patient Header>Collection. Normally, clicking in the Patient Header doesn’t
initiate an action. Specimen Collection Status is an exception:
Tip: Select the Refresh button in the Patient Header to update
Specimen Collection Status.

Study Guide
Nursing Student Version: v.4
Version Date: 08/31/2015
Brackett, Shelly Page 27 of 41
WORK LIST
Use the Work List Activity to complete Tasks:
1. Overdue tasks appear in Yellow.
2. Skip Tasks to remove them from the Work List.
3. Doc to jump to alternate activities to complete documentation (examples: MAR
and Flowsheets).
4. Print Label to print Lab Labels for Collecting Labs and Point of Care Tests.
a. Once you select Print Label, the button changes to Collect:
b. Select Collect to open the Collection Window to complete documentation:
c. Red Stop Sign icons indicate a Hard Stop in documentation. This
documentation must be completed to move on.
d. Yellow Yield Sign icons indicate Recommendations in documentation.
This documentation is not required, but is highly recommended before
moving on – as it will often delay the workflow of yourself and others later
on.
Tip: Use shortcuts such as “t” for “today” and “n” for “now” to speed
documentation.
e. Once documentation is complete in the Collection Window, the task is
removed from the Work List.

Study Guide
Nursing Student Version: v.4
Version Date: 08/31/2015
Brackett, Shelly Page 28 of 41
Tip: If the Print Label button does not appear on the Work List, verify that
Specimen Collection Status is set to Unit Colllect and a) call the lab to have
them send the Lab Label for Unit Collection or b) call the Lab to cancel the Lab
Collect and have the Provider re-enter the Order with the Unit Collect Status
now in place.
5. Reprint Lab Label can only be done from the Summary Activity>Active
Orders>Lab Orders:
Note: Reprint Lab Label and Collect hyperlinks will appear here and both
tasks can be completed from here as well as from the Work List.
ADMINISTERING MEDICATIONS Medication Administration is documented on the Medication Administration Record
(MAR).
MAR
MAR Documentation is completed in the MAR Activity:
Medications can be filtered by category:
Messages to the Pharmacy
1. Send messages to the Pharmacy in the Workspace Toolbar:

Study Guide
Nursing Student Version: v.4
Version Date: 08/31/2015
Brackett, Shelly Page 29 of 41
a. Send a generic message about the Patient or all Medications by selecting
the Rx Messages button.
b. Select Rx in a Medication Row to send a message about a specific
Medication:
PRN Medications
Obtain PRN Medications from the Pyxis dispensary per protocol and use barcode
scanning to Administer Medications whenever possible.
1. Scanning the Patient ID Band will open the Chart to the MAR Activity.
2. Scanning the Medication will link the Administration to an existing Order in the
MAR.
3. The Medication Administration Window will appear.
a. Verify Order Information:
b. Verify Administration Details:

Study Guide
Nursing Student Version: v.4
Version Date: 08/31/2015
Brackett, Shelly Page 30 of 41
c. Associated Flowsheet Rows appear to streamline documentation:
4. The Medication now appears as Given on the MAR:
Tip: Hover over the Administration Documentation to view additional details:
Edit an Administration
1. Click on the Administration Documentation in the MAR to open the Details of the
Administration:
2. Select the Edit Administration box:
3. Edit the Administration Documentation and click Accept.
Override Medications
1. Pulling an Override Medication from the Pyxis Dispensary from a Profiled Pyxis
(associated with a Patient) will trigger the Medication population on the Patient’s
MAR. This Benadryl was pulled as an Override Medication without an Order and
is indicated by a PINK bar:
2. Document the Administration using a Barcode Scanner.
3. The Medication Documentation drops to the bottom of the MAR under
Completed Medications and can also be viewed by filtering the MAR by the

Study Guide
Nursing Student Version: v.4
Version Date: 08/31/2015
Brackett, Shelly Page 31 of 41
Override Pulls tab:
4. Reconciling Override Pulls must be completed when the RN retroactively enters
the Order for the Medication.
a. RN must select Link Order in the Order Details Box:
b. The Link Orders Window appears for the RN to complete reconciliation
of the Override Pull.
LDA’S AND INTAKE & OUTPUT LDA is an acronym for Lines, Drains, and Airways. This section also includes Wounds,
Tubes, and Incisions. Let’s review documenting an IV Start and reviewing I&O.
DOCUMENT AN IV START 1. Flowsheets Activity>IV Assessment Flowsheet>Add LDA:
2. The Lines, Drains, Airways, Tubes and Wounds window opens. Search for the
appropriate LDA:

Study Guide
Nursing Student Version: v.4
Version Date: 08/31/2015
Brackett, Shelly Page 32 of 41
3. Select an Existing LDA or Select Add New:
4. The selection prompts the Caregiver to document the properties of the LDA:
Note: Leave Removal Documentation blank for future documentation. It is
possible to Discharge Patients with Active Lines in Place and unresolved
Wounds & Incisions. The Removal & Resolution must be documented during
the patient’s next Encounter or when applicable.
Study Guide
Nursing Student Version: v.4
Version Date: 08/31/2015
Brackett, Shelly Page 33 of 41
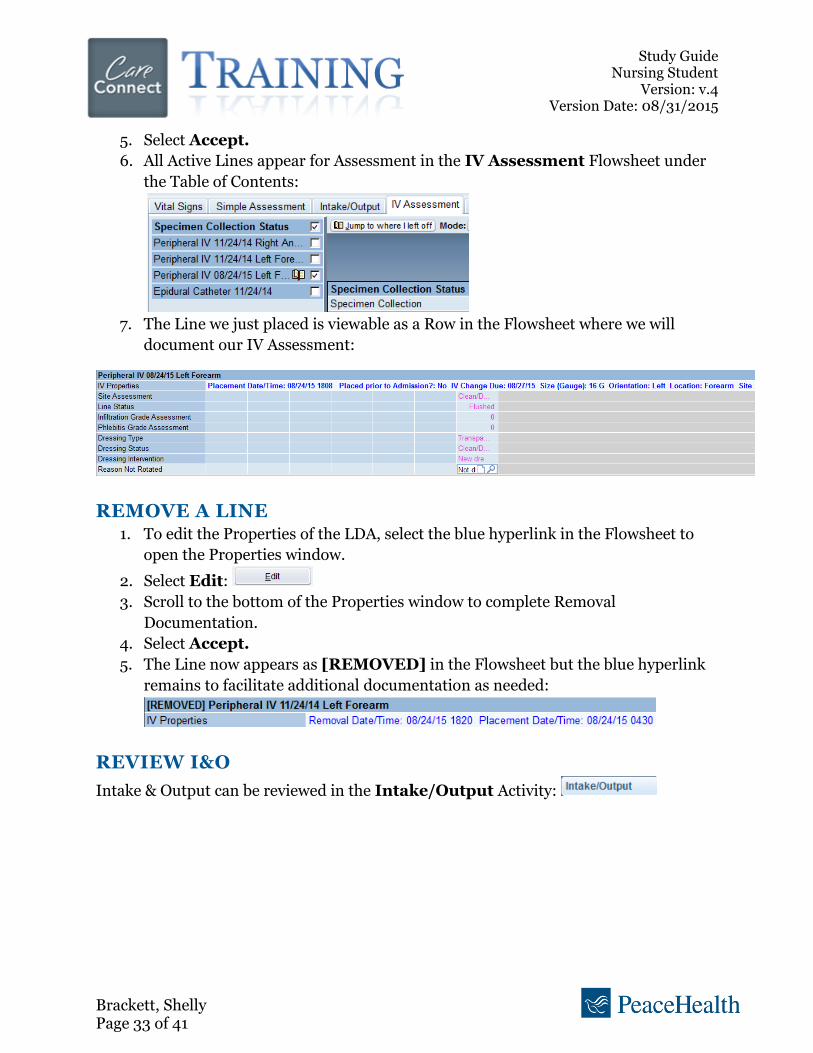
5. Select Accept.
6. All Active Lines appear for Assessment in the IV Assessment Flowsheet under
the Table of Contents:
7. The Line we just placed is viewable as a Row in the Flowsheet where we will
document our IV Assessment:
REMOVE A LINE 1. To edit the Properties of the LDA, select the blue hyperlink in the Flowsheet to
open the Properties window.
2. Select Edit:
3. Scroll to the bottom of the Properties window to complete Removal
Documentation.
4. Select Accept.
5. The Line now appears as [REMOVED] in the Flowsheet but the blue hyperlink
remains to facilitate additional documentation as needed:
REVIEW I&O
Intake & Output can be reviewed in the Intake/Output Activity:

Study Guide
Nursing Student Version: v.4
Version Date: 08/31/2015
Brackett, Shelly Page 34 of 41
Tip: The Tableview is set as the default but Graph and Cumulative are available
for selection in the Workspace Toolbar.
Intake & Output can be documented from the Intake/Output Flowsheet. Use I/O
Flowsheet button in the Workspace Toolbar: or Flowsheets Activity>
Intake/Output Flowsheet.
1. Document Unmeasured Output as an occurance:
ADMINISTERING IV MEDICATIONS Documenting IV Medications is similar to Documenting Oral, SubQ, and IM
Medications.
1. Scanning the Patient ID Band will open the Chart to the MAR Activity.
2. Scanning the Medication will link the Administration to an existing Order in the
MAR.
3. The Medication Administration Window will appear.
a. Verify Order Information.

Study Guide
Nursing Student Version: v.4
Version Date: 08/31/2015
Brackett, Shelly Page 35 of 41
b. Verify Administration Details. Including the Action:
c. Click Accept.
d. The Medication now appears as a New Bag on the MAR:
e. To Document a new action
i. Select the appropriate cell (Medication/Date & Time) on the MAR
ii. Select the appropriate Action
iii. Select Accept
f. The New Action now appears on the MAR:
Note: Stop Time documentation is required at PeaceHealth.
Tip: If IV Infusion calculations for I&O do not match the pump volumes, the
documentation should be edited to match the pump volumes. The pump is the
source of truth.
PATIENT EDUCATION
Patient Education is documented in the Education Activity:
DOCUMENT A LEARNING ASSESSMENT The Learning Assessment must be documented for the appropriate Learner’s prior to
documenting Education.
1. Education Activity>Assessment Tab>Create New
2. Document the Learning Assessment(s)

Study Guide
Nursing Student Version: v.4
Version Date: 08/31/2015
Brackett, Shelly Page 36 of 41
3. Select File (use File Incomplete to return to the Assessment at a later time).
DOCUMENT EDUCATION Document Education provided to the Learner(s).
1. Education Activity>Unresolved Education Tab
2. Select Add Title/AddPoint as appropriate. Templates exist to ease selections:
3. Choose only applicable Titles/Topics/Points.

Study Guide
Nursing Student Version: v.4
Version Date: 08/31/2015
Brackett, Shelly Page 37 of 41
4. Select the Teaching Point in Unresolved Education:
5. Select the Learner and document Readiness, Method, and Response:
6. Documentation is reflected:
7. Related Education Materials are populated and will print with the After Visit
Summary at Discharge.
8. Select File
9. Education provided is indicated by a green check mark:
Tip: Education for Multiple Learners can be documented simultaneously as long
as all Learners have the same levels of Readiness, Method, & Response by
using the Multiple button:

Study Guide
Nursing Student Version: v.4
Version Date: 08/31/2015
Brackett, Shelly Page 38 of 41
TRANSPORT A PATIENT Transport is requested from an Order for Imaging.
TICKET TO RIDE Patients leaving the Unit without their Primary Nurse should carry a Ticket to Ride.
1. Summary Activity>Search Reports “Ticket”:
2. Select Print button in the upper right corner of the screen:
Note: Never send a Patient off the Unit without a Nurse or a Ticket to Ride. This
brief overview of the Patient’s Allergies, Hospital Problems, and Current
Medications could be vital to Patient Care in the event of an Emergency during
Tranpsort.
DISCHARGE A PATIENT Discharge Orders will prompt the Discharge process. Documentation is completed in the
Navigator Activity>Discharge Tab (See Discharge Navigator above).
TRANSFER A PATIENT Transfer Orders initiate the Transport process. Documentation is completed in the
Navigator Activity>Transfer Tab (See Transfer Navigator above).
END OF SHIFT Any Transfer of Care requires a bedside Nursing Report.

Study Guide
Nursing Student Version: v.4
Version Date: 08/31/2015
Brackett, Shelly Page 39 of 41
1. Complete End of Shift Note
a. Patient Lists>End of Shift button:
b. Complete End of Shift Documentation and click Accept:
c. View the EOS Note in Summary Activity>Care Plan:
2. Review SBAR Handoff Report with Receiving Nurse
a. Summary Activity>SBAR Handoff
Note: When you completed the Sign In action at the Start of the Shift, your pre-
selected shift times will prompt Sign Out and will End My Assignments. If your
Shift Ends early remember to manually select Sign Out from Patient Lists.

Study Guide
Nursing Student Version: v.4
Version Date: 08/31/2015
Brackett, Shelly Page 40 of 41
CARE PLAN The Plan of Care is a compilation of discrete data and Nursing Care Standards. It is
dynamically populated by documentation, BPA’s and more.

Study Guide
Nursing Student Version: v.4
Version Date: 08/31/2015
Brackett, Shelly Page 41 of 41
Note: At PeaceHealth, there is no documentation within the Care Plan. It is a
report of documentation already completed in the Patient Chart that is pertinent
to the Plan of Care.
LEARNING HOME DASHBOARD Your single best resource in CareConnect is your Learning Home Dashboard.
1. Access Nurse Guides using the hyperlinks to view Tip Sheets, Quick Start Guides
and Step By Step Guides to guide you through any workflow.
2. Access PeaceHealth’s Policy C360 web page to search policies.
3. Use hyperlinks to access job aides such as Mosby’s.