Client Administrators Guide - Helpjuice
30
THINKIOSK 6.2 ADMINISTRATOR’S GUIDE 1 .2 Client Administrator’s Guide Version 6.2
Transcript of Client Administrators Guide - Helpjuice

THINKIOSK 6.2 ADMINISTRATOR’S GUIDE 1
.2
Client Administrator’s Guide
Version 6.2

THINKIOSK 6.2 ADMINISTRATOR’S GUIDE 2
ThinKiosk Client Overview ........................................................................................................................... 3
Requirements ....................................................................................................................................................... 3
Upgrading from version 4.7.x ................................................................................................................................ 3
Upgrading from version 5.0.x or higher ................................................................................................................. 3
Licensing ..................................................................................................................................................... 4
Community Edition ........................................................................................................................................................ 4
Trial ................................................................................................................................................................................ 4
Enterprise and Enterprise Plus ....................................................................................................................................... 4
Profile Sources ............................................................................................................................................ 5
Installation ................................................................................................................................................. 6
Silent install options ............................................................................................................................................. 8
Examples ........................................................................................................................................................................ 9
Uninstalling ThinKiosk .........................................................................................................................................10
ThinKiosk Setup Wizard .............................................................................................................................11
ThinScale Management Server .............................................................................................................................11
FTP Server ..................................................................................................................................................15
Local Profile ...............................................................................................................................................18
ThinKiosk Client Interface ..........................................................................................................................20
Splash Screen ......................................................................................................................................................20
ThinKiosk User Interface ............................................................................................................................21
Ribbon bar ..........................................................................................................................................................21
Details Pane ........................................................................................................................................................23
Printers Window .................................................................................................................................................24
Display Window ..................................................................................................................................................25
About Window ....................................................................................................................................................26
Admin Interface ..................................................................................................................................................27
ThinKiosk Browser Interface ................................................................................................................................28
ThinKiosk Applications Interface ..........................................................................................................................29
Local Applications ........................................................................................................................................................ 29
Virtual Desktops / Remote Apps .................................................................................................................................. 29

THINKIOSK 6.2 ADMINISTRATOR’S GUIDE 3
ThinKiosk Client Overview
Requirements
• .NET Framework 4.5.2 or above
• Windows 7 or higher *
• Firewall rule allowing ThinKiosk to take inbound connections (created by the installer)
• Internet Explorer 7 or better
* Note: if on Windows 7 machine, this patch is required:
https://docs.microsoft.com/en-us/security-updates/SecurityAdvisories/2015/3033929
Upgrading from version 4.7.x
Upgrading the ThinKiosk client from previous 4.7.x releases is possible, but due to changes in the ThinKiosk
profile format, older profiles are not compatible with the 6.2 releases.
If you are using Local or FTP deployment for your profile, you will need to re-create your profile using the
ThinKiosk 6.2 Profile Editor before upgrading your client devices.
The ThinKiosk Broker and ThinKiosk Management Server, available with ThinKiosk 4.7.x, are not compatible
with the ThinKiosk 6.2 client. ThinKiosk 6.2 requires the installation and configuration of the ThinScale
Management Server and ThinScale Management Console.
For more information about migrating your existing ThinKiosk 4.7.x devices to ThinKiosk 6.2 .x and the new
ThinScale Management Platform please see the ‘ThinKiosk 5.x Migration Guide’
Upgrading from version 5.0.x or higher
Upgrading the ThinKiosk client from previous 5.0.x releases or higher is straight forward. You can either
deploy the update via Management Platform, or simply by running the installation file locally on the machine.
ThinKiosk wizard will take you through the upgrade process.

THINKIOSK 6.2 ADMINISTRATOR’S GUIDE 4
Licensing
ThinKiosk has 3 licensing options:
Community Edition
The Desktop Virtualisation community are a wonderful bunch! For this reason, all the current functionality
that the previous versions of ThinKiosk offers, will be still available in ThinKiosk post version 4 along with the
improved look and feel and the improved application handling.
This will allow all current ThinKiosk customers to upgrade for free to the latest and greatest incarnation
without the need to spend a penny.
Note: A community edition license requires you to register the license and number of seats you require…
Nothing too scary.
Trial
By default, when ThinKiosk 6.2 is installed, it will install a 30-day license trial for you to test the entire product.
A trial license can also be used with the ThinScale Management Platform to evaluate the functionality.
When the trial expires, you must request an enterprise, enterprise plus or community license and publish this
license to the client to continue to work undisturbed. You can request licensing information from
Enterprise and Enterprise Plus
Enterprise and Enterprise Plus licenses entitle you to extra functionality. Details of these features can be
found at https://www.thinscale.com
You can request licensing information from [email protected]

THINKIOSK 6.2 ADMINISTRATOR’S GUIDE 5
Profile Sources
ThinKiosk requires a profile which contains all the ThinKiosk configuration including the connections to your
virtual desktops and internal settings.
The ThinKiosk Profile Editor can be used to modify the end point configuration.
ThinKiosk can use 3 methods to collect a profile:
1. ThinScale Management Server
2. Pull from FTP
3. Standalone configuration (Local Profile)
Note: If configured to use the ThinScale Management Server or FTP, ThinKiosk will keep a local copy of the
profile it receives just in case it loses access to the profile source. This allows ThinKiosk to work offline for
extended periods without interruption.
TIP: In a scenario where the Microsoft FBWF (File based write filter) is in use, it’s highly recommended the
ThinKiosk installation folder is excluded.

THINKIOSK 6.2 ADMINISTRATOR’S GUIDE 6
Installation
Note: Installation must be performed by a user with administrator privileges.
Copy the installation media to a temporary folder on a local drive on the server and run the installation media
(ThinKioskClient-6.2.x.msi)
Click ‘Next’

THINKIOSK 6.2 ADMINISTRATOR’S GUIDE 7
Accept the License Agreement and click ‘Next’
Select the installation folder and click ‘Next’
Click ‘Install’
During installation, the ThinKiosk Setup Wizard will launch, please see the section below ‘ThinKiosk Setup
Wizard’ for details of the available configuration options.

THINKIOSK 6.2 ADMINISTRATOR’S GUIDE 8
ThinKiosk may prompt to restart the device is a reboot is required.
Silent install options
ThinKiosk can be installed silently using the MSI command line options detailed below:
Command Line Option Description
CONNECTIONTYPE Configures the ThinKiosk profile source
0 = ThinScale Management Server
1 = FTP
2 = Standalone
MGMTURI The address of a ThinScale Management Server
e.g. https://tstmgmtserver.domain.local/TSTMgmt
MGMTDEFAULTSITE Configures ThinKiosk to connect to the ‘Default Site’ in the Management
Platform
1 = Use Default Site
MGMTUSERNAME The username associated with the Management Site you want this ThinKiosk
device to connect via.
(for more information on Management Sites, please see the ThinScale Management Console
Administrators Guide)
MGMTPASSWORD The password associated with the Management Site you want this ThinKiosk
device to connect via.
(for more information on Management Sites, please see the ThinScale Management Console
Administrators Guide)
FTPSERVER FTP Server name or FQDN
FTPUSER FTP Username
FTPPASSWORD FTP Password
FTPPATH Location on FTP server where the ThinKiosk profile is stored.
e.g. /TKProfile/Profile.json
LEAVEDOMAIN Leave the domain the current pc is a member of after the installation.
1 = Leave domain
0 = Do not leave the domain
WORKGROUPNAME Name of the workgroup to join after leaving the domain.
“WORKGROUP” is the default name if this parameter is not specified
DISABLECOMPUTEROBJECT Disables the domain computer object when leaving the domain

THINKIOSK 6.2 ADMINISTRATOR’S GUIDE 9
1 = Disable the computer object
0 = Do not disable the computer object
DOMAINUSERNAME Domain username with permissions to disable computer objects when
leaving the domain
DOMAINPASSWORD Password of the domain user account
Examples
1. Auto install ThinKiosk with no interaction, connect to a Management Server and leave the domain:
msiexec /I ThinKioskClientSetup.msi CONNECTIONTYPE=0 MGMTURI=https://tstmgmt.domain.local
MGMTUSERNAME=tkdevices MGMTPASSWORD=xxxxxxx LEAVEDOMAIN=1 /QB /L*V
"%USERPROFILE%\TK.LOG"
2. Auto install ThinKiosk with no interaction, use an ftp server, and leave the domain:
msiexec /I ThinKioskClientSetup.msi FTPSERVER=FTPSERVERNAME FTPUSER=ANONYMOUS
FTPPASSWORD=PASSWORD FTPPATH /TEST/PROFILE.XML CONNECTIONTYPE=1 LEAVEDOMAIN=1 /QB
/L*V "%USERPROFILE%\TK.LOG"
3. Auto install ThinKiosk, use a local configuration file:
msiexec /I ThinKioskClientSetup.msi CONNECTIONTYPE=2 /QB /L*V "%USERPROFILE%\TK.LOG"
4. Auto install ThinKiosk, use a Management Server and remove the computer from domain and join the
workgroup “TKDEVICES”:
msiexec /I ThinKioskClientSetup.msi CONNECTIONTYPE=0 MGMTURI=https://tstmgmt.domain.local
MGMTUSERNAME=tkdevices MGMTPASSWORD=xxxxxxx LEAVEDOMAIN=1
WORKGROUPNAME=”TKDEVICES” DISABLECOMPUTEROBJECT=1 DOMAINUSERNAME=”Administrator”
DOMAINPASSWORD=”password” /QB /L*V "%USERPROFILE%\TK.LOG"
5. Auto install ThinKiosk, use a Management Server default site and remove the computer from domain
and join the workgroup “TKDEVICES”:

THINKIOSK 6.2 ADMINISTRATOR’S GUIDE 10
msiexec /I ThinKioskClientSetup.msi CONNECTIONTYPE=0 MGMTURI=https://tstmgmt.domain.local
MGMTDEFAULTSITE=1 LEAVEDOMAIN=1 WORKGROUPNAME=”TKDEVICES”
DISABLECOMPUTEROBJECT=1 DOMAINUSERNAME=”Administrator” DOMAINPASSWORD=”password”
/QB /L*V "%USERPROFILE%\TK.LOG
Uninstalling ThinKiosk
Note: The Uninstall must be performed by a user with administrator privileges on the local device.
ThinKiosk is an MSI based installation and will appear in Program and Features within Windows Control Panel.
To uninstall:
- Open Control Panel
- Select Programs -> Program and Features
- Right click ThinKiosk and select ‘Uninstall’
- Follow the uninstall instructions
A reboot will be required once the uninstall process has completed.
To silently uninstall ThinKiosk use the following command line:
msiexec /X ThinKioskClient-x.x.xx.msi /qn

THINKIOSK 6.2 ADMINISTRATOR’S GUIDE 11
ThinKiosk Setup Wizard
The ThinKiosk Setup Wizard will automatically launch during installation and allow you to configure where you
want to receive your ThinKiosk profile from. You can also optionally remove the machine from the domain.
ThinScale Management Server
Select ‘ThinScale Management Server’ and click ‘Next’

THINKIOSK 6.2 ADMINISTRATOR’S GUIDE 12
Enter the Management Server’s URI
To connect to the ‘Default Site’ within the Management Console, leave ‘Connect to a configured Management
Site’ unselected. If want to connect to an alternative site you have created, select ‘Connect to a configured
Management Site’ and enter the credentials of the site.
(Note: for more information on Management Server Sites, please refer to the ThinScale Management Console
Administrators guide)
Click ‘Verify Management Server’
If the setup wizard can successfully connect to your Management Server using the details provided a
‘Management Server verified’ message will appear. If the connection is not successful a message detailing the
failure reason will be shown.
When successfully verified click ‘Next’

THINKIOSK 6.2 ADMINISTRATOR’S GUIDE 13
Select if you would like this device to be removed from the domain during configuration.
You can optionally disable the domain computer object.
Click ‘Apply’

THINKIOSK 6.2 ADMINISTRATOR’S GUIDE 14
The setup wizard will apply your configuration.
If the wizard succeeds it will automatically close upon completion.
If any of the configuration steps fail, you can view the setup log for detailed information about the step that
failed.

THINKIOSK 6.2 ADMINISTRATOR’S GUIDE 15
FTP Server
Select ‘FTP Server’ and click ‘Next’

THINKIOSK 6.2 ADMINISTRATOR’S GUIDE 16
Enter the FTP Server’s name, credentials to connect with and path on the FTP server where the ThinKiosk
profile is located.
Click ‘Next’
Select if you would like this device to be removed from the domain during configuration.
You can optionally disable the domain computer object.
Click ‘Apply’

THINKIOSK 6.2 ADMINISTRATOR’S GUIDE 17
The setup wizard will apply your configuration.
If the wizard succeeds it will automatically close upon completion.
If any of the configuration steps fail, you can view the setup log for detailed information about the step that
failed.
THINKIOSK 6.2 ADMINISTRATOR’S GUIDE 18
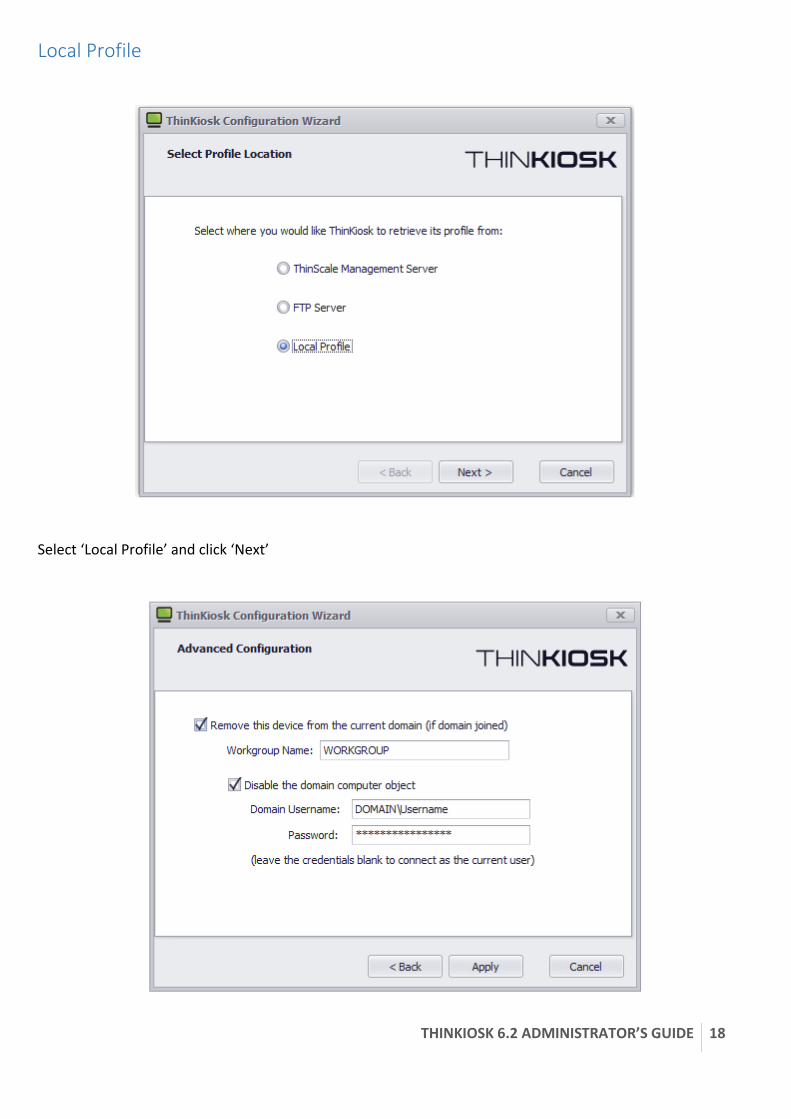
Local Profile
Select ‘Local Profile’ and click ‘Next’
THINKIOSK 6.2 ADMINISTRATOR’S GUIDE 19
Select if you would like this device to be removed from the domain during configuration.
You can optionally disable the domain computer object.
Click ‘Apply’
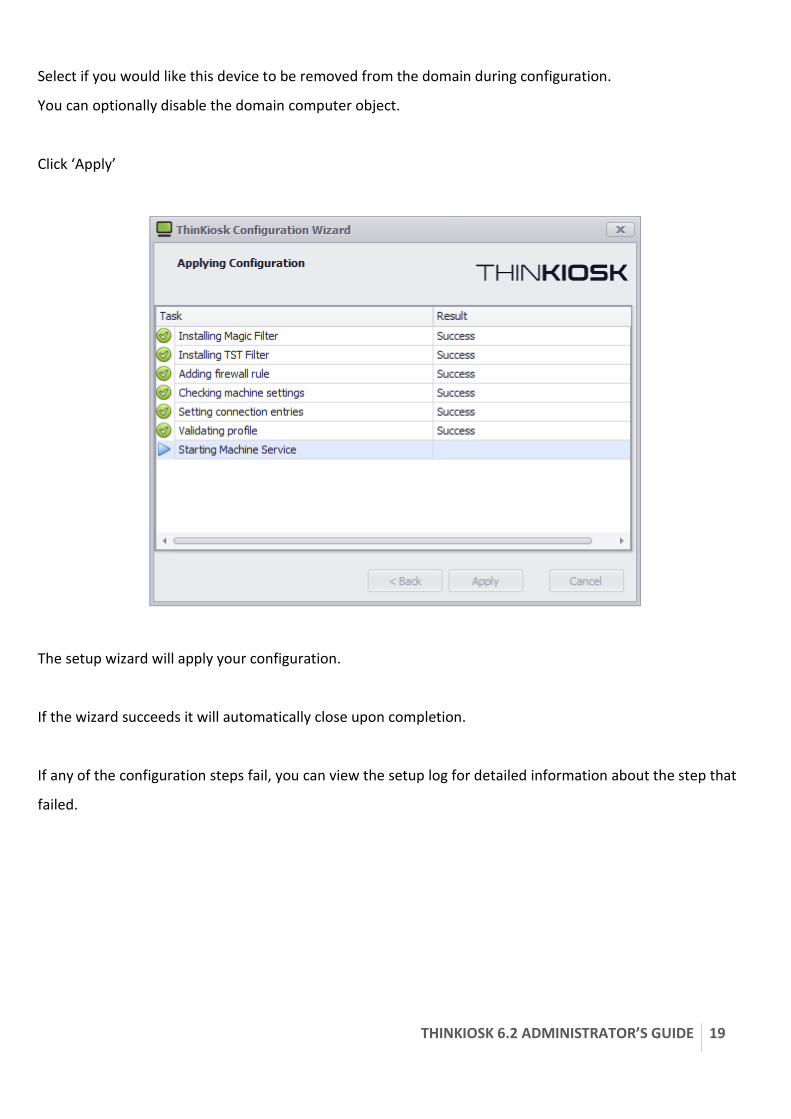
The setup wizard will apply your configuration.
If the wizard succeeds it will automatically close upon completion.
If any of the configuration steps fail, you can view the setup log for detailed information about the step that
failed.

THINKIOSK 6.2 ADMINISTRATOR’S GUIDE 20
ThinKiosk Client Interface
The ThinKiosk client interface is sleek, stylish and extremely configurable. Every button, box and colour can be
modified or hidden.
Splash Screen
When ThinKiosk launches, it will fire up its own splash screen, detailing information on its current activities
and progress.
This splash screen can be customised or supressed completely with an Enterprise/ Enterprise Plus license.
When the network is unavailable, ThinKiosk will attempt to wait for the network for up to 90 seconds, during
this time the user can cancel the wait period with above cancel button.

THINKIOSK 6.2 ADMINISTRATOR’S GUIDE 21
ThinKiosk User Interface
The user interface is split into two components, the ribbon bar at the top and the details pane underneath.
Ribbon bar
The user interface is the only tab displayed by ThinKiosk when it launches. This ribbon has been designed to
be as clean and easy to use as possible while still empowering the users with customisation and power
options.
Web Browser Button to display Browser Tabs
Application Button to display Application Tab
Favourite Apps Contains application that you don’t want to show in the ThinKiosk desktop
On Screen Keyboard Shows the Easy of Access onscreen Keyboard
Audio Configure the audio properties
Date/Time Configure the date/time of the system
Display Configure the display resolution, Orientation and Scaling
Keyboard Configure the Keyboard settings
Mouse Configure the mouse settings
Printers View and amend local printers on the device
Volume Control the local devices volume.
Shutdown Turn’s off the PC
Restart Restarts the PC
Log off Logs off the current user (logs back in if auto login is configured).
Lock Lock the local PC Screen
Screenshot Take a screenshot and email it to the support department (if enabled)
Note: all items on this ribbon can be removed.

THINKIOSK 6.2 ADMINISTRATOR’S GUIDE 22
Optionally you can choose to use a different command for the display button with the following registry keys:
The registry values needed for this are as follows:
• 64 bit key (HKEY_LOCAL_MACHINE\SOFTWARE\Wow6432Node\ThinKiosk)
• 32 bit Key (HKEY_LOCAL_MACHINE\SOFTWARE \ThinKiosk)

THINKIOSK 6.2 ADMINISTRATOR’S GUIDE 23
Details Pane
The details pane provides an at a glance view of the time and server status, as well as allowing the user to
switch from the applications or browser tab.
Browser tab Display the browser tab
Applications tab Display the applications tab
Battery indicator If a battery is detected, its status is displayed
Connection Status If using a Broker, shows the connection status
Wi-Fi indicator If a Wi-Fi device is detected, the status is displayed (windows 7 and
above only)
Administrative unlock Click this button instead of the keystroke if you wish
Language Selection Choose the language ThinKiosk should use
Clock What time is it anyway?
Optionally, you can add captions to the tab icons via the “Advanced Appearance” settings in the profile
editor:

THINKIOSK 6.2 ADMINISTRATOR’S GUIDE 24
Printers Window
The printers window available from the ribbon gives the user access to the local printers installed on the
device.

THINKIOSK 6.2 ADMINISTRATOR’S GUIDE 25
Display Window
When the ‘Use ThinKiosk Display Resolution Settings’ option is enabled in the profile, the display icon in the
ribbon bar will launch ThinKiosk’ s Display Settings manager.
Note: recommended if ThinKiosk is selected as the shell
The Display Settings manager allows you to configure:
- The resolution of each monitor
- The orientation of each monitor
- Whether each monitor is used or disconnected
- The selection of the primary display monitor
- Identify display
- Extend Displays
The Display Settings manager also allows you to configure the layout of your monitors by dragging and
dropping them into position using the virtual display layout.

THINKIOSK 6.2 ADMINISTRATOR’S GUIDE 26
About Window
The About window provides versioning and licensing information.
You can also view the binary versions and ThinKiosk’ s own version.
Please Note version number may be different on your machine.

THINKIOSK 6.2 ADMINISTRATOR’S GUIDE 27
Admin Interface
The administrative interface can be accessed via the keystroke [Ctrl] + [Alt] + [U] (and a password) or via the
unlock button in the tray. This interface allows an administrator to diagnose any issues or circumvent
ThinKiosk and access the desktop directly.
The default unlock password is KioskPassw0rd
Command Prompt Launch a command prompt as the user
Windows Explorer Launch Windows Explorer and the user’s desktop
Internet Settings Open the Internet explorer control panel item
Remote Desktop Launches an instance of the Microsoft RDP application
Task Manager Opens the Task manager interface, if this interface is disabled, ThinKiosk
will enable it when an unlock command Is received
Export Logs Export the tracing log files
Profile Editor If you are using a local configuration file, the profile editor button will
allow you to modify the local profile and reload settings when finished
Custom Tools Any applications added but restricted to administrators
Debug Open the Debug interface. This is covered below.
Temporarily disable
auto logon
To log off and manually log on once. Useful for admin access.
View Profile View the xml profile in use by ThinKiosk.
View Machine Log View the log file for the ThinKiosk Machine Service.
Restart Restarts ThinKiosk (if the debug window is open, debug logging will be
enabled from the start)
Exit Closes ThinKiosk.
This interface is easily hidden by repeating the keystroke or pressing the unlock button again.

THINKIOSK 6.2 ADMINISTRATOR’S GUIDE 28
ThinKiosk Browser Interface
ThinKiosk’ s browser interface gives access to a browser window within ThinKiosk.
• The URL selection can be populated with VDI access websites or a link of internal / external web pages
• With the browser bar, users can now enter custom URLs if they wish
• The navigation buttons allow a more native browser experience
• All items on the interface can be hidden / disabled if required
• Cache can be cleared
• Multiple tabs can be opened

THINKIOSK 6.2 ADMINISTRATOR’S GUIDE 29
ThinKiosk Applications Interface
The ThinKiosk applications interface provides access to both locally installed applications and resources
published from Citrix StoreFront, VMware Horizon and Microsoft RDS brokers.
Local Applications
With local applications you can publish:
• Local installed applications
• VMware View pool connections
• Citrix ICA files
• Microsoft Remote Desktop Services RDP files
The above files can be auto launched too!
Virtual Desktops / Remote Apps
The application tab can also provide direct access to applications and desktops published from the following
brokers.
• Citrix StoreFront
• VMware Horizon
• Microsoft RDS
• WVDs

THINKIOSK 6.2 ADMINISTRATOR’S GUIDE 30
ThinKiosk will talk directly to the broker and does not require the web components of the associated broker.
Credentials are supplied (explicit logon or SSO, SSO is only available for StoreFront Broker) and passed to the
configured brokers. Resources that are available to the user are displayed and are available to launch.
Resources from multiple brokers will be combined into a single desktop and applications lists.
Optionally, you can choose to merge the Local Applications and Remote Desktops and Applications tiles via
the App Window Appearance page, under the applications tab in the appearance category of the profile
editor.
Optionally, with an Enterprise/ Enterprise Plus license, you can choose to place a custom wallpaper on the
applications tab in the ThinKiosk profile.