CLICK! - Wilfrid Laurier · DIGITAL CAMERA TECH Menu Button - This button allows you to adjust...
19
CLICK!
Transcript of CLICK! - Wilfrid Laurier · DIGITAL CAMERA TECH Menu Button - This button allows you to adjust...

CLICK!
© Choice of Weapons, Minneapolis Public Schools. FFI: contact Karon Sherarts - 612 695 5154 or Usry Alleyne - 612 203 1528 © Choice of Weapons, Minneapolis Public Schools. FFI: contact Karon Sherarts - 612 695 5154 or Usry Alleyne - 612 203 1528
TABLE OF CONTENTS
I. INTRODUCTION
II. PHOTOGRAPHY IS DRAWING WITH LIGHT 1. Traditional and Digital Photography Digital Still Camera Memory 2. Basic Camera Parts 3. Digital Camera Tech
III. COMPOSITION 4. Who, What, Where, When and Why 5. Discussing Photographs
IV. FRAMING 6. Camera Shots 7. Camer Angles 8. Focal Point V. VISUAL ELEMENTS AND PRINCIPLES 9. Foreground and Background 10. Line 11. Shape 12. Pattern 13. Texture 14 - 15. Light VI. WRITING ABOUT PHOTOGRAPHS 16. Writing about photographs VII. PHOTO PROJECTS (To be added) ISPY (Shingle Creek) Abstration (Bannaker and Whittier) Self Portraits (Bannaker and Willard) 1. In natural settings 2. In studio setting with controlled light
CLICK!Creating Digital Photographs
About the authors:
Karon Sherarts is the Choice of Weapons project director for Minneapolis Public Schools. She consults nationally on media arts, education and media literacy. She is the recipient of A Saint Companies LIN grant to explore ways to use media arts to bring people together and bridge multiple generations. For twenty years she has been teaching media arts to people of all ages and cultural backgrounds. She has also published several articles on the media arts.
Usry Alleyne is a media arts mentor with A Choice of Weapons project. As a media artist, he works with video, digital photography and sound. For the past 9 years, he has taught drawing, painting, and media arts to adults and children of all ages in Schools throughout Minnesota.

© Choice of Weapons, Minneapolis Public Schools. FFI: contact Karon Sherarts - 612 695 5154 or Usry Alleyne - 612 203 1528 © Choice of Weapons, Minneapolis Public Schools. FFI: contact Karon Sherarts - 612 695 5154 or Usry Alleyne - 612 203 1528
CLICK: Creating Digital Photographs introduces students and teachers to a new art form. The booklet is based on the experience of teaching digital photography to teachers and students participating in the Minneapolis Public School’s A Choice of Weapons pilot project. * It treats digital photography as an art form, rather than as a technical skill. As an art form, digital photography engages students and teachers in:
• Inquiry• Reading images (analyzing, predicting, drawing
conclusions, interpreting)• The creative process (using the visual and technical
elements of the photography, creative decision making, refining, sharing and responding to your own and other’s photographs)
• Writing about and discussing images.
Each section provides background information about a topic and inquiry-based activities called, Try and See, which outline a hands-on method to explore and reflect on that topic. We have used digital photographs by 4th and 6th graders involved in A Choice of Weapons throughout the booklet to demonstrate concepts. As works by young artists, these images also remind us of the ability of children to create compelling and meaningful work that conveys their points of view. The final section, to be added, will provide examples of successful student projects from A Choice of Weapons,
CLICK adapts the Literacy through Photography approach, developed by photographer Wendy Ewald, to the digital medium. Her essay, “Using Photography in the Classroom,” (see Section VII) explains how this approach can be used in classroom. The Art Connections curriculum series used by Minneapolis visual arts teachers, was our reference for defining visual elements and the process for reading images.
A Choice of Weapons artist mentors will use CLICK as an instructional tool during the 2002-03 school year for teachers and students. Because this is the “prototype” of CLICK, we are very interested in your feedback. We invite you to complete and return the CLICK questionnaire; your views will help us improve the booklet. Thank you.
Karon Sherarts, A Choice of Weapons Project Director, Minneapolis Public Schools
Phone: 612-695-5154
*“A Choice of Weapons” is a collaboration between the Minneapolis Public Schools Media and Technology and Fine Arts departments, and is funded by the U.S. Department of Education. The initiative involves students in grades 4-6, media and visual arts specialists and classroom teachers in Minneapolis schools with 75% free and reduced lunch. The projects’ goals are for students to learn to: 1) critically view, interpret and analyze electronic and other forms of media and 2) create and share media arts work that presents their voice.
Toward these ends the project provides: Teacher staff development and mentoring by media artists (2) student learning, making and presenting original media arts work; analyzing and writing about media (3) Parent learning media literacy skills and (4) Community learning by viewing and discussing student media arts work.
INTRODUCTION

© Choice of Weapons, Minneapolis Public Schools. FFI: contact Karon Sherarts - 612 695 5154 or Usry Alleyne - 612 203 1528 © Choice of Weapons, Minneapolis Public Schools. FFI: contact Karon Sherarts - 612 695 5154 or Usry Alleyne - 612 203 1528
PHOTOGRAPHY IS DRAWING WITH LIGHTphoto = light graph = draw
A. A fl oppy disk or diskette
B. A compact fl ash card
C. A smart media card
E. A Memory Stick (Sony)
D. A CD or Compact Disk
F. A hard drive or Microdrive
Film
CCD
DIGITAL STILL CAMERA MEMORY
The most common memory devices used in digital cameras are:
Traditional photography has several steps:A. Expose a piece of plastic coated with light sensitive chemicals called fi lm to light.B. Process the fi lm with chemicals to create a negative or positive (a slide).C. Create a print by shinning light through the fi lm on to the surface of a piece of photographic paper with an enlarger.D. Process the photographic paper to create a print.
Digital photography replaces fi lm with a light sensitive computer chip and memory:A. Expose a computer chip called a CCD (Charged Coupled Device) to light to create an electronic image. B. Store the electronic image from the CCD in the camera’s memory. C. Download the image from the camera’s memory to a computer.D. Print the image with a laser or inkjet printer. Prints can also be made directly from some digital cameras or their memory cards.
1

© Choice of Weapons, Minneapolis Public Schools. FFI: contact Karon Sherarts - 612 695 5154 or Usry Alleyne - 612 203 1528 © Choice of Weapons, Minneapolis Public Schools. FFI: contact Karon Sherarts - 612 695 5154 or Usry Alleyne - 612 203 1528
BASIC CAMERA PARTS
Most digital cameras have the same basic parts: lens, body, viewfi nder, iris, and shutter button.
The lens is located at the front of the camera. It focuses or concentrates the light refl ected from the subject onto the CCD. A lens can be manual-focus, auto-focus or fi xed focus. A manually focused lens allows the photographer to decide what will be sharp in the picture. An auto-focus lens focuses automatically. A fi xed focus lens puts everything between 3 and 6 feet from the camera into sharp focus. The focal length determines how close your subject appears to be from your camera. The focal length of your lens can be fi xed or variable. On your digital camera the zoom button controls the focal length.
Lens & iris
Body - The body of the camera holds the CCD and all the electronic parts of the camera.
Viewfi nder - The viewfi nder allows the photographer to see the image before the picture is taken. Many digital cameras also have electronic viewfi nders or LCD (liquid crystal display) screens.
Shutter button - Pressing the shutter button exposes the camera’s CCD to light.
Iris - The iris is a small hole between the lens and the CCD. It can change size like the pupil of your eye. When it’s big, a lot of light reaches the CCD. When it’s small, less light reaches the CCD.
Flash - When there is not enough light, the fl ash adds enough light for the picture.
Inside a basic digital camera
Wide (W) Telephoto (T)Zoom buttonsWide (W) Telephoto (T)
Shutter button
Viewfi nder
Body
A digital camera
Body
Lens
Shutter button Viewfi nder Flash
Iris
CCD
2

© Choice of Weapons, Minneapolis Public Schools. FFI: contact Karon Sherarts - 612 695 5154 or Usry Alleyne - 612 203 1528 © Choice of Weapons, Minneapolis Public Schools. FFI: contact Karon Sherarts - 612 695 5154 or Usry Alleyne - 612 203 1528
Copy the drawings below and label the camera parts. Add and label the buttons for the camera you are using.
DIGITAL CAMERA TECH
Menu Button - This button allows you to adjust various camera settings.
Flash Button - This button controls your camera’s fl ash settings.
Quality - This setting adjusts the amount of memory used to store the picture and the sharpness of the image. For prints use the highest setting. Usually this is shown by the word Fine, HQ, or SHQ, .
Resolution - This setting adjusts the size of your picture. Some common settings are:
- VGA 640X480 - best for internet, video and 3X4 prints - SVGA 1024X768 - good for 4X6 inch prints - 1 megapixel - 1280X960 and up - good for 4X6 to 5X7 prints
Delete - This button erases images from the camera’s memory device.
Format - This button prepares the camera’s memory device for use and erases all images.
Timer - Press this button and then the shutter release button. You will have about 10 seconds to pose yourself in front of the camera before it takes a picture.
Macro Button - Switch this button on to take a close-up.
Flash on
Playback Button- Press this button to review pictures.
Display Button - Press this button to turn the LCD screen on and off.
White Balance setting - Use this setting to adjust your camera to different types of light.
TRY AND SEE - CAMERA PARTS
Flash off Red eye elimination Auto fl ash
Lens
Shutter button
Viewfi nder
Flash
Iris
Front of a digital camera
LCD screen
Menu button
Back of a digital camera
DISP
WB
3
© Choice of Weapons, Minneapolis Public Schools. FFI: contact Karon Sherarts - 612 695 5154 or Usry Alleyne - 612 203 1528 © Choice of Weapons, Minneapolis Public Schools. FFI: contact Karon Sherarts - 612 695 5154 or Usry Alleyne - 612 203 1528
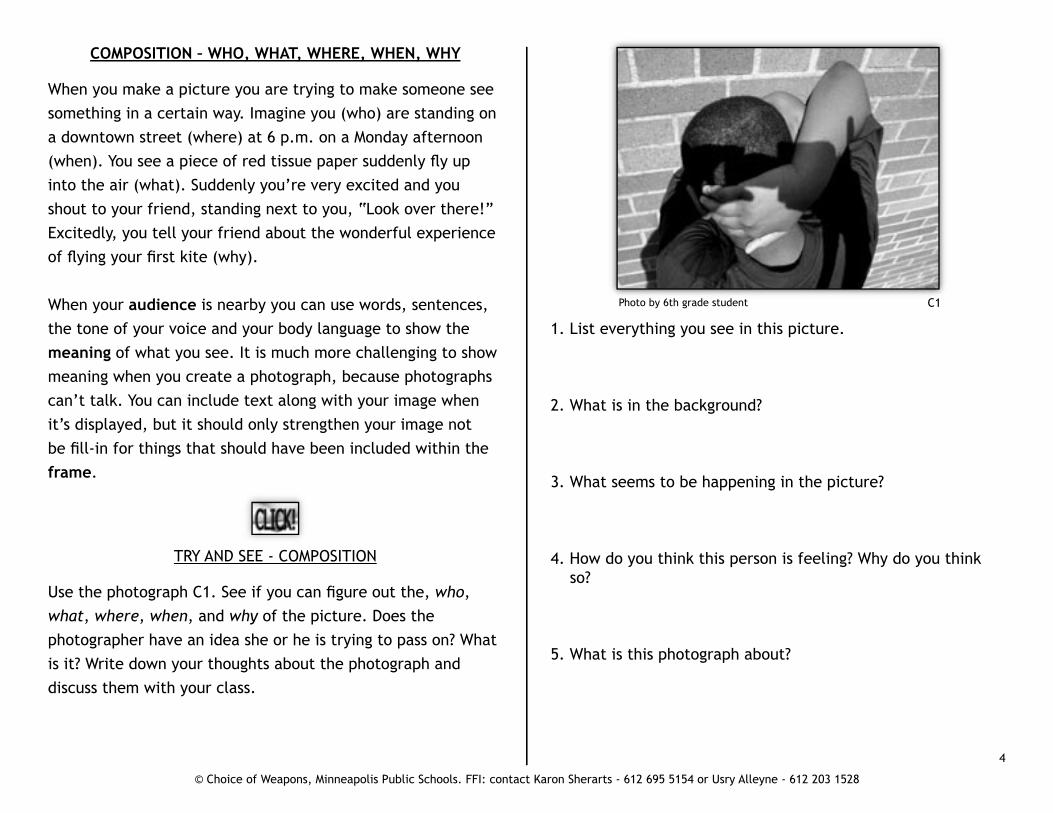
COMPOSITION – WHO, WHAT, WHERE, WHEN, WHY
When you make a picture you are trying to make someone see something in a certain way. Imagine you (who) are standing on a downtown street (where) at 6 p.m. on a Monday afternoon (when). You see a piece of red tissue paper suddenly fl y up into the air (what). Suddenly you’re very excited and you shout to your friend, standing next to you, “Look over there!” Excitedly, you tell your friend about the wonderful experience of fl ying your fi rst kite (why).
When your audience is nearby you can use words, sentences, the tone of your voice and your body language to show the meaning of what you see. It is much more challenging to show meaning when you create a photograph, because photographs can’t talk. You can include text along with your image when it’s displayed, but it should only strengthen your image not be fi ll-in for things that should have been included within the frame.
Use the photograph C1. See if you can fi gure out the, who, what, where, when, and why of the picture. Does the photographer have an idea she or he is trying to pass on? What is it? Write down your thoughts about the photograph and discuss them with your class.
C1
1. List everything you see in this picture.
2. What is in the background?
3. What seems to be happening in the picture?
4. How do you think this person is feeling? Why do you think so?
5. What is this photograph about?
TRY AND SEE - COMPOSITION
Photo by 6th grade student
4
© Choice of Weapons, Minneapolis Public Schools. FFI: contact Karon Sherarts - 612 695 5154 or Usry Alleyne - 612 203 1528 © Choice of Weapons, Minneapolis Public Schools. FFI: contact Karon Sherarts - 612 695 5154 or Usry Alleyne - 612 203 1528
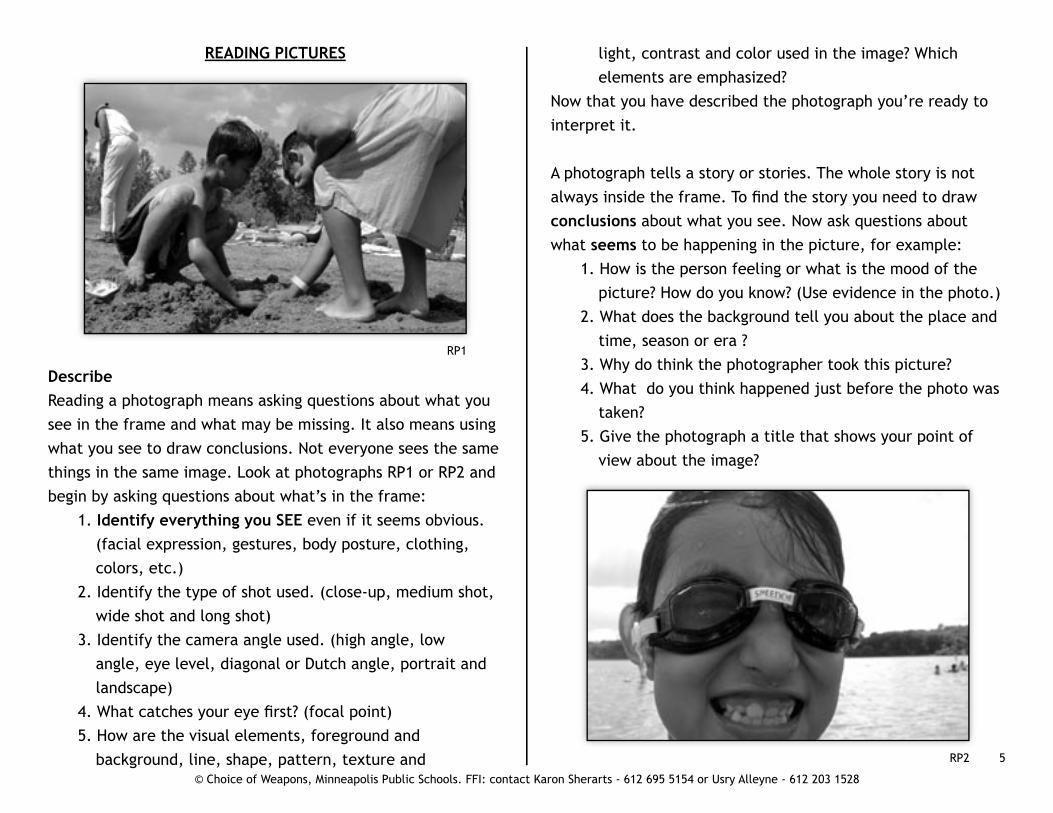
READING PICTURES
DescribeReading a photograph means asking questions about what you see in the frame and what may be missing. It also means using what you see to draw conclusions. Not everyone sees the same things in the same image. Look at photographs RP1 or RP2 and begin by asking questions about what’s in the frame:
1. Identify everything you SEE even if it seems obvious. (facial expression, gestures, body posture, clothing, colors, etc.)
2. Identify the type of shot used. (close-up, medium shot, wide shot and long shot)
3. Identify the camera angle used. (high angle, low angle, eye level, diagonal or Dutch angle, portrait and landscape)
4. What catches your eye fi rst? (focal point)5. How are the visual elements, foreground and
background, line, shape, pattern, texture and
light, contrast and color used in the image? Which elements are emphasized?
Now that you have described the photograph you’re ready to interpret it.
A photograph tells a story or stories. The whole story is not always inside the frame. To fi nd the story you need to draw conclusions about what you see. Now ask questions about what seems to be happening in the picture, for example:
1. How is the person feeling or what is the mood of the picture? How do you know? (Use evidence in the photo.)
2. What does the background tell you about the place and time, season or era ?
3. Why do think the photographer took this picture? 4. What do you think happened just before the photo was
taken?5. Give the photograph a title that shows your point of
view about the image?
RP1
RP2 5

© Choice of Weapons, Minneapolis Public Schools. FFI: contact Karon Sherarts - 612 695 5154 or Usry Alleyne - 612 203 1528 © Choice of Weapons, Minneapolis Public Schools. FFI: contact Karon Sherarts - 612 695 5154 or Usry Alleyne - 612 203 1528
Close-up (CU)– move close to your subject so that only a small portion of the subject is within your viewfi nder. (Note: when taking close-up shots remember to press the macro button on your camera’s body.
Medium shot (MS)- frame your subject so half of its full size is visible.
Wide shot (WS)– stand back so you can see the full size of your subject
Long shot (LS) – stand very far away from your subject so it occupies only a small part of your frame.
Look at photos CS1, CS2, CS3 and CS4. Discuss how these shots affect how you feel about the subject.
FRAMING & CAMERA SHOTS
Where you place objects or people (your subject) in the viewfi nder can infl uence how your audience reads or gets meaning from your picture.
TRY AND SEE - FRAMINGFraming is choosing what is within the borders of your picture and what is not. Photographers frame shots to present a point of view about the subject. There are four basic types of shots:
Close-up
Medium Shot
Wide Shot
Long Shot
F1 F2
Discuss the framing in photos F1 and F2. How does the framing affect how you feel about the subject?
Find something or someone to photograph. Imagine a grid, three rectangles down by three rectangles across (F3). Frame your subject in different sections of the grid then take photographs.
Discuss how the placement of your subject in the frame affects the meaning of the picture.
Pay attention to everything you see in the viewfi nder, because if something is in the viewfi nder it will be in your picture.
F3
CS1
CS2
CS4
CS5
6

© Choice of Weapons, Minneapolis Public Schools. FFI: contact Karon Sherarts - 612 695 5154 or Usry Alleyne - 612 203 1528 © Choice of Weapons, Minneapolis Public Schools. FFI: contact Karon Sherarts - 612 695 5154 or Usry Alleyne - 612 203 1528
Objects in the world have three dimensions, length, width, and depth. The surface of a photograph is two-dimensional so in order to show all three dimensions we need to pay attention to perspective, or camera angle. There are four basic camera angles and two camera orientations:
Photograph a subject using the four basic angles. How does the camera change the meaning of the image? Discuss the results with your group.
CAMERA ANGLES
TRY AND SEE - CAMERA ANGLES
Portrait - Hold your camera so the viewfi nder is vertical like a door.
CA1
High angle (HA) – Point your camera down toward the subject.
Low angle (LA) – Point your camera up at the subject.
Eye level (EL) – Hold your camera parallel to the ground. When doing portraits, pay attention to the eye level of the subject.
Diagonal or Dutch Angle (DA) – Tilt your camera toward your left or right shoulder.
Landscape – Hold your camera so the viewfi nder is horizontal like a car.
Look at photo CA1. What camera angle is the photographer using? Discuss it with your class.
Camera angles above or below eye level can say very different things about your subject.
Photo by 4th grade student
7
Camera Orientation

© Choice of Weapons, Minneapolis Public Schools. FFI: contact Karon Sherarts - 612 695 5154 or Usry Alleyne - 612 203 1528 © Choice of Weapons, Minneapolis Public Schools. FFI: contact Karon Sherarts - 612 695 5154 or Usry Alleyne - 612 203 1528
A. Place the subject in the center of the frame.
FOCAL POINT
2. Take several photographs of a subject using techniques A, B, C, D, and E from the Focal Point lesson.
3. See if you can discover your own way of creating a focal point in a photograph.
The focal point is part of the photograph you want your viewer pay the most attention to. Here are several ways to create a focal point:
B. Focus the camera so the subject is sharp and the ground is out of focus.
C. Use contrast or special lighting and to highlight the subject.
D. Place the subject in an unusual part of the frame (review framing for ideas).
E. Fill the frame with your subject (close-up).
1. Look at photo FP1. What is the focal point? How did the photographer create a focal point?
TRY AND SEE - FOCAL POINT
FP1
8

© Choice of Weapons, Minneapolis Public Schools. FFI: contact Karon Sherarts - 612 695 5154 or Usry Alleyne - 612 203 1528 © Choice of Weapons, Minneapolis Public Schools. FFI: contact Karon Sherarts - 612 695 5154 or Usry Alleyne - 612 203 1528
When you take a photograph, whatever is closest to you is the foreground (front of your picture). Whatever is behind your closest subject is in the background.
In a photograph the foreground and background are equally important. The background adds meaning to your photograph. The background tells you where the subject is. But if your background is too busy your subject may be lost.
Once you have framed your subject, look at the edges of the frame to make sure nothing unwanted is being photographed. If you see things you don’t want in the background, move closer to the subject or change your camera angle.
FOREGROUND & BACKGROUND
TRY AND SEE - FOREGROUND & BACKGROUND
Discuss photos FB1 and FB2. What camera angles and shots did the photographers use? Describe the photos. Describe the background and foreground in each picture. Discuss the sizes of the subjects in each photo. How does moving closer to your subject affect the proportions of subjects in your picture? How does size change the focal point of your picture?
FB1
FB2
Find a person or object you can place in different settings. Place the subject in front of different backgrounds. Take se-reval pictures using different camera shots and angles. Look at the photos. How do the proportions change? Compare the moods in each photo? Does your subject have the same importance in each picture?
Photo by 4th grade student
Photo by 4th grade student
9

© Choice of Weapons, Minneapolis Public Schools. FFI: contact Karon Sherarts - 612 695 5154 or Usry Alleyne - 612 203 1528 © Choice of Weapons, Minneapolis Public Schools. FFI: contact Karon Sherarts - 612 695 5154 or Usry Alleyne - 612 203 1528
There are many types of lines. Imagine gentle swaying lines on the surface of a quiet pond or the jagged broken lines of lightning, tree branches or the long vertical lines of a skyscraper.
Compare the photos L1 and L2. Trace the movement of the lines with your fi ngers. How are the lines different? What camera angles were used? How does the movement of the line make you feel when you look at the photograph?
LINE
Take several photographs that emphasize line. To emphasize the importance of the lines, place your camera in an unusual position in an unusual angle. Look through the viewfi nder and try out different camera angles before you take any pictures. For example, place your camera on or parallel to a wall instead of facing the wall. Take several pictures of the lines from different angles. Discuss the results with your class.
TRY AND SEE - LINE
L1
L2
L3Photo by 4th grade student
10

© Choice of Weapons, Minneapolis Public Schools. FFI: contact Karon Sherarts - 612 695 5154 or Usry Alleyne - 612 203 1528 © Choice of Weapons, Minneapolis Public Schools. FFI: contact Karon Sherarts - 612 695 5154 or Usry Alleyne - 612 203 1528
If you take a line, stretch it out, bend it in a few different directions and reconnect it to its beginning you will have a shape. If you want to emphasize the shape of something in a picture you will often have to ignore its surface details. Imagine a silhouette of a person’s head or the sight of your hand held up against the sun. You may not be able to see the details of the person’s face or the wrinkles in your skin, but you can clearly see the shape of these subjects against the light in background.
SHAPE
Discuss how pictures S1 and S2 emphasize shape. Describe the shapes in these photos. What camera angles and shots were used in these photographs?
Find subjects with interesting shapes. Place the subject so that the brightest light is behind them. Take a photograph. Discuss the results with your class.
TRY AND SEE - SHAPE
S1
S2
Photo by 6th grade student
11

© Choice of Weapons, Minneapolis Public Schools. FFI: contact Karon Sherarts - 612 695 5154 or Usry Alleyne - 612 203 1528 © Choice of Weapons, Minneapolis Public Schools. FFI: contact Karon Sherarts - 612 695 5154 or Usry Alleyne - 612 203 1528
Shapes, lines, and forms will often repeat themselves in the real world. This is pattern. Buildings and sidewalks often use repeating shapes. Windows, bricks and squares of concrete repeat to create patterns. Leaves on trees, ripples on water, hair, and petals on fl owers are examples of patterns in nature. It’s very common to have multiple patterns occurring at once.When you photograph a pattern it’s a good idea to fi nd the point where a pattern changes or overlaps with another pattern. Capturing the change in the pattern often makes a photograph stronger.
In photographs P1 and P2 what patterns do you see? Point to where the patterns change and overlap. What shot is the photographer using in photo P1? What camera angle is the photographer using in photo P2? Discuss the way patterns,
PATTERN
Find patterns in the spaces around you. Photograph these patterns. Find places where multiple patterns coexist. As you take photos use different camera angles and shots. Look at your photos and discuss the types of patterns you see. Find places where multiple patterns coexist. Are they dense, open, organic or manufactured? How do different camera angles affect the way you see the pattern? What gets your attention fi rst?
TRY AND SEE - PATTERN
shots and camera angles are used.
P1
P2
12

© Choice of Weapons, Minneapolis Public Schools. FFI: contact Karon Sherarts - 612 695 5154 or Usry Alleyne - 612 203 1528 © Choice of Weapons, Minneapolis Public Schools. FFI: contact Karon Sherarts - 612 695 5154 or Usry Alleyne - 612 203 1528
Texture is the tactile (rough, matte, smooth, shiny ) quality of a surface. Contrast allows us to see texture in a photograph. In photos T1 and T2 describe the textures you see. Make a list. For example, the hair is__________. The ornaments are____________.
To emphasize texture, photographers use light and contrasting surfaces.
On rough and matte surfaces, deep shadows and diffuse highlights show texture. On smooth and shiny surfaces, bright highlights and refl ections show texture. Sometimes you need to use a close-up to emphasize texture.
Find subjects with different types of surfaces. If these subjects can be moved photograph them in different types of light. Photograph the subject using indoor and outdoor light sources. Use different camera angles and shots in each photo.
TEXTURE
TRY AND SEE - TEXTURE
T1
T2
Photo by 6th grade student
Photo by 4th grade student
13
© Choice of Weapons, Minneapolis Public Schools. FFI: contact Karon Sherarts - 612 695 5154 or Usry Alleyne - 612 203 1528 © Choice of Weapons, Minneapolis Public Schools. FFI: contact Karon Sherarts - 612 695 5154 or Usry Alleyne - 612 203 1528
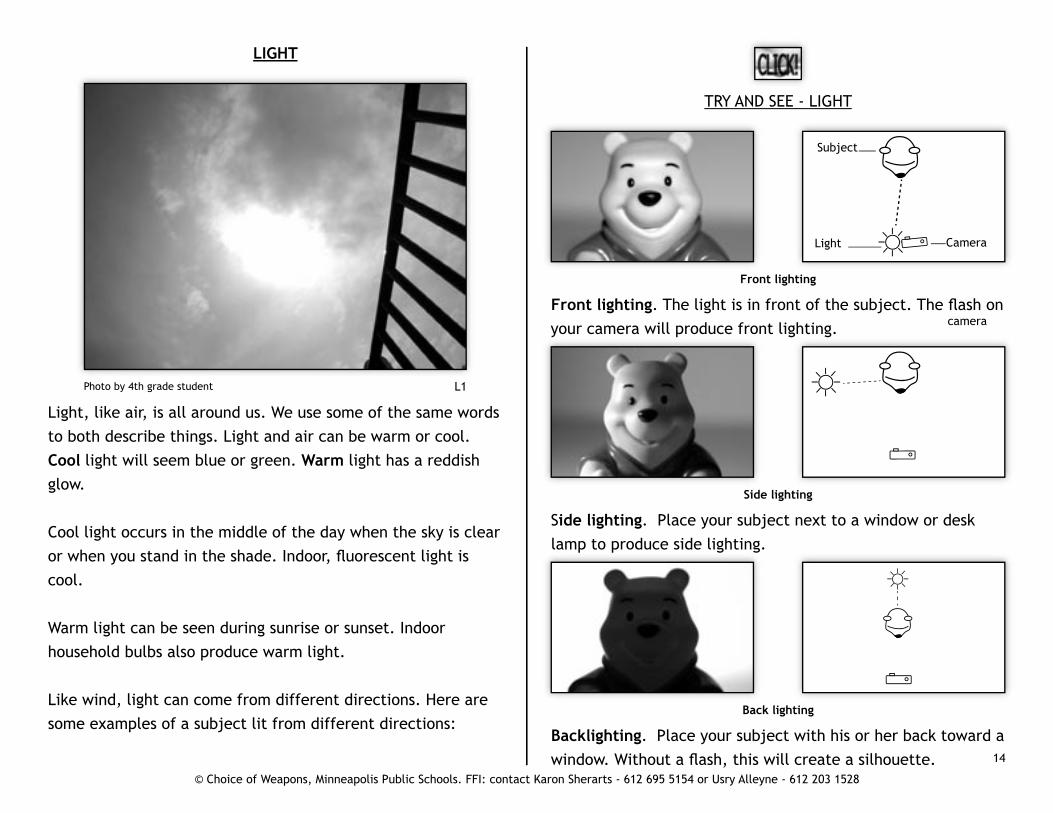
Light, like air, is all around us. We use some of the same words to both describe things. Light and air can be warm or cool. Cool light will seem blue or green. Warm light has a reddish glow.
Cool light occurs in the middle of the day when the sky is clear or when you stand in the shade. Indoor, fl uorescent light is cool.
Warm light can be seen during sunrise or sunset. Indoor household bulbs also produce warm light.
Like wind, light can come from different directions. Here are some examples of a subject lit from different directions:
LIGHT
TRY AND SEE - LIGHT
L1
Front lighting
Subject
Light
camera
Side lighting
Front lighting. The light is in front of the subject. The fl ash on your camera will produce front lighting.
Side lighting. Place your subject next to a window or desk lamp to produce side lighting.
Back lighting
Backlighting. Place your subject with his or her back toward a window. Without a fl ash, this will create a silhouette.
Camera
Photo by 4th grade student
14
© Choice of Weapons, Minneapolis Public Schools. FFI: contact Karon Sherarts - 612 695 5154 or Usry Alleyne - 612 203 1528 © Choice of Weapons, Minneapolis Public Schools. FFI: contact Karon Sherarts - 612 695 5154 or Usry Alleyne - 612 203 1528
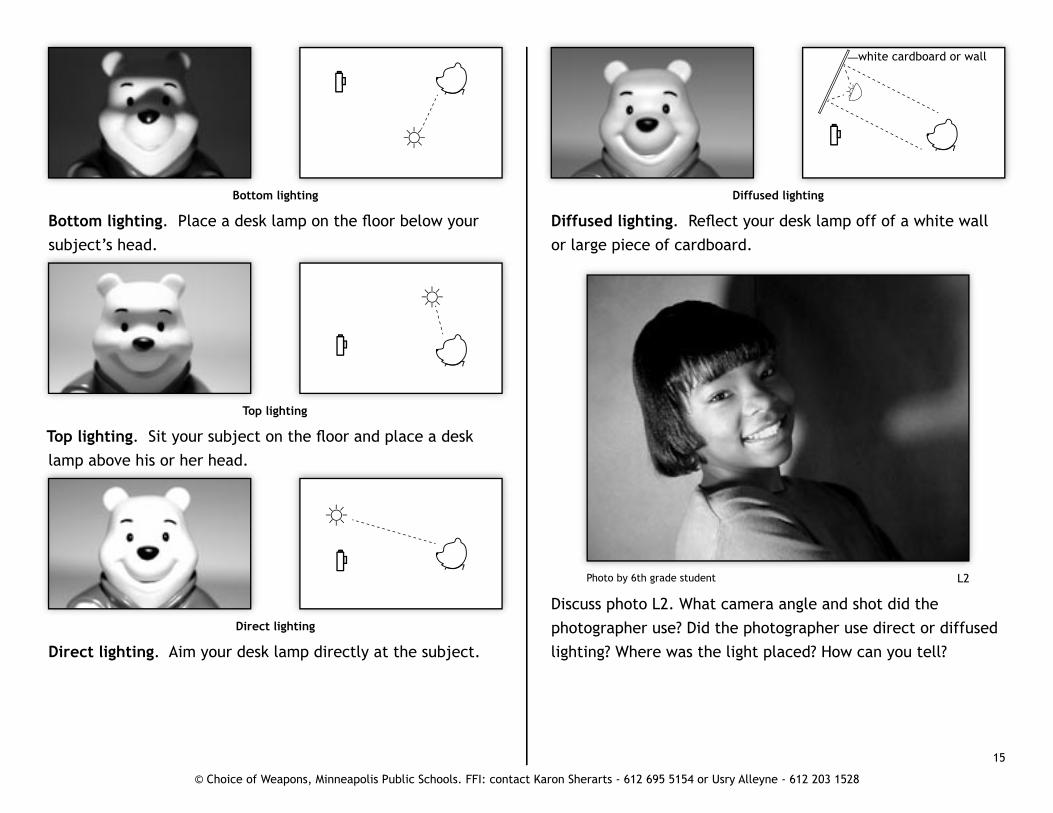
Bottom lighting
Top lighting
Direct lighting
Diffused lighting
white cardboard or wall
Bottom lighting. Place a desk lamp on the fl oor below your subject’s head.
Top lighting. Sit your subject on the fl oor and place a desk lamp above his or her head.
Direct lighting. Aim your desk lamp directly at the subject.
Diffused lighting. Refl ect your desk lamp off of a white wall or large piece of cardboard.
L2
Discuss photo L2. What camera angle and shot did the photographer use? Did the photographer use direct or diffused lighting? Where was the light placed? How can you tell?
Photo by 6th grade student
15

© Choice of Weapons, Minneapolis Public Schools. FFI: contact Karon Sherarts - 612 695 5154 or Usry Alleyne - 612 203 1528 © Choice of Weapons, Minneapolis Public Schools. FFI: contact Karon Sherarts - 612 695 5154 or Usry Alleyne - 612 203 1528
There are may different ways to write about pictures. Here are some suggestions:
1. A short report (non-fi ction) that describes the picture. Look at WAP1. A. Make a list of everything you see in this picture. B. What camera shot and angle did the photographer use? C. What is in the foreground and background? D. Describe the subject’s facial expression and posture? E. What is the subject doing?F. Now organize your responses into paragraphs.
2. A Story (fi ction). Use the picture, WAP1, to tell a story. In your mind, ask and answer as many questions as you can about the subject? Use your answers to write an imaginary story about the subject? Here are some ways to begin: A. Give the subject a name. B. Where does the subject live? C. How old is the subject?
WRITING ABOUT PHOTOGRAPHS
WAP1
D. What is the subject doing and why? E. Why is the subject on the table? F. When did the subject start behaving this way? G. What is the subject looking at? Why? H. Who are the subject’s friends? Imagine what the subject’s friends might say about him or her. I. What does the subject like to eat and why? Is the subject behaving this way because of something he or she ate?
3. First person story (fi ction). Pretend you are the subject in WAP1. In your mind, ask and answer as many questions as you can about yourself? Use your answers to write an imaginary story about yourself? Here are some sample questions?A. What is your name? B. How old are you?C. Where were you born?D. Where do you live now? Tell us about the place where you live? E. Tell us about your family?F. Before someone took a picture of you, what were you doing?G. What are your doing now and why? H. What will you do next?I. How do you feel and why?
4. What I see...A point of view poem. Pretend you are the subject in WAP1. Imagine you’re looking at something outside of the picture. What is it? Create a poem describing what “you see”. Your poem does not have to rhyme.
16


![Remote Camera Tool - support.d-imaging.sony.co.jp · 4. : On the camera’s pairing screen, select [OK]. 5. : Turn the power switch of the camera to OFF. Table of Contents > Step](https://static.fdocuments.in/doc/165x107/600593c19679605eb50ce8e5/remote-camera-tool-supportd-4-on-the-cameraas-pairing-screen-select-ok.jpg)