CLEARWATER SPA MANUAL
53
CLEARWATER SPA MANUAL RHYTHM, SPORT, BEACHCRAFT & ULTRA-SAGE SERIES
Transcript of CLEARWATER SPA MANUAL

CLEARWATER SPA MANUAL
RHYTHM, SPORT, BEACHCRAFT & ULTRA-SAGE SERIES

ii
OWNER’S MANUAL
RHYTHM, SPORT, BEACHCRAFT, ULTRA-SAGE SERIES
PO Box 2140 Woodinville, WA 98072 www.clearwaterspas.com

iii

iv
TABLE OF CONTENTS INTRODUCTION ______________________________________________1 ICON Key.....................................................................................................................1 IMPORTANT SAFETY INSTRUCTIONS____________________________2 Read and Follow All Instructions.................................................................................2 INSTALLATION _______________________________________________5 Before Your Spa Arrives..............................................................................................5 Electrical .......................................................................................................................7 Fill The Tub...................................................................................................................9 Topside Controllers....................................................................................................10 Power On ...................................................................................................................10 CONTROL REFERENCE ______________________________________11 Rhythm and Sport Package Control Reference......................................................11 Beachcraft and Ultra-Sage Package Control Reference........................................17 CHEMICALS ________________________________________________23 Keeping The Water Clean.........................................................................................23 Spa Chemistry 101....................................................................................................24 How To Use the Chemicals............................................................................. 27 Usage Definitions.......................................................................................................27 Starting A Chemical Maintenance Program.................................................... 28 JETS_______________________________________________________30 Types Of Jets.............................................................................................................30 Cleaning The Rotating Jets.......................................................................................32 Jet Removal..................................................................................................... 32 Filtration ......................................................................................................................33 Ozone Generator............................................................................................. 34

v
MAINTENANCE & MISCELLANEOUS____________________________35 Spa Light ....................................................................................................................35 Pillows.........................................................................................................................35 Spa Skirt .......................................................................................................... 35 The Shell ....................................................................................................................35 Spa Cover........................................................................................................ 36 Winterizing..................................................................................................................37 APPENDIX A ________________________________________________38 Troubleshooting .........................................................................................................38 System Trouble................................................................................................ 38 Controls ......................................................................................................................39 Pumps.............................................................................................................. 39 Jets................................................................................................................... 40 Water ..........................................................................................................................41 APPENDIX B ________________________________________________43 Warranty.....................................................................................................................43 NOTES _______________________________________________________ 44

1
INTRODUCTION Congratulations on your purchase of a new Clearwater Spa! Your Clearwater Spa is designed and manufactured with the finest components available and is engineered with comfort, low maintenance, and durability in mind.
You will enjoy your spa for several years to come if you are diligent with the care and maintenance of your spa. This manual will help you to determine the best way to take care of your spa based on the amount of use and the type of environment your spa is installed.
It is very important for you to read the entire manual before attempting to use your spa. Contained in this manual are important maintenance and start-up procedures as well as safety precautions that must be followed to ensure the prolonged life of your spa and the safety of the people using the spa. Failure to follow start-up procedures may damage your unit and void your warranty.
Please feel free to call your local Clearwater Spa dealer if you have any further questions after reading this manual. We hope you enjoy many years of fun and relaxation in your new Clearwater Spa.
ICON Key The Icon key on the left defines the type of information boxes that will appear throughout the manual. The boxes highlight helpful information that contains useful tips or warnings that apply to the use and care of your spa.
ICON KEY
Safety tip
Key point
Warning

2
SAFETY FIRST
IMPORTANT SAFETY INSTRUCTIONS! READ AND FOLLOW ALL
INSTRUCTIONS
SAVE THESE INSTRUCTIONS
When installing and using this electrical equipment it is recommended that a licensed and bonded electrician perform the work. Basic safety precautions should always be followed, including the following:
• A pressure wire connector is provided on the outside of the control box to permit the connection of a solid copper bonding wire between the spa and any metal equipment, metal enclosures of electrical equipment, metal water pipe or conduit within 5 feet of the spa as needed to comply with local requirements.
• A green colored terminal (or a wire connector marked “G”, “GR”, “Ground”, or “Grounding”) is provided. To reduce the risk of electric shock, connect this terminal to the grounding terminal of your electric service or supply panel with a continuous green insulated copper wire equivalent to the circuit conductor supplying this equipment.
• The electrical supply must include a suitably rated Ground Fault Interrupter Circuit to open all underground supply conductors to comply with section 422-20 of the National Electrical Code. ANSI/NFPA 70-1987. The power supply cut off must be readily accessible to the spa occupant, but installed at least 5 feet from spa water.
• Test the performance of the GFCI according to manufacturers recommendations. If the GFCI does not
Electrical warning!

3
perform correctly, there may be a ground current flowing indicating the possibility of electric shock. Disconnect the power until the fault has been identified and corrected.
• DANGER – RISK OF ELECTRIC SHOCK. Install at least 5 feet from all metal surfaces.
• DANGER – RISK OF ELECTRIC SHOCK. Do not permit any electric appliance such as a light, telephone, radio or television within 5 feet of a spa or hot tub.
• WARNING – RISK OF CHILD DROWNING. Extreme caution must be exercised to prevent unauthorized access by children. To avoid accidents, ensure that children cannot use a spa or hot tub unless they are supervised at all times.
• DANGER – To reduce risk of injury, do not remove suction fittings.
• Installation should provide drainage of the electrical equipment area to prevent electrical shortage.
• Store all chemicals in a cool dry area and keep out of children’s reach.
• To reduce the risk of injury: A. Spa heat can cause hyperthermia and
unconsciousness! The water in a spa or hot tub should never exceed 104° F (40° C). Water temperatures between 100° F (38° C) and 104° F (40° C) are considered safe for a healthy adult. Lower water temperatures are recommended for extended use (exceeding 10 – 15 minutes) and for young children.
B. Since excessive water temperatures have a high potential for causing fetal damage during the early months of pregnancy, pregnant or possibly pregnant women should limit water temperatures to 100° F (38° C).
• The use of alcohol, drugs, or medication before or during spa or hot tub use may lead to unconsciousness with the possibility of drowning.
• Persons suffering from obesity or with a medical history of heart disease, low or high blood pressure, circulatory
Safety warning!

4
system problems or diabetes should consult a physician before using a spa or hot tub.
• Persons using medication should consult a physician before using a spa or hot tub since some medication may induce drowsiness while other medication may affect heart rate, blood pressure, and circulation.

5
INSTALLATION
Before Your Spa Arrives
Prior to having your new spa delivered to your house you will need to prepare an area to install the spa. We have listed some key points to installing your spa that will help eliminate some of the unforeseeable situations that could occur.
• Do not install too close to a building or structure.
• Leave enough room around all sides to allow access to service panels.
• Install on a load bearing, level platform.
• Do not install less than 5 feet from ground conductors.
• Use non-conductive conduit for all wiring.
• If installing below a deck surface, leave enough room to access and remove service panels.
We recommend a level 4" thick concrete pad if you are installing on land (versus deck or platform). The dimensions of the pad should be at least 3" wider than the spa dimension on all sides. (e.g.: If the spa is 8' x 8', then the pad should be 8'6" x 8'6"). Allow a few days for curing the cement when calculating your scheduled delivery date.
Balconies and upper decks are not recommended for spa installations, but if you choose to do so, keep in mind that a large filled spa with 6 people can weigh as much as three tons. Balconies and decks must be constructed to current state and local building codes and must support at least 100 pounds per square foot.
If you are building a deck around the spa, be sure that the deck does not cover any of the service panels to the spa. If you are building stairs for getting up to the spa, it is recommended that they be installed in such a way that they can be moved out of the way if entrance to the service panels is required.
Important installation highlights!

6
The most obvious thing to remember is to plan your installation in a location where it will be easy to move from the delivery truck to the location site. Spas are typically transported on a mover’s dolly lying on their side. Check for adequate gate clearance and remove any fence panels if necessary to allow access to the installation site.
If you don’t know the dimensions of your spa, contact your local Clearwater Spa dealer for information.
7
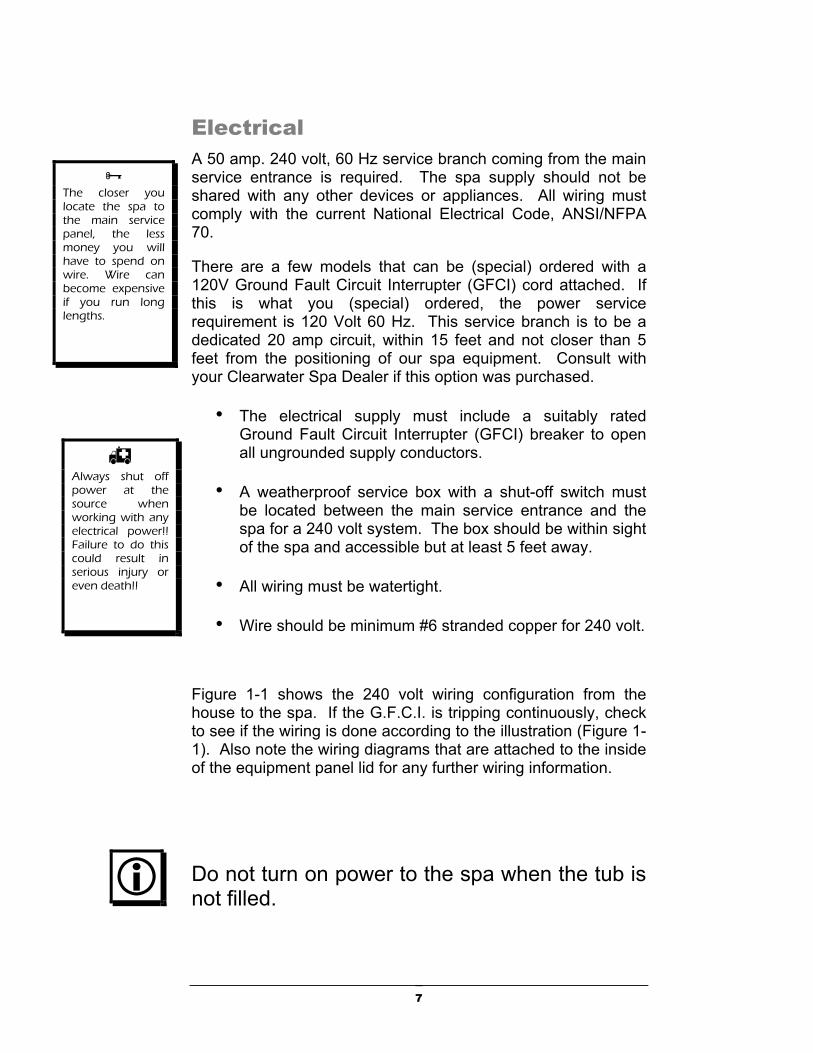
Electrical A 50 amp. 240 volt, 60 Hz service branch coming from the main service entrance is required. The spa supply should not be shared with any other devices or appliances. All wiring must comply with the current National Electrical Code, ANSI/NFPA 70.
There are a few models that can be (special) ordered with a 120V Ground Fault Circuit Interrupter (GFCI) cord attached. If this is what you (special) ordered, the power service requirement is 120 Volt 60 Hz. This service branch is to be a dedicated 20 amp circuit, within 15 feet and not closer than 5 feet from the positioning of our spa equipment. Consult with your Clearwater Spa Dealer if this option was purchased.
• The electrical supply must include a suitably rated Ground Fault Circuit Interrupter (GFCI) breaker to open all ungrounded supply conductors.
• A weatherproof service box with a shut-off switch must be located between the main service entrance and the spa for a 240 volt system. The box should be within sight of the spa and accessible but at least 5 feet away.
• All wiring must be watertight.
• Wire should be minimum #6 stranded copper for 240 volt.
Figure 1-1 shows the 240 volt wiring configuration from the house to the spa. If the G.F.C.I. is tripping continuously, check to see if the wiring is done according to the illustration (Figure 1-1). Also note the wiring diagrams that are attached to the inside of the equipment panel lid for any further wiring information.
Do not turn on power to the spa when the tub is not filled.
The closer you locate the spa to the main service panel, the less money you will have to spend on wire. Wire can become expensive if you run long lengths.
Always shut off power at the source when working with any electrical power!! Failure to do this could result in serious injury or even death!!

8
Figure 1-1
240 volt wiring configuration from the house to the spa

9
Fill The Tub
Before you begin to fill your tub, it is advisable to have your water tested for hardness (water rich in calcium and mineral content). Wells usually contain harder water than urban water supplies. Mineral and metal imbalances in your water can shorten the life of the equipment in your spa. Contact your local Clearwater Spa dealer for proper water analysis.
We recommend that you purchase a high quality “Water Test Kit” for checking pH and sanitizer levels. Test the water daily until your “user load” is determined.
Make sure there is no dirt or sediment at the bottom of the tub and that there is nothing inside the filter compartment before filling with water. Remove the service panel below the main control panel with the #2 square-head driver bit supplied with your spa. Insure that the drain valve located as shown in figure 1-2 is closed all the way.
IMPORTANT!!
Improperly balanced
water may damage your spa and void
your warranty.!!
IMPORTANT!!
Do not fill your tub with water from your hot water heater.!!
DRAIN VALVE
Figure 1-2 – Controller, Ozonator and Drain Valve
OPTIONAL OZONATOR

10
Topside Controllers
Identify your topside control as either Rhythm and Sport package (See figures 1-3 on page 11) or Beachcraft and Ultra-Sage (See figures 1-4 on page 12).
If your equipment is Rhythm and Sport see your fill up and power on instructions on pages 13-17.
If your equipment is Beachcraft and Ultra-Sage see your instructions on pages 18-25.
After you identified your control system, and the spa is filled to the fill line, turn your power on and go to your controller spa operations.
Power On
It’s time to turn on the power. Set the breaker at the main service panel to the on position. Now set the breaker at the service panel or spa disconnect outside the spa to the on position. Then proceed to Initial Start-up referencing your specific control system.
IMPORTANT!!
Do not turn power on until tub is full of water and all valves are open!!

11
Figure 1-3
Rhythm & Sport Package Controllers
Beachcraft & Ultra-Sage Controller
RHYTHM CONTROL PANEL – SINGLE PUMP
RHYTHM AND SPORT CONTROL PANEL – DOUBLE PUMP
Figure 1-4

12
Rhythm and Sport Package Control Reference Initial Start-up When your spa is first actuated, it will go into Priming mode (after displaying some configuration information). The Priming mode will last for up to 4 minutes and then the spa will begin to heat the spa and maintain the water temperature in the Standard mode. You can exit Priming mode early by pressing “Temp.” Temp (80°F - 104°F / 26°C - 40°C) The start-up temperature is set at 100°F/37.5°C. The last measured temperature is constantly displayed on the LCD. Note that the last measured spa temperature displayed is current only when the pump has been running for at least 2 minutes. Temp Press the "Temp" button once to display the set temperature. To change the set temperature, press the pad a second time before the LCD stops flashing. Each press of the "Temp" button will continue to either raise or lower the set temperature. If the opposite direction is desired, release the pad and let the display revert to the current water temperature. Press the pad to display the set temperature, and again to make the temperature change in the desired direction. Mode A button combination is used to switch between standard, economy, and sleep modes. Press “Temp” followed by “Light” to enter mode programming, press “Temp” to cycle through to desired mode (LCD flashes until confirmed), then press “Light” to confirm selection. Standard mode maintains the desired temperature. Note that the last measured spa temperature displayed is current only when the pump has been running for at least 2 minutes. “Std” will appear on the display momentarily when you switch into Standard Mode. Economy mode heats the spa to the set temperature only during filter cycles. “Ecn” will appear solid when the temperature is not current and will alternate with the temperature when the temperature is current.
Pressing “Jets 1” while in Economy mode puts the spa in Standard-In-Economy mode, (“SE”) which operates the same as Standard Mode, then reverts to Economy Mode automatically after 1 hour. During this time, pressing “Temp” followed by “Light” will revert the mode to Economy immediately. Sleep mode heats the spa to within 20°F (11°C) of the set temperature only during filter cycles. “SLP” will appear on the display until mode is changed. Jets 1 Press the “Jets 1” button once to turn pump 1 on or off, and to shift between low and high speeds (if equipped). If left running, the low speed turns off after 2 hours and the high speed turns off after 15 minutes.* On non-circ systems, the low speed of pump 1 runs when the blower or any other pump is on. It may also activate for at least 2 minutes every 30 minutes to detect the spa temperature (polling) and then to heat to the set temperature if needed, depending upon mode. When the low speed turns on automatically, it cannot be deactivated from the panel; however, the high speed may be started. Jets 2 (optional) If your system has a second pump but your panel does not have a “Jets 2” button, use the “Aux” button to control pump 2. Press the “Jets 2” button once to turn pump 2 on or off, and to shift between low and high speeds if it is a two-speed pump. If left running, the pump will turn off after 15 minutes.* Blower If your system has a blower (and only one pump), but your panel does not have a “Blower” button, use the “Aux” button to control the blower.

13
1-speed operation: on/off; 2-speed operation: med/hi/off; or 3-speed operation: lo/med/hi/off. If left on, the blower will automatically turn off after 15 minutes.* Light Some systems are equipped with both a spa light and a fiber optic light; however, only one be accessed by this panel. (Larger panels may be purchased so that both the spa light and fiber optic light can be utilized.) Depending upon how your spa is equipped and configured, the “Light” button will operate in one of three ways: 1) Press the “Light” button to turn the spa light on and off, and to shift between dim and bright settings if your light is dimmable. 2) If a fiber-optic light with wheel is installed, press the “Light” button once to start the light and wheel, press it again to stop the wheel, and then again to turn the light off. 3) If a fiber-optic light without a separate wheel stop is installed, press the “Light” button to turn it on and off. If any light is left on, it will automatically turn off after 4 hours. Preset Filter Cycles The pump and the ozone generator** will run during filtration. At the start of each filter cycle, the blower will run on highest speed for 30 seconds to clean out the air channels. The lowest speed of pump 2 will run for 5 minutes. The first filter cycle (“day”) begins 6 minutes after the spa is powered up. The second filter cycle (“night”) begins 12 hours later. Filter duration is programmable for 1-12 hours (F1-F12). The default filter time is 2 hours. To program, press “Temp” then “Jets 1.” Press “Temp” to select the filter duration. Press “Jets 1” to select the number of filter cycles. The
display will show “dn” (both “day” and “night” cycles); “d” (day cycle only); or “n” (“night” cycle only). Press “Temp” to adjust, then press “Jets 1” to exit the programming mode. For continuous filtration, use F12 and “dn.” Clean-up Cycle (optional) When the pump or blower is turned on by a button press, a clean-up cycle begins 30 minutes after the pump or blower is turned off or times out. The pump and the ozone generator** will run for one hour. **Ozone (optional) On most systems, the ozone generator (if installed) runs during filter cycles (except when pump 1 is operating at high speed on a non-circ system) and during clean-up cycles. On some systems, the ozone generator operates whenever the pump runs. If your system is configured with the optional ozone suppress feature, the ozone generator will turn off for 1 hour any time a function button (Jets 1, Jets 2, Blower, etc.) is pressed. Freeze Protection If the temperature sensors detect a drop to 44°F (approximately 6.7°C) within the heater, then the pump automatically activates to provide freeze protection. The equipment stays on until 4 minutes after the sensors detect that the spa temperature has risen to 45°F (approximately 7.2°C) or higher. In colder climates, an optional additional freeze sensor may be added to protect against freeze conditions that may not be sensed by the standard sensors. Aux freeze sensor protection acts similarly except with the temperature thresholds determined by the switch and without a 4-minute delay in turnoff. See your dealer for details.

14
Message Action required
No message on display. Power has been cut off to the spa.
The control panel will be disabled until power returns.
OHH “Overheat” - The spa has shut down. On some systems, an alarm may sound. One of the sensors has detected 118°F (approx. 47.8°C) at the heater.
DO NOT ENTER THE WATER. Remove the spa cover and allow water to cool. Once the heater has cooled, reset by pushing any button. If spa does not reset, shut off the power to the spa and call your dealer or service organization.
OHS “Overheat” - The spa has shut down. One of the sensors has detected that the spa water is 110°F
(approx. 43.3°C).
DO NOT ENTER THE WATER. Remove the spa cover and allow water to cool. At 107°F (approx.
41.7°C), the spa should automatically reset. If spa does not reset, shut off the power to the spa and call your dealer or service organization.
ICE “Ice” - Potential freeze condition detected
No action required. The pumps and the blower will automatically activate regardless of spa status.
SnA Spa is shut down. The sensor that is plugged into the Sensor “A” jack is not working
If the problem persists, contact your Clearwater Spa dealer or service organization. (May appear temporarily in an overheat situation and disappear when the heater cools.)
SnB Spa is shut down. The sensor that is plugged into the Sensor “B” jack is not working
If the problem persists, contact your Clearwater Spa dealer or service organization. (May appear temporarily in an overheat situation and disappear when the heater cools.)
SnS Sensors are out of balance. If this is alternating with the temperature it may just be a temporary condition. If the display shows only this message (periodically blinking) the spa is shut down.
If problem persists, contact your Clearwater Spa dealer or service organization

15
HFL A substantial difference between the temperature sensors was detected. This could indicate a flow problem.
Check water level in spa. Refill if necessary. If the water level is okay make sure the pumps have been primed. If problem persists contact your Clearwater Spa dealer or service organization.
LF Persistent low flow problems. (Displays on the fifth occurrence of “HFL” message within 24 hours.) Heater is shut down, but other spa functions continue to run normally.
Follow action required for “HFL” message. Heating capacity of the spa will not reset automatically; you may press any button to reset. If problem persists, contact your Clearwater Spa dealer or service organization.
dr Inadequate water, detected in the heater.
Check water level in spa. Refill if necessary. If the water level is okay make sure the pumps have been primed. Press any button to reset.
Dr4 Inadequate water detected in heater. (Displays on third occurrence of “dr” message.) Spa is shut down.
Follow action required for “dr” message. Spa will not automatically reset; you may press any button to reset.
Pr When your spa is first actuated it will go into Priming mode.
The Priming mode will last for up to 4 minutes and then the spa will begin to heat and maintain the water temperature in the Standard mode.
- - Temperature not yet known.
This is normal within the first few minutes of the spa power-up.
Std The spa is operating in Standard Mode.
Temperature display is current after pump has been running for at least 2 minutes. Press ”Temp” followed by “Light” to switch modes.
Ecn The spa is operating in Economy Mode.
“Ecn” will appear solid on the display when the temperature is not current. “Ecn” will alternate with the temperature when the temperature is current. Press “Temp” followed by “Light” to switch modes.
SE The spa is operating Standard-in-Economy Mode.
Operates the same as Standard mode, then reverts to Economy mode after 1 hour. Press “Temp” followed by “Light” to switch directly to Economy mode.

16
SLP Sleep Mode has been activated by pressing a button combination on the user panel.
Press “Temp” followed by “Light” to switch modes.
Sby Standby Mode has been activated by pressing a button combination on the user panel.
Press any button to leave Standby mode and return to normal operation.
PHL pH is low. Add pH increaser.
PHH pH is high. Add pH decreaser.
SAL Sanitizer is low. Add sanitizer.
SAH Sanitizer is high. Remove spa cover and allow sanitizer to dissipate.
Periodic Reminder Messages (Press the “ Temp” button to reset a displayed reminder)
rPH .Every 7 days Test and adjust pH chemical levels.
rSA Every 7 days Test and adjust sanitizer chemical levels.
rCL Every 30 days Remove, clean and reinstall filter.
rt9 Every 30 days Test & reset GFCI per their manufacturer’ s instructions.
rdr Every 90 days Drain and refill spa.
rCO Every 180 days Clean and condition cover.
rtr Every 180 days Clean and condition wood.
rCh Every 365 days. Install new filter.
Warning! Shock Hazard! No User Serviceable Parts. Do not attempt service of this control system. Contact your Clearwater Spas dealer or service organization for assistance. Follow all owner’s manual power connection instructions. Installation must be performed by a licensed electrician and all grounding connections must be properly installed.

17
Beachcraft and Ultra-Sage Package Control Reference Initial Start-up When your spa is first actuated, it will go into Priming mode (after displaying some configuration information). Press Jet 1 Button once to start low speed on pump one. The Priming mode will last for up to 4 minutes and then the spa will begin to heat and maintain the water temperature in the Standard mode. You can exit Priming mode early by pressing “Temp”. Temp Set (80°F - 104°F / 26.0°C - 40.0°C) The start-up temperature is set at 100°F/37.5°C. The last measured temperature is constantly displayed on the LCD. Note that the last measured spa temperature displayed is current only when the pump has been running for at least 2 minutes. Up/Down Press the “Down” or “Up” button once to display the set temperature. Each time either button is pressed again, the set temperature will increase or decrease depending on which button is pressed. After three seconds, the LCD will automatically display the last measured spa temperature. Mode This button is used to switch between standard, economy, and sleep modes. Press “Mode” to enter mode programming, press “Down” to cycle through to desired mode (LCD flashes until confirmed), then press “Mode” to confirm selection. Standard mode maintains the desired temperature. Note that the last measured spa temperature displayed is current only when the pump as been running for at least 2 minutes. The “Std” will appear on the display momentarily when you switch into Standard Mode. Economy mode heats the spa to the set temperature only during filter cycles. The “Ecn” will appear solid when the temperature is not current and will alternate with the temperature when the temperature is current. Pressing “Jets 1” while in Economy mode puts the spa in Standard-In-Economy mode, (“SE”) which
operates the same as Standard Mode, then reverts to Economy Mode automatically after 1 hour. During this time, a press of the “Down” or “Up” followed by “Light” will revert the mode to Economy immediately. Sleep mode heats the spa to within 20°F (11°C) of the set temperature only during filter cycles. The “Slp” will appear on the display until mode is changed. Standby Mode Pressing “Down” or “Up” followed by “Blower” or “Jets 2” or “Aux” will turn off all spa functions temporarily. This is helpful when changing a filter. Pressing any button exits Standby mode. Jets 1 Press the “Jets 1” button once to turn pump 1 on or off, and to shift between low and high speeds (if equipped). If left running, the low speed turns off after 2 hours and the high speed turns off after 15 minutes. On non-circ systems, the low speed of pump 1 runs when the blower or any other pump is on. It may also activate for at least 2 minutes every 30 minutes to detect the spa temperature (polling) and then to heat to the set temperature if needed, depending upon mode. When the low speed turns on automatically, it cannot be deactivated from the panel; however, the high speed may be started. Jets 2 Press the “Jets 2” button once to turn pump 2 on or off, and to shift between low and high speeds if it is a two-speed pump. If left running, the pump will turn off after 15 minutes.

18
Jets 3 Press the “Jets 3” button once to turn pump 3 on or off. If left running, the pump will turn off after 15 minutes. If applicable. Aroma Press the “Aroma” button once to turn on. Again to turn off. If left on, the blower will automatically turn off after 15 minutes. If applicable. Light Press the “Light” button to turn the spa light on and off, and to shift between dim and bright settings if your light is dimmable. On dim, the LCD will show center circle plus one quarter of the light beams. Half of the light beams will show on medium brightness, and all of the light beams will show on bright. If a fiber-optic light without a separate wheel stop is installed, press the “Light” button to turn it on and off. If any light is left on, it will automatically turn off after 4 hours. Circ Pump (Optional) If your system is equipped with a circ pump, it may be configured to work in one of three different ways: 1) The circ pump operates continuously (24 hours) with the exception of turning off for 30 minutes at a time when the water temperature reaches 3°F (1.5°C) above the set temperature (most likely to happen in very hot climates). 2) The circ pump stays on continuously, regardless of water temperature. 3) The circ pump will come on when the system is checking temperature (polling), during filter cycles, during freeze conditions, or when the blower or another pump is on. Preset Filter Cycles On all systems, the pump and the ozone generator** will run during filtration. At the start of each filter cycle, the blower will run on highest speed for 30 seconds to clean out the air channels. The lowest speed of pump 2 will run for 5 minutes. The first filter cycle (“day”) begins 6 minutes after the spa is powered up. The second filter cycle (“night”) begins 12 hours later. Filter duration is programmable for 1-12 hours (F1-F12). The default filter time is 2 hours. To program, press “Down” or “Up” then “Jets 1”.
Press “Down” or “Up” to select the filter duration. Press “Jets 1” to select the number of filter cycles. The display will show “dn” (day cycle only)’ or “n” (“night” cycle only). Press “Down” or “Up” to adjust, then press “Jets 1” to exit the programming mode. For continuous filtration, use F12 and “dn”. Clean-up Cycle When the pump or blower is turned on by a button press, a clean-up cycle begins 30 minutes after the pump or blower is turned off or times out. The pump and the ozone generator** will run for one hour. **Ozone (optional) The ozone generator (if installed) runs during filter cycles (except when pump 1 is operating at high speed on a non-circ system) and during clean-up cycles. Freeze Protection If the temperature sensors detect a drop to 44°F (approximately 6.7°C) within the heater, then the pump automatically activates to provide freeze protection. The equipment stays on until 4 minutes after the sensors detect that the spa temperature has risen to 45°F (approximately 7.2°C) or higher. In colder climates, an optional additional freeze sensor may be added to protect against freeze conditions that may not be sensed by the standard sensors. Aux freeze sensor protection acts similarly except with the temperature thresholds determined by the switch and without a 4-minute delay in turnoff. See your Clearwater Spa dealer for details.

19
Diagnostic Messages Message
Meaning
Action Required
No message on display. Power has been cut off to the spa.
The control panel will be disabled until power returns. Settings are preserved until the next power-up.
OHH “Overheat” - The spa has shut down. One of the sensors has detected 118°F (approximately 47.8°C) at the heater.
DO NOT ENTER THE WATER. Remove the spa cover and allow water to cool. Once the heater has cooled, reset by pushing any button. If spa does not reset, shut off the power to the spa and call your Clearwater Spa dealer or service organization.
OHS “Overheat” - The spa has shut down. One of the sensors has detected that the spa water is 110°F (approximately 43.3°C).
DO NOT ENTER THE WATER. Remove the spa cover and allow water to cool. At 107°F (approximately 41.7°C), the spa should automatically reset. If spa does not reset, shut off the power to the spa and call your Clearwater Spa dealer or service organization.
ICE “Ice” - Potential freeze condition detected.
No action required. The pumps and the blower will automatically activate regardless of spa status.
SnA Spa is shut down. The sensor that is plugged into the Sensor “A” jack is not working.
If the problem persists, contact your Clearwater Spa dealer or service organization. (May appear temporarily in an overheat situation and disappear when the heater cools.)
SnB Spa is shut down. The sensor that is plugged into the Sensor “B” jack is not working.
If the problem persists, contact your Clearwater Spa dealer or service organization. (May appear temporarily in an

20
overheat situation and disappear when the heater cools.)
SnS Sensors are out of balance. If this is alternating with the temperature, it may just be a temporary condition. If the display shows only this message (periodically blinking), the spa is shut down.
If the problem persists, contact your Clearwater Spa dealer or service organization.
HFL A substantial difference between the temperature sensors was detected. This could indicate a flow problem.
Check water level in spa. Refill if necessary. If the water level is okay, make sure the pumps have been primed. If problem persists, contact your Clearwater Spa dealer or service organization.
LF Persistent low flow problems. (Displays on the fifth occurrence of the “HFL” message within 24 hours.) Heater is shut down, but other spa functions continue to run normally.
Follow action required for “HFL” message. Heating capacity of the spa will not reset automatically; you may press any button to reset.
dr Inadequate water detected in heater.
Check water level in spa. Refill if necessary. If the water level is okay, make sure the pumps have been primed. Press any button to reset.
dr4 Inadequate water detected in heater. (Displays on third occurrence of “dr” message.) Spa is shut down.
Follow action required for “dr” message. Spa will not automatically reset; you may press any button to reset.
Pr When your spa is first actuated, it will go into Priming mode.
See the M-7 Installation Instruction Manual for complete instructions on Power-up and Pump Priming. The Priming mode will last for up to 4 minutes and then the spa will begin to heat and maintain the water temperature in the Standard mode.

21
-- Temperature not yet known.
This is normal within the first few minutes of the spa power-up.
Std The spa is operating in Standard Mode.
Temperature display is current after pump has been running for at least 2 minutes.
Ecn The spa is operating in Economy Mode.
“Ecn” will appear sol on the display when the temperature is not current. “Ecn” will alternate with the temperature when the temperature is current.
SE The spa is operating Standard-in-Economy Mode.
Operates the same as Standard mode, after 1 hour. Press “Mode” to switch directly to Economy mode.
Slp Sleep Mode has been activated by pressing a button combination on the user panel.
“SLP” will appear solid on the display when the temperature is not current. “SLP” will alternate with the temperature when the temperature is current.
SbY Standby Mode has been activated by pressing a button combination on the user panel.
Press any button to leave Standby Mode and return to normal operation.
PHL pH is low. Add pH increaser according to manufacturer’s instructions.
Phh pH is high. Add pH decreaser according to manufacturer’s instructions.
Sal Sanitizer is low. Add sanitizer according to manufacturer’s instructions.
Sah Sanitizer is high. Remove spa cover and allow sanitizer to dissipate.

22
Periodic Reminder Messages (Press the “Mode” button to reset a display reminder) Message
Frequency
Action Required
rPH Every 7 days
Test and adjust chemical levels per manufacturer’s instructions.
rSA Every 7 days
Test and adjust chemical levels per manufacturer’s instructions.
rCL Every 30 days
Remove, clean, and reinstall filter per manufacturer’s instructions.
rt9 Every 30 days
Test & reset GFCI per manufacturer’s instructions.
rdr Every 90 days
Drain and refill spa per manufacturer’s instructions.
rCO Every 180 days
Clean and condition cover per manufacturer’s instructions.
rtr Every 180 days
Clean and condition wood per manufacturer’s instructions.
rCH Every 365 days
Install new filter.
23
CHEMICALS
Keeping The Water Clean One of the bigger reasons that people require service on their spa is because they haven’t followed a strict chemical application routine. Water can accumulate impurities that can worsen the performance or even the damage the filtration system if chemicals are not applied on a regular basis. The water can even become unhealthy if chemicals are not used to sanitize the water. Improper pH levels or calcium levels can cause either corrosion of parts or scale build-up.
We recommend that you begin a routine of applying chemicals that you can get comfortable with and follow all the time. If you get into a scheduled routine, it will be easier to remember when to apply the chemicals.
Your spa may come with an optional ozonator that will do a very good job at killing bacteria and oxygenating the water, but chlorine, bromine or Nature II are used to compliment the job of the ozonator.
Finally, the best way to keep the water clean over long periods of time is to change the water four times a year. Connect a hose to the drain valve and open it all the way to allow the tub to drain all the way. Use a shop-vac to remove any standing water and debris at the bottom of the tub. Refer to the maintenance section for instructions on cleaning the tub before refilling it.
IMPORTANT!!
Always read directions on chemical container thoroughly
before using spa chemicals.

24
Spa Chemistry 101 At first, trying to understand spa chemistry can seem like a daunting task to say the least. We intend on helping you understand spa chemicals so that you can maintain the health of your spa at the best level possible.
There are three basic principals to spa water chemistry.
1. Sanitize/Disinfect (kill viruses, germs, etc.)
2. Oxidize (break down organic compounds like oils and sweat)
3. Maintain slightly base (alkaline) water (pH of 7.4 - 7.6). This controls the corrosiveness of the water, prevents excessive scaling (mineral formation on surfaces exposed to water, and insures that the water is comfortable to the skin.
Once you have a good understanding of the chemicals that are used in your spa, you will be able to maintain proper water balance. Water balance is reached when all elements (pH, total alkalinity, calcium hardness and total dissolved solids) are within their proper ranges.
The following definitions for chemicals will help you understand what the chemical is and what it is used for:
Sanitizers CHLORINE - Chlorine is widely used as a sanitizer or disinfectant in pool and spa water to kill bacteria, viruses and algae, and oxidizes ammonia and nitrogen compounds such as swimmer waste. Its formal name is Sodium Dichlor and is referred to as a chlorinated concentrate. Sodium Dichlor is a fast-dissolving, granular, stabilized organic chlorine compound providing either 56% or 63% available chlorine. Cyanuric acid and/or stabilizers are added to prevent U.V. light destruction of the chlorine by the sun.
Chlorinated concentrate produces chlorides and chloramines, which are formed when chlorine has combined with ammonia and nitrogen in pool and spa water. Chloramines exude a foul, “chlorine” odor and causes skin and eye irritation.
BROMINE – Bromine is the other commonly used sanitizer or disinfectant in pool and spa water to kill bacteria and algae, and oxidizes ammonia and nitrogen compounds such as swimmer waste. This chemical does not eliminate swimmer waste unless it is combined with an oxidizer (non-chlorine shock). It is very susceptible to direct sunlight, therefore is not efficient in outdoor pools. Bromine is sometimes used as an alternative for people whom are allergic or sensitive to chlorine products.
The pH scale goes from 0 to 14, with zero being extremely acidic and 14 being extremely base (alkaline). Seven is considered neutral pH.

25
Bromine products are available as sodium bromide and bromine tablets. The bromide ion has no effective disinfectant or sanitizing capabilities without the use of non-chlorine shock (potassium monopersulfate). Potassium monopersulfate is added to oxidize, or activate, bromide ion to bromine, which rapidly forms the active sanitizer - hypobromous acid - in spa water. Upon reaction with bacteria and other spa contaminants, hypobromous acid is reduced back to bromide ion, ready to be activated again by the next dose of potassium monopersulfate. Potassium monopersulfate begins to produce bromine immediately and continues to do so for several hours, providing sufficient time for oxidation of bather waste and other organic contamination such as ammonia and nitrogen.
NON-CHLORINE SHOCK (Potassium Monopersulfate) – Also known as “Oxy-Shock”, is an important chemical used in the process of disinfecting and sanitizing the spa water. Non-chlorine shock is used as an oxidation agent to oxidize and eliminate organic contaminants, dead algae and debris, and will also convert the chlorine by-products (chlorides and chloramines) back into free available chlorine.
When used with bromine products, non-chlorine shock is used with sodium bromide in a two-part disinfection system. Potassium monopersulfate (non- chlorine shock) is added to oxidize, or activate, bromide ion to bromine which rapidly forms the active sanitizer - hypobromous acid - in spa water. Upon reaction with bacteria and other spa contaminants, hypobromous acid is reduced back to bromide ion, ready to be activated again by the next dose of potassium monopersulfate.
Most non-chlorine shock products have buffers that reduce pH instability, and corrosion inhibitors that help protect the heater and other metal surfaces.
OZONE – Ozone is a powerful gas that is used as a sanitizer and an oxidant to keep the spa water clean and disinfected. Although ozone is about 3000 times more powerful than chlorine, it has a tendency to dissipate quickly and does not create any sanitizer residual. By using an ozonator for your spa, you can cut maintenance time and chemical costs by as much as 60%. Ozone is manufactured by an ozonator (ozone generator) and is dispensed during the filtration mode.
Nature2 ®- Comes in a cartridge form that is easily installed inside your filter. Spa water is percolated through minerals and then trace amounts of minerals are released back into the water to help control bacteria. This does not altogether eliminate the need for chlorine but greatly reduces it. (Do not use bromine with Nature II)
Be sure to ask your Clearwater Spas Dealer for the complete Nature2® Spa Recipe.

26
pH Controllers
SODIUM BICARBONATE - Commonly used to increase pH and total alkalinity of spa water. Sodium bicarbonate is also known as natural baking soda.
SODIUM CARBONATE – Also known as soda ash, is a substance used to raise pH and total alkalinity.
SODIUM BISULFATE - Also known as dry acid, the chemical used to lower pH and total alkalinity of spa water.
MURIATIC ACID - A liquid acid that is most commonly used to reduce pH and total alkalinity levels. It tends to be very strong and is not recommended for use in spas.
Water Conditioners
FLOCCULENT - A compound which clarifies spa water by gathering oils, dirt, scum, metal deposits and small contaminant particles into larger globules, which then can be easily trapped in the filtering system allowing the filtering system to work more effectively.
CLARIFIER - A compound used to remove dissolved solids, metals, dirt, oils, or other contaminants from spa and pool water.
SCUM BALL - A softball sized ball that is kept in the water. The ball is chemically treated so that it attracts contaminants that would normally be trapped in the filter.
SEQUESTERING AGENT - Stain & scale preventing compounds that sequester dissolved metals to prevent water discoloration.
CALCIUM CHLORIDE - A soluble white compound used to raise the calcium hardness of spa & pool water, to protect equipment from corrosion.
ALGAECIDE - A chemical used to kill algae and prevent it from growing back.
DEFOAMER - A compound used to reduce or eliminate foaming in spa water. Products containing Chitin do this naturally.
CHITIN - A naturally occurring polymer (pronounced KY-tin) found in crab and lobster shells. As a spa clarifier, it is the best flocculating agent available. Removes

27
oils, dirt, scum, and metal deposits and allows the filtering system to work more effectively.
How To Use The Chemicals Now that you have some knowledge about spa chemicals, you will learn how to use those chemicals to maintain balanced water in your spa. This section will explain how to apply chemicals, how much to use, and when to use them.
Usage Definitions Before getting into how much and when, it is important to understand some of the terminology that is used to describe how the chemicals are applied:
P.P.M. – Parts Per Million. Expressed as a ratio of number out of 1 million.
SHOCK - Addition of an oxidizer (OXY SHOCK) or superchlorinator to the water to break-down the organic contaminates on which bacteria feed and to destroy ammonia and nitrogen compounds (oxidize only).
SUPERCHLORINATION - Means the addition of enough chlorine in the water to kill all living things (sanitize) and destroy any organic wastes present in the water (oxidize). Usually this means about double your normal dose of chlorine. Superchlorination can be done once a day for heavy bather loads or as infrequent as once a week for a moderately used spa.
CHLORINATION – To add chlorine to your spa on a regular basis to disinfect and oxidize your spa water.
BREAK POINT CHLORINATION - The process of shocking the water with significant quantities of chlorine to oxidize all contaminants and organic wastes and leave all remaining chlorine as free chlorine.
CALCIUM HARDNESS - A measure of the amount of calcium dissolved in water. Water with low hardness can lead to corrosion of metal parts. Water with high level of hardness can cause scale (calcium crust) build up on spa surfaces and clog filters, heaters and pumps.
WATER BALANCE - Water balance is reached when all elements (pH, total alkalinity, calcium hardness and total dissolved solids) are within their proper ranges.
WATER BALANCE is reached when all elements (free chlorine, pH, total alkalinity, calcium hardness and total dissolved solids) are within their proper ranges.

28
ENZYMES - Biodegradable proteins which breakdown oils, films and digest scum in spa water.
FREE CHLORINE - The amount of chlorine available to kill bacteria or algae. Also known as “Available Chlorine”.
COMBINED CHLORINE - The portion of the total chlorine in water in chemical combination with ammonia, organics, and nitrogen, most of which are chloramines.
TOTAL ALKALINITY (TA) - The measure in PPM of all the dissolved base/alkaline material in the water. The acid-neutralizing capacity of water which indicates its buffering ability, or resistance to fluctuations in pH.
TOTAL DISSOLVED SOLIDS (TDS) - The total amount of dissolved materials in pool or spa water. The ideal range is from 1,000 to 2,000 ppm in pools and 1,500 ppm above the start-up TDS in spas.
Starting A Chemical Maintenance Program Ultimately, in a chemical maintenance program, the goal is to maintain water balance. If you apply chemicals and test your water on a regular basis, water balance is easy to maintain and your spa water will stay clear and healthy. Discuss with your Clearwater Spa dealer proper water maintenance. You will want to purchase more chemicals from your local Clearwater Spa dealer after you have a better idea of what your chemical needs will be. Although test strips are fairly accurate, test kits are also available that are very accurate and will test everything that you will need to monitor your water chemistry.
Three main parameters should be tracked closely:
1. pH
2. Free chlorine
3. Alkalinity
T.D.S. (Total Dissolved Solids) and calcium hardness should be checked after the first three are in the correct range. Test strips and test kits come with instructions on how to diagnose readings to determine whether the chemicals are in the right range. Table 2-1 shows how to dispense chemicals and how often to do it.

29
PARAMETER INDICATION SCHEDULE ACTION
pH < 7.2 pH Check bi-weekly or more for heavy use
Add Spa Up™
pH > 7.8 pH Check bi-weekly or more for heavy use
Add Spa Down™
Chlorine/Bromine 3 – 5 ppm Check bi-weekly or more for heavy use
Add Chlorine or Bromine
Alkalinity 80 – 120 ppm Check bi-weekly or more for heavy use
Add Alkalinity Increaser
TDS < 3000 ppm Check monthly Drain and refill if > 3000 ppm
Oxy-Shock Add bi-weekly or more for heavy use
Add Oxy-Shock
Hardness 150 – 400 ppm
Check monthly or with new water
Add calcium increaser if < 200 ppm. Drain and refill if >400 ppm
Ozone Ozonator runs on FILTER CYCLES
In the beginning, it is a good idea to test your water daily to learn how the water changes with the addition of chemicals. By keeping a log, you will be able to keep better track of your water condition.
When adding water to your spa for the first time or changing the water, you should superchlorinate the water by doubling (1 tbsp. Per 100 gallons) the regular dose of chlorine. It is a good idea to wait for 8 hours before entering your spa after superchlorinating the water.
Remember that keeping your spa water healthy keeps you, your family, and your guests healthy too. Most service calls for spa repairs are related to problems caused by not maintaining balanced spa water.
ALWAYS
read the entire label on a chemical container before using. Read all safety precautions on the container.
Table 2-1 – Spa water care

30
JETS
Types Of Jets Your Clearwater Spa comes with different types of jets and jet configurations. Each type of jet has a specific purpose and operates differently than the others. All jets with the exception of the fixed jets in the foot well by the light are adjustable and can be turned on or off. They all combine to create a luxurious and invigorating hydrotherapy environment that can’t be beat.
Most of the jets are removable for easy cleaning. It is not uncommon for particulates to get caught in the jets causing them to stop rotating, especially in environments where there are trees overhead or nearby. Refer to the next section for jet cleaning instructions. Most of the jets are easiest to adjust or remove when the pumps are off.
3” Mini Power Flo Jet The Mini Power Flo Jet provides massaging relief to the areas affected by discomfort from carpel tunnel syndrome or arthritis. This jet can be directed to maximize your ultimte comfort, as it is fully adjustible.
3 ½” Power Flo Jet The Power Flo Jet is designed to concentrate a soft massage to the smaller muscle groups particularly in the spine and shoulder areas. Similar to the Maxim Power Flo Jet, this jet is available in single or dual massaging action. It will generate a complete hydrotherapy experience.
5” Maxim Power Flo Jet This jet propels an extravagant swirl of water and air bubbles. With just a touch you can change this directional jet into a rotating jet. It is available in single or dual massage action creating a luxurious hydrotherapy experience.

31
5” Extreme Power Flo Jet The Extreme Power Flo Jet delivers the maximum volume of water to operate the incredible volcano and dual massage jets. These jets are placed to target the feet and legs where the relief of the day-to-day wear and tear is critical.
Topside Diverter Valves
This valve, which is located on the topside, is used to divert the power from the pump to one of the “Hot Seats” or the other. The valve has a 180° range from one side to the other. By moving the valve to one side, the pump will deliver all of its power to one seat. Moving the valve to the other side will shift the power to the other seat. If the valve is moved to a position
anywhere between both sides, the power will be shared between both sides. The other diverter valve controls the power going to “Extreme Power Flo Jet” (footwell jet).
Waterfall Control and Waterfall Jet Soothing dual waterfalls are featured on selected models. Handy turn knob controls allows for
complete adjustability of flow to match your every mood.
Soothing Scents Aromatherapy scent packets load through the topside screw top inductor to the air system. Apple, Kiwi, Floral and Ocean scents are all available through your Clearwater Spas Dealer.

32
Air Controls These valves, which are located on the topside, are used to control the air that flows through the jets. By introducing air into the jets, they effectively double their power. Because there are so many tub models, it would be impractical to describe which air controls correspond with what jets. Experiment by opening all the jets and turn on one motor at
a time. Turn the air controls one at a time and take note as to what jets are affected. Air controls will only affect the jets that are operating.
Cleaning The Rotating Jets Occasionally debris will get caught in the housing of the rotating jets causing the jet to either slow down the rotation or stop rotating altogether. This can easily be fixed by removing the jet and cleaning it. Always turn pumps off before removing jets. After removing the jet, they can easily be cleaned by vigorously shaking the jet while in the water. If the jet nozzle does not spin freely after doing this, move the nozzle to the outside rotating position and turn the nozzle in the rotating pattern until it starts to bind. Move the nozzle back and forth over the binding spot until it starts to free up. Shake the jet in the water again and check for free rotation.
Jet Removal Jets – To remove jets simply turn the outside ring of the jet counterclockwise aproximately one quarter turn and pull jet out. (Figure 3-1) To replace the jet, simply place the jet in the shell and turn the jet until the slots line up, then turn jet one quarter turn clockwise until secured. The jet will easily push into place and “snap” when it is locked.
Figure 3-1 – Turn Outer Ring Counter Clockwise To Remove Jet.

33
FILTRATION
Your spa is pre-programmed to run a 2-hour filter cycle twice a day. For the system to work properly, the filters must be hosed off at least once a week and thoroughly cleaned once a month with a filter degreaser. We recommend that you buy an extra filter cartridge from your Clearwater Spas dealer to alternate with the filters included with your spa. A dirty filter will restrict water flow and will prohibit the filtering system from keeping your spa clean. If the filters are not cleaned for extended periods, it could possibly damage the pumps.
If you have a problem with floating contaminants, you may want to purchase a skimmer net to easily remove bugs, leaves, etc…
Details on cleaning the filters are included in the maintenance section, but as a reminder, it is important to first turn off the power to the spa. Leaving the power on while changing the filters could allow objects to be drawn into the heater and/or pump and may damage your equipment.
Ask your Clearwater Spa Dealer for more information on the new Microban Filters, a new technology with antimicrobial protection that will inhibit the growth of bacteria and mold.
CAUTION !
Turn off the power to the spa before removing the filter!
For the best performance possible, clean the filter weekly.
100 sq. ft. Filter Housing. To remove filters pull weir skimmer frame up and off. Un screw filters (counter clockwise) and lift out. (Part #6CH-940)
50 SQ. FT. FILTER. To remove filter turn top ring approximately one quarter turn and lift off. Lift out leaf basket, then lift out filter. (Part #C-4335)
To remove filter pull weir open and remove

34
Ozone Generator Clearwater Spas offers an optional Ozonator made to our specifications. Ozonators supply the spa water with ozone, which is an extremely effective oxidant that will kill bacteria and microorganisms. The Ozonator will distribute ozone into your spa automatically during the filter cycles and will keep your spa and water sparkling clean. Even though ozone is effective at keeping your water clean, it cannot replace the use of chlorine or bromine. Refer to the chemical section for more information.
No maintenance is necessary on the ozonator. The ozonator works during the filter cycles set by the controller only.
If your spa did not include an optional ozonator and you would like to have one installed, contact your Clearwater Spas sales representative.

35
MAINTENANCE & MISCELLANEOUS
Spa Light Colored lenses are provided with your spa. Simply snap the colored cover over the light lens in the bottom of the tub. Use a flat blade screwdriver to lightly pry the cover off when changing light covers.
If the light bulb burns out, a replacement bulb can be obtained from your Clearwater Spa dealer. To replace the bulb, shut off power to the spa and remove the service panel closest to the light. Turn the bulb receptacle a quarter of a turn counter clockwise and pull out the bulb receptacle.
Pillows Your spa is equipped with high quality polyurethane foam pillows. These pillows can be removed by simply pulling them off. To replace them, line the receptacle holes up with the buttons on the spa.
Note that it is normal for water to accumulate in the pillows and will not damage them. Using a basketball pump needle, insert into receiving hole on pillow to evacuate water, Use the basketball pump and needle to inflate.
Spa Skirt Clearwater Spas uses select clear cedar for manufacturing the exterior cabinet. High quality wood is used for beauty and functionality. A generous coat of water base sealer has been applied at the factory. To maintain the beautiful appearance and extend the life of the cabinet, apply a coat of water base clear sealer once a year.
If access to the plumbing, motors or the controller is required, remove the screws on the service panels using the square bit supplied with the spa. Panels can then be easily removed by pulling the panel away from the spa.
The Shell Your Spa is constructed with a high quality, impact resistant, thermoplastic shell that requires very little maintenance. Make sure that when you drain and clean your spa that you use a mild, non-abrasive cleaner and cleaning pads. We recommend that you use a
WARNING!!
Use 6 watt replacement bulbs only!
WARNING!!
Do not sand quarite finishes.

36
cleaner made specifically for cleaning spas. They tend to be non-abrasive and easy to rinse off completely. Contact your Clearwater Spa dealer for information on waxes and sealers.
Spa Cover If you purchased a cover with your spa, you will want to be sure to keep it clean and protected. Spa covers exposed to the outdoors take a beating from the elements. Use a vinyl protectant to discourage deterioration caused by the UV rays from the sun. This will also minimize rain penetration. See your Clearwater Spa dealer for a vinyl protectant.
Once a month, take the cover off the spa and use a sponge and dish soap to scrub the cover clean. Keeping the cover free of dirt and debris is the most important maintenance task for the cover. Be sure to clean the seams extra well.
Your cover comes with screws that are used to fasten the receiving end of the strap locks. Simply align the cover on the spa and stretch out the straps until they are tight. Mark the location of the strap receptacles, then fasten them to the spa skirt with the screws supplied.

37
Winterizing If you live in a climate where winter temperatures are below freezing and power to the spa will be disconnected, follow these procedures for draining:
1. Add an algaecide to the water and run pumps for half an hour to evenly disperse algaecide.
2. Turn off power to the unit at the circuit breaker.
3. Drain the spa by attaching a garden hose to the hose bib in the equipment housing and open the drain valve all the way. After the spa is empty, remove the hose and leave the drain valve open.
4. For freeze protection – Access motor area by removing the outer front panels to the right and left of the controller panel and unscrew the plumbing collars from the pumps. Leave union couplings disconnected. Vacuum out lines with a wet/dry shop vacuum.
5. Soak up any excess water that drains from motors and associated plumbing with a towel. Keep water and debris out by covering with a rigid spa cover.
6. Before using the spa again, reattach pump couplings, close drain valve, and review startup instructions.
If the spa is to be used during the winter, save energy by turning the temperature down and keeping the spa covered. If the spa reaches freezing temperatures, the main pumps will automatically turn on to circulate the water.
WARNING !
Damage caused by freezing is not covered under the warranty.

38
APPENDIX A
Troubleshooting For error messages on your topside control, see your control reference from the Initial Start-up.
System Trouble
PROBLEM PROBABLE CAUSE REMEDY GFCI trips (on startup) Improper or defective wiring. Electrician should inspect for
wiring mistakes.
GFCI trips A) Ozone generator defective.
Unplug from controller and reset breaker to verify problem.
B) Unknown cause. Unplug all components, then plug in one at a time until problem is identified.
C) Heater element burned out.
Contact Clearwater Spa dealer.
System not operating A) System lockup. Reset power source or GFCI.
B) Improper or defective wiring.
Electrician should inspect for wiring mistakes.
C) House circuit breaker tripped to off position.
Reset circuit breaker.
GFCI tripped to off position. Reset GFCI. If still tripping, Check installation guide for proper wiring.

39
Controls
PROBLEM PROBABLE CAUSE REMEDY System overheating/shutdown
A) Restricted filter. Clean filter overnight with filter degreaser.
B) Water too low. Fill water to fill line on filter door.
Control response poor A) Low water level. Fill water to fill line on filter door.
B) Dirty filter. Clean filter overnight with filter degreaser.
C) Closed slice valves. Remove service panels and open slice valves.
Water won’t heat A) Same suggestions as system overheating and poor control response.
If problem persists, contact Clearwater Spa dealer.
B) Improper or defective wiring.
Electrician should inspect for wiring mistakes.
Pumps
PROBLEM PROBABLE CAUSE REMEDY Noisy pump or motor A) Clogged filter or pump
inlets. Clean filter, filter basket, and pump inlets.
B) Low water level. Fill water to fill line on filter door.
C) Slice valves not open. Remove service panels and open slice valves.
D) Debris in pump(s). Contact Clearwater Spa dealer.
E) Damaged or worn motor bearings.
Contact Clearwater Spa dealer.

40
Pumps (cont.)
PROBLEM PROBABLE CAUSE REMEDY Motor not functioning A) Cord unplugged or
damaged. Check wiring to controller. Contact Clearwater Spa dealer if damaged.
B) Motor overloaded. Let motor cool for one hour, open all jets. Motor will reset automatically.
C) Defective start switch. Contact Clearwater Spa dealer.
Insufficient flow from motor A) Jets closed. Open jets.
B) Air controls closed. Open air controls.
C) Clogged filter or pump inlets.
Clean filter, filter basket, and pump inlets.
D) Blockage in line. Contact Clearwater Spa dealer.
E) Kink in hose. Remove service panels and check for a kinked hose.
F) Slice valves not open. Remove service panels and open slice valves.
Jets
PROBLEM PROBABLE CAUSE REMEDY Cyclone jet won’t rotate Debris in jet housing. See “Cleaning The Rotating
Jets” section of the JETS chapter.
Vari-swirl jets won’t rotate Debris in jet housing. See “Cleaning The Rotating Jets” section of the JETS chapter.

41
Water
PROBLEM PROBABLE CAUSE REMEDY Water leak A) Compression fittings
(unions) have loosened. Tighten fittings.
B) Leak at barbed fitting. Remove compression clip and reseat hose. Replace clip. If leak persists, contact Clearwater Spa dealer.
Cloudy water A) Clogged or blocked filter fitting.
Remove filter and clean fitting.
B) Dirty filter. Clean filter.
C) Poor water chemistry. Balance water.
D) Insufficient filter time. Increase filter time to a minimum 4 hours per filter cycle.
E) Particles too small for filter.
Add flocculent and clarifier.
F) High pH and /or alkalinity. Adjust pH with pH Down.
G) Trace metals in water. Use metal remover.
H) Too much clarifier used. Wait to be filtered out.
Green water A) Algae. Add algaecide, superchlorinate and add Oxy Shock. Check ozonator.
B) Metal corrosion in equipment.
PH too low, adjust to 7.2 to 7.6 with pH Up.
Brown water Iron present in water. Superchlorinate and add Oxy Shock. Add metal remover.
Blue-green water Copper present in water. Usually only found in spas with gas heaters.
PH too low, adjust to 7.2 to 7.6 with pH Up.

42
Water (cont.)
PROBLEM PROBABLE CAUSE REMEDY Bleached hair/bathing suits. Eye irritation.
Too much chlorine. Allow to dissipate. Add Oxy Shock.
Bad smell, eye & skin irritation, complaints of too much chlorine.
Too much chloramines, not enough free chlorine in water.
Superchlorinate and maintain 3 - 5 PPM. Add Oxy Shock.
Scale formation on walls and equipment.
A) High pH Reduce to 7.2 to 7.6 pH.
B) Calcium too high Drain 20% to 40% of tub and refill with “soft” water. Maintain at 150 to 400 PPM
pH fluctuates radically Total alkalinity out of balance Balance alkalinity

43
LIMITED WARRANTY
RHYTHM SERIES
TEN YEAR SPA SHELL Clearwater Spa shells are warranted against water loss occurring from defects in material or workmanship for ten years from the original purchase date. Clearwater Spas also warrant their spa shell interior surface against blistering, cracking and delamination for five years from the original purchase date.
TWO YEAR EQUIPMENT
Clearwater Spas warrants the operating equipment and plumbing against defects in workmanship and materials for two years from the original purchase date.
BEACHCRAFT & ULTRA-SAGE SERIES
TWENTY YEAR SPA SHELL Clearwater Spa shells are warranted against water loss occurring from defects in material or workmanship for twenty years from the original purchase date. Clearwater Spas also warrant their spa shell interior surface against blistering, cracking and delamination for five years from the original purchase date.
FIVE YEAR EQUIPMENT
Clearwater Spas warrants the operating equipment and plumbing against defects in workmanship and materials for five years from the original purchase date.
HOW THE WARRANTY WORKS In the event of a covered defect under this Limited Warranty, Clearwater Spas or its agent will make repair in accordance with conditions contained in this Limited Warranty. There will be no charge for parts or labor to repair the spa. There may be repairman travel costs if the spa is located outside the normal serviceman's service area. If the covered defect cannot be repaired, as determined by Clearwater Spas, we reserve the right to provide a replacement exchange spa of equal value. In such an event, the spa owner will be responsible for the cost associated with the removal of the defective spa and the installation of the replacement spa. The liability of Clearwater Spas under this Limited Warranty, if any, shall not exceed the original amount paid for the defective product. It is the responsibility of the spa owner to notify the factory in writing immediately upon discovery of a warranty claim. Neglecting this notification may void your claim.
LIABILITY LIMITATIONS
This warranty does not cover any defects, malfunctions or damages that result from improper installation, commercial use or improper maintenance. The spa shell is made of high quality impact resistant thermoplastic. The spa surface can not be subjected to periods of direct sunlight without being filled with water. Exposure to direct sun can cause deformation of the spa surface. Such exposure will void the warranty. This Limited Warranty is limited to the original owner installed at the original site. Any requests for change of site location must first be approved in writing by Clearwater Spas. This Limited Warranty is void if the spa has been altered, neglected, abused or misused or if any repairs have been made by an unauthorized agent. Misuse and abuse include any installation, maintenance or operation not in accordance with the owner's operations manual. Clearwater Spas is not responsible for incidental or consequential damages of any nature, acts of God or other causes beyond the control of Clearwater Spas. All warranties implied or otherwise, including implied warranties for merchantability and fitness for a particular purpose, are limited to the terms set forth in this warranty. This limited warranty only covers those items manufactured by Clearwater Spas, excluding pillows, CD stereo players, filter cartridges and ozonators which are covered under their separate manufacturer's warranty. Exterior surround, skirting is warranted to be free of defects at time of delivery and for one year thereafter. No representative of Clearwater Spas not its agents, distributors or dealers has any authority to alter in any manner the terms of this Limited Warranty and Clearwater Spas is not responsible for any undertaking, representation of warranty made by any other person beyond those expressly set forth in this warranty.
A division of Hydra Plastics, Inc. 1/05

44
Notes: ___________________________________________________________________________ ___________________________________________________________________________ ___________________________________________________________________________ ___________________________________________________________________________ ___________________________________________________________________________ ___________________________________________________________________________ ___________________________________________________________________________ ___________________________________________________________________________ ___________________________________________________________________________ ___________________________________________________________________________ ___________________________________________________________________________ ___________________________________________________________________________ ___________________________________________________________________________ ___________________________________________________________________________ ___________________________________________________________________________ ___________________________________________________________________________ ___________________________________________________________________________

45
Notes: ___________________________________________________________________________ ___________________________________________________________________________ ___________________________________________________________________________ ___________________________________________________________________________ ___________________________________________________________________________ ___________________________________________________________________________ ___________________________________________________________________________ ___________________________________________________________________________ ___________________________________________________________________________ ___________________________________________________________________________ ___________________________________________________________________________ ___________________________________________________________________________ ___________________________________________________________________________ ___________________________________________________________________________ ___________________________________________________________________________ ___________________________________________________________________________ ___________________________________________________________________________

46
Notes: ___________________________________________________________________________ ___________________________________________________________________________ ___________________________________________________________________________ ___________________________________________________________________________ ___________________________________________________________________________ ___________________________________________________________________________ ___________________________________________________________________________ ___________________________________________________________________________ ___________________________________________________________________________ ___________________________________________________________________________ ___________________________________________________________________________ ___________________________________________________________________________ ___________________________________________________________________________ ___________________________________________________________________________ ___________________________________________________________________________ ___________________________________________________________________________ ___________________________________________________________________________

47
Notes: ___________________________________________________________________________ ___________________________________________________________________________ ___________________________________________________________________________ ___________________________________________________________________________ ___________________________________________________________________________ ___________________________________________________________________________ ___________________________________________________________________________ ___________________________________________________________________________ ___________________________________________________________________________ ___________________________________________________________________________ ___________________________________________________________________________ ___________________________________________________________________________ ___________________________________________________________________________ ___________________________________________________________________________ ___________________________________________________________________________ ___________________________________________________________________________ ___________________________________________________________________________

PO Box 2140 | Woodinville, WA 98072 | www.clearwaterspas.com