Clear and Simple Quick Start Guide - Cricket Wireless · Clear and Simple Quick Start Guide ......
2
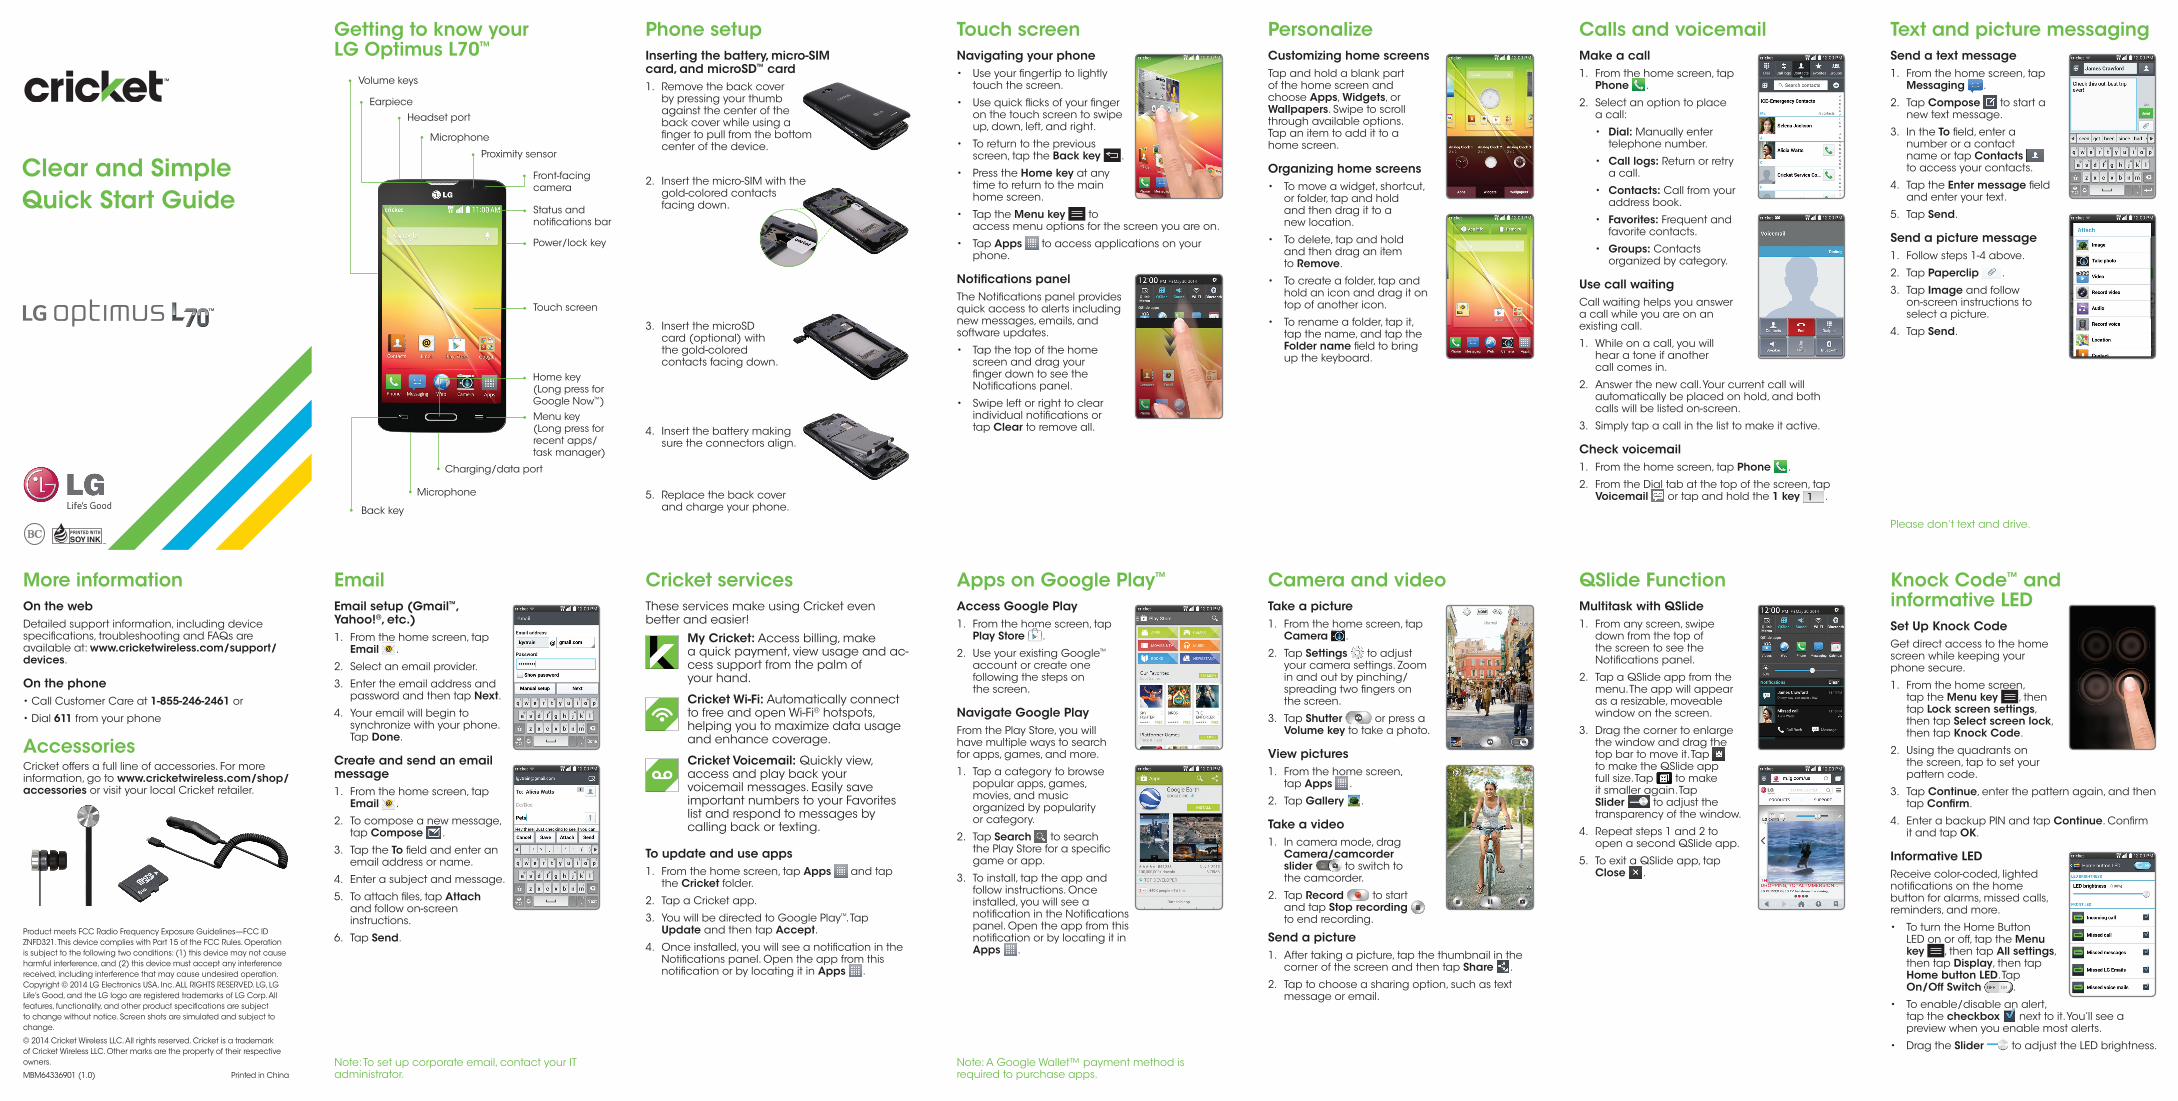
Clear and Simple Quick Start Guide Getting to know your LG Optimus L70 ™ Phone setup Inserting the battery, micro-SIM card, and microSD ™ card 1. Remove the back cover by pressing your thumb against the center of the back cover while using a finger to pull from the bottom center of the device. 2. Insert the micro-SIM with the gold-colored contacts facing down. 3. Insert the microSD card (optional) with the gold-colored contacts facing down. 4. Insert the battery making sure the connectors align. 5. Replace the back cover and charge your phone. Cricket services These services make using Cricket even better and easier! My Cricket: Access billing, make a quick payment, view usage and ac- cess support from the palm of your hand. Cricket Wi-Fi: Automatically connect to free and open Wi-Fi ® hotspots, helping you to maximize data usage and enhance coverage. Cricket Voicemail: Quickly view, access and play back your voicemail messages. Easily save important numbers to your Favorites list and respond to messages by calling back or texting. To update and use apps 1. From the home screen, tap Apps and tap the Cricket folder. 2. Tap a Cricket app. 3. You will be directed to Google Play ™ . Tap Update and then tap Accept. 4. Once installed, you will see a notification in the Notifications panel. Open the app from this notification or by locating it in Apps . Email Email setup (Gmail ™ , Yahoo! ® , etc.) 1. From the home screen, tap Email . 2. Select an email provider. 3. Enter the email address and password and then tap Next. 4. Your email will begin to synchronize with your phone. Tap Done. Create and send an email message 1. From the home screen, tap Email . 2. To compose a new message, tap Compose . 3. Tap the To field and enter an email address or name. 4. Enter a subject and message. 5. To attach files, tap Attach and follow on-screen instructions. 6. Tap Send. More information On the web Detailed support information, including device specifications, troubleshooting and FAQs are available at: www.cricketwireless.com/support/ devices. On the phone • Call Customer Care at 1-855-246-2461 or • Dial 611 from your phone Accessories Cricket offers a full line of accessories. For more information, go to www.cricketwireless.com/shop/ accessories or visit your local Cricket retailer. Touch screen Navigating your phone • Use your fingertip to lightly touch the screen. • Use quick flicks of your finger on the touch screen to swipe up, down, left, and right. • To return to the previous screen, tap the Back key . • Press the Home key at any time to return to the main home screen. • Tap the Menu key to access menu options for the screen you are on. • Tap Apps to access applications on your phone. Notifications panel The Notifications panel provides quick access to alerts including new messages, emails, and software updates. • Tap the top of the home screen and drag your finger down to see the Notifications panel. • Swipe left or right to clear individual notifications or tap Clear to remove all. Apps on Google Play ™ Access Google Play 1. From the home screen, tap Play Store . 2. Use your existing Google ™ account or create one following the steps on the screen. Navigate Google Play From the Play Store, you will have multiple ways to search for apps, games, and more. 1. Tap a category to browse popular apps, games, movies, and music organized by popularity or category. 2. Tap Search to search the Play Store for a specific game or app. 3. To install, tap the app and follow instructions. Once installed, you will see a notification in the Notifications panel. Open the app from this notification or by locating it in Apps . Personalize Customizing home screens Tap and hold a blank part of the home screen and choose Apps, Widgets, or Wallpapers. Swipe to scroll through available options. Tap an item to add it to a home screen. Organizing home screens • To move a widget, shortcut, or folder, tap and hold and then drag it to a new location. • To delete, tap and hold and then drag an item to Remove. • To create a folder, tap and hold an icon and drag it on top of another icon. • To rename a folder, tap it, tap the name, and tap the Folder name field to bring up the keyboard. Camera and video Take a picture 1. From the home screen, tap Camera . 2. Tap Settings to adjust your camera settings. Zoom in and out by pinching/ spreading two fingers on the screen. 3. Tap Shutter or press a Volume key to take a photo. View pictures 1. From the home screen, tap Apps . 2. Tap Gallery . Take a video 1. In camera mode, drag Camera/camcorder slider to switch to the camcorder. 2. Tap Record to start and tap Stop recording to end recording. Send a picture 1. After taking a picture, tap the thumbnail in the corner of the screen and then tap Share . 2. Tap to choose a sharing option, such as text message or email. Calls and voicemail Make a call 1. From the home screen, tap Phone . 2. Select an option to place a call: • Dial: Manually enter telephone number. • Call logs: Return or retry a call. • Contacts: Call from your address book. • Favorites: Frequent and favorite contacts. • Groups: Contacts organized by category. Use call waiting Call waiting helps you answer a call while you are on an existing call. 1. While on a call, you will hear a tone if another call comes in. 2. Answer the new call. Your current call will automatically be placed on hold, and both calls will be listed on-screen. 3. Simply tap a call in the list to make it active. Check voicemail 1. From the home screen, tap Phone . 2. From the Dial tab at the top of the screen, tap Voicemail or tap and hold the 1 key . QSlide Function Multitask with QSlide 1. From any screen, swipe down from the top of the screen to see the Notifications panel. 2. Tap a QSlide app from the menu. The app will appear as a resizable, moveable window on the screen. 3. Drag the corner to enlarge the window and drag the top bar to move it. Tap to make the QSlide app full size. Tap to make it smaller again. Tap Slider to adjust the transparency of the window. 4. Repeat steps 1 and 2 to open a second QSlide app. 5. To exit a QSlide app, tap Close . Text and picture messaging Send a text message 1. From the home screen, tap Messaging . 2. Tap Compose to start a new text message. 3. In the To field, enter a number or a contact name or tap Contacts to access your contacts. 4. Tap the Enter message field and enter your text. 5. Tap Send. Send a picture message 1. Follow steps 1-4 above. 2. Tap Paperclip . 3. Tap Image and follow on-screen instructions to select a picture. 4. Tap Send. Knock Code ™ and informative LED Set Up Knock Code Get direct access to the home screen while keeping your phone secure. 1. From the home screen, tap the Menu key , then tap Lock screen settings, then tap Select screen lock, then tap Knock Code. 2. Using the quadrants on the screen, tap to set your pattern code. 3. Tap Continue, enter the pattern again, and then tap Confirm. 4. Enter a backup PIN and tap Continue. Confirm it and tap OK. Informative LED Receive color-coded, lighted notifications on the home button for alarms, missed calls, reminders, and more. • To turn the Home Button LED on or off, tap the Menu key , then tap All settings, then tap Display, then tap Home button LED. Tap On/Off Switch . • To enable/disable an alert, tap the checkbox next to it. You’ll see a preview when you enable most alerts. • Drag the Slider to adjust the LED brightness. Product meets FCC Radio Frequency Exposure Guidelines—FCC ID ZNFD321. This device complies with Part 15 of the FCC Rules. Operation is subject to the following two conditions: (1) this device may not cause harmful interference, and (2) this device must accept any interference received, including interference that may cause undesired operation. Copyright © 2014 LG Electronics USA, Inc. ALL RIGHTS RESERVED. LG, LG Life’s Good, and the LG logo are registered trademarks of LG Corp. All features, functionality, and other product specifications are subject to change without notice. Screen shots are simulated and subject to change. © 2014 Cricket Wireless LLC. All rights reserved. Cricket is a trademark of Cricket Wireless LLC. Other marks are the property of their respective owners. MBM64336901 (1.0) Printed in China Note: To set up corporate email, contact your IT administrator. Note: A Google Wallet™ payment method is required to purchase apps. Back key Volume keys Earpiece Proximity sensor Headset port Microphone Front-facing camera Power/lock key Touch screen Menu key (Long press for recent apps/ task manager) Status and notifications bar Home key (Long press for Google Now ™ ) Charging/data port Microphone Please don’t text and drive.
Transcript of Clear and Simple Quick Start Guide - Cricket Wireless · Clear and Simple Quick Start Guide ......
Clear and SimpleQuick Start Guide
Getting to know your LG Optimus L70™
Phone setupInserting the battery, micro-SIM card, and microSD™ card1. Remove the back cover
by pressing your thumb against the center of the back cover while using a finger to pull from the bottom center of the device.
2. Insert the micro-SIM with the gold-colored contacts facing down.
3. Insert the microSD card (optional) with the gold-colored contacts facing down.
4. Insert the battery making sure the connectors align.
5. Replace the back cover and charge your phone.
Cricket servicesThese services make using Cricket even better and easier!
My Cricket: Access billing, make a quick payment, view usage and ac-cess support from the palm of your hand.
Cricket Wi-Fi: Automatically connect to free and open Wi-Fi® hotspots, helping you to maximize data usage and enhance coverage.
Cricket Voicemail: Quickly view, access and play back your voicemail messages. Easily save important numbers to your Favorites list and respond to messages by calling back or texting.
To update and use apps1. From the home screen, tap Apps and tap
the Cricket folder.
2. Tap a Cricket app.
3. You will be directed to Google Play™. Tap Update and then tap Accept.
4. Once installed, you will see a notification in the Notifications panel. Open the app from this notification or by locating it in Apps .
EmailEmail setup (Gmail™, Yahoo!®, etc.)1. From the home screen, tap
Email .
2. Select an email provider.
3. Enter the email address and password and then tap Next.
4. Your email will begin to synchronize with your phone. Tap Done.
Create and send an email message1. From the home screen, tap
Email .
2. To compose a new message, tap Compose .
3. Tap the To field and enter an email address or name.
4. Enter a subject and message.
5. To attach files, tap Attach and follow on-screen instructions.
6. Tap Send.
More informationOn the webDetailed support information, including device specifications, troubleshooting and FAQs are available at: www.cricketwireless.com/support/devices.
On the phone• Call Customer Care at 1-855-246-2461 or
• Dial 611 from your phone
AccessoriesCricket offers a full line of accessories. For more information, go to www.cricketwireless.com/shop/accessories or visit your local Cricket retailer.
Touch screenNavigating your phone• Use your fingertip to lightly
touch the screen.
• Use quick flicks of your finger on the touch screen to swipe up, down, left, and right.
• To return to the previous screen, tap the Back key .
• Press the Home key at any time to return to the main home screen.
• Tap the Menu key to access menu options for the screen you are on.
• Tap Apps to access applications on your phone.
Notifications panelThe Notifications panel provides quick access to alerts including new messages, emails, and software updates.
• Tap the top of the home screen and drag your finger down to see the Notifications panel.
• Swipe left or right to clear individual notifications or tap Clear to remove all.
Apps on Google Play™
Access Google Play1. From the home screen, tap
Play Store .
2. Use your existing Google™ account or create one following the steps on the screen.
Navigate Google PlayFrom the Play Store, you will have multiple ways to search for apps, games, and more.
1. Tap a category to browse popular apps, games, movies, and music organized by popularity or category.
2. Tap Search to search the Play Store for a specific game or app.
3. To install, tap the app and follow instructions. Once installed, you will see a notification in the Notifications panel. Open the app from this notification or by locating it in Apps .
PersonalizeCustomizing home screensTap and hold a blank part of the home screen and choose Apps, Widgets, or Wallpapers. Swipe to scroll through available options. Tap an item to add it to a home screen.
Organizing home screens• To move a widget, shortcut,
or folder, tap and hold and then drag it to a new location.
• To delete, tap and hold and then drag an item to Remove.
• To create a folder, tap and hold an icon and drag it on top of another icon.
• To rename a folder, tap it, tap the name, and tap the Folder name field to bring up the keyboard.
Camera and videoTake a picture1. From the home screen, tap
Camera .
2. Tap Settings to adjust your camera settings. Zoom in and out by pinching/ spreading two fingers on the screen.
3. Tap Shutter or press a Volume key to take a photo.
View pictures1. From the home screen,
tap Apps .
2. Tap Gallery .
Take a video1. In camera mode, drag
Camera/camcorder slider to switch to the camcorder.
2. Tap Record to start and tap Stop recording to end recording.
Send a picture1. After taking a picture, tap the thumbnail in the
corner of the screen and then tap Share .
2. Tap to choose a sharing option, such as text message or email.
Calls and voicemailMake a call1. From the home screen, tap
Phone .
2. Select an option to place a call:
• Dial: Manually enter telephone number.
• Call logs: Return or retry a call.
• Contacts: Call from your address book.
• Favorites: Frequent and favorite contacts.
• Groups: Contacts organized by category.
Use call waitingCall waiting helps you answer a call while you are on an existing call.
1. While on a call, you will hear a tone if another call comes in.
2. Answer the new call. Your current call will automatically be placed on hold, and both calls will be listed on-screen.
3. Simply tap a call in the list to make it active.
Check voicemail1. From the home screen, tap Phone .
2. From the Dial tab at the top of the screen, tap Voicemail or tap and hold the 1 key .
QSlide FunctionMultitask with QSlide1. From any screen, swipe
down from the top of the screen to see the Notifications panel.
2. Tap a QSlide app from the menu. The app will appear as a resizable, moveable window on the screen.
3. Drag the corner to enlarge the window and drag the top bar to move it. Tap to make the QSlide app full size. Tap to make it smaller again. Tap Slider to adjust the transparency of the window.
4. Repeat steps 1 and 2 to open a second QSlide app.
5. To exit a QSlide app, tap Close .
Text and picture messagingSend a text message1. From the home screen, tap
Messaging .
2. Tap Compose to start a new text message.
3. In the To field, enter a number or a contact name or tap Contacts to access your contacts.
4. Tap the Enter message field and enter your text.
5. Tap Send.
Send a picture message1. Follow steps 1-4 above.
2. Tap Paperclip .
3. Tap Image and follow on-screen instructions to select a picture.
4. Tap Send.
Knock Code™ and informative LEDSet Up Knock CodeGet direct access to the home screen while keeping your phone secure.
1. From the home screen, tap the Menu key , then tap Lock screen settings, then tap Select screen lock, then tap Knock Code.
2. Using the quadrants on the screen, tap to set your pattern code.
3. Tap Continue, enter the pattern again, and then tap Confirm.
4. Enter a backup PIN and tap Continue. Confirm it and tap OK.
Informative LEDReceive color-coded, lighted notifications on the home button for alarms, missed calls, reminders, and more.
• To turn the Home Button LED on or off, tap the Menu key , then tap All settings, then tap Display, then tap Home button LED. Tap On/Off Switch .
• To enable/disable an alert, tap the checkbox next to it. You’ll see a preview when you enable most alerts.
• Drag the Slider to adjust the LED brightness.
Product meets FCC Radio Frequency Exposure Guidelines—FCC ID ZNFD321. This device complies with Part 15 of the FCC Rules. Operation is subject to the following two conditions: (1) this device may not cause harmful interference, and (2) this device must accept any interference received, including interference that may cause undesired operation. Copyright © 2014 LG Electronics USA, Inc. ALL RIGHTS RESERVED. LG, LG Life’s Good, and the LG logo are registered trademarks of LG Corp. All features, functionality, and other product specifications are subject to change without notice. Screen shots are simulated and subject to change.
© 2014 Cricket Wireless LLC. All rights reserved. Cricket is a trademark of Cricket Wireless LLC. Other marks are the property of their respective owners.
MBM64336901 (1.0) Printed in ChinaNote: To set up corporate email, contact your IT administrator.
Note: A Google Wallet™ payment method is required to purchase apps.
Back key
Volume keys
Earpiece
Proximity sensor
Headset port
Microphone
Front-facing camera
Power/lock key
Touch screen
Menu key(Long press for recent apps/task manager)
Status and notifications bar
Home key (Long press for Google Now™)
Charging/data port
Microphone
Please don’t text and drive.
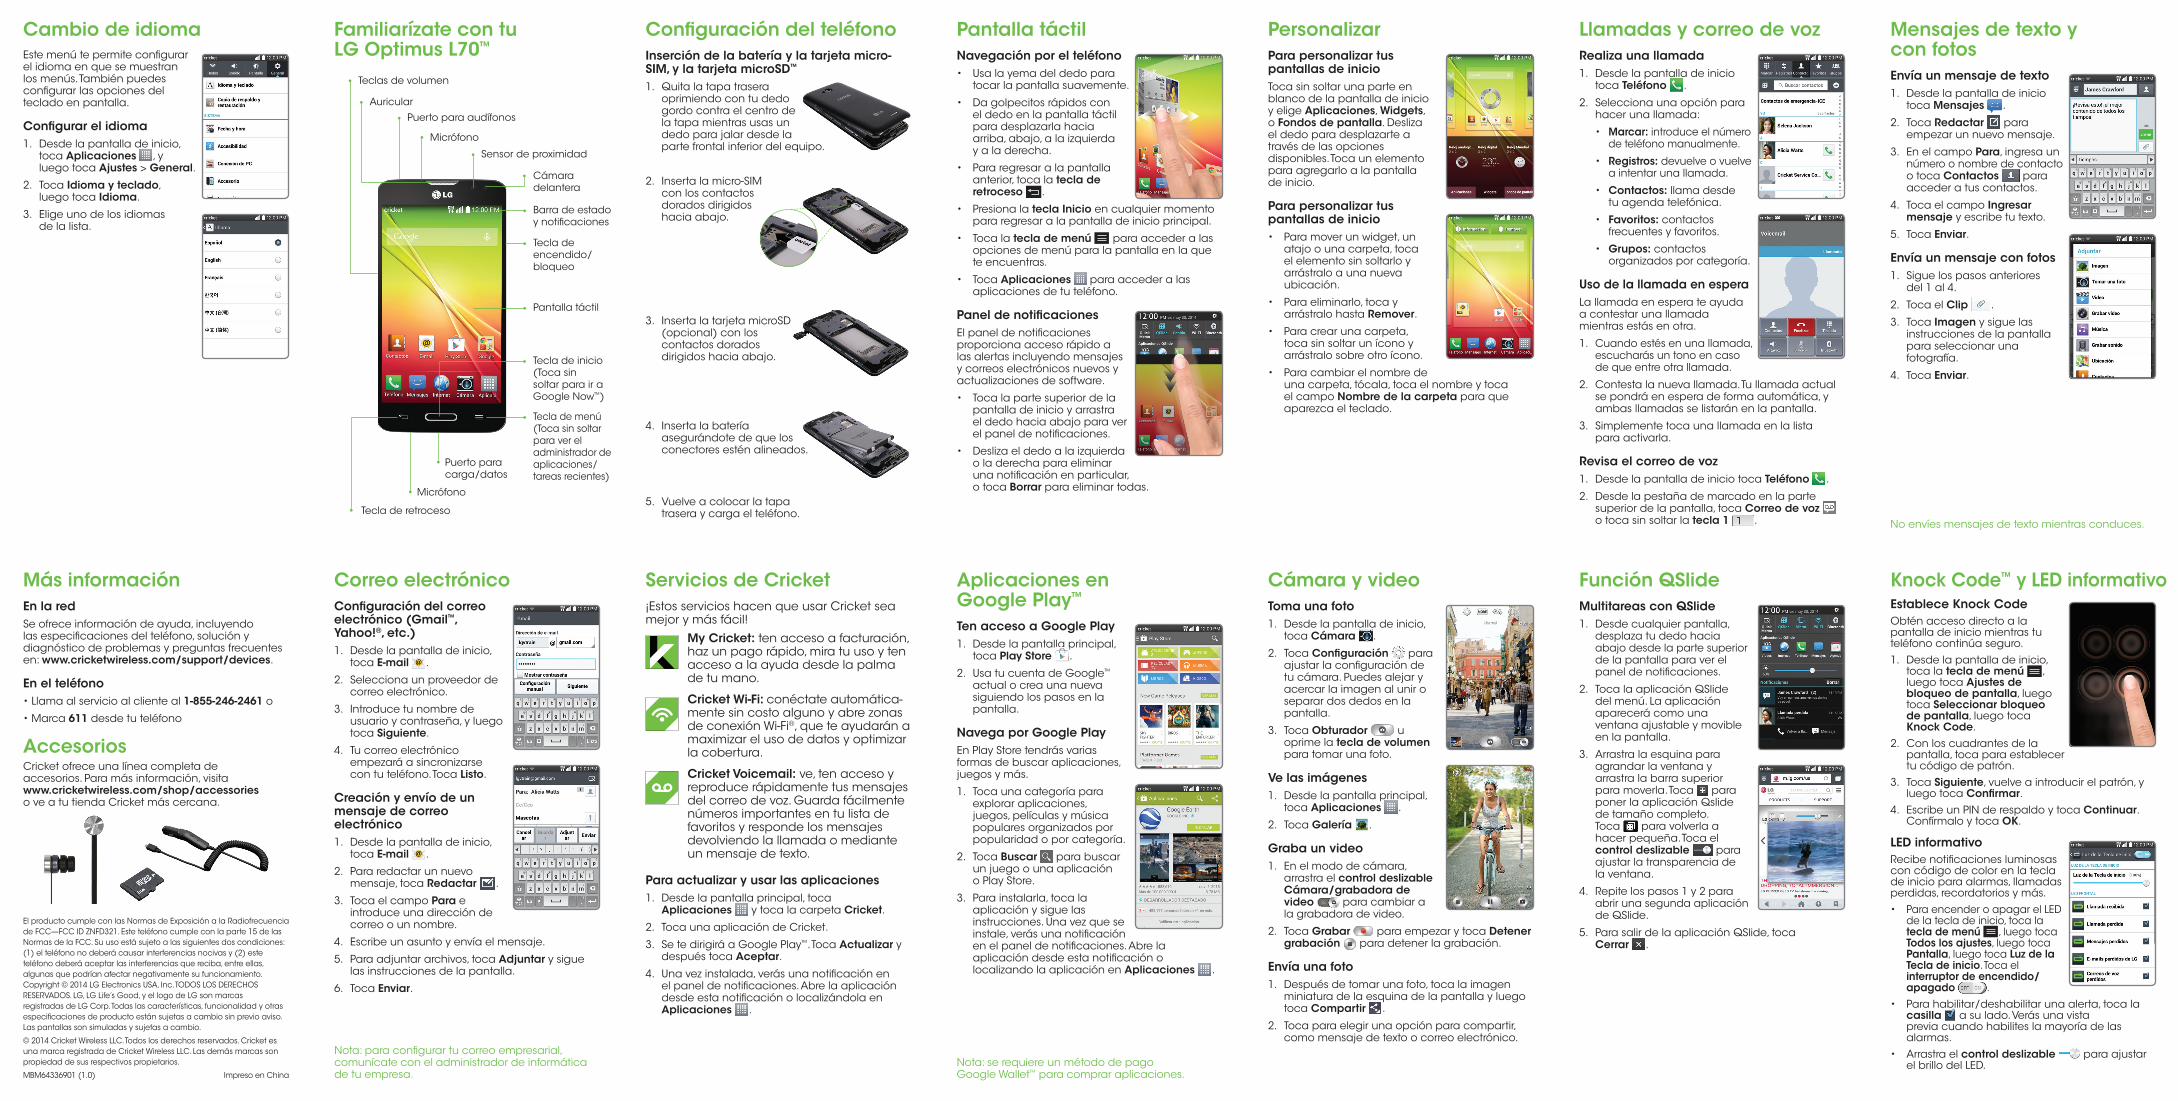
Familiarízate con tu LG Optimus L70™
Configuración del teléfonoInserción de la batería y la tarjeta micro-SIM, y la tarjeta microSD™
1. Quita la tapa trasera oprimiendo con tu dedo gordo contra el centro de la tapa mientras usas un dedo para jalar desde la parte frontal inferior del equipo.
2. Inserta la micro-SIM con los contactos dorados dirigidos hacia abajo.
3. Inserta la tarjeta microSD (opcional) con los contactos dorados dirigidos hacia abajo.
4. Inserta la batería asegurándote de que los conectores estén alineados.
5. Vuelve a colocar la tapa trasera y carga el teléfono.
Servicios de Cricket¡Estos servicios hacen que usar Cricket sea mejor y más fácil!
My Cricket: ten acceso a facturación, haz un pago rápido, mira tu uso y ten acceso a la ayuda desde la palma de tu mano.
Cricket Wi-Fi: conéctate automática-mente sin costo alguno y abre zonas de conexión Wi-Fi®, que te ayudarán a maximizar el uso de datos y optimizar la cobertura.
Cricket Voicemail: ve, ten acceso y reproduce rápidamente tus mensajes del correo de voz. Guarda fácilmente números importantes en tu lista de favoritos y responde los mensajes devolviendo la llamada o mediante un mensaje de texto.
Para actualizar y usar las aplicaciones1. Desde la pantalla principal, toca
Aplicaciones y toca la carpeta Cricket.
2. Toca una aplicación de Cricket.
3. Se te dirigirá a Google Play™. Toca Actualizar y después toca Aceptar.
4. Una vez instalada, verás una notificación en el panel de notificaciones. Abre la aplicación desde esta notificación o localizándola en Aplicaciones .
Correo electrónicoConfiguración del correo electrónico (Gmail™, Yahoo!®, etc.)1. Desde la pantalla de inicio,
toca E-mail .
2. Selecciona un proveedor de correo electrónico.
3. Introduce tu nombre de usuario y contraseña, y luego toca Siguiente.
4. Tu correo electrónico empezará a sincronizarse con tu teléfono. Toca Listo.
Creación y envío de un mensaje de correo electrónico1. Desde la pantalla de inicio,
toca E-mail .
2. Para redactar un nuevo mensaje, toca Redactar .
3. Toca el campo Para e introduce una dirección de correo o un nombre.
4. Escribe un asunto y envía el mensaje.
5. Para adjuntar archivos, toca Adjuntar y sigue las instrucciones de la pantalla.
6. Toca Enviar.
Más informaciónEn la redSe ofrece información de ayuda, incluyendo las especificaciones del teléfono, solución y diagnóstico de problemas y preguntas frecuentes en: www.cricketwireless.com/support/devices.
En el teléfono• Llama al servicio al cliente al 1-855-246-2461 o
• Marca 611 desde tu teléfono
AccesoriosCricket ofrece una línea completa de accesorios. Para más información, visita www.cricketwireless.com/shop/accessories o ve a tu tienda Cricket más cercana.
Pantalla táctilNavegación por el teléfono• Usa la yema del dedo para
tocar la pantalla suavemente.
• Da golpecitos rápidos con el dedo en la pantalla táctil para desplazarla hacia arriba, abajo, a la izquierda y a la derecha.
• Para regresar a la pantalla anterior, toca la tecla de retroceso .
• Presiona la tecla Inicio en cualquier momento para regresar a la pantalla de inicio principal.
• Toca la tecla de menú para acceder a las opciones de menú para la pantalla en la que te encuentras.
• Toca Aplicaciones para acceder a las aplicaciones de tu teléfono.
Panel de notificacionesEl panel de notificaciones proporciona acceso rápido a las alertas incluyendo mensajes y correos electrónicos nuevos y actualizaciones de software.
• Toca la parte superior de la pantalla de inicio y arrastra el dedo hacia abajo para ver el panel de notificaciones.
• Desliza el dedo a la izquierda o la derecha para eliminar una notificación en particular, o toca Borrar para eliminar todas.
Aplicaciones en Google Play™
Ten acceso a Google Play1. Desde la pantalla principal,
toca Play Store .
2. Usa tu cuenta de Google™ actual o crea una nueva siguiendo los pasos en la pantalla.
Navega por Google PlayEn Play Store tendrás varias formas de buscar aplicaciones, juegos y más.
1. Toca una categoría para explorar aplicaciones, juegos, películas y música populares organizados por popularidad o por categoría.
2. Toca Buscar para buscar un juego o una aplicación o Play Store.
3. Para instalarla, toca la aplicación y sigue las instrucciones. Una vez que se instale, verás una notificación en el panel de notificaciones. Abre la aplicación desde esta notificación o localizando la aplicación en Aplicaciones .
PersonalizarPara personalizar tus pantallas de inicioToca sin soltar una parte en blanco de la pantalla de inicio y elige Aplicaciones, Widgets, o Fondos de pantalla. Desliza el dedo para desplazarte a través de las opciones disponibles. Toca un elemento para agregarlo a la pantalla de inicio.
Para personalizar tus pantallas de inicio• Para mover un widget, un
atajo o una carpeta, toca el elemento sin soltarlo y arrástralo a una nueva ubicación.
• Para eliminarlo, toca y arrástralo hasta Remover.
• Para crear una carpeta, toca sin soltar un ícono y arrástralo sobre otro ícono.
• Para cambiar el nombre de una carpeta, tócala, toca el nombre y toca el campo Nombre de la carpeta para que aparezca el teclado.
Cambio de idiomaEste menú te permite configurar el idioma en que se muestran los menús. También puedes configurar las opciones del teclado en pantalla.
Configurar el idioma1. Desde la pantalla de inicio,
toca Aplicaciones , y luego toca Ajustes > General.
2. Toca Idioma y teclado, luego toca Idioma.
3. Elige uno de los idiomas de la lista.
Cámara y videoToma una foto1. Desde la pantalla de inicio,
toca Cámara .
2. Toca Configuración para ajustar la configuración de tu cámara. Puedes alejar y acercar la imagen al unir o separar dos dedos en la pantalla.
3. Toca Obturador u oprime la tecla de volumen para tomar una foto.
Ve las imágenes1. Desde la pantalla principal,
toca Aplicaciones .
2. Toca Galería .
Graba un video1. En el modo de cámara,
arrastra el control deslizable Cámara/grabadora de video para cambiar a la grabadora de video.
2. Toca Grabar para empezar y toca Detener grabación para detener la grabación.
Envía una foto1. Después de tomar una foto, toca la imagen
miniatura de la esquina de la pantalla y luego toca Compartir .
2. Toca para elegir una opción para compartir, como mensaje de texto o correo electrónico.
Llamadas y correo de vozRealiza una llamada1. Desde la pantalla de inicio
toca Teléfono .
2. Selecciona una opción para hacer una llamada:
• Marcar: introduce el número de teléfono manualmente.
• Registros: devuelve o vuelve a intentar una llamada.
• Contactos: llama desde tu agenda telefónica.
• Favoritos: contactos frecuentes y favoritos.
• Grupos: contactos organizados por categoría.
Uso de la llamada en esperaLa llamada en espera te ayuda a contestar una llamada mientras estás en otra.
1. Cuando estés en una llamada, escucharás un tono en caso de que entre otra llamada.
2. Contesta la nueva llamada. Tu llamada actual se pondrá en espera de forma automática, y ambas llamadas se listarán en la pantalla.
3. Simplemente toca una llamada en la lista para activarla.
Revisa el correo de voz1. Desde la pantalla de inicio toca Teléfono .
2. Desde la pestaña de marcado en la parte superior de la pantalla, toca Correo de voz o toca sin soltar la tecla 1 .
Función QSlideMultitareas con QSlide1. Desde cualquier pantalla,
desplaza tu dedo hacia abajo desde la parte superior de la pantalla para ver el panel de notificaciones.
2. Toca la aplicación QSlide del menú. La aplicación aparecerá como una ventana ajustable y movible en la pantalla.
3. Arrastra la esquina para agrandar la ventana y arrastra la barra superior para moverla. Toca para poner la aplicación Qslide de tamaño completo. Toca para volverla a hacer pequeña. Toca el control deslizable para ajustar la transparencia de la ventana.
4. Repite los pasos 1 y 2 para abrir una segunda aplicación de QSlide.
5. Para salir de la aplicación QSlide, toca Cerrar .
Mensajes de texto y con fotosEnvía un mensaje de texto1. Desde la pantalla de inicio
toca Mensajes .
2. Toca Redactar para empezar un nuevo mensaje.
3. En el campo Para, ingresa un número o nombre de contacto o toca Contactos para acceder a tus contactos.
4. Toca el campo Ingresar mensaje y escribe tu texto.
5. Toca Enviar.
Envía un mensaje con fotos1. Sigue los pasos anteriores
del 1 al 4.
2. Toca el Clip .
3. Toca Imagen y sigue las instrucciones de la pantalla para seleccionar una fotografía.
4. Toca Enviar.
Knock Code™ y LED informativoEstablece Knock CodeObtén acceso directo a la pantalla de inicio mientras tu teléfono continúa seguro.
1. Desde la pantalla de inicio, toca la tecla de menú , luego toca Ajustes de bloqueo de pantalla, luego toca Seleccionar bloqueo de pantalla, luego toca Knock Code.
2. Con los cuadrantes de la pantalla, toca para establecer tu código de patrón.
3. Toca Siguiente, vuelve a introducir el patrón, y luego toca Confirmar.
4. Escribe un PIN de respaldo y toca Continuar. Confírmalo y toca OK.
LED informativoRecibe notificaciones luminosas con código de color en la tecla de inicio para alarmas, llamadas perdidas, recordatorios y más.
• Para encender o apagar el LED de la tecla de inicio, toca la tecla de menú , luego toca Todos los ajustes, luego toca Pantalla, luego toca Luz de la Tecla de inicio. Toca el interruptor de encendido/ apagado .
• Para habilitar/deshabilitar una alerta, toca la casilla a su lado. Verás una vista previa cuando habilites la mayoría de las alarmas.
• Arrastra el control deslizable para ajustar el brillo del LED.
El producto cumple con las Normas de Exposición a la Radiofrecuencia de FCC—FCC ID ZNFD321. Este teléfono cumple con la parte 15 de las Normas de la FCC. Su uso está sujeto a las siguientes dos condiciones: (1) el teléfono no deberá causar interferencias nocivas y (2) este teléfono deberá aceptar las interferencias que reciba, entre ellas, algunas que podrían afectar negativamente su funcionamiento. Copyright © 2014 LG Electronics USA, Inc. TODOS LOS DERECHOS RESERVADOS. LG, LG Life’s Good, y el logo de LG son marcas registradas de LG Corp. Todas las características, funcionalidad y otras especificaciones de producto están sujetas a cambio sin previo aviso. Las pantallas son simuladas y sujetas a cambio.
© 2014 Cricket Wireless LLC. Todos los derechos reservados. Cricket es una marca registrada de Cricket Wireless LLC. Las demás marcas son propiedad de sus respectivos propietarios.
MBM64336901 (1.0) Impreso en China
Nota: para configurar tu correo empresarial, comunícate con el administrador de informática de tu empresa.
Nota: se requiere un método de pago Google Wallet™ para comprar aplicaciones.
Tecla de retroceso
Teclas de volumen
Auricular
Sensor de proximidad
Puerto para audífonos
Micrófono
Cámara delantera
Tecla de encendido/bloqueo
Pantalla táctil
Tecla de menú (Toca sin soltar para ver el administrador de aplicaciones/tareas recientes)
Barra de estado y notificaciones
Tecla de inicio (Toca sin soltar para ir a Google Now™)
Puerto para carga/datos
Micrófono
No envíes mensajes de texto mientras conduces.