clean and contemporary Floating Shelves - Fine Woodworking · 58 FINe WOODWOrKING Flush up the...
7
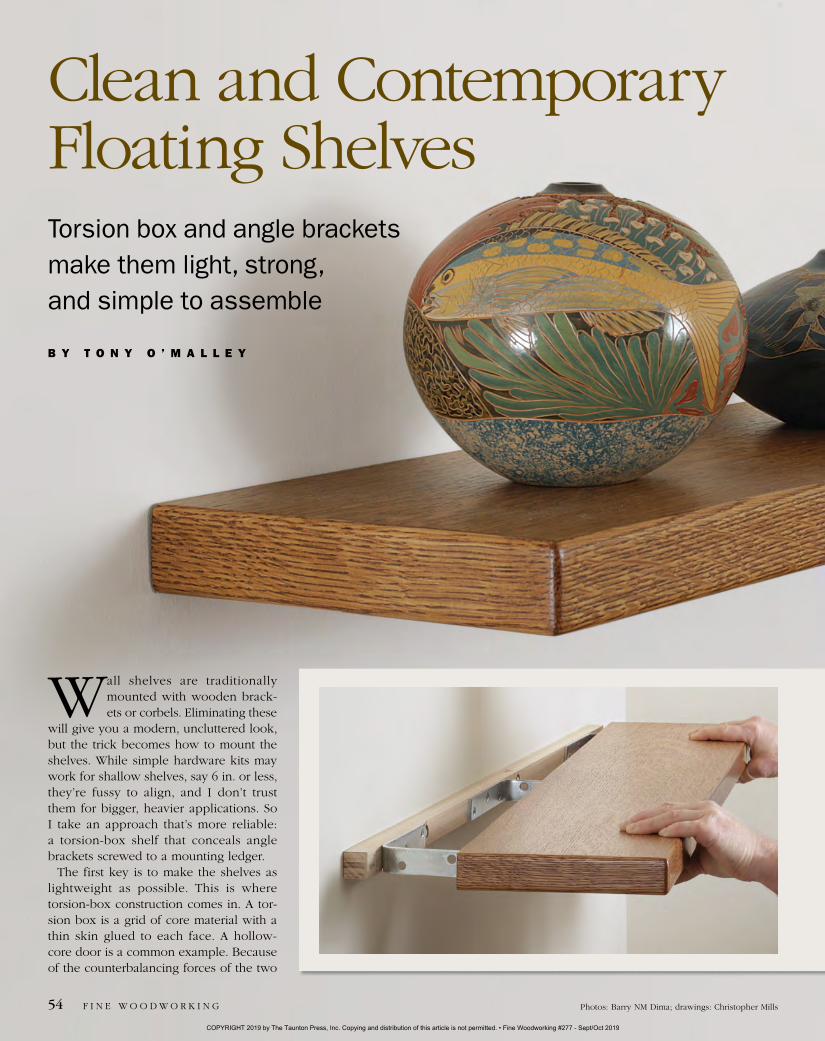
FINE WOODWORKING 54 Photos: Barry NM Dima; drawings: Christopher Mills W all shelves are traditionally mounted with wooden brack- ets or corbels. Eliminating these will give you a modern, uncluttered look, but the trick becomes how to mount the shelves. While simple hardware kits may work for shallow shelves, say 6 in. or less, they’re fussy to align, and I don’t trust them for bigger, heavier applications. So I take an approach that’s more reliable: a torsion-box shelf that conceals angle brackets screwed to a mounting ledger. The first key is to make the shelves as lightweight as possible. This is where torsion-box construction comes in. A tor- sion box is a grid of core material with a thin skin glued to each face. A hollow- core door is a common example. Because of the counterbalancing forces of the two Clean and Contemporary Floating Shelves Torsion box and angle brackets make them light, strong, and simple to assemble BY TONY O’MALLEY COPYRIGHT 2019 by The Taunton Press, Inc. Copying and distribution of this article is not permitted. • Fine Woodworking #277 - Sept/Oct 2019
Transcript of clean and contemporary Floating Shelves - Fine Woodworking · 58 FINe WOODWOrKING Flush up the...
F I N e W O O D W O r K I N G54 photos: barry Nm Dima; drawings: christopher mills
Wall shelves are traditionally mounted with wooden brack-ets or corbels. eliminating these
will give you a modern, uncluttered look, but the trick becomes how to mount the shelves. While simple hardware kits may work for shallow shelves, say 6 in. or less, they’re fussy to align, and I don’t trust them for bigger, heavier applications. So I take an approach that’s more reliable: a torsion-box shelf that conceals angle brackets screwed to a mounting ledger.
The first key is to make the shelves as lightweight as possible. This is where torsion- box construction comes in. A tor-sion box is a grid of core material with a thin skin glued to each face. A hollow-core door is a common example. because of the counterbalancing forces of the two
clean and contemporary Floating ShelvesTorsion box and angle bracketsmake them light, strong, and simple to assemble
B Y T O N Y O ’ M A L L E Y
COPYRIGHT 2019 by The Taunton Press, Inc. Copying and distribution of this article is not permitted. • Fine Woodworking #277 - Sept/Oct 2019
S e p T e m b e r / O c T O b e r 2 0 1 9 55
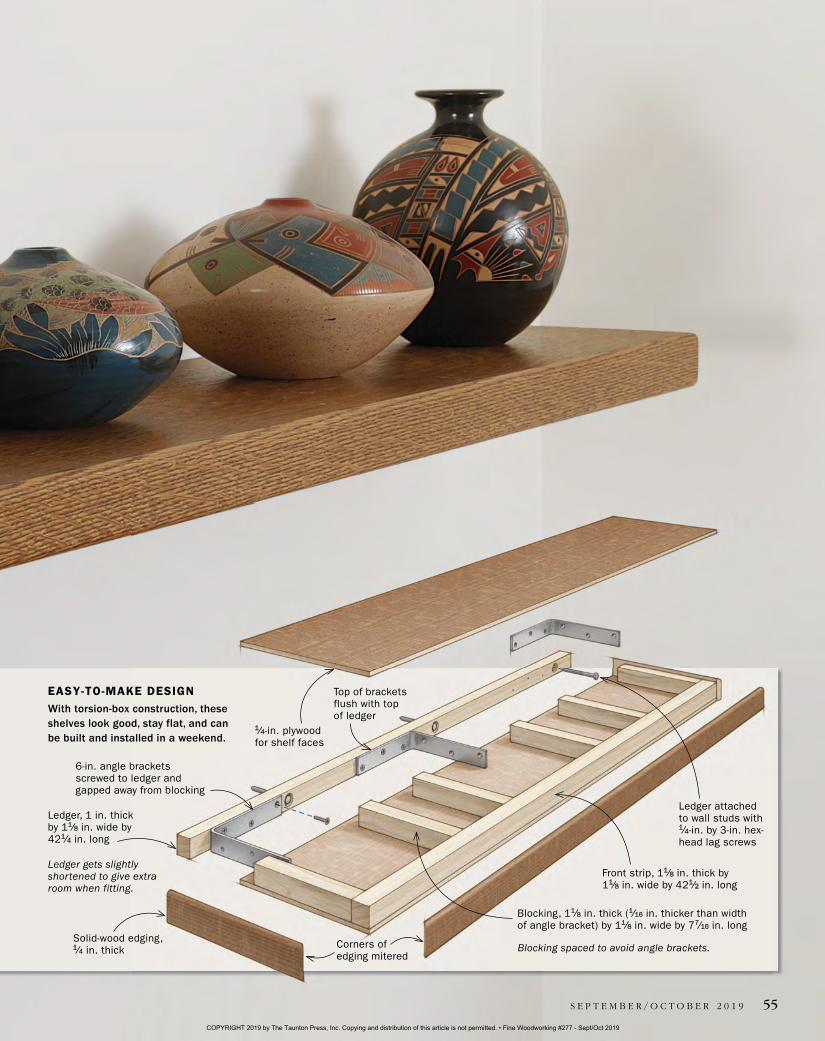
EASY-TO-MAKE DESIGNWith torsion-box construction, these shelves look good, stay flat, and can be built and installed in a weekend.
Top of brackets flush with top of ledger
6-in. angle brackets screwed to ledger and gapped away from blocking
Ledger, 1 in. thick by 11⁄8 in. wide by 421⁄4 in. long
Ledger gets slightly shortened to give extra room when fitting.
Ledger attached to wall studs with 1⁄4-in. by 3-in. hex-head lag screws
Front strip, 11⁄8 in. thick by 11⁄8 in. wide by 421⁄2 in. long
Solid-wood edging, 1⁄4 in. thick Corners of
edging mitered
1⁄4-in. plywood for shelf faces
Blocking, 11⁄8 in. thick (1⁄16 in. thicker than width of angle bracket) by 11⁄8 in. wide by 77⁄16 in. long
Blocking spaced to avoid angle brackets.
COPYRIGHT 2019 by The Taunton Press, Inc. Copying and distribution of this article is not permitted. • Fine Woodworking #277 - Sept/Oct 2019
56
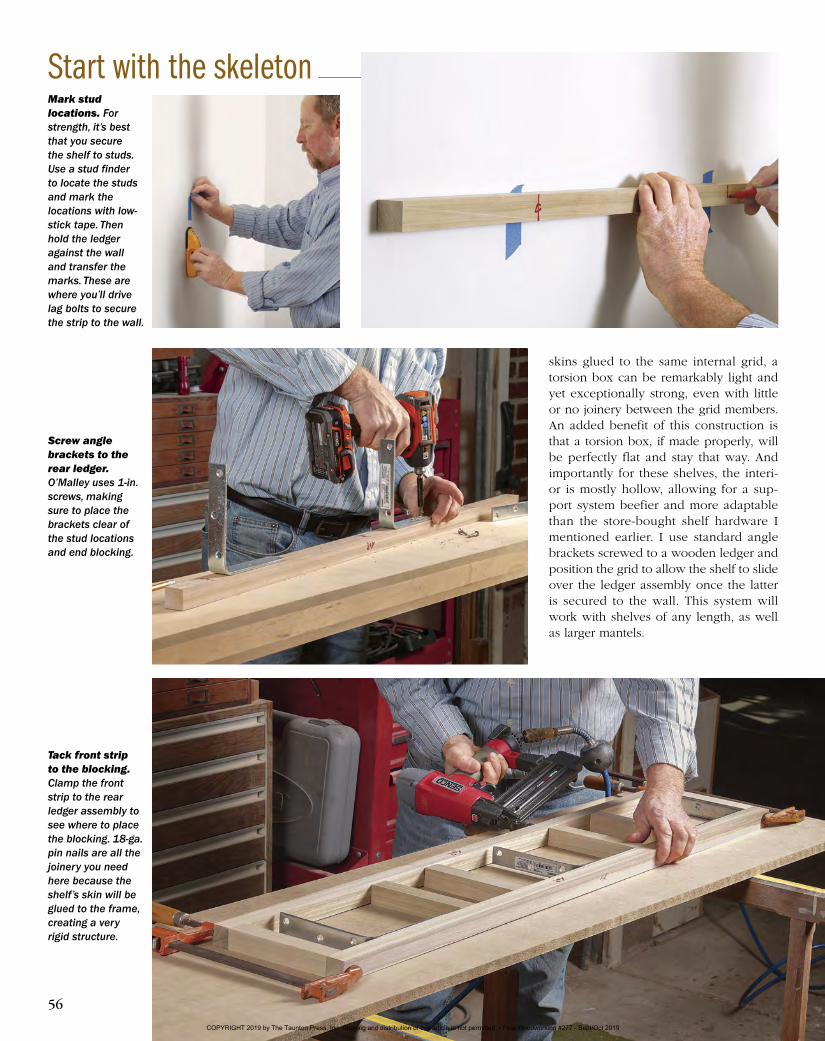
Tack front strip to the blocking. Clamp the front strip to the rear ledger assembly to see where to place the blocking. 18-ga. pin nails are all the joinery you need here because the shelf’s skin will be glued to the frame, creating a very rigid structure.
Mark stud locations. For strength, it’s best that you secure the shelf to studs. Use a stud finder to locate the studs and mark the locations with low-stick tape. Then hold the ledger against the wall and transfer the marks. These are where you’ll drive lag bolts to secure the strip to the wall.
Screw angle brackets to the rear ledger. O’Malley uses 1-in. screws, making sure to place the brackets clear of the stud locations and end blocking.
skins glued to the same internal grid, a torsion box can be remarkably light and yet exceptionally strong, even with little or no joinery between the grid members. An added benefit of this construction is that a torsion box, if made properly, will be perfectly flat and stay that way. And importantly for these shelves, the interi-or is mostly hollow, allowing for a sup-port system beefier and more adaptable than the store-bought shelf hardware I mentioned earlier. I use standard angle brackets screwed to a wooden ledger and position the grid to allow the shelf to slide over the ledger assembly once the latter is secured to the wall. This system will work with shelves of any length, as well as larger mantels.
Start with the skeleton
COPYRIGHT 2019 by The Taunton Press, Inc. Copying and distribution of this article is not permitted. • Fine Woodworking #277 - Sept/Oct 2019

S e p T e m b e r / O c T O b e r 2 0 1 9 57www.finewoodworking.com
Clamp using flat cauls. To distribute clamping pressure and ensure the shelf is flat, O’Malley uses a flat torsion box for the bottom caul and two pieces of 3⁄4-in. plywood for the top. Using cauls about the same width as the shelf makes it easier to get clamps along both sides of the assembly.
Wax ledger before inserting into shelf. O’Malley likes to have the ledger assembly in place when gluing the skins to the core, so he wipes on a layer of wax in case any glue creeps onto it.
I used poplar for the core, skinned it top and bottom with 1⁄4-in.-thick quartersawn oak plywood, and edged the assembly with solid oak, also quartersawn.
Torsion box makes for good bonesThe width of the metal brackets determines the thickness of the grid stock, so have the brackets on hand before you begin. mill the ledger, front strip, and blocking slightly beefier than the angle brackets. I used 6-in. angle brackets here. They are slightly over 1 in. wide, so I made this shelf’s poplar grid pieces 11⁄8 in. thick.
Attaching the ledger securely to the wall is critical. The ledger determines both how strong your shelf will be and how you’ll organize the inside of the torsion box, so lay out the attachment points for it early
Glue and tack plywood skins to the top and bottom. Make the skins overwide and long so you can flush them up later. Add glue to the blocking and front strip only. Attach the skins with 23-ga. pin nails at the corners to prevent them from moving as you handle the assembly and, later, when you clamp it up.
Add the skins
COPYRIGHT 2019 by The Taunton Press, Inc. Copying and distribution of this article is not permitted. • Fine Woodworking #277 - Sept/Oct 2019
F I N e W O O D W O r K I N G58
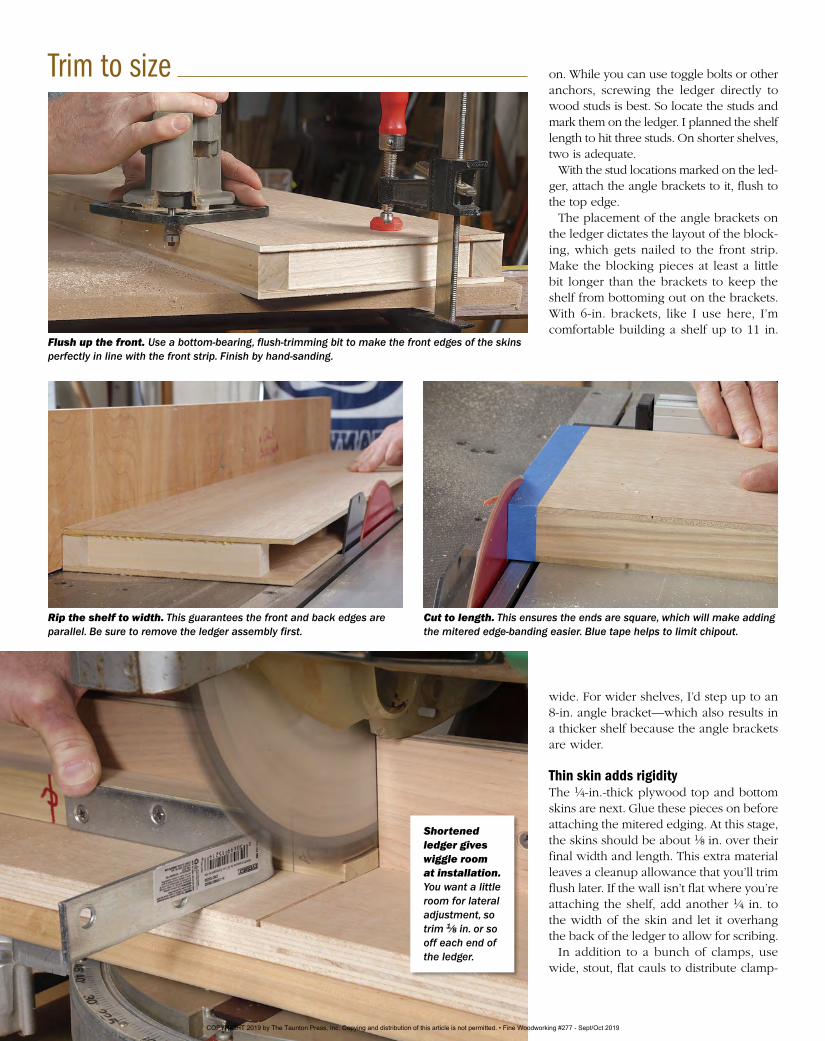
Flush up the front. Use a bottom-bearing, flush-trimming bit to make the front edges of the skins perfectly in line with the front strip. Finish by hand-sanding.
Rip the shelf to width. This guarantees the front and back edges are parallel. Be sure to remove the ledger assembly first.
Cut to length. This ensures the ends are square, which will make adding the mitered edge-banding easier. Blue tape helps to limit chipout.
on. While you can use toggle bolts or other anchors, screwing the ledger directly to wood studs is best. So locate the studs and mark them on the ledger. I planned the shelf length to hit three studs. On shorter shelves, two is adequate.
With the stud locations marked on the led-ger, attach the angle brackets to it, flush to the top edge.
The placement of the angle brackets on the ledger dictates the layout of the block-ing, which gets nailed to the front strip. make the blocking pieces at least a little bit longer than the brackets to keep the shelf from bottoming out on the brackets. With 6-in. brackets, like I use here, I’m comfortable building a shelf up to 11 in.
wide. For wider shelves, I’d step up to an 8-in. angle bracket—which also results in a thicker shelf because the angle brackets are wider.
Thin skin adds rigidityThe 1⁄4-in.-thick plywood top and bottom skins are next. Glue these pieces on before attaching the mitered edging. At this stage, the skins should be about 1⁄8 in. over their final width and length. This extra material leaves a cleanup allowance that you’ll trim flush later. If the wall isn’t flat where you’re attaching the shelf, add another 1⁄4 in. to the width of the skin and let it overhang the back of the ledger to allow for scribing.
In addition to a bunch of clamps, use wide, stout, flat cauls to distribute clamp-
Trim to size
Shortened ledger gives wiggle room at installation. You want a little room for lateral adjustment, so trim 1⁄8 in. or so off each end of the ledger.
COPYRIGHT 2019 by The Taunton Press, Inc. Copying and distribution of this article is not permitted. • Fine Woodworking #277 - Sept/Oct 2019
S e p T e m b e r / O c T O b e r 2 0 1 9 59www.finewoodworking.com
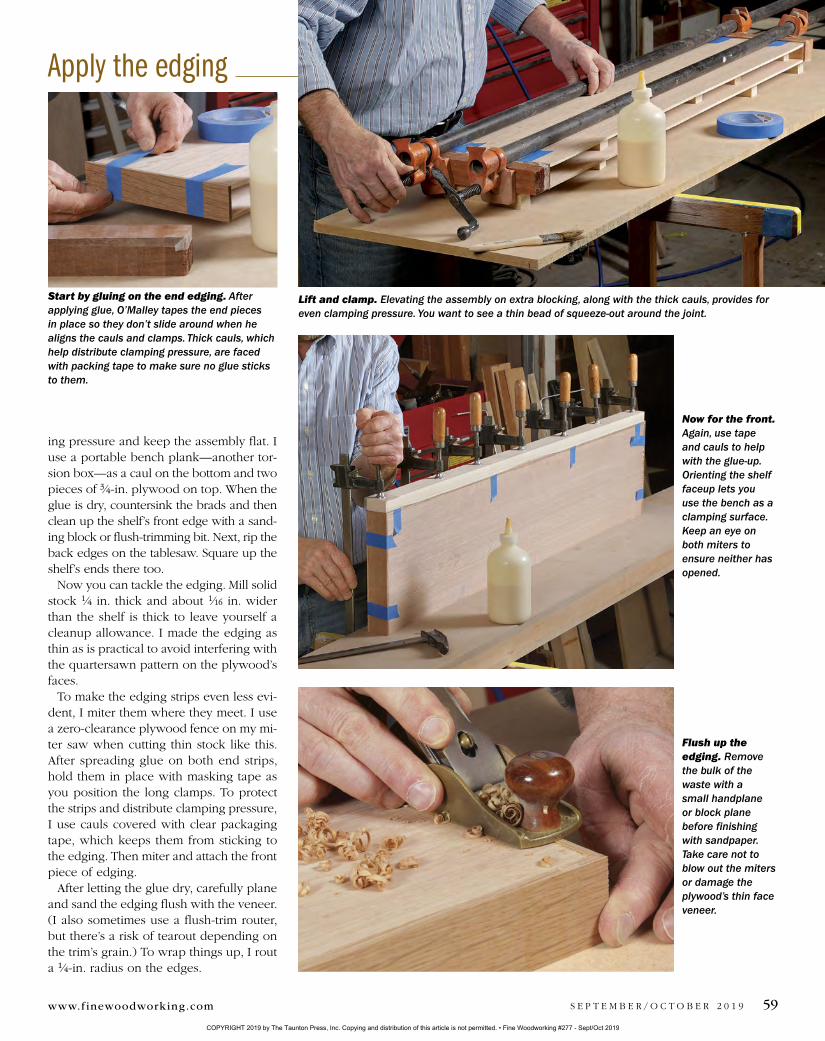
Flush up the edging. Remove the bulk of the waste with a small handplane or block plane before finishing with sandpaper. Take care not to blow out the miters or damage the plywood’s thin face veneer.
Now for the front. Again, use tape and cauls to help with the glue-up. Orienting the shelf faceup lets you use the bench as a clamping surface. Keep an eye on both miters to ensure neither has opened.
Lift and clamp. Elevating the assembly on extra blocking, along with the thick cauls, provides for even clamping pressure. You want to see a thin bead of squeeze-out around the joint.
Start by gluing on the end edging. After applying glue, O’Malley tapes the end pieces in place so they don’t slide around when he aligns the cauls and clamps. Thick cauls, which help distribute clamping pressure, are faced with packing tape to make sure no glue sticks to them.
ing pressure and keep the assembly flat. I use a portable bench plank—another tor-sion box—as a caul on the bottom and two pieces of 3⁄4-in. plywood on top. When the glue is dry, countersink the brads and then clean up the shelf’s front edge with a sand-ing block or flush-trimming bit. Next, rip the back edges on the tablesaw. Square up the shelf’s ends there too.
Now you can tackle the edging. mill solid stock 1⁄4 in. thick and about 1⁄16 in. wider than the shelf is thick to leave yourself a cleanup allowance. I made the edging as thin as is practical to avoid interfering with the quartersawn pattern on the plywood’s faces.
To make the edging strips even less evi-dent, I miter them where they meet. I use a zero-clearance plywood fence on my mi-ter saw when cutting thin stock like this. After spreading glue on both end strips, hold them in place with masking tape as you position the long clamps. To protect the strips and distribute clamping pressure, I use cauls covered with clear packaging tape, which keeps them from sticking to the edging. Then miter and attach the front piece of edging.
After letting the glue dry, carefully plane and sand the edging flush with the veneer. (I also sometimes use a flush-trim router, but there’s a risk of tearout depending on the trim’s grain.) To wrap things up, I rout a 1⁄4-in. radius on the edges.
Apply the edging
COPYRIGHT 2019 by The Taunton Press, Inc. Copying and distribution of this article is not permitted. • Fine Woodworking #277 - Sept/Oct 2019
F I N e W O O D W O r K I N G60
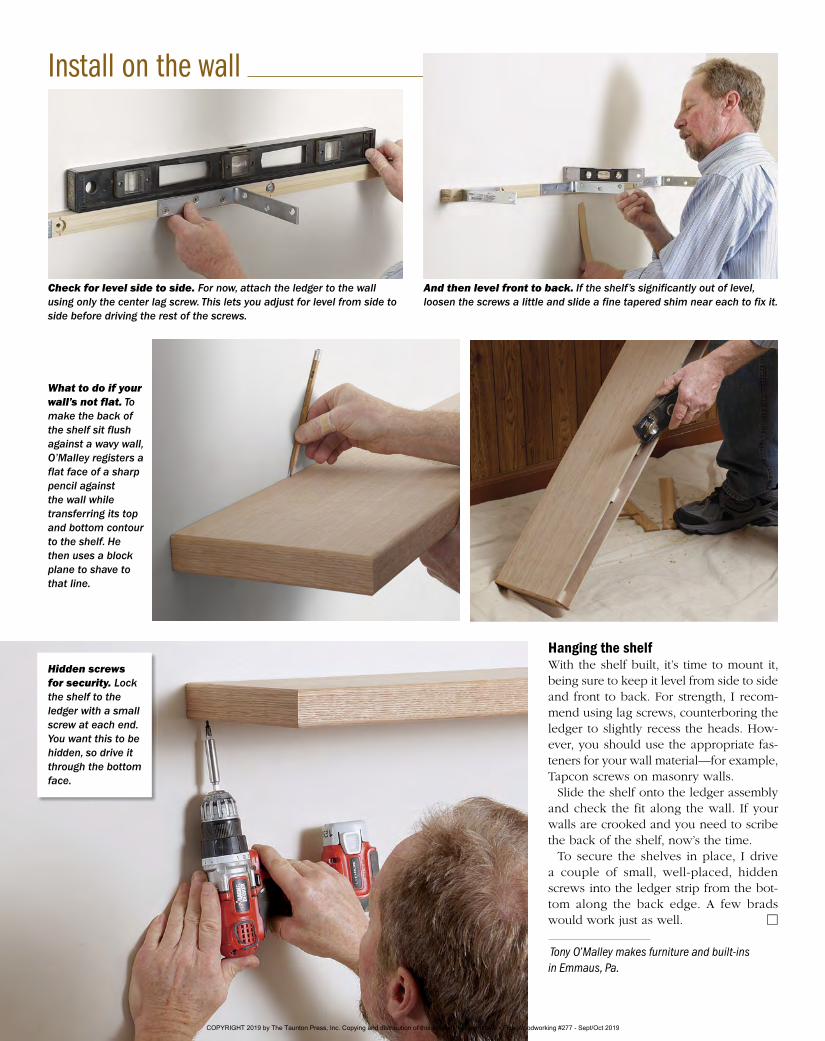
What to do if your wall’s not flat. To make the back of the shelf sit flush against a wavy wall, O’Malley registers a flat face of a sharp pencil against the wall while transferring its top and bottom contour to the shelf. He then uses a block plane to shave to that line.
Check for level side to side. For now, attach the ledger to the wall using only the center lag screw. This lets you adjust for level from side to side before driving the rest of the screws.
And then level front to back. If the shelf’s significantly out of level, loosen the screws a little and slide a fine tapered shim near each to fix it.
Hanging the shelfWith the shelf built, it’s time to mount it, being sure to keep it level from side to side and front to back. For strength, I recom-mend using lag screws, counterboring the ledger to slightly recess the heads. How-ever, you should use the appropriate fas-teners for your wall material—for example, Tapcon screws on masonry walls.
Slide the shelf onto the ledger assembly and check the fit along the wall. If your walls are crooked and you need to scribe the back of the shelf, now’s the time.
To secure the shelves in place, I drive a couple of small, well-placed, hidden screws into the ledger strip from the bot-tom along the back edge. A few brads would work just as well. □
Tony O’Malley makes furniture and built-ins in Emmaus, Pa.
Install on the wall
Hidden screws for security. Lock the shelf to the ledger with a small screw at each end. You want this to be hidden, so drive it through the bottom face.
COPYRIGHT 2019 by The Taunton Press, Inc. Copying and distribution of this article is not permitted. • Fine Woodworking #277 - Sept/Oct 2019