
ClassI_16Strand_EyeSplice
3
2090 Thornton Street Ferndale, WA USA 98248 (T) 360.384.4669 (F) 360.384.0572 www.samsonrope.com Page 1 of 3 22" eye splice 16-strand Class I Class I 16-strand ropes are made from any or all of the following bers: olen, polyester, or nylon. The eye splice is used to place a permanent loop in the end of a rope, generally for attachment purposes to a xed point. An eye is also used to form the rope around a thimble, which i s used to protect the rope, especially when it is to be attached to a shackle, chain or wire rope. 1 s t e p measurements 2 step marking cover taper 1 A Measure 28-inches from end of rope and make Mark A. 1c Measure 22-inches down from Mark B and make Mark C. 1E Tie a knot in body of the rope about 11-inches down from Mark D. 1D Measure 11-inches down from Mark C and make Mark D. 1b Form desired size of eye and make Mark B opposite Mark A. 2 A From Mark A count 5 strand pairs toward the end of rope and mark the 5th pair (left and right strands). 2b Continue counting down 5 pairs and marking the 5th pair until a total of 5 strand pairs are marked. 28" 11" A C D B 1 2 3 4 5 A TIP: For this rope awire fd is easier to use than a tubular fd. step 3 Carefully open up the braid at Mark C and pull out the core yarns from the end of the rope back to Mark C. core removal 4 tapering end of rope 4 A Pull out marked strand pairs from braid. Do not cut. 4b Tape end of cover tail and attach d to tapered end of rope. s t e p A B C D C D Additional rope needed for splice: 28: plus length of eye.
-
Upload
repairmanjim -
Category
Documents
-
view
221 -
download
0
Transcript of ClassI_16Strand_EyeSplice
8/3/2019 ClassI_16Strand_EyeSplice
http://slidepdf.com/reader/full/classi16strandeyesplice 1/3
2090 Thornton Street
Ferndale, WA USA 98248
(T) 360.384.4669
(F) 360.384.0572
www.samsonrope.com
Page 1 of 3
22"
e y e s p l i c e 1 6 - s t r a n d C l a s s I
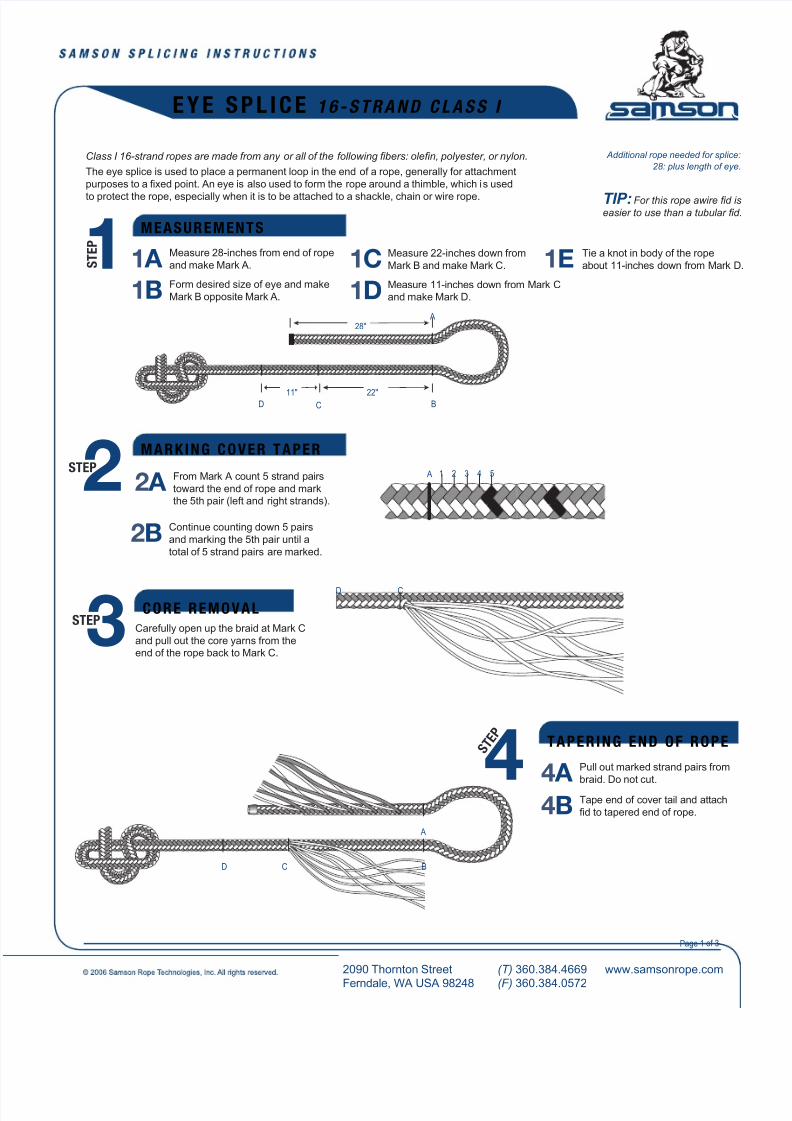
Class I 16-strand ropes are made from any or all of the following bers: olen, polyester, or nylon.
The eye splice is used to place a permanent loop in the end of a rope, generally for attachment
purposes to a xed point. An eye is also used to form the rope around a thimble, which is used
to protect the rope, especially when it is to be attached to a shackle, chain or wire rope.
1 s t e p
measurements
2stepmarking cover taper
1 A Measure 28-inches from end of rope
and make Mark A. 1cMeasure 22-inches down from
Mark B and make Mark C. 1ETie a knot in body of the rope
about 11-inches down from Mark D
1DMeasure 11-inches down from Mark C
and make Mark D.1bForm desired size of eye and make
Mark B opposite Mark A.
2 A From Mark A count 5 strand pairs
toward the end of rope and mark
the 5th pair (left and right strands).
2bContinue counting down 5 pairs
and marking the 5th pair until a
total of 5 strand pairs are marked.
28"
11"
A
CD B
1 2 3 4 5A
TIP:For this rope awire fd iseasier to use than a tubular fd.
step3 Carefully open up the braid at Mark C
and pull out the core yarns from the
end of the rope back to Mark C.
core removal
4tapering end of rope
4 A Pull out marked strand pairs from
braid. Do not cut.
4bTape end of cover tail and attach
d to tapered end of rope.
s t e
p
A
BCD
CD
Additional rope needed for splice:
28: plus length of eye.

8/3/2019 ClassI_16Strand_EyeSplice
http://slidepdf.com/reader/full/classi16strandeyesplice 2/3
2090 Thornton Street
Ferndale, WA USA 98248
(T) 360.384.4669
(F) 360.384.0572
www.samsonrope.com
Page 2 of 3
e y e s p l i c e 1 6 - s t r a n d C l a s s I
55 A
Insert d into rope at Mark B andout at Mark D.
performing spl ice
5bPull tail through body of rope from
B to D.
s t e p
5DContinue to pull the tail end of the rope
through until Mark A and Mark B coincide.
5cAs each marked strand pair is about to be
buried in the rope at Mark B, carefully cut each
strand in the marked pair.
BCD
A
BCD
6 s t e p
marking tails
6 A Smooth rope from eye back to Mark
D to remove all slack in the braid.
6bSmooth rope from knot to Mark C to
bury as much of the core yarns as
possible.
6cMark both cover tail and core yarns where
they exit from the body of the rope.
CD B

8/3/2019 ClassI_16Strand_EyeSplice
http://slidepdf.com/reader/full/classi16strandeyesplice 3/3
2090 Thornton Street
Ferndale, WA USA 98248
(T) 360.384.4669
(F) 360.384.0572
www.samsonrope.com
Page 3 of 3
77 A
Pull buried tail and cover yarns out
of rope at their respective exit points
until about 13-inches are exposed.
This is the distance that the tail and
core yarns overlap in the splice.
f inal taper
7bCut both cover tail and core yarns
where they were marked in step
6C above.
7DBury the exposed ends by alternately
smoothing the rope from the eye down and
from the knot up.
7cTaper both cover tail and core yarns from
the ends back about 6.5-inches. This taper
provides a smooth transition from the buried
tail of the splice to the core yarns extending
down the remainder of the rope.
step
e y e s p l i c e 1 6 - s t r a n d C l a s s I
CD B
13"13"
A
8 s t e p
8 A Secure knot rmly in place and pull sharply on eye to make sure
all slack is removed from splice area and cover and core tails areseated properly.
f in ishing the spl ice
8bApply whipping to base of eye for a distance of about 1-inch
or 2 rope diameters.


