Classenti CDP1 Owner's Manual
22
1 Classenti CDP1 Classenti CDP1 Owner's Manual
Transcript of Classenti CDP1 Owner's Manual
1
ClassentiCDP1
Classenti CDP1 Owner's Manual

2
WELCOME!
Thank you for purchasing a Classenti digital piano. Classenti digital pianos are high-performance instruments that are easy to
operate. The Classenti pianos are perfect for the professional musician and beginner alike. In order to learn the functions of
your digital piano, please read this manual carefully.
●Caution:
Warning: do not place your piano near water or moisture.
Warning: electronic components are dangerous - do not open the cover of your piano by yourself. Only trained repair
technicians should attempt to maintain the piano.
Attention: to avoid electric shock, make sure the plug is firmly connected to the wall outlet.
.
● Important safety information:
Before using, please read carefully:
1. Use AC220V power only. (AC110V in US, Canada and etc)
2. Do not touch the power supply with wet or damp hands.
3. Avoid excessive pressure or bending of the power cord.
4. Un-plug your instrument during lightning storms.
5. Turn off the power when not in use.
6. Avoid water or liquids being spilled into the keyboard or piano body.
7. Do not put containers with liquid on the piano - such as flower vase, wine glass, etc...
8. If liquid spills into the keyboard or piano body, please turn off the power at once and contact your re-seller or service
support consultant.
9. Do not attempt to modify the piano components.
10. Avoid dust getting into the keyboard.
11. Keep the piano away from TV, radio and other objects with strong electromagnetism.
12. Keep the piano on a flat and level surface.
13. Please clean the piano with a dry and soft cloth.
14. Operate the piano according to your user manual - any non-standard operation could cause damage to your piano.
15. Your piano should be in an area that is well ventilated – away from any heating appliance.
3
INDEX
(2)Assembly instructions
(3)Main features
(4)Functions diagrams
(5)Name and function of the components
(6)Play (basic play)
(7)Use of headphone
(8) Pedal functions
(9) Play the demonstration songs
(10) Practice songs
(11) Layer function
(12) Metronome function
(13) Changing the touch sensitivity
(14) Record function
(15) Transpose
(16) Setting the turning curve
(17) Adjust the master tuning
(18)MIDI
(19) Chart of practice and demonstration songs
(20) Modulator
(21) Technical specification
3
4
7
7
8
10
10
10
11
11
15
15
16
17
18
18
19
20
21
23
23
..................................................................
.........................................................................................................................
..............................................................................................
........................................................
.....................................................................
........................................................
.........................................................
................................................................
(1) Overview

4
(1) OVERVIEW

5
(2) ASSEMBLY INSTRUCTIONS
♦ Please check you have all parts and screws before assembling your piano.

6
(4)Side board(right)
(3)Music stand(2)Music board
(1)Upper body
(5)Side board(left)(6)Pedal board
(7)leg
(8)
Screw
Sc rew Ca p
(3) MAIN FEATURESl PCM sound source
l Built-in Demos
8 demonstration sounds and 32 practice sounds built in.
l Ability to mix sounds
(play 2 sounds simultaneously)
l Built-in metronome
Assignable Beat and speed settings
l Transposition
Transpose to any key
l Play/record your compositions
Sound can be recorded and played-back
l Touch sensitive – responds to your performance (loud and soft)
l Reverb
l MIDI interface
Connect your piano to other MIDI devices
7
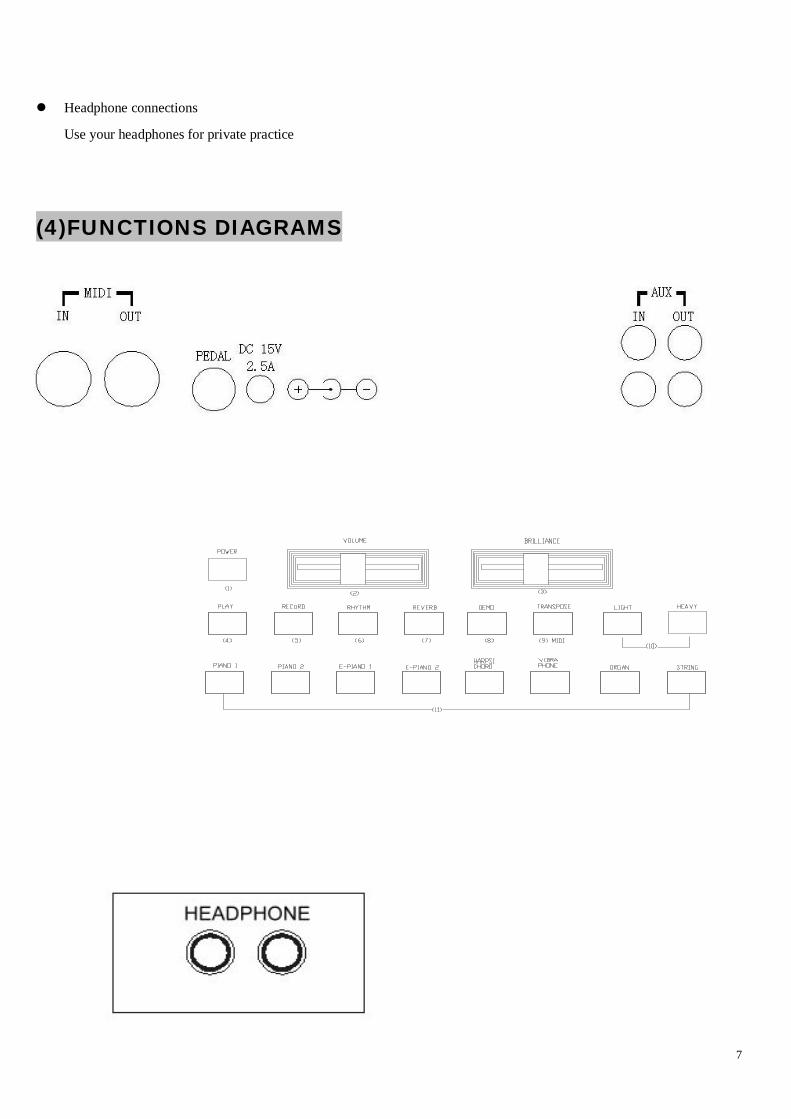
l Headphone connections
Use your headphones for private practice
(4)FUNCTIONS DIAGRAMS

8
(5) NAME AND FUNCTION OF COMPONENTS
1. Power Switch
On/off
2. Master volume
Adjust the overall volume.
3. Speed/balance
Depending on the function: volume balance for sound-layer; change the speed of Metronome or song; adjust the volume of
the metronome
4. Playback button
Playback the sound recorded
5. Record button
Record the sound played
6. Metronome button
Use to practice your tempo/rhythm.
7. Reverb button
Change the effects on a sound. E.g. useful for the church organ sound.
8. Demo Button
Used for demonstration songs and practice songs
9. Transpose/MIDI
Used for tone modification, tunings and MIDI settings.
10. Touch Sensitivity Setting
Used to change touch sensitivity of keyboard (3). Produces the feel of a “softer” or “heavier” key action
11. Headphone jack
A. Loudspeakers are disconnected while the headphone is connected so you hear the sound in the headphone only.
B. Note: Loud volumes for an extended period of time can damage your ears.
12. Transpose feature
To set the transpose and swing keynote.
13. Pedal connection
14. MIDI connections
Please refer to section for MIDI functions
15. AUX input
Connect other instruments into your piano and utilize the internal speakers.
16. AUX output
9
Connect to an external speaker or amplifier. The Master volume will control the level being sent to the AUX output.
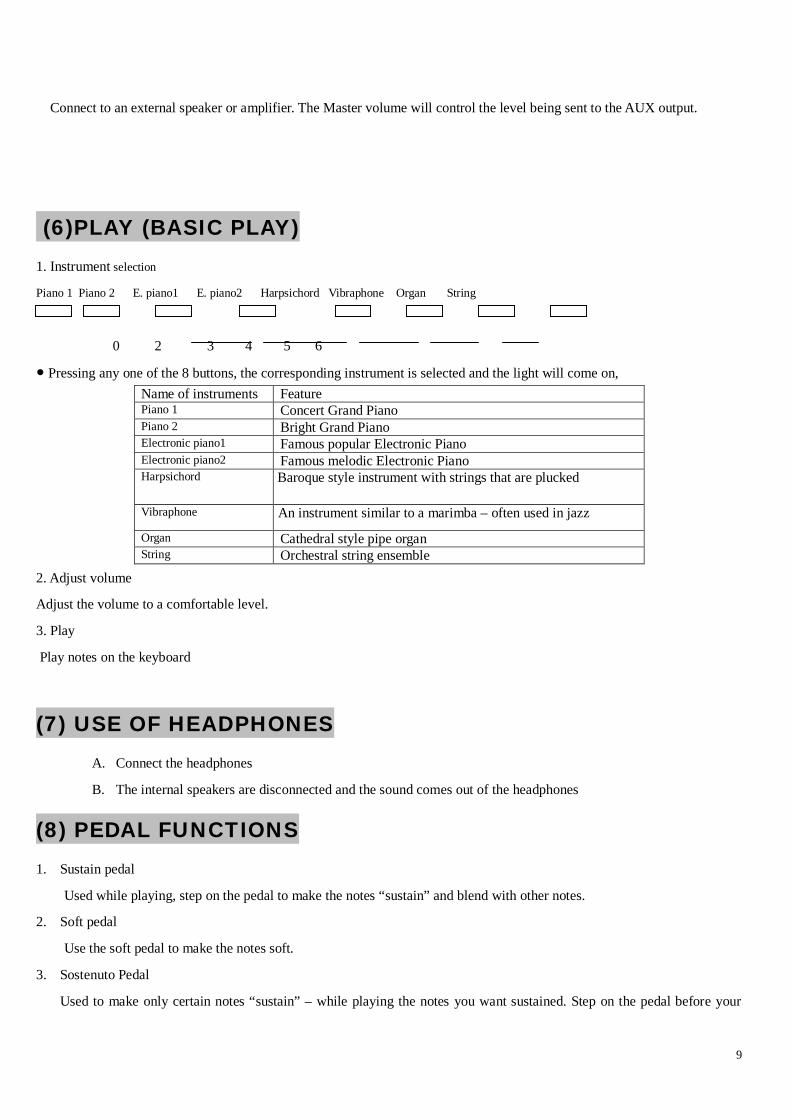
(6)PLAY (BASIC PLAY)1. Instrument selection
Piano 1 Piano 2 E. piano1 E. piano2 Harpsichord Vibraphone Organ String
0 2 3 4 5 6
● Pressing any one of the 8 buttons, the corresponding instrument is selected and the light will come on,Name of instruments FeaturePiano 1 Concert Grand PianoPiano 2 Bright Grand PianoElectronic piano1 Famous popular Electronic PianoElectronic piano2 Famous melodic Electronic PianoHarpsichord A Baroque style instrument with strings that are plucked
Vibraphone An instrument similar to a marimba – often used in jazz
Organ Cathedral style pipe organString Orchestral string ensemble
2. Adjust volume
Adjust the volume to a comfortable level.
3. Play
Play notes on the keyboard
(7) USE OF HEADPHONESA. Connect the headphones
B. The internal speakers are disconnected and the sound comes out of the headphones
(8) PEDAL FUNCTIONS1. Sustain pedal
Used while playing, step on the pedal to make the notes “sustain” and blend with other notes.
2. Soft pedal
Use the soft pedal to make the notes soft.
3. Sostenuto Pedal
Used to make only certain notes “sustain” – while playing the notes you want sustained. Step on the pedal before your

10
fingers release from the key to make the notes sustain.
(9) PLAY THE DEMONSTRATION SONGS Demo Piano 1 Piano 2 E-piano1 E-piano 2 Harpsichord Vibraphone Organ Strings
0 2 3 4 5 6
1. Start the play demonstration
Press the demo button -the demonstration light comes on, all the instrument lights will flash.
2. Select the song
Press the instrument button ---- the light will flash, the other instrument lights will turn off, the corresponding timbre is stored
and played
If you don’t select any songs, about 2 seconds later, piano 1 is played automatically.
3. To Change the song
Press the button of an instrument ---the light will flash, the timbre is stored and played.
4. Stop the play of demonstration songs
Press the demo button - --the light will turn off and the demonstration will stop.
● After playing the song that is stored , next stored song is played automatically.
● Play demonstration is used to introduce the instrument only - some songs are not played completely.
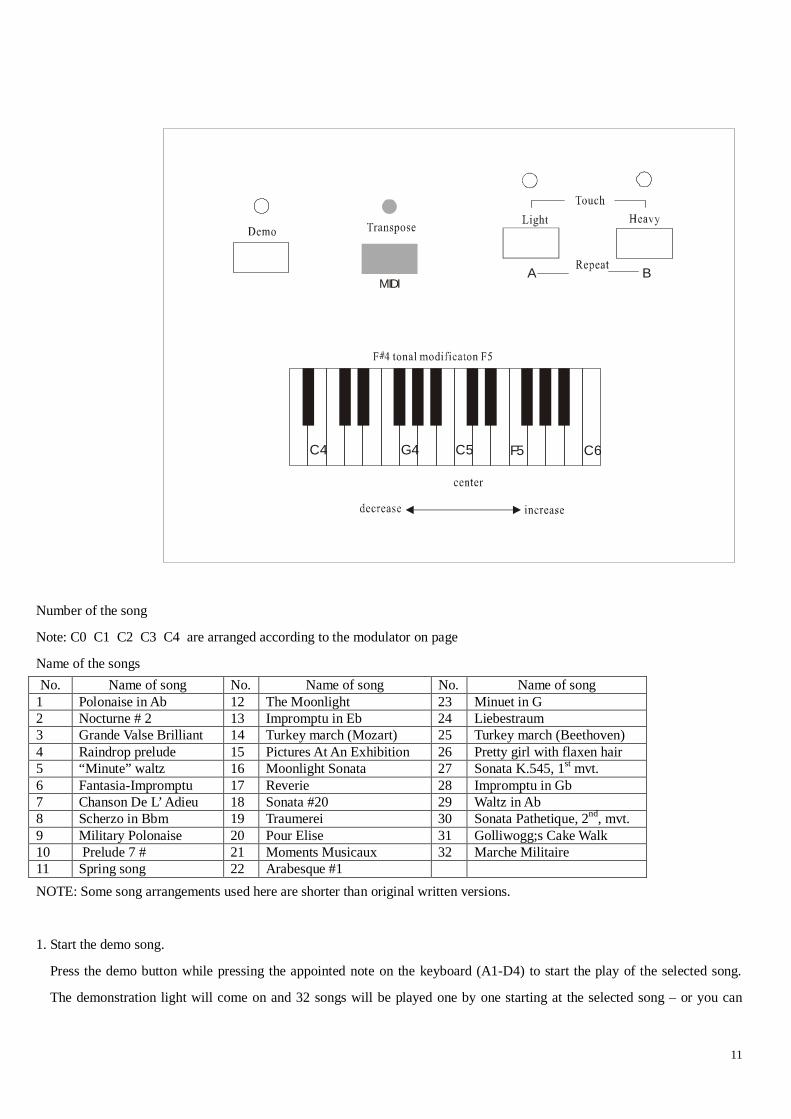
(10) PRACTICE SONGS32 songs are stored in the piano. Press the demo button while pressing the appointed key in the following picture to start the
song demonstration.
11
MIDIA B
C4 G4 C5 F5 C6
Number of the song
Note: C0 C1 C2 C3 C4 are arranged according to the modulator on page
Name of the songsNo. Name of song No. Name of song No. Name of song
1 Polonaise in Ab 12 The Moonlight 23 Minuet in G2 Nocturne # 2 13 Impromptu in Eb 24 Liebestraum3 Grande Valse Brilliant 14 Turkey march (Mozart) 25 Turkey march (Beethoven)4 Raindrop prelude 15 Pictures At An Exhibition 26 Pretty girl with flaxen hair5 “Minute” waltz 16 Moonlight Sonata 27 Sonata K.545, 1st mvt.6 Fantasia-Impromptu 17 Reverie 28 Impromptu in Gb7 Chanson De L’ Adieu 18 Sonata #20 29 Waltz in Ab8 Scherzo in Bbm 19 Traumerei 30 Sonata Pathetique, 2nd, mvt.9 Military Polonaise 20 Pour Elise 31 Golliwogg;s Cake Walk10 Prelude 7 # 21 Moments Musicaux 32 Marche Militaire11 Spring song 22 Arabesque #1NOTE: Some song arrangements used here are shorter than original written versions.
1. Start the demo song.
Press the demo button while pressing the appointed note on the keyboard (A1-D4) to start the play of the selected song.
The demonstration light will come on and 32 songs will be played one by one starting at the selected song – or you can

12
select other songs during playback.
----The indictor displays the song number while pressing the button.
The piano continues to play the 32 songs in a ‘loop’.
In addition, songs can be reselected during the play.
● you can change the speed during playback.
● you can change the rhythm during playback.
● you can change the timbre during playback.
● In the case of using two sounds (layer), the timbre button that is pressed first is the right track , the 2nd button is the left
track..
2. Stop the play of demo songs
Press the demo button again-the light turns off, playback stops.
Listen to the melody and the accompaniment
Press the demo button and select the song, the record light and play light will turn on at the same time.
A. Press the play button, the record light turns off and the play light turns on. You can listen to the melody and play the
accompaniment.
B. Press the record button, the play light turns on and the record light turns off. You can listen to the accompaniment
and play the melody.
C. Come back to the performance of the practice songs with both hands.
Press the record button and the play button at the same time, the corresponding lights turn on, you can play in the
bass and treble with the practice song.

13
A B
3£©
4. Listen to some part of the song again and again.
You can select one part of the song to listen and practice again and again, the way is to first name A point (start point) and
B point (return point).
A. Listen to your chosen song,
Begin to play the practice song, press A button during the play and the A light turns on.
B. Set A point (start point)
While A light is on, press the A button and set A point (start point), and the set of B point (turning point) is in waiting
state. A light is on, B light flashes. Now press the A button again, and the play begin from the A point.
C. Play the song again and again from A point to B point
Press B button and set B point (turning point) while A light is on and B light is blinking. Play will start from A point to B
point again and again. The A light and B light are both on.
D. Stop the play in the A-B part
While playing from A to B, press the B button to change the piano to play one song again and again B light turns off.
E. Play the 32 songs again and again.
When one song is being played again and again, press the B button to change the piano to play all the songs again and
again. A light turns off.
● While B point (turning point) is in waiting state (A light is on, B light is twinkling), if the last song is finished, the piano
plays the song from A point to the point where the song is finished again and again. A light and B light are both on.
● A and B points can only be set during the performance.
● The piano can not record while playing the song again and again.

14
(11) LAYER FUNCTIONThe piano can combine two sounds at the same time.
Piano1 Piano2 E. piano1 E. piano2 Harpsichord Vibraphone Organ Strings
1. Select two sounds
Press two sound buttons at the same time, two corresponding lights turn on.
2. Adjust volume balance of the two sounds.
A. Hold down the two sounds button, and two lights flash.
B. Move the speed/balance adjuster to change the balance of the volume.
Move rightwards to increase the volume of the right sound
Move leftwards to increase the volume of the left sound
3. Stop the setting of layer balance.
Press any sound button which flashes, two sounds buttons turn on from flashing. The sound combination will be stored in the
piano.
(12) METRONOME FUNCTION
20 120 250
0 2 3 4 5 6
▲
▲
▲
▲
1. Use the metronome. Press the metronome button—the light turns on.
2. Change the tempo
A. Press the metronome button and the corresponding sound button together
B. Select the tempo - there are 5 kinds of tempo. 0 beat tempo, 2 beat tempo,3 beat tempo,4 beat tempo,5 beat tempo
and 6 beat tempo.
C. When the power is turned on, the tempo is 4 beat tempo

15
3. Change the speed.
Move the speed/balance adjuster - the speed slows down when it moves left and speeds up when it moves right.
4. Change the volume
Hold down the metronome button, and the light begins to flash, move the speed/balance adjuster to change the volume.
● When power is on, the initial volume is set by the factory
● Before moving the adjuster, the volume is the last volume set.
Press the metronome button------the light turns off, the function stops
5. Stop setting the volume
Press the metronome button, the light turns on from flashing. The speed/balance adjuster is in the state of adjusting the
speed.
6. Stop the metronome function
Press the metronome button again and the light turns off.
7. In order to set the exact speed, you should go directly to input setting.
A. Hold down the metronome button and press the B5 (starting) button, the light flashes quickly.
B. Input the number
Input the speed number with the key from C6-A6
For example: press 1-C#6,3-D#6,4-E6 one by one, then it means the speed is 134
C. Stop the setting
Press the input key (B6), the setting stops, the light turns on, and the metronome works according to the speed set.
(13) CHANGING THE TOUCH SENSITIVITY3 different touch sensitivity settings
Standard: Normal weight key action.
Light: Lighter touch – less effort to produce louder sounds.
Heavy: Heavier touch – more effort to produce louder sounds. Useful for practicing and developing finger strength and
agility.
To change the touch sensitivity.
A. Light Touch. Press the Light key -------the light turns on.
B. Heavy Touch. Press the Heavy key ----- the light turns on.
C. Standard Touch. Press the button of which the light is on – the light turns off.
Relation between light and heavy key touch

16
WeightStatus Light Heavy
Standard Off OffLight On OffHeavy Off On
● Touch sensitivity adjusts the response of the key action, the mechanics of the keyboard is not changed.
(14) RECORD FUNCTION1. Record.
A. Get ready to record. Press the record button and the light twinkles.
B. Begin to record
a. Start the recording (no time record)
the recording starts when you play (press the keyboard、step on the pedal, etc.).
b. Start the recording (with time record)
Press the metronome button, and the recording starts after the time engaged, the light turns on.
c. Stop the recording
Press the record button again. The record light turns off .
● Memory capacity --about 5000 events.
Content of recording includes pedal operation, change of timbre and pauses, etc…
● Memory warning
The record light starts to twinkle when the memory becomes full.
The record light is turned off and the record stops when the recording amount exceeds 5000 events.
● Stop the recording
Press the record button again and the light is turned off.
● Use the metronome
Before the recording, operate the metronome, and it will be recorded.
● Change the Measure
Measure can not be changed during the recording.
● Change the speed
Speed can not be changed during the recording.
2. Playback
A. Start the playback
Press the play button and the recorded song begins to play, the light is turned on
B. Stop the playback
After the song is finished, the playback stops and the light turns off.

17
C. Stop the playback in the middle of a song
(15) TRANSPOSEl. Transpose
Hold down the transpose button and press the F#4--F5 key, the light turns on after the transpose.
2. Back to “C” or standard key
Press the transpose button, the light turns off and the instrument returns to its original key.
(16) SETTING THE TUNING CURVEWith electronic pianos and synthesizers, you can modify the master tuning curve.
1. Set the tuning to 12 average tune.
Hold down the transpose button and press the organ button
2. Back to the tuning of piano
Hold down the transpose button and press the organ button
l While you press the button, the organ light indicates the content set
l The relation between the light and the tuningLight (on) Tuning of pianoLight (off) 12 average tuning● When the power is on ,it is the tuning of piano
(17) ADJUST THE MASTER TUNING

18
Adjust tone with other instruments.
You can modify the master tuning while pressing the key and you can also modify by inputting the center A frequency.
1. Change the sound while listening
A. Get ready
Hold down the transpose button, then press the demo button, the transpose and demo lights flash. The heavy touch button and
the light touch button turn on.
B. Modify the tuning
Press the soft key while increasing the semitones
Press the strong key while decreasing the semitones
Modify the tone while pressing the key
C. Come back
Press the heavy and light touch buttons at the same time, the heavy and light touch buttons turn on.
D. Exit from adjusting the master tuning
Press the transpose button and the light turns off.
2. Input the number to change the tone.
A. Get ready to input the number
Hold down the transpose and demo buttons, and press the initial key(B5), the transpose and demo lights flash quickly.
B. Input the number
Input the frequency number value (A3 in the center)
For example: to input 442HZ, press the following key:
4-E6
4-E6
2-D6
C. Stop the setting
Press the input key (B6), the transpose light turns off (this light is on while the transpose is going), the demo light turns
off.
D. Exit
Press the transpose button, the transpose light turns off (this light is on while the transpose is going), the demo light turns
off. The frequency of A3 is 440HZ.
l The input number should be 427—453, other numbers are invalid.
l The frequency of A3 is 440HZ when the power is on
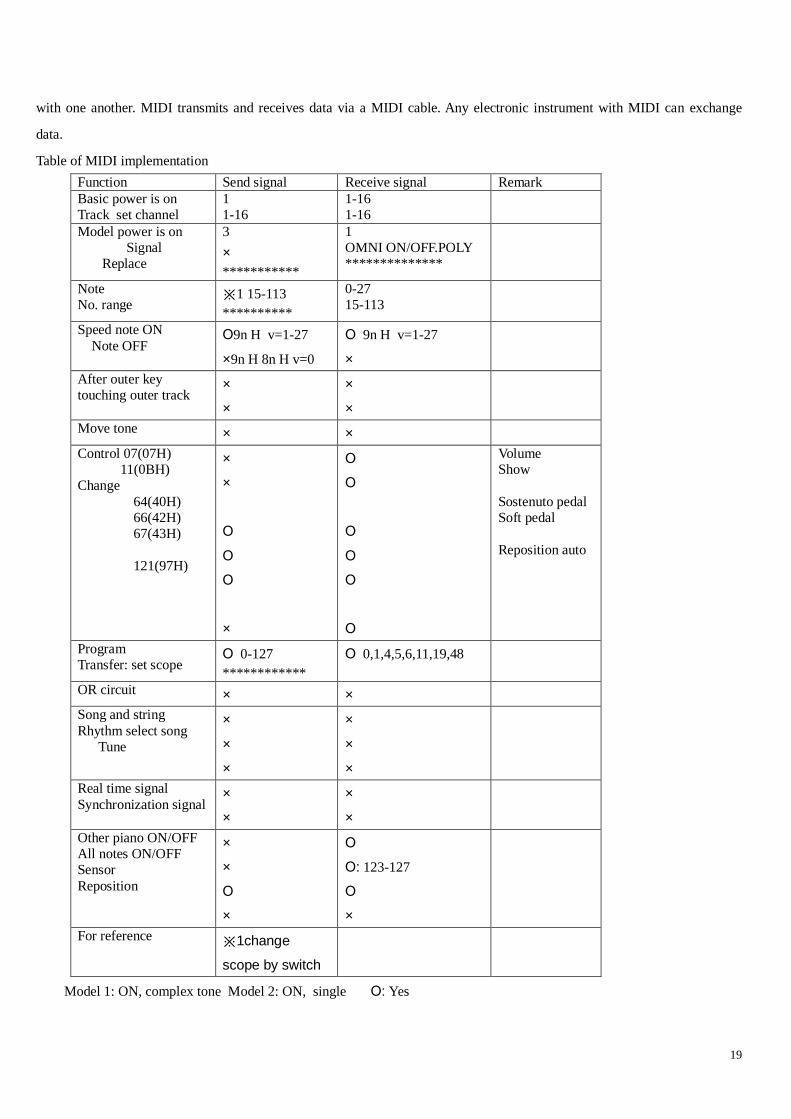
(18) MIDIMIDI (musical instrument digital interface) is an international standard that allows different musical products to communicate
19
with one another. MIDI transmits and receives data via a MIDI cable. Any electronic instrument with MIDI can exchange
data.
Table of MIDI implementationFunction Send signal Receive signal RemarkBasic power is onTrack set channel
11-16
1-161-16
Model power is onSignal
Replace
3×***********
1OMNI ON/OFF.POLY**************
NoteNo. range
※1 15-113**********
0-2715-113
Speed note ON Note OFF
О9n H v=1-27
×9n H 8n H v=0
О 9n H v=1-27
×After outer keytouching outer track
××
××
Move tone × ×Control 07(07H)
11(0BH)Change
64(40H)66(42H)67(43H)
121(97H)
××
ООО
×
ОО
ООО
О
VolumeShow
Sostenuto pedalSoft pedal
Reposition auto
ProgramTransfer: set scope
О 0-127************
О 0,1,4,5,6,11,19,48
OR circuit × ×Song and stringRhythm select song Tune
×××
×××
Real time signalSynchronization signal
××
××
Other piano ON/OFFAll notes ON/OFFSensorReposition
××О×
ОО: 123-127
О×
For reference ※1changescope by switch
Model 1: ON, complex tone Model 2: ON, single О: Yes

20
Model 3: OFF, complex tone Model 4: OFF, single ×: No
(19) CHART OF PRACTICE & DEMONSTRATION SONGSNO. KEY NAME COMPOSER SOUND TIME1 A0 Polonaise in Ab Major, op. 53 Chopin Piano 1 3:402 B0 Nocturne op. 9, no. 2 Chopin Piano 1 4:403 C1 Grande Valse Brilliant op. 18, no. 2 Chopin Piano 1 3:104 D1 Raindrop-Prelude op.28, no. 15 Chopin Piano 1 4:375 E1 Valse op. 4, no. 1 “Petit Chien” (“Minute
Waltz”)
Chopin Piano 1 1:44
6 F1 Fantasie-Impromptu in C#m, Op 66 Chopin Piano 1 3:457 G1 Etude op. 10, no 3 “Chanson De L’Adieu” Chopin Piano 1 4:14
8 A1 Scherzo in Bbm , op. 31, no. 2 Chopin Piano 1 5:159 B1 Military Polonaise op. 40, no. 1 Chopin Piano 1 5:16
10 C2 Prelude op.28, no. 7 Chopin Piano 1 0:0511 D2 Frühlingslied (Spring song) Op.62 #6 Mendelssohn Piano 1 3:14
12 E2 Clair De Lune Debussy Piano 1 4:1113 F2 Impromptu E-flat Major, Op. 90, no.2, D.
899Schubert Piano 1 4:18
14 G2 Sonata K.331, 3rd Mvmt. (TurkishRondo)
Mozart Piano 1 3:32
15 A2 Pictures at an Exhibition – Promenade Mussorgsky Piano 1 5:20
16 B2 Sonata op. 27, no. 2 “Moonlight”, 1st
mvmt.
Beethoven Piano 1 6:10
17 C3 Reverie Debussy Piano 1 1:3218 D3 Piano Sonata No. 20 in G major, Opus
49 no 2Beethoven Piano 1 4:37
19 E3 Traumerei Schumann Piano 1 2:3520 F3 Fur Elise Beethoven Piano 1 2:5521 G3 Moments Musicaux, Op. 94, #3 in Fm Schubert Piano 1 1:5522 A3 Arabesque No. 1 (from middle section
onward)Debussy Piano 1 1:45
23 B3 Minuet in G Beethoven Piano 1 2:0624 C4 Liebestraume No.3 in A flat, S541 Liszt Piano 1 3:3725 D4 Turkish March (Ruins Of Athens Op.113
No. 4)Beethoven Piano 1 2:15
26 E4 The Girl with the Flaxen Hair (Preludes,Book 1)
Debussy Piano 1 2:04
27 F4 Sonata K.545, 1st movement Mozart Piano 1 4:3728 G4 Impromptu in G-flat Major, Op 90, #3 Schubert Piano 1 4:3529 A4 Waltz in Ab, Op. 39, No. 15 Brahms Piano 1 1:3830 B4 Sonata No. 8, Op. 13, 'Pathetique', 2nd
mvmt.Beethoven Piano 1 4:59
31 C5 Golliwogg’s Cake Walk Debussy Piano 1 2:38
32 D5 Marche Militaire No.1,op.51, D733 Schubert Piano 1 4:55SOUND DEMO SONGS
1 Grande Valse Brilliant op. 18, no. 1 Chopin Piano 1 1:302 Arabesque No. 1 Debussy Piano 1 1:203 Missing Forever Piano 1 1:05

21
4 Humoresque Dvorak Piano 2 1:205 Sinfonia No. 3 Bach Harpsichord 0:506 Jazz Tune Vibraphone 0:507 Prelude in D minor, BWV 539 Bach Organ 1:208 Brilliance of Grassland String 0:55
(20) MODULATOR
中央
C
..
..
(21) TECHNICAL SPECIFICATIONS
Keys 88 Hammer Action KeysInstruments Piano1, piano 2, e-piano1, e-piano2, harpsichord, vibraphone, organ, stringsFunctions Dual sound (layer), touch sensitivity (3 types), transpose, reverb, record, demo
songs, metronome, tuning curve, MIDIControl Power switch, volume control, speed balanceSelect the pedal Soft (middle), sostenuto (left), sustain (right)Terminal headphone×2 ,AUX IN ,AUX OUT,MIDI IN ,MIDI OUTLoudspeaker 18cm×2Power 30WPower supply AC220V/110V

22