Class XI Chemistry Lab Manual
140
description
CBSE Class XI Chemistry Lab Manual.This is the full ebook with all chapters.
Transcript of Class XI Chemistry Lab Manual
Laboratory Manual
ChemistryClass XI
New Delhi21 May 2008
FOREWORD
The National Council of Educational Research and Training (NCERT) is the apexbody concerning all aspects of refinement of School Education. It has recentlydeveloped textual material in Chemistry for Higher Secondary stage which isbased on the National Curriculum Framework (NCF)–2005. NCF recommendsthat children’s experience in school education must be linked to the life outsideschool so that learning experience is joyful and fills the gap between the experienceat home and in community. It recommends to diffuse the sharp boundariesbetween different subjects and discourages rote learning. The recent developmentof syllabi and textual material is an attempt to implement this basic idea. Thepresent laboratory manual will be complementary to the textbook of Chemistryfor Class XI. It is in continuation to the NCERT’s efforts to improve uponcomprehension of concepts and practical skills among students. The purpose ofthis manual is not only to convey the approach and philosophy of the practicalcourse to students and teachers but to provide them appropriate guidance forcarrying out experiments in the laboratory. The manual is supposed to encouragechildren to reflect on their own learning and to pursue further activities andquestions. Of course the success of this effort also depends on the initiatives tobe taken by the principals and teachers to encourage children to carry outexperiments in the laboratory and develop their thinking and nurture creativity.
The methods adopted for performing the practicals and their evaluation willdetermine how effective this practical book will prove to make the children’s lifeat school a happy experience, rather than a source of stress and boredom. Thepractical book attempts to provide space to opportunities for contemplation andwondering, discussion in small groups, and activities requiring hands-onexperience. It is hoped that the material provided in this manual will help studentsin carrying out laboratory work effectively and will encourage teachers tointroduce some open-ended experiments at the school level.
PROFESSOR YASH PAL
ChairpersonNational Steering Committee
National Council of EducationalResearch and Training

PREFACE
The development of the present laboratory manual is in continuation to theNCERT’s efforts to improve upon comprehension of concepts and practical skillsamong the students. The present laboratory manual will be complementary tothe textbook of Chemistry for Class XI.
The expansion of scientific knowledge and consequently the change in thesystem of education has led to the development of new methods of instructions.Today the stress is laid on the enquiry approach and discussion method insteadof lecture method of teaching. Unfortunately, it is believed that study of chemistrymeans abstract thinking, writing long formulas and complex structures andhandling complicated equipments. The reason behind such endeavour is thateven well-endowed schools tend to give only the cosmetic importance to thelaboratory work. Children’s natural spirit of inquiry is often not nurtured.
The new syllabus of practical work in chemistry has been designed to caterto the needs of pupil who are desirous of pursuing science further. Thefundamental objective of this course is to develop scientific attitude and desiredlaboratory skills required at this level. The practical syllabus includes contentbased experiments, which help in comprehension of the concepts.
The project work is expected to provide thrill in learning chemistry. It isexpected to serve the real purpose of practical work, which means inculcatingthe ability to design an experiment, to make observations methodically and todraw conclusions out of experimental data .The real purpose of practical workshould be to enable the students to represent the outcome of experimentslogically to conclusion, with genuine appreciation of it’s limitation.
For each practical work, brief theory, material required, procedure,precautions and the questions for discussion are given in the book. The questionsare aimed at testing learner’s understanding of the related problems. However,teacher may provide help in case the problem is found to be beyond the capabilityof the learner. Precautions must be well understood by the learners beforeproceeding with the experiments and projects.
In order to provide some basic idea about the investigatory projects, a briefdescription of some investigatory projects is given in the book. However, this listis only suggested and not exhaustive. The students may select projects fromsubject area of chemistry, interdisciplinary areas or from the environment. Whileselecting a project, care should be taken to see that the facilities for carrying itout are available.
Appendices related to the chemical data and logarithmic tables areattached at the end of the book. International symbols for hazards and hazardwarnings are given at several places in the book. It is expected that this willmake the learners more careful about the environment and make them carefulwhile dealing with the chemicals. Some non evaluative learning material hasbeen given in the boxes to provide interesting information related to thepractical work.
It is a pleasure to express my thanks to all those who have been associatedat various stages of development of this laboratory manual. It is hoped that thispractical book will improve teaching learning process in chemistry to a greatextent. The learners will be able to understand the subject well and will be ableto apply the acquired knowledge in new situations. I acknowledge with thanksthe dedicated efforts and valuable contribution of Dr Alka Mehrotra, coordinatorof this programme and other team members who contributed and finalised themanuscript. I especially thank Professor Krishna Kumar, Director, and ProfessorG. Ravindra, Joint Director, NCERT for their administrative support and keeninterest in the development of this laboratory manual. I am also grateful to theparticipating teachers and subject experts who participated in the reviewworkshop and provided their comments and suggestions which helped in therefinement of this manual and make it learner friendly. We warmly welcomecomments and suggestions from our readers for further improvement of thismanual.
HUKUM SINGH
Professor and Head
Department of Education in
Science and Mathematics
vi
MEMBERS
Anjni Koul, Senior Lecturer, DESM, NCERT, New Delhi
Brahm Parkash, Professor, DESM, NCERT, New Delhi
I. P. Aggarwal, Professor, Regional Institute of Education, NCERT, Bhopal
R. S. Sindhu, Professor, DESM, NCERT, New Delhi
Ruchi Verma, Lecturer, DESM, NCERT, New Delhi
MEMBER-COORDINATOR
Alka Mehrotra, Reader, DESM, NCERT, New Delhi
LABORATORY MANUAL DEVELOPMENT TEAM
ACKNOWLEDGEMENTS
The National Council of Educational Research and Training (NCER T)acknowledges the valuable contributions of the individuals and theorganisations involved in the development of Manual for Chemistry Practicalsfor Class XI. The following academics contributed very effectively for thereview of the manuscript of this manual : D. S. Rawat, Reader, Departmentof Chemistry, University of Delhi; Haritima Chopra, Reader, Maitreyi College,New Delhi; K. G. Trikha, Reader (Retired), A.R.S.D. College, New Delhi;M. S. Frank, Vice Principal, St. Stephen’s College, Delhi; Samta Goel, Reader,Zakir Hussain College, New Delhi; S. G. Warkar, Lecturer, Delhi College ofEngenering, Delhi; Sunita Bhagat, Reader, A.R.S.D. College, New Delhi;K. K. Singh, PGT, Kendriya Vidyalaya, Pushp Vihar, New Delhi; Mona Rastogi,Senior Headmistress, ITL Public School, Dwarka, New Delhi; Nivedita Bose,PGT, Bluebells School, New Delhi; Nishi Saraswat, PGT, Kendriya VidyalayaNo.1, Delhi Cantt. We are thankful to them. We also acknowledge thecontribution of Sunita Kumari, JPF. Special thanks are due to Hukum Singh,Professor and Head, DESM, NCERT for his administrative support.
The Council also acknowledges the support provided by the administrativestaff of DESM; Deepak Kapoor, Incharge, Computer Station; Ishwar Singh,DTP Operator for refining and drawing some of the illustrations; Ritu Jha, DTPOperator; K. T. Chitralekha, Copy Editor. The efforts of the PublicationDepartment are also highly appreciated.
CONTENTS
iii
v
FOREWORD
PREFACE
UNIT-1 : Introduction• Do’s and don’ts in a chemistry laboratory
• Analytical methods
• Basic laboratory equipment and procedures
• Handling reagent bottles
• Heating devices
UNIT-2 : Basic Laboratory Techniques• Cutting of glass tube and glass rod
• Bending of a glass tube
• Drawing out a jet
• Boring a cork
• Heating solution in a test tube
• Heating solution in a beaker or a flask
• Filtration
• Measuring volume of liquids
• Weighing technique
• Experiment 2.1 : Preparation of standard solution ofoxalic acid
UNIT-3 : Purification and Criteria of Purity• Experiment 3.1 : Purification of sample of a compound
by crystallisation
• Experiment 3.2 : Determination of melting point of an organiccompound
• Experiment 3.3 : Determination of boiling point of an organiccompound
UNIT-4 : Chemical Equilibrium (Ionic Equilibrium in Solution)• Experiment 4.1 : Study of shift in equilibrium in the reaction
of ferric ions and thiocyanate ions
12
5
5
10
11
1616
18
19
20
22
22
22
25
30
34
38
38
40
43
46
47
x
• Experiment 4.2 : Study of shift in equilibrium in the reactionbetween [Co(H2O)6]
2+ and Cl– ions
UNIT-5 : pH and pH Change in Aqueous Solutions• Experiment 5.1 : To determine the pH of some fruit
juices
• Experiment 5.2 : To observe the variation in pH of acid/base with dilution
• Experiment 5.3 : To study the variation in pH by commonion effect in the case of weak acids andweak bases
• Experiment 5.4 : To study the change in pH during thetitration of a strong acid with a strongbase by using universal indicator
• Experiment 5.5 : To study the pH of solutions of sodiumchloride, ferric chloride and sodiumcarbonate
UNIT-6 : Titrimetric Analysis• Detection of end point
• Requirement for a reaction in the titrimetric analysis
• Acidimetry and alkalimetry
• Indicators in acid base titration
• Experiment 6.1 : Determination of the concentration(strength) of a given sodium hydroxidesolution by titrating it against astandard solution of oxalic acid
• Experiment 6.2 : Preparation of a standard solution ofsodium carbonate
• Experiment 6.3 : Determination of the strength of agiven solution of dilute hydrochloricacid by titrating it against a standardsolution of sodium carbonate
UNIT-7 : Systematic Qualitative Analysis• Experiment 7.1 : Detection of one cation and one anion
in the given salt
• Systematic analysis of anions
• Preliminary tests with dilute sulphuric acid
• Confirmatory tests for anions of dilute sulphuric acid group
• Preliminary tests with concentrated sulphuric acid
50
53
54
56
58
61
63
6565
66
66
67
69
74
75
79
80
81
8182
86

xi
• Confirmatory tests for anions of concentrated sulphuricacid group
• Tests for sulphate and phosphate
• Systematic analysis of cations
• Preliminary examination of salt for identification of cation
• Wet tests for identification of cations
• Analysis of Group-zero cation
• Analysis of Group-I cations
• Analysis of Group-II cations
• Analysis of Group-III cations
• Analysis of Group-IV cations
• Analysis of Group-V cations
• Analysis of Group-VI cations
• Specimen record of salt analysis
PROJECTS
APPENDICES
87
92
93
93
99
99
101
102
105
106
109
111
114
116
129

UNIT-1
INTRODUCTION
L ABORATORY work has special importance in the learning of science as scientific principles develop and grow on the basis of laboratory work. Chemistry is an experimental science; the concepts learned in the theory classes are
better understood through experimentation. Laboratory work provides anopportunity to observe many of the chemical phenomena under controlledlaboratory conditions and workout a problem through the method of inquiry. Inother words, it provides you with ample opportunity to become a keen observerand to draw inferences and explain results.
The training in laboratory work helps to develop skills for handling apparatusand equipment and carry out experiments. In this way, the experimental workhelps to promote scientific temper and adopt a cooperative attitude. Working inthe laboratory provides a platform for trying novel and creative ideas and givingthem concrete shape.
Before you become familiar with the scientific procedures and experimentalskills and start working in the laboratory, you should be well acquainted withthe chemistry laboratory. You should notice the facilities provided in thelaboratory and on your working table.
You will notice that your table is provided with a water-tap, gas-tap, Bunsenburner spirit lamp/kerosene lamp, a reagent shelf and a bin for disposing wastematerial. You will find that some reagents are kept on the shelf fixed on the tablewhile some reagents are kept on the shelf fixed on sidewalls. Reagents kept onthe shelf of the table are frequently required while those on the shelf fixed onwalls are less commonly used. Besides the facilities on the table, you will seethat there are exhaust fans fitted on the upper portion of the wall opposite to thedoors and windows and are placed close to the level of the ceiling. This facilitatesthe exhaution of harmful fumes and circulation of fresh air in the laboratory.For this purpose, there are also enough number of windows in the laboratory.Keep these open while working. A fume cupboard is provided in the laboratoryfor performing those experiments in which fumes are produced.
It is strongly advised that you should become fully familiar with yourchemistry laboratory, laboratory practices and procedures, and more importantlythe precautions to be taken while working in the laboratory.
The environment in the chemistry laboratory is somewhat special in the sensethat it can be a place of joy, discovery and learning. It can also become a place offrustration and danger. Frustration – if you come unprepared and neglectrecording the important data properly, and danger – if you do not follow theprecautions properly in conducting the experiments where potential danger exists.
LABORATORY MANUAL CHEMISTRY
2
In order to become proficient in basic principles underlyingthe laboratory work, you must learn to handle the equipment andfamiliarise yourself with the safety measures and good laboratorypractices.
You should organise yourself before entering into the laboratoryfor work and be aware of the pre-laboratory preparation andexperimental procedures so that your work is not haphazard. Youshould work individually unless the experiments requireteamwork. Use your ingenuity and common sense while working.This attitude is the basic requirement to aquire scientific approach.Prepare reports of the experiments in the laboratory notebook. Donot use loose sheets or scraped papers for this purpose. Thinkand try to get answers of important questions that give you anunderstanding of the principles on which the experimentalprocedure is based.
Scientists learn much by discussion. In the same manner,you too may be benefitted by discussion with your teacher andclassmates. Use books in case of any doubt because books aremore reliable, complete and better source of information thanclassmates. Else consult your teacher.
Safety rules are designed to ensure that the work done in thelaboratory is safe for you and your fellow students. Follow thesafety rules and be aware of where the items like first-aid box, fireextinguisher etc., are kept.
Don’t taste anything in the laboratory (Poisonoussubstances are not always so labelled in the laboratory) and neveruse laboratory as an eating-place. Never use glass apparatus ofthe laboratory for eating and drinking purposes. Never work inthe laboratory alone. Seek the permission of your teacher forworking for extra hours, in case it is needed.
1.1 DO’S AND DON’TS IN A CHEMISTRY LABORATORY
The practices outlined below are designated to guide you indeveloping efficient laboratory techniques and to make yourlaboratory a pleasant place to work. You should follow thepractices listed below:
• Wear safety glasses, lab coat and shoes while working in thelaboratory.
• Check and read the label of the reagent bottle carefully beforeusing its content.
• Read procedures and precautions carefully and follow them.• It is a bad practice to leave the reagent bottles on the working
table. Put the stoppers properly on the bottles and keep themon the shelf immediately after use.

INTRODUCTION
3
• If a reagent bottle on your seat is empty, ask the laboratoryattendant to fill it.
• If you require a reagent from the bottle kept on side shelf,take the test tube or the beaker to the shelf. Do not bringthe bottle to your seat.
• Avoid using excessive amounts of reagents unless youare advised to do so.
• Never return unused chemicals to the stock bottles. Ifyou commit a mistake in putting the material back into thecorrect bottle, experiments of other students will be spoiled.
• Never mix the chemicals unless it is required in theexperiment. Failure in following this rule may result inserious accidents.
• Use only properly cleaned droppers, spatulas orpipettes etc. to take out the reagents from the stocksolutions and reagent bottles.
• Do not keep the stopper of the bottle on the table.Impurities may stick to it and the content of the bottle maybe contaminated. Whenever you require a chemical fromthe reagent bottle, pick up the bottle with one hand andremove or replace the stopper with the other hand and keepit on a clean glazed tile. To take out dry solid reagents usespatula and keep it on watch glass, never use filterpapers. Do not keep the reagent on your palm or touchit with your fingers.
• Never throw used match sticks, litmus papers, broken glassapparatus, filter papers or any other insoluble solidmaterial into the sink or on the floor. Dispose them off inthe waste bin provided at your seat. Only waste liquidsshould be thrown in the sink while keeping the tap waterrunning so that nothing stinks and sticks and the wasteliquid is drained completely.
• Do not waste water or gas. Close the taps whenever theyare not in use. Do not leave the lighted burner under thewire gauze when nothing is being heated. Extinguish it.
• Hot apparatus should not be placed on working table directlybecause it may spoil the working table. Place it on a glazedtile or a wire gauze.
• Do not heat the apparatus which is made of thick glass, e.g.,graduated cylinder, bottles, measuring flasks etc., as thesebreak on heating. Also heating distorts the glass andcalibrations on the measuring apparatus may become invalid.Test tubes may break if they are heated above the level of theliquid filled in them. Crucibles may be heated to red-hot.
INTERNATIONAL
HAZARD SYMBOLS
Note : Look for these symbolson the labels of bottlesof chemicals.
LABORATORY MANUAL CHEMISTRY
4
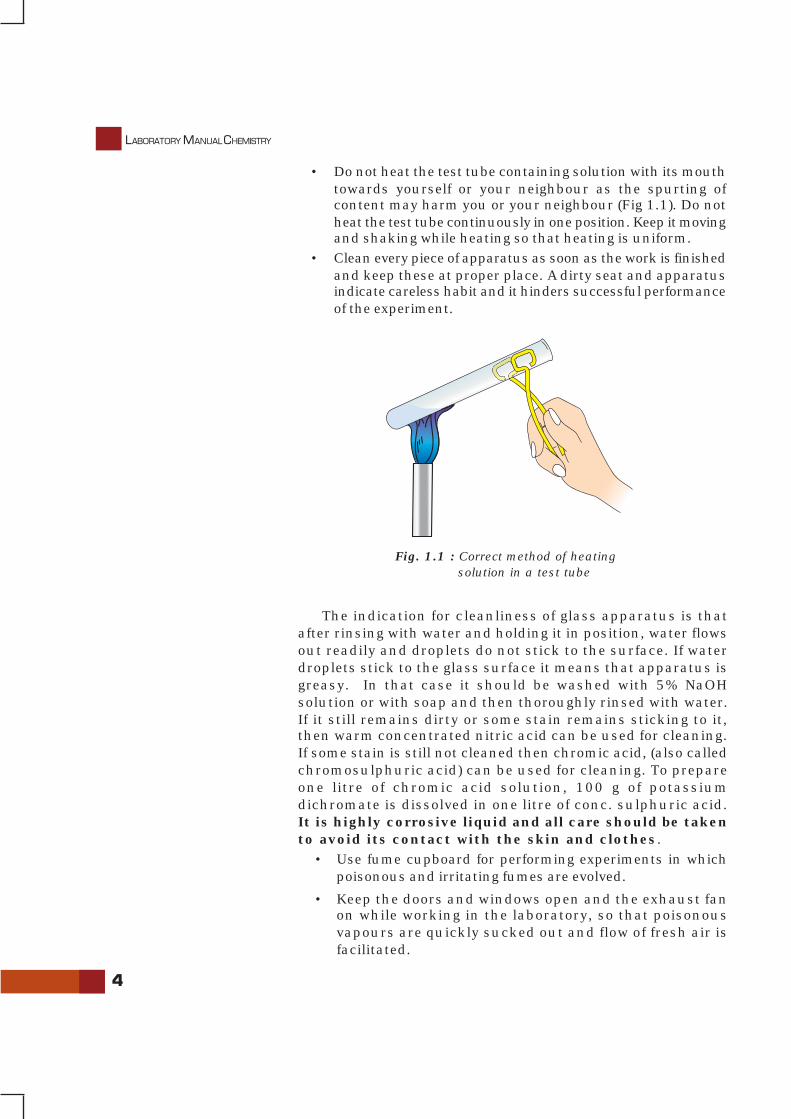
• Do not heat the test tube containing solution with its mouthtowards yourself or your neighbour as the spurting ofcontent may harm you or your neighbour (Fig 1.1). Do notheat the test tube continuously in one position. Keep it movingand shaking while heating so that heating is uniform.
• Clean every piece of apparatus as soon as the work is finishedand keep these at proper place. A dirty seat and apparatusindicate careless habit and it hinders successful performanceof the experiment.
The indication for cleanliness of glass apparatus is thatafter rinsing with water and holding it in position, water flowsout readily and droplets do not stick to the surface. If waterdroplets stick to the glass surface it means that apparatus isgreasy. In that case it should be washed with 5% NaOHsolution or with soap and then thoroughly rinsed with water.If it still remains dirty or some stain remains sticking to it,then warm concentrated nitric acid can be used for cleaning.If some stain is still not cleaned then chromic acid, (also calledchromosulphuric acid) can be used for cleaning. To prepareone litre of chromic acid solution, 100 g of potassiumdichromate is dissolved in one litre of conc. sulphuric acid.It is highly corrosive liquid and all care should be takento avoid its contact with the skin and clothes.
• Use fume cupboard for performing experiments in whichpoisonous and irritating fumes are evolved.
• Keep the doors and windows open and the exhaust fanon while working in the laboratory, so that poisonousvapours are quickly sucked out and flow of fresh air isfacilitated.
Fig. 1.1 : Correct method of heating solution in a test tube

INTRODUCTION
5
• If you will follow the Do’s and Don’ts outlined above, yourexperience of learning basic scientific techniques will surelybe full of joy.
In the following pages you will be introduced to basiclaboratory equipments, procedures and techniques required forworking in a chemistry laboratory. Let us begin with theintroduction to type of analytical methods used in chemistry.
1.2 ANALYTICAL METHODS
Elements and their compounds may be detected by their physicalfeatures such as physical state, colour, odour, lustre, meltingpoint, boiling point, sublimation, colour imparted to the flameon heating, hardness, crystalline state or amorphous state,solubility in water and other solvents, etc., but sometimes it isimpossible to identify the substance on the basis of physicalproperties only, therefore, chemical methods such as reactionwith alkalies, acids, oxidising agents, reducing agents and othercompounds are employed for the identification of substances. Asubstance is analysed to establish its qualitative and quantitativechemical composition. Therefore, analysis may be eitherqualitative or quantitative. Qualitative analysis is used to detectthe elemental composition of the substance; it may involvedetection of ions formed, and the type of molecules present inthe substance. The methods of qualitative analysis are verydiverse. They not only allow us to determine the elements whichconstitute the substances known on the Earth, but also thecomposition of celestial bodies which are away from the Earth.Quantitative analysis helps to establish the quantity of theconstituents of substances. It helps in measurement of energychanges etc.
1.3 BASIC LABORATORY EQUIPMENT AND PROCEDURES
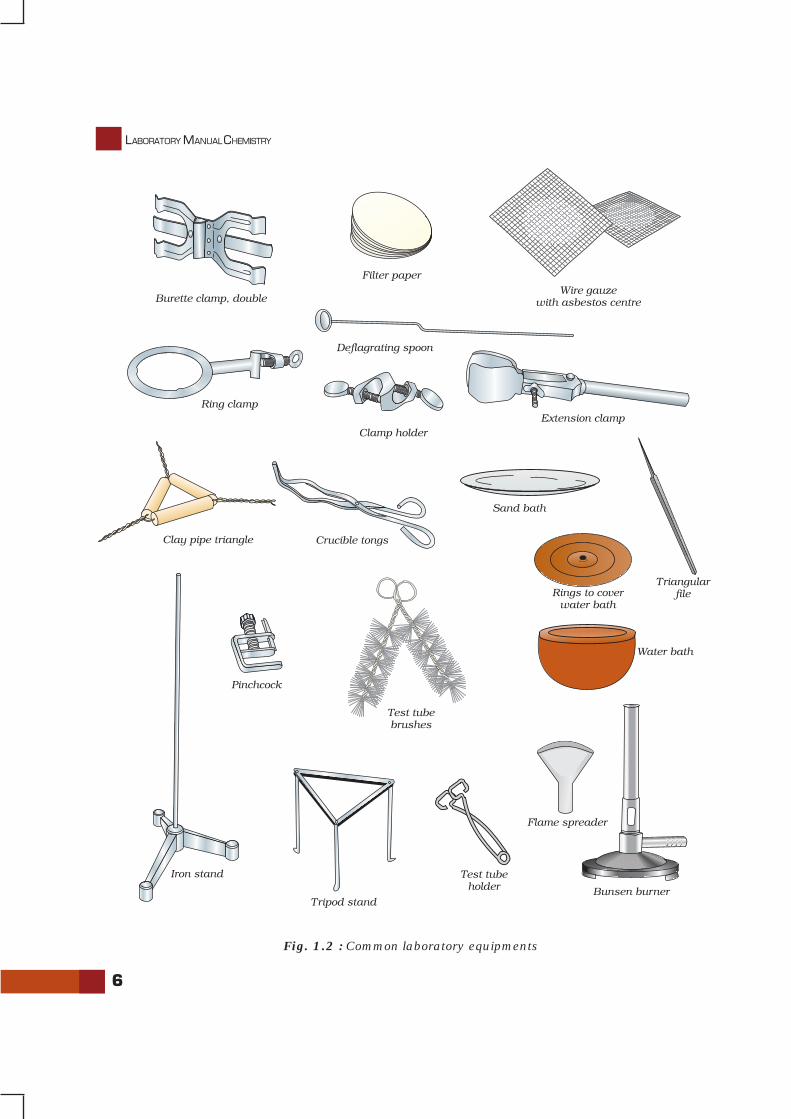
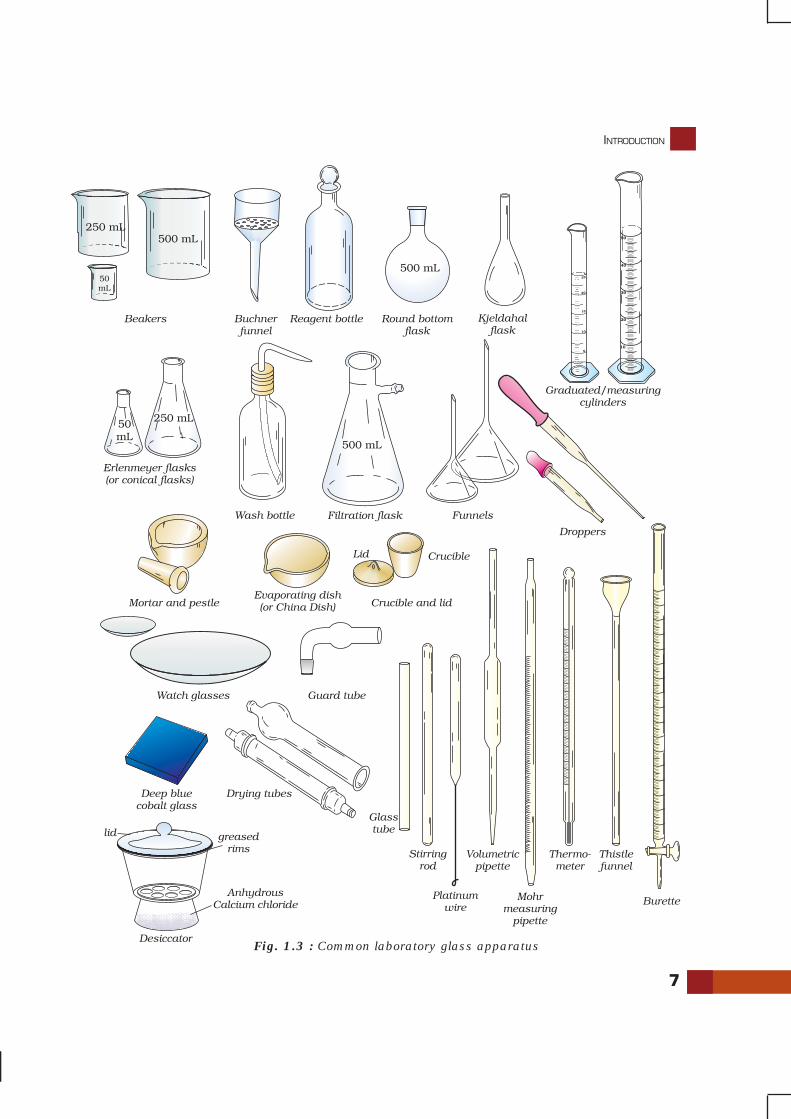
Heating, filtration, decantation, measuring volumes andweighing solids and liquids are some of the basic laboratoryprocedures, which are required frequently during theexperimentations in the chemistry laboratory. Some of thespecific equipment required for this purpose are shown inFig. 1.2 and 1.3. You will learn about the use of these whileperforming experiments. Guidelines for using some of thecommon apparatus are as follows :
LABORATORY MANUAL CHEMISTRY
6
Fig. 1.2 : Common laboratory equipments
INTRODUCTION
7
Fig. 1.3 : Common laboratory glass apparatus
LABORATORY MANUAL CHEMISTRY
8
Test Tubes
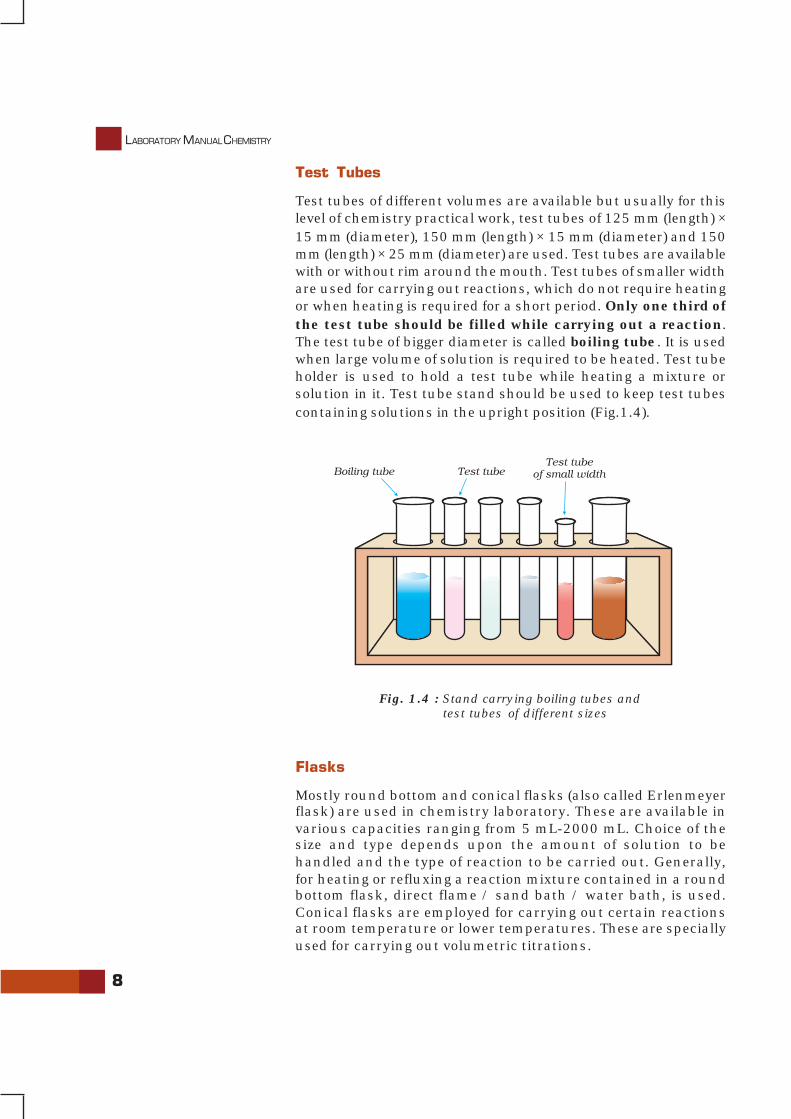
Test tubes of different volumes are available but usually for thislevel of chemistry practical work, test tubes of 125 mm (length) ×15 mm (diameter), 150 mm (length) × 15 mm (diameter) and 150mm (length) × 25 mm (diameter) are used. Test tubes are availablewith or without rim around the mouth. Test tubes of smaller widthare used for carrying out reactions, which do not require heatingor when heating is required for a short period. Only one third ofthe test tube should be filled while carrying out a reaction.The test tube of bigger diameter is called boiling tube. It is usedwhen large volume of solution is required to be heated. Test tubeholder is used to hold a test tube while heating a mixture orsolution in it. Test tube stand should be used to keep test tubescontaining solutions in the upright position (Fig.1.4).
Fig. 1.4 : Stand carrying boiling tubes andtest tubes of different sizes
Flasks
Mostly round bottom and conical flasks (also called Erlenmeyerflask) are used in chemistry laboratory. These are available invarious capacities ranging from 5 mL-2000 mL. Choice of thesize and type depends upon the amount of solution to behandled and the type of reaction to be carried out. Generally,for heating or refluxing a reaction mixture contained in a roundbottom flask, direct flame / sand bath / water bath, is used.Conical flasks are employed for carrying out certain reactionsat room temperature or lower temperatures. These are speciallyused for carrying out volumetric titrations.
INTRODUCTION
9
Beakers
Beakers of various capacities ranging from 5 mL to 2000 mL areavailable and are employed for the purpose of preparingsolutions, for carrying out precipitation reactions and forevaporation of solvents etc.
Separating Funnels
These are used for separating immiscible liquids. Separatingfunnels of various sizes and shapes are available (Fig. 1.5).
Condensers
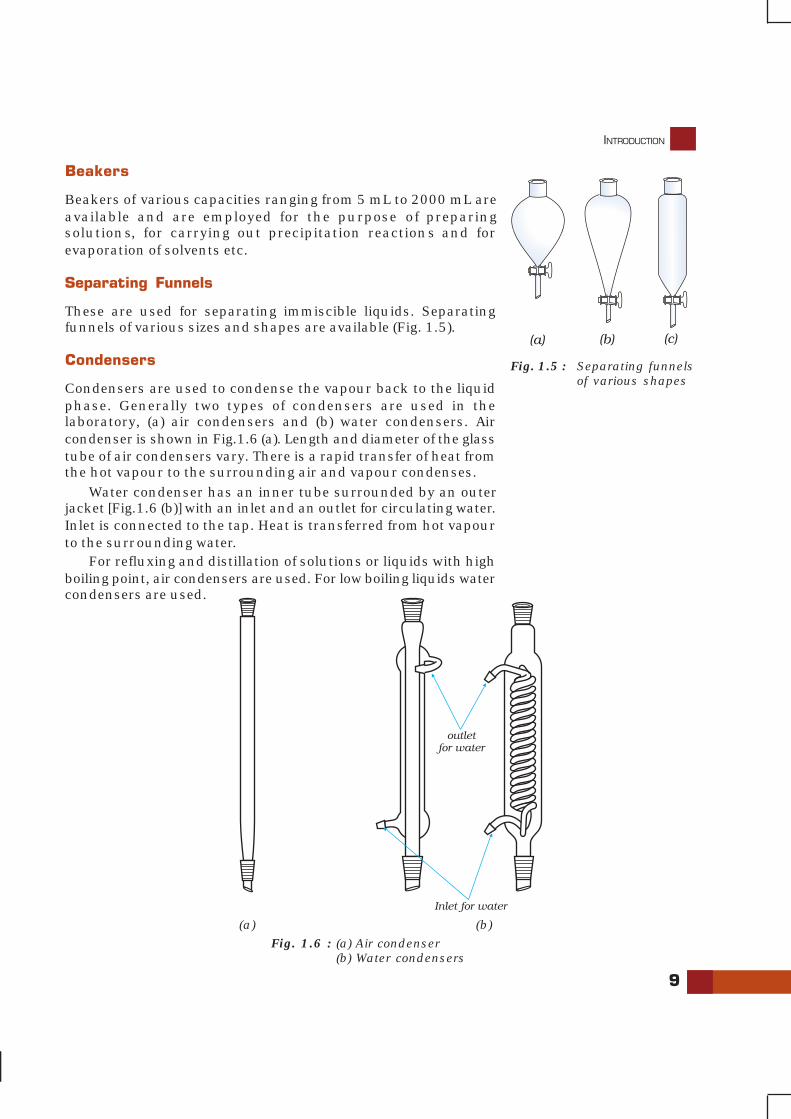
Condensers are used to condense the vapour back to the liquidphase. Generally two types of condensers are used in thelaboratory, (a) air condensers and (b) water condensers. Aircondenser is shown in Fig.1.6 (a). Length and diameter of the glasstube of air condensers vary. There is a rapid transfer of heat fromthe hot vapour to the surrounding air and vapour condenses.
Water condenser has an inner tube surrounded by an outerjacket [Fig.1.6 (b)] with an inlet and an outlet for circulating water.Inlet is connected to the tap. Heat is transferred from hot vapourto the surrounding water.
For refluxing and distillation of solutions or liquids with highboiling point, air condensers are used. For low boiling liquids watercondensers are used.
Fig. 1.5 : Separating funnelsof various shapes
Fig. 1.6 : (a) Air condenser(b) Water condensers
(a) (b)

LABORATORY MANUAL CHEMISTRY
10
Ground Glass Joints
Now-a-days ground glass joints are fixed to inlets or outlets of theapparatus described above to minimize the use of corks. Apparatuswith ground glass joints of various sizes are available.
Fig. 1.7 : Apparatus with ground glass joints
1.4 HANDLING REAGENT BOTTLES
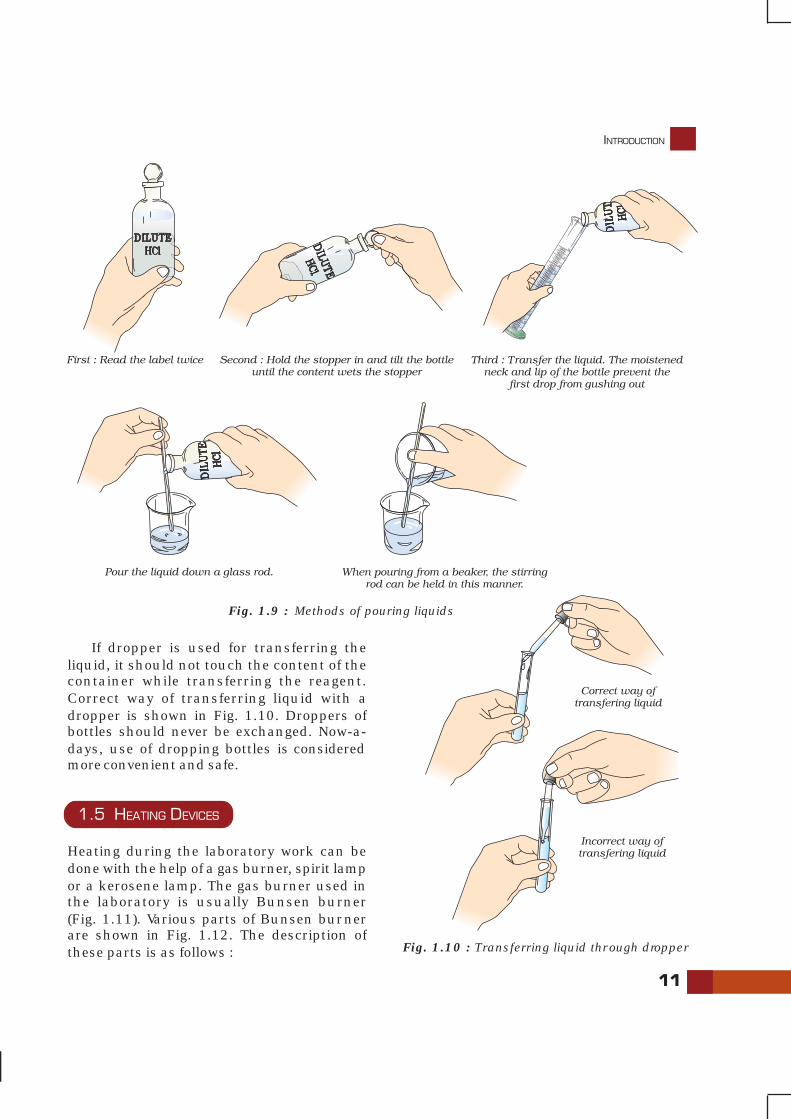
Correct methods for taking out solid and liquid reagentsfrom reagent bottles are shown in Fig. 1.8 and 1.9respectively. Before taking out any reagent from the bottleone should double-check the name written on label to makesure that correct reagent is being taken out. Liquid reagentsare stored either in reagent bottle of small mouth with glassstoppers or dropping bottles. While using reagent bottleswith stopper, put the stopper on a clean glazed tile. Neverput the stopper on the table because dirt from the table maystick to it and contaminate the reagent. Replace the stopperimmediately after taking out the reagent. The proper way ofpouring liquid from the bottle is shown in Fig. 1.9. Whenadding liquids directly from bottles into the beaker, a glassrod is held against the mouth of the bottle so as to permitthe flow of liquid along the rod without splashing.
Fig. 1.8 : Method for taking outsolid from the reagentbottle
INTRODUCTION
11
If dropper is used for transferring theliquid, it should not touch the content of thecontainer while transferring the reagent.Correct way of transferring liquid with adropper is shown in Fig. 1.10. Droppers ofbottles should never be exchanged. Now-a-days, use of dropping bottles is consideredmore convenient and safe.
1.5 HEATING DEVICES
Heating during the laboratory work can bedone with the help of a gas burner, spirit lampor a kerosene lamp. The gas burner used inthe laboratory is usually Bunsen burner(Fig. 1.11). Various parts of Bunsen burnerare shown in Fig. 1.12. The description ofthese parts is as follows : Fig. 1.10 : Transferring liquid through dropper
Fig. 1.9 : Methods of pouring liquids
LABORATORY MANUAL CHEMISTRY
12
BUNSEN BURNER
(A) Parts of Bunsen Burner
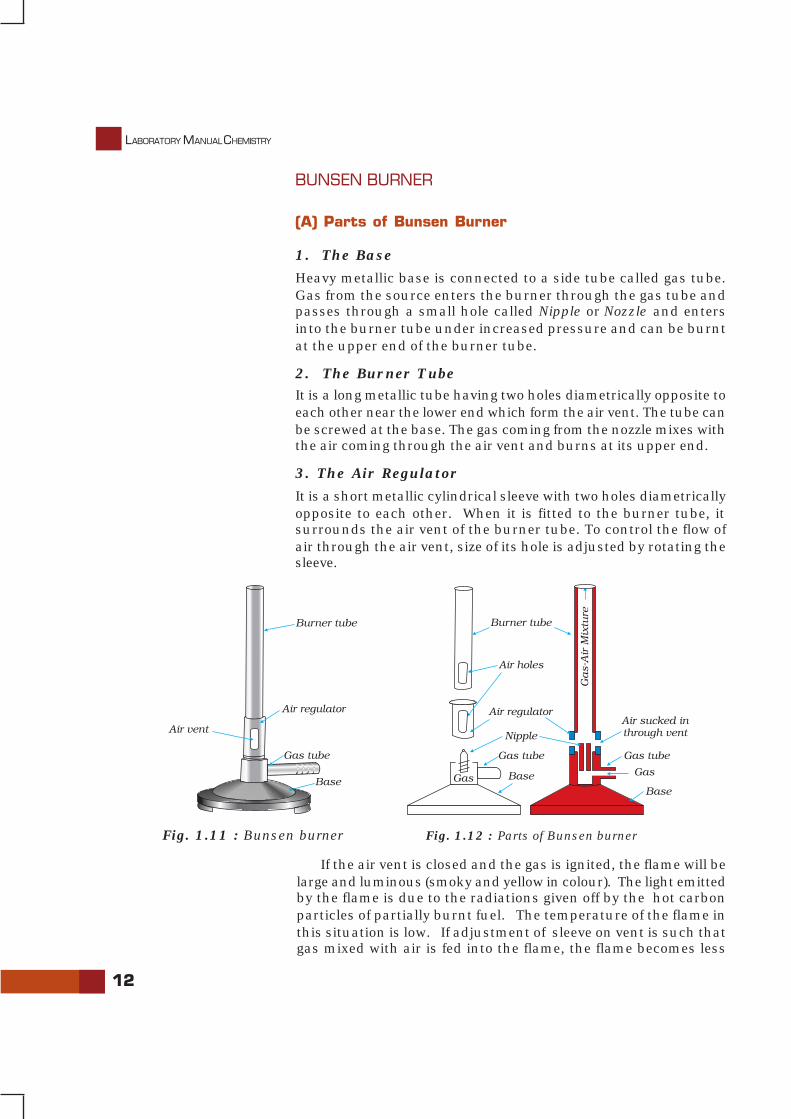
1. The Base
Heavy metallic base is connected to a side tube called gas tube.Gas from the source enters the burner through the gas tube andpasses through a small hole called Nipple or Nozzle and entersinto the burner tube under increased pressure and can be burntat the upper end of the burner tube.
2. The Burner TubeIt is a long metallic tube having two holes diametrically opposite toeach other near the lower end which form the air vent. The tube canbe screwed at the base. The gas coming from the nozzle mixes withthe air coming through the air vent and burns at its upper end.
3. The Air Regulator
It is a short metallic cylindrical sleeve with two holes diametricallyopposite to each other. When it is fitted to the burner tube, itsurrounds the air vent of the burner tube. To control the flow ofair through the air vent, size of its hole is adjusted by rotating thesleeve.
Fig. 1.12 : Parts of Bunsen burnerFig. 1.11 : Bunsen burner
If the air vent is closed and the gas is ignited, the flame will belarge and luminous (smoky and yellow in colour). The light emittedby the flame is due to the radiations given off by the hot carbonparticles of partially burnt fuel. The temperature of the flame inthis situation is low. If adjustment of sleeve on vent is such thatgas mixed with air is fed into the flame, the flame becomes less
INTRODUCTION
13
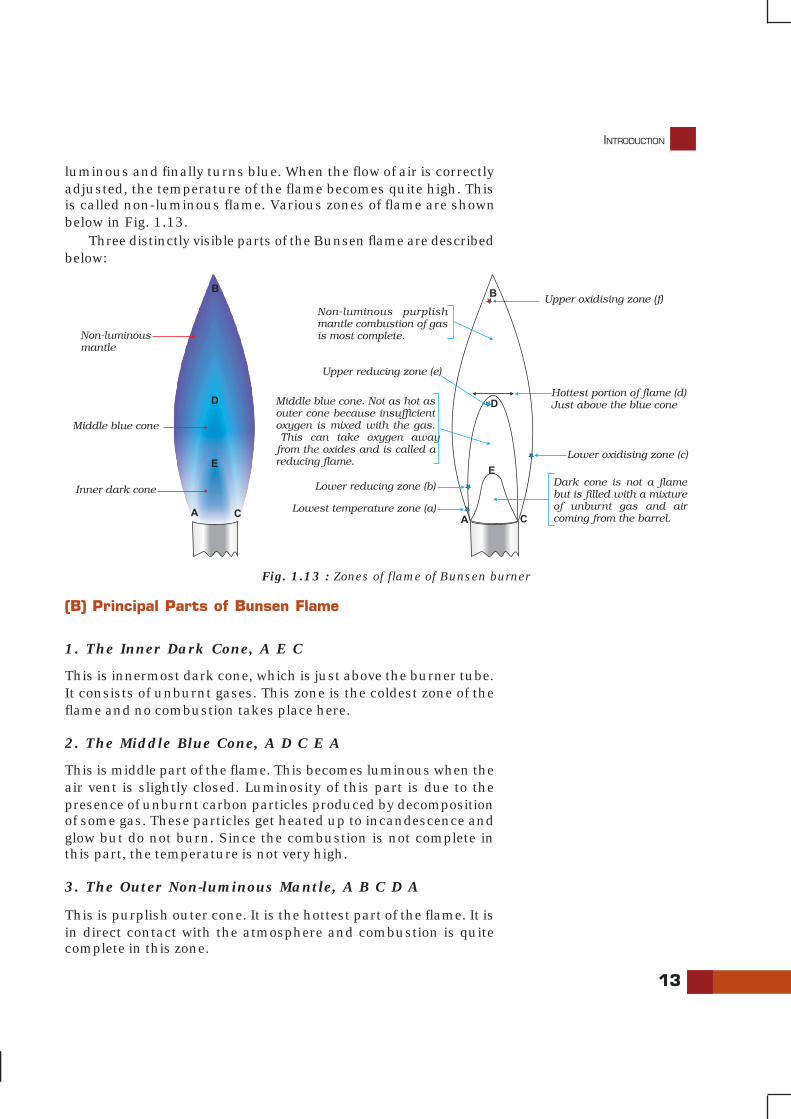
luminous and finally turns blue. When the flow of air is correctlyadjusted, the temperature of the flame becomes quite high. Thisis called non-luminous flame. Various zones of flame are shownbelow in Fig. 1.13.
Three distinctly visible parts of the Bunsen flame are describedbelow:
Fig. 1.13 : Zones of flame of Bunsen burner
(B) Principal Parts of Bunsen Flame
1. The Inner Dark Cone, A E C
This is innermost dark cone, which is just above the burner tube.It consists of unburnt gases. This zone is the coldest zone of theflame and no combustion takes place here.
2. The Middle Blue Cone, A D C E A
This is middle part of the flame. This becomes luminous when theair vent is slightly closed. Luminosity of this part is due to thepresence of unburnt carbon particles produced by decompositionof some gas. These particles get heated up to incandescence andglow but do not burn. Since the combustion is not complete inthis part, the temperature is not very high.
3. The Outer Non-luminous Mantle, A B C D A
This is purplish outer cone. It is the hottest part of the flame. It isin direct contact with the atmosphere and combustion is quitecomplete in this zone.
LABORATORY MANUAL CHEMISTRY
14
Bunsen identified six different regions in these threeprincipal parts of the flame:
(i) The upper oxidising zone (f)
Its location is in the non-luminous tip of the flame which is inthe air. In comparison to inner portions of the flame large excessof oxygen is present here. The temperature is not as high as inregion (c ) described below. It may be used for all oxidationprocesses in which highest temperature of the flame is not required.
(ii) Upper reducing zone (e)
This zone is at the tip of the inner blue cone and is rich inincandescent carbon. It is especially useful for reducing oxideincrustations to the metals.
(iii) Hottest portion of flame (d)
It is the fusion zone. It lies at about one-third of the height of theflame and is approximately equidistant from inside and outsideof the mantle i.e. the outermost cone of the flame. Fusibility of thesubstance can be tested in this region. It can also be employed fortesting relative volatility of substances or a mixture of substances.
(iv) Lower oxidising zone (c)
It is located on the outer border of the mantle near the lower partof the flame and may be used for the oxidation of substancesdissolved in beads of borax or sodium carbonate etc.
(v) Lower reducing zone (b)
It is situated in the inner edge of the outer mantle near to the bluecone and here reducing gases mix with the oxygen of the air. It isa less powerful reducing zone than (e) and may be employed forthe reduction of fused borax and similar beads.
(vi) Lowest temperature zone (a)
Zone (a) of the flame has lowest temperature. It is used for testingvolatile substances to determine whether they impart colour tothe flame.
(C) Striking Back of the Bunsen Burner
Striking back is the phenomenon in which flame travels down theburner tube and begins to burn at the nozzle near the base. Thishappens when vents are fully open.The flow of much air and lessgas makes the flame become irregular and it strikes back.

INTRODUCTION
15
The tube becomes very hot and it may produce burns on touching.This may melt attached rubber tube also. If it happens, put off theburner and cool it under the tap and light it again by keeping theair vent partially opened.
SPIRIT LAMP
If Bunsen burner is not available in the laboratory then spiritlamp can be used for heating. It is a devise in which one end of awick of cotton thread is dipped in a spirit container and the otherend of the wick protrudes out of the nozzle at upper end of thecontainer (Fig. 1.14). Spirit rises upto the upper end of the wickdue to the capillary action and can be burnt. The flame is nonluminous hence can be used for all heating purposes in thelaboratory. To put off the lamp, burning wick is covered with thecover. Never try to put off the lighted burner by blowing atthe flame.
KEROSENE HEATING LAMP
A kerosene lamp has been developed by National Council ofEducational Research and Training (NCERT), which is a versatileand cheaper substitute of spirit lamp. It may be used in laboratoriesas a source of heat whereever spirit and gas burner are notavailable. Parts of kerosene lamp are shown in Fig. 1.15.
Working of the Kerosene Lamp
More than half of the container is filled with kerosene. Outer sleeveis removed for lighting the wicks. As the outer sleeve is placedback in position, the flames of four wicks combine to form a bigsoot-free blue flame.
The lighted heating lamp can be put off only by covering thetop of the outer sleeve with a metal or asbestos sheet.
Fig. 1.15 : Parts of Kerosene Heating Lamp
Fig. 1.14 : The spirit lamp
UNIT-2
BASIC LABORATORY
TECHNIQUES
T HE laboratory apparatus for carrying out reactions, in general, is made up of glass. It is because glass is resistant to the action of most of the chemicals. Generally, two types of glass are used for making apparatus
for laboratory work. These are soda-lime glass and borosilicate glass.Soda-lime glass, which is made by heating soda, limestone and silica, softens
readily at about 300-400°C in the burner flame. Therefore, on heating glasstubings made of soda-lime glass easily softens and can be bent. Coefficient ofexpansion of soda glass is very high, therefore on sudden heating and cooling, itmay break. To avoid breaking, it should be heated and cooled gradually. Annealingby mild reheating and uniform cooling prevents breakage. Such glass shouldnot be kept on cold surface while it is hot, since sudden cooling may break it.
Borosilicate glass does not soften below 700-800°C and requires oxygen-natural gas flame for working. Natural gas mixed with oxygen is burnt to get theoxygen-natural gas flame. Coefficient of expansion of this glass is low andapparatus made of this glass can withstand sudden changes in temperature.Therefore, apparatus used for heating purposes is made from borosilicate glass.On heating, glass apparatus made up of borosilicate glass does not distort.
In the following pages you will learn about some of the techniques of handlingglass tubes and glass rods without injuring yourself. Also, you will learn thetechniques of using laboratory apparatus and equipments.
2.1 CUTTING OF GLASS TUBE AND GLASS ROD
Material Required
• Soda-glass tube : 15 cm long• Soda-glass rod : 15 cm long• Triangular file : One
Procedure
(i) Place the glass tube or the glass rod on the table and press it with your lefthand.
BASIC LABORATORY TECHNIQUES
17
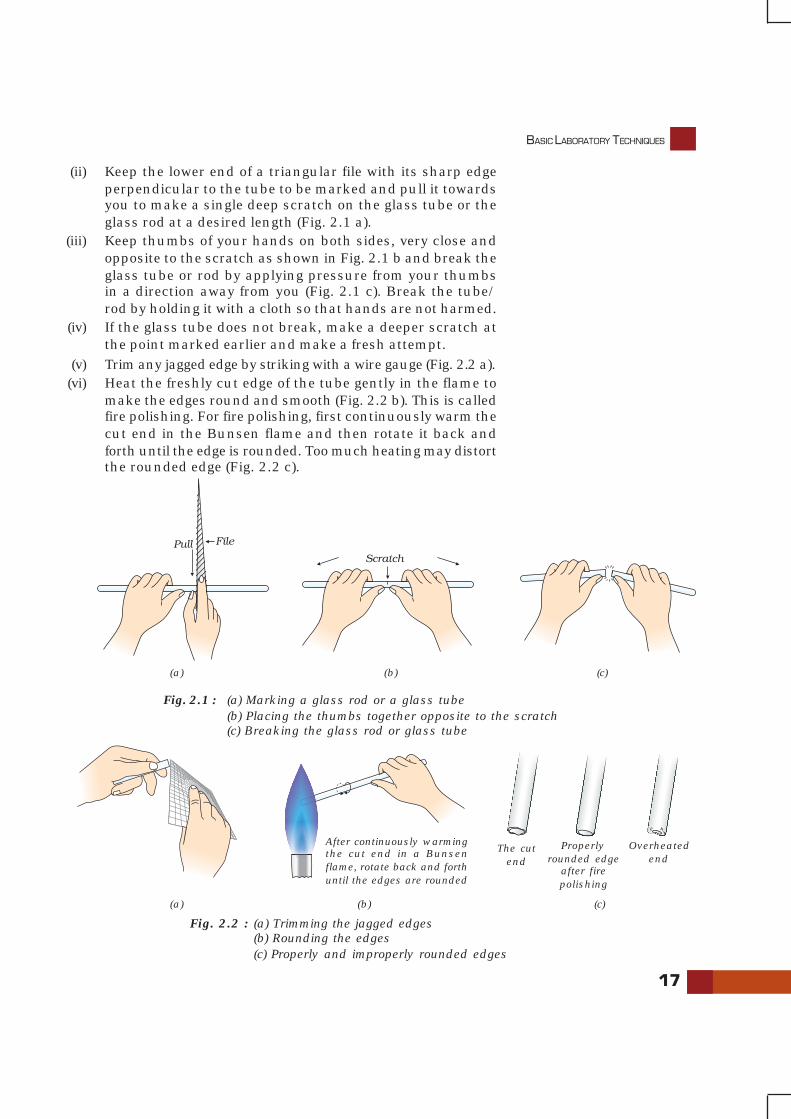
(ii) Keep the lower end of a triangular file with its sharp edgeperpendicular to the tube to be marked and pull it towardsyou to make a single deep scratch on the glass tube or theglass rod at a desired length (Fig. 2.1 a).
(iii) Keep thumbs of your hands on both sides, very close andopposite to the scratch as shown in Fig. 2.1 b and break theglass tube or rod by applying pressure from your thumbsin a direction away from you (Fig. 2.1 c). Break the tube/rod by holding it with a cloth so that hands are not harmed.
(iv) If the glass tube does not break, make a deeper scratch atthe point marked earlier and make a fresh attempt.
(v) Trim any jagged edge by striking with a wire gauge (Fig. 2.2 a).(vi) Heat the freshly cut edge of the tube gently in the flame to
make the edges round and smooth (Fig. 2.2 b). This is calledfire polishing. For fire polishing, first continuously warm thecut end in the Bunsen flame and then rotate it back andforth until the edge is rounded. Too much heating may distortthe rounded edge (Fig. 2.2 c).
Fig. 2.2 : (a) Trimming the jagged edges(b) Rounding the edges(c) Properly and improperly rounded edges
The cutend
Properlyrounded edge
after firepolishing
Overheatedend
After continuously warmingthe cut end in a Bunsenflame, rotate back and forthuntil the edges are rounded
(c)(b)(a)
Fig. 2.1 : (a) Marking a glass rod or a glass tube(b) Placing the thumbs together opposite to the scratch(c) Breaking the glass rod or glass tube
(c)(b)(a)
18
LABORATORY MANUAL CHEMISTRY
Precautions
(a) Make a single deep scratch at the desired length with one stroke of the file.(b) To avoid injury, carry out the filing and breaking of the glass tube/rod away
from the face as far as possible and hold the glass tube / rod with the help of apiece of cloth to avoid injury to hands.
Discussion Questions
(i) Why does glass not possess a sharp melting point?
(ii) Why is it required to round off the freshly cut edges of the glass tube or theglass rod?
2.2 BENDING OF A GLASS TUBE
Material Required
• Glass tube : 20-25 cm long• Triangular file : One
Procedure
(i) Cut a tube of desired length with the help of a triangular fileas described in section 2.1.
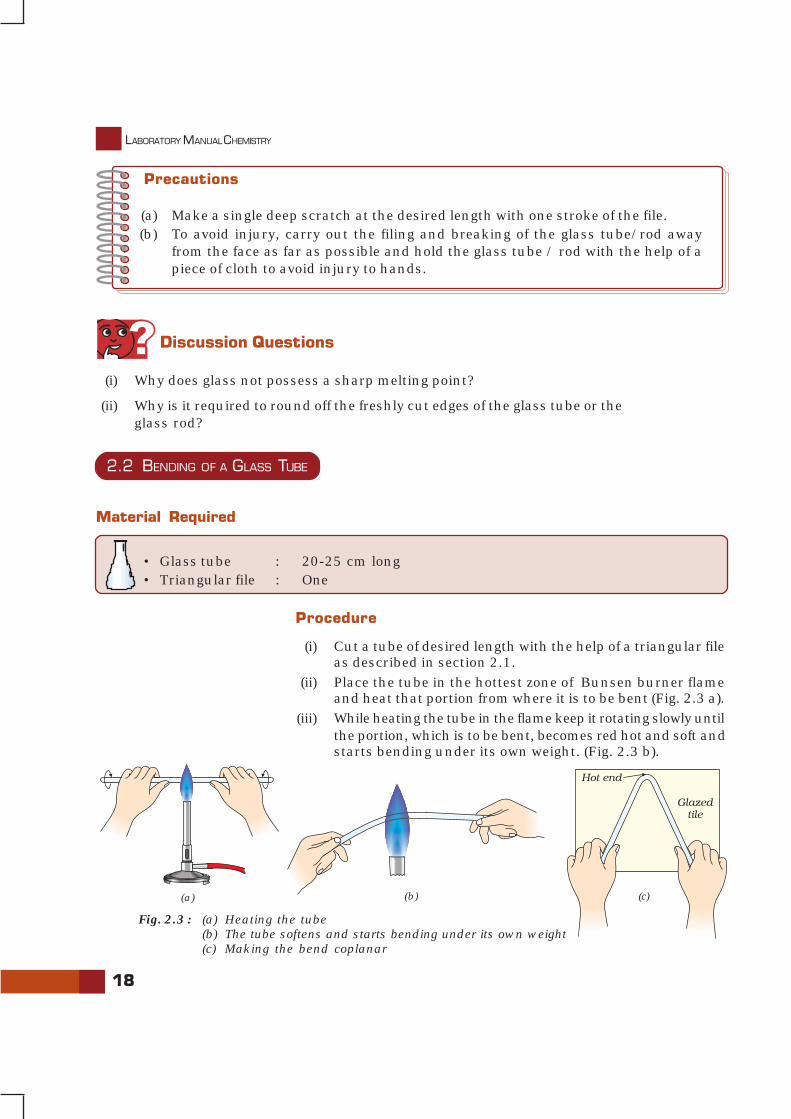
(ii) Place the tube in the hottest zone of Bunsen burner flameand heat that portion from where it is to be bent (Fig. 2.3 a).
(iii) While heating the tube in the flame keep it rotating slowly untilthe portion, which is to be bent, becomes red hot and soft andstarts bending under its own weight. (Fig. 2.3 b).
(a) (b) (c)
Fig. 2.3 : (a) Heating the tube(b) The tube softens and starts bending under its own weight(c) Making the bend coplanar
BASIC LABORATORY TECHNIQUES
19
(iv) Remove the tube from the flame and bend it slowly at adesired angle by pressing it against a glazed tile to ensurethe coplanarity of the bend (Fig. 2.3 c). Slow process ofbending prevents flattening of glass tube (Fig. 2.4).
(v) Cool it by placing on a glazed tile (Fig. 2.3 c).(vi) Bend the tubes at different angles as shown in Fig. 2.5.
Precautions
(a) Avoid heating the glass tube only on one side, rather rotate it while heating.(b) Select a glass tube of appropriate length (nearly 30 cm long) to keep your hands
safe from heat.(c) To avoid flattening of the glass tube while bending, carry out the process slowly.
Discussion Questions
(i) Why should the tube be rotated while heating?
(ii) Why is the red-hot tube bent slowly?
2.3 DRAWING OUT A JET
Material Required
• Glass tube : 20-25 cm long• Triangular file : One• Sand paper : As per need
Fig. 2.5 : Bend drawn atvarious angles
Fig. 2.4 : A glance of properand improper bends
20
LABORATORY MANUAL CHEMISTRY
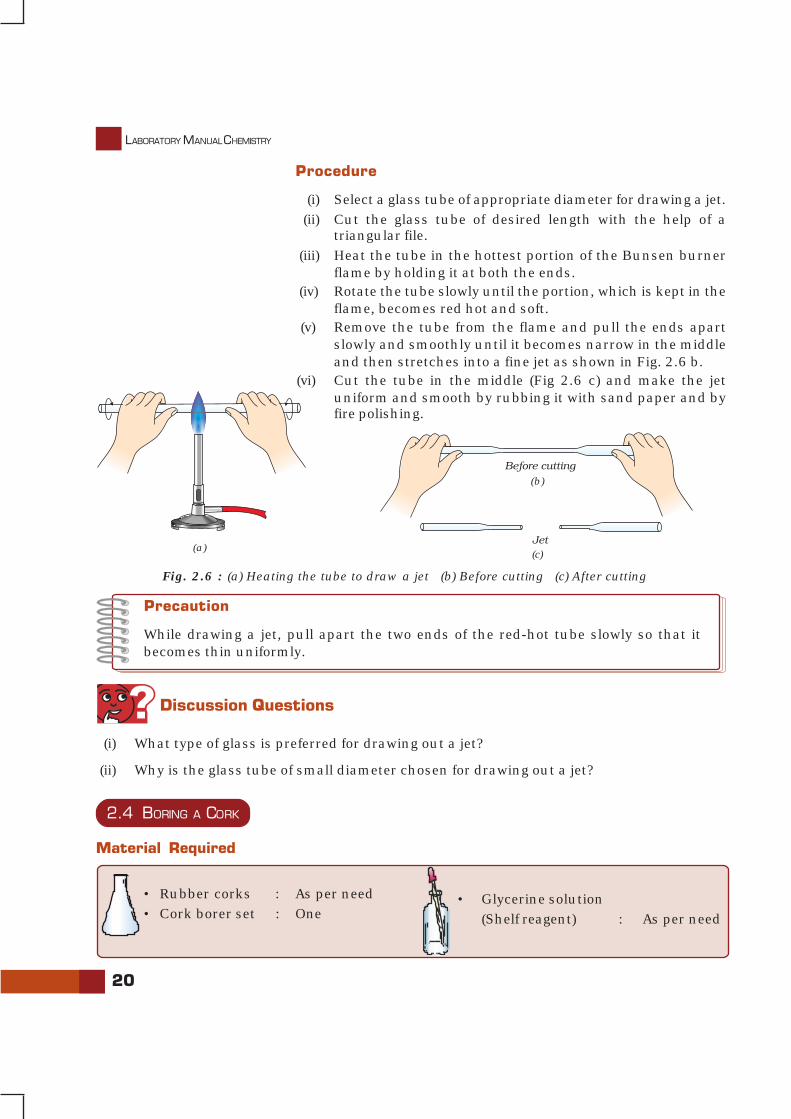
Procedure
(i) Select a glass tube of appropriate diameter for drawing a jet.(ii) Cut the glass tube of desired length with the help of a
triangular file.(iii) Heat the tube in the hottest portion of the Bunsen burner
flame by holding it at both the ends.(iv) Rotate the tube slowly until the portion, which is kept in the
flame, becomes red hot and soft.(v) Remove the tube from the flame and pull the ends apart
slowly and smoothly until it becomes narrow in the middleand then stretches into a fine jet as shown in Fig. 2.6 b.
(vi) Cut the tube in the middle (Fig 2.6 c) and make the jetuniform and smooth by rubbing it with sand paper and byfire polishing.
Precaution
While drawing a jet, pull apart the two ends of the red-hot tube slowly so that itbecomes thin uniformly.
Discussion Questions
(i) What type of glass is preferred for drawing out a jet?
(ii) Why is the glass tube of small diameter chosen for drawing out a jet?
2.4 BORING A CORK
Material Required
• Rubber corks : As per need• Cork borer set : One
• Glycerine solution(Shelf reagent) : As per need
(b)
(c)
Fig. 2.6 : (a) Heating the tube to draw a jet (b) Before cutting (c) After cutting
(a)

BASIC LABORATORY TECHNIQUES
21
Procedure
(i) Mark the rubber cork on both its sides at the place where ahole is to be drilled (Fig. 2.7 a).
(ii) Choose a borer of diameter slightly smaller in size thanthat diameter of the tube to be inserted in the hole (Fig. 2.7 b).
(iii) Place the rubber cork on the table with its smaller end in theupward direction as shown in Fig. 2.7 c.
(iv) Hold the cork in position with the left hand and put a suitableborer, lubricated by dipping in water or glycerine, at theplace where the hole is to be drilled (Fig. 2.7 c). By lubricatingthe borer with water or glycerine a smooth hole is drilled.
(v) Now hold and push the borer vertically in the downwarddirection, and drill the hole by rotating the borer andsimultaneously apply the pressure gently.
(v) For making two holes in the same cork, keep appropriatedistance between the holes and use borers of proper size.
Precautions
(a) Make a mark on both sides of the cork and select borer of proper size.(b) To obtain a smooth hole, drill half the hole from one side and another half from
the other side of the cork.
Discussion Questions
(i) What is the role of glycerine in the process of boring?
(ii) Why should the diameter of the borer be less than the diameter of the tube to be insertedin the hole?
Fig. 2.7 : (a) Marked cork (b) Choosing the borer (c) Boring process
(a) (b) (c)
22
LABORATORY MANUAL CHEMISTRY
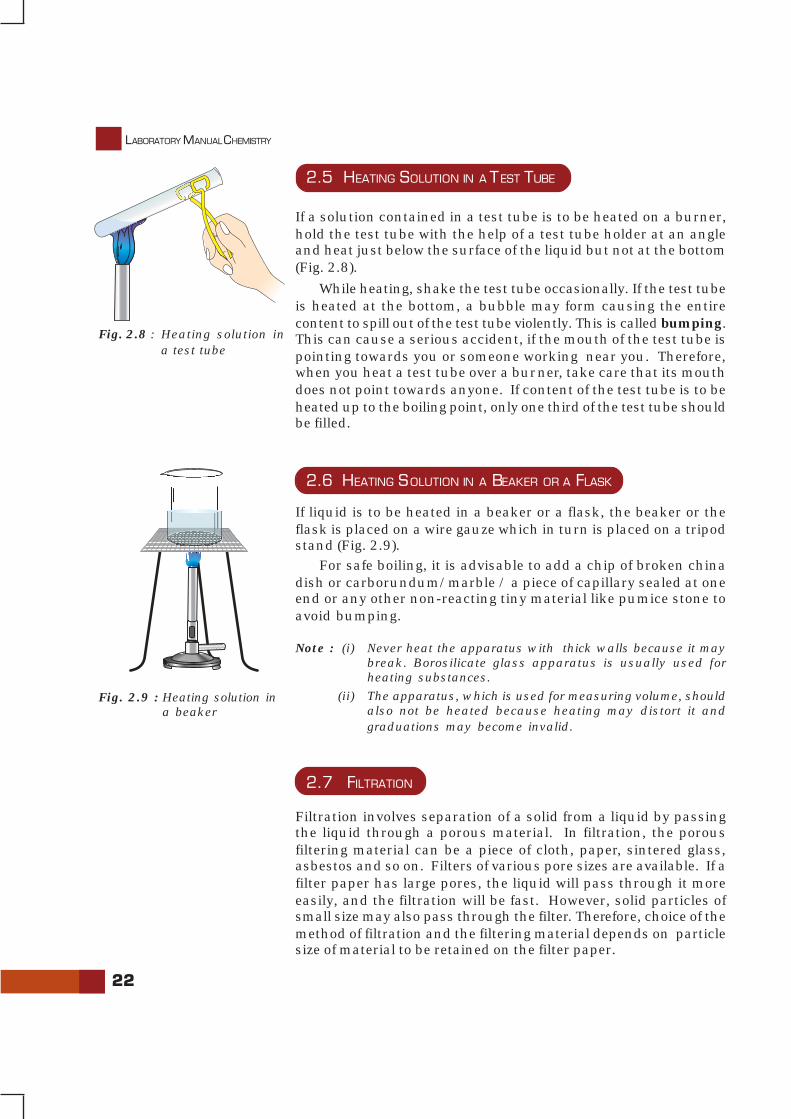
2.5 HEATING SOLUTION IN A TEST TUBE
If a solution contained in a test tube is to be heated on a burner,hold the test tube with the help of a test tube holder at an angleand heat just below the surface of the liquid but not at the bottom(Fig. 2.8).
While heating, shake the test tube occasionally. If the test tubeis heated at the bottom, a bubble may form causing the entirecontent to spill out of the test tube violently. This is called bumping.This can cause a serious accident, if the mouth of the test tube ispointing towards you or someone working near you. Therefore,when you heat a test tube over a burner, take care that its mouthdoes not point towards anyone. If content of the test tube is to beheated up to the boiling point, only one third of the test tube shouldbe filled.
2.6 HEATING SOLUTION IN A BEAKER OR A FLASK
If liquid is to be heated in a beaker or a flask, the beaker or theflask is placed on a wire gauze which in turn is placed on a tripodstand (Fig. 2.9).
For safe boiling, it is advisable to add a chip of broken chinadish or carborundum/marble / a piece of capillary sealed at oneend or any other non-reacting tiny material like pumice stone toavoid bumping.
Note : (i) Never heat the apparatus with thick walls because it maybreak. Borosilicate glass apparatus is usually used forheating substances.
(ii) The apparatus, which is used for measuring volume, shouldalso not be heated because heating may distort it andgraduations may become invalid.
2.7 FILTRATION
Filtration involves separation of a solid from a liquid by passingthe liquid through a porous material. In filtration, the porousfiltering material can be a piece of cloth, paper, sintered glass,asbestos and so on. Filters of various pore sizes are available. If afilter paper has large pores, the liquid will pass through it moreeasily, and the filtration will be fast. However, solid particles ofsmall size may also pass through the filter. Therefore, choice of themethod of filtration and the filtering material depends on particlesize of material to be retained on the filter paper.
Fig. 2.8 : Heating solution ina test tube
Fig. 2.9 : Heating solution ina beaker
BASIC LABORATORY TECHNIQUES
23
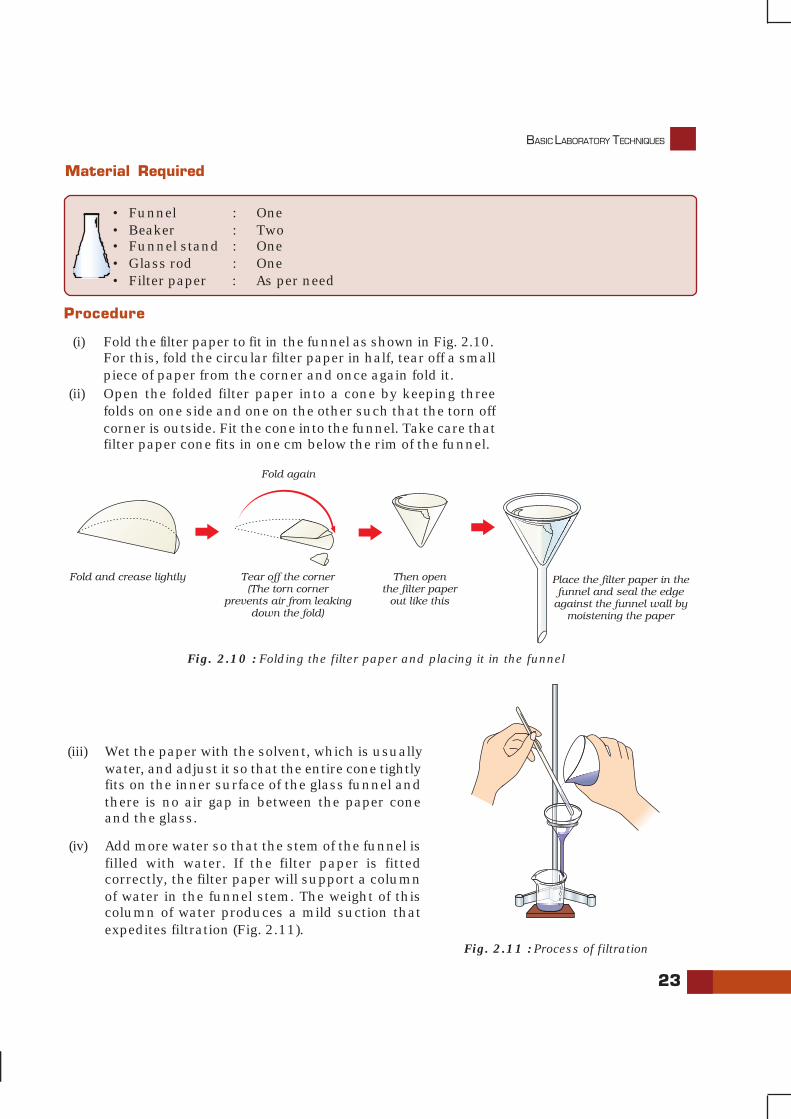
Procedure
(i) Fold the filter paper to fit in the funnel as shown in Fig. 2.10.For this, fold the circular filter paper in half, tear off a smallpiece of paper from the corner and once again fold it.
(ii) Open the folded filter paper into a cone by keeping threefolds on one side and one on the other such that the torn offcorner is outside. Fit the cone into the funnel. Take care thatfilter paper cone fits in one cm below the rim of the funnel.
Material Required
• Funnel : One• Beaker : Two• Funnel stand : One• Glass rod : One• Filter paper : As per need
(iii) Wet the paper with the solvent, which is usuallywater, and adjust it so that the entire cone tightlyfits on the inner surface of the glass funnel andthere is no air gap in between the paper coneand the glass.
(iv) Add more water so that the stem of the funnel isfilled with water. If the filter paper is fittedcorrectly, the filter paper will support a columnof water in the funnel stem. The weight of thiscolumn of water produces a mild suction thatexpedites filtration (Fig. 2.11).
Fig. 2.10 : Folding the filter paper and placing it in the funnel
Fig. 2.11 : Process of filtration
24
LABORATORY MANUAL CHEMISTRY
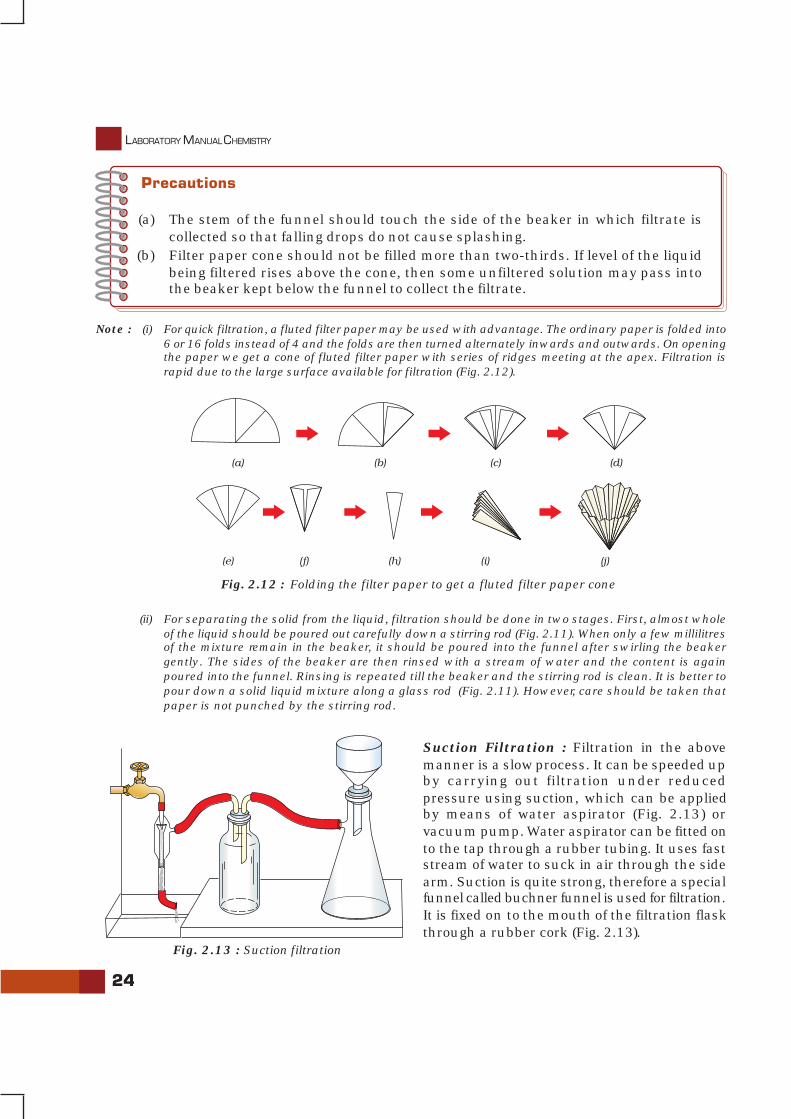
Precautions
(a) The stem of the funnel should touch the side of the beaker in which filtrate iscollected so that falling drops do not cause splashing.
(b) Filter paper cone should not be filled more than two-thirds. If level of the liquidbeing filtered rises above the cone, then some unfiltered solution may pass intothe beaker kept below the funnel to collect the filtrate.
Fig. 2.13 : Suction filtration
Fig. 2.12 : Folding the filter paper to get a fluted filter paper cone
Note : (i) For quick filtration, a fluted filter paper may be used with advantage. The ordinary paper is folded into6 or 16 folds instead of 4 and the folds are then turned alternately inwards and outwards. On openingthe paper we get a cone of fluted filter paper with series of ridges meeting at the apex. Filtration israpid due to the large surface available for filtration (Fig. 2.12).
(ii) For separating the solid from the liquid, filtration should be done in two stages. First, almost wholeof the liquid should be poured out carefully down a stirring rod (Fig. 2.11). When only a few millilitresof the mixture remain in the beaker, it should be poured into the funnel after swirling the beakergently. The sides of the beaker are then rinsed with a stream of water and the content is againpoured into the funnel. Rinsing is repeated till the beaker and the stirring rod is clean. It is better topour down a solid liquid mixture along a glass rod (Fig. 2.11). However, care should be taken thatpaper is not punched by the stirring rod.
Suction Filtration : Filtration in the abovemanner is a slow process. It can be speeded upby carrying out filtration under reducedpressure using suction, which can be appliedby means of water aspirator (Fig. 2.13) orvacuum pump. Water aspirator can be fitted onto the tap through a rubber tubing. It uses faststream of water to suck in air through the sidearm. Suction is quite strong, therefore a specialfunnel called buchner funnel is used for filtration.It is fixed on to the mouth of the filtration flaskthrough a rubber cork (Fig. 2.13).
BASIC LABORATORY TECHNIQUES
25
2.8 MEASURING VOLUME OF LIQUIDS
Usually volumetric flasks, graduated cylinders, pipettes andburettes are used for measuring volume of liquids. Volumetricflasks and cylinders are graduated to measure volume of a liquidat a certain temperature. Pipettes and burettes are calibrated todeliver certain specific volume of a liquid at a specified temperature.The capacity mark is usually etched on the glass of the equipment.
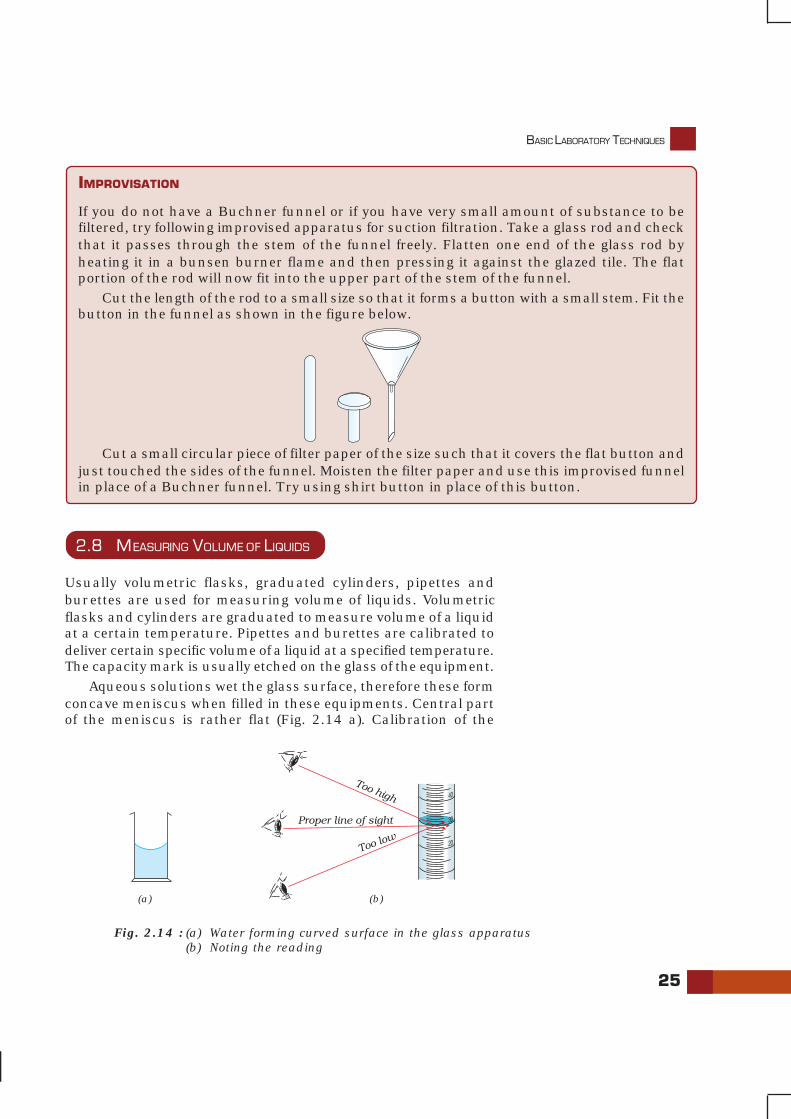
Aqueous solutions wet the glass surface, therefore these formconcave meniscus when filled in these equipments. Central partof the meniscus is rather flat (Fig. 2.14 a). Calibration of the
IMPROVISATION
If you do not have a Buchner funnel or if you have very small amount of substance to befiltered, try following improvised apparatus for suction filtration. Take a glass rod and checkthat it passes through the stem of the funnel freely. Flatten one end of the glass rod byheating it in a bunsen burner flame and then pressing it against the glazed tile. The flatportion of the rod will now fit into the upper part of the stem of the funnel.
Cut the length of the rod to a small size so that it forms a button with a small stem. Fit thebutton in the funnel as shown in the figure below.
Cut a small circular piece of filter paper of the size such that it covers the flat button andjust touched the sides of the funnel. Moisten the filter paper and use this improvised funnelin place of a Buchner funnel. Try using shirt button in place of this button.
Fig. 2.14 : (a) Water forming curved surface in the glass apparatus(b) Noting the reading
(a) (b)
26
LABORATORY MANUAL CHEMISTRY
apparatus coinciding with this flat portion of the meniscus gives ameasure of the volume of the liquid. Therefore, while making finaladjustment of volume or noting the reading, the curved surface ofthe liquid should appear touching the etched mark when viewedby keeping the eye level aligned to the etched mark (Fig. 2.14 b).This helps in avoiding the parallax errors (error caused by thechange in position of the observer). Note that if the liquid formsconvex meniscus or is coloured and opaque e.g. KMnO4 solutionthen reading coinciding with upward surface is noted. In flasksand pipettes capacity mark is etched on the narrow part of theequipment to minimize the error in noting the level of meniscus.Graduated cylinders are not used for very precise measurements,so they need not be narrow. Burettes and pipettes are used tomeasure the volume of a liquid accurately.
(a) Using Graduated Cylinder
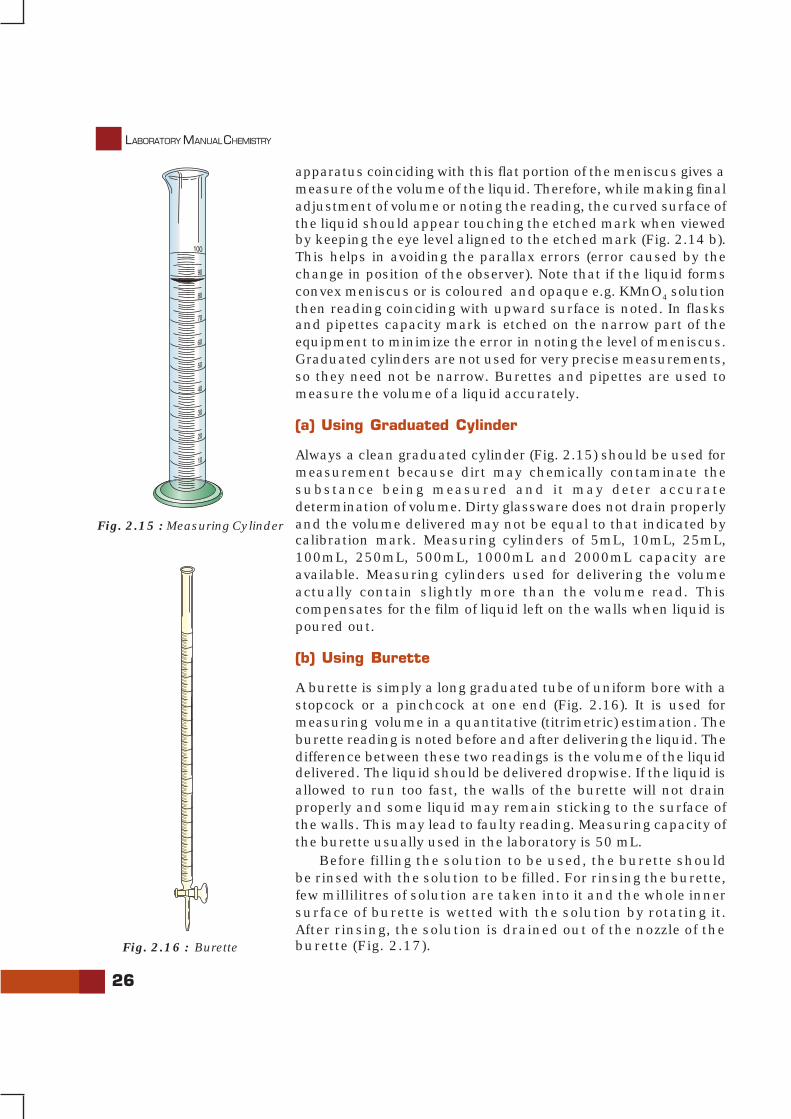
Always a clean graduated cylinder (Fig. 2.15) should be used formeasurement because dirt may chemically contaminate thesubstance being measured and it may deter accuratedetermination of volume. Dirty glassware does not drain properlyand the volume delivered may not be equal to that indicated bycalibration mark. Measuring cylinders of 5mL, 10mL, 25mL,100mL, 250mL, 500mL, 1000mL and 2000mL capacity areavailable. Measuring cylinders used for delivering the volumeactually contain slightly more than the volume read. Thiscompensates for the film of liquid left on the walls when liquid ispoured out.
(b) Using Burette
A burette is simply a long graduated tube of uniform bore with astopcock or a pinchcock at one end (Fig. 2.16). It is used formeasuring volume in a quantitative (titrimetric) estimation. Theburette reading is noted before and after delivering the liquid. Thedifference between these two readings is the volume of the liquiddelivered. The liquid should be delivered dropwise. If the liquid isallowed to run too fast, the walls of the burette will not drainproperly and some liquid may remain sticking to the surface ofthe walls. This may lead to faulty reading. Measuring capacity ofthe burette usually used in the laboratory is 50 mL.
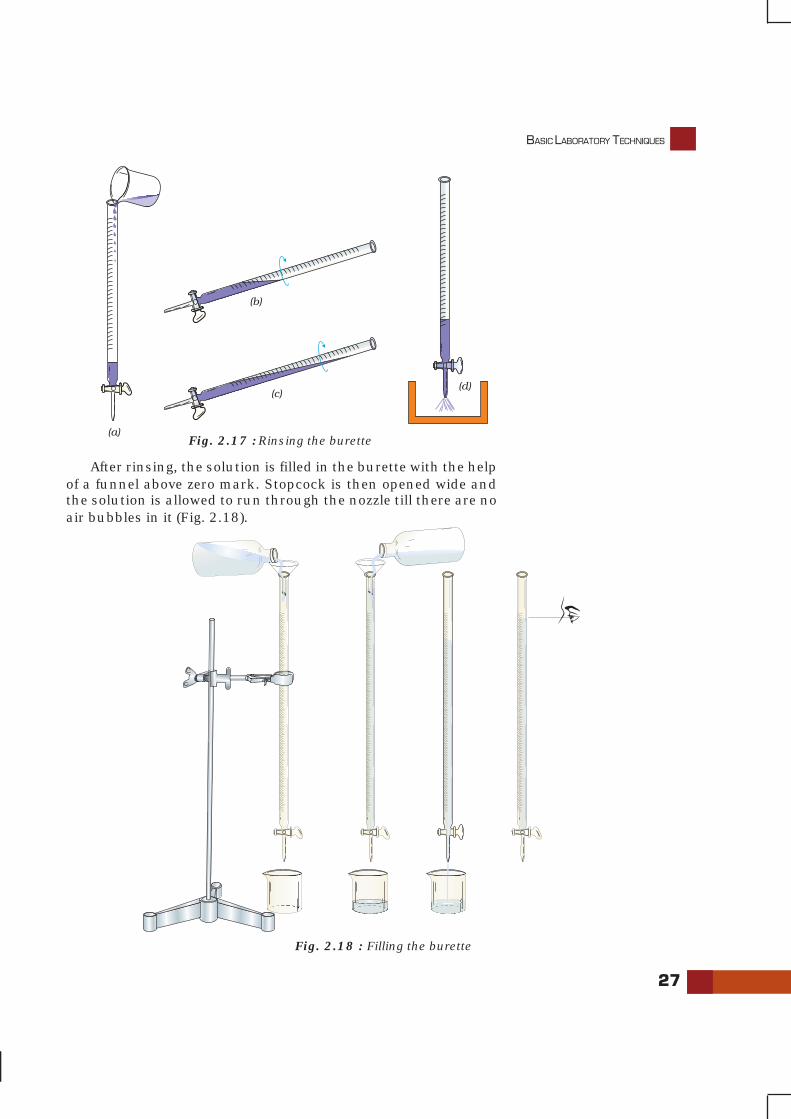
Before filling the solution to be used, the burette shouldbe rinsed with the solution to be filled. For rinsing the burette,few millilitres of solution are taken into it and the whole innersurface of burette is wetted with the solution by rotating it.After rinsing, the solution is drained out of the nozzle of theburette (Fig. 2.17).
Fig. 2.15 : Measuring Cylinder
Fig. 2.16 : Burette
BASIC LABORATORY TECHNIQUES
27
After rinsing, the solution is filled in the burette with the helpof a funnel above zero mark. Stopcock is then opened wide andthe solution is allowed to run through the nozzle till there are noair bubbles in it (Fig. 2.18).
Fig. 2.17 : Rinsing the burette
Fig. 2.18 : Filling the burette
28
LABORATORY MANUAL CHEMISTRY
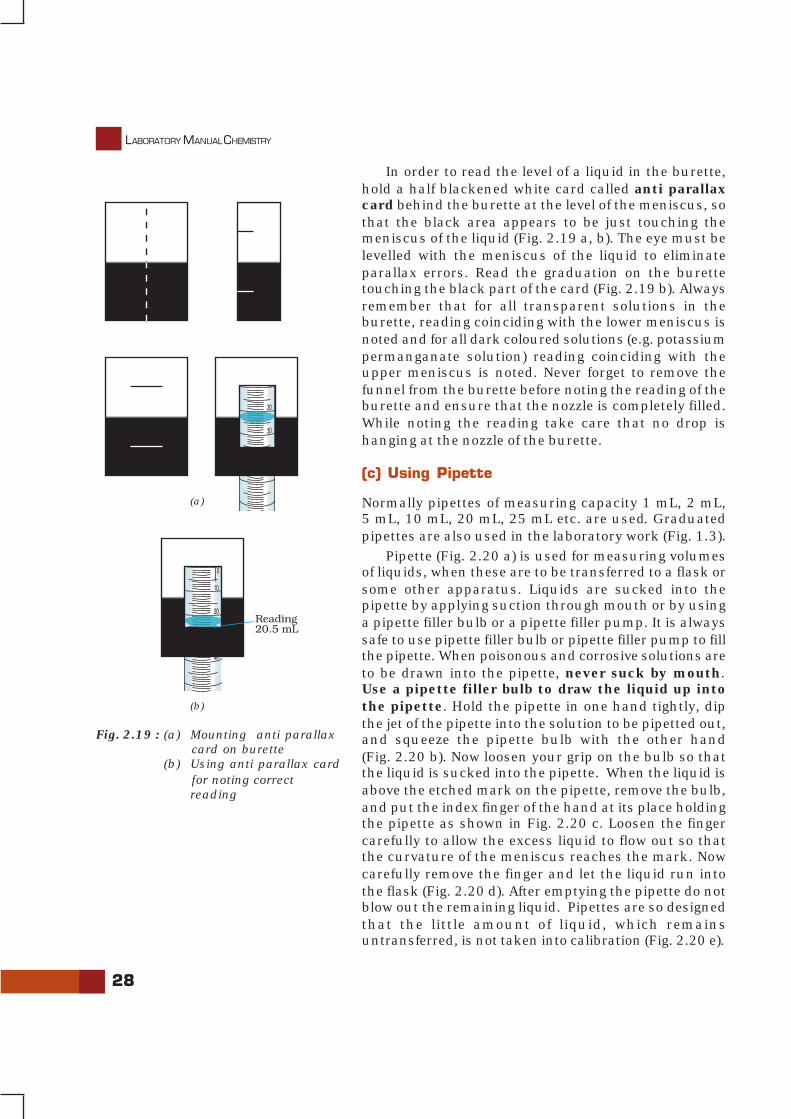
In order to read the level of a liquid in the burette,hold a half blackened white card called anti parallaxcard behind the burette at the level of the meniscus, sothat the black area appears to be just touching themeniscus of the liquid (Fig. 2.19 a, b). The eye must belevelled with the meniscus of the liquid to eliminateparallax errors. Read the graduation on the burettetouching the black part of the card (Fig. 2.19 b). Alwaysremember that for all transparent solutions in theburette, reading coinciding with the lower meniscus isnoted and for all dark coloured solutions (e.g. potassiumpermanganate solution) reading coinciding with theupper meniscus is noted. Never forget to remove thefunnel from the burette before noting the reading of theburette and ensure that the nozzle is completely filled.While noting the reading take care that no drop ishanging at the nozzle of the burette.
(c) Using Pipette
Normally pipettes of measuring capacity 1 mL, 2 mL,5 mL, 10 mL, 20 mL, 25 mL etc. are used. Graduatedpipettes are also used in the laboratory work (Fig. 1.3).
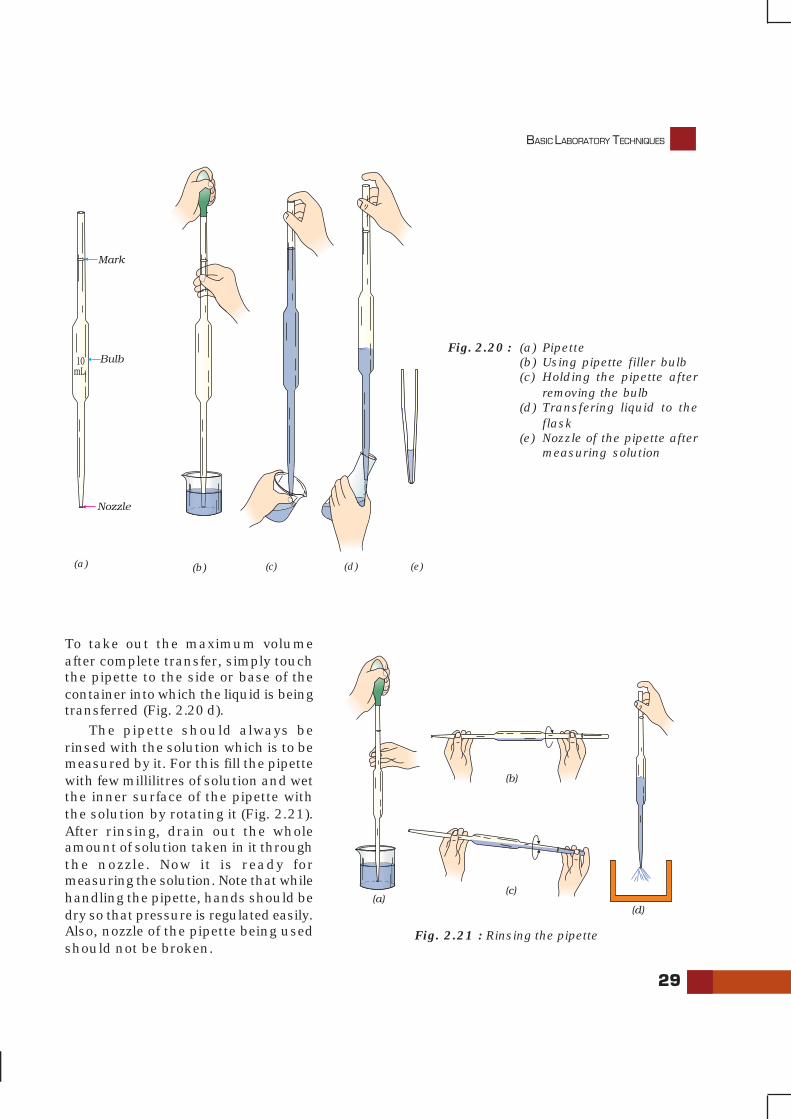
Pipette (Fig. 2.20 a) is used for measuring volumesof liquids, when these are to be transferred to a flask orsome other apparatus. Liquids are sucked into thepipette by applying suction through mouth or by usinga pipette filler bulb or a pipette filler pump. It is alwayssafe to use pipette filler bulb or pipette filler pump to fillthe pipette. When poisonous and corrosive solutions areto be drawn into the pipette, never suck by mouth.Use a pipette filler bulb to draw the liquid up intothe pipette. Hold the pipette in one hand tightly, dipthe jet of the pipette into the solution to be pipetted out,and squeeze the pipette bulb with the other hand(Fig. 2.20 b). Now loosen your grip on the bulb so thatthe liquid is sucked into the pipette. When the liquid isabove the etched mark on the pipette, remove the bulb,and put the index finger of the hand at its place holdingthe pipette as shown in Fig. 2.20 c. Loosen the fingercarefully to allow the excess liquid to flow out so thatthe curvature of the meniscus reaches the mark. Nowcarefully remove the finger and let the liquid run intothe flask (Fig. 2.20 d). After emptying the pipette do notblow out the remaining liquid. Pipettes are so designedthat the little amount of liquid, which remainsuntransferred, is not taken into calibration (Fig. 2.20 e).
Fig. 2.19 : (a) Mounting anti parallaxcard on burette
(b) Using anti parallax cardfor noting correctreading
(a)
(b)
BASIC LABORATORY TECHNIQUES
29
To take out the maximum volumeafter complete transfer, simply touchthe pipette to the side or base of thecontainer into which the liquid is beingtransferred (Fig. 2.20 d).
The pipette should always berinsed with the solution which is to bemeasured by it. For this fill the pipettewith few millilitres of solution and wetthe inner surface of the pipette withthe solution by rotating it (Fig. 2.21).After rinsing, drain out the wholeamount of solution taken in it throughthe nozzle. Now it is ready formeasuring the solution. Note that whilehandling the pipette, hands should bedry so that pressure is regulated easily.Also, nozzle of the pipette being usedshould not be broken.
Fig. 2.20 : (a) Pipette(b) Using pipette filler bulb(c) Holding the pipette after
removing the bulb(d) Transfering liquid to the
flask(e) Nozzle of the pipette after
measuring solution
(a) (b) (c) (d) (e)
Fig. 2.21 : Rinsing the pipette
30
LABORATORY MANUAL CHEMISTRY
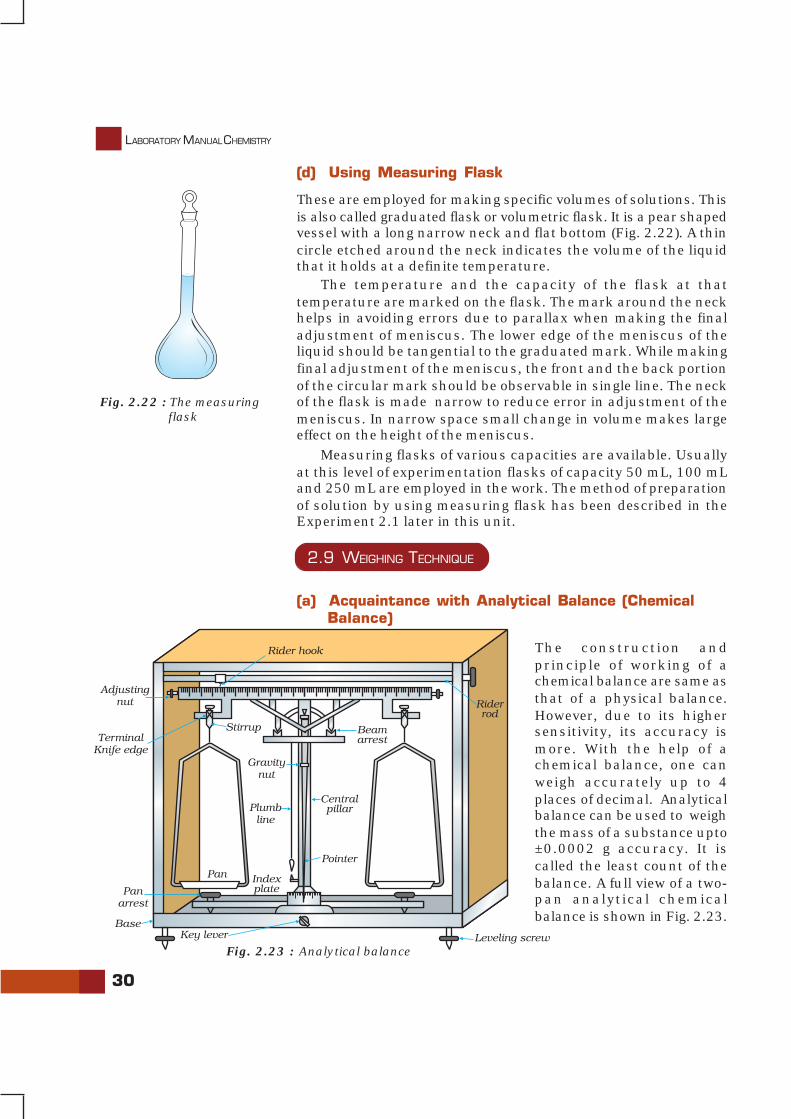
(d) Using Measuring Flask
These are employed for making specific volumes of solutions. Thisis also called graduated flask or volumetric flask. It is a pear shapedvessel with a long narrow neck and flat bottom (Fig. 2.22). A thincircle etched around the neck indicates the volume of the liquidthat it holds at a definite temperature.
The temperature and the capacity of the flask at thattemperature are marked on the flask. The mark around the neckhelps in avoiding errors due to parallax when making the finaladjustment of meniscus. The lower edge of the meniscus of theliquid should be tangential to the graduated mark. While makingfinal adjustment of the meniscus, the front and the back portionof the circular mark should be observable in single line. The neckof the flask is made narrow to reduce error in adjustment of themeniscus. In narrow space small change in volume makes largeeffect on the height of the meniscus.
Measuring flasks of various capacities are available. Usuallyat this level of experimentation flasks of capacity 50 mL, 100 mLand 250 mL are employed in the work. The method of preparationof solution by using measuring flask has been described in theExperiment 2.1 later in this unit.
2.9 WEIGHING TECHNIQUE
(a) Acquaintance with Analytical Balance (ChemicalBalance)
The construction andprinciple of working of achemical balance are same asthat of a physical balance.However, due to its highersensitivity, its accuracy ismore. With the help of achemical balance, one canweigh accurately up to 4places of decimal. Analyticalbalance can be used to weighthe mass of a substance upto±0.0002 g accuracy. It iscalled the least count of thebalance. A full view of a two-pan analytical chemicalbalance is shown in Fig. 2.23.
Fig. 2.22 : The measuring flask
Fig. 2.23 : Analytical balance
BASIC LABORATORY TECHNIQUES
31
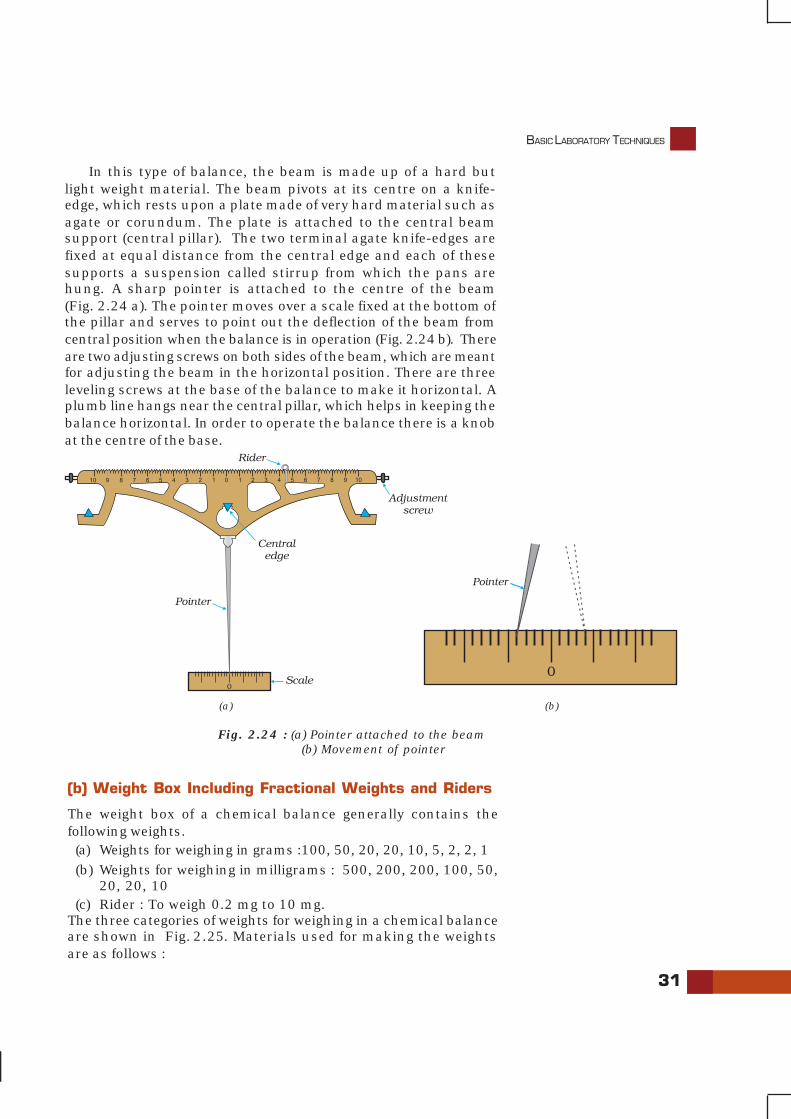
In this type of balance, the beam is made up of a hard butlight weight material. The beam pivots at its centre on a knife-edge, which rests upon a plate made of very hard material such asagate or corundum. The plate is attached to the central beamsupport (central pillar). The two terminal agate knife-edges arefixed at equal distance from the central edge and each of thesesupports a suspension called stirrup from which the pans arehung. A sharp pointer is attached to the centre of the beam(Fig. 2.24 a). The pointer moves over a scale fixed at the bottom ofthe pillar and serves to point out the deflection of the beam fromcentral position when the balance is in operation (Fig. 2.24 b). Thereare two adjusting screws on both sides of the beam, which are meantfor adjusting the beam in the horizontal position. There are threeleveling screws at the base of the balance to make it horizontal. Aplumb line hangs near the central pillar, which helps in keeping thebalance horizontal. In order to operate the balance there is a knobat the centre of the base.
Fig. 2.24 : (a) Pointer attached to the beam(b) Movement of pointer
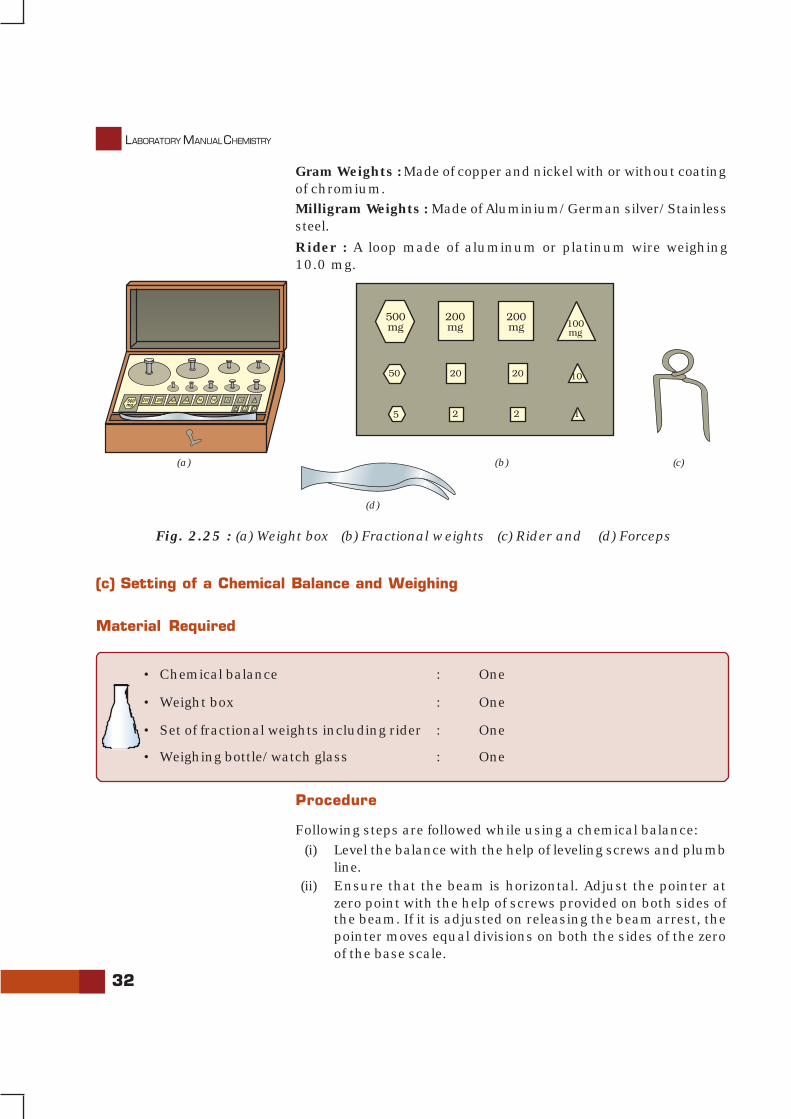
(b) Weight Box Including Fractional Weights and Riders
The weight box of a chemical balance generally contains thefollowing weights.(a) Weights for weighing in grams :100, 50, 20, 20, 10, 5, 2, 2, 1(b) Weights for weighing in milligrams : 500, 200, 200, 100, 50,
20, 20, 10(c) Rider : To weigh 0.2 mg to 10 mg.
The three categories of weights for weighing in a chemical balanceare shown in Fig. 2.25. Materials used for making the weightsare as follows :
(a) (b)
32
LABORATORY MANUAL CHEMISTRY
(c) Setting of a Chemical Balance and Weighing
Material Required
• Chemical balance : One
• Weight box : One
• Set of fractional weights including rider : One
• Weighing bottle/watch glass : One
Procedure
Following steps are followed while using a chemical balance:(i) Level the balance with the help of leveling screws and plumb
line.(ii) Ensure that the beam is horizontal. Adjust the pointer at
zero point with the help of screws provided on both sides ofthe beam. If it is adjusted on releasing the beam arrest, thepointer moves equal divisions on both the sides of the zeroof the base scale.
(d)
Fig. 2.25 : (a) Weight box (b) Fractional weights (c) Rider and (d) Forceps
(c)(a) (b)
Gram Weights : Made of copper and nickel with or without coatingof chromium.Milligram Weights : Made of Aluminium/German silver/Stainlesssteel.
Rider : A loop made of aluminum or platinum wire weighing10.0 mg.
BASIC LABORATORY TECHNIQUES
33
(iii) Place a watch glass/weighing bottle on the left pan in whichweighing material is kept. Put approximate weights fromthe weight box with the help of forceps on the right pan.
(iv) Release the beam arrest slowly and note the movement ofthe pointer on the scale. If its weight is not appropriate, thepointer will move towards the lighter side. Add or removeweights according to the requirement after bringing the pansto rest by arresting the beam with the help of the knob locatednear the base. When weight on both the pans becomes equal,the pointer moves equal divisions on both sides of the zeroof the base scale.
(v) Use the rider for adjustment of weight below 10mg.
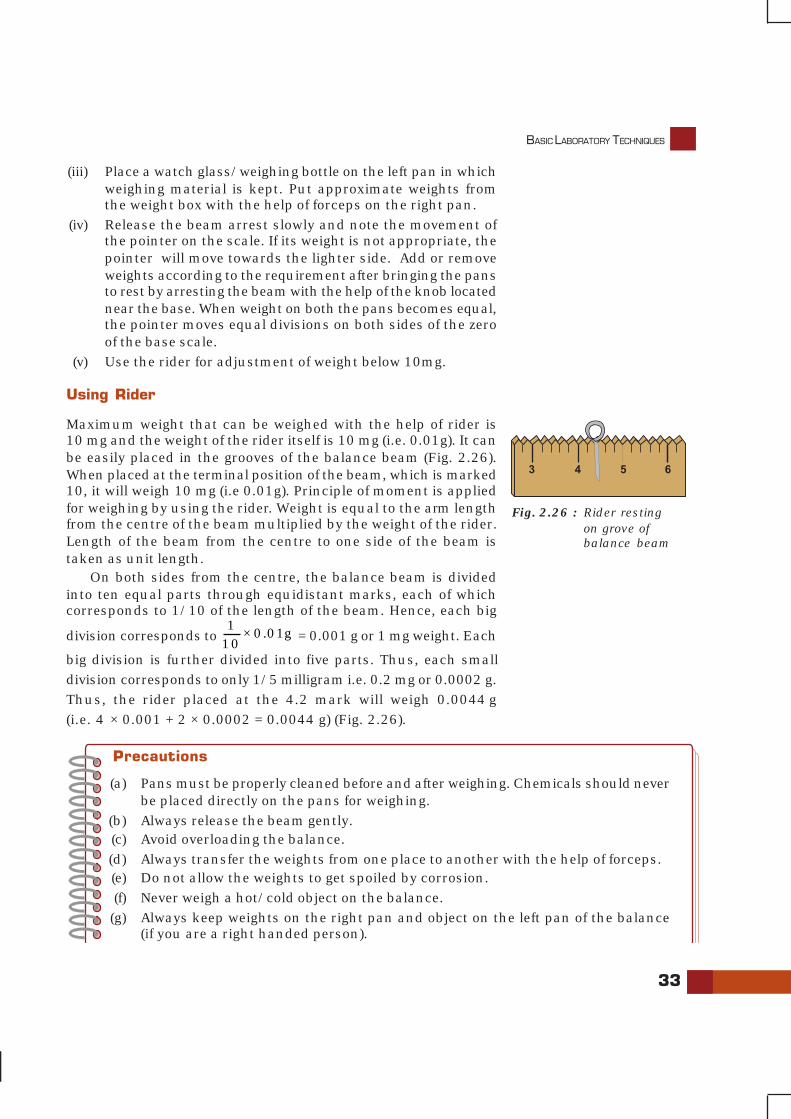
Using Rider
Maximum weight that can be weighed with the help of rider is10 mg and the weight of the rider itself is 10 mg (i.e. 0.01g). It canbe easily placed in the grooves of the balance beam (Fig. 2.26).When placed at the terminal position of the beam, which is marked10, it will weigh 10 mg (i.e 0.01g). Principle of moment is appliedfor weighing by using the rider. Weight is equal to the arm lengthfrom the centre of the beam multiplied by the weight of the rider.Length of the beam from the centre to one side of the beam istaken as unit length.
On both sides from the centre, the balance beam is dividedinto ten equal parts through equidistant marks, each of whichcorresponds to 1/10 of the length of the beam. Hence, each big
division corresponds to 1
× 0.01g10
= 0.001 g or 1 mg weight. Each
big division is further divided into five parts. Thus, each smalldivision corresponds to only 1/5 milligram i.e. 0.2 mg or 0.0002 g.Thus, the rider placed at the 4.2 mark will weigh 0.0044 g(i.e. 4 × 0.001 + 2 × 0.0002 = 0.0044 g) (Fig. 2.26).
Precautions
(a) Pans must be properly cleaned before and after weighing. Chemicals should neverbe placed directly on the pans for weighing.
(b) Always release the beam gently.(c) Avoid overloading the balance.(d) Always transfer the weights from one place to another with the help of forceps.(e) Do not allow the weights to get spoiled by corrosion.(f) Never weigh a hot/cold object on the balance.(g) Always keep weights on the right pan and object on the left pan of the balance
(if you are a right handed person).
Fig. 2.26 : Rider restingon grove ofbalance beam
34
LABORATORY MANUAL CHEMISTRY
EXPERIMENT 2.1
Aim
Preparation of 250 mL of 0.1M standard solution* of oxalic acid.
TheoryA solution of exactly known concentration is considered to be astandard solution. There are various ways of expressing theconcentration of a standard solution. Standard solution of an acid/base is used to determine the unknown concentration of a solutionof bases / acids by volumetric analysis. For example, a standardsolution of oxalic acid can be used to determine the unknownconcentration of an alkali solution. The strength of a standardsolution is usually expressed in moles per litre. The formula ofhydrated crystalline oxalic acid is
(h) Always make necessary adjustments in the balance before weighing.(i) To insert or remove weights and to keep the object on the pans always use the
side doors. Never use the front shutter.(j) Keep the doors shut while relasing the beam arrest to note the movement of the
pointer on the scale.
* Learn more about standard solution in Unit-6.
Discussion Questions
(i) How is an analytical balance different from a physical balance?
(ii) On what principle, is weighing by using rider based?
(iii) What is the maximum weight that can be weighed on a chemical balance?
(iv) Which weights are called fractional weights?
(v) Why are forceps always used for handling the weights?
(vi) The rider rests at a reading of 3.4 on the left side of the beam. What contribution does thismake to the weight of the material being weighed when weights are placed on the rightpan?
(vii) Can you weigh 0.0023 g using chemical balance? Give reason for your answer.
Oxalic acid
BASIC LABORATORY TECHNIQUES
35
• Oxalic acid : As per need
and its molar mass is 126 g. If 126 g of oxalic acid is present in one
litre of the solution, it is known as one molar (1.0 M) solution.For the preparation of one litre of 0.1 M oxalic acid solution, we
require 126
12.6g10
= of hydrated oxalic acid. Therefore, for preparing
250 mL of 0.1 M oxalic acid solution, we require:
12.6 g× 250 mL=3.1500g of hydrated oxalic acid.
1000 mL
In general for preparing a solution of required molarity, the amount
of substance to be weighed can be calculated by using the formula
given below :
Mass of solute is grams × 1000Molarity (M) =
Molar mass of solute (volume of solution to
be prepared in mL)
×
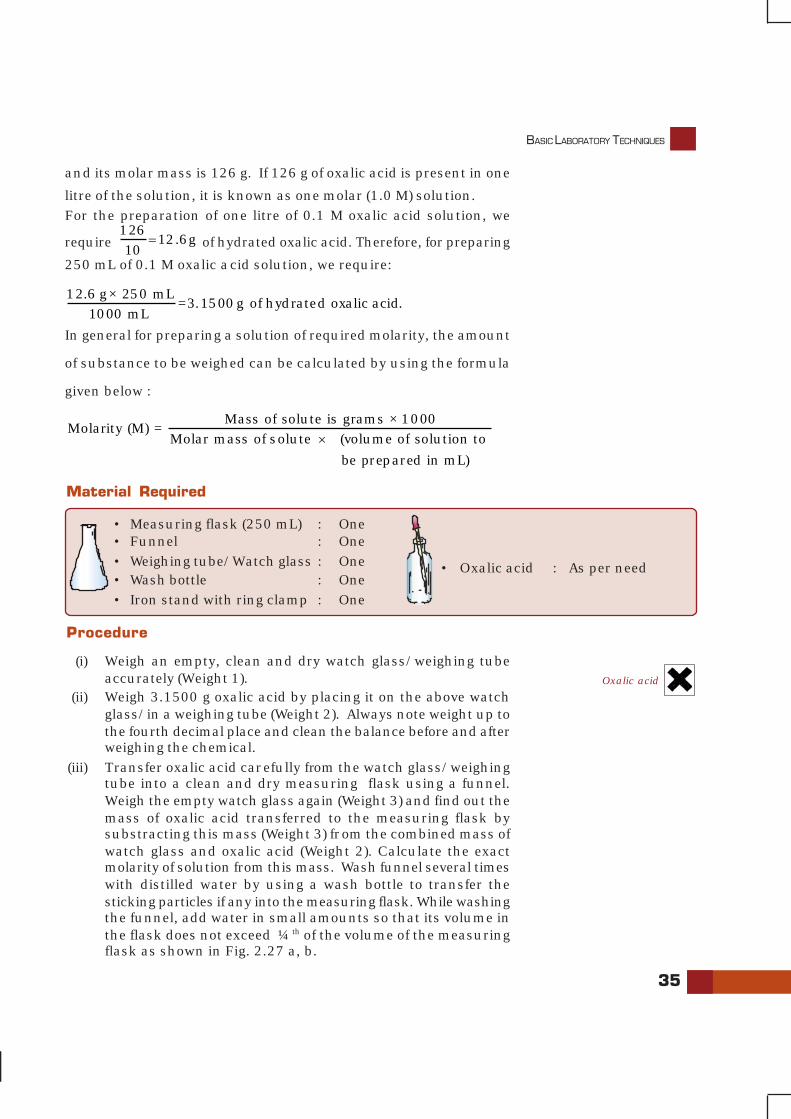
Material Required
• Measuring flask (250 mL) : One• Funnel : One• Weighing tube/Watch glass : One• Wash bottle : One• Iron stand with ring clamp : One
Procedure
(i) Weigh an empty, clean and dry watch glass/weighing tubeaccurately (Weight 1).
(ii) Weigh 3.1500 g oxalic acid by placing it on the above watchglass/in a weighing tube (Weight 2). Always note weight up tothe fourth decimal place and clean the balance before and afterweighing the chemical.
(iii) Transfer oxalic acid carefully from the watch glass/weighingtube into a clean and dry measuring flask using a funnel.Weigh the empty watch glass again (Weight 3) and find out themass of oxalic acid transferred to the measuring flask bysubstracting this mass (Weight 3) from the combined mass ofwatch glass and oxalic acid (Weight 2). Calculate the exactmolarity of solution from this mass. Wash funnel several timeswith distilled water by using a wash bottle to transfer thesticking particles if any into the measuring flask. While washingthe funnel, add water in small amounts so that its volume inthe flask does not exceed ¼th of the volume of the measuringflask as shown in Fig. 2.27 a, b.
Oxalic acid
36
LABORATORY MANUAL CHEMISTRY
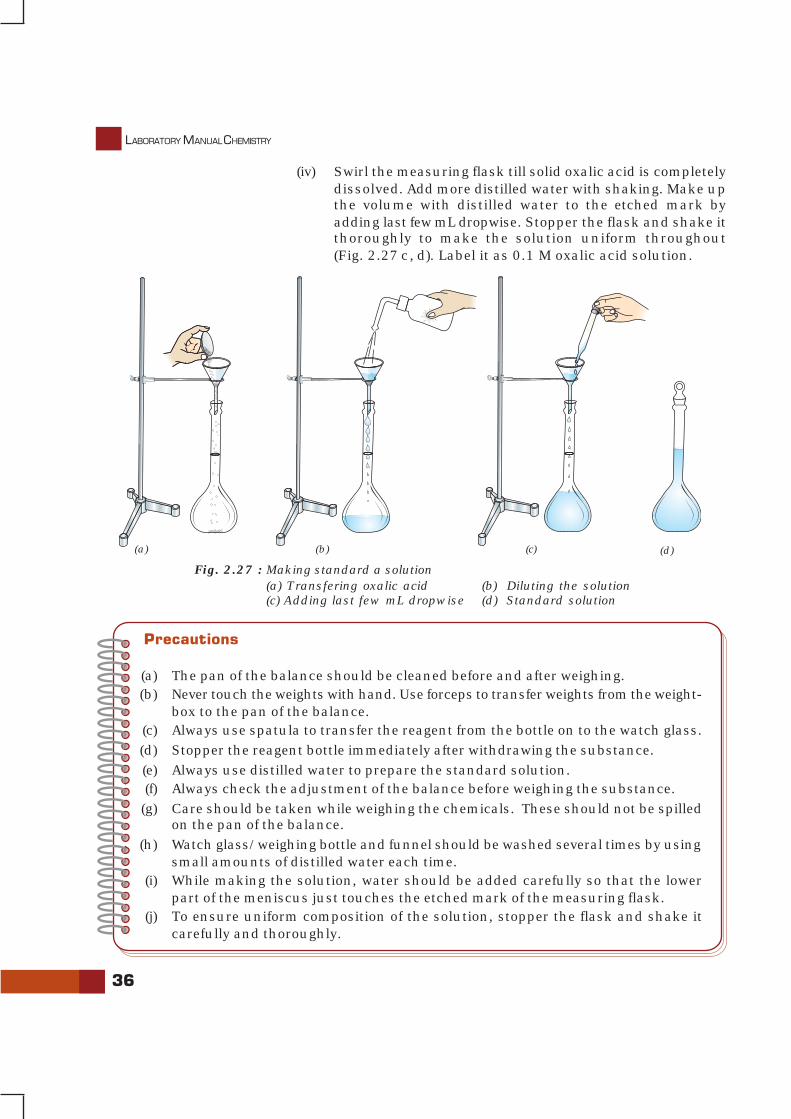
(iv) Swirl the measuring flask till solid oxalic acid is completelydissolved. Add more distilled water with shaking. Make upthe volume with distilled water to the etched mark byadding last few mL dropwise. Stopper the flask and shake itthoroughly to make the solution uniform throughout(Fig. 2.27 c, d). Label it as 0.1 M oxalic acid solution.
Precautions
(a) The pan of the balance should be cleaned before and after weighing.(b) Never touch the weights with hand. Use forceps to transfer weights from the weight-
box to the pan of the balance.(c) Always use spatula to transfer the reagent from the bottle on to the watch glass.(d) Stopper the reagent bottle immediately after withdrawing the substance.(e) Always use distilled water to prepare the standard solution.(f) Always check the adjustment of the balance before weighing the substance.(g) Care should be taken while weighing the chemicals. These should not be spilled
on the pan of the balance.(h) Watch glass/weighing bottle and funnel should be washed several times by using
small amounts of distilled water each time.(i) While making the solution, water should be added carefully so that the lower
part of the meniscus just touches the etched mark of the measuring flask.(j) To ensure uniform composition of the solution, stopper the flask and shake it
carefully and thoroughly.
Fig. 2.27 : Making standard a solution(a) Transfering oxalic acid (b) Diluting the solution(c) Adding last few mL dropwise (d) Standard solution
(a) (b) (d)(c)
BASIC LABORATORY TECHNIQUES
37
Discussion Questions
(i) What is the formula and the basicity of hydrated oxalic acid and anhydrous oxalic acid?
(ii) What do you mean by a molar solution?
(iii) Why are the standard solutions always prepared in a volumetric flask?
(iv) How will you prepare 250 mL of 0.05 M oxalic acid solution?
(v) Can solid NaOH be used to prepare its standard solution?
(vi) What type of substance can be used for preparing standard solution?
(vii) What is meant by “weighing by transfer”? When is this used?
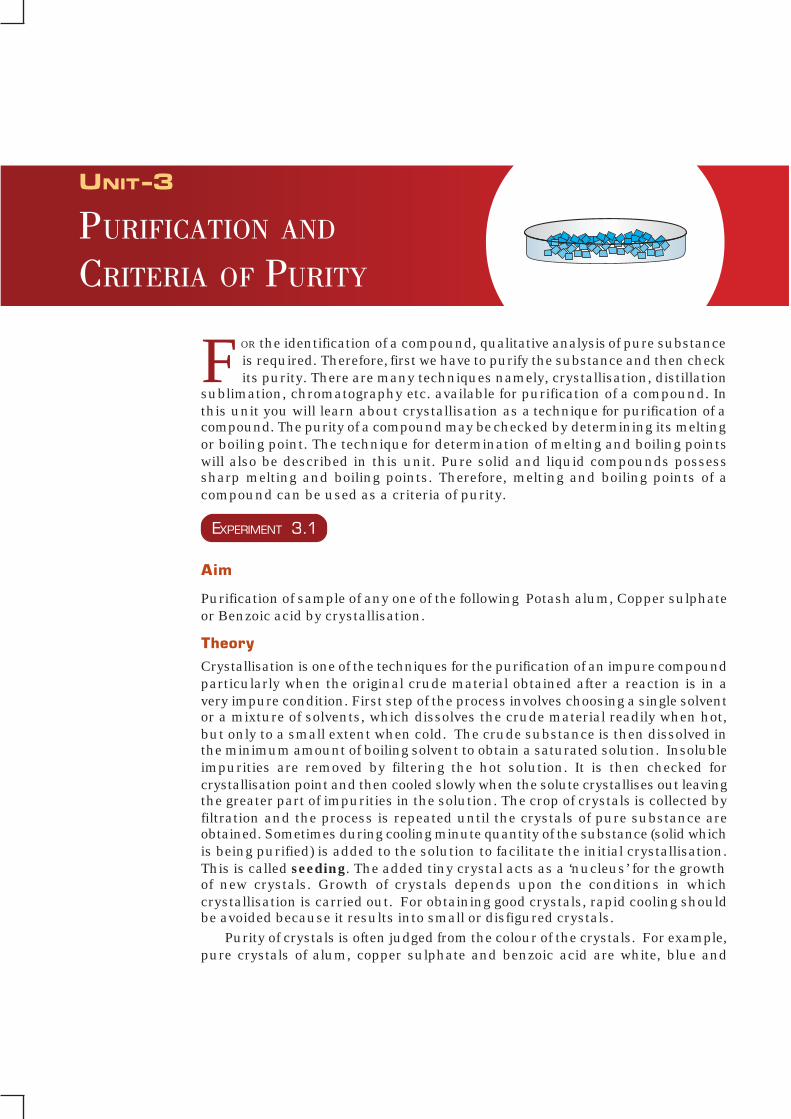
UNIT-3
PURIFICATION AND
CRITERIA OF PURITY
FOR the identification of a compound, qualitative analysis of pure substanceis required. Therefore, first we have to purify the substance and then checkits purity. There are many techniques namely, crystallisation, distillation
sublimation, chromatography etc. available for purification of a compound. Inthis unit you will learn about crystallisation as a technique for purification of acompound. The purity of a compound may be checked by determining its meltingor boiling point. The technique for determination of melting and boiling pointswill also be described in this unit. Pure solid and liquid compounds possesssharp melting and boiling points. Therefore, melting and boiling points of acompound can be used as a criteria of purity.
EXPERIMENT 3.1
Aim
Purification of sample of any one of the following Potash alum, Copper sulphateor Benzoic acid by crystallisation.
TheoryCrystallisation is one of the techniques for the purification of an impure compoundparticularly when the original crude material obtained after a reaction is in avery impure condition. First step of the process involves choosing a single solventor a mixture of solvents, which dissolves the crude material readily when hot,but only to a small extent when cold. The crude substance is then dissolved inthe minimum amount of boiling solvent to obtain a saturated solution. Insolubleimpurities are removed by filtering the hot solution. It is then checked forcrystallisation point and then cooled slowly when the solute crystallises out leavingthe greater part of impurities in the solution. The crop of crystals is collected byfiltration and the process is repeated until the crystals of pure substance areobtained. Sometimes during cooling minute quantity of the substance (solid whichis being purified) is added to the solution to facilitate the initial crystallisation.This is called seeding. The added tiny crystal acts as a ‘nucleus’ for the growthof new crystals. Growth of crystals depends upon the conditions in whichcrystallisation is carried out. For obtaining good crystals, rapid cooling shouldbe avoided because it results into small or disfigured crystals.
Purity of crystals is often judged from the colour of the crystals. For example,pure crystals of alum, copper sulphate and benzoic acid are white, blue and
PURIFICATION AND CRITERIA OF PURITY
39
greenish white respectively. Impurities impart colour to the crystals;therefore, impure crystals have a colour different from pure crystals.
Material Required
• Beaker (250 mL) : One• Glass funnel : One• Tripod stand : One• Porcelain dish : One• Glass rod : One• Sand bath : One
Procedure
(i) Take 30-50 mL distilled water in a beaker and prepare asaturated solution of potash alum/copper sulphate in it atroom temperature by adding the impure solid sample insmall amounts with stirring. Stop adding the solid when itdoes not dissolve further. To prepare saturated solution ofbenzoic acid use hot water.
(ii) Filter the saturated solution so prepared and transfer thefiltrate into a porcelain dish. Heat it on a sand bath till nearly¾th of the solvent is evaporated. Dip a glass rod into thesolution, take it out and dry it by blowing air from themouth. If a solid film deposits on the rod, stop heating.
(iii) Cover the porcelain dish with a watch glass and keep thecontent of the dish undisturbed for cooling.
(iv) When crystals are formed, remove the mother liquor (liquidleft after crystallisation) by decantation.
(v) Wash the crystals of potash alum and copper sulphate, thusobtained first with very small quantity of alcohol containingsmall amount of cold water to remove the adhering motherliquor and then with alcohol to remove moisture. Wash thecrystals of benzoic acid with cold water. Benzoic acid issoluble in alcohol. Do not use alcohol to wash its crystals.
(vi) Dry the crystals between the folds of a filter paper.(vii) Store the dry crystals thus obtained at a safe and dry place.(viii) Repeat steps (ii-vii) for obtaining maximum amount of pure
substance.
• Potash alum,Copper sulphateand Benzoic acid : As per need
Precautions(a) Do not evaporate the entire solvent while concentrating the solution.(b) Do not disturb the solution while it is being cooled.(c) Use the washing liquid in 3-4 very small installments rather than in one installment.
Copper sulphate
40
LABORATORY MANUAL CHEMISTRY
Discussion Questions
(i) Which one of the following formula is correct representationof potash alum(phitkari)? Explain.
(a) K+(H2O)6 Al3+ (H2O)6(2–
4SO )2
(b) K2SO4.Al2(SO4)3 . 24H2O
(ii) What are isomorphous compounds?
(iii) What is meant by the term, ‘water of crystallisation’?
(iv) Describe the effect of strong heating on each type of crystalprepared by you.
(v) What do you understand by the term mother liquor?
(vi) Which thermodynamic function favours the process ofcrystallisation?
(vii) Explain the term-saturated solution?
(viii) Why is the preparation of a saturated solution essential formaking crystals?
(ix) Name the processes involved in crystallisation?
(x) What is Kipp’s waste? How can we obtain crystals of ferroussulphate from Kipp’s waste?
EXPERIMENT 3.2
Aim
Determination of melting point of a solid organic compound.
Theory
The kinetic energy of molecules of a substance increases on heating.When it becomes high enough to overcome the attractive forcesoperating between the molecules, the lattice structure of the solidbreaks, the solid melts and comes into the liquid state. Meltingpoint of a substance is the temperature at which solid state of asubstance begins to change into the liquid state, when the pressureis one atmosphere.
PURIFICATION AND CRITERIA OF PURITY
41
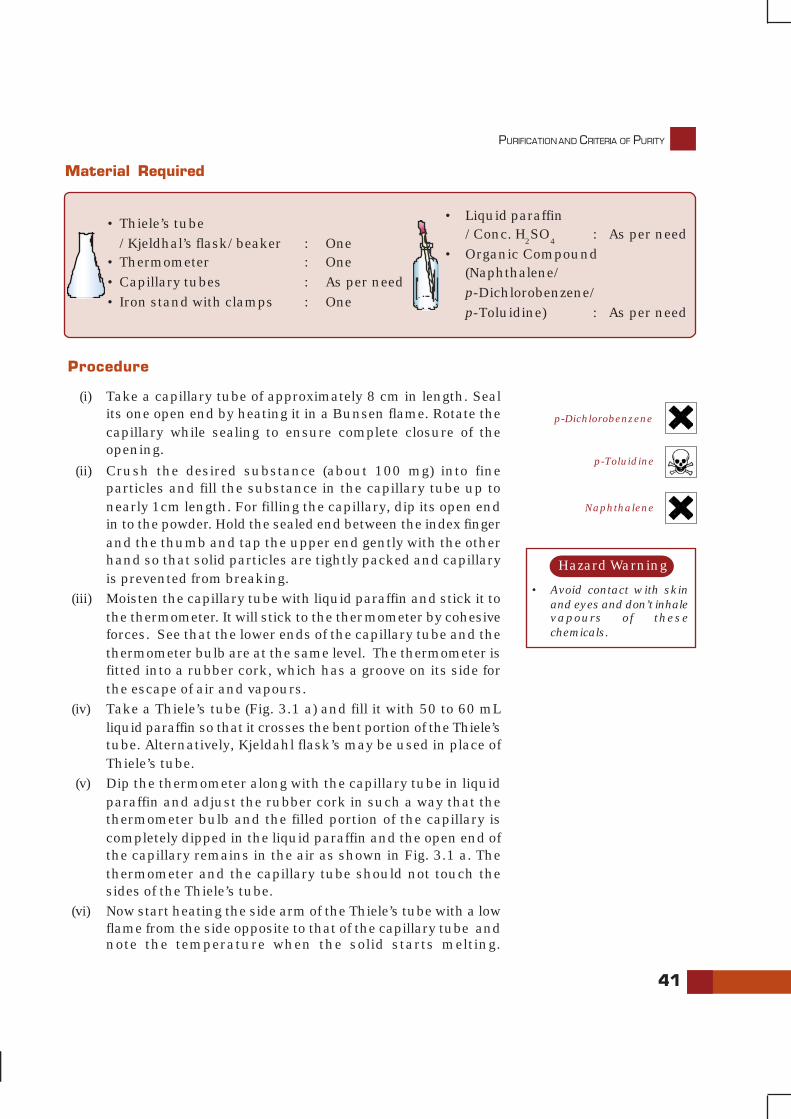
Material Required
• Thiele’s tube/Kjeldhal’s flask/beaker : One
• Thermometer : One• Capillary tubes : As per need• Iron stand with clamps : One
• Liquid paraffin/Conc. H
2SO
4: As per need
• Organic Compound(Naphthalene/p-Dichlorobenzene/p-Toluidine) : As per need
Procedure
(i) Take a capillary tube of approximately 8 cm in length. Sealits one open end by heating it in a Bunsen flame. Rotate thecapillary while sealing to ensure complete closure of theopening.
(ii) Crush the desired substance (about 100 mg) into fineparticles and fill the substance in the capillary tube up tonearly 1cm length. For filling the capillary, dip its open endin to the powder. Hold the sealed end between the index fingerand the thumb and tap the upper end gently with the otherhand so that solid particles are tightly packed and capillaryis prevented from breaking.
(iii) Moisten the capillary tube with liquid paraffin and stick it tothe thermometer. It will stick to the thermometer by cohesiveforces. See that the lower ends of the capillary tube and thethermometer bulb are at the same level. The thermometer isfitted into a rubber cork, which has a groove on its side forthe escape of air and vapours.
(iv) Take a Thiele’s tube (Fig. 3.1 a) and fill it with 50 to 60 mLliquid paraffin so that it crosses the bent portion of the Thiele’stube. Alternatively, Kjeldahl flask’s may be used in place ofThiele’s tube.
(v) Dip the thermometer along with the capillary tube in liquidparaffin and adjust the rubber cork in such a way that thethermometer bulb and the filled portion of the capillary iscompletely dipped in the liquid paraffin and the open end ofthe capillary remains in the air as shown in Fig. 3.1 a. Thethermometer and the capillary tube should not touch thesides of the Thiele’s tube.
(vi) Now start heating the side arm of the Thiele’s tube with a lowflame from the side opposite to that of the capillary tube andnote the temperature when the solid starts melting.
p-Dichlorobenzene
p-Toluidine
Naphthalene
• Avoid contact with skinand eyes and don’t inhalevapours of thesechemicals.
Hazard Warning
42
LABORATORY MANUAL CHEMISTRY
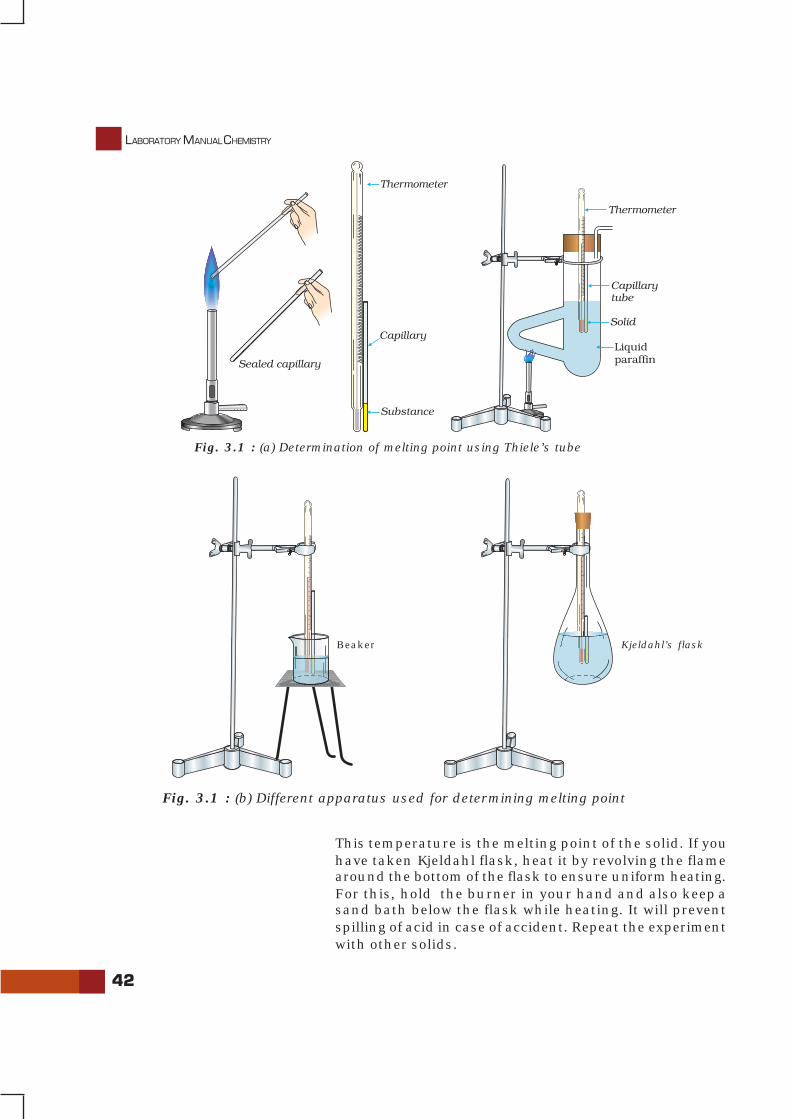
Fig. 3.1 : (a) Determination of melting point using Thiele’s tube
Beaker Kjeldahl’s flask
This temperature is the melting point of the solid. If youhave taken Kjeldahl flask, heat it by revolving the flamearound the bottom of the flask to ensure uniform heating.For this, hold the burner in your hand and also keep asand bath below the flask while heating. It will preventspilling of acid in case of accident. Repeat the experimentwith other solids.
Fig. 3.1 : (b) Different apparatus used for determining melting point
PURIFICATION AND CRITERIA OF PURITY
43
Precautions
(a) Keep the lower end of the capillary tube and the thermometer at the same level.(b) Capillary tube should not be very thick.(c) Packing of the powder should be uniform without any big air gaps in between
the solid particles.(d) Thiele’s tube should be heated at the side arm by using a low flame.(e) The cork of the Thiele’s tube or Kjeldhal flask holding the thermometer should
have a side groove so that vapours can escape through it during the process ofheating to prevent bursting of the tube or flask.
(f) Never fill the bulb of Kjeldahl flask’s more than half.
Note : Paraffin can be safely heated upto 220°C. Therefore for determination of melting point of a substancepossessing melting point higher than this, conc. H
2SO
4 may be used which can be heated upto 280°C.
Sulphuric acid has been suggested for use but is not recomended. Silicone oils are most satisfactoryliquids and can be used in place of sulphuric acid.
Discussion Questions
(i) Why do pure solids possess sharp melting point?
(ii) What is the effect of impurities on the melting point of a solid?
(iii) Why is the melting point of benzamide more than acetamide?
(iv) Can any other liquid be used in place of liquid paraffin to determine the melting point?
(v) Can we heat the capillary directly for the determination of melting point?
(vi) Why is liquid paraffin filled in the Thiele’s tube/Kjeldahl’s flask?
(vii) Why is Thiele’s tube heated at the side arm?
EXPERIMENT 3.3
AimDetermination of boiling point of a liquid organic compound.
TheoryThe boiling point of a liquid is the temperature at which vapourpressure of the liquid becomes equal to the atmospheric pressure,which the surface of the liquid experiences. At 1.013 baratmospheric pressure the boiling point of the liquid is termed asnormal boiling point. Different liquids have different boiling point.The difference in the boiling points of liquids is essentially due tothe difference in the intermolecular forces operating between themolecules of the liquid.
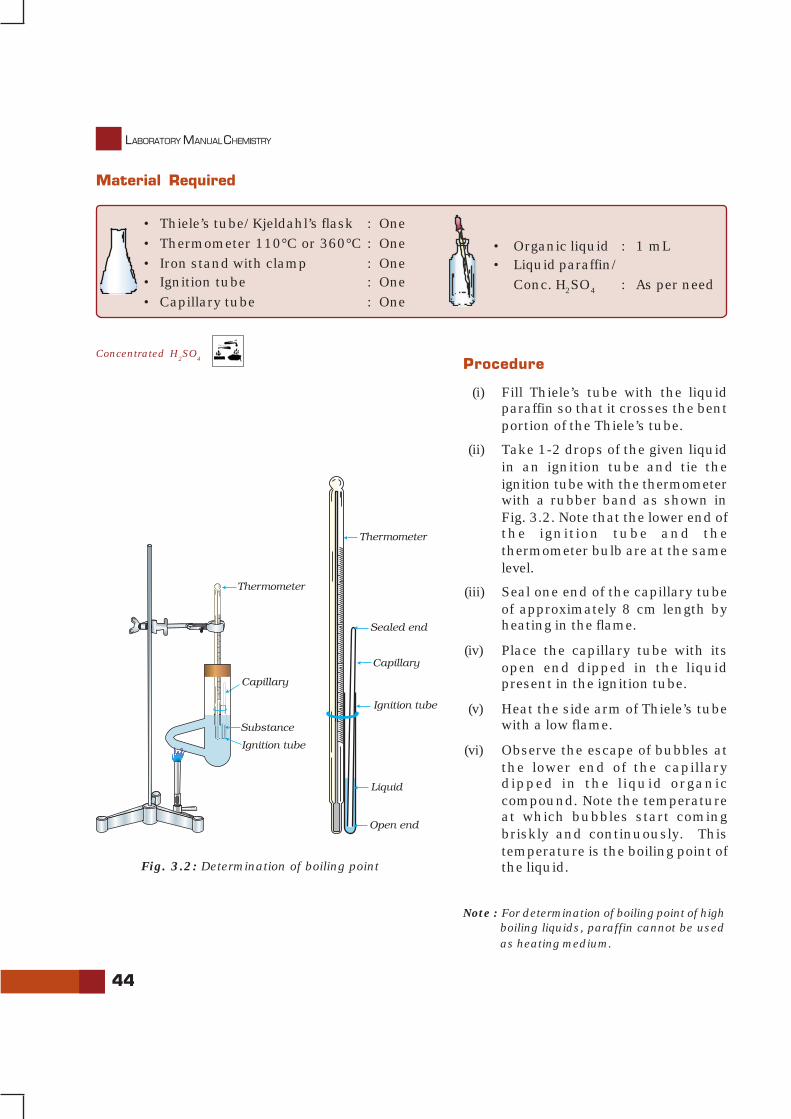
44
LABORATORY MANUAL CHEMISTRY
Material Required
• Thiele’s tube/Kjeldahl’s flask : One• Thermometer 110°C or 360°C : One• Iron stand with clamp : One• Ignition tube : One• Capillary tube : One
Procedure
(i) Fill Thiele’s tube with the liquidparaffin so that it crosses the bentportion of the Thiele’s tube.
(ii) Take 1-2 drops of the given liquidin an ignition tube and tie theignition tube with the thermometerwith a rubber band as shown inFig. 3.2. Note that the lower end ofthe ignition tube and thethermometer bulb are at the samelevel.
(iii) Seal one end of the capillary tubeof approximately 8 cm length byheating in the flame.
(iv) Place the capillary tube with itsopen end dipped in the liquidpresent in the ignition tube.
(v) Heat the side arm of Thiele’s tubewith a low flame.
(vi) Observe the escape of bubbles atthe lower end of the capillarydipped in the liquid organiccompound. Note the temperatureat which bubbles start comingbriskly and continuously. Thistemperature is the boiling point ofthe liquid.Fig. 3.2: Determination of boiling point
Note : For determination of boiling point of highboiling liquids, paraffin cannot be usedas heating medium.
• Organic liquid : 1 mL• Liquid paraffin/
Conc. H2SO4 : As per need
Concentrated H2SO
4

PURIFICATION AND CRITERIA OF PURITY
45
Precautions
(a) Record the temperature as the boiling point at which brisk and continuousevolution of the bubbles starts from the lower end of the capillary dipped in theliquid organic compound.
(b) Keep the lower end of the ignition tube and the thermometer bulb at the samelevel.
(c) Heat the side arm of the Thiele’s tube gently.(d) Boiling point of the liquid filled in Thiele’s tube should be 50-60°C higher than
that of the liquid, of which boiling point is to be determined.
Discussion Questions
(i) Suggest a suitable liquid, which can be filled in the Thiele’s tube for the determination ofthe boiling point of carbon tetrachloride?
(ii) In place of liquid paraffin, can any other liquid be used for the purpose of determination ofboiling point?
(iii) Suppose boiling point of a liquid in Delhi is 100°C. At hill station, will it be the same ordifferent? Give reasons.
(iv) Why is food cooked more quickly in a pressure cooker?
(v) How would the boiling point of water vary with the addition of equimolar quantities ofurea, potassium chloride and potassium sulphate?
(vi) Why do different isomers of alcohol represented by the formula C4H
10O differ in their boiling
points?
Do you know?
Learning technique of crystallisation is not only important from the point of view ofpurification of compounds but also from the point of developing large single crystals; becausestudies on single crystals have shown them to have many optical and electrical propertiesof great use. For example, slices from large crystals of silicon containing traces of certainimpurities are used in making solar batteries used for the operation of instruments insatellites. Frequency control in radar, television and radio is done by making use of slices ofsome crystals. Also, use of crystals of some compounds is made in microphones andearphones. You can now realize how important it is for chemist to learn these techniques.
UNIT–4
CHEMICAL EQUILIBRIUM(IONIC EQUILIBRIUM IN SOLUTION)
CHEMICAL reactions can be classified into two categories; namely reversibleand irreversible reactions. Reversible reactions take place in the samereaction vessel and can proceed in the forward and backward direction
simultaneously under the same conditions of temperature and pressure. Furtherin the case of reversible reactions a state is reached, when the rate of the forwardreaction becomes equal to the rate of the reverse reaction and it appears as thoughthe reaction has come to a stand still. This state is referred to as the state ofdynamic equilibrium. Consider the following simple reversible reaction at thegiven temperature, T.
A + B C+D
According to the law of mass action, rate of forward reaction, r1, will be directlyproportional to the product of concentrations of A and B and the rate of backwardreaction, r2, will be directly proportional to the products of concentrations of Cand D.
Thus, 1 1r = k [A][B] and 2 2r = k [C][D]
where k1 and k2 are the rate constants for the forward and the backwardreactions respectively and [A], [B], [C] and [D] are the molar concentrations of A,B, C and D respectively.
At equilibrium, r1 will be equal to r
2
1 2k [A][B] = k [C][D]
⇒ 1
2
k [C][D]=
k [A][B]
Putting 1
2
kk = K
c we have
[C][D]=
[A][B]cK
Kc is called equilibrium constant. Its value is independent of initialconcentration of reactants and is a function of temperature but remains constantat a constant temperature. At a given temperature, if the concentration of anyone of the reactants or products is changed, then equilibrium is disturbed andaccording to Le Chatelier principle, reaction proceeds in that direction whichcounteracts the change in concentration , so as to maintain the equilibrium.

CHEMICAL EQUILIBRIUM (IONIC EQUILIBRIUM IN SOLUTION)
47
The state of equilibrium in any reaction is recognised by theconstancy of an observable property (macroscopic property) likecolour intensity of the solution. In this unit we will study aboutthe shift in equilibrium in various reactions.
EXPERIMENT* 4.1
Aim
Study of shift in equilibrium in the reaction of ferric ions andthiocyanate ions by increasing the concentration of any one ofthese ions.
Theory
The equilibrium reaction between ferric chloride and potassiumthiocyanate is conveniently studied through the change in theintensity of colour of the solution.
Fe3+(aq) + SCN– (aq) [Fe(SCN)]2+ (aq)
(Blood red colour)
The equilibrium constant for the above reaction may bewritten as:
2+
3+ –
[[Fe(SCN)] (aq)]
[Fe (aq)] [SCN (aq)]K =
Here K is constant at a constant temperature. Increasing theconcentration of either Fe3+ ion or thiocyanate ion would result ina corresponding increase in the concentration of [Fe(SCN)]2+ ions.In order to keep the value of K constant, there is a shift inequilibrium, in the forward direction and consequently an increasein the intensity of the blood red colour which is due to [Fe(SCN)]2+.At equilibrium colour intensity remains constant.
• Ferric chloride : 0.100g• Potassium thiocyanate : 0.100g
Material Required
• Beakers (100 mL) : Two• Beaker (250 mL) : One• Boiling tubes : Six• Burettes : Four• Glass droppers : Two• Test tube stand : One• Glass rod : One
* The very nature of the experiment is purely qualitative. therefore, preparation of solution in terms of molarity hasnot been stressed.
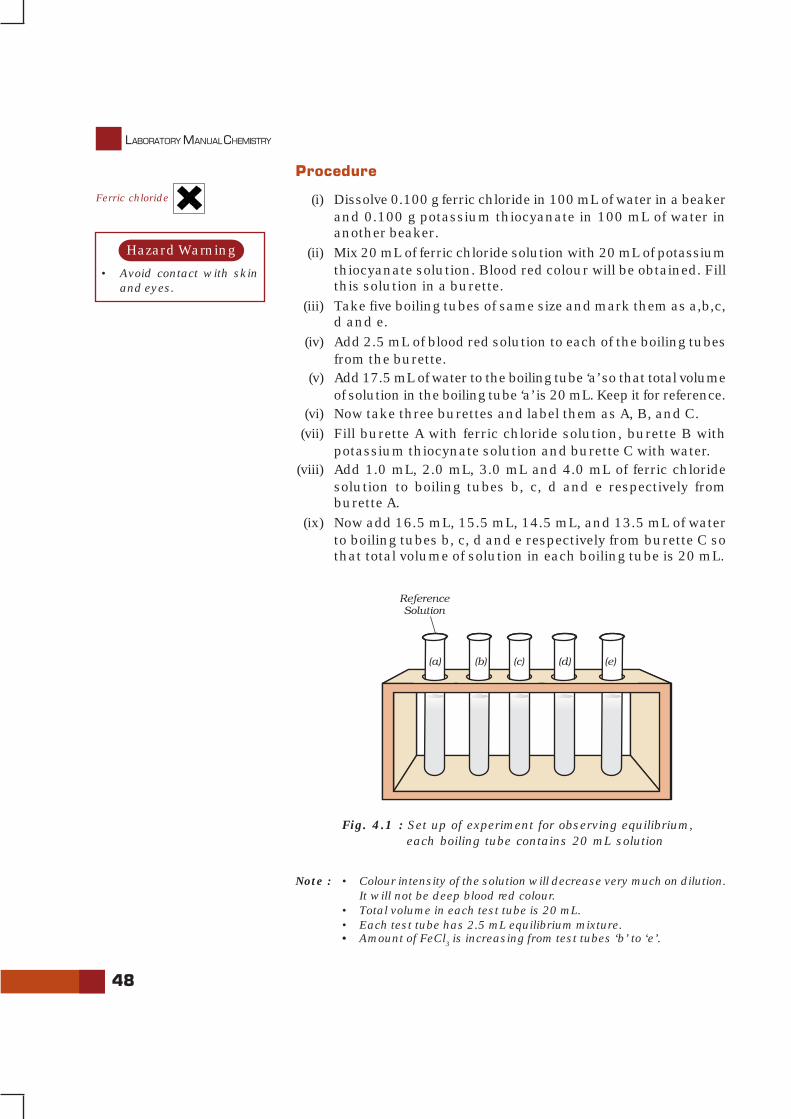
48
LABORATORY MANUAL CHEMISTRY
Procedure
(i) Dissolve 0.100 g ferric chloride in 100 mL of water in a beakerand 0.100 g potassium thiocyanate in 100 mL of water inanother beaker.
(ii) Mix 20 mL of ferric chloride solution with 20 mL of potassiumthiocyanate solution. Blood red colour will be obtained. Fillthis solution in a burette.
(iii) Take five boiling tubes of same size and mark them as a,b,c,d and e.
(iv) Add 2.5 mL of blood red solution to each of the boiling tubesfrom the burette.
(v) Add 17.5 mL of water to the boiling tube ‘a’ so that total volumeof solution in the boiling tube ‘a’ is 20 mL. Keep it for reference.
(vi) Now take three burettes and label them as A, B, and C.(vii) Fill burette A with ferric chloride solution, burette B with
potassium thiocynate solution and burette C with water.(viii) Add 1.0 mL, 2.0 mL, 3.0 mL and 4.0 mL of ferric chloride
solution to boiling tubes b, c, d and e respectively fromburette A.
(ix) Now add 16.5 mL, 15.5 mL, 14.5 mL, and 13.5 mL of waterto boiling tubes b, c, d and e respectively from burette C sothat total volume of solution in each boiling tube is 20 mL.
Fig. 4.1 : Set up of experiment for observing equilibrium, each boiling tube contains 20 mL solution
Note : • Colour intensity of the solution will decrease very much on dilution.It will not be deep blood red colour.
• Total volume in each test tube is 20 mL.• Each test tube has 2.5 mL equilibrium mixture.• Amount of FeCl
3 is increasing from test tubes ‘b’ to ‘e’.
Ferric chloride
• Avoid contact with skinand eyes.
Hazard Warning
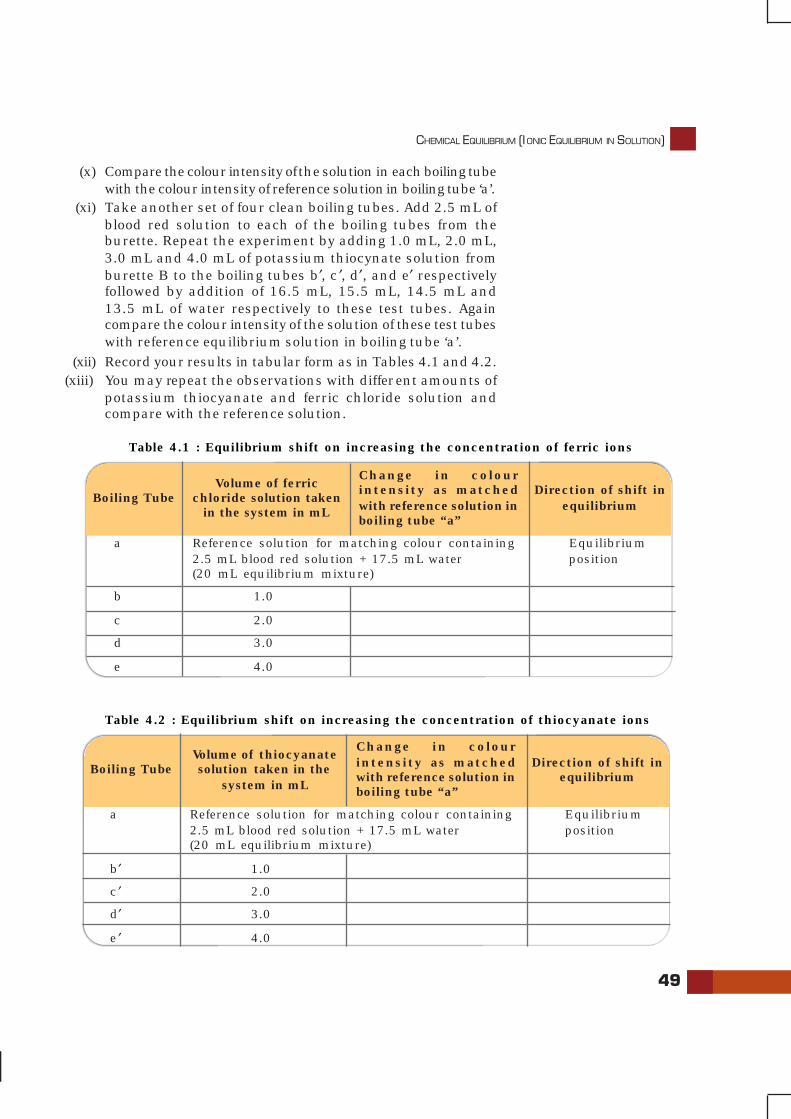
CHEMICAL EQUILIBRIUM (IONIC EQUILIBRIUM IN SOLUTION)
49
(x) Compare the colour intensity of the solution in each boiling tubewith the colour intensity of reference solution in boiling tube ‘a’.
(xi) Take another set of four clean boiling tubes. Add 2.5 mL ofblood red solution to each of the boiling tubes from theburette. Repeat the experiment by adding 1.0 mL, 2.0 mL,3.0 mL and 4.0 mL of potassium thiocynate solution fromburette B to the boiling tubes b′, c ′, d′, and e′ respectivelyfollowed by addition of 16.5 mL, 15.5 mL, 14.5 mL and13.5 mL of water respectively to these test tubes. Againcompare the colour intensity of the solution of these test tubeswith reference equilibrium solution in boiling tube ‘a’.
(xii) Record your results in tabular form as in Tables 4.1 and 4.2.(xiii) You may repeat the observations with different amounts of
potassium thiocyanate and ferric chloride solution andcompare with the reference solution.
Boiling TubeVolume of ferric
chloride solution takenin the system in mL
Change in colourintensity as matchedwith reference solution inboiling tube “a”
Direction of shift inequilibrium
a Reference solution for matching colour containing Equilibrium2.5 mL blood red solution + 17.5 mL water position(20 mL equilibrium mixture)
b 1.0
c 2.0
d 3.0
e 4.0
Table 4.1 : Equilibrium shift on increasing the concentration of ferric ions
Boiling TubeVolume of thiocyanatesolution taken in the
system in mL
Change in colourintensity as matchedwith reference solution inboiling tube “a”
Direction of shift inequilibrium
a Reference solution for matching colour containing Equilibrium2.5 mL blood red solution + 17.5 mL water position(20 mL equilibrium mixture)
b′ 1.0
c ′ 2.0
d′ 3.0
e ′ 4.0
Table 4.2 : Equilibrium shift on increasing the concentration of thiocyanate ions
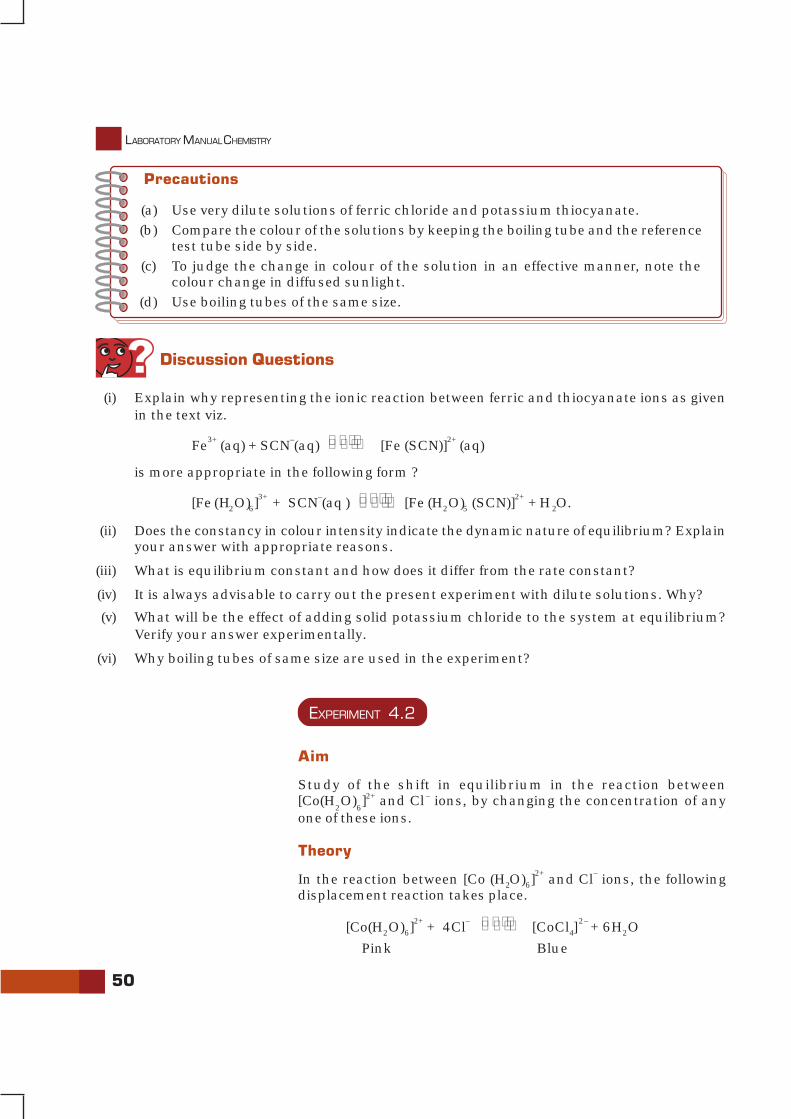
50
LABORATORY MANUAL CHEMISTRY
Precautions
(a) Use very dilute solutions of ferric chloride and potassium thiocyanate.(b) Compare the colour of the solutions by keeping the boiling tube and the reference
test tube side by side.(c) To judge the change in colour of the solution in an effective manner, note the
colour change in diffused sunlight.(d) Use boiling tubes of the same size.
Discussion Questions
(i) Explain why representing the ionic reaction between ferric and thiocyanate ions as givenin the text viz.
Fe3+ (aq) + SCN–(aq) [Fe (SCN)]2+ (aq)
is more appropriate in the following form ?
[Fe (H2O)6]3+ + SCN–(aq ) [Fe (H2O)5 (SCN)]2+ + H2O.
(ii) Does the constancy in colour intensity indicate the dynamic nature of equilibrium? Explainyour answer with appropriate reasons.
(iii) What is equilibrium constant and how does it differ from the rate constant?
(iv) It is always advisable to carry out the present experiment with dilute solutions. Why?
(v) What will be the effect of adding solid potassium chloride to the system at equilibrium?Verify your answer experimentally.
(vi) Why boiling tubes of same size are used in the experiment?
EXPERIMENT 4.2
Aim
Study of the shift in equilibrium in the reaction between[Co(H
2O)
6]2+ and Cl– ions, by changing the concentration of any
one of these ions.
Theory
In the reaction between [Co (H2O)6]2+ and Cl– ions, the following
displacement reaction takes place.
[Co(H2O)6]2+ + 4Cl– [CoCl4]
2– + 6H2O
Pink Blue
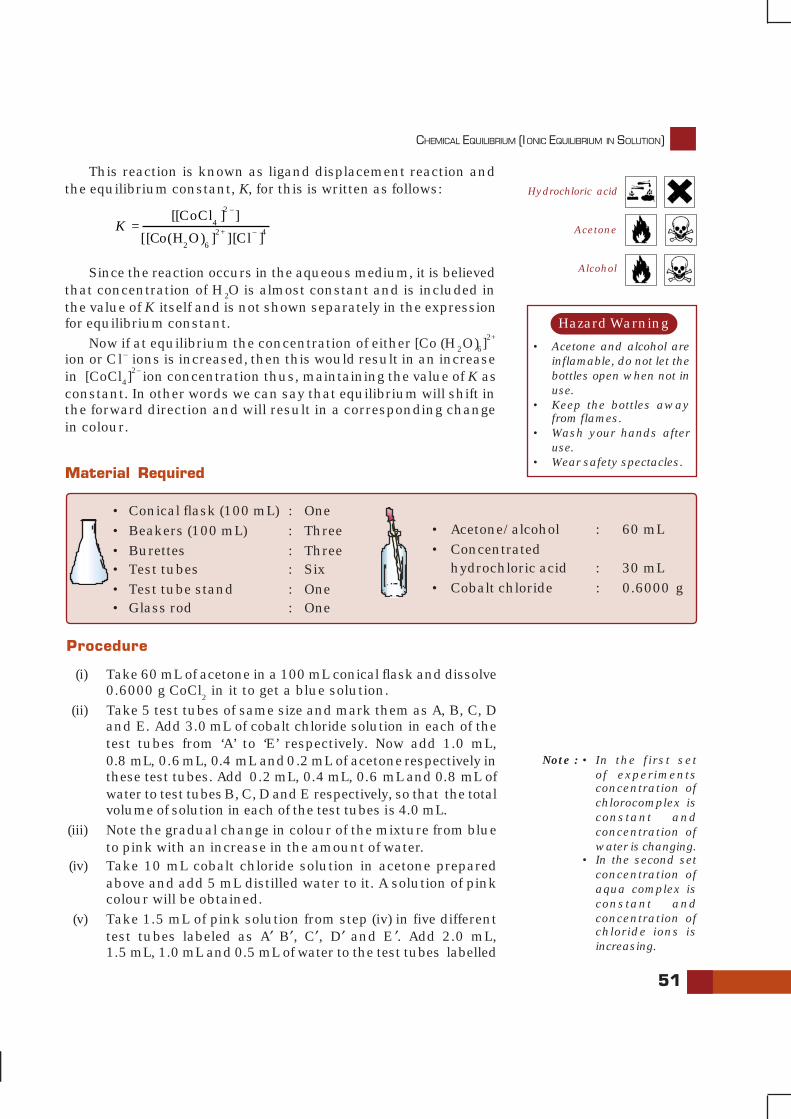
CHEMICAL EQUILIBRIUM (IONIC EQUILIBRIUM IN SOLUTION)
51
This reaction is known as ligand displacement reaction andthe equilibrium constant, K, for this is written as follows:
2 –
42+ – 4
2 6
[[CoCl ] ]=
[[Co(H O) ] ] [Cl ]K
Since the reaction occurs in the aqueous medium, it is believedthat concentration of H2O is almost constant and is included inthe value of K itself and is not shown separately in the expressionfor equilibrium constant.
Now if at equilibrium the concentration of either [Co (H2O)6]2+
ion or Cl– ions is increased, then this would result in an increasein [CoCl4]
2– ion concentration thus, maintaining the value of K asconstant. In other words we can say that equilibrium will shift inthe forward direction and will result in a corresponding changein colour.
Material Required
• Conical flask (100 mL) : One• Beakers (100 mL) : Three• Burettes : Three• Test tubes : Six• Test tube stand : One• Glass rod : One
Procedure
(i) Take 60 mL of acetone in a 100 mL conical flask and dissolve0.6000 g CoCl
2 in it to get a blue solution.
(ii) Take 5 test tubes of same size and mark them as A, B, C, Dand E. Add 3.0 mL of cobalt chloride solution in each of thetest tubes from ‘A’ to ‘E’ respectively. Now add 1.0 mL,0.8 mL, 0.6 mL, 0.4 mL and 0.2 mL of acetone respectively inthese test tubes. Add 0.2 mL, 0.4 mL, 0.6 mL and 0.8 mL ofwater to test tubes B, C, D and E respectively, so that the totalvolume of solution in each of the test tubes is 4.0 mL.
(iii) Note the gradual change in colour of the mixture from blueto pink with an increase in the amount of water.
(iv) Take 10 mL cobalt chloride solution in acetone preparedabove and add 5 mL distilled water to it. A solution of pinkcolour will be obtained.
(v) Take 1.5 mL of pink solution from step (iv) in five differenttest tubes labeled as A′ B′, C′, D′ and E ′. Add 2.0 mL,1.5 mL, 1.0 mL and 0.5 mL of water to the test tubes labelled
• Acetone/alcohol : 60 mL• Concentrated
hydrochloric acid : 30 mL• Cobalt chloride : 0.6000 g
Hydrochloric acid
Acetone
Alcohol
• Acetone and alcohol areinflamable, do not let thebottles open when not inuse.
• Keep the bottles awayfrom flames.
• Wash your hands afteruse.
• Wear safety spectacles.
Hazard Warning
Note : • In the first setof experimentsconcentration ofchlorocomplex isconstant andconcentration ofwater is changing.
• In the second setconcentration ofaqua complex isconstant andconcentration ofchloride ions isincreasing.
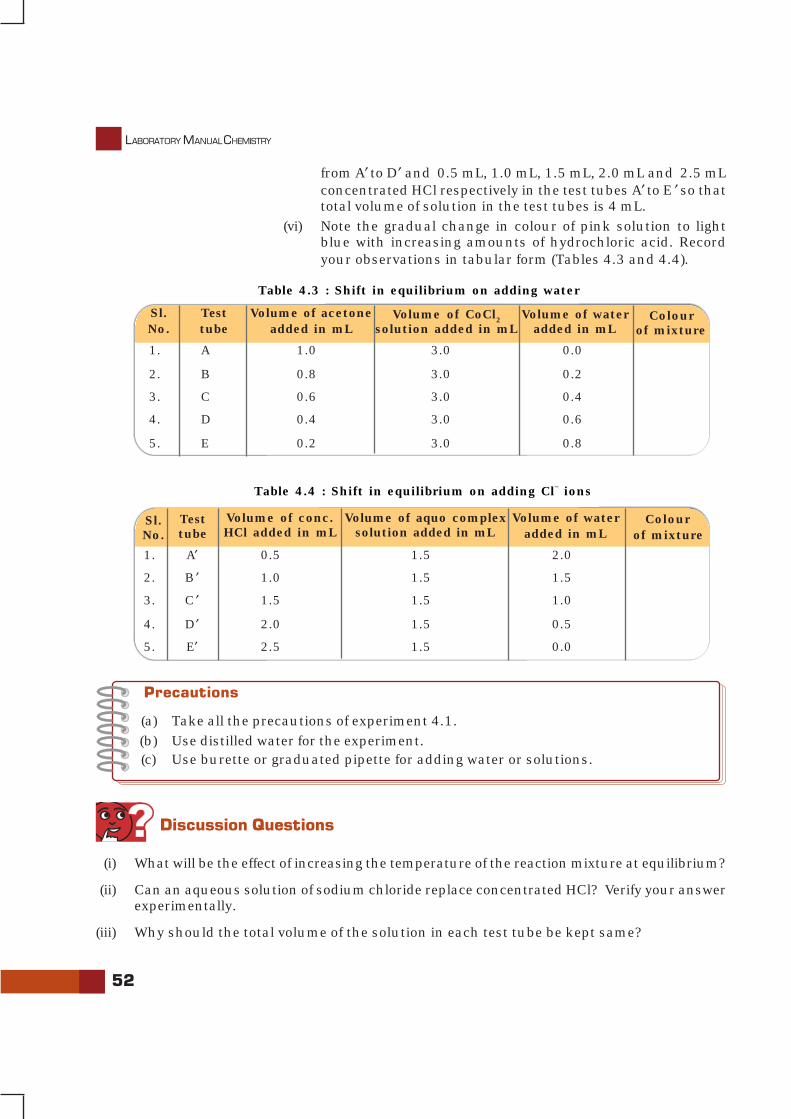
52
LABORATORY MANUAL CHEMISTRY
Volume of wateradded in mL
Sl.No.
Volume of acetoneadded in mL
Volume of CoCl2solution added in mL
Colourof mixture
1. A 1.0 3.0 0.0
2. B 0.8 3.0 0.2
3. C 0.6 3.0 0.4
4. D 0.4 3.0 0.6
5. E 0.2 3.0 0.8
Table 4.3 : Shift in equilibrium on adding water
Precautions
(a) Take all the precautions of experiment 4.1.(b) Use distilled water for the experiment.(c) Use burette or graduated pipette for adding water or solutions.
Table 4.4 : Shift in equilibrium on adding Cl– ions
from A′ to D′ and 0.5 mL, 1.0 mL, 1.5 mL, 2.0 mL and 2.5 mLconcentrated HCl respectively in the test tubes A′ to E ′ so thattotal volume of solution in the test tubes is 4 mL.
(vi) Note the gradual change in colour of pink solution to lightblue with increasing amounts of hydrochloric acid. Recordyour observations in tabular form (Tables 4.3 and 4.4).
Volume of wateradded in mL
Sl.No.
Volume of conc.HCl added in mL
Volume of aquo complexsolution added in mL
Colourof mixture
1. A′ 0.5 1.5 2.0
2. B ′ 1.0 1.5 1.5
3. C ′ 1.5 1.5 1.0
4. D′ 2.0 1.5 0.5
5. E′ 2.5 1.5 0.0
Discussion Questions
(i) What will be the effect of increasing the temperature of the reaction mixture at equilibrium?
(ii) Can an aqueous solution of sodium chloride replace concentrated HCl? Verify your answerexperimentally.
(iii) Why should the total volume of the solution in each test tube be kept same?
Testtube
Testtube
UNIT-5
PH AND PH CHANGE INAQUEOUS SOLUTIONS
YOU have already performed experiments on dynamic equilibrium betweenunionised salt and the ions produced by it on dissolving in a solvent. Inthis unit we will learn about shift in ionic equilibrium between unionised
water molecules and H+ and OH– ions. The conductivity experiments prove thateven pure water ionises to some extent although it has very low conductivity. Onthis basis it can be concluded that ionic equilibrium exists in pure water also.This ionic equilibrium can be represented as
H2O(l) H+(aq) + OH– (aq)
Since H+ ion cannot have independent existence in water because of its positivecharge and small ionic radius, a better representation of this equilibrium is
2H2O(l) H
3O+(aq) + OH – (aq)
This is self ionisation of water. Equilibrium constant for this chemicalequation can be written as follows:
+ –
32
2
[H O ] [OH ]=
[H O]K
Since water is in large excess, its concentration can be assumed to be constantand combining it with K provides a new constant K
w, which can be written as follows:
Kw = [H3O+] [OH–]
Kw is self ionisation constant of water or simply ionization constant of water.It remains constant at constant temperature. At 25°C value of K
w is 1.0×10⁻¹⁴.
Thus, it is quite evident that at a given temperature in any aqueous solution,this product i.e. [H3O
+] [OH –] remains constant whether acidic, alkaline or neutralin nature. If dissolution of a substance shifts the equilibrium in such a way thatat equilibrium the hydronium ion concentration is more than hydroxyl ionconcentration then the solution is acidic in nature. If dissolution of a substanceshifts the equilibrium in such a way that at equilibrium concentration of OH–
ions is greater than the concentration of hydronium ions, then the solution isalkaline in nature. Thus, concentration of hydronium ion in an aqueous solutioncan provide information about acidic, basic and neutral nature of the solution.The concentration of H
3O+ ions in a solution is measured in terms of pH which is
defined as the negative logarithm of hydronium ion concentration and is givenby the following expression.
pH = –log [H3O+]
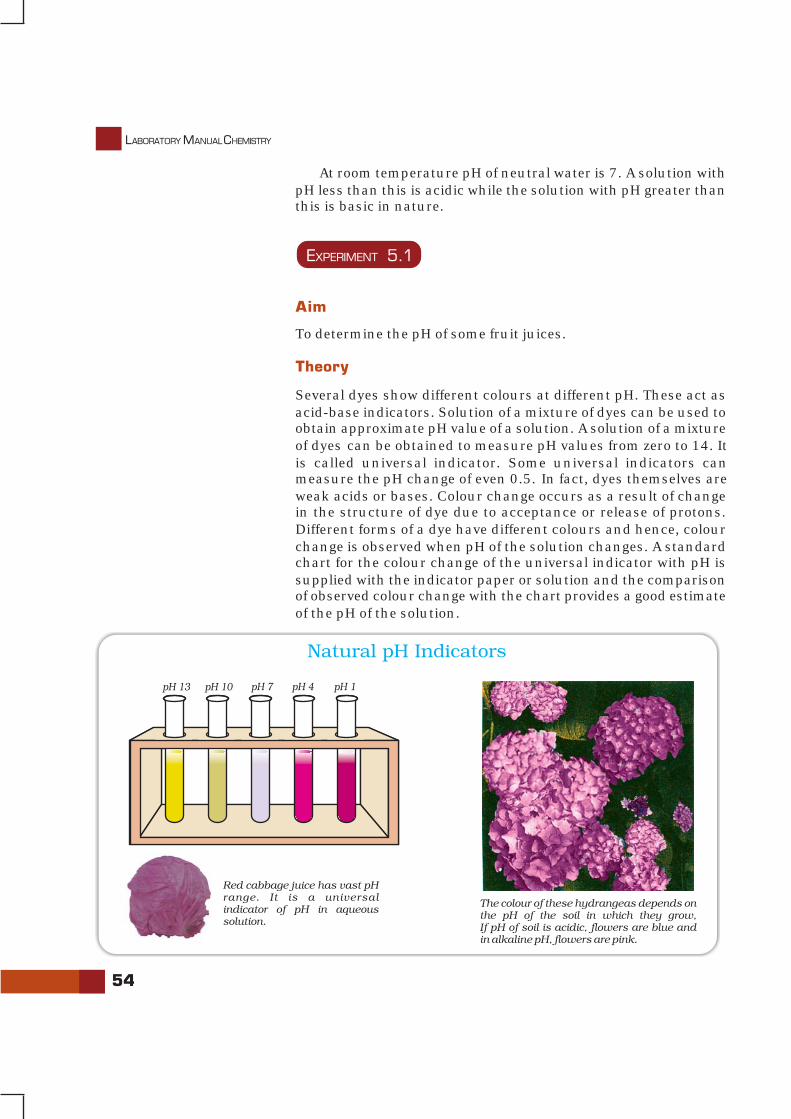
54
LABORATORY MANUAL CHEMISTRY
At room temperature pH of neutral water is 7. A solution withpH less than this is acidic while the solution with pH greater thanthis is basic in nature.
EXPERIMENT 5.1
Aim
To determine the pH of some fruit juices.
Theory
Several dyes show different colours at different pH. These act asacid-base indicators. Solution of a mixture of dyes can be used toobtain approximate pH value of a solution. A solution of a mixtureof dyes can be obtained to measure pH values from zero to 14. Itis called universal indicator. Some universal indicators canmeasure the pH change of even 0.5. In fact, dyes themselves areweak acids or bases. Colour change occurs as a result of changein the structure of dye due to acceptance or release of protons.Different forms of a dye have different colours and hence, colourchange is observed when pH of the solution changes. A standardchart for the colour change of the universal indicator with pH issupplied with the indicator paper or solution and the comparisonof observed colour change with the chart provides a good estimateof the pH of the solution.
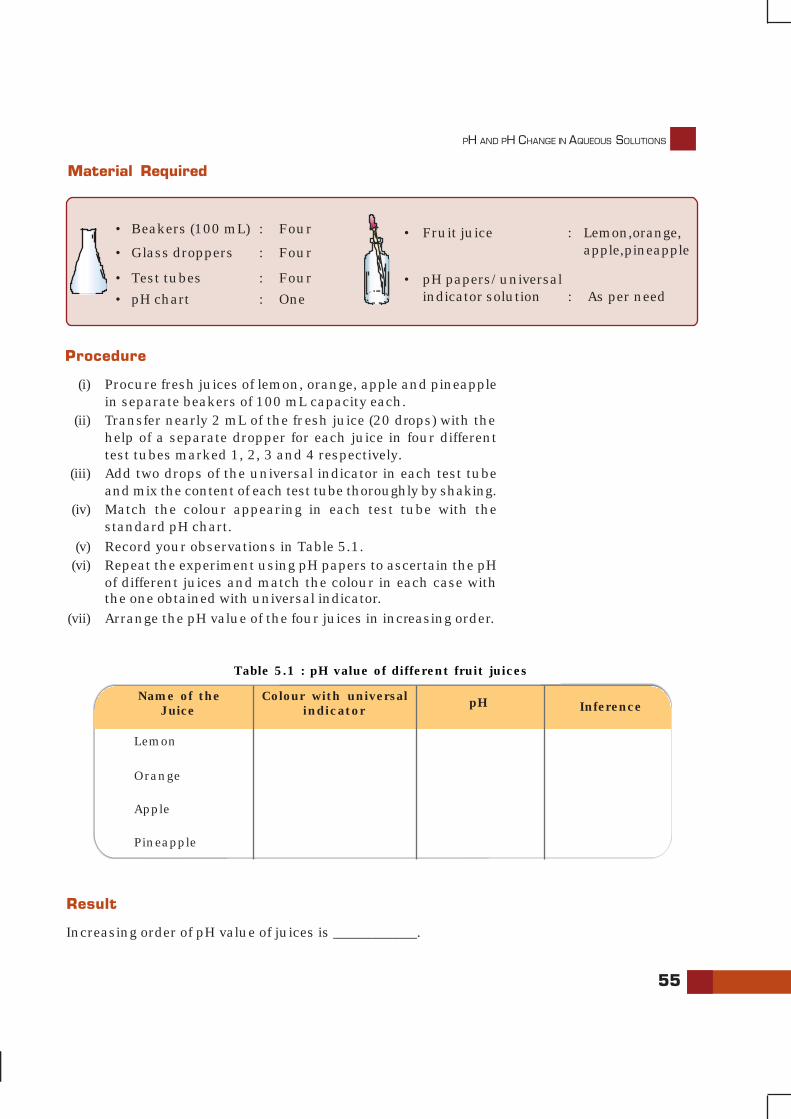
PH AND PH CHANGE IN AQUEOUS SOLUTIONS
55
Procedure
(i) Procure fresh juices of lemon, orange, apple and pineapplein separate beakers of 100 mL capacity each.
(ii) Transfer nearly 2 mL of the fresh juice (20 drops) with thehelp of a separate dropper for each juice in four differenttest tubes marked 1, 2, 3 and 4 respectively.
(iii) Add two drops of the universal indicator in each test tubeand mix the content of each test tube thoroughly by shaking.
(iv) Match the colour appearing in each test tube with thestandard pH chart.
(v) Record your observations in Table 5.1.(vi) Repeat the experiment using pH papers to ascertain the pH
of different juices and match the colour in each case withthe one obtained with universal indicator.
(vii) Arrange the pH value of the four juices in increasing order.
Material Required
• Beakers (100 mL) : Four
• Glass droppers : Four
• Test tubes : Four
• pH chart : One
Table 5.1 : pH value of different fruit juices
Name of theJuice
Colour with universalindicator
pH
Lemon
Orange
Apple
Pineapple
Inference
Result
Increasing order of pH value of juices is ____________.
• Fruit juice : Lemon,orange,apple,pineapple
• pH papers/universalindicator solution : As per need
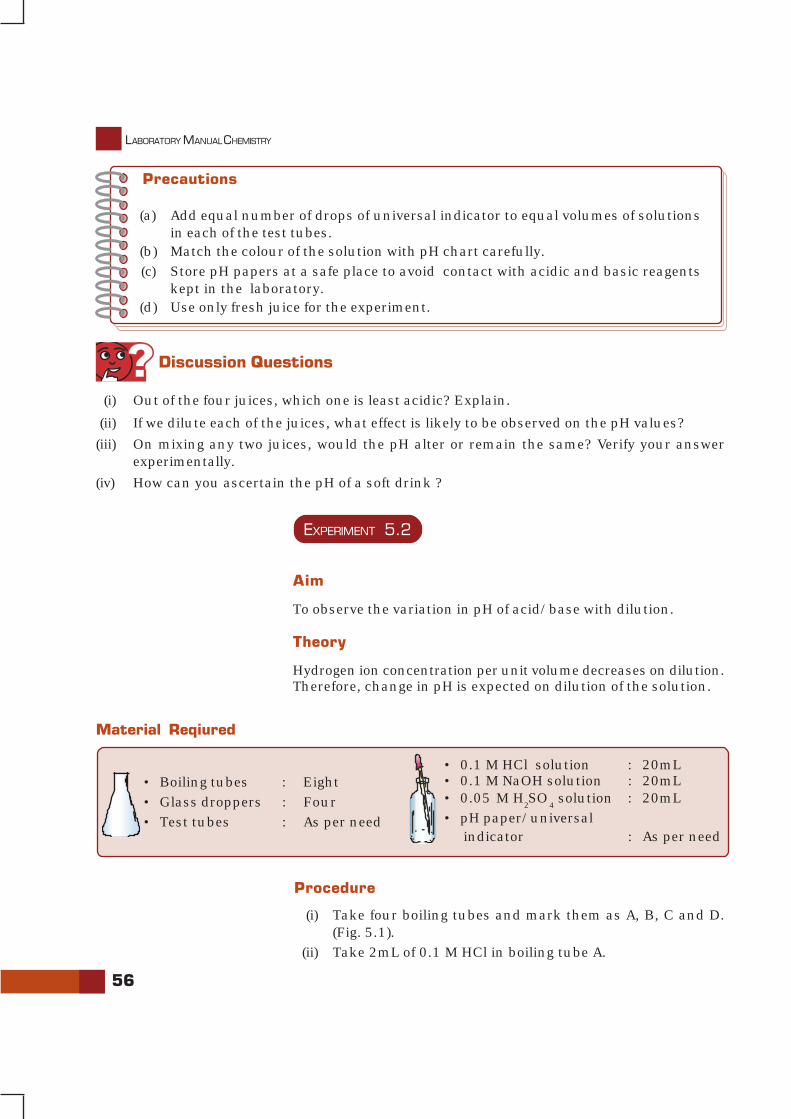
56
LABORATORY MANUAL CHEMISTRY
EXPERIMENT 5.2
Aim
To observe the variation in pH of acid/base with dilution.
Theory
Hydrogen ion concentration per unit volume decreases on dilution.Therefore, change in pH is expected on dilution of the solution.
Material Reqiured
• Boiling tubes : Eight• Glass droppers : Four• Test tubes : As per need
• 0.1 M HCl solution : 20mL• 0.1 M NaOH solution : 20mL• 0.05 M H
2SO
4 solution : 20mL
• pH paper/universal indicator : As per need
Procedure
(i) Take four boiling tubes and mark them as A, B, C and D.(Fig. 5.1).
(ii) Take 2mL of 0.1 M HCl in boiling tube A.
Precautions
(a) Add equal number of drops of universal indicator to equal volumes of solutionsin each of the test tubes.
(b) Match the colour of the solution with pH chart carefully.(c) Store pH papers at a safe place to avoid contact with acidic and basic reagents
kept in the laboratory.(d) Use only fresh juice for the experiment.
Discussion Questions
(i) Out of the four juices, which one is least acidic? Explain.
(ii) If we dilute each of the juices, what effect is likely to be observed on the pH values?
(iii) On mixing any two juices, would the pH alter or remain the same? Verify your answerexperimentally.
(iv) How can you ascertain the pH of a soft drink ?
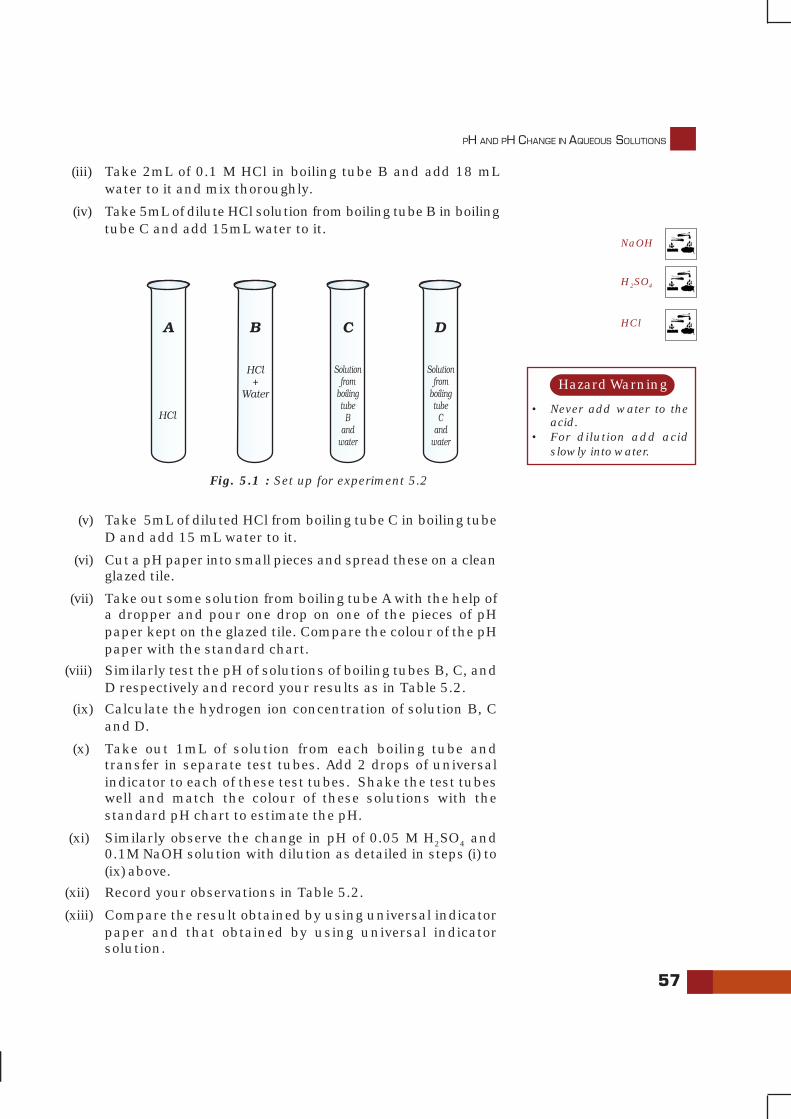
PH AND PH CHANGE IN AQUEOUS SOLUTIONS
57
Fig. 5.1 : Set up for experiment 5.2
(iii) Take 2mL of 0.1 M HCl in boiling tube B and add 18 mLwater to it and mix thoroughly.
(iv) Take 5mL of dilute HCl solution from boiling tube B in boilingtube C and add 15mL water to it.
(v) Take 5mL of diluted HCl from boiling tube C in boiling tubeD and add 15 mL water to it.
(vi) Cut a pH paper into small pieces and spread these on a cleanglazed tile.
(vii) Take out some solution from boiling tube A with the help ofa dropper and pour one drop on one of the pieces of pHpaper kept on the glazed tile. Compare the colour of the pHpaper with the standard chart.
(viii) Similarly test the pH of solutions of boiling tubes B, C, andD respectively and record your results as in Table 5.2.
(ix) Calculate the hydrogen ion concentration of solution B, Cand D.
(x) Take out 1mL of solution from each boiling tube andtransfer in separate test tubes. Add 2 drops of universalindicator to each of these test tubes. Shake the test tubeswell and match the colour of these solutions with thestandard pH chart to estimate the pH.
(xi) Similarly observe the change in pH of 0.05 M H2SO4 and0.1M NaOH solution with dilution as detailed in steps (i) to(ix) above.
(xii) Record your observations in Table 5.2.
(xiii) Compare the result obtained by using universal indicatorpaper and that obtained by using universal indicatorsolution.
NaOH
H2SO4
• Never add water to theacid.
• For dilution add acidslowly into water.
Hazard Warning
HCl
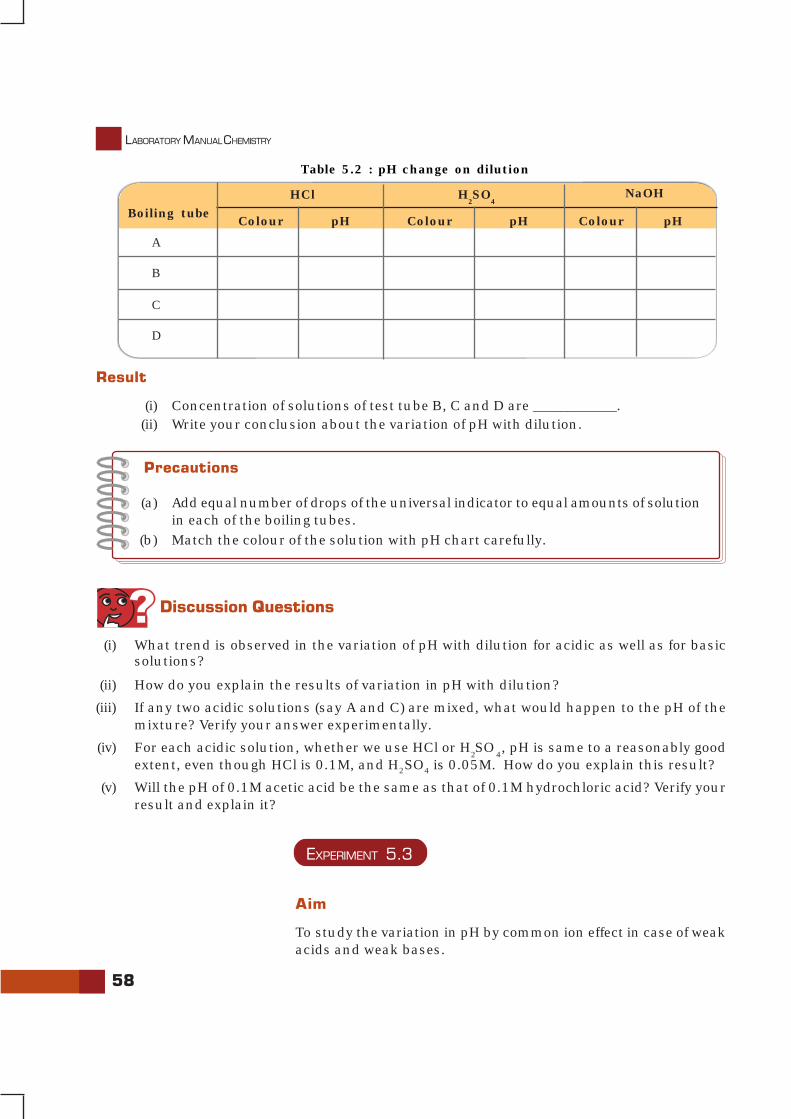
58
LABORATORY MANUAL CHEMISTRY
Boiling tubeHCl H
2SO
4NaOH
A
B
C
D
Table 5.2 : pH change on dilution
Colour pH Colour pH Colour pH
Result
(i) Concentration of solutions of test tube B, C and D are ____________.(ii) Write your conclusion about the variation of pH with dilution.
Precautions
(a) Add equal number of drops of the universal indicator to equal amounts of solutionin each of the boiling tubes.
(b) Match the colour of the solution with pH chart carefully.
Discussion Questions
(i) What trend is observed in the variation of pH with dilution for acidic as well as for basicsolutions?
(ii) How do you explain the results of variation in pH with dilution?
(iii) If any two acidic solutions (say A and C) are mixed, what would happen to the pH of themixture? Verify your answer experimentally.
(iv) For each acidic solution, whether we use HCl or H2SO
4, pH is same to a reasonably good
extent, even though HCl is 0.1M, and H2SO4 is 0.05M. How do you explain this result?
(v) Will the pH of 0.1M acetic acid be the same as that of 0.1M hydrochloric acid? Verify yourresult and explain it?
EXPERIMENT 5.3
Aim
To study the variation in pH by common ion effect in case of weakacids and weak bases.
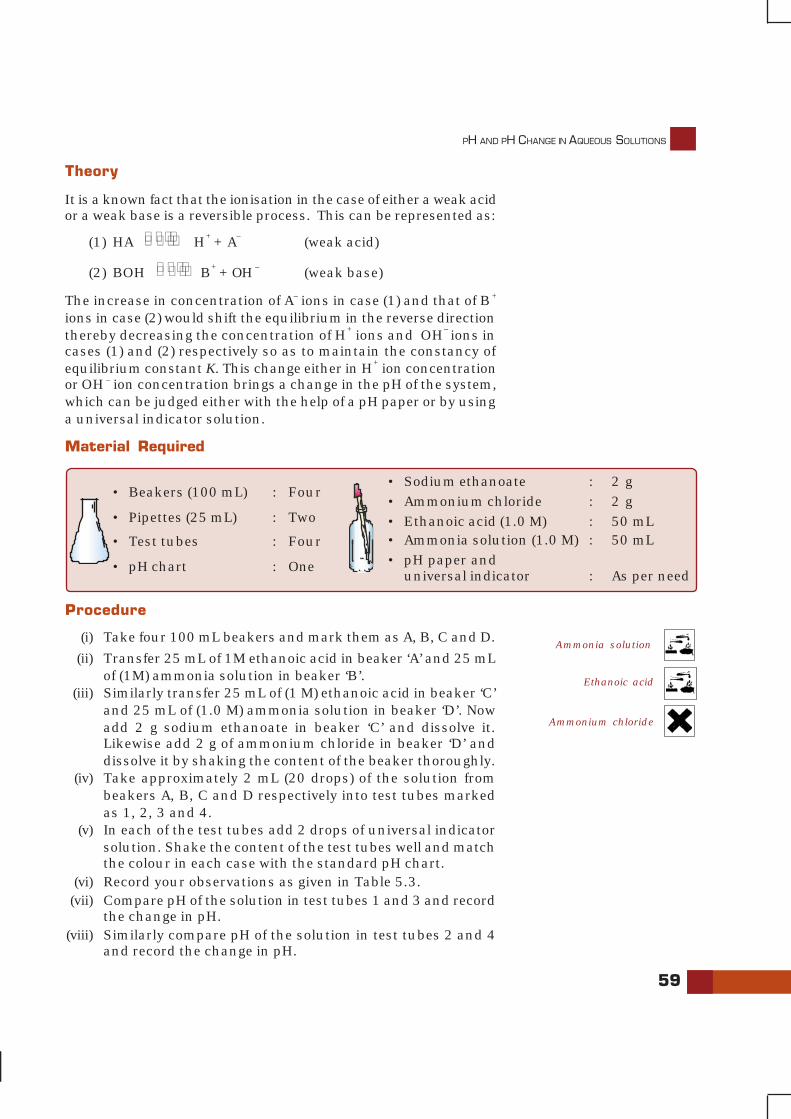
PH AND PH CHANGE IN AQUEOUS SOLUTIONS
59
Theory
It is a known fact that the ionisation in the case of either a weak acidor a weak base is a reversible process. This can be represented as:
(1) HA H+ + A– (weak acid)
(2) BOH B+ + OH – (weak base)
The increase in concentration of A– ions in case (1) and that of B+
ions in case (2) would shift the equilibrium in the reverse directionthereby decreasing the concentration of H+ ions and OH– ions incases (1) and (2) respectively so as to maintain the constancy ofequilibrium constant K. This change either in H+ ion concentrationor OH – ion concentration brings a change in the pH of the system,which can be judged either with the help of a pH paper or by usinga universal indicator solution.
Procedure
(i) Take four 100 mL beakers and mark them as A, B, C and D.
(ii) Transfer 25 mL of 1M ethanoic acid in beaker ‘A’ and 25 mLof (1M) ammonia solution in beaker ‘B’.
(iii) Similarly transfer 25 mL of (1 M) ethanoic acid in beaker ‘C’and 25 mL of (1.0 M) ammonia solution in beaker ‘D’. Nowadd 2 g sodium ethanoate in beaker ‘C’ and dissolve it.Likewise add 2 g of ammonium chloride in beaker ‘D’ anddissolve it by shaking the content of the beaker thoroughly.
(iv) Take approximately 2 mL (20 drops) of the solution frombeakers A, B, C and D respectively into test tubes markedas 1, 2, 3 and 4.
(v) In each of the test tubes add 2 drops of universal indicatorsolution. Shake the content of the test tubes well and matchthe colour in each case with the standard pH chart.
(vi) Record your observations as given in Table 5.3.(vii) Compare pH of the solution in test tubes 1 and 3 and record
the change in pH.(viii) Similarly compare pH of the solution in test tubes 2 and 4
and record the change in pH.
Material Required
• Beakers (100 mL) : Four
• Pipettes (25 mL) : Two
• Test tubes : Four
• pH chart : One
Ammonia solution
Ethanoic acid
Ammonium chloride
• Sodium ethanoate : 2 g• Ammonium chloride : 2 g• Ethanoic acid (1.0 M) : 50 mL• Ammonia solution (1.0 M) : 50 mL• pH paper and
universal indicator : As per need
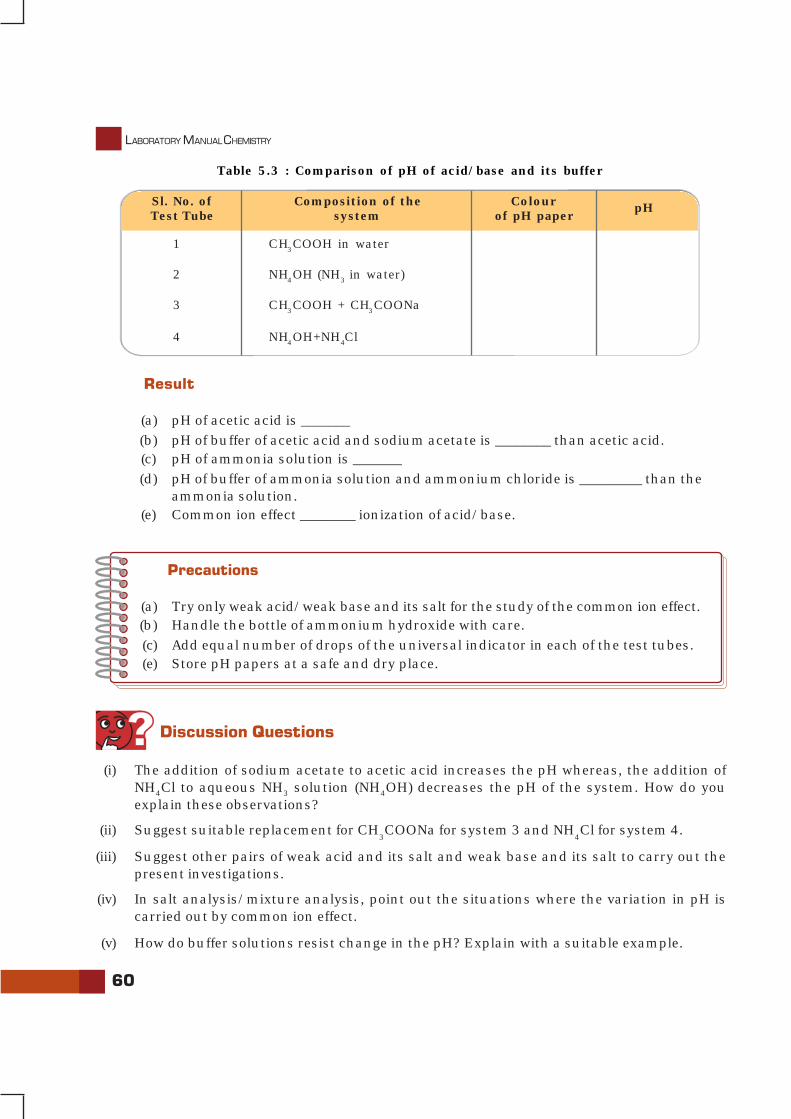
60
LABORATORY MANUAL CHEMISTRY
Result
(a) pH of acetic acid is _______(b) pH of buffer of acetic acid and sodium acetate is ________ than acetic acid.(c) pH of ammonia solution is _______(d) pH of buffer of ammonia solution and ammonium chloride is _________ than the
ammonia solution.(e) Common ion effect ________ ionization of acid/base.
Table 5.3 : Comparison of pH of acid/base and its buffer
Sl. No. ofTest Tube
Composition of thesystem
pH
1 CH3COOH in water
2 NH4OH (NH3 in water)
3 CH3COOH + CH3COONa
4 NH4OH+NH4Cl
Colourof pH paper
Precautions
(a) Try only weak acid/weak base and its salt for the study of the common ion effect.(b) Handle the bottle of ammonium hydroxide with care.(c) Add equal number of drops of the universal indicator in each of the test tubes.(e) Store pH papers at a safe and dry place.
Discussion Questions
(i) The addition of sodium acetate to acetic acid increases the pH whereas, the addition ofNH4Cl to aqueous NH3 solution (NH4OH) decreases the pH of the system. How do youexplain these observations?
(ii) Suggest suitable replacement for CH3COONa for system 3 and NH
4Cl for system 4.
(iii) Suggest other pairs of weak acid and its salt and weak base and its salt to carry out thepresent investigations.
(iv) In salt analysis/mixture analysis, point out the situations where the variation in pH iscarried out by common ion effect.
(v) How do buffer solutions resist change in the pH? Explain with a suitable example.

PH AND PH CHANGE IN AQUEOUS SOLUTIONS
61
EXPERIMENT 5.4
Aim
To study the change in pH during the titration of a strong acidwith a strong base by using universal indicator.
Theory
It is assumed that strong acids and strong bases are completelydissociated in solution. During the process of neutralisation,H+ ions obtained from the acid combine with the OH– ions producedby base and form water. Therefore, when a solution of strong acidis added to a solution of strong base or vice versa, the pH of thesolution changes. As the titration proceeds, initially there is slowchange in the pH but in the vicinity of the equivalence point thereis very rapid change in the pH of the solution.
Material Required
• Burette : One• Beakers (250 mL) : Two• Conical flask (100 mL): One• Dropper : One• pH chart : One
Procedure
(i) Take 25 mL hydrochloric acid solution (0.1 M) in 100 mLconical flask.
(ii) Add five drops of universal indicator solution to it.
(iii) Add (0.1 M) sodium hydroxide solution from the burette asgiven in Table 5.4.
(iv) Shake the content of the flask well after each addition ofsodium hydroxide solution. Note the colour of the solutionin the conical flask each time and find out the pH bycomparing its colour with the pH chart.
(v) Note down your observations in Table 5.4.
(vi) Plot a graph of pH vs. total volume of NaOH added.
Hydrochloric acid
Sodium hydroxide
• Hydrochloric acid(0.1 M) : 25 mL
• Sodium Hydroxidesolution (0.1 M) : 50 mL
• Universal indicator : As per requirement
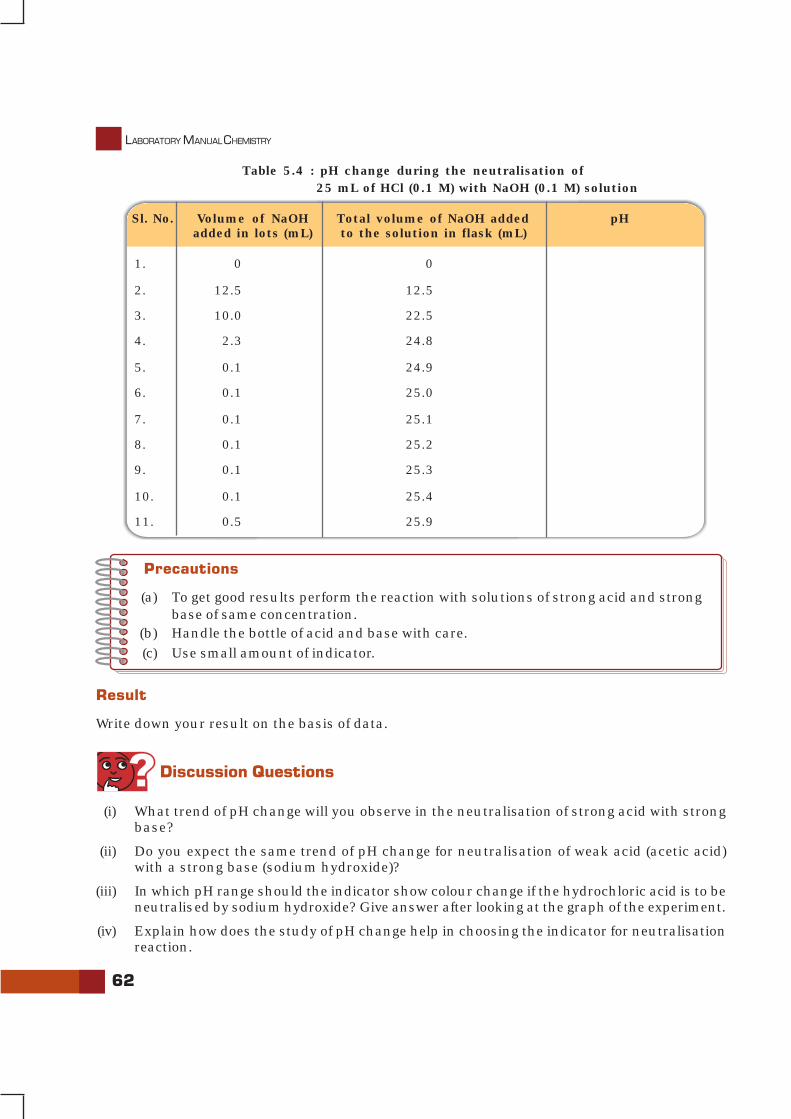
62
LABORATORY MANUAL CHEMISTRY
Table 5.4 : pH change during the neutralisation of 25 mL of HCl (0.1 M) with NaOH (0.1 M) solution
Sl. No. Volume of NaOHadded in lots (mL)
Total volume of NaOH addedto the solution in flask (mL)
pH
1. 0 0
2. 12.5 12.5
3. 10.0 22.5
4. 2.3 24.8
5. 0.1 24.9
6. 0.1 25.0
7. 0.1 25.1
8. 0.1 25.2
9. 0.1 25.3
10. 0.1 25.4
11. 0.5 25.9
Precautions
(a) To get good results perform the reaction with solutions of strong acid and strongbase of same concentration.
(b) Handle the bottle of acid and base with care.(c) Use small amount of indicator.
Result
Write down your result on the basis of data.
Discussion Questions
(i) What trend of pH change will you observe in the neutralisation of strong acid with strongbase?
(ii) Do you expect the same trend of pH change for neutralisation of weak acid (acetic acid)with a strong base (sodium hydroxide)?
(iii) In which pH range should the indicator show colour change if the hydrochloric acid is to beneutralised by sodium hydroxide? Give answer after looking at the graph of the experiment.
(iv) Explain how does the study of pH change help in choosing the indicator for neutralisationreaction.
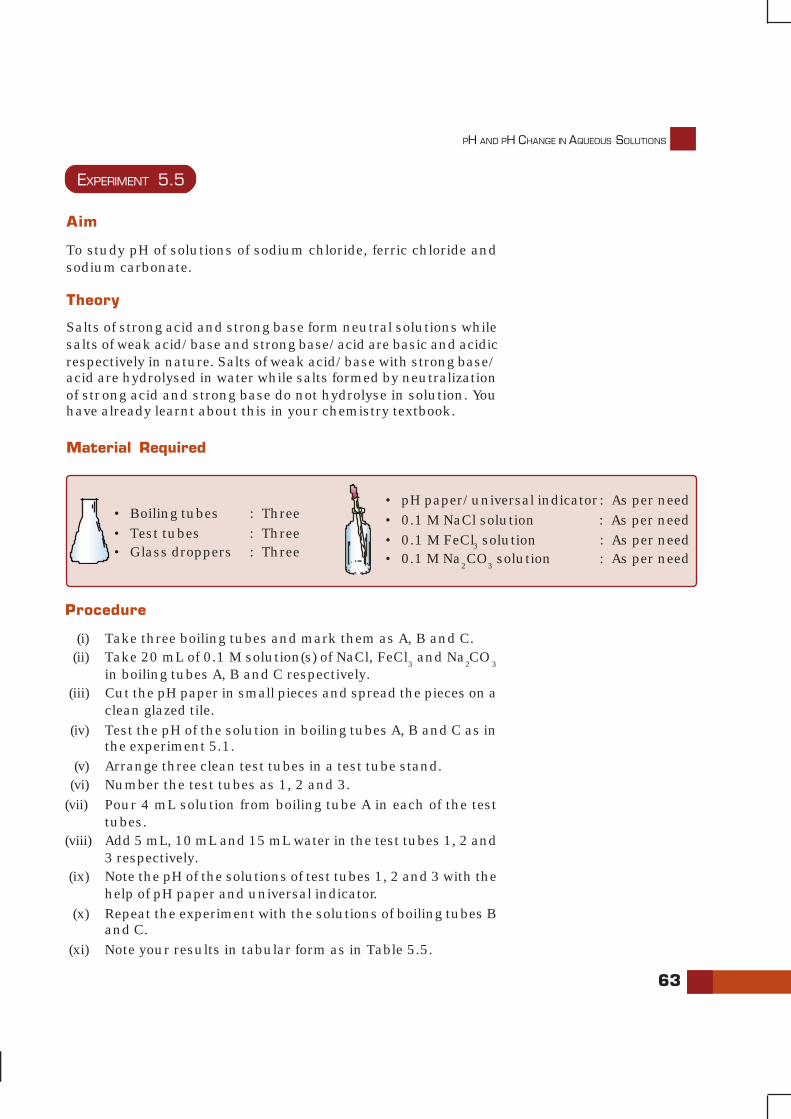
PH AND PH CHANGE IN AQUEOUS SOLUTIONS
63
• pH paper/universal indicator: As per need• 0.1 M NaCl solution : As per need• 0.1 M FeCl3 solution : As per need• 0.1 M Na
2CO
3 solution : As per need
Material Required
• Boiling tubes : Three• Test tubes : Three• Glass droppers : Three
Procedure
(i) Take three boiling tubes and mark them as A, B and C.(ii) Take 20 mL of 0.1 M solution(s) of NaCl, FeCl
3 and Na
2CO
3
in boiling tubes A, B and C respectively.(iii) Cut the pH paper in small pieces and spread the pieces on a
clean glazed tile.(iv) Test the pH of the solution in boiling tubes A, B and C as in
the experiment 5.1.(v) Arrange three clean test tubes in a test tube stand.(vi) Number the test tubes as 1, 2 and 3.
(vii) Pour 4 mL solution from boiling tube A in each of the testtubes.
(viii) Add 5 mL, 10 mL and 15 mL water in the test tubes 1, 2 and3 respectively.
(ix) Note the pH of the solutions of test tubes 1, 2 and 3 with thehelp of pH paper and universal indicator.
(x) Repeat the experiment with the solutions of boiling tubes Band C.
(xi) Note your results in tabular form as in Table 5.5.
EXPERIMENT 5.5
Aim
To study pH of solutions of sodium chloride, ferric chloride andsodium carbonate.
Theory
Salts of strong acid and strong base form neutral solutions whilesalts of weak acid/base and strong base/acid are basic and acidicrespectively in nature. Salts of weak acid/base with strong base/acid are hydrolysed in water while salts formed by neutralizationof strong acid and strong base do not hydrolyse in solution. Youhave already learnt about this in your chemistry textbook.
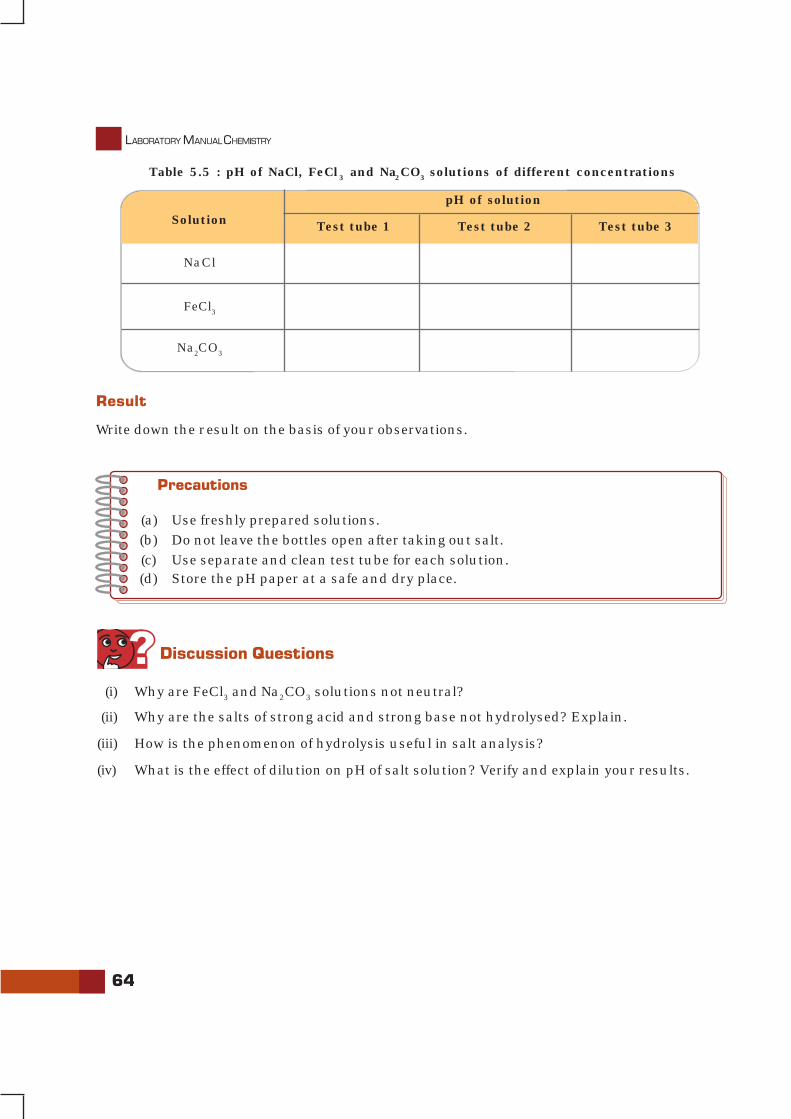
64
LABORATORY MANUAL CHEMISTRY
Precautions
(a) Use freshly prepared solutions.(b) Do not leave the bottles open after taking out salt.(c) Use separate and clean test tube for each solution.(d) Store the pH paper at a safe and dry place.
Discussion Questions
(i) Why are FeCl3 and Na2CO3 solutions not neutral?
(ii) Why are the salts of strong acid and strong base not hydrolysed? Explain.
(iii) How is the phenomenon of hydrolysis useful in salt analysis?
(iv) What is the effect of dilution on pH of salt solution? Verify and explain your results.
Table 5.5 : pH of NaCl, FeCl3 and Na2CO3 solutions of different concentrations
Solution
pH of solution
Test tube 1 Test tube 2 Test tube 3
NaCl
FeCl3
Na2CO3
Result
Write down the result on the basis of your observations.
UNIT-6
TITRIMETRIC ANALYSIS
YOU are already aware that a substance is analysed to establish its qualitativeand quantitative chemical composition. Thus, chemical analysis can becategorised as qualitative analysis and quantitative analysis. In this unit
you will learn about determination of the amount of substance in solution. Dependingupon the method adopted for determining the amount of chemical substances insolution, there are two methods of analysis namely, titrimetric analysis andgravimetric analysis. In titrimetric analysis measurement of only volumes is involvedwhile in gravimetric analysis measurement of volumes as well as mass is involved.
Titrimetric analysis involves determination of the volume of a solution ofaccurately known concentration, which is required to react quantitatively withthe measured volume of the solution of a substance, concentration of which is tobe determined. The solution of accurately known concentration is called standardsolution. The mass of the substance dissolved in the solution of unknownconcentration is calculated from the volume of the standard solution used, thechemical equation and the relative molecular masses of the reacting compounds.The reagent of known concentration is called titrant and the substance beingtitrated is termed as titrand.
To carry out titrimetric analysis, standard solution is usually added fromthe long graduated tube called burette. The process of adding the standardsolution to the solution of unknown concentration until the reaction is justcomplete is called titration. The point at which reaction is completed is calledequivalence point or the theoretical or stoichiometric end point. It is notpossible all the time to take standard solution in the burette. You will come to knowabout it later in this unit in the titration of sodium hydroxide with oxalic acid.
6.1 DETECTION OF END POINT
The end point is detected either by some physical change produced in the reactionmixture itself or by the addition of an auxiliary reagent, known as indicator;alternatively some other physical measurement may be used. At the completionof the reaction, the indicator shows a visible change e.g. (colour change or turbidity)in the solution being titrated. In an ideal titration, the visible end point coincideswith the stoichiometric or theoretical end point; but in practice usually somesmall difference occurs. This represents titration error.
Indicator and the experimental conditions selected should be such that thedifference between the visible end point and the theoretical end point isminimum.Requirements for a Reaction in the Titrimetric Analysis
66
LABORATORY MANUAL CHEMISTRY
6.2 REQUIREMENT FOR A REACTION IN THE TITRIMETRIC ANALYSIS
(i) The substance of which amount is to be determined bytitrimetric analysis must react completely and rapidly withthe other reagent in stoichiometric proportion.
(ii) The reaction should be fast and there must be alteration inphysical or chemical property of the solution at theequivalence point, which can be detected by an indicator, orby measuring the potential difference or current etc.
6.3 ACIDIMETRY AND ALKALIMETRY
Titrimetric analysis can be carried out for various types of reactions.In this unit you will learn only about neutralisation reactions.These involve titrations of acids and bases. Standard solutions ofacids (acidimetry) and bases (alkalimetry) are used in thesetitrations. In quantitative estimation through titrimetric analysis,concentration of solution is expressed in terms of molarity. It isnumber of moles of solute dissolved in 1 litre of solution.
Molarity, M = number of moles of solutevolume of solution in litres
Standard SolutionA solution of exactly known concentration is called standardsolution. Any substance, which is stable at room temperature anddoes not react with solvent in which it is dissolved, can be directlyweighed to prepare its standard solution. Description andpreparation of these solutions is given below:
Primary and secondary standardsA primary standard is a compound of sufficient purity in whichtotal amount of impurities does not exceed 0.01-0.02%. Thestandard solution can be prepared by direct weighing of a sampleof primary standard followed by its dissolution in water (or solvent)to obtain a definite volume of solution. The substance to be used asa primary standard should also satisfy the following requirements:1. It must be easily available in pure and dry form.2. It should not undergo change in air i.e. it should not be
hygroscopic, oxidised by air or affected by gases such ascarbon dioxide present in the atmosphere or lose water ofcrystallization, so that it can be stored safely.
3. It should be easy to detect the impurities present in it.4. It should have high relative molecular mass so that weighing
errors are neglible.5. Its reaction with another substance should be instantaneous
and stoichiometric.6. The substance should be readily soluble in water.
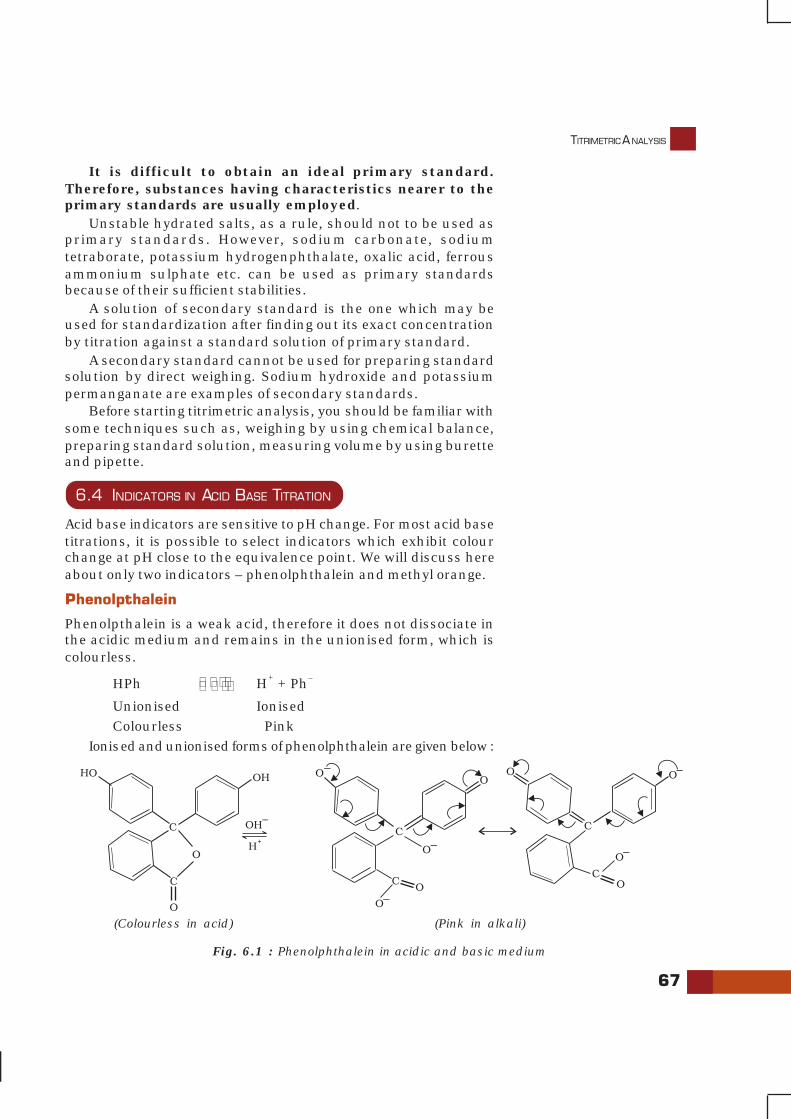
TITRIMETRIC ANALYSIS
67
It is difficult to obtain an ideal primary standard.Therefore, substances having characteristics nearer to theprimary standards are usually employed.
Unstable hydrated salts, as a rule, should not to be used asprimary standards. However, sodium carbonate, sodiumtetraborate, potassium hydrogenphthalate, oxalic acid, ferrousammonium sulphate etc. can be used as primary standardsbecause of their sufficient stabilities.
A solution of secondary standard is the one which may beused for standardization after finding out its exact concentrationby titration against a standard solution of primary standard.
A secondary standard cannot be used for preparing standardsolution by direct weighing. Sodium hydroxide and potassiumpermanganate are examples of secondary standards.
Before starting titrimetric analysis, you should be familiar withsome techniques such as, weighing by using chemical balance,preparing standard solution, measuring volume by using buretteand pipette.
6.4 INDICATORS IN ACID BASE TITRATION
Acid base indicators are sensitive to pH change. For most acid basetitrations, it is possible to select indicators which exhibit colourchange at pH close to the equivalence point. We will discuss hereabout only two indicators – phenolphthalein and methyl orange.
PhenolpthaleinPhenolpthalein is a weak acid, therefore it does not dissociate inthe acidic medium and remains in the unionised form, which iscolourless.
HPh H+ + Ph–
Unionised IonisedColourless Pink
Ionised and unionised forms of phenolphthalein are given below :
(Colourless in acid) (Pink in alkali)
Fig. 6.1 : Phenolphthalein in acidic and basic medium
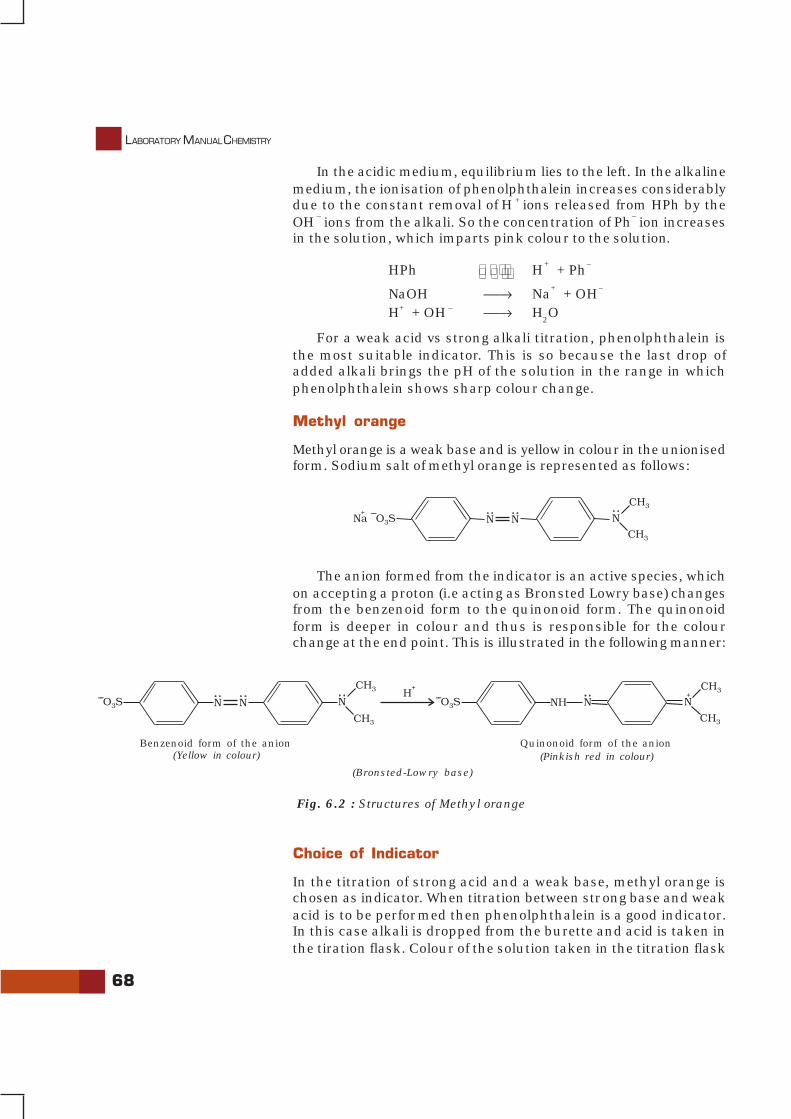
68
LABORATORY MANUAL CHEMISTRY
In the acidic medium, equilibrium lies to the left. In the alkalinemedium, the ionisation of phenolphthalein increases considerablydue to the constant removal of H + ions released from HPh by theOH – ions from the alkali. So the concentration of Ph– ion increasesin the solution, which imparts pink colour to the solution.
HPh H+ + Ph–
NaOH ⎯→ Na+ + OH–
H+ + OH – ⎯→ H2O
For a weak acid vs strong alkali titration, phenolphthalein isthe most suitable indicator. This is so because the last drop ofadded alkali brings the pH of the solution in the range in whichphenolphthalein shows sharp colour change.
Methyl orange
Methyl orange is a weak base and is yellow in colour in the unionisedform. Sodium salt of methyl orange is represented as follows:
Benzenoid form of the anion(Yellow in colour)
Quinonoid form of the anion(Pinkish red in colour)
(Bronsted-Lowry base)
Fig. 6.2 : Structures of Methyl orange
Choice of Indicator
In the titration of strong acid and a weak base, methyl orange ischosen as indicator. When titration between strong base and weakacid is to be performed then phenolphthalein is a good indicator.In this case alkali is dropped from the burette and acid is taken inthe tiration flask. Colour of the solution taken in the titration flask
The anion formed from the indicator is an active species, whichon accepting a proton (i.e acting as Bronsted Lowry base) changesfrom the benzenoid form to the quinonoid form. The quinonoidform is deeper in colour and thus is responsible for the colourchange at the end point. This is illustrated in the following manner:
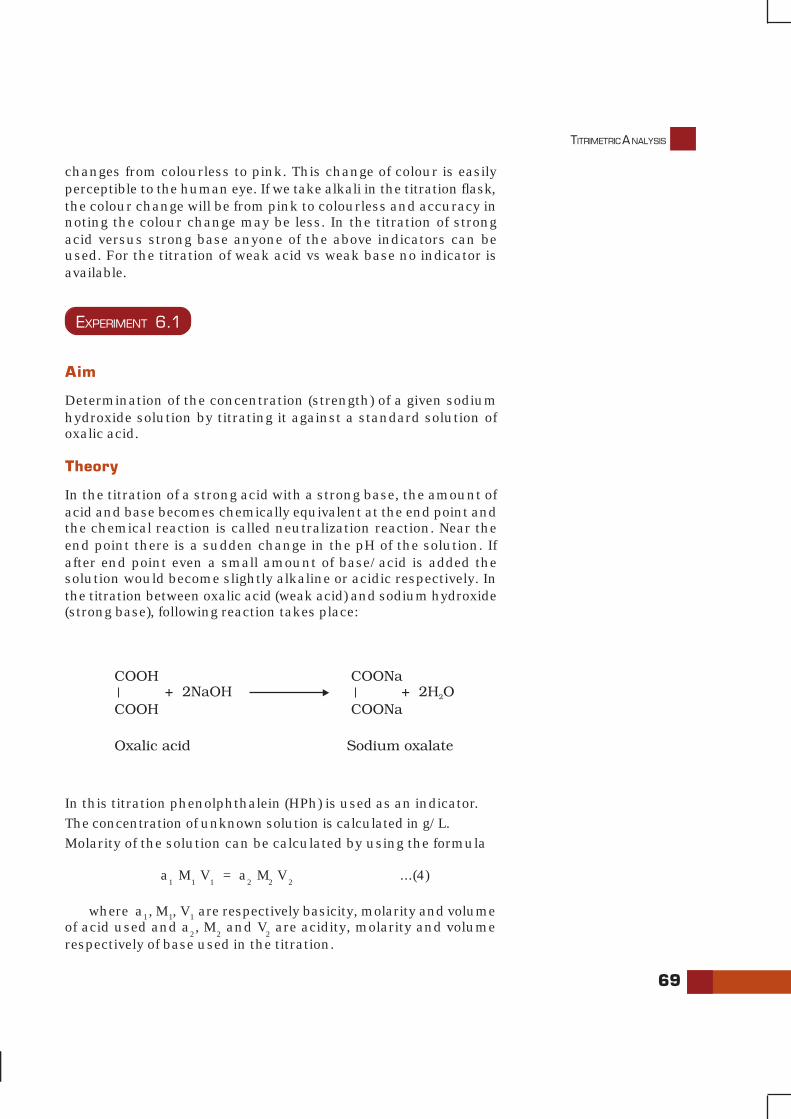
TITRIMETRIC ANALYSIS
69
changes from colourless to pink. This change of colour is easilyperceptible to the human eye. If we take alkali in the titration flask,the colour change will be from pink to colourless and accuracy innoting the colour change may be less. In the titration of strongacid versus strong base anyone of the above indicators can beused. For the titration of weak acid vs weak base no indicator isavailable.
EXPERIMENT 6.1
Aim
Determination of the concentration (strength) of a given sodiumhydroxide solution by titrating it against a standard solution ofoxalic acid.
Theory
In the titration of a strong acid with a strong base, the amount ofacid and base becomes chemically equivalent at the end point andthe chemical reaction is called neutralization reaction. Near theend point there is a sudden change in the pH of the solution. Ifafter end point even a small amount of base/acid is added thesolution would become slightly alkaline or acidic respectively. Inthe titration between oxalic acid (weak acid) and sodium hydroxide(strong base), following reaction takes place:
In this titration phenolphthalein (HPh) is used as an indicator.The concentration of unknown solution is calculated in g/L.Molarity of the solution can be calculated by using the formula
a1 M
1 V
1 = a
2 M
2 V
2...(4)
where a1, M1, V1 are respectively basicity, molarity and volumeof acid used and a
2, M
2 and V
2 are acidity, molarity and volume
respectively of base used in the titration.
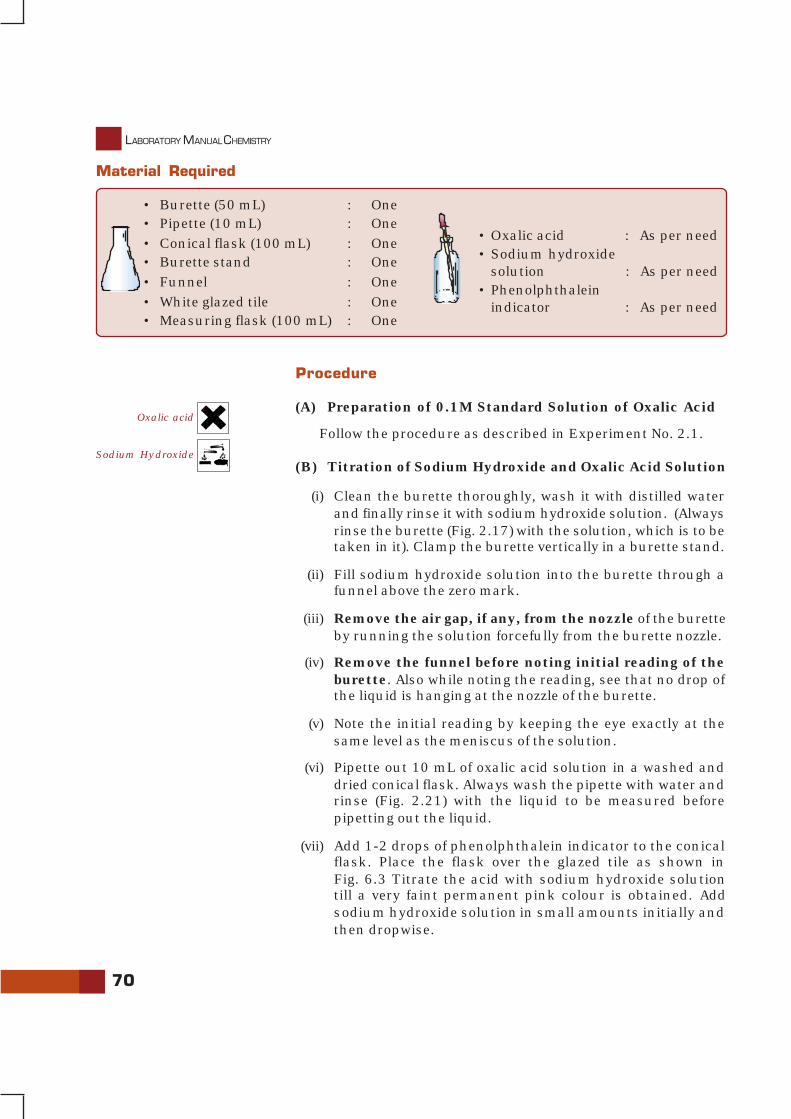
70
LABORATORY MANUAL CHEMISTRY
• Oxalic acid : As per need• Sodium hydroxide
solution : As per need• Phenolphthalein
indicator : As per need
Material Required
• Burette (50 mL) : One• Pipette (10 mL) : One• Conical flask (100 mL) : One• Burette stand : One• Funnel : One• White glazed tile : One• Measuring flask (100 mL) : One
Procedure
(A) Preparation of 0.1M Standard Solution of Oxalic Acid
Follow the procedure as described in Experiment No. 2.1.
(B) Titration of Sodium Hydroxide and Oxalic Acid Solution
(i) Clean the burette thoroughly, wash it with distilled waterand finally rinse it with sodium hydroxide solution. (Alwaysrinse the burette (Fig. 2.17) with the solution, which is to betaken in it). Clamp the burette vertically in a burette stand.
(ii) Fill sodium hydroxide solution into the burette through afunnel above the zero mark.
(iii) Remove the air gap, if any, from the nozzle of the buretteby running the solution forcefully from the burette nozzle.
(iv) Remove the funnel before noting initial reading of theburette. Also while noting the reading, see that no drop ofthe liquid is hanging at the nozzle of the burette.
(v) Note the initial reading by keeping the eye exactly at thesame level as the meniscus of the solution.
(vi) Pipette out 10 mL of oxalic acid solution in a washed anddried conical flask. Always wash the pipette with water andrinse (Fig. 2.21) with the liquid to be measured beforepipetting out the liquid.
(vii) Add 1-2 drops of phenolphthalein indicator to the conicalflask. Place the flask over the glazed tile as shown inFig. 6.3 Titrate the acid with sodium hydroxide solutiontill a very faint permanent pink colour is obtained. Addsodium hydroxide solution in small amounts initially andthen dropwise.
Oxalic acid
Sodium Hydroxide
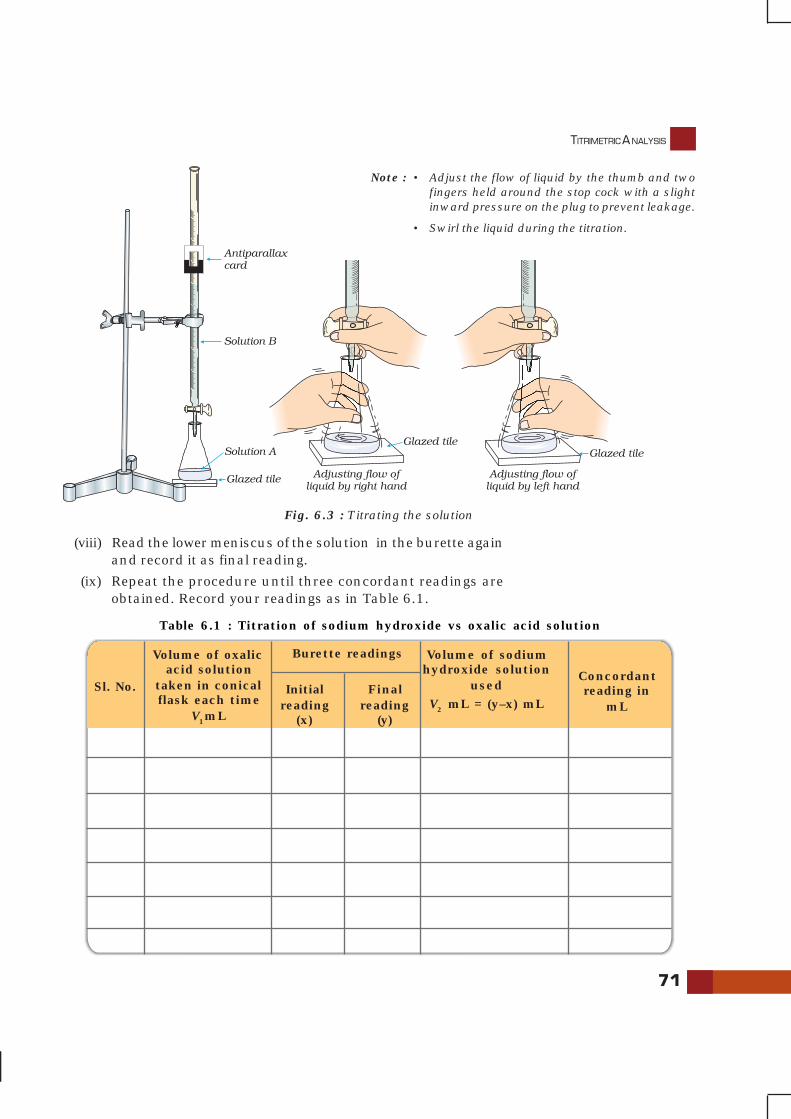
TITRIMETRIC ANALYSIS
71
Fig. 6.3 : Titrating the solution
Note : • Adjust the flow of liquid by the thumb and twofingers held around the stop cock with a slightinward pressure on the plug to prevent leakage.
• Swirl the liquid during the titration.
(viii) Read the lower meniscus of the solution in the burette againand record it as final reading.
(ix) Repeat the procedure until three concordant readings areobtained. Record your readings as in Table 6.1.
Table 6.1 : Titration of sodium hydroxide vs oxalic acid solution
Sl. No.
Volume of oxalicacid solution
taken in conicalflask each time
V1mL
Initialreading
(x)
Concordantreading in
mL
Burette readings
Finalreading
(y)
Volume of sodiumhydroxide solution
usedV2 mL = (y–x) mL
72
LABORATORY MANUAL CHEMISTRY
Calculations
Molarity of NaOH solution can be calculated by using the equation:Oxalic acid Sodium hydroxide
a1 M
1V
1 = a
2 M
2V
2
where, M1 and V1 are the molarity and volume of the oxalicacid solution.
M2 and V
2 are the molarity and volume of the sodium hydroxide
solution.
a1 and a
2 are respectively the basicity of oxalic acid and acidity
of sodium hydroxide. In this case a1= 2 and a2 = 1.
Also, Molar mass of oxalic acid, (COOH) 2.2H2O = 126 g mol–1
and Molar mass of sodium hydroxide (NaOH) = 40 g mol–1
Calculate the concentration of sodium hydroxide solution in g/Lby using the equation given below.
Concentration (strength) in g/L = Molarity×Molar mass
Result
Concentration of NaOH solution is ——————— g/L.
Precautions
(a) Always rinse the burette with the solution, which is to be taken in it.(b) Remove the air gap if any, from the burette before titrating the solution. Make
sure that the nozzle of burette is also filled.(c) Never forget to remove the funnel from the burette before noting the readings of
the burette and ensure that no drop is hanging from the nozzle of the burette.(d) Always read the lower meniscus for all transparent solutions and upper meniscus
for coloured solutions.(e) To note the burette readings place the eye exactly at the level of the meniscus.(f) Never hold the pipette at the bulb.(g) Never use the pipette and burette with a broken nozzle.(h) Never suck a strong acid or an alkali with the pipette.(i) Always keep the lower end of the pipette dipped in the liquid while sucking the
liquid.(j) Do not blow out the last drop of the solution from the jet end of the pipette into
the flask.(k) The concentration (strength) of the solution must be calculated up to the fourth
place of decimal.
TITRIMETRIC ANALYSIS
73
Discussion Questions
(i) Why are the burette and the pipette rinsed with the solution with which these are filled?
(ii) What is an indicator? Which indicator is used in the titration of oxalic acid vs sodiumhydroxide? Can the titration be performed by using some other indicator?
(iii) Why should one read the lower meniscus in the case of colourless and transparent solutionsand the upper meniscus for solutions of dark colour?
(iv) Explain the term ‘end point’?(v) What do you mean by 1.0 M solution?(vi) Why should the last drop of the solution not be blown out of a pipette?(vii) Explain the term basicity of an acid and acidity of a base?(viii) For titrating NaOH vs HCl, phenolphthalein and methyl orange, both are suitable indicators.
Why?(ix) What is meant by the term , ‘concordant readings’?(x) Can one take oxalic acid solution in the burette and sodium hydroxide solution in the
titration flask? Point out the limitations of doing so if any.
KNOW THIS ALSO
The complete neutralisation is possible only when the amount of alkali is in equivalentproportion to the amount of acid. Therefore, at the end point equivalent mass of acid dissolvedin volume V1 of solvent should be equal to the equivalent mass of the base dissolved inVolume V2 of solvent. If N1 and N2 are equivalent masses of acid and base respectively dissolvedin per litre of solution then N
1V
1 = N
2V
2… (i)
Equivalent mass of acids and bases is given by the following expression:
Equivalent mass of acid = molar mass
basicity … (ii)
Equivalent mass of base = molar mass
acidity ... (iii)
The number of gram equivalent mass of solute dissolved in one litre of the solution iscalled the normality of the solution. For acids and bases
Normality (N)= Number of gram equivalent mass
Volume of solution in litre ( )V =
w/ Equivalent mass
Volumeof solution in litre ( )V… (iv)
Where w = mass of substance in grams
Relationship between Normality and Molarity From definition of normality (N) [(equation (iv)]
Equivalent mass = w
N V×... (v)
If acidity or basicity is ‘a’, then by definition of equivalent mass
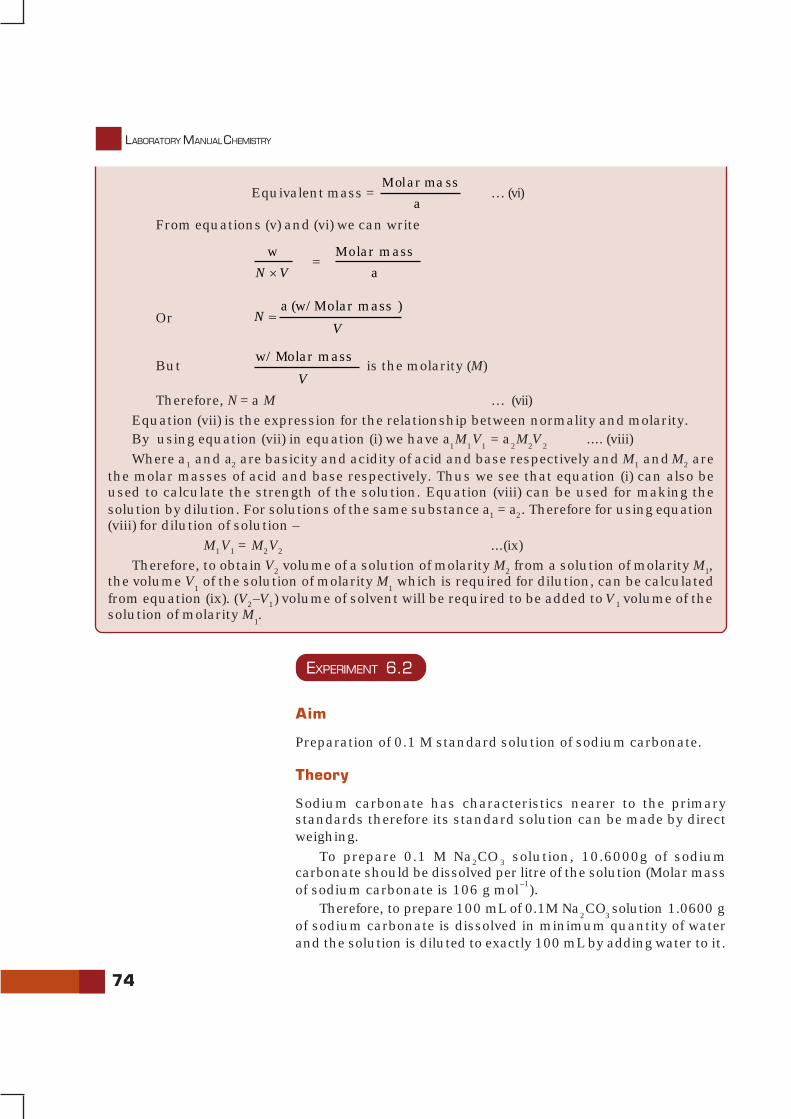
74
LABORATORY MANUAL CHEMISTRY
Equivalent mass = Molar mass
a … (vi)
From equations (v) and (vi) we can write
w Molar mass
a N V=
×
Ora (w/Molar mass )
N
V=
Butw/Molar mass
V is the molarity (M)
Therefore, N = a M … (vii)Equation (vii) is the expression for the relationship between normality and molarity.By using equation (vii) in equation (i) we have a
1M
1V
1 = a
2M
2V
2.... (viii)
Where a1 and a2 are basicity and acidity of acid and base respectively and M1 and M2 arethe molar masses of acid and base respectively. Thus we see that equation (i) can also beused to calculate the strength of the solution. Equation (viii) can be used for making thesolution by dilution. For solutions of the same substance a1 = a2. Therefore for using equation(viii) for dilution of solution –
M1V1 = M2V2 ...(ix)Therefore, to obtain V2 volume of a solution of molarity M2 from a solution of molarity M1,
the volume V1 of the solution of molarity M
1 which is required for dilution, can be calculated
from equation (ix). (V2–V1) volume of solvent will be required to be added to V1 volume of thesolution of molarity M
1.
EXPERIMENT 6.2
Aim
Preparation of 0.1 M standard solution of sodium carbonate.
Theory
Sodium carbonate has characteristics nearer to the primarystandards therefore its standard solution can be made by directweighing.
To prepare 0.1 M Na2CO3 solution, 10.6000g of sodiumcarbonate should be dissolved per litre of the solution (Molar massof sodium carbonate is 106 g mol–1).
Therefore, to prepare 100 mL of 0.1M Na2CO
3 solution 1.0600 g
of sodium carbonate is dissolved in minimum quantity of waterand the solution is diluted to exactly 100 mL by adding water to it.
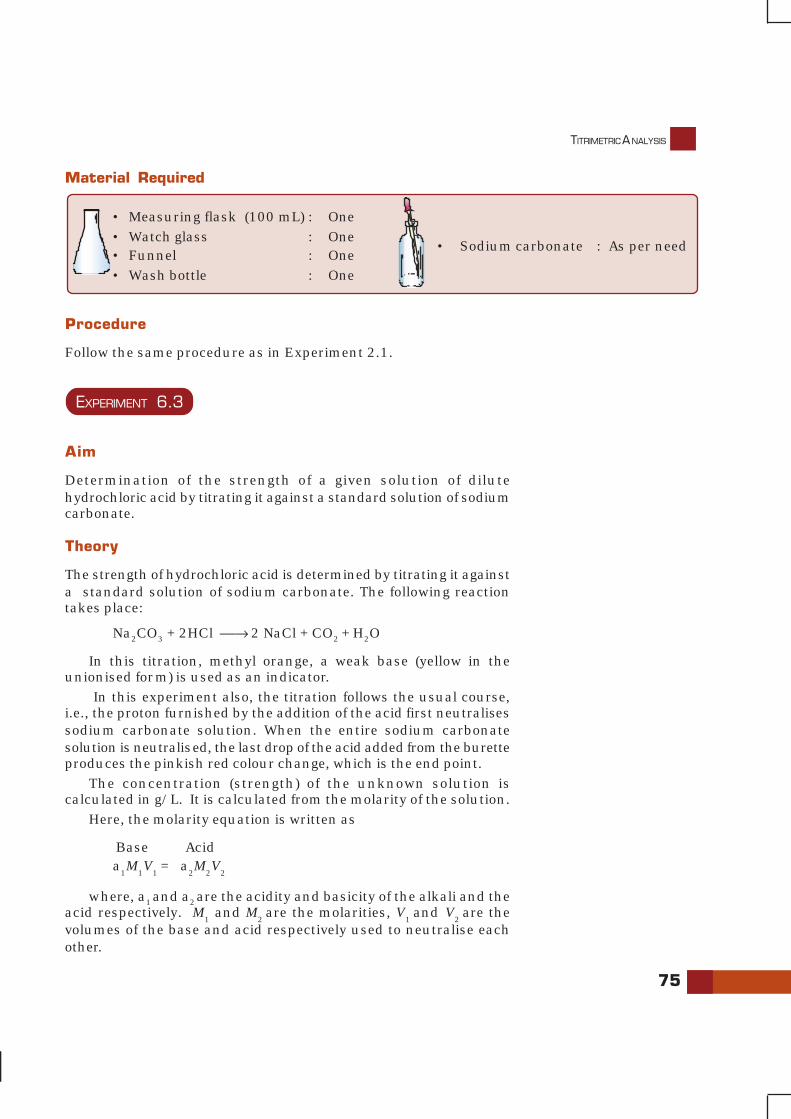
TITRIMETRIC ANALYSIS
75
Material Required
• Measuring flask (100 mL) : One• Watch glass : One• Funnel : One• Wash bottle : One
Procedure
Follow the same procedure as in Experiment 2.1.
EXPERIMENT 6.3
Aim
Determination of the strength of a given solution of dilutehydrochloric acid by titrating it against a standard solution of sodiumcarbonate.
Theory
The strength of hydrochloric acid is determined by titrating it againsta standard solution of sodium carbonate. The following reactiontakes place:
Na2CO3 + 2HCl ⎯→ 2 NaCl + CO2 + H2O
In this titration, methyl orange, a weak base (yellow in theunionised form) is used as an indicator.
In this experiment also, the titration follows the usual course,i.e., the proton furnished by the addition of the acid first neutralisessodium carbonate solution. When the entire sodium carbonatesolution is neutralised, the last drop of the acid added from the buretteproduces the pinkish red colour change, which is the end point.
The concentration (strength) of the unknown solution iscalculated in g/L. It is calculated from the molarity of the solution.
Here, the molarity equation is written as
Base Acida
1M
1V
1= a
2M
2V
2
where, a1 and a2 are the acidity and basicity of the alkali and theacid respectively. M
1 and M
2 are the molarities, V
1 and V
2 are the
volumes of the base and acid respectively used to neutralise eachother.
• Sodium carbonate : As per need
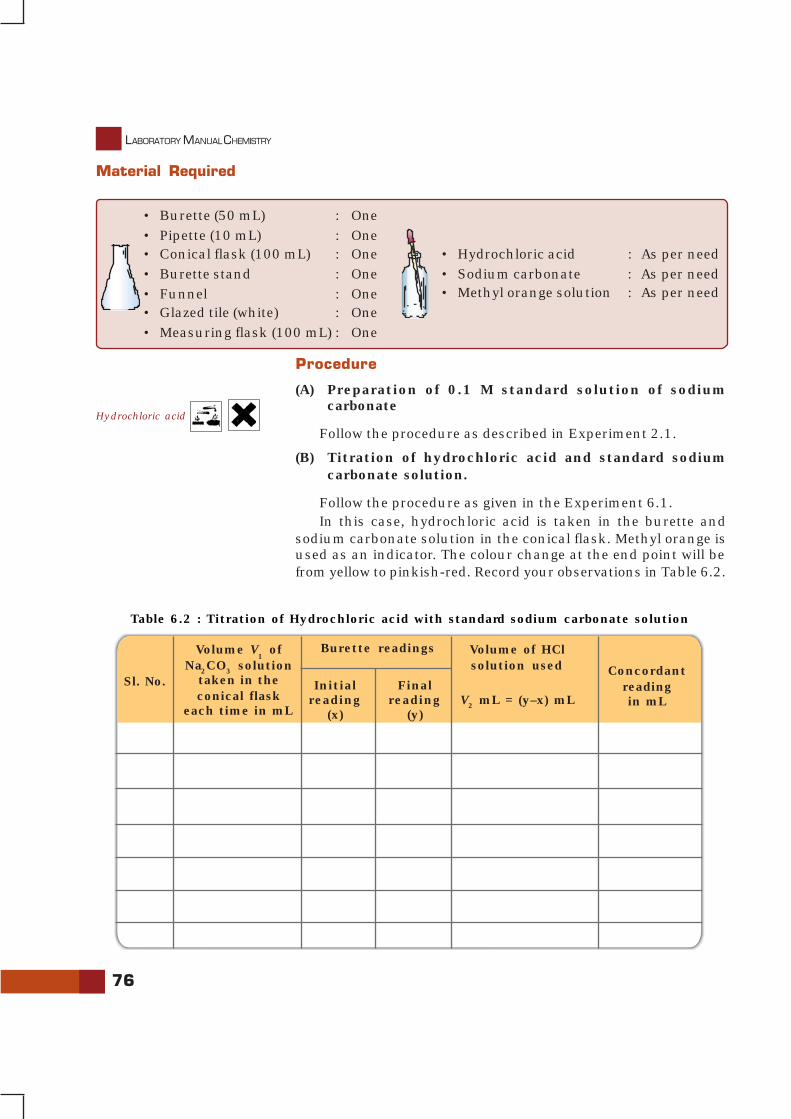
76
LABORATORY MANUAL CHEMISTRY
Table 6.2 : Titration of Hydrochloric acid with standard sodium carbonate solution
Sl. No.
Volume V1 of
Na2CO3 solutiontaken in theconical flask
each time in mL
Initialreading
(x)
Concordantreadingin mL
Burette readings
Finalreading
(y)
Volume of HClsolution used
V2 mL = (y–x) mL
Procedure
(A) Preparation of 0.1 M standard solution of sodiumcarbonate
Follow the procedure as described in Experiment 2.1.
(B) Titration of hydrochloric acid and standard sodiumcarbonate solution.
Follow the procedure as given in the Experiment 6.1.In this case, hydrochloric acid is taken in the burette and
sodium carbonate solution in the conical flask. Methyl orange isused as an indicator. The colour change at the end point will befrom yellow to pinkish-red. Record your observations in Table 6.2.
Material Required
• Burette (50 mL) : One• Pipette (10 mL) : One• Conical flask (100 mL) : One• Burette stand : One• Funnel : One• Glazed tile (white) : One• Measuring flask (100 mL) : One
• Hydrochloric acid : As per need• Sodium carbonate : As per need• Methyl orange solution : As per need
Hydrochloric acid
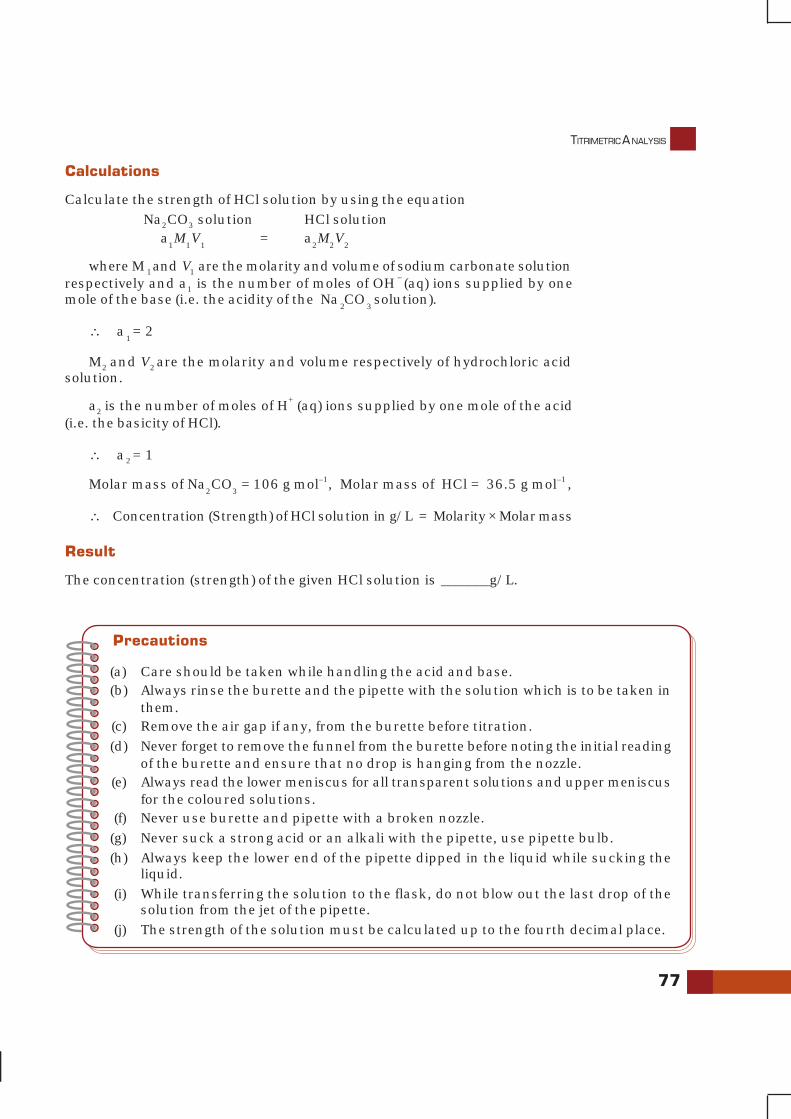
TITRIMETRIC ANALYSIS
77
Calculations
Calculate the strength of HCl solution by using the equation Na2CO3 solution HCl solution
a1M
1V
1 = a
2M
2V
2
where M 1 and V1 are the molarity and volume of sodium carbonate solutionrespectively and a1 is the number of moles of OH – (aq) ions supplied by onemole of the base (i.e. the acidity of the Na
2CO
3 solution).
∴ a1 = 2
M2 and V2 are the molarity and volume respectively of hydrochloric acidsolution.
a2 is the number of moles of H+ (aq) ions supplied by one mole of the acid(i.e. the basicity of HCl).
∴ a2 = 1
Molar mass of Na2CO
3 = 106 g mol–1, Molar mass of HCl = 36.5 g mol–1 ,
∴ Concentration (Strength) of HCl solution in g/L = Molarity × Molar mass
Result
The concentration (strength) of the given HCl solution is _______g/L.
Precautions
(a) Care should be taken while handling the acid and base.(b) Always rinse the burette and the pipette with the solution which is to be taken in
them.(c) Remove the air gap if any, from the burette before titration.(d) Never forget to remove the funnel from the burette before noting the initial reading
of the burette and ensure that no drop is hanging from the nozzle.(e) Always read the lower meniscus for all transparent solutions and upper meniscus
for the coloured solutions.(f) Never use burette and pipette with a broken nozzle.(g) Never suck a strong acid or an alkali with the pipette, use pipette bulb.(h) Always keep the lower end of the pipette dipped in the liquid while sucking the
liquid.(i) While transferring the solution to the flask, do not blow out the last drop of the
solution from the jet of the pipette.(j) The strength of the solution must be calculated up to the fourth decimal place.
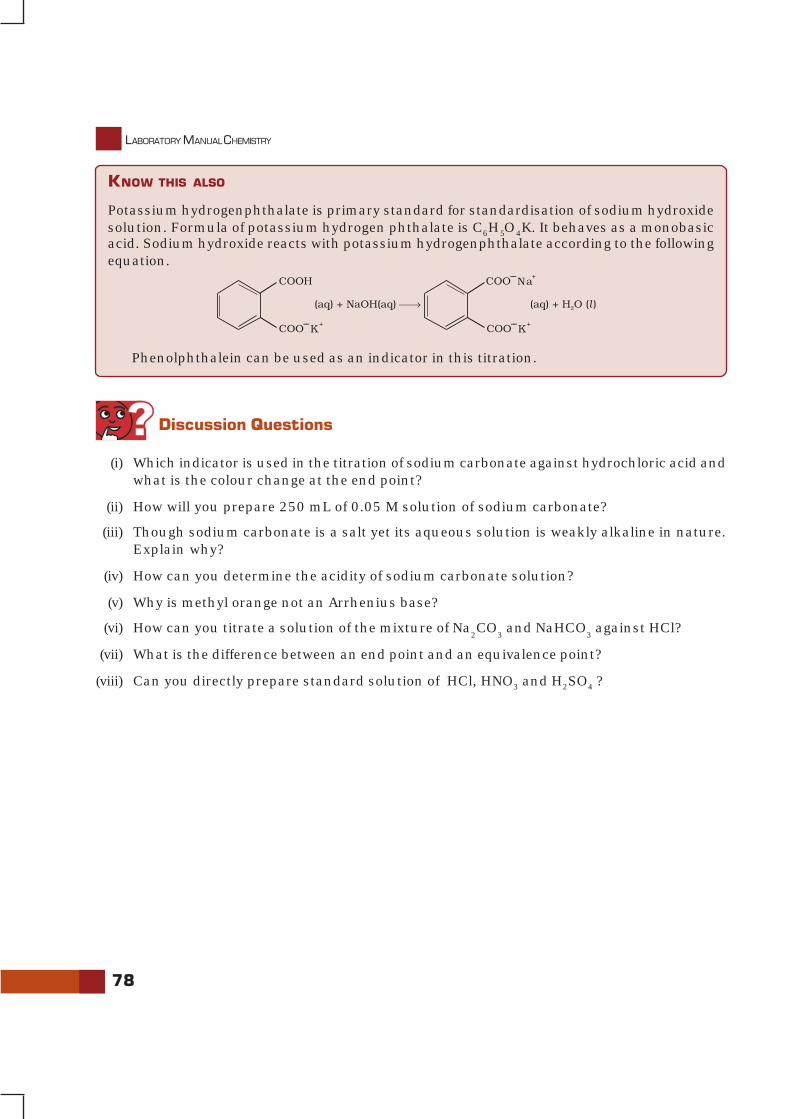
78
LABORATORY MANUAL CHEMISTRY
Discussion Questions
(i) Which indicator is used in the titration of sodium carbonate against hydrochloric acid andwhat is the colour change at the end point?
(ii) How will you prepare 250 mL of 0.05 M solution of sodium carbonate?
(iii) Though sodium carbonate is a salt yet its aqueous solution is weakly alkaline in nature.Explain why?
(iv) How can you determine the acidity of sodium carbonate solution?
(v) Why is methyl orange not an Arrhenius base?
(vi) How can you titrate a solution of the mixture of Na2CO
3 and NaHCO
3 against HCl?
(vii) What is the difference between an end point and an equivalence point?
(viii) Can you directly prepare standard solution of HCl, HNO3 and H2SO4 ?
KNOW THIS ALSO
Potassium hydrogenphthalate is primary standard for standardisation of sodium hydroxidesolution. Formula of potassium hydrogen phthalate is C6H5O4K. It behaves as a monobasicacid. Sodium hydroxide reacts with potassium hydrogenphthalate according to the followingequation.
Phenolphthalein can be used as an indicator in this titration.
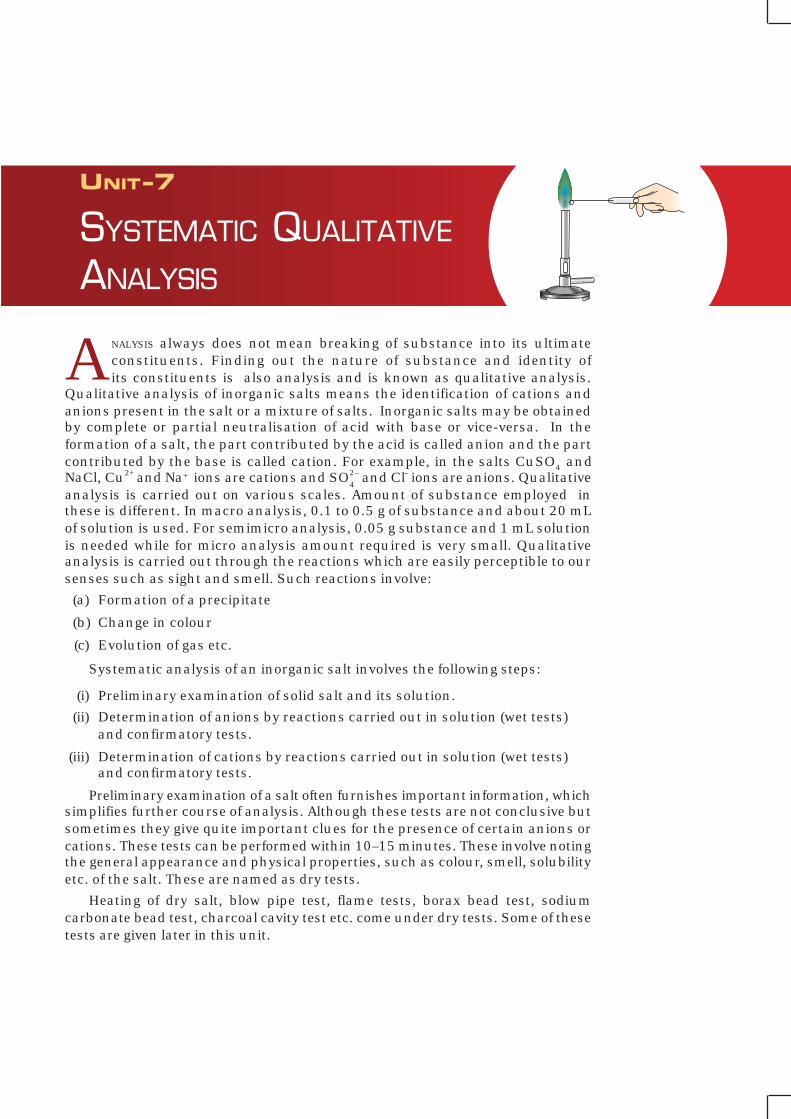
UNIT-7
SYSTEMATIC QUALITATIVE
ANALYSIS
ANALYSIS always does not mean breaking of substance into its ultimateconstituents. Finding out the nature of substance and identity ofits constituents is also analysis and is known as qualitative analysis.
Qualitative analysis of inorganic salts means the identification of cations andanions present in the salt or a mixture of salts. Inorganic salts may be obtainedby complete or partial neutralisation of acid with base or vice-versa. In theformation of a salt, the part contributed by the acid is called anion and the partcontributed by the base is called cation. For example, in the salts CuSO4 andNaCl, Cu2+ and Na+ ions are cations and SO
4
2– and Cl– ions are anions. Qualitativeanalysis is carried out on various scales. Amount of substance employed inthese is different. In macro analysis, 0.1 to 0.5 g of substance and about 20 mLof solution is used. For semimicro analysis, 0.05 g substance and 1 mL solutionis needed while for micro analysis amount required is very small. Qualitativeanalysis is carried out through the reactions which are easily perceptible to oursenses such as sight and smell. Such reactions involve:
(a) Formation of a precipitate
(b) Change in colour
(c) Evolution of gas etc.
Systematic analysis of an inorganic salt involves the following steps:
(i) Preliminary examination of solid salt and its solution.
(ii) Determination of anions by reactions carried out in solution (wet tests)and confirmatory tests.
(iii) Determination of cations by reactions carried out in solution (wet tests)and confirmatory tests.
Preliminary examination of a salt often furnishes important information, whichsimplifies further course of analysis. Although these tests are not conclusive butsometimes they give quite important clues for the presence of certain anions orcations. These tests can be performed within 10–15 minutes. These involve notingthe general appearance and physical properties, such as colour, smell, solubilityetc. of the salt. These are named as dry tests.
Heating of dry salt, blow pipe test, flame tests, borax bead test, sodiumcarbonate bead test, charcoal cavity test etc. come under dry tests. Some of thesetests are given later in this unit.
80
LABORATORY MANUAL CHEMISTRY
Solubility of a salt in water and the pH of aqueous solutions give importantinformation about the nature of ions present in the salt. If a solution of the salt isacidic or basic in nature, this means that it is being hydrolysed in water. If thesolution is basic in nature then salt may be some carbonate or sulphide etc. Ifthe solution shows acidic nature then it may be an acid salt or salt of weak baseand strong acid. In this case it is best to neutralise the solution with sodiumcarbonate before testing it for anions.
Gases evolved in the preliminary tests with dil. H2SO
4/dil. HCl and conc. H
2SO
4
also give good indication about the presence of acid radicals (see Tables 7.1 and7.3). Preliminary tests should always be performed before starting the confirmatorytests for the ions.
EXPERIMENT 7.1
Aim
To detect one cation and one anion in the given salt from the following ions:Cations - Pb2+, Cu2+, As3+, Al3+, Fe3+, Mn2+, Ni2+, Zn2+, Co2+, Ca2+, Sr2+, Ba2+,
Mg2+, 4
NH+
Anions - 2–
3CO , S2–, 2–
3SO , 2–
4SO , –
2NO , –
3NO , Cl– , Br–, I–, 3–
4PO , 2–
2 4C O ,
CH3COO–.
(Insoluble salts to be excluded)
Theory
Two basic principles of great use in the analysis are:(i) the Solubility product and(ii) the Common ion effect
When ionic product of a salt exceeds its solubility product, precipitation takesplace. Ionic product of salt is controlled by making use of common ion effectwhich you have studied in the textbook of chemistry.
Material Required
• Boiling tube : As per need• Test tubes : As per requirement• Measuring cylinder : One• Test tube stand : One• Test tube holder : One• Delivery tube : One• Corks : As per need• Filter paper : As per need
• Reagents : As per need
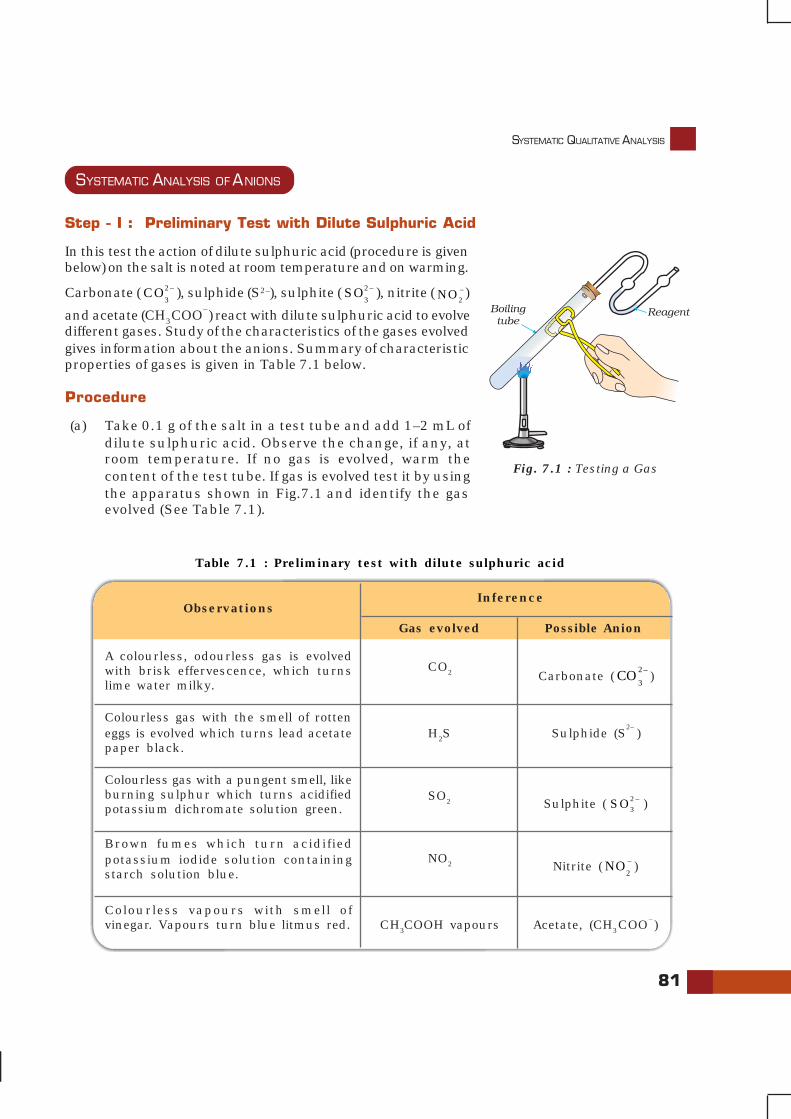
SYSTEMATIC QUALITATIVE ANALYSIS
81
SYSTEMATIC ANALYSIS OF ANIONS
Step - I : Preliminary Test with Dilute Sulphuric Acid
In this test the action of dilute sulphuric acid (procedure is givenbelow) on the salt is noted at room temperature and on warming.
Carbonate ( 2–
3CO ), sulphide (S2–), sulphite ( 2–
3SO ), nitrite ( –
2NO )
and acetate (CH3COO–) react with dilute sulphuric acid to evolvedifferent gases. Study of the characteristics of the gases evolvedgives information about the anions. Summary of characteristicproperties of gases is given in Table 7.1 below.
Procedure
(a) Take 0.1 g of the salt in a test tube and add 1–2 mL ofdilute sulphuric acid. Observe the change, if any, atroom temperature. If no gas is evolved, warm thecontent of the test tube. If gas is evolved test it by usingthe apparatus shown in Fig.7.1 and identify the gasevolved (See Table 7.1).
Fig. 7.1 : Testing a Gas
ObservationsInference
Gas evolved Possible Anion
A colourless, odourless gas is evolvedwith brisk effervescence, which turnslime water milky.
Colourless gas with the smell of rotteneggs is evolved which turns lead acetatepaper black.
Colourless gas with a pungent smell, likeburning sulphur which turns acidifiedpotassium dichromate solution green.
Brown fumes which turn acidifiedpotassium iodide solution containingstarch solution blue.
CO2
H2S
SO2
NO2
Carbonate (2–
3CO )
Sulphide (S2–
)
Sulphite ( 2–
3SO )
Nitrite ( –
2NO )
Table 7.1 : Preliminary test with dilute sulphuric acid
Colourless vapours with smell ofvinegar. Vapours turn blue litmus red. CH3COOH vapours Acetate, (CH3COO
–)
82
LABORATORY MANUAL CHEMISTRY
Confirmatory tests for CO3
2- S
2–, SO3
2-, NO2
– and CH3COO
–
Confirmatory (wet) tests for anions are performed by using water extract whensalt is soluble in water and by using sodium carbonate extract when salt isinsoluble in water. Confirmation of CO
3
2– is done by using aqueous solution ofthe salt or by using solid salt as such because sodium carbonate extract containscarbonate ions. Water extract is made by dissolving salt in water. Preparation ofsodium carbonate extract is given below.
Preparation of sodium carbonate extract
Take 1 g of salt in a porcelain dish or boiling tube. Mix about 3 g of solid sodiumcarbonate and add 15 mL of distilled water to it. Stir and boil the content for about10 minutes. Cool, filter and collect the filtrate in a test tube and label it as sodiumcarbonate extract.
Confirmatory tests for acid radicals, which react with dilute sulphuric acidare given below in Table 7.2.
Anion
Take 0.1 g of salt in a test tube, add dilute sulphuric acid.CO
2 gas is evolved with brisk effervescence which turns lime
water milky. On passing the gas for some more time, milkinessdisappears.
Confirmatory test
Carbonate ( 2
3
-CO )
Take 1 mL of water extract and make it alkaline by addingammonium hydroxide or sodium carbonate extract. Add a drop ofsodium nitroprusside solution. Purple or violet colouration appears.
Sulphide (S2–)
(a) Take 1 mL of water extract or sodium carbonateextract in a test tube and add barium chloridesolution. A white precipitate is formed which dissolvesin dilute hydrochloric acid and sulphur dioxide gasis also evolved.
(b) Take the precipitate of step (a) in a test tube and adda few drops of potassium permanganate solutionacidified with dil. H2SO4. Colour of potassiumpermanganate solution gets discharged.
*Sulphite ( 2–
3SO )
(a) Take 1 mL of water extract in a test tube. Add a fewdrops of potassium iodide solution and a few drops ofstarch solution, acidify with acetic acid. Blue colourappears.
(b) Acidify 1 mL of water extract with acetic acid. Add2-3 drops of sulphanilic acid solution followed by 2-3drops of 1-naphthylamine reagent. Appearance of redcolour indicates the presence of nitrite ion.
Nitrite ( –
2NO )
Table 7.2 : Confirmatory tests for CO3
2–, S
2–, SO3
2–, NO3
– , CH3COO
–
* Like CO2 sulphur dioxide also turns lime water milky. But CO
2 is odourless gas and SO
2 has a
characteristic smell.
SYSTEMATIC QUALITATIVE ANALYSIS
83
Chemistry of Confirmatory Tests
1. Test for Carbonate ion [CO2
3
–]
If there is effervescence with the evolution of a colourless and odourless gas onadding dil. H2SO4 to the solid salt, this indicates the presence of carbonate ion.The gas turns lime water milky due to the formation of CaCO
3 (Fig. 7.1)
Na2CO3 + H2SO4 ⎯→ Na2SO4 + H2O +CO2
Ca(OH)2 + CO
2 ⎯→ CaCO
3 + H
2O
If CO2 gas is passed in excess through lime water, the milkiness produced
disappears due to the formation of calcium hydrogen carbonate which is solublein water.
CaCO3 + CO2 + H2O ⎯→ Ca (HCO3)2
2. Test for Sulphide ion [S2–
]
(a) With warm dilute H2SO4 a sulphide gives hydrogen sulphide gas whichsmells like rotten eggs. A piece of filter paper dipped in lead acetatesolution turns black on exposure to the gas due to the formation oflead sulphide which is black in colour.
Na2S + H
2SO
4⎯→ Na
2SO
4 + H
2S
(CH3COO)2Pb + H2S ⎯→ PbS + 2CH3COOHLead sulphideBlack precipitate
(b) If the salt is soluble in water, take the solution of salt in water make italkaline with ammonium hydroxide and add sodium nitroprussidesolution. If it is insoluble in water take sodium carbonate extract andadd a few drops of sodium nitroprusside solution. Purple or violet
(a) Take 0.1 g of salt in a china dish. Add 1 mL of ethanoland 0.2 mL conc. H
2SO
4 and heat. Fruity odour
confirms the presence of acetate ion.(b) Take 0.1 g of salt in a test tube, add 1-2 mL distilled
water, shake well filter if necessary. Add 1 to 2 mLneutral** ferric chloride solution to the filtrate. Deepred colour appears which disappears on boiling anda brown-red precipitate is formed.
Acetate (CH3COO–)
** Prepareation of neutral Ferric Chloride : Add dilute NaOH solution to ferric chloride solution drop by drop withshaking until a small but permanent precipitate of ferric hydroxide is obtained. Filter the precipitate and usethe filtrate for analysis.
Hydrogen
sulphide
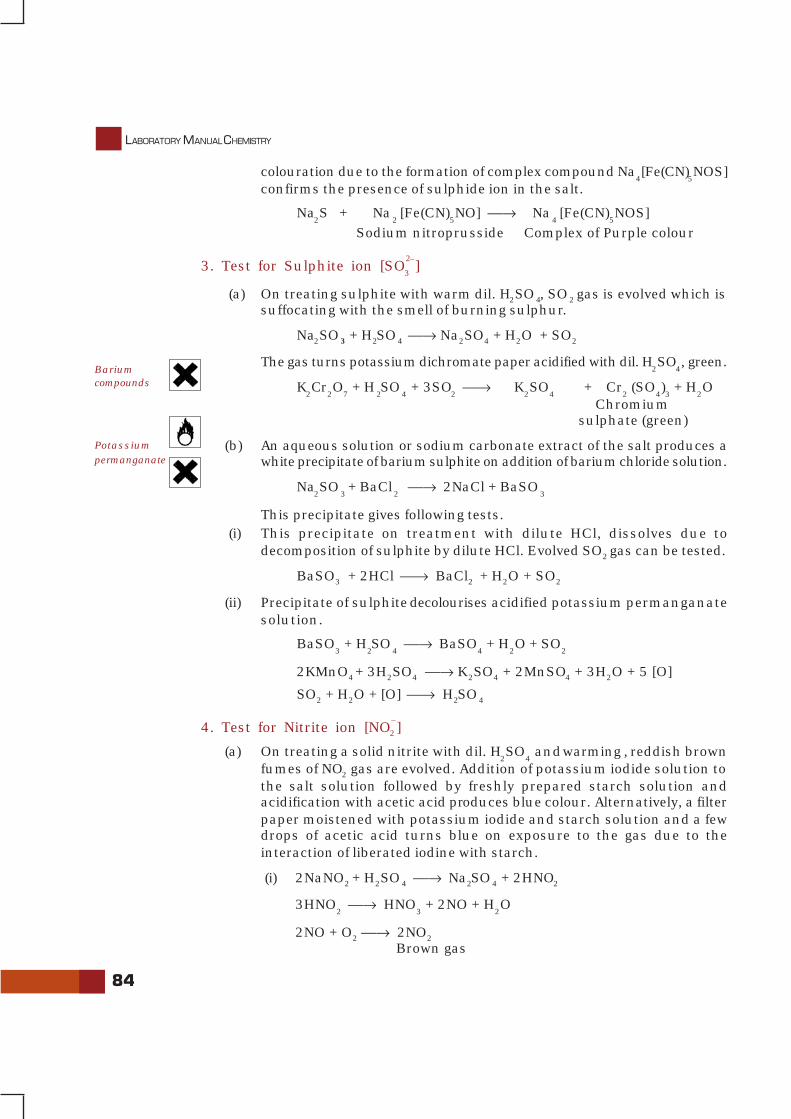
84
LABORATORY MANUAL CHEMISTRY
colouration due to the formation of complex compound Na4[Fe(CN)
5NOS]
confirms the presence of sulphide ion in the salt.
Na2S + Na
2 [Fe(CN)
5NO] ⎯→ Na
4 [Fe(CN)
5NOS]
Sodium nitroprusside Complex of Purple colour
3. Test for Sulphite ion [SO2
3
–]
(a) On treating sulphite with warm dil. H2SO4, SO2 gas is evolved which issuffocating with the smell of burning sulphur.
Na2SO3 + H2SO4 ⎯→ Na2SO4 + H2O + SO2
The gas turns potassium dichromate paper acidified with dil. H2SO
4, green.
K2Cr
2O
7 + H
2SO
4 + 3SO
2 ⎯→ K
2SO
4+ Cr
2 (SO
4)3 + H
2O
Chromium sulphate (green)
(b) An aqueous solution or sodium carbonate extract of the salt produces awhite precipitate of barium sulphite on addition of barium chloride solution.
Na2SO
3 + BaCl
2 ⎯→ 2NaCl + BaSO
3
This precipitate gives following tests.(i) This precipitate on treatment with dilute HCl, dissolves due to
decomposition of sulphite by dilute HCl. Evolved SO2 gas can be tested.
BaSO3 + 2HCl ⎯→ BaCl2 + H2O + SO2
(ii) Precipitate of sulphite decolourises acidified potassium permanganatesolution.
BaSO3 + H
2SO
4 ⎯→ BaSO
4 + H
2O + SO
2
2KMnO4 + 3H2SO4 ⎯→ K2SO4 + 2MnSO4 + 3H2O + 5 [O]
SO2 + H2O + [O] ⎯→ H2SO4
4. Test for Nitrite ion [NO–
2]
(a) On treating a solid nitrite with dil. H2SO
4 and
warming
, reddish brown
fumes of NO2 gas are evolved. Addition of potassium iodide solution tothe salt solution followed by freshly prepared starch solution andacidification with acetic acid produces blue colour. Alternatively, a filterpaper moistened with potassium iodide and starch solution and a fewdrops of acetic acid turns blue on exposure to the gas due to theinteraction of liberated iodine with starch.
(i) 2NaNO2 + H2SO4 ⎯→ Na2SO4 + 2HNO2
3HNO2 ⎯→ HNO
3 + 2NO + H
2O
2NO + O2 ⎯→ 2NO2
Brown gas
Bariumcompounds
Potassiumpermanganate
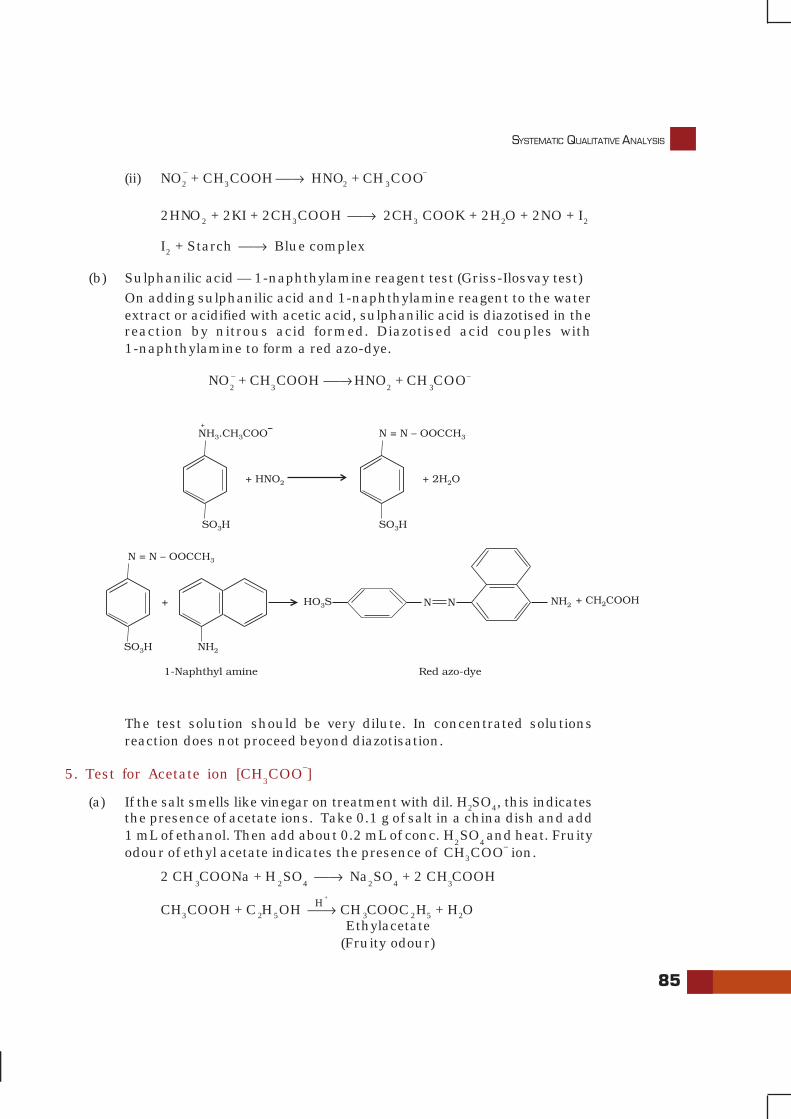
SYSTEMATIC QUALITATIVE ANALYSIS
85
(ii) NO2
– + CH3COOH ⎯→ HNO2 + CH3COO–
2HNO2 + 2KI + 2CH3COOH ⎯→ 2CH3 COOK + 2H2O + 2NO + I2
I2 + Starch ⎯→ Blue complex
(b) Sulphanilic acid — 1-naphthylamine reagent test (Griss-Ilosvay test)On adding sulphanilic acid and 1-naphthylamine reagent to the waterextract or acidified with acetic acid, sulphanilic acid is diazotised in thereaction by nitrous acid formed. Diazotised acid couples with1-naphthylamine to form a red azo-dye.
NO2
– + CH3COOH ⎯→ HNO
2 + CH
3COO–
The test solution should be very dilute. In concentrated solutionsreaction does not proceed beyond diazotisation.
5. Test for Acetate ion [CH3COO
–]
(a) If the salt smells like vinegar on treatment with dil. H2SO4, this indicatesthe presence of acetate ions. Take 0.1 g of salt in a china dish and add1 mL of ethanol. Then add about 0.2 mL of conc. H
2SO
4 and heat. Fruity
odour of ethyl acetate indicates the presence of CH3COO– ion.
2 CH3COONa + H
2SO
4 ⎯→ Na
2SO
4 + 2 CH
3COOH
CH3COOH + C2H5OH ⎯→ CH3COOC2H5 + H2O Ethylacetate
(Fruity odour)
H+
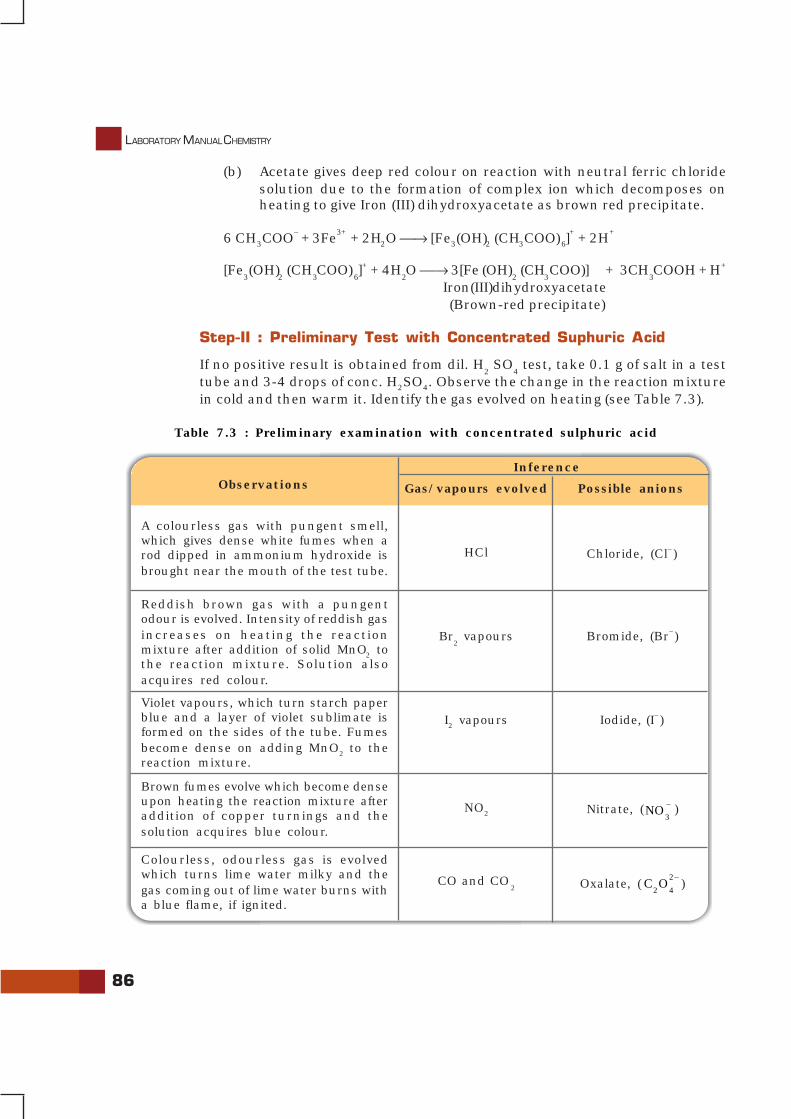
86
LABORATORY MANUAL CHEMISTRY
(b) Acetate gives deep red colour on reaction with neutral ferric chloridesolution due to the formation of complex ion which decomposes onheating to give Iron (III) dihydroxyacetate as brown red precipitate.
6 CH3COO– + 3Fe3+ + 2H2O ⎯→ [Fe3(OH)2 (CH3COO)6]+ + 2H+
[Fe3(OH)
2 (CH
3COO)
6]+ + 4H
2O ⎯→ 3[Fe (OH)
2 (CH
3COO)] + 3CH
3COOH + H+
Iron(III)dihydroxyacetate (Brown-red precipitate)
Step-II : Preliminary Test with Concentrated Suphuric Acid
If no positive result is obtained from dil. H2 SO
4 test, take 0.1 g of salt in a test
tube and 3-4 drops of conc. H2SO4. Observe the change in the reaction mixturein cold and then warm it. Identify the gas evolved on heating (see Table 7.3).
ObservationsInference
Gas/vapours evolved Possible anions
A colourless gas with pungent smell,which gives dense white fumes when arod dipped in ammonium hydroxide isbrought near the mouth of the test tube.
Reddish brown gas with a pungentodour is evolved. Intensity of reddish gasincreases on heating the reactionmixture after addition of solid MnO2 tothe reaction mixture. Solution alsoacquires red colour.
Violet vapours, which turn starch paperblue and a layer of violet sublimate isformed on the sides of the tube. Fumesbecome dense on adding MnO2 to thereaction mixture.
Brown fumes evolve which become denseupon heating the reaction mixture afteraddition of copper turnings and thesolution acquires blue colour.
HCl
Br2 vapours
I2 vapours
NO2
Chloride, (Cl– )
Bromide, (Br– )
Iodide, (I– )
Nitrate, ( –
3NO )
Table 7.3 : Preliminary examination with concentrated sulphuric acid
Colourless, odourless gas is evolvedwhich turns lime water milky and thegas coming out of lime water burns witha blue flame, if ignited.
CO and CO2 Oxalate, (
2–
2 4C O )
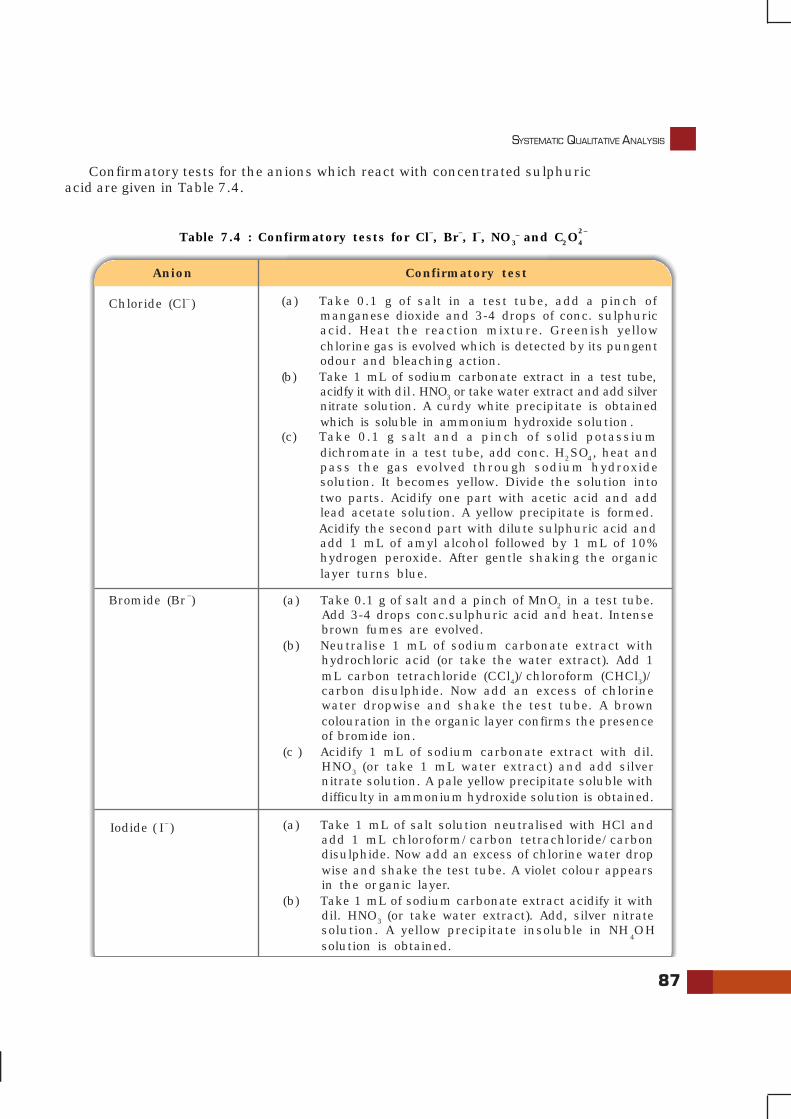
SYSTEMATIC QUALITATIVE ANALYSIS
87
Confirmatory tests for the anions which react with concentrated sulphuricacid are given in Table 7.4.
Anion
(a) Take 0.1 g of salt in a test tube, add a pinch ofmanganese dioxide and 3-4 drops of conc. sulphuricacid. Heat the reaction mixture. Greenish yellowchlorine gas is evolved which is detected by its pungentodour and bleaching action.
(b) Take 1 mL of sodium carbonate extract in a test tube,acidfy it with dil . HNO3 or take water extract and add silvernitrate solution. A curdy white precipitate is obtainedwhich is soluble in ammonium hydroxide solution.
(c) Take 0.1 g salt and a pinch of solid potassiumdichromate in a test tube, add conc. H2SO4, heat andpass the gas evolved through sodium hydroxidesolution. It becomes yellow. Divide the solution intotwo parts. Acidify one part with acetic acid and addlead acetate solution. A yellow precipitate is formed.Acidify the second part with dilute sulphuric acid andadd 1 mL of amyl alcohol followed by 1 mL of 10%hydrogen peroxide. After gentle shaking the organiclayer turns blue.
Confirmatory test
Chloride (Cl– )
(a) Take 0.1 g of salt and a pinch of MnO2 in a test tube.Add 3-4 drops conc.sulphuric acid and heat. Intensebrown fumes are evolved.
(b) Neutralise 1 mL of sodium carbonate extract withhydrochloric acid (or take the water extract). Add 1mL carbon tetrachloride (CCl4)/chloroform (CHCl3)/carbon disulphide. Now add an excess of chlorinewater dropwise and shake the test tube. A browncolouration in the organic layer confirms the presenceof bromide ion.
(c ) Acidify 1 mL of sodium carbonate extract with dil.HNO3 (or take 1 mL water extract) and add silvernitrate solution. A pale yellow precipitate soluble withdifficulty in ammonium hydroxide solution is obtained.
Bromide (Br–)
(a) Take 1 mL of salt solution neutralised with HCl andadd 1 mL chloroform/carbon tetrachloride/carbondisulphide. Now add an excess of chlorine water dropwise and shake the test tube. A violet colour appearsin the organic layer.
(b) Take 1 mL of sodium carbonate extract acidify it withdil. HNO3 (or take water extract). Add, silver nitratesolution. A yellow precipitate insoluble in NH
4OH
solution is obtained.
Iodide ( I– )
Table 7.4 : Confirmatory tests for Cl–, Br–, I–, NO3– and C2O
2
4
–
88
LABORATORY MANUAL CHEMISTRY
Chemistry of Confirmatory Tests
1. Test for Chloride ion [Cl–]
(a) If on treatment with warm conc. H2SO
4 the salt gives a colourless gas
with pungent smell or and if the gas which gives dense white fumeswith ammonia solution, then the salt may contain Cl– ions and thefollowing reaction occurs.
NaCl + H2SO
4 ⎯→ NaHSO
4 + HCl
Sodium Hydrogen chloride hydrogen sulphate Colourless gas
HCl + NH3
⎯→ NH4Cl
Ammonium chloride White fumes
(b) If a salt gives effervescence on heating with conc. H2SO
4 and MnO
2 and
a light greenish yellow pungent gas is evolved, this indicates the presenceof Cl– ions.
MnO2 + 2NaCl + 2H2SO4 ⎯→ Na2SO4 + MnSO4 + 2H2O + Cl2(c) Salt solution acidified with dilute HNO
3 on addition of silver nitrate
solution gives a curdy white precipitate soluble in ammonium hydroxidesolution. This indicates the presence of Cl– ions in the salt.
NaCl + AgNO3 ⎯→ NaNO
3 + Ag Cl
Silver chloride (White precipitate)
AgCl + 2NH4OH ⎯→ [Ag(NH
3)2 ]Cl + 2H
2O
Diammine silver (I) chloride
Take 1 mL of salt solution in water in a test tube. Add 2 mLconc. of H2SO4 and mix thoroughly. Cool the mixture underthe tap. Add freshly prepared ferrous sulphate along thesides of the test tube without shaking. A dark brown ring isformed at the junction of the two solutions.
*Nitrate ( –3NO )
(a) Take 1 mL of water extract or sodium carbonateextract acidified with acetic acid and add calciumchloride solution. A white precipitate insoluble inammonium oxalate and oxalic acid solution butsoluble in dilute hydrochloric acid and dilute nitricacid is formed.
(b) Take the precipitate from test (a) and dissolve it indilute H2SO4. Add very dilute solution of KMnO4 andwarm. Colour of KMnO4 solution is discharged. Passthe gas coming out through lime water. The lime waterturns milky.
Oxalate ( 2–
2 4C O )
* This test can also be performed by adding first ferrous sulphate solution and then conc. H2SO
4.
Manganesedioxide
Silver nitrate
SYSTEMATIC QUALITATIVE ANALYSIS
89
(d) Mix a little amount of salt and an equal amount of solid potassiumdichromate (K
2Cr
2O
7) in a test tube and add conc. H
2SO
4 to it. Heat the
test tube and pass the evolved gas through sodium hydroxide solution.If a yellow solution is obtained, divide the solution into two parts. Acidifythe first part with acetic acid and then add lead acetate solution.Formation of a yellow precipitate of lead chromate confirms the presenceof chloride ions in the salt. This test is called chromyl chloride test.*
4NaCl + K2Cr2O7 + 6H2SO4 ⎯→ 2KHSO4 + 2CrO2Cl2 + 4NaHSO4 + 3H2O(Chromylchloride)
CrO2Cl
2 + 4NaOH ⎯→ Na
2CrO
4 + 2NaCl + 2H
2O
(CH3COO)
2Pb + Na
2CrO
4 ⎯→ PbCrO
4 + 2CH
3COONa
Sodium Lead chromate chromate (Yellow precipitate)
Acidify the second part with dilute sulphuric acid and add small amounts ofamyl alcohol and then 1 mL of 10% hydrogen peroxide solution. On gentle shakingorganic layer turns blue. CrO2
4
– ion formed in the reaction of chromyl chloridewith sodium hydroxide reacts with hydrogen peroxide to form chromium pentoxide(CrO
5) (See structure) which dissolves in amyl alcohol to give blue colour.
CrO4
2– + 2H+ + 2H2O2 ⎯→ Cr O5 + 3H2O Chromium pentoxide
2. Test for Bromide ion (Br– )
If on heating the salt with conc. H2SO4 reddish brown fumes of bromine areevolved in excess, this indicates the presence of Br–ions. The fumes get intensifiedon addition of MnO
2. Bromine vapours turn starch paper yellow.
2NaBr + 2H2SO4 ⎯→ Br2 + SO2 + Na2SO4 + 2H2O
2NaBr + MnO2 + 2H
2SO
4 ⎯→ Na
2SO
4 + MnSO
4 + 2H
2O + Br
2
(a) Add 1 mL of carbon tetrachloride (CCl4)/chloroform (CHCl3)** and excessof freshly prepared chlorine water dropwise to the salt solution in wateror sodium carbonate extract neutralised with dilute HCl. Shake the testtube vigorously. The appearance of an orange brown colouration in theorganic layer due to the dissolution of bromine in it, confirms thepresence of bromide ions.
2NaBr + Cl2 ⎯→ 2NaCl + Br
2
* Chromyl chloride test should be performed with minimum amount of substance to avoid pollution by Cr3+ ions.** In place of carbon tetrachloride or chloroform, carbon disulphide or dichloromethane (CH
2Cl
2) can also be used.
Chromylchloride
Leadchromate
Brominevery toxic by
inhalationcorrosive
90
LABORATORY MANUAL CHEMISTRY
(b) Acidify the sodium carbonate extract of the salt with dil. HNO3. Add
silver nitrate (AgNO3) solution and shake the test tube. A pale yellowprecipitate is obtained which dissolves in ammonium hydroxide withdifficulty.
NaBr + AgNO3 ⎯→ NaNO3 + AgBr Silver bromide Pale yellow precipitate
3. Test for Iodide ion ( I– )
(a) If on heating the salt with conc. H2SO4 , deep violet vapours with apungent smell are evolved. These turns starch paper blue and a violetsublimate is formed on the sides of the test tube, it indicates the presenceof I– ions. Some HI, sulphur dioxide, hydrogen sulphide, and sulphurare also formed due to the following reactions.
2NaI + 2H2SO4 ⎯→ Na2SO4 + SO2 + 2H2O + I2
I
2 + Starch ⎯→ Blue colour
solution
NaI + H2SO4 ⎯→ NaHSO4 + HI
2HI + H2SO
4 ⎯→ 2H
2O + I
2 + SO
2
6NaI + 4H2SO4 ⎯→ 3I2 + 4H2O +S + 3Na2SO4
8NaI + 5 H2SO
4 ⎯→ 4I
2 + H
2S + 4Na
2SO
4 + 4H
2O
On adding MnO2 to the reaction mixture, the violet vapours becomedense.
2NaI + MnO2 + 2H
2SO
4 ⎯→ I
2 + MnSO
4 + Na
2SO
4 + 2H
2O
(b) Add 1 mL of CHCl3 or CCl4 and chlorine water in excess to the saltsolution in water or sodium carbonate extract neutralised with dil.HCland shake the test tube vigorously. Presence of violet colouration in theorganic layer confirms the presence of iodide ions.
2NaI + Cl2 ⎯→ 2NaCl + I
2
Iodine dissolves in the organic solvent and the solution becomes violet.
(c) Acidify sodium carbonate extract of the salt with dil.HNO3 and add
AgNO3 solution. Appearance of a yellow precipitate insoluble in excessof NH4OH confirms the presence of iodide ions.
NaI + AgNO3 ⎯→ AgI + NaNO
3
silver iodide (Yellow precipitate)
Iodine,
harmful byinhalation
and contactwith skin
Chlorine,
toxic byinhalation
Chloroform,
harmful andtoxic by
inhalation
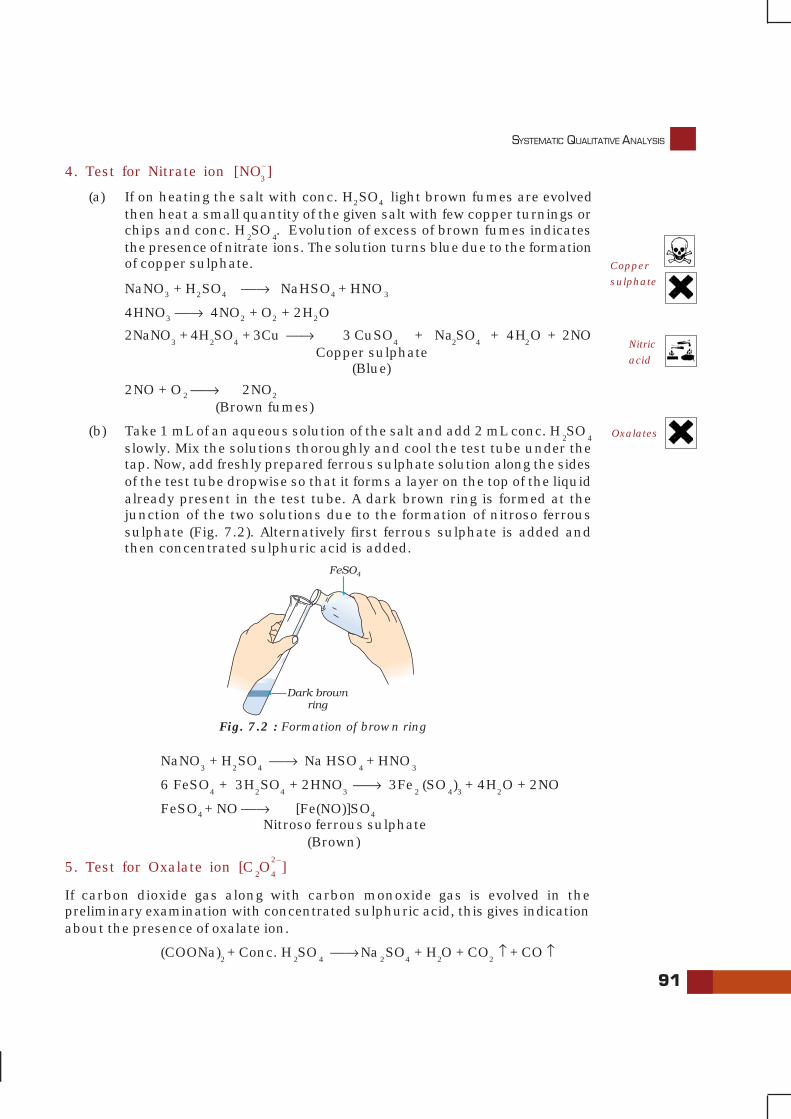
SYSTEMATIC QUALITATIVE ANALYSIS
91
4. Test for Nitrate ion [NO–
3]
(a) If on heating the salt with conc. H2SO4 light brown fumes are evolvedthen heat a small quantity of the given salt with few copper turnings orchips and conc. H
2SO
4. Evolution of excess of brown fumes indicates
the presence of nitrate ions. The solution turns blue due to the formationof copper sulphate.
NaNO3 + H2SO4 ⎯→ NaHSO4 + HNO3
4HNO3 ⎯→ 4NO2 + O2 + 2H2O
2NaNO3 + 4H
2SO
4 + 3Cu ⎯→ 3 CuSO
4 + Na
2SO
4 + 4H
2O + 2NO
Copper sulphate(Blue)
2NO + O2 ⎯→ 2NO2
(Brown fumes)
(b) Take 1 mL of an aqueous solution of the salt and add 2 mL conc. H2SO
4
slowly. Mix the solutions thoroughly and cool the test tube under thetap. Now, add freshly prepared ferrous sulphate solution along the sidesof the test tube dropwise so that it forms a layer on the top of the liquidalready present in the test tube. A dark brown ring is formed at thejunction of the two solutions due to the formation of nitroso ferroussulphate (Fig. 7.2). Alternatively first ferrous sulphate is added andthen concentrated sulphuric acid is added.
Fig. 7.2 : Formation of brown ring
NaNO3 + H
2SO
4 ⎯→ Na HSO
4 + HNO
3
6 FeSO4 + 3H
2SO
4 + 2HNO
3 ⎯→ 3Fe
2 (SO
4)3 + 4H
2O + 2NO
FeSO4 + NO ⎯→ [Fe(NO)]SO4
Nitroso ferrous sulphate (Brown)
5. Test for Oxalate ion [C2O
2
4
–]
If carbon dioxide gas along with carbon monoxide gas is evolved in thepreliminary examination with concentrated sulphuric acid, this gives indicationabout the presence of oxalate ion.
(COONa)2 + Conc. H
2SO
4 ⎯→ Na
2SO
4 + H
2O + CO
2 ↑ + CO ↑
Copper
sulphate
Nitric
acid
Oxalates
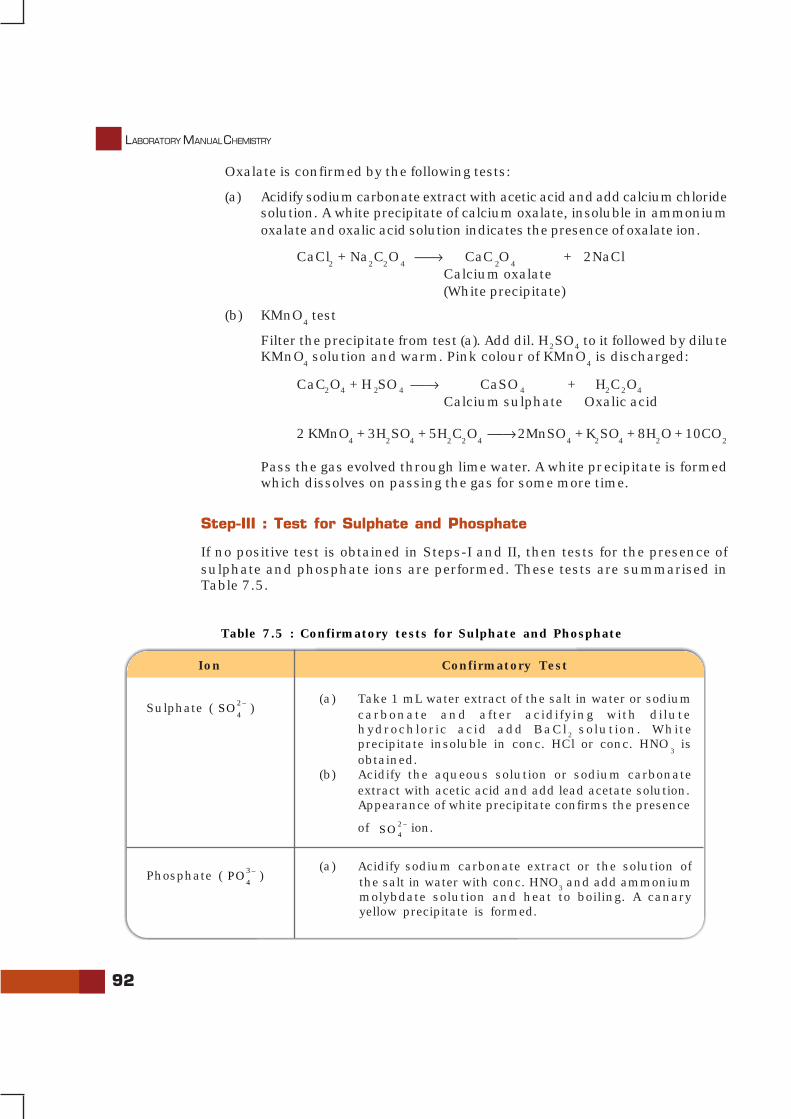
92
LABORATORY MANUAL CHEMISTRY
Oxalate is confirmed by the following tests:
(a) Acidify sodium carbonate extract with acetic acid and add calcium chloridesolution. A white precipitate of calcium oxalate, insoluble in ammoniumoxalate and oxalic acid solution indicates the presence of oxalate ion.
CaCl2 + Na
2C
2O
4 ⎯→ CaC
2O
4 + 2NaCl
Calcium oxalate (White precipitate)
(b) KMnO4 test
Filter the precipitate from test (a). Add dil. H2SO4 to it followed by diluteKMnO
4 solution and warm. Pink colour of KMnO
4 is discharged:
CaC2O4 + H2SO4 ⎯→ CaSO4 + H2C2O4
Calcium sulphate Oxalic acid
2 KMnO4 + 3H
2SO
4 + 5H
2C
2O
4 ⎯→ 2MnSO
4 + K
2SO
4 + 8H
2O + 10CO
2
Pass the gas evolved through lime water. A white precipitate is formedwhich dissolves on passing the gas for some more time.
Step-III : Test for Sulphate and Phosphate
If no positive test is obtained in Steps-I and II, then tests for the presence ofsulphate and phosphate ions are performed. These tests are summarised inTable 7.5.
Ion
(a) Take 1 mL water extract of the salt in water or sodiumcarbonate and after acidifying with dilutehydrochloric acid add BaCl2 solution. Whiteprecipitate insoluble in conc. HCl or conc. HNO
3 is
obtained.(b) Acidify the aqueous solution or sodium carbonate
extract with acetic acid and add lead acetate solution.Appearance of white precipitate confirms the presence
of 2–
4SO ion.
Confirmatory Test
Sulphate ( 2–
4SO )
(a) Acidify sodium carbonate extract or the solution ofthe salt in water with conc. HNO3 and add ammoniummolybdate solution and heat to boiling. A canaryyellow precipitate is formed.
Phosphate ( 3–
4PO )
Table 7.5 : Confirmatory tests for Sulphate and Phosphate
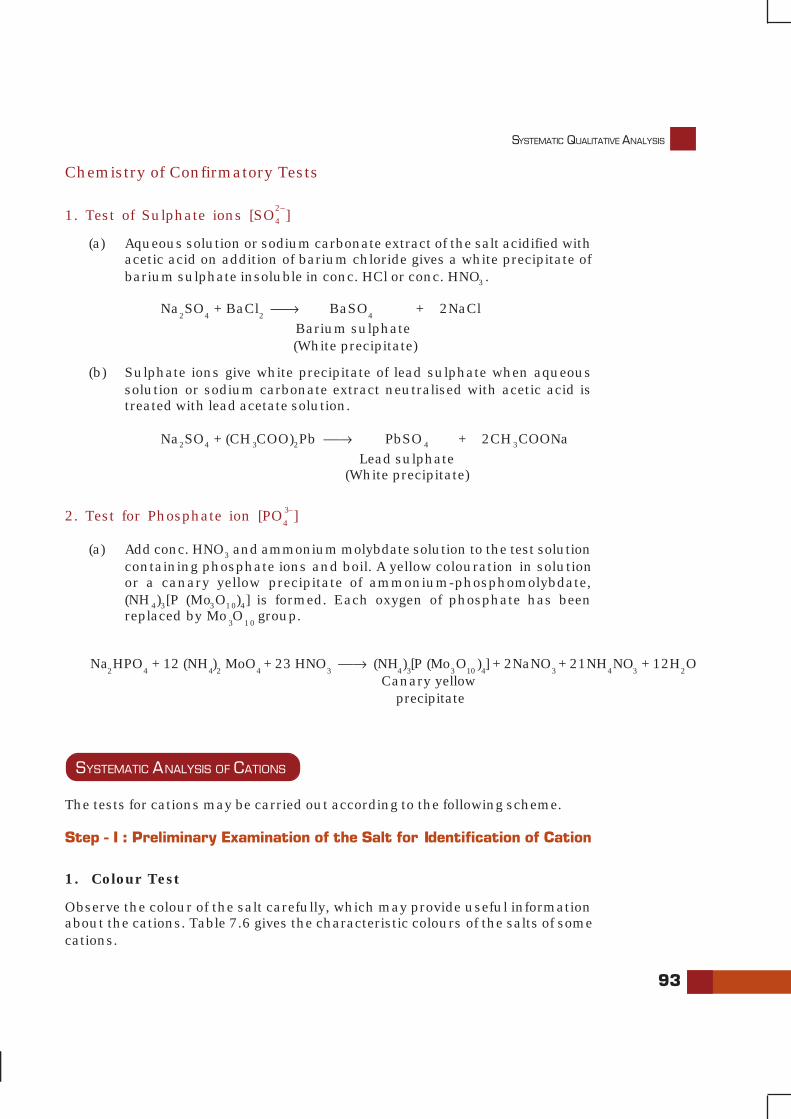
SYSTEMATIC QUALITATIVE ANALYSIS
93
Chemistry of Confirmatory Tests
1. Test of Sulphate ions [SO2
4
–]
(a) Aqueous solution or sodium carbonate extract of the salt acidified withacetic acid on addition of barium chloride gives a white precipitate ofbarium sulphate insoluble in conc. HCl or conc. HNO3.
Na2SO
4 + BaCl
2 ⎯→ BaSO
4 + 2NaCl
Barium sulphate (White precipitate)
(b) Sulphate ions give white precipitate of lead sulphate when aqueoussolution or sodium carbonate extract neutralised with acetic acid istreated with lead acetate solution.
Na2SO4 + (CH3COO)2Pb ⎯→ PbSO4 + 2CH3COONa Lead sulphate
(White precipitate)
2. Test for Phosphate ion [PO3
4
–]
(a) Add conc. HNO3 and ammonium molybdate solution to the test solutioncontaining phosphate ions and boil. A yellow colouration in solutionor a canary yellow precipitate of ammonium-phosphomolybdate,(NH4)3[P (Mo3O10)4] is formed. Each oxygen of phosphate has beenreplaced by Mo
3O
10 group.
Na2HPO
4 + 12 (NH
4)2 MoO
4 + 23 HNO
3 ⎯→ (NH
4)3[P (Mo
3O
10)4] + 2NaNO
3 + 21NH
4NO
3 + 12H
2O
Canary yellow precipitate
SYSTEMATIC ANALYSIS OF CATIONS
The tests for cations may be carried out according to the following scheme.
Step - I : Preliminary Examination of the Salt for Identification of Cation
1. Colour Test
Observe the colour of the salt carefully, which may provide useful informationabout the cations. Table 7.6 gives the characteristic colours of the salts of somecations.
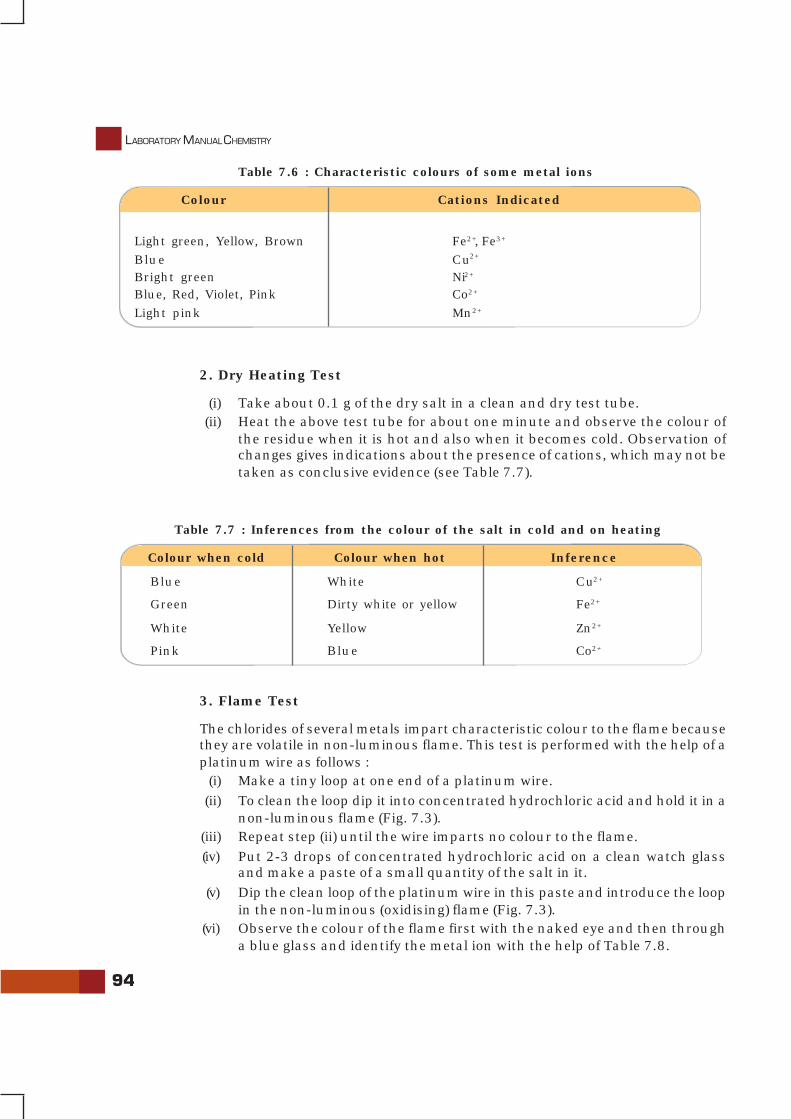
94
LABORATORY MANUAL CHEMISTRY
2. Dry Heating Test
(i) Take about 0.1 g of the dry salt in a clean and dry test tube.(ii) Heat the above test tube for about one minute and observe the colour of
the residue when it is hot and also when it becomes cold. Observation ofchanges gives indications about the presence of cations, which may not betaken as conclusive evidence (see Table 7.7).
Colour Cations Indicated
Table 7.6 : Characteristic colours of some metal ions
Light green, Yellow, Brown Fe2+, Fe3+
Blue Cu2+
Bright green Ni2+
Blue, Red, Violet, Pink Co2+
Light pink Mn2+
Colour when cold
Table 7.7 : Inferences from the colour of the salt in cold and on heating
Blue White Cu2+
Green Dirty white or yellow Fe2+
White Yellow Zn2+
Pink Blue Co2+
Colour when hot Inference
3. Flame Test
The chlorides of several metals impart characteristic colour to the flame becausethey are volatile in non-luminous flame. This test is performed with the help of aplatinum wire as follows :
(i) Make a tiny loop at one end of a platinum wire.(ii) To clean the loop dip it into concentrated hydrochloric acid and hold it in a
non-luminous flame (Fig. 7.3).(iii) Repeat step (ii) until the wire imparts no colour to the flame.(iv) Put 2-3 drops of concentrated hydrochloric acid on a clean watch glass
and make a paste of a small quantity of the salt in it.(v) Dip the clean loop of the platinum wire in this paste and introduce the loop
in the non-luminous (oxidising) flame (Fig. 7.3).(vi) Observe the colour of the flame first with the naked eye and then through
a blue glass and identify the metal ion with the help of Table 7.8.
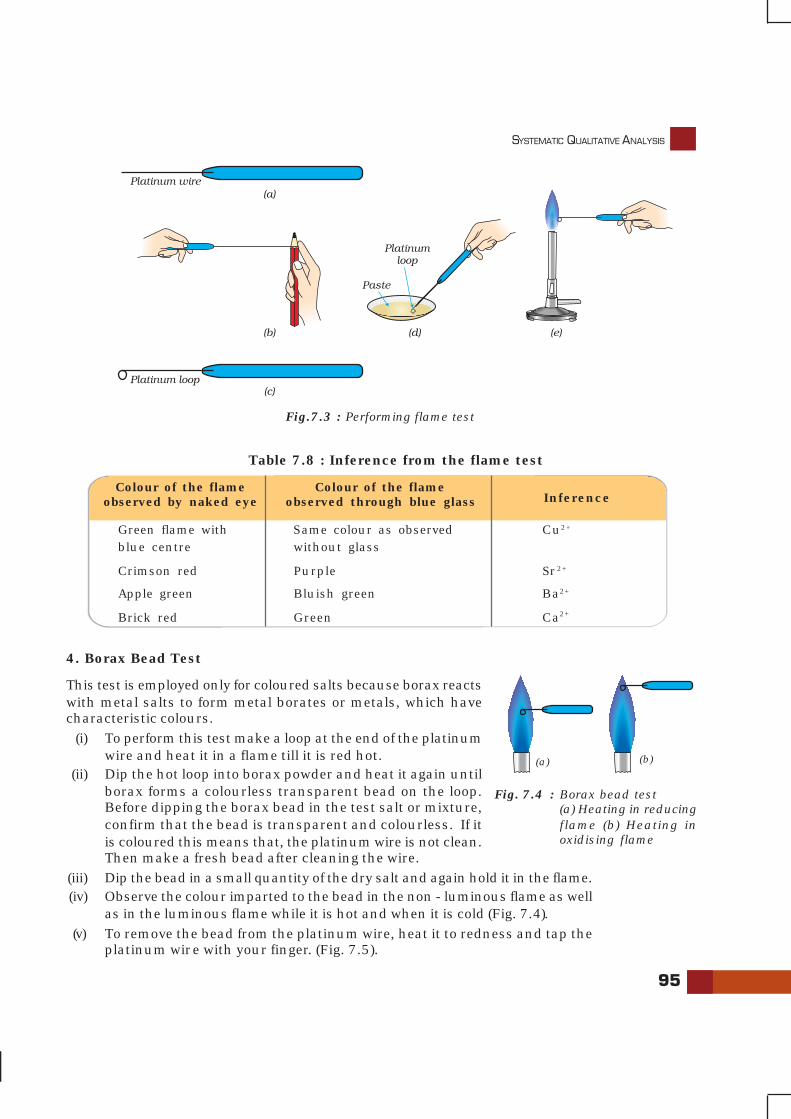
SYSTEMATIC QUALITATIVE ANALYSIS
95
Fig.7.3 : Performing flame test
4. Borax Bead Test
This test is employed only for coloured salts because borax reactswith metal salts to form metal borates or metals, which havecharacteristic colours.
(i) To perform this test make a loop at the end of the platinumwire and heat it in a flame till it is red hot.
(ii) Dip the hot loop into borax powder and heat it again untilborax forms a colourless transparent bead on the loop.Before dipping the borax bead in the test salt or mixture,confirm that the bead is transparent and colourless. If itis coloured this means that, the platinum wire is not clean.Then make a fresh bead after cleaning the wire.
(iii) Dip the bead in a small quantity of the dry salt and again hold it in the flame.(iv) Observe the colour imparted to the bead in the non - luminous flame as well
as in the luminous flame while it is hot and when it is cold (Fig. 7.4).(v) To remove the bead from the platinum wire, heat it to redness and tap the
platinum wire with your finger. (Fig. 7.5).
Colour of the flameobserved by naked eye
Table 7.8 : Inference from the flame test
Green flame with Same colour as observed Cu2+
blue centre without glass
Crimson red Purple Sr2+
Apple green Bluish green Ba2+
Brick red Green Ca2+
Colour of the flameobserved through blue glass Inference
Fig. 7.4 : Borax bead test(a) Heating in reducingflame (b) Heating inoxidising flame
(b)(a)
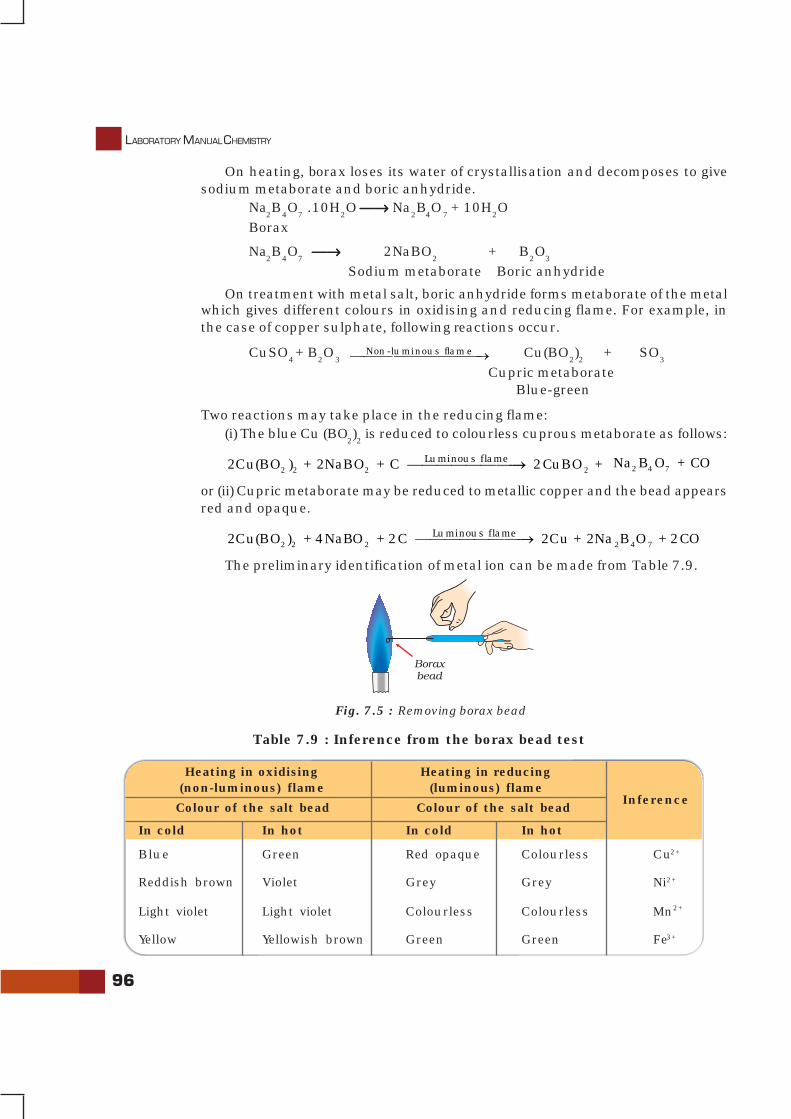
96
LABORATORY MANUAL CHEMISTRY
On heating, borax loses its water of crystallisation and decomposes to givesodium metaborate and boric anhydride.
Na2B
4O
7 .10H
2O ⎯→⎯→⎯→⎯→⎯→ Na
2B
4O
7 + 10H
2O
Borax
Na2B
4O
7 ⎯→⎯→⎯→⎯→⎯→ 2NaBO
2+ B
2O
3
Sodium metaborate Boric anhydride
On treatment with metal salt, boric anhydride forms metaborate of the metalwhich gives different colours in oxidising and reducing flame. For example, inthe case of copper sulphate, following reactions occur.
CuSO4 + B
2O
3 Non-luminous flame⎯⎯⎯⎯⎯⎯⎯⎯⎯→ Cu(BO
2)2 + SO
3
Cupric metaborate Blue-green
Two reactions may take place in the reducing flame:(i) The blue Cu (BO
2)2 is reduced to colourless cuprous metaborate as follows:
2 2 2 2Luminous flame2Cu(BO ) + 2NaBO + C 2CuBO + ⎯⎯⎯⎯⎯⎯⎯⎯→ 2 4 7Na B O + CO
or (ii) Cupric metaborate may be reduced to metallic copper and the bead appearsred and opaque.
2 2 2 2 4 7Luminous flame2Cu(BO ) + 4NaBO + 2C 2Cu + 2Na B O⎯⎯⎯⎯⎯⎯⎯⎯→ + 2CO
The preliminary identification of metal ion can be made from Table 7.9.
Fig. 7.5 : Removing borax bead
Table 7.9 : Inference from the borax bead test
Heating in reducing(luminous) flame
Inference
Heating in oxidising(non-luminous) flame
Colour of the salt bead Colour of the salt bead
In cold In hot In cold In hot
Blue Green Red opaque Colourless Cu2+
Reddish brown Violet Grey Grey Ni2+
Light violet Light violet Colourless Colourless Mn2+
Yellow Yellowish brown Green Green Fe3+
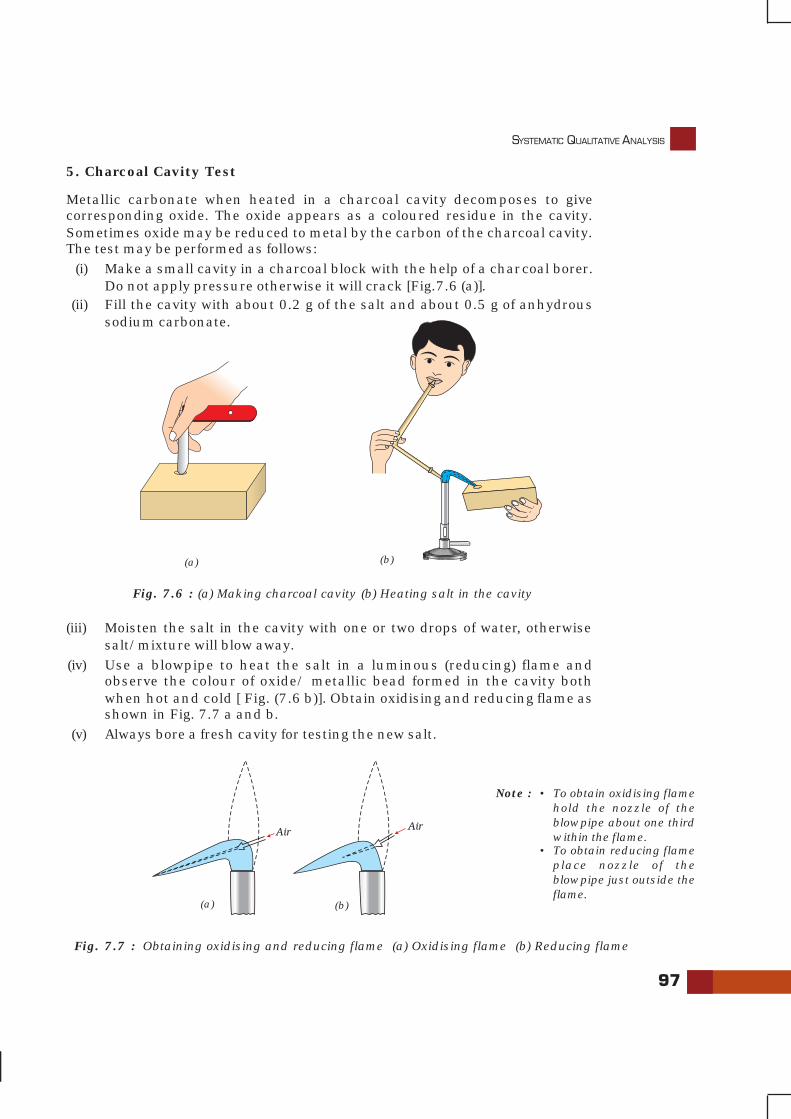
SYSTEMATIC QUALITATIVE ANALYSIS
97
5. Charcoal Cavity Test
Metallic carbonate when heated in a charcoal cavity decomposes to givecorresponding oxide. The oxide appears as a coloured residue in the cavity.Sometimes oxide may be reduced to metal by the carbon of the charcoal cavity.The test may be performed as follows:
(i) Make a small cavity in a charcoal block with the help of a charcoal borer.Do not apply pressure otherwise it will crack [Fig.7.6 (a)].
(ii) Fill the cavity with about 0.2 g of the salt and about 0.5 g of anhydroussodium carbonate.
Fig. 7.6 : (a) Making charcoal cavity (b) Heating salt in the cavity
(iii) Moisten the salt in the cavity with one or two drops of water, otherwisesalt/mixture will blow away.
(iv) Use a blowpipe to heat the salt in a luminous (reducing) flame andobserve the colour of oxide/ metallic bead formed in the cavity bothwhen hot and cold [ Fig. (7.6 b)]. Obtain oxidising and reducing flame asshown in Fig. 7.7 a and b.
(v) Always bore a fresh cavity for testing the new salt.
Fig. 7.7 : Obtaining oxidising and reducing flame (a) Oxidising flame (b) Reducing flame
(a) (b)
Note : • To obtain oxidising flamehold the nozzle of theblowpipe about one thirdwithin the flame.
• To obtain reducing flameplace nozzle of theblowpipe just outside theflame.
(a) (b)
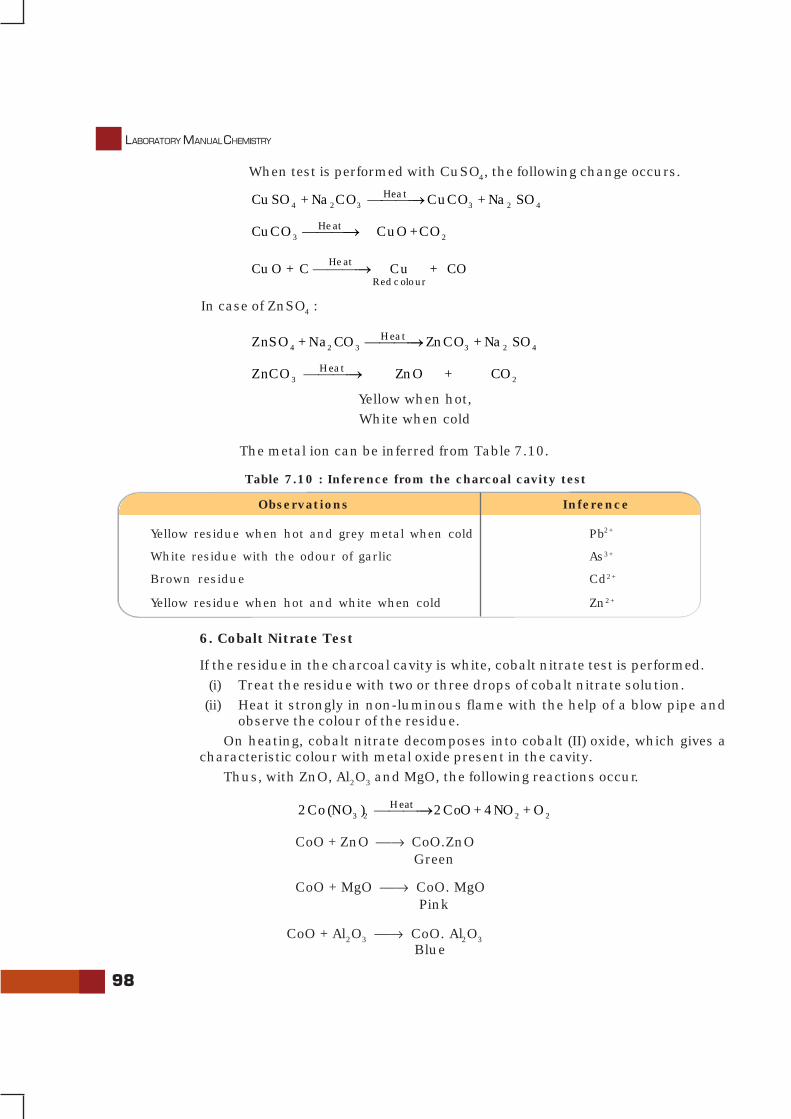
98
LABORATORY MANUAL CHEMISTRY
When test is performed with CuSO4, the following change occurs.
4 2 3 3 2 4HeatCuSO + Na CO CuCO + Na SO⎯⎯⎯⎯→
3 2HeatCuCO CuO+CO⎯⎯⎯⎯→
Heat
RedcolourCuO + C Cu + CO⎯⎯⎯⎯→
In case of ZnSO4 :
4 2 3 3 2 4HeatZnSO + Na CO ZnCO + Na SO⎯⎯⎯⎯→
3 2HeatZnCO ZnO + CO⎯⎯⎯⎯→
Yellow when hot, White when cold
The metal ion can be inferred from Table 7.10.
Observations
Table 7.10 : Inference from the charcoal cavity test
Inference
Yellow residue when hot and grey metal when cold Pb2+
White residue with the odour of garlic As3+
Brown residue Cd2+
Yellow residue when hot and white when cold Zn2+
6. Cobalt Nitrate Test
If the residue in the charcoal cavity is white, cobalt nitrate test is performed.(i) Treat the residue with two or three drops of cobalt nitrate solution.(ii) Heat it strongly in non-luminous flame with the help of a blow pipe and
observe the colour of the residue.On heating, cobalt nitrate decomposes into cobalt (II) oxide, which gives a
characteristic colour with metal oxide present in the cavity.Thus, with ZnO, Al2O3 and MgO, the following reactions occur.
3 2 2 2Heat2Co(NO ) 2CoO+ 4NO + O⎯⎯⎯⎯→
CoO + ZnO ⎯→ CoO.ZnO Green
CoO + MgO ⎯→ CoO. MgO Pink
CoO + Al2O3 ⎯→ CoO. Al2O3
Blue

SYSTEMATIC QUALITATIVE ANALYSIS
99
Step-II : Wet Tests for Identification of Cations
The cations indicated by the preliminary tests given above are confirmed bysystematic analysis given below.
The first essential step is to prepare a clear and transparent solution of thesalt. This is called original solution. It is prepared as follows:
Preparation of Original Solution (O.S.)
To prepare the original solution, following steps are followed one after the otherin a systematic order. In case the salt does not dissolve in a particular solventeven on heating, try the next solvent.
The following solvents are tried:
1. Take a little amount of the salt in a clean boiling tube and add a few mL ofdistilled water and shake it. If the salt does not dissolved, heat the contentof the boiling tube till the salt completely dissolves.
2. If the salt is insoluble in water as detailed above, take fresh salt in a cleanboiling tube and add a few mL of dil.HCl to it. If the salt is insoluble incold, heat the boiling tube till the salt is completely dissolved.
3. If the salt does not dissolve either in water or in dilute HCl even on heating,try to dissolve it in a few mL of conc. HCl by heating.
4. If salt does not dissolve in conc. HCl, then dissolve it in dilute nitric acid.
5. If salt does not dissolve even in nitric acid then a mixture of conc. HCl andconc. HNO3 in the ratio 3:1 is tried. This mixture is called aqua regia. A saltnot soluble in aqua regia is considered to be an insoluble salt.
Group Analysis
(I) Analysis of Zero group cation (NH4+ ion)
(a) Take 0.1 g of salt in a test tube and add 1-2 mL of NaOH solution toit and heat. If there is a smell of ammonia, this indicates the presenceof ammonium ions. Bring a glass rod dipped in hydrochloric acidnear the mouth of the test tube. White fumes are observed.
(b) Pass the gas through Nessler’s reagent. Brown precipitate is obtained.
Chemistry of Confirmatory Tests for NH+4 ion
(a) Ammonia gas evolved by the action of sodium hydroxide on ammoniumsalts reacts with hydrochloric acid to give ammonium chloride, which isvisible as dense white fume.
(NH4)
2 SO
4 + 2NaOH ⎯→ Na
2SO
4 + 2NH
3 + 2H
2O
NH3 + HCl → NH4Cl
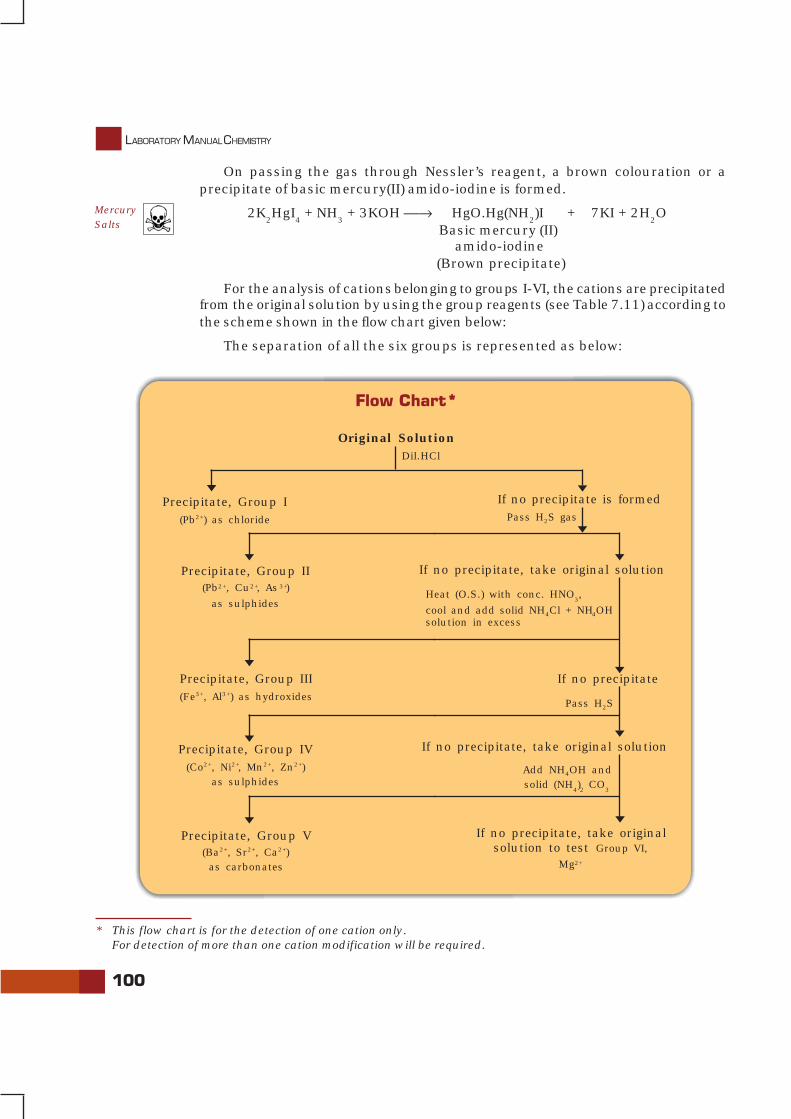
100
LABORATORY MANUAL CHEMISTRY
On passing the gas through Nessler’s reagent, a brown colouration or aprecipitate of basic mercury(II) amido-iodine is formed.
2K2HgI
4 + NH
3 + 3KOH ⎯→ HgO.Hg(NH
2)I + 7KI + 2H
2O
Basic mercury (II) amido-iodine
(Brown precipitate)
For the analysis of cations belonging to groups I-VI, the cations are precipitatedfrom the original solution by using the group reagents (see Table 7.11) according tothe scheme shown in the flow chart given below:
The separation of all the six groups is represented as below:
* This flow chart is for the detection of one cation only.For detection of more than one cation modification will be required.
MercurySalts
Original SolutionDil.HCl
Precipitate, Group I If no precipitate is formedPass H2S gas(Pb2+) as chloride
Precipitate, Group II(Pb2+, Cu2+, As3+)
as sulphides
If no precipitate, take original solution
Heat (O.S.) with conc. HNO3,
cool and add solid NH4Cl + NH4OHsolution in excess
Precipitate, Group III(Fe3+, Al3+) as hydroxides
If no precipitate
Pass H2S
If no precipitate, take original solution
Add NH4OH andsolid (NH
4)2 CO
3
Precipitate, Group IV(Co2+, Ni2+, Mn2+, Zn2+)
as sulphides
Precipitate, Group V(Ba2+, Sr2+, Ca2+)as carbonates
If no precipitate, take originalsolution to test Group VI,
Mg2+
Flow Chart*
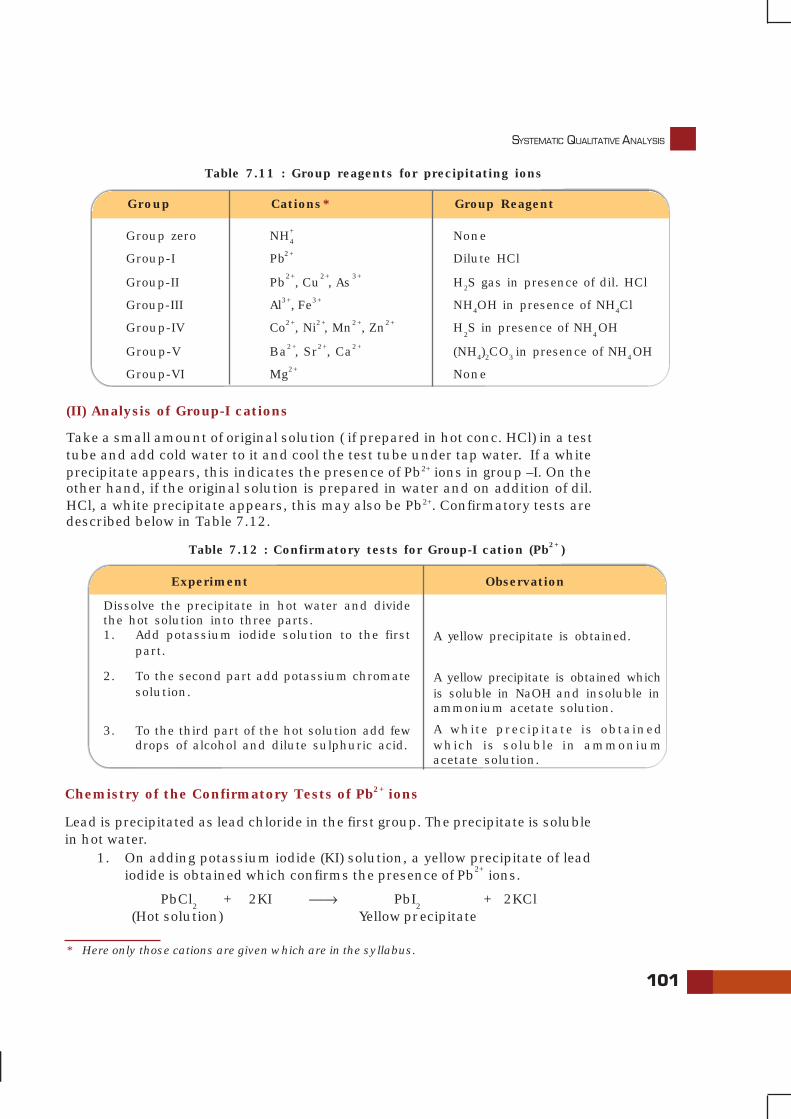
SYSTEMATIC QUALITATIVE ANALYSIS
101
(II) Analysis of Group-I cations
Take a small amount of original solution ( if prepared in hot conc. HCl) in a testtube and add cold water to it and cool the test tube under tap water. If a whiteprecipitate appears, this indicates the presence of Pb2+ ions in group –I. On theother hand, if the original solution is prepared in water and on addition of dil.HCl, a white precipitate appears, this may also be Pb2+. Confirmatory tests aredescribed below in Table 7.12.
Table 7.12 : Confirmatory tests for Group-I cation (Pb2+ )
Dissolve the precipitate in hot water and dividethe hot solution into three parts.1. Add potassium iodide solution to the first
part.
2. To the second part add potassium chromatesolution.
3. To the third part of the hot solution add fewdrops of alcohol and dilute sulphuric acid.
A yellow precipitate is obtained.
A yellow precipitate is obtained whichis soluble in NaOH and insoluble inammonium acetate solution.
A white precipitate is obtainedwhich is soluble in ammoniumacetate solution.
Experiment Observation
Chemistry of the Confirmatory Tests of Pb2+ ions
Lead is precipitated as lead chloride in the first group. The precipitate is solublein hot water.
1. On adding potassium iodide (KI) solution, a yellow precipitate of leadiodide is obtained which confirms the presence of Pb2+ ions.
PbCl2 + 2KI ⎯→ PbI
2 + 2KCl
(Hot solution) Yellow precipitate
Group zero NH4
+ None
Group-I Pb2+ Dilute HCl
Group-II Pb2+
, Cu2+, As
3+H2S gas in presence of dil. HCl
Group-III Al3+, Fe3+ NH4OH in presence of NH4Cl
Group-IV Co2+, Ni2+, Mn2+, Zn2+ H2S in presence of NH
4OH
Group-V Ba2+, Sr2+, Ca2+ (NH4)2CO3 in presence of NH4OH
Group-VI Mg2+ None
Table 7.11 : Group reagents for precipitating ions
Group Cations* Group Reagent
* Here only those cations are given which are in the syllabus.
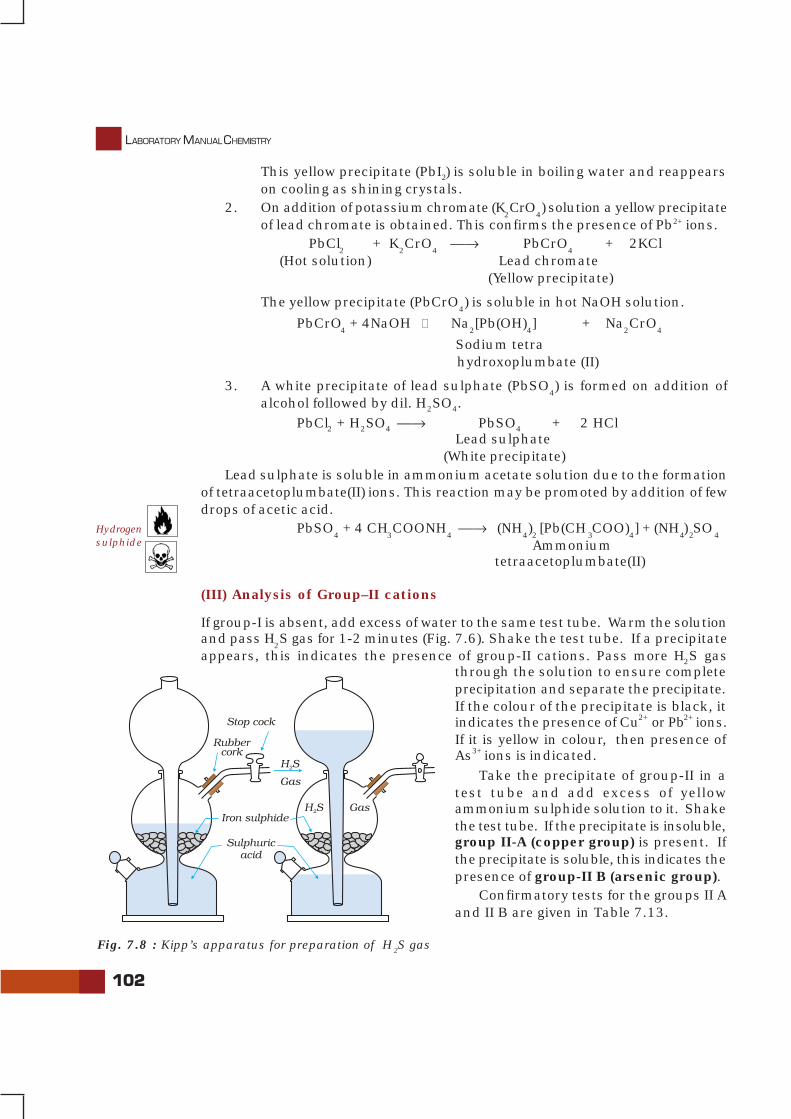
102
LABORATORY MANUAL CHEMISTRY
This yellow precipitate (PbI2) is soluble in boiling water and reappearson cooling as shining crystals.
2. On addition of potassium chromate (K2CrO
4) solution a yellow precipitate
of lead chromate is obtained. This confirms the presence of Pb2+ ions. PbCl
2 + K
2CrO
4 ⎯→ PbCrO
4 + 2KCl
(Hot solution) Lead chromate(Yellow precipitate)
The yellow precipitate (PbCrO4) is soluble in hot NaOH solution.
PbCrO4 + 4NaOH Na
2[Pb(OH)
4] + Na
2CrO
4
Sodium tetra hydroxoplumbate (II)
3. A white precipitate of lead sulphate (PbSO4) is formed on addition of
alcohol followed by dil. H2SO4.PbCl2 + H2SO4 ⎯→ PbSO4 + 2 HCl
Lead sulphate (White precipitate)
Lead sulphate is soluble in ammonium acetate solution due to the formationof tetraacetoplumbate(II) ions. This reaction may be promoted by addition of fewdrops of acetic acid.
PbSO4 + 4 CH
3COONH
4 ⎯→ (NH
4)2 [Pb(CH
3COO)
4] + (NH
4)
2SO
4
Ammonium tetraacetoplumbate(II)
(III) Analysis of Group–II cations
If group-I is absent, add excess of water to the same test tube. Warm the solutionand pass H
2S gas for 1-2 minutes (Fig. 7.6). Shake the test tube. If a precipitate
appears, this indicates the presence of group-II cations. Pass more H2S gasthrough the solution to ensure completeprecipitation and separate the precipitate.If the colour of the precipitate is black, itindicates the presence of Cu2+ or Pb2+ ions.If it is yellow in colour, then presence ofAs3+ ions is indicated.
Take the precipitate of group-II in atest tube and add excess of yellowammonium sulphide solution to it. Shakethe test tube. If the precipitate is insoluble,group II-A (copper group) is present. Ifthe precipitate is soluble, this indicates thepresence of group-II B (arsenic group).
Confirmatory tests for the groups II Aand II B are given in Table 7.13.
Fig. 7.8 : Kipp’s apparatus for preparation of H2S gas
Hydrogensulphide
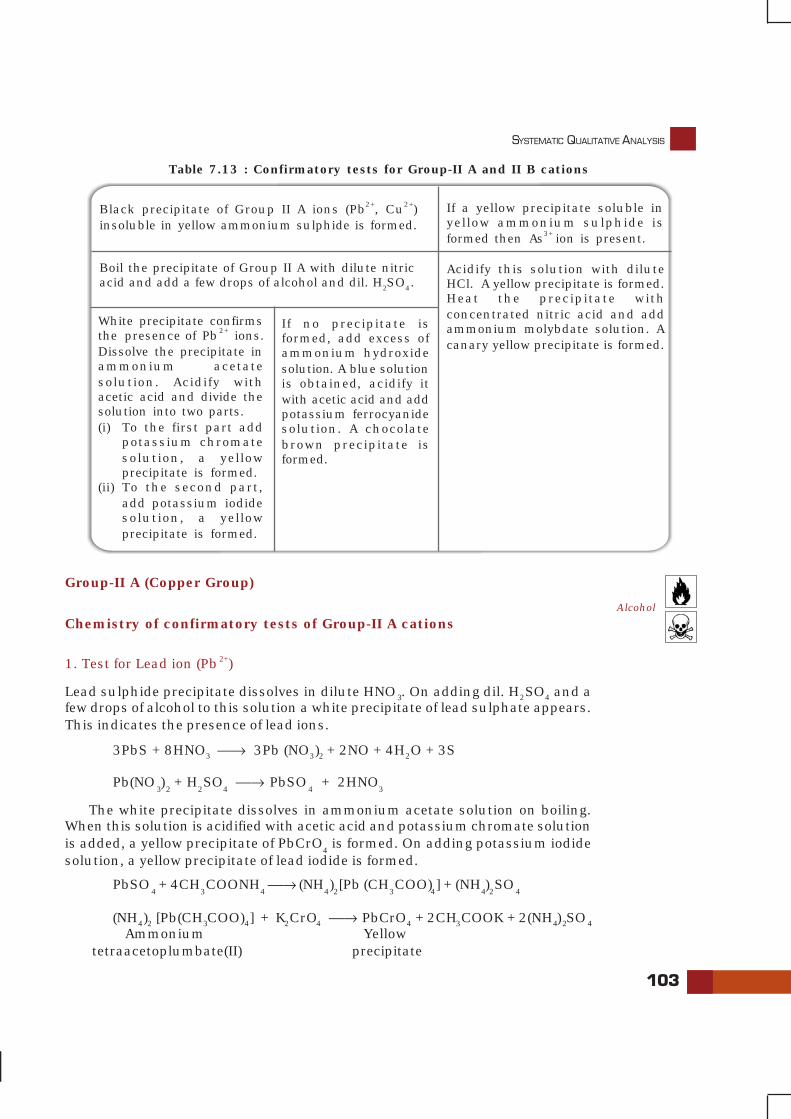
SYSTEMATIC QUALITATIVE ANALYSIS
103
Table 7.13 : Confirmatory tests for Group-II A and II B cations
Black precipitate of Group II A ions (Pb2+, Cu2+)insoluble in yellow ammonium sulphide is formed.
If a yellow precipitate soluble inyellow ammonium sulphide isformed then As3+ ion is present.
Boil the precipitate of Group II A with dilute nitricacid and add a few drops of alcohol and dil. H2SO4.
Acidify this solution with diluteHCl. A yellow precipitate is formed.Heat the precipitate withconcentrated nitric acid and addammonium molybdate solution. Acanary yellow precipitate is formed.
If no precipitate isformed, add excess ofammonium hydroxidesolution. A blue solutionis obtained, acidify itwith acetic acid and addpotassium ferrocyanidesolution. A chocolatebrown precipitate isformed.
White precipitate confirmsthe presence of Pb2+ ions.Dissolve the precipitate inammonium acetatesolution. Acidify withacetic acid and divide thesolution into two parts.(i) To the first part add
potassium chromatesolution, a yellowprecipitate is formed.
(ii) To the second part,add potassium iodidesolution, a yellowprecipitate is formed.
Group-II A (Copper Group)
Chemistry of confirmatory tests of Group-II A cations
1. Test for Lead ion (Pb2+)
Lead sulphide precipitate dissolves in dilute HNO3. On adding dil. H2SO4 and afew drops of alcohol to this solution a white precipitate of lead sulphate appears.This indicates the presence of lead ions.
3PbS + 8HNO3 ⎯→ 3Pb (NO3)2 + 2NO + 4H2O + 3S
Pb(NO3)
2 + H
2SO
4 ⎯→ PbSO
4 + 2HNO
3
The white precipitate dissolves in ammonium acetate solution on boiling.When this solution is acidified with acetic acid and potassium chromate solutionis added, a yellow precipitate of PbCrO
4 is formed. On adding potassium iodide
solution, a yellow precipitate of lead iodide is formed.
PbSO4 + 4CH
3COONH
4 ⎯→ (NH
4)2[Pb (CH
3COO)
4] + (NH
4)2SO
4
(NH4)2 [Pb(CH3COO)4] + K2CrO4 ⎯→ PbCrO4 + 2CH3COOK + 2(NH4)2SO4
Ammonium Yellow tetraacetoplumbate(II) precipitate
Alcohol
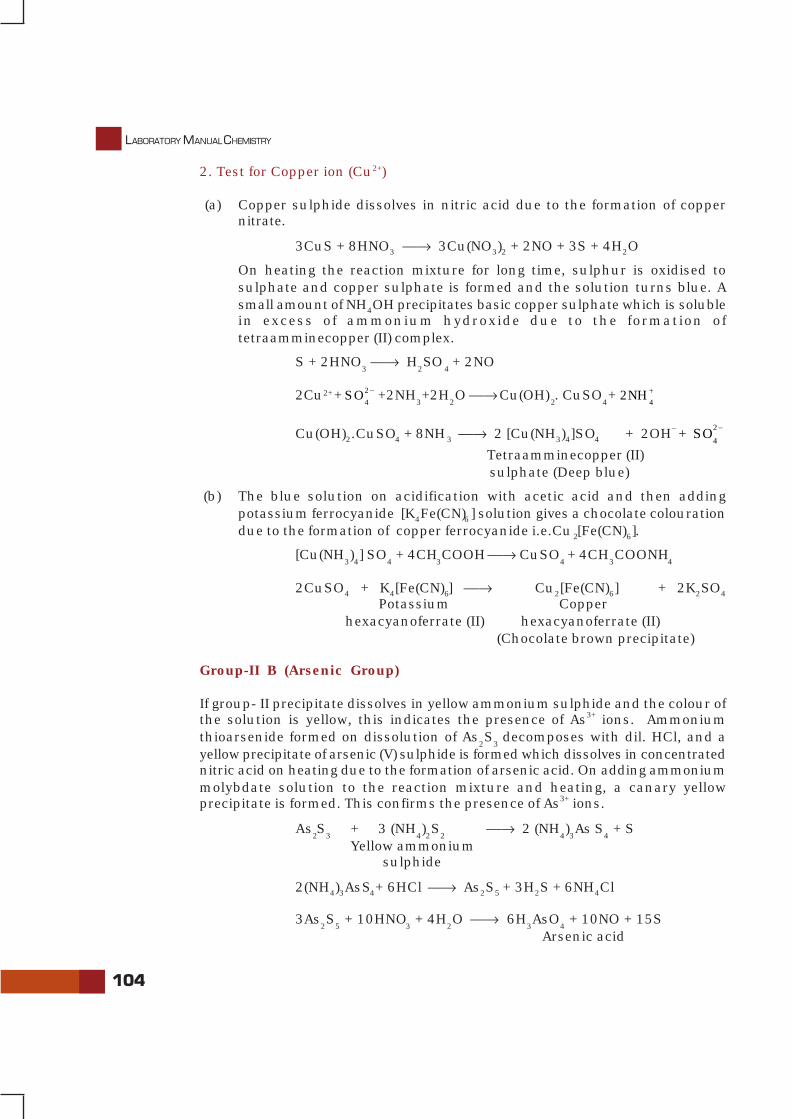
104
LABORATORY MANUAL CHEMISTRY
2. Test for Copper ion (Cu2+)
(a) Copper sulphide dissolves in nitric acid due to the formation of coppernitrate.
3CuS + 8HNO3 ⎯→ 3Cu(NO3)2 + 2NO + 3S + 4H2O
On heating the reaction mixture for long time, sulphur is oxidised tosulphate and copper sulphate is formed and the solution turns blue. Asmall amount of NH4OH precipitates basic copper sulphate which is solublein excess of ammonium hydroxide due to the formation oftetraamminecopper (II) complex.
S + 2HNO3
⎯→ H2SO
4 + 2NO
2Cu2++ 2
4SO − +2NH
3+2H
2O ⎯→ Cu(OH)
2. CuSO
4+
42NH +
Cu(OH)2.CuSO4 + 8NH3 ⎯→ 2 [Cu(NH3)4]SO4 + 2OH– + 2
4SO −
Tetraamminecopper (II) sulphate (Deep blue)
(b) The blue solution on acidification with acetic acid and then addingpotassium ferrocyanide [K4Fe(CN)6 ] solution gives a chocolate colourationdue to the formation of copper ferrocyanide i.e.Cu2[Fe(CN)6].
[Cu(NH3)4] SO
4 + 4CH
3COOH ⎯→ CuSO
4 + 4CH
3COONH
4
2CuSO4 + K4[Fe(CN)6] ⎯→ Cu2[Fe(CN)6] + 2K2SO4
Potassium Copper hexacyanoferrate (II) hexacyanoferrate (II)
(Chocolate brown precipitate)
Group-II B (Arsenic Group)
If group- II precipitate dissolves in yellow ammonium sulphide and the colour ofthe solution is yellow, this indicates the presence of As3+ ions. Ammoniumthioarsenide formed on dissolution of As
2S
3 decomposes with dil. HCl, and a
yellow precipitate of arsenic (V) sulphide is formed which dissolves in concentratednitric acid on heating due to the formation of arsenic acid. On adding ammoniummolybdate solution to the reaction mixture and heating, a canary yellowprecipitate is formed. This confirms the presence of As3+ ions.
As2S
3 + 3 (NH
4)2S
2⎯→ 2 (NH
4)3As S
4 + S
Yellow ammonium sulphide
2(NH4)3AsS4+ 6HCl ⎯→ As2S5 + 3H2S + 6NH4Cl
3As2S
5 + 10HNO
3 + 4H
2O ⎯→ 6H
3AsO
4 + 10NO + 15S
Arsenic acid
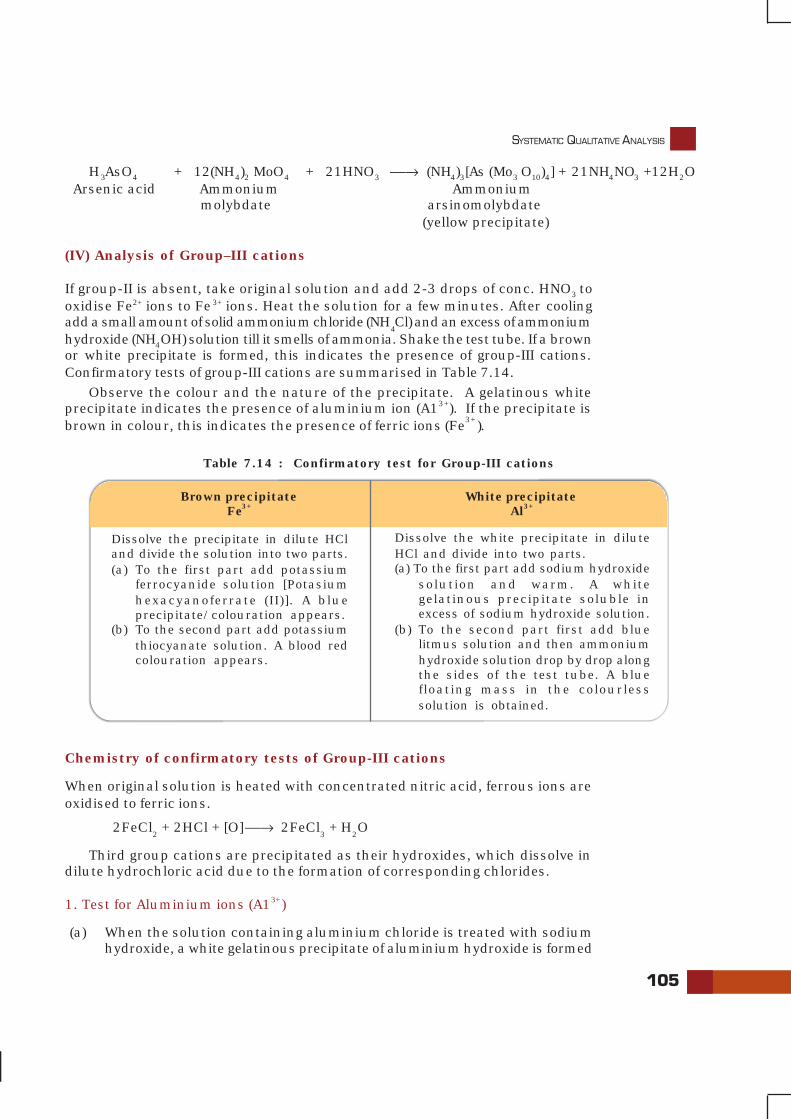
SYSTEMATIC QUALITATIVE ANALYSIS
105
H3AsO4 + 12(NH4)2 MoO4 + 21HNO3 ⎯→ (NH4)3[As (Mo3 O10)4] + 21NH4NO3 +12H2O Arsenic acid Ammonium Ammonium
molybdate arsinomolybdate (yellow precipitate)
Dissolve the precipitate in dilute HCland divide the solution into two parts.(a) To the first part add potassium
ferrocyanide solution [Potasiumhexacyanoferrate (II)]. A blueprecipitate/colouration appears.
(b) To the second part add potassiumthiocyanate solution. A blood redcolouration appears.
Dissolve the white precipitate in diluteHCl and divide into two parts.(a) To the first part add sodium hydroxide
solution and warm. A whitegelatinous precipitate soluble inexcess of sodium hydroxide solution.
(b) To the second part first add bluelitmus solution and then ammoniumhydroxide solution drop by drop alongthe sides of the test tube. A bluefloating mass in the colourlesssolution is obtained.
Brown precipitateFe3+
White precipitateAl3+
Table 7.14 : Confirmatory test for Group-III cations
Chemistry of confirmatory tests of Group-III cations
When original solution is heated with concentrated nitric acid, ferrous ions areoxidised to ferric ions.
2FeCl2 + 2HCl + [O] ⎯→ 2FeCl
3 + H
2O
Third group cations are precipitated as their hydroxides, which dissolve indilute hydrochloric acid due to the formation of corresponding chlorides.
1. Test for Aluminium ions (A13+)
(a) When the solution containing aluminium chloride is treated with sodiumhydroxide, a white gelatinous precipitate of aluminium hydroxide is formed
(IV) Analysis of Group–III cations
If group-II is absent, take original solution and add 2-3 drops of conc. HNO3 tooxidise Fe2+ ions to Fe3+ ions. Heat the solution for a few minutes. After coolingadd a small amount of solid ammonium chloride (NH
4Cl) and an excess of ammonium
hydroxide (NH4OH) solution till it smells of ammonia. Shake the test tube. If a brownor white precipitate is formed, this indicates the presence of group-III cations.Confirmatory tests of group-III cations are summarised in Table 7.14.
Observe the colour and the nature of the precipitate. A gelatinous whiteprecipitate indicates the presence of aluminium ion (A13+). If the precipitate isbrown in colour, this indicates the presence of ferric ions (Fe3+ ).
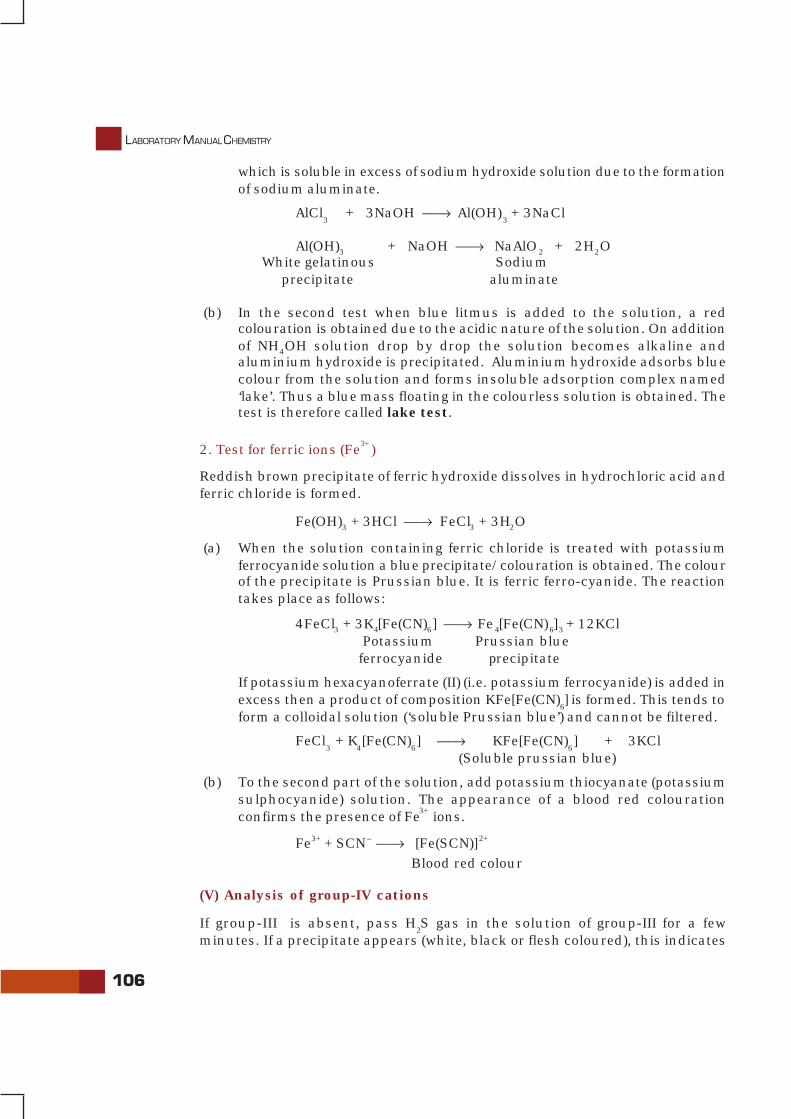
106
LABORATORY MANUAL CHEMISTRY
which is soluble in excess of sodium hydroxide solution due to the formationof sodium aluminate.
AlCl3 + 3NaOH ⎯→ Al(OH)
3 + 3NaCl
Al(OH)3 + NaOH ⎯→ NaAlO2 + 2H2O White gelatinous Sodium precipitate aluminate
(b) In the second test when blue litmus is added to the solution, a redcolouration is obtained due to the acidic nature of the solution. On additionof NH4OH solution drop by drop the solution becomes alkaline andaluminium hydroxide is precipitated. Aluminium hydroxide adsorbs bluecolour from the solution and forms insoluble adsorption complex named‘lake’. Thus a blue mass floating in the colourless solution is obtained. Thetest is therefore called lake test.
2. Test for ferric ions (Fe3+ )
Reddish brown precipitate of ferric hydroxide dissolves in hydrochloric acid andferric chloride is formed.
Fe(OH)3 + 3HCl ⎯→ FeCl3 + 3H2O
(a) When the solution containing ferric chloride is treated with potassiumferrocyanide solution a blue precipitate/colouration is obtained. The colourof the precipitate is Prussian blue. It is ferric ferro-cyanide. The reactiontakes place as follows:
4FeCl3 + 3K4[Fe(CN)6] ⎯→ Fe4[Fe(CN)6]3 + 12KCl Potassium Prussian blue ferrocyanide precipitate
If potassium hexacyanoferrate (II) (i.e. potassium ferrocyanide) is added inexcess then a product of composition KFe[Fe(CN)
6] is formed. This tends to
form a colloidal solution (‘soluble Prussian blue’) and cannot be filtered.
FeCl3 + K
4[Fe(CN)
6] ⎯→ KFe[Fe(CN)
6] + 3KCl
(Soluble prussian blue)
(b) To the second part of the solution, add potassium thiocyanate (potassiumsulphocyanide) solution. The appearance of a blood red colourationconfirms the presence of Fe3+ ions.
Fe3+ + SCN– ⎯→ [Fe(SCN)]2+
Blood red colour
(V) Analysis of group-IV cations
If group-III is absent, pass H2S gas in the solution of group-III for a few
minutes. If a precipitate appears (white, black or flesh coloured), this indicates

SYSTEMATIC QUALITATIVE ANALYSIS
107
the presence of group-IV cations. Table 7.15 gives a summary of confirmatorytests of group-IV cations.
White precipitate(Zn2+)
Flesh coloured precipitate(Mn2+)
Black precipitate(Ni2+, Co2+)
Dissolve the precipitatein dilute HCl by boiling.Divide the solution intotwo parts.
(a) To the first part addsodium hydroxidesolution. A whiteprecipitate solublein excess of sodiumhydroxide solutionconfirms thepresence of Zn
2+
ions.
(b) Neutralise thesecond part witha m m o n i u mhydroxide solutionand add potassiumf e r r o c y a n i d esolution. A bluishwhite precipitateappears.
Dissolve the precipitate indilute HCl by boiling, then addsodium hydroxide solution inexcess. A white precipitate isformed which turns brown onkeeping.
Dissolve the precipitate inaqua regia. Heat thesolution to dryness andcool. Dissolve the residuein water and divide thesolution into two parts.
(a) To the first part of thesolution add ammoniumhydroxide solution till itbecomes alkaline. Adda few drops of dimethylglyoxime and shake thetest tube. Formation ofa bright red precipitateconfirms the presenceof Ni2+ ions.
(b) Neutralise the secondpart with ammoniumhydroxide solution.Acidify it with diluteacetic acid and addsolid potassium nitrite.A yellow precipitateconfirms the presenceof Co2+ ions.
Table 7.15 : Confirmatory test for Group-IV cations
Chemistry of confirmatory tests of Group–IV cations
Fourth group cations are precipitated as their sulphides. Observe the colour ofthe precipitate. A white colour of the precipitate indicates the presence of zincions, a flesh colour indicates the presence of manganese ions and a black colourindicates the presence of Ni2+ or Co2+ ions.
1. Test for Zinc ion (Zn2+)
Zinc sulphide dissolves in hydrochloric acid to form zinc chloride.
ZnS + 2HCl ⎯→ ZnCl2 + H
2S
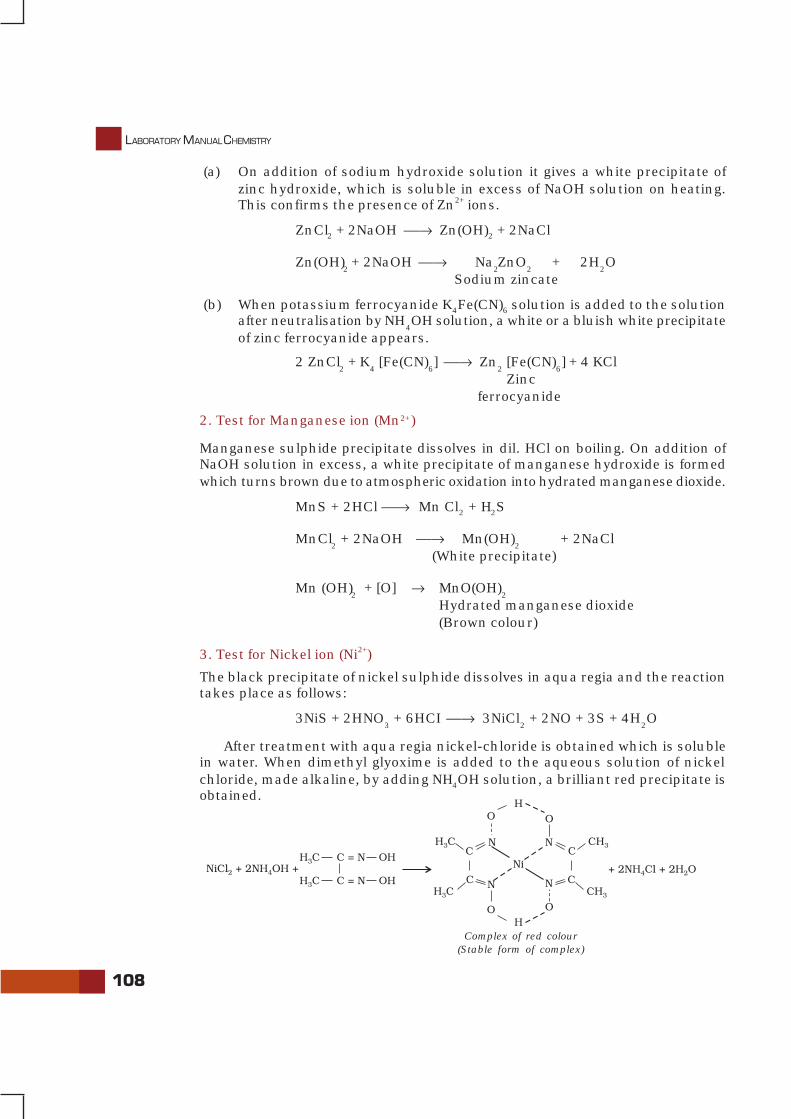
108
LABORATORY MANUAL CHEMISTRY
Complex of red colour(Stable form of complex)
(a) On addition of sodium hydroxide solution it gives a white precipitate ofzinc hydroxide, which is soluble in excess of NaOH solution on heating.This confirms the presence of Zn2+ ions.
ZnCl2 + 2NaOH ⎯→ Zn(OH)2 + 2NaCl
Zn(OH)2 + 2NaOH ⎯→ Na
2ZnO
2 + 2H
2O
Sodium zincate
(b) When potassium ferrocyanide K4Fe(CN)6 solution is added to the solutionafter neutralisation by NH
4OH solution, a white or a bluish white precipitate
of zinc ferrocyanide appears.
2 ZnCl2 + K
4 [Fe(CN)
6] ⎯→ Zn
2 [Fe(CN)
6] + 4 KCl
Zinc ferrocyanide
2. Test for Manganese ion (Mn2+)
Manganese sulphide precipitate dissolves in dil. HCl on boiling. On addition ofNaOH solution in excess, a white precipitate of manganese hydroxide is formedwhich turns brown due to atmospheric oxidation into hydrated manganese dioxide.
MnS + 2HCl ⎯→ Mn Cl2 + H2S
MnCl2 + 2NaOH ⎯→ Mn(OH)
2 + 2NaCl
(White precipitate)
Mn (OH)2 + [O] → MnO(OH)
2
Hydrated manganese dioxide(Brown colour)
3. Test for Nickel ion (Ni2+)
The black precipitate of nickel sulphide dissolves in aqua regia and the reactiontakes place as follows:
3NiS + 2HNO3 + 6HCI ⎯→ 3NiCl
2 + 2NO + 3S + 4H
2O
After treatment with aqua regia nickel-chloride is obtained which is solublein water. When dimethyl glyoxime is added to the aqueous solution of nickelchloride, made alkaline, by adding NH4OH solution, a brilliant red precipitate isobtained.
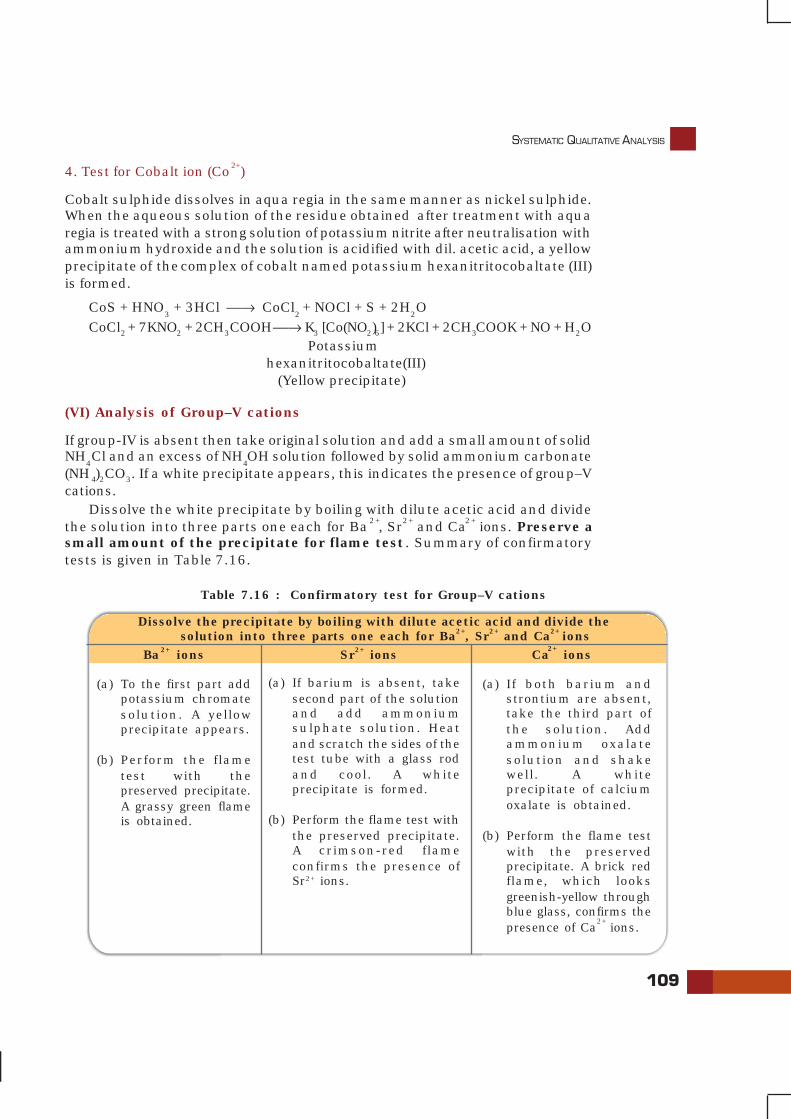
SYSTEMATIC QUALITATIVE ANALYSIS
109
4. Test for Cobalt ion (Co2+)
Cobalt sulphide dissolves in aqua regia in the same manner as nickel sulphide.When the aqueous solution of the residue obtained after treatment with aquaregia is treated with a strong solution of potassium nitrite after neutralisation withammonium hydroxide and the solution is acidified with dil. acetic acid, a yellowprecipitate of the complex of cobalt named potassium hexanitritocobaltate (III)is formed.
CoS + HNO3 + 3HCl ⎯→ CoCl
2 + NOCl + S + 2H
2O
CoCl2 + 7KNO2 + 2CH3COOH ⎯→ K3 [Co(NO2)6] + 2KCl + 2CH3COOK + NO + H2O Potassium
hexanitritocobaltate(III) (Yellow precipitate)
(VI) Analysis of Group–V cations
If group-IV is absent then take original solution and add a small amount of solidNH
4Cl and an excess of NH
4OH solution followed by solid ammonium carbonate
(NH4)2CO3. If a white precipitate appears, this indicates the presence of group–Vcations.
Dissolve the white precipitate by boiling with dilute acetic acid and dividethe solution into three parts one each for Ba2+, Sr2+ and Ca2+ ions. Preserve asmall amount of the precipitate for flame test. Summary of confirmatorytests is given in Table 7.16.
Ba2+ ions Sr2+ ions Ca2+
ions
(a) To the first part addpotassium chromatesolution. A yellowprecipitate appears.
(b) Perform the flametest with thepreserved precipitate.A grassy green flameis obtained.
(a) If barium is absent, takesecond part of the solutionand add ammoniumsulphate solution. Heatand scratch the sides of thetest tube with a glass rodand cool. A whiteprecipitate is formed.
(b) Perform the flame test withthe preserved precipitate.A crimson-red flameconfirms the presence ofSr2+ ions.
(a) If both barium andstrontium are absent,take the third part ofthe solution. Addammonium oxalatesolution and shakewell. A whiteprecipitate of calciumoxalate is obtained.
(b) Perform the flame testwith the preservedprecipitate. A brick redflame, which looksgreenish-yellow throughblue glass, confirms thepresence of Ca
2+ ions.
Table 7.16 : Confirmatory test for Group–V cations
Dissolve the precipitate by boiling with dilute acetic acid and divide thesolution into three parts one each for Ba2+, Sr2+ and Ca2+ ions
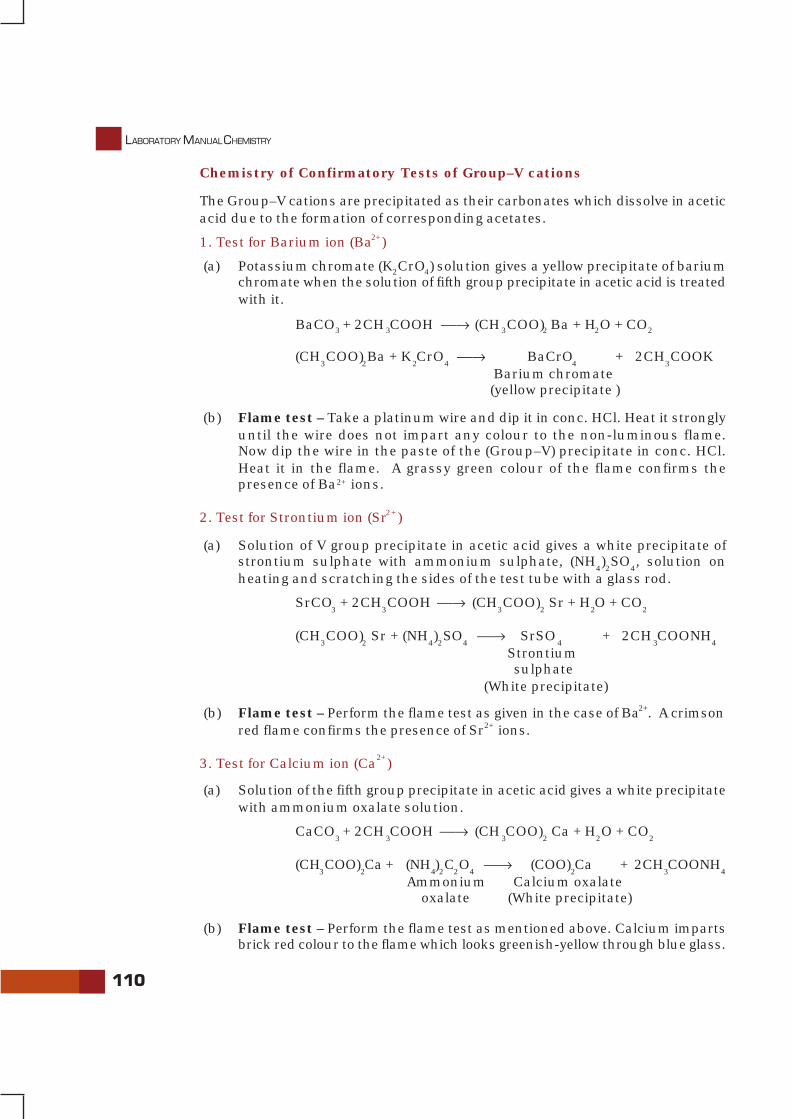
110
LABORATORY MANUAL CHEMISTRY
Chemistry of Confirmatory Tests of Group–V cations
The Group–V cations are precipitated as their carbonates which dissolve in aceticacid due to the formation of corresponding acetates.
1. Test for Barium ion (Ba2+)
(a) Potassium chromate (K2CrO4) solution gives a yellow precipitate of bariumchromate when the solution of fifth group precipitate in acetic acid is treatedwith it.
BaCO3 + 2CH3COOH ⎯→ (CH3COO)2 Ba + H2O + CO2
(CH3COO)
2Ba + K
2CrO
4 ⎯→ BaCrO
4 + 2CH
3COOK
Barium chromate (yellow precipitate )
(b) Flame test – Take a platinum wire and dip it in conc. HCl. Heat it stronglyuntil the wire does not impart any colour to the non-luminous flame.Now dip the wire in the paste of the (Group–V) precipitate in conc. HCl.Heat it in the flame. A grassy green colour of the flame confirms thepresence of Ba2+ ions.
2. Test for Strontium ion (Sr2+ )
(a) Solution of V group precipitate in acetic acid gives a white precipitate ofstrontium sulphate with ammonium sulphate, (NH
4)2SO
4, solution on
heating and scratching the sides of the test tube with a glass rod.
SrCO3 + 2CH
3COOH ⎯→ (CH
3COO)
2 Sr + H
2O + CO
2
(CH3COO)
2 Sr + (NH
4)2SO
4 ⎯→ SrSO
4 + 2CH
3COONH
4
Strontium sulphate
(White precipitate)
(b) Flame test – Perform the flame test as given in the case of Ba2+. A crimsonred flame confirms the presence of Sr2+ ions.
3. Test for Calcium ion (Ca2+)
(a) Solution of the fifth group precipitate in acetic acid gives a white precipitatewith ammonium oxalate solution.
CaCO3 + 2CH
3COOH ⎯→ (CH
3COO)
2 Ca + H
2O + CO
2
(CH3COO)
2Ca + (NH
4)2C
2O
4 ⎯→ (COO)
2Ca + 2CH
3COONH
4
Ammonium Calcium oxalate oxalate (White precipitate)
(b) Flame test – Perform the flame test as mentioned above. Calcium impartsbrick red colour to the flame which looks greenish-yellow through blue glass.
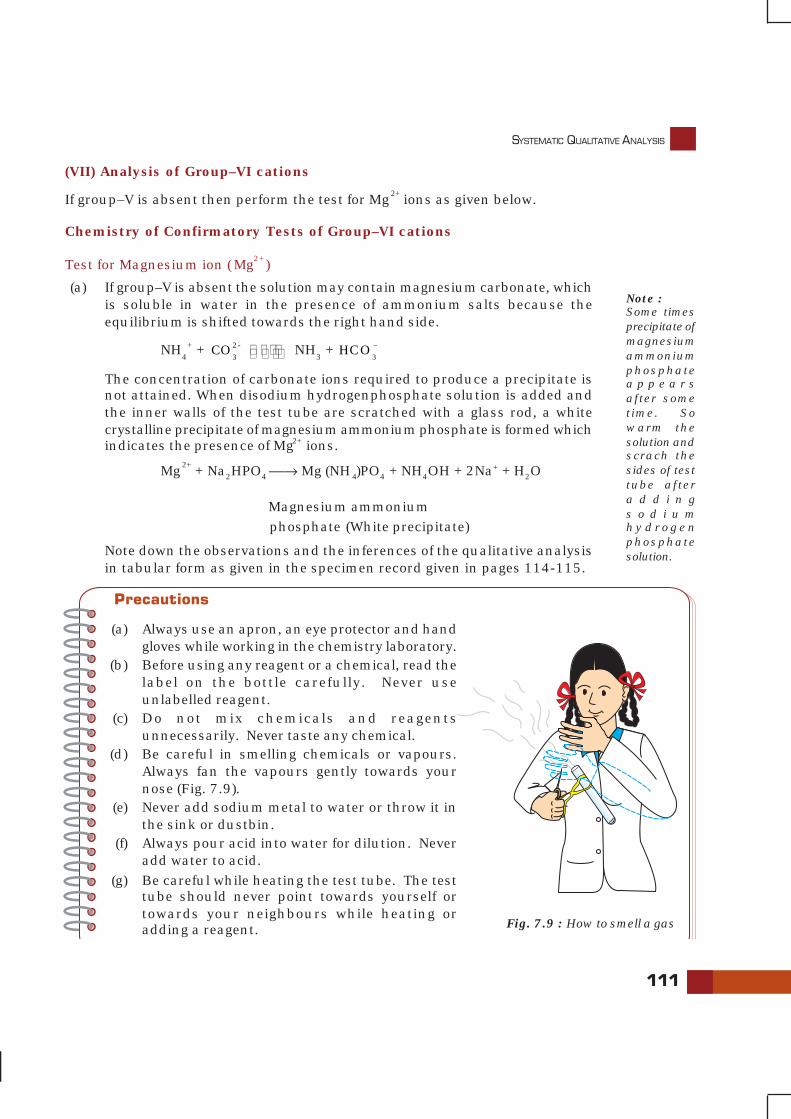
SYSTEMATIC QUALITATIVE ANALYSIS
111
(VII) Analysis of Group–VI cations
If group–V is absent then perform the test for Mg2+ ions as given below.
Chemistry of Confirmatory Tests of Group–VI cations
Test for Magnesium ion ( Mg2+ )
(a) If group–V is absent the solution may contain magnesium carbonate, whichis soluble in water in the presence of ammonium salts because theequilibrium is shifted towards the right hand side.
NH4
+ + 2-
3CO NH
3 + –
3HCO
The concentration of carbonate ions required to produce a precipitate isnot attained. When disodium hydrogenphosphate solution is added andthe inner walls of the test tube are scratched with a glass rod, a whitecrystalline precipitate of magnesium ammonium phosphate is formed whichindicates the presence of Mg2+ ions.
Mg2+ + Na2HPO4 ⎯→ Mg (NH4)PO4 + NH4OH + 2Na+ + H2O
Magnesium ammonium phosphate (White precipitate)
Note down the observations and the inferences of the qualitative analysisin tabular form as given in the specimen record given in pages 114-115.
Precautions
(a) Always use an apron, an eye protector and handgloves while working in the chemistry laboratory.
(b) Before using any reagent or a chemical, read thelabel on the bottle carefully. Never useunlabelled reagent.
(c) Do not mix chemicals and reagentsunnecessarily. Never taste any chemical.
(d) Be careful in smelling chemicals or vapours.Always fan the vapours gently towards yournose (Fig. 7.9).
(e) Never add sodium metal to water or throw it inthe sink or dustbin.
(f) Always pour acid into water for dilution. Neveradd water to acid.
(g) Be careful while heating the test tube. The testtube should never point towards yourself ortowards your neighbours while heating oradding a reagent. Fig. 7.9 : How to smell a gas
Note :Some timesprecipitate ofmagnesiumammoniumphosphatea p p e a r safter sometime. Sowarm thesolution andscrach thesides of testtube aftera d d i n gs o d i u mh y d r o g e nphosphatesolution.
112
LABORATORY MANUAL CHEMISTRY
(h) Be careful while dealing with the explosive compounds, inflammable substances,poisonous gases, electric appliances, glass wares, flame and the hot substances.
(i) Keep your working surroundings clean. Never throw papers and glass in thesink. Always use dustbin for this purpose.
(j) Always wash your hands after the completion of the laboratory work.(k) Always use the reagents in minimum quantity. Use of reagents in excess, not
only leads to wastage of chemicals but also causes damage to the environment.
Discussion Questions
(i) What is the difference between a qualitative and a quantitative analysis?
(ii) Can we use glass rod instead of platinum wire for performing the flame test? Explainyour answer.
(iii) Why is platinum metal preferred to other metals for the flame test?
(iv) Name the anions detected with the help of dilute H2SO4?
(v) Why is dilute H2SO4 preferred over dilute HCl while testing anions?
(vi) Name the anions detected by conc. H2SO
4.
(vii) How is sodium carbonate extract prepared ?
(viii) What is lime water and what happens on passing carbon dioxide gas through it?
(ix) Carbon dioxide gas and sulphur dioxide gas both turn lime water milky. How will youdistinguish between the two?
(x) How will you test the presence of carbonate ion?
(xi) What is the composition of dark brown ring which is formed at the junction of two layersin the ring test for nitrates?
(xii) Name the radical confirmed by sodium nitroprusside test.
(xiii) What is chromyl chloride test ? How do you justify that CrO2Cl
2 is acidic in nature?
(xiv) Why do bromides and iodides not give tests similar to chromyl chloride test?
(xv) Describe the layer test for bromide and iodide ions.

SYSTEMATIC QUALITATIVE ANALYSIS
113
(xvi) Why is silver nitrate solution stored in dark coloured bottles?
(xvii) How do you test the presence of sulphide ion?
(xviii) Why does iodine give a blue colour with starch solution?
(xix) What is Nessler’s reagent?
(xx) Why is original solution for cations not prepared in conc. HNO3 or H
2SO
4?
(xxi) Why cannot conc. HCl be used as a group reagent in place of dil. HCl for the precipitationof Ist group cations?
(xxii) How can one prevent the precipitation of Group–IV radicals, with the second groupradicals?
(xxiii) Why is it essential to boil off H2S gas before precipitation of radicals of group–III?
(xxiv) Why is heating with conc. nitric acid done before precipitation of group–III?
(xxv) Can we use ammonium sulphate instead of ammonium chloride in group–III?
(xxvi) Why is NH4OH added before (NH
4)2CO
3 solution while precipitating group–V cations?
(xxvii) Why do we sometimes get a white precipitate in group–VI even if the salt does notcontain Mg2+ radical?
(xxviii) What is aqua regia?
(xxix) Name a cation, which is not obtained from a metal.
(xxx) How can you test the presence of ammonium ion?
(xxxi) Why are the group–V radicals tested in the order Ba2+, Sr2+ and Ca2+ ?
(xxxii) Why does conc. HNO3 kept in a bottle turn yellow in colour?
(xxxiii) Why should the solution be concentrated before proceeding to group–V?
(xxxiv) Why is the reagent bottle containing sodium hydroxide solution never stoppered?
(xxxv) What do you understand by the term common ion effect?
(xxxvi) Why is zinc sulphide not precipitated in group–II?

114
LABORATORY MANUAL CHEMISTRY
SPECIMEN RECORD OF SALT ANALYSIS
Aim
To analyse the given salt for one anion and one cation present in it.
Material required
• Boiling tubes, test tubes, test tube holder, test tube stand, delivery tube, corks,filter papers, reagents
Sl. No. Experiment Observation Inference
1. Noted the colour of the givensalt.
White Cu2+
, Fe2+
, Ni2+
,Co2+
,Mn2+ are absent.
Noted the smell of the salt. No specific smell. S2–, SO3
2–
, CH3COO–
may be absent.
Heated 0.5 g of the salt in adry test tube and noted thecolour of the gas evolved andchange in the colour of theresidue on heating andcooling.
(i) No gas was evolved.
(ii) No particularchange in colour ofthe residue isobserved whenheated and whencooled.
(i) CO3
2– may bepresent, NO
3
–, NO2
–,
Br– may beabsent.
(ii) Zn2+ may beabsent.
Prepared a paste of the saltwith conc. HCl and performedthe flame test.
No distinct colour of theflame seen.
Ca2+
, Sr2+
, Ba2+ Cu
2+
may be absent.
Borax bead test was notperformed as the salt waswhite in colour.
— —
Treated 0.1 g of salt with 1 mLdil.H2SO4 and warmed.
No effervescence andevolution of vapours.
CO3
2–, SO3
2–, S2–, NO2
– ,
CH3COO– absent.
Heated 0.1 g of salt with 1 mLconc. H2SO4.
No gas evolved. Cl–, Br–, I–, NO3
– , C2O4
–
are absent.
Acidified 1mL of aqueous saltsolution with conc. HNO
3.
Warmed the contents and thenadded 4-5 drops of ammoniummolybdate solution.
No yellow precipitate PO4
3– absent.
2.
3.
4.
5.
6.
7.
8.
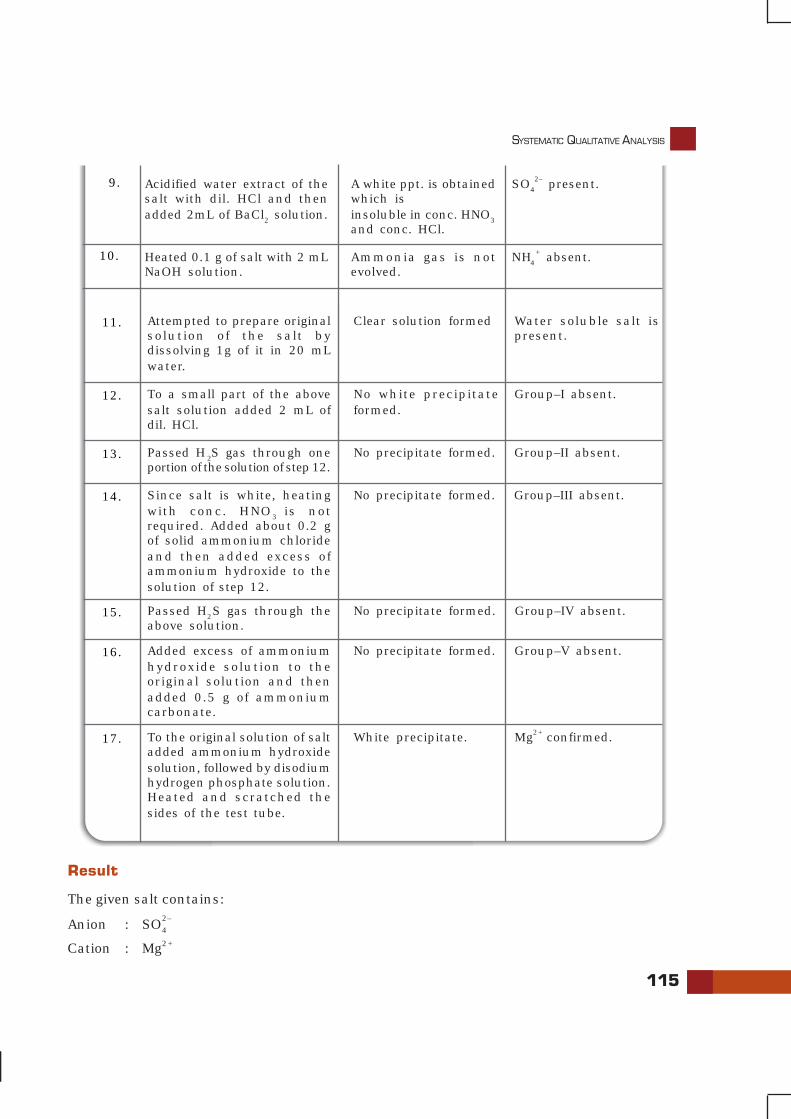
SYSTEMATIC QUALITATIVE ANALYSIS
115
11. Attempted to prepare originalsolution of the salt bydissolving 1g of it in 20 mLwater.
Clear solution formed Water soluble salt ispresent.
12. To a small part of the abovesalt solution added 2 mL ofdil. HCl.
No white precipitateformed.
Group–I absent.
13. Passed H2S gas through oneportion of the solution of step 12.
No precipitate formed. Group–II absent.
14. Since salt is white, heatingwith conc. HNO3 is notrequired. Added about 0.2 gof solid ammonium chlorideand then added excess ofammonium hydroxide to thesolution of step 12.
No precipitate formed. Group–III absent.
15. Passed H2S gas through theabove solution.
No precipitate formed. Group–IV absent.
16. Added excess of ammoniumhydroxide solution to theoriginal solution and thenadded 0.5 g of ammoniumcarbonate.
No precipitate formed. Group–V absent.
17. To the original solution of saltadded ammonium hydroxidesolution, followed by disodiumhydrogen phosphate solution.Heated and scratched thesides of the test tube.
White precipitate. Mg2+ confirmed.
Result
The given salt contains:
Anion : SO4
2–
Cation : Mg2+
Acidified water extract of thesalt with dil. HCl and thenadded 2mL of BaCl2 solution.
A white ppt. is obtainedwhich isinsoluble in conc. HNO3
and conc. HCl.
SO4
2– present.9.
Heated 0.1 g of salt with 2 mLNaOH solution.
Ammonia gas is notevolved.
NH4
+ absent.10.
PROJECTS
BACKGAROUND INFORMATION
ABOUT INVESTIGATORY PROJECTS
INTRODUCTION
The expansion of scientific knowledge and consequently the change in the systemof education has led to a modification in the methods of instruction. Today thestress is laid on inquiry approach and discussion method instead of the age-oldlecture method of teaching. A new dimension in the teaching of science has beenadded by including the project-work at the higher secondary level. Teachingthrough project work is an individualized instructional technique. It provides anopportunity to the student to define a problem, to plan his/her work, to searchappropriate resources, to carry out his/her plans, and to draw conclusions. Thisway, students are exposed to the fundamental scientific principles, methods andprocesses and get a first hand knowledge about the various phases involved in ascientific investigation. Thus the project work helps to: (a) stimulate interest inscience; (b) arouse scientific curiosity; (c) develop independent critical thinking;(d) provide experience of using various tools and techniques in the field of scienceand (e) develop self-confidence. The modern trend in the teaching of sciencetherefore encourages more project work.
Any kind of investigation; formulated, designed and carried out in the library,laboratory, in the field, or at home constitutes an investigatory project. A projectmay be as simple as collection of samples of minerals and it may be as difficult asdeveloping an original indigenous process for the production of a chemical. Someof the projects can be completely theoretical and involve only the library work.Others may involve the experimental work to be carried out in the laboratory.The experimental work in science exposes the students to a number of scientificinstruments, tools, techniques and intellectual skills.
SELECTION OF PROJECTS
Projects should usually be selected by the students. The idea of a project originatesfrom studying a subject in the classroom, reading the reports of various projects,science news, popular science articles from science journals etc. Sometimes theidea of a science project may strike during classroom discussion on topics, whichmay require testing, quantifying and interpreting. Some of the science journalsfor getting the ideas for a project are : (a) Journal of Chemical Education;(b) Chemistry Education; (c) Education in Chemistry; (d) New Scientist; (e) School
BACKGROUND INFORMATION ABOUT INVESTIGATORY PROJECTS
117
Science; (f) School Science Review; (g) Science; (h) ScientificAmerican; (i) School Science Resource Letter, etc. Once the projectwork begins, it might provide new titles and ideas.
In spite of the availability of the above listed scientific literature,it should not be assumed that students can begin the work onprojects spontaneously. Since majority of the science journals listedabove are not available in Indian Schools. Students need the helpand guidance from the teacher. If some student does not get anidea for the project, the teacher may provide a list of suggestedprojected or take the students to science fairs and exhibitions toshow what other students are doing. A format for working on theprojects is given below:
1. Title of Project2. Objectives and importance of Project3. A brief outline of work on ProjectThe title of the project should be written in such a manner that
the objectives and importance of the project is clearly defined. Inother words a project title and its objectives should create aninterest and curiosity. A ‘brief outline of working on a project’ helpsthe student to initiate the work.
It may be debatable that this approach of suggesting ideas forthe projects defeats one of the basic objectives of project work,namely originality, but providing guidelines to the students iscompletely scientific and desirable to encourage every student tobegin and aim at something in the first attempt.
MANAGING TIME
Central Board of Secondary Education has allocated ten periodsfor the project work. A student can start the project right in thebeginning of the academic year and can carry it out in phases andsubmit the report of the project at the end of the year.
TECHNICAL AND ACADEMIC GUIDANCE
This is an important factor in the smooth running of the projectwork. The student should plan for the project well in advance anddiscuss its design with the teacher. If improvisation of the apparatusor some instrument is needed or a chemical is not available in thelaboratory. The help of teacher may be taken. If some technical oracademic guidance is required help may be taken not only fromthe concerned teacher of chemistry but also from physics fromand other science teachers as well.
118
LABORATORY MANUAL CHEMISTRY
LABORATORY FACILITIES
The selection of the project should be such that as far as possible,the material (apparatus, instruments, chemicals, etc.) needed forthe project-work is easily available. Student may purchase theaffordable chemical or an apparatus (improvised or original) if it isnot available in the laboratory, and the student is very curious totake up the project and wants to do it. The students should bediscouraged from taking highly expensive projects. An effectiveproject-work requires an integrated approach rather than a subjectspecific approach.
The project work in the laboratory requires a bigger and separatespace. Arrangements should be made in such a way that at a giventime all the students are not involved in doing the laboratory work.Some students should carry out the work of collecting references inthe library while others should design experiments.
Problems may arise in carrying out the long term experimentslike corrosion, fermentation etc. in the laboratory. It is suggestedto have a separate bench in the laboratory, where long termexperiments can be set up. For storing the samples of certainchemicals and apparatuses relevant to the project-work, card-board boxes, with student’s name written on them can be used.Empty bottles, if available, can also serve the purpose of storingthe chemicals.
RECORDING THE PROJECT WORK
Recording the actual observation in the project work is veryessential. Students should be encouraged to record the negativeresults also. A general format for writing the project report issuggested below. It should involve the following points :
1. Title of project reflecting objectives2. Principles used for Investigation3. Apparatus and Chemicals required4. Improvisation, if any5. Procedure6. Observations and Calculations7. Conclusions and the logic upon which the conclusions are
based8. Precautions9. Suggestions for further investigations, if any
To illustrate the format outlined above, a ‘sample project’report is presented in the end. It may further be noted thatsample project report serves merely as a guideline to the
BACKGROUND INFORMATION ABOUT INVESTIGATORY PROJECTS
119
students while writing their projects. It is by no meansexhaustive and is open to further improvements. Briefoutline of some projects is given below.
PROJECT 1
Title
To test the contamination of water by bacteria by checking thesulphide ion concentration and find out the cause of contamination.
Objective
To check the bacterial contamination in samples of water collectedfrom different sources by determining sulphide ion concentration.
Background Information
Sulphide ions are present in water when anaerobic bacteriadecompose organic matter or reduce sulphates. These are foundin stagnent water. Generally pollutants from paper mills, gas works,tanneries, sewage works and other chemical plants are responsiblefor the growth of such bacteria.
Brief Procedure
Collection of Samples
Sulphides are readily oxidised, therefore care should be taken atthe time of sampling to exclude air by flushing it with nitrogen orcarbon dioxide. But the best way is to ‘fix’ the sample immediatelyafter collection. This can be done by adding small volume ofcadmium-zinc acetate solution. For this take 80 mL of water andadd cadmium-zinc acetate solution 20 mL to obtain a total volumeof about 100 mL. To make Cd-Zn acetate solution dissolve 50 gcadmium acetate and 50 g zinc acetate in 1.0 L of water. If collectedsample is acidic in nature, then first neutralize it with little excessof alkali.
Titration of Fixed Solution
Take 100 mL fixed solution in a titration flask, add 20 mL 0.025 Miodine solution and immediately add 15 mL, (1:1) HCl and mix. Titratethe excess iodine against 0.05 M Na2S2O3, adding starch solutionas indicateor towards the end point. Calculate the amount ofsulphide ions in the original samples from the amount of iodineused in the reaction with H2S. Subtract the values of blank titrationif available from the calculated values.
120
LABORATORY MANUAL CHEMISTRY
PROJECT 2
Title
To study the methods of purification of water.
Objectives
• To study level of purity achieved by using different methodsof purification.
• To study advantages and disadvantages of using differentmethod for purification.
• To know about specific uses of pure water.
Background Information
Purity of water obtained from different natural sources is different.The type of contamination and impurity present depends uponthe source from which water is obtained. Besides drinkingpurposes, we require pure water for various other purposes e.g.in chemical analysis. There are various methods for the purificationof water. these remove impurities and contamination to differentextent. There are some advantages and disadvantages in usingthese methods. Comparison of various methods of purification willprovide an idea about obtaining water of specific purity for aspecific purpose.
Brief Procedure
Students may find out level of puriety achieved by varioustechniques in use, for the purification of drinking water. They cansurvey the literature and visit industries etc. to find out uses ofwater of specific purity. Students may work in groups for the studyof various aspects of the project.
Note : Another aspect of the project may be to study different methods ofpurification of water taken from different sources such as river, well,bore-well, municipality etc.
PROJECT 3
Title
Testing the hardness, presence of iron, fluoride, chloride etc. indrinking water obtained from different regions and a study of thecause of presence of these ions above permissible limits.

BACKGROUND INFORMATION ABOUT INVESTIGATORY PROJECTS
121
Objectives
• To test the total hardness, iron, fluoride and chloride etc. indifferent samples of water.
• To collect information about local sources of above ions inwater.
• To study the effect of these ions on health if present beyondpermissible limits.
• To find out whether any such problem exists in the localityand around.
Background Information
Quality of drinking water has direct relationship with thehuman health and life. If iron, fluoride, chloride etc. arepresent in water above permissible limits, they may causeseveral health problems. For example, if fluoride is presentabove permissible limit, people of the region may suffer fromfluorosis. Hardness of water is due to the presence of calciumand magnesium ions. It is well known fact that hard water isnot fit for laundary purposes. Thus, it is very important toknow the ions and their amount present in water.
Brief Procedure
Students may collect samples of water from different sources. Theycan detect the presence of different ions by usual methods ofanalysis. Total hardness of water can be estimated by standardprocedure of complexometric titration. Estimation of Cl–, F– andFe2+ is difficult at this level. Therefore existing data from approvedlabs can be taken for the purpose of investigation.
PROJECT 4
Title
Investigation of the foaming capacity of different washing soapsand the effect of addition of sodium carbonate on their foamingcapacity.
Objective
To study the foaming capacity of soaps and the effect of additionof sodium carbonate on their foaming capacity.
122
LABORATORY MANUAL CHEMISTRY
Brief Procedure
Weigh 1 gram of a sample of soap and dissolve it completely in100 mL of distilled water. Take 10 mL of the soap solution in aboiling tube close the mouth of the boiling tube with the help of acork and shake the solution making 20 regular strokes so thatfoam increases uniformly. Measure the length of the boiling tubeup to which the foam rises. Similarly, perform the experiment withother soap solutions.
Dissolve 0.5g of sodium carbonate in 50 mL of each of theabove soap solutions separately. Now take 10 mL of a solution ina boiling tube and shake it equal number of times (e.g. 20 regularstrokes). Measure the length up to which foam appears. Similarly,perform the experiment with other soap solutions. Record theobservations in a tabular form.
Compare the height upto which foam produced rises in differentsoap solutions with and without the presence of Na2CO3 and drawconclusions.
PROJECT 5
Title
Study of the acidity of different samples of tea leaves and reasonsfor the variation in colour of tea prepared from these leaves.
Objective
To estimate the concentration of acids present in different teasamples and the effect of addition of acids or bases on the colourof tea extract.
Brief Procedure
(a) Estimation of Concentration of Acids Present in Tea
Weigh 10 grams of the sample of tea leaves and prepare the extractof each sample separately in 200 mL of distilled water. For this,boil different samples of tea leaves with distilled water 8 for a fixedtime period.
Take 5mL of tea extract in a conical flask and dilute it with 20mL of distilled water. Shake the solution well for homogenousmixing and then titrate it against M/50 NaOH solution usingphenolphathalein as an indicator. Similarly, titrate other tea
BACKGROUND INFORMATION ABOUT INVESTIGATORY PROJECTS
123
extracts with M/50 NaOH solution. Calculate the concentration ofacids present in different samples of tea leaves in terms of molarity.If colour of the extract causes problem, then tea extract can be takenin the burette and sodium hydroxide solution in the conical flask.Phenolphthalein may be used as an indicator if sodium hydroxidesolution is taken is conical flask. The colour change will be frompink to colourless.
(b) Effect of Acids and Bases on the Colour of Tea Extract
Take five filter paper strips and mark them as A, B, C, D and E. Dipall the strips in any one sample of tea extract and then take themout. Now put two drops of dilute HC1, acetic acid solution, NaOHsolution and NH4OH solution on strips A, B, C and D respectively.Compare the change in colour of these strips with reference to thecolour of the strip E. Repeat this experiment with other samples oftea extract.
PROJECT 6
Title
Study the rates of evaporation of different liquids
Objective
To study the relationship between the rates of evaporation of differentliquids and their chemical constitution.
Brief Procedure
Take five clean and dry weighing tubes and mark them as A, B, C, Dand E. Weigh each weighing tube with its stopper. Now pour 10 mLof different liquids (ethanol, ether, tetrachloromethane, acetone etc.)in different weighing tubes. Weigh each weighing tube again andfind the mass of the liquid taken in each weighing tube.
Remove the stoppers of the weighing tubes and keep them atroom temperature for one hour. After exactly one hour, close themouth of all the weighing tubes with their stoppers and weigh themagain one by one.
Calculate the loss in mass of each liquid. The temperature andthe surface area should be the same for the evaporation of eachliquid. Determine the rate of evaporation of each liquid in grams ofliquid evaporated per second. Relate the difference in rates ofevaporation of liquids with their chemical constitution and variationin intermolecular/intra-molecular interactions.
124
LABORATORY MANUAL CHEMISTRY
PROJECT 7
Title
Study the effect of acids and alkalies on the tensile strength offibres
Objective
To study the effect of acids on the tensile strength of different typesof fibers.
Brief Procedure
The tensile strength of a fibre is measured by noting the minimumweight required just to break the thread. It may be done as follows:
Take a thread of about 20 cm length and tie its one end with aring fixed on the iron stand and the other end with a hanger whichcarries the weights. Increase the weight on the hanger and findout the minimum weight required to just break the thread. Repeatthe experiment with threads of equal length and thickness but ofdifferent materials (eg. cotton, wool, silk, terylene etc.). Theseweights are the measure of tensile strength of the fibre.
The effect of acids and alkalies on the tensile strength of fibrescan be determined by dipping them separately in dilute HC1 ordilute NaOH solution of equal strengths for equal intervals of time.After a small but fixed interval of time, the fibres are removed fromthe solution, washed with water and dried. Then minimum weightrequired to just break these threads are determined. These weightsare the measures of the tensile strengths of fibres after treatmentwith acid or alkali. Interpret your observations in terms of chemicalconstitution of the material of fibre.
PROJECT 8
Title
Study of the acids and mineral contents of vegetables and fruits.
Objective
(a) To determine the amount of acids present in variousvegetables and fruits.
(b) To detect the presence of iron, carbohydrate, protein andsugar etc. in vegetables and fruits.

BACKGROUND INFORMATION ABOUT INVESTIGATORY PROJECTS
125
Brief Procedure
(a) Acid Content
Take out the juice of a few fruits and vegetables (apple, orange, amla,lemon, raddish, cane sugar etc.) by crushing them. Keep the juicesamples in different containers. Determine the pH of different samplesof juices. Determine their acid content by titrating a known quantityof juice with M/100 potassium hydroxide solution usingphenolphthalein as an indicator. In case of dark coloured juices,dilute them with enough distilled water to get sharp end point duringtitration.
Compare the acid contents of juices by comparing their acidvalues. Acid value of vegetables and fruits is the number of milligramsof potassium hydroxide required for neutralizing the acids presentin one gram of vegetable/fruit.
(b) Tests for Iron, Carbohydrate (starch and sugar), Proteinand Fats
Test the vegetables and fruit juices for the presence of iron. Heat thevegetable juice with concentrated HNO3 for some time and performthe test for iron. Carbohydrate (starch, sugar), protein and fats canbe tested by the usual tests.
SAMPLE PROJECT REPORT
Title
A study of the variation of viscosity of organic compounds of samehomologous series with variation in the (a) molecular masses and(b) structures of carbon chains.
Background Information
Some liquids like honey or Mobil oil flow very slowly while otherslike water or kerosene flow rapidly. Liquids that flow slowly areknown as viscous liquids while others that flow rapidly are knownas non-viscous liquids. The resistance offered by a liquid to flow isknown as viscosity. It is related to intermolecular forces existing in aliquid. Different liquids have different values of viscosity due to theexistence of different magnitudes of intermolecular forces. Thecomparison of viscosities of various homologues and isomers in aparticular homologous series would give an idea about themagnitude of intermolecular forces existing in them.
126
LABORATORY MANUAL CHEMISTRY
Objectives
The objectives of this project are to establish a relationship between(a) viscosity and molecular masses; and (b) viscosity and nature ofcarbon chain in organic compounds.
Principle Involved
The resistance to flow offered by a liquid is measured in terms ofcoefficient of viscosity which is defined as follows:
‘Coefficient of viscosity of a liquid at a specified temperature isthe steady force required to maintain a velocity difference of unitybetween two parallel layers of a liquid, a unit distance apart andhaving a unit area of contact’. Coefficient of viscosity is measuredby Ostwald viscometer method. For two liquids whose coefficientof viscosity are d
1 and d
2, η
1 , η
2 the time of flow in seconds are t
1
and densities are d1 and respectively d
2 then the following relation
holds:
1 1 1
2 2 2
d t
d t
ηη
×=
×
Hence if the viscosity of one liquid is known, the viscosity ofother can be determined.
Material required
Ostwald viscometer, stop-watch, beaker (250 mL), pipette, graduated cylinder, kerosene,petrol, diesel, methyl alcohol, ethyl alcohol, propyl alcohol, isopropyl alcohol, butylalcohol, isobutyl alcohol, tert butyl alcohol and amyl alcohol.
Brief Procedure
The viscometer was washed, rinsed with alcohol and dried.10 mL of the liquid under investigation was filled in it and the timerequired for the flow of liquid between two marks of viscometer wasnoted with the help of a stop watch. These observation were recordedin Tables I and II. The viscosities of various liquids were calculatedby the formula discussed under the heading principles involved.
Observations and Calculations
Room Temperature = 23°C.A viscometer of different capacity was used for alcohols.
• Acetone and alcohols areinflamable, do not let thebottles open when not inuse.
• Keep the bottles awayfrom flames.
• Wash your hands afteruse.
• Wear safety spectacles.
Hazard Warning
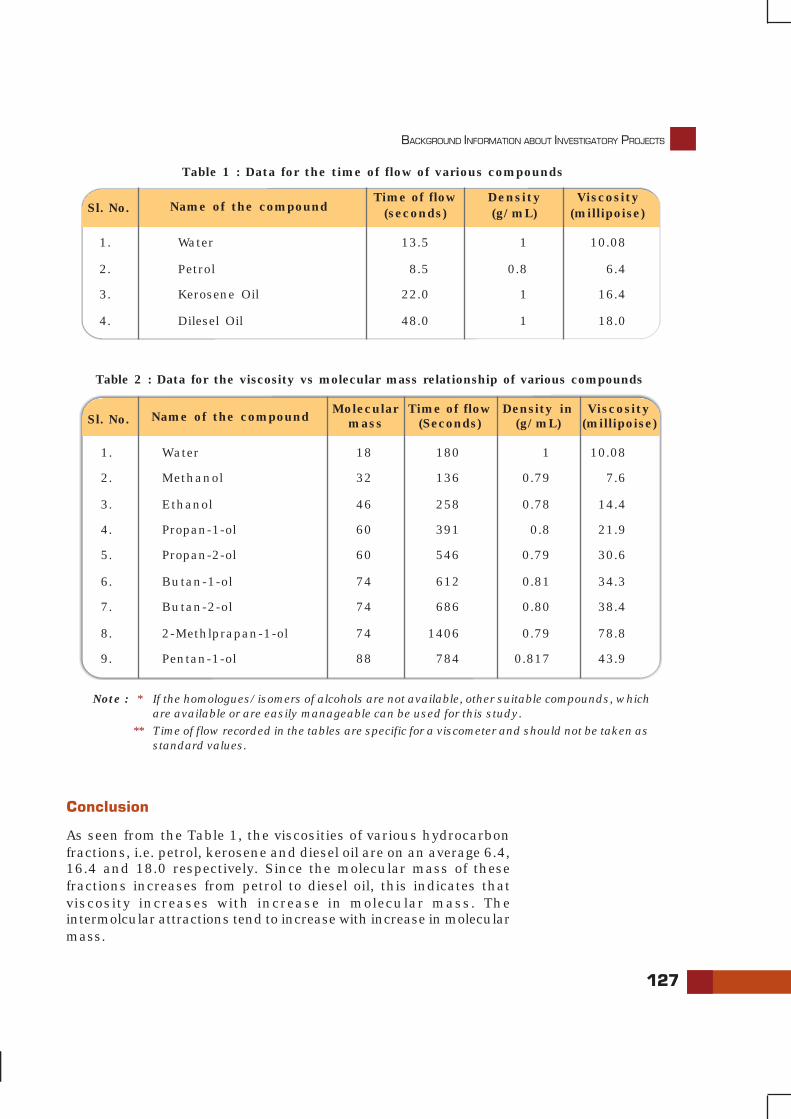
BACKGROUND INFORMATION ABOUT INVESTIGATORY PROJECTS
127
Conclusion
As seen from the Table 1, the viscosities of various hydrocarbonfractions, i.e. petrol, kerosene and diesel oil are on an average 6.4,16.4 and 18.0 respectively. Since the molecular mass of thesefractions increases from petrol to diesel oil, this indicates thatviscosity increases with increase in molecular mass. Theintermolcular attractions tend to increase with increase in molecularmass.
Sl. No. Name of the compoundTime of flow
(seconds)Density(g/mL)
Viscosity(millipoise)
1. Water 13.5 1 10.08
2. Petrol 8.5 0.8 6.4
3. Kerosene Oil 22.0 1 16.4
4. Dilesel Oil 48.0 1 18.0
Table 1 : Data for the time of flow of various compounds
Sl. No. Name of the compoundMolecular
massTime of flow
(Seconds)Density in
(g/mL)Viscosity
(millipoise)
1. Water 18 180 1 10.08
2. Methanol 32 136 0.79 7.6
3. Ethanol 46 258 0.78 14.4
4. Propan-1-ol 60 391 0.8 21.9
5. Propan-2-ol 60 546 0.79 30.6
6. Butan-1-ol 74 612 0.81 34.3
7. Butan-2-ol 74 686 0.80 38.4
8. 2-Methlprapan-1-ol 74 1406 0.79 78.8
9. Pentan-1-ol 88 784 0.817 43.9
Table 2 : Data for the viscosity vs molecular mass relationship of various compounds
Note : * If the homologues/isomers of alcohols are not available, other suitable compounds, whichare available or are easily manageable can be used for this study.
** Time of flow recorded in the tables are specific for a viscometer and should not be taken asstandard values.
128
LABORATORY MANUAL CHEMISTRY
In the case of alcohols, the viscosity of nine alcohols weredetermined and their values are given in Table-II. The viscosity ofalchohols increases with an increase in the molecular mass ascan be seen from the viscosities of methanol, ethanol, propan-1-ol,butan-1 –ol, the viscosities are 34.3, 38.4 and 78.8 millipoiserespectively. This shows that viscosity increases with the increasein molecular mass.
Precaution
The viscometer should be thoroughly cleaned and dried before use.
Suggestions for further investigation
A study of the variation of viscosity with intermolecular forces maybe carried out using appropriate compounds.
References
KEENAN, C.W.; WOOD, J.H. General Chemistry IVth Edition., Harperand Row Publishers Inc. New York.