Citrix Risk-Based Authentication Deployment Guide · Install the RSA Authentication Bridge by...
19
Citrix Risk-Based Authentication Deployment Guide Step-by-step RBA deployment for NetScaler, StoreFront and RSA Adaptive Authentication Connector. Citrix Risk-Based Authentication Deployment Guide
Transcript of Citrix Risk-Based Authentication Deployment Guide · Install the RSA Authentication Bridge by...

Citrix Risk-Based
Authentication
Deployment Guide
Step-by-step RBA deployment for
NetScaler, StoreFront and RSA Adaptive
Authentication Connector.
Citrix Risk-Based Authentication Deployment Guide
Contents
1 Introduction .................................................................................................................................................................... 3
2 Software used ................................................................................................................................................................. 3
3 Environment .................................................................................................................................................................... 4
4 StoreFront (DFA Server) .................................................................................................................................................. 4
4.1 Installation .............................................................................................................................................................. 4
4.1.1 Installation recommendations ........................................................................................................................ 5
4.1.2 StoreFront Cluster Installation Considerations ............................................................................................... 5
4.2 Uninstallation .......................................................................................................................................................... 5
5 RSA Authentication Bridge Installation and Configuration ............................................................................................. 5
5.1 Installation .............................................................................................................................................................. 5
5.1.1 Installation considerations .............................................................................................................................. 5
5.1.2 Installing RSA Authentication Bridge .............................................................................................................. 5
5.2 Uninstalling RSA Authentication Bridge .................................................................................................................. 5
5.3 Configure RSA Authentication Bridge via the StoreFront Admin Console .............................................................. 5
5.3.1 Configure RSA Adaptive Authentication Connector URL ................................................................................ 6
5.3.2 Allow Users to Change Their Password ........................................................................................................... 7
5.3.3 Configure Trusted Domains ............................................................................................................................ 7
6 RSA Adaptive Authentication Connector ........................................................................................................................ 8
6.1 Customizing Disclaimer Text for Worx Home ......................................................................................................... 8
7 NetScaler Upgrade/Configuration .................................................................................................................................. 9
7.1 Load Balancing StoreFront (DFA server) ................................................................................................................. 9
7.1.1 Create Servers ............................................................................................................................................... 10
7.1.2 Create Custom DFA Monitor ......................................................................................................................... 10
7.1.3 Create Services .............................................................................................................................................. 10
7.1.4 Create LB VServer .......................................................................................................................................... 10
8 Citrix Pre-Shared Key Configuration ............................................................................................................................. 11
8.1 Configuration Checklist ......................................................................................................................................... 11
8.2 NetScaler ............................................................................................................................................................... 11
8.2.1 Create Delegated Form Authentication Action ............................................................................................. 11
8.2.2 Create Delegated Form Authentication (DFA) Policy .................................................................................... 12
8.2.3 Bind With a VPN Vserver ............................................................................................................................... 12
8.3 StoreFront ............................................................................................................................................................. 13
9 Troubleshooting and FAQ ............................................................................................................................................. 14
9.1 Worx Home ........................................................................................................................................................... 14
9.2 StoreFront and RSA Adaptive Bridge .................................................................................................................... 15
9.3 NetScaler ............................................................................................................................................................... 15
9.4 RSA Adaptive Authentication Connector .............................................................................................................. 16
9.5 Miscellaneous ....................................................................................................................................................... 16
10 Appendix ................................................................................................................................................................... 17
10.1 Appendix A: Netscaler and StoreFront Delegated Form Authentication KeyExchange Workflow ....................... 17

1 Introduction
Risk-based authentication (RBA) provides a means of determining the information required from a user and their
endpoint device depending upon the security posture or “fingerprint” of the device. When the device contacts the
authentication service, information about the device’s characteristics — and perhaps the location — along with user
credentials are passed to the service. This information is then used to determine whether the user is authenticated or
whether additional information is needed from the user to confirm their identity.
Third-party vendors, such as RSA, can integrate its Adaptive Authentication (or known as RBA in Citrix’s context) solution
within Citrix products using StoreFront Authentication SDK. This allows RSA-customized authentication flow to be
executed via the StoreFront Authentication Service.
In order for NetScaler to deliver RSA’s customized authentication flow, a new protocol named Delegated Form
Authentication (DFA) protocol was created. Its purpose is to allow generation and processing of authentication forms,
including credential validation, to be delegated to another component. In this example, NetScaler will delegate
authentication to StoreFront via DFA.
The diagram below shows how DFA fits into the RBA context:
This document is intended to be a simple guide that explains how to configure NetScaler and StoreFront to perform the
DFA protocol. While it is not a complete guide, it contains all the necessary information to set up a working DFA
connection.
We assume that the readers of this document will have the following knowledge:
NetScaler configuration, especially load balancing and session policy
StoreFront installation and configuration
RSA Adaptive Authentication workflow
XenMobile configuration
2 Software used
The following table displays the software used in this guide:
Server Type Version Extension
Ns1.citrix.lab NetScaler NS10.5 Build 54.9008.e.nc only
Tar-gzip
Sfdfa.citrix.lab StoreFront 2.6. or above Exe
Sfdfa.citrix.lab (RSA Authentication Bridge)*
RSA Authentication Bridge
1.0.0.31944 Msi
iOS Worx Home iOS Worx Home 10.0.0.59 or above ipa
RSA Adaptive Authentication Connector
RSA Adaptive Authentication Connector
1.0.0.119 Exe
iOS WorxHome
NSGRSA Adaptive
Authentication Connector
RSA Adaptive Authentication
Server
DFA Protocol
RSA Proprietary
RSA Proprietary
SF Auth Service
RSA Authentication
Bridge
Auth SDK
StoreFront

The RSA Authentication Bridge has to be installed with StoreFront.
3 Environment
This guide is created to deploy the environment shown below:
Worx Home IOS
Ns1.citrix.lab
StoreFront DFA Services
DFA SF cluster
RSA Adaptive Authentication
Connector
RSA Adaptive Authentication Server
Firewall
Firewall
XenMobile
StoreFront Services
Citrix XenDesktop
XenApp Services
Existing Deployment
New RBA Deployment
RSAAuth
Bridge
RSAAuth
Bridge
The following components need to be setup prior to configuring the DFA protocol:
StoreFront: Existing StoreFront to enumerate all the apps and desktops
XenMobile: Existing XenMobile to deliver mobile apps
XenApp/XenDesktop
RSA Adaptive Authentication Server
NetScaler: Configured with appropriate authentication and session policies to accommodate
XenApp/XenDesktop/XenMobile access
4 StoreFront (DFA Server)
4.1 Installation Please refer to the Citrix product documentation site for information on how to install and configure StoreFront.

4.1.1 Installation recommendations To ensure communication between NetScaler and StoreFront is protected, it is recommended to have HTTPS instead of
HTTP protocol. For cluster deployment, ensure all the nodes will have the same server certificate installed and
configured in IIS HTTPS binding prior to configuration steps.
Ensure that NetScaler will issue the certificate for the StoreFront server and is configured as a trusted certificate
authority when HTTPS is configured in StoreFront.
4.1.2 StoreFront Cluster Installation Considerations For a StoreFront cluster installation, you need to install the third-party RSA Authentication Bridge authentication plug-in
on all the nodes prior to joining them up together.
Configure all the DFA-related settings (see this configuration’s PowerShell-related commands in the Citrix Pre-Shared
Key Configuration section) on one node and propagate the changes to others.
4.2 Uninstallation Before you uninstall StoreFront, first uninstall the RSA Authentication Bridge because it will impact the functionality of
StoreFront. (See Uninstalling RSA Authentication Bridge for more details).
5 RSA Authentication Bridge Installation and Configuration
5.1 Installation
5.1.1 Installation considerations Install StoreFront prior to installing the RSA Authentication Bridge. This feature pack only supports StoreFront 2.6 or
later.
5.1.2 Installing RSA Authentication Bridge Install the RSA Authentication Bridge by clicking on RSA-StoreFront-Bridge-x64-1.0.0.15164.msi. Because it is a simple
plug-in installation, you should not be prompted to configure anything.
5.2 Uninstalling RSA Authentication Bridge To uninstall the bridge, you first need to clear the RSA Authentication Bridge check box under the Authentication tab in
the StoreFront admin console. If you do not, the bridge will not uninstall.
5.3 Configure RSA Authentication Bridge via the StoreFront Admin Console You must install the RSA Authentication Bridge before configuring it (please refer to previous section 5.1.2 before
starting this). Once the RSA Authentication Bridge is installed properly, you can enable it via the StoreFront admin
console as shown in the screenshot below:

5.3.1 Configure RSA Adaptive Authentication Connector URL You will be required to configure the RSA Adaptive Authentication Connector URL in the StoreFront DFA server. Please
note that this is essential step. You can configure it by selecting Manage RSA Authentication Bridge.

You can test the RSA Connector URL in a browser. You should see the following:
This shows that StoreFront is able to communicate with the RSA Adaptive Authentication Connector server.
5.3.2 Allow Users to Change Their Password You can allow users to change expired passwords via Worx Home by selecting Manage Password Options and then
selecting either “When expired” or “At any time.” Please note that this Worx Home iOS version does not support
changing passwords at any time.
In this example, we set it to “At any time” to accommodate Receiver for Web as it supports it. However, this Worx Home
iOS version will behave as if “When expired” is selected.
5.3.3 Configure Trusted Domains You can restrict which domain the users can log on to by selecting Configure Trusted Domains.

6 RSA Adaptive Authentication Connector
This section assumes that you have a working Tomcat server deployed as per RSA’s installation requirements. The
StoreFront DFA server relies on the correct configuration on RSA Adaptive Authentication Connector to work properly.
We will cover the basic installation and configuration on the RSA Adaptive Authentication Connector, with which the
StoreFront DFA server will be integrated.
In the RSA installation wizard, fill in the necessary information in accordance to your RSA Adaptive Authentication Server.
You need to configure the necessary authentication methods supported by your RSA Adaptive Authentication Server; for
example, do not put in SMS out of Band Authentication if you do not have the authentication configured on RSA
Adaptive Authentication Server. Mismatched configurations on the connector and RSA Adaptive Authentication Server
will break the Worx Home authentication flow.
After successful configuration, copy the WAR file generated by the installer to your Tomcat webapps folder. It should
take Tomcat a few minutes to deploy it (given that you have Tomcat configured to do auto WAR file deployment):
For more information about how to manually deploy the WAR file, see http://tomcat.apache.org/tomcat-7.0-
doc/deployer-howto.html.
Check the deployment via Tomcat’s app manager (http://localhost:8080/manager), and you will see something like this:
6.1 Customizing Disclaimer Text for Worx Home The RSA Adaptive Authentication Connector allows administrators to customize the content of the disclaimer text shown
on Worx Home. Modify the message properties in the RSA Adaptive Authentication Connector webapp’s location:

C:\Program Files\Apache Software Foundation\Tomcat 7.0\webapps\adapters-sf-aaconnector-webapp\WEB-
INF\i18n\messages.properties.
Change the value as shown in the screenshot below:
7 NetScaler Upgrade/Configuration
Before configuring the NetScaler appliance for this deployment, install the appropriate software version for DFA support.
For this guide, we used the following installation bundle:
build_tagma_54_9008_e_nc.tgz
Upgrade via secure shell:
1. Copy the installation bundle to the directory /var/nsinstall via a secure copy client such as SCP.
2. After the file is copied, launch a secure shell client, and log on to the NetScaler appliance at the NetScaler IP
address.
3. Enter shell at the prompt.
4. Move to the directory where you copied the installation bundle with cd /var/nsinstall.
5. Extract the installation file by entering tar -zxvf build_tagma_54_9008_e_nc.tgz.
6. Enter./installns to begin the installation.
7. Follow the prompts, and allow the NetScaler appliance to reboot when prompted.
Note: This guide assumes you have a preconfigured NetScaler appliance; therefore, basic configuration information
is not provided.
7.1 Load Balancing StoreFront (DFA server) This section is applicable only to deployments that have two or more DFA servers installed. NetScaler can load-balance
these servers by having a load balancer virtual server (lb vserver) configured.
The following sub-sections explain how to create the following in NetScaler:
Servers
o This is the representation of the actual server in NetScaler. We will be inserting the IP address of the
StoreFront DFA cluster node.
Custom DFA Monitor
o Mechanism to check whether a particular server (in this case, StoreFront DFA cluster node) is online.
Services
o The role of the server. This is the instance to where the monitor and server are linked.
LB Vserver
o Representation of the load-balancer server with the services.
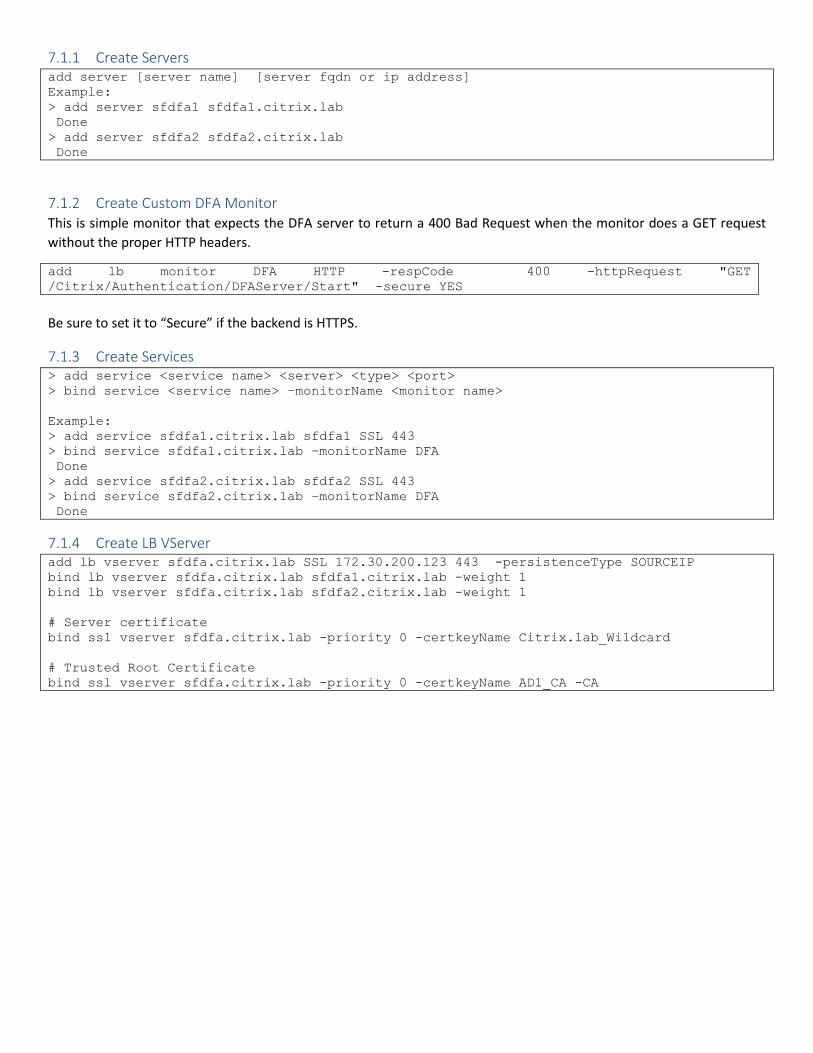
7.1.1 Create Servers add server [server name] [server fqdn or ip address]
Example:
> add server sfdfa1 sfdfa1.citrix.lab
Done
> add server sfdfa2 sfdfa2.citrix.lab
Done
7.1.2 Create Custom DFA Monitor This is simple monitor that expects the DFA server to return a 400 Bad Request when the monitor does a GET request
without the proper HTTP headers.
add lb monitor DFA HTTP -respCode 400 -httpRequest "GET
/Citrix/Authentication/DFAServer/Start" -secure YES
Be sure to set it to “Secure” if the backend is HTTPS.
7.1.3 Create Services > add service <service name> <server> <type> <port>
> bind service <service name> –monitorName <monitor name>
Example:
> add service sfdfa1.citrix.lab sfdfa1 SSL 443
> bind service sfdfa1.citrix.lab –monitorName DFA
Done
> add service sfdfa2.citrix.lab sfdfa2 SSL 443
> bind service sfdfa2.citrix.lab –monitorName DFA
Done
7.1.4 Create LB VServer add lb vserver sfdfa.citrix.lab SSL 172.30.200.123 443 -persistenceType SOURCEIP
bind lb vserver sfdfa.citrix.lab sfdfa1.citrix.lab -weight 1
bind lb vserver sfdfa.citrix.lab sfdfa2.citrix.lab -weight 1
# Server certificate
bind ssl vserver sfdfa.citrix.lab -priority 0 -certkeyName Citrix.lab_Wildcard
# Trusted Root Certificate
bind ssl vserver sfdfa.citrix.lab -priority 0 -certkeyName AD1_CA -CA

8 Citrix Pre-Shared Key Configuration
A Citrix pre-shared key is intended for the exchange of a user’s credentials securely between NetScaler and StoreFront
after a successful logon. The mechanism relies on an identical pre-shared key to be configured between NetScaler and
StoreFront so the content can be encrypted and decrypted accordingly.
Note: You only need to configure this if you have NetScaler in the deployment and intend to allow NetScaler to delegate
its form auth flow to StoreFront.
8.1 Configuration Checklist This section explains how the key needs to be configured in NetScaler and StoreFront’s context. Before you configure
them, take extreme care about the following parameters:
Client ID
o The ID can be the FQDN of the NSG server, such as netscaler.server.com, for example.
o It’s vital that the client ID lowercase and identical for both NetScaler and StoreFront.
Key
o Has to be identical for both NetScaler and StoreFront.
Server URL
o It is always in the format of http(s)://[StoreFront fqdn]/Citrix/Authentication/DFAServer/Start/
o It is not case-sensitive — /citrix/authentication/dfaserver/start will work, too.
o If StoreFront is using HTTPS, make sure you have the issuer of StoreFront’s server certificates as a
trusted Certificate Authority in Netscaler.
8.2 NetScaler
8.2.1 Create Delegated Form Authentication Action You will need to configure a DFA action via SSH:
add dfaaction [dfa action name] –clientID [client id] –passPhrase [passphrase] –
serverURL [URL to StoreFront DFA]
Example:
> add dfaaction sfdfa_rsa_sample_action -clientID netscaler.fqdn.com -passPhrase secret
–serverURL http://sfdfa.citrix.lab/Citrix/Authentication/DFAServer/Start
If you created it successfully, you should see this:
> show dfaaction sfdfa_rsa_sample_action
1) Name: sfdfa_rsa_sample_action
ClientID: netscaler.fqdn.com
ServerURL: http://sfdfa.citrix.lab/Citrix/Authentication/DFAServer/Start
Success: 0
Failures: 0
Done
Notes:
The client IDs and passphrases have to match the ones configured in StoreFront. They are case-sensitive.
The server URL is always in the format of: http(s)://[your StoreFront
fqdn]/Citrix/Authentication/DFAServer/Start

o If the server URL is HTTPS, ensure you install the StoreFront server certificates issuer as trusted root CA
in NetScaler.
o Recommended deployment will be HTTPS. However, you can start with HTTP for initial testing.
o Your server URL has to be reachable by NSG. The easiest way to test it is the following: cURL <server url>
cURL http://sfdfa.citrix.lab
8.2.2 Create Delegated Form Authentication (DFA) Policy Create a DFA policy, and bind the action to it:
add dfaPolicy [dfa policy name] –rule [how the policy should be matched] –action [action
to execute]
Example:
> add dfaPolicy sfdfa_rsa_sample_policy -rule ns_true -action sfdfa_rsa_sample_action
Once successfully created, you should able to see this when typing the following command:
> show dfaPolicy sfdfa_rsa_sample_policy
1) Name: sfdfa_rsa_sample_policy Rule: ns_true
Request action: dfa_rsa_sample_action
Done
iOS WorxHome and Receiver For Web DFA Policies
The above example only to illustrate how DFA policy can be applied. The following policy rules will ensure only DFA
feature will be applied to appropriate client.
For iOS WorxHome, the policy will be as such:
add dfaPolicy dfa_ios_pol -rule "REQ.HTTP.HEADER User-Agent CONTAINS Worx%20Home
&& REQ.HTTP.HEADER User-Agent CONTAINS Darwin" -action dfa_action
For browser, the policy will be as such:
add dfaPolicy dfa_browser_pol -rule "REQ.HTTP.HEADER User-Agent CONTAINS Mozilla
|| REQ.HTTP.HEADER User-Agent CONTAINS AppleWebKit || REQ.HTTP.HEADER User-Agent
CONTAINS Chrome || REQ.HTTP.HEADER User-Agent CONTAINS Safari" -action
dfa_action
8.2.3 Bind DFA Policy to a VPN Vserver Bind it with a vpn vserver.
bind vpn vserver [dfa vserver name] -policy [dfa policy]
Example:
> bind vpn vserver sfdfa_vserver -policy sfdfa_rsa_sample_policy
If it is successful, you should able to see something like this:
> show vpn vserver sfdfa_vserver
dfa_vserver (10.x.x.x.x:443) - SSL Type: CONTENT
State: UP Nodegroup: ???
Down state flush: ENABLED
Disable Primary Vserver On Down : DISABLED
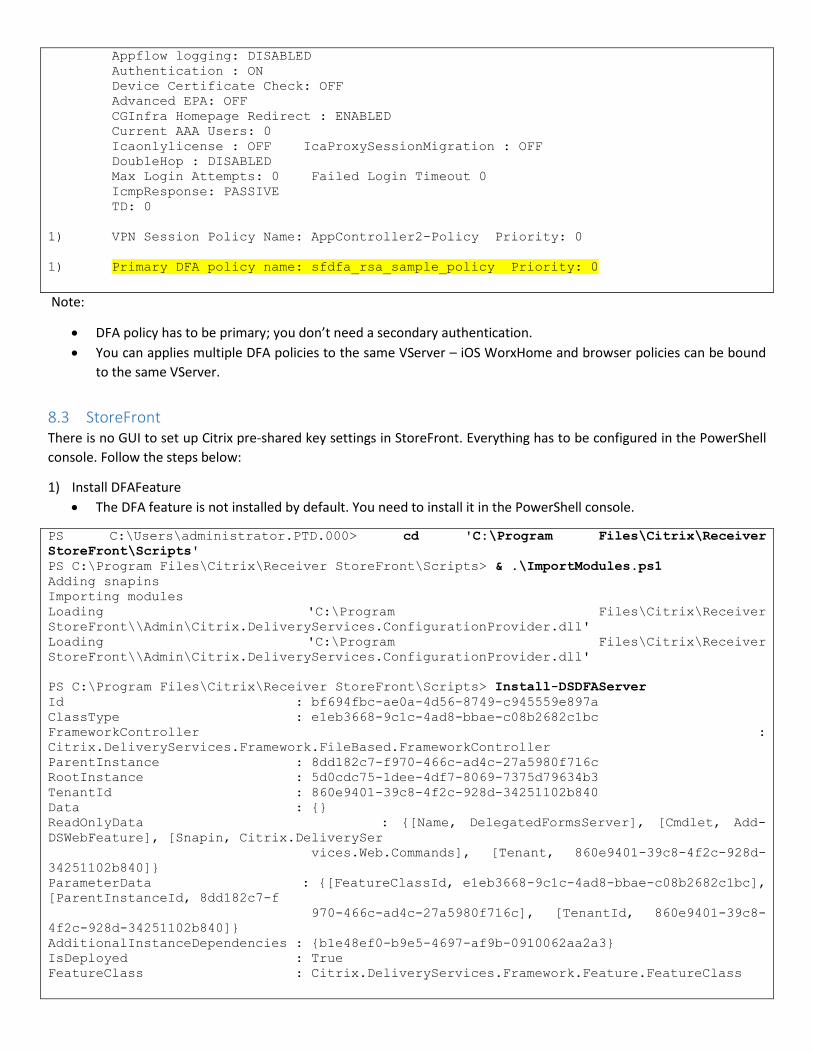
Appflow logging: DISABLED
Authentication : ON
Device Certificate Check: OFF
Advanced EPA: OFF
CGInfra Homepage Redirect : ENABLED
Current AAA Users: 0
Icaonlylicense : OFF IcaProxySessionMigration : OFF
DoubleHop : DISABLED
Max Login Attempts: 0 Failed Login Timeout 0
IcmpResponse: PASSIVE
TD: 0
1) VPN Session Policy Name: AppController2-Policy Priority: 0
1) Primary DFA policy name: sfdfa_rsa_sample_policy Priority: 0
Note:
DFA policy has to be primary; you don’t need a secondary authentication.
You can applies multiple DFA policies to the same VServer – iOS WorxHome and browser policies can be bound
to the same VServer.
8.3 StoreFront There is no GUI to set up Citrix pre-shared key settings in StoreFront. Everything has to be configured in the PowerShell
console. Follow the steps below:
1) Install DFAFeature
The DFA feature is not installed by default. You need to install it in the PowerShell console.
PS C:\Users\administrator.PTD.000> cd 'C:\Program Files\Citrix\Receiver
StoreFront\Scripts'
PS C:\Program Files\Citrix\Receiver StoreFront\Scripts> & .\ImportModules.ps1
Adding snapins
Importing modules
Loading 'C:\Program Files\Citrix\Receiver
StoreFront\\Admin\Citrix.DeliveryServices.ConfigurationProvider.dll'
Loading 'C:\Program Files\Citrix\Receiver
StoreFront\\Admin\Citrix.DeliveryServices.ConfigurationProvider.dll'
PS C:\Program Files\Citrix\Receiver StoreFront\Scripts> Install-DSDFAServer
Id : bf694fbc-ae0a-4d56-8749-c945559e897a
ClassType : e1eb3668-9c1c-4ad8-bbae-c08b2682c1bc
FrameworkController :
Citrix.DeliveryServices.Framework.FileBased.FrameworkController
ParentInstance : 8dd182c7-f970-466c-ad4c-27a5980f716c
RootInstance : 5d0cdc75-1dee-4df7-8069-7375d79634b3
TenantId : 860e9401-39c8-4f2c-928d-34251102b840
Data : {}
ReadOnlyData : {[Name, DelegatedFormsServer], [Cmdlet, Add-
DSWebFeature], [Snapin, Citrix.DeliverySer
vices.Web.Commands], [Tenant, 860e9401-39c8-4f2c-928d-
34251102b840]}
ParameterData : {[FeatureClassId, e1eb3668-9c1c-4ad8-bbae-c08b2682c1bc],
[ParentInstanceId, 8dd182c7-f
970-466c-ad4c-27a5980f716c], [TenantId, 860e9401-39c8-
4f2c-928d-34251102b840]}
AdditionalInstanceDependencies : {b1e48ef0-b9e5-4697-af9b-0910062aa2a3}
IsDeployed : True
FeatureClass : Citrix.DeliveryServices.Framework.Feature.FeatureClass

2) Add Citrix Trusted Client
This section, we configure the shared secret key (passphrase) between StoreFront and NetScaler. The passphrases
and client IDs must be identical to what you have configured in NetScaler (See Configuration for NetScaler.).
PS C:\Program Files\Citrix\Receiver StoreFront\Scripts> Add-DSCitrixPSKTrustedClient -
clientId netscaler.fqdn.com -passphrase secret
3) Set DFA Conversation Factory
This step will route all the traffic to the custom form (the RSA Authentication Bridge). Currently, the only way to find
the conversation factory is by checking the content of the web.config of C:\inetpub\wwwroot\Citrix\Authentication.
Look for “ConversationFactory” and you should see something like this:
<RSABridge connectorURL="http://RSA.connector.url:8080/adapters-sf-aaconnector-webapp"> <routeTable order="1000"> <routes> <route name="StartRSABridgeAuthentication" url="RSA-Bridge-Forms/Start"> <defaults> <add param="controller" value="ExplicitFormsAuthentication" /> <add param="action" value="AuthenticateStart" /> <add param="postbackAction" value="Authenticate" /> <add param="cancelAction" value="CancelAuthenticate" /> <add param="conversationFactory" value="RSABridgeAuthentication" /> <add param="changePasswordAction" value="StartChangePassword" /> <add param="changePasswordController" value="ChangePassword" /> <add param="protocol" value="CustomForms" /> </defaults>
</route>
In the PowerShell concole, set the DFA conversation factory to “RSABridgeAuthentication”:
PS C:\Program Files\Citrix\Receiver StoreFront\Scripts> Set-DSDFAProperty -
ConversationFactory RSABridgeAuthentication
Please note that PowerShell’s argument is not case-sensitive; ConversationFactory is identical to
conversationfactory.
9 Troubleshooting and FAQ
9.1 Worx Home Q1 Authentication error when I launch Worx Home It may be because of the following:
Delegated Form Authentication between NetScaler and StoreFront is misconfigured. o Make sure the client ID and passphrase are identical. o If the client ID and passphrase are not identical, you can view the Event Viewer log to see the
error.
StoreFront servers are offline.
The RSA Authentication Bridge is not installed and configured on StoreFront.
Q2 After logging on with my user name and password successfully, Worx Home does not authenticate.

If you can log on with your user credentials, this indicates the communication between NetScaler and StoreFront is working. Here is list of possible checks you can do:
Misconfigured RSA Adaptive Authentication Connector URL in StoreFront. o Check if the RSA Adaptive Authentication Connector is correct in StoreFront. You can view the
Event Viewer log to see if there is any error reporting about the RSA Adaptive Authentication Connector server.
Communication issue between RSA Adaptive Authentication Connector and RSA Adaptive Authentication Server.
o Check the log under ${user.home} of the user who runs Tomcat.
Q3 I don’t see any RSA-related extended authentication challenges after I log on with my user name and password.
It may be because of the following:
RSA Adaptive Authentication Connector’s policy is set to “Allow” when the RSA Adaptive Authentication Server is unreachable.
The “Remember Device” option is set during enrolment or logon.
Q4 Does iOS Worx Home support user enrollment? Yes.
9.2 StoreFront and RSA Adaptive Bridge Q1 How do I check if Delegated Form Authentication (DFA) protocol communication with NetScaler is having an
issue? DFA generates three event log entries for Task Category 1100 in the Event Viewer:
Event ID 2: Failed to create the transport cipher object, which generally means the key exchange failed. There will probably be an exception stack trace.
Event ID 3: This is a developer error and should not occur.
Event ID 4: Failed to decrypt a message; again, there will be stack trace.
Q2 How do I check if there are communication issues between the RSA Authentication Bridge and the RSA Adaptive Authentication Connector?
The RSA Authentication Bridge will generate one event log entry for Task Category 30000 in Event Viewer:
Event ID 1: Error calling RSA Adaptive Authentication Connector: Unable to connect to the remote server. There will be an exception stack trace.
9.3 NetScaler Q1 How do I debug the Delegated Form Authentication protocol communication between NetScaler and
StoreFront? Please do the following:
1. Log on to NetScaler via SSH. 2. Go to Shell mode by typing “shell” in the prompt. 3. Type in the following: nsapimgr -ys call=enable_dfa_debug 4. Monitor the debug trace by typing this: nsconmsg 5. Use iOS Worx Home to test it end to end.
Note: You will be able to see user credentials in plain-text format in the trace. It is only recommended only if it is necessary to do so; for example, in the development environment to troubleshoot DFA communication issues.
You can disable it by typing the following: nsapimgr -ys call=disable_dfa_debug
9.4 RSA Adaptive Authentication Connector Q1 How do I debug communication between the RSA Adaptive Authentication Connector and RSA Adaptive
Authentication Server? 1. Go to Tomcat webapp for RSA StoreFront Adapter folder: C:\Program Files\Apache Software
Foundation\Tomcat 7.0\webapps\adapters-sf-aaconnector-webapp\WEB-INF\classes\log4j.properties 2. Change the value of log4j.logger.com.rsa.adapters.soap=INFO to
log4j.logger.com.rsa.adapters.soap=DEBUG 3. Reload the adapters-sf-aaconnector-webapp application 4. The log file should be under ${user.home} of the user who runs Tomcat.
Note: By changing the value to “debug,” the credential of the caller is exposed in the log.
9.5 Miscellaneous Q1 Does it support non-English authentication challenges? The authentication challenge text is sent by a third party — in this case, RSA. Please refer to the third party’s
documentation for non-English language support.
Q2 Will other receivers work with risk-based authentication? No. iOS Worx Home is the only fully supported receiver.
10 Appendix
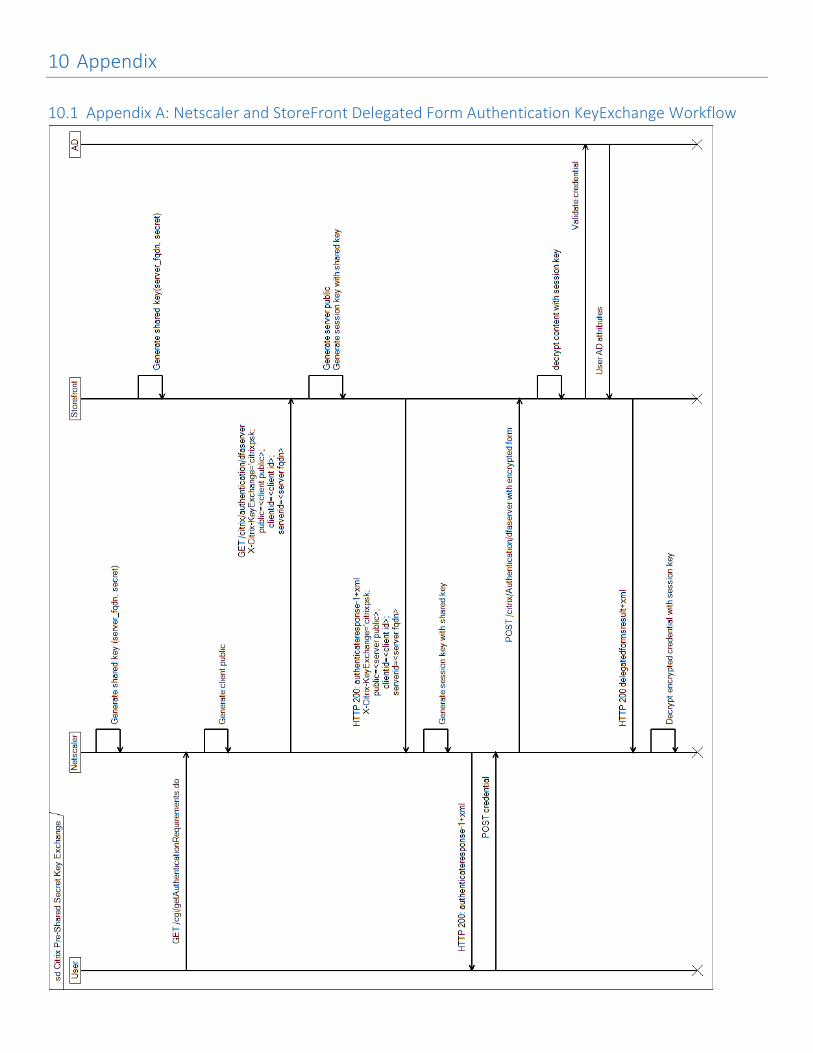
10.1 Appendix A: Netscaler and StoreFront Delegated Form Authentication KeyExchange Workflow

About Citrix
Citrix (NASDAQ:CTXS) is a leader in mobile workspaces, providing virtualization, mobility management,
networking and cloud services to enable new ways to work better. Citrix solutions power business mobility
through secure, personal workspaces that provide people with instant access to apps, desktops, data and
communications on any device, over any network and cloud. This year Citrix is celebrating 25 years of
innovation, making IT simpler and people more productive. With annual revenue in 2013 of $2.9 billion, Citrix
solutions are in use at more than 330,000 organizations and by over 100 million users globally. Learn more at
www.citrix.com.
Copyright © 2015 Citrix Systems, Inc. All rights reserved. The following are trademarks of Citrix, Inc. and/or
one or more of its subsidiaries, and may be registered in the United States Patent and Trademark Office and in
other countries:
Citrix®, Citrix Access Gateway™, Citrix NetScaler™, Citrix NetScaler Gateway™, Citrix Provisioning
Services™, Citrix Receiver™, Citrix XenApp™, NetScaler®, XenApp™, XenDesktop™, XenMobile™,
XenServer™