Cisco MDS Data Mobility Manager - desbrq3.n-con.netdesbrq3.n-con.net/support/Cisco/Switches/MD9000...
120
Americas Headquarters Cisco Systems, Inc. 170 West Tasman Drive San Jose, CA 95134-1706 USA http://www.cisco.com Tel: 408 526-4000 800 553-NETS (6387) Fax: 408 527-0883 Cisco MDS 9000 Family Data Mobility Manager Configuration Guide Cisco MDS 9000 SAN-OS Release 3.2(1) September 2007 Text Part Number: OL-8007-08, Cisco MDS SAN-OS Release 3.x
Transcript of Cisco MDS Data Mobility Manager - desbrq3.n-con.netdesbrq3.n-con.net/support/Cisco/Switches/MD9000...

Cisco MDS 9000 Family Data Mobility Manager Configuration Guide
Cisco MDS 9000 SAN-OS Release 3.2(1)
September 2007
Americas HeadquartersCisco Systems, Inc.170 West Tasman DriveSan Jose, CA 95134-1706 USAhttp://www.cisco.comTel: 408 526-4000
800 553-NETS (6387)Fax: 408 527-0883
Text Part Number: OL-8007-08, Cisco MDS SAN-OS Release 3.x

Send documenta t ion comments to mdsfeedback -doc@c i sco .com
THE SPECIFICATIONS AND INFORMATION REGARDING THE PRODUCTS IN THIS MANUAL ARE SUBJECT TO CHANGE WITHOUT NOTICE. ALL STATEMENTS, INFORMATION, AND RECOMMENDATIONS IN THIS MANUAL ARE BELIEVED TO BE ACCURATE BUT ARE PRESENTED WITHOUT WARRANTY OF ANY KIND, EXPRESS OR IMPLIED. USERS MUST TAKE FULL RESPONSIBILITY FOR THEIR APPLICATION OF ANY PRODUCTS.
THE SOFTWARE LICENSE AND LIMITED WARRANTY FOR THE ACCOMPANYING PRODUCT ARE SET FORTH IN THE INFORMATION PACKET THAT SHIPPED WITH THE PRODUCT AND ARE INCORPORATED HEREIN BY THIS REFERENCE. IF YOU ARE UNABLE TO LOCATE THE SOFTWARE LICENSE OR LIMITED WARRANTY, CONTACT YOUR CISCO REPRESENTATIVE FOR A COPY.
The Cisco implementation of TCP header compression is an adaptation of a program developed by the University of California, Berkeley (UCB) as part of UCB’s public domain version of the UNIX operating system. All rights reserved. Copyright © 1981, Regents of the University of California.
NOTWITHSTANDING ANY OTHER WARRANTY HEREIN, ALL DOCUMENT FILES AND SOFTWARE OF THESE SUPPLIERS ARE PROVIDED “AS IS” WITH ALL FAULTS. CISCO AND THE ABOVE-NAMED SUPPLIERS DISCLAIM ALL WARRANTIES, EXPRESSED OR IMPLIED, INCLUDING, WITHOUT LIMITATION, THOSE OF MERCHANTABILITY, FITNESS FOR A PARTICULAR PURPOSE AND NONINFRINGEMENT OR ARISING FROM A COURSE OF DEALING, USAGE, OR TRADE PRACTICE.
IN NO EVENT SHALL CISCO OR ITS SUPPLIERS BE LIABLE FOR ANY INDIRECT, SPECIAL, CONSEQUENTIAL, OR INCIDENTAL DAMAGES, INCLUDING, WITHOUT LIMITATION, LOST PROFITS OR LOSS OR DAMAGE TO DATA ARISING OUT OF THE USE OR INABILITY TO USE THIS MANUAL, EVEN IF CISCO OR ITS SUPPLIERS HAVE BEEN ADVISED OF THE POSSIBILITY OF SUCH DAMAGES.
CCVP, the Cisco logo, and the Cisco Square Bridge logo are trademarks of Cisco Systems, Inc.; Changing the Way We Work, Live, Play, and Learn is a service mark ofCisco Systems, Inc.; and Access Registrar, Aironet, BPX, Catalyst, CCDA, CCDP, CCIE, CCIP, CCNA, CCNP, CCSP, Cisco, the Cisco Certified Internetwork Expert logo,Cisco IOS, Cisco Press, Cisco Systems, Cisco Systems Capital, the Cisco Systems logo, Cisco Unity, Enterprise/Solver, EtherChannel, EtherFast, EtherSwitch, Fast Step,Follow Me Browsing, FormShare, GigaDrive, HomeLink, Internet Quotient, IOS, iPhone, IP/TV, iQ Expertise, the iQ logo, iQ Net Readiness Scorecard, iQuick Study,LightStream, Linksys, MeetingPlace, MGX, Networking Academy, Network Registrar, PIX, ProConnect, ScriptShare, SMARTnet, StackWise, The Fastest Way to IncreaseYour Internet Quotient, and TransPath are registered trademarks of Cisco Systems, Inc. and/or its affiliates in the United States and certain other countries.
All other trademarks mentioned in this document or Website are the property of their respective owners. The use of the word partner does not imply a partnership relationshipbetween Cisco and any other company. (0708R)
Any Internet Protocol (IP) addresses used in this document are not intended to be actual addresses. Any examples, command display output, and figures included in the document are shown for illustrative purposes only. Any use of actual IP addresses in illustrative content is unintentional and coincidental.
Cisco MDS 9000 Family Fabric Manager Configuration Guide© 2007 Cisco Systems, Inc. All rights reserved.

OL-8007-08, Cisco MDS SAN-OS Release 3.x
C O N T E N T S
Preface i
Audience i
Organization i
Document Conventions ii
Related Documentation iii
Obtaining Documentation, Obtaining Support, and Security Guidelines iv
Product Overview 1-1
About Cisco MDS DMM 1-1
Concepts and Terminology 1-2
Cisco MDS DMM Features and Capabilities 1-4
Data Migration Overview 1-5
Software Requirements 1-7
Hardware Requirements 1-7
Deployment Guidelines 1-8
Getting Started 2-1
Installing Cisco MDS DMM Software 2-1
Using DMM Software Licenses 2-1
Installing and Configuring DMM Management Tools 2-2
Configuring IP Connectivity 2-3
Enabling the DMM Feature 2-4
Configuring Migration Rate 2-6
Preparing for Data Migration 3-1
Planning a Data Migration Job 3-1
Pre-Migration Configuration 3-2
Using the DMM GUI for Data Migration 4-1
About the DMM GUI 4-1
Guidelines for Using the DMM GUI 4-3
Selecting Ports for Server-Based Jobs 4-3
Configuring a Server-Based Migration Job 4-3
iiiCisco MDS 9000 Family Fabric Manager Configuration Guide

Send documenta t ion comments to mdsfeedback -doc@c i sco .com
Contents
Configuring a Storage-Based Migration Job 4-10
Optional Configuration Steps 4-17
Displaying the Data Migration Status 4-20
Using the Data Migration Status 4-20
Post-Migration Activities 4-25
Troubleshooting Cisco MDS DMM 5-1
DMM Overview 5-1
Best Practices 5-1
License Requirements 5-2
Initial Troubleshooting Checklist 5-2
Troubleshooting Connectivity Issues 5-3
Troubleshooting Job Creation Issues 5-5
Troubleshooting Job Execution Issues 5-7
Troubleshooting General Issues 5-8
DMM Error Reason Codes 5-8
Understanding DMM Topologies 6-1
Overview 6-1
FC Redirect 6-1
DMM Topology Guidelines 6-3
Homogeneous SANs 6-3
Heterogeneous SANs 6-4
Ports to Include in a Server-Based Job 6-4
Using the DMM CLI for Data Migration 7-1
About DMM CLI Commands 7-1
Selecting Ports for Server-Based Jobs 7-2
Configuring Data Migration Using the CLI 7-2
Controlling DMM Jobs 7-12
Monitoring DMM Jobs 7-14
Completing DMM Jobs 7-15
A P P E N D I X A DMM CLI Command Reference A-1
ssm enable feature dmm A-2
dmm module job A-4
attributes (DMM job configuration submode) A-6
ivCisco MDS 9000 Family Fabric Manager Configuration Guide
OL-8007-08, Cisco MDS SAN-OS Release 3.x

Send documenta t ion comments to mdsfeedback -doc@c i sco .com
Contents
commit (DMM job configuration submode) A-7
peer (DMM job configuration submode) A-8
server (DMM job configuration submode) A-9
server (configure session submode) A-11
storage (DMM job configuration submode) A-12
dmm module A-14
show dmm discovery-log A-15
show dmm fp-port A-16
show dmm ip-peer A-18
show dmm job A-19
show dmm srvr-vt-login A-22
show dmm vt A-24
debug dmm-debug A-25
vCisco MDS 9000 Family Fabric Manager Configuration Guide
OL-8007-08, Cisco MDS SAN-OS Release 3.x

Send documenta t ion comments to mdsfeedback -doc@c i sco .com
Contents
viCisco MDS 9000 Family Fabric Manager Configuration Guide
OL-8007-08, Cisco MDS SAN-OS Release 3.x

Send documenta t ion comments to mdsfeedback -doc@c i sco .com
Preface
This preface describes the audience, organization, and conventions of the Cisco MDS 9000 Family Fabric Manager Configuration Guide. The preface also provides information on how to obtain related documentation.
AudienceThis guide is for experienced network administrators who are responsible for planning, installing, configuring, and maintaining the Cisco MDS 9000 Data Mobility Manager (DMM) application.
OrganizationThis document is organized as follows:
Chapter Title Description
Chapter 1 Product Overview Presents an overview of the Cisco MDS DMM application.
Chapter 2 Getting Started Describes the installation, provisioning, and configuration tasks.
Chapter 3 Preparing for Data Migration Describes the tasks to complete prior to starting a data migration job.
Chapter 4 Using the DMM GUI for Data Migration
Describes how to configure, monitor, and verify data migration jobs using the Cisco MDS DMM GUI.
Chapter 5 Troubleshooting Cisco MDS DMM Describes procedures for troubleshooting DMM issues.
Chapter 6 Understanding DMM Topologies Describes the network topologies supported by Cisco MDS DMM.
Chapter 7 Using the DMM CLI for Data Migration
Describes how to use DMM CLI commands to configure and monitor data migration jobs.
Appendix A DMM CLI Command Reference Syntax and usage guidelines for the Cisco MDS DMM CLI commands
iCisco MDS 9000 Family Fabric Manager Configuration Guide
OL-8007-08, Cisco MDS SAN-OS Release 3.x

Send documenta t ion comments to mdsfeedback -doc@c i sco .com
PrefaceDocument Conventions
Document ConventionsCommand descriptions use these conventions:
Screen examples use these conventions:
This document uses the following conventions:
Note Means reader take note. Notes contain helpful suggestions or references to material not covered in the manual.
Caution Means reader be careful. In this situation, you might do something that could result in equipment damage or loss of data.
boldface font Commands and keywords are in boldface.
italic font Arguments for which you supply values are in italics.
[ ] Elements in square brackets are optional.
[ x | y | z ] Optional alternative keywords are grouped in brackets and separated by vertical bars.
screen font Terminal sessions and information the switch displays are in screen font.
boldface screen font Information you must enter is in boldface screen font.
italic screen font Arguments for which you supply values are in italic screen font.
< > Nonprinting characters, such as passwords, are in angle brackets.
[ ] Default responses to system prompts are in square brackets.
!, # An exclamation point (!) or a pound sign (#) at the beginning of a line of code indicates a comment line.
iiCisco MDS 9000 Family Fabric Manager Configuration Guide
OL-8007-08, Cisco MDS SAN-OS Release 3.x

Send documenta t ion comments to mdsfeedback -doc@c i sco .com
PrefaceRelated Documentation
Related DocumentationThe documentation set for the Cisco MDS 9000 Family includes the following documents. To find a document online, use the Cisco MDS SAN-OS Documentation Locator at:
http://www.cisco.com/en/US/docs/storage/san_switches/mds9000/roadmaps/doclocater.htm
Release Notes• Cisco MDS 9000 Family Release Notes for Cisco MDS SAN-OS Releases
• Cisco MDS 9000 Family Release Notes for Storage Services Interface Images
• Cisco MDS 9000 Family Release Notes for Cisco MDS 9000 EPLD Images
Compatibility Information• Cisco MDS 9000 SAN-OS Hardware and Software Compatibility Information
• Cisco MDS 9000 Family Interoperability Support Matrix
• Cisco MDS Storage Services Module Interoperability Support Matrix
• Cisco MDS SAN-OS Release Compatibility Matrix for Storage Service Interface Images
Regulatory Compliance and Safety Information• Regulatory Compliance and Safety Information for the Cisco MDS 9000 Family
Hardware Installation• Cisco MDS 9124 Multilayer Fabric Switch Quick Start Guide
• Cisco MDS 9500 Series Hardware Installation Guide
• Cisco MDS 9200 Series Hardware Installation Guide
• Cisco MDS 9100 Series Hardware Installation Guide
iiiCisco MDS 9000 Family Fabric Manager Configuration Guide
OL-8007-08, Cisco MDS SAN-OS Release 3.x

Send documenta t ion comments to mdsfeedback -doc@c i sco .com
PrefaceObtaining Documentation, Obtaining Support, and Security Guidelines
Cisco Fabric Manager• Cisco MDS 9000 Family Fabric Manager Quick Configuration Guide
• Cisco MDS 9000 Family Fabric Manager Configuration Guide
• Cisco MDS 9000 Family Fabric Manager Database Schema
Command-Line Interface• Cisco MDS 9000 Family Software Upgrade and Downgrade Guide
• Cisco MDS 9000 Family Storage Services Module Software Installation and Upgrade Guide
• Cisco MDS 9000 Family CLI Quick Configuration Guide
• Cisco MDS 9000 Family CLI Configuration Guide
• Cisco MDS 9000 Family Command Reference
Troubleshooting and Reference• Cisco MDS 9000 Family Troubleshooting Guide
• Cisco MDS 9000 Family MIB Quick Reference
• Cisco MDS 9000 Family SMI-S Programming Reference
• Cisco MDS 9000 Family System Messages Reference
Installation and Configuration Note• Cisco MDS 9000 Family SSM Configuration Note
• Cisco MDS 9000 Family Port Analyzer Adapter Installation and Configuration Note
• Cisco 10-Gigabit X2 Transceiver Module Installation Note
• Cisco MDS 9000 Family CWDM SFP Installation Note
• Cisco MDS 9000 Family CWDM Passive Optical System Installation Note
Obtaining Documentation, Obtaining Support, and Security Guidelines
Cisco documentation and additional literature are available on Cisco.com. This section explains the product documentation resources that Cisco offers.
For information on obtaining documentation, obtaining support, providing documentation feedback, security guidelines, and also recommended aliases and general Cisco documents, see the monthly What’s New in Cisco Product Documentation, which also lists all new and revised Cisco technical documentation, at:
http://www.cisco.com/en/US/docs/general/whatsnew/whatsnew.html
ivCisco MDS 9000 Family Fabric Manager Configuration Guide
OL-8007-08, Cisco MDS SAN-OS Release 3.x

Send documenta t ion comments to mdsfeedback -doc@c i sco .com
Cisco MDOL-8007-08, Cisco MDS SAN-OS Release 3.x
C H A P T E R 1
Product OverviewData migration is the process of copying data from an existing storage device to a new storage device. Data migration is required for storage array upgrades and for consolidation or replacement of existing storage arrays. Traditional methods of migrating data can be complex and can cause service disruptions.
Cisco MDS Data Mobility Manager (DMM) for the Cisco MDS 9000 family of switches provides capabilities and features that simplify data migration and minimize service disruptions.
This chapter includes the following sections:
• About Cisco MDS DMM, page 1-1
• Concepts and Terminology, page 1-2
• Cisco MDS DMM Features and Capabilities, page 1-4
• Data Migration Overview, page 1-5
• Software Requirements, page 1-7
• Hardware Requirements, page 1-7
• Deployment Guidelines, page 1-8
About Cisco MDS DMM Traditional data migration methods can be complex and disruptive, often requiring extensive rewiring and reconfiguration of the SAN infrastructure. Configuration changes to servers and storage subsystems require coordination among different IT groups and storage vendor service reps. Server downtime requires advanced scheduling with potentially long lead times.
Cisco MDS DMM is an intelligent software application that runs on the Storage Services Module (SSM) of an MDS switch. With Cisco MDS DMM, no rewiring or reconfiguration is required for the server, the existing storage, or the SAN fabric. The SSM can be located anywhere in the fabric, as Cisco MDS DMM operates across the SAN. Data migrations are enabled and disabled by software control from the Cisco Fabric Manager.
Cisco MDS DMM provides a graphical user interface (GUI) (integrated into Fabric Manager) for configuring and executing data migrations. There is also a command-line interface (CLI), which is suitable for creating scripts.
Cisco MDS DMM can be used in SANs which have only Cisco MDS 9000 switches as well as those containing a heterogeneous mixture of Cisco and other vendor switches.
1-1S 9000 Family Fabric Manager Configuration Guide

Send documenta t ion comments to mdsfeedback -doc@c i sco .com
Chapter 1 Product OverviewConcepts and Terminology
Application downtime is a critical factor in data migration, as prolonged periods of downtime are difficult to schedule. Cisco MDS DMM minimizes application downtime. Existing data is available to the applications while the migration is performed. Cisco MDS DMM uses hardware and software resources on the SSM to move data to the new storage. This approach ensures that data migration adds no processing overhead to the servers.
Cisco MDS DMM supports online migration, allowing applications to continue to access the existing storage devices. During data migration, all traffic between the server and storage flows through the SSM, as shown in Figure 1-1 (right side). The SSM coordinates all server access to the storage and performs the data migration. The migration activity is transparent to the server, which continues to have full access to the data. Figure 1-1 (left side) shows the server’s view of the network during data migration. The server is unaware of the SSM, the new storage, and the migration activity.
Figure 1-1 Data Migration Using Cisco MDS DMM
Cisco MDS DMM performs data migration without any additional layer of virtualization. Cisco MDS DMM requires only SSM configuration to enable the feature and SAN configuration to access the new storage array. Cisco MDS DMM can be enabled (when data needs to be migrated) and disabled (after the migration is completed) without any major SAN or host reconfiguration.
Concepts and TerminologyCisco MDS DMM uses the following concepts and terminology:
Existing Storage
The storage that is currently used by the application server. The data contained in the existing storage will be migrated to the new storage.
New Storage
The storage to which the data will be migrated.
SAN fabric SAN fabric
Server Server
MDS switch(with SSM)
Existingstorage
Existingstorage
Newstorage
Server viewduring migration
I/O flowduring migration
1839
57
1-2Cisco MDS 9000 Family Fabric Manager Configuration Guide
OL-8007-08, Cisco MDS SAN-OS Release 3.x
Send documenta t ion comments to mdsfeedback -doc@c i sco .com
Chapter 1 Product OverviewConcepts and Terminology
Logical Unit Number (LUN)
A Logical Unit Number (LUN) is a reference to a unit of storage that the user can specify for migration (see Data Migration Session). The LUN is only a unique number in the context of a storage port.
Data Migration Session
A data migration session migrates the data from one LUN in the existing storage to a LUN in the new storage.
Data Migration Job
A data migration job defines a set of LUNs to be migrated together. A data migration session is created for each LUN that is to be migrated. The data migration job is the main unit of configuration and management. For example, the migration rate and other attributes are configured for the data migration job. The data migration job (and not individual sessions) can be started or stopped.
SSM
An SSM is an MDS switch module that provides intelligent services. The Cisco MDS DMM feature executes on the SSM.
Peer SSM
In a dual-fabric topology, a data migration job runs on an SSM in each fabric. The two SSMs are peers. SSMs communicate with their peer SSMs to coordinate the data migration jobs.
Fibre Channel Redirect
Fibre channel redirect (FC Redirect) allows on-demand insertion and removal of SSM intelligent services with minimal disruption to existing traffic. No configuration changes are required on the server or storage devices. Cisco MDS DMM uses the FC Redirect capability to set up traffic redirects to the SSM. This redirection is transparent to the host and storage devices.
Virtual Target
A virtual target (VT) is a proxy target address for a storage port. During data migration, the FC Redirect feature redirects traffic from the server to a VT on the SSM.
Virtual Initiator
A virtual initiator (VI) is a proxy initiator address for a server host bus access (HBA) port. During data migration, the SSM uses a VI to forward redirected traffic to the existing storage port. The SSM also uses the VI to forward data migration traffic to the new storage.
Control Plane Processor
The control plane processor (CPP) is the main processor in the SSM. DMM runs on the CPP.
Data Path Processors
The data path processors (DPPs) are a set of resource processors in the SSM. The DPP transfers blocks of data across the switch without impacting the CPP. DMM uses a VI on the DPP for migrating data.
1-3Cisco MDS 9000 Family Fabric Manager Configuration Guide
OL-8007-08, Cisco MDS SAN-OS Release 3.x

Send documenta t ion comments to mdsfeedback -doc@c i sco .com
Chapter 1 Product OverviewCisco MDS DMM Features and Capabilities
Cisco MDS DMM Features and CapabilitiesCisco MDS DMM supports the following features and capabilities:
Server-Based Migration
In server-based migration, the focus is data migration for the storage used by a particular server (or server HBA port). All LUNs accessed by the selected server are available for migration to new storage.
Storage-Based Migration
In storage-based migration, the focus is data migration for storage exposed by a particular storage array (or storage array port). All LUNs in the specified storage array are available for migration to new storage.
Online Data Migration
Cisco MDS DMM is designed to provide online data migration. The existing storage is available to server applications while the SSM performs the data migration. During migration, data reads from the server are directed to the existing storage. DMM ensures that data writes are processed correctly. For example, if the write is to a storage segment already migrated, the write is mirrored to the existing and new storage.
Offline Data Migration
During offline data migration, servers must not initiate reads or writes to the existing storage. Any server application using the existing storage must be quiesced. Offline data migration is faster than online data migration and can be used for non critical data applications.
Configuration Using Cisco Fabric Manager GUI
The Cisco MDS DMM GUI is integrated into Fabric Manager. The DMM GUI provides a wizard to guide you through the steps required to configure a data migration job. To minimize customer impact, you can schedule the start time for a data migration and you can configure the rate of data migration. The wizard also prompts you to perform tasks on external entities such as the fabric switch and the storage devices.
The DMM GUI also provides a job status screen, for monitoring and managing data migration jobs and sessions.
Configuration Using CLI
Cisco MDS DMM provides a set of CLI commands, which are suitable for creating scripts. These commands are accessed from the MDS switch command console or Telnet session.
Migration to Larger LUN
To increase the amount of data that an existing server can access, Cisco MDS DMM facilitates migration to a larger LUN. After the migration, expand the file system on the LUN to take advantage of the increased storage space.
Heterogeneous Storage Migration
Cisco MDS DMM can migrate data between storage devices from different vendors. The supported devices are listed in the Cisco MDS 9000 Family Interoperability document, which is available at the following URL:
http://www.cisco.com/en/US/docs/storage/san_switches/mds9000/interoperability/guide/intopgd.html
1-4Cisco MDS 9000 Family Fabric Manager Configuration Guide
OL-8007-08, Cisco MDS SAN-OS Release 3.x

Send documenta t ion comments to mdsfeedback -doc@c i sco .com
Chapter 1 Product OverviewData Migration Overview
Heterogeneous SAN Environments
Cisco MDS DMM supports data migration on SANs that contain third party vendor switches (such as Brocade). The existing and new storage devices must be attached to an MDS switch.
Offline Verification
Cisco MDS DMM supports verification of the new storage. The existing storage is offline during the verification.
Simultaneous Migration of Multiple LUNs
Cisco MDS DMM supports multiple simultaneous data migration jobs and simultaneous data migration sessions within a job.
Dual Fabric Support
Cisco MDS DMM supports data migration for dual fabric topology. In this topology, servers are connected to storage devices across two independent SAN fabrics and the servers are configured for multipathing.
Cisco MDS DMM also supports data migration for single fabric SANs with single-path or multipath configurations.
Delayed Cutover
After the data migration activity is completed, you can delay the cutover to the new storage. During this period, all writes are mirrored to the existing storage and the new storage.
Data Migration OverviewA data migration job typically comprises three major stages (see Figure 1-2).
In the pre-migration stage, you create a plan for the data migration, configure the new storage, and create the DMM job. In the migration stage, you start the data migration job and monitor its progress. In the post-migration phase, you prepare the server to use the new storage, delete the data migration job, and remove the old storage.
Figure 1-2 Data Migration Stages
The following sections provide an overview of the typical data migration stages (additional details are covered in subsequent chapters):
• Pre-Migration, page 1-6
• Migration, page 1-6
• Post-Migration, page 1-6
Pre-Migration Migration Post-Migration
Plan Createjob Schedule VerifyStart job and monitor progressSchedule Configure Cutover
1841
31
1-5Cisco MDS 9000 Family Fabric Manager Configuration Guide
OL-8007-08, Cisco MDS SAN-OS Release 3.x

Send documenta t ion comments to mdsfeedback -doc@c i sco .com
Chapter 1 Product OverviewData Migration Overview
Pre-MigrationIn the pre-migration stage, create a plan for the migration, configure the new storage, and create the data migration job. Full details about pre-migration activities are covered in Chapter 3, “Preparing for Data Migration.”
Plan
Create a plan for the data migration, identifying external dependencies and activities that need to be scheduled.
Configure
Configure the new storage device and any other configuration.
Create the Data Migration Job
Create and configure the data migration job using the DMM GUI. You can create a job without a schedule or you can specify the day and time for the job to start.
MigrationIn the migration stage, jobs with a configured schedule jobs start automatically. Manually start unscheduled data migration jobs.
Start the Migration
A data migration job comprises one or more data migration sessions. A data migration session performs the migration of one LUN from existing storage to new storage.
During migration, the DMM feature ensures the integrity of the storage data by intercepting all traffic from the server and storage ports involved in the migration job.
Cisco MDS DMM directs all server-initiated reads and writes to the existing storage. If the server initiates a write to a region that has already migrated, the write is mirrored to the new storage.
Monitor
During the migration, you can monitor progress of the DMM job using the job status display in the DMM GUI.
Post-MigrationIn the post-migration stage, reconfigure the server to use the new storage. The exact post-migration configuration steps vary depending on the operating system of the server.
Schedule
Schedule a time (and the personnel) to reconfigure the server to use the new storage and remove references to the existing storage.
Verify
Optionally, you can verify the data integrity between the existing and new storage after the migration has completed. The existing storage must be offline during the verification.
1-6Cisco MDS 9000 Family Fabric Manager Configuration Guide
OL-8007-08, Cisco MDS SAN-OS Release 3.x

Send documenta t ion comments to mdsfeedback -doc@c i sco .com
Chapter 1 Product OverviewSoftware Requirements
Cutover
Data migration cutover involves a series of activities which must be completed in sequence:
• Quiesce the server applications to stop accessing the existing storage.
• Use the DMM GUI to delete the completed data migration job.
• Reconfigure the server to access the new storage.
Software RequirementsCisco MDS DMM has the following software requirements:
• MDS switches hosting the storage or the SSM must be running SAN-OS release 3.2(1).
• The Fabric Manager server must be running software release 3.2(1).
Hardware RequirementsCisco MDS DMM software application executes in the SSM of an MDS switch.
SSM-Capable Switches
The following switches support the SSM:
• All MDS 9200 family switches
• All MDS 9500 family switches
Storage Ports
The storage ports must connect to Cisco MDS switches that support FC Redirect. All Cisco MDS switches support FC Redirect, with the following exceptions:
• MDS 9124
• MDS 9134
• MDS 9020
Server HBA Ports
The server HBA ports can be connected to any switch (Cisco or third-party vendor).
SAN Fabric
Note the following hardware-related requirements:
• Cisco MDS DMM supports single-fabric and dual-fabric topologies. The DMM feature requires at least one SSM in each fabric.
• The Cisco MDS DMM feature is supported in homogeneous and heterogeneous SAN fabrics. SSMs can be located on any SSM-capable MDS switch in the fabric. However, the SSM and the storage ports must either be located on the same switch or connected through a Cisco SAN.
1-7Cisco MDS 9000 Family Fabric Manager Configuration Guide
OL-8007-08, Cisco MDS SAN-OS Release 3.x

Send documenta t ion comments to mdsfeedback -doc@c i sco .com
Chapter 1 Product OverviewDeployment Guidelines
Deployment GuidelinesWhen planning and configuring data migration using Cisco MDS DMM, follow these deployment guidelines:
• We recommend that you install the SSM in the same MDS switch as the existing storage and connect the new storage to the same switch. Data migration causes increased inter-switch link (ISL) traffic if the existing storage or new storage devices are connected to different switches than the SSM.
• MDS DMM supports 16 simultaneous jobs on each SSM.
• Do not add the same initiator/target port pair into more than one migration job simultaneously.
• When using multipath ports, the server must not send simultaneous I/O write requests to the same LUN from both multipath ports. The first I/O request must be acknowledged as completed before initiating the second I/O request.
• DMM does not support Small Computer System Interface (SCSI) persistent reservations, so DMM does not support software-controlled server clusters (that is, multiple servers that have access to the same storage ports).
• DMM is not compatible with LUN zoning.
• DMM is not compatible with inter-VLAN routing (IVR). The server and storage ports must be included in the same VSAN.
• DMM is not compatible with SAN device virtualization (SDV). The server and storage ports cannot be virtual devices, or physical devices associated with a virtual device.
1-8Cisco MDS 9000 Family Fabric Manager Configuration Guide
OL-8007-08, Cisco MDS SAN-OS Release 3.x

Send documenta t ion comments to mdsfeedback -doc@c i sco .com
Cisco MDOL-8007-08, Cisco MDS SAN-OS Release 3.x
C H A P T E R 2
Getting StartedThis chapter describes how to install and configure the Cisco MDS DMM feature. The required tasks are described in the following sections:
• Installing Cisco MDS DMM Software, page 2-1
• Using DMM Software Licenses, page 2-1
• Installing and Configuring DMM Management Tools, page 2-2
• Configuring IP Connectivity, page 2-3
• Enabling the DMM Feature, page 2-4
• Configuring Migration Rate, page 2-6
Installing Cisco MDS DMM SoftwareThe Cisco MDS DMM feature runs on the Storage Service Module (SSM) in a MDS 9000 series switch.
The DMM software package is included in the SSI image, delivered as part of SAN OS 3.2(1).
For information on how to install the SSM image, refer to Cisco MDS 9000 Family Storage Services Module Software Installation and Upgrade Guide.
Using DMM Software LicensesYou can use the Cisco MDS DMM software without a license for a period of 120 days.
To purchase a license for DMM, use one of the following product identifiers for the MDS 9500 family:
• M95DMMS1K9 perpetual license for one SSM.
• M95DMMTS1K9 time-based license (one SSM for 180 days).
Use one of the following product identifiers for the MDS 9200 family:
• M92DMMS1K9 perpetual license for one SSM.
• M92DMMTS1K9 time-based license (one SSM for 180 days).
You may purchase a DMM license for an SSM in a fabric that does not have a Fabric Manager license. In this configuration, you can open multiple fabrics in Fabric Manager and use the DMM functionality. Full Fabric Manager functionality is not available. For example, performance manager, desktop client remote login, and web client fabric reporting are not available without an Fabric Manager license.
2-1S 9000 Family Fabric Manager Configuration Guide

Send documenta t ion comments to mdsfeedback -doc@c i sco .com
Chapter 2 Getting StartedInstalling and Configuring DMM Management Tools
For more information about installing or upgrading software licenses, refer to Cisco MDS 9000 Family Fabric Manager Configuration Guide.
Note If the DMM license for an SSM expires, all scheduled and in-progress jobs will continue to execute. You cannot create new jobs with an expired license.
Installing and Configuring DMM Management ToolsCisco MDS DMM supports a CLI tool and a GUI tool for configuring and managing data migrations. The tools are described in these sections:
• DMM CLI, page 2-2
• DMM GUI (Fabric Manager), page 2-2
DMM CLIThe Cisco MDS DMM feature uses the CLI on the MDS switch and on the SSM.
No DMM-specific tasks are required to install or configure the CLI. For additional information about the CLI, refer to the Cisco MDS 9000 Family CLI Configuration Guide.
DMM GUI (Fabric Manager)The Cisco MDS 9000 Fabric Manager, a Java-based GUI, manages Cisco MDS 9000 Family switches using SNMP. The GUI for the Cisco MDS DMM is integrated into Fabric Manager.
To use the DMM GUI, complete the following tasks:
• Installing Fabric Manager, page 2-2
• Configuring SSH on the Switch, page 2-2
Installing Fabric Manager
The DMM GUI software is bundled into the Fabric Manager software package.
For information about installing Fabric Manager software, refer to Cisco MDS 9000 Family Fabric Manager Configuration Guide.
Configuring SSH on the Switch
The DMM GUI communicates with the SSM using a secure shell protocol (SSH) connection. Before using DMM, you need to enable SSH on the switch that hosts the SSM.
For information about configuring SSH, see the SSH chapter of the Cisco MDS 9000 Family CLI Configuration Guide, available at the following URL:
http://cisco.com/en/US/products/ps5989/products_configuration_guide_chapter09186a00805ed013.html#wp1423600
2-2Cisco MDS 9000 Family Fabric Manager Configuration Guide
OL-8007-08, Cisco MDS SAN-OS Release 3.x

Send documenta t ion comments to mdsfeedback -doc@c i sco .com
Chapter 2 Getting StartedConfiguring IP Connectivity
Configuring IP ConnectivitySSMs and the supervisor module in an MDS switch communicate over VSAN 1 using IP. You need to configure an IP subnetwork for VSAN 1 on the MDS switch.
SSMs communicate with their peer SSMs using the management IP network. Each DMM-enabled SSM on the management IP network must have a unique subnetwork address configured for VSAN 1.
Configuring IPFC for an SSM consists of the following tasks:
• Create the VSAN 1 interface and configure an IP address for this interface.
The IP subnet can use a private address space because these addresses will not be advertised. As noted, the subnet number needs to be unique for each SSM-enabled MDS switch that is connected to the same management IP subnetwork.
• Create a CPP interface (with an IP address) on each SSM on the switch.
CPP IP addresses needs to be in the same subnet as the VSAN 1 interface.
• Configure zoning.
The CPP interfaces and the VSAN 1 interface need to be zoned together.
• Enable IPv4 routing.
• Configure the default gateway for each CPP interface.
Configure the default-gateway for the CPP interface to point to the VSAN 1 IP address, so that all IP traffic from the CPP interface is routed to the management interface.
• Configure static routes as required to access the peer SSMs.
Configure static routes in the switch to each SSM-enabled peer switch to enable routing of packets between peer SSMs.
Figure 2-1 IP Configuration
The following example is based on the configuration and subnetwork numbers shown in Figure 2-1. The example shows the configuration for MDS switch 1:
• Create VSAN 1 and configure it with an IP address:
MDS-1# configure terminalMDS-1(config)# interface vsan 1MDS-1(config-if)# ip address 10.10.1.1 255.255.255.0MDS-1(config-if)# no shutdownMDS-1(config-if)# exit
• Create the CPP IP/FC interface, and configure an IP address:
MDS-1(config)# interface cpp 8/1/1MDS-1(config-if)# ip address 10.10.1.6 255.255.255.0MDS-1(config-if)# no shutdown
1839
58SSM Slot# 8IP 10.10.1.6
Mgmt IP172.22.43.94
Mgmt IP172.22.43.95
VSAN 1 IP10.10.1.1
SSM Slot# 4IP 10.10.2.7
VSAN 1 IP
MDS 2
Fabric A Fabric B
SSM Slot# 8IP 10.10.1.6
Mgmt IP172.22.43.94
Mgmt IP172.22.43.95
VSAN 1 IP10.10.1.1
SSM Slot# 4IP 10.10.2.7
VSAN 1 IP10.10.2.1
MDS 2MDS MDS1
SSM SSM
IPNetwork
2-3Cisco MDS 9000 Family Fabric Manager Configuration Guide
OL-8007-08, Cisco MDS SAN-OS Release 3.x

Send documenta t ion comments to mdsfeedback -doc@c i sco .com
Chapter 2 Getting StartedEnabling the DMM Feature
MDS-1(config-if)# exit
• Configure a new zone to include the pWWN of the SSM and the supervisor module:
MDS-1(config)# zone name DMM_IP_MGMT vsan 1 MDS-1(config-zone)# member pwwn 22:00:00:20:37:39:15:09MDS-1(config-zone)# member pwwn 21:00:00:e0:8b:05:76:28MDS-1(config-zone)# exit
• Enable IPv4 routing:
MDS-1(config)# ip routing
• Configure the default gateway for the SSMs:
MDS-1(config)# ip default-gateway 10.10.1.1 interface cpp 8/1/1
• Configure static route to access the peer SSMs:
MDS-1(config)# ip route 10.10.2.1 255.255.255.0 172.22.45.95
The following example shows the configuration for MDS switch 2 (see Figure 2-1):
MDS-2# configure terminalMDS-2(config)# interface vsan 1MDS-2(config-if)# ip address 10.10.2.1 255.255.255.0MDS-2(config-if)# no shutdownMDS-2(config-if)# exit
MDS-2(config)# interface cpp 8/1/1MDS-2(config-if)# ip address 10.10.2.7 255.255.255.0MDS-2(config-if)# no shutdownMDS-2(config-if)# exit
MDS-2(config)# zone name DMM_IP_MGMT vsan 1 MDS-2(config-zone)# member pwwn 22:00:00:20:25:19:25:11MDS-2(config-zone)# member pwwn 21:00:00:c0:7d:76:04:15MDS-2(config-zone)# exit
MDS-2(config)# ip routing
MDS-2(config)# ip default-gateway 10.10.2.1 interface cpp 8/1/1
MDS-2(config)# ip route 10.10.1.1 255.255.255.0 172.22.45.94
For additional information about configuring IP over Fibre Channel (IPFC), refer to the Cisco MDS 9000 Family CLI Configuration Guide.
Enabling the DMM FeatureYou can use the CLI or the Fabric Manager GUI to enable the DMM feature. The two methods are described in the following sections:
• Enabling DMM with the CLI, page 2-5
• Enabling DMM with Fabric Manager, page 2-5
2-4Cisco MDS 9000 Family Fabric Manager Configuration Guide
OL-8007-08, Cisco MDS SAN-OS Release 3.x

Send documenta t ion comments to mdsfeedback -doc@c i sco .com
Chapter 2 Getting StartedEnabling the DMM Feature
Enabling DMM with the CLITo enable DMM on an SSM and to provision ports to use the DMM feature, follow these steps:
Enabling DMM with Fabric ManagerTo enable DMM for an SSM using Fabric Manager, and to provision ports to use the DMM service, follow these steps:
Step 1 Expand End Devices and then double click the SSM Features folder in the Physical Attributes pane.
You see the SSM services display in the Information pane.
Step 2 Click the SSM tab.
You see the set of configured services in the Information pane as shown in Figure 2-2.
Figure 2-2 SSM Tab
Step 3 Click Create Row button (third button in the tool bar, directly above the SSM tab).
You see the Create SSM dialog box shown in Figure 2-3.
Command Purpose
Step 1 Router# configure terminal Enters configuration mode.
Step 2 Router(config)# ssm enable feature dmm module slot
Enables DMM on the SSM module in the specified slot.
Router(config)# no ssm enable feature dmm module slot
Disables DMM on the SSM module in the specified slot.
Step 3 Router(config)# ssm enable feature dmm interface slot/port - port
Enables DMM for the interface in the specified slot and port range.
2-5Cisco MDS 9000 Family Fabric Manager Configuration Guide
OL-8007-08, Cisco MDS SAN-OS Release 3.x

Send documenta t ion comments to mdsfeedback -doc@c i sco .com
Chapter 2 Getting StartedConfiguring Migration Rate
Figure 2-3 Create SSM Dialog Box
Step 4 Select the switch and SSM module where you want to enable DMM.
Step 5 The Use All Ports on Module check box is checked by default. DMM does not support provisioning a subset of the ports on the card to use this service.
Step 6 Select dmm from the drop-down list of services.
Step 7 Click Create to enable the DMM service.
Configuring Migration RateWhen a migration job is created, you can configure the migration rate as fast, medium, or slow. Use the CLI or the Fabric Manager GUI to configure the values for these rates, as described in the following sections:
• Configuring Migration Rate Using the CLI, page 2-6
• Configuring Migration Rate Using Fabric Manager, page 2-7
Configuring Migration Rate Using the CLITo configure the values associated with the fast, medium and slow migration rates, follow these steps:
The following example sets the fast migration rate to 100 MB per second for the SSM in slot 4:
MDS-1(config)# dmm module 4 rate_of_migration fast 100 medium 25 slow 10
Step Command Comments
Step 1 switch(config)# dmm module module-id rate_of_migration fast rate medium rate slow rate
Sets the migration rate for the specified SSM module. The migration rate has a range of 1 to 200 and the units are Megabits per second (Mbps).
The default values for migration rate are as follows:
• Slow: 10 Mbps
• Medium: 25 Mbps
• Fast: 60 Mbps
2-6Cisco MDS 9000 Family Fabric Manager Configuration Guide
OL-8007-08, Cisco MDS SAN-OS Release 3.x

Send documenta t ion comments to mdsfeedback -doc@c i sco .com
Chapter 2 Getting StartedConfiguring Migration Rate
Configuring Migration Rate Using Fabric ManagerTo configure the values to associate with the fast, medium, and slow migration rates, follow these steps:
Step 1 Expand End Devices and then double click the SSM Features folder in the Physical Attributes pane.
You see the SSM services display in the Information pane.
Step 2 Click the DMM Rate tab.
You see the set of configured services in the Information pane as shown in Figure 2-4.
Figure 2-4 Configuring Migration Rate
Step 3 Click in the table cell that you are configuring (Fast, Medium, or Slow).
Step 4 Enter the new value for the migration rate. The units are Mbps.
Step 5 Click the Save button to save the configuration values.
2-7Cisco MDS 9000 Family Fabric Manager Configuration Guide
OL-8007-08, Cisco MDS SAN-OS Release 3.x

Send documenta t ion comments to mdsfeedback -doc@c i sco .com
Chapter 2 Getting StartedConfiguring Migration Rate
2-8Cisco MDS 9000 Family Fabric Manager Configuration Guide
OL-8007-08, Cisco MDS SAN-OS Release 3.x

Send documenta t ion comments to mdsfeedback -doc@c i sco .com
Cisco MDOL-8007-08, Cisco MDS SAN-OS Release 3.x
C H A P T E R 3
Preparing for Data MigrationThis chapter describes how to prepare for a data migration job. It includes the following sections:
• Planning a Data Migration Job, page 3-1
• Pre-Migration Configuration, page 3-2
Planning a Data Migration JobTraditional data migration is a complex procedure, which requires coordination of activities that may be performed by vendor representatives and multiple IT groups. Activities may need to occur at specific times to minimize service disruption.
Cisco MDS DMM is designed to minimize the dependency on multiple organizations, and is designed to minimize service disruption. However, even with Cisco MDS DMM, data migration is a fairly complex activity. We recommend that you create a plan to ensure a smooth data migration.
To create your data migration plan, use the following steps:
1. Document the SAN topology for the data migration. Identify and obtain any additional equipment and software licenses.
2. Design the mapping of source LUNs to destination LUNs.
Identify the LUNs that need to be migrated and the impacted servers. The Server Lunmap Discovery (SLD) tool provides assistance in identifying this information. (See Checking Storage ASL Status, page 3-2 for additional information about the SLD tool).
Calculate the storage requirements of the new LUNs. Identify the LUNs on the new storage subsystem. The new storage LUNs need to be the same size or larger than the matching existing storage LUN.
3. Develop a schedule for the migration job.
Identify any required equipment and resources. Availability of external resources (such as a vendor service representative) may impact your schedule.
Identify periods of low user activity and I/O activity, to minimize disruption during the migration. Cisco MDS DMM provides features to minimize user impact. For example, you can schedule the migration to run during nonpeak hours or configure a slow migration rate.
Identify any required pre-migration configuration changes. (These changes are described in the following sections.)
Plan for one short window in which service may not be available (during server cutover to the new storage after the data migration has completed).
3-1S 9000 Family Fabric Manager Configuration Guide

Send documenta t ion comments to mdsfeedback -doc@c i sco .com
Chapter 3 Preparing for Data MigrationPre-Migration Configuration
4. As a precaution, ensure that any critical data on the existing storage has a recent back up.
Pre-Migration ConfigurationPrior to performing a data migration job, ensure that the existing storage, the new storage, and the fabric switches are configured as required. The following sections describe the tasks to be completed:
• Configuring Switches and SSMs, page 3-2
• Configuring the Existing and New Storage, page 3-2
• Configuring Enclosures, page 3-3
• Configuring the SAN Fabric, page 3-3
Configuring Switches and SSMsThe Cisco MDS DMM feature executes on the SSM. The DMM feature supports data migration for storage LUNs exposed anywhere on the SAN fabric (that is, the storage port can be connected to the switch hosting the SSM or to another switch).
If necessary, provision an SSM on an MDS switch in each fabric. We recommend that you install the SSMs on the switches that are connected to the existing storage ports.
If the existing or new storage port is on a different switch than the SSM, ISL network traffic will increase during the migration, as all traffic between the existing and new storage is directed through the SSM. Also, if the server port is on a different switch than the SSM, ISL network traffic will increase during the migration, as all traffic between the server and the storage is directed through the SSM.
Ensure that Cisco MDS DMM is the only active intelligent application on the SSMs being used for the data migration job.
Configuring the Existing and New Storage Complete the following configuration tasks for the storage devices:
• New Storage—connect the new storage to the SAN. Create LUN maps and LUN masks. Configure access lists for the new storage.
• Existing Storage—check that the LUNs are mapped.
• VSANs—ensure that the existing storage and new storage port pair in each fabric is configured in the same VSAN. Also ensure that the server port is configured in the same VSAN.
• Zones—Optionally, you can reconfigure zoning to add the new storage. Cisco MDS DMM does not enforce zoning for the new storage. If you do not configure the zoning before the migration, you will need to complete this action after the cutover.
Checking Storage ASL StatusThe DMM feature contains the Array-Specific Library (ASL), which is a database of information about specific storage array products. DMM uses the ASL to correlate the LUN maps between multi-path port pairs.
3-2Cisco MDS 9000 Family Fabric Manager Configuration Guide
OL-8007-08, Cisco MDS SAN-OS Release 3.x

Send documenta t ion comments to mdsfeedback -doc@c i sco .com
Chapter 3 Preparing for Data MigrationPre-Migration Configuration
Use the SLD tool to check the ASL status of LUNs on a storage array port. If the LUNs are all ASL=Yes, the Cisco MDS DMM feature automatically correlates the LUN maps.
If some or all of the LUNs result in ASL=No, the DMM GUI wizard requires manual lunmap configuration when creating a job with these LUNs. For assistance with manual lunmap configuration, contact Cisco support.
The SLD tool is launched from the supervisor module CLI. To check the status of a storage port, perform this task:
The following example shows how to display ASL status for a storage port:
router# show sld module 4 vsan 100 server-pwwn 21:00:00:e0:8b:08:5e:3e target-pwwn 50:06:0e:80:04:2c:5c:70================================================================================= Id LUN Id Device Type Size Vendor Product Id Serial Number ASL Status ================================================================================= 1 0x0 DASD 1.95GB VendorA ModelB5 11356 Yes Active 2 0x1 DASD 1.95GB VendorA ModelB5 11356 Yes Active 3 0x2 DASD 1.95GB VendorA ModelB5 11356 Yes Active 4 0x3 DASD 1.95GB VendorA ModelB5 11356 Yes Active =================================================================================
Configuring EnclosuresBefore creating a migration job, you need to ensure that the server and storage ports are included in enclosures.
If the server ports are not already included in existing enclosures, you need to create enclosures for the server ports. If the server has multiple single-port HBAs, all of these ports need to be included in one enclosure. Enclosures for existing and new storage ports are created automatically.
For information on how to configure enclosures, see the Cisco MDS 9000 Family Fabric Manager Configuration Guide.
Configuring the SAN FabricIf the SAN is a heterogeneous SAN, you may need to install new MDS switches or adjust the SAN topology to meet DMM requirements. For additional information about SAN topologies, refer to Chapter 6, “Understanding DMM Topologies.”
Command Purpose
Step 1 Router# sld module module number vsan vsan no server-pwwn server pWWN target-pwwn target pWWN discover
Runs the SLD tool to discover the LUNs associated with the specified source/destination port pair.
Step 2 Router(config)# show sld module module number vsan vsan no server-pwwn server pWWN target-pwwn target pWWN
Displays the ASL status for LUNs associated with the specified source/destination port pair.
3-3Cisco MDS 9000 Family Fabric Manager Configuration Guide
OL-8007-08, Cisco MDS SAN-OS Release 3.x

Send documenta t ion comments to mdsfeedback -doc@c i sco .com
Chapter 3 Preparing for Data MigrationPre-Migration Configuration
3-4Cisco MDS 9000 Family Fabric Manager Configuration Guide
OL-8007-08, Cisco MDS SAN-OS Release 3.x

Send documenta t ion comments to mdsfeedback -doc@c i sco .com
Cisco MDOL-8007-08, Cisco MDS SAN-OS Release 3.x
C H A P T E R4
Using the DMM GUI for Data MigrationThis chapter describes how to use the DMM GUI to configure and monitor data migrations. This chapter includes the following sections:
• About the DMM GUI, page 4-1
• Guidelines for Using the DMM GUI, page 4-3
• Configuring a Server-Based Migration Job, page 4-3
• Configuring a Storage-Based Migration Job, page 4-10
• Optional Configuration Steps, page 4-17
• Displaying the Data Migration Status, page 4-20
• Using the Data Migration Status, page 4-20
• Post-Migration Activities, page 4-25
About the DMM GUIThe DMM GUI is integrated into the Fabric Manager and provides wizards to configure server-based and storage-based data migrations. The DMM GUI also provides a status window to monitor and control data migration jobs and sessions.
The following sections provide additional information about the DMM GUI:
• DMM Data Migration Wizards, page 4-1
• DMM Job Migration Status, page 4-3
DMM Data Migration WizardsDMM GUI provides wizards to configure and perform data migration jobs. You can launch the DMM wizards from the Fabric Manager, by choosing the Data Mobility Manager option from the Tools menu (see Figure 4-1). There are separate options to launch server-based data migration jobs and storage-based data migration jobs.
You can also launch the DMM wizards from the job status display. On the Data Migration Status toolbar, the Config Server-based Mode tool launches the wizard for a server-based job and the Config Storage-based Mode launches the wizard for a storage-based job (see Figure 4-18).
4-1S 9000 Family Fabric Manager Configuration Guide

Send documenta t ion comments to mdsfeedback -doc@c i sco .com
Chapter 4 Using the DMM GUI for Data MigrationAbout the DMM GUI
Figure 4-1 Launching the Wizard
The DMM wizard guides users through the configuration steps. At the end of each step, the wizard communicates with the SSMs as required (to create the job, to obtain configuration information, or to create the sessions).
The DMM GUI uses the configuration information from the SSM in order to automate parts of the data migration configuration. For example, when you choose a server enclosure, the GUI displays the storage devices (and a list of storage device ports) that are exposed to the server enclosure (based on VSAN and zone information).
The DMM feature performs LUN discovery to select the LUNs available for migration and automates the session creation by matching the LUNs in the existing and new storage. The wizard allows you to adjust the session configuration prior to sending it to the SSM.
Server-Based Data Migration Overview
The major steps in a server-based data migration are as follows:
• Create the job, select the server and storage ports.
• Select the SSMs to run the data migration job.
• (Optional) Select the migration path.
• (Optional) Correlate the LUN maps (existing storage).
• (Optional) Correlate the LUN maps (new storage).
• Configure the data migration sessions.
Storage-Based Data Migration Overview
The major steps in a storage-based data migration are as follows:
• Create the job and select the storage ports.
• Select the SSMs to run the data migration job.
• (Optional) Select the migration path manually.
4-2Cisco MDS 9000 Family Fabric Manager Configuration Guide
OL-8007-08, Cisco MDS SAN-OS Release 3.x

Send documenta t ion comments to mdsfeedback -doc@c i sco .com
Chapter 4 Using the DMM GUI for Data MigrationGuidelines for Using the DMM GUI
• Configure the VIs in the storage arrays.
• Verify the zones to be activated.
• (Optional) Correlate the LUN map (existing storage).
• (Optional) Correlate the LUN map (new storage).
• Configure the data migration sessions.
DMM Job Migration StatusIn the Fabric Manager window, the Data Migration Status area displays a list of jobs and information about each job. The Data Migration Status area also contains a toolbar of commands that operate on the selected job or jobs. The commands are context sensitive: depending on the status of the selected job or jobs, only certain commands are activated.
The information displayed in the Data Migration Status area is updated periodically, based on polling the SSMs. Set the polling interval using the Poll Interval drop-down list.
You can view the sessions associated with a job by clicking the maximize button (+) next to a job. The display expands to show information about all the sessions associated with the job (see Figure 4-18).
Guidelines for Using the DMM GUIWhen using the DMM GUI, note the following guidelines:
• For a storage-based migration, all servers that use the selected storage enclosure must use the same operating system (for example, all AIX or all Solaris).
• If the MDS switch (hosting the storage or the server) performs a restart after the migration but before the cutover, you must restart the data migration from the beginning.
• You can use the DMM GUI simultaneously on multiple Fabric Manager client sessions. However, we recommend that you limit DMM GUI usage to one client session at a time. If an SSM receives conflicting commands from two different client sessions, the SSM may reject commands.
Selecting Ports for Server-Based JobsWhen creating a server-based migration job, you must include all possible paths from the host to the LUNs being migrated. This is because all writes to a migrated LUN need to be mirrored in the new storage until the cutover occurs, so that no data writes are lost.
For additional information about selecting ports for server-based jobs, refer to the “Ports to Include in a Server-Based Job” section on page 6-4.
Configuring a Server-Based Migration JobThe DMM GUI wizard guides users through the steps required for configuring a server-based job. The wizard uses information from the SSM to preconfigure much of the required information.
This section assumes a dual-fabric topology with multipath ports defined in the server and in the storage devices.
4-3Cisco MDS 9000 Family Fabric Manager Configuration Guide
OL-8007-08, Cisco MDS SAN-OS Release 3.x

Send documenta t ion comments to mdsfeedback -doc@c i sco .com
Chapter 4 Using the DMM GUI for Data MigrationConfiguring a Server-Based Migration Job
The wizard creates and configures the job in three steps, which are described in the following sections:
• Creating a Migration Job, page 4-4
• Selecting SSMs for the Migration, page 4-6
• Configuring Migration Sessions, page 4-8
Creating a Migration JobTo create a server-based data migration job, launch Fabric Manager and perform this task:
Step 1 In the Tools menu, choose Data Mobility Manager> Server based.
You see the Create Job window, as shown in Figure 4-2.
Figure 4-2 Create Job Window
The Create Job window displays the server and storage enclosures available for data migration.
When you select a host enclosure, the wizard lists all existing storage that the selected host port can access (based on Zone and VSAN information). For the new storage, DMM includes zoned and unzoned devices (because the new device may not be zoned yet).
Step 2 From the Enclosure field of the Host pane, choose the server to include in this job. You may need to scroll down to see all of the enclosures.
When you select a server enclosure, you see the available ports in the Ports field of the Host pane.
Step 3 The wizard selects the correct host enclosure ports, so do not change the selection. For additional information about ports to include in the data migration, see section “Ports to Include in a Server-Based Job” section on page 6-4.
Step 4 From the Enclosure field of the Existing Storage pane, choose the existing storage enclosure for this job.
4-4Cisco MDS 9000 Family Fabric Manager Configuration Guide
OL-8007-08, Cisco MDS SAN-OS Release 3.x

Send documenta t ion comments to mdsfeedback -doc@c i sco .com
Chapter 4 Using the DMM GUI for Data MigrationConfiguring a Server-Based Migration Job
When you select an existing storage enclosure, you see the available ports in the Ports field.
Step 5 The wizard selects all of the ports to include in the job. If the storage is an active-passive array, select only the active ports. For additional information about ports to include for an active-passive array, see section “Single LUN Set, Active-Passive Array” section on page 6-7.
Step 6 From the Enclosure field of the New Storage pane, choose the new storage enclosure for this job.
When you choose a new storage enclosure, you see the available ports in the Ports field.
Step 7 The wizard selects all of the ports to include in the job. If the storage is an active-passive array, select only the active ports. For additional information about ports to include for an active-passive array, see section “Single LUN Set, Active-Passive Array” section on page 6-7.
Step 8 (Optional) In the Job Name field, enter a name for the job. The default value is “admin_” concatenated with today’s date and the current time.
Step 9 (Optional) To configure the job as offline, click the Offline Migration Type radio button. The default migration type is online.
Step 10 (Optional) To configure the migration rate, click the appropriate Rate radio button. The default rate is best effort, which means that the SSM migrates the data as fast as resources allow. Slow, medium, and fast are configurable migration rates. Their default values are 25, 50, and 100 Mbps, respectively. To change these values, see the “Configuring Migration Rate” section on page 2-6.
Step 11 (Optional) To configure a schedule for the job, click the appropriate Schedule radio button. The default is None, which means that the job is created but will not be started.
• Click the Now radio button for the job to start right after configuration is complete.
• Click the Specify radio button to configure a scheduled start time for the job. Additional fields are displayed, so that you can enter a start date and time (see Figure 4-3).
Note If the configured start time is in the past, the job starts as if you specified now.
Figure 4-3 Scheduling the Job
Step 12 Click Next.
If the job configuration is OK, you see the Select SSM window. See Figure 4-4.
If the job configuration contains errors, you see a pop-up window with one of the following error messages:
• No host enclosures are defined.
• You cannot select a host enclosure with ports that connect to more than two fabrics.
• There are no paths from the selected host port to any storage ports.
• You must select at least one host port, existing storage port and new storage port.
4-5Cisco MDS 9000 Family Fabric Manager Configuration Guide
OL-8007-08, Cisco MDS SAN-OS Release 3.x

Send documenta t ion comments to mdsfeedback -doc@c i sco .com
Chapter 4 Using the DMM GUI for Data MigrationConfiguring a Server-Based Migration Job
• If the existing and new storage are in the same enclosure, you cannot select the same storage port for the existing and new storage.
• The matching host port and storage ports (existing and new) must connect across the same fabric.
• The matching host port and storage ports (existing and new) must be members of the same VSAN.
Selecting SSMs for the MigrationFigure 4-4 shows the Select SSM window, which displays the DMM-enabled SSMs available to run the migration job.
Figure 4-4 Select SSM Window
The wizard preselects the least-loaded SSM in each fabric and automatically selects the path for each source/destination port pair.
If the selections are acceptable, you can click Setup Job to proceed to the next configuration task. The wizard sends the job configuration information to both SSMs and the SSMs create the data migration job. The SSMs return information (such as LUN maps) that is required to configure sessions. You see the Create Session window. See Figure 4-6.
To manually select SSMs or migration paths for the data migration, perform this task:
Step 1 (Optional) Click a new row to select an SSM. Hold down the Control key and click to deselect a row. The number of active jobs in each SSM is displayed in the # of Active Jobs field.
Step 2 (Optional) Check the Manual Migration Path check box to view and manually select source/destination paths. This action causes a pop-up window to open after you perform step 3. For information about selecting paths see the “Selecting Paths to Existing and New Storage” section on page 4-17.
4-6Cisco MDS 9000 Family Fabric Manager Configuration Guide
OL-8007-08, Cisco MDS SAN-OS Release 3.x

Send documenta t ion comments to mdsfeedback -doc@c i sco .com
Chapter 4 Using the DMM GUI for Data MigrationConfiguring a Server-Based Migration Job
Step 3 Click Setup Job.
If you had checked the Manual Migration Path check box, you see the Choose Existing and New Path window, as shown in Figure 4-5.
Figure 4-5 Choose Migration Path
Step 4 (Optional) To select a migration path, Click a row to select a path.
Step 5 When you have chosen an existing and new path, click Next.
The wizard sends the job configuration information to both SSMs and the SSMs create the data migration job. The SSMs return information (such as LUN maps) that is required to configure sessions.
If the job configuration is OK, you see the Create Session window. See Figure 4-6.
If the job configuration contains errors, you see a pop-up window with the following error message:
• Mismatched number of LUNs.
If the number of LUNs on the existing and new storage does not match, the wizard generates an error message and stops. You need to correct the LUN configurations on the storage devices.
4-7Cisco MDS 9000 Family Fabric Manager Configuration Guide
OL-8007-08, Cisco MDS SAN-OS Release 3.x

Send documenta t ion comments to mdsfeedback -doc@c i sco .com
Chapter 4 Using the DMM GUI for Data MigrationConfiguring a Server-Based Migration Job
Configuring Migration SessionsFigure 4-6 shows the Create Session window, which displays the sessions available for migration.
Figure 4-6 Create Session Window
The wizard preconfigures the sessions by matching existing and new LUN pairs, based on information provided by the SSM. Click Finish to accept the sessions as configured.
To manually configure sessions for the data migration, perform this task:
Step 1 Check or uncheck the Select check boxes to select (or deselect) sessions for this data migration job. Each session is a source/destination LUN pair.
Step 2 (Optional) Correct any anomalies, which are highlighted in red.
Step 3 Click Finish.
The session configuration is sent to the SSMs.
DMM refreshes the Data Migration Status area to display the new data migration job.
4-8Cisco MDS 9000 Family Fabric Manager Configuration Guide
OL-8007-08, Cisco MDS SAN-OS Release 3.x

Send documenta t ion comments to mdsfeedback -doc@c i sco .com
Chapter 4 Using the DMM GUI for Data MigrationConfiguring a Server-Based Migration Job
Correcting Session AnomaliesIf the GUI detects a problem with a session, the GUI highlights the LUN fields in red. Figure 4-7 shows an example in which LUN 0 in the new storage is smaller than the matching LUN in the existing storage.
Figure 4-7 LUN Size Mismatch
To manually override the preselected LUN match, click the Existing LUN/Size or New LUN/Size field. The field expands to show the available LUN choices (see Figure 4-8). Select the existing and new LUNs that you want to match up.
Figure 4-8 Selecting a LUN
4-9Cisco MDS 9000 Family Fabric Manager Configuration Guide
OL-8007-08, Cisco MDS SAN-OS Release 3.x

Send documenta t ion comments to mdsfeedback -doc@c i sco .com
Chapter 4 Using the DMM GUI for Data MigrationConfiguring a Storage-Based Migration Job
Note Note: The LUN for the new storage must have the same or greater capacity than the existing storage.
Configuring a Storage-Based Migration JobThe DMM GUI wizard guides the user through the steps required to configure a storage-based job. The topology for this example is dual-fabric with multipath ports defined in the server and in the storage devices.
The wizard creates and configures the job in five steps, which are described in the following sections:
• Creating a Job and Selecting Storage Enclosures, page 4-10
• Selecting SSMs for the Migration, page 4-13
• Configuring the Virtual Initiators in the Storage Arrays, page 4-14
• Verifying the New Zone, page 4-15
• Configuring Migration Sessions, page 4-16
Creating a Job and Selecting Storage EnclosuresTo create a storage-based data migration job, launch Fabric Manager and perform this task:
Step 1 In the Tools menu, choose Data Mobility Manager > Storage based.
You see the Create Job window, as shown in Figure 4-9.
4-10Cisco MDS 9000 Family Fabric Manager Configuration Guide
OL-8007-08, Cisco MDS SAN-OS Release 3.x

Send documenta t ion comments to mdsfeedback -doc@c i sco .com
Chapter 4 Using the DMM GUI for Data MigrationConfiguring a Storage-Based Migration Job
Figure 4-9 Create Job Window (Storage-Based)
Step 2 From the Enclosure field of the Existing Storage pane, choose the existing storage enclosure.
Step 3 The wizard selects all of the ports to include in the job. If the storage is an active-passive array, select only the active ports. For additional information about ports to include for an active-passive array, see section “Single LUN Set, Active-Passive Array” section on page 6-7.
Step 4 From the Enclosure field of the New Storage pane, choose the new storage enclosure
Step 5 The wizard selects all of the ports to include in the job. If the storage is an active-passive array, select only the active ports. For additional information about ports to include for an active-passive array, see section “Single LUN Set, Active-Passive Array” section on page 6-7.
Step 6 (Optional) Click the Show Dependent Ports button to display all host ports zoned by the selected storage. The host ports are displayed in the Hosts area of the Fabric Manager window. See Figure 4-10. If the new storage is not zoned, the Hosts area displays all hosts connected to the new storage.
4-11Cisco MDS 9000 Family Fabric Manager Configuration Guide
OL-8007-08, Cisco MDS SAN-OS Release 3.x

Send documenta t ion comments to mdsfeedback -doc@c i sco .com
Chapter 4 Using the DMM GUI for Data MigrationConfiguring a Storage-Based Migration Job
Figure 4-10 Dependent Ports for a Storage-Based Migration
Step 7 Click Next.
You see the Select SSM window. See Figure 4-11.
4-12Cisco MDS 9000 Family Fabric Manager Configuration Guide
OL-8007-08, Cisco MDS SAN-OS Release 3.x

Send documenta t ion comments to mdsfeedback -doc@c i sco .com
Chapter 4 Using the DMM GUI for Data MigrationConfiguring a Storage-Based Migration Job
Selecting SSMs for the MigrationFigure 4-11 shows the Select SSM window, which displays the available SSMs to run the migration job.
Figure 4-11 Select SSMs for Storage-Based Job
The wizard preselects the least-loaded SSM in each fabric and automatically selects the path for each source/destination port pair.
If the selections are acceptable, you can click Setup Job to proceed to the next configuration task. The wizard sends the job configuration information to both SSMs and the SSMs create the data migration job. The SSMs return information (such as LUN maps) that is required to configure sessions. You see the DPP VI Selection window. See Figure 4-12.
To manually select SSMs or migration paths for the data migration, perform this task:
Step 1 (Optional) Click a new row to select an SSM. Hold down the Control key and click to deselect a row. The number of active jobs in each SSM is displayed in the # of Active Jobs field.
Step 2 (Optional) Check the Manual Migration Path check box to view and manually select source/destination paths. This action causes a pop-up window to open after you perform step 3. For information about selecting paths see the “Selecting Paths to Existing and New Storage” section on page 4-17.
Step 3 Click Setup Job.
If you had checked the Manual Migration Path check box, you see Choose Existing and New Path window. See Figure 4-5.
Step 4 (Optional) To select a migration path, click a row to select a path.
Step 5 When you have chosen an existing and new path, click Next.
4-13Cisco MDS 9000 Family Fabric Manager Configuration Guide
OL-8007-08, Cisco MDS SAN-OS Release 3.x

Send documenta t ion comments to mdsfeedback -doc@c i sco .com
Chapter 4 Using the DMM GUI for Data MigrationConfiguring a Storage-Based Migration Job
The wizard sends the job configuration information to both SSMs and the SSMs create the data migration job. The SSMs return information (such as LUN maps) that is required to configure sessions.
If the job configuration is OK, you see the DPP VI Selection window, as shown in Figure 4-12.
If the job configuration contains errors, you see a pop-up window with the following error message:
• Mismatched number of LUNs.
If the number of LUNs on the existing and new storage do not match, the wizard generates an error message and stops. You need to correct the LUN configurations on the storage devices.
Configuring the Virtual Initiators in the Storage ArraysIn a storage-based job, the DMM feature creates a virtual initiator (VI) for each SSM that was selected for the current job. The VI is created in the same VSAN as the storage ports (existing and new). If the job contains multiple storage ports, DMM creates the VI in one of the VSANs.
For the data migration to work correctly, you must configure the storage arrays (existing and new) to allow the VIs access to all LUNs that are being migrated. The VI information is displayed in the DPP VI Selection window, as shown in Figure 4-12.
Figure 4-12 DPP VI Selection
To configure the VIs, perform this task:
Step 1 Use the information displayed in the DPP VI Selection window to configure the VIs in the existing and new storage devices. The exact configuration steps to follow are manufacturer-specific.
Step 2 Click Next.
4-14Cisco MDS 9000 Family Fabric Manager Configuration Guide
OL-8007-08, Cisco MDS SAN-OS Release 3.x

Send documenta t ion comments to mdsfeedback -doc@c i sco .com
Chapter 4 Using the DMM GUI for Data MigrationConfiguring a Storage-Based Migration Job
You see the Zone Creation and Activation Status window, as shown in Figure 4-13.
Note If your storage array provides host group configuration (EMC arrays p), ensure that the VIs are added to the same host group as the servers that access the array.
Verifying the New ZoneIn a storage-based job, the DMM feature creates a new zone using the job name as the zone name. As shown in Figure 4-13, the Zone Creation and Activation Status window displays information about all zones in each of the two fabrics.
Figure 4-13 Zone Creation Window
To verify the new zones, perform this task:
Step 1 For each fabric, scroll to the end of the list. The newly created zone is at the end of the list. Verify that the activated zones are OK.
Step 2 Click Next.
You see the Create Session window, as shown in Figure 4-14.
4-15Cisco MDS 9000 Family Fabric Manager Configuration Guide
OL-8007-08, Cisco MDS SAN-OS Release 3.x

Send documenta t ion comments to mdsfeedback -doc@c i sco .com
Chapter 4 Using the DMM GUI for Data MigrationConfiguring a Storage-Based Migration Job
Configuring Migration SessionsThe Create Session window displays the LUNs available for migration, as shown in Figure 4-14.
Figure 4-14 Create Sessions Window
To create sessions for the data migration job, perform this task:
Step 1 The wizard preselects default matches of existing and new LUN pairs.
Step 2 Check/uncheck the Select check boxes to select/deselect sessions for this data migration job. Each session is a source/destination LUN pair.
Step 3 (Optional) Check the Load Balance check box to balance the sessions between SSMs.
Step 4 (Optional) Correct any anomalies, which are highlighted in red. See the “Correcting Session Anomalies” section on page 4-9 for details.
Step 5 Click Finish.
This sends the data migration session configurations to the SSMs.
DMM updates the Data Migration Status area in the Fabric Manager window to display the new data migration job.
4-16Cisco MDS 9000 Family Fabric Manager Configuration Guide
OL-8007-08, Cisco MDS SAN-OS Release 3.x

Send documenta t ion comments to mdsfeedback -doc@c i sco .com
Chapter 4 Using the DMM GUI for Data MigrationOptional Configuration Steps
Optional Configuration StepsThe DMM GUI wizard provides two optional configuration steps that apply to both types of data migration jobs (server-based and storage-based).
If the DMM feature cannot automatically correlate the LUN maps across multiple paths for the existing storage or the new storage, the wizard displays the configuration steps to manually correlate the LUNs.
The following sections provide a description of the additional configuration steps:
• Selecting Paths to Existing and New Storage, page 4-17
• Correlating LUN Maps (Existing Storage), page 4-18
• Correlating LUN Maps (New Storage), page 4-19
Selecting Paths to Existing and New StorageThe data migration wizard automatically selects a path through the SAN for each source/destination port pair. To manually select the source/destination path,
If you checked the Manual Migration Path check box in the Select SSM window, you see the Choose Existing and New Path window, as shown in Figure 4-15. This window shows all the available paths, with the selected paths highlighted.
Figure 4-15 Select Paths
To select a migration path, perform this task:
Step 1 Click a path to select or deselect the path.
Step 2 When you have selected an existing and new storage path, click Next.
4-17Cisco MDS 9000 Family Fabric Manager Configuration Guide
OL-8007-08, Cisco MDS SAN-OS Release 3.x

Send documenta t ion comments to mdsfeedback -doc@c i sco .com
Chapter 4 Using the DMM GUI for Data MigrationOptional Configuration Steps
Note You must select one existing storage path and one new storage path.
Correlating LUN Maps (Existing Storage)After you click Setup Job in the Select SSM window, DMM automatically correlates the LUN maps. If DMM is unable to correlate the LUN maps for paths to the existing storage, you see the Create LUN Map window, as shown in Figure 4-16.
Figure 4-16 Correlate LUN Map (Existing Storage)
To correlate the LUN maps for the existing storage, perform this task:
Step 1 Use the pull down lists to select a matching set of LUNs on the existing storage paths.
Step 2 Click the add button to add the LUN set to the selected list.
Step 3 Repeat step 1 and step 2 for each of the LUN sets.
Step 4 Click Create.
This opens the Create LUN Map window (for the new storage).
Note For a storage migration job, the path from the VIs are also displayed and also require correlation.
4-18Cisco MDS 9000 Family Fabric Manager Configuration Guide
OL-8007-08, Cisco MDS SAN-OS Release 3.x

Send documenta t ion comments to mdsfeedback -doc@c i sco .com
Chapter 4 Using the DMM GUI for Data MigrationOptional Configuration Steps
Note Note: You must correlate an existing LUN to only one new LUN.
Correlating LUN Maps (New Storage)After you click Setup Job in the Select SSM window, DMM automatically correlates the LUN maps. If DMM is unable to correlate the LUN maps for paths to the new storage, you see the Create LUN Map window, as shown in Figure 4-17.
Figure 4-17 Correlate LUN Map (New Storage)
To manually correlate the LUNs for the new storage, perform this task:
Step 1 Use the pull down lists to select a matching set of LUNs on the new storage.
Step 2 Click the add button to add the LUN set to the Selected list.
Step 3 Repeat step 1 and step 2 for each of the LUN sets.
Step 4 Click Create.
This opens the Configure Session window, which displays the available migration sessions.
Note For a storage migration job, the path from the VIs are also displayed and also require correlation.
4-19Cisco MDS 9000 Family Fabric Manager Configuration Guide
OL-8007-08, Cisco MDS SAN-OS Release 3.x

Send documenta t ion comments to mdsfeedback -doc@c i sco .com
Chapter 4 Using the DMM GUI for Data MigrationDisplaying the Data Migration Status
Displaying the Data Migration Status To display the Data Migration Status, perform this task:
Step 1 Click Data Mobility Manager in the physical attributes panel.
The Job Status area appears in the upper right quarter of the display. The area is labeled “Data Migration Status”.
Using the Data Migration StatusTo display Data Migration Status in the Information pane, expand End Devices and then select Data Mobility Manager in Physical Attributes.
The Data Migration Status displays the status of data migration jobs and their sessions (see Figure 4-18). The Data Migration Status also provides a toolbar containing tools to create new jobs and perform operations on existing jobs.
Figure 4-18 Data Migration Status
4-20Cisco MDS 9000 Family Fabric Manager Configuration Guide
OL-8007-08, Cisco MDS SAN-OS Release 3.x

Send documenta t ion comments to mdsfeedback -doc@c i sco .com
Chapter 4 Using the DMM GUI for Data MigrationUsing the Data Migration Status
Job Status Display Fields The job status display is arranged as a table. Each row of the table displays information about one job. You can expand the job to display a table row for each session in the job. Table 4-1 describes the information that is displayed in the fields for jobs and sessions.
Table 4-1 Field Definitions in the Job Status Display
Field Description for a Job Row Description for a Session Row
Name The name of the job. This field is blank.
Id System-assigned unique identifier for the job.
The session number within the job.
Mode Server mode or storage mode. This field is blank.
Existing Storage Alias name of the port on the existing storage.
LUN number on the existing storage.
New Storage Alias name of the port on the new storage.
LUN number on the new storage.
Status Status of the job: a created or scheduled job has not yet started. An in-progress job is currently performing the migration. A completed or verified job has finished successfully. A stopped, failed or reset job has finished unsuccessfully.
Status of the session.
Time Date and time that the job is scheduled to start. If the job is in progress or completed, this field continues to display the scheduled start date and time.
This field is blank if the job has not been scheduled.
If the session is in progress, this field displays the estimated duration remaining until the session completes. Otherwise, the field is blank.
SSM1 Switch number and slot of the SSM executing the migration job.
Displays On SSM 1 if the session is executing on SSM 1.
SSM2 Switch number and slot of the SSM executing the migration job.
Displays On SSM 2 if the session is executing on SSM 2.
Type Online or offline migration. This field is blank.
Rate Best effort, slow, medium, or fast. You set the rate when you configure the migration job. See the “Creating a Migration Job” section on page 4-4.
This field is blank.
4-21Cisco MDS 9000 Family Fabric Manager Configuration Guide
OL-8007-08, Cisco MDS SAN-OS Release 3.x

Send documenta t ion comments to mdsfeedback -doc@c i sco .com
Chapter 4 Using the DMM GUI for Data MigrationUsing the Data Migration Status
Table 4-2 shows the job status values and provides their descriptions.
Table 4-3 shows the session status values and provides their descriptions.
Job Status Display Commands You can invoke commands on data jobs and sessions by clicking on the command buttons displayed above the list of jobs. The command buttons are context sensitive. Commands are valid or not valid depending on the job status of the selected job or jobs. Command buttons are dimmed for commands that are not valid for any of the selected jobs or sessions. For example, the Stop button is available only when one or more data migration session is in progress.
Table 4-2 Job Status Values
Job Status Value Description
Created The job has been created, but has not been scheduled.
Scheduled The job has been configured with a scheduled start time. It will automatically start at that time.
InProgress The job is currently running.
Completed The job has completed successfully.
Verified The completed job has been verified.
Stopped The job has been stopped manually by the user.
Failed The job has been stopped because of failures related to storage I/O.
Reset The job has been reinitialized because of failures related to the SAN or IP network. Failure examples include port flaps, connection loss between peer SSMs, or SSM reloads.
Table 4-3 Session Status Values
Session State Value Description
Created The session has been created, but the data migration has not started running.
Complete The session has completed successfully.
InProgress The data migration for this session is in progress.
Suspended The user has suspended execution of the session.
Failure The session has failed due to an internal problem.
I/O Failure The session has failed due to an I/O problem.
4-22Cisco MDS 9000 Family Fabric Manager Configuration Guide
OL-8007-08, Cisco MDS SAN-OS Release 3.x
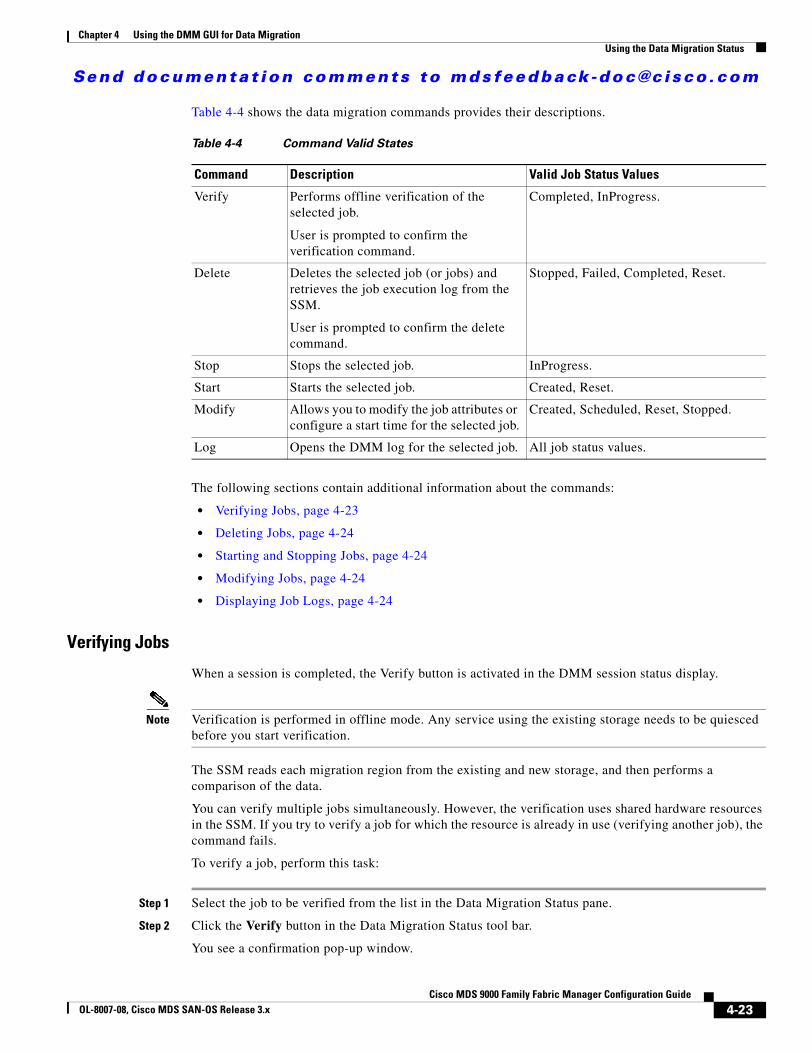
Send documenta t ion comments to mdsfeedback -doc@c i sco .com
Chapter 4 Using the DMM GUI for Data MigrationUsing the Data Migration Status
Table 4-4 shows the data migration commands provides their descriptions.
The following sections contain additional information about the commands:
• Verifying Jobs, page 4-23
• Deleting Jobs, page 4-24
• Starting and Stopping Jobs, page 4-24
• Modifying Jobs, page 4-24
• Displaying Job Logs, page 4-24
Verifying Jobs
When a session is completed, the Verify button is activated in the DMM session status display.
Note Verification is performed in offline mode. Any service using the existing storage needs to be quiesced before you start verification.
The SSM reads each migration region from the existing and new storage, and then performs a comparison of the data.
You can verify multiple jobs simultaneously. However, the verification uses shared hardware resources in the SSM. If you try to verify a job for which the resource is already in use (verifying another job), the command fails.
To verify a job, perform this task:
Step 1 Select the job to be verified from the list in the Data Migration Status pane.
Step 2 Click the Verify button in the Data Migration Status tool bar.
You see a confirmation pop-up window.
Table 4-4 Command Valid States
Command Description Valid Job Status Values
Verify Performs offline verification of the selected job.
User is prompted to confirm the verification command.
Completed, InProgress.
Delete Deletes the selected job (or jobs) and retrieves the job execution log from the SSM.
User is prompted to confirm the delete command.
Stopped, Failed, Completed, Reset.
Stop Stops the selected job. InProgress.
Start Starts the selected job. Created, Reset.
Modify Allows you to modify the job attributes or configure a start time for the selected job.
Created, Scheduled, Reset, Stopped.
Log Opens the DMM log for the selected job. All job status values.
4-23Cisco MDS 9000 Family Fabric Manager Configuration Guide
OL-8007-08, Cisco MDS SAN-OS Release 3.x

Send documenta t ion comments to mdsfeedback -doc@c i sco .com
Chapter 4 Using the DMM GUI for Data MigrationUsing the Data Migration Status
Step 3 Click OK.
Deleting Jobs
Click the Delete button to permanently delete the selected job (or jobs). You are prompted to confirm the delete operation.
When you delete a job, DMM retrieves the job execution log from the SSM.
You can select multiple jobs for deletion at the same time. This capability is useful when migrating active-passive arrays, which require at least two simultaneous jobs to perform the migration.
Starting and Stopping Jobs
Click the Stop button to stop a job that is in progress. Restart the job by clicking the Start button.
Modifying Jobs
If a job is not in progress, you can change the schedule or the migration rate by performing the following task;
Step 1 Select the job to be verified from the list in the Data Migration Status pane.
Step 2 Click the Modify button in the Data Migration Status tool bar.
You see the Reschedule Job pop-up window, as shown in Figure 4-19.
Figure 4-19 Modify Schedule
Step 3 Modify the migration rate and schedule as required.
Step 4 Click OK.
Displaying Job Logs
Click the Log button to display the Job Log for the selected job.
The job log includes the following information for each job:
• Created time
• Scheduled time
• Start time
4-24Cisco MDS 9000 Family Fabric Manager Configuration Guide
OL-8007-08, Cisco MDS SAN-OS Release 3.x

Send documenta t ion comments to mdsfeedback -doc@c i sco .com
Chapter 4 Using the DMM GUI for Data MigrationPost-Migration Activities
• Completed time
Post-Migration Activities After the data migration job has completed successfully, you need to reconfigure the server to use the new storage. The exact post-migration configuration steps vary depending on the operating system of the server.
Reconfiguration may include the following steps:
• Perform a graceful shut down of all server applications that use the migrated LUNs, to ensure that there are no pending I/O operations on the existing storage.
• Unmount the existing storage file system.
• Configure zoning to remove host access to the existing storage.
• Using the DMM GUI, delete the data migration job. The SSM removes the FC Redirects, so that server and storage traffic no longer flows through the SSM.
• Configure zoning to add host access to the new storage.
• From the server, scan for the new storage.
• Mount the file system for the new storage.
• From the server, restart the server applications to access data from the new storage.
• (Optional) Remove the existing storage:
– Reconfigure the server to remove the existing storage LUNs.
– Remove the existing storage from the SAN.
4-25Cisco MDS 9000 Family Fabric Manager Configuration Guide
OL-8007-08, Cisco MDS SAN-OS Release 3.x

Send documenta t ion comments to mdsfeedback -doc@c i sco .com
Chapter 4 Using the DMM GUI for Data MigrationPost-Migration Activities
4-26Cisco MDS 9000 Family Fabric Manager Configuration Guide
OL-8007-08, Cisco MDS SAN-OS Release 3.x

Send documenta t ion comments to mdsfeedback -doc@c i sco .com
Cisco MDOL-8007-08, Cisco MDS SAN-OS Release 3.x
C H A P T E R 5
Troubleshooting Cisco MDS DMMThis chapter describes procedures used to troubleshoot the data migration feature in the Cisco MDS 9000 Family multilayer directors and fabric switches. This chapter contains the following sections:
• DMM Overview, page 5-1
• Best Practices, page 5-1
• License Requirements, page 5-2
• Initial Troubleshooting Checklist, page 5-2
• Troubleshooting Connectivity Issues, page 5-3
• Troubleshooting Job Creation Issues, page 5-5
• Troubleshooting Job Execution Issues, page 5-7
• Troubleshooting General Issues, page 5-8
• DMM Error Reason Codes, page 5-8
DMM OverviewCisco MDS DMM is an intelligent software application that runs on the Storage Services Module (SSM) of an MDS switch. With Cisco MDS DMM, no rewiring or reconfiguration is required for the server, the existing storage, or the SAN fabric. The SSM can be located anywhere in the fabric, as Cisco MDS DMM operates across the SAN. Data migrations are enabled and disabled by software control from the Cisco Fabric Manager.
Cisco MDS DMM provides a graphical user interface (GUI) (integrated into Fabric Manager) for configuring and executing data migrations. Cisco MDS DMM also provides CLI commands for configuring data migrations and displaying information about data migration jobs.
Best PracticesYou can avoid problems when using DMM if you observe the following best practices:
• Use the Server Lunmap Discovery (SLD) tool.
The DMM feature includes the Array-Specific Library (ASL), which is a database of information about specific storage array products. DMM uses ASL to automatically correlate LUN maps between multipath port pairs.
5-1S 9000 Family Fabric Manager Configuration Guide

Send documenta t ion comments to mdsfeedback -doc@c i sco .com
Chapter 5 Troubleshooting Cisco MDS DMMLicense Requirements
Use the sld CLI command output to ensure that your storage devices are ASL classified. Otherwise, you will need to correlate the LUNs manually when configuring jobs.
For migration jobs involving active-passive arrays, use the sld output to verify the mapping of active and passive LUNs to ports. Only ports with active LUNs should be included in migration jobs.
For more information about the SLD tool, see Checking Storage ASL Status, page 3-2.
• Create a migration plan.
Cisco MDS DMM is designed to minimize the dependency on multiple organizations, and is designed to minimize service disruption. However, even with Cisco MDS DMM, data migration is a fairly complex activity. We recommend that you create a plan to ensure a smooth data migration.
• Configure enclosures.
Before creating a migration job with the DMM GUI, you need to ensure that server and storage ports are included in enclosures. You need to create enclosures for server ports. If the server has multiple single-port HBAs, all of these ports need to be included in one enclosure. Enclosures for existing and new storage ports are typically created automatically.
• Follow the topology guidelines.
Restrictions and recommendations for DMM topology are described in the “DMM Topology Guidelines” section on page 6-3.
• Ensure all required ports are included in the migration job
When creating a data migration job, you must include all possible server HBA ports that access the LUNs being migrated. This is because all writes to a migrated LUN need to be mirrored to the new storage until the cut over occurs, so that no data writes are lost.
For additional information about selecting ports for server-based jobs, refer to the “Ports to Include in a Server-Based Job” section on page 6-4.
License RequirementsEach SSM with Cisco MDS DMM enabled requires a DMM license. DMM operates without a license for a grace period of 180 days.
DMM licenses are described in the “Using DMM Software Licenses” section on page 2-1.
Initial Troubleshooting ChecklistBegin troubleshooting DMM issues by checking the troubleshooting checklist in Table 5-1.
Table 5-1 Initial Troubleshooting Checklist
Checklist Checkoff
Verify that an SSM is installed in each fabric, and DMM is enabled on the SSMs.
Verify that your DMM licenses are valid.
Verify that DMM is the only intelligent application running on the SSM.
Verify that the existing and new storage devices are connected to a switch that supports FC-Redirect
5-2Cisco MDS 9000 Family Fabric Manager Configuration Guide
OL-8007-08, Cisco MDS SAN-OS Release 3.x

Send documenta t ion comments to mdsfeedback -doc@c i sco .com
Chapter 5 Troubleshooting Cisco MDS DMMTroubleshooting Connectivity Issues
Common Troubleshooting Tools The following navigation paths may be useful in troubleshooting DMM issues using Fabric Manager:
• Select End Devices > SSM Features to access the SSM configuration.
• Select End Devices > Data Mobility Manager to access the DMM status and configuration.
The following CLI commands on the SSM module may be useful in troubleshooting DMM issues:
• show dmm job
• show dmm job job-id job-id details
• show dmm job job-id job-id session
Note You need to connect to the SSM module using the attach module command prior to using the show dmm commands.
Troubleshooting Connectivity IssuesThis section covers the following topics:
• Cannot Connect to the SSM, page 5-3
• No Peer-to-Peer Communication, page 5-4
• Connection Timeouts, page 5-4
Cannot Connect to the SSMProblems connecting the SSM can be caused by SSH, zoning or routing configuration issues. Table 5-2 shows possible solutions.
Verify SAN OS 3.2(1) is running on the switches hosting the SSM and the storage.
Verify IP connectivity between peer SSMs, by using the ping command.
Table 5-1 Initial Troubleshooting Checklist
Checklist Checkoff
5-3Cisco MDS 9000 Family Fabric Manager Configuration Guide
OL-8007-08, Cisco MDS SAN-OS Release 3.x

Send documenta t ion comments to mdsfeedback -doc@c i sco .com
Chapter 5 Troubleshooting Cisco MDS DMMTroubleshooting Connectivity Issues
No Peer-to-Peer CommunicationTable 5-3 shows possible solutions to problems connecting to the peer SSM.
Connection TimeoutsIf the DMM SSH connection is generating too many timeout errors, you can change the SSL and SSH timeout values. These properties are stored in the Fabric Manager Server properties file (Cisco Systems/MDS 9000/conf/server.properties). You can edit this file with a text editor, or you can set the properties through the Fabric Manager Web Services GUI, under the Admin tab.
The following server properties are related to DMM:
• dmm.read.timeout—Read timeout for job creation. The default value is 60 seconds. The value is displayed in milliseconds.
• dmm.read.ini.timeout—Read timeout for a job or session query. The default value is 5 seconds. The value is displayed in milliseconds.
• dmm.connect.timeout—SSH connection attempt timeout. The default value is 6 seconds. The value is displayed in milliseconds.
• dmm.connection.retry—If set to true, DMM will retry if the first connection attempt fails. By default, set to true.
Table 5-2 Cannot Connect to the SSM
Symptom Possible Cause Solution
Cannot connect to the SSM.
SSH not enabled on the supervisor module.
Enable SSH on the switch that hosts the SSM. See Configuring SSH on the Switch, page 2-2.
Zoning configuration error. If VSAN 1 default zoning is denied, ensure that the VSAN 1 interface (supervisor module) and the CPP IP/FC interface have the same zoning. See Configuring IP Connectivity, page 2-3
IP routing not enabled. Ensure that IPv4 routing is enabled. Use the ip routing command in configuration mode.
IP default gateway. Configure the default gateway for the CPP IPFC interface to be the VSAN 1 IP address. See Configuring IP Connectivity, page 2-3
Table 5-3 No Peer-to-Peer Communication
Symptom Possible Cause Solution
Cannot ping the peer SSM.
No route to the peer SSM. Configure a static route to the peer SSM. See Configuring IP Connectivity, page 2-3
5-4Cisco MDS 9000 Family Fabric Manager Configuration Guide
OL-8007-08, Cisco MDS SAN-OS Release 3.x

Send documenta t ion comments to mdsfeedback -doc@c i sco .com
Chapter 5 Troubleshooting Cisco MDS DMMTroubleshooting Job Creation Issues
Troubleshooting Job Creation IssuesThe DMM GUI displays error messages to help you troubleshoot basic configuration mistakes when using the job creation wizards. See Creating a Migration Job, page 4-4. A list of potential configuration errors is included after the last step in the task.
The following sections describe other issues that may occur during job creation:
• Failures During Job Creation, page 5-5
• DMM License Expires, page 5-6
• Scheduled Job is Reset, page 5-6
Failures During Job CreationIf you make a configuration mistake while creating a job, the job creation wizards display an error message to help you troubleshoot the problem. You need to correct your input before the wizard will let you proceed.
Table 5-4 shows other types of failures that may occur during job creation.
Opening the Job Activity Log
To open the job activity log, follow these steps:
Step 1 (Optional) Drag the wizard window to expose the Data Migration Status command bar.
Step 2 Click the refresh button.
Step 3 Select the job that you are troubleshooting from the list of jobs.
Step 4 Click the Log command to retrieve the job activity log.
Step 5 Open the job activity log file, located in the following directory:
C:\Documents and Settings\<user>\.cisco_mds9000\tftp\dmm
Step 6 Click the Cancel button in the Wizard window to delete the job
Table 5-4 Failures During Job Creation
Symptom Possible Cause Solution
Create Job failures. No SSM available. Ensure that the fabric has an SSM with DMM enabled and a valid DMM license.
Job infrastructure setup error. Possible causes are incorrect selection of server/storage port pairs, the server and existing storage ports are not zoned, or IP connectivity between SSMs is not configured correctly.
The exact error is displayed in the job activity log. See the “Opening the Job Activity Log” section on page 5-5.
LUN discovery failures. Use the sld command in the CLI to check that the LUNs are being discovered properly.
5-5Cisco MDS 9000 Family Fabric Manager Configuration Guide
OL-8007-08, Cisco MDS SAN-OS Release 3.x

Send documenta t ion comments to mdsfeedback -doc@c i sco .com
Chapter 5 Troubleshooting Cisco MDS DMMTroubleshooting Job Creation Issues
Note You must retrieve the job activity log prior to deleting the job.
DMM License ExpiresIf a time-bound license expires (or the default grace period expires), note the following behavior:
• All jobs currently in progress will continue to execute until they are finished.
• Jobs which are configured but not scheduled will run when the schedule kicks in
• Jobs which are stopped or in a failure state can also be started and executed.
• If the switch or SSM module performs a restart, the existing jobs cannot be restarted until the switch has a valid DMM license.
Scheduled Job is ResetIf the SSM or the switch performs a restart, all scheduled DMM jobs are placed in Reset state. Use the Modify command to restore jobs to the Scheduled state.
For each job, perform the following task:
Step 1 Select the job to be verified from the job list in the Data Migration Status pane.
Step 2 Click the Modify button in the Data Migration Status tool bar.
You see the Reschedule Job pop-up window, as shown in Figure 5-1.
Figure 5-1 Modify Job Schedule
Step 3 The originally configured values for migration rate and schedule are displayed. Modify the values if required.
Step 4 Click OK.
The job is automatically validated. If validation is successful, the job transitions into scheduled state. If you selected the Now radio button, the job starts immediately.
5-6Cisco MDS 9000 Family Fabric Manager Configuration Guide
OL-8007-08, Cisco MDS SAN-OS Release 3.x

Send documenta t ion comments to mdsfeedback -doc@c i sco .com
Chapter 5 Troubleshooting Cisco MDS DMMTroubleshooting Job Execution Issues
Troubleshooting Job Execution IssuesIf a failure occurs while the data migration job executes, DMM halts the migration job and the job is placed in Failed or Reset state.
DMM removes the FC redirects (in the switches connected to the server and the existing storage).
The data migration job needs to be validated before restarting it. In the DMM GUI, validation is done automatically when you restart the job. In the CLI, you need to enter the validate command before entering the start command.
Note If a new port becomes active in the same zone as a migration job in progress, DMM generates a warning message in the system logs.
Troubleshooting job execution failures is described in the following sections:
• DMM Jobs in Fail State, page 5-7
• DMM Jobs in Reset State, page 5-8
DMM Jobs in Fail StateIf DMM encounters SSM I/O error to the storage, the job is placed in Failed state. Table 5-5 shows possible solutions for jobs in Failed state.
Table 5-5 DMM Jobs in Failed State
Symptom Possible Cause Solution
DMM job status is Failed.
SSM failure. If the SSM has performed a reload, you must restart or reschedule all failed jobs when the SSM returns to operational state.
5-7Cisco MDS 9000 Family Fabric Manager Configuration Guide
OL-8007-08, Cisco MDS SAN-OS Release 3.x

Send documenta t ion comments to mdsfeedback -doc@c i sco .com
Chapter 5 Troubleshooting Cisco MDS DMMTroubleshooting General Issues
DMM Jobs in Reset StateTable 5-6 shows possible causes and solutions for jobs in Reset state.
Troubleshooting General IssuesIf you need assistance with troubleshooting an issue, save the output from the relevant show commands.
You must connect to the SSM to execute DMM show commands. Use the attach module slot command to connect to the SSM.
The show dmm job command provides useful information for troubleshooting DMM issues. For detailed information about using this command, see the “DMM CLI Command Reference” appendix.
Save the output of command show dmm tech-support into a file when reporting a DMM problem to the technical support organization.
Also run the show tech-support fc-redirect command on all switches with FC Redirects. Save the output into a file.
DMM Error Reason Codes If DMM encounters an error while running the job creation wizard, a popup window displays the error reason code. Error reason codes are are also captured in the Job Activity Log. Table 5-7 provides a description of the error codes.
.
Table 5-6 DMM Jobs in Reset State
Symptom Possible Cause Solution
DMM Job fails to complete and is placed in Reset state.
Server HBA port offline. Check the server status and server port status. When the server port is available, restart the data migration job.
Existing or new storage port offline. Use Fabric Manager to determine why the storage port is no longer online. When the storage port is available, restart the data migration job.
Server or storage port is moved out of the zone.
Correct the zone configuration and restart the data migration job.
Loss of IP connectivity to the peer SSM.
Restart the data migration job when IP connectivity has been restored.
Table 5-7 DMM Error Codes
Error Code Description
DMM_JOB_NOT_PRESENT A job with specified job id was not found on the SSM.
DMM_JOB_ID_DUPLICATE Job creation using a job id that already exists on the SSM.
5-8Cisco MDS 9000 Family Fabric Manager Configuration Guide
OL-8007-08, Cisco MDS SAN-OS Release 3.x

Send documenta t ion comments to mdsfeedback -doc@c i sco .com
Chapter 5 Troubleshooting Cisco MDS DMMDMM Error Reason Codes
DMM_JOB_ID_ZERO Job id 0 is a invalid job id.
DMM_JOB_VSAN_MISMATCH Server port VSAN number and corresponding storage port VSAN number is different.
DMM_JOB_TYPE_MISMATCH SSM received a storage job query for a server-based job.
DMM_JOB_CREATION_ERROR SSM failed while creating the data structures for the job, which could be a memory allocation failure.
DMM_JOB_INTERNAL_ERROR SSM failed while creating the data structures for the job, which could be a memory allocation failure.
DMM_JOB_SESSION_EXEC Attempting to delete a job while one or more sessions are in progress. Stop the job first before trying to delete it.
DMM_JOB_DPP_ALLOC_FAILURE No DPP available to create a job. The maximum number of allowed jobs on a DPP exceeded.
DMM_JOB_INFRA_SETUP_ERROR Failed to setup infrastructure for a job. Possible causes are incorrect selection of server/storage port pairs, the server and existing storage ports are not zoned, or IP connectivity between SSMs is not configured correctly.
DMM_JOB_INFRA_REMOTE_LMAP_ERR_TCP_DN
Failure to establish connection with the peer SSM during job creation.
DMM_JOB_INFRA_FC_REDIRECT_SETUP_ERR Failed to install FC Redirects for one or more server-storage pairs in the job.
DMM_JOB_INFRA_DPP_DIED The DPP assigned to the JOB failed during job creation.
DMM_JOB_INFRA_NOT_ALLOWED The SSM was unable to create the job. Retry the job creation.
DMM_JOB_SRC_LUN_INFO_NOT_PRESENT A source LUN specified in the session was not discovered by SSM. This error can occur when trying to restart/reschedule a job in Reset state. A possible cause is a change in LUN inventory or LUN Mapping on the storage device.
DMM_JOB_DST_LUN_INFO_NOT_PRESENT A destination LUN specified in the session was not discovered by SSM. This error can occur when trying to restart/reschedule a job in Reset state. A possible cause is a change in LUN inventory or LUN Mapping on the storage device.
Table 5-7 DMM Error Codes
Error Code Description
5-9Cisco MDS 9000 Family Fabric Manager Configuration Guide
OL-8007-08, Cisco MDS SAN-OS Release 3.x

Send documenta t ion comments to mdsfeedback -doc@c i sco .com
Chapter 5 Troubleshooting Cisco MDS DMMDMM Error Reason Codes
DMM_VT_VSAN_DOWN The storage VSAN is not operational or was suspended during JOB creation.
DMM_VT_ISAPI_CREATION_FAILED Failed to create a Virtual Target corresponding to the storage port.
DMM_FC_RDRT_NO_DNS_ENTRY FC Redirect configuration failure. Storage/Server port not visible in FC Name Server on SSM switch.
DMM_FC_RDRT_NO_ZS_ENTRY FC Redirect configuration failure. The server and existing storage port are not zoned together.
DMM_FC_RDRT_INSTALL_ERROR FC Redirect configuration could not be installed in the fabric. A possible cause is that CFS is not enabled to distribute FC Redirect configuration.
DMM_FC_RDRT_LUXOR_ACL_ERROR FC Redirect failed to program a rewrite entry in the local SSM.
DMM_SRVR_VT_LOGIN_SRVR_LOGIN_ERROR SSM failed to log in or discover LUNs from the storage on behalf of the server. This can occur if the new storage access list is not programmed with the server pWWN, or there is no LUN Mapping on the storage for the selected server.
DMM_SRVR_VT_LOGIN_VI_LOGIN_ERROR SSM Failed to log in discover LUNs from the storage on behalf of the storage-based job VI. This can occur if the storage access list is not programmed with the VI pWWN, or there is no LUN Mapping on the storage for the VI.
DMM_SRVR_VT_NO_PRLI_SRVR No PRLI was received from the server after a PLOGI from the server to the storage was accepted.
DMM_PREVIOUS_REQ_INPROGRESS The SSM cannot process a request because a previous operation on the job has not yet completed.
DMM_ITL_NOT_FOUND This error may be generated when the user is performing manual correlation of the paths to a LUN from the DMM GUI. It is generated if a specified path (ITL) in the manual correlation has not be discovered by the SSM.
DMM_ITL_NOT_FOUND_IN_NON_ASL_LIST Attempt to resolve a LUN path that has not been classified as NON ASL.
DMM_ILLEGAL_REQ The selected command cannot be performed in the current job state.
DMM_INIT_NOT_FOUND Failed to create a session because the server port is invalid.
Table 5-7 DMM Error Codes
Error Code Description
5-10Cisco MDS 9000 Family Fabric Manager Configuration Guide
OL-8007-08, Cisco MDS SAN-OS Release 3.x

Send documenta t ion comments to mdsfeedback -doc@c i sco .com
Chapter 5 Troubleshooting Cisco MDS DMMDMM Error Reason Codes
DMM_SRC_TGT_NOT_FOUND Failed to create a session because the existing storage port is invalid.
DMM_DST_TGT_NOT_FOUND Failed to create a session because the new storage port is invalid.
DMM_ITL_NOT_FOUND_IN_GUI_ASL_LIST Attempt to update a LUN path that has not been classified as GUI ASL.
DMM_ITL_FOUND_IN_AUTO_ASL_LIST Attempt to resolve a LUN path that has already been classified as AUTO ASL.
DMM_SRC_LUN_GREATER_THAN_DST Session creation failed because the source LUN has a greater size than the destination LUN.
DMM_TGT_NOT_REACHABLE The storage port is offline.
DMM_SRC_TGT_NOT_ASL_CLASSIFIED Failure returned when trying to create a session with an source LUN that has not been classified as AUTO ASL or GUI ASL. Manual correlation is required to resolve multipathing for the LUN.
DMM_DST_TGT_NOT_ASL_CLASSIFIED Failure returned when trying to create a session with an destination LUN that has not been classified as AUTO ASL or GUI ASL. Manual correlation is required to resolve multipathing for the LUN.
DMM_SRC_LUN_ALREADY_EXISTS Failure returned when trying to create a session with an source LUN that has already been used in another session in the job.
DMM_DST_LUN_ALREADY_EXISTS Failure returned when trying to create a session with an destination LUN that has already been used in another session in the job.
DMM_VT_FC_REDIRECT_GET_CFG_ERR The SSM failed to retrieve the existing configuration from FC Redirect. The FC Redirect process may no longer be running on the supervisor module.
DMM_NO_LICENSE No active DMM license is available on the SSM where the job is being created.
DMM_VI_NOT_SEEING_ANY_LUNS The storage job VI cannot see any LUNs from the existing and new storage ports. Possible causes – no access for VI pWWN on the storage ports or no LUN Mapping for the VI on the storage ports.
DMM_VI_NOT_SEEING_ES_LUNS The storage job VI cannot see any LUNs from the existing storage ports. Possible causes – no access for VI pWWN on the existing storage ports or no LUN Mapping for the VI on the existing storage ports.
Table 5-7 DMM Error Codes
Error Code Description
5-11Cisco MDS 9000 Family Fabric Manager Configuration Guide
OL-8007-08, Cisco MDS SAN-OS Release 3.x

Send documenta t ion comments to mdsfeedback -doc@c i sco .com
Chapter 5 Troubleshooting Cisco MDS DMMDMM Error Reason Codes
DMM_VI_NOT_SEEING_NS_LUNS The storage job VI cannot see any LUNs from the new storage ports. Possible causes – no access for VI pWWN on the new storage ports or no LUN Mapping for the VI on the new storage ports.
DMM_NO_RESOURCES_TRY_LATER Failure returned for the verify operation if shared SSM resources for verify are already being used by another job.
DMM_IT_PAIR_PRESENT_IN_ANOTHER_JOB Failure returned for job create if the same server-storage port pair(s) is being used by an existing job.
Table 5-7 DMM Error Codes
Error Code Description
5-12Cisco MDS 9000 Family Fabric Manager Configuration Guide
OL-8007-08, Cisco MDS SAN-OS Release 3.x

Send documenta t ion comments to mdsfeedback -doc@c i sco .com
Cisco MDOL-8007-08, Cisco MDS SAN-OS Release 3.x
C H A P T E R 6
Understanding DMM TopologiesCisco MDS DMM is designed to support a variety of SAN topologies. The SAN topology influences the location of the SSM module and the DMM feature configuration. The following sections describe common SAN topologies and their implications for DMM:
• Overview, page 6-1
• FC Redirect, page 6-1
• DMM Topology Guidelines, page 6-3
• Homogeneous SANs, page 6-3
• Heterogeneous SANs, page 6-4
• Ports to Include in a Server-Based Job, page 6-4
Overview Cisco DMM supports homogeneous SANs (all Cisco MDS switches), as well as heterogeneous SANs (a mixture of MDS switches and other vendor switches). In a heterogeneous SAN, you must connect the existing and new storage to Cisco MDS switches.
In both homogeneous and heterogeneous SANs, Cisco MDS DMM supports dual-fabric and single-fabric SAN topologies. Dual-fabric and single-fabric topologies both support single path and multipath configurations.
In a single path configuration, a migration job includes only the one path (which is represented as an initiator/target port pair). In a multipath configuration, a migration job must include all paths (which are represented as two initiator/target port pairs).
FC RedirectWhen a data migration job is in progress, all traffic (in both directions) sent between the server HBA port and the existing storage is intercepted and forwarded to the SSM, using the FC Redirect capability.
FC Redirect requirements for the SAN topology/configuration include the following:
• The existing storage must be connected to a switch with FC Redirect capability. FC Redirect capability is available on MDS 9500 series and MDS 9200 series switches.
• Server HBA ports may be connected to a switch with or without FC Redirect capability.
• The switches with FC Redirect must be running SAN OS 3.2(1) or later release.
6-1S 9000 Family Fabric Manager Configuration Guide

Send documenta t ion comments to mdsfeedback -doc@c i sco .com
Chapter 6 Understanding DMM TopologiesFC Redirect
• The server HBA port and the existing storage port must be zoned together. The default-zone policy must be configured as deny.
• The SSM can be located anywhere in the fabric, as long as the FCNS database in the SSM’s switch has the required information about the server HBA ports and the existing storage ports. The SSM switch must be running SAN OS 3.2(1) or later release.
The following examples show the server-to-storage packet flow when a data migration job is in progress. For clarity, the example shows the SSM and the existing storage connected to separate switches. Our recommended practice is to connect the existing storage to the same switch as the SSM.
In Figure 6-1, the server HBA port is connected to switch A and the existing storage is connected to switch C. Both switches have FC Redirect capability. The SSM is installed on switch B. All three switches are running SAN OS 3.2(1).
Figure 6-1 Host Connected to FC-Redirect Switch
When the data migration job is started, FC Redirect is configured on switch A to divert the server traffic to the SSM. FC Redirect is configured on switch C to redirect the storage traffic to the SSM.
In Figure 6-2, the server HBA port is connected to switch A, which does not have FC Redirect capability or is not running OS 3.2(1). The existing storage is connected to switch C, which has FC Redirect capability. The SSM is installed on switch B. Switches B and C are running SAN OS 3.2(1).
When the data migration job is started, FC Redirect is configured on switch C to redirect the server and storage traffic to the SSM. This configuration introduces additional network latency and consumes additional bandwidth, because traffic from the server travels an extra network hop (A to C, C to B, B to C). The recommended configuration (placing the SSM in switch C) avoids the increase in network latency and bandwidth.
Figure 6-2 Host not Connected to FC-Redirect Switch
ServerExistingstorage
Switch A Switch C
Switch B
SSM
1850
32
ServerExistingstorage
Switch A Switch C
Switch B
SSM
1850
33
6-2Cisco MDS 9000 Family Fabric Manager Configuration Guide
OL-8007-08, Cisco MDS SAN-OS Release 3.x

Send documenta t ion comments to mdsfeedback -doc@c i sco .com
Chapter 6 Understanding DMM TopologiesDMM Topology Guidelines
DMM Topology GuidelinesWhen determining the provisioning and configuration requirements for DMM, note the following guidelines related to SAN topology:
• The existing and new storage must be connected to MDS switches.
• Switches connected to the storage ports must be running MDS SAN OS 3.2.1 or later release.
• The SSM is supported on MDS 9500 family switches and MDS 9200 family switches. The switch must be running MDS SAN OS 3.2.1 or later release.
• DMM requires a minimum of one SSM in each fabric.
• DMM does not support migration of Logical Volumes. For example, if the existing storage is a Logical Volume with three physical LUNs, DMM treats this as three LUN-to-LUN migration sessions.
• If you plan to deploy DMM and FCIP Write Acceleration together, there are restrictions in the supported topologies. Contact Cisco for assistance with designing the DMM topology.
Note In a storage-based migration, you may corrupt the storage if a new server port tries to access the storage ports once the migration has started. For example, a server port is returned to service, or a new server is brought on line.
Homogeneous SANs A homogeneous SAN contains only Cisco MDS switches. Most topologies fit the following categories:
• Core-Edge—hosts at the edge of the network, and storage at the core.
• Edge-Core—hosts and storage at the edge of the network, and ISLs between the core switches.
• Edge-Core-Edge—hosts and storage connected to opposite edges of the network and core switches with ISLs.
For all of the above categories, we recommend that you locate the SSM in the switch closest to the storage devices. Following this recommendation ensures that DMM introduces no additional network traffic during data migrations.
Figure 6-3 shows a common SAN topology, with servers at the edge of the network and storage arrays in the core.
6-3Cisco MDS 9000 Family Fabric Manager Configuration Guide
OL-8007-08, Cisco MDS SAN-OS Release 3.x

Send documenta t ion comments to mdsfeedback -doc@c i sco .com
Chapter 6 Understanding DMM TopologiesHeterogeneous SANs
Figure 6-3 Homogeneous SAN Topology
In a homogeneous network, you can locate the SSM on any DMM-enabled MDS switch in the fabric. We recommend that you install the SSM in the switch connected to the existing storage. You should also connect the new storage to the same switch as the existing storage. If the SSM is on a different switch from the storage, additional ISL traffic crosses the network during the migration (all traffic between storage and server is routed through the SSM).
Heterogeneous SANsWhen planning Cisco MDS DMM data migration for a heterogeneous SAN, note the following guidelines:
• The existing and new storage devices for the migration must be connected to MDS switches.
• The path from the SSM to the storage-connected switch must be through a Cisco fabric.
Depending on the topology, you may need to make configuration changes prior to data migration.
Ports to Include in a Server-Based Job This section provides guidelines for configuring server-based migration jobs.
When creating a server-based migration job, you must include all possible paths from the host to the LUNs being migrated. This is because all writes to a migrated LUN need to be mirrored in the new storage until the cutover occurs, so that no data writes are lost.
Therefore, all active ports on the existing storage that expose the same set of LUNs to the server must be added to a single data migration job.
Server
Existingstorage
Newstorage 18
4132
SSM SSM
6-4Cisco MDS 9000 Family Fabric Manager Configuration Guide
OL-8007-08, Cisco MDS SAN-OS Release 3.x

Send documenta t ion comments to mdsfeedback -doc@c i sco .com
Chapter 6 Understanding DMM TopologiesPorts to Include in a Server-Based Job
In a multipath configuration, two or more active storage ports expose the same set of LUNs to two HBA ports on the server (one initiator/target port pair for each path). Multipath configurations are supported in dual-fabric topologies (one path through each fabric) and in single-fabric topologies (both paths through the single fabric).
In a single path configuration, only one active storage port exposes the LUN set to the server. The migration job includes one initiator/target port pair (DMM does not support multiple servers accessing the same LUN set).
Note DMM does not support clustered servers all accessing the same LUNs (using SCSI persistent reservations). DMM requires that each LUN to be migrated can only be accessed from one server.
If the storage array supports active-passive multipathing, only the active ports are added to the data migration job.
The following sections describe how to apply the rules to various configurations:
• Single LUN Set, Active-Active Array, page 6-5
• Multiple LUN Set, Active-Active Arrays, page 6-6
• Single LUN Set, Active-Passive Array, page 6-7
Single LUN Set, Active-Active Array
In the example shown in Figure 6-4, the server accesses three LUNs over Fabric 1 using storage port ES1. The server accesses the same LUNs over Fabric 2 using storage port ES2.
Both storage ports (ES1 and ES2) must be included in the same data migration job, as both ports are active and expose the same LUN set.
Figure 6-4 Single LUN Set, Active-Active Array
Fabric 1 Fabric 2
H1 H2
ES1
NS1ES2
NS2
Existingstorage
012
New storage
012
Server
1839
60
6-5Cisco MDS 9000 Family Fabric Manager Configuration Guide
OL-8007-08, Cisco MDS SAN-OS Release 3.x

Send documenta t ion comments to mdsfeedback -doc@c i sco .com
Chapter 6 Understanding DMM TopologiesPorts to Include in a Server-Based Job
You create a data migration job with the following configuration:
Note If the example in Figure 6-4 showed multipathing over a single fabric SAN, there would be no difference in the data migration job configuration.
Multiple LUN Set, Active-Active Arrays
In the example shown in Figure 6-5, the server accesses three LUNs over Fabric 1 using storage port ES1. The server accesses the same LUNs over Fabric 2 using storage port ES2. The server accesses three different LUNs over Fabric 1 using storage port ES3, and accesses the same LUNs over Fabric 2 using storage port ES4.
Figure 6-5 Multiple LUN set, active-active arrays
You need to create two data migration jobs, because the server has access to two LUN sets on two different storage ports. You need to include two storage ports in each data migration job, as they are active-active multipathing ports.
One migration job has the following configuration:
Server PortExisting Storage Port
New Storage Port
H1 ES1 NS1
H2 ES2 NS2
Fabric 2
H1 H2
Existingstorage
New storage
Server
1839
61
Fabric 1
ES3 ES4ES2ES1 NS3 NS4NS2NS1
0 7
1 8
2 9
0 7
1 8
2 9
6-6Cisco MDS 9000 Family Fabric Manager Configuration Guide
OL-8007-08, Cisco MDS SAN-OS Release 3.x

Send documenta t ion comments to mdsfeedback -doc@c i sco .com
Chapter 6 Understanding DMM TopologiesPorts to Include in a Server-Based Job
This job includes three data migration sessions (for LUNs 1,2, and 3).
The other migration job has the following configuration:
This job includes three data migration sessions (for LUNs 7,8, and 9).
Single LUN Set, Active-Passive Array
In an active-passive array, the LUNs exposed by a storage port may be active or passive.
In the example shown in Figure 6-6, the server accesses a single LUN set. However, all LUNs are not active on a single storage port. The active-passive array in the example has two controllers, each with two ports. LUN 0 and LUN 1 are active on ES1 and ES2. LUN 2 and LUN 3 are active on ES3 and ES4.
Logically, the server sees two active LUN sets, accessed from two different storage ports (each paired for multipathing).
Figure 6-6 Single LUN set, active-passive array
Server PortExisting Storage New Storage
H1 ES1 NS1
H2 ES2 NS2
Server PortExisting Storage New Storage
H1 ES3 NS3
H2 ES4 NS4
ES1 ES2
Controller
LUN 3
LUN 2
LUN 1
LUN 0
ES3 ES4
LUN 3
LUN 2
LUN 1
LUN 0
Controller
NS1 NS2
Controller
LUN 3
LUN 2
LUN 1
LUN 0
NS3 NS4
LUN 3
LUN 2
LUN 1
LUN 0
Controller
Fabric 2
H1 H2
Server
1839
62
Fabric 1
6-7Cisco MDS 9000 Family Fabric Manager Configuration Guide
OL-8007-08, Cisco MDS SAN-OS Release 3.x

Send documenta t ion comments to mdsfeedback -doc@c i sco .com
Chapter 6 Understanding DMM TopologiesPorts to Include in a Server-Based Job
The server accesses LUN 0 and LUN 1 over Fabric 1 using storage port ES1. The server accesses the same LUNs over Fabric 2 using storage port ES2. The server accesses LUN 3 and LUN 4 over Fabric 1 using storage port ES3, and accesses the same LUNs over Fabric 2 using storage port ES4.
You need to create two data migration jobs, because the server has access to two LUN sets over two different storage ports. Each of the data migration jobs includes two storage ports, because both ports access the active LUNs on the storage.
Only the active LUNs are included in each job. (LUNs 0 and 1 in one job and LUNs 1 and 2 in the other job).
Note You can use the Server Lunmap Discovery (SLD) tool to see the LUNs that are active on each port of an active-passive array.
One migration job has the following configuration:
This job includes two data migration sessions (for LUNs 0 and 1).
The other migration job has the following configuration:
This job includes two data migration sessions (for LUNs 3 and 4).
Server PortExisting Storage New Storage
H1 ES1 NS1
H2 ES2 NS2
Server PortExisting Storage New Storage
H1 ES3 NS3
H2 ES4 NS4
6-8Cisco MDS 9000 Family Fabric Manager Configuration Guide
OL-8007-08, Cisco MDS SAN-OS Release 3.x

Send documenta t ion comments to mdsfeedback -doc@c i sco .com
Cisco MDOL-8007-08, Cisco MDS SAN-OS Release 3.x
C H A P T E R7
Using the DMM CLI for Data MigrationThis chapter describes how to use DMM CLI commands to configure and monitor data migration jobs.
This chapter includes the following sections:
• About DMM CLI Commands, page 7-1
• Selecting Ports for Server-Based Jobs, page 7-2
• Configuring Data Migration Using the CLI, page 7-2
• Controlling DMM Jobs, page 7-12
• Monitoring DMM Jobs, page 7-14
• Completing DMM Jobs, page 7-15
About DMM CLI CommandsThe DMM feature includes CLI commands to configure and perform data migration jobs. Job and session configuration commands are entered at the switch CLI prompt.
A DMM job can be active on more than one switch. For example, in a dual-fabric topology with multipath configurations, the DMM job runs on a switch in each fabric. To configure the job, you enter DMM CLI commands on both switches.
The DMM feature runs on an SSM in the switch. Each session runs on only one SSM. Enter the session configuration commands on the MDS switch that will perform the session migration.
The DMM show commands are accessed directly from the SSM. From the command prompt in the switch, you must attach to the SSM module before entering these commands.
When using the DMM CLI commands, note the following guidelines:
• In DMM job configuration mode, the job configuration is not saved until you enter the commit command. If you exit DMM configuration mode without issuing the commit command, all job configuration changes are discarded. You only need to enter the commit command when configuring a new job.
• For a storage-based migration, all servers that use the selected storage enclosure must use the same operating system (for example, all AIX or all Solaris).
• If the MDS switch (hosting the storage or the server) performs a restart after the migration but before the cutover, you must restart the data migration from the beginning.
7-1S 9000 Family Fabric Manager Configuration Guide

Send documenta t ion comments to mdsfeedback -doc@c i sco .com
Chapter 7 Using the DMM CLI for Data MigrationSelecting Ports for Server-Based Jobs
Selecting Ports for Server-Based JobsWhen creating a server-based migration job, you must include all possible paths from the server HBA ports to the LUNs being migrated. This is because all writes to a migrated LUN need to be mirrored to the new storage until the cutover occurs, so that no data writes are lost.
For additional information about selecting ports for server-based jobs, refer to the “Ports to Include in a Server-Based Job” section on page 6-4.
Configuring Data Migration Using the CLIWhen you enter the command to create a data migration job, the CLI enters DMM job configuration submode. This submode provides commands to configure the server HBA ports, storage ports, and job attributes. The job is only created on the SSM when you enter the commit command.
In a dual-fabric topology with redundant paths, the data migration job runs on an SSM in each fabric. You need to configure the job on both SSMs.
In this chapter, the examples and command descriptions use the following terminology (see Figure 7-1):
• The dual fabric configuration includes Fabric 1 and Fabric 2.
• Switch A (on Fabric 1) contains the SSM for data migration jobs.
• Switch B (on Fabric 2) contains the SSM for data migration jobs.
• H1 and H2 are the server HBA ports to each fabric.
• ES1 and ES2 are the existing storage ports.
• NS1 and NS2 are the new storage ports.
Figure 7-1 Example Topology
The steps to configure a data migration job are described in the following sections:
• Configuring the Virtual Initiator (Storage-Based Migration), page 7-3
• Creating the Data Migration Job, page 7-4
Fabric 1 Fabric 2
Switch A Switch B
H1 H2
ES1
NS1ES2
NS2
Existingstorage
012
New storage
012
Server
1850
38
7-2Cisco MDS 9000 Family Fabric Manager Configuration Guide
OL-8007-08, Cisco MDS SAN-OS Release 3.x

Send documenta t ion comments to mdsfeedback -doc@c i sco .com
Chapter 7 Using the DMM CLI for Data MigrationConfiguring Data Migration Using the CLI
• Configuring the Job, page 7-4
• Committing the Job, page 7-5
• Configuring the Peer SSM, page 7-6
• Configuring Sessions, page 7-7
• Server-Based Migration Example, page 7-8
• Storage-Based Migration Example, page 7-10
Configuring the Virtual Initiator (Storage-Based Migration)
Note This step is not required for a server-based data migration job.
Prior to creating a storage-based data migration job, you must retrieve the virtual initiator (VI) port world wide name (pWWN) and create a new zone containing the pWWNs of the VI and the storage ports. To use the new zone, add the new zone to a zoneset and activate the zoneset.
To configure the VI in Fabric 1, follow these steps:
Prior to creating the data migration job, you must complete the following configuration tasks on the storage devices:
1. Configure the existing storage to give the VI pWWN access to all LUNs.
2. Configure the new storage to give the VI pWWN access to all LUNs.
Step Command Comments
Step 1 switchA# configuration terminal Enters configuration mode.
Step 2 switchA(config)# dmm module module-id job job-id get-vi vsan 0-4093
Retrieves the VI information for the specified SSM module.
You must specify a unique job identifier.
The command output displays the assigned VI node WWN and port WWN.
Step 3 switchA(config)# zone name name vsan 0-4093 Creates a new zone.
Step 4 switchA(config-zone)# member pwwn value Uses the member command multiple times to add the VI pWWN, the existing storage pWWNs, and the new storage pWWNs.
Step 5 switchA(config-zone)# exit Exits zone configuration submode.
Step 6 switchA(config)# zoneset name name vsan 0-4093 Enters configuration mode for the active zoneset. Specify the name of the active zoneset.
Step 7 switchA(config-zoneset)# member name Adds the named zone to the zoneset.
Step 8 switchA(config-zoneset)# exit Exits zoneset configuration submode.
Step 9 switchA(config)# zoneset activate name name vsan 0-4093
Reactivates the zoneset.
7-3Cisco MDS 9000 Family Fabric Manager Configuration Guide
OL-8007-08, Cisco MDS SAN-OS Release 3.x

Send documenta t ion comments to mdsfeedback -doc@c i sco .com
Chapter 7 Using the DMM CLI for Data MigrationConfiguring Data Migration Using the CLI
Note For a dual-fabric topology, you must repeat the same set of configuration steps on switch B. Retrieve the VI information and create a new zone on switch B and configure the storage to allow the VI to access the LUNs exposed in fabric B. For an example configuration, see the “Storage-Based Migration Example” section on page 7-10.
Creating the Data Migration JobTo configure a data migration job, first create the job on Switch A. After creating the job, the CLI enters DMM job configuration mode, where you enter the commands for configuring the job.
To create the data migration job, follow these steps:
Configuring the JobUse the commands in DMM job configuration mode to add the server and storage ports to the job.
Note To prevent data corruption, the job must contain all the server HBA ports that can access the set of LUNs being migrated, and all storage ports that expose these LUNs:
• Add all server HBA ports in this fabric that can access the LUNs being migrated.
• Add all storage ports in the fabric that expose the set of LUNs being migrated.
For additional information, see the “Checking Storage ASL Status” section on page 3-2.
In a dual-fabric topology, configure the IP address of the peer SSM (the DMM peers communicate using the management IP network).
Step Command Comments
Step 1 switchA# configuration terminal Enters configuration mode
Step 2 switchA(config)# dmm module module-id job job-id create
Creates a migration job on the specified SSM module and enters DMM job configuration mode.
Specify a unique job identifier. For a storage-based job, use the same job identifier that you specified when retrieving the VI information (in the previous task).
7-4Cisco MDS 9000 Family Fabric Manager Configuration Guide
OL-8007-08, Cisco MDS SAN-OS Release 3.x

Send documenta t ion comments to mdsfeedback -doc@c i sco .com
Chapter 7 Using the DMM CLI for Data MigrationConfiguring Data Migration Using the CLI
Configure the data migration job using the following steps:
Committing the JobThe next step is to commit the data migration job on switch A. To commit the job, use the commit command.
When you enter the commit command, the switch sends the job configuration to the SSM.
The DMM feature sends configuration information to other switches in the fabric as required, so that all traffic between the server HBA port and the existing storage is redirected to the SSM.
The SSM performs discovery of all existing and new storage LUNs visible to the server HBA ports/VIs in this job.
Step Command Comments
Step 1 switchA(config-dmm-job)# server vsan 0-4093 pwwn pWWN
Specifies the VSAN and pWWN of the server HBA port to include in the migration.
Note All server HBA ports (in fabric 1) that can access the LUNs to be migrated need to be added to this job.
Step 2 switchA(config-dmm-job)# storage vsan 0-4093 pwwn pWWN existing
Specifies the VSAN and pWWN of the existing storage port.
Note All existing storage ports (in fabric 1) that expose the LUNs to be migrated need to be added to this job.
Step 3 switchA(config-dmm-job)# storage vsan 0-4093 pwwn pWWN new
Specifies the VSAN and pWWN of the new storage port.
Note All new storage ports (in fabric 1) that expose the new LUNs need to be added to this job.
Step 4 switchA(config-dmm-job)# attributes job_type {1 | 2} job_mode {1 | 2} job_rate {1 | 2 | 3 | 4}
Specifies the job type, job mode, and job rate:
For job_type, enter 1 for server-based migration or 2 for storage-based migration.
For job_mode, enter 1 for online or 2 for offline migration.
For job_rate enter 1 for best effort, 2 for slow, 3 for medium, and 4 for fast data migration. For additional information about data migration rate, see the “Configuring Migration Rate” section on page 2-6.
Step 5 switchA(config-dmm-job)# peer IP_address Configures the IP address of the SSM on switch B.
For information about configuring SSM IP addresses, see the “Configuring IP Connectivity” section on page 2-3
7-5Cisco MDS 9000 Family Fabric Manager Configuration Guide
OL-8007-08, Cisco MDS SAN-OS Release 3.x

Send documenta t ion comments to mdsfeedback -doc@c i sco .com
Chapter 7 Using the DMM CLI for Data MigrationConfiguring Data Migration Using the CLI
Note The commit command may require a noticeable amount of time to complete, depending on the number of LUNs to be discovered.
Configuring the Peer SSMThe next step is to configure the data migration job on the peer SSM.
Note You must use the same job number that you created on switch A.
To configure the data migration job on the peer SSM, follow these steps:
Step Command Comments
Step 1 switchB# configuration terminal Enters configuration mode.
Step 2 switchB(config)# dmm module module-id job job-id create
Creates a migration job on the specified SSM module and enters DMM job configuration mode.
Note Enter the same job ID that you created on switch A.
Step 3 switchB(config-dmm-job)# server vsan 0-4093 pwwn pWWN
Specifies the VSAN and pWWN of the server HBA port to include in the migration.
Note All server HBA ports (in fabric 2) that can access the LUNs to be migrated need to be added to this job.
Step 4 switchB(config-dmm-job)# storage vsan 0-4093 pwwn pWWN existing
Specifies the VSAN and pWWN of the existing storage port.
Note All existing storage ports (in fabric 2) that expose the LUNs to be migrated need to be added to this job.
Step 5 switchB(config-dmm-job)# storage vsan 0-4093 pwwn pWWN new
Specifies the VSAN and pWWN of the new storage port.
Note All new storage ports (in fabric 2) that expose the new LUNs need to be added to this job.
Step 6 switchB(config-dmm-job)# attributes job_type {1 | 2} job_mode {1 | 2} job_rate {1 | 2 | 3 | 4}
Specifies the job type, job mode, and job rate
Note The configuration values for the attributes and the schedule must match on both switches.
Step 7 switchB(config-dmm-job)# peer IP_address Configures the IP address of the SSM on switch A.
Step 8 switchB(config-dmm-job)# commit Commits the data migration job on switch B.
7-6Cisco MDS 9000 Family Fabric Manager Configuration Guide
OL-8007-08, Cisco MDS SAN-OS Release 3.x

Send documenta t ion comments to mdsfeedback -doc@c i sco .com
Chapter 7 Using the DMM CLI for Data MigrationConfiguring Data Migration Using the CLI
Configuring SessionsThe next step is to configure sessions in the data migration job. For a server-based migration, configure all of the sessions on one SSM.
For a storage-based migration, you can manually balance the load on the SSMs by configuring sessions on both SSMs.
Note For a a storage-based migration, use the pWWN of the VI as the server in the session configuration.
To display that the SSM has discovered the LUNs correctly, enter the show dmm job job-id job id storage command from the SSM CLI.
To configure sessions, follow these steps:
Step Command Comments
Step 1 switchA(config)# dmm module module-id job job-id session
Enters session configuration mode for the specified job on the specified SSM.
Step 2 switchA(config-session)# server pWWN src_tgt pWWN src_lun num dst_tgt pWWN dst_lun num
Configures a session. The server HBA port, existing storage port, and new storage port must all belong to the same VSAN.
• server is the server pWWN (server-based job) or VI pWWN (storage-based job).
• src_tgt is the existing storage pWWN.
• src_lun is the LUN number in the existing storage. Enter this value in hexidecimal notation.
• dst_tgt num is the new storage pWWN.
• dst_lun is the LUN number in the new storage. Enter this value in hexidecimal notation.
7-7Cisco MDS 9000 Family Fabric Manager Configuration Guide
OL-8007-08, Cisco MDS SAN-OS Release 3.x

Send documenta t ion comments to mdsfeedback -doc@c i sco .com
Chapter 7 Using the DMM CLI for Data MigrationConfiguring Data Migration Using the CLI
Server-Based Migration ExampleThe topology for this example is dual fabric with multipath ports defined in the server and redundant paths to the storage devices (as shown in Figure 7-2).
Figure 7-2 Topology for the Example
On both switches, the SSM module is located in slot 8. The pWWNs for the ports are listed here:
Configure the data migration job on switch A:
switchA# configure terminalswitchA(config)# dmm module 8 job 2345 createStarted New DMM Job Configuration.Do not exit sub-mode until configuration is complete and committedswitchA(config-dmm-job)# server vsan 100 pwwn 21:00:00:e0:8b:0a:5d:e7switchA(config-dmm-job)# storage vsan 100 pwwn 50:06:04:82:bf:cf:e0:43 existingswitchA(config-dmm-job)# storage vsan 100 pwwn 50:06:0e:80:03:4e:95:13 newswitchA(config-dmm-job)# peer 10.10.2.4switchA(config-dmm-job)# attributes job_type 1 job_mode 1 job-rate 1switchA(config-dmm-job)# commitswitchA(config-dmm-job)# endEnding DMM Job Configuration.If the Job was not committed, it will be required to reconfigure the job.
Fabric 1 Fabric 2
H1 H2
ES1
NS1ES2
NS2
Existingstorage
012
New storage
012
Server
1839
60
Port pWWN
H1 21:00:00:e0:8b:0a:5d:e7
ES1 50:06:04:82:bf:cf:e0:43
NS1 50:06:0e:80:03:4e:95:13
H2 21:01:00:e0:8b:0a:5d:e7
ES2 50:06:04:82:bf:cf:e0:5d
NS2 50:06:0e:80:03:4e:95:03
7-8Cisco MDS 9000 Family Fabric Manager Configuration Guide
OL-8007-08, Cisco MDS SAN-OS Release 3.x

Send documenta t ion comments to mdsfeedback -doc@c i sco .com
Chapter 7 Using the DMM CLI for Data MigrationConfiguring Data Migration Using the CLI
Configure the data migration job on switch B:
switchB# configure terminalswitchB(config)# dmm module 8 job 2345 createStarted New DMM Job Configuration.Do not exit sub-mode until configuration is complete and committedswitchB(config-dmm-job)# server vsan 100 pwwn 21:01:00:e0:8b:0a:5d:e7switchB(config-dmm-job)# storage vsan 100 pwwn 50:06:04:82:bf:cf:e0:5d existingswitchB(config-dmm-job)# storage vsan 100 pwwn 50:06:0e:80:03:4e:95:03 new switchB(config-dmm-job)# peer 10.10.1.8switchB(config-dmm-job)# attributes job_type 1 job_mode 1 job-rate 1switchB(config-dmm-job)# commitswitchB(config-dmm-job)# endEnding DMM Job Configuration.If the Job was not committed, it will be required to reconfigure the job.switchB#
Configure the data migration sessions on switch A:
switchA(config)# dmm module 4 job 2345 sessionswitchA(config-session)# server 21:00:00:e0:8b:0a:5d:e7 src_tgt 50:06:04:82:bf:cf:e0:43 src_lun 0x5 dst_tgt 50:06:0e:80:03:4e:95:13 dst_lun 0x0switchA(config-session)# server 21:00:00:e0:8b:0a:5d:e7 src_tgt 50:06:04:82:bf:cf:e0:43 src_lun 0x6 dst_tgt 50:06:0e:80:03:4e:95:13 dst_lun 0x1switchA(config-session)# exit
Start the data migration job on switch A:
switchA(config)# dmm module 8 job 2345 start Started New DMM Job Configuration.Do not exit sub-mode until configuration is complete and committedswitchA(config)# exit
7-9Cisco MDS 9000 Family Fabric Manager Configuration Guide
OL-8007-08, Cisco MDS SAN-OS Release 3.x

Send documenta t ion comments to mdsfeedback -doc@c i sco .com
Chapter 7 Using the DMM CLI for Data MigrationConfiguring Data Migration Using the CLI
Storage-Based Migration ExampleThe topology for this example is dual fabric with multipath ports defined in the server and redundant paths to the storage devices (as shown in Figure 7-3).
Figure 7-3 Topology for the Example
On both switches, the SSM module is located in slot 8. The pWWNs for the ports are listed here:
Configure the VI on switch A:
switchA# configure terminalswitchA(config)# dmm module 8 job 2345 get-vi vsan 100DMM Storage Job:0x929 assigned follwing VI - VI NodeWWN: 21:0c:00:0d:ec:02:2d:82VI PortWWN: 21:0d:00:0d:ec:02:2d:82sjc7-9509-6(config)#
Fabric 1 Fabric 2
H1 H2
ES1
NS1ES2
NS2
Existingstorage
012
New storage
012
Server
1839
60
Port pWWN
Host 1 21:00:00:e0:8b:0a:5d:e7
VI 1 21:0d:00:0d:ec:02:2d:82
ES1 50:06:04:82:bf:cf:e0:43
NS1 50:06:0e:80:03:4e:95:13
Host 2 21:01:00:e0:8b:0a:5d:e7
VI 2 21:0d:00:0d:0a:01:2b:82
ES2 50:06:04:82:bf:cf:e0:5d
NS2 50:06:0e:80:03:4e:95:03
7-10Cisco MDS 9000 Family Fabric Manager Configuration Guide
OL-8007-08, Cisco MDS SAN-OS Release 3.x

Send documenta t ion comments to mdsfeedback -doc@c i sco .com
Chapter 7 Using the DMM CLI for Data MigrationConfiguring Data Migration Using the CLI
Configure the zone and zoneset on switch A:
switchA(config)# zone name DMM1 vsan 100switchA(config-zone)# member pwwn 21:0d:00:0d:ec:02:2d:82 viswitchA(config-zone)# member pwwn 50:06:0b:00:00:11:b9:18 serverswitchA(config-zone)# member pwwn 50:06:04:8a:cc:d1:f9:40 esswitchA(config-zone)# member pwwn 50:06:04:8a:cc:d1:f9:41 nsswitchA(config-zone)# exitswitchA(config)# zoneset name DMM1 vsan 100switchA(config-zoneset)# member DMM1switchA(config-zoneset)# exitswitchA(config)#
Configure the data migration job on switch A:
switchA(config)# dmm module 8 job 2345 createStarted New DMM Job Configuration.Do not exit sub-mode until configuration is complete and committedswitchA(config-dmm-job)# server vsan 100 pwwn 50:06:0b:00:00:11:b9:18switchA(config-dmm-job)# storage vsan 100 pwwn 50:06:04:8a:cc:d1:f9:40 existingswitchA(config-dmm-job)# storage vsan 100 pwwn 50:06:04:8a:cc:d1:f9:41 newswitchA(config-dmm-job)# peer 10.10.2.4switchA(config-dmm-job)# attributes job_type 2 job_mode 1 job-rate 1switchA(config-dmm-job)# commit switchA(config-dmm-job)# endEnding DMM Job Configuration.If the Job was not committed, it will be required to reconfigure the job.switchB#
Configure the VI on switch B:
switchB# configure terminalswitchB(config)# dmm module 8 job 2345 get-vi vsan 100DMM Storage Job:0x929 assigned follwing VI - VI NodeWWN: 21:0c:01:0e:ec:02:2d:82VI PortWWN: 21:0d:00:0d:0a:01:2b:82switchB(config)#
Configure the zone and zoneset on switch B:
switchB(config)# zone name DMM1 vsan 100switchB(config-zone)# member pwwn 21:0d:00:0d:ec:02:2d:82 viswitchB(config-zone)# member pwwn 50:06:0b:00:00:11:b9:18 serverswitchB(config-zone)# member pwwn 50:06:04:8a:cc:d1:f9:40 esswitchB(config-zone)# member pwwn 50:06:04:8a:cc:d1:f9:41 nsswitchB(config-zone)# exitswitchB(config)# zoneset name DMM1 vsan 100switchB(config-zoneset)# member DMM1switchB(config-zoneset)# exitswitchB(config)#
Configure the data migration job on switch B:
switchB# configure terminalswitchB(config)# dmm module 8 job 2345 createStarted New DMM Job Configuration.Do not exit sub-mode until configuration is complete and committedswitchB(config-dmm-job)# server vsan 100 pwwn 21:01:00:e0:8b:0a:5d:e7switchB(config-dmm-job)# storage vsan 100 pwwn 50:06:04:82:bf:cf:e0:5d existingswitchB(config-dmm-job)# storage vsan 100 pwwn 50:06:0e:80:03:4e:95:03 new switchB(config-dmm-job)# peer 10.10.1.8switchB(config-dmm-job)# attributes job_type 1 job_mode 1 job-rate 1switchB(config-dmm-job)# commitswitchB(config-dmm-job)# end
7-11Cisco MDS 9000 Family Fabric Manager Configuration Guide
OL-8007-08, Cisco MDS SAN-OS Release 3.x

Send documenta t ion comments to mdsfeedback -doc@c i sco .com
Chapter 7 Using the DMM CLI for Data MigrationControlling DMM Jobs
Ending DMM Job Configuration.If the Job was not committed, it will be required to reconfigure the job.switchB#
Configure the data migration sessions on switch A:
switchA(config)# dmm module 4 job 2345 sessionswitchA(config-session)# server 21:0d:00:0d:ec:02:2d:82 src_tgt 50:06:04:8a:cc:d1:f9:40 src_lun 0x5 dst_tgt 50:06:0e:80:03:4e:95:03 dst_lun 0x0
switchA(config-session)# exit
Start the data migration job on switch A:
switchA(config)# dmm module 8 job 2345 start Started New DMM Job Configuration.Do not exit sub-mode until configuration is complete and committedswitchA(config)# exit
Configure the data migration sessions on switch B:
switchB(config)# dmm module 4 job 2345 sessionswitchB(config-session)# server 21:0d:00:0d:ec:02:2d:82 src_tgt 50:06:04:8a:cc:d1:f9:40 src_lun 0x5 dst_tgt 50:06:0e:80:03:4e:95:03 dst_lun 0x0
switchB(config-session)# exit
Start the data migration job on switch B:
switchB(config)# dmm module 8 job 2345 start Started New DMM Job Configuration.Do not exit sub-mode until configuration is complete and committedswitchB(config)# exit
Controlling DMM JobsThe DMM CLI provides a set of commands to control jobs that have been configured. The job state determines which commands are valid to run. Job states are shown in Table 7-1.
Table 7-1 Job Status Values
Job Status Value Description
Created The job has been created, but has not been scheduled.
Scheduled The job has been configured with a scheduled start time. It will automatically start at that time.
InProgress The job is currently running.
Completed The job has completed successfully.
Verified The completed job has been verified.
Stopped The job has been stopped manually by the user.
7-12Cisco MDS 9000 Family Fabric Manager Configuration Guide
OL-8007-08, Cisco MDS SAN-OS Release 3.x

Send documenta t ion comments to mdsfeedback -doc@c i sco .com
Chapter 7 Using the DMM CLI for Data MigrationControlling DMM Jobs
Table 7-2 describes the data migration commands.
Note You must enter these commands on the switch with sessions configured. If both SSMs have sessions configured, enter the commands on both switches.
Failed The job has been stopped because of failures related to storage I/O.
Reset The job has been reinitialized because of failures related to the SAN or IP network. Failure examples include port flaps, connection loss between peer SSMs, or SSM reloads.
Table 7-1 Job Status Values
Job Status Value Description
Table 7-2 Command Valid States
Command Description Valid Job Status Values
Verify Performs offline verification of the selected job.
User is prompted to confirm the verification command.
Completed, InProgress
Delete Deletes the selected job (or jobs) and retrieves the job execution log from the SSM.
User is prompted to confirm the delete command.
Stopped, Failed, Completed, Reset
Stop Stops the selected job. InProgress
Start Starts the selected job. Created, Reset
Modify Allows you to modify the job attributes or configure a start time for the selected job.
Created, Scheduled, Reset, Stopped
Log Opens the DMM log for the selected job. All job status values
7-13Cisco MDS 9000 Family Fabric Manager Configuration Guide
OL-8007-08, Cisco MDS SAN-OS Release 3.x

Send documenta t ion comments to mdsfeedback -doc@c i sco .com
Chapter 7 Using the DMM CLI for Data MigrationMonitoring DMM Jobs
To control the data migration job, use the following commands:
Monitoring DMM JobsUse the show dmm job command in the SSM CLI to monitor the status of data migration jobs, and the current progress of jobs and sessions that are in progress.
To monitor data migration jobs, follow these steps:
Command PurposeswitchA(config)# dmm module module-id job job-id start
Starts a data migration job or restarts a job that was stopped.
Note For a job in reset state, run the validate command on both switches before restarting the job.
The start command is ignored if the job is scheduled for a future time. Use the schedule now command to start a scheduled job.
switchA(config)# dmm module module-id job job-id stop
Stops execution of the job.
Note Job progress is not preserved. If you start the job again later, the job restarts from the beginning.
switchA(config)# dmm module module-id job job-id validate
If the job is in the reset state, run the validate option. After validation, start the job using the start command.
Note Always run the validate command on both SSMs (even if only one SSM has sessions).
switchA(config)# dmm module module-id job job-id schedule [ now | hour hr min min day day month month [year] | reset ]
Configures a scheduled start time for the data migration job.
Enter schedule now to start the job immediately.
Enter reset to remove the scheduled start time from the job. The job remains in created state until you manually start it.
Note Enter the schedule command on each SSM with sessions.
Step Command Comments
Step 1 switch# attach module module-id Enters CLI mode on the SSM module.
7-14Cisco MDS 9000 Family Fabric Manager Configuration Guide
OL-8007-08, Cisco MDS SAN-OS Release 3.x

Send documenta t ion comments to mdsfeedback -doc@c i sco .com
Chapter 7 Using the DMM CLI for Data MigrationCompleting DMM Jobs
For additional information about monitoring and troubleshooting data migration jobs, see Chapter 5, “Troubleshooting Cisco MDS DMM.”
Completing DMM JobsWhen all of the sessions in a job have completed successfully, you can delete the job in coordination with other post-migration tasks, which are described in the following sections:
• (Optional) Verifying the Completed Job, page 7-15
• Post-Migration Activities, page 7-16
• Deleting the Job, page 7-16
(Optional) Verifying the Completed JobWhen all of the sessions in a job have completed successfully, you can optionally perform verification of the data in the new storage location. The SSM compares the data in the new storage with the data in the existing storage by reading each migration region from the existing and new storage, and then performing a comparison of the data.
To perform migration verification, follow these steps:
Note Verification is performed in offline mode. Any service using the existing storage needs to be quiesced before you start verification.
While verification is being performed on a job, you can display the verification progress using the following command:
show dmm
Step 2 switch# show dmm job Displays summary information about the data migration jobs configured on this SSM.
Step 3 switch# show dmm job job-id job-id {detail | session | storage}
Displays information about the specified job.
detail displays the job attributes, schedule, server HBA and storage ports, the job log, and job error log.
session displays the sessions included in the job.
storage displays the storage ports included in the job.
Step Command Comments
Step Command Comments
Step 1 switchA(config)# dmm module module-id job job-id verify
Verifies the data migration by comparing the data in the new storage with the data in the existing storage. The verify command operates in offline mode.
7-15Cisco MDS 9000 Family Fabric Manager Configuration Guide
OL-8007-08, Cisco MDS SAN-OS Release 3.x

Send documenta t ion comments to mdsfeedback -doc@c i sco .com
Chapter 7 Using the DMM CLI for Data MigrationCompleting DMM Jobs
Post-Migration Activities After the data migration job has completed successfully, you need to reconfigure the server to use the new storage. The exact post-migration configuration steps vary depending on the operating system of the server.
Reconfiguration may include the following steps:
• Perform a graceful shut down on all server applications that use the migrated LUNs to ensure that there are no pending I/O operations on the existing storage.
• Unmount the existing storage LUNs.
• Configure zoning to remove server access to the existing LUNs.
• Using the DMM CLI, delete the data migration job. DMM removes the FC redirects to the SMM. Server writes are no longer mirrored to the existing and new storage.
• Configure zoning to add server access to the new LUNs.
• From the server, scan for the new storage.
• Mount the file system for the new storage.
• From the server, restart the server applications to access data from the new storage.
Deleting the JobTo delete the data migration job, follow these steps:
Step Command Comments
Step 1 switchA# dmm module module-id job job-id destroy Deletes the specified data migration job.
Step 2 switchA#
7-16Cisco MDS 9000 Family Fabric Manager Configuration Guide
OL-8007-08, Cisco MDS SAN-OS Release 3.x

Send documenta t ion comments to mdsfeedback -doc@c i sco .com
Cisco MDS 9000OL-8007-08, Cisco MDS SAN-OS Release 3.x
A
P P E N D I X A DMM CLI Command ReferenceThe Cisco MDS DMM feature provides a CLI suitable for scripting and advanced operations.
This appendix contains an alphabetical listing of commands that are unique to the Cisco MDS DMM feature.
For information about other commands that apply to the Cisco MDS 9000 Family of multilayer directors and fabric switches, refer to the Cisco MDS 9000 Family CLI Configuration Guide.
A-1 Family Fabric Manager Configuration Guide

Send documenta t ion comments to mdsfeedback -doc@c i sco .com
Appendix A DMM CLI Command Referencessm enable feature dmm
ssm enable feature dmmTo enable DMM, use the ssm enable feature dmm command in configuration mode. To disable DMM, use the no form of the command.
ssm enable feature dmm {force {interface fc slot/port | module slot} | interface fc slot/port | module slot}
no ssm enable feature dmm {force {interface fc slot/port | module slot} | interface fc slot/port | module slot}
Syntax Description
Defaults The DMM feature is disabled.
Command Modes Configuration mode.
Command History
Usage Guidelines None.
Examples The following example shows how to enable DMM on a module:
switch# config tEnter configuration commands, one per line. End with CNTL/Z.switch(config)# ssm enable feature dmm module 1
The following example shows how to enable DMM on an interface:
switch# config tEnter configuration commands, one per line. End with CNTL/Z.switch(config)# ssm enable feature dmm interface fc 1/1 - 4
The following example shows how to force a reload on some of the ports on a line card:
switch# config tEnter configuration commands, one per line. End with CNTL/Z.switch(config)# ssm enable feature dmm force interface fc 1/1 - 8, fc 1/13 - 16
force Forces a switching module reload.
interface Specifies the interface.
fc slot/port Specifies the Fiber Channel slot and port numbers.
module slot Specifies the SSM module slot number.
Release Modification
3.2(1) This command was introduced.
A-2Cisco MDS 9000 Family Fabric Manager Configuration Guide
OL-8007-08, Cisco MDS SAN-OS Release 3.x

Send documenta t ion comments to mdsfeedback -doc@c i sco .com
Appendix A DMM CLI Command Referencessm enable feature dmm
Related Commands Command Description
show ssm provisioning Displays information about features provisioned on the SSM.
show dmm job Displays DMM job information.
A-3Cisco MDS 9000 Family Fabric Manager Configuration Guide
OL-8007-08, Cisco MDS SAN-OS Release 3.x

Send documenta t ion comments to mdsfeedback -doc@c i sco .com
Appendix A DMM CLI Command Referencedmm module job
dmm module jobTo configure a data migration job, use the dmm module job command in configuration mode.
dmm module mod-idjob job-id create | destroy | get-vti vsan vsan-id | restart | schedule {hour hour min minute day day month month year year | now | reset} | session | stop | validate | verify
no dmm module mod-idschedule {hour hour min minute day day month month year year | now | reset} | session | stop | validate | verify
Syntax Description
Defaults None.
Command Modes Configuration mode.
Command History
module mod-id Specifies the module ID.
job job-id Specifies the job ID. The range is 0 to18446744073709551615.
create Creates the job and enters DMM job configuration submode.
destroy Deletes the DMM job.
get-vti Retrieves the VI for the DMM job.
vsan vsan-id Specifies the VSAN ID. The range is 1 to 4093.
restart Restarts the DMM job session.
schedule Schedules the DMM job.
hour hour Specifies the hour the DMM job starts. The range is 0 to 23.
min minute Specifies the minute the DMM job starts. The range is 0 to 59.
day day Specifies the day the DMM job starts. The range is 1 to 31.
month month Specifies the month the DMM job starts. The range is 1 to 12.
year year Specifies the year the DMM job starts. The range is 2000 to 2030.
now Resets the schedule to start the DMM job immediately.
reset Resets the DMM job to unscheduled.
session Enables the Session Configuration submode.
stop Stops the DMM job.
validate Validates the DMM job data.
verify Verifies the data migration for the specified job.
Release Modification
3.2(1) This command was introduced.
A-4Cisco MDS 9000 Family Fabric Manager Configuration Guide
OL-8007-08, Cisco MDS SAN-OS Release 3.x

Send documenta t ion comments to mdsfeedback -doc@c i sco .com
Appendix A DMM CLI Command Referencedmm module job
Usage Guidelines DMM must be enabled before you can create DMM jobs. Use the ssm enable feature dmm command to enable DMM.
The data migration job stops executing if it encounters any errors. To restart the migration, enter the validate command to validate the job configuration, then enter the restart command to restart the job.
Examples The following example shows how to create a job with a schedule. The job is scheduled to start on Sunday, January 6, 2008 at 11:00 P.M.
switch# config tEnter configuration commands, one per line. End with CNTL/Z.switch(config)# dmm module 3 job 1 schedule hour 23 min 0 day 6 month 1 year 2008
The following example shows how to set the migration region size to 100 disk blocks.
switch# config tEnter configuration commands, one per line. End with CNTL/Z.switch(config)# dmm module 3 migration_block_size 100
The following example shows how to migrate 110 disk blocks.
switch# config tEnter configuration commands, one per line. End with CNTL/Z.switch(config) dmm module 3 num_migration_blocks 110
The following example shows how to set the fast migration rate to 100 Mbps, the medium migration rate to 50 Mbps, and slow migration rate to 10 Mbps.
switch# config tEnter configuration commands, one per line. End with CNTL/Z.switch(config) dmm module 3 rate_of_migration fast 100 medium 50 slow 10
Related Commands Command Description
show dmm job Displays DMM job information.
show dmm ip-peer Displays the IP peers that the DMM port is connected to.
A-5Cisco MDS 9000 Family Fabric Manager Configuration Guide
OL-8007-08, Cisco MDS SAN-OS Release 3.x

Send documenta t ion comments to mdsfeedback -doc@c i sco .com
Appendix A DMM CLI Command Referenceattributes (DMM job configuration submode)
attributes (DMM job configuration submode)To set the attributes of a data migration job, use the attributes command in DMM job configuration submode. To delete the job attributes, use the no form of the command.
attributes job_type {1 | 2} job_mode {1 | 2} job_rate {1 | 2 | 3 | 4}
no attributes job_type {1 | 2} job_mode {1 | 2} job_rate {1 | 2 | 3 | 4}
Syntax Description
Defaults None.
Command Modes DMM job configuration submode.
Command History
Usage Guidelines None.
Examples The following example sets the job type to storage, the job mode to online, and the job rate to fast.
switch# config tEnter configuration commands, one per line. End with CNTL/Z.switch(config)# dmm module 3 job 1 createStarted New DMM Job Configuration.Do not exit sub-mode until configuration is complete and committedswitch(config-dmm-job)# attributes job_type 2 job_mode 1 job_rate 4switch(config-dmm-job)#
Related Commands
job_type {1 | 2} Specifies the job type. Specify 1 for a server type job and 2 for a storage type job.
job_mode {1 | 2} Specifies the job mode. Specify 1 for an online job and 2 for an offline job.
job_rate {1 | 2 | 3 | 4} Specifies the job rate. Specify 1 for the default rate, 2 for a slow rate, 3 for a medium rate, and 4 for a fast rate.
Release Modification
3.2(1) This command was introduced.
Command Description
show dmm ip-peer Displays job information.
show dmm srvr-vt-login Displays server VT login information.
A-6Cisco MDS 9000 Family Fabric Manager Configuration Guide
OL-8007-08, Cisco MDS SAN-OS Release 3.x

Send documenta t ion comments to mdsfeedback -doc@c i sco .com
Appendix A DMM CLI Command Referencecommit (DMM job configuration submode)
commit (DMM job configuration submode)To commit a DMM job, use the commit command in DMM job configuration submode. To delete the job, use the no form of the command.
commit
no commit
Syntax Description This command has no arguments or keywords.
Defaults None.
Command Modes DMM job configuration submode.
Command History
Usage Guidelines You need to configure the server HBA ports, storage ports, and job attributes before you commit the job.
Examples The following example shows how to commit a data migration job:
switch# config tEnter configuration commands, one per line. End with CNTL/Z.switch(config)# dmm module 3 job 1 createStarted New DMM Job Configuration.Do not exit sub-mode until configuration is complete and committedswitch(config-dmm-job)# commitswitch(config-dmm-job)#
The following example shows how to delete a data migration job:
switch# config tEnter configuration commands, one per line. End with CNTL/Z.switch(config)# dmm module 3 job 1 createStarted New DMM Job Configuration.Do not exit sub-mode until configuration is complete and committedswitch(config-dmm-job)# no commitswitch(config-dmm-job)#
Related Commands
Release Modification
3.2(1) This command was introduced.
Command Description
ssm enable feature dmm Enables DMM.
show dmm job Displays job information.
A-7Cisco MDS 9000 Family Fabric Manager Configuration Guide
OL-8007-08, Cisco MDS SAN-OS Release 3.x

Send documenta t ion comments to mdsfeedback -doc@c i sco .com
Appendix A DMM CLI Command Referencepeer (DMM job configuration submode)
peer (DMM job configuration submode)To add peer SSM information to a job, use the peer command in DMM job configuration submode. To delete the peer information, use the no form of the command.
peer ip-address
no peer ip-address
Syntax Description
Defaults None.
Command Modes DMM job configuration submode.
Command History
Usage Guidelines In a dual-fabric topology, the migration job runs on an SSM in each fabric. The two SSMs exchange messages over the management IP network, so each SSM needs the IP address of the peer.
Examples The following example shows how to add peer SSM information to a job:
switch# config tEnter configuration commands, one per line. End with CNTL/Z.switch(config)# dmm module 3 job 1 createStarted New DMM Job Configuration.Do not exit sub-mode until configuration is complete and committedswitch(config-dmm-job)# peer 224.2.1.2switch(config-dmm-job)#
The following example shows how to delete peer SSM information from a job:
switch# config tEnter configuration commands, one per line. End with CNTL/Z.switch(config)# dmm module 3 job 1 createStarted New DMM Job Configuration.Do not exit sub-mode until configuration is complete and committedswitch(config-dmm-job)# no peer 224.2.1.2switch(config-dmm-job)#
Related Commands
ip-address Specifies the peer SSM IP address. The format for the IP address is A.B.C.D.
Release Modification
3.2(1) This command was introduced.
Command Description
show dmm job Displays job information.
show dmm ip-peer Displays a DMM port’s IP peer.
A-8Cisco MDS 9000 Family Fabric Manager Configuration Guide
OL-8007-08, Cisco MDS SAN-OS Release 3.x

Send documenta t ion comments to mdsfeedback -doc@c i sco .com
Appendix A DMM CLI Command Referenceserver (DMM job configuration submode)
server (DMM job configuration submode)To add a server HBA port to the DMM job, use the server command in DMM job configuration submode. To delete the server HBA port, use the no form of the command.
server vsan vsan-id pwwn port-wwn
no server vsan vsan-id pwwn port-wwn
Syntax Description
Defaults None.
Command Modes DMM job configuration submode.
Command History
Usage Guidelines None.
Examples The following example shows how to add server information to a DMM job:
switch# config tEnter configuration commands, one per line. End with CNTL/Z.switch(config)# dmm module 3 job 1 createStarted New DMM Job Configuration.Do not exit sub-mode until configuration is complete and committedswitch(config-dmm-job)# server vsan 3 pwwn 1d:22:3a:21:3c:44:3b:51switch(config-dmm-job)#
The following example shows how to delete server information from a DMM job:
switch# config tEnter configuration commands, one per line. End with CNTL/Z.switch(config)# dmm module 3 job 1 createStarted New DMM Job Configuration.Do not exit sub-mode until configuration is complete and committedswitch(config-dmm-job)# no server vsan 3 pwwn 1d:22:3a:21:3c:44:3b:51switch(config-dmm-job)#
vsan vsan-id Specifies the VSAN ID. The range is 1 to 4093.
pwwn port-wwn Specifies the world-wide name of the server HBA port. The format is hh:hh:hh:hh:hh:hh:hh:hh, where h is a hexadecimal number.
Release Modification
3.2(1) This command was introduced.
A-9Cisco MDS 9000 Family Fabric Manager Configuration Guide
OL-8007-08, Cisco MDS SAN-OS Release 3.x

Send documenta t ion comments to mdsfeedback -doc@c i sco .com
Appendix A DMM CLI Command Referenceserver (DMM job configuration submode)
Related Commands Command Description
show dmm job Displays job information.
show dmm srvr-vt-login Displays server VT login information.
A-10Cisco MDS 9000 Family Fabric Manager Configuration Guide
OL-8007-08, Cisco MDS SAN-OS Release 3.x

Send documenta t ion comments to mdsfeedback -doc@c i sco .com
Appendix A DMM CLI Command Referenceserver (configure session submode)
server (configure session submode)To configure a data migration session, use the server command in session configuration submode. To delete the session, use the no form of the command.
server pw-wn src_tgt pw-wn src_lun src-lun dst_tgt pw-wn dst_lun dst-lun
no server pw-wn src_tgt pw-wn src_lun src-lun dst_tgt pw-wn dst_lun dst-lun
Syntax Description
Defaults None.
Command Modes Configure session submode.
Command History
Usage Guidelines None.
Examples The following example shows how to a source target, source LUN, destination target, and destination LUN in a session:
switch# config tEnter configuration commands, one per line. End with CNTL/Z.switch(config)# dmm module 3 job 1 sessionswitch(config-session)# server 12:13:1d:1c:2d:2d:3f:3a src_tgt 12:13:1d:1c:2d:2d:3f:3a src_lun 0x1 dst_tgt 12:13:1d:1c:2d:2d:3f:3a dst_lun 0x5
Related Commands
pwwn pwwn Specifies the port world-wide name of the server. The format is hh:hh:hh:hh:hh:hh:hh:hh, where h is a hexadecimal number.
src_tgt pwwn Specifies the port world-wide name of the source target. The format is hh:hh:hh:hh:hh:hh:hh:hh, where h is a hexadecimal number.
src_lun src-lun Specifies the source LUN number in hex notation. The range is 0x0 to 0xfff.
dst_tgt pwwn Specifies the port world-wide name of the destination target. The format is hh:hh:hh:hh:hh:hh:hh:hh, where h is a hexadecimal number.
dst_lun dst-lun Specifies the destination LUN in hex notation. The range is 0x0 to 0xfff.
Release Modification
3.2(1) This command was introduced.
Command Description
show dmm job Displays job information.
show dmm srvr-vt-login Displays server VT login information.
A-11Cisco MDS 9000 Family Fabric Manager Configuration Guide
OL-8007-08, Cisco MDS SAN-OS Release 3.x

Send documenta t ion comments to mdsfeedback -doc@c i sco .com
Appendix A DMM CLI Command Referencestorage (DMM job configuration submode)
storage (DMM job configuration submode)To add a storage port to a DMM job, use the storage command in DMM job configuration submode.
storage vsan vsan-id pwwn port-wwn {existing | new}
no storage vsan vsan-id pwwn port-wwn {existing | new}
Syntax Description
Defaults None.
Command Modes DMM job configuration submode.
Command History
Usage Guidelines None.
Examples The following example shows how to add storage information to a DMM job:
switch# config tEnter configuration commands, one per line. End with CNTL/Z.switch(config)# dmm module 3 job 1 createStarted New DMM Job Configuration.Do not exit sub-mode until configuration is complete and committedswitch(config-dmm-job)# storage vsan 3 pwwn 1d:22:3a:21:3c:44:3b:51switch(config-dmm-job)#
The following example shows how to delete storage information from a DMM job:
switch# config tEnter configuration commands, one per line. End with CNTL/Z.switch(config)# dmm module 3 job 1 createStarted New DMM Job Configuration.Do not exit sub-mode until configuration is complete and committedswitch(config-dmm-job)# no storage vsan 3 pwwn 1d:22:3a:21:3c:44:3b:51switch(config-dmm-job)#
vsan vsan-id Specifies the VSAN ID. The range is 1 to 4093.
pwwn port-wwn Specifies the world-wide name of the storage port. The format is hh:hh:hh:hh:hh:hh:hh:hh, where h is a hexadecimal number.
existing Specifies a port on the existing storage.
new Specifies a port on the new storage.
Release Modification
3.2(1) This command was introduced.
A-12Cisco MDS 9000 Family Fabric Manager Configuration Guide
OL-8007-08, Cisco MDS SAN-OS Release 3.x

Send documenta t ion comments to mdsfeedback -doc@c i sco .com
Appendix A DMM CLI Command Referencestorage (DMM job configuration submode)
Related Commands Command Description
ssm enable feature dmm Enables DMM.
show dmm job Displays job information.
A-13Cisco MDS 9000 Family Fabric Manager Configuration Guide
OL-8007-08, Cisco MDS SAN-OS Release 3.x

Send documenta t ion comments to mdsfeedback -doc@c i sco .com
Appendix A DMM CLI Command Referencedmm module
dmm module To specify default DMM values for migration block size, number of migration blocks and fast migration speed, use the dmm module command in Configuration mode.
dmm module mod-id migration-block-size block-size
dmm module mod-id num-migration-blocks num-blocks
dmm module mod-id rate-of-migration fast migration-rate medium migration-rate slow migration-rate
Syntax Description
Defaults None.
Command Modes Configuration mode.
Command History
Usage Guidelines None.
Examples The following example shows how to a job:
switch# config tEnter configuration commands, one per line. End with CNTL/Z.switch(config)# dmm module 3
Related Commands
mod-id Specifies the module ID.
migration-block-size Migration block is the unit of data copied from existing to new storage.
block-size Specifies the block size in MB.
num-migration-blocks DMM divides each LUN into a number of migration blocks.
num-blocks Specifies the number of migration blocks per LUN.
rate-of-migration Migration rate can be configured as slow, medium or fast.
fast migration-rate Specifies the rate for fast migration. Units are Megabits per second (Mbps).
medium migration-rate Specifies the rate for medium migration. Units are Mbps.
slow migration-rate Specifies the rate for slow migration. Units are Mbps.
Release Modification
3.2(1) This command was introduced.
Command Description
show dmm job Displays job information.
show dmm ip-peer Displays a DMM port’s IP peer.
A-14Cisco MDS 9000 Family Fabric Manager Configuration Guide
OL-8007-08, Cisco MDS SAN-OS Release 3.x

Send documenta t ion comments to mdsfeedback -doc@c i sco .com
Appendix A DMM CLI Command Referenceshow dmm discovery-log
show dmm discovery-logTo display SCSI device discovery logs, use the show dmm discovery-log command in EXEC mode.
show dmm discovery-log {all | error}
Syntax Description
Defaults None.
Command Modes EXEC mode.
Command History
Usage Guidelines You must connect to an SSM on your switch to execute DMM show commands. Use the show module command to determine the slot number of an SSM on your switch. Use the attach module slot command to connect to the SSM.
Examples The following example displays error entries:
switch# attach module 3Attaching to module 3 ...To exit type 'exit', to abort type '$.'Bad terminal type: "ansi". Will assume vt100.module-3# show dmm discovery-log error005 State: 3CDB: 00 00 00 00 00 00 00 00 00 00 00 00 00 00 00 00Sts:0x02 SnsKey:0x02 AscAscq:0x0403Time: 5(ms)
LogIndex:26 HostPWWN:2c:fc:00:05:30:01:9e:88 TargetPWWN:50:06:01:62:30:60:36:64OPC: 0x00 Lun:0x0000000000000006 State: 3CDB: 00 00 00 00 00 00 00 00 00 00 00 00 00 00 00 00Sts:0x02 SnsKey:0x02 AscAscq:0x0403Time: 4(ms)
Related Commands
all Displays all entries in the Device Discovery SCSI log.
error Displays error entries in the Device Discovery SCSI log.
Release Modification
3.2(1) This command was introduced.
Command Description
ssm enable feature dmm Enables the DMM feature.
dmm module Enables DMM configuration on a module.
A-15Cisco MDS 9000 Family Fabric Manager Configuration Guide
OL-8007-08, Cisco MDS SAN-OS Release 3.x

Send documenta t ion comments to mdsfeedback -doc@c i sco .com
Appendix A DMM CLI Command Referenceshow dmm fp-port
show dmm fp-portTo display front panel ports on a line card, use the show dmm fp-port command in EXEC mode.
show dmm fp-port
Syntax Description This command has no arguments or keywords.
Defaults None.
Command Modes EXEC mode.
Command History
Usage Guidelines You must connect to an SSM on your switch to execute DMM show commands. Use the show module command to determine the slot number of an SSM on your switch. Use the attach module slot command to connect to the SSM.
Examples The following example displays front panel ports:
switch# attach module 3Attaching to module 3 ...To exit type 'exit', to abort type '$.'Bad terminal type: "ansi". Will assume vt100.module-3# show dmm fp-portCisco DMM Front Panel Port Map------------------------------------------------------------------- Port Index Mirage Id DPP Id------------------------------------------------------------------- 1 0 1 2 2 1 1 2 3 2 1 2 4 3 1 2 5 4 2 3 6 5 2 3 7 6 2 3 8 7 2 3 9 8 3 6 10 9 3 6 11 10 3 6 12 11 3 6 13 12 4 7 14 13 4 7 15 14 4 7 16 15 4 7 17 16 1 1 18 17 1 1
Release Modification
3.2(1) This command was introduced.
A-16Cisco MDS 9000 Family Fabric Manager Configuration Guide
OL-8007-08, Cisco MDS SAN-OS Release 3.x

Send documenta t ion comments to mdsfeedback -doc@c i sco .com
Appendix A DMM CLI Command Referenceshow dmm fp-port
19 18 1 1 20 19 1 1 21 20 2 4 22 21 2 4 23 22 2 4 24 23 2 4 25 24 3 5 26 25 3 5 27 26 3 5 28 27 3 5 29 28 4 8 30 29 4 8 31 30 4 8 32 31 4 8
Related Commands Command Description
ssm enable feature dmm Enables the DMM feature.
dmm module Enables DMM configuration on a module.
A-17Cisco MDS 9000 Family Fabric Manager Configuration Guide
OL-8007-08, Cisco MDS SAN-OS Release 3.x

Send documenta t ion comments to mdsfeedback -doc@c i sco .com
Appendix A DMM CLI Command Referenceshow dmm ip-peer
show dmm ip-peerTo display information about the IP peers the DMM interface is connected to, use the show dmm ip-peer command in EXEC mode.
show dmm ip-peer
Syntax Description This command has no arguments or keywords.
Defaults None.
Command Modes EXEC mode.
Command History
Usage Guidelines You must connect to an SSM on your switch to execute DMM show commands. Use the show module command to determine the slot number of an SSM on your switch. Use the attach module slot command to connect to the SSM.
Examples The following example displays DMM IP peer information:
switch# attach module 3Attaching to module 3 ...To exit type 'exit', to abort type '$.'Bad terminal type: "ansi". Will assume vt100.module-3# show dmm ip-peer
Cisco DMM IP Peer Table------------------------------------------------------------------- No Type SD IP Address TCP State------------------------------------------------------------------- 1 CONFIG_STATION 23 10.100.2.1 DOWN 2 PEER_SSM 22 10.100.1.20 UP 3 CONFIG_STATION 19 10.100.2.1 DOWN
Related Commandss
Release Modification
3.2(1) This command was introduced.
Command Description
ssm enable feature dmm Enables the DMM feature.
dmm module Enables DMM configuration on a module.
A-18Cisco MDS 9000 Family Fabric Manager Configuration Guide
OL-8007-08, Cisco MDS SAN-OS Release 3.x

Send documenta t ion comments to mdsfeedback -doc@c i sco .com
Appendix A DMM CLI Command Referenceshow dmm job
show dmm jobTo display DMM job information, use the show dmm job command in EXEC mode.
show dmm job job-id{detail |job-fsm-eventlog |job-infra-fsm-eventlog |lun_tokens token tok-pwwn |session |[session_id sess-id] [session-event-log] |storage [tgt-pwwn tgt-pwwn] {vi-pwwn vi-pwwn} [lun-event-log lun-id | tgt-event-log]}
Syntax Description
Defaults None.
Command Modes EXEC mode.
Command History
Usage Guidelines You must connect to an SSM on your switch to execute DMM show commands. Use the show module command to determine the slot number of an SSM on your switch. Use the attach module slot command to connect to the SSM.
job-id Specifies the job ID. The range is 0 to 18446744073709551615.
detail Displays detailed job information.
job-fsm-eventlog Displays the Job FSM Event Log.
job-infra-fsm-eventlog Displays the Job Infra FSM Event Log.
lun_tokens Displays a list of job LUN tokens.
token tok-pwwn Specifies the storage port world-wide name.
session Displays job session information.
session_id sess-id Specifies the job session. The range is 0 to 255.
session-event-log Displays the Session FSM Event Log.
storage Displays the storage ports discovered by DMM.
tgt-pwwn tgt-pwwn Specifies the storage port world-wide name. The format is hh:hh:hh:hh:hh:hh:hh:hh, where h is a hexadecimal number.
vi-pwwn vi-pwwn Specifies the Virtual Initiator port world-wide name. The format is hh:hh:hh:hh:hh:hh:hh:hh, where h is a hexadecimal number.
lun-event-log lun-id Displays the Virtual Initiator Target LUN FSM event log and specifies the LUN ID.
tgt-event-log Displays the Virtual Initiator Target FSM Event Log.
Release Modification
3.2(1) This command was introduced.
A-19Cisco MDS 9000 Family Fabric Manager Configuration Guide
OL-8007-08, Cisco MDS SAN-OS Release 3.x

Send documenta t ion comments to mdsfeedback -doc@c i sco .com
Appendix A DMM CLI Command Referenceshow dmm job
Examples The following example shows how to display a summary of all the jobs:
module-4# show dmm job ======================================================================================================== Data Mobility Manager Job Information======================================================================================================== Num Job Identifier Name Type Mode DMM GUI IP Peer SSM DPP Session Status======================================================================================================== 1 1181174016 admin_2007/06/06-16:53 STG ON 10.1.1.25 10.1.0.1 6 CREATED 2 1181174164 admin_2007/06/06-16:55 STG ON 10.1.1.25 10.1.0.1 7 CREATED
Number of Jobs :2
The following example shows how to display the details for one job:module-4# show dmm job job-id 1181174016 detail =========================================================================== Data Mobility Manager Job Details=========================================================================== Job Identifier : 1181174016 Job Name : admin_2007/06/06-16:53 Job Type : STORAGE Job Rate : Default, no rate limiting Job Mode : ONLINE Job DPP : 5 Peer SSM IP : 10.1.0.1 DMM GUI IP : 10.1.1.25 Job FSM : READY Job Infra FSM : DONE VI nWWN : 27:8a:00:05:30:00:29:28 VI pWWN : 27:8b:00:05:30:00:29:28------------------------------------------------------------------------- Job Schedule Information ------------------------------------------------------------------------- Date : 0/ 0/0 [Month/Day/Year] Time : 0:0 [Hour:Min]------------------------------------------------------------------------- Server Port List (Num Ports :2)-------------------------------------------------------------------------Num VSAN Server pWWN Virtual Initiator pWWN ------------------------------------------------------------------------- 1 100 27:8b:00:05:30:00:29:28 27:8b:00:05:30:00:29:28 2 100 21:00:00:e0:8b:08:5e:3e 27:87:00:05:30:00:29:28------------------------------------------------------------------------- Storage Port List (Num Ports :2)-------------------------------------------------------------------------Num VSAN Storage pWWN Type Virtual Target pWWN ------------------------------------------------------------------------- 1 100 50:06:0e:80:04:2c:5c:50 NS 27:8f:00:05:30:00:29:28 2 100 50:06:0e:80:04:2c:5c:70 ES 27:8d:00:05:30:00:29:28---------------------------------------------------------------------------------------------------- DMM GUI PDU History----------------------------------------------------------------------------------------------------Num PDU Opcode GUI IP Rx Tx----------------------------------------------------------------------------------------------------
A-20Cisco MDS 9000 Family Fabric Manager Configuration Guide
OL-8007-08, Cisco MDS SAN-OS Release 3.x

Send documenta t ion comments to mdsfeedback -doc@c i sco .com
Appendix A DMM CLI Command Referenceshow dmm job
1 DM_JOB_CREATE_REQ 10.1.1.25 Wed Oct 7 05:34:12 1981 Wed Oct 7 05:34:12 1981 2 DM_JOB_STORAGE_JOB_VI_REQ 10.1.1.25 Wed Oct 7 05:34:12 1981 Wed Oct 7 05:34:12 1981 3 DM_JOB_INFRA_CREATE_REQ 10.1.1.25 Wed Oct 7 05:34:28 1981 Wed Oct 7 05:34:32 1981 4 DM_JOB_LUNMAP_REQ 10.1.1.25 Wed Oct 7 05:34:34 1981 Wed Oct 7 05:34:34 1981 5 DM_JOB_MANUAL_LUNMAP_REQ 10.1.1.25 Wed Oct 7 05:34:39 1981 Wed Oct 7 05:34:39 1981 6 DM_JOB_MANUAL_LUNMAP_REQ 10.1.1.25 Wed Oct 7 05:34:40 1981 Wed Oct 7 05:34:40 1981 7 DM_JOB_MANUAL_LUNMAP_REQ 10.1.1.25 Wed Oct 7 05:34:45 1981 Wed Oct 7 05:34:45 1981 8 DM_JOB_MANUAL_LUNMAP_REQ 10.1.1.25 Wed Oct 7 05:34:46 1981 Wed Oct 7 05:34:46 1981 9 DM_JOB_QUERY_REQ 10.1.1.25 Wed Oct 7 05:36:27 1981 Wed Oct 7 05:36:27 1981 10 DM_JOB_QUERY_REQ 10.1.1.25 Wed Oct 7 07:57:33 1981 Wed Oct 7 07:57:33 1981 11 DM_JOB_QUERY_REQ 10.1.1.25 Wed Oct 7 08:18:41 1981 Wed Oct 7 08:18:41 1981 12 DM_JOB_QUERY_REQ 10.1.1.25 Wed Oct 7 20:58:14 1981 Wed Oct 7 20:58:14 1981 13 DM_JOB_QUERY_REQ 10.1.1.25 Wed Oct 7 21:01:54 1981 Wed Oct 7 21:01:54 1981 14 DM_JOB_QUERY_REQ 10.1.1.25 Wed Oct 7 21:01:59 1981 Wed Oct 7 21:01:59 1981 15 DM_JOB_QUERY_REQ 10.1.1.25 Wed Oct 7 21:02:54 1981 Wed Oct 7 21:02:54 1981 16 DM_JOB_SESSION_QUERY_REQ 10.1.1.25 Wed Oct 7 21:04:26 1981 Wed Oct 7 21:04:26 1981 17 DM_JOB_QUERY_REQ 10.1.1.25 Wed Oct 7 21:33:44 1981 Wed Oct 7 21:33:44 1981 18 DM_JOB_QUERY_REQ 10.1.1.25 Wed Oct 7 21:34:41 1981 Wed Oct 7 21:34:41 1981 19 DM_JOB_QUERY_REQ 10.1.1.25 Wed Oct 7 21:35:25 1981 Wed Oct 7 21:35:25 1981
Related Commands Command Description
ssm enable feature dmm Enables the DMM feature.
dmm module Enables DMM configuration on a module.
A-21Cisco MDS 9000 Family Fabric Manager Configuration Guide
OL-8007-08, Cisco MDS SAN-OS Release 3.x

Send documenta t ion comments to mdsfeedback -doc@c i sco .com
Appendix A DMM CLI Command Referenceshow dmm srvr-vt-login
show dmm srvr-vt-loginTo display server virtual target login information, use the show dmm srvr-vt-login command in EXEC mode.
show dmm srvr-vt-login [job-id job-id] server-pwwn srvr-pwwn vt-pwwn vt-pwwn {fc_rdrt-fsm-eventlog | login-fsm-eventlog}
Syntax Description
Defaults None.
Command Modes EXEC mode.
Command History
Usage Guidelines You must connect to an SSM on your switch to execute DMM show commands. Use the show module command to determine the slot number of an SSM on your switch. Use the attach module slot command to connect to the SSM.
Examples The following example shows how to display the server VT login summary:
switch# show dmm srvr-vt-login========================================================================================= Data Mobility Manager Server VT Login Information========================================================================================== Id Job Id VSAN Srvr pWWN Srvr FCID VT pWWN VT FCID State (FC Redirect/Login)========================================================================================== 1 1187978941 1 21:32:00:0d:ec:02:2d:82 0x660000 21:36:00:0d:ec:02:2d:82 0x660003 (READY/WAITING_PLOGI) 2 1187978941 1 21:32:00:0d:ec:02:2d:82 0x660000 21:34:00:0d:ec:02:2d:82 0x66000a (READY/WAITING_PLOGI)
Number of Logins :2
job-id job-id Specifies the job ID. The range is 0 to 18446744073709551615.
server-pwwn srvr-pwwn
Specifies the server port world-wide name. The format is hh:hh:hh:hh:hh:hh:hh:hh, where h is a hexadecimal number.
vt-pwwn vt-pwwn Specifies the Virtual Target port world-wide name. The format is hh:hh:hh:hh:hh:hh:hh:hh, where h is a hexadecimal number.
fc_rdrt-fsm-eventlog Displays the Server Virtual Target FC Redirect FSM Event Log.
login-fsm-eventlog Displays the Server Virtual Target FSM Event Log.
Release Modification
3.2(1) This command was introduced.
A-22Cisco MDS 9000 Family Fabric Manager Configuration Guide
OL-8007-08, Cisco MDS SAN-OS Release 3.x

Send documenta t ion comments to mdsfeedback -doc@c i sco .com
Appendix A DMM CLI Command Referenceshow dmm srvr-vt-login
The following example shows how to display the event log for a specified VT:
switch# show dmm srvr-vt-login job-id 1187978941 server-pwwn 21:32:00:0d:ec:02:2d:82
vt-pwwn 21:36:00:0d:ec:02:2d:82 login-fsm-e
==========================================================================================Server/VT Login FSM Event Log -> Job Id : 1187978941 Server : 21:32:00:0d:ec:02:2d:82 VT : 21:36:00:0d:ec:02:2d:82==========================================================================================
Log Entry: 1 time: Fri Aug 24 11:09:19 2007 Curr state: DMM_SRVR_VT_LOGIN_S_NULL Triggered event: DMM_SRVR_VT_LOGIN_E_START_ACTION
Log Entry: 2 time: Fri Aug 24 11:09:19 2007 Curr state: DMM_SRVR_VT_LOGIN_S_WAITING_PLOGI Triggered event: DMM_SRVR_VT_LOGIN_E_LOGIN_DONE_OK
Related Commands Command Description
ssm enable feature dmm Enables the DMM feature.
dmm module Enables DMM configuration on a module.
A-23Cisco MDS 9000 Family Fabric Manager Configuration Guide
OL-8007-08, Cisco MDS SAN-OS Release 3.x

Send documenta t ion comments to mdsfeedback -doc@c i sco .com
Appendix A DMM CLI Command Referenceshow dmm vt
show dmm vtTo display virtual target information, use the show dmm vt command in EXEC mode.
show dmm vt vt-job-id job-id pwwn vt-pwwn vt-fsm-eventlog
Syntax Description
Defaults None.
Command Modes EXEC mode.
Command History
Usage Guidelines You must connect to an SSM on your switch to execute DMM show commands. Use the show module command to determine the slot number of an SSM on your switch. Use the attach module slot command to connect to the SSM.
Examples The following example displays virtual target information:
switch# attach module 3Attaching to module 3 ...To exit type 'exit', to abort type '$.'Bad terminal type: "ansi". Will assume vt100.module-3# show dmm vt===================================================================================== Data Mobility Manager VT Information===================================================================================== Id Job Id VT pWWN VSAN FCID IF-IDX PORT STATE===================================================================================== 1 1177009472 2f:00:00:05:30:01:9e:88 3 0xee00a0 0x1110000 0x10 VT_UP 2 1177009472 2c:fe:00:05:30:01:9e:88 3 0xee00a1 0x1110000 0x10 VT_UPNumber of VTs :2
Related Commands
vt-job-id job-id Specifies the virtual target job ID. The range is 0 to 18446744073709551615.
pwwn vt-pwwn Specifies the virtual target port world-wide name. The format is hh:hh:hh:hh:hh:hh:hh:hh, where h is a hexadecimal number.
vt-fsm-eventlog Displays the Virtual Target FSM Event Log.
Release Modification
3.2(1) This command was introduced.
Command Description
ssm enable feature dmm Enables the DMM feature.
dmm module Enables DMM configuration on a module.
A-24Cisco MDS 9000 Family Fabric Manager Configuration Guide
OL-8007-08, Cisco MDS SAN-OS Release 3.x

Send documenta t ion comments to mdsfeedback -doc@c i sco .com
Appendix A DMM CLI Command Referencedebug dmm-debug
debug dmm-debugTo enable debugging for DMM, use the debug dmm-debug command. To disable a debug command for DMM, use the no form of the command.
debug dmm-debug {all | common-err | common-ev | fsm | init | itl-err | itl-ev | job-err | job-ev | msghndlr-err | msghndlr-ev | p2p-err | p2p-ev | timer | vi-lun-err | vi-lun-ev | vi-tgt-err | vi-tgt-ev}
no debug dmm-debug {all | common-err | common-ev | fsm | init | itl-err | itl-ev | job-err | job-ev | msghndlr-err | msghndlr-ev | p2p-err | p2p-ev | timer | vi-lun-err | vi-lun-ev | vi-tgt-err | vi-tgt-ev}
Syntax Description
Defaults Debugging for DMM is disabled.
Command Modes EXEC mode.
Command History
all Enables all DMM debug options.
common-err Enables debugging for DMM common errors.
common-ev Enables debugging for DMM common events.
fsm Enables debugging for DMM FSM.
init Enables debugging for DMM initialization.
itl-err Enables debugging for DMM ITL errors.
itl-ev Enables debugging for DMM ITL events.
job-err Enables debugging for DMM job errors.
job-ev Enables debugging for DMM job events.
msghndlr-err Enables debugging for DMM message handler errors.
msghndlr-ev Enables debugging for DMM message handler events.
p2p-err Enables debugging for DMM P2P errors.
p2p-ev Enables debugging for DMM P2P events.
timer Enables debugging for the DMM timer.
vi-lun-err Enables debugging for Virtual Initiator LUN errors.
vi-lun-ev Enables debugging for Virtual Initiator LUN events.
vi-tgt-err Enables debugging for Virtual Initiator Target errors.
vi-tgt-ev Enables debugging for Virtual Initiator Target events.
Release Modification
3.2(1) This command was introduced.
A-25Cisco MDS 9000 Family Fabric Manager Configuration Guide
OL-8007-08, Cisco MDS SAN-OS Release 3.x

Send documenta t ion comments to mdsfeedback -doc@c i sco .com
Appendix A DMM CLI Command Referencedebug dmm-debug
Usage Guidelines You must connect to an SSM on your switch to execute DMM debug commands. Use the show module command to determine the slot number of an SSM on your switch. Use the attach module slot command to connect to the SSM.
Examples The following example enables all the DMM debug options:
switch# debug dmm-debug all
Related Commands Command Description
ssm enable feature dmm Enables the DMM feature.
dmm module Configures DMM.
A-26Cisco MDS 9000 Family Fabric Manager Configuration Guide
OL-8007-08, Cisco MDS SAN-OS Release 3.x

Send documenta t ion comments to mdsfeedback -doc@c i sco .com
Cisco MDOL-8007-08, Cisco MDS SAN-OS Release 3.x
I N D E X
A
about DMM 1-1
active-passive arrays 6-7
Array-Specific Library. See ASL
ASL 3-2
B
best practices 5-1
C
CLI commands A-1
command reference A-1
commands
CLI 7-1
Delete 4-24
GUI 4-22
Modify 4-24
Start 4-24
Stop 4-24
Verify 4-23
configuring IP connectivity 2-3
D
data migration
lifecycle 1-5
planning 3-1
software requirements 1-7
Data Migration Status display 4-3
data migration wizards 4-1Customer Order Number:
Delayed Cutover 1-5
DMM
best practices 5-1
command reference A-1
configuring migration rate 2-6
licenses 2-1
server-based migration 1-4
topologies 6-1
documentation
additional publications iii
related documents iii
E
enabling DMM 2-5
Enclosures
configuring 3-3
error reason codes 5-8
Existing Storage
about 1-2
configuring 3-2
F
FC Redirect 6-1
G
guidelines for deploying DMM 1-8
H
heterogeneous SANs 6-1
IN-1S 9000 Family Fabric Manager Configuration Guide

Send documenta t ion comments to mdsfeedback -doc@c i sco .com
Index
homogeneous SANs 6-1
I
installing DMM 2-1
IP configuration 2-3
J
job creation errors 4-5
job status values 4-21
L
licenses 2-1
Logical Unit Number
See LUN
LUN 1-3
M
migration rate
configuring for a job 4-24
N
New Storage
about 1-2
configuring 3-2
P
paths
manually selecting 4-6
post-migration 4-25
S
schedule
IN-2Cisco MDS 9000 Family Fabric Manager Configuration Guide
changing 4-24
server-based job
selecting ports 4-3
Server Lunmap Discovery Tool. See SLD
sessions
configuring 4-8
session state values 4-22
SLD 3-3
SSM
configuring 3-2
storage ports
including in a job 6-4
T
topologies 6-1
troubleshooting
checklist 5-2
V
virtual initiator
configuring 7-3
Virtual Target
about 1-3
VT. See virtual target
OL-8007-08, Cisco MDS SAN-OS Release 3.x