Cisco Firepower Threat Defense Virtual for the Microsoft ... · PDF file1 Cisco Systems, Inc....
26
1 Cisco Systems, Inc. www.cisco.com Cisco Firepower Threat Defense Virtual for the Microsoft Azure Cloud Quick Start Guide Published: January 23, 2017 Updated: April 26, 2018 Microsoft Azure is an open, flexible, enterprise-grade public cloud computing platform that provides a range of cloud services, including those for compute, analytics, storage, and networking. You can pick and choose from these services to develop and scale new applications, or run existing applications, in the public cloud. This document explains how to deploy Firepower Threat Defense Virtual on Azure. About Deployment On the Microsoft Azure Cloud, page 1 Prerequisites and System Requirements for the Firepower Threat Defense Virtual and Azure, page 2 Sample Network Topology for Firepower Threat Defense Virtual on Azure, page 4 Resources Created During Deployment, page 4 Azure Routing, page 5 Routing Configuration for VMs in the Virtual Network, page 5 IP Addresses, page 6 Deploy the Firepower Threat Defense Virtual, page 6 Appendix - Azure Resource Template Sample, page 16 About Deployment On the Microsoft Azure Cloud Firepower Threat Defense Virtual is integrated into the Microsoft Azure marketplace. The managing Firepower Management Center runs outside of Azure at the customer premises. The Firepower Threat Defense Virtual on Microsoft Azure supports two instance types: Standard D3—4 vCPUs, 14 GB, 4vNICs Standard D3_v2—4 vCPUs, 14 GB, 4vNICs
Transcript of Cisco Firepower Threat Defense Virtual for the Microsoft ... · PDF file1 Cisco Systems, Inc....

Cisco Firepower Threat Defense Virtual for the Microsoft Azure Cloud Quick Start Guide
Published: January 23, 2017
Updated: April 26, 2018
Microsoft Azure is an open, flexible, enterprise-grade public cloud computing platform that provides a range of cloud services, including those for compute, analytics, storage, and networking. You can pick and choose from these services to develop and scale new applications, or run existing applications, in the public cloud.
This document explains how to deploy Firepower Threat Defense Virtual on Azure.
About Deployment On the Microsoft Azure Cloud, page 1
Prerequisites and System Requirements for the Firepower Threat Defense Virtual and Azure, page 2
Sample Network Topology for Firepower Threat Defense Virtual on Azure, page 4
Resources Created During Deployment, page 4
Azure Routing, page 5
Routing Configuration for VMs in the Virtual Network, page 5
IP Addresses, page 6
Deploy the Firepower Threat Defense Virtual, page 6
Appendix - Azure Resource Template Sample, page 16
About Deployment On the Microsoft Azure CloudFirepower Threat Defense Virtual is integrated into the Microsoft Azure marketplace. The managing Firepower Management Center runs outside of Azure at the customer premises. The Firepower Threat Defense Virtual on Microsoft Azure supports two instance types:
Standard D3—4 vCPUs, 14 GB, 4vNICs
Standard D3_v2—4 vCPUs, 14 GB, 4vNICs
1
Cisco Systems, Inc. www.cisco.com

Cisco Firepower Threat Defense Virtual for the Microsoft Azure Cloud Quick Start Guide
Prerequisites and System Requirements for the Firepower Threat Defense Virtual and Azure
Prerequisites and System Requirements for the Firepower Threat Defense Virtual and Azure
Create an account on Azure.com.
After you create an account on Microsoft Azure, you can log in, search the marketplace for Cisco Firepower Threat Defense, and choose the “Cisco Firepower Next Generation Firewall - virtual” offering.
A Cisco Smart Account. You can create one at Cisco Software Central (https://software.cisco.com/).
License the Firepower Threat Defense Virtual.
— Configure all license entitlements for the security services from the Firepower Management Center.
— See “Licensing the Firepower System” in the Firepower Management Center Configuration Guide for more information about how to manage licenses; see Cisco Firepower System Feature Licenses for an overview of feature licenses for the Firepower System, including helpful links.
Communication Paths:
— Management interface—Used to connect the Firepower Threat Defense Virtual to the Firepower Management Center.
— Diagnostic interface—Used for diagnostics and reporting; cannot be used for through traffic.
— Inside interface (required)—Used to connect the Firepower Threat Defense Virtual to inside hosts.
— Outside interface (required)—Used to connect the Firepower Threat Defense Virtual to the public network.
For Firepower Threat Defense Virtual and Firepower System compatibility, see Cisco Firepower Threat Defense Virtual Compatibility.
Guidelines and Limitations for the Firepower Threat Defense Virtual and Azure
Supported Features
Only the Firepower Threat Defense Virtual is available from the Microsoft Azure marketplace. The Firepower Management Center runs outside of Azure.
Supported Azure Instances - Standard_D3_V2 (default) and Standard_D3. Both instances support 4vCPU, 14GB memory, 4vNIC.
Licensing modes:
— Smart License only
— PLR is not supported
Networking:
— Routed firewall mode only
Public IP addressing
— Only the Management 0/0 and GigabitEthernet0/0 are assigned public IP addresses.
Interfaces:
— The Firepower Threat Defense Virtual deploys with four interfaces.
Unsupported Features
Licensing
2

Cisco Firepower Threat Defense Virtual for the Microsoft Azure Cloud Quick Start Guide
Guidelines and Limitations for the Firepower Threat Defense Virtual and Azure
— Pay As You Go (PAYG) licensing
— Permanent License Reservation (PLR)
Networking (many of these limitations are Microsoft Azure restrictions)
— Jumbo frames
— IPv6
— 802.1Q VLANs
— Transparent Mode and other Layer 2 features; no broadcast, no multicast.
— Proxy ARP for an IP address that the device does not own from an Azure perspective (impacts some NAT capabilities)
— Promiscuous mode (no capture of subnet traffic)
— Inline-set modes, passive mode
Note: Azure policy prevents the Firepower Threat Defense Virtual from operating in transparent firewall or inline mode because it does not allow interfaces to operate in promiscuous mode.
— ERSPAN (uses GRE, which is not forwarded in Azure)
Management
— Console access; management is performed over the network using Firepower Management Center (SSH is available for some setup and maintenance activities)
— Azure portal “reset password” function
— Console-based password recovery; because the user does not have real-time access to the console, password recovery is not possible. It is not possible to boot the password recovery image. The only recourse is to deploy a new Firepower Threat Defense Virtual VM.
High Availability (active/standby)
Clustering
VM import/export
Firepower Device Manager user interface
3
Cisco Firepower Threat Defense Virtual for the Microsoft Azure Cloud Quick Start Guide
Sample Network Topology for Firepower Threat Defense Virtual on Azure
Sample Network Topology for Firepower Threat Defense Virtual on Azure
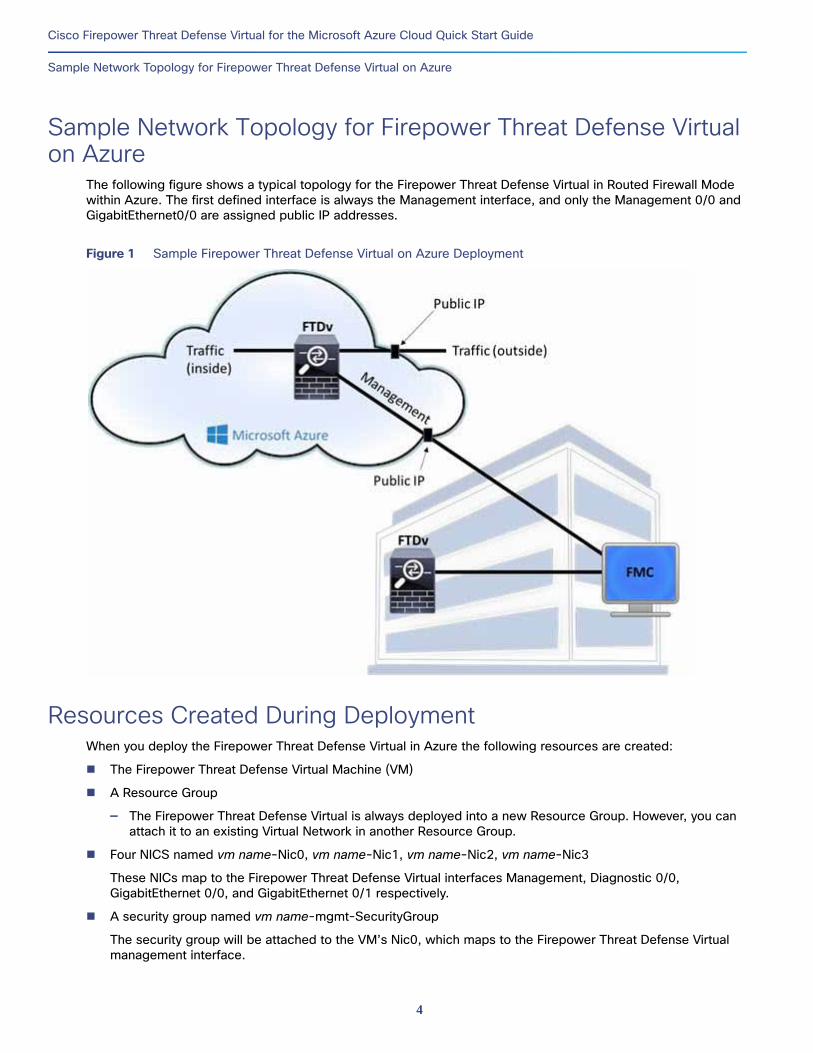
The following figure shows a typical topology for the Firepower Threat Defense Virtual in Routed Firewall Mode within Azure. The first defined interface is always the Management interface, and only the Management 0/0 and GigabitEthernet0/0 are assigned public IP addresses.
Figure 1 Sample Firepower Threat Defense Virtual on Azure Deployment
Resources Created During Deployment When you deploy the Firepower Threat Defense Virtual in Azure the following resources are created:
The Firepower Threat Defense Virtual Machine (VM)
A Resource Group
— The Firepower Threat Defense Virtual is always deployed into a new Resource Group. However, you can attach it to an existing Virtual Network in another Resource Group.
Four NICS named vm name-Nic0, vm name-Nic1, vm name-Nic2, vm name-Nic3
These NICs map to the Firepower Threat Defense Virtual interfaces Management, Diagnostic 0/0, GigabitEthernet 0/0, and GigabitEthernet 0/1 respectively.
A security group named vm name-mgmt-SecurityGroup
The security group will be attached to the VM’s Nic0, which maps to the Firepower Threat Defense Virtual management interface.
4

Cisco Firepower Threat Defense Virtual for the Microsoft Azure Cloud Quick Start Guide
Azure Routing
The security group includes rules to allow SSH (TCP port 22) and the management traffic for the Firepower Management Center interface (TCP port 8305). You can modify these values after deployment.
A Public IP Address (named according to the value you chose during deployment).
The public IP address is associated with VM Nic0, which maps to Management.
Note: You must choose a public IP address (new or existing); the NONE option is not supported.
A Virtual Network with four subnets will be created if you choose the New Network option.
A Routing Table for each subnet (updated if it already exists)
The tables are named “subnet name”-FTDv-RouteTable.
Each routing table includes routes to the other three subnets with the Firepower Threat Defense Virtual IP address as the next hop. You may chose to add a default route if traffic needs to reach other subnets or the Internet.
A boot diagnostics file in the selected storage account
The boot diagnostics file will be in Blobs (binary large objects).
Two files in the selected storage account under Blobs and container VHDs named vm name-disk.vhd and vm name-<uuid>.status
A Storage account (unless you chose an existing storage account)
Note: When you delete a VM, you must delete each of these resources individually, except for any resources you want to keep.
Azure Routing Routing in an Azure Virtual Network Subnet is determined by the Subnet's Effective Routing Table. The Effective Routing Table is a combination of built-in system routes and the routes in the User Defined Route (UDR) Table.
Note: You can view the Effective Routing Table under VM NIC properties.
You can view and edit the User Defined Routing table. When the system routes and the user defined routes are combined to form the Effective Routing Table, the most specific route wins and ties go to the User Defined Routing table. The System Routing Table includes a default route (0.0.0.0/0) pointing to Azure’s Virtual Network Internet Gateway. The System Routing Table also includes specific routes to the other defined subnets with the next-hop pointing to Azure’s Virtual Network infrastructure gateway.
To route traffic through the Firepower Threat Defense Virtual, routes must be added/updated in the User Defined Routing table associated with each data subnet. Traffic of interest should be routed by using the Firepower Threat Defense Virtual IP address on that subnet as the next-hop. Also, a default route for 0.0.0.0/0 can be added with a next hop of the Firepower Threat Defense Virtual IP if needed.
Because of the existing specific routes in the System Routing Table, you must add specific routes to the User Defined Routing table to point to the Firepower Threat Defense Virtual as the next-hop. Otherwise, a default route in the User Defined table would lose to the more specific route in the System Routing Table and traffic would bypass the Firepower Threat Defense Virtual.
Routing Configuration for VMs in the Virtual NetworkRouting in the Azure Virtual Network depends on the Effective Routing Table and not the particular gateway settings on the clients. Clients running in a Virtual Network may be given routes by DHCP that are the .1 address on their respective subnets. This is a place holder and serves only to get the packet to the Virtual Network’s infrastructure
5

Cisco Firepower Threat Defense Virtual for the Microsoft Azure Cloud Quick Start Guide
IP Addresses
virtual gateway. Once a packet leaves the VM it is routed according to the Effective Routing Table (as modified by the User Defined Table). The Effective Routing Table determines the next hop regardless of whether a client has a gateway configured as .1 or as the Firepower Threat Defense Virtual address.
Azure VM ARP tables will show the same MAC address (1234.5678.9abc) for all known hosts. This ensures that all packets leaving an Azure VM will reach the Azure gateway where the Effective Routing Table will be used to determine the path of the packet.
IP AddressesThe following information applies to IP addresses in Azure:
The first NIC on the Firepower Threat Defense Virtual (which maps to Management) is given a private IP address in the subnet to which it is attached.
A public IP address may be associated with this private IP address and the Azure Internet gateway handles the NAT translations.
You can associate a public IP address with a data interface (GigabitEthernet0/0, for example) after the Firepower Threat Defense Virtual has been deployed.
Public IP addresses that are dynamic may change during an Azure stop/start cycle. However, they are persistent during Azure restart and during Firepower Threat Defense Virtual reload.
Public IP addresses that are static do not change until you change them in Azure.
Firepower Threat Defense Virtual interfaces may use DHCP to set their IP addresses. The Azure infrastructure ensures that the Firepower Threat Defense Virtual interfaces are assigned the IP addresses set in Azure.
Deploy the Firepower Threat Defense VirtualYou can deploy the Firepower Threat Defense Virtual in Azure using templates. Cisco provides two kinds of templates:
Solution Template in the Azure Marketplace—Use the solution template available in the Azure Marketplace to deploy the Firepower Threat Defense Virtual using the Azure portal. You can use an existing resource group and storage account (or create them new) to deploy the virtual appliance. To use the solution template, see Deploy from the Azure Marketplace Using the Solution Template, page 6.
Custom Template using a Managed Image from a VHD (available from cisco.com)—In addition to the Marketplace-based deployment, Cisco provides a compressed virtual hard disk (VHD) that you can upload to Azure to simplify the process of deploying the Firepower Threat Defense Virtual in Azure. Using a Managed Image and two JSON files (a Template file and a Parameter File), you can deploy and provision all the resources for the Firepower Threat Defense Virtual in a single, coordinated operation. To use the custom template, see Deploy from Azure Using a VHD and Resource Template, page 8.
Deploy from the Azure Marketplace Using the Solution TemplateThe following instructions show you how to deploy the solution template for the Firepower Threat Defense Virtual that is available in the Azure Marketplace. To use the customizable ARM templates available in the GitHub repository, see Use the ARM Template to Deploy the VM-Series Firewall.
The following procedure is a top-level list of steps to set up the Firepower Threat Defense Virtual in the Microsoft Azure environment. For detailed steps for Azure setup, see Getting Started with Azure.
When you deploy the Firepower Threat Defense Virtual in Azure it automatically generates various configurations, such as resources, public IP addresses, and route tables. You can further manage these configurations after deployment. For example, you may want to change the Idle Timeout value from the default, which is a low timeout.
6

Cisco Firepower Threat Defense Virtual for the Microsoft Azure Cloud Quick Start Guide
Deploy the Firepower Threat Defense Virtual
Procedure
1. Log into the Azure Resource Manager (ARM) portal.
The Azure portal shows virtual elements associated with the current account and subscription regardless of data center location.
2. Choose Azure Marketplace > Virtual Machines.
3. Search Marketplace for “Cisco Firepower Next Generation Firewall - virtual”, choose the offering, and click Create.
4. Configure the basic settings.
a. Enter a name for the virtual machine. This name should be unique within your Azure subscription.
Note: Make sure you do not use an existing name or the deployment will fail.
b. Enter a username for the Firepower Threat Defense Virtual administrator.
Note: The name “admin” is reserved in Azure and cannot be used.
c. Choose an authentication type, either password or SSH key.
If you choose password, enter a password and confirm.
If you choose SSH key, specify the RSA public key of the remote peer.
d. Create a password to use with the Admin user account when you log in to configure the Firepower Threat Defense Virtual.
e. Choose your subscription type.
f. Create a new Resource Group.
The Firepower Threat Defense Virtual should be deployed into a new Resource Group. The option to deploy into an existing Resource Group only works if that existing Resource Group is empty.
However, you can attach the FTDv to an existing Virtual Network in another Resource Group when configuring the network options in later steps.
g. Select geographical location. This should be the same for all resources used in this deployment (for example: FTDv, Network, storage accounts).
h. Click OK.
5. Complete the initial configuration for Firepower Threat Defense Virtual.
a. Choose the virtual machine size.
b. Choose a storage account.
Note: You can use an existing storage account or create a new one. The storage account name can only contain lowercase letters and numbers.
c. Request a public IP address by entering a label for the IP address in the Name field, and then click OK.
Note: Azure creates a dynamic public IP address, regardless of the dynamic/static choice made in this step. The public IP may change when the VM is stopped and restarted. If you prefer a fixed IP address, you can open the created public-ip after deployment and change it from a dynamic to a static address.
d. Add a DNS label if needed.
7

Cisco Firepower Threat Defense Virtual for the Microsoft Azure Cloud Quick Start Guide
Deploy the Firepower Threat Defense Virtual
Note: The fully qualified domain name will be your DNS label plus the Azure URL: <dnslabel>.<location>.cloudapp.azure.com
e. Choose an existing virtual network or create a new one.
f. Configure four subnets for the Firepower Threat Defense Virtual network interfaces:
— FTDv Management interface, attached to the “First subnet”
— FTDv Diagnostic interface, attached to the “Second subnet”
— FTDv Gig0/0 interface, attached to the “Third subnet”
— FTDv Gig0/1 interface, attached to the “Fourth subnet”
g. Click OK.
6. View the configuration summary, and then click OK.
7. View the terms of use and then click Purchase.
Deployment times vary in Azure. Wait until Azure reports that the Firepower Threat Defense Virtual VM is running.
What to Do Next
Update the Firepower Threat Defense Virtual’s IP configuration in Azure.
Deploy from Azure Using a VHD and Resource TemplateYou can create your own custom Cisco Firepower Threat Defense Virtual images using a compressed VHD image available from Cisco. To deploy using a VHD image, you must upload the VHD image to your Azure storage account. Then, you can create a managed image using the uploaded disk image and an Azure Resource Manager template. Azure templates are JSON files that contain resource descriptions and parameter definitions.
Before You Begin
You need the JSON template and corresponding JSON parameter file for your Cisco Firepower Threat Defense Virtual template deployment. See Appendix - Azure Resource Template Sample, page 16 for instructions on how to build a template and parameter file.
This procedure requires an existing Linux VM in Azure. We recommended you use a temporary Linux VM (such as Ubuntu 16.04) to upload the compressed VHD image to Azure. This image will require about 50G of storage when unzipped. Also, your upload times to Azure storage will be faster from a Linux VM in Azure.
If you need to create a VM, use one of the following methods:
— Create a Linux virtual machine with the Azure CLI
— Create a Linux virtual machine with the Azure portal
In your Azure subscription, you should have a storage account available in the Location in which you want to deploy the Cisco Firepower Threat Defense Virtual.
Procedure
1. Download the Cisco Firepower Threat Defense Virtual compressed VHD image from the Cisco Download Software page:
a. Navigate to Products > Security > Firewalls > Next-Generation Firewalls (NGFW) > Firepower NGFW Virtual.
b. Click Firepower Threat Defense Software.
8

Cisco Firepower Threat Defense Virtual for the Microsoft Azure Cloud Quick Start Guide
Deploy the Firepower Threat Defense Virtual
Follow the instructions for downloading the image.
For example, Cisco_Firepower_Threat_Defense_Virtual-6.2.3-81.vhd.bz2
2. Copy the compressed VHD image to your Linux VM in Azure.
There are many options that you can use to move files up to Azure and down from Azure. This example shows SCP or secure copy:
# scp /[email protected]/dir/Cisco_Firepower_Threat_Defense_Virtual-6.2.3-81.vhd. bz2 <linux-ip>
3. Log in to the Linux VM in Azure and navigate to the directory where you copied the compressed VHD image.
4. Unzip the Firepower Threat Defense Virtual VHD image.
There are many options that you can use to unzip or decompress files. This example shows the Bzip2 utility, but there are also Windows-based utilities that would work.
# bunzip2 Cisco_Firepower_Threat_Defense_Virtual-6.2.3-81.vhd.bz2
5. Upload the VHD to a container in your Azure storage account. You can use an existing storage account or create a new one. The storage account name can only contain lowercase letters and numbers.
There are many options that you can use to upload a VHD to your storage account, including AzCopy, Azure Storage Copy Blob API, Azure Storage Explorer, Azure CLI, or the Azure Portal. We do not recommend using the Azure Portal for a file as large as the Firepower Threat Defense Virtual VHD.
The following example shows the syntax using Azure CLI:
azure storage blob upload \ --file <unzipped vhd> \ --account-name <azure storage account> \ --account-key yX7txxxxxxxx1dnQ== \ --container <container> \ --blob <desired vhd name in azure> \ --blobtype page
6. Create a Managed Image from the VHD:
a. In the Azure Portal, select Images.
b. Click Add to create a new image.
c. Provide the following information:
• Name—Enter a user-defined name for the managed image.
• Subscription—Choose a subscriptions from the drop-down list.
• Resource group—Choose an existing resource group or create a new one.
• OS disk—Select Linux as the OS type.
• Storage blob—Browse to the storage account to select the uploaded VHD.
• Account type—Choose Standard (HDD) from the drop-down list.
• Host caching—Choose Read/write from the drop-down list.
• Data disks—Leave at the default; don't add a data disk.
d. Click Create.
Wait for the Successfully created image message under the Notifications tab.
9

Cisco Firepower Threat Defense Virtual for the Microsoft Azure Cloud Quick Start Guide
Deploy the Firepower Threat Defense Virtual
Note: Once the Managed Image has been created, the uploaded VHD and upload Storage Account can be removed.
7. Acquire the Resource ID of the newly created Managed Image.
Internally, Azure associates every resource with a Resource ID. You’ll need the Resource ID when you deploy new Firepower Threat Defense Virtual firewalls from this managed image.
a. In the Azure Portal, select Images.
b. Select the managed image created in the previous step.
c. Click Overview to view the image properties.
d. Copy the Resource ID to the clipboard.
The Resource ID takes the form of: /subscriptions/<subscription-id>/resourceGroups/<resourceGroup>/providers/Microsoft.Compute/<container>/<vhdname>
8. Build a Firepower Threat Defense Virtual firewall using the managed image and a resource template:
a. Select New, and search for Template Deployment until you can select it from the options.
b. Select Create.
c. Select Build your own template in the editor.
You have a blank template that is available for customizing. See Create a Resource Template, page 17 for an example of how to create a template.
d. Paste your customized JSON template code into the window, and then click Save.
e. Choose a Subscription from the drop-down list.
f. Choose an existing Resource group or create a new one.
g. Choose a Location from the drop-down list.
h. Paste the Managed Image Resource ID from the previous step into the Vm Managed Image Id field.
9. Click Edit parameters at the top of the Custom deployment page. You have a parameters template that is available for customizing.
a. Click Load file and browse to the customized Firepower Threat Defense Virtual parameter file. See Create a Parameter File, page 24 for an example of how to create a parameter template.
b. Paste your customized JSON parameters code into the window, and then click Save.
10. Review the Custom deployment details. Make sure that the information in Basics and Settings matches your expected deployment configuration, including the Resource ID.
11. Review the Terms and Conditions, and check the I agree to the terms and conditions stated above check box.
12. Click Purchase to deploy a Firepower Threat Defense Virtual firewall using the managed image and a custom template.
If there are no conflicts in your template and parameter files, you should have a successful deployment.
The Managed Image is available for multiple deployments within the same subscription and region.
What to Do Next
Update the Firepower Threat Defense Virtual’s IP configuration in Azure.
10

Cisco Firepower Threat Defense Virtual for the Microsoft Azure Cloud Quick Start Guide
Deploy the Firepower Threat Defense Virtual
Update the Public IP Address ConfigurationProcedure
1. From the Virtual Machine list, choose the Firepower Threat Defense Virtual VM.
2. Click Overview.
3. Click the blue IP and DNS names below the Public IP address/DNS name label.
4. Click Configuration:
— To connect by IP address, choose the Assignment Static.
— To connect by DNS name, enter a DNS name label.
— (Optional) For convenience you can increase the Idle Timeout to its maximum range (30 minutes). This prevents management SSH sessions from timing out too quickly.
5. Click Save.
What to Do Next
Optionally, add a public IP address to a data interface.
Configure the Firepower Threat Defense Virtual for management by a Firepower Management Center.
(Optional) Add a Public IP Address to a Data InterfaceProcedure
1. From the Virtual Machine list, choose the Firepower Threat Defense Virtual VM.
2. Click Network interfaces.
3. Choose a data interface you want to add the IP addresses to:
— Nic2 (the third NIC) maps to GigabitEthernet 0/0 when viewed from the Firepower Management Center. This is the first data NIC.
— Nic3 (the fourth NIC) maps to GigabitEthernet 0/1 when viewed from the Firepower Management Center. This is the second data NIC.
4. Click IP Configurations.
5. Click Add.
6. Choose IPConfig-1 from the list on the right.
7. In the IPConfig-1 configuration blade, switch the Public IP address to Enabled.
8. Use the Create new dialog to create a new public IP address.
Note: You can create a static or dynamic IP address. If you create a dynamic IP address, then you must always access this interface by DNS name rather than IP address.
9. Click OK.
Wait for the configuration change to process then check the Network interfaces list to make sure a public IP address was added to the data interface.
11

Cisco Firepower Threat Defense Virtual for the Microsoft Azure Cloud Quick Start Guide
Deploy the Firepower Threat Defense Virtual
Note: When Internet traffic is directed at the public IP address associated with a data interface, the traffic will be Destination NATed by the Azure gateway and the new destination IP of the packet will be the private IP of the Firepower Threat Defense Virtual interface associated with the public IP. The Firepower Threat Defense Virtual must be configured with NAT to translate the destination IP to an IP of some resource on the inside subnet.
10. Click Save.
What to Do Next
Configure the Firepower Threat Defense Virtual for management by a Firepower Management Center.
Configure the Firepower Threat Defense Virtual for Firepower ManagementThe Firepower Threat Defense Virtual needs to be configured with the networking information required to register the device to a Firepower Management Center.
To configure the Firepower Threat Defense Virtual so that an FMC can add it as a device, use the configure manager add command. A unique self-generated alphanumeric registration key is always required to register a device to a Firepower Management Center. This is a simple key that you specify, and it is not the same as a license key.
If you have an Express Route connection from your premises to your Azure virtual network, you can provide the Firepower Management Center’s IP address along with the registration key, for example:
configure manager add XXX.XXX.XXX.XXX my_reg_key
where XXX.XXX.XXX.XXX is the IP address of the managing Firepower Management Center and my_reg_key is the user-defined registration key for the virtual device.
However, if you want to register the Firepower Threat Defense Virtual using its public IP address, then you need to also enter a unique NAT ID along with the registration key, and specify DONTRESOLVE instead of the IP address. For example:
configure manager add DONTRESOLVE my_reg_key my_nat_id
where my_reg_key is the user-defined registration key and my_nat_id is the user-defined NAT ID for the virtual device.
Procedure
1. SSH to the Firepower Threat Defense Virtual using the public IP address provided by Azure.
2. Log in with the username admin and the password Admin123.
3. Complete the system configuration as prompted.
You must first read and accept the end user license agreement (EULA). Then change the admin password, then configure the management address, DNS settings, and firewall mode (routed) as prompted.
4. Wait for the default system configuration to be processed. This may take a few minutes.
5. Identify the Firepower Management Center appliance that will manage this device using the configure manager add command.
> configure manager add {hostname | IPv4_address | IPv6_address | DONTRESOLVE} reg_key [nat_id]
Note: The registration key is a user-defined one-time use key that must not exceed 37 characters. Valid characters include alphanumeric characters (A–Z, a–z, 0–9) and the hyphen (-). You will need to remember this registration key when you add the device to the Firepower Management Center.
If the Firepower Management Center is not directly addressable, use DONTRESOLVE.
12

Cisco Firepower Threat Defense Virtual for the Microsoft Azure Cloud Quick Start Guide
Deploy the Firepower Threat Defense Virtual
Note: The NAT ID is an optional user-defined alphanumeric string that follows the same conventions as the registration key described above. It is required if the hostname is set to DONTRESOLVE. You will need to remember this NAT ID when you add the device to the Firepower Management Center.
Because the IP address of the Firepower Management Center will likely be NATed into Azure, the NAT ID is required. For example:
configure manager add DONTRESOLVE 1234 ABCD
What to Do Next
Update the Azure Security Groups.
Update Security GroupsA Security Group controls which ports/destinations Azure allows/denies for certain interfaces. To gain SSH access to the Firepower Threat Defense Virtual as well as from the Firepower Management Center, rules need to be added to the Security Group on the VM’s primary interface. TCP port 22 is needed for SSH and TCP port 8305 is needed for registration and diagnostics.
Procedure
1. Open the VM information page for the newly deployed Firepower Threat Defense Virtual.
2. Choose Network Interfaces.
3. Choose Nic0.
4. In the Essentials pane, find the Network Security Group. Click the blue network security group name. It should follow a convention similar to <vmname>-SSH-SecurityGroup.
5. Click Inbound security rules.
6. Verify that there is an SSH-Rule that allows Service = SSH, or add one if there is none.
We recommend that you limit the Source address range to IP addresses you expect to be using when you connect to the Firepower Threat Defense Virtual via SSH, otherwise SSH is open to the Internet.
7. Add a Security group rule for the diagnostic interface:
a. Name—Name the inbound rule; for example, sf-tunnel.
b. Priority—Leave the default
c. Source—Change to CIDR, and enter the subnet that the Firepower Management Center will be sending from.
d. Service—Custom
e. Protocol—TCP
f. Port range—8305
g. Action—Allow
8. Click OK.
What to Do Next
Register the Firepower Threat Defense Virtual with the Firepower Management Center.
13

Cisco Firepower Threat Defense Virtual for the Microsoft Azure Cloud Quick Start Guide
Deploy the Firepower Threat Defense Virtual
Register with the Firepower Management Center Make sure that security groups on the first interface and on the Management subnet allow all traffic from your Firepower Management Center’s source address. This is typically an address from a pool on an Internet-facing firewall. You can temporarily allow all traffic. However, once you discover the IP address block that your Firepower Management Center is connecting from, you should restrict your security group to allow traffic only from those known safe blocks.
Procedure
Before You Begin
Firepower Threat Defense Virtual requires Smart Software Licensing, which is configurable from the Firepower Management Center.
Determine the time synchronization requirements for your virtual appliance. We recommend that you synchronize your appliances to a physical NTP server. Do not synchronize your managed devices to a virtual Firepower Management Center. See the Firepower Management Center Configuration Guide for time synchronization requirements.
Procedure
1. Log into the Firepower Management Center using an HTTPS connection in a browser, using the hostname or address of the configured Firepower Management Center. For example, https://MC.example.com.
2. On the web interface for the Management Center, choose Devices > Device Management.
3. From the Add drop-down list, choose Add Device.
4. In the Host field:
a. To connect over the Internet using a public IP address, enter the public IP address associated with the Firepower Threat Defense Virtual’s Management interface.
b. To connect over Azure ExpressRoute, enter the private IP associated with the Firepower Threat Defense Virtual’s Management interface.
5. In the Display Name field, enter a name for the security module as you want it to display in the Management Center.
6. In the Registration Key field, enter the same registration key that you used when you configured the Firepower Threat Defense Virtual for Firepower Management.
7. If you are adding a device in a multidomain environment, assign the device to a leaf domain by selecting a value from the Domain drop-down list.
If your current domain is a leaf domain, the device is automatically added to the current domain.
8. Optionally, add the device to a device Group.
9. From the Access Control Policy drop-down list, choose an initial policy to deploy to the security module:
— The Default Access Control policy blocks all traffic from entering your network.
— The Default Intrusion Prevention policy allows all traffic that is also passed by the Balanced Security and Connectivity intrusion policy.
— The Default Network Discovery policy allows all traffic, which is inspected by network discovery only.
— You can choose any existing user-defined access control policy. For more information, see “Managing Access Control Policies” in the Firepower Management Center Configuration Guide.
10. Choose licenses to apply to the device.
14

Cisco Firepower Threat Defense Virtual for the Microsoft Azure Cloud Quick Start Guide
Deploy the Firepower Threat Defense Virtual
Note: Control, Malware, and URL Filtering licenses require a Protection license; see the Firepower Management Center Configuration Guide for more information.
11. If you used a NAT ID to identify the device when you configured it to be managed by the Firepower Management Center, expand the Advanced section and enter the same NAT ID in the Unique NAT ID field.
Note: If you connect to the Firepower Threat Defense Virtual over the Internet using the management’s Public IP, then you need to use the NAT ID. If you connect over Azure ExpressRoute, you do not need to use the NAT ID.
12. Click Register and confirm a successful registration.
It may take up to two minutes for the Firepower Management Center to verify the device’s heartbeat and establish communication.
What to Do Next
Enable and configure the two data interfaces.
Configure Device Settings After you register the Firepower Threat Defense Virtual to its managing Firepower Management Center, you need to enable and configure the two data interfaces.
Procedure
1. Choose Devices > Device Management.
2. Click the edit icon next to the Firepower Threat Defense Virtual device where you want to configure the interface.
In a multidomain deployment, if you are not in a leaf domain, the system prompts you to switch.
3. Click the edit icon next to the GigabitEthernet0/0 interface:
a. From the Mode drop-down list, choose None to leave the interface in routed mode.
b. Click the IPv4 tab and verify that the IP Address matches the address given to the interface during deployment in Azure.
c. Click OK.
4. Repeat the same steps for the GigabitEthernet0/1 interface.
5. Click Save.
What to Do Next
You can use the Firepower Management Center user interface to configure and apply access control policies and other related policies to manage traffic using your Firepower Threat Defense Virtual instance; see the Firepower Management Center Configuration Guide or the online help.
15

Cisco Firepower Threat Defense Virtual for the Microsoft Azure Cloud Quick Start Guide
Appendix - Azure Resource Template Sample
Appendix - Azure Resource Template SampleThis section describes the structure of an Azure Resource Manager template you can use to deploy the Firepower Threat Defense Virtual. An Azure Resource Template is a JSON file. To simplify the deployment of all the required resources, this example includes two JSON files:
Template File—This is the main resources file that deploys all the components within the resource group.
Parameter File—This file includes the parameters required to successfully deploy the Firepower Threat Defense Virtual. It includes details such as the subnet information, virtual machine tier and size, username and password for the Firepower Threat Defense Virtual, the name of the storage container, etc. You can customize this file for your Azure deployment environment.
Template File FormatThis section describes the structure of an Azure Resource Manager template file. The following figure shows a collapsed view of a template file and presents the different sections of a template.
Figure 2 Azure Resource Manager JSON Template File
The template consists of JSON and expressions that you can use to construct values for your Firepower Threat Defense Virtual deployment. In its simplest structure, a template contains the following elements:
Table 1 Azure Resource Manager JSON Template File Elements Defined
{ "$schema": "http://schema.management.azure.com/schemas/2015-01-01/deploymentTemplate.json#", "contentVersion": "", "parameters": { }, "variables": { }, "resources": [ ], "outputs": { }}
Element Required Description
$schema Yes Location of the JSON schema file that describes the version of the template language. Use the URL shown in the preceding figure.
contentVersion Yes Version of the template (such as 1.0.0.0). You can provide any value for this element. When deploying resources using the template, this value can be used to make sure that the right template is being used.
parameters No Values that are provided when deployment is executed to customize resource deployment. Parameters allow for inputting values at the time of deployment. They are not absolutely required, but without them the JSON template will deploy the resources with the same parameters each time.
variables No Values that are used as JSON fragments in the template to simplify template language expressions.
resources Yes Resource types that are deployed or updated in a resource group.
outputs No Values that are returned after deployment.
16

Cisco Firepower Threat Defense Virtual for the Microsoft Azure Cloud Quick Start Guide
Appendix - Azure Resource Template Sample
You can make use of JSON templates to not only declare the resource types to be deployed, but also their related configuration parameters. The following sample shows a template that deploys a new Firepower Threat Defense Virtual.
Create a Resource TemplateHere you will find a complete sample of a Firepower Threat Defense Virtual deployment template.
Procedure
To create your own template using a text editor:
1. Copy the sample template in the following figure.
2. Save the file locally as a JSON file; for example, azureDeploy.json.
3. Use this template to deploy the Firepower Threat Defense Virtual as described in Deploy from Azure Using a VHD and Resource Template, page 8.
Figure 3 Firepower Threat Defense Virtual JSON Template File Sample
{ "$schema": "http://schema.management.azure.com/schemas/2015-01-01/deploymentTemplate.json#", "contentVersion": "1.0.0.0", "parameters": { "vmName": { "type": "string", "defaultValue": "ngfw", "metadata": { "description": "Name of the NGFW VM" } }, "vmManagedImageId": { "type": "string", "defaultValue": "/subscriptions/{subscription-id}/resourceGroups/myresourcegroup1/providers/Microsoft.Compute/images/myImage", "metadata": { "description": "The ID of the managed image used for deployment. /subscriptions/{subscription-id}/resourceGroups/myresourcegroup1/providers/Microsoft.Compute/images/myImage" } }, "adminUsername": { "type": "string", "defaultValue": "", "metadata": { "description": "Username for the Virtual Machine. admin, Administrator among other values are disallowed - see Azure docs" } }, "adminPassword": { "type": "securestring", "defaultValue" : "", "metadata": { "description": "Password for the Virtual Machine. Passwords must be 12 to 72 chars and have at least 3 of the following: Lowercase, uppercase, numbers, special chars" } }, "vmStorageAccount": { "type": "string", "defaultValue": "", "metadata": { "description": "A storage account name (boot diags require a storage account). Between 3 and 24 characters. Lowercase letters and numbers only" } }, "virtualNetworkResourceGroup": { "type": "string", "defaultValue": "", "metadata": { "description": "Name of the virtual network's Resource Group"
17

Cisco Firepower Threat Defense Virtual for the Microsoft Azure Cloud Quick Start Guide
Appendix - Azure Resource Template Sample
} }, "virtualNetworkName": { "type": "string", "defaultValue": "", "metadata": { "description": "Name of the virtual network" } }, "mgmtSubnetName": { "type": "string", "defaultValue": "", "metadata": { "description": "The FTDv management interface will attach to this subnet" } }, "mgmtSubnetIP": { "type": "string", "defaultValue": "", "metadata": { "description": "NGFW IP on the mgmt interface (example: 192.168.0.10)" } }, "diagSubnetName": { "type": "string", "defaultValue": "", "metadata": { "description": "The FTDv diagnostic0/0 interface will attach to this subnet" } }, "diagSubnetIP": { "type": "string", "defaultValue": "", "metadata": { "description": "NGFW IP on the diag interface (example: 192.168.1.10)" } }, "gig00SubnetName": { "type": "string", "defaultValue": "", "metadata": { "description": "The FTDv Gigabit 0/0 interface will attach to this subnet" } }, "gig00SubnetIP": { "type": "string", "defaultValue": "", "metadata": { "description": "The IP on the Gigabit 0/0 interface (example: 192.168.2.10)" } }, "gig01SubnetName": { "type": "string", "defaultValue": "", "metadata": { "description": "The FTDv Gigabit 0/1 interface will attach to this subnet" } }, "gig01SubnetIP": { "type": "string", "defaultValue": "", "metadata": { "description": "The IP on the Gigabit 0/1 interface (example: 192.168.3.5)" } }, "vmSize": { "type": "string", "defaultValue": "Standard_D3_v2", "allowedValues": [ "Standard_D3_v2" , "Standard_D3" ], "metadata": { "description": "NGFW VM Size (Standard_D3_v2 or Standard_D3)" } } }, "variables": {
"virtualNetworkID": "[resourceId(parameters('virtualNetworkResourceGroup'),'Microsoft.Network/virtualNetworks', parameters('virtualNetworkName'))]", "vmNic0Name":"[concat(parameters('vmName'),'-nic0')]",
18

Cisco Firepower Threat Defense Virtual for the Microsoft Azure Cloud Quick Start Guide
Appendix - Azure Resource Template Sample
"vmNic1Name":"[concat(parameters('vmName'),'-nic1')]", "vmNic2Name":"[concat(parameters('vmName'),'-nic2')]", "vmNic3Name":"[concat(parameters('vmName'),'-nic3')]", "vmNic0NsgName":"[concat(variables('vmNic0Name'),'-NSG')]",
"vmMgmtPublicIPAddressName": "[concat(parameters('vmName'),'nic0-ip')]", "vmMgmtPublicIPAddressType": "Static", "vmMgmtPublicIPAddressDnsName": "[variables('vmMgmtPublicIPAddressName')]" }, "resources": [ { "apiVersion": "2017-03-01", "type": "Microsoft.Network/publicIPAddresses", "name": "[variables('vmMgmtPublicIPAddressName')]", "location": "[resourceGroup().location]", "properties": { "publicIPAllocationMethod": "[variables('vmMgmtPublicIpAddressType')]", "dnsSettings": { "domainNameLabel": "[variables('vmMgmtPublicIPAddressDnsName')]" } } }, { "apiVersion": "2015-06-15", "type": "Microsoft.Network/networkSecurityGroups", "name": "[variables('vmNic0NsgName')]", "location": "[resourceGroup().location]", "properties": { "securityRules": [ { "name": "SSH-Rule", "properties": { "description": "Allow SSH", "protocol": "Tcp", "sourcePortRange": "*", "destinationPortRange": "22", "sourceAddressPrefix": "Internet", "destinationAddressPrefix": "*", "access": "Allow", "priority": 100, "direction": "Inbound" } }, { "name": "SFtunnel-Rule", "properties": { "description": "Allow tcp 8305", "protocol": "Tcp", "sourcePortRange": "*", "destinationPortRange": "8305", "sourceAddressPrefix": "Internet", "destinationAddressPrefix": "*", "access": "Allow", "priority": 101, "direction": "Inbound" } } ] } }, { "apiVersion": "2017-03-01", "type": "Microsoft.Network/networkInterfaces", "name": "[variables('vmNic0Name')]", "location": "[resourceGroup().location]", "dependsOn": [ "[concat('Microsoft.Network/networkSecurityGroups/',variables('vmNic0NsgName'))]", "[concat('Microsoft.Network/publicIPAddresses/', variables('vmMgmtPublicIPAddressName'))]" ], "properties": { "ipConfigurations": [ { "name": "ipconfig1", "properties": { "privateIPAllocationMethod": "Static", "privateIPAddress" : "[parameters('mgmtSubnetIP')]", "subnet": {
19

Cisco Firepower Threat Defense Virtual for the Microsoft Azure Cloud Quick Start Guide
Appendix - Azure Resource Template Sample
"id": "[concat(variables('virtualNetworkID'),'/subnets/', parameters('mgmtSubnetName'))]" }, "publicIPAddress":{ "id": "[resourceId('Microsoft.Network/publicIPAddresses/', variables('vmMgmtPublicIPAddressName'))]" } } } ], "networkSecurityGroup": { "id": "[resourceId('Microsoft.Network/networkSecurityGroups', variables('vmNic0NsgName'))]" }, "enableIPForwarding": true } }, { "apiVersion": "2017-03-01", "type": "Microsoft.Network/networkInterfaces", "name": "[variables('vmNic1Name')]", "location": "[resourceGroup().location]", "dependsOn": [ ], "properties": { "ipConfigurations": [ { "name": "ipconfig1", "properties": { "privateIPAllocationMethod": "Static", "privateIPAddress" : "[parameters('diagSubnetIP')]", "subnet": { "id": "[concat(variables('virtualNetworkID'),'/subnets/', parameters('diagSubnetName'))]" } } } ], "enableIPForwarding": true } }, { "apiVersion": "2017-03-01", "type": "Microsoft.Network/networkInterfaces", "name": "[variables('vmNic2Name')]", "location": "[resourceGroup().location]", "dependsOn": [ ], "properties": { "ipConfigurations": [ { "name": "ipconfig1", "properties": { "privateIPAllocationMethod": "Static", "privateIPAddress" : "[parameters('gig00SubnetIP')]", "subnet": { "id": "[concat(variables('virtualNetworkID'),'/subnets/', parameters('gig00SubnetName'))]" } } } ], "enableIPForwarding": true } }, { "apiVersion": "2017-03-01", "type": "Microsoft.Network/networkInterfaces", "name": "[variables('vmNic3Name')]", "location": "[resourceGroup().location]", "dependsOn": [ ], "properties": { "ipConfigurations": [ { "name": "ipconfig1", "properties": { "privateIPAllocationMethod": "Static", "privateIPAddress" : "[parameters('gig01SubnetIP')]", "subnet": { "id": "[concat(variables('virtualNetworkID'),'/subnets/', parameters('gig01SubnetName'))]"
} }
20

Cisco Firepower Threat Defense Virtual for the Microsoft Azure Cloud Quick Start Guide
Appendix - Azure Resource Template Sample
} ], "enableIPForwarding": true } }, { "type": "Microsoft.Storage/storageAccounts", "name": "[concat(parameters('vmStorageAccount'))]", "apiVersion": "2015-06-15", "location": "[resourceGroup().location]", "properties": { "accountType": "Standard_LRS" } }, { "apiVersion": "2017-12-01", "type": "Microsoft.Compute/virtualMachines", "name": "[parameters('vmName')]", "location": "[resourceGroup().location]", "dependsOn": [ "[concat('Microsoft.Storage/storageAccounts/', parameters('vmStorageAccount'))]", "[concat('Microsoft.Network/networkInterfaces/',variables('vmNic0Name'))]", "[concat('Microsoft.Network/networkInterfaces/',variables('vmNic1Name'))]", "[concat('Microsoft.Network/networkInterfaces/',variables('vmNic2Name'))]", "[concat('Microsoft.Network/networkInterfaces/',variables('vmNic3Name'))]" ], "properties": { "hardwareProfile": { "vmSize": "[parameters('vmSize')]" }, "osProfile": { "computername": "[parameters('vmName')]", "adminUsername": "[parameters('AdminUsername')]", "adminPassword": "[parameters('AdminPassword')]" }, "storageProfile": { "imageReference": { "id": "[parameters('vmManagedImageId')]" }, "osDisk": { "osType": "Linux", "caching": "ReadWrite", "createOption": "FromImage" } }, "networkProfile": { "networkInterfaces": [ { "properties": { "primary": true }, "id": "[resourceId('Microsoft.Network/networkInterfaces', variables('vmNic0Name'))]" }, { "properties": { "primary": false }, "id": "[resourceId('Microsoft.Network/networkInterfaces', variables('vmNic1Name'))]" }, { "properties": { "primary": false }, "id": "[resourceId('Microsoft.Network/networkInterfaces', variables('vmNic2Name'))]" }, { "properties": { "primary": false }, "id": "[resourceId('Microsoft.Network/networkInterfaces', variables('vmNic3Name'))]" } ] }, "diagnosticsProfile": { "bootDiagnostics": { "enabled": true, "storageUri": "[concat('http://',parameters('vmStorageAccount'),'.blob.core.windows.net')]" }
21
Cisco Firepower Threat Defense Virtual for the Microsoft Azure Cloud Quick Start Guide
Appendix - Azure Resource Template Sample
} } } ], "outputs": { }}
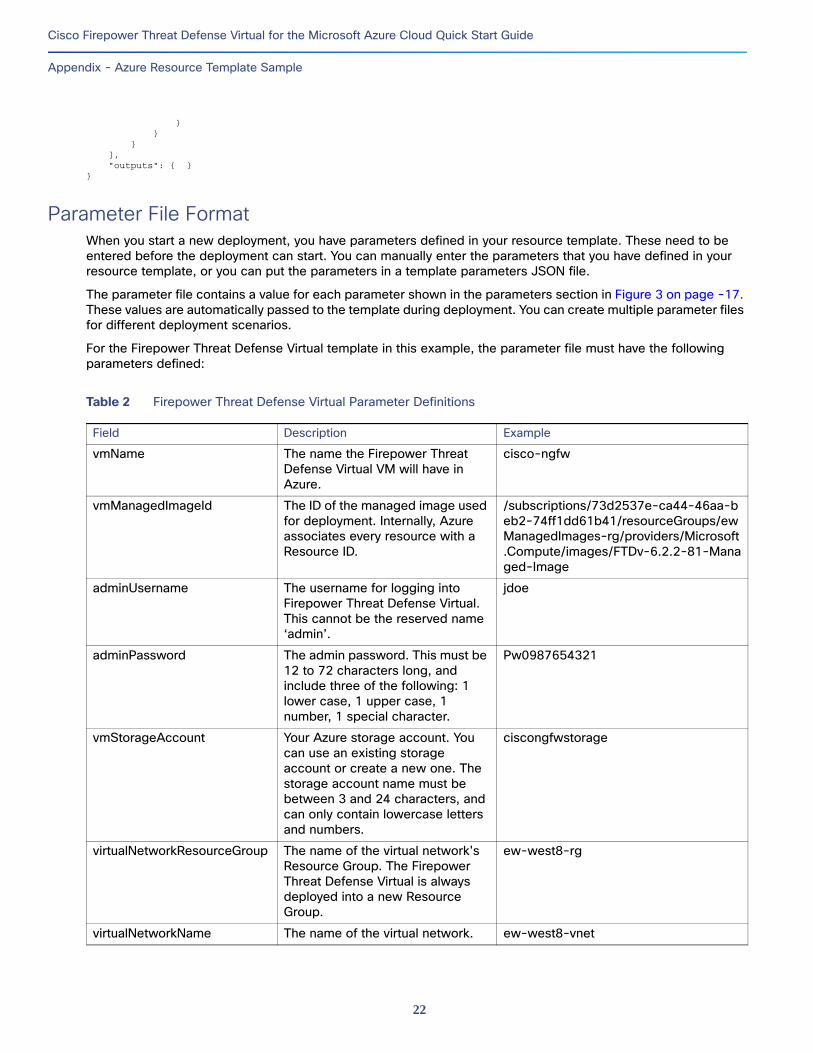
Parameter File FormatWhen you start a new deployment, you have parameters defined in your resource template. These need to be entered before the deployment can start. You can manually enter the parameters that you have defined in your resource template, or you can put the parameters in a template parameters JSON file.
The parameter file contains a value for each parameter shown in the parameters section in Figure 3 on page -17. These values are automatically passed to the template during deployment. You can create multiple parameter files for different deployment scenarios.
For the Firepower Threat Defense Virtual template in this example, the parameter file must have the following parameters defined:
Table 2 Firepower Threat Defense Virtual Parameter Definitions
Field Description Example
vmName The name the Firepower Threat Defense Virtual VM will have in Azure.
cisco-ngfw
vmManagedImageId The ID of the managed image used for deployment. Internally, Azure associates every resource with a Resource ID.
/subscriptions/73d2537e-ca44-46aa-beb2-74ff1dd61b41/resourceGroups/ewManagedImages-rg/providers/Microsoft.Compute/images/FTDv-6.2.2-81-Managed-Image
adminUsername The username for logging into Firepower Threat Defense Virtual. This cannot be the reserved name ‘admin’.
jdoe
adminPassword The admin password. This must be 12 to 72 characters long, and include three of the following: 1 lower case, 1 upper case, 1 number, 1 special character.
Pw0987654321
vmStorageAccount Your Azure storage account. You can use an existing storage account or create a new one. The storage account name must be between 3 and 24 characters, and can only contain lowercase letters and numbers.
ciscongfwstorage
virtualNetworkResourceGroup The name of the virtual network's Resource Group. The Firepower Threat Defense Virtual is always deployed into a new Resource Group.
ew-west8-rg
virtualNetworkName The name of the virtual network. ew-west8-vnet
22

Cisco Firepower Threat Defense Virtual for the Microsoft Azure Cloud Quick Start Guide
Appendix - Azure Resource Template Sample
mgmtSubnetName The management interface will attach to this subnet. This maps to Nic0, the first subnet. Note, this must match an existing subnet name if joining an existing network.
mgmt
mgmtSubnetIP The Management interface IP address.
10.8.0.55
diagSubnetName The diagnostic interface will attach to this subnet. This maps to Nic1, the second subnet. Note, this must match an existing subnet name if joining an existing network.
diag
diagSubnetIP The diagnostic interface IP address.
10.8.1.55
gig00SubnetName The GigabitEthernet 0/0 interface will attach to this subnet. This maps to Nic2, the third subnet. Note, this must match an existing subnet name if joining an existing network.
inside
gig00SubnetIP The GigabitEthernet 0/0 interface IP address. This is for Firepower Threat Defense Virtual’s first data interface.
10.8.2.55
gig01SubnetName The GigabitEthernet 0/1 interface will attach to this subnet. This maps to Nic3, the third subnet. Note, this must match an existing subnet name if joining an existing network.
outside
gig01SubnetIP The GigabitEthernet 0/1 interface IP address. This is for Firepower Threat Defense Virtual’s second data interface.
10.8.3.55
vmSize The VM size to use for the Firepower Threat Defense Virtual VM. Standard_D3_V2 and Standard_D3 are supported. Standard_D3_V2 is the default.
Standard_D3_V2 or Standard_D3
Field Description Example
23

Cisco Firepower Threat Defense Virtual for the Microsoft Azure Cloud Quick Start Guide
Appendix - Azure Resource Template Sample
Create a Parameter FileHere you will find a complete sample of a Firepower Threat Defense Virtual parameter file.
Procedure
To create your own parameter file using a text editor:
1. Copy the sample text in the following figure.
2. Save the file locally as a JSON file; for example, azureParameters.json.
3. Use this parameter template to deploy the Firepower Threat Defense Virtual as described in Deploy from Azure Using a VHD and Resource Template, page 8.
Figure 4 Firepower Threat Defense Virtual Parameter File Sample{ "$schema": "https://schema.management.azure.com/schemas/2015-01-01/deploymentParameters.json#", "contentVersion": "1.0.0.0", "parameters": { "vmName": { "value": "cisco-ngfw1" }, "vmManagedImageId": { "value": "/subscriptions/33d2517e-ca88-46aa-beb2-74ff1dd61b41/resourceGroups/ewManagedImages-rg/providers/Microsoft.Compute/images/FTDv-6.2.2-81-Managed-Image" }, "adminUsername": { "value": "jdoe" }, "adminPassword": { "value": "Pw0987654321" }, "vmStorageAccount": { "value": "ciscongfwstorage" }, "virtualNetworkResourceGroup": { "value": "ew-west8-rg" }, "virtualNetworkName": { "value": "ew-west8-vn" }, "mgmtSubnetName": { "value": "mgmt" }, "mgmtSubnetIP": { "value": "10.8.3.77" }, "diagSubnetName": { "value": "dmz" }, "diagSubnetIP": { "value": "10.8.2.77" }, "gig00SubnetName": { "value": "outside" }, "gig00SubnetIP": { "value": "10.8.0.77" }, "gig01SubnetName": { "value": "inside" }, "gig01SubnetIP": { "value": "10.8.1.77" }, "VmSize": { "value": "Standard_D3_v2" } }}
24

Cisco Firepower Threat Defense Virtual for the Microsoft Azure Cloud Quick Start Guide
Appendix - Azure Resource Template Sample
Cisco and the Cisco logo are trademarks or registered trademarks of Cisco and/or its affiliates in the U.S. and other countries. Toview a list of Cisco trademarks, go to this URL: www.cisco.com/go/trademarks. Third-party trademarks mentioned are the propertyof their respective owners. The use of the word partner does not imply a partnership relationship between Cisco and any othercompany. (1721R)
© 2018 Cisco Systems, Inc. All rights reserved.
25

Cisco Firepower Threat Defense Virtual for the Microsoft Azure Cloud Quick Start Guide
Appendix - Azure Resource Template Sample
26