Cisco 12016, Cisco 12416, and Cisco 12816 Router Scissor ... · 4 Cisco 12016, Cisco 12416, and...
16
Corporate Headquarters: Copyright © 2004 Cisco Systems, Inc. All rights reserved. Cisco Systems, Inc., 170 West Tasman Drive, San Jose, CA 95134-1706 USA Cisco 12016, Cisco 12416, and Cisco 12816 Router Scissor-Jack Instructions Cisco Product Number: GSR16-SCR-TABLE= Document Order Number: DOC-7815717= Introduction This publication contains instructions for using the scissor-jack platform with Cisco 12016, Cisco 12416, and Cisco 12816 Routers. Contents The following sections are included in this publication: • Scissor-Jack Overview, page 2 • Preparing for Installation, page 2 • Using the Scissor-Jack Platform, page 5 • Regulatory, Compliance, and Safety Information, page 10 • Obtaining Documentation, page 12 • Obtaining Technical Assistance, page 14 • Obtaining Additional Publications and Information, page 15
Transcript of Cisco 12016, Cisco 12416, and Cisco 12816 Router Scissor ... · 4 Cisco 12016, Cisco 12416, and...
Cisco 12016, Cisco 12416, and Cisco 12816 Router Scissor-Jack Instructions
Cisco Product Number: GSR16-SCR-TABLE=Document Order Number: DOC-7815717=
IntroductionThis publication contains instructions for using the scissor-jack platform with Cisco 12016, Cisco 12416, and Cisco 12816 Routers.
ContentsThe following sections are included in this publication:
• Scissor-Jack Overview, page 2
• Preparing for Installation, page 2
• Using the Scissor-Jack Platform, page 5
• Regulatory, Compliance, and Safety Information, page 10
• Obtaining Documentation, page 12
• Obtaining Technical Assistance, page 14
• Obtaining Additional Publications and Information, page 15
Corporate Headquarters:
Copyright © 2004 Cisco Systems, Inc. All rights reserved.
Cisco Systems, Inc., 170 West Tasman Drive, San Jose, CA 95134-1706 USA
Scissor-Jack Overview
Scissor-Jack OverviewThe scissor-jack platform enables a team of two installers to easily move a fully loaded router. This publication describes how to move a router chassis from an equipment rack and onto the scissor-jack, and then describes how to move it from the scissor-jack and onto a shipping pallet.
Preparing for InstallationInstallation preparation is presented in the following sections:
• Safety Guidelines
• Preventing Electrostatic Discharge Damage
• Required Tools and Equipment
• Related Documentation
Safety GuidelinesBefore you perform any procedure in this publication, review the safety guidelines in this section to avoid injuring yourself or damaging the equipment. In addition, review the safety warnings listed in the Regulatory Compliance and Safety Information for the Cisco 12000 Series Internet Router publication that accompanied your router before installing, configuring, or maintaining the router.
The following guidelines are for your safety and to protect equipment. The guidelines do not include all hazards. Be alert.
Safety with Equipment
• Always disconnect all power cords and interface cables before moving the system.
• Never assume that power is disconnected from a circuit; always check.
• Keep tools and assembly components away from walk areas.
• Do not work alone if potentially hazardous conditions exist.
• Do not perform any action that creates a potential hazard to people or makes the equipment unsafe.
• Carefully examine your work area for possible hazards such as moist floors, ungrounded power extension cables, and missing safety grounds.
Safety with Electricity
• Before beginning any procedures requiring access to the interior of the router, locate the emergency power-off switch for the room in which you are working.
• Disconnect all power and external cables before installing or removing a router.
• Never assume that power has been disconnected from a circuit; always check.
• Do not perform any action that creates a potential hazard to people or makes the equipment unsafe.
• Never install equipment that appears damaged.
2Cisco 12016, Cisco 12416, and Cisco 12816 Router Scissor-Jack Instructions
78-15717-01
Preparing for Installation
• Carefully examine your work area for possible hazards such as moist floors, ungrounded power extension cables, and missing safety grounds.
• If an electrical accident does occur, proceed as follows:
– Use caution; do not become a victim yourself. Disconnect power to the router.
– If possible, send another person to get medical aid; otherwise, assess the condition of the victim and then call for help.
– Determine if the person needs rescue breathing or external cardiac compressions; then take appropriate action.
In addition, observe the following guidelines when working with any equipment that is disconnected from a power source but still connected to telephone or network wiring:
• Never install telephone wiring during a lightning storm.
• Never install telephone jacks in wet locations unless the jack is specifically designed for wet locations.
• Never touch uninsulated telephone wires or terminals unless the telephone line has been disconnected at the network interface.
• Use caution when installing or modifying telephone lines.
Preventing Electrostatic Discharge DamageMany router components can be damaged by static electricity. Some components can be damaged by voltages as low as 30V, while static voltages as high as 35,000V can be generated just by handling plastic or foam packing material, or by sliding assemblies across plastic and carpets. Not exercising the proper electrostatic discharge (ESD) precautions can result in intermittent or complete component failures. To minimize the potential for ESD damage, observe the following guidelines:
• Always use an ESD-preventive antistatic wrist strap or ankle strap and ensure that it makes good skin contact.
Caution You should periodically check the resistance value of the ESD-preventive strap. The measurement should be between 1 and 10 megohms.
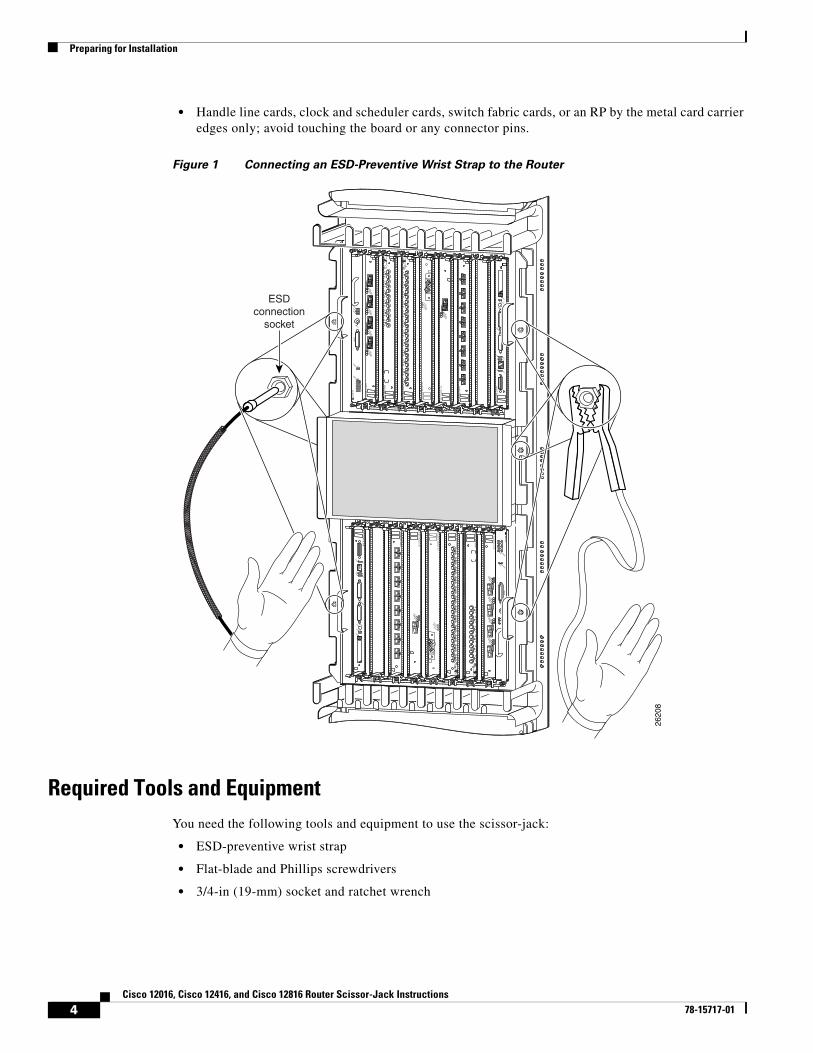
• When removing or installing a component, make sure the equipment end of your antistatic strap leash is connected to one of the ESD connection sockets on the front of the chassis or to a bare metal surface on the chassis. (See Figure 1.) Avoid contact between the component and your clothing. The ESD-preventive wrist strap only protects the component from ESD voltages on the body; ESD voltages on your clothing can still cause component damage.
• Always place a card component-side-up on an antistatic surface, in an antistatic card rack, or in a static shielding bag. If you are returning the item to the factory, immediately place it in a static shielding bag.
• When installing a line card or route processor (RP), use the ejector levers to seat the card connectors in the backplane, then tighten both captive screws on the faceplate of the card. These screws prevent accidental removal, provide proper grounding for the router, and help to ensure that the card connector is seated in the backplane.
• When removing line cards, clock and scheduler cards, switch fabric cards, or an RP, use the ejector levers to unseat the card connector from the backplane. Pull the metal card carrier out slowly, placing one hand along the bottom of the carrier to guide it straight out of the slot.
3Cisco 12016, Cisco 12416, and Cisco 12816 Router Scissor-Jack Instructions
78-15717-01
Preparing for Installation
• Handle line cards, clock and scheduler cards, switch fabric cards, or an RP by the metal card carrier edges only; avoid touching the board or any connector pins.
Figure 1 Connecting an ESD-Preventive Wrist Strap to the Router
Required Tools and EquipmentYou need the following tools and equipment to use the scissor-jack:
• ESD-preventive wrist strap
• Flat-blade and Phillips screwdrivers
• 3/4-in (19-mm) socket and ratchet wrench
ALARM
ENABLEDFAIL
ACO/LT
AL
AR
M
CSC
0
FAIL
10
12
ENABLED
CRITICALMAJORMINOR
SFC
ACTIVE
0
CARRIER
RX PKT
ACTIVE
1
CARRIER
RX PKT
ACTIVE
2
CARRIER
RX PKT
ACTIVE
3
CARRIER
RX PKT
Q O
C-3/ST
M-PO
S
6DS
3–SM
B P
/H/F
DOWN
LOO
PRA
LA
CDHNTCD
TX
0RX
TX
1RX
TX
2RX
TX
3RX
TX
4RX
TX
5RX
12DS
3–SM
B P
/H/F
DOWN
LOO
PRA
LA
CDHNTCD
TX
0RX
TX
1RX
TX
2RX
TX
3RX
TX
4RX
TX
5RX
TX
6RX
TX
7RX
TX
8RX
TX
9RX
TX10RX
TX11RX
ACTIVECARRIERRX PKT
OC
-48/STM
-16-SCPO
S
ACTIVE
0
CARRIER
RX CELL
OC
-12/STM
-4 AT
M
FAST
ET
ER
NE
T
SLOT-0
RO
UT
E PR
OC
ESSO
R
SLOT-1COLL
LINKTX
RXRJ-45
MII
RESET
AUX
CONSOLE
EJECT
SLOT-0
RO
UT
E P
RO
CE
SSO
R
SLOT-1
COLL
LINK
TX
RXRJ-4
5
MII
RESET
AUX
CONSOLE
EJECT
FAST
ET
ER
NE
T
ACTIVE
0
CARRIER
RX CELL
OC
-12/
STM
-4 A
TM
ACTIVE CARRIE
R RX PKT
OC
-48/
STM
-16-
SCPO
S
12D
S3–
SM
B P
/H/F
DOW
N
LOO
PRA
LA
CDHN
TCD
TX
0RX
TX
1RX
TX
2RX
TX
3RX
TX
4RX
TX
5RX
TX
6RX
TX
7RX
TX
8RX
TX
9RX
TX10RX
TX11RX 6D
S3–
SM
B P
/H/F
DOW
N
LOO
PRA
LA
CDHN
TCD
TX
0RX
TX
1RX
TX
2RX
TX
3RX
TX
4RX
TX
5RX
ACTIVE
0
CARRIER
RX PKT
ACTIVE
1
CARRIER
RX PKT
ACTIVE
2
CARRIER
RX PKT
ACTIVE
3
CARRIER
RX PKT
Q O
C-3
/ST
M-P
OS
ALAR
MENABLE
DFA
IL
ACO/LT
AL
AR
M
CSC
0
FAIL
10
12
ENABLED
CRITICAL MAJO
R MINOR
SFC
OOOO
OOOO
OOOO
OOOO
OOOO
OOOO
OOOO
OOOO
OOOO
OOOO
OOOO
OOOO
OOOO
OOOO
OOOO
OOOO
OOOO
OOOO
OOOO
OOOO
OOOO
OOOO
OOOO
OOOO
O
2620
8
ESDconnection
socket
4Cisco 12016, Cisco 12416, and Cisco 12816 Router Scissor-Jack Instructions
78-15717-01
Using the Scissor-Jack Platform
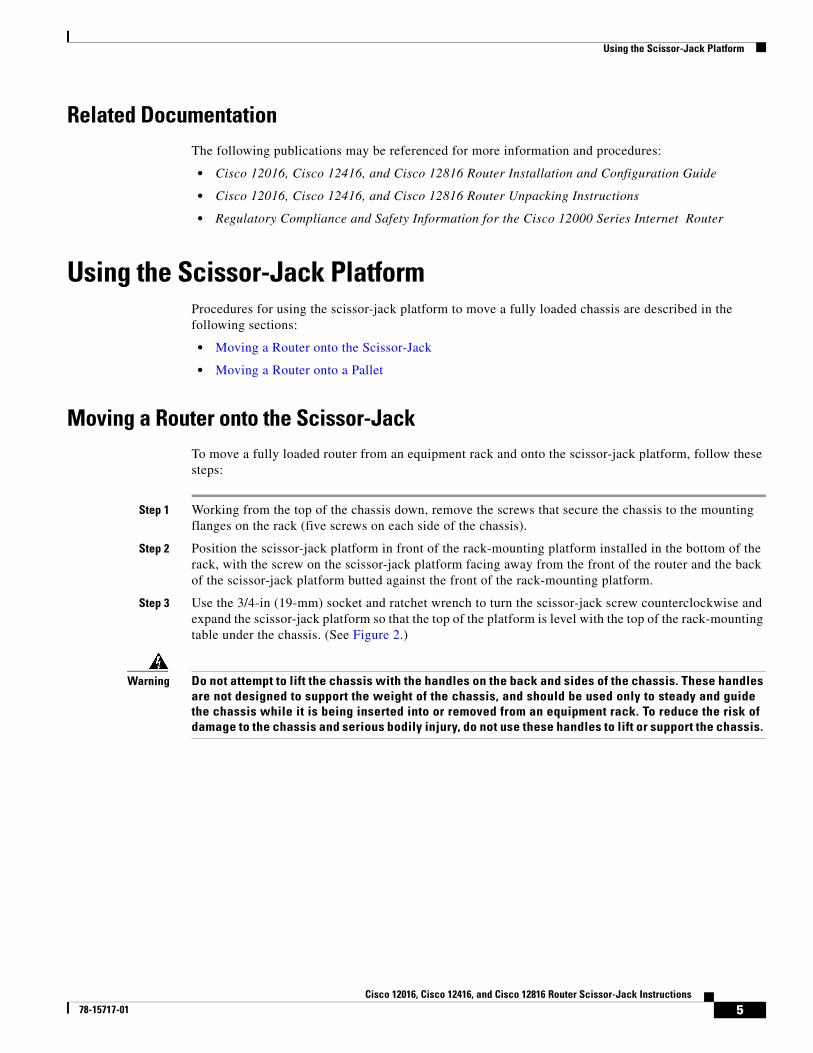
Related DocumentationThe following publications may be referenced for more information and procedures:
• Cisco 12016, Cisco 12416, and Cisco 12816 Router Installation and Configuration Guide
• Cisco 12016, Cisco 12416, and Cisco 12816 Router Unpacking Instructions
• Regulatory Compliance and Safety Information for the Cisco 12000 Series Internet Router
Using the Scissor-Jack PlatformProcedures for using the scissor-jack platform to move a fully loaded chassis are described in the following sections:
• Moving a Router onto the Scissor-Jack
• Moving a Router onto a Pallet
Moving a Router onto the Scissor-JackTo move a fully loaded router from an equipment rack and onto the scissor-jack platform, follow these steps:
Step 1 Working from the top of the chassis down, remove the screws that secure the chassis to the mounting flanges on the rack (five screws on each side of the chassis).
Step 2 Position the scissor-jack platform in front of the rack-mounting platform installed in the bottom of the rack, with the screw on the scissor-jack platform facing away from the front of the router and the back of the scissor-jack platform butted against the front of the rack-mounting platform.
Step 3 Use the 3/4-in (19-mm) socket and ratchet wrench to turn the scissor-jack screw counterclockwise and expand the scissor-jack platform so that the top of the platform is level with the top of the rack-mounting table under the chassis. (See Figure 2.)
Warning Do not attempt to lift the chassis with the handles on the back and sides of the chassis. These handles are not designed to support the weight of the chassis, and should be used only to steady and guide the chassis while it is being inserted into or removed from an equipment rack. To reduce the risk of damage to the chassis and serious bodily injury, do not use these handles to lift or support the chassis.
5Cisco 12016, Cisco 12416, and Cisco 12816 Router Scissor-Jack Instructions
78-15717-01

Using the Scissor-Jack Platform
Figure 2 Preparing the Scissor-Jack Platform
Step 4 Position one person in front of the router to support and guide it while the second person slowly pushes the router to slide it off the rack-mounting table, out of the rack, and onto the scissor-jack platform. (See Figure 3.)
Figure 3 Transferring the Router to the Scissor-Jack Platform
2918
9
SLOT-0
SLOT-1
RESET
AUX
CONSOLE
EJECT
ACTIVE
0
CARRIER
RX CELL
ACTIVE CARRIE
R RX PKT
DOW
N
LOO
PRA
LA
CDHN
TCD
TX
0RX
TX
1RX
TX
2RX
TX
3RX
TX
4RX
TX
5RX
TX
6RX
DOW
N
LOO
PRA
LA
CDHN
TCD
TX
0RX
TX
1RX
TX
2RX
TX
3RX
TX
4RX
TX
5RX
ACTIVE
0
CARRIER
RX PKT
ACTIVE
1
CARRIER
RX PKT
ACTIVE
2
CARRIER
ACO/LT
CRITICAL MAJO
R MINOR
2965
9
6Cisco 12016, Cisco 12416, and Cisco 12816 Router Scissor-Jack Instructions
78-15717-01
Using the Scissor-Jack Platform
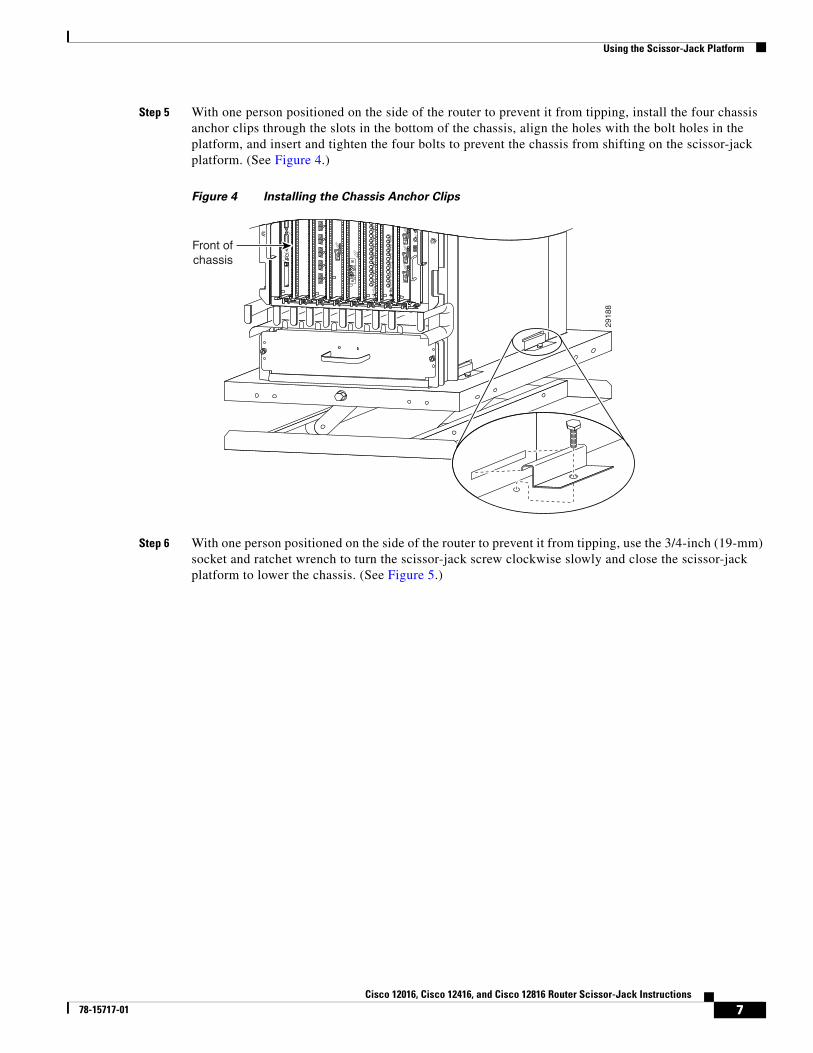
Step 5 With one person positioned on the side of the router to prevent it from tipping, install the four chassis anchor clips through the slots in the bottom of the chassis, align the holes with the bolt holes in the platform, and insert and tighten the four bolts to prevent the chassis from shifting on the scissor-jack platform. (See Figure 4.)
Figure 4 Installing the Chassis Anchor Clips
Step 6 With one person positioned on the side of the router to prevent it from tipping, use the 3/4-inch (19-mm) socket and ratchet wrench to turn the scissor-jack screw clockwise slowly and close the scissor-jack platform to lower the chassis. (See Figure 5.)
SLOT-0
SLOT-1
RESET
AUX
CONSOLE
EJECT
ACTIVE
0
CARRIER
RX CELL
ACTIVE CARRIE
R RX PKT
DOW
N
LOO
PRA
LA
CDHN
TCD
TX
0RX
TX
1RX
TX
2RX
TX
3RX
TX
4RX
TX
5RX
TX
6RX
DOW
N
LOO
PRA
LA
CDHN
TCD
TX
0RX
TX
1RX
TX
2RX
TX
3RX
TX
4RX
TX
5RX
ACTIVE
0
CARRIER
RX PKT
ACTIVE
1
CARRIER
RX PKT
ACTIVE
2
CARRIER
ACO/LT
CRITICAL MAJO
R MINORFront of
chassis
2918
8
7Cisco 12016, Cisco 12416, and Cisco 12816 Router Scissor-Jack Instructions
78-15717-01
Using the Scissor-Jack Platform
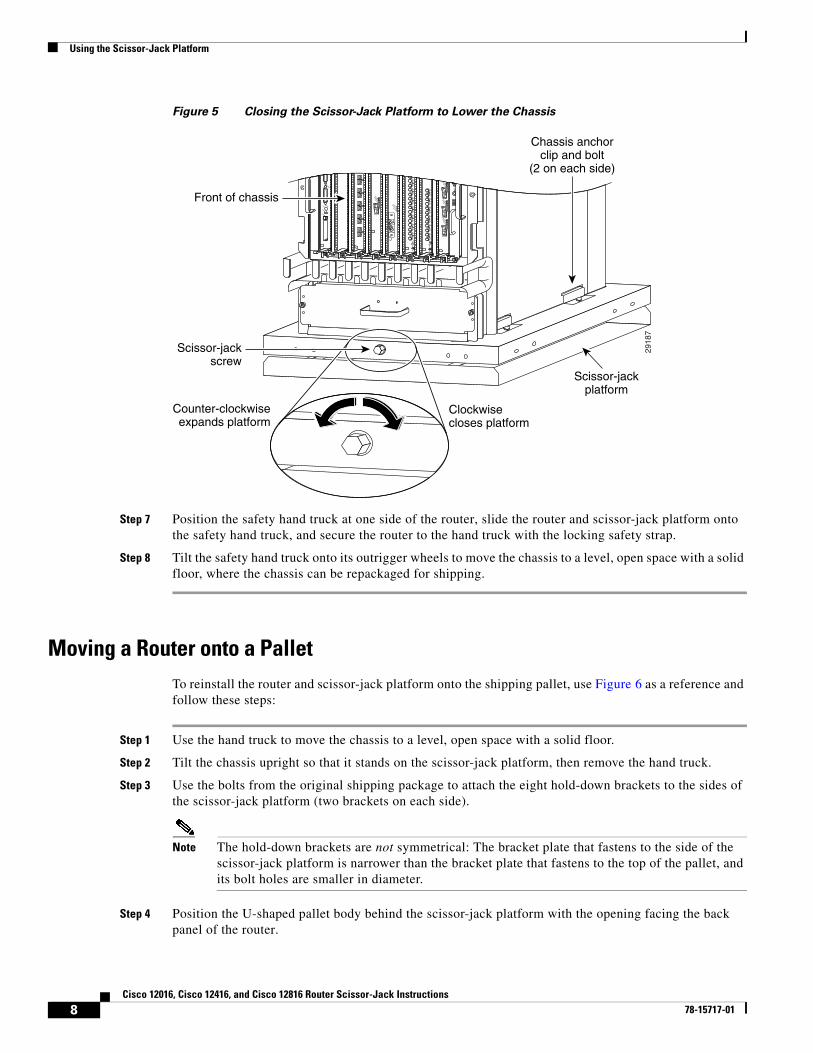
Figure 5 Closing the Scissor-Jack Platform to Lower the Chassis
Step 7 Position the safety hand truck at one side of the router, slide the router and scissor-jack platform onto the safety hand truck, and secure the router to the hand truck with the locking safety strap.
Step 8 Tilt the safety hand truck onto its outrigger wheels to move the chassis to a level, open space with a solid floor, where the chassis can be repackaged for shipping.
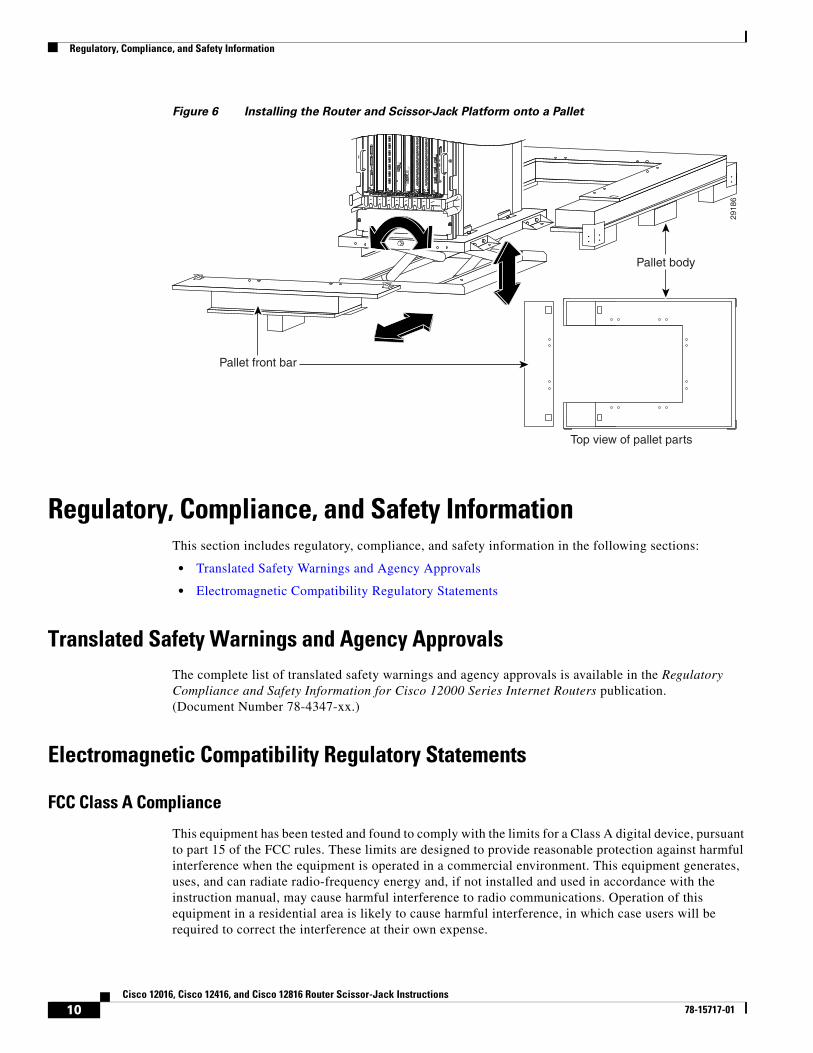
Moving a Router onto a PalletTo reinstall the router and scissor-jack platform onto the shipping pallet, use Figure 6 as a reference and follow these steps:
Step 1 Use the hand truck to move the chassis to a level, open space with a solid floor.
Step 2 Tilt the chassis upright so that it stands on the scissor-jack platform, then remove the hand truck.
Step 3 Use the bolts from the original shipping package to attach the eight hold-down brackets to the sides of the scissor-jack platform (two brackets on each side).
Note The hold-down brackets are not symmetrical: The bracket plate that fastens to the side of the scissor-jack platform is narrower than the bracket plate that fastens to the top of the pallet, and its bolt holes are smaller in diameter.
Step 4 Position the U-shaped pallet body behind the scissor-jack platform with the opening facing the back panel of the router.
SLOT-0
SLOT-1
RESET
AUX
CONSOLE
EJECT
ACTIVE
0
CARRIER
RX CELL
ACTIVE CARRIE
R RX PKT
DOW
N
LOO
PRA
LA
CDHN
TCD
TX
0RX
TX
1RX
TX
2RX
TX
3RX
TX
4RX
TX
5RX
TX
6RX
DOW
N
LOO
PRA
LA
CDHN
TCD
TX
0RX
TX
1RX
TX
2RX
TX
3RX
TX
4RX
TX
5RX
ACTIVE
0
CARRIER
RX PKT
ACTIVE
1
CARRIER
RX PKT
ACTIVE
2
CARRIER
ACO/LT
CRITICAL MAJO
R MINORFront of chassis
2918
7
Scissor-jackplatform
Chassis anchorclip and bolt
(2 on each side)
Clockwisecloses platform
Counter-clockwiseexpands platform
Scissor-jackscrew
8Cisco 12016, Cisco 12416, and Cisco 12816 Router Scissor-Jack Instructions
78-15717-01
Using the Scissor-Jack Platform
Step 5 Use the 3/4-inch (19-mm) socket and ratchet wrench to turn the scissor-jack screw slowly counterclockwise to expand the scissor-jack platform and raise the top of the scissor-jack platform high enough for the hold-down brackets to clear the top of the pallet body.
Step 6 Slide the pallet body around the scissor-jack platform.
Step 7 Slide the pallet front bar into the opening on the pallet body and use the hinge locks to secure it as instructed in these steps:
a. Pivot the butterfly handle on the hinge lock up so that it is perpendicular to the body of the hinge lock.
b. Twist the butterfly handle counterclockwise to extend the hinge lock hook to its maximum reach.
c. Lower the hinge lock hook over the hinge lock catch on the pallet body.
d. Twist the butterfly handle clockwise to clamp the hinge lock hook on the hinge lock catch on the pallet body.
e. Pivot the butterfly lever down onto the hinge lock body so that it lies flat.
Step 8 Shift the pallet to ensure that it is positioned evenly all the way around the scissor-jack platform and that the bolt holes in the hold-down brackets on the sides of the scissor-jack platform are aligned with the holes in the top of the shipping pallet.
Step 9 Turn the scissor-jack screw slowly clockwise to close the scissor-jack platform and lower the top of the scissor-jack platform slowly until the hold-down brackets touch the top of the shipping pallet.
Step 10 Set a blocking plate into the hold-down bracket so that the blank side of the blocking plate is against the heads of the bolts in the side of the scissor-jack platform, and the open holes in the blocking plate align with the bolt holes in the top of the pallet.
Step 11 Insert bolts through each of the hold-down bracket holes and into the holes in the top of the shipping pallet, then use the 9/16-inch (14-mm) wrench to tighten the bolts.
Step 12 Turn the scissor-jack screw slowly clockwise to collapse the scissor-jack platform and raise the base of the scissor-jack platform until the weight of the router and scissor-jack platform is absorbed by the pallet. Continue turning the scissor-jack screw clockwise to close the scissor-jack platform and lift the base of the scissor-jack platform until the scissor-jack platform is completely closed (the screw can not be turned).
9Cisco 12016, Cisco 12416, and Cisco 12816 Router Scissor-Jack Instructions
78-15717-01
Regulatory, Compliance, and Safety Information
Figure 6 Installing the Router and Scissor-Jack Platform onto a Pallet
Regulatory, Compliance, and Safety InformationThis section includes regulatory, compliance, and safety information in the following sections:
• Translated Safety Warnings and Agency Approvals
• Electromagnetic Compatibility Regulatory Statements
Translated Safety Warnings and Agency ApprovalsThe complete list of translated safety warnings and agency approvals is available in the Regulatory Compliance and Safety Information for Cisco 12000 Series Internet Routers publication. (Document Number 78-4347-xx.)
Electromagnetic Compatibility Regulatory Statements
FCC Class A Compliance
This equipment has been tested and found to comply with the limits for a Class A digital device, pursuant to part 15 of the FCC rules. These limits are designed to provide reasonable protection against harmful interference when the equipment is operated in a commercial environment. This equipment generates, uses, and can radiate radio-frequency energy and, if not installed and used in accordance with the instruction manual, may cause harmful interference to radio communications. Operation of this equipment in a residential area is likely to cause harmful interference, in which case users will be required to correct the interference at their own expense.
SLOT-0
SLOT-1
RESET
AUX
CONSOLE
EJECT
ACTIVE
0
CARRIER
RX CELL
ACTIVE CARRIE
R RX PKT
DOW
N
LOO
PRA
LA
CDHN
TCD
TX
0RX
TX
1RX
TX
2RX
TX
3RX
TX
4RX
TX
5RX
TX
6RX
DOW
N
LOO
PRA
LA
CDHN
TCD
TX
0RX
TX
1RX
TX
2RX
TX
3RX
TX
4RX
TX
5RX
ACTIVE
0
CARRIER
RX PKT
ACTIVE
1
CARRIER
RX PKT
ACTIVE
2
CARRIER
ACO/LT
CRITICAL MAJO
R MINOR
2918
6
Top view of pallet parts
Pallet body
Pallet front bar
10Cisco 12016, Cisco 12416, and Cisco 12816 Router Scissor-Jack Instructions
78-15717-01
Regulatory, Compliance, and Safety Information
Modifying the equipment without Cisco’s authorization may result in the equipment no longer complying with FCC requirements for Class A digital devices. In that event, your right to use the equipment may be limited by FCC regulation and you may be required to correct any interference to radio or television communication at your own expense.
You can determine whether your equipment is causing interference by turning it off. If the interference stops, it was probably caused by the Cisco equipment or one of its peripheral devices. If the equipment causes interference to radio or television reception, try to correct the interference by using one or more of the following measures:
• Turn the television or radio antenna until the interference stops.
• Move the equipment to one side or the other of the television or radio.
• Move the equipment farther away from the television or radio.
• Plug the equipment into an outlet that is on a different circuit from the television or radio. (That is, make certain the equipment and the television or radio are on circuits controlled by different circuit breakers or fuses.)
CISPR 22
This apparatus complies with CISPR 22/EN55022 Class B radiated and conducted emissions requirements.
Canada
English Statement of Compliance
This class A digital apparatus complies with Canadian ICES-003.
French Statement of Compliance
Cet appareil numérique de la classe A est conforme à la norme NMB-003 du Canada.
Europe (EU)
This apparatus complies with EN55022 Class B and EN55024 standards when used as ITE/TTE equipment, and EN300386 for Telecommunications Network Equipment (TNE) in both installation environments, telecommunication centers and other indoor locations.
VCCI Class A Notice for Japan
Warning This is a Class A product based on the standard of the Voluntary Control Council for Interference by Information Technology Equipment (VCCI). If this equipment is used in a domestic environment, radio disturbance may arise. When such trouble occurs, the user may be required to take corrective actions. Statement 191
11Cisco 12016, Cisco 12416, and Cisco 12816 Router Scissor-Jack Instructions
78-15717-01
Obtaining Documentation
Class A Notice for Hungary
Class A Notice for Taiwan and Other Traditional Chinese Markets
Class A Notice for Korea
Obtaining DocumentationCisco provides several ways to obtain documentation, technical assistance, and other technical resources. These sections explain how to obtain technical information from Cisco Systems.
Cisco.comYou can access the most current Cisco documentation on the World Wide Web at this URL:
http://www.cisco.com/univercd/home/home.htm
Warning This equipment is a class A product and should be used and installed properly according to the Hungarian EMC Class A requirements (MSZEN55022). Class A equipment is designed for typical commercial establishments for which special conditions of installation and protection distance are used. Statement 256
Warning This is a Class A Information Product, when used in residential environment, it may cause radio frequency interference, under such circumstances, the user may be requested to take appropriate countermeasures. Statement 257
Warning This is a Class A Device and is registered for EMC requirements for industrial use. The seller or buyer should be aware of this. If this type was sold or purchased by mistake, it should be replaced with a residential-use type. Statement 294
12Cisco 12016, Cisco 12416, and Cisco 12816 Router Scissor-Jack Instructions
78-15717-01
Obtaining Documentation
You can access the Cisco website at this URL:
http://www.cisco.com
International Cisco websites can be accessed from this URL:
http://www.cisco.com/public/countries_languages.shtml
Documentation CD-ROMCisco documentation and additional literature are available in a Cisco Documentation CD-ROM package, which may have shipped with your product. The Documentation CD-ROM is updated regularly and may be more current than printed documentation. The CD-ROM package is available as a single unit or through an annual or quarterly subscription.
Registered Cisco.com users can order a single Documentation CD-ROM (product number DOC-CONDOCCD=) through the Cisco Ordering tool:
http://www.cisco.com/en/US/partner/ordering/ordering_place_order_ordering_tool_launch.html
All users can order annual or quarterly subscriptions through the online Subscription Store:
http://www.cisco.com/go/subscription
Click Subscriptions & Promotional Materials in the left navigation bar.
Ordering DocumentationYou can find instructions for ordering documentation at this URL:
http://www.cisco.com/univercd/cc/td/doc/es_inpck/pdi.htm
You can order Cisco documentation in these ways:
• Registered Cisco.com users (Cisco direct customers) can order Cisco product documentation from the Networking Products MarketPlace:
http://www.cisco.com/en/US/partner/ordering/index.shtml
• Nonregistered Cisco.com users can order documentation through a local account representative by calling Cisco Systems Corporate Headquarters (California, USA) at 408 526-7208 or, elsewhere in North America, by calling 800 553-NETS (6387).
Documentation FeedbackYou can submit e-mail comments about technical documentation to [email protected].
You can submit comments by using the response card (if present) behind the front cover of your document or by writing to the following address:
Cisco SystemsAttn: Customer Document Ordering170 West Tasman DriveSan Jose, CA 95134-9883
We appreciate your comments.
13Cisco 12016, Cisco 12416, and Cisco 12816 Router Scissor-Jack Instructions
78-15717-01
Obtaining Technical Assistance
Obtaining Technical AssistanceFor all customers, partners, resellers, and distributors who hold valid Cisco service contracts, the Cisco Technical Assistance Center (TAC) provides 24-hour-a-day, award-winning technical support services, online and over the phone. Cisco.com features the Cisco TAC website as an online starting point for technical assistance. If you do not hold a valid Cisco service contract, please contact your reseller.
Cisco TAC WebsiteThe Cisco TAC website provides online documents and tools for troubleshooting and resolving technical issues with Cisco products and technologies. The Cisco TAC website is available 24 hours a day, 365 days a year. The Cisco TAC website is located at this URL:
http://www.cisco.com/tac
Accessing all the tools on the Cisco TAC website requires a Cisco.com user ID and password. If you have a valid service contract but do not have a login ID or password, register at this URL:
http://tools.cisco.com/RPF/register/register.do
Opening a TAC CaseUsing the online TAC Case Open Tool is the fastest way to open P3 and P4 cases. (P3 and P4 cases are those in which your network is minimally impaired or for which you require product information.) After you describe your situation, the TAC Case Open Tool automatically recommends resources for an immediate solution. If your issue is not resolved using the recommended resources, your case will be assigned to a Cisco TAC engineer. The online TAC Case Open Tool is located at this URL:
http://www.cisco.com/tac/caseopen
For P1 or P2 cases (P1 and P2 cases are those in which your production network is down or severely degraded) or if you do not have Internet access, contact Cisco TAC by telephone. Cisco TAC engineers are assigned immediately to P1 and P2 cases to help keep your business operations running smoothly.
To open a case by telephone, use one of the following numbers:
Asia-Pacific: +61 2 8446 7411 (Australia: 1 800 805 227) EMEA: +32 2 704 55 55 USA: 1 800 553-2447
For a complete listing of Cisco TAC contacts, go to this URL:
http://www.cisco.com/warp/public/687/Directory/DirTAC.shtml
TAC Case Priority DefinitionsTo ensure that all cases are reported in a standard format, Cisco has established case priority definitions.
Priority 1 (P1)—Your network is “down” or there is a critical impact to your business operations. You and Cisco will commit all necessary resources around the clock to resolve the situation.
Priority 2 (P2)—Operation of an existing network is severely degraded, or significant aspects of your business operation are negatively affected by inadequate performance of Cisco products. You and Cisco will commit full-time resources during normal business hours to resolve the situation.
14Cisco 12016, Cisco 12416, and Cisco 12816 Router Scissor-Jack Instructions
78-15717-01
Obtaining Additional Publications and Information
Priority 3 (P3)—Operational performance of your network is impaired, but most business operations remain functional. You and Cisco will commit resources during normal business hours to restore service to satisfactory levels.
Priority 4 (P4)—You require information or assistance with Cisco product capabilities, installation, or configuration. There is little or no effect on your business operations.
Obtaining Additional Publications and InformationInformation about Cisco products, technologies, and network solutions is available from various online and printed sources.
• The Cisco Product Catalog describes the networking products offered by Cisco Systems, as well as ordering and customer support services. Access the Cisco Product Catalog at this URL:
http://www.cisco.com/en/US/products/products_catalog_links_launch.html
• Cisco Press publishes a wide range of general networking, training and certification titles. Both new and experienced users will benefit from these publications. For current Cisco Press titles and other information, go to Cisco Press online at this URL:
http://www.ciscopress.com
• Packet magazine is the Cisco quarterly publication that provides the latest networking trends, technology breakthroughs, and Cisco products and solutions to help industry professionals get the most from their networking investment. Included are networking deployment and troubleshooting tips, configuration examples, customer case studies, tutorials and training, certification information, and links to numerous in-depth online resources. You can access Packet magazine at this URL:
http://www.cisco.com/packet
• iQ Magazine is the Cisco bimonthly publication that delivers the latest information about Internet business strategies for executives. You can access iQ Magazine at this URL:
http://www.cisco.com/go/iqmagazine
• Internet Protocol Journal is a quarterly journal published by Cisco Systems for engineering professionals involved in designing, developing, and operating public and private internets and intranets. You can access the Internet Protocol Journal at this URL:
http://www.cisco.com/en/US/about/ac123/ac147/about_cisco_the_internet_protocol_journal.html
• Training—Cisco offers world-class networking training. Current offerings in network training are listed at this URL:
http://www.cisco.com/en/US/learning/index.html
15Cisco 12016, Cisco 12416, and Cisco 12816 Router Scissor-Jack Instructions
78-15717-01
Obtaining Additional Publications and Information
This document is used in conjunction with the Cisco 12016, Cisco 12416, and Cisco 12816 Router Installation and Configuration Guide.
CCIP, CCSP, the Cisco Arrow logo, the Cisco Powered Network mark, Cisco Unity, Follow Me Browsing, FormShare, and StackWise are trademarks of Cisco Systems, Inc.; Changing the Way We Work, Live, Play, and Learn, and iQuick Study are service marks of Cisco Systems, Inc.; and Aironet, ASIST, BPX, Catalyst, CCDA, CCDP, CCIE, CCNA, CCNP, Cisco, the Cisco Certified Internetwork Expert logo, Cisco IOS, the Cisco IOS logo, Cisco Press, Cisco Systems, Cisco Systems Capital, the Cisco Systems logo, Empowering the Internet Generation, Enterprise/Solver, EtherChannel, EtherSwitch, Fast Step, GigaStack, Internet Quotient, IOS, IP/TV, iQ Expertise, the iQ logo, iQ Net Readiness Scorecard, LightStream, MGX, MICA, the Networkers logo, Networking Academy, Network Registrar, Packet, PIX, Post-Routing, Pre-Routing, RateMUX, Registrar, ScriptShare, SlideCast, SMARTnet, StrataView Plus, Stratm, SwitchProbe, TeleRouter, The Fastest Way to Increase Your Internet Quotient, TransPath, and VCO are registered trademarks of Cisco Systems, Inc. and/or its affiliates in the United States and certain other countries.
All other trademarks mentioned in this document or Website are the property of their respective owners. The use of the word partner does not imply a partnership relationship between Cisco and any other company. (0401R)
Copyright © 2004, Cisco Systems, Inc.
All rights reserved.Produced in the USA.
16Cisco 12016, Cisco 12416, and Cisco 12816 Router Scissor-Jack Instructions
78-15717-01