CIS Purchasing Module User Guide - Saint Anselm …legacyweb.anselm.edu/Documents/CIS...
35
CIS Purchasing Module User Guide 1 Purpose Purchasing Process Following is a high level overview of the relationships and processes involved in purchasing. The example shown below may differ slightly for users. Figures 1a - 1d. Prerequisite Tasks Identify the specific account numbers you will use when processing purchase orders. Understand which approvers are assigned to approve the purchase order and/or commodity. Form Types The College uses five basic form types in the Purchasing application: Request for Purchase (RP) Purchase Order (PO) Blanket Purchase Orders (PB) Requisition from Invoice (RI) Purchase from Invoice (PI) The selection of the purchase order type affects the fields are active on the current screen and the sequence for PO numbering. Contents 1 Purpose (p. 1) 2 Process Relationships (p. 1) 3 Purposes (p. 3) 4 Accessing Purchasing (p. 4) Logging In 5 Creating a PO (p. 5) 6 Status (p. 9) 7 Receiving (p. 16) 8 Invoicing (p. 21) 9 Budget Review (p. 21) 10 Appendix A (p. 22) Form Field Descriptions 11 Appendix B Location of Figures Order originators will now issue Purchase Orders to select vendors. VERSION 2 April 2011 1 Written by Jacques Plante, Purchasing Manager, with contributions from Robert Baron, Director of Financial Planning & Risk Management, and using Jenzabar ® CX 8.1 and information from the Jenzabar ® Purchasing and Accounts Payable User Guide (file name UGPO, rev. 03/14/06), the Requisitioning, Purchasing an Accounts Payable Technical Manual (file name TMRPA, 01/05/04), and the Getting Started User Guide (file name UGSTART, 11/15/03). Use of Jenzabar ® data, files, content and logo is with the express permission of Jenzabar ® . This guide is deemed a derivative work of Jenzabar ® intellectual property and Jenzabar ® retains all usage and ownership rights herein. Jenzabar ® makes no representation for such compilation. Any alterations or changes to this guide require Jenzabar ® approval. This guide is to be kept confidential and not disclosed to any third party without Jenzabar ® prior written consent. The purpose of this guide is to provide the user with a quick reference learning tool about the use of the CIS purchasing (RPA) module for making purchases, receiving items, and approving invoices for payment as part of the College’s new purchasing process. The RPA module allows you to enter and maintain information about items that you have ordered, paid, and received. This guide addresses the following functions: Purchasing, Receiving, Invoice Approval, and Budget Review This guide is promulgated as part of the College’s new purchasing system and is published as a companion to the Web Portal—Purchasing Approver Quick Guide. The proponent for the purchasing system is the Office of the Treasurer. Contact Purchasing at [email protected] if you have any questions or need assistance. The Purchasing Department In accordance with the College’s purchasing policy, assists departments and employees in purchasing goods and services at the best price and most favorable terms and conditions through competitive bids, negotiated contracts and vendor research. Maintains the electronic purchase order system to ensure that all purchases are properly authorized and encumbered in order to maintain “real-time” financial department budget information for the College. Creates and maintain an approved vendor list in CIS. Ensure that Accounts Payable receives payment information accurately and in a timely manner. Implement a program for standardization of material used throughout the College to ensure the best value and most favorable terms and conditions are achieved. Conducts sales persons and manufacturer’s agents’ interviews.
Transcript of CIS Purchasing Module User Guide - Saint Anselm …legacyweb.anselm.edu/Documents/CIS...

CIS Purchasing Module User Guide1
Purpose
Purchasing Process Following is a high level overview of the relationships and processes involved in purchasing. The example shown below may differ slightly for users. Figures 1a - 1d.
Prerequisite Tasks
Identify the specific account numbers you will use when processing purchase orders.
Understand which approvers are assigned to approve the purchase order and/or commodity.
Form Types
The College uses five basic form types in the Purchasing application:
Request for Purchase (RP)
Purchase Order (PO)
Blanket Purchase Orders (PB)
Requisition from Invoice (RI)
Purchase from Invoice (PI)
The selection of the purchase order type affects the fields are active on the current screen and the sequence for PO numbering.
Contents
1 Purpose (p. 1)
2 Process Relationships (p. 1)
3 Purposes (p. 3)
4 Accessing Purchasing (p. 4)
Logging In
5 Creating a PO (p. 5)
6 Status (p. 9)
7 Receiving (p. 16)
8 Invoicing (p. 21)
9 Budget Review (p. 21)
10 Appendix A (p. 22) Form Field Descriptions
11 Appendix B Location of Figures
Order originators will now issue Purchase Orders to
select vendors.
VERSION 2
April 2011
1 Written by Jacques Plante, Purchasing Manager, with contributions from Robert Baron, Director of Financial Planning & Risk Management, and using Jenzabar® CX 8.1 and information from the Jenzabar® Purchasing and Accounts Payable User Guide (file name UGPO, rev. 03/14/06), the Requisitioning, Purchasing an Accounts Payable Technical Manual (file name TMRPA, 01/05/04), and the Getting Started User Guide (file name UGSTART, 11/15/03). Use of Jenzabar® data, files, content and logo is with the express permission of Jenzabar®. This guide is deemed a derivative work of Jenzabar® intellectual property and Jenzabar® retains all usage and ownership rights herein. Jenzabar® makes no representation for such compilation. Any alterations or changes to this guide require Jenzabar® approval. This guide is to be kept confidential and not disclosed to any third party without Jenzabar® prior written consent.
The purpose of this guide is to provide the user with a quick reference learning tool about the use of the CIS purchasing (RPA) module for making purchases, receiving items, and approving invoices for payment as part of the College’s new purchasing process. The RPA module allows you to enter and maintain information about items that you have ordered, paid, and received. This guide addresses the following functions:
Purchasing, Receiving, Invoice Approval, and Budget Review
This guide is promulgated as part of the College’s new purchasing system and is published as a companion to the Web Portal—Purchasing Approver Quick Guide. The proponent for the purchasing system is the Office of the Treasurer. Contact Purchasing at [email protected] if you have any questions or need assistance.
The Purchasing Department
In accordance with the College’s purchasing policy, assists departments and employees in purchasing goods and services at the best price and most favorable terms and conditions through competitive bids, negotiated contracts and vendor research. Maintains the electronic purchase order system to ensure that all purchases are properly authorized and encumbered in order to maintain “real-time” financial department budget information for the College. Creates and maintain an approved vendor list in CIS. Ensure that Accounts Payable receives payment information accurately and in a timely manner. Implement a program for standardization of material used throughout the College to ensure the best value and most favorable terms and conditions are achieved. Conducts sales persons and manufacturer’s agents’ interviews.
PAGE 2 CIS PURCHASING MODULE USER GUIDE
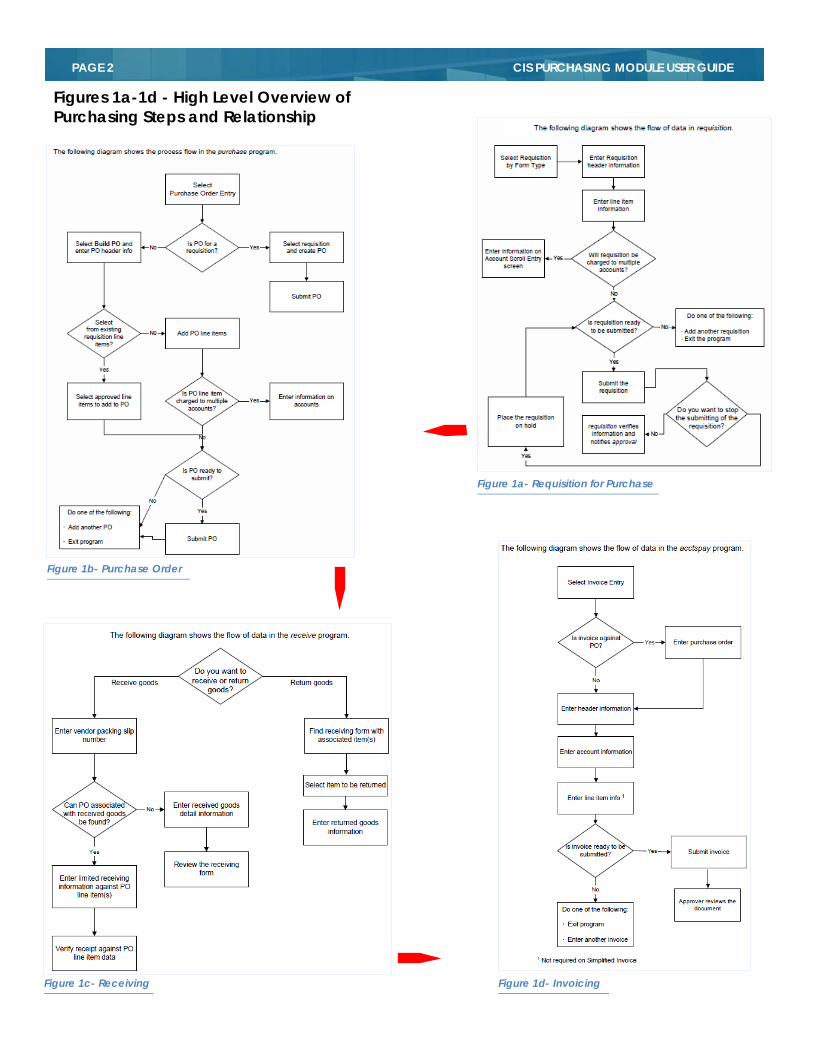
Figures 1a-1d - High Level Overview of Purchasing Steps and Relationship
Figure 1a- Requisition for Purchase
Figure 1b- Purchase Order
Figure 1c- Receiving Figure 1d- Invoicing

PAGE 3 CIS PURCHASING MODULE USER GUIDE
The purchasing system uses the following CIS application program components and related functions.
Purpose of the Purchasing Application The primary functions of the Purchasing application include:
Combining requisitioned items into a purchase order Encumbering the related accounts for the cost of the merchandise
Purpose of the Receiving Application The primary functions of the Receiving application:
Recording the receipt of ordered merchandise, including the quantity and condition of the merchandise
Recording the return of received items o Note: For College use, Receiving only needs to be used to record damaged or defective
merchandise that must be returned or replaced and for which the invoice will not be approved.
o Receiving will not have to be used when merchandise is acceptable and ready to be paid. In other words, Receiving will be used by exception.
Purpose of the Accounts Payable Application The primary functions of the Accounts Payable application:
Entering Invoices Approving Invoices Submitting invoices for payment
Accounts Payable is used to create an invoice, which is then approved by the purchase order originator before submission for payment. Accounts Payable is used by Business Office personnel.
The System Creates an encumbrance for each account and a receiving record for each item and account. Updates the general ledger accounts. Creates a Fixed Asset record for fixed assets. Sends e-mail and systems notifications as necessary.
Approval Process Description The approval process begins when a requisition, purchase order or invoice is submitted. In the first phase of the approval process, the approval program goes through the following steps: • Determines who must approve the document, based on approval type criteria (e.g., ID, account or commodity code). Sorts approvers by authorization limit. Notifies the first approver (vertical) or approvers (horizontal) by mail that a document needs approval. After each approval (vertical) or group of approvals (horizontal) is received: Notifies the submitter that the document has been approved by the approver. Determines who must approve the document next, then sends that approver mail to notify them that a document awaits his/her approval. If the document is denied, notifies the submitter of the denial, including the reason. The approval program continues this process until all approvals have been received. Then, the program notifies the person who submitted the document that it has been approved, and makes a requisition available to purchasing. If the document is a purchase order or an invoice, the program makes the document available to accounts payable for appropriate processing.
Components of PurchasingNotes:

PAGE 4 CIS PURCHASING MODULE USER GUIDE
Figure 2-URL for CIS "Live."
Figure 3-URL for CIS "Train."
This section, and following, show each screen and window you use in Purchasing and provides explanations for each of their fields, including how to access CIS and the CIS Training module. This section also provides a reference of the commands and options you use to perform procedures in Purchasing. Refer to this section when you have questions about a specific field or command, or when you are completing the procedures in this guide.
Accessing Purchasing and Related Screens
Logging Into the System
You can access two versions of the CIS database: “live” and “train.” To log in to either, use one of the following URLs in your favorite web browser: For “Live” use:
http://cis.anselm.edu:9040/CXConnect.htm as shown in Figure 2.
For “Train” use: http://cis.anselm.edu:9045/CXConnect.htm
as shown in Figure 3.
In either the “Live” or “Train” log-in screens, click on “Run Jenzabar CX.” If needed, a Java 6 update check will quickly occur and then your log-in window will appear. Enter your CIS username and password (this will not be the same as your regular domain username and password, which you use for logging in to your computer or Citrix); Refer to Figures 4 & 5.
Figure 4-Java Update Check
Figure 5-Log-In Window
Notes: Your exact menu configuration may differ.
PAGE 5 CIS PURCHASING MODULE USER GUIDE
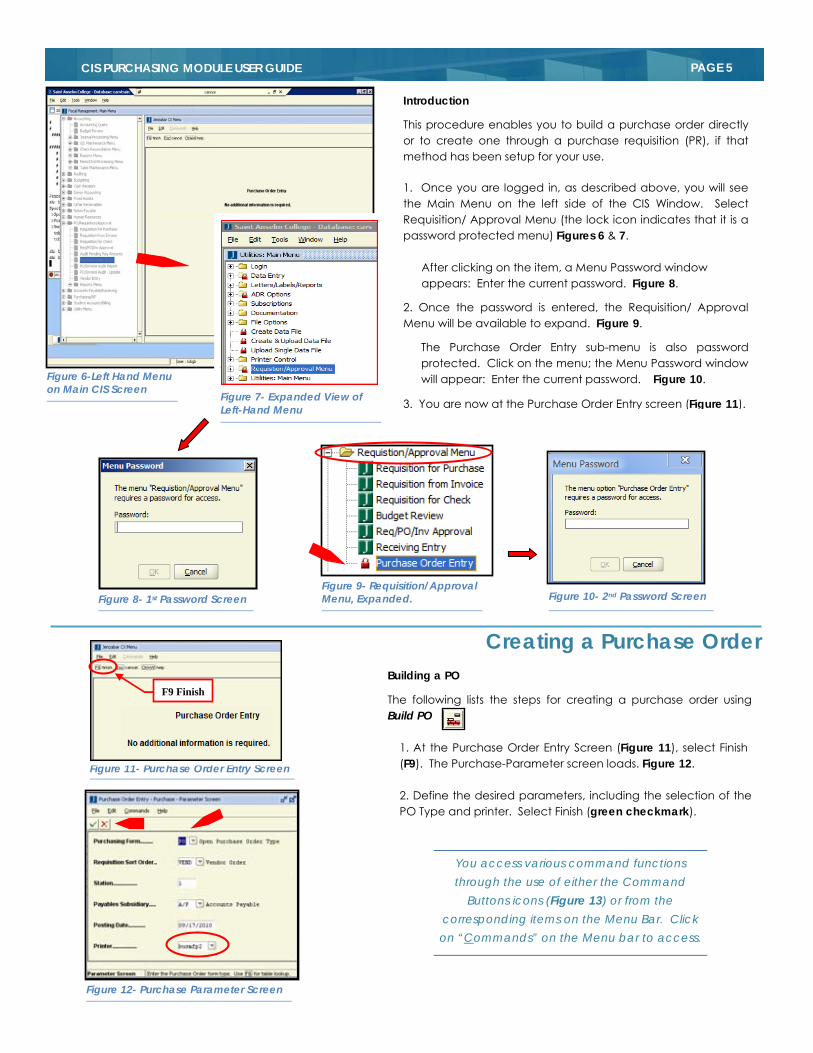
Building a PO
The following lists the steps for creating a purchase order using Build PO
1. At the Purchase Order Entry Screen (Figure 11), select Finish (F9). The Purchase-Parameter screen loads. Figure 12.
2. Define the desired parameters, including the selection of the PO Type and printer. Select Finish (green checkmark).
You access various command functions through the use of either the Command
Buttons icons (Figure 13) or from the corresponding items on the Menu Bar. Click on “Commands” on the Menu bar to access.
Introduction
This procedure enables you to build a purchase order directly or to create one through a purchase requisition (PR), if that method has been setup for your use. 1. Once you are logged in, as described above, you will see the Main Menu on the left side of the CIS Window. Select Requisition/ Approval Menu (the lock icon indicates that it is a password protected menu) Figures 6 & 7.
After clicking on the item, a Menu Password window appears: Enter the current password. Figure 8.
2. Once the password is entered, the Requisition/ Approval Menu will be available to expand. Figure 9.
The Purchase Order Entry sub-menu is also password protected. Click on the menu; the Menu Password window will appear: Enter the current password. Figure 10.
3. You are now at the Purchase Order Entry screen (Figure 11).
Figure 6-Left Hand Menu on Main CIS Screen Figure 7- Expanded View of
Left-Hand Menu
Creating a Purchase Order
Figure 9- Requisition/Approval Menu, Expanded. Figure 10- 2nd Password Screen Figure 8- 1st Password Screen
Figure 11- Purchase Order Entry Screen
F9 Finish
Figure 12- Purchase Parameter Screen
PAGE 6 CIS PURCHASING MODULE USER GUIDE
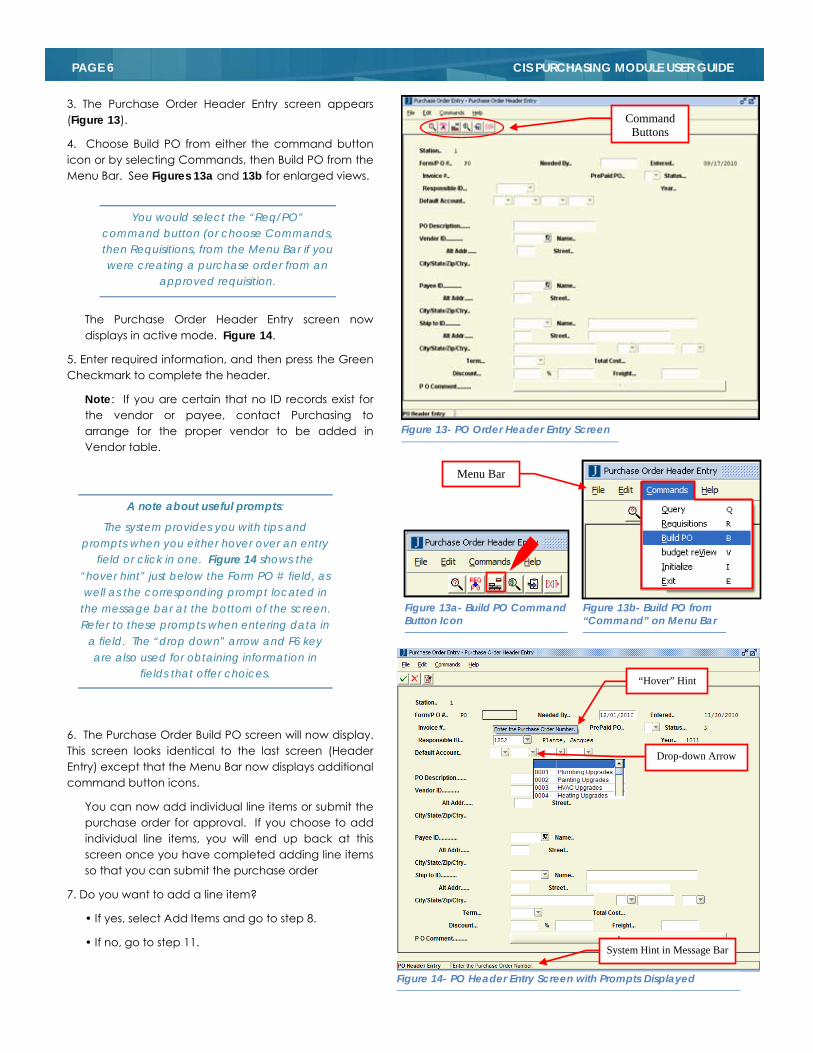
3. The Purchase Order Header Entry screen appears (Figure 13).
4. Choose Build PO from either the command button icon or by selecting Commands, then Build PO from the Menu Bar. See Figures 13a and 13b for enlarged views.
The Purchase Order Header Entry screen now displays in active mode. Figure 14.
5. Enter required information, and then press the Green Checkmark to complete the header.
Note: If you are certain that no ID records exist for the vendor or payee, contact Purchasing to arrange for the proper vendor to be added in Vendor table.
A note about useful prompts:
The system provides you with tips and prompts when you either hover over an entry
field or click in one. Figure 14 shows the “hover hint” just below the Form PO # field, as well as the corresponding prompt located in
the message bar at the bottom of the screen. Refer to these prompts when entering data in
a field. The “drop down” arrow and F6 key are also used for obtaining information in
fields that offer choices.
6. The Purchase Order Build PO screen will now display. This screen looks identical to the last screen (Header Entry) except that the Menu Bar now displays additional command button icons.
You can now add individual line items or submit the purchase order for approval. If you choose to add individual line items, you will end up back at this screen once you have completed adding line items so that you can submit the purchase order
7. Do you want to add a line item?
• If yes, select Add Items and go to step 8.
• If no, go to step 11.
You would select the “Req/PO” command button (or choose Commands, then Requisitions, from the Menu Bar if you were creating a purchase order from an
approved requisition.
Figure 13a- Build PO Command Button Icon
Figure 13- PO Order Header Entry Screen
Command Buttons
Figure 13b- Build PO from “Command” on Menu Bar
Menu Bar
System Hint in Message Bar
“Hover” Hint
Drop-down Arrow
Figure 14- PO Header Entry Screen with Prompts Displayed

PAGE 7 CIS PURCHASING MODULE USER GUIDE
• Account Info to enter information on multiple accounts to be charged for the item. The Line Item Account Entry screen appears. After you enter the account information, select Finish.
• Save/Next Item to enter another item. The Purchase Order Line Item Entry screen appears in the Line Item Detail Entry mode. When entering multiple items, continue using the Save/Next Item command until all items have been listed, then select Finish.
The Status of the Purchase Order changes based upon where it is in the
process.
Refer to Page 11 for an explanation of status
codes.
See examples of completed POs
on Pages 12 & 13.
Note: The “Commodity” field is required.
In the future, some commodity types may require an additional
approval chain.
8. The Purchase Order Line Item Entry screen appears in the Line Item Detail Entry mode. Enter the information needed for the
first item being added, and select the appropriate command:

PAGE 8 CIS PURCHASING MODULE USER GUIDE
Figure 16- Example of a Menu “drop down”
10. Do you want to add another line item? • If yes, repeat steps 8-9.
• If no, go to step 11.
11. Are you ready to submit the purchase order? • If yes, select Submit. The program does the following:
− Creates the purchase order.
− Assigns a PO number.
− Enables the Accounts Payable and Receiving applications to access the purchase order.
− Displays the Purchase Order Header Entry screen.
− Prints a copy of the submitted purchase order to the printer.
Note: If you are using approval for purchase orders, the program will send the purchase order into the approval process. After approval is complete, you will be notified by mail that the purchase order can be submitted for processing. You then Query and Submit the purchase order to the accounts payable process.
• If no, select the desired command to continue working with this purchase order, or select Close. After selecting Close, the purchase order is created and the Purchase Order Header Entry screen displays. Note: The program enables you to update the purchase order at any time until you submit it and make it available to the Accounts Payable and Receiving processes.
12. Do you want to continue working in Purchasing?
• If yes, select the appropriate command for your next procedure.
• If no, select Exit.
Notes:
The system sends e-mail notifications during various steps of the process.
I.e., e-mails are sent informing approvers that a RP or PO is waiting.
E-mails are also sent advising requestors or originators that an RP
or PO has been approved or denied.
See Pages 14 & 15 for examples.
PAGE 9 CIS PURCHASING MODULE USER GUIDE
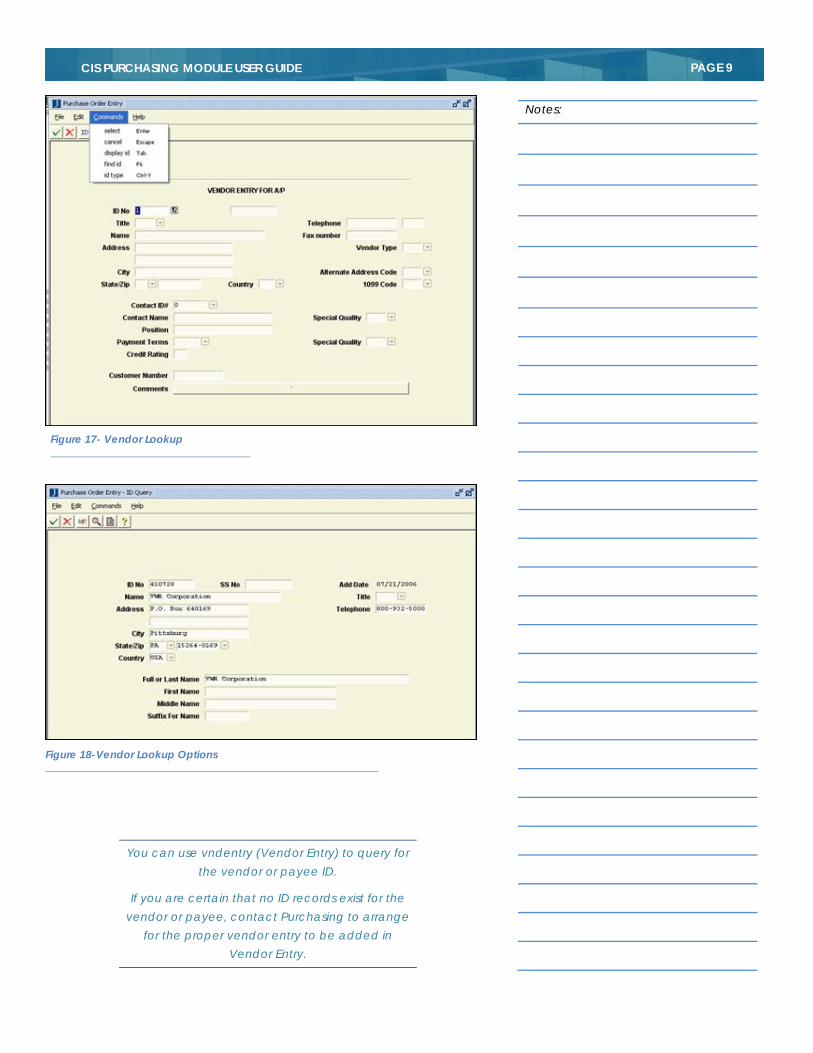
Figure 18-Vendor Lookup Options
Figure 17- Vendor Lookup
You can use vndentry (Vendor Entry) to query for the vendor or payee ID.
If you are certain that no ID records exist for the vendor or payee, contact Purchasing to arrange
for the proper vendor entry to be added in Vendor Entry.
Notes:
PAGE 10 CIS PURCHASING MODULE USER GUIDE
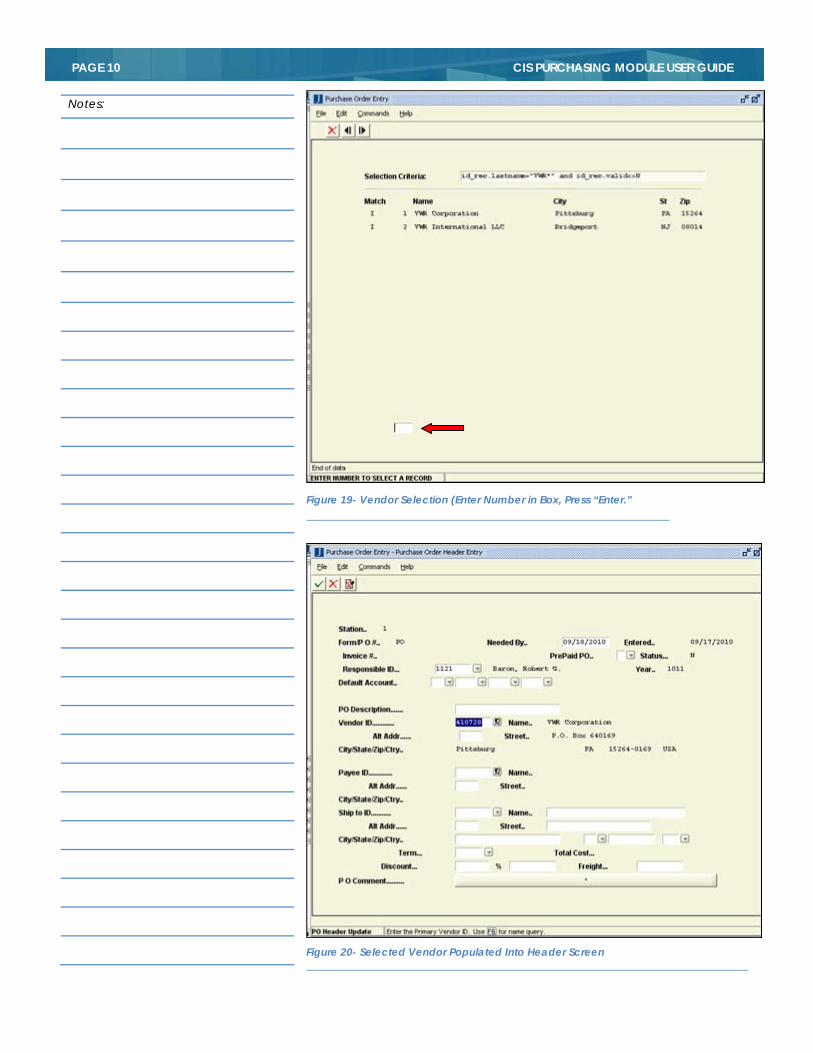
Figure 19- Vendor Selection (Enter Number in Box, Press “Enter.”
Figure 20- Selected Vendor Populated Into Header Screen
Notes:
PAGE 11 CIS PURCHASING MODULE USER GUIDE
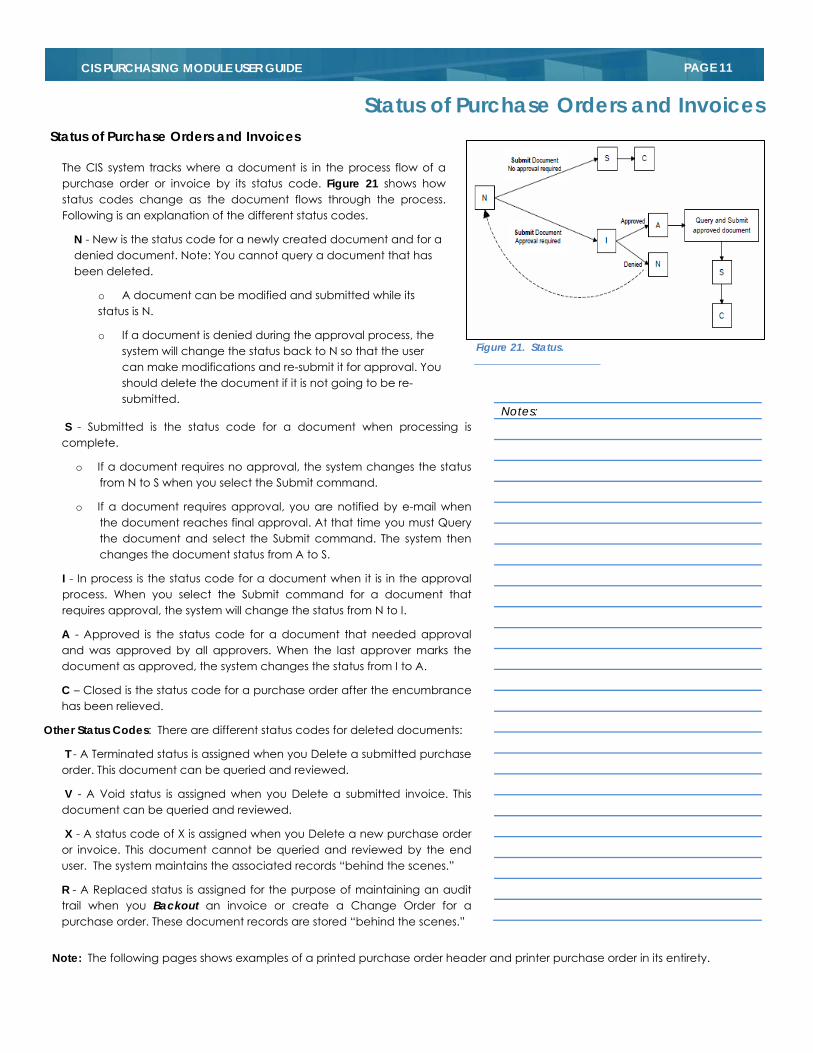
Figure 21. Status.
Status of Purchase Orders and InvoicesStatus of Purchase Orders and Invoices
The CIS system tracks where a document is in the process flow of a purchase order or invoice by its status code. Figure 21 shows how status codes change as the document flows through the process. Following is an explanation of the different status codes.
N - New is the status code for a newly created document and for a denied document. Note: You cannot query a document that has been deleted.
o A document can be modified and submitted while its status is N.
o If a document is denied during the approval process, the system will change the status back to N so that the user can make modifications and re-submit it for approval. You should delete the document if it is not going to be re-submitted.
Notes:
S - Submitted is the status code for a document when processing is complete.
o If a document requires no approval, the system changes the status from N to S when you select the Submit command.
o If a document requires approval, you are notified by e-mail when the document reaches final approval. At that time you must Query the document and select the Submit command. The system then changes the document status from A to S.
I - In process is the status code for a document when it is in the approval process. When you select the Submit command for a document that requires approval, the system will change the status from N to I.
A - Approved is the status code for a document that needed approval and was approved by all approvers. When the last approver marks the document as approved, the system changes the status from I to A.
C – Closed is the status code for a purchase order after the encumbrance has been relieved.
Other Status Codes: There are different status codes for deleted documents:
T - A Terminated status is assigned when you Delete a submitted purchase order. This document can be queried and reviewed.
V - A Void status is assigned when you Delete a submitted invoice. This document can be queried and reviewed.
X - A status code of X is assigned when you Delete a new purchase order or invoice. This document cannot be queried and reviewed by the end user. The system maintains the associated records “behind the scenes.”
R - A Replaced status is assigned for the purpose of maintaining an audit trail when you Backout an invoice or create a Change Order for a purchase order. These document records are stored “behind the scenes.”
Note: The following pages shows examples of a printed purchase order header and printer purchase order in its entirety.
PAGE 12 CIS PURCHASING MODULE USER GUIDE
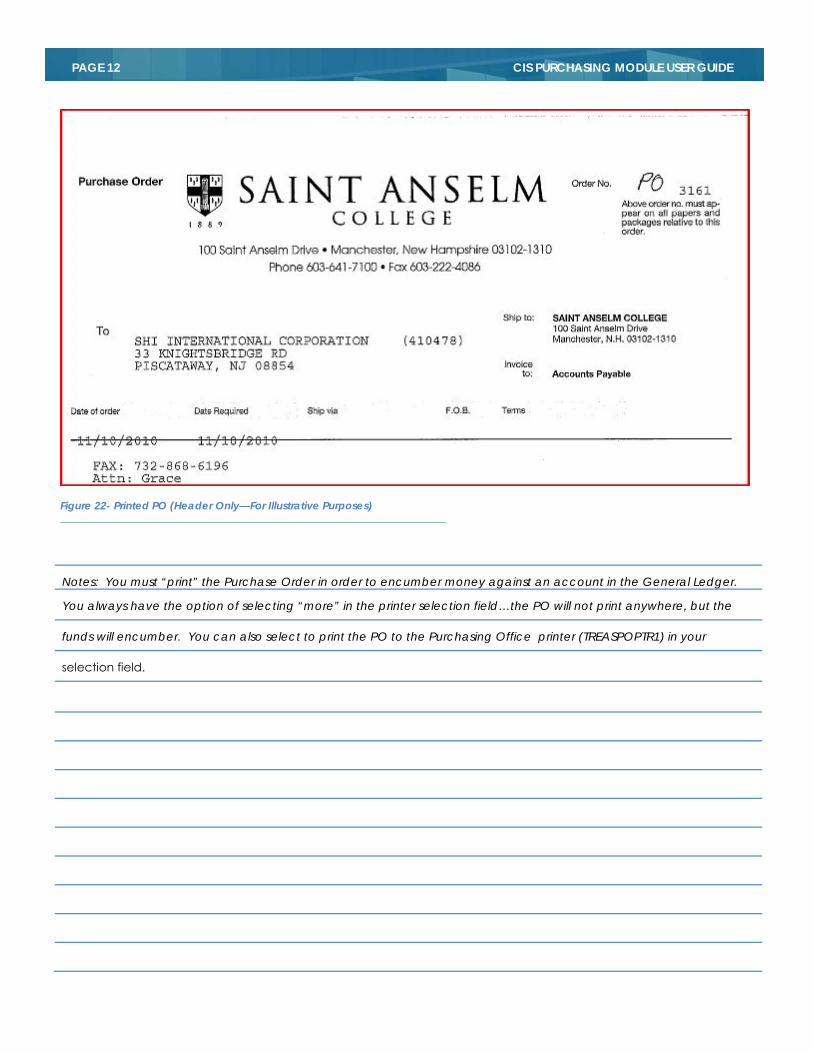
Notes: You must “print” the Purchase Order in order to encumber money against an account in the General Ledger.
You always have the option of selecting “more” in the printer selection field…the PO will not print anywhere, but the
funds will encumber. You can also select to print the PO to the Purchasing Office printer (TREASPOPTR1) in your
selection field.
Figure 22- Printed PO (Header Only—For Illustrative Purposes)
PAGE 13 CIS PURCHASING MODULE USER GUIDE
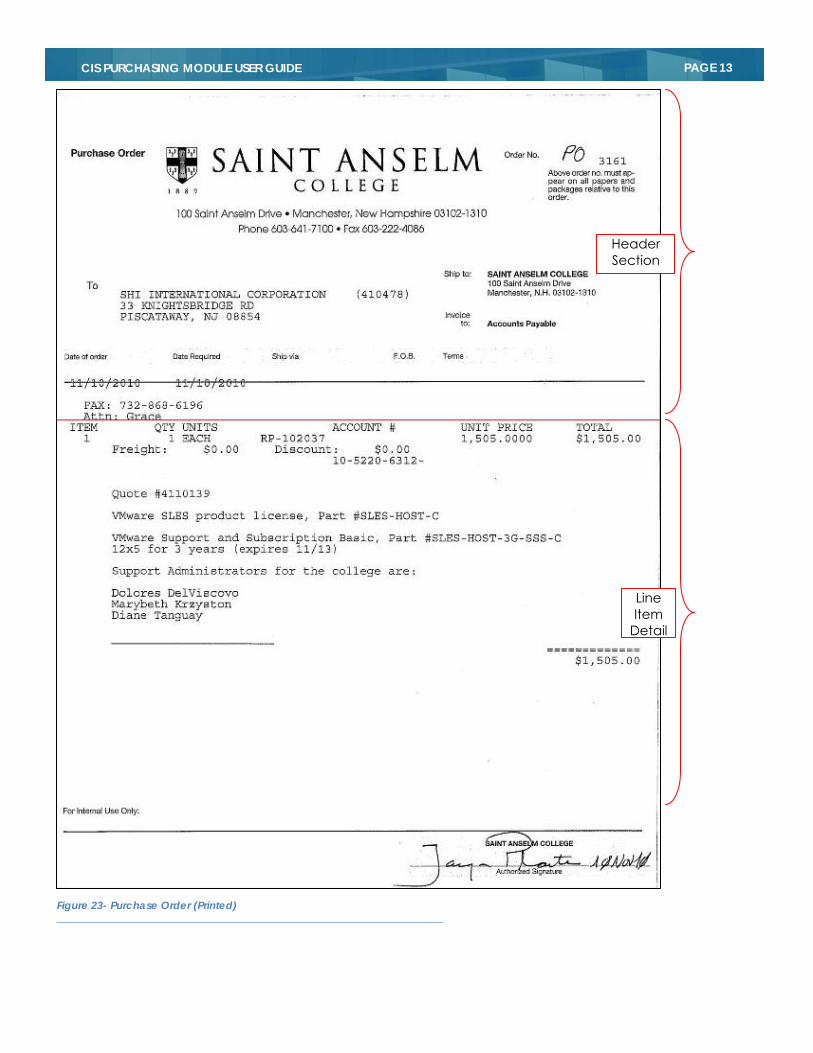
Figure 23- Purchase Order (Printed)
Header Section
Line Item
Detail
PAGE 14 CIS PURCHASING MODULE USER GUIDE
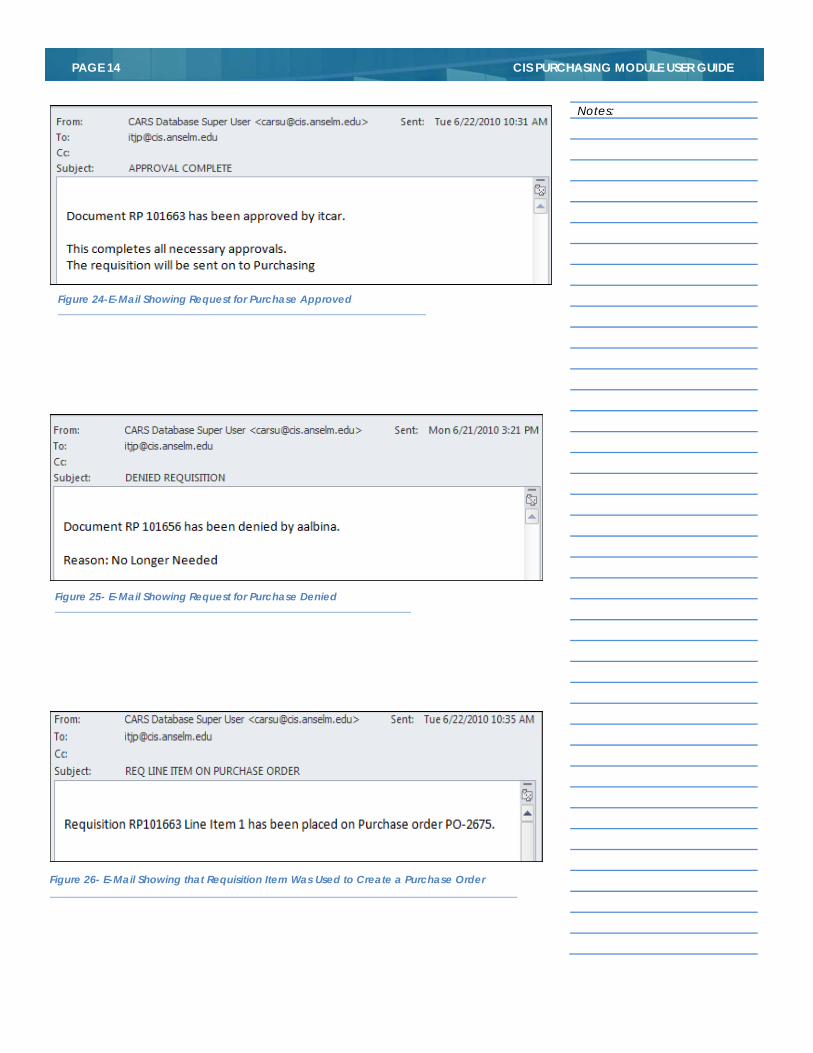
Figure 26- E-Mail Showing that Requisition Item Was Used to Create a Purchase Order
Figure 25- E-Mail Showing Request for Purchase Denied
Figure 24-E-Mail Showing Request for Purchase Approved
Notes:

PAGE 15 CIS PURCHASING MODULE USER GUIDE
Figure 28- E-Mail Informing Requisitioner that Receiving Clerk Has Received Item Requested (Steps were: Requisitioner Submits RP, RP is Approved and Sent to Purchase Order Originator, Purchase Order is Created, Approved, and Sent to Vendor. Goods Are Received in System, Which Generates This E-Mail to Original Requestor.
Figure 27- E-Mail Indicating That Approver Has Purchase Order Awaiting Approval in System
Notes:

PAGE 16 CIS PURCHASING MODULE USER GUIDE
Conduct Receiving Process The following shows the general phases that take place before, during, and after adding and updating Receiving information.
1. The goods arrive at the institution.
2. The individual who receives the goods (the receiver) accesses the Receiving application.
3. The receiver inspects the goods and compares the packing slip to the items received.
4. The receiver records the received items and packing slip information.
5. The receiver records information about any returned items.
6. The system sends electronic mail about the received and returned goods. Figure 28.
Command to Use
To access the Receiving application, select the Receiving Entry option on the Accounts Payable/Receiving menu. Figure 29.
Notes:
Figure 29- Receiving Entry Selection from Main Menu

PAGE 17 CIS PURCHASING MODULE USER GUIDE
The “Packing Slip” field is a required entry. Enter
the data from your hard copy packing slip or
define your own if there is no packing slip
number.
How to Record Receiving Information
The following lists the steps for recording receiving information.
1. From the Fiscal Management: Accounts Payable/Receiving menu, select Receiving Entry, then Finish. The Receiving Header Entry screen appears in the Receiving Header mode.
2. Select Receive. You are given access to the entry fields on the Receiving Header Entry screen in the Receiving Header mode.
3. Enter the Packing Slip and Vendor ID data in the proper Header Entry fields.
4. Are the received goods associated with a purchase order?
• If yes, enter the PO type and number, then select Finish and go to step 5. The Receiving
PO Summary screen appears in the Receive PO Items mode.
• If no, select Finish and go to step 8. The Receiving - Information screen appears in the Enter Received Items mode.
5. Select the PO line item to record by putting an asterisk (*) in the selection field next to it, and select Add Items. The Receiving Line Item Entry screen appears in the Enter Received Items mode.
6. Enter the Received information and select Finish. The Receiving PO Summary screen appears in the Receive PO Items mode.
7. Are there more received items to record for this purchase order?
• If yes, repeat steps 5 and 6.
• If no, are there received items not associated with a purchase order to be recorded?
− If yes, select Add Items and go to step 8. The Receiving -Information screen appears in the Enter Received Items mode.
− If no, select Close and go to step 11. The Receiving Header Entry screen
appears in the Receiving Header mode.
Figure 30- Receiving Entry Screen Start — Click on “F9” (finish) to Continue
Figure 32- Enter Packing Slip Number (This Entry is Required, and You Can Define Your Own if There is No Numbered Packing Slip). Complete Remainder of Field Data
Figure 31- Receiving Header Entry Screen — Click on “Process Receipt” Button or “Receive” from the drop-down “Commands” Menu.
PAGE 18 CIS PURCHASING MODULE USER GUIDE
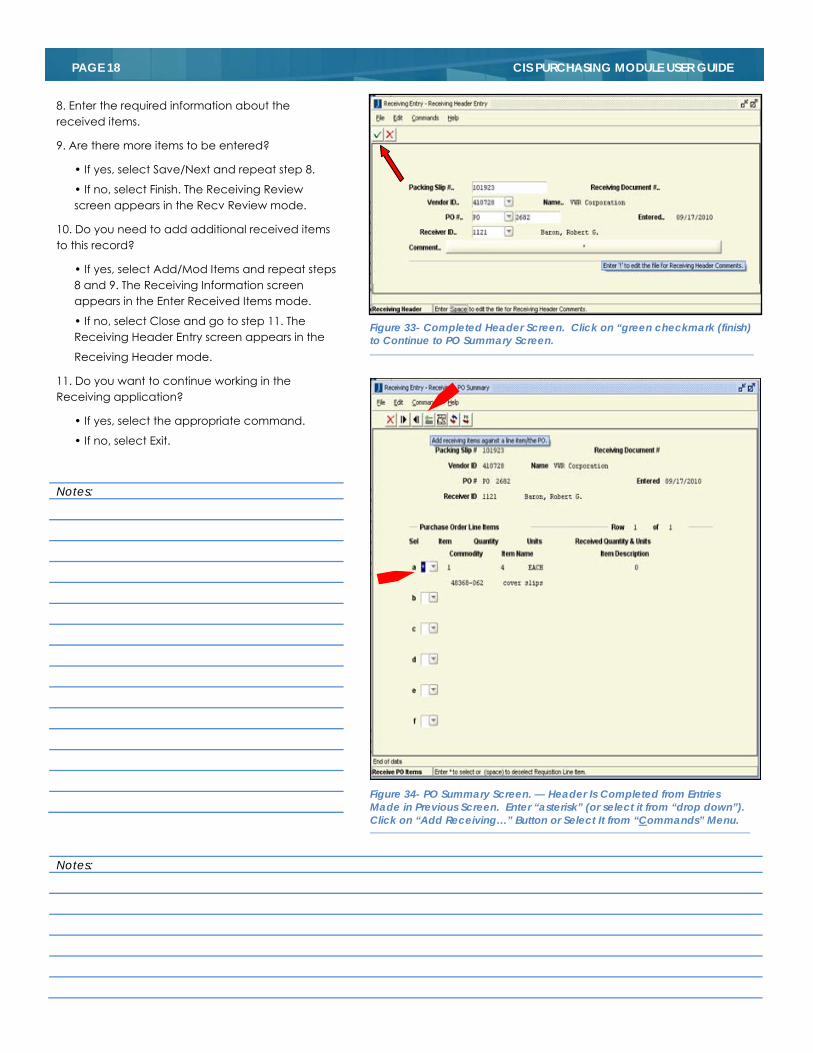
Figure 33- Completed Header Screen. Click on “green checkmark (finish) to Continue to PO Summary Screen.
Figure 34- PO Summary Screen. — Header Is Completed from Entries Made in Previous Screen. Enter “asterisk” (or select it from “drop down”). Click on “Add Receiving…” Button or Select It from “Commands” Menu.
8. Enter the required information about the received items.
9. Are there more items to be entered?
• If yes, select Save/Next and repeat step 8.
• If no, select Finish. The Receiving Review screen appears in the Recv Review mode.
10. Do you need to add additional received items to this record?
• If yes, select Add/Mod Items and repeat steps 8 and 9. The Receiving Information screen appears in the Enter Received Items mode.
• If no, select Close and go to step 11. The Receiving Header Entry screen appears in the
Receiving Header mode.
11. Do you want to continue working in the Receiving application?
• If yes, select the appropriate command.
• If no, select Exit.
Notes:
Notes:
PAGE 19 CIS PURCHASING MODULE USER GUIDE
4. Did a Return record exist?
• If yes, select Close, then go to step 9. You are returned to the Receiving Header Entry screen in the Query PO mode. At this point you are finished, because this return has been recorded.
• If no, select OK and select Receipt Review. The Receiving Review screen appears in the Recv Review mode.
Clicking the “Add Receiving” button without first entering the “asterisk” in the
item field will allow you to receive an item not on the original PO.
You might use this feature if a vendor had substituted a similar item at the
same price as original item.
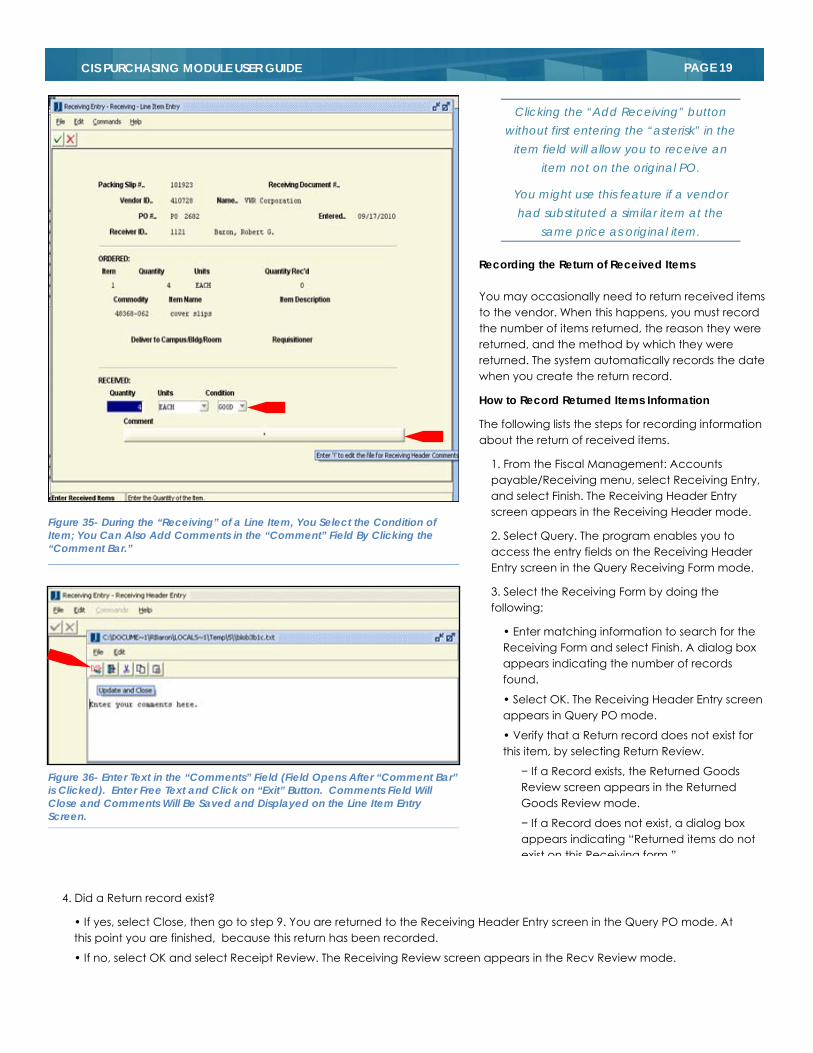
Figure 36- Enter Text in the “Comments” Field (Field Opens After “Comment Bar” is Clicked). Enter Free Text and Click on “Exit” Button. Comments Field Will Close and Comments Will Be Saved and Displayed on the Line Item Entry Screen.
Figure 35- During the “Receiving” of a Line Item, You Select the Condition of Item; You Can Also Add Comments in the “Comment” Field By Clicking the “Comment Bar.”
Recording the Return of Received Items You may occasionally need to return received items to the vendor. When this happens, you must record the number of items returned, the reason they were returned, and the method by which they were returned. The system automatically records the date when you create the return record.
How to Record Returned Items Information
The following lists the steps for recording information about the return of received items.
1. From the Fiscal Management: Accounts payable/Receiving menu, select Receiving Entry, and select Finish. The Receiving Header Entry screen appears in the Receiving Header mode.
2. Select Query. The program enables you to access the entry fields on the Receiving Header Entry screen in the Query Receiving Form mode.
3. Select the Receiving Form by doing the following:
• Enter matching information to search for the Receiving Form and select Finish. A dialog box appears indicating the number of records found.
• Select OK. The Receiving Header Entry screen appears in Query PO mode.
• Verify that a Return record does not exist for this item, by selecting Return Review.
− If a Record exists, the Returned Goods Review screen appears in the Returned Goods Review mode.
− If a Record does not exist, a dialog box appears indicating “Returned items do not exist on this Receiving form ”

PAGE 20 CIS PURCHASING MODULE USER GUIDE
5. Select the item to be returned by putting an asterisk (*) in the selection field; then select
Return Items. The Return screen appears in the Enter Returned Goods mode.
6. Enter the Return information in the bottom section of the screen, then select Finish. The
Receiving Review screen appears in the Recv Review mode.
7. Are there more items to be returned?
• If yes, repeat steps 6 and 7.
• If no, select Close. The Receiving Header Entry screen appears in the Query PO mode.
8. Are you finished with this record?
• If yes, select Close. The Receiving Header Entry screen appears in the Receiving Header mode.
• If no, select the appropriate command to continue.
9. Do you want to continue working in the Receiving application?
• If yes, select the appropriate command.
• If no, select Exit.
Figure 37- Example of Comment Appearing in “Comment Bar” After Entry. Click on “Green Checkmark” to Save Changes and Exit Screen.
Notes:

PAGE 21 CIS PURCHASING MODULE USER GUIDE
The primary functions of the Accounts Payable application are:
Entering electronic invoices received from vendors
Submitting invoices for approval to the purchase order originator
Submitting invoices for payment
The Accounts Payable application is used by Business Office personnel. The Accounts Payable clerk enters an electronic invoice and then submits it to the purchase order originator for approval. Authorization for payment is given by the purchase order originator prior to any disbursement of funds. Once approval is obtained, the invoice is scheduled for payment.
Process
You will be notified via e-mail message when an invoice has been submitted for your approval. Refer to Figure 38 for an example.
1. In CIS, begin by selecting “Req/PO/Inv Approval” from the menu. The Req/PO/Inv Approval screen appears. Select “F9” or Finish. Refer to Figures 39 & 40.
2. The Req/PO/Inv Approval Item Selection
screen appears. From this screen, select the
type of item to approve, i.e., request for
purchase, purchase order or invoice, by clicking
on the item’s “letter” button. See Figure 41.
3. Once you select the item, the Req/PO/Inv Approval detail screen will appear, allowing you to review details of the electronic invoice. Click the “OK” command button to approve. Figure 42.
4. You will receive a system verification prompt asking if you are sure that you want to approve the document. Figure 43.
5. An e-mail message will then be transmitted to the Account Payable clerk, who will then be able to process payment.
6. The invoice can only be approved in its entirety…you cannot approve only a partial invoice.
You may also choose to not approve the Invoice, which will also transmit a non-approval message to Accounts Payable.
Changes to the invoice will have to be communicated to Accounts Payable for resubmission for approval.
Figure 41-Req/PO/Inv Approval Item Selection Screen
Items to Approve
Figure 38-Example of Invoice E-mail Message
Figure 39- Choose “Req/PO/Inv Approval from Menu
Figure 40- Req/PO/Inv Approval Screen
Figure 42- Req/PO/Inv Approval Detail Screen Figure 43- Verification Message
Conduct Invoice Approval
PAGE 22 CIS PURCHASING MODULE USER GUIDE
Figure 45- “myAnselm” Portal Address
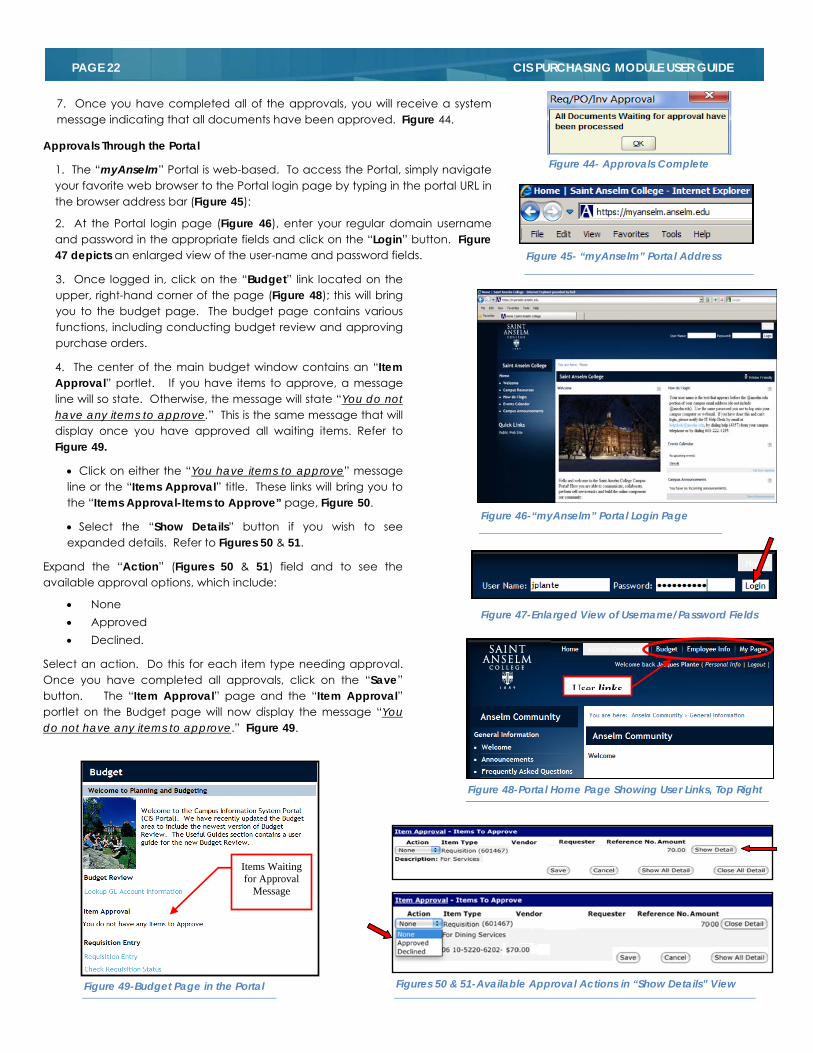
3. Once logged in, click on the “Budget” link located on the upper, right-hand corner of the page (Figure 48); this will bring you to the budget page. The budget page contains various functions, including conducting budget review and approving purchase orders.
4. The center of the main budget window contains an “Item Approval” portlet. If you have items to approve, a message line will so state. Otherwise, the message will state “You do not have any items to approve.” This is the same message that will display once you have approved all waiting items. Refer to Figure 49.
Click on either the “You have items to approve” message line or the “Items Approval” title. These links will bring you to the “Items Approval-Items to Approve” page, Figure 50.
Select the “Show Details” button if you wish to see expanded details. Refer to Figures 50 & 51.
Expand the “Action” (Figures 50 & 51) field and to see the available approval options, which include:
None Approved Declined.
Select an action. Do this for each item type needing approval. Once you have completed all approvals, click on the “Save” button. The “Item Approval” page and the “Item Approval” portlet on the Budget page will now display the message “You do not have any items to approve.” Figure 49.
Figure 46-“myAnselm” Portal Login Page
7. Once you have completed all of the approvals, you will receive a system message indicating that all documents have been approved. Figure 44.
Figure 44- Approvals Complete
Approvals Through the Portal
1. The “myAnselm” Portal is web-based. To access the Portal, simply navigate your favorite web browser to the Portal login page by typing in the portal URL in the browser address bar (Figure 45):
2. At the Portal login page (Figure 46), enter your regular domain username and password in the appropriate fields and click on the “Login” button. Figure 47 depicts an enlarged view of the user-name and password fields.
Figure 47-Enlarged View of Username/Password Fields
Figure 48-Portal Home Page Showing User Links, Top Right
User links
Figures 50 & 51-Available Approval Actions in “Show Details” View Figure 49-Budget Page in the Portal
Items Waiting for Approval
Message

PAGE 23 CIS PURCHASING MODULE USER GUIDE
Acc
t. #
Sele
ct
Selection
Date
Ran
ge
Period
Figure 53- Budget Review Page Showing Available Options on “Full Account” Tab
Figure 55- Period and Account Selection
Conduct Budget Review
Using the Portal
1. You conduct budget review in the portal through the “Lookup GL Account Information” link under the “Budget Review” subheading on the “Budget” page. Select the link to continue. Figure 52.
On the “Budget Review” page, select the period range for which you want to view budget information. In the “Account Number Selection” area, you can choose the budget line to review using different methods, either by full account or partial account number. Choose the desired method with the proper selection tab.
The “Full Acct.#” tab provides the option of returning a single account by entering an account number in the “Begin Acct. #” field and leaving the “End Acct.#” field blank.
Budget review can be conducted directly from the CIS system or by using the web portal.
Figure 52- Budget Page on Portal Entering a range of accounts will return accounts information within the range.
The “Partial Acct. #” tab returns information on select accounts by entering only a portion of the relevant account number. Figure 54.
Enter the relevant date range in the fields at the bottom of the screen.
What is a Range?
A range is a distinct period of time. Range could be one month, quarter, half-year, etc. Examples:
“Beginning Month July to Ending Month July”
Or “Beginning – July – Ending September” for one quarter
Or “Beginning – July – Ending December” for one half of a fiscal year.
Figure 55 provides a diagram of decision choices to make.
Figure 54- “Partial Account” Tab
5470
PAGE 24 CIS PURCHASING MODULE USER GUIDE
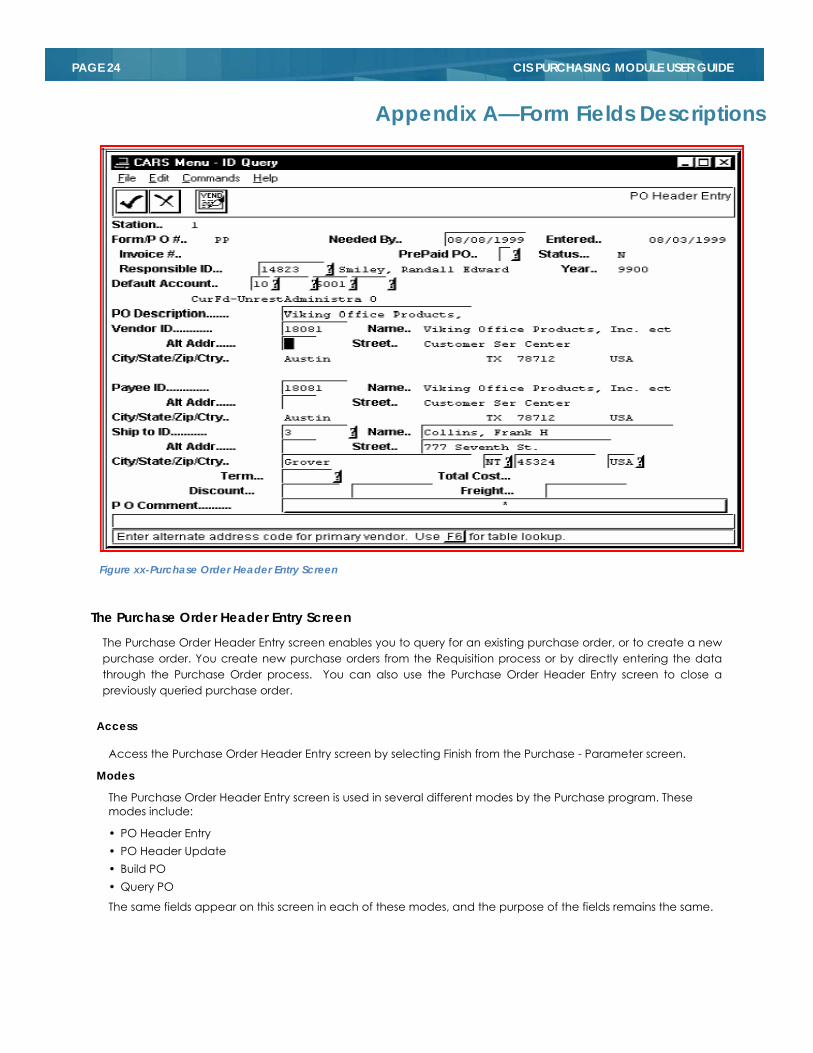
Figure xx-Purchase Order Header Entry Screen
Appendix A—Form Fields Descriptions
The Purchase Order Header Entry Screen
The Purchase Order Header Entry screen enables you to query for an existing purchase order, or to create a new purchase order. You create new purchase orders from the Requisition process or by directly entering the data through the Purchase Order process. You can also use the Purchase Order Header Entry screen to close a previously queried purchase order.
Access
Access the Purchase Order Header Entry screen by selecting Finish from the Purchase - Parameter screen.
Modes
The Purchase Order Header Entry screen is used in several different modes by the Purchase program. These modes include:
• PO Header Entry • PO Header Update • Build PO • Query PO
The same fields appear on this screen in each of these modes, and the purpose of the fields remains the same.

PAGE 25 CIS PURCHASING MODULE USER GUIDE
Notes:
Discount Two fields for the discount applied to the entire purchase order. The discount will be applied equally to all line items. Use only one field:
• First field is for the dollar amount of the discount • Second field is for the percentage of the discount (1.00 = 1%)
Entered The date when the purchase order was first added. Note: When querying on the date, you can use the following arithmetic symbols with dates to retrieve requisitions that fall in date ranges:
• (after the specified date)
• < (before the specified date)
• >= (on or after the specified date)
• <= (on or before the specified date)
Form/PO # The purchase order form type and number.
Freight The amount of the freight cost for the purchase order.
Invoice # The invoice number associated with the purchase order.
Needed By The date when the purchase order items are needed. Note: When querying on the date, you can use the following arithmetic symbols with dates to retrieve requisitions that fall in date ranges:
• (after the specified date)
• < (before the specified date)
• >= (on or after the specified date)
• <= (on or before the specified date)
Notes:
PAGE 26 CIS PURCHASING MODULE USER GUIDE
Payee ID The identification number of the person to be paid for the items on the purchase order.
Payee ID Alt Addr The alternate address code associated with the ID of the payee.
Payee ID City/State/Zip/Ctry The city, state, zip code and country associated with the Payee ID for this purchase order.
Payee ID Name The name of the person to be paid for the items on the purchase order.
Payee ID Street The street address of the person to be paid for this purchase order.
PO Comment The comment field where you enter comments about the purchase order. Note: The PO Comment field is a binary large object (BLOB) field that can contain a variable amount of text. You use the text editor to edit text in a BLOB field. When you move the cursor to the comment field and enter !, the text editor file appears in the Edit mode.
PO Description Description of the purchase order used for posting to the general and subsidiary ledgers and viewable within Budget Review. The default description comes from the Vendor Name field.
Pre Paid PO A Y/N field indicating whether the purchase order has been prepaid.
Responsible ID The identification number of the person responsible for the purchase order.
Ship to ID The identification number of the person where the purchase order items are to be delivered. If no ID is available you may enter the name in the Ship to ID Name field. (Optional)
Ship to ID Alt Addr The alternate address code associated with the ID of the person where the purchase order items are to be delivered.
Ship to ID City/State/Zip/Ctry The city, state, zip code, and country where the purchase order items are to be delivered.
Ship to ID Name The name of the person to whom the purchase order items are to be delivered.
Ship to ID Street The street address of the person where the purchase order items are to be delivered.
Station The station number associated with the purchase order.
Status The purchase order status. Valid values are:
• A (Approved) • C (Closed) • I (In Process) • N (New) • S (Submitted) • T (Terminated) • X (Deleted)
Note: When you create a change order, the program creates a snapshot of the original document with a status of R (Replaced) that is maintained for an audit trail. This status is not seen by the user, but is seen only from behind the scenes.
Notes:

PAGE 27 CIS PURCHASING MODULE USER GUIDE
Term The terms of payment for the purchase order. Note: You can use Table Lookup to find valid values.
Total Cost The total amount of the purchase order.
Vendor Alt Addr The alternate address code associated with the ID of the primary vendor for the purchase order.
Vendor City/State/Zip/Ctry The city, state, zip code, and country of the primary vendor for the purchase order.
Vendor ID The identification number of the primary vendor for the purchase order.
Vendor Name The name of the primary vendor for the purchase order.
Vendor Street The street address of the primary vendor for this purchase order.
Year The fiscal year to which the purchase order applies.
Commands The following is a list of commands you can execute from the Purchase Order Header Entry screen and their purposes. You can use a specific command only when it appears on the current command line, toolbar, menu, or when it is black (not dimmed) on the list that appears when you select Commands from the menu bar. This list includes commands from all four modes that use this screen.
Add Items Enables you to manually add line items to the current Purchase Order.
Budget Review Enables you to access the Budget Review program and review budget information for the specified account. You can view budget information for selected accounts, account statuses, years, and accounting periods, including varying levels of detail.
Build PO Displays the PO Header Entry screen and enables you to create a new purchase order in Build PO mode. In this mode, you can access Vendor Entry in which you can add vendor IDs.
Cancel Enables you to back out of the current command mode without saving any changes to the information.
Change Order Enables you to write a change order for the current purchase order.
Check Displays listings of invoices and checks for the current purchase order, if any exist.
Close Closes the selected purchase order so no further invoices can be processed against it.
Close PO Removes all remaining encumbrances for the selected purchase order,
Delete Enables you to delete the current purchase order.
Notes:
PAGE 28 CIS PURCHASING MODULE USER GUIDE
Exit Exits the program and returns you to the menu.
Finish Signals the program that you have completed your selection or data entry/update. If you entered/changed data, changes are saved. Initialize Displays the Purchase - Parameter screen and enables you to change your parameter definitions.
List Displays a list of all the purchase orders that meet your search criteria.
Next Enables you to display the next purchase order in a queried listing.
Previous Enables you to display the previous Purchase Order in a queried listing.
Print Enables you to print a copy of the current Purchase Order information.
Query Displays the Query PO screen and enables you to select a specific purchase order.
Requisitions Displays the PO - Select Requisitions screen with a listing of all approved requisitions regardless of the fiscal year in which they originated), and enables you to select a specific requisition for processing.
Review Enables you to review information on the current purchase order.
Select Items Enables you to select requisition line items to add to the current purchase order.
Submit Enables you to submit the current purchase order for processing.
Update Enables you to update the purchase order header information for the current purchase order.
Vndentry Enables you to access Vendor Entry, in which you can enter vendor IDs.
The Purchase Order Line Item Entry Screen
The Purchase Order Line Item Entry screen enables you to enter line items directly through the purchasing process, bypassing the requisition and approval process. You can also use this screen to view line items on existing purchase orders.
Access You can access the Purchase Order Line Item Entry screen from several screens, depending on whether you are updating a current purchase order or creating a new one. You can access the Purchase Order Line Item Entry screen in the following ways:
• Select Add Items on the Purchase Order Header Entry screen in either the Build PO or the Query PO mode • Select a specific line item and View Items or View/Mod Items on the Purchase Order Review screen.
Notes:
PAGE 29 CIS PURCHASING MODULE USER GUIDE
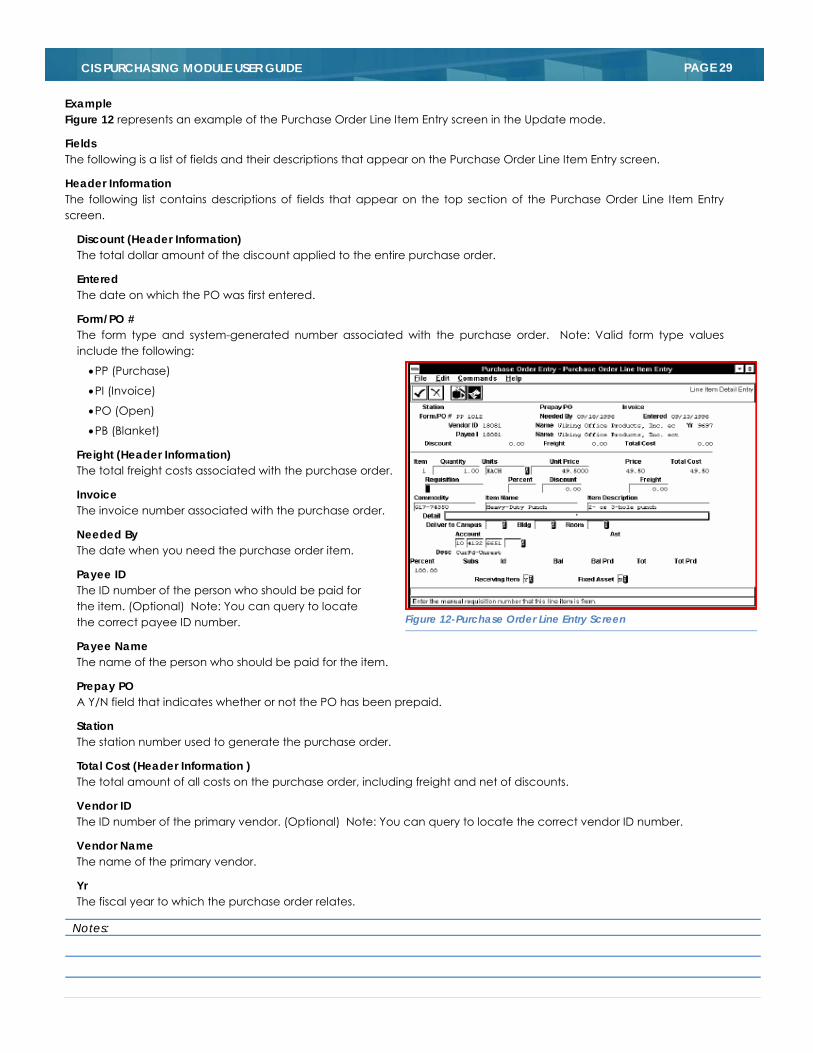
Example Figure 12 represents an example of the Purchase Order Line Item Entry screen in the Update mode.
Fields The following is a list of fields and their descriptions that appear on the Purchase Order Line Item Entry screen.
Header Information The following list contains descriptions of fields that appear on the top section of the Purchase Order Line Item Entry screen.
Discount (Header Information) The total dollar amount of the discount applied to the entire purchase order.
Entered The date on which the PO was first entered.
Form/PO # The form type and system-generated number associated with the purchase order. Note: Valid form type values include the following:
PP (Purchase)
PI (Invoice)
PO (Open)
PB (Blanket)
Freight (Header Information) The total freight costs associated with the purchase order.
Invoice The invoice number associated with the purchase order.
Needed By The date when you need the purchase order item.
Payee ID The ID number of the person who should be paid for the item. (Optional) Note: You can query to locate the correct payee ID number.
Payee Name The name of the person who should be paid for the item.
Prepay PO A Y/N field that indicates whether or not the PO has been prepaid.
Station The station number used to generate the purchase order.
Total Cost (Header Information ) The total amount of all costs on the purchase order, including freight and net of discounts.
Vendor ID The ID number of the primary vendor. (Optional) Note: You can query to locate the correct vendor ID number.
Vendor Name The name of the primary vendor.
Yr The fiscal year to which the purchase order relates.
Figure 12-Purchase Order Line Entry Screen
Notes:
PAGE 30 CIS PURCHASING MODULE USER GUIDE
Line Item Information The following list contains descriptions of fields that appear on the bottom section of the Purchase Order Line Item Entry screen.
Account The account number that you want to charge for the item.
Ast The type of restriction applied to the account. Valid values include the following:
• P (Permanently restricted)
• T (Temporarily restricted)
• U (Unrestricted)
Bal A field showing the balance code for the Subsidiary record.
Bal Prd A field showing the balance period for the Subsidiary record.
Commodity The part number of the item as required by the vendor. You can use Table Lookup to identify commodity codes for selected items.
Deliver to The location to which you want the item delivered. This includes three fields that identify the following:
• Campus
• Building
• Room
Desc The description of the account number. Note: This field is located on the lower portion of the screen below the account number.
Detail Instructions or comments about the specific line item. Note: The detail field can contain a variable amount of text. You use the text editor to edit text in the field. When you move the cursor to the comment field and enter !, the text editor file appears in the Edit mode.
Discount (Line Item Information) The total dollar amount of the discount applied to the selected line item.
Fixed Asset A Y/N field indicating whether the item should become a fixed asset.
Freight (Line Item Information) The total freight costs associated with the selected line item.
Id The ID number of the person or company associated with the Subsidiary record.
Item The system-generated number associated with the line item on the purchase order. Note: This number increments as you add new items to the purchase order.
Item Description The description of the item.
Item Name The name of the item.
Percent (Acc) The percentage of the PO Line Item associated with the designated account.
Notes:
PAGE 31 CIS PURCHASING MODULE USER GUIDE
Percent (Disc) The discount percentage rate applied to the cost of all the line items.
Price The amount of the total cost of the line item.
Quantity The number of units requested. You can express this as a whole number or decimal (e.g., if you request 2.5 cases or 17 wastebaskets, 2.5 and 17 are the correct quantities).
Receiving Item A Y/N field indicating whether the item will be handled by Receiving.
Requisition The requisition number associated with this purchase order line item.
Subs The Subsidiary type of the account.
Tot The total code for the Subsidiary record.
Tot Prd The total period for the Subsidiary record.
Total Cost (Line Item Information) The total cost of the specific line item (e.g., 2 cases @ $7.9450 has a Total Cost of $15.89).
Unit Price The price of each unit of the line item (e.g., $7.9450 per case).
Units The grouping size of the line item (e.g., cases, gross, or each).
Commands
The following is a list of commands you can execute from the Purchase Line Item Entry screen and their purposes. You can use a specific command only when it appears on the current command line, toolbar, menu, or when it is black (not dimmed) on the list that appears when you select Commands from the menu bar.
Account Info Displays the Account Info Entry screen, enabling you to enter or modify information about the account to charge for the specific line item. The Account Info Entry screen also enables you to charge the line item to multiple accounts.
Cancel Displays the previous screen without saving any information or executing a command.
Finish Completes the current purchase order line item entry, and displays the previous screen.
Save/Next Item Saves the current item detail information, and positions the cursor so you can enter information about another item.
Notes:
Notes:
PAGE 32 CIS PURCHASING MODULE USER GUIDE
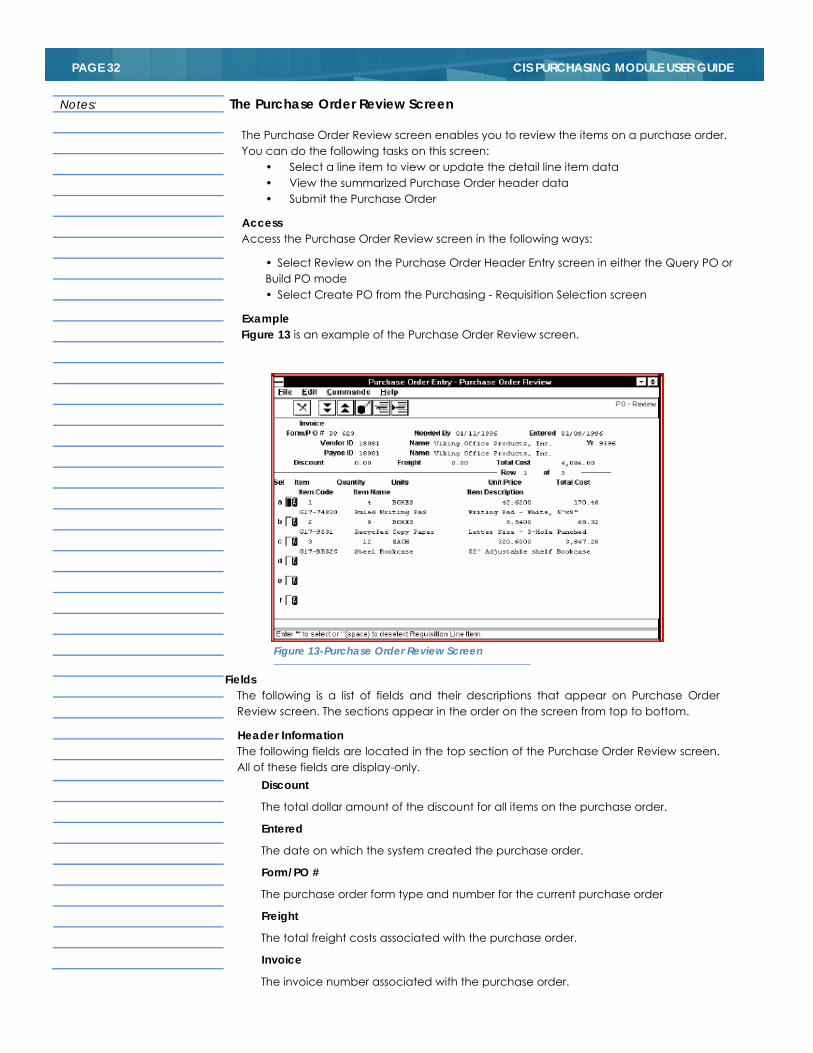
The Purchase Order Review Screen
The Purchase Order Review screen enables you to review the items on a purchase order. You can do the following tasks on this screen:
• Select a line item to view or update the detail line item data • View the summarized Purchase Order header data • Submit the Purchase Order
Access Access the Purchase Order Review screen in the following ways:
• Select Review on the Purchase Order Header Entry screen in either the Query PO or Build PO mode • Select Create PO from the Purchasing - Requisition Selection screen
Example Figure 13 is an example of the Purchase Order Review screen.
Fields The following is a list of fields and their descriptions that appear on Purchase Order Review screen. The sections appear in the order on the screen from top to bottom.
Header Information The following fields are located in the top section of the Purchase Order Review screen. All of these fields are display-only.
Discount
The total dollar amount of the discount for all items on the purchase order.
Entered
The date on which the system created the purchase order.
Form/PO #
The purchase order form type and number for the current purchase order
Freight
The total freight costs associated with the purchase order.
Invoice
The invoice number associated with the purchase order.
Notes:
Figure 13-Purchase Order Review Screen
PAGE 33 CIS PURCHASING MODULE USER GUIDE
Needed By
The date on which you need the item.
Payee ID
The ID number of the payee.
Payee Name
The name of the payee.
Total Cost - Purchase Order
The total of all the costs on the purchase order, including freight and net of discounts.
Vendor ID
The ID number of the vendor.
Vendor Name
The name of the vendor.
Yr
The fiscal year of the purchase order. Line Item Information The following list contains descriptions of fields that appear on the bottom section of the Purchase Order Review screen. All of these fields are display-only.
Item The system-generated number associated with the line item on the purchase order. Note: This number increments as you add new items to the purchase order.
Item Code The part number of the item as required by the vendor.
Item Description The description of the item.
Item Name The name of the item.
Quantity The number of units requested. You can express this as a whole number or a decimal (e.g., if you request 2.5 cases or 17 wastebaskets, 2.5 and 17 are the correct quantities).
Sel A one-character selection field that indicates whether you have selected the item. Valid codes include the following:
• Blank You have not selected the item. • You have selected the item.
Total Cost The total cost for the specific line item (e.g., 2 cases @ $7.9450 has a Total Cost of $15.89).
Unit Price The price of each unit of the line item (e.g., $7.9450 per case).
Units The grouping size of the line item (e.g., cases, gross, or each).
Commands
The following is a list of commands you can execute from the Purchase Order Review window and their purposes. You can use a specific command only when it appears on the current command line, toolbar, menu, or when it is black (not dimmed) on the list that appears when you select Commands from the menu bar.
Notes:
PAGE 34 CIS PURCHASING MODULE USER GUIDE
Add/Mod Items Enables you to add new line items to the purchase order when no items are selected, or to modify the selected line item.
* All Enables you to select all the line items on the purchase order for review.
Back Displays the previous page of line items on the purchase order.
Cancel Enables you to back out of the current command mode without saving any changes to the information.
Close Exits this screen and displays the previous screen.
Delete Enables you to delete or terminate the current purchase order.
Delete Items Enables you to delete the selected line item(s) from the purchase order.
Finish Signals the program that you have completed your selection or data entry/update.
Forward Displays the next page of line items on the purchase order.
Submit Enables you to submit the current purchase order to the Purchase Order process, making journal entries and adding encumbrances to the General Ledger.
Update Enables you to update the Purchase Order Header information for the current purchase order.
View items Enables you to review detail information on the selected line item(s).
View/Mod Enables you to view or update detail information for the selected line item(s).
The Purchase – Parameter Screen
The Purchase - Parameter screen enables you to define parameters required to access the purchasing application. Values you can define include the purchasing form type, requisition sort order, station number, payables subsidiary, posting date and the printer where you can print copies of the PO. Valid purchasing form types are the following:
• PB (Blanket Purchase Order)
• PI (Invoice)
• PO (Open Purchase Order)
• PP (Purchase Order)
Access Access the Purchase - Parameter screen by selecting the Purchase Order Entry option from the menu, or by selecting Initialize on the Purchase Order Header Entry screen.
Example Figure 7 is an example of the Purchase Parameter screen.
Notes:
PAGE 35 CIS PURCHASING MODULE USER GUIDE
Fields The following is a list of fields and their descriptions that appear on the Purchase – Parameter screen.
Payables Subsidiary The subsidiary code associated with the purchase order. The most common subsidiary to use with Accounts Payable is A/P; however, your institution can use other subsidiaries if desired.
Posting Date The date to be used to post the account in the general ledger. The default value is the current date; however, you can enter a future date in the format mm/dd/yyyy. Note: If a different date is entered, the fiscal calendar must be open for the month to be posted.
Printer The name of the printer to be used for printing purchase orders. Purchasing Form The form type of purchase order to be written. The default value is PP, indicating a regular purchase order. Valid values include the following:
• PB (Blanket Purchase Order)
• PI (Invoice Type)
• PO (Open Purchase Order Type)
• PP (Purchase Order Type)
Requisition Sort Order The sort order to be used for approved purchase orders. The default value is VEND, indicating an alphabetical sort by vendor name. Valid values are: (Note: The Jenzabar coordinator can add additional sorts if necessary.)
• COMM (Commodity code items)
• ITEM (Item name)
• NEED (Need by date)
• RUSH (Rush and Need by dates)
• VEND (Vendor order)
Station The station number of the person entering the purchase order. Note: A value of zero (0) allows you to enter the purchase order number manually. A non-zero value allows the system to generate the purchase order number automatically.
Commands The following is a list of commands you can execute from the Purchase - Parameter screen and their purposes. You can use a specific command only when it appears on the current command line, toolbar, menu, or when it is black (not dimmed) on the list that appears when you select Commands from the menu bar.
Cancel Ends the application session and returns you to the menu.
Finish Takes you to the PO Header Entry screen.
Notes: