
Chronograph - elysee-watches.com · EINSTELLUNGEN FÜR RONDA UHRWERK Sekundenzähler Datum...
43
elysee-watches.com Bedienungsanleitung Instruction manual Chronograph
Transcript of Chronograph - elysee-watches.com · EINSTELLUNGEN FÜR RONDA UHRWERK Sekundenzähler Datum...
elysee-watches.com
Bedienungsanleitung Instruction manual
Chronograph

3
INHALT · CONTENTELYSEE Uhren ............................................................. 5Einstellung für CITIZEN/MIYOTA Uhrwerke .................. 6Einstellungen für RONDA Uhrwerke ........................... 10Einstellungen für SEIKO/TMI Uhrwerke ...................... 14Einstellungen für ETA/VALJOUX Uhrwerke ................. 18Wasserdichtigkeit ....................................................... 21Gewährleistung und Garantie ..................................... 22Umwelthinweis und Entsorgung ................................. 23
ELYSEE Watches ....................................................... 25Settings for CITIZEN/MIYOTA movement ................... 26Settings for RONDA movement .................................. 30Settings for SEIKO/TMI movement ............................. 34Settings for ETA/VALJOUX movement ....................... 38Water resistance ........................................................ 41Warranty and guarantee ............................................ 42Environmental note and disposal ............................... 43

4 Düsseldorf

5
Seit 1960 lässt ELYSEE klassische Uhrmachertechnik in feinstem Uhrendesign auferstehen. Hier in Düsseldorf, entstehen so hochwertige Zeitmesser - Made in Germany. Dabei immer besser zu werden, ist für das gesamte ELYSEE-Team gelebte Firmenphilosophie:
„Im Zentrum unseres Schaffens steht die Summe von Design, Qualität und hohem Gegenwert, verbunden mit den Wünschen von Uhren-Liebhabern.“
Wir möchten Sie daher zu Ihrer neuen ELYSEE beglückwünschen und hoffen, dass Sie lange und viel Freude daran haben werden.
Mit den besten Grüßen aus Düsseldorf,Ihr ELYSEE-Team

6
EINSTELLUNGEN FÜR CITIZEN/MIYOTA UHRWERK
DatumStoppuhr: Sekundenanzeige
Sekundenzeiger
Stoppuhr: Minutenanzeige
Drücker B
Drücker A
24-Stunden-AnzeigeMinutenzeiger
Krone10 2
Stundenzeiger
Bitte beachten Sie, dass dies nur eine schematische Abbildung zur Verdeutlichung der Einstellun-gen ist. Das Design sowie verschiedene Funktionen können daher von Ihrer Uhr abweichen.

7
Einstellen des Datums1. Ziehen Sie die Krone bis zur Position 1 heraus und drehen Sie die Krone
gegen den Uhrzeigersinn, um das Datum des Vortages einzustellen.2. Ziehen Sie die Krone bis Position 2 heraus. Um sicherzustellen, dass die
Datumsanzeige nicht mittags, sondern um Mitternacht schaltet, drehen Sie den Stunden- und Minutenzeiger vorwärts, bis die Datumsanzeige auf das heutige Datum schaltet.
3. Stellen Sie jetzt, durch weiteres Drehen der Krone, den Stunden- und Minutenzeiger auf die aktuelle Uhrzeit ein.
4. Drücken Sie anschließend die Krone wieder in die Normalposition (0) zurück und setzen Sie so die Uhr wieder in Gang.
Einstellen der Uhrzeit1. Ziehen Sie die Krone bis zur Position 2 heraus und drehen Sie die Krone
im Uhrzeigersinn, um die aktuelle Uhrzeit einzustellen.2. Drücken Sie die Krone wieder in die Normalposition (0) zurück.
Das Datum muss am ersten Tag jedes Monats, der auf einen Monat mit weniger als 31 Tagen folgt, neu eingestellt werden.
8
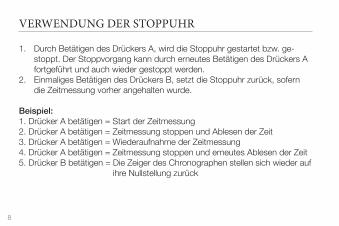
1. Durch Betätigen des Drückers A, wird die Stoppuhr gestartet bzw. ge-stoppt. Der Stoppvorgang kann durch erneutes Betätigen des Drückers A fortgeführt und auch wieder gestoppt werden.
2. Einmaliges Betätigen des Drückers B, setzt die Stoppuhr zurück, sofern die Zeitmessung vorher angehalten wurde.
Beispiel:1. Drücker A betätigen = Start der Zeitmessung2. Drücker A betätigen = Zeitmessung stoppen und Ablesen der Zeit3. Drücker A betätigen = Wiederaufnahme der Zeitmessung4. Drücker A betätigen = Zeitmessung stoppen und erneutes Ablesen der Zeit5. Drücker B betätigen = Die Zeiger des Chronographen stellen sich wieder auf
ihre Nullstellung zurück
VERWENDUNG DER STOPPUHR
9
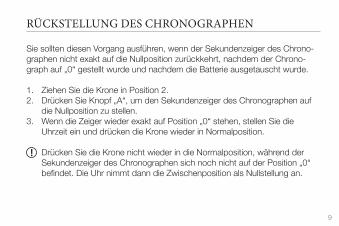
Sie sollten diesen Vorgang ausführen, wenn der Sekundenzeiger des Chrono-graphen nicht exakt auf die Nullposition zurückkehrt, nachdem der Chrono-graph auf „0“ gestellt wurde und nachdem die Batterie ausgetauscht wurde.
1. Ziehen Sie die Krone in Position 2.2. Drücken Sie Knopf „A“, um den Sekundenzeiger des Chronographen auf
die Nullposition zu stellen.3. Wenn die Zeiger wieder exakt auf Position „0“ stehen, stellen Sie die
Uhrzeit ein und drücken die Krone wieder in Normalposition.
Drücken Sie die Krone nicht wieder in die Normalposition, während der Sekundenzeiger des Chronographen sich noch nicht auf der Position „0“ befindet. Die Uhr nimmt dann die Zwischenposition als Nullstellung an.
RÜCKSTELLUNG DES CHRONOGRAPHEN

10
EINSTELLUNGEN FÜR RONDA UHRWERK
DatumSekundenzähler
MinutenzählerDrücker B
Drücker ASekundenzeiger
Minutenzeiger
Krone10 2Stundenzeiger
Bitte beachten Sie, dass dies nur eine schematische Abbildung zur Verdeutlichung der Einstellun-gen ist. Das Design sowie verschiedene Funktionen können daher von Ihrer Uhr abweichen.

11
Einstellen des Datums1. Ziehen Sie die Krone bis zur Position 1 heraus und drehen Sie die Krone
gegen den Uhrzeigersinn, um das Datum des Vortages einzustellen.2. Ziehen Sie die Krone bis Position 2 heraus und drehen Sie diese, bis das
Datum, auf das heutige Datum schaltet. 3. Stellen Sie jetzt, durch weiteres Drehen der Krone, den Stunden- und
Minutenzeiger auf die aktuelle Uhrzeit ein. 4. Drücken Sie anschließend die Krone wieder in die Normalposition (0)
zurück und setzen Sie so die Uhr wieder in Gang.
Einstellen der Uhrzeit1. Ziehen Sie die Krone bis zur Position 2 heraus und drehen Sie die Krone,
um die aktuelle Uhrzeit einzustellen.2. Drücken Sie die Krone wieder in die Normalposition (0) zurück.
Das Datum muss am ersten Tag jedes Monats, der auf einen Monat mit weniger als 31 Tagen folgt, neu eingestellt werden.

12
Chronograph: Grundfunktion (Start/Stopp/Nullstellung)1. Durch Betätigen des Drückers A, wird die Stoppuhr gestartet bzw. ge-
stoppt. Der Stoppvorgang kann durch erneutes Betätigen des Drückers A fortgeführt und auch wieder gestoppt werden.
2. Einmaliges Betätigen des Drückers B, setzt die Chronographen-Zeiger wieder in ihre Nullstellungen zurück, sofern der Stoppvorgang vorher angehalten wurde.
ZEITMESSUNGEN
Weitere Zeitmessungen, wie z.B. eine aufaddierte Zeitmessung oder eine Zwischenzeit-Messungen sind ebenfalls möglich. Weitere Informationen erhalten Sie unter www.elysee-watches.com

13
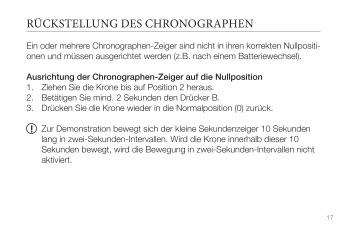
Ein oder mehrere Chronographen-Zeiger sind nicht in ihren korrekten Nullpositi-onen und müssen ausgerichtet werden (z.B. nach einem Batteriewechsel).
Ausrichtung der Chronographen-Zeiger auf die Nullposition1. Ziehen Sie die Krone bis auf Position 2. (Alle Chronographen-Zeiger stellen
sich in ihre korrekte bzw. nicht korrekte Nullposition.)2. Betätigen Sie mind. 2 Sekunden die Drücker A und B gleichzeitig. Der Kor-
rekturmodus ist aktiviert, wenn der Sekundenzeiger sich um 360° dreht.3. Betätigen Sie jetzt Drücker A (1 x kurz = Einzelschritte, lang = kontinuier-
lich), um die Ausrichtung des Sekundenzeigers einzustellen.4. Wechseln Sie zum nächsten Zeiger, indem Sie Drücker B betätigen.
Wiederholen Sie Schritt 3. und 4., bis Sie alle Zeiger auf die korrekte Nullposition eingestellt haben.
5. Drücken Sie anschließend die Krone wieder in die Normalposition (0) zurück.
RÜCKSTELLUNG DES CHRONOGRAPHEN

14
EINSTELLUNG FÜR SEIKO/TMI
Datum60-Sekunden-Zähler
Drücker B
Drücker A
Minutenzeiger
Krone10 2
Minuten-Zähler
Stundenzeiger
Bitte beachten Sie, dass dies nur eine schematische Abbildung zur Verdeutlichung der Einstellun-gen ist. Das Design sowie verschiedene Funktionen können daher von Ihrer Uhr abweichen.
Sekundenzeiger

15
Einstellung des Datums1. Ziehen Sie die Krone bis zur Position 1 heraus und drehen Sie diese im
Uhrzeigersinn, um das Datum des Vortages einzustellen.2. Ziehen Sie die Krone bis Position 2 heraus. Um sicherzustellen, dass die
Datumsanzeige nicht mittags, sondern um Mitternacht schaltet, drehen Sie den Stunden- und Minutenzeiger vorwärts, bis die Anzeige auf das heutige Datum schalten.
3. Stellen Sie durch weiteres Drehen der Krone, den Stunden- und Minuten-zeiger auf die aktuelle Uhrzeit ein und beachten Sie, ob die aktuelle Zeit vor oder nach 12:00 Uhr mittags ist.
4. Drücken Sie die Krone wieder in die Normalposition (0) zurück.
Einstellen der Uhrzeit1. Ziehen Sie die Krone bis zur Position 2 heraus und drehen Sie diese, um
die aktuelle Uhrzeit einzustellen. Beachten Sie, ob die aktuelle Zeit vor oder nach 12:00 Uhr mittags ist.
2. Drücken Sie die Krone wieder in die Normalposition (0) zurück.

16
Chronograph: Grundfunktion (Start/Stopp/Nullstellung)1. Durch Betätigen des Drückers A, wird die Stoppuhr gestartet bzw. ge-
stoppt. Der Stoppvorgang kann durch erneutes Betätigen des Drückers A fortgeführt und auch wieder gestoppt werden.
2. Einmaliges Betätigen des Drückers B, setzt die Chronographen-Zeiger wieder in ihre Nullstellungen zurück, sofern der Stoppvorgang vorher angehalten wurde.
ZEITMESSUNGEN
Weitere Zeitmessungen, wie z.B. eine aufaddierte Zeitmessung oder eine Zwischenzeit-Messungen sind ebenfalls möglich. Weitere Informationen erhalten Sie unter www.elysee-watches.com
17
Ein oder mehrere Chronographen-Zeiger sind nicht in ihren korrekten Nullpositi-onen und müssen ausgerichtet werden (z.B. nach einem Batteriewechsel).
Ausrichtung der Chronographen-Zeiger auf die Nullposition1. Ziehen Sie die Krone bis auf Position 2 heraus. 2. Betätigen Sie mind. 2 Sekunden den Drücker B.3. Drücken Sie die Krone wieder in die Normalposition (0) zurück.
Zur Demonstration bewegt sich der kleine Sekundenzeiger 10 Sekunden lang in zwei-Sekunden-Intervallen. Wird die Krone innerhalb dieser 10 Sekunden bewegt, wird die Bewegung in zwei-Sekunden-Intervallen nicht aktiviert.
RÜCKSTELLUNG DES CHRONOGRAPHEN
18
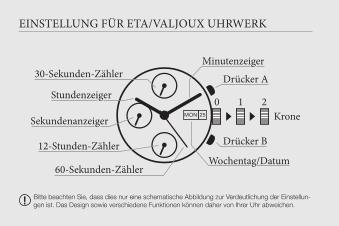
EINSTELLUNG FÜR ETA/VALJOUX UHRWERK
Wochentag/Datum60-Sekunden-Zähler
12-Stunden-Zähler
Sekundenanzeiger
Drücker B
Drücker A
Minutenzeiger
Krone10 2
30-Sekunden-Zähler
Stundenzeiger
Bitte beachten Sie, dass dies nur eine schematische Abbildung zur Verdeutlichung der Einstellun-gen ist. Das Design sowie verschiedene Funktionen können daher von Ihrer Uhr abweichen.
MON

19
Einstellung von Wochentag/Datum1. Ziehen Sie die Krone bis zur Position 1 heraus und drehen Sie diese im
Uhrzeigersinn, um das Datum des Vortages einzustellen. Drehen Sie die Krone entgegen dem Uhrzeigersinn, um den Wochentag des Vortages einzustellen.
2. Ziehen Sie die Krone bis Position 2 heraus. Um sicherzustellen, dass die Datums- und Wochentags-Anzeige nicht mittags, sondern um Mitternacht schaltet, drehen Sie den Stunden- und Minutenzeiger vorwärts, bis beide Anzeigen auf das heutige Datum und Wochentag schalten.
3. Stellen Sie durch weiteres Drehen der Krone, den Stunden- und Minuten-zeiger auf die aktuelle Uhrzeit ein und beachten Sie, ob die aktuelle Zeit vor oder nach 12:00 Uhr mittags ist.
4. Drücken Sie die Krone wieder in die Normalposition (0) zurück.
Einstellen der Uhrzeit1. Ziehen Sie die Krone bis zur Position 2 heraus und drehen Sie diese, um
die aktuelle Uhrzeit einzustellen.2. Drücken Sie die Krone wieder in die Normalposition (0) zurück.

20
ZEITMESSUNG
1. Durch Betätigen des Drückers A, wird die Stoppuhr gestartet bzw. ge-stoppt. Der Stoppvorgang kann durch erneutes Betätigen des Drückers A fortgeführt und auch wieder gestoppt werden.
2. Einmaliges Betätigen des Drückers B, setzt die Chronographen-Zeiger wieder in ihre Nullstellungen zurück, sofern der Stoppvorgang vorher angehalten wurde.
Beispiel:1. Drücker A betätigen = Start der Zeitmessung2. Drücker A betätigen = Zeitmessung stoppen und ablesen der Zeit3. Drücker A betätigen = Wiederaufnahme der Zeitmessung4. Drücker A betätigen = Zeitmessung stoppen und erneutes Ablesen der Zeit5. Drücker B betätigen = Die Zeiger des Chronographen stellen sich wieder auf
ihre Nullstellung zurück

21
DIE WASSERDICHTIGKEIT (DIN 8310)
Die Angaben zur Wasserdichtigkeit, finden Sie auf dem Gehäuseboden Ihrer Uhr.
3 ATM Beständig gegen Spritzer, Schweiß und Regentropfen.
5 ATM Wasserdicht, möglichst jedoch
nicht schwimmen. 10 ATM Zum Schwimmen oder Schnorcheln
geeignet. 20 ATM Zum Schwimmen, Schnorcheln und
Tauchen geeignet.

22
GEWÄHRLEISTUNG UND GARANTIE
Ihre ELYSEE hat eine Garantie von 2 Jahren ab Kaufdatum gegen alle Fabri-kationsfehler. Davon ausgenommen sind Armbänder, Glas, Batterien sowie Beschädigungen, die durch Eingriffe von unbefugter Seite verursacht werden.
Sollten Sie die Garantie oder eine Reparatur in Anspruch nehmen müssen, schicken Sie bitte Ihre ELYSEE mit Beilage des originalen Kassenbelegs an folgende Adresse:
ELYSEE Uhren GmbHHeerdter Lohweg 21240549 Düsseldorf
Sollten Sie Fragen zur Serviceabwicklung haben, können Sie sich gerne telefonisch unter +49 211 522894-12 an uns wenden. Oder schreiben Sie eine E-Mail an [email protected]

23
Einige unserer Produkte, werden aus hochwertigen Materialien und Teilen her-gestellt, die recyclebar sind und wieder verwendet werden können. Sie dürfen diese Produkte daher nicht über den Hausmüll entsorgen. Die Entsorgung muss gemäß den geltenden Richtlinien für Elektro- und Elektronik-Altgeräte erfolgen. Bitte geben Sie die Produkte an einer örtlichen Sammelstelle für Elektronik-Altgeräte ab.
Als Endverbraucher sind Sie durch die Batterieverordnung gesetzlich zur Rück-gabe aller gebrauchten Batterien und Akkus verpflichtet. Die Entsorgung über den Hausmüll ist verboten. Verbrauchte Batterien können Sie unentgeltlich bei den Sammelstellen Ihrer Gemeinde und überall, wo Batterien verkauft werden, abgeben.
Mit der Verwertung von Altgeräten und der ordnungsgemäßen Entsorgung von Batterien/Akkus leisten Sie einen wichtigen Beitrag zum Schutz unserer Umwelt.
UMWELT-HINWEIS UND ENTSORGUNG

24 Düsseldorf

25
Since 1960 ELYSEE stands for classic watchmaking and finest watch design. Here in Düsseldorf, we are producing high quality time pieces – Made in Germany. A constant motivation to do even better, is for the entire team living company philosophy:
“At the heart of our work is the sum of design, quality and great value for money, of course, connected with the varied desires of watch lovers.”
We would like to congratulate you on your new ELYSEE and we hope that you will enjoy it.
With best regards,your ELYSEE team

26
DateStopwatch:Seconds display
Second hand
Stopwatch:Minute display
Pusher B
Pusher A
24 hour displayMinutenzeiger
Crown10 2
Hour hand
SETTINGS FOR CITIZEN/MIYOTA MOVEMENT
Please note that this is only a schematic diagram for explaining the settings. The design and various functions can therefore differ from your watch.

27
Setting the date1. Pull the crown out to position 1 and turn the crown counterclockwise to set
the date of the previous day.2. Pull the crown out to position 2. To ensure that the indication of the date
will not change at noon, turn the hour and minute hands forward until the indication of the date changes to the current date.
3. By turning the crown, set the hour and minute hand to the current time.4. Push the crown back to its normal position (0).
Setting the time1. Pull the crown out to position 2 and turn the crown clockwise to set the
current time.2. Push the crown back to its normal position (0).
The date must be reset on the first day of each month following a month with less than 31 days.
28
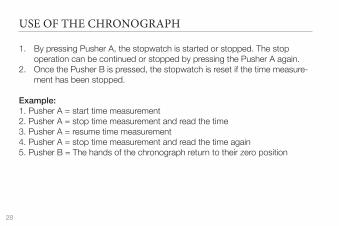
1. By pressing Pusher A, the stopwatch is started or stopped. The stop operation can be continued or stopped by pressing the Pusher A again.
2. Once the Pusher B is pressed, the stopwatch is reset if the time measure-ment has been stopped.
Example:1. Pusher A = start time measurement2. Pusher A = stop time measurement and read the time3. Pusher A = resume time measurement4. Pusher A = stop time measurement and read the time again5. Pusher B = The hands of the chronograph return to their zero position
USE OF THE CHRONOGRAPH

29
RESET THE CHRONOGRAPH
You should always carry out a reset, if the second hands won‘t be in their correct zero position or every time after changing the battery.
1. Pull out the crown into position 2.2. By pressing the Pusher A you can reset the second hand of the Chrono-
graph to position “0”.3. After being back exactly on zero position, please adjust the time and pull
back the crown into its normal position.
Do not press the crown back into its normal position while the chrono-graph’s second hand is not yet in the right zero position. Otherwise, the chronograph assumes the intermediate position as the zero position.

30
SETTINGS FOR RONDA MOVEMENT
DateSecond hand
chronograph minute hand
Pusher B
Pusher ASmall second
Minute hand
Crown10 2
Hour hand
Please note that this is only a schematic diagram for explaining the settings. The design and various functions can therefore differ from your watch.

31
Setting the date1. Pull the crown out to position 1 and turn the crown counterclockwise to set
the date of the previous day.2. Pull the crown out to position 2. To ensure that the indication of the date
will not change at noon, turn the hour and minute hands forward until the date changes to the current date.
3. By turning the crown, set the hour and minute hand to the current time.4. Push the crown back to its normal position (0).
Setting the time1. Pull the crown out to position 2 and turn the crown to set the current time.2. Push the crown back to its normal position (0).
The date must be reset on the first day of each month following a month with less than 31 days.

32
Chronograph: Basic function (Start / Stop / Zero)1. Press the Pusher A to start or stop the time measurement. The stop opera-
tion can be continued or stopped by pressing the Pusher A again.2. Pressing the Pusher B once resets the chronograph hands back to their
zero positions, if the time measurement has been stopped before.
USE OF THE CHRONOGRAPH
Other time measurements are also possible. For further information please visit www.elysee-watches.com

33
One or more chronograph hands are not in theirs correct zero positions and must be aligned (e.g. after battery change).
Alignment of the chronograph pointer to the zero position1. Pull the crown to position 2. (All chronograph hands move to their correct
or incorrect position.)2. Press the Pushers A and B simultaneously for at least 2 seconds. The
correction mode is activated when the second hand rotates 360°.3. Now press Pusher A (1 x short = single steps, long = continuous) to adjust
the alignment of the hands.4. Move to the next hand by pressing Pusher B. Repeat steps 3 and 4 until
you have set all hands to the correct zero position.5. Push the crown back to its normal position (0).
RESET THE CHRONOGRAPH
34
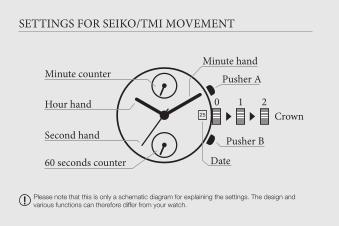
SETTINGS FOR SEIKO/TMI MOVEMENT
Date60 seconds counter
Pusher B
Pusher A
Minute hand
Crown10 2
Minute counter
Hour hand
Second hand
Please note that this is only a schematic diagram for explaining the settings. The design and various functions can therefore differ from your watch.

35
Setting the date1. Pull the crown out to position 1 and turn it clockwise to set the date of the
previous day.2. Pull the crown out to position 2. To ensure that the date display does not
switch at noon, turn the hour and minute hand forward until the display changes to the current date.
3. Set the current time by turning the crown and check whether the current time is before or after noon.
4. Push the crown back to its normal position (0).
Setting the time1. Pull the crown out to position 2 and turn it to set the current time. Note
that the current time is before or after noon.2. Press the crown back to its normal position (0).
36
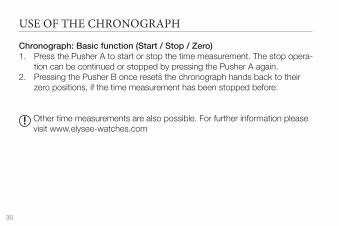
USE OF THE CHRONOGRAPH
Chronograph: Basic function (Start / Stop / Zero)1. Press the Pusher A to start or stop the time measurement. The stop opera-
tion can be continued or stopped by pressing the Pusher A again.2. Pressing the Pusher B once resets the chronograph hands back to their
zero positions, if the time measurement has been stopped before.
Other time measurements are also possible. For further information please visit www.elysee-watches.com

37
One or more chronograph hands are not in theirs correct zero positions and must be aligned (e.g. after battery change).
Alignment of the chronograph pointer to the zero position1. Pull the crown out to position 2. 2. Press the Pusher B for two seconds and release the Pusher.3. Push the crown back to its normal position (0).
The small second hand will move at two-second interval for 10 seconds as a demonstration. If the crown is operated within these 10 seconds, the two-second interval movement will not be activated.
RESET THE CHRONOGRAPH

38
SETTING FOR ETA/VALJOUX MOVEMENT
Day/Date60 seconds counter
12 hours counter
Second hand
Pusher B
Pusher A
Minute hand
Crown10 2
30 minutes counter
Hour hand
Please note that this is only a schematic diagram for explaining the settings. The design and various functions can therefore differ from your watch.
MON

39
Setting the day and date1. Pull the crown out to position 1 and turn it clockwise to set the indication
of the date of the previous day. Rotate the crown counterclockwise to set the indication of the day of the previous day.
2. Pull the crown out to position 2. To ensure that the indications will not change at noon, turn the hour and minute hands forward until the day and date change to the current day and date.
3. By turning the crown, set the hour and minute hand to the current time.4. Push the crown back to its normal position (0).
Setting the time1. Pull the crown out to position 2 and turn it to set the current time.2. Press the crown back to its normal position (0).
Please do not set the weekday and date display between 21:00pm and 03:00am, otherwise damage to the clockwork may occur.

40
USE OF THE CHRONOGRAPH
1. Pressing Pusher A starts or stops the stopwatch. The stop operation can be continued or stopped by pressing the Pusher A again
2. Once the Pusher B is pressed, the chronograph’s hands are reset to theirs zero positions, but only if the time measurement has been stopped first.
Example:1. Pusher A = start time measurement2. Pusher A = stop time measurement and read the time3. Pusher A = resume time measurement4. Pusher A = stop time measurement and read the time again5. Pusher B = The hands of the chronograph return to theirs zero positions

41
WATER RESISTANCE (DIN 8310)
The details of the water resistance can be found on the case back of your watch.
3 ATM Resistant to splashes, sweat and rain drops
5 ATM Waterproof, but not suitable for swimming
10 ATM Suitable for swimming or snorkeling
20 ATM Suitable for swimming, snorkeling and diving

42
WARRANTY AND GUARANTEE
Your ELYSEE has a warranty of 2 years from the date of purchase against all manufacturing defects. This excludes the use of bracelet, glass, battery and damage caused by unauthorized access.
Should you need the warranty or a repair, please send your ELYSEE with the original receipt to the following address:
ELYSEE Uhren GmbHHeerdter Lohweg 21240549 DüsseldorfGermany
Should you have any questions regarding the service processing, please do not hesitate to contact us by phone +49 211 522894-12 or just write an e-mail to [email protected].

43
Some products are made of high quality materials and parts that can be recycled and reused. Therefore, at the end of their service life, they must not dispose of the product via household waste. Disposal must be in accordance with the applicable directives for WEEE. Please dispose of the products at a local collection point for waste electrical and electronic equipment.
As a consumer you are legally obliged by the battery regulation to return all used batteries and accumulators. Disposal in household waste is prohibited. You can dispose of used batteries free of charge at the collecting points of your municipality and everywhere where batteries are sold.
With the recycling of old equipment and the proper disposal of batteries / accumulators, you make an important contribution to the protection of our environment.
ENVIRONMENTAL NOTE AND DISPOSAL

ELYSEE Uhren GmbHHeerdter Lohweg 212 · 40549 Düsseldorf · Deutschland
Tel. +49 211 522894-0 · Fax +49 211 522894-29E-Mail [email protected] · www.elysee-watches.com


