
CHERRY HEART DESIGNS Spice of Life Crochet Along · Cherry Heart Original ... this is especially...
33
CHERRY HEART DESIGNS Add a touch of spice by mixing and matching… A great way to learn new stitches and increase your crochet confidence. Lots of new patterns and colour combinations will keep this blanket interesting right to the end. #spiceoflifecal Pattern Notes Originally released in six parts for the Cherry Heart and Black Sheep Wools ‘Spice of Life Crochet Along’. This pattern includes clearly written instructions and photo tutorials to walk you through each new section. This pattern is written in UK terms US translations given (a separate version is available) A Sandra Paul/Cherry Heart original design. © Copyright 2015. All rights reserved. Page of 1 33 This pattern remains the property of Sandra Paul/Cherry Heart Designs at all times and is for your own personal use only. Please respect my work and do not copy, reproduce, redistribute or re-sell this pattern. For more copyright information please see: www.cherryheart.co.uk/p/copyright Spice of Life Crochet Along BY SANDRA PAUL www.cherryheart.co.uk
Transcript of CHERRY HEART DESIGNS Spice of Life Crochet Along · Cherry Heart Original ... this is especially...

CHERRY HEART DESIGNS
Add a touch of spice by mixing and matching… A great way to learn new stitches and increase your crochet confidence.
Lots of new patterns and colour combinations will keep this blanket interesting right to the end.
#spiceoflifecal
Pattern Notes Originally released in six parts for the Cherry Heart and Black Sheep Wools ‘Spice of Life Crochet Along’.
This pattern includes clearly written instructions and photo tutorials to walk you through each new section.
This pattern is written in UK terms US translations given (a separate version is available)
A Sandra Paul/Cherry Heart original design. © Copyright 2015. All rights reserved. Page of 1 33This pattern remains the property of Sandra Paul/Cherry Heart Designs at all times and is for your own personal use only. Please respect my work and do not copy, reproduce, redistribute or re-sell this pattern. For more copyright information please see: www.cherryheart.co.uk/p/copyright
Spice of Life Crochet AlongBY SANDRA PAUL
www.cherryheart.co.uk

CHERRY HEART DESIGNS
Part One - Getting Ready 4 What you’ll need… 4
Yarn
Hook
Other Materials
Size and Gauge… 5
Size
Gauge
Tension, Gauge and Swatches
Making a Swatch
Adjusting the Swatch
Following this Pattern… 6
Skill Level
Notes for Beginners
Using the Yarn Colours
Before you begin
Changing the Blanket Size… 7
Other Useful Information… 8
Social Media Links
Tutorial Links
Part Two - Starting the Blanket 9 Notes
Starting Chain Tips
Abbreviations
Stitch Terms
Special Stitches
Starting the Blanket
Section 1: Grannies
Photo Tutorial Section 1: Grannies
Part Three - Sections 2, 3 & 4 13 Notes
Tension Tips
Section 2: Stacked Grannies
Section 3 : Big Zipper
A Sandra Paul/Cherry Heart original design. © Copyright 2015. All rights reserved. Page of 2 33This pattern remains the property of Sandra Paul/Cherry Heart Designs at all times and is for your own personal use only. Please respect my work and do not copy, reproduce, redistribute or re-sell this pattern. For more copyright information please see: www.cherryheart.co.uk/p/copyright

CHERRY HEART DESIGNS
Section 4: Stacked Shells
Photo Tutorial Section 2: Stacked Grannies
Photo Tutorial Section 3 : Big Zipper
Photo Tutorial Section 4: Stacked Shells
Part Four - Sections 5, 6, 7 & 8 19 Notes
Problem Solving Tips
Section 5: Fill the Gap
Section 6: Tulips
Section 7: Waves
Section 8: Puffs
Photo Tutorial Section 5: Fill the Gap
Photo Tutorial Section 6: Tulips
Photo Tutorial Section 7: Waves
Photo Tutorial Section 8: Puffs
Part Five - Working the Blanket Repeat & End Rows 26 Notes
Tips
Working the Blanket Repeat
End Rows
Part Six - The Border & Finishing 28 Notes
Problem Solving Tips
Blocking
Border
Border Set Up Row
Border: Round Two
Border: Round Three
Border: Round Four
Finishing
Border Photo Tutorial
A Sandra Paul/Cherry Heart original design. © Copyright 2015. All rights reserved. Page of 3 33This pattern remains the property of Sandra Paul/Cherry Heart Designs at all times and is for your own personal use only. Please respect my work and do not copy, reproduce, redistribute or re-sell this pattern. For more copyright information please see: www.cherryheart.co.uk/p/copyright

CHERRY HEART DESIGNS
Part One - Getting Ready #spiceoflifecal
What you’ll need for the CAL, making a swatch and top tips There’s a lot of information here, but do take some time to read it as it will tell you all you need to know to make your blanket a success and answers many of the questions that came up during the CAL.
What you’ll need…
Yarn Original Colours: 14 balls of Rico Baby Classic DK 1 ball of each: Cream (2), Vanilla (3), Red (9), Petrol (10), Purple (16), Ice Blue (23), Turquoise (25), Melon (33), Grass (35), Jeans (36), Clay (37), Smokey Rose (39) 2 balls of: Light Green (27)
Sara’s Alternative Colours: 13 balls of Stylecraft Special DK 1 ball of each: Raspberry (1023), Meadow (1065), Grape (1067), Pale Rose (1080), Pomegranate (1083), Parchment (1218), Denim (1302), Petrol (1708), Gold (1709), Lime (1712), Storm Blue (1722), Parma Violet (1724), Sage (1725)
Yarn Packs The complete colour packs are available to purchase from Black Sheep Wools: Cherry Heart Original Blanket Colours in Rico Classic Baby DK Black Sheep Wools - Sara's Colours in Stylecraft Special DK
Hook Suggested size: 4mm / G - USA Or size need to match gauge. (See ‘Making a Swatch’)
Other Materials Yarn needle Stitch markers are useful to help keep track of your stitch count
A Sandra Paul/Cherry Heart original design. © Copyright 2015. All rights reserved. Page of 4 33This pattern remains the property of Sandra Paul/Cherry Heart Designs at all times and is for your own personal use only. Please respect my work and do not copy, reproduce, redistribute or re-sell this pattern. For more copyright information please see: www.cherryheart.co.uk/p/copyright

CHERRY HEART DESIGNS
Size and Gauge…
Size 106 x 138 cm (42 x 54”)
Gauge 15 sts by 10 rows in treble crochet
Tension, Gauge and Swatches If you are new to crochet you probably won't have heard much about this yet but it can be quite important. As crafters, we all crochet in a different way and this can affect the final size of the finished object and, more importantly for this project - how much yarn you use!
(If you are using the Rico packs, this is especially important as you don't want to run out of yarn, and we don't want you to either.)
Making a Swatch The Gauge for the pattern is 15 sts by 10 rows in treble crochet = 10cm (4”) square
That means, when working in treble crochet stitches (dc - US) a square of 15 stitches long by 10 rows high should measure 10 x 10cm (or 4 x 4”)
So you’ll want to make a square that is 15 stitches long and work 10 rows, then measure it and see what you get.
To get a square that is 15 stitches long, you’ll need a starting chain of 17. (The first stitch is made into the 4th chain from the hook, the 3 skipped chains count as the first stitch.)
Adjusting the Swatch If your square is smaller than the measurements given your crochet is coming out tighter and you need to go up a hook size.
If your square is bigger, then your crochet is coming out looser and you need to get a smaller hook.
A Sandra Paul/Cherry Heart original design. © Copyright 2015. All rights reserved. Page of 5 33This pattern remains the property of Sandra Paul/Cherry Heart Designs at all times and is for your own personal use only. Please respect my work and do not copy, reproduce, redistribute or re-sell this pattern. For more copyright information please see: www.cherryheart.co.uk/p/copyright

CHERRY HEART DESIGNS
Following this Pattern…
Skill Level Easy/Intermediate This pattern is intended to help someone who has learnt the basics of crochet and is now looking to move increase their crochet confidence. This pattern starts with the basics and progresses through to intermediate stitches and combinations. It is a great way to get used to working from written patterns and will guiding you step by step through each stage with photo tutorials if you need more.
Notes for Beginners Although I wrote this pattern with the newer crocheter in mind, I did assume that you would know:
• How to work back and forth in rows • How to make double (US- sc) and treble (US - dc) stitches • How to change colours and weave in ends
So if you haven't done those things before, or aren't confident with them then please do practise before starting the blanket so that you feel comfortable with them when it comes to working on the real thing. See ‘Tutorial Links’ on page 5 for more help.
Using the Yarn Colours Please note that the Stylecraft colour pack (“Sara’s colour pack”) was a later addition and did not follow the original colours changes as written. An additional guide for working these colours was therefore added to each part during the CAL.
This pattern has now been updated to show the alternative colours. You will now find the original (Rico) colours written first in capital letters, with the alternative (Sara’s Stylecraft) colour listed afterwards in bold.
Eg: RICO / Stylecraft
✽ For all other colour packs, or if using your own colours, you can choose to assign each colour to one of the colours in the pattern, or design your own random scheme.
Before you begin Please remember to make a swatch square before you begin, especially if you are using the Rico yarn pack or are concerned about yardage. See ‘Size and Gauge’ on page 5 for more information.
A Sandra Paul/Cherry Heart original design. © Copyright 2015. All rights reserved. Page of 6 33This pattern remains the property of Sandra Paul/Cherry Heart Designs at all times and is for your own personal use only. Please respect my work and do not copy, reproduce, redistribute or re-sell this pattern. For more copyright information please see: www.cherryheart.co.uk/p/copyright

CHERRY HEART DESIGNS
Changing the Blanket Size… For those of you interested in changing the size of your blanket, so to help you make your blankets bigger or smaller here’s some extra information for you.
PLEASE NOTE: I don’t recommend making changes to the blanket pattern for beginners. These guidelines are for those crocheters that are confident in amending patterns, re-calculating sizes and estimating yardage requirements accordingly.
Changing the Width
Adjusting the width is fairly simple, all you need to do is remember that the pattern needs a multiple of 12 stitches, plus 1 extra.
So, for the starting chain you’ll need a number which is a multiple of 12, and then work another 3 chains on top. These extra 3 chains will count as your 1st treble and will make your 1 extra stitch.
STARTING CHAIN: Multiple of 12 + 3 STITCH COUNT: Multiple of 12 + 1
Make a note of your revised number, you’ll need this if you want to check your stitch count throughout the blanket.
To estimate the number of stitches you want for the width of blanket you require you’ll need to work your own gauge swatch and use the measurements accordingly.
Changing the Length
The blanket pattern includes a repeat which you’ll be able to work as many times as necessary to get your desired length of blanket. Also, as the pattern parts become available each week you’ll see that it will be easy to change the length of the blanket by working extra repeats of the section or sections that you like best.
To make a shorter blanket, you can simply leave out the pattern repeat, or sections as desired.
A Sandra Paul/Cherry Heart original design. © Copyright 2015. All rights reserved. Page of 7 33This pattern remains the property of Sandra Paul/Cherry Heart Designs at all times and is for your own personal use only. Please respect my work and do not copy, reproduce, redistribute or re-sell this pattern. For more copyright information please see: www.cherryheart.co.uk/p/copyright

CHERRY HEART DESIGNS
Other Useful Information…
Social Media Links There are still many Spice of Life blankets been made around the world, so it’s definitely not too late to join in the fun. You can share pictures, chat with other blanket makers and ask questions using the links below:
Facebook: Spice of Life Crochet Along Group Instagram: #spiceoflifecal Ravelry: Spice of Life CAL Thread
Tutorial Links Some helpful links to photo tutorials on my Crochet Corner site. Helpful for beginners looking to get started and practise the basics before we begin.
BASIC STITCHES: Slip knot Chain Stitch Double Crochet (Single - USA) Treble Crochet (Double - USA)
WORKING IN ROWS: Making a starting chain Turning chains
WORKING WITH COLOURS: Joining new colours Weaving in ends Crocheting Over Ends
A Sandra Paul/Cherry Heart original design. © Copyright 2015. All rights reserved. Page of 8 33This pattern remains the property of Sandra Paul/Cherry Heart Designs at all times and is for your own personal use only. Please respect my work and do not copy, reproduce, redistribute or re-sell this pattern. For more copyright information please see: www.cherryheart.co.uk/p/copyright

CHERRY HEART DESIGNS
Part Two - Starting the Blanket #spiceoflifecal
Working the set-up rows and Section 1 Time to start our blankets. So this week we'll be tackling the start chain and pesky first row. Beginning working back and forth in stripes and complete the first pattern section. We'll be working a total of 18 rows this week.
Notes Remember that this pattern is written in UK terms. If you are in the US, you'll need to refer to the 'Stitch Terms' section to see which US stitches to use.
You'll also see a section on 'Special Stitches'. Beginners, please don't worry too much about this section just yet. We'll be explaining all these stitches in photo tutorials as we go along.
Starting Chain Tips Working the starting chain can be daunting when it's one long enough for a blanket. Here's some tips to help you make things a little easier:
Use a larger hook Try using a size (or two) larger than hook you’ll be using for the blanket to make the start chain. Then switch back to your normal size to start making stitches. This will make the chains easier to work into and will stop your blanket pulling in tight at the bottom.
Keep track of your chains It's easy to lose count on a long chain so if you are having problems, try use markers every 20 or 30 stitches to help.
Make your starting chain longer It's always horrible to work the first row just to realise you've miscounted and don't have enough stitches. To avoid this happening, once you have checked the count of your start chain and you think you have enough chains, add some more. Add 10 more, or 20 even. Then work your first row as normal, you should have some chains over. Once you are certain you have the right number of stitches, you can undo the extra chains you don't need.
A Sandra Paul/Cherry Heart original design. © Copyright 2015. All rights reserved. Page of 9 33This pattern remains the property of Sandra Paul/Cherry Heart Designs at all times and is for your own personal use only. Please respect my work and do not copy, reproduce, redistribute or re-sell this pattern. For more copyright information please see: www.cherryheart.co.uk/p/copyright
CHERRY HEART DESIGNS
Abbreviations beg - beginning RS - right side sp - space st/s - stitch/es tog - together WS - wrong side yo - wrap yarn over the hook
Stitch Terms This pattern is written in UK crochet terms US terms are given below to help you translate the pattern:
Special Stitches V Stitch (Sections 3, 5 & 6) (1tr, 1ch, 1tr) worked into one stitch/space.
3tr cl (Section 6) 3 treble crochet cluster (yo, insert hook in sp/st, yo and pull through, yo and pull through 2 loops on hook) three times, yo and pull through remaining 3 loops on hook.
Photo Tutorial Link: Cluster Stitch
3tr puff ( Section 8) 3 treble crochet cluster (yo, insert hook in sp/st, yo and pull up to height of tr) three times, yo and pull through all loops on hook leaving only 1 unworked, yo and pull through last 2 loops.
Photo tutorial Link: Puff Stitch
Term UK Stitch US Stitch
ch/s chain/s
ss slip stitch
dc double crochet single crochet
htr half treble crochet half double crochet
tr treble crochet double crochet
3tr cl 3 treble crochet cluster stitch 3 double crochet cluster stitch
3tr puff 3 treble crochet puff stitch 3 double crochet puff stitch
dtr double treble crochet treble crochet
A Sandra Paul/Cherry Heart original design. © Copyright 2015. All rights reserved. Page of 10 33This pattern remains the property of Sandra Paul/Cherry Heart Designs at all times and is for your own personal use only. Please respect my work and do not copy, reproduce, redistribute or re-sell this pattern. For more copyright information please see: www.cherryheart.co.uk/p/copyright

CHERRY HEART DESIGNS
Starting the Blanket The blanket is worked back and forth in rows, which means you’ll need to turn the work at the end of each row.
To begin the blanket take MELON / Grape and make a starting chain of 159, then work the chains as follows:
First row: 1tr into the 4ch from the hook, then work 1 tr into each chain to the end. [157 stitches]
✽ Each row will now always have 157 stitches, so you can check you have the correct number of stitches if you need to. Sometimes the pattern will include some other useful numbers you can count to help you keep track. But the stitch number will always stay the same.
TREBLE ROW
Throughout the blanket sections you’ll be instructed to work ‘Treble Rows’. These are rows of plain treble stitches in various colours to split up the sections. They should be worked as follows:
TREBLE ROW: 3ch [counts as 1st tr], 1tr in each remaining st to end.
SET UP ROWS
To start the blanket we’ll work a series of ‘Treble Rows’ in the following colours:
Row 2: MELON / Grape Row 3 & 4: SMOKEY ROSE / Parma Violet Row 5 & 6: CLAY / Raspberry Row 7 & 8: TURQUOISE / Storm Blue Row 9 & 10: GRASS / Parchment
Now we can move on to working the sections of different patterns.
Section 1: Grannies In JEANS / Petrol work:
Row 1: 3ch [counts as 1st tr], 2tr in same place [1st st] [makes a ‘shell’], *skip 2 sts, make 3tr into the next st,* repeat from * to * all the way along the blanket until only 3 sts remain, skip 2 sts and make 1tr into the last st. [52 ‘shells’]
In CREAM / Meadow work:
Row 2: 3ch [counts as 1st tr], 2tr between the 1st st, and the 1st ‘shell’ of the row below, *skip 3 sts, 3tr’s between the first and last tr’s that make up the ‘shells’ of the row below,* repeat from * to * all the way along the blanket only 1 ‘shell’ [3sts] remain, skip 2 sts and make 1tr into the last st. [52 ‘shells’]
Row 3: As Row 2 in JEANS / Petrol
Row 4: As Row 2 in CREAM / Meadow
Row 5: As Row 2 in JEANS / Petrol
Now work ‘Treble Rows’ as follows:
Row 6: ICE BLUE / Gold Row 7: PURPLE / Pomegranate Row 8: RED / Lime
A Sandra Paul/Cherry Heart original design. © Copyright 2015. All rights reserved. Page of 11 33This pattern remains the property of Sandra Paul/Cherry Heart Designs at all times and is for your own personal use only. Please respect my work and do not copy, reproduce, redistribute or re-sell this pattern. For more copyright information please see: www.cherryheart.co.uk/p/copyright

CHERRY HEART DESIGNS
Photo Tutorial Section 1: Grannies ROW 1
After joining the new colour and making 3 chains, the first 2 treble crochets are made into the first stitch of the row below. This makes a shell.
Now you just need to skip 2 chains and work 3 more trebles all into the next chain along.
Repeat that all along the row until there are only 3 more stitches left. Then end the row with just 1 treble crochet into the last stitch. (That will mean working into the top of the 3 chains that started the last row.)
ROW 2
For the second row the stitches are the same, but this time the trebles are worked into the spaces between the shells. (Groups of 3 treble crochets.)
To start, the new colour is joined into the top of the first stitch and then just 2 more tr’s are needed. These are worked into the first space.
Then make a shell in each space along the row until you reach the last shell. To finish, you skip 2 of the trebles, then make the last tr into the last stitch. (3 chain of the row below.)
The rest of the rows will be worked in the same way as Row 2.
A Sandra Paul/Cherry Heart original design. © Copyright 2015. All rights reserved. Page of 12 33This pattern remains the property of Sandra Paul/Cherry Heart Designs at all times and is for your own personal use only. Please respect my work and do not copy, reproduce, redistribute or re-sell this pattern. For more copyright information please see: www.cherryheart.co.uk/p/copyright
skip these 2 stitches
3tr into this stitch
skip 2 stitches
last tr into top of last stitch
work into the space between groups of treble stitches
last tr into top of last stitch
skip 2 stitches

CHERRY HEART DESIGNS
Part Three - Sections 2, 3 & 4 #spiceoflifecal
Learning New Stitch combinations The sections we work this week only make use of the two basic crochet stitches, double crochet and treble crochet but combines them to make some new stitch patterns. This part contains 3 new sections to add to your blanket and we'll be working a total of 21 rows.
Notes Section 2: Stacked Grannies Although this section also uses granny stitches, note that the rows are worked in a different way and that the groups of treble stitches (US - dc) are separated by a chain this time. This section has rows of double crochets (US - sc’s).
Section 3: Big Dipper This pattern section includes rows of double crochets (US - sc's) so you'll need to watch your tension in this section too.
Section 4: Stacked Shells Rows 2, 4 and 6 of this section are made using stitches separated by chain stitches. It is also very easy to make these chains a lot tighter than you would normally crochet. So you will need to also watch your tension and if necessary work the chains in these rows looser.
Tension Tips As this is a mixed stitch pattern blanket, it is very easy for your tension to vary over the different sections. If you are having problems with the blanket coming in at the sides after working any of these three sections, here's some things you can do:
Loosen your tension We tend to naturally work chains and double crochets tighter than we work rows of treble stitches, so you could try consciously working rows of dc's or rows with chains a little looser
Use a larger hook If you are finding it hard to adjust your tension for these rows, try using a larger hook instead. Just remember to change back to your regular size hook for the other rows
Blocking In the last section I'll also be explaining how you can block you blanket. This is a great way to even out the blanket overall at the end.
A Sandra Paul/Cherry Heart original design. © Copyright 2015. All rights reserved. Page of 13 33This pattern remains the property of Sandra Paul/Cherry Heart Designs at all times and is for your own personal use only. Please respect my work and do not copy, reproduce, redistribute or re-sell this pattern. For more copyright information please see: www.cherryheart.co.uk/p/copyright

CHERRY HEART DESIGNS
Section 2: Stacked Grannies In LIGHT GREEN / Denim work:
Row 1: 3ch [counts as 1st tr], 1tr in the same place [1st st], *1ch, skip 3 sts, make 3tr’s into the next st [makes a ‘shell’], repeat from * to * all the way along the blanket until only 4 sts remain, 1ch, skip 3 sts and make 2tr into the last st. [38 ‘shells’]
In PETROL / Sage work:
Row 2: 1ch, 1dc in same place [1st st], 1dc in next st, *1dc in ch sp, 1dc in next 3 sts,* repeat from * to * along the row until the last ch sp, 1dc in ch sp, 1dc in each of the last 2 sts.
Row 3: As Row 1 in LIGHT GREEN / Denim
Row 4: As Row 2 in PETROL / Sage
Now work ‘Treble Rows’ as follows:
Row 5 & 6: VANILLA / Pale Rose
Section 3 : Big Zipper In SMOKEY ROSE / Parma Violet work:
Row 1: 1ch, 1dc in same place [1st st], 1dc in each remaining stitch to end of the row.
Row 2: 3ch [counts as 1st tr], 1tr in same place [1st st], *skip 2 sts, (1tr, 1ch, 1tr) into the next st [makes a ‘V stitch’],* repeat from * to * to the last 3 sts then, skip 2 sts, 2tr’s into last st. [51 ‘V stitches’}
In RED / Pomegranate work:
Row 3: 3ch [counts as 1st tr], 1tr in same place [1st st], *skip 2 sts, (1tr, 1ch, 1tr) into the next ch sp [makes a ‘V stitch’],* repeat from * to * until the last ch sp has been worked then, skip 2 sts, 2tr’s into last st. [51 ‘V stitches’}
Row 4: 1ch, 1dc in same place [1st st], *1dc in next 2sts, 1dc in ch sp,* repeat from * to * until the last ch sp has been worked then, 1dc in last 3sts.
Now work ‘Treble Rows’ as follows:
Row 5 & 6: ICE BLUE / Gold
Section 4: Stacked Shells In CLAY / Raspberry work:
Row 1: 1ch, 1dc in same place [1st st], *skip 2 sts, 5tr into next st [makes ‘shell’], skip 2 sts, 1dc into next st,* repeat from * to * to end of the row. [26 Shells]
In MELON / Grape work:
Row 2: 5ch [counts as 1tr, 2ch], *skip 2tr, 1dc in middle tr, 2ch, skip 2tr, 1tr in dc, 2ch* repeat from * to the end of the row, ending the last repeat with a tr into the last dc.
✽ If you are finding the rows of this section pulling in at the edges, you need to make the chain stitches on Row 2 looser.
Row 3: 1ch, 1dc in same place [1st st], *skip 2ch, 5tr into dc [makes ‘shell’], skip 2ch, 1dc into tr,* repeat from * to * to end of the row, ending the last repeat with a dc into the 3rd ch of the beg 5ch of the row below. [26 Shells]
Row 4: As Row 2 in TURQUOISE / Storm Blue
Row 5: As Row 3 in TURQUOISE / Storm Blue
Row 6: As Row 2 in CREAM / Meadow
In CREAM / Meadow work:
Row 7: 3ch, [counts as 1st tr], *2tr into ch sp, 1tr into dc, 2tr into ch sp, 1tr into tr,* repeat from * to * until the last dc has been worked, then make 2tr into the last ch sp and 1tr into the 3rd ch of the beg 5ch of the row below.
Now work ‘Treble Rows’ as follows:
Row 8: PETROL / Sage Row 9: PURPLE / Sage
A Sandra Paul/Cherry Heart original design. © Copyright 2015. All rights reserved. Page of 14 33This pattern remains the property of Sandra Paul/Cherry Heart Designs at all times and is for your own personal use only. Please respect my work and do not copy, reproduce, redistribute or re-sell this pattern. For more copyright information please see: www.cherryheart.co.uk/p/copyright

CHERRY HEART DESIGNS
Photo Tutorial Section 2: Stacked Grannies
ROW 1
These grannies are worked in a slightly different way. This time the row starts with 3 chains and just 1 treble crochet into the first stitch.
Then, make 1chain and skip 3 stitches before the next shell (made up of 3 trebles) is worked.
Keep making 1 chain, skipping the stitches then working a shell along the row until there are 4 stitches left. To finish, make 1 more chain, skip 3 stitches as normal but end with just 2 treble crochets into the last stitch.
ROW 2
This row is nice and simple, after joining the new colour and making 1 chain, just work 1 double crochet into each stitch and into each chain space along the row.
ROW 3
This is worked in exactly the same way as Row 1 and it’s a little easier to check you have skipped the right number of stitches each time by making sure the the new shell is always worked above the middle treble in the shell below.
A Sandra Paul/Cherry Heart original design. © Copyright 2015. All rights reserved. Page of 15 33This pattern remains the property of Sandra Paul/Cherry Heart Designs at all times and is for your own personal use only. Please respect my work and do not copy, reproduce, redistribute or re-sell this pattern. For more copyright information please see: www.cherryheart.co.uk/p/copyright
skip these 3 stitches
3tr into this stitch
last 2 tr’s into top of last stitch
skip these 3 stitches
1 dc into each stitch and space
the middle stitch of the shells will line up if the spacing is correct

CHERRY HEART DESIGNS
Photo Tutorial Section 3 : Big Zipper
ROW 2
As row 1 is a straight forward dc row, we’ll begin with Row 2.
This starts with 3 chains and a treble crochet into the first stitch. Then 2 stitches are skipped and a ‘V’ stitch is made.
This is made by working a treble stitch, then making 1 chain and then working another treble crochet into the same stitch.
Carry on working V stitches along the row, skipping 2 stitches between each one up to the last 3 stitches. Then skip 2 and finish by working just 2 treble crochet into the last stitch.
ROW 3
The next row uses the same stitches again but this time the V stitches are worked into the chain space in the middle of each V stitch of the row below.
Start by joining the new yarn and chaining 3, then make a treble crochet into the first stitch. Skip the next treble and the first treble of the V stitch, ready to make the next V in the space.
ROW 4
To finish there is a simple row of double crochet stitches, where a double crochet is made into each stitch and each chain space.
A Sandra Paul/Cherry Heart original design. © Copyright 2015. All rights reserved. Page of 16 33This pattern remains the property of Sandra Paul/Cherry Heart Designs at all times and is for your own personal use only. Please respect my work and do not copy, reproduce, redistribute or re-sell this pattern. For more copyright information please see: www.cherryheart.co.uk/p/copyright
skip these 2 stitches
V stitch: 1tr, 1ch, 1tr into same stitch
skip these 2 stitches
last 2 tr’s into top of last stitch
skip these 2 stitches
V stitch worked into space
1 dc into each stitch and space

CHERRY HEART DESIGNS
Photo Tutorial Section 4: Stacked Shells
ROW 1
Start by joining the new colour and making a chain, then make 1 double crochet into the first stitch. Now we will make a shell, made up of 3 treble crochets. So, skip 2 stitches and then work 5 treble crochets into the next stitch.
Then skip 2 more stitches and work a double crochet into the next stitch. Carry on across the row in the same way, skipping 2 stitches, working a 5tr shell, skipping 2 stitches then working a dc.
The row will end with a double crochet into the last stitch.
ROW 2
Start by joining the new colour and making 5 chains, think of these chains as a treble stitch followed by 2 chains.
Then we need to skip some stitches and make a double crochet into the middle treble of the shell.
Then make 2 more chains and make a treble crochet into the next dc.
Carry on along the row, working 2 chains, making a dc into the middle tr of the shell, working 2 more chains and then making a tr into the dc.
The row will end with a treble crochet into the last dc.
A Sandra Paul/Cherry Heart original design. © Copyright 2015. All rights reserved. Page of 17 33This pattern remains the property of Sandra Paul/Cherry Heart Designs at all times and is for your own personal use only. Please respect my work and do not copy, reproduce, redistribute or re-sell this pattern. For more copyright information please see: www.cherryheart.co.uk/p/copyright
dc stitches
skipped stitches
dc into middle tr of shells
tr into each dc
counts as a tr
tr will be made here 2 chains
skip these 2 stitches
dc will be made here 5tr shell in 1 stitch

CHERRY HEART DESIGNS
ROW 3
Keep the same colour, chain 1 and work a dc into the first stitch. Now we will work another row of shells by skipping the chains and working a 5tr shell into the dc stitch.
To finish the shell, skip the next 2 chains and make a dc into the treble crochet.
Repeat this across the row until a shell has been made in the last dc. To finish, we need to remember to think of the starting 5 chains of the row below as a tr and 2 chains. So we skip the 1st 2 chains and then work the dc into the 3rd chain. (This would be the same as working into the top of a tr.)
Work Rows 4, 5 and 6 in the same way.
ROW 7
To finish there is a row of treble crochets, starting with 3 chains, which counts as the first stitch, then 2 treble crochets are made into the chain space. Work along the row working 1 treble into each dc or tr and 2 trebles into each chain space.
To finish, again remember that our starting 5 chain is like a treble crochet and 2 chains. So find the middle chain, which will act as the top of the tr.
Then make 2 more trebles into the chain space, and end the row by working a treble into the middle chain.
A Sandra Paul/Cherry Heart original design. © Copyright 2015. All rights reserved. Page of 18 33This pattern remains the property of Sandra Paul/Cherry Heart Designs at all times and is for your own personal use only. Please respect my work and do not copy, reproduce, redistribute or re-sell this pattern. For more copyright information please see: www.cherryheart.co.uk/p/copyright
skip 2 chains
dc will be made here 5tr shell in dc
skip these 2 chains
last dc will be made in this chain
2 tr’s into each chain space
last tr will be made in this chain
2 tr’s into last chain space
last tr in place

CHERRY HEART DESIGNS
Part Four - Sections 5, 6, 7 & 8 #spiceoflifecal
Learning new stitches
This week we'll be making use of some new stitches to create some new patterns and textures for our blankets. There could be quite a few new things to learn here if you are a beginner but don't worry, there's plenty of help to guide you on your way. This part contains 4 new sections to add to your blanket and we'll be working a total of 27 rows.
Notes Section 5: Fill the Gap This one is the easiest this week, no new stitches in this section so hopefully you'll find it straight forward.
Section 6: Tulips Like the 'Stacked Shells' last week, this section uses stitches separated by a chains, so you'll need to watch your tension here. You'll also be using a new stitch, the cluster stitch to make your tulips.
Section 7: Waves Again, as mentioned last week, remember to watch your tension on the rows of UK dc's.
Section 8: Puffs Another stitch we haven't used before, the puff stitch. This adds a new texture to your blanket.
Problem Solving Tips Lining up Stitches - Waves Section Take your time working through this section as you'll want to make sure the stitches line up correctly to get the wave effect. Taking yourself off somewhere quiet can help and here's a couple more tips:
When working Row 2 of this section, after you make the 1st UK dc into the 1st stitch, each UK dc you work will be into the 6th stitch. So keeping count while you work through the different stitches should help.
When working Row 3, the best way to check you are on track is to make sure that each double treble is being made into a UK dc. It's not always easy to tell some of the other stitches apart, but the UK dc is usually quite clear so it's good way to check things arena track.
Beginners If you are really struggling with any of the new sections in this part of the blanket. Please don't worry. This is a mixed blanket, so if one part is really giving you problems you could always swap it for a section you've done already.
For example, if you can't get 'Waves' to work, you could do another 'Big Zipper' instead. It has the same number of dc and tr rows so swapping these sections won't affect your yardage requirements.
A Sandra Paul/Cherry Heart original design. © Copyright 2015. All rights reserved. Page of 19 33This pattern remains the property of Sandra Paul/Cherry Heart Designs at all times and is for your own personal use only. Please respect my work and do not copy, reproduce, redistribute or re-sell this pattern. For more copyright information please see: www.cherryheart.co.uk/p/copyright

CHERRY HEART DESIGNS
Section 5: Fill the Gap In GRASS / Parchment work:
Row 1: 3ch [counts as 1st tr], 1tr in same place [1st st], *skip 2 sts, (1tr, 1ch, 1tr) into the next st [makes a ‘V stitch’],* repeat from * to * to the last 3 sts then, skip 2 sts, 2tr’s into last st. [51 ‘V stitches’]
In ICE BLUE / Gold work:
Row 2: 3ch [counts as 1st tr], 1tr in same place [1st st], *skip 2 sts, 3tr’s into the next ch sp [makes a ‘shell’],* repeat from * to * until all the last ch sp has been worked then, skip 2 sts, 2tr’s into last st. [51 ‘shells’}
Row 3: As Row 1 in SMOKEY ROSE / Parma Violet
Row 4: As Row 2 in JEANS / Petrol
Now work ‘Treble Rows’ as follows:
Row 5: VANILLA / Pale Rose Row 6 & 7: GRASS / Parchment
Section 6: Tulips In LIGHT GREEN / Denim Blue work:
Row 1: As ‘Treble Row’
Row 2: 3ch [counts as 1st tr], 1tr in same place [1st st], *skip 2 sts, (1tr, 1ch, 1tr) into the next st [makes a ‘V stitch’],* repeat from * to * to the last 3 sts then, skip 2 sts, 2tr’s into last st. [51 ‘V stitches’]
In RED / Pomegranate work:
Row 3: 5ch [counts as 1tr, 2ch], *skip 2sts, 3tr cl into ch sp, 2ch, * repeat from * to * until last ch sp has been worked then, skip 2 sts, 1tr into last st. [51 clusters]
In CREAM / Meadow work:
Row 4: 3ch [counts as 1tr], *2tr into ch sp, 1tr into top of cl,* repeat from * to * until the last cl has been worked, then make 2tr into the last ch sp and 1tr into the 3rd ch of the beg 5ch of the row below.
Now work ‘Treble Rows’ as follows:
Row 5 & 6: PETROL / Sage
Section 7: Waves In TURQUOISE / Storm Blue work:
Row 1: 1ch, 1dc in same place [1st st], 1dc in each stitch to end of the row.
Row 2: 1ch, 1dc in same place [1st st], *1htr, 1tr, 1dtr, 1tr, 1htr, 1dc,* repeat from * to * to the end of the row.
In SMOKEY ROSE / Parma Violet work:
Row 3: 4ch [counts as 1st dtr], *1tr, 1htr, 1dc, 1htr, 1tr, 1dtr,* repeat from * to * to the end of the row.
Row 4: As Row 1. Now work ‘Treble Rows’ as follows:
Row 5 & 6: CLAY / Raspberry
Section 8: Puffs In VANILLA / Pale Rose work:
Row 1: 3ch [counts as 1st tr], 3tr puff, *1ch, skip 1 st, 3tr puff into next st,* repeat from * to * to the last st then, 1tr into last st. [78 puffs]
In MELON / Grape work:
Row 2: 3ch [counts as 1st tr], *1tr into top of puff, 1tr into ch sp,* repeat from * to * until last ch sp has been worked, 1tr into top of puff, 1tr into last st.
Row 3: As row 1 in LIGHT GREEN / Denim
Row 4: As row 2 in ICE BLUE / Gold
Now work ‘Treble Rows’ as follows:
Row 5: RED / Pomegranate Row 6 & 7: PURPLE / Lime Row 8: TURQUOISE / Petrol
A Sandra Paul/Cherry Heart original design. © Copyright 2015. All rights reserved. Page of 20 33This pattern remains the property of Sandra Paul/Cherry Heart Designs at all times and is for your own personal use only. Please respect my work and do not copy, reproduce, redistribute or re-sell this pattern. For more copyright information please see: www.cherryheart.co.uk/p/copyright

CHERRY HEART DESIGNS
Photo Tutorial Section 5: Fill the Gap ROW 2
Row 1 is worked in the same way as Row 2 in the section ‘Big Zipper’, so refer back to that section if you need a reminder on Row 1. We’ll begin with Row 2.
This row is also very similar to ‘Big Zipper’, except this time, a row of shells is worked into each V stitch. So start with a chain of 3 and a tr into the first shell. Then skip the next 2 tr’s and work the 3tr shell into the space.
ROW 3
Then another row of V stitches are worked in the same way as Row 1. This time it will be even easier to see if the spacing is correct as each V stitch is made into the middle tr of the shell below and will line up nicely with the first row of V stitches.
A Sandra Paul/Cherry Heart original design. © Copyright 2015. All rights reserved. Page of 21 33This pattern remains the property of Sandra Paul/Cherry Heart Designs at all times and is for your own personal use only. Please respect my work and do not copy, reproduce, redistribute or re-sell this pattern. For more copyright information please see: www.cherryheart.co.uk/p/copyright
skipped treble crochets
shell worked in chain space
Centre of V stitches and shells line up
CHERRY HEART DESIGNS
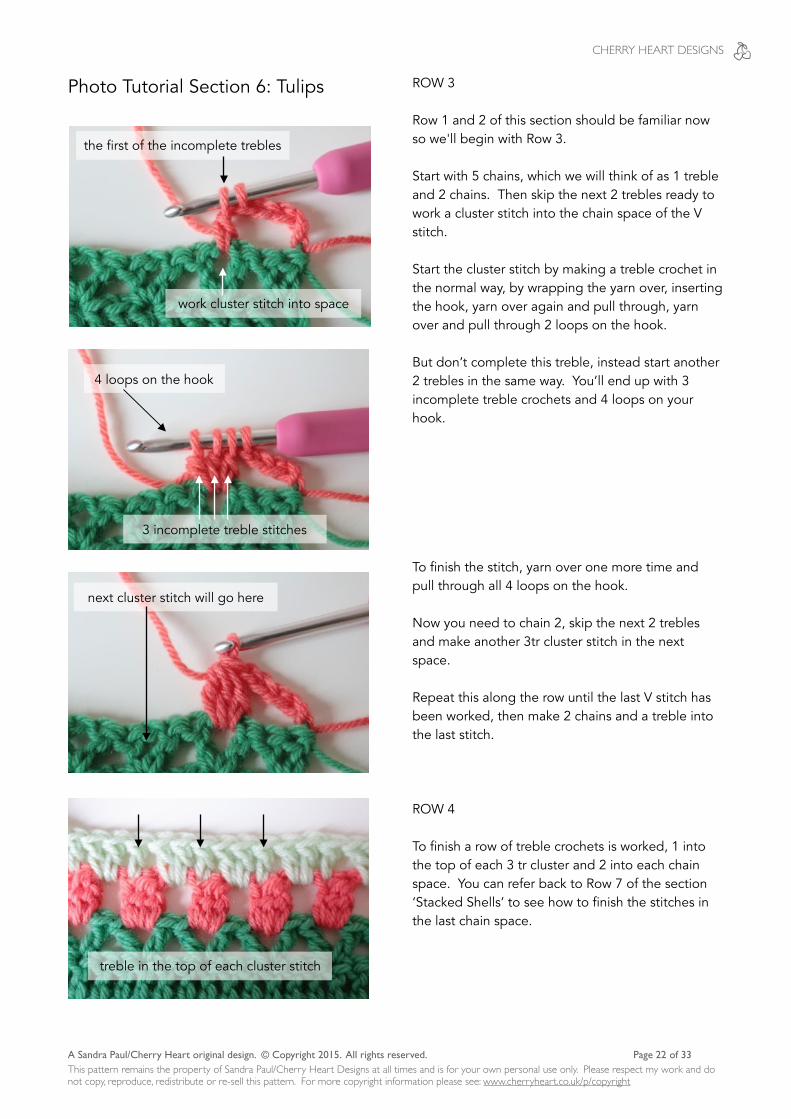
Photo Tutorial Section 6: Tulips ROW 3
Row 1 and 2 of this section should be familiar now so we'll begin with Row 3.
Start with 5 chains, which we will think of as 1 treble and 2 chains. Then skip the next 2 trebles ready to work a cluster stitch into the chain space of the V stitch.
Start the cluster stitch by making a treble crochet in the normal way, by wrapping the yarn over, inserting the hook, yarn over again and pull through, yarn over and pull through 2 loops on the hook.
But don’t complete this treble, instead start another 2 trebles in the same way. You’ll end up with 3 incomplete treble crochets and 4 loops on your hook.
To finish the stitch, yarn over one more time and pull through all 4 loops on the hook.
Now you need to chain 2, skip the next 2 trebles and make another 3tr cluster stitch in the next space.
Repeat this along the row until the last V stitch has been worked, then make 2 chains and a treble into the last stitch.
ROW 4
To finish a row of treble crochets is worked, 1 into the top of each 3 tr cluster and 2 into each chain space. You can refer back to Row 7 of the section ‘Stacked Shells’ to see how to finish the stitches in the last chain space.
A Sandra Paul/Cherry Heart original design. © Copyright 2015. All rights reserved. Page of 22 33This pattern remains the property of Sandra Paul/Cherry Heart Designs at all times and is for your own personal use only. Please respect my work and do not copy, reproduce, redistribute or re-sell this pattern. For more copyright information please see: www.cherryheart.co.uk/p/copyright
work cluster stitch into space
the first of the incomplete trebles
4 loops on the hook
3 incomplete treble stitches
next cluster stitch will go here
treble in the top of each cluster stitch

CHERRY HEART DESIGNS
Photo Tutorial Section 7: Waves ROW 2
As Row 1 is a row of plain double crochets, we’ll start with Row 2.
For this row different height stitches are used to create a wave effect.
Chain 1 and make a double crochet to start, then simply work each stitch in the order, next is the half treble, then treble, then double treble.
After the tallest stitch is worked, the stitches decrease in size again so next will follow, a treble, a half treble and then a double.
Repeat the sequence of stitches: htr, tr, dtr, htr, dc along the row to the end.
ROW 3
This row levels out the wave effect by using the same stitches in a different order.
Once the new colour is joined, 4 chains are worked, which is the same as a double treble, then work the sequence of stitches across the first bump: tr, htr, dc, htr, tr, dtr
Repeat the sequence all the way along the row, taking care that each stitch goes in the right place:
Tr into htr Htr into tr Dc into dtr Htr into tr Tr into htr Dtr into dc
The row ends with a dtr into the last dc.
A Sandra Paul/Cherry Heart original design. © Copyright 2015. All rights reserved. Page of 23 33This pattern remains the property of Sandra Paul/Cherry Heart Designs at all times and is for your own personal use only. Please respect my work and do not copy, reproduce, redistribute or re-sell this pattern. For more copyright information please see: www.cherryheart.co.uk/p/copyright
dc htr tr 4ch/dtr
dtr tr htr dc
dtr tr htr dc
dc htr tr dtr
dtr, tr, htr, dc
dc, htr, tr

CHERRY HEART DESIGNS
Photo Tutorial Section 8: Puffs ROW 1
After joining the new colour and making 3 chains, we’ll be working a series of puff stitches. The first one is worked into the next tr in the row.
To make a puff, wrap the yarn around the hook as for a normal treble, insert the hook into the stitch, wrap and yarn and pull through as normal but then keeping pulling upwards and allow the wrapped yarn to lift up to the height of a normal treble stitch.
This counts as the first treble of the 3tr puff. Repeat this again 2 more times for the other trebles until you have 7 loops on the hook.
To complete the stitch, wrap the yarn over the hook again and pull through 6 of those loops.
Then wrap the yarn 1 last time and pull through the remaining 2 loops on the hook.
Next we’ll make 1 chain, skip a stitch and then work another puff into the next stitch.
A Sandra Paul/Cherry Heart original design. © Copyright 2015. All rights reserved. Page of 24 33This pattern remains the property of Sandra Paul/Cherry Heart Designs at all times and is for your own personal use only. Please respect my work and do not copy, reproduce, redistribute or re-sell this pattern. For more copyright information please see: www.cherryheart.co.uk/p/copyright
pull the wrapped yarn up to the height of a normal treble
pull the wrapped yarn through 6 of the 7 loops
next puff will be made here
skip 1 stitch
7 loops on the hook
3 ‘pulled up’ trebles

CHERRY HEART DESIGNS
Repeat the 1chain, skip a stitch, 1 puff along the row, until there is only one stitch left. To finish the row, make a treble crochet into the last stitch.
ROW 2
This row is made up of treble stitches, 1 worked into each stitch and 1 into each chain space.
A Sandra Paul/Cherry Heart original design. © Copyright 2015. All rights reserved. Page of 25 33This pattern remains the property of Sandra Paul/Cherry Heart Designs at all times and is for your own personal use only. Please respect my work and do not copy, reproduce, redistribute or re-sell this pattern. For more copyright information please see: www.cherryheart.co.uk/p/copyright
final tr in last stitch
skipped stitches
1 treble into each puff stitch
1 treble into each space
CHERRY HEART DESIGNS
Part Five - Working the Blanket Repeat & End Rows #spiceoflifecal
Consolidating what we’ve learnt This week we won't be learning anything new. Instead we are just working through the sections we already know which will really help you consolidate your knowledge and feel comfortable with the new stitches. This is the biggest pattern part, with a total of 63 rows.
Notes How to work this Section This part details the sections you need to repeat for the second half of the blanket, along with the colours you need to use this time around. You'll need to refer back to each relevant section for the written instructions (and photos) and use this week's part to tell you the correct colours to work.
Tips Pace Yourself The most important tip this week is to not focus on the amount to do, but on each manageable chunk. Just take it a section at a time. We have made half our blankets so far and this latest download will give you the information to make the second half.
You'll be working the sections you already know, so they will at least be familiar to you, which means you'll be quicker this time around.
Remember to use the social media links from Part One, to find other crocheters at the same stage. It’s easier to stay motivated when you know others are in the same boat.
A Sandra Paul/Cherry Heart original design. © Copyright 2015. All rights reserved. Page of 26 33This pattern remains the property of Sandra Paul/Cherry Heart Designs at all times and is for your own personal use only. Please respect my work and do not copy, reproduce, redistribute or re-sell this pattern. For more copyright information please see: www.cherryheart.co.uk/p/copyright

CHERRY HEART DESIGNS
Working the Blanket Repeat To make the blanket big enough, the sections are worked again in different colours. All the colours to use are given below. Refer back to the instructions for each section for the correct pattern for each row.
Start at section 2 and work through to section 8 in the following colours:
SECTION 2: STACKED GRANNIES
Row 1: JEANS / Denim Row 2: GRASS / Parchment Row 3: JEANS / Denim Row 4: GRASS / Parchment Row 5 & 6: PETROL / Sage
SECTION 3: BIG ZIPPER
Row 1 & 2: CREAM / Meadow Row 3 & 4: MELON / Grape Row 5 & 6: ICE BLUE / Gold
SECTION 4: STACKED SHELLS
Row 1: RED / Pomegranate Row 2 & 3: SMOKEY ROSE / Parma Violet Row 4 & 5: PURPLE / Lime Row 6 & 7: CLAY / Raspberry Row 8: LIGHT GREEN / Denim Row 9: VANILLA / Pale Rose
SECTION 5: FILL THE GAP
Row 1: JEANS / Petrol Row 2: ICE BLUE / Gold Row 3: MELON / Grape Row 4: TURQUOISE / Storm Blue Row 5: SMOKEY ROSE / Parma Violet Row 6 & 7: CREAM / Meadow
SECTION 6: TULIPS
Row 1: GRASS / Parchment Row 2: GRASS / Pale Rose Row 3: VANILLA / Sage Row 4: PETROL / Grape Row 5 & 6: CLAY / Pomegranate
SECTION 7: WAVES
Row 1 & 2: MELON / Lime Row 3 & 4: PURPLE / Petrol Row 5 & 6: SMOKEY ROSE / Parma Violet
SECTION 8: PUFFS
Row 1: LIGHT GREEN / Denim Row 2: GRASS / Parchment Row 3: JEANS / Gold Row 4: RED / Grape Row 5: TURQUOISE / Storm Blue Row 6: PETROL / Sage Row 7: CLAY / Petrol Do not work Row 8 of this section.
Then work section 1 as follows:
SECTION 1: GRANNIES
Row 1: PURPLE / Lime Row 2: CREAM / Pale Rose Row 3: PURPLE / Lime Row 4: CREAM / Pale Rose Row 5: PURPLE / Lime
Do not work Rows 6, 7 or 8 of this section.
End Rows To finish the blanket work ‘Treble Rows’ as follows:
Row 1 & 2: LIGHT GREEN / Parchment Row 3 & 4: PETROL / Raspberry Row 5 & 6: ICE BLUE / Meadow Row 7 & 8: RED / Parma Violet Row 9 & 10: VANILLA / Pomegranate
A Sandra Paul/Cherry Heart original design. © Copyright 2015. All rights reserved. Page of 27 33This pattern remains the property of Sandra Paul/Cherry Heart Designs at all times and is for your own personal use only. Please respect my work and do not copy, reproduce, redistribute or re-sell this pattern. For more copyright information please see: www.cherryheart.co.uk/p/copyright

CHERRY HEART DESIGNS
Part Six - The Border & Finishing #spiceoflifecal
The border and finishing touches
This week we'll be adding the finishing touch to our blankets with a small and simple border. I've also included a guide to blocking for acrylic yarns like those in the yarn packs. It can be a great way to even everything up and create a lovely drape to your finished piece. The border is approximately equivalent to working 20 rows of the blanket.
Notes Working the First Round This is one of the trickiest parts as the number of stitches you'll need to work along each side of the blanket will vary, depending on your own unique tension. I've added instructions that you can follow in the written pattern to guide you but you may well find that you need to add a few more or a few less stitches to get the border just right for your blanket.
Working the Second Round This round is simple to crochet but it will highlight any tension issues with the first round. See the 'problem solving tips' below to help you with the first and second row.
Working the Third Round If you needed to change the number of stitches to adjust your tension in the first two rounds, the stitch multiples on this round might be slightly out. See the pattern tutorial to see how to correct this without ripping back.
Problem Solving Tips Tension
When working the first two rounds, you might have a problem with the border laying flat. This is most likely to be along the edges where it is hard to determine the exact stitch count to use.
... If your border curls or puckers up and won't lie down flat ... You have too few stitches and it is pulling your edges too tight. You need to add a few more stitches to the ends of the rows.
... If your border looks frilly and won't smooth out flat ... You have too many stitches and they haven't got space to lie evenly. You need to work less stitches into the ends of the rows.
Checking You're On Track
You can keep an eye on your tension by stopping and laying your blanket out every so often to see how flat and smooth it is lying.
Once you've worked the first side, make a note of how many stitches you needed to get the tension right. Then work the other side the same way. (Make this easier by breaking it down by blanket section.)
A Sandra Paul/Cherry Heart original design. © Copyright 2015. All rights reserved. Page of 28 33This pattern remains the property of Sandra Paul/Cherry Heart Designs at all times and is for your own personal use only. Please respect my work and do not copy, reproduce, redistribute or re-sell this pattern. For more copyright information please see: www.cherryheart.co.uk/p/copyright

CHERRY HEART DESIGNS
It can take a little experimentation to get the border to look right but it will be worth it as this will be the last part of your project and will set it off nicely.
Fudging
Borders are a great time to learn to relax in your quest for perfection.
When working those great long lengths it's hard to make sure that your stitch count multiples work out just right and match exactly to the pattern as written. This is especially true if you needed to adjust a little to accommodate your tension.
Luckily, the pattern repeat on this border pattern is nice and small so when working you will only be a stitch or two out at most. See my tips in the photo tutorial to see how to make a correction on Round three if you need to.
Blocking Steam blocking acrylic yarn
If you wish you can also to block the blanket to help get a neater finish. It can be a great way to even out and neaten up your work, especially if you are still having problems with the edges drifting in or with the border not lying quite flat.
You’ll need a protected surface to place the blanket on. I usually block blankets in sections over my ironing board, using a few old towels layered underneath to pin into.
Shape the blanket to the shape required. You may just be able to smooth and pull the blanket into the desired shape. But if you need to, use stainless steel or blocking pins to hold things in place.
Then, with your iron on the steam setting, holding the iron just above the blanket (approx 3/4cm or 2”), and let the steam only soak through the surface. It will dampen and warm the yarn and help it to relax into shape.
✽ Take your time with this and be careful to only ever use the steam. If the iron touches your blanket it will ruin the acrylic yarn.
Once the area you are working on has dried out and cooled down completely you can move onto the next section.
Blocking different yarns and fibres
The blocking method works well for the type of acrylic yarns that we are using for this blanket. If you have used a different yarn or fibre you will need to find out what method will work best for the yarn you are using.
A Sandra Paul/Cherry Heart original design. © Copyright 2015. All rights reserved. Page of 29 33This pattern remains the property of Sandra Paul/Cherry Heart Designs at all times and is for your own personal use only. Please respect my work and do not copy, reproduce, redistribute or re-sell this pattern. For more copyright information please see: www.cherryheart.co.uk/p/copyright
CHERRY HEART DESIGNS
Border The border will be worked all the way around the edge of the blanket in one colour, in the round. Decide which side of the blanket you would like best to be the front of the blanket and work the border with this side facing you.
To start the border take LIGHT GREEN / Storm Blue and join the yarn to any corner stitch at the top of the blanket.
✽ The corner stitches are the first and last stitches of the top row and the bottom row of the blanket. You may like to mark these 4 stitches now with stitch markers.
Border Set Up Row To provide a foundation to work the rest of the border from, first work a round of dc’s all around the blanket.
As the yarn is attached to a corner stitch, you will start with chain 1 and 3dc into this same stitch. You can then continue making dc’s using the guidelines below:
Corner Stitches: 3dc [if you are using stitch markers, move the marker to the middle one of these 3 dc’s.]
Top Edge: 1dc into each stitch (except the 1st and last stitch, which will be worked as corners)
Bottom Edge: 1dc into the back loop of each starting chain (except the 1st and last stitch, which will be worked as corners)
Sides: 2dc into the end of each tr row, 1 dc into the end of each dc row.
✽ There are only two pattern sections along the sides that are worked differently:
Grannies: 2dc into the end of each row that ends with a ‘shell’ of 3tr’s and only 1dc into the end of each row that ends with 1 tr.
Waves: 1dc into the end of each dc row, 1dc into the row ending with a dc, 2dc into the end of the row ending with dtr.
Once you have gone all the way around the blanket, make a ss into the 1st dc of the round. Then make a ss into the next st. This will bring you to the middle stitch of the 3 corner dc’s.
Border: Round Two 4ch [counts as 1htr, 2ch], 2htr into the same place, *1htr into each stitch up to the middle stitch of the 3 corner dc’s, work (2htr, 2ch, 2htr) into the middle dc,* repeat from * to * around the blanket until you are back to the beginning, to finish make 1htr into the stitch at the bottom of the starting ch, then make a ss into the 2nd ch of the beginning 4 ch.
Border: Round Three ss into the corner ch sp, 1ch, *(1dc, 3ch, 1dc) into the corner sp, (3ch, skip 2 sts, 1dc in next st) all the way along the edge up to 2sts before corner space, 3ch, skip 2 sts,* repeat from * to * around the blanket, ending the last repeat with ss into the top of the first dc of the round.
✽ Don’t worry if you don’t have exactly the right number of stitches to bring you correctly to each corner as written in Round 2 above. You can always skip 1 more or 1 less stitch if you need to. No-one will notice!
Border: Round Four Make *4dc into corner space, 1ss into dc, (3dc into next ch sp, 1ss into dc) along the edge until you reach the next corner,* repeat from * to * around the blanket until you reach the beginning, making the final ss into the 1st ss of the round.
Finishing Weave in all ends if you haven’t already and block blanket if required.
A Sandra Paul/Cherry Heart original design. © Copyright 2015. All rights reserved. Page of 30 33This pattern remains the property of Sandra Paul/Cherry Heart Designs at all times and is for your own personal use only. Please respect my work and do not copy, reproduce, redistribute or re-sell this pattern. For more copyright information please see: www.cherryheart.co.uk/p/copyright

CHERRY HEART DESIGNS
Border Photo Tutorial
A Sandra Paul/Cherry Heart original design. © Copyright 2015. All rights reserved. Page of 31 33This pattern remains the property of Sandra Paul/Cherry Heart Designs at all times and is for your own personal use only. Please respect my work and do not copy, reproduce, redistribute or re-sell this pattern. For more copyright information please see: www.cherryheart.co.uk/p/copyright
working into tr’s working over tr’s
make a ss into 1st dc
make a ss into next dc
middle of the 3 corner dc’s
SET UP ROUND: ROUND 1
Start in either the first or last stitch of the top row. (Depending on which side of the blanket you want to be the ‘right side’.)
To begin, make 1 chain and then 3 double crochets in the same stitch.
Work your way around the blanket, making the double crochet stitches as described in the pattern.
When working into the ends of the rows for the sides of the blanket, you have a choice of working over the last stitch, or into the stitch, depending on which look you like best.
If you want to work into the stitches, just push your hook between the loops making up the stitch. Aim to pick up 2 pieces of yarn with your hook and leave 1 behind.
Once you are around to the beginning of the blanket you need to make a slip stitch into the very first dc you made, right back at the start of this round.
Then, to get into position for the second round, you need to make another slip stitch so that you are in the middle stitch of the 3 corner stitches.

CHERRY HEART DESIGNS
A Sandra Paul/Cherry Heart original design. © Copyright 2015. All rights reserved. Page of 32 33This pattern remains the property of Sandra Paul/Cherry Heart Designs at all times and is for your own personal use only. Please respect my work and do not copy, reproduce, redistribute or re-sell this pattern. For more copyright information please see: www.cherryheart.co.uk/p/copyright
ROUND 2
Start with 4 chains, 2 of the chains count as a half treble and 2 are to make a corner space. Make two more half treble crochets into the same stitch.
Carry on working a half treble into each stitch up to the middle dc at the corner. (You might have marked this with a stitch marker.)
Work 2 half treble crochets into the corner dc, chain 2 and then make another 2 half treble crochets into the same stitch.
Work in the same way around the blanket, 1htr in each stitch, then a corner as shown.
Once you get round to the beginning, work a last half treble crochet into the same stitch as the starting chain.
The make a slip stitch into the 2nd chain of the chain of 4 at the start of the round.
ROUND 3
Start by chaining 1, then making 1 dc in the corner space. Chain 3 and make another dc into the same corner space. You now made a new corner.
Work along the blanket, making a chain of 3, skipping 2 stitches and then making a dc into the next stitch.
middle of the 3 corner dc’s
middle of the 3 corner dc’s
2htr, 2ch, 2htr into corner dc
work last htr into the bottom of the start chain
make ss into 2nd chain
skip 2 stitches between dc’s
corner space

CHERRY HEART DESIGNS
A Sandra Paul/Cherry Heart original design. © Copyright 2015. All rights reserved. Page of 33 33This pattern remains the property of Sandra Paul/Cherry Heart Designs at all times and is for your own personal use only. Please respect my work and do not copy, reproduce, redistribute or re-sell this pattern. For more copyright information please see: www.cherryheart.co.uk/p/copyright
2 stitches skipped as normal
1 stitch skipped
ss into top of 1st dc
4 dc’s into corner space
ss into dc
make the last ss here
If your stitch count doesn’t come out exactly right to the corner, simply adjust slightly to compensate.
Skip either 1 more or one less stitch to bring you out right to the corner space.
If you make this adjustment slightly away from the corner, it won’t be noticeable.
To end this round, make a slip stitch into the first dc of the round.
ROUND 4
Without making a chain as you normally would, instead make 4 double crochets directly into the corner space. Then make a slip stitch into the double crochet.
Continue around the blanket, working 3dc into each space along the sides and 4 dc’s into the corner spaces.
When you have worked into the last space, finish the round with a final slip stitch into the dc from round 3.


![Crochet - Ondori Crochet Motif Book - [Jap]](https://static.fdocuments.in/doc/165x107/55cf9b6c550346d033a60317/crochet-ondori-crochet-motif-book-jap.jpg)
