Chenille Supplement - help.wilcom.com · embroidery machine formats, chenille ... Until recently...
64
Chenille Supplement
-
Upload
nguyenphuc -
Category
Documents
-
view
223 -
download
0
Transcript of Chenille Supplement - help.wilcom.com · embroidery machine formats, chenille ... Until recently...

Chenille Supplement

Copyright © 1998-2017 Wilcom Pty Ltd, Wilcom International Pty Ltd. All rights reserved.
No parts of this publication or the accompanying software may be copied or distributed, transmitted, transcribed, stored in a retrieval system or translated into any human or computer language, in any form or by any means, electronic, mechanical, magnetic, manual, or otherwise, or disclosed to any third party without the express written permission of:
Wilcom Pty Ltd. (A.B.N. 43 001 971 919)Level 3, 1-9 Glebe Point Rd, GlebeSydney, New South Wales, 2037, AustraliaPO Box 1094, Broadway, NSW 2007Phone: +61 2 9578 5100Fax: +61 2 9578 5108Web: http://www.wilcom.com
TrueView™ and Point & Stitch™ are trademarks of Wilcom Pty Ltd, Wilcom International Pty Ltd. Portions of the imaging technology of this Product are copyrighted by AccuSoft Corporation. The EPS File Import/Export Converter used in this Product is copyrighted by Access Softek, Inc. All rights reserved.
Wilcom Pty Ltd makes no representation or warranties with respect to the contents of this publication and specifically disclaims any implied warranties of merchantable quality or fitness for any particular purpose.
Further, Wilcom Pty Ltd reserves the right to revise this publication and to make changes in it from time to time without obligation of Wilcom Pty Ltd to notify any person or organization of such revisions or changes.
The screen illustrations in this publication are intended as representations, not exact duplicates of screen layouts generated by the software. The samples used to illustrate software features and capabilities may not be exactly duplicable, depending on inclusions provided with your software model or product level. Some artwork for design samples is kindly provided by Digital Art Solutions.
The Product Differentiation Table which appears in the appendices of this manual indicates which features are relevant to each level of product. While every effort has been made to maintain this table up to the current release, late changes may not be exactly reflected. For further advice, refer to your Wilcom sales representative.
© 2017 Corel Corporation. All rights reserved. Corel, CorelDRAW, the CorelDRAW balloon logo, the Corel logo, the Corel balloon logo, Corel CAPTURE, CONNECT, PHOTO-PAINT, PowerTRACE and Smart Carver are trademarks of Corel Corporation and/or its subsidiaries in the United States and/or other countries. This product and packaging include intellectual property (including trademarks) owned, registered and/or licensed by/from respective third parties. Use of this product is subject to the acceptance of the license agreements included in this package. Protected by Patents in the United States and elsewhere. This product is provided under an enclosed license agreement that defines what you may do with this product and contains limitations on warranties and your remedies.
Subject to any warranties implied by law which are incapable of limitation or exclusion, the software is purchased ‘as is’ without any warranty as to its performance, accuracy, freedom from
error or to any results generated through its use and without any implied warranty of merchantability or of fitness for any particular purpose for which the software is being acquired. The purchaser relies on its own skill and judgement in selecting the software for its own use and assumes the entire risk as to the results and performance of the software. Wilcom Pty Ltd specifically does not warrant that the software will meet the purchaser’s requirements or operate without interruption or error.
Rev 2 November 2017

Wilcom EmbroideryStudio e4 Chenil le Supplement 3
Chapter 1
Introduction to Chenille
There are several models of EmbroideryStudio, some of which have additional capabilities. These can be purchased as add-on ‘Elements’. The Chenille add-on includes special chenille embroidery capabilities for use with chenille or combination lockstitch systems. These include chenille embroidery machine formats, chenille stitch types and effects, and chenille object properties. The digitizing methods used for chenille work are the same as those used for regular embroidery.The Chenille add-on Element can be used in any of these contexts: For use with dedicated chenille
machines capable of producing chain and moss stitching with chenille stitch patterns – square, double square, coil, and island coil.
For use with ‘Simple Chenille’ devices attached to lockstitch machines to simulate chenille embroidery. These devices are generally only capable of moss stitching.
For use with combination machines capable of both chenille and lockstitch embroidery stitching. In this context, moss and chain can only be used in chenille mode, but chenille stitch patterns – square, double square, coil, and island coil – can be used in both.
Modern chenille machines equipped with multiple loopers and automatic color-change capabilities produce chenille embroidery more efficiently than earlier mechanical machines. With chenille-capable design software such as EmbroideryStudio, it is possible to exploit these machines to the maximum of their commercial potential, and appeal to both popular as well as custom apparel and fashion markets.
Refer to the EmbroideryStudio User Manual for more information on basic procedures.

Chapter 1 Introduction to Chenil le 4
Background
Chenille fabric dates back to 18th century France and refers to velvety fabric with the characteristic ‘chenille look’. The material is made on a special loom similar to ones used in carpet manufacture.
The yarn is typically made from cotton but can also be made with synthetics. Turned in the light, the fabric takes on a lustrous, glossy appearance. Today it is typically associated with soft fuzzy sweaters, bedspreads and bathrobes. These are made on the same principle as chenille embroidery.
Chenille embroidery
Like the fabric, chenille embroidery is made from loops of yarn creating a soft, fuzzy appearance. It is one of the most commonly recognized types of embroidery. It is commonly used for sweatshirt emblems. It is often combined with regular embroidery for decorated apparel such as sports and woolen jackets. It is also widely used with children’s apparel.

Wilcom EmbroideryStudio e4 Chenil le Supplement 5
Chenille also finds applications in home decor, from pillow covers to sofa throws. Because of its heavier thread, chenille is not generally used for small intricate designs. Chain stitch, however, can appear in more delicate work.
Chenille machines
There are many types of chenille machine, including machines for taping, cording and sequins as well as those with two needles for four-thread stitching.
Some machines can combine both chenille and lockstitch embroidery in the same design. Such machines are generally capable of automatic color changes and trims. They may also be capable of automatic chenille needle height control for different depths of pile. Other derivations of chenille are produced on multihead machines using special attachments to sew down looped yarn or cord.
Chapter 1 Introduction to Chenil le 6
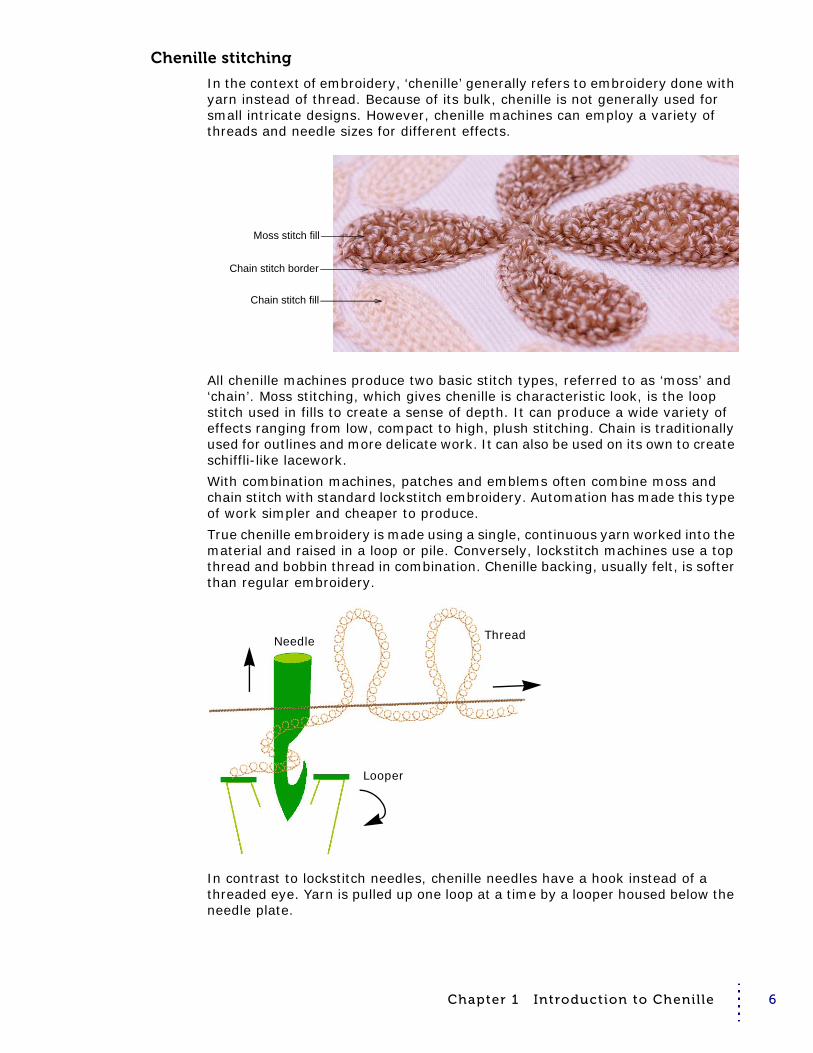
Chenille stitching
In the context of embroidery, ‘chenille’ generally refers to embroidery done with yarn instead of thread. Because of its bulk, chenille is not generally used for small intricate designs. However, chenille machines can employ a variety of threads and needle sizes for different effects.
All chenille machines produce two basic stitch types, referred to as ‘moss’ and ‘chain’. Moss stitching, which gives chenille is characteristic look, is the loop stitch used in fills to create a sense of depth. It can produce a wide variety of effects ranging from low, compact to high, plush stitching. Chain is traditionally used for outlines and more delicate work. It can also be used on its own to create schiffli-like lacework.With combination machines, patches and emblems often combine moss and chain stitch with standard lockstitch embroidery. Automation has made this type of work simpler and cheaper to produce.True chenille embroidery is made using a single, continuous yarn worked into the material and raised in a loop or pile. Conversely, lockstitch machines use a top thread and bobbin thread in combination. Chenille backing, usually felt, is softer than regular embroidery.
In contrast to lockstitch needles, chenille needles have a hook instead of a threaded eye. Yarn is pulled up one loop at a time by a looper housed below the needle plate.
Moss stitch fill
Chain stitch border
Chain stitch fill
Needle Thread
Looper

Wilcom EmbroideryStudio e4 Chenil le Supplement 7
Chenille design considerations
Chenille designs look best at larger size because of yarn thickness and the relative size of moss and chain stitching. Detail can be added by over-sewing with standard embroidery. Chenille sometimes employs multiple strands of yarn for distinctive looks and textures.Until recently chenille design was a specialist technique. In reality, digitizing for chenille is easier than regular embroidery. In general, design areas are filled more simply and registration tolerances are broader. The Chenille add-on supports a wide range of chenille work and provides: Constant stitch length in all objects, for consistent smooth appearance Ability to control shortcut angles Variable width coil stitching Gaps at the ends of columns automatically filled with coil stitching Special ‘compound chenille’ objects which can include any kind of fill, with up
to six offset borders in any combination of chain and moss stitching.Designing and digitizing for chenille is similar to regular embroidery, with these differences: Chenille is limited in its ability to achieve intricate detail, but it is possible to
achieve elaborate designs using color, texture and dimension. It is important to map out the design, as you would with normal embroidery,
so as to minimize jumps. Chenille shapes generally consist of a fill with one or more offsets of chain and
sometimes moss stitching. The border is needed to hold the fill inside the shape. Wherever possible, use ‘compound chenille’ objects which include their own offset outlines.
Otherwise, chain stitching should be used to act as ‘tie-ins’ and ‘tie-offs’ to stop moss stitching from unraveling.
Chenille stitching is thicker than the lines in your digitized design so you need to recognize and compensate for this. For instance, chain stitching is digitized as a single run. On screen, it appears like a regular run stitch.
Because chenille yarn is thicker than normal thread, it is critical to avoid yarn pile-up caused by overlapping stitches, particularly chain stitches.
Similarly, small clusters of stitches are not suitable for chenille work because of yarn thickness. They may cause yarn breakage or holes in the fabric. Avoid shapes with sharp angles.
Chenille embroidery primarily ‘pushes’ or expands, unlike the ‘pull-push’ factor in traditional embroidery. Large designs require a cutaway backing to compensate for this.
Overlocking is used to prevent chain stitches unraveling. You need to manually insert a chain for Barudan and Melco chenille machines. Tajima machines can change automatically from moss to chain if the machine has this option enabled.
Note You should first become familiar with general EmbroideryStudio techniques before employing chenille-specific techniques. EmbroideryStudio has a certain design philosophy but once you understand it, similarities between individual functions become obvious. See the EmbroideryStudio User Manual for details.

Wilcom EmbroideryStudio e4 Chenil le Supplement 8
Chapter 2
Chenille Basics
To start using Chenille, you need to know basic procedures, such as starting up, opening and creating designs, selecting chenille machine formats, and saving and exporting design and machine files.
This section provides an overview of the chenille terms and concepts as they relate to the Chenille add-on Element. For an essential introduction to EmbroideryStudio software concepts, refer to the EmbroideryStudio User Manual.
Chenille with EmbroideryStudio
In EmbroideryStudio, you use a single design window for both chenille and standard lockstitch embroidery. In addition, with the Chenille add-on activated, there is a dedicated Chenille template, a Chenille toolbar with chenille-specific

Wilcom EmbroideryStudio e4 Chenil le Supplement 9
stitch types and machine functions, and a dedicated tab on the Object Properties docker.
Chenille stitch types
The two basic stitch types created by all chenille embroidery machines are ‘moss’ and ‘chain’. In EmbroideryStudio, Moss and Chain are treated as machine functions which can be interpreted only by dedicated chenille or combination machines.
Moss stitch
Chenille Moss produces a looped stitch which provides dense cover. It is used in filled areas to create depth. This stitch produces the typical raised stitching
Compound chenille settings for chenille objects
Chain
Moss
Needle Height
View by Chain/Moss
Compound Chenille
Use Chenille > Moss to create a looped pile look. Right-click to adjust settings.
Moss stitch fill
Chain stitch border
Chain stitch fill

Chapter 2 Chenil le Basics 10
associated with chenille work. It can be stitched using different needle heights – lower for outlines and higher for fill. It works best with simple shapes.
Chain stitch
Chenille Chain produces a decorative style of stitching resembling the links of a chain. It is used for outlining and bordering designs as well as in monograms. It can be used to produce a more delicate look.
Tip In conjunction with chain stitching, a design typically builds in height from the edges to the middle.
Chenille fills
EmbroideryStudio provides a number of stitch styles typically associated with chenille work – Square, Double Square, Coil, and Island Coil. Stitch angles have no effect on any of these fill types. Other stitch types can also be used if you have a combination machine capable of producing both chenille and regular stitching.
Coil directionFor some machines, best results with Coil are achieved by sewing in a counterclockwise direction because when you sew in a clockwise direction, you are adding more twist to the yarn causing it to become tighter, distorting the moss stitch loops. Refer to your machine handbook for details.
Use Chenille > Chain to create flat stitches traditionally used as a border or outline for moss stitches. Right-click to adjust settings.
Moss stitch
Chain stitch
Coil
Double Square
Island Coil
Square
Coil
Ideal loop Extra-twisted yarn loop

Wilcom EmbroideryStudio e4 Chenil le Supplement 11
Compound chenille
For chenille work with EmbroideryStudio, you mainly use Complex Fill in combination with Compound Chenille to digitize objects – even narrow ones – with built-in offset chain or moss borders. Compound chenille objects typically consist of 1-3 chain runs around the shape, 1-3 moss runs of a lower height, and a fill of Island Coil, Double Square or Square stitch. Compound objects can be scaled or transformed as a single object.
Because offsets are used so frequently, Chenille digitizers have to apply some thought and special techniques to their work. As much as possible, chenille designs should be planned to use Complex Fill together with Compound Chenille. The advantage of compound chenille is the tie-in/tie-off. However, if your machine supports it, you can use regular embroidery to stitch a few tie-off stitches on the end of the chenille object.
Other chenille considerations
In addition to basic and decorative chenille stitch types and effects, Chenille allows you to control the following settings.
Needle height
On some chenille machines, needle height can be set to control the loop size formed when a machine sews moss stitch.
You may use different needle heights for different areas of color. Or between fills and borders – lower for borders, higher for fills. When using Compound Chenille, you can change needle heights of each offset. The needle height setting has less effect on chain stitches although it does affect width.
Use Chenille > Compound Chenille to automatically digitize chenille shapes with offset borders. Right-click to adjust automatic offset borders.
Use Traditional Digitizing > Complex Fill to digitize filled shapes with a single stitch angle. Right-click for settings.
Use Chenille > Needle Height to control height of loop formed when sewing moss stitch as well as width of chain stitch.

Chapter 2 Chenil le Basics 12
If you intend to use loops of varying height, always adjust needle height rather than stitch length. Even though stitch length affects loop height, it is easier and more accurate to adjust needle height. Normally, it’s best to use default settings. Do a test run on the machine to check the outcome. Then, if necessary, adjust needle heights.
Tip With some machines, needle height can also be adjusted on the machine. In practice, it is more common to adjust there rather than in the design.
ScalingAs with lockstitch designs, any chenille design created in EmbroideryStudio can be scaled. Stitches are automatically recalculated from object outlines. Densities are preserved and there are no gaps or heavy over-stitching. Compound Chenille objects are recalculated together with their offset outlines.When old chenille designs are read from stitch data – e.g. Melco EXP, Tajima or Barudan disk – the EmbroideryStudio Stitch Processor converts them to objects. However, it does not fully recognize Coil and Square stitching. These will be converted to a series of Run stitch objects. This limits the scalability of these old designs to ±5-10%. However, old designs can be readily stitch-edited and sections re-digitized if required. See the EmbroideryStudio User Manual for details.
TrimsFew chenille machines have an automatic thread trim mechanism as connecting threads are under the fabric and are not visible. In this case, digitize all shapes and lines of the same color sequentially in order to minimize manual trims. This will reduce stitchout time. Be careful how you connect from one spot to another. Avoid long connecting stitches which may pull previous stitching and require trimming. Typically, most objects will include a chain run before the fill to tie-in, and another chain run after, to tie-off.
JumpsJump(M) functions cause frame movements without needle penetrations. The use of jumps is not recommended because the pulling effect on the fabric during a jump may distort the design, especially if the fabric is thin. To avoid long connecting stitches, plan carefully the order in which you digitize shapes and lines. Use chain stitch rather than jumps when traveling across a shape filled with moss stitching as chain stitch will be hidden beneath moss stitching. Use Jump only if there is a significant contrast in colors, particularly if the current stitch is of a lighter color where the yarn may show through.
CornersAvoid corners with an angle smaller than 60° as this can cause a machine fault or loop stitching may be changed to chain. EmbroideryStudio automatically adds an extra stitch to avoid sharp corners within objects, including manual stitch objects. If you round off sharp corners in runs and complex fills, you can avoid both sharp angles and small stitches. However, sometimes an extra stitch causes chain stitches to swell, giving a poor finish.
Tip Use Smart Corners to achieve smooth, even placement of stitches, and eliminate gaps in your design. Smart Corners can be used with Square stitch and Coil for Column C objects. See Smart Corners in the EmbroideryStudio User Manual for details.

Wilcom EmbroideryStudio e4 Chenil le Supplement 13
Stitch lengthStitch length should be constant for the same thread type throughout a design. If stitch length varies, the height of moss loops and width of chain loops will also vary, causing uneven embroidery. The chenille machine pulls up the same length of yarn for each loop according to the current needle height setting. Even though stitch length affects loop height, it is easier and more accurate to adjust needle height. If you intend to use loops of various height, adjust the needle height rather than stitch length. See Adjusting needle heights for details.Select a stitch length for a design according to yarn thickness, fabric thickness, and required density. Using inappropriate stitch length may cause yarn breakage, needle breakage, or damage to the fabric.
Note If the yarns in use are of the same type, the lengths of chain and moss stitch are different. The following table gives an indication of appropriate values.
Tip These values may vary depending on the fabric used. When you use a new thread and fabric combination, sew a test design first using the above values as an initial guide.
Creating designs for chenille machines
While the chenille fill patterns – Square, Double Square, Coil, and Island Coil – are typically used with chenille designs, they can also be used as decorative lockstitch pattern types. However, lockstitch machines can’t produce actual chenille chain or moss stitching. In order to use these patterns to create chenille designs, you need to use the dedicated Chenille template.
Machine files & formats
Different embroidery machines speak different languages. They have their own control commands for the various machine functions. Before you can stitch a
Thread typeRayon 300d/2P
Miki wool Woolly yarnCotton thread #12
Softaine G
Chain stitch length
2.0-3.0 mm 2.5-3.5 mm 1.8-2.2 mm 2.3mm 2.0mm
Moss stitch length
1.5-1.7 mm 2.0-2.2 mm 1.6mm 2.1mm 1.7mm
Moss stitch spacing
1.5mm 1.8mm 1.7mm 1.5mm 1.8mm
Use Fill Stitch Types > Square to create open straight parallel fills. Right-click for settings.
Use Fill Stitch Types > Double Square to create grid fills. Apply closed shapes. Right-click for settings.
Use Fill Stitch Types > Coil to stitch narrow shapes or columns where each stitch traverses the column width. Right-click to adjust settings.
Use Fill Stitch Types > Island Coil to fill large Complex Fill objects with concentric rows of coil stitching, simulating the circular motion of hand-chenille embroidery. Right-click to adjust settings.

Chapter 2 Chenil le Basics 14
design, it must be in a format which can be understood by the embroidery machine. When you select the Chenille template upon opening the software, the machine format will switch to the default chenille machine. Chenille stitch types – Moss and Chain – can only be used with a chenille machine format.
Machine filesThere is no chenille-specific machine file format as such. Upon output, EmbroideryStudio will translate chenille stitch types – Moss and Chain – into machine functions that can be understood by the selected machine. Each machine requires its own machine file format. Typically:
TBF and U?? are newer formats intended for combination chenille machines. Upon export, machine head assignments are automatically encoded in the machine file.
Standard machine formatsEmbroideryStudio supports Tajima – both the old TMCE-100 and new TMCE-600 models – Barudan and Melco chenille machines. Explicit support is provided for these machine types: Tajima TBF Tajima TMCE-100 Tajima TMCE-600 Barudan FDR-II Chenille Combination Barudan Chenille Barudan FDR-II Twin Sequin Chenille Combination Barudan FDR-3 Barudan FDR-3 Chenille Combination Melco Chenille
Note If a design was created as a chenille design, you need to select the associated machine format when opening the file in order to display the chenille functions correctly.
Starting a new chenille design
When you start EmbroideryStudio, a new file – Design1 – is automatically created ready for you to start digitizing. By default, Design1 is based on the NORMAL template. Use the CHENILLE template to create new chenille designs.
Machine type File type Purpose
Tajima DST For pure chenille machines
TBF For combination chenille and normal embroidery (including sequin)
Barudan DSB For pure chenille machines
U?? For combination chenille and normal embroidery (including sequin)
Melco EXP For pure chenille machines
Use File > New to start a new design with the chenille template.

Wilcom EmbroideryStudio e4 Chenil le Supplement 15
To start a new chenille design Start EmbroideryStudio and select CHENILLE as your template.
Alternatively, with the design window already open, select File > New From Template to access the dialog. The Chenille template defaults the system to chenille values. If you are using a different machine, you can select and save to the Chenille template via this dialog. You can also change machine format at any time on a design-by-design basis via the Design menu.
Select your preferred machine format from the droplist.Finished designs can be sent direct to most chenille machines, or saved to your preferred chenille machine file format. See Changing machine formats for details. See also Modifying a template in the EmbroideryStudio User Manual for further details.
Custom machine formats
If your machine is different, you can customize machine format settings. For example, different models of the same embroidery machine, may require different values for the same functions. You have three options: Modify the format for a specific design, creating a custom format to use only
with that design. See Customizing formats for specific designs for details. Modify one of the standard formats provided. Obviously, you would only do
this if you no longer needed the original values. See Modifying standard formats for details.
Create a new format, based on the original, and make it available to all designs. See Creating custom formats for details.
Opening or reading chenille designs
Select Chenille template
Select machine format
Save to Chenilletemplate
Use Standard > Open to open an existing design.

Chapter 2 Chenil le Basics 16
Chenille designs can be saved to native EMB as well as machine file formats. Chenille files open in EmbroideryStudio like any other EMB design. When you read a chenille machine file, it is converted to EMB format. The chenille functions appear in the converted design in the same way as they are stored in the machine file or on paper tape. When reading a chenille design from stitch data – e.g. Melco EXP, Tajima or Barudan disk – Stitch Processor converts stitches to objects. However, it does not fully recognize Coil and Square stitching. These will be converted to a series of Run stitch objects. This limits the scalability of these designs to ±5-10%. However, old designs can be readily stitch-edited and sections re-digitized if required.
Tip There is no chenille-specific machine file format as such. However, if a design was created as a chenille design, you will need to select the associated machine format when opening the file in order to display it correctly.
To open or read a design Open a chenille design from DOS or embroidery disk as follows: Click the Open icon or select File > Open. Open your EMB chenille design
file like any other native design file.
Use Legacy Features > Embroidery Disk to open designs from or save to proprietary embroidery disk formats.

Wilcom EmbroideryStudio e4 Chenil le Supplement 17
To open a chenille machine file, choose a specific machine file format from the droplist or choose ‘All Machine Files’.
If your chenille design is saved to proprietary disk, select Embroidery Disk from the Legacy Features toolbar and choose your format from the dialog.
Options available formachine formats
Open embroidery diskand choose a
proprietary format
Options available formachine formats

Chapter 2 Chenil le Basics 18
If you are opening a machine file, the Options button is activated. Chenille designs cannot be automatically distinguished from lockstitch designs. You need to tell the system which machine format you are using.
Tip In Tajima TMCE-600, all Chenille stops are interpreted as color changes. Select a chenille machine from the Machine Type list and click OK. See the
EmbroideryStudio User Manual for further details.
Outputting designs for chenille
Chenille designs can be saved to native EMB format or exported as machine files. They can be output to embroidery floppy disk, punched to a paper tape or sent directly to embroidery machine connected to the computer. Select the correct machine format before outputting the design. Upon output, EmbroideryStudio translates chenille stitch types – Moss and Chain – into machine functions that can be understood by machine. Most chenille machine files are encoded in DOS format. Some older style files are encoded in proprietary embroidery disk formats.
Check the following values before sending the design.
Disk type Melco format Barudan format Tajima format
DOS Melco EXP Barudan 2HDBarudan S-FMC
Tajima T01Tajima DST
Embroidery Melco Barudan Tajima
Machine type Format Check...
Melco Melco EXP
Barudan Barudan Jump stitch length is within 4mm.
Tajima TMCE-100 Tajima DST Shortcut angle is set to 60°
Tajima TMCE-600 Tajima DST Shortcut angle is set to 60°

Wilcom EmbroideryStudio e4 Chenil le Supplement 19
Saving chenille designs
EmbroideryStudio supports Tajima – both the old TMCE-100 and new TMCE-600 models – Barudan and Melco chenille machines. As with lockstitch designs, all information about a chenille design is stored in the native EMB file format, regardless of machine format. This makes it easy to write designs to different formats.
To save a chenille design Click the Save Design icon. If this is the first time you have saved the design,
the Save As dialog opens. Alternatively, choose File > Save As. File type will default to the latest EMB, but you can save to previous versions via the Save as type droplist.
Exporting chenille designs
While chenille design files are saved to native EMB format, this cannot be read by machine. You can export designs to local disk, embroidery disk, or even punch them to paper tape.
Use Standard > Save Design to save the current design. Right-click to open the Save As dialog.
Use Legacy Features > Embroidery Disk to open designs from or save to proprietary embroidery disk formats.

Chapter 2 Chenil le Basics 20
To export a chenille design To export a chenille design as a machine file, select File > Export Machine
File.
To save a chenille design to a proprietary embroidery disk, choose Legacy Features > Embroidery Disk > Save As.
Tip Once a design is complete, you can output to any supported embroidery machine without changing the original machine format. If a selected machine format does not support a particular function in the design – either automatically or manually inserted – it is simply ignored. To change the original format, see Changing machine formats.
Sending chenille designs to machine
Select proprietary disk format
Use Standard > Send to Connection Manager to connect to supported machines via proprietary machine software.
Use Legacy Features > Send to Stitch Manager to send a design to any supported embroidery machine without changing the original design format.

Wilcom EmbroideryStudio e4 Chenil le Supplement 21
Chenille designs can be sent directly to an embroidery machine if connected to the computer. Newer machines use USB or Wired-Wireless network connections. EmbroideryStudio supports these connections via the Connection Manager. Older-style machines generally use serial port connections. EmbroideryStudio supports connection to these machines via the Stitch Manager. See the EmbroideryStudio User Manual for further details.
Select the correct machine format before sending the design. See Creating designs for chenille machines for details. Check the following values before sending the design.
Note Machine Manager and its operations are described in a separate Machine Manager Supplement.
Select machineformat

Wilcom EmbroideryStudio e4 Chenil le Supplement 22
Chapter 3
Digitizing for Chenille
You can digitize chenille objects using regular input methods – traditional and graphical. Most objects are digitized with Complex Fill in combination with Square or Coil for smaller objects, Double Square or Island Coil for larger objects. Use these stitch patterns in combination with both chenille Moss and Chain for outlines or fills. Run stitch is typically used with chain for borders.
Wherever possible, Compound Chenille is used with Complex Fill to add up to six offset run borders automatically. Borders are added either before or after the fill, to hold the fabric in place and provide clear edge definition for shapes. You can digitize manually by creating multiple objects – one for the fill and one or two for the border. However, Compound Chenille provides the easiest way to do so.
Digitizing chenille objects
As mentioned in the introduction, digitizing for chenille is easier than regular embroidery. In general, design areas are filled more simply and registration tolerances are broader. The Chenille add-on supports a wide range of chenille work. Concepts to keep in mind: Chenille work involves only two stitch types – Chain and Moss. Chenille work usually involves a combination of two basic fill stitch patterns –
Square and Coil, single or double. For chenille work, you mainly use Complex Fill in combination with
Compound Chenille to digitize objects – even narrow ones – with built-in offset chain or moss borders.

Wilcom EmbroideryStudio e4 Chenil le Supplement 23
Chenille stitch types & patterns
To qualify as a ‘chenille object’, a digitized shape must have Chain or Moss applying. These are added to an object as machine functions. As such, these stitch types cannot be displayed in TrueView. In addition, Compound Chenille can be used with Complex Fill to create ‘compound chenille’ objects. As well as having a chain or moss fill stitch type, these objects include their own built-in chain or moss offset outlines.
Chenille fill patterns
Chenille work usually involves a combination of two basic fill stitch patterns – Square and Coil. For larger areas, density can be increased using – Double Square and Island Coil. The pattern you use depends on object shape, size and the effect you want to achieve. Borders for both open and closed objects can be created with Coil outline or Square outline stitching.
Chenille input methods
Use Chenille > Chain for decorative stitching resembling links of a chain – used for outlines and borders as well as monograms.
Use Chenille > Moss to create dense cover using looped stitch typical of chenille raised stitching – best with simple shapes.
Use Outline Stitch Types > Square to create open borders or columns of even width for an open ‘toothed’ effect. Right-click for settings.
Use Fill Stitch Types > Square to create open straight parallel fills. Right-click for settings.
Use Fill Stitch Types > Double Square to create grid fills. Apply closed shapes. Right-click for settings.
Use Outline Stitch Types > Coil to Use to create borders or columns of even width for an open ‘coil’ effect. Right-click to adjust settings.
Use Fill Stitch Types > Coil to stitch narrow shapes or columns where each stitch traverses the column width. Right-click to adjust settings.
Use Fill Stitch Types > Island Coil to fill large Complex Fill objects with concentric rows of coil stitching, simulating the circular motion of hand-chenille embroidery. Right-click to adjust settings.
Use Traditional Digitizing > Complex Fill to digitize filled shapes with a single stitch angle. Right-click for settings.
Use Traditional Digitizing > Column A to create columns of varying width and stitch angle. Right-click for settings.
Use Traditional Digitizing > Column B to create asymmetrical columns of turning stitches, where opposite sides are different shapes. Right-click for settings.
Use Traditional Digitizing > Column C to digitize columns or borders of fixed width. Right-click for settings.
Use Traditional Digitizing > Digitize Run to create row of single stitches along a digitized line.

Chapter 3 Digit izing for Chenil le 24
You can digitize chenille objects manually using practically any input method, including Freehand. However, for chenille work, you will mainly use Complex Fill in combination with Compound Chenille to digitize objects – even narrow ones – with built-in offset moss or chain borders. You can also use some graphic tools in combination with Compound Chenille, including – Closed Shape, Rectangle, Ellipse, and Basic Shapes.Other input methods can be used to digitize chenille objects with chain or moss stitching. For instance, Column A/B objects can be used with variable width Coil stitching, while complex fill objects will default to Island Coil.
Similarly, Column C objects can be used with variable width stitching.
Bear in mind however, that Column A, Column B and Column C do not produce automatic borders with Compound Chenille so these need to be added manually. This makes scaling more problematic as gaps between borders and fills will change. Also, while the effect of variable width coil looks artistic on screen, it may be better used for lockstitch. Moss stitching is dense and covers the fabric entirely. Thus Island Coil fill is generally the preferred pattern.
Note While you can use Turning Complex with Compound Chenille, stitch angles have no effect. Similarly Column A/B stitch angles have no effect on chenille stitching. They may be used when combining chenille with regular embroidery.
Chenille runs & bordersTo stitch single-line borders manually, you typically use Digitize Run with Chain stitching. Moss can also be used. Chenille Run stitches are similar to lockstitch Run except that stitch length should be constant. One or two offset run-arounds provide a clear edge for filled areas and help to secure chenille fill stitching. Other graphic input methods can be used. You may also digitize additional chenille borders with Column C in combination with Coil and Moss stitch. If your machine supports it, you may combine chenille with regular stitching – e.g. to tie-off chenille objects.
Use Chenille > Compound Chenille to automatically digitize chenille shapes with offset borders. Right-click to adjust automatic offset borders.
Column A/B with coil
Complex fill with island coil
Column C with coil

Wilcom EmbroideryStudio e4 Chenil le Supplement 25
Tip Use Backtrack and Repeat to reinforce outlines while specifying the direction of the stitching. See the EmbroideryStudio User Manual for details.
Digitizing for chenille
Digitizing chenille objects involves the same techniques as regular lockstitch embroidery with the addition of chenille stitch types – Moss and Chain – chenille fill types – Coil and Square – and usually Compound Chenille.
To digitize for chenille1 Open a new file or design using the Chenille template and select a machine
format. See Creating designs for chenille machines for details.2 Choose an input method – graphical or traditional. For fills, Compound Chenille will work with Complex Fill plus some
graphic tools – Closed Shape, Rectangle, Ellipse, and Basic Shapes. Compound Chenille is toggled on by default. This will automatically generate a traditional chenille object with offset outlines.
For outlines, Digitize Run method will work with Moss and Chain. Turn off Variable run length and set a suitable stitch length. This value determines the size of chain or loop, depending on the chenille stitch type you use.
3 Choose a chenille stitch type.
4 For filled shapes, choose a chenille fill pattern:
Use Traditional Digitizing > Complex Fill to digitize filled shapes with a single stitch angle. Right-click for settings.
Use Traditional Digitizing > Digitize Run to create row of single stitches along a digitized line.
Use Chenille > Compound Chenille to automatically digitize chenille shapes with offset borders. Right-click to adjust automatic offset borders.
Chenille stitch For...
Moss Looped stitching
Chain Flat stitching and borders
Fill pattern To fill...
Coil Curved columns or narrow shapes.
Square Shapes diagonally, or horizontally and vertically (similar to tatami).
Adjust nominal stitch length
Turn off variablerun length

Chapter 3 Digit izing for Chenil le 26
5 Digitize the shape: Left-click for corner points Right-click for curve points.
6 Press Enter to complete.
Tip If you make a mistake, press Backspace to delete the last reference point. Press Esc to undo all new reference points. Press Esc again to exit digitizing mode.
Visualizing & checking chenille stitching
The two basic stitch types created by all chenille embroidery machines are ‘moss’ and ‘chain’. In EmbroideryStudio, Moss and Chain are treated as machine functions which can be interpreted only by dedicated chenille or combination machines. Chenille objects cannot be viewed in TrueView but they can be viewed in a special viewing mode which allows easy identification of chain and moss elements. The design displays using only the first three colors in the color palette where Color 1 = lockstitch elements, Color 2 = chain elements, and Color 3 = moss elements.
Double Square Large shapes with two layers of straight lines.
Island Coil Large shapes with spiral stitches.
Fill pattern To fill...
Last point marked on top of first with right button
curv
e
Press Enter – the object is closed automatically
straight
line
1
2
3
45
67
8 9
10
1112
1
2
3
45
67
8 9
10
1112
13
Coil outline
Square outline Double Square
Island Coil
Coil
Square fill
Use Chenille > View by Chain/Moss to view chenille objects in special mode to allow easy identification of chain and Moss elements – lockstitch in green, chain in blue, moss in red.

Wilcom EmbroideryStudio e4 Chenil le Supplement 27
To check for chain/moss digitizing errors Click the icon to activate Chain/Moss display or select View > View by
Machine Function > Chain/Moss.
Use the Stitch List to check machine functions in the design. To travel by machine function, click/right-click the Travel by Function tool.
Alternatively, press Ctrl + Page Up or Ctrl + Page Down. The needle point will stop at every jump, trim, and color change in the design.
Note TrueView does not display chain and moss stitching. However, it can still be useful to give an impression of the design when viewed at a small zoom factor (less than 1:1).
Chain/Moss view
Check chenille functions
View by Chain/Moss
Chain stitch
Moss stitch

Chapter 3 Digit izing for Chenil le 28
Creating chenille fills
Chenille work usually involves a combination of four fill stitch types – Coil, Square, Double Square and Island Coil. The stitch type you use depends on input method as well as object shape, size and the effect you want to achieve.
Coil and Island Coil are traditional forms of Chenille fill. They are both stitched in spirals. To fill columns or narrow areas, Coil is typically used with with moss stitching. As an alternative, use Square for the same purpose. Large areas can filled with Island Coil together with moss stitching. This fill type is designed to mimic hand-made chenille embroidery. Alternatively, large areas can be filled with moss stitching using two layers of square stitching called Double Square. Unlike Coil, stitches are generated along straight lines. Stitch angles have no effect on any of these fill types.
Digitizing with coil
Coil is equivalent to Satin in regular embroidery. Stitches are generated in spirals. Stitch length is consistent even over different widths. Coil is suited to narrow shapes or columns where each stitch traverses the width of the column. Stitches are generated along curved lines and coils generate consistent stitch
Coil for narrow shapes of varying width
Double Square for large shapes
Square for narrow shapes
Island Coil for texture
Chain stitch foroutlines
Use Outline Stitch Types > Coil to Use to create borders or columns of even width for an open ‘coil’ effect. Right-click to adjust settings.
Use Fill Stitch Types > Coil to stitch narrow shapes or columns where each stitch traverses the column width. Right-click to adjust settings.

Wilcom EmbroideryStudio e4 Chenil le Supplement 29
length even over different widths. This produces a smooth finish which does not unravel easily.
To digitize with coil stitch Choose a chenille stitch type – Chain or Moss – and select Coil. Choose an input method and start digitizing. The same boundary can be used
to generate coil fills or outlines.
Press Spacebar or Enter after digitizing the shape. Coil stitching can be generated with either closed or open ends: Press Spacebar to generate open-ended coil stitching. This is useful for
joining objects. Press Enter to generate closed-ended coil stitching.
Column C + Coil
Column B + Coil
Column A + Coil
Press Spacebar for open coil Press Enter for closed coil

Chapter 3 Digit izing for Chenil le 30
Double-click the object to access object properties.
Normally there is no need to change stitch length for chenille work. 2mm is standard. For moss stitching, it may be adjusted for thread thickness.
Tip If you intend to use loops of different height, adjust needle height rather than the stitch length. This method is easier and more accurate. See Adjusting needle heights for details.
Adjust coil spacing for a looser or tighter looking chenille. Usually, you will do so in combination with width to achieve the desired chenille look.
Note The Smart Corners effect can be used with Coil for Column C objects. See Smart Corners in the EmbroideryStudio User Manual for further details.
Digitizing with island coil
Coil spacing
Stitchlength
Coil width
Adjust coil stitch settings
Stitch length: 2mm Stitch length: 5mm
Coil spacing: 5mm Coil spacing: 10mm
Use Fill Stitch Types > Island Coil to fill large closed objects with concentric rows of coil stitching, simulating the circular motion of hand-chenille embroidery. Right-click to adjust settings.

Wilcom EmbroideryStudio e4 Chenil le Supplement 31
Large areas can be filled with moss stitching using Island Coil fills. Island Coil is probably the most popular chenille fill because it simulates the circular motion of hand-chenille embroidery. Stitch angles have no effect.
Tip Use Compound Chenille to generate automatic offset borders. See Compound Chenille for details.
To digitize with island coil stitch Choose Moss and select Island Coil fill. Choose an input method and start digitizing – e.g. Complex Fill. Double-click the object to access object properties. You can set the Island
Coil stitch length, coil width, coil spacing, coil height and coil overlap. Use smaller stitches for tight curves.
As for Coil, there is generally no need to change stitch length for Island Coil. 2mm is standard. For moss stitching, it may be adjusted for thread thickness.
Similarly, depending on preference, you may juggle spacing and width values for more or less dense chenille look. Width is set as a percentage of coil spacing value. The smaller the value, the tighter the coils.
Coil height
Stitch length Coil spacing
Coil overlap
Coil width
Coil width: 50% Coil width: 100%

Chapter 3 Digit izing for Chenil le 32
Adjust coil height as desired. The height value corresponds to the size of each loop.
Adjust the coil overlap as desired. This controls the spacing between loops and thus fill density.
Digitizing with square stitch
Square is similar to Tatami and is suitable for narrow objects digitized typically with Complex Fill. To fill columns or narrow areas, use Square fill with Moss stitch. You can fill areas diagonally, or on the horizontal and vertical. Stitches are generated along straight lines. Stitch length is consistent even over different widths.
Coil height: 9mm Coil height: 5mm
Coil overlap: 2mm Coil overlap: 1mm
Use Outline Stitch Types > Square to create open borders or columns of even width for an open ‘toothed’ effect. Right-click for settings.
Use Fill Stitch Types > Square to create open straight parallel fills. Right-click for settings.
Column C + Square
Column A + Square
Column B + Square

Wilcom EmbroideryStudio e4 Chenil le Supplement 33
To digitize square stitch Choose a chenille stitch type – Chain or Moss – and choose Square. Choose an input method and start digitizing. The same boundary can be used
to generate square fill or square outline.
Double-click the object to access object properties. You can set values for stitch length and spacing as well as stitch angle.
Juggle stitch length and spacing to create the desired effect. The spacing value is the space between stitch lines. Stitch length is the gap between needle points.
Stitch spacing
Stitchlength Stitch angle
Stitch Spacing: 2.5mm Stitch Spacing: 5.0mm

Chapter 3 Digit izing for Chenil le 34
Adjust stitch angle/s via object properties or with the Reshape tool.
Note The Smart Corners effect can be used with Square stitch for Column C objects. See Smart Corners in the EmbroideryStudio User Manual for further details.
Digitizing with double square
Double Square is the most common fill stitch used in chenille work. It is suitable for large closed areas filled with Moss. Stitch angles have no effect on this stitch type. It is made up of two layers of Square stitch. The angle of the first layer of stitches is defined by object properties. Typically, the second layer of fill is perpendicular to the original fill with 45° and 135° used.
Tip Use Compound Chenille to generate automatic offset borders. See Compound Chenille for details.
To digitize with Double Square Choose Moss stitch type and select Double Square fill. Choose an input method such as Complex Fill and start digitizing. See also
Digitizing chenille objects.
Use Fill Stitch Types > Double Square to create grid fills. Apply closed shapes. Right-click for settings.

Wilcom EmbroideryStudio e4 Chenil le Supplement 35
Double-click the object to access object properties. You can adjust stitch length, spacing and angle of the second Double Square layer.
Juggle stitch length and spacing to create the desired effect. The spacing value is the space between stitch lines. Stitch length is the gap between needle points.
Adjust stitch angle/s via object properties. The angle of the first layer is defined by Complex Fill object properties.
Access the Double Square properties to adjust the angle of the second layer. By default, the angle of the second layer is 90º to the first.
Adjusting needle heights
The needle height controls the height of the loop formed by the chenille machine when it is sewing a moss stitch, and the width of the chain stitch. Some machines allow needle height control only at the machine. The Melco chenille machine uses 26 different needle height positions, which are designated ‘A’ through ‘Z’. Height ‘A’ is the lowest - 0.0100’, ‘Z’ is the highest - 0.3225’. Each
Stitchlength
Stitch spacing
Adjust angle offirst layer
Angle of first layer: 0º
Angle of first layer: 45º
Adjust angle ofsecond layer
Angle of second layer: 45º
Click Chenille > Needle Height to set needle height values.

Chapter 3 Digit izing for Chenil le 36
successive letter is 0.0125’ higher than the preceding letter. The actual needle height measurement is a distance from upper surface of the needle plate to the inside of the needle hook.You can insert Needle Height functions and select the positions during digitizing. The Melco tape file format has specific codes assigned to each needle height position.
To adjust needle heights Click the Needle Height icon. The Needle Height dialog opens.
Select a needle height value from the list and click OK.
Note While stitching a design, the Melco chenille machine will automatically change the needle height according to your selection. To use the needle heights selected in the design, select the Explicit checkbox in the Machine Format Values dialog. See Adjusting needle heights for details.
Converting complex fill to chenille
You can convert a complex fill object to a chenille using Compound Chenille. This will add offset borders and a chenille fill. Multiple offset runs are generated automatically from the same boundary as the fill.
To convert complex fill to chenille1 Select the Complex Fill object.2 Click the Chain or Moss icon.3 Select a chenille fill stitch type – Square, Double Square or Island Coil.4 Click the Compound Chenille icon. Offset borders and a chenille fill are
added to the object. See also Compound chenille settings.
Use Traditional Digitizing > Complex Fill to digitize filled shapes with a single stitch angle. Right-click for settings.
Use Chenille > Compound Chenille to automatically digitize chenille shapes with offset borders. Right-click to adjust automatic offset borders.
With Compound Chenille– automatic borders
generated around shape
Complex Fillobject

Wilcom EmbroideryStudio e4 Chenil le Supplement 37
Combining chenille & lockstitch designs
Chenille designs can be converted to any machine format, including lockstitch machines. This is useful when you wish to combine regular embroidery and chenille embroidery in a single design. Combined chenille and lockstitch design can be output to machine from a single file.
To combine chenille and lockstitch designs Plan your chenille and lockstitch design. Select a combination machine format via the Design menu.
Design you design using a combination of chenille and lockstitch stitch types. When using a machine that supports both lockstitch and chenille, you can
easily interchange lockstitch and chenille objects by selecting or deselecting chenille stitch types – Chain or Moss.
Selectcombination
machine format

Wilcom EmbroideryStudio e4 Chenil le Supplement 38
Chapter 4
Compound Chenille
Chenille objects need to have a border to contain the stitches within the shape and provide clearer edge definition. The Compound Chenille tool enables multiple offset borders to be automatically generated before and after the fill area stitching. Offset runs can be set to stitch with either moss or chain, at specific offsets and at specific needle heights. When a compound object is scaled, offsets maintain all their values. Only objects digitized with Complex Fill can use Compound Chenille.
The Compound Chenille tool can automatically generate up to three offset borders both within and/or outside the shape. Offset moss or chain stitching generated within a shape can be used to define it, while outside offset moss or chain stitch may used as a highlight.This section explains how to create automatic chenille using the Compound Chenille feature, as well as change stitch settings to obtain the best results.
Creating compound chenille
Use Compound Chenille with Complex Fill to digitize up to three offset borders. Offsets provide a clear edge for filled areas. Compound Chenille generates multiple offsets automatically using the fill boundary. You can set up

Wilcom EmbroideryStudio e4 Chenil le Supplement 39
to three offsets before and after the fill, each with their own settings including offset distances, as well as chain, moss and needle height.
Digitizing compound chenille borders
Compound Chenille allows you to: Generate up to three offsets before the fill Choose to include or exclude fill Generate up to three offsets after the fill.
Tip You can also digitize Compound Chenille borders around existing objects created with other input tools by excluding the fill stitching.
To digitize a chenille border1 Open a new file or design using the Chenille template. See Creating designs
for chenille machines for details.2 Select Chain or Moss stitch and click the Compound Chenille icon.
Chain offsets outside objectboundary (negative values)
Moss offsets inside objectboundary (positive values)
Object boundary
Square fill stitch
Use Chenille > Chain to create flat stitches traditionally used as a border or outline for moss stitches.
Use Chenille > Moss to create a looped pile look.
Use Chenille > Compound Chenille to automatically digitize chenille shapes with offset borders.
Fill and offset borders Fill only, no borders Borders only, no fill

Chapter 4 Compound Chenil le 40
3 Select a chenille fill type – Square, Double Square or Island Coil.4 Digitize the boundary using a closed shape tool such as Complex Fill. Click to enter corner points. Right-click to enter curve points.
Tip Use the prompts in the prompt line to help you digitize. If you make a mistake, press Backspace to delete the last reference point. Press Esc to undo all new reference points. Press Esc again to exit digitizing mode.
5 Press Enter to close the shape.6 Mark entry and exit points on the boundary.7 Define the stitch angle by digitizing two points.
Tip To minimize segments and gaps in your embroidery, place the entry and exit points opposite each other on the outside boundary. Then define the stitch angle so it is perpendicular to the line between entry and exit points.
8 Press Enter. Free shapes generally stitch out in several segments, joined by travel runs. However, all segments and boundaries are part of the same object.
Setting border properties
With Compound Chenille, you can set up to six offsets – three before, and three after the fill. It is common for a chenille object to have a chain border with a moss fill. With chenille, there is no such thing as a ‘tie-in’ or ‘tie-off’. Normally you run a chain border first to act as a tie-in. Moss stitch is not so effective – threads can come loose. After the fill, a chain border is again applied to act as a tie-off. As well as holding chenille objects in place, borders also provide edge definition and embellishment. The number you add depends on the size of object – the bigger the object, the more borders can be added. You have independent

Wilcom EmbroideryStudio e4 Chenil le Supplement 41
control over offset distance, stitch type – chain or moss – as well as needle height.
To set border properties Select a Compound Chenille object and right-click the icon. The Object
Properties > Compound Chenille docker opens.
Set the ‘before fill’ offsets as required: Set a stitch type for each: Chain’, ‘Moss’, or ‘None’ (no offset). The first,
and possibly only offset, is usually stitched with Chain, others with Moss. Set an offset distance: use positive values to generate offsets within the
object, negative values to generate offsets around the object.
Select before or after fill
Specify offset 1
Specify offset 2
Specify offset 3

Chapter 4 Compound Chenil le 42
From the droplist, set a needle height for each offset. This determines the height of loop formed when sewing moss stitch, and affects the width of chain stitches.
Repeat the operation for ‘after fill’ offsets as required. Again: Set a stitch type for each. The first, and possibly only offset, is usually
stitched with Chain. This helps ‘tie-off’ the chenille object. Set an offset distance for each. Set a needle height for each.
Optionally, enter a Fill Offset value.
Fill Offset sets the gap between the digitized boundary and fill area. It is always measured from the object boundary, not from the last offset. Use a positive value to move the fill within the boundary, a negative value to offset outside the boundary.
Tip Color changes can be manually inserted between fill and offsets.
Offset 1.5mmoutside outline
Offset 1.5mm inside outline
Object outline
Adjust fill offset
Fill OffsetDistance: 0.0mm
Fill OffsetDistance: 2.5mm

Wilcom EmbroideryStudio e4 Chenil le Supplement 43
Compound chenille settings
The Compound Chenille docker allows you to: Set the number of overlapping stitches between offset runs. Change run stitch direction, clockwise or anti-clockwise. Set offset stitch length – both chain and moss. Set offset needle height for machines which support it. Exclude stitch fill altogether.
Overlapping stitchesThe Overlapping Stitches setting allows you to set the number of overlapping stitches between offset runs. This shifts connectors between offset runs by a few stitches to prevent stitch buildup at the joins. Also, connectors are less visible if they are not in one line.
Run stitch directionYou can set the run stitch direction for offset borders.
The correct stitching direction is important for moss borders. When stitching out, the yarn should not loosen due to any counter-twisting effect. Instead, it should be more tightly twisted. When purchasing yarns, some embroiders check the twisting direction to make sure it is right for the machine.
Offset stitch lengthYou can adjust stitch length for both chain and moss offsets.
Stitch length should be constant for the same thread type throughout a design. If stitch length varies, the height of moss loops and width of chain loops will also vary, causing uneven embroidery. The chenille machine pulls up the same length of yarn for each loop according to the current needle height setting.
Note If you intend to use loops of varying height, always adjust needle height rather than stitch length. Even though stitch length also affects the loop height, it is easier and more accurate to adjust needle height. See Adjusting needle heights for details.
Enter number of overlapping stitches
Two overlapping stitches
Select run direction
Ajdust stitch length for both chain and moss

Chapter 4 Compound Chenil le 44
Offset needle heightNeedle Height controls are available for each offset. If you intend to use loops of varying height, always adjust needle height rather than stitch length. Even though stitch length also affects the loop height, it is easier and more accurate to adjust needle height. Needle height has less effect on chain stitches although it does affect width. See also Other chenille considerations.
Borders without fillsThe fill in a compound chenille object is included by default. However, you can choose to include or exclude it and just use offset borders. You might, for example, want to exclude the fill when creating a common chenille border around multiple chenille objects.
Set needle height foreach offset as required
Untick to exclude fill altogether

Wilcom EmbroideryStudio e4 Chenil le Supplement 45
Chapter 5
Chenille Lettering
The Chenille add-on Element allows you to create special chenille lettering. The chenille fonts provided with the software can be scaled and recolored like other fonts. Or you can create your own.
Adding lettering to chenille designs
The Chenille add-on Element includes dedicated chenille fonts. These fonts can be scaled and colored like regular fonts. By their nature, however, chenille fonts
Click Toolbox > Lettering to enter text on screen. Right-click to enter text in the docker and adjust settings for embroidery lettering.
Use Chenille > Moss to create a looped pile look. Right-click to adjust settings.

Chapter 5 Cheni l le Letter ing 46
are digitized for relatively large applications – anywhere between 2" (50mm) and 6" (150mm).
Add chenille lettering as you would regular lockstitch lettering. Select a chenille font via the Lettering docker. Chenille fonts are tagged with the prefix ‘CH’.
Chenille fonts can be used like regular fonts except that they must employ the ‘As Digitized’ joining method. Some are digitized with Coil fill, others with Double Square. If you break chenille lettering into its component letters, you
Select chenillefont

Wilcom EmbroideryStudio e4 Chenil le Supplement 47
will find each one is a compound chenille object with a single chain and two moss offsets before the moss fill.
If you check the Stitch List, you will see again that each letter is stitched with its own chain and moss stitching.
Scaling chenille lettering
Some chenille fonts are made to suit a particular letter size and one type of thread (thickness) only. The size of these fonts cannot be successfully varied by more than 5-10% from that recommended. It is not recommended that you change the stitching values (stitch length, spacing, etc) of these fonts at all. Other chenille fonts have been designed for use within certain size ranges and of these some Double Square fonts allow object properties such as stitch
Moss fill

Chapter 5 Cheni l le Letter ing 48
length, spacing and offsets to be varied. See Chenille font samples for size recommendations for each chenille font.
Using other fonts with chenille
You can, with some effort, use standard embroidery fonts and even TrueType font for chenille lettering. Font letters are usually digitized with Column A so you cannot automatically add borders with Compound Chenille. You need to add a border either manually or by generating offsets. For instance, let’s say you want to create chenille lettering with a regular block font and coil fill. Each letter would quickly unravel without traditional chenille chain and moss outlines.
You could attempt to use the Simple Offsets to generate outlines and turn them into chain runs. However, as shown here, you are likely to end up with a single outline around the entire lettering object.

Wilcom EmbroideryStudio e4 Chenil le Supplement 49
A solution can be found by increasing letter spacing before generating simple offsets. However, there is a problem in that the offsets are generated as separate objects following the lettering.
The lettering object must be broken apart and everything resequenced.
Lettering objectfollowed by generated
outlines
Break apart letteringand resequence

Chapter 5 Cheni l le Letter ing 50
For addtional embellishment, you could generate other offsets around the entire object – e.g. Column C with Coil and Moss.
Chenille font samples
A selection of standard fonts is included, both Coil and Double Square filled fonts. Chenille fonts can be used like regular fonts except that they must employ the ‘As Digitized’ joining method. By their nature, chenille fonts are digitized for relatively large applications – anywhere between 2" (50mm) and 6" (150mm). They are not suitable for, say, a chest pocket. The table lists the Chenille fonts with their recommended size ranges:
Font Sample Recommended Sizes
Min Max
ins mm ins mmCH 2Color Numbers
2 50 5 125
CH 2inch Pennant
Script
2 50 2 50
CH 3inch Pennant
Script
3 75 3 75
CH 3.5inch Shadow
Nos
3.5 87 3.5 87
CH 6inch 3D-Block
6 150 6 150

Wilcom EmbroideryStudio e4 Chenil le Supplement 51
CH Chenille
Block
2 50 6 150
CH Playbill 4 100 6 150
CH Prince Athletic
2 50 6 150
CH Square Block
2 50 6 150
CH Tall Pennant
Script
3 75 4 100
Font Sample Recommended Sizes
Min Max
ins mm ins mm

Wilcom EmbroideryStudio e4 Chenil le Supplement 52
Chapter 6
Changing Machine Formats
Different embroidery machines speak different languages. They have their own control commands for the various machine functions. Before you can stitch a design, it must be in a format which can be understood by the embroidery machine. When you select a machine format, Chenille translates the commands that were applied during digitizing into machine functions that can be understood by the machine.If you select the CHENILLE template when opening a design, the machine format will default to a chenille machine. You can change machine formats at any time. Finished designs can be sent direct to a Melco chenille machine, or stitched on Tajima and Barudan chenille machines. This section describes how to change machine formats as well as how to customize machine formats to meet your machines’ requirements.
Changing machine formats
Once a design is complete, you can output to any supported embroidery machine without changing the original machine format. Explicit support is provided for these machine types: Tajima TBF Tajima TMCE-100 Tajima TMCE-600 Barudan FDR-II Chenille Combination Barudan Chenille Barudan FDR-II Twin Sequin Chenille Combination Barudan FDR-3 Barudan FDR-3 Chenille Combination Melco ChenilleIf a selected machine format does not support a particular function in the design – either automatically or manually inserted – it is simply ignored.

Wilcom EmbroideryStudio e4 Chenil le Supplement 53
To change machine formats Select Design > Select Machine Format.
Select the required chenille machine format from the list. To check the settings for the selected format, click Settings. See below for
details. Click OK.
Modifying machine formats
If your machine is different, you may need to modify the machine format settings. For example, if you have different models of the same machine type, different functions may require different values. You have three options: Modify the format for a specific design, creating a custom format to use only
with that design. Modify one of the standard formats provided. Obviously, you would only do
this if you no longer needed the original values. Create a new format, based on the original, and make it available to all
designs.
Customizing formats for specific designs
Use this feature if you intend to modify machine format values for a specific design without changing the original format. Select Design > Machine Format Settings.
Select machineformat
Current machine format
Modify values
Adjust both standard and advanced settings
Format namecannot be changed

Chapter 6 Changing Machine Formats 54
Adjust format settings as required. A new machine format is created for the particular design. It is automatically named after the original machine format together with the design name – e.g. Melco - Design1. This appears in the Select Machine Format dialog and is saved with the design.
Modifying standard formats
If the standard machine values are incorrect for your particular machine, you can change them. From the Select Machine Format dialog, select a machine format to modify.
Click Settings to access the format settings. Adjust format settings as required. The new settings are saved with the selected format and are available to all new designs.
Creating custom formats
If you don’t want to overwrite standard machine formats, you can create a new format, based on an original, and make it available to all designs. Select Design
Select machineformat to modify
Access format settings
Format name cannot be changed
Modify settings

Wilcom EmbroideryStudio e4 Chenil le Supplement 55
> Select Machine Format and select a machine format on which to base the new format.
Click Create. The Machine Format Settings > Standard tab opens.
Enter a name for the new format. Overwrite the default – e.g. ‘Chenille Combination-1’. In the Comment field, enter any information that will help you identify the format – e.g. ‘No Trim’. Adjust machine format settings as required. The new format appears in the Available Machine Formats list.
Note You can’t remove standard formats but you can remove custom machine formats from your system when they are no longer required.
Machine format settings
Different machines require different settings. When you select a machine format, only fields relevant to the selected machine format will appear. You have three options:
Select machineformat
Create new format based on selected
Enter a name for the format
Modify settings
Custom machineformat Click to remove
format

Chapter 6 Changing Machine Formats 56
Modify the format for a specific design, creating a custom format to use only with that design.
Modify one of the standard formats provided. Obviously, you would only do that if you no longer need the original values.
Create a new format, based on the original, and make it available to all designs.
To modify settings, access the Machine Format Settings dialog. Typical modifiable values are maximum and minimal stitch and shortcut angle values. Chenille shortcut filters are provided to avoid small stitches and sharp changes in stitch direction during chenille stitch generation. These filters operate only on chenille stitch types and have no effect on lockstitch stitch types.Chenille machines have the same machine format values as standard lockstitch, except for the following:
The Advanced tab lets you set additional machine format options. Again, available settings depend on the selected machine format. You can set color change sequence, and insert special codes for the start or end of a design.
Caution Only change settings if you are familiar with the codes used by your embroidery machine.
Minimal & maximal stitch values
The chenille stitch length settings avoid small stitches during chenille stitch generation. This filter operates only on chenille stitch types and has no effect on lockstitch stitch types. That is, unless the format pertains to a combination machine. In that case, you can set values independently for lockstitch and chenille.
In the Minimal Stitch field, enter the smallest stitch to allow when outputting to the selected machine. The Maximum Stitch value depends on the tape code used by your machine:
Machine Additional values
Melco Chenille Minimal Stitch, Shortcut Angle, Needle Height Explicit value
Tajima TMCE-600 Minimal Stitch, Shortcut Angle
Tajima TMCE-100 Minimal Stitch, Shortcut Angle, No BoringMaximum frame movement is 4.0mm
System Value
Binary 12.7 mm
Ternary 12.1 mm
Minimal and maximalstitch length settings

Wilcom EmbroideryStudio e4 Chenil le Supplement 57
Shortcut angle values
Some chenille machine types require that the angle between one stitch and the next is not very sharp – e.g. Tajima chenille machines require it to be at least 60º. The Chenille Shortcut Angle setting avoids sharp changes in stitch direction during chenille stitch generation.
This filter operates only on chenille stitch types and has no effect on lockstitch stitch types. Chenille automatically applies the shortcut angle to all cover stitches inside an object. However connections between travel stitches and offsets and fills are not always checked. Also, the shortcut is not applied to connecting stitches and jumps between objects.
Tip A design checker is provided to identify chenille Shortcut Angle violations. The design checker is activated by hot key Ctrl+K. The stitch cursor will jump to the first stitch which violates the Shortcut Angle. You must correct this problem by stitch editing. Press the hot key combination again for the software to detect any problems further into the design.
Note Non-EMB embroidery format chenille designs can be shortcut-checked when opened into EmbroideryStudio by clearing the Outlines/Objects checkbox.
Color-change values
Chenille machines interpret ‘Color Change’ functions in the design either as a Needle Number or Stop functions on the machine.
The following rules apply: Single-needle machines simply stop when a Color Change or Stop function is
encountered. Some multi-needle machines default to the next color without stopping. Some multi-needle machines support direct needle addressing.
Adjust shortcutangle
Function Purpose
Stop Stop functions allow the operator to manually change threads. They are generally used with machines that only have one needle. Stop functions are sometimes combined with Jump functions to indicate color changes.
Color change settingsin combination
machine

Chapter 6 Changing Machine Formats 58
For needle addressing machines, you need to specify how many needles or loopers are on the machine. Or both, in the case of combination machines. This tells the machine how often it needs to stop for the operator to change threads. For example, for a design with 15 colors to be stitched out on a machine with five needles, it must stop after every three color changes in order for the operator to change threads.Other settings may include:
Trim functions
Trim functions in chenille are basically the same as lockstitch. The difference is the absence of tie-ins and tie-offs due to mechanical limitation of the chenille head. With some machine formats you can specify how to format and interpret trim commands. Some machines understand specific trim codes. Other machines interpret multiple jumps as a trim command.
Machines without an automatic trimmer may not know how to interpret trim commands, and may even shift the design when a trim code is encountered. For these machines you need to deselect the Output trims checkbox so that trim functions are ignored when the design is stitched.
Note If you deselect the Output Trims checkbox, the trim functions are not removed from the design but simply ignored for the selected machine format.
Color Change For those machines that support them, Color Change functions tell the machine to move to the next needle whenever a CC function is encountered. The machine must have the correct thread colors loaded according to the production worksheet.
Needle Number For needle addressing machines, each color ‘slot’ on the color palette corresponds to a needle number. Needle Number functions are sometimes combined with Jump functions to indicate color changes.
Setting Purpose
Use group addressing
Some machines can group two heads together so you can stitch a design using needles from both heads. For example, if a machine has two heads and nine needles per head, the machine moves the hoop from the first head under the second head, which allows you to stitch 18 colors without a manual change.
First CC required Some machines require a First CC code to initialize the machine and bring the head back to the first color change needle position.
Return to start This returns the needle to the start of design, preparing the machine for the repeat run.
Function Purpose
Select to outputtrim functions
Specify number of jumps to trim

Wilcom EmbroideryStudio e4 Chenil le Supplement 59
Needle height
On some chenille machines, needle height can be set to control the loop size formed when a machine sews moss stitch.
With some machines, needle height can also be adjusted on the machine. Thus you can choose whether to use heights specified in the design or not. Clear the checkbox if you want to select needle heights manually on the machine.
Setting borer functions
Some embroidery machines are equipped with a borer. The borer often replaces one of the needles.
Borers are often ‘knife’ attachments where the cutting position is offset 12mm from the main needle. You need to specify the needle position of the borer and its offset value. If your machine automatically enters an offset when a Borer In function
is encountered, enter an offset of 0mm. If your machine requires an offset value, enter an offset of 12.0mm.
Color-change sequence
Some machines cannot interpret Color Change commands unless they form part of a ‘color change sequence’ made up of Empty Jumps and Empty Stitches before and after each Color Change command. Check the
Check to use theneedle heights
specified in the design
Color change settingsin combination
machine
Enter borer offset

Chapter 6 Changing Machine Formats 60
requirements of your machine to determine whether you need to enter color change sequence values.
In the Advanced tab, the Color Change Sequence panel reads from top to bottom, in the order the codes appear in the sequence. The first two fields show the number of Empty Stitches and Empty Jumps to insert before the Color Change command. The other fields show the Empty Jumps and Empty Stitches to insert after the command.
Start/end of design sequence
In addition to any End of Design function, some machines require extra Empty Stitches and Empty Jumps in order to stitch the start and end of a design. Other machines require a Stop function. Depending on the machine type, you may also require commands to initialize the machine or trigger the frame out exit after stitching. Remember that these fields show the number of extra codes you want to insert in addition to the default values.
When starting with chain stitching, an empty stitch (non-data) code will automatically be inserted at the start of the design. When starting with moss stitching, an empty stitch (non-data) and a stop code will be automatically inserted at the start of the design.
Caution Do not digitize two Empty Stitches at the beginning of the design, as this will affect registration. Avoid using Empty Stitches elsewhere in the design. Other Tajima chenille values are the same as the standard lockstitch Tajima machine values.
Checking control commands
If you change the machine format of a design that contains manual machine functions, you may need to check whether the functions are compatible with the new format. Generally, functions that cannot be performed by the machine are simply ignored. If an ignored function was inserted on an Empty Stitch or
The color-change sequence in Stitch List corresponds to sequence defined in the machine format settings.
Specify extra codes to insert in addition to default values

Wilcom EmbroideryStudio e4 Chenil le Supplement 61
Empty Jump, the stitch or jump is automatically removed. Sometimes, however, functions may not be correctly translated. For example, trim commands may be misinterpreted, as some machines use trim codes, and others a sequence of jumps.
Note If a function is not available in the new machine format, the word Ignored appears in brackets after the function name.
To check control commands Travel to the position of the machine function. Alternatively, use the Stitch List to identify and select a given machine
function. The machine function name appears in the Prompt line. Extra information may appear in brackets after the function name – e.g. needle number.
Outputting to Tajima chenille machines
Tajima chenille machines have three functions – Chain, Moss and Color Change. The Tajima code system does not have specific codes assigned to these machine functions; each Tajima chenille machine uses different combinations of empty stitch and stop codes to indicate these machine functions. Chenille provides machine formats for both Tajima chenille machines.There are two types of Tajima chenille machine – TMCE-100 and TMCE-600. The newer Tajima TMCE-600 machine only uses single stop codes for switching between chain and moss stitching. The old ‘multistop’ TMCE-100 machine uses different combinations of multiple stop codes and empty stitch codes for the chain, moss and needle height functions. If you intend to stitch a design on one of these machines, make sure that you select the ‘Tajima Chenille multi-stop’ machine format. The chain, moss and needle height functions will be automatically converted to the correct combinations of empty stitch and stop codes.
FromChange color
Change needle height
To Function codesMachine setup for needle height
Chain 3 7 Chain stop -
Chain 7 3 Chain stop set new height
Chain 3 3 Chain stop-empty-stop set new height 2
Chain 7 7 Moss stop-stop -
Chain 3 7 Moss stop-stop-stop-stop
-
Chain 7 3 Moss stop-stop set new height
Chain 3 3 Moss stop-stop-stop-stop
set new height 2
Moss 3 7 Moss stop-stop -
Moss 7 3 Moss stop-stop set new height
Moss 3 3 Moss stop-stop-stop-stop
set new height 2
Moss 7 7 Chain stop-stop -
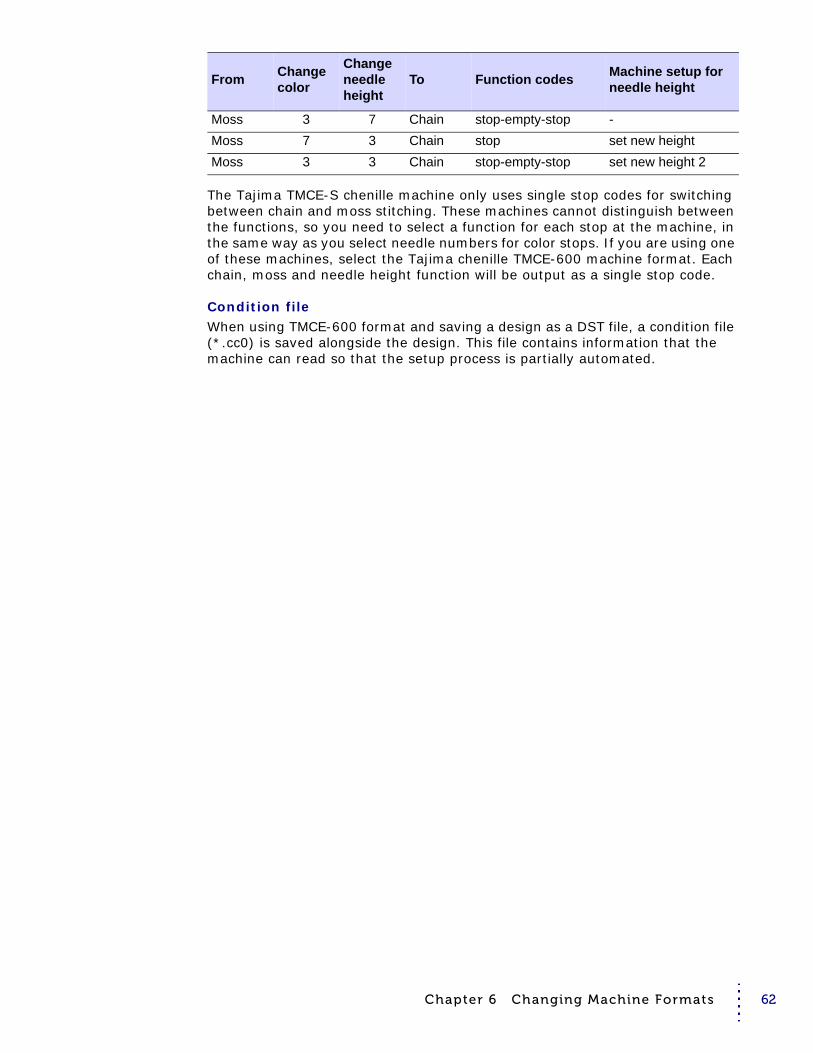
Chapter 6 Changing Machine Formats 62
The Tajima TMCE-S chenille machine only uses single stop codes for switching between chain and moss stitching. These machines cannot distinguish between the functions, so you need to select a function for each stop at the machine, in the same way as you select needle numbers for color stops. If you are using one of these machines, select the Tajima chenille TMCE-600 machine format. Each chain, moss and needle height function will be output as a single stop code.
Condition fileWhen using TMCE-600 format and saving a design as a DST file, a condition file (*.cc0) is saved alongside the design. This file contains information that the machine can read so that the setup process is partially automated.
Moss 3 7 Chain stop-empty-stop -
Moss 7 3 Chain stop set new height
Moss 3 3 Chain stop-empty-stop set new height 2
FromChange color
Change needle height
To Function codesMachine setup for needle height

Wilcom EmbroideryStudio e4 Chenil le Supplement 63
Index
Aalphabet samples 50angles 12
Bborders
adding offsets before fill 40
CChain stitch 10Chain tool 10, 23, 39Chain/Moss View 28chenille
adding lettering 45Compound Chenille 11digitizing manually 22
Chenille alphabets 45chenille lettering 45Chenille machines
outputting designs 18, 20supported machines 61
Chenille templateusing 13
Chenille toolbarChain 10, 23, 39Compound Chenille 11, 24, 25, 36, 39Moss 9, 23, 39, 45Needle Height 11, 35View by Chain Moss 26
Coiladjusting stitch values 28Coil tool 13, 23, 28using for fills 28
Column A tool 23Column B tool 23Column C tool 23combining chenille and lockstitch
designs 37Complex Fill tool 11, 23–25, 36Compound Chenille 11
digitizing 39tool 11, 24, 25, 36, 39
condition file (*.cc0) 62control commands, checking 61corners 12
Ddesigns
adding lettering 45combining with lockstitch 37opening 15opening multiple 15scalability 12
dialogsSave As 19, 20
Digitize Run tool 23, 25Double Square
adjusting second layer angle 34adjusting stitch values 34
EEmbroidery Disk tool 16–19existing designs, opening 15
Ffile, condition file (*.cc0) 62Fill Offset Distance 42Fill Stitch Types toolbar
Coil 13, 23, 28Double Square 13, 23, 34Island Coil 13, 23, 30Square 13, 23, 32
fill stitchingCompound Chenille 11
FillsDouble Square 13, 23, 34Square 13, 23, 32
fillscreating with Coil 28creating with Island Coil 30
formatssetting machine formats 52
Hheight
adjusting needle height 35needle 11
IIsland Coil
tool 13, 23, 30using for fills 30
Jjumps 12
LLegacy Features toolbar
Embroidery Disk 16–19Send to Stitch Manager 20
lengthstitch 13
letteringadding to chenille designs 45chenille 45
lettering objectsscaling 47
Mmachine formats 52
checking 61machine functions
checking control commands 61Tajima Chenille 61
machinesoutputting to Chenille machines 18,
20
supported chenille machines 61Moss tool 9, 23, 39, 45
Nneedle height 11
adjusting 35Needle Height tool 11, 35new designs, New tool 14
Oobject properties
changing stitch type 25objects
converting to chenille 36digitizing chenille objects 22scaling lettering objects 47
offset bordersadding before fill 40
Open tool 15Outline Stitch Types toolbar
Square 23, 32outlines
Square 23, 32outlining 10Overlapping Stitches 43
Ssamples of chenille alphabets 50Save As dialog 19, 20Save tool 19scalability of designs 12scaling lettering objects 47second layer, adjusting for Double
Square 34Send to
Stitch Manager tool 20sharp corners 12Square tool 23, 32Standard toolbar
New 14Open 15Save 19Send to Connection Manager 20
stitch length 13Stitch Manager
Send to Stitch Manager tool 20stitch types
Chain 10changing 25selecting 25Square 23, 32
stitch valuesadjusting Coil 28adjusting Double Square 34adjusting Straight 32
stitchesselecting a stitch type 25
stitching designsSend to Connection Manager tool 20Send to Stitch Manager tool 20
Straightadjusting stitch values 32

Index 64
TTajima Chenille machine
functions 61templates
using the Chenille template 13thread type and stitch length 13Traditional Digitizing toolbar
Column A 23Column B 23Column C 23Complex Fill 11, 23–36Digitize Run 23, 25
Trim 12trims 12
VView by Chain Moss tool 26