Chapter 9.2 - Configuring and compiling Kernel and Windows...
27
475 FriendlyARM English User Manual Rev.01 (20090909) Venus Supply Co., Ltd. 196/1, Soi Thedsaban-Nimit-Nau 8, Thedsaban-Nimit-Nau Road, Ladyao, Chatuchak, Bangkok, 10900, Thailand Tel. +(66)2954-2408 , Fax. +(66)2953-8443, Website: www.thaieasyelec.com 9.2 Configuring and compiling Kernel and Windows CE 6.0 bootloader Because Windows CE6 kernel configuration is more complex, vulnerable configuration does not compile result, we all know Windows CE platform compilation use a long time, we deliberately use two kernel project samples for reference, the user according to the following steps can be compiled, and CD-ROM images\wince6.0 directory corresponding compiled kernel image file. Be noted that BSP compile kernel can't larger than the 30MB, Tencent QQ have relatively large, so we have two sample : mini2440 and mini2440-with-QQ, the former contains some common configuration options, which remove the SQL-related components, add the Tencent QQ, the other part is most of the same, the user can compare. We recommend users to use mini2440 (This is referred to the default kernel example), install the development board; Tencent QQ is just the common test. 9.2.1 Introduction to the default Kernel The default kernel configuration options the user some common features, along the following lines: 9.2.2 Compile default Kernel sample project Now, we start to compile just installed VS2005 mini2440 BSP, VS2005, when you first start to take note of some issues, the following steps:
Transcript of Chapter 9.2 - Configuring and compiling Kernel and Windows...

475 FriendlyARM English User Manual
Rev.01 (20090909)
Venus Supply Co., Ltd.
196/1, Soi Thedsaban-Nimit-Nau 8, Thedsaban-Nimit-Nau Road,
Ladyao, Chatuchak, Bangkok, 10900, Thailand
Tel. +(66)2954-2408 , Fax. +(66)2953-8443, Website: www.thaieasyelec.com
9.2 Configuring and compiling Kernel and Windows CE 6.0 bootloader
Because Windows CE6 kernel configuration is more complex, vulnerable configuration
does not compile result, we all know Windows CE platform compilation use a long time, we
deliberately use two kernel project samples for reference, the user according to the following
steps can be compiled, and CD-ROM images\wince6.0 directory corresponding compiled
kernel image file.
Be noted that BSP compile kernel can't larger than the 30MB, Tencent QQ have
relatively large, so we have two sample : mini2440 and mini2440-with-QQ, the former contains
some common configuration options, which remove the SQL-related components, add the
Tencent QQ, the other part is most of the same, the user can compare. We recommend users to
use mini2440 (This is referred to the default kernel example), install the development board;
Tencent QQ is just the common test.
9.2.1 Introduction to the default Kernel
The default kernel configuration options the user some common features, along the
following lines:
9.2.2 Compile default Kernel sample project
Now, we start to compile just installed VS2005 mini2440 BSP, VS2005, when you first
start to take note of some issues, the following steps:

476 FriendlyARM English User Manual
Rev.01 (20090909)
Venus Supply Co., Ltd.
196/1, Soi Thedsaban-Nimit-Nau 8, Thedsaban-Nimit-Nau Road,
Ladyao, Chatuchak, Bangkok, 10900, Thailand
Tel. +(66)2954-2408 , Fax. +(66)2953-8443, Website: www.thaieasyelec.com
Step 1: Click "Start > Programs > Microsoft Visual Studio 2005 > Microsoft Visual Studio
2005" (referred to VS2005), as shown in figure.
Step 2: Tip window will appear below, please do not click "Continue", where Microsoft
recommends that you use to run the program as an administrator, so the click of "Exit Visual
Studio" to exit.
477 FriendlyARM English User Manual
Rev.01 (20090909)
Venus Supply Co., Ltd.
196/1, Soi Thedsaban-Nimit-Nau 8, Thedsaban-Nimit-Nau Road,
Ladyao, Chatuchak, Bangkok, 10900, Thailand
Tel. +(66)2954-2408 , Fax. +(66)2953-8443, Website: www.thaieasyelec.com
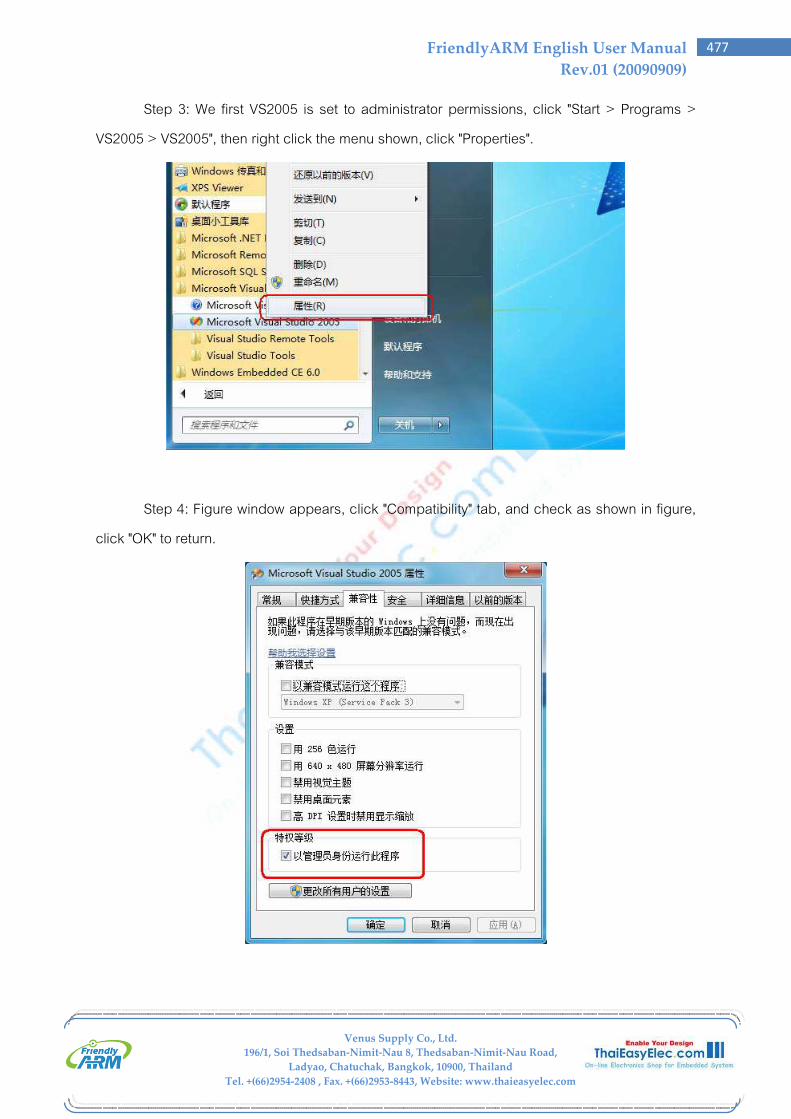
Step 3: We first VS2005 is set to administrator permissions, click "Start > Programs >
VS2005 > VS2005", then right click the menu shown, click "Properties".
Step 4: Figure window appears, click "Compatibility" tab, and check as shown in figure,
click "OK" to return.

478 FriendlyARM English User Manual
Rev.01 (20090909)
Venus Supply Co., Ltd.
196/1, Soi Thedsaban-Nimit-Nau 8, Thedsaban-Nimit-Nau Road,
Ladyao, Chatuchak, Bangkok, 10900, Thailand
Tel. +(66)2954-2408 , Fax. +(66)2953-8443, Website: www.thaieasyelec.com
Step 5: At this time click "Start > Programs > VS2005 > VS2005", will just tip window
appear, as shown, click "Continue", at this time will be run VS2005 as administrator.
Step 6: In figure interface, this interface is the work of VS2005, this is no longer
repeating the arguments the interface, please refer to the user data can be used VS2005.

479 FriendlyARM English User Manual
Rev.01 (20090909)
Venus Supply Co., Ltd.
196/1, Soi Thedsaban-Nimit-Nau 8, Thedsaban-Nimit-Nau Road,
Ladyao, Chatuchak, Bangkok, 10900, Thailand
Tel. +(66)2954-2408 , Fax. +(66)2953-8443, Website: www.thaieasyelec.com
Step 7: Click File > Open > Project/Solution ...A shown in figure.
Step 8: File selection window appears, find the default kernel mini2440 project files
(path: C:\WINCE600\OSDesigns\Mini2440), click "Open", shown in figure.

480 FriendlyARM English User Manual
Rev.01 (20090909)
Venus Supply Co., Ltd.
196/1, Soi Thedsaban-Nimit-Nau 8, Thedsaban-Nimit-Nau Road,
Ladyao, Chatuchak, Bangkok, 10900, Thailand
Tel. +(66)2954-2408 , Fax. +(66)2953-8443, Website: www.thaieasyelec.com
Step 9: Wait a moment, mini2440 default kernel project workspace is loaded, the
interface in figure.
Step 10: Click "Build > Advanced Build Commands > Clean Sysgen" to compile the
kernel, as shown, this process is longer, please waiting.

481 FriendlyARM English User Manual
Rev.01 (20090909)
Venus Supply Co., Ltd.
196/1, Soi Thedsaban-Nimit-Nau 8, Thedsaban-Nimit-Nau Road,
Ladyao, Chatuchak, Bangkok, 10900, Thailand
Tel. +(66)2954-2408 , Fax. +(66)2953-8443, Website: www.thaieasyelec.com
Step 11: Compilation completed, the results shown at this time would be to build the
kernel image file NK.bin and NK.nb0, and the path is as follows.
C:\WINCE600\OSDesigns\Mini2440\Mini2440\RelDir\Mini2440_ARMV4I_Release.

482 FriendlyARM English User Manual
Rev.01 (20090909)
Venus Supply Co., Ltd.
196/1, Soi Thedsaban-Nimit-Nau 8, Thedsaban-Nimit-Nau Road,
Ladyao, Chatuchak, Bangkok, 10900, Thailand
Tel. +(66)2954-2408 , Fax. +(66)2953-8443, Website: www.thaieasyelec.com
9.2.3 Kernel compiled with Tencent QQ example projects
Compile the kernel with Tencent QQ project and support similar to the steps above, but
do not have to reset the VS2005 "administrator permissions" of the property, as follows.
Step 1: Click "Start > Programs > VS2005 > VS2005", open the VS2005 working
interface.

483 FriendlyARM English User Manual
Rev.01 (20090909)
Venus Supply Co., Ltd.
196/1, Soi Thedsaban-Nimit-Nau 8, Thedsaban-Nimit-Nau Road,
Ladyao, Chatuchak, Bangkok, 10900, Thailand
Tel. +(66)2954-2408 , Fax. +(66)2953-8443, Website: www.thaieasyelec.com
Step 2: Click EFile > Open > Project/Solution ...A shown in figure.
Step 3: File selection window appears, find the default kernel mini2440 project files
(path: C:\WINCE600\OSDesigns\Mini2440-with-QQ), Click "Open", shown in figure.

484 FriendlyARM English User Manual
Rev.01 (20090909)
Venus Supply Co., Ltd.
196/1, Soi Thedsaban-Nimit-Nau 8, Thedsaban-Nimit-Nau Road,
Ladyao, Chatuchak, Bangkok, 10900, Thailand
Tel. +(66)2954-2408 , Fax. +(66)2953-8443, Website: www.thaieasyelec.com
Step 4: Wait a moment, mini2440 default kernel project workspace is loaded, the
interface in figure.
Step 5: Click "Build > Advanced Build Commands > Clean Sysgen" to compile the
kernel, as shown, this process is longer, please waiting.
485 FriendlyARM English User Manual
Rev.01 (20090909)
Venus Supply Co., Ltd.
196/1, Soi Thedsaban-Nimit-Nau 8, Thedsaban-Nimit-Nau Road,
Ladyao, Chatuchak, Bangkok, 10900, Thailand
Tel. +(66)2954-2408 , Fax. +(66)2953-8443, Website: www.thaieasyelec.com
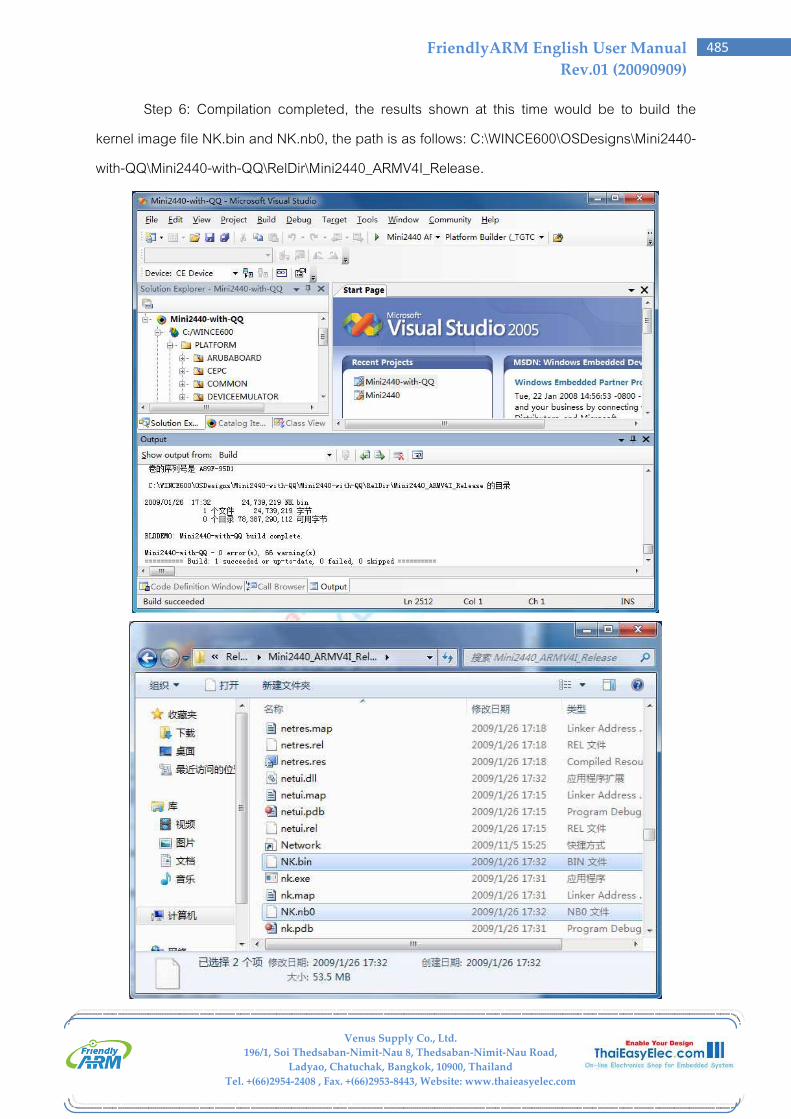
Step 6: Compilation completed, the results shown at this time would be to build the
kernel image file NK.bin and NK.nb0, the path is as follows: C:\WINCE600\OSDesigns\Mini2440-
with-QQ\Mini2440-with-QQ\RelDir\Mini2440_ARMV4I_Release.

486 FriendlyARM English User Manual
Rev.01 (20090909)
Venus Supply Co., Ltd.
196/1, Soi Thedsaban-Nimit-Nau 8, Thedsaban-Nimit-Nau Road,
Ladyao, Chatuchak, Bangkok, 10900, Thailand
Tel. +(66)2954-2408 , Fax. +(66)2953-8443, Website: www.thaieasyelec.com
9.2.4 Compiling and burning Nboot Bootloader
Note: We provide Nboot can also apply to Windows CE 5/6, so the CD all the Nboot
project source code is the same, but for the convenience of the organization to use, specifically
increased the copy, and were placed in a different directory.
Compile Nboot integrated development environment to use ADS, the detailed steps, see
chapter 4 of this manual, the Windows 7 system, you can install Windows XP mode to create a
Windows XP environment.
Nboot is a very simple bootloader, its size less than 4K, usually programmed into the
Block 0 position of NAND Flash to start the WinCE kernel, Nboot reason to Samsung, we have
done a lot of improvements, currently has the following features:
• Adaptive support 64M/128M/256M/1G for mini2440/micro2440
• Support rapid start-up screen display
• Support dynamic load WinCE kernel progress bar
• Start WinCE only 5-10 seconds, depending on the size of the kernel
Note: Nboot do not have the programming capabilities, it can only read the
programming process has been well documented: the boot screen (Boot Logo) and WinCE
kernel.
Nboot has convenient customization, you can modify the splash screen header file
defines the display position, background, and the progress bar color, position, length, and
width, these definitions are located in Eoption.hA file, as follows:
// By changing the definition, select the appropriate LCD models, where the default choice W35, said Wang Ping W35 (LQ035Q1DG06) //#define LCD_N35 //#define LCD_L80 //#define LCD_T35 //#define LCD_X35 #define LCD_W35 //#define LCD_A70 //#define LCD_VGA1024768 // Set the background color #define BACKGROUND_R 0x00 #define BACKGROUND_G 0x00 #define BACKGROUND_B 0x00 // Set progress bar colors

487 FriendlyARM English User Manual
Rev.01 (20090909)
Venus Supply Co., Ltd.
196/1, Soi Thedsaban-Nimit-Nau 8, Thedsaban-Nimit-Nau Road,
Ladyao, Chatuchak, Bangkok, 10900, Thailand
Tel. +(66)2954-2408 , Fax. +(66)2953-8443, Website: www.thaieasyelec.com
#define PROGRESS_BAR_R 0xFF #define PROGRESS_BAR_G 0xFF #define PROGRESS_BAR_B 0x00 // Set the location of the boot image #define LOGO_POS_TOP 0 #define LOGO_POS_LEFT 0 // Set start position and length and width of the #define PROGRESS_BAR_TOP 260 #define PROGRESS_BAR_LEFT 20 #define PROGRESS_BAR_WIDTH 200 #define PROGRESS_BAR_HEIGHT 12
Here Nboot compilation methods and steps:
Compile Nboot
The CD "WindowsCE6.0" directory folder "NBOOT" folder into hard disk of a directory
(in this case D:\work), remove the read-only attribute, running ADS1.2 integrated development
environment, click EFile > Open ...A to open nboot.mcp file, as shown.

488 FriendlyARM English User Manual
Rev.01 (20090909)
Venus Supply Co., Ltd.
196/1, Soi Thedsaban-Nimit-Nau 8, Thedsaban-Nimit-Nau Road,
Ladyao, Chatuchak, Bangkok, 10900, Thailand
Tel. +(66)2954-2408 , Fax. +(66)2953-8443, Website: www.thaieasyelec.com
At this click the menu EProject > MakeA or press the F7 key to start compiling nboot
project, compile completed as shown:
In D:\work\NBOOT\nboot_Data\DebugRel directory will generate nboot.bin executable
file, as shown.

489 FriendlyARM English User Manual
Rev.01 (20090909)
Venus Supply Co., Ltd.
196/1, Soi Thedsaban-Nimit-Nau 8, Thedsaban-Nimit-Nau Road,
Ladyao, Chatuchak, Bangkok, 10900, Thailand
Tel. +(66)2954-2408 , Fax. +(66)2953-8443, Website: www.thaieasyelec.com
The NBOOT programmed into the development board NAND Flash
(1) Connect the development board power supply, serial cable, USB cable, and set the
toggle switch S2 to start the system in NOR Flash, respectively, to open the serial
port and HyperTerminal DNW, power on the development board.
(2) USB driver has been installed (previously described in detail the USB driver
installation method), then you can see DNW's title bar displays [USB: OK], if not
installed drivers will display [USB: x] , as shown:

490 FriendlyARM English User Manual
Rev.01 (20090909)
Venus Supply Co., Ltd.
196/1, Soi Thedsaban-Nimit-Nau 8, Thedsaban-Nimit-Nau Road,
Ladyao, Chatuchak, Bangkok, 10900, Thailand
Tel. +(66)2954-2408 , Fax. +(66)2953-8443, Website: www.thaieasyelec.com
(3) When the BIOS functions in the HyperTerminal menu, select the function [n], USB
download wait message appears:
(4) Click DNW program "USB Port > Transmit", as shown in figure choose just compile
out of the image file (CD-ROM "images\wince6.0" directory has been compile
executable file), This will start the download, and instantly you can download is
complete, supervivi it will automatically be programmed into the NAND Flash in the
starting block 0; the S2 switch to NAND side, select start from the NAND Flash
system; if the system has been good programming WinCE kernel boot image files
and image files, it will immediately boot screen and progress bar, wait a moment to
see the wince started. Use NBOOT start WinCE serial information is as follows:

491 FriendlyARM English User Manual
Rev.01 (20090909)
Venus Supply Co., Ltd.
196/1, Soi Thedsaban-Nimit-Nau 8, Thedsaban-Nimit-Nau Road,
Ladyao, Chatuchak, Bangkok, 10900, Thailand
Tel. +(66)2954-2408 , Fax. +(66)2953-8443, Website: www.thaieasyelec.com
9.2.5 Modifying the BSP LCD type and serial output
Note: We provide the BSP currently supports the following models of LCD screen:
• Horizontal 3.5-inch LCD screen with touch (LQ035Q1DG06 or compatible, referred to as
W35)
• NEC3.5-inch screen with touch
• TPO 3.5-inch LCD with touch
• Sharp 8-inch LCD (or compatible) with touch
• Innolux 7-inch screen with touch
• VGA display output module, resolution of 1024x768
By modifying the mini2440\Src\Inc\options.h header file LCD_TYPE definition, you can
select the appropriate type of LCD:
//# define LCD_N35 for NEC3.5 "LCD // # define LCD_L80 for Sharp 8 "LCD (or compatible) // # define LCD_T35 for TPO 3.5 "LCD // # define LCD_X35 for Sony 3.5 "LCD (LQ035Q1DG06 or compatible, referred to as W35) #define LCD_W35 for horizontal screen 3.5 "LCD // # define LCD_A70 group record for 7 "LCD // # define LCD_VGA1024768 for LCD2VGA module with a resolution of 1024x768
Tip: The default LCD model CD-ROM is LCD_T35.
In options.h file, the user can modify the serial output functions: as ordinary serial port
functionality or debugging output (only serial port 1 and 2), defined as follows:
#define KITL_NONE //#define KITL_SERIAL_UART0 //#define KITL_SERIAL_UART1 //#define KITL_USBSERIAL //#define KITL_ETHERNET
The default is defined here as ordinary serial port functions, serial port 1 if you want to
use as a debugging information output, should be defined as:
//#define KITL_NONE #define KITL_SERIAL_UART0 //#define KITL_SERIAL_UART1 //#define KITL_USBSERIAL //#define KITL_ETHERNET
492 FriendlyARM English User Manual
Rev.01 (20090909)
Venus Supply Co., Ltd.
196/1, Soi Thedsaban-Nimit-Nau 8, Thedsaban-Nimit-Nau Road,
Ladyao, Chatuchak, Bangkok, 10900, Thailand
Tel. +(66)2954-2408 , Fax. +(66)2953-8443, Website: www.thaieasyelec.com
9.2.6 Create and Modify the Windows CE boot logo
In the previous chapter, we mentioned:
Windows CE system's boot process, there are two logo: BootLogo and StartLogo.
One BootLogo shown by Nboot loaded, the user can modify the Nboot source code to adjust
BootLogo display location and background color; StartLogo belongs to a part of BSP, which is
an array file (StartLogo.c), located in the "mini2440\Src\Kernel\Oal "directory from the directory
init.c file to achieve load display, StartLogo.c file by this CD StartLogoMaker.exe tool
production.
StartLogoMaker FriendlyARM developed by the Linux Logo Maker LogoMaker (running
on Fedora 9) transplant, this is a "green software", it does not require installation, directly copied
to the Windows XP/Vista platform to run, use it to bmp, jpg, and png format images converted to
an array of needed mini2440 BSP file StartLogo.c, using the new file to replace the BSP
generated files the same name, you can replace the Windows CE start screen, StartLogo.c the
head of the array as follows:
// Automatic generated by StartLogo.exe from FriendlyARM Co., Ltd. static const unsigned short StartLogoData[] = { 240, 320, 0x965, 0x945, 0x164, 0x9C4, 0x1246, 0x22CA, 0x22A8, 0x2AA7,
Here is StartLogoMaker.exe production StartLogo.c steps:
493 FriendlyARM English User Manual
Rev.01 (20090909)
Venus Supply Co., Ltd.
196/1, Soi Thedsaban-Nimit-Nau 8, Thedsaban-Nimit-Nau Road,
Ladyao, Chatuchak, Bangkok, 10900, Thailand
Tel. +(66)2954-2408 , Fax. +(66)2953-8443, Website: www.thaieasyelec.com
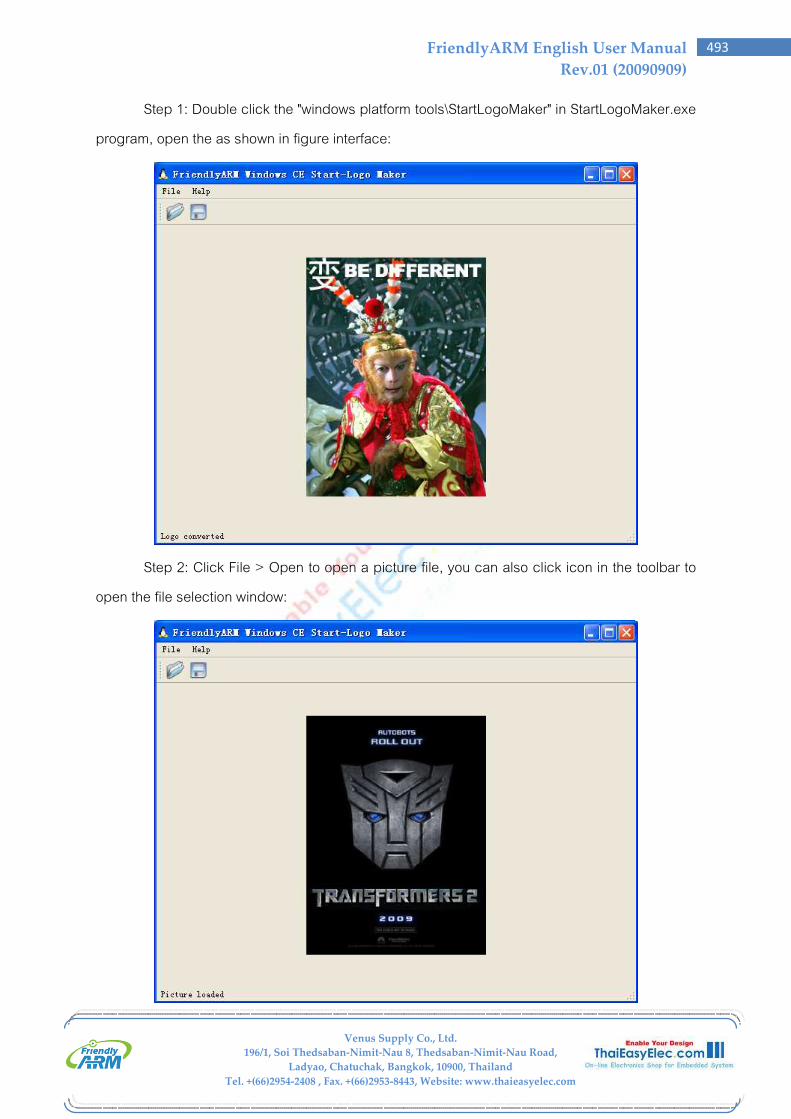
Step 1: Double click the "windows platform tools\StartLogoMaker" in StartLogoMaker.exe
program, open the as shown in figure interface:
Step 2: Click File > Open to open a picture file, you can also click icon in the toolbar to
open the file selection window:
494 FriendlyARM English User Manual
Rev.01 (20090909)
Venus Supply Co., Ltd.
196/1, Soi Thedsaban-Nimit-Nau 8, Thedsaban-Nimit-Nau Road,
Ladyao, Chatuchak, Bangkok, 10900, Thailand
Tel. +(66)2954-2408 , Fax. +(66)2953-8443, Website: www.thaieasyelec.com
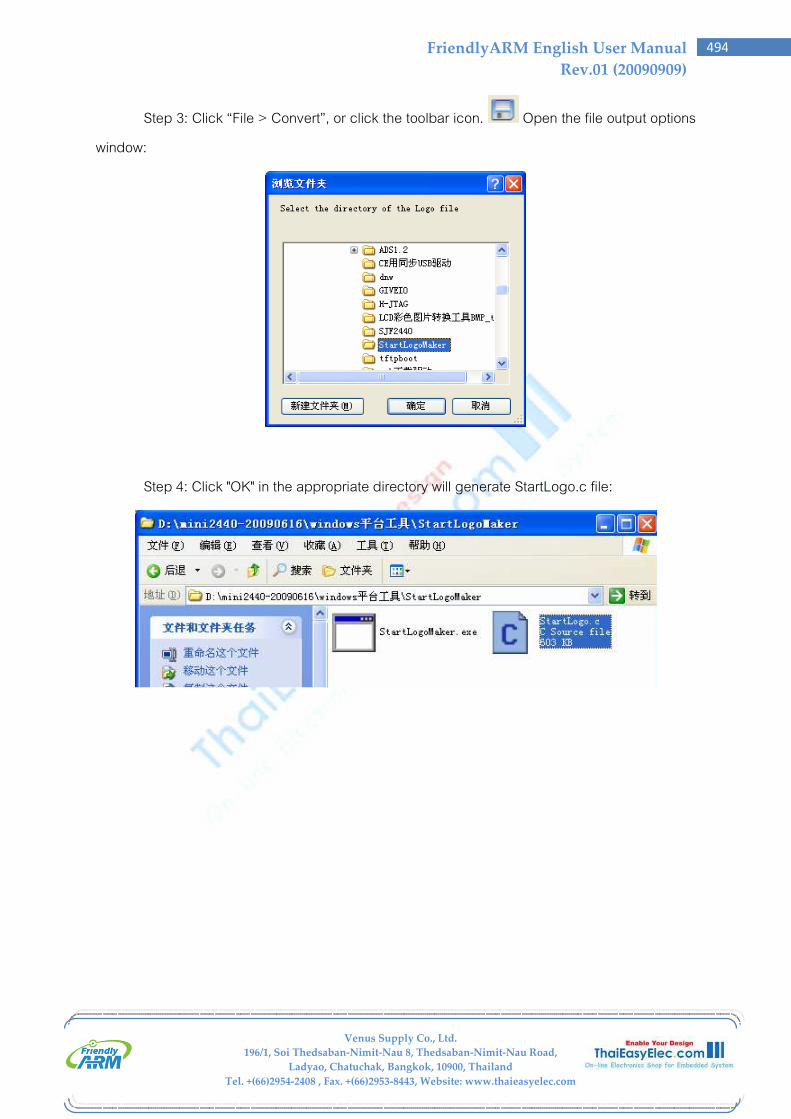
Step 3: Click EFile > ConvertA, or click the toolbar icon. Open the file output options
window:
Step 4: Click "OK" in the appropriate directory will generate StartLogo.c file:

495 FriendlyARM English User Manual
Rev.01 (20090909)
Venus Supply Co., Ltd.
196/1, Soi Thedsaban-Nimit-Nau 8, Thedsaban-Nimit-Nau Road,
Ladyao, Chatuchak, Bangkok, 10900, Thailand
Tel. +(66)2954-2408 , Fax. +(66)2953-8443, Website: www.thaieasyelec.com
Step 5: Replace the generated files the same name in the BSP file (located in the
mini2440-BSP\Src\Kernel\Oal directory), recompile the kernel, and programmed to run the
board, you can see yourself making of WinCE startup screen:

496 FriendlyARM English User Manual
Rev.01 (20090909)
Venus Supply Co., Ltd.
196/1, Soi Thedsaban-Nimit-Nau 8, Thedsaban-Nimit-Nau Road,
Ladyao, Chatuchak, Bangkok, 10900, Thailand
Tel. +(66)2954-2408 , Fax. +(66)2953-8443, Website: www.thaieasyelec.com
9.2.7 Creating SDK
SDK for development only when installed VS2005 on the host, but did not install the
Windows CE 6.0 Platform Builder plug-in, when developers want to develop mini2440 VS2005
application, you need an SDK, which is similar to Embedded Visual C++, required the SDK.
When you compiled the default kernel, this step created by VS2005 platform
corresponding SDK, Note: This only applies to VS2005 SDK development environment, it canPt
install EVC, canPt install VS2008, the following are the detailed steps to create SDK.
Step 1: Run VS2005 and open the default kernel has been compiled sample project mini2440,
find the location as shown in figure, and right-click "Mini2440-CE6-SDK" menu appears, and
click to start creating SDK Build.

497 FriendlyARM English User Manual
Rev.01 (20090909)
Venus Supply Co., Ltd.
196/1, Soi Thedsaban-Nimit-Nau 8, Thedsaban-Nimit-Nau Road,
Ladyao, Chatuchak, Bangkok, 10900, Thailand
Tel. +(66)2954-2408 , Fax. +(66)2953-8443, Website: www.thaieasyelec.com
Step 2: Wait a moment, SDK has been created, shown in the figure.
Step 3: In the C:\WINCE600\OSDesigns\Mini2440\Mini2440\SDKs\SDK1 directory, you can see
Mini2440-CE6-SDK.msi installation files has been generated.

498 FriendlyARM English User Manual
Rev.01 (20090909)
Venus Supply Co., Ltd.
196/1, Soi Thedsaban-Nimit-Nau 8, Thedsaban-Nimit-Nau Road,
Ladyao, Chatuchak, Bangkok, 10900, Thailand
Tel. +(66)2954-2408 , Fax. +(66)2953-8443, Website: www.thaieasyelec.com
9.2.8 Installing the SDK
Mini2440 through VS2005 to develop applications, you need to install just the production
of the SDK, as follows
Step 1: Double click Mini2440-CE6-SDK.msi, there is interface, click "Next" to continue.
Step 2: As shown in figure, select "Accept", click "Next" to continue.

499 FriendlyARM English User Manual
Rev.01 (20090909)
Venus Supply Co., Ltd.
196/1, Soi Thedsaban-Nimit-Nau 8, Thedsaban-Nimit-Nau Road,
Ladyao, Chatuchak, Bangkok, 10900, Thailand
Tel. +(66)2954-2408 , Fax. +(66)2953-8443, Website: www.thaieasyelec.com
Step 3: Appear in figure interface, enter the user name and company name, click "Next" to
continue.
Step 4: Appear in figure interface, click "Complete" and ENextA to continue.
500 FriendlyARM English User Manual
Rev.01 (20090909)
Venus Supply Co., Ltd.
196/1, Soi Thedsaban-Nimit-Nau 8, Thedsaban-Nimit-Nau Road,
Ladyao, Chatuchak, Bangkok, 10900, Thailand
Tel. +(66)2954-2408 , Fax. +(66)2953-8443, Website: www.thaieasyelec.com
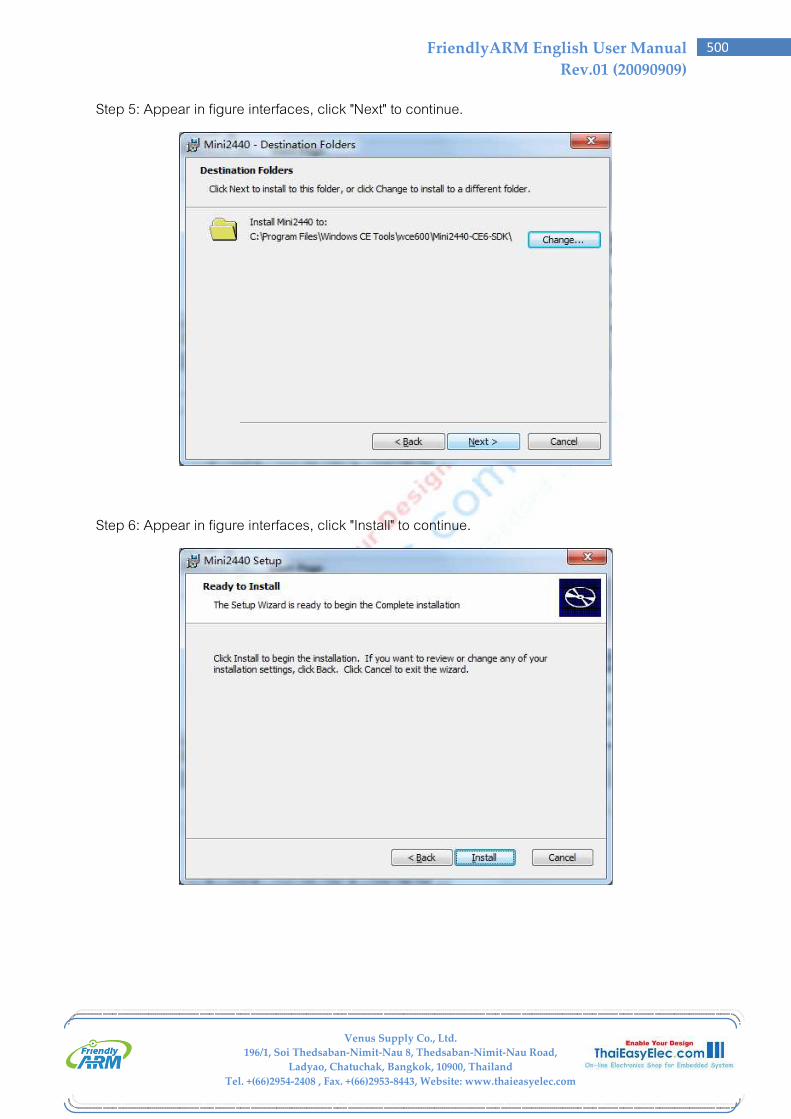
Step 5: Appear in figure interfaces, click "Next" to continue.
Step 6: Appear in figure interfaces, click "Install" to continue.

501 FriendlyARM English User Manual
Rev.01 (20090909)
Venus Supply Co., Ltd.
196/1, Soi Thedsaban-Nimit-Nau 8, Thedsaban-Nimit-Nau Road,
Ladyao, Chatuchak, Bangkok, 10900, Thailand
Tel. +(66)2954-2408 , Fax. +(66)2953-8443, Website: www.thaieasyelec.com
Step 7: Installation progress screen appears as shown in figure, wait a moment.
Step 8: At the end of the installation interfaces, click "Finish". SDK has been installed.