Chapter 6: CSS Layoutscomputingattallis.weebly.com/uploads/2/6/4/3/... · Static Positioning The...
16
Client-side Web Design, Chapter 6 Page 1 of 18 © ZigZag Education, 2015 Chapter 6: CSS Layouts 6.1 Theory: CSS Positioning The previous chapters focused on defining the purpose of HTML elements, as well as demonstrating how these elements can be manipulated using CSS. Although important skills, the web pages completed so far still do not look like real ‘web pages’! To be able to build ‘real’ web pages, positioning techniques must be learnt. In this chapter, CSS layouts will be examined in detail; and by the end of this chapter, it will be possible to construct web pages that will begin to appear ‘professional’ in design. Static Positioning The positioning properties are essential in manipulating the position of HTML elements on a web page. For example, placing an element in-front of / behind another and/or determining how a HTML element positions itself on a web page. There are four positioning methods available in CSS, each have distinct differences. The four methods are listed below: Static – By default, HTML elements are positioned as static. This means that the HTML elements are displayed in their normal position, determined by the normal flow of a web page. Static elements cannot use the top, bottom, left and right properties that are available to the other positioning methods. This will become more apparent as the chapter proceeds. All of the activities completed so far would be considered as having a ‘static’ positioning type, and thus are displayed in a ‘normal’ document flow. This is my paragraph This is my paragraph This is my paragraph Normal document flow Learning Outcomes: Identify the four types of CSS positioning: static, relative, fixed and absolute Identify the use of CSS floats Be able to implement HTML and CSS to construct a three-column themed web page Prerequisite Knowledge: Complete Chapter 5 Be able to use hyperlinks and style them using CSS, including the various states Be able to manipulate HTML elements using the CSS box model properties Static Relative Fixed Absolute Float HTML Tips! Google’s Chrome provides an excellent web- developer tool, called the ‘element inspector’, which can be accessed by pressing Ctrl+Shift+I when Chrome is open. This tool allows a web page to be closely inspected, including any CSS that is applied. This is an excellent tool for finding troublesome code, and is something that every web designer should be familiar with!
Transcript of Chapter 6: CSS Layoutscomputingattallis.weebly.com/uploads/2/6/4/3/... · Static Positioning The...
Client-side Web Design, Chapter 6 Page 1 of 18 © ZigZag Education, 2015
Chapter 6: CSS Layouts
6.1 Theory: CSS Positioning
The previous chapters focused on defining the purpose of HTML elements, as well as demonstrating how these
elements can be manipulated using CSS. Although important skills, the web pages completed so far still do not look
like real ‘web pages’! To be able to build ‘real’ web pages, positioning techniques must be learnt. In this chapter, CSS
layouts will be examined in detail; and by the end of this chapter, it will be possible to construct web pages that will
begin to appear ‘professional’ in design.
Static Positioning
The positioning properties are essential in manipulating the position of HTML elements on a web page. For example,
placing an element in-front of / behind another and/or determining how a HTML element positions itself on a web page.
There are four positioning methods available in CSS, each have distinct differences. The four methods are listed below:
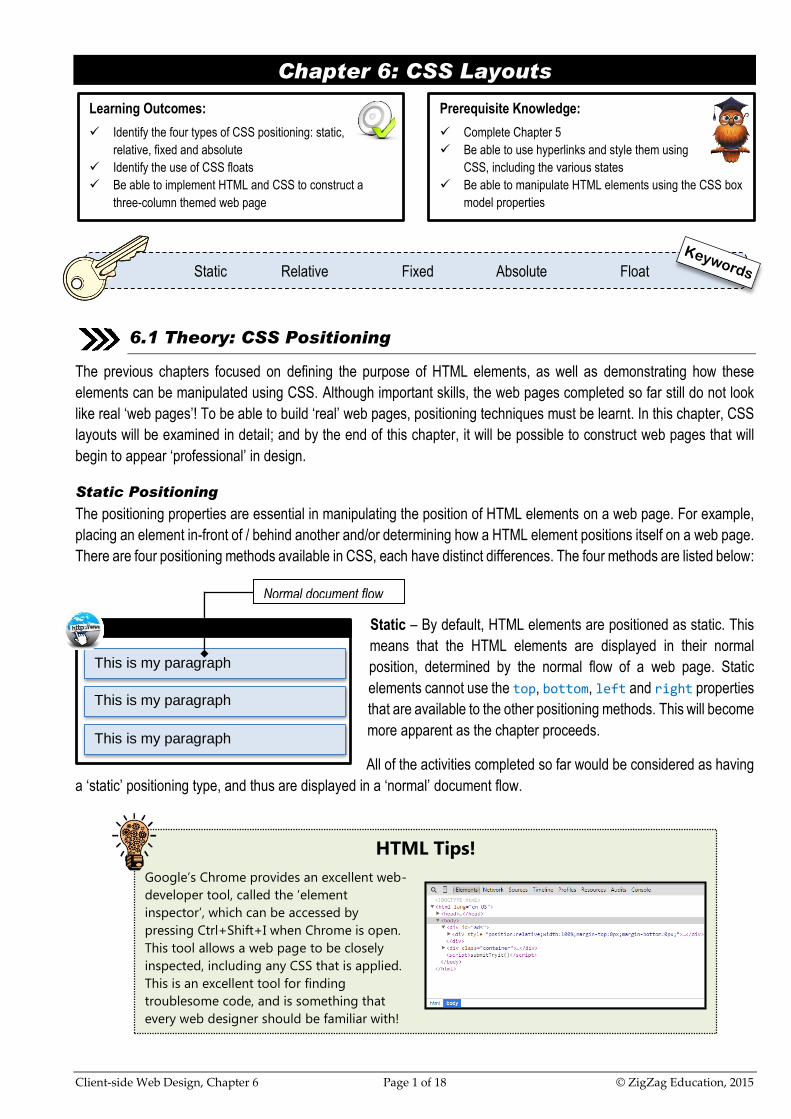
Static – By default, HTML elements are positioned as static. This
means that the HTML elements are displayed in their normal
position, determined by the normal flow of a web page. Static
elements cannot use the top, bottom, left and right properties
that are available to the other positioning methods. This will become
more apparent as the chapter proceeds.
All of the activities completed so far would be considered as having
a ‘static’ positioning type, and thus are displayed in a ‘normal’ document flow.
This is my paragraph
This is my paragraph
This is my paragraph
Normal document flow
Learning Outcomes:
Identify the four types of CSS positioning: static,
relative, fixed and absolute
Identify the use of CSS floats
Be able to implement HTML and CSS to construct a
three-column themed web page
Prerequisite Knowledge:
Complete Chapter 5
Be able to use hyperlinks and style them using
CSS, including the various states
Be able to manipulate HTML elements using the CSS box
model properties
Static Relative Fixed Absolute Float
HTML Tips!
Google’s Chrome provides an excellent web-
developer tool, called the ‘element
inspector’, which can be accessed by
pressing Ctrl+Shift+I when Chrome is open.
This tool allows a web page to be closely
inspected, including any CSS that is applied.
This is an excellent tool for finding
troublesome code, and is something that
every web designer should be familiar with!

Client-side Web Design, Chapter 6 Page 2 of 18 © ZigZag Education, 2015
6.2 Practical: Other Position Types
Relative Positioning
A relative positioned HTML element is positioned
‘relative’ to where it would normally appear on a web
page, if the element had a ‘static’ position type. When
an element is set to relative, the element can be
positioned so that it overlaps other HTML elements in
the web page. Although a relative element may move
from its original position in the web page, the element
still reserves its original space in the document, and that
original space will affect other web page elements.
Relative positioned elements are often used by web
designers to contain absolute positioned elements; the
effects of this will be demonstrated later in the chapter.
This is my paragraph This is my paragraph
This is my paragraph
This is my paragraph
The paragraph’s position is set ‘relative’ to
where it would appear normally if it were static
Original reserved space
HTML Tips!
Relative positioned elements can be
positioned on top of other elements.
Activity 6.1
Create a web page that has three paragraphs and a heading;
the web page can be on any topic. Use styles to ensure that
each paragraph is unique in appearance. Set two of those
paragraphs so that they have a relative position and appear
differently to the normal document flow.
<!DOCTYPE html>
<html>
<head>
<title>Relative Positioning</title>
<meta charset="UTF-8">
<link rel="stylesheet" type="text/css" href="my_style_sheet.css">
</head>
<body>
<p class="one">This paragraph is positioned relative.</p>
<p>This paragraph is positioned normally.</p>
<p class="two">This paragraph is positioned relative too.</p>
</body>
</html>
p.one{background-color:yellow;
position:relative;
left:15px;
top:10px;
}
p.two{background-color:pink;
position:relative;
left:-15px;
top:-10px;
}

Client-side Web Design, Chapter 6 Page 3 of 18 © ZigZag Education, 2015
Absolute Positioning
Elements can also be positioned absolutely, which means that
an element is positioned relative to its first parent / outside
container that has a position other than that of static. If no
such element exists, then the absolute position is set
relative to the containing <html> block. Unlike elements
that are set with a relative position, an absolute element is
removed from the normal flow (and thus its original space
will be filled as other elements act as though the element
does not exist). Due to this behaviour, absolutely
positioned elements can overlap other HTML elements.
If an absolute element is placed inside either a relative or fixed positioned element, then the position of the absolute
element is set in accordance to the boundary of the containing element. In other words, the top, bottom, left and
right properties will set the distance between the containing HTML element, as opposed to the entire web page. An
example of this is demonstrated below:
The other paragraphs fill the space of the original
paragraph because it is positioned absolutely
This is my paragraph
This is my paragraph This is my paragraph
This paragraph is positioned absolutely and thus is removed from the document flow
<!DOCTYPE html>
<html>
<head>
<title>Absolute Positioning</title>
<meta charset="UTF-8">
<link rel="stylesheet" type="text/css" href="my_style_sheet.css">
</head>
<body>
<p class="one">This paragraph is positioned absolutely.</p>
<p>This paragraph is positioned normally.</p>
<p>This paragraph is positioned normally.</p>
</body>
</html>
p.one{background-color:yellow;
position:absolute;
left:50px;
top:50px;
}
<body>
<div>
<p class="one">This paragraph is positioned absolutely.</p>
</div>
<p>This paragraph is positioned normally.</p>
<p>This paragraph is positioned normally.</p>
</body>
p.one{background-color:yellow;
position:absolute;
left:10px;top:20px;
}
div{background-color:red;
position:relative;
left:20px;top:20px;
width:300px;height:100px;
}
30px
40px

Client-side Web Design, Chapter 6 Page 4 of 18 © ZigZag Education, 2015
Fixed Positioning
An element that has a fixed position is positioned relative to
the browser window and will not move from that
position (even when the browser window is scrolled
up or down). Like absolute positioned elements, fixed
position elements are removed from the document
flow and, therefore, their original space will be filled
by any remaining elements. Naturally, fixed
positioned elements will overlap other elements.
<!DOCTYPE html>
<html>
<head>
<title>Fixed Positioning</title>
<meta charset="UTF-8">
<link rel="stylesheet" type="text/css" href="my_style_sheet.css">
</head>
<body>
<p class="one">This paragraph is fixed.</p>
<p>This paragraph is positioned normally.</p>
<p>This paragraph is positioned normally.</p>
</body>
</html>
p.one{background-color:yellow;
position:fixed;
left:50px;
top:50px;
}
body{height:1000px;}
The other paragraphs fill the space of the original
paragraph because it has a fixed position
This paragraph has a fixed position and thus is removed from the document flow. This paragraph will not move from this
position even when the browser window is scrolled
This is my paragraph
This is my paragraph
This is my paragraph
Activity 6.2
Create a web page that has five paragraphs and a heading; the web page can be on any
topic. One of the paragraphs should use absolute positioning and should be positioned to the far
right of the web page with a width of 300 pixels. Another paragraph should use the fixed
position and should be positioned to the left of the page, also with a width of 300 pixels. The
height of the body tag should be set to 1,200 pixels to allow the web page to scroll up and
down. Use a variety of CSS styles to make each paragraph unique and interesting. Suitable
borders and background colours should be applied to each paragraph too.
HTML Tips!
IE7 and IE8 do not support the
fixed position, unless the
!DOCTYPE is specified

Client-side Web Design, Chapter 6 Page 5 of 18 © ZigZag Education, 2015
6.3 Theory: Overlapping and Aligning Elements
Overlapping Elements
As demonstrated earlier in the chapter, elements that are removed from the normal flow of a HTML document (for
example, elements that are set to absolute or fixed) can be positioned over other elements. However, it is also possible
to determine where an element appears in the ‘stack order’; in other words, elements can be placed in front of, or
behind of, other HTML elements. An element can be set with a negative or positive stack order, but the element with
the greater stack order will appear in front of the element with the lower. The property used to control the stack order
is the z-index property. An example of this property is demonstrated below:
Centring Elements
Previously it was explained that the text-align
property can be used to centre text in a HTML
element; however, this property does not centre align
the HTML element itself. To centre align block level elements, such as paragraphs and divisions, set the left and right
margins to ‘auto’; this indicates that the browser should split the available space equally between both margins, ergo
centring the element. Two important points to consider when using this technique are: firstly, this technique will have
no effect if the width of the element is set to 100%. Secondly, the auto value does not work in earlier versions of Internet
Explorer, unless a !DOCTYPE is defined. An example of this technique is illustrated below:
<!DOCTYPE html>
<html>
<head>
<title>Overlapping Elements</title>
<meta charset="UTF-8">
<link rel="stylesheet" type="text/css" href="my_style_sheet.css">
</head>
<body>
<img src="sheep.jpg" alt="sheep jumping">
<p>This paragraph is a paragraph.</p>
<p>This paragraph is a paragraph.</p>
<p>This paragraph is a paragraph.</p>
</body>
</html>
img{background-color:yellow;
position:absolute;
left:10px;
top:10px;
z-index:-1;
}
div{background-color:yellow;
margin-left:auto;
margin-right:auto;
width:90%;
}
...
<body>
<div>
<p>This paragraph is a paragraph.</p>
<p>This paragraph is a paragraph.</p>
<p>This paragraph is a paragraph.</p>
</div>
</body>
...
5% 5%

Client-side Web Design, Chapter 6 Page 6 of 18 © ZigZag Education, 2015
Left and Right Alignment (Absolute)
HTML element can be positioned left or right by setting their position to ‘absolute’ and the corresponding left/right
property to zero. However, as explained before, doing so will remove the element from the document flow, and thus
the original space will be filled by the remaining elements; for this reason, this method of alignment is not the most
popular way of aligning elements to the left or to the right. Below is an example of how to position absolute elements
to the left and right:
div{background-color:yellow;
position:absolute;
right:0px;
width:500px;
}
...
<body>
<div>
<p>This paragraph is a paragraph.</p>
<p>This paragraph is a paragraph.</p>
<p>This paragraph is a paragraph.</p>
</div>
</body>
...
div{background-color:yellow;
position:absolute;
left:0px;
width:500px;
}
HTML Tips!
Like many other CSS properties, earlier web-browser versions, e.g. Internet Explorer,
will not display this technique correctly. The problem is that if the !DOCTYPE is missing
from the HTML document, and the element has a specified width, earlier versions of
Internet Explorer will add a 17-pixel margin to the right side of the container; this is
space that is reserved for a vertical scroll bar.
Finally, it is also considered best practice to preset the margin and padding properties
of the <body> tag, often to set them both to zero. This is to avoid any visual
differences that may occur in different browsers and browser versions.

Client-side Web Design, Chapter 6 Page 7 of 18 © ZigZag Education, 2015
6.4 Practical: Using Floats
Floating Elements
One of the most useful properties available in CSS is the float property, a property that can be used to align HTML
elements either to the right or left. When a HTML block element is set to float, it no longer fills the entire span of the
container, and thus allows other elements to wrap around it. The floating technique is often used when working with
images and layouts (where it is most useful).
When working with floats it is important to understand how they behave. Floated elements are positioned horizontally,
not vertically. A floated element will also move as far to the left or right (of the containing element) as possible; however,
it will respect any boundaries marked out by padding or margin properties. Once an element is floated, the remaining
space will be filled by proceeding elements if possible. For example, if used with images, the proceeding text will wrap
around the image. Below is an example of the float property being applied to an image:
As mentioned, floats can be used with layouts too. Below is an example of using the float property with a division:
div{float:left;
width:250px;
height:200px;
background-color:yellow;
border:1px solid black;
}
...
<body>
<div>
<p>This paragraph is inside.</p>
<p>This paragraph is inside.</p>
<p>This paragraph is inside.</p>
</div>
<p>This paragraph is outside.</p>
<p>This paragraph is outside.</p>
<p>This paragraph is outside.</p>
</body>
...
<!DOCTYPE html>
<html>
<head>
<title>Floats</title>
<meta charset="UTF-8">
<link rel="stylesheet" type="text/css" href="my_style_sheet.css">
</head>
<body>
<img src="sheep.jpg" alt="sheep jumping">
<p>This paragraph is a paragraph.</p>
<p>This paragraph is a paragraph.</p>
<p>This paragraph is a paragraph.</p>
</body>
</html>
img{float:left;
width:100px;
height:100px;
}

Client-side Web Design, Chapter 6 Page 8 of 18 © ZigZag Education, 2015
Floating Multiple Elements
When an element is floated to the left or right, if there is sufficient space on the web page, it is also possible to float
multiple HTML elements alongside the original floated element. This is achieved by setting the float property of the
other HTML elements too. Below is an example that demonstrates how to float multiple images next to each other.
Remember that the same technique could also be applied to divisions for layout purposes.
Clearing Floats
Proceeding HTML elements will automatically wrap around floated elements if there is sufficient space to do so.
However, if this is not the desired effect then the clear property can be added to the proceeding element; this will
instruct the browser to ‘clear’ the float and to not wrap around the floated element. The clear property has three useful
values: left, right and both. If the value is set to the left, this means that the proceeding element will clear the left float,
but not the right float (should there be one). The right value is the same, except the right float is cleared and not the
left. The 'both’ value would result in the left and right floats being cleared. Below is an example of the clear property
being used:
<!DOCTYPE html>
<html>
<head>
<title>Multiple Floats</title>
<meta charset="UTF-8">
<link rel="stylesheet" type="text/css" href="my_style_sheet.css">
</head>
<body>
<img src="sheep.jpg" alt="sheep jumping">
<img src="sheep.jpg" alt="sheep jumping">
<img src="sheep.jpg" alt="sheep jumping">
<img src="sheep.jpg" alt="sheep jumping">
</body>
</html>
img{float:left;
width:50px;
height:50px;
margin:5px;
}
div{float:left;
width:250px;
height:120px;
background-color:yellow;
border:1px solid black;
}
.one{clear:left;}
...
<body>
<div>
<p>This paragraph is inside.</p>
<p>This paragraph is inside.</p>
<p>This paragraph is inside.</p>
</div>
<p class="one">This paragraph is outside.</p>
<p class="one">This paragraph is outside.</p>
<p class="one">This paragraph is outside.</p>
</body>
...
Activity 6.3
Create a web page that has three divisions, each containing a paragraph and each on any topic. Float the first division to the left and the second division too, so that the first two divisions are horizontally level. The third division should clear the floats and be below the other two divisions. Add a fourth division and absolutely position it to the top right-hand corner.

Client-side Web Design, Chapter 6 Page 9 of 18 © ZigZag Education, 2015
6.5 Practical: My First Web page Layout
The Design
Finally, it is time to combine all of the techniques learned (from this chapter and previous ones) together and use those
techniques to build a complete (and fully styled) web page. The web page will follow a standard three-column layout
and will also consist of a header and footer. A navigation bar will also be placed into the left column (to be added once
the basic layout is completed). Below is a wireframe that demonstrates the design of the proposed web page:
The Basic Layout
To build the layout above, several division (<div>) elements are required. Firstly, a ‘container’ division is created to
house all of the other divisions; this will enable greater control of the web page layout, as well as enabling the web
page layout to be easily centred. Inside the container division, the other divisions are created in the order that they are
required; specifically, the header division first, followed by the left side column, right side column, the main placeholder
and the footer division. The HTML source code for the above layout is documented below:
Header
Footer
Left column Right column
Middle column
<!DOCTYPE html>
<html>
<head>
<title>My First Webpage</title>
<meta charset="UTF-8">
<link rel="stylesheet" type="text/css" href="my_style_sheet.css">
</head>
<body>
<div id="container">
<div id="header"></div>
<div id="left_side"></div>
<div id="right_side"></div>
<div id="main_placeholder"></div>
<div id="footer"></div>
</div>
</body>
</html>
Activity 6.4 Create a HTML and CSS file and link them together; then add the HTML (this page) and CSS (following page) syntax as demonstrated to the appropriate files. Test the web page to ensure the layout works correctly and is styled as expected.

Client-side Web Design, Chapter 6 Page 10 of 18 © ZigZag Education, 2015
body{
margin:0px;
padding:0px;
background-color:#EAF2FF;
}
#container{
width:90%;
margin-left:auto;
margin-right:auto;
min-width:1024px;
border:1px solid black;
background-color:#FEFFEF;
height:768px;
margin-top:25px;
}
#header{
height:60px;
width:100%;
border-bottom:1px dotted black;
background-color:#E6E9FE;
}
#left_side{
height:75%;
width:20%;
border:1px dotted black;
background-color:#E6E9FE;
float:left;
margin-top:15px;
margin-left:15px;
}
#right_side{
height:75%;
width:20%;
border:1px dotted black;
background-color:#E6E9FE;
float:right;
margin-top:15px;
margin-right:15px;
}
#main_placeholder{
margin-left:25%;
margin-right:25%;
border:1px dotted black;
background-color:#E6E9FE;
margin-top:15px;
height:75%;
}
#footer{
height:60px;
border:1px dotted black;
background-color:#E6E9FE;
margin-top:25px;
margin-left:16px;
margin-right:16px;
}
Sets the margin and padding of the body element to 0px; this removes any white space if the web page needed to sit flush with the web browser window and is also good for backwards compatibility. The background colour outside the main
container is also set to a light blue.
Builds the main container that holds the other containers; the width is set to 90% of the browser window and the right and left margin are set to auto, centring the container division. The minimum width and height is set to 1024 by 768, meaning that the divisions will not move out of place if the browser window is resized. Finally, a border, background colour and a top
margin are added.
These properties set the height of the header division to 60 pixels and the width of the header division to 100% (of the outside containing division). Finally, a border is added to the
bottom of the division and a background colour is added too.
This styles the left division; firstly, by setting the height to 75% and the width to 20% of the outside container. A margin is added to the top and left to move the division away from the outside container’s border. A border and background colour is added to the division also. Finally, the division is floated to the
left to allow the main placeholder to move alongside it.
These properties are similar to the left division, except it floats the column to the right of the web page. Also, a right margin
is applied, as opposed to a left margin.
Sets the left and right margin to 25% of the outside container; the margins surpasses the left and right columns by 5%, as the width of these columns is set to 20%. This centres the placeholder, and as there is a centre space, and because both columns are floated to either side, the placeholder takes up the space in the middle of the web page. The height is set to 75% of the outside container and a margin is added to the top; the same value as the left and right columns so that they
appear level.
The final division is set with a height of 60 pixels and the margins are set so that it appears centrally. Finally, a border
and background colour are added.

Client-side Web Design, Chapter 6 Page 11 of 18 © ZigZag Education, 2015
Once the above HTML and CSS documents are created, the web page will look similar to the screen-print below. Note
that because the width property is set to 90% of the browser window (providing the width is not less than 1028 pixels),
the web page will stretch to fit larger screen resolutions; this is sometimes referred to as being ‘elastic’.
Adding a Title
The above web page is currently a blank canvas; it has no content. In the next few sections, the previous CSS and
HTML syntax will be expanded upon to include content in the header, footer, right column, left column and centre
column. Below is the first alteration to the HTML and CSS files used previously; these new changes will result in the
header division now featuring a centred title and a text shadow.
Activity 6.5
Amend the web page from 6.4 so that the web page now features a
centred title in the header division; the title can be on any topic.
#header h1{
font-family:arial, sans-serif;
font-size:1.5em;
text-align:center;
margin:0px;
padding-top:12px;
color:#6B6BB2;
text-shadow:1px 1px #000;
}
...
<div id="header">
<h1>The Magical Mystery Webpage!</h1>
</div>
...

Client-side Web Design, Chapter 6 Page 12 of 18 © ZigZag Education, 2015
Adding to the Centre Column
Now that the web page has a title, it is time to add some content to the main placeholder (the centre column). Below
are some further changes that have been made to the HTML and CSS document that now affect the main placeholder
division; the division now contains a heading and three paragraphs. They are also styled so that they fit the web page
theme.
...
<div id="main_placeholder">
<h2>The Beatles!</h2>
<p>The Beatles were an English rock band that formed in Liverpool, in 1960.
With John Lennon, Paul McCartney, George Harrison and Ringo Starr, they
became widely regarded as the greatest and most influential act of the rock
era.</p>
<p>Rooted in skiffle, beat and 1950s rock and roll, the Beatles later
experimented with several genres, ranging from pop ballads and Indian music
to psychedelic and hard rock, often incorporating classical elements in
innovative ways.</p>
<p>In the early 1960s, their enormous popularity first emerged as
"Beatlemania", but as their song writing grew in sophistication they came to
be perceived as an embodiment of the ideals shared by the era's
sociocultural revolutions.</p>
</div>
...
#main_placeholder p{
font-family:arial, sans-serif;
font-size:1em;
text-align:justify;
padding:10px;
}
#main_placeholder h2{
font-family:arial, sans-serif;
font-size:1.1em;
text-align:center;
color:#6B6BB2;
text-shadow:1px 1px #000;
}
Activity 6.6
Amend the web page from 6.5 so that the
web page now includes some content in the
main placeholder; the content topic should
match the web page title. Include at least
three paragraphs, a heading and a list.

Client-side Web Design, Chapter 6 Page 13 of 18 © ZigZag Education, 2015
Adding to the Right Column
The web page is beginning to take shape; it has a title and content. However, there are still two columns and a footer
which remain empty. Below are some further changes that have been made to the HTML and CSS document that now
affect the right column division; the right division now contains a heading, an image and a paragraph. They too have
been styled so that they fit the web page theme.
These properties are used to centre the image
inside the division
#right_side p{
font-family:arial, sans-serif;
font-size:1em;
text-align:justify;
padding:10px;
font-style:italic;
}
#right_side img{
display:block;
margin-left:auto;
margin-right:auto;
}
#right_side h2{
font-family:arial, sans-serif;
font-size:1.1em;
text-align:center;
color:#6B6BB2;
text-shadow:1px 1px #000;
}
...
<div id="right_side">
<h2>The Fab Four</h2>
<img src="beatles.jpg" alt="the fab four photo" height="100px" width="100px">
<p> CIRCA 1963: Vintage Merchandise stamps each portraying an image of a
member of 'The Beatles', circa 1963.</p>
</div>
...
Activity 6.7
Amend the web page from 6.6 so that the web
page now includes some content, including an
image, in the right placeholder; the content topic
should be relevant to the web page title and the
other content previously added. Include at least
one paragraph and a heading.

Client-side Web Design, Chapter 6 Page 14 of 18 © ZigZag Education, 2015
Adding Navigation to the Left Column
Most web pages require some form of navigation to allow the user to navigate around the website; it is common practice
to have navigation (links) displayed either on the top or left-hand side of the web page, although many websites today
often display links in the footer and the right side of the web page too. In this case, the HTML and CSS code will be
edited again so that the web page now includes a themed navigation bar displayed on the left-hand side of the web
page. For now the links will be set to external websites, but do note that the links could just as easily point to other web
pages of the same website.
...
<div id="left_side">
<ul>
<li><a href=" http://www.thebeatles.com">The Beatles.com</a></li>
<li><a href=" http://www.thebeatles.com">John Lennon.com</a></li>
<li><a href=" http://www.paulmccartney.com">Paul McCartney.com</a></li>
<li><a href=" http://www.mtv.co.uk/music">MTV</a></li>
</ul>
</div>
...
#left_side ul{
list-style-type:none;
margin:0;
padding:0;
}
#left_side a:link, #left_side a:visited{
font-family:arial, sans-serif;
font-size:1em;
display:block;
width:100%;
background-color:#EBD6FF;
color:#935ACC;
text-align:center;
padding-top:15px;
text-decoration:none;
height:30px;
border-bottom:1px dotted gray;
}
#left_side a:hover, #left_side a:active{
background-color:#E6E9FE;
text-decoration:underline;
}
Activity 6.8
Amend the web page from 6.7 so that the
web page now includes a themed
navigation bar displayed in the left column
division; the navigation bar should include
links that point to external websites relevant
to the web page’s topic. Ensure that the
web pages are appropriate in content.

Client-side Web Design, Chapter 6 Page 15 of 18 © ZigZag Education, 2015
Adding Content to Footer
The web page is nearly complete; only the footer division remains untouched and empty of any content. Below are
further changes that have been made to the HTML and CSS document that now affect the footer division; the division
now includes a copyright statement. The web page is now complete!
...
<div id="footer">
<p><em>©The Magic Mystery Webpage 2015</em></p>
</div>
...
#footer{
font-family:arial, sans-serif;
font-size:1em;
text-align:center;
}
Activity 6.9
Amend the web page from 6.8 so that the
web page now includes a
paragraph/statement in the footer division.

Client-side Web Design, Chapter 6 Page 16 of 18 © ZigZag Education, 2015
Chapter Summary
There are four types of positioning in CSS: static, relative, absolute and fixed.
HTML elements that are set to static mean that they are displayed in their normal position,
determined by the normal flow of a web page.
A relative positioned HTML element is positioned ‘relative’ to where it would normally appear on
a web page if the element had a ‘static’ position type.
Elements that are positioned absolutely are positioned relative to their first parent / outside
container that has a position other than that of static; they are also removed from the document’s
normal flow. If no such element exists, then the absolute position is set relative to the containing
<html> block.
An element that has a fixed position is positioned relative to the browser window, and will not
move from that position even when the browser window is scrolled up or down. They too are
removed from the document’s normal flow.
Floated elements are positioned horizontally, not vertically. A floated element will move as far to
the left or right (of the containing element) as possible; however, it will respect any boundaries
marked out by padding or margin properties. Once an element is floated, the remaining space
will be filled by proceeding elements if possible.
The clear property can be used to ‘clear’ floated elements and avoid wrapping around them.