CHAPTER 4 USING YOUR WASHER - Cole-Parmer
14
Product Service 1-800-522-7658 37 C CHAPTER 4 4 U USING Y YOUR W WASHER After your washer has passed the basic diagnostics test detailed in Chapter 3: Getting Started, you are ready to begin using your washer. Read this chapter to learn how to: • arrange the racks inside your washer to meet your specific needs. • properly position glassware inside your washer. • fill the detergent and neutralizing acid dispensers. • interrupt a wash cycle after it has begun. • select an operating cycle. Do not use the Glassware Washer in a manner not specified by the manufacturer. The electrical protection properties of the washer may be impaired if the washer is used inappropriately. Arranging the Washer Racks The FlaskScrubber and SteamScrubber are equipped with different rack configurations to accommodate the various types of laboratory glassware. In addition to the standard configuration of the Glassware Washers, many optional racks and inserts are available to customize your washer to !
Transcript of CHAPTER 4 USING YOUR WASHER - Cole-Parmer

Product Service 1-800-522-7658 37
CCHHAAPPTTEERR 44UUSSIINNGG YYOOUURR WWAASSHHEERR
After your washer has passed the basic diagnostics testdetailed in Chapter 3: Getting Started, you are ready tobegin using your washer. Read this chapter to learn howto:
• arrange the racks inside your washer to meet yourspecific needs.
• properly position glassware inside your washer.• fill the detergent and neutralizing acid dispensers.• interrupt a wash cycle after it has begun.• select an operating cycle.
Do not use the Glassware Washer in amanner not specified by themanufacturer. The electrical protectionproperties of the washer may beimpaired if the washer is usedinappropriately.
Arranging the Washer RacksThe FlaskScrubber and SteamScrubber are equipped withdifferent rack configurations to accommodate the varioustypes of laboratory glassware. In addition to the standardconfiguration of the Glassware Washers, many optionalracks and inserts are available to customize your washer to
!!!!

Chapter 2: Prerequisites Chapter 4: Using Your Washer
Product Service 1-800-522-765838
best suit your needs. For a complete list of available rackaccessories, refer to Appendix D: Glassware WasherAccessories.
If you purchased a SteamScrubber, proceed to thefollowing section, The SteamScrubber Racks. If youpurchased a FlaskScrubber, proceed to the section, TheFlaskScrubber Racks, later in this chapter.
The SteamScrubber RacksThe SteamScrubber is equipped with two racks (a top rackand a bottom rack), and two 10-pin inserts. The top rackof the SteamScrubber Glassware Washer is designed toaccommodate beakers and other wide-mouth laboratoryglassware. The top rack is not recommended for narrow-necked glassware.
The bottom rack of the SteamScrubber Glassware Washeris designed to accommodate flasks, beakers, culture-tubes,graduated cylinders, Erlenmeyer flasks, petri dishes, watchglasses, BOD bottles, and a variety of other laboratoryglassware. In addition to the two 10-pin inserts that areprovided with your washer, there are a variety of otherinserts that are available to accommodate the various typesof glassware, as detailed in Appendix D.
Lowering the Top Washer Armand Top Rack
The top rack of your SteamScrubber may be lowered toaccommodate taller glassware. Perform the steps listedbelow to lower the washer arm and the top rack. Refer toFigure 4-1 for help in lowering the washer arm. Figure 4-2 illustrates how to remove the rail bumpers. Refer toFigure 4-2 for help in lowering the top rack rails.

Chapter 4: Using Your Washer
39 Product Service 1-800-522-7658
To lower the top washer arm and the top rack ofthe SteamScrubber:
1. Open the washer door by sliding the latch knob to theleft. Pull the door toward you and down.
2. Depress the button on the right side of the upper washarm tower, as illustrated in Figure 4-1.
3. Lower the upper portion of the tower and the wash armby gently pushing down.
4. Secure the wash arm by clicking the wash arm into theupper hole in the wash arm support tube.
5. Remove the rubber bumper at the front of each siderail, as shown in Figure 4-2.
Depress the button andgently push down tolower the wash arm.
Wash arm
Wash arm tower
Figure 4-1

Chapter 2: Prerequisites Chapter 4: Using Your Washer
Product Service 1-800-522-765840
6. Pull the upper rack forward and lift the front until thewheels disengage from the track.
7. With a twisting motion, remove the rails from therollers on each side of the tank, as shown above inFigure 4-2.
8. Reposition the rails on the lower set of rollers and witha twisting motion insert them in the rollers.
9. Place the rack rollers in the rails.10. Replace the rubber bumpers.
You must removethe rubber bumper
from the front ofthe rail before the
rack can beremoved.
Remove the railby twisting out
and down.
Figure 4-2
Chapter 4: Using Your Washer
41 Product Service 1-800-522-7658
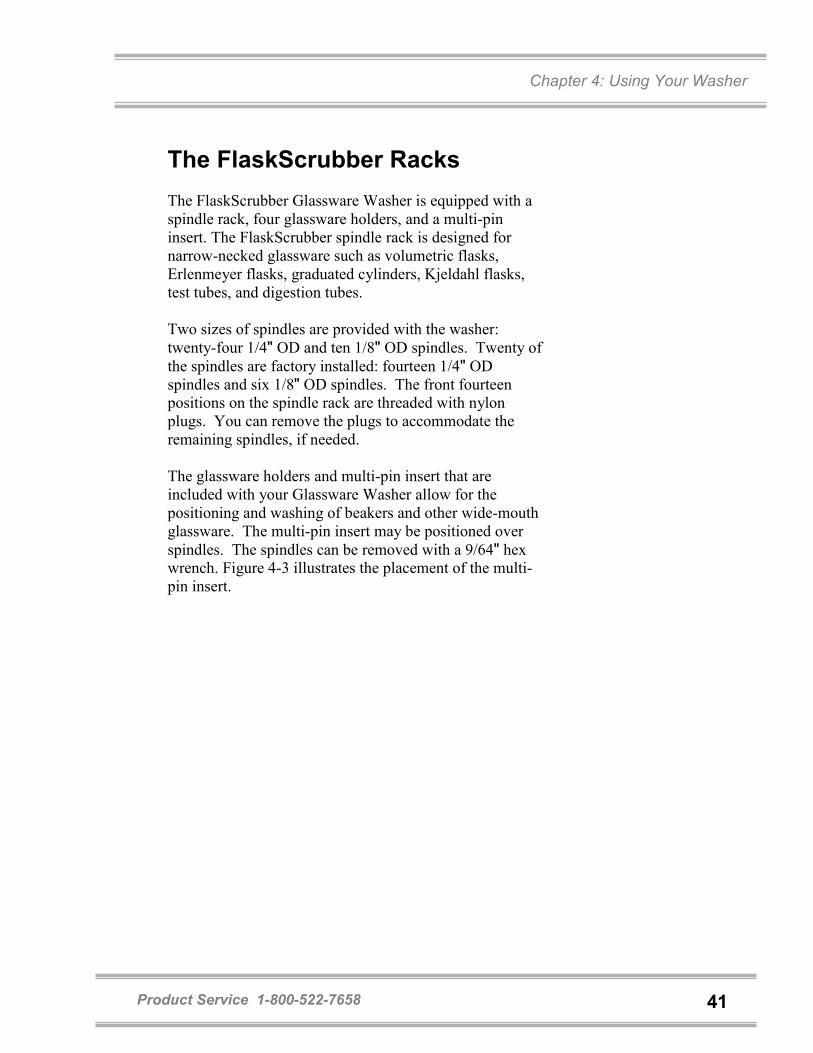
The FlaskScrubber RacksThe FlaskScrubber Glassware Washer is equipped with aspindle rack, four glassware holders, and a multi-pininsert. The FlaskScrubber spindle rack is designed fornarrow-necked glassware such as volumetric flasks,Erlenmeyer flasks, graduated cylinders, Kjeldahl flasks,test tubes, and digestion tubes.
Two sizes of spindles are provided with the washer:twenty-four 1/4" OD and ten 1/8" OD spindles. Twenty ofthe spindles are factory installed: fourteen 1/4" ODspindles and six 1/8" OD spindles. The front fourteenpositions on the spindle rack are threaded with nylonplugs. You can remove the plugs to accommodate theremaining spindles, if needed.
The glassware holders and multi-pin insert that areincluded with your Glassware Washer allow for thepositioning and washing of beakers and other wide-mouthglassware. The multi-pin insert may be positioned overspindles. The spindles can be removed with a 9/64" hexwrench. Figure 4-3 illustrates the placement of the multi-pin insert.

Chapter 2: Prerequisites Chapter 4: Using Your Washer
Product Service 1-800-522-765842
An optional, adjustable top rack is available for theFlaskScrubber, to expand the washer�s capacity toaccommodate many types of glassware, particularlybeakers. The rack includes two 24-pin inserts.
IF THE MULTI-PIN INSERT ISINSTALLED ON THE BOTTOM RACKAND THE OPTIONAL UPPER RACK ISUSED, DO NOT HEAVILY LOAD THEMULTI-PIN INSERT WITH WIDEMOUTH GLASSWARE. THIS MAYRESTRICT WATER FLOW FROM THELOWER DISTRIBUTION ARM TO THEGLASSWARE IN THE UPPER RACK.
����
The multi-pin insertcan be placed over
spindles. The multi-pin insert accom-
modates a variety ofglassware types
and sizes.
To remove a spindle,insert a hex wrench
into the slot on the topof the spindle and turn
clockwise. Afterremoving the spindle,
thread a nylon pluginto the resulting hole.
Figure 4-3

Chapter 4: Using Your Washer
43 Product Service 1-800-522-7658
Loading Glassware into theFlaskScrubberTo load glassware onto a spindle, place the glassware onthe spindle and adjust the position by raising or loweringthe spring clip, as shown in Figure 4-4. The outlet of thespindle should be as close to the center of the flask aspossible. Do not allow the glassware to rest on the end ofthe spindle.
Squeeze the spring cliptogether and raise orlower the clip to positionthe glassware properly.
Figure 4-4

Chapter 2: Prerequisites Chapter 4: Using Your Washer
Product Service 1-800-522-765844
Two large and two small glassware holders are suppliedwith each FlaskScrubber. These holders enable you toplace wide-mouth glassware onto the FlaskScrubberspindles. To position glassware in a glassware holder andinstall the holder on a spindle, refer to Figure 4-5 andfollow the instructions below.
To use a glassware holder:
1. Press the glassware into the holder; the clamps shouldspring out and grip the glassware.
2. Loosen the set screw in the hub, as shown in Figure 4-5, and raise or lower the holder to position the spindlenear the center of the glassware. Do not allow theglassware to rest on top of the spindle.
3. Re-tighten the set screw.
Figure 4-5
Press the glasswareinto the glassware
holder. Then, turnthe set screw
counterclockwise toloosen the glasswareholder hub. Positionthe glassware holderso that the spindle is
near the center of theglassware. Turn theset screw clockwiseto tighten the glass-
ware holder in place.

Chapter 4: Using Your Washer
45 Product Service 1-800-522-7658
Glassware should be loaded so that it does not touch eachother during a wash cycle. The washer has been designedfor quiet operation. To prevent noise and glass breakage,be certain that the glassware does not touch.
Place heavily soiled items toward the center of the racks.Place lightly soiled items in the corners.
The Detergent DispenserYour Glassware Washer is equipped with a detergentdispenser that contains a main wash cavity and aneutralizing solution port, as shown in Figure 4-6. Inaddition, the washer door has a depression where detergentmay be added for use during the first wash of the cycle.
Neutralizingsolution port
Main wash cavity
Neutralizing solutiondial
Neutralizing aciddispenser cover
Figure 4-6

Chapter 2: Prerequisites Chapter 4: Using Your Washer
Product Service 1-800-522-765846
The detergent dispenser opens during the second washcycle, except when the Plastic cycle is selected, which hasonly one wash cycle. If your glassware is heavily soiled,you may want to add detergent to the pre-wash cavity.Refer to the table below to determine which cavities to fill,based on the selected wash choice. You may use either thepre-wash cavity stamped in the washer door or the one onthe lid of the detergent cup.
Wash Cycle Fill Pre-wash Cavity Fill Main CavityRinse Only NO NOPlastic NO YESGlass OPTIONAL YESGlass Plus OPTIONAL YESScientific OPTIONAL YESUser 1 OPTIONAL YESUser 2 OPTIONAL YES
Do not use combustible solvents in theGlassware Washer. If soiled glasswarecontains flammable compounds, rinse theglassware thoroughly prior to placing theglassware into the washer. Heaters inthe washer are very hot and could causea fire.
Non-foaming powder or liquid detergent formulated forlabware washers, in conjunction with adequate hot water,is vital for obtaining clean glassware. If the water is soft,less detergent may be needed. Too much detergent withsoftened water may cause etching of the glassware. Thisappears as a permanent cloudy film on the glassware.
Fill the main detergent cavity three-fourths full if the waterhardness grains per gallon (GPG) for your water measures0 � 4 GPG (soft water). Fill the detergent cavitycompletely if your water measures 4 GPG or higher(medium to hard water). If you use the pre-wash cavitystamped in the washer door, fill it completely.
To achieve the bestresults with yourGlassware Washer, useLabconco�s Lab-Solutions Detergent.
!!!!
Store detergent in acool, dry place.Immediately replacethe detergent con-tainer lid afterdispensing. If lumpsdevelop due toexposure to moisture,discard the detergentaccording to localregulations.

Chapter 4: Using Your Washer
47 Product Service 1-800-522-7658
To open the detergent dispenser, gentlyslide the white tab sideways. If the tab ispulled upward or perpendicular to thedoor, it will break.
Filling the Neutralizing AcidDispenserIf it is necessary to neutralize the alkalinity of thedetergent, a mild or weak acid may be placed in thedetergent cup neutralizing dispenser from which it will bedispensed during the first rinse. If pure water rinse isselected, the last two rinses will be made with pure water.To avoid dispensing neutralizing acid during a pure rinse,more than two rinses should be selected. The dispenserholds approximately 170 ml and should be checked andreplenished as needed. To fill the neutralizing aciddispenser, refer to Figure 4-6 and follow the instructionsbelow.
To fill the neutralizing acid dispenser:
1. Twist and pull up on the cap to remove the round coveron the neutralizing solution port.
2. Fill the cavity with either 1M citric acid or 10%phosphoric acid until the level of the liquid rises and isvisible in the port.
3. Set the dial to read 4 ml.4. Replace the cover.
Selecting an Operating CycleThe microprocessor control on your Glassware Washerallows you to select one of four factory preset wash cycles,to custom program two additional cycles, or to run a rinse-only cycle. The control panel is shown in Figure 4-7.
!!!!

Chapter 2: Prerequisites Chapter 4: Using Your Washer
Product Service 1-800-522-765848
Programming and Starting aWash CycleRefer to Appendix C: Glassware Washer Specifications forcomplete details on the various factory-set programs andthe options available for customizing cycles. After youhave decided which washer cycle you need to use, followthe instructions below to start your washer.
Washers built for use on 230V have the capability to washglassware at a temperature of 180°F (82°C). They also areable to operate at the lower temperature of 140°F (60°C)which is the standard temperature of the 115V models.Selecting a high-heat operation is achieved by selecting anappropriate program.
Figure 4-7
Press toactivate
thesteam
function.
Press todisplaydetails
about theselected
wash cycle.
Press tostart washcycle.
Pressto
selectthe
washcycle.
Press torinse with
pure water.
Press tochange
thelength ofWash 2cycle.
Press tochange
thenumber
ofrinses.
Press tochange
thedryingtime.
Chapter 4: Using Your Washer
49 Product Service 1-800-522-7658
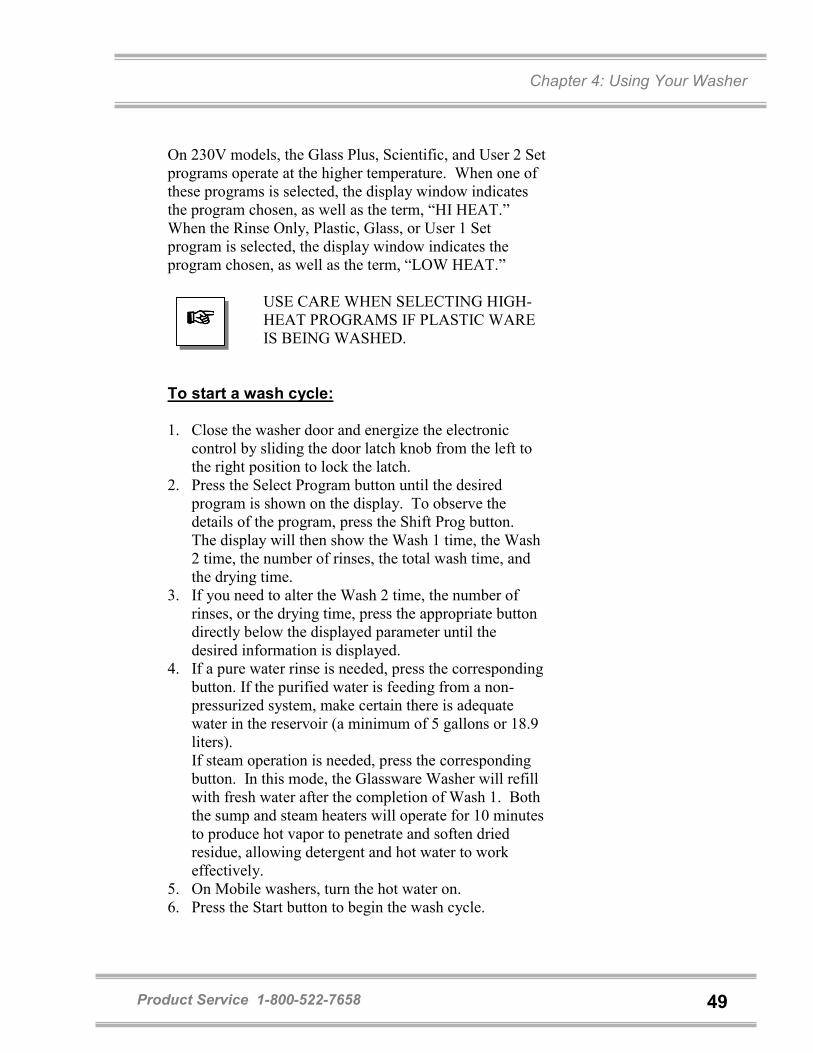
On 230V models, the Glass Plus, Scientific, and User 2 Setprograms operate at the higher temperature. When one ofthese programs is selected, the display window indicatesthe program chosen, as well as the term, �HI HEAT.�When the Rinse Only, Plastic, Glass, or User 1 Setprogram is selected, the display window indicates theprogram chosen, as well as the term, �LOW HEAT.�
USE CARE WHEN SELECTING HIGH-HEAT PROGRAMS IF PLASTIC WAREIS BEING WASHED.
To start a wash cycle:
1. Close the washer door and energize the electroniccontrol by sliding the door latch knob from the left tothe right position to lock the latch.
2. Press the Select Program button until the desiredprogram is shown on the display. To observe thedetails of the program, press the Shift Prog button.The display will then show the Wash 1 time, the Wash2 time, the number of rinses, the total wash time, andthe drying time.
3. If you need to alter the Wash 2 time, the number ofrinses, or the drying time, press the appropriate buttondirectly below the displayed parameter until thedesired information is displayed.
4. If a pure water rinse is needed, press the correspondingbutton. If the purified water is feeding from a non-pressurized system, make certain there is adequatewater in the reservoir (a minimum of 5 gallons or 18.9liters).If steam operation is needed, press the correspondingbutton. In this mode, the Glassware Washer will refillwith fresh water after the completion of Wash 1. Boththe sump and steam heaters will operate for 10 minutesto produce hot vapor to penetrate and soften driedresidue, allowing detergent and hot water to workeffectively.
5. On Mobile washers, turn the hot water on.6. Press the Start button to begin the wash cycle.
����

Chapter 2: Prerequisites Chapter 4: Using Your Washer
Product Service 1-800-522-765850
7. Press the Shift Program button if you want the displayto indicate details about what mode the washer is inand the time remaining.
Interrupting a Wash CycleTo temporarily pause a wash cycle, simply unlatch thewasher door. After the door is unlatched, wait 4 to 5seconds before opening the door to prevent water fromsplashing out of the washer.
To resume the wash cycle, close and re-latch the washerdoor. The washer will pause to equalize temperatures andthen the cycle will resume at the point it was interrupted.
The wash cycle can be terminated at any time by pressingthe Start/Cancel button.