Chapter 4 Surgical Asepsis - Brands Delmar 4 Surgical Asepsis Procedure 12 Opening A Sterile Tray...
11
Chapter 4 Surgical Asepsis Procedure 12 Opening A Sterile Tray Procedure 13 Opening A Sterile Package Procedure 14 Setting Up A Sterile Field Using A Sterile Drape Procedure 15 Adding An Item To A Sterile Field Procedure 16 Adding Liquids To A Sterile Field Procedure 17 Applying And Removing Sterile Gloves Procedure 18 Using Transfer Forceps
Transcript of Chapter 4 Surgical Asepsis - Brands Delmar 4 Surgical Asepsis Procedure 12 Opening A Sterile Tray...
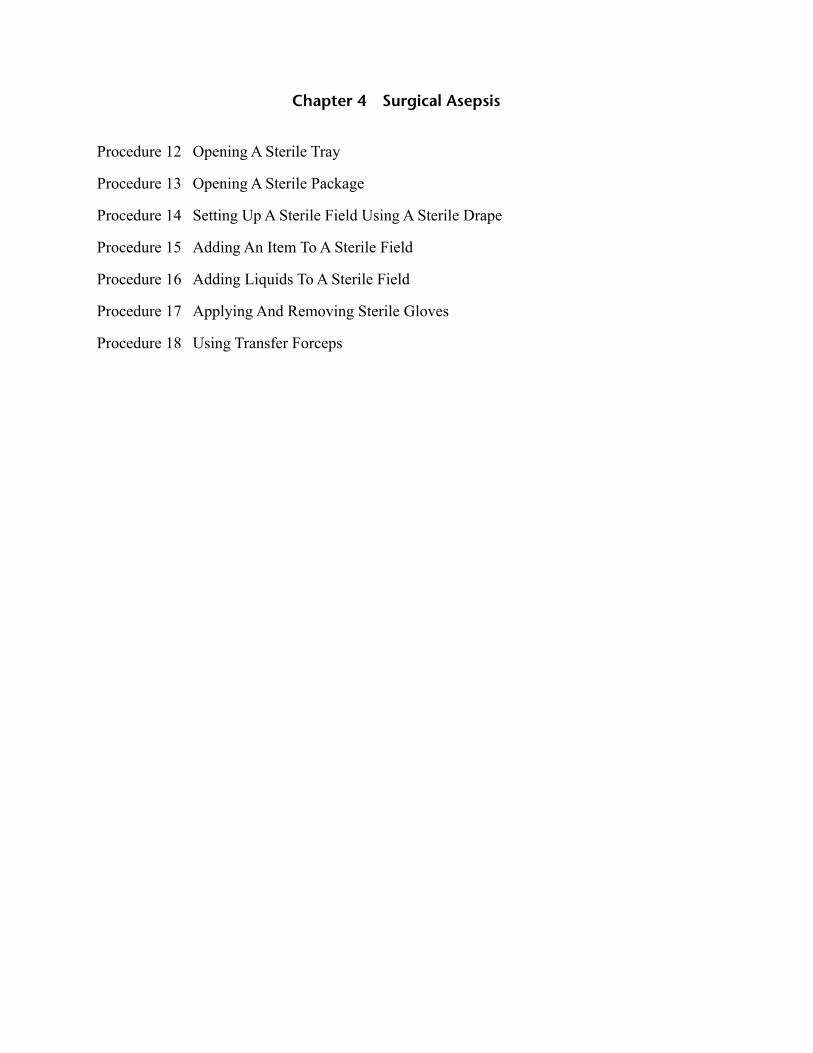
Chapter 4 Surgical Asepsis
Procedure 12 Opening A Sterile Tray
Procedure 13 Opening A Sterile Package
Procedure 14 Setting Up A Sterile Field Using A Sterile Drape
Procedure 15 Adding An Item To A Sterile Field
Procedure 16 Adding Liquids To A Sterile Field
Procedure 17 Applying And Removing Sterile Gloves
Procedure 18 Using Transfer Forceps
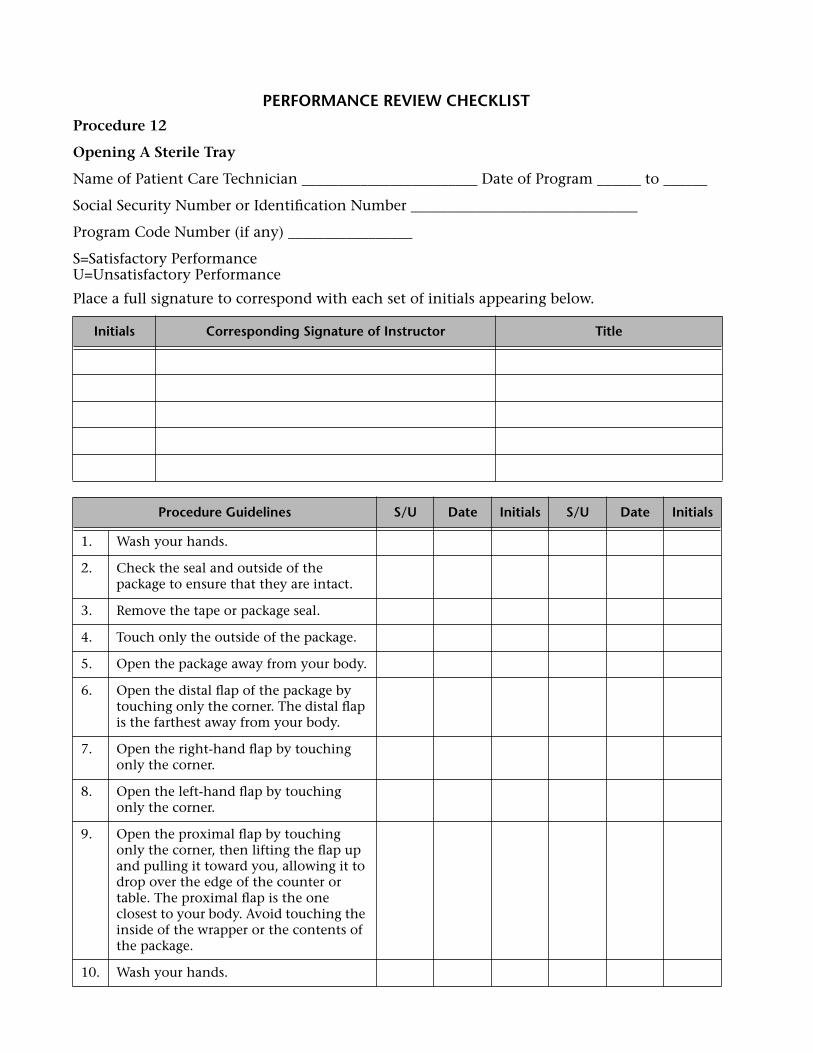
PERFORMANCE REVIEW CHECKLIST
Procedure 12
Opening A Sterile Tray
Name of Patient Care Technician ________________________ Date of Program ______ to ______
Social Security Number or Identification Number _______________________________
Program Code Number (if any) _________________
S=Satisfactory PerformanceU=Unsatisfactory Performance
Place a full signature to correspond with each set of initials appearing below.
Initials Corresponding Signature of Instructor Title
Procedure Guidelines S/U Date Initials S/U Date Initials
1. Wash your hands.
2. Check the seal and outside of the package to ensure that they are intact.
3. Remove the tape or package seal.
4. Touch only the outside of the package.
5. Open the package away from your body.
6. Open the distal flap of the package by touching only the corner. The distal flap is the farthest away from your body.
7. Open the right-hand flap by touching only the corner.
8. Open the left-hand flap by touching only the corner.
9. Open the proximal flap by touching only the corner, then lifting the flap up and pulling it toward you, allowing it to drop over the edge of the counter or table. The proximal flap is the one closest to your body. Avoid touching the inside of the wrapper or the contents of the package.
10. Wash your hands.

__________________________________ _______________
Instructor Signature Date
__________________________________ _______________
Student Signature Date
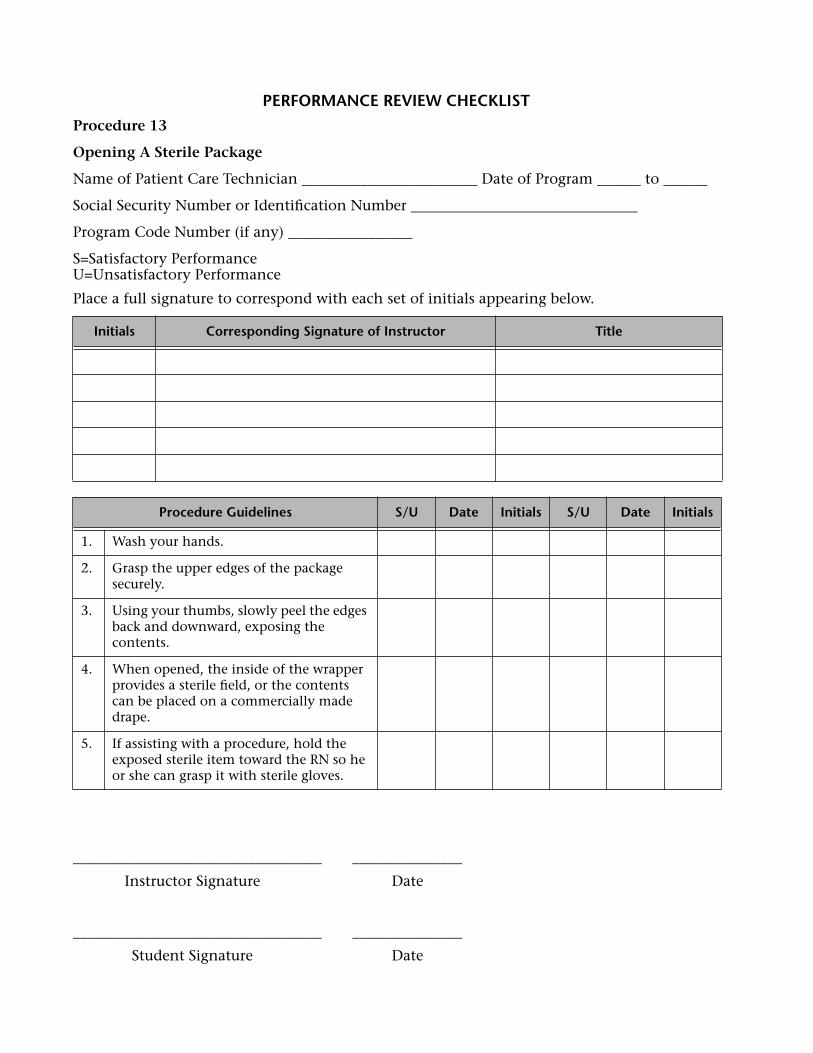
PERFORMANCE REVIEW CHECKLIST
Procedure 13
Opening A Sterile Package
Name of Patient Care Technician ________________________ Date of Program ______ to ______
Social Security Number or Identification Number _______________________________
Program Code Number (if any) _________________
S=Satisfactory PerformanceU=Unsatisfactory Performance
Place a full signature to correspond with each set of initials appearing below.
__________________________________ _______________
Instructor Signature Date
__________________________________ _______________
Student Signature Date
Initials Corresponding Signature of Instructor Title
Procedure Guidelines S/U Date Initials S/U Date Initials
1. Wash your hands.
2. Grasp the upper edges of the package securely.
3. Using your thumbs, slowly peel the edges back and downward, exposing the contents.
4. When opened, the inside of the wrapper provides a sterile field, or the contents can be placed on a commercially made drape.
5. If assisting with a procedure, hold the exposed sterile item toward the RN so he or she can grasp it with sterile gloves.
PERFORMANCE REVIEW CHECKLIST
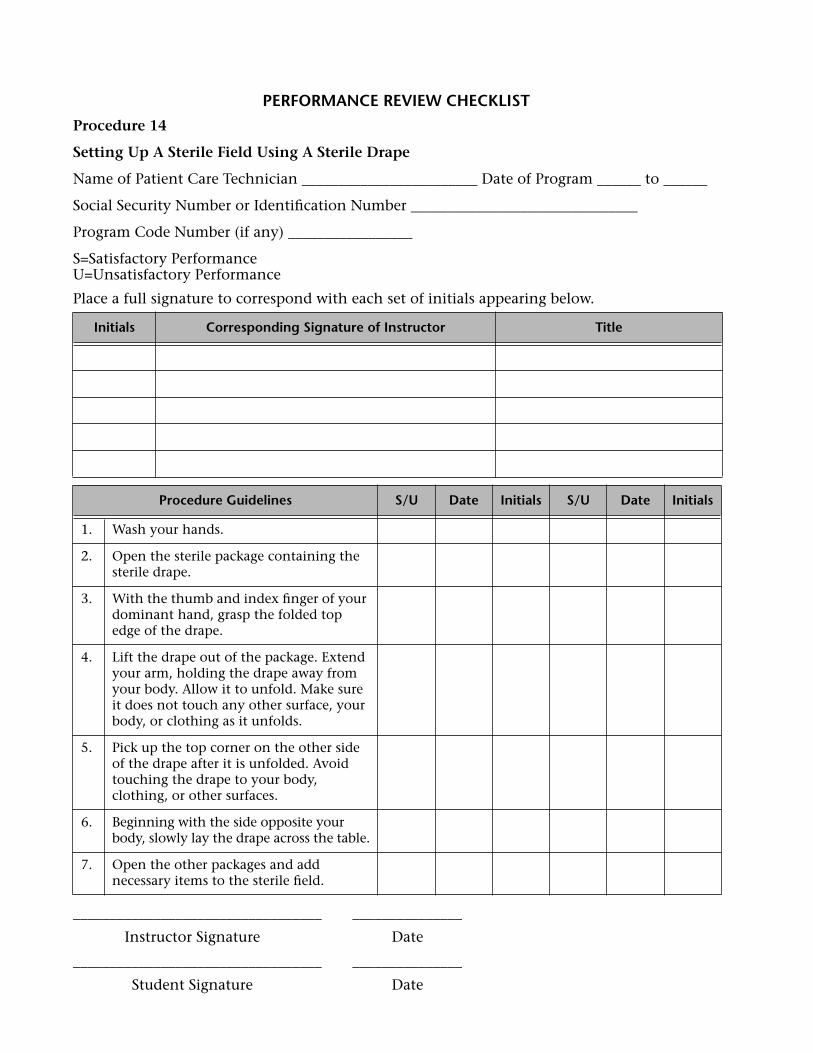
Procedure 14
Setting Up A Sterile Field Using A Sterile Drape
Name of Patient Care Technician ________________________ Date of Program ______ to ______
Social Security Number or Identification Number _______________________________
Program Code Number (if any) _________________
S=Satisfactory PerformanceU=Unsatisfactory Performance
Place a full signature to correspond with each set of initials appearing below.
__________________________________ _______________
Instructor Signature Date
__________________________________ _______________
Student Signature Date
Initials Corresponding Signature of Instructor Title
Procedure Guidelines S/U Date Initials S/U Date Initials
1. Wash your hands.
2. Open the sterile package containing the sterile drape.
3. With the thumb and index finger of your dominant hand, grasp the folded top edge of the drape.
4. Lift the drape out of the package. Extend your arm, holding the drape away from your body. Allow it to unfold. Make sure it does not touch any other surface, your body, or clothing as it unfolds.
5. Pick up the top corner on the other side of the drape after it is unfolded. Avoid touching the drape to your body, clothing, or other surfaces.
6. Beginning with the side opposite your body, slowly lay the drape across the table.
7. Open the other packages and add necessary items to the sterile field.
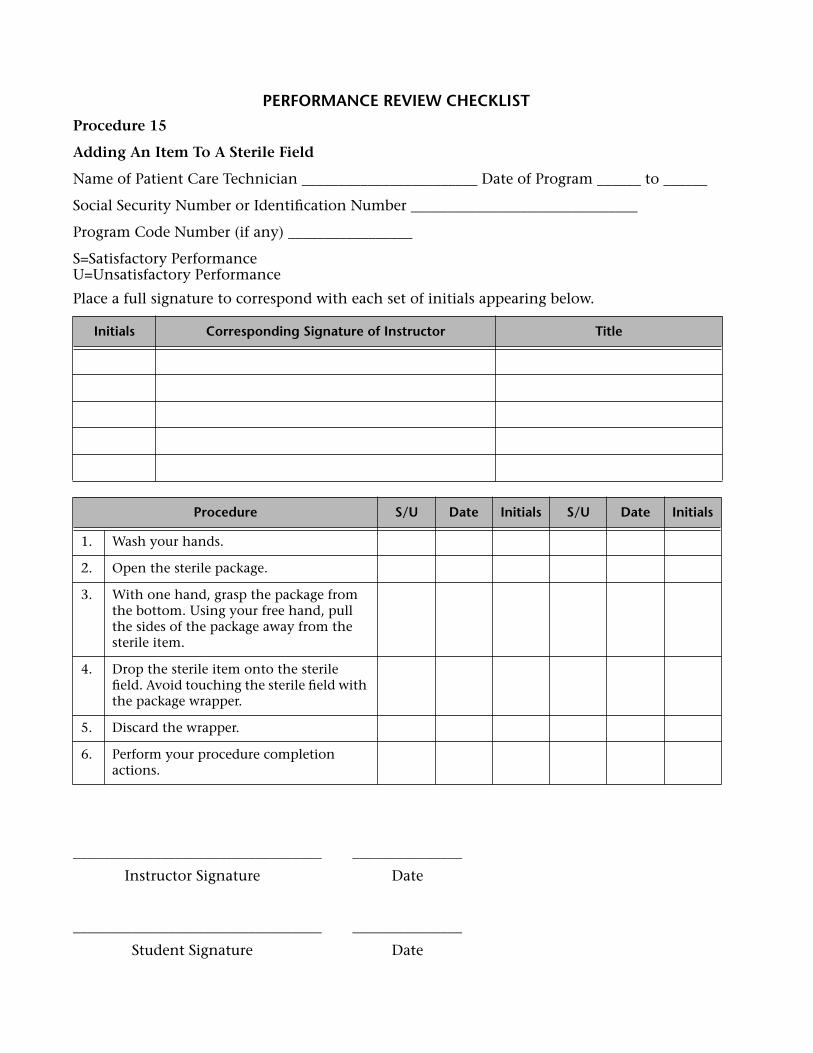
PERFORMANCE REVIEW CHECKLIST
Procedure 15
Adding An Item To A Sterile Field
Name of Patient Care Technician ________________________ Date of Program ______ to ______
Social Security Number or Identification Number _______________________________
Program Code Number (if any) _________________
S=Satisfactory PerformanceU=Unsatisfactory Performance
Place a full signature to correspond with each set of initials appearing below.
__________________________________ _______________
Instructor Signature Date
__________________________________ _______________
Student Signature Date
Initials Corresponding Signature of Instructor Title
Procedure S/U Date Initials S/U Date Initials
1. Wash your hands.
2. Open the sterile package.
3. With one hand, grasp the package from the bottom. Using your free hand, pull the sides of the package away from the sterile item.
4. Drop the sterile item onto the sterile field. Avoid touching the sterile field with the package wrapper.
5. Discard the wrapper.
6. Perform your procedure completion actions.
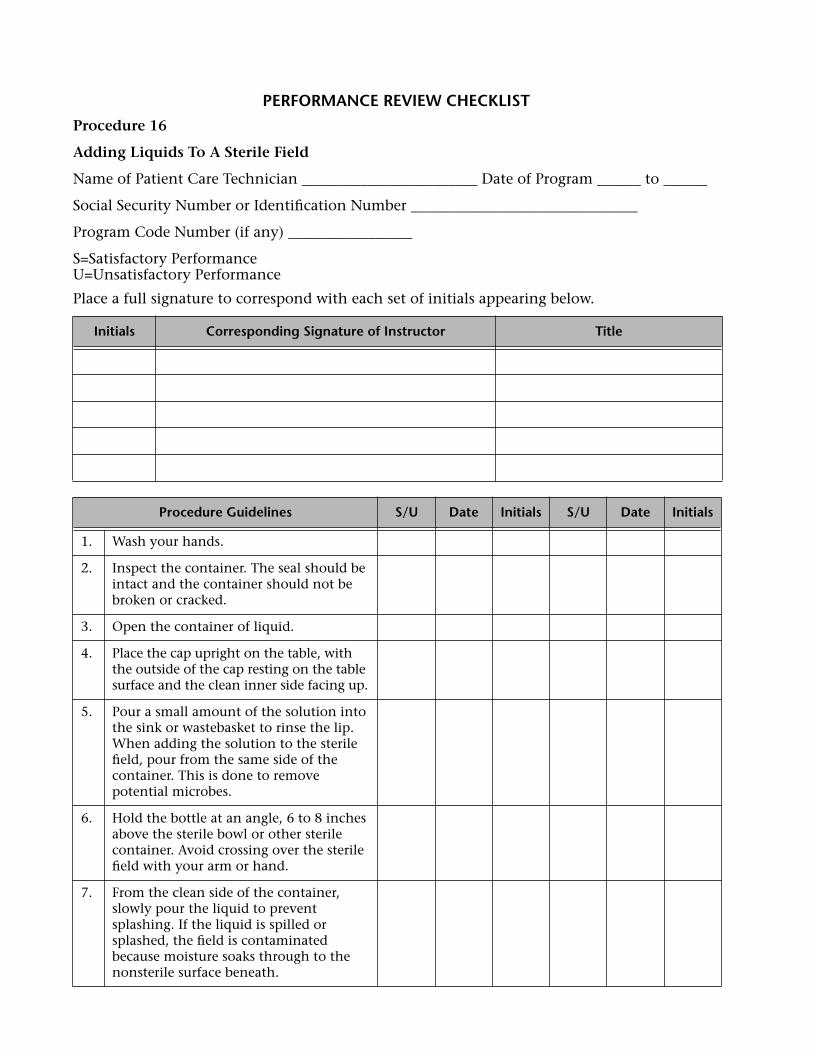
PERFORMANCE REVIEW CHECKLIST
Procedure 16
Adding Liquids To A Sterile Field
Name of Patient Care Technician ________________________ Date of Program ______ to ______
Social Security Number or Identification Number _______________________________
Program Code Number (if any) _________________
S=Satisfactory PerformanceU=Unsatisfactory Performance
Place a full signature to correspond with each set of initials appearing below.
Initials Corresponding Signature of Instructor Title
Procedure Guidelines S/U Date Initials S/U Date Initials
1. Wash your hands.
2. Inspect the container. The seal should be intact and the container should not be broken or cracked.
3. Open the container of liquid.
4. Place the cap upright on the table, with the outside of the cap resting on the table surface and the clean inner side facing up.
5. Pour a small amount of the solution into the sink or wastebasket to rinse the lip. When adding the solution to the sterile field, pour from the same side of the container. This is done to remove potential microbes.
6. Hold the bottle at an angle, 6 to 8 inches above the sterile bowl or other sterile container. Avoid crossing over the sterile field with your arm or hand.
7. From the clean side of the container, slowly pour the liquid to prevent splashing. If the liquid is spilled or splashed, the field is contaminated because moisture soaks through to the nonsterile surface beneath.
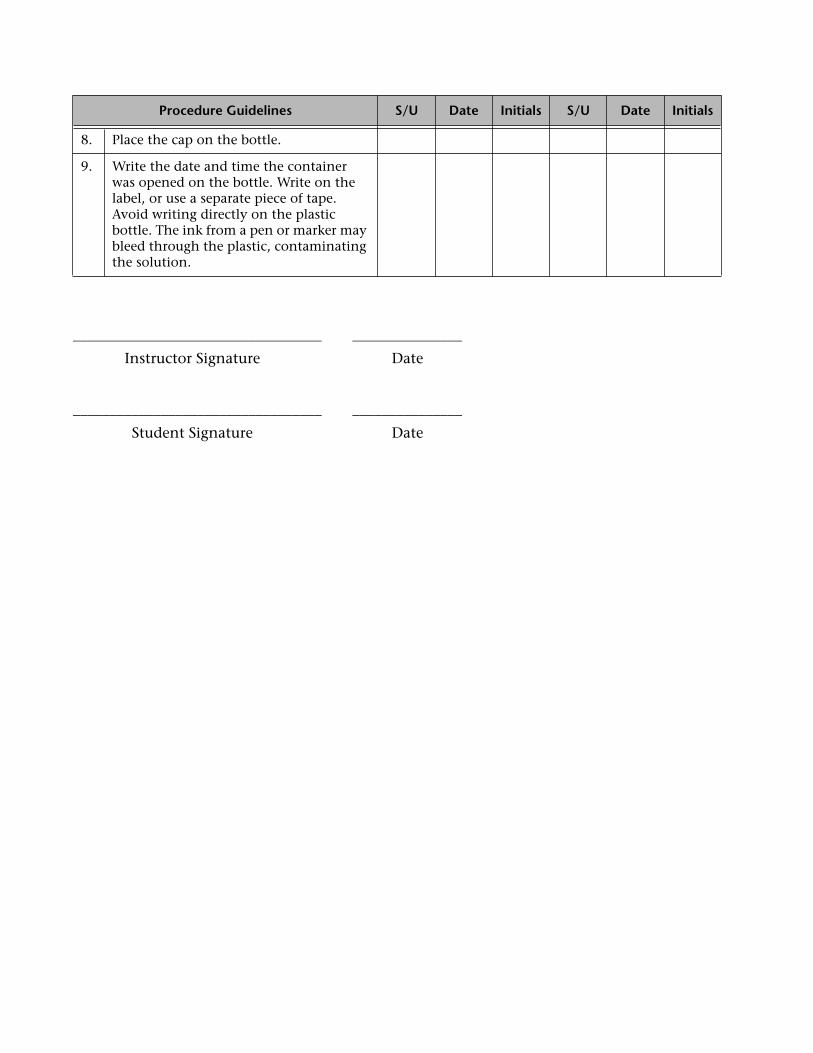
__________________________________ _______________
Instructor Signature Date
__________________________________ _______________
Student Signature Date
8. Place the cap on the bottle.
9. Write the date and time the container was opened on the bottle. Write on the label, or use a separate piece of tape. Avoid writing directly on the plastic bottle. The ink from a pen or marker may bleed through the plastic, contaminating the solution.
Procedure Guidelines S/U Date Initials S/U Date Initials
PERFORMANCE REVIEW CHECKLIST
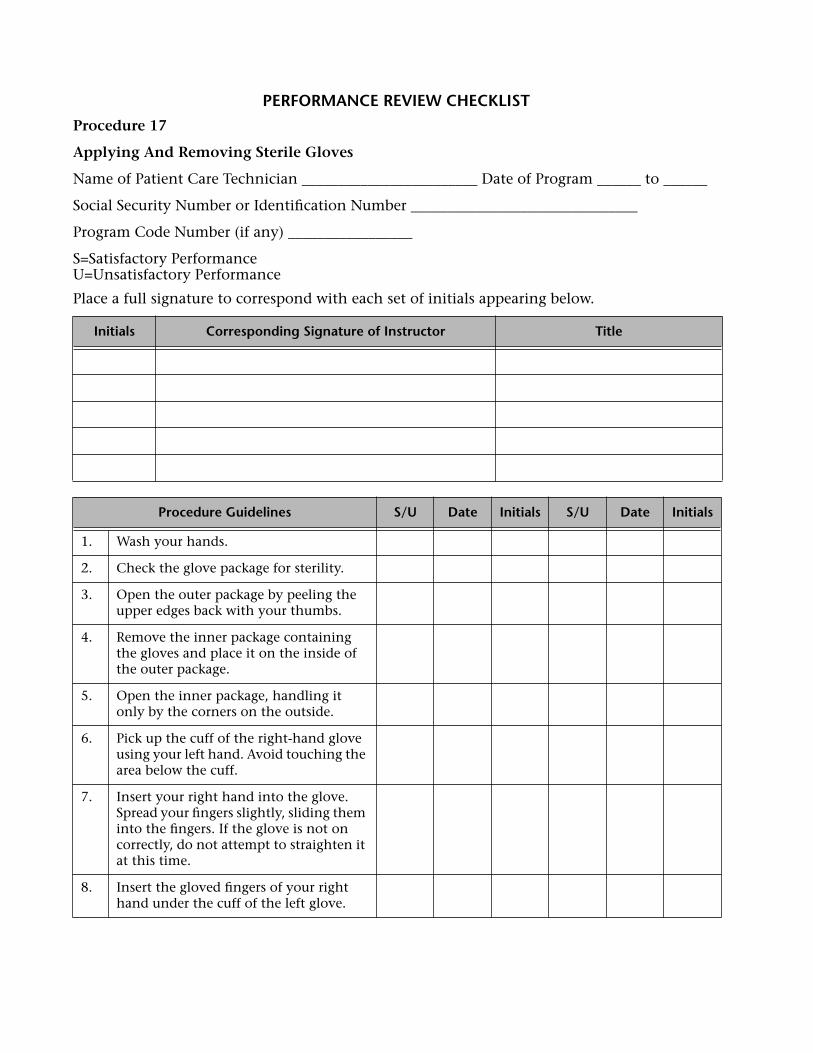
Procedure 17
Applying And Removing Sterile Gloves
Name of Patient Care Technician ________________________ Date of Program ______ to ______
Social Security Number or Identification Number _______________________________
Program Code Number (if any) _________________
S=Satisfactory PerformanceU=Unsatisfactory Performance
Place a full signature to correspond with each set of initials appearing below.
Initials Corresponding Signature of Instructor Title
Procedure Guidelines S/U Date Initials S/U Date Initials
1. Wash your hands.
2. Check the glove package for sterility.
3. Open the outer package by peeling the upper edges back with your thumbs.
4. Remove the inner package containing the gloves and place it on the inside of the outer package.
5. Open the inner package, handling it only by the corners on the outside.
6. Pick up the cuff of the right-hand glove using your left hand. Avoid touching the area below the cuff.
7. Insert your right hand into the glove. Spread your fingers slightly, sliding them into the fingers. If the glove is not on correctly, do not attempt to straighten it at this time.
8. Insert the gloved fingers of your right hand under the cuff of the left glove.
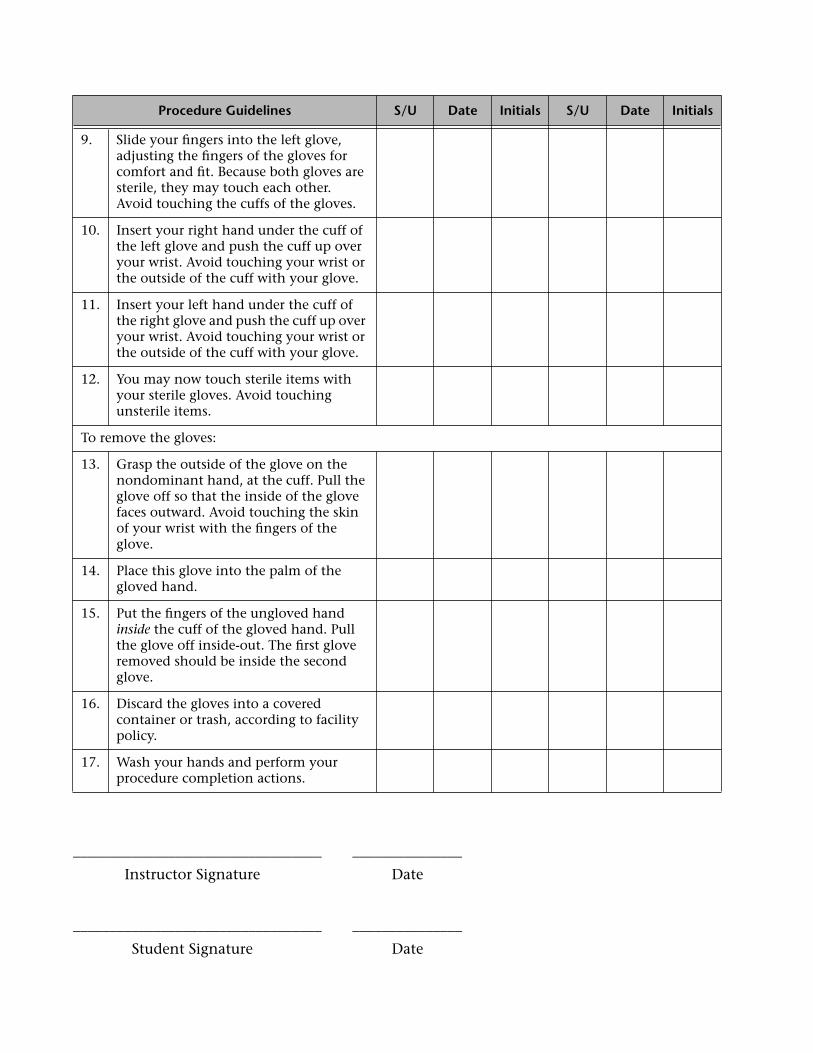
__________________________________ _______________
Instructor Signature Date
__________________________________ _______________
Student Signature Date
9. Slide your fingers into the left glove, adjusting the fingers of the gloves for comfort and fit. Because both gloves are sterile, they may touch each other. Avoid touching the cuffs of the gloves.
10. Insert your right hand under the cuff of the left glove and push the cuff up over your wrist. Avoid touching your wrist or the outside of the cuff with your glove.
11. Insert your left hand under the cuff of the right glove and push the cuff up over your wrist. Avoid touching your wrist or the outside of the cuff with your glove.
12. You may now touch sterile items with your sterile gloves. Avoid touching unsterile items.
To remove the gloves:
13. Grasp the outside of the glove on the nondominant hand, at the cuff. Pull the glove off so that the inside of the glove faces outward. Avoid touching the skin of your wrist with the fingers of the glove.
14. Place this glove into the palm of the gloved hand.
15. Put the fingers of the ungloved hand
inside
the cuff of the gloved hand. Pull the glove off inside-out. The first glove removed should be inside the second glove.
16. Discard the gloves into a covered container or trash, according to facility policy.
17. Wash your hands and perform your procedure completion actions.
Procedure Guidelines S/U Date Initials S/U Date Initials
PERFORMANCE REVIEW CHECKLIST
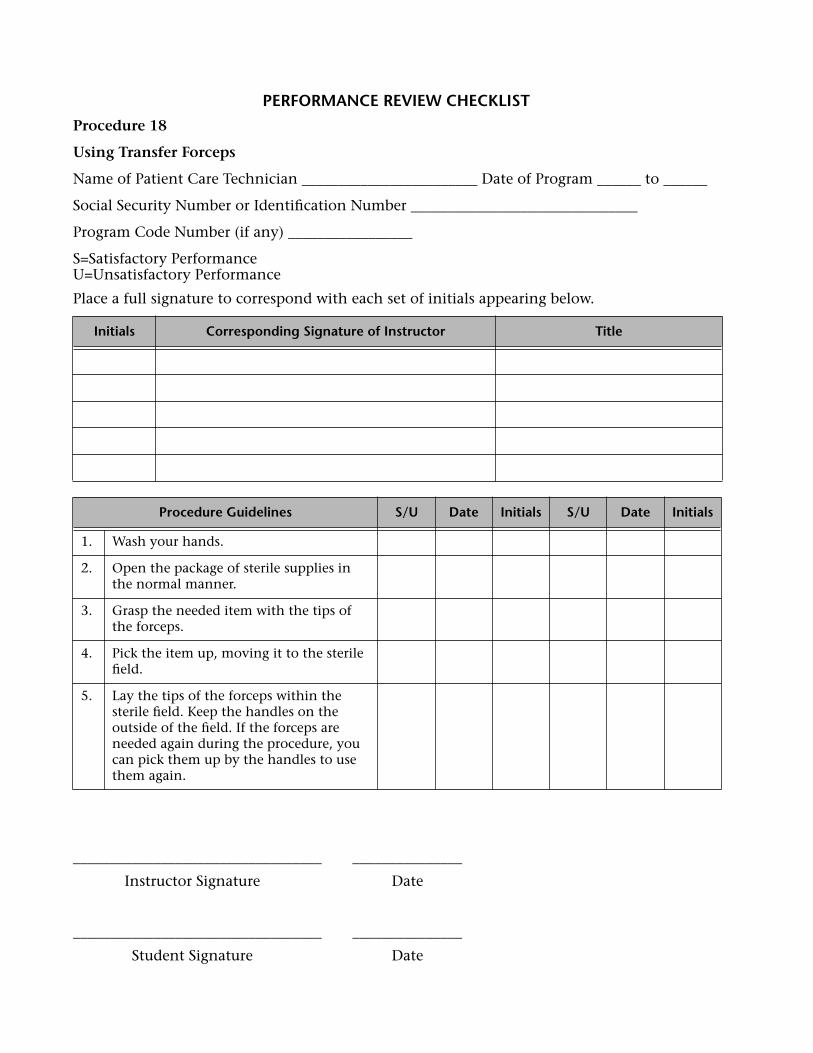
Procedure 18
Using Transfer Forceps
Name of Patient Care Technician ________________________ Date of Program ______ to ______
Social Security Number or Identification Number _______________________________
Program Code Number (if any) _________________
S=Satisfactory PerformanceU=Unsatisfactory Performance
Place a full signature to correspond with each set of initials appearing below.
__________________________________ _______________
Instructor Signature Date
__________________________________ _______________
Student Signature Date
Initials Corresponding Signature of Instructor Title
Procedure Guidelines S/U Date Initials S/U Date Initials
1. Wash your hands.
2. Open the package of sterile supplies in the normal manner.
3. Grasp the needed item with the tips of the forceps.
4. Pick the item up, moving it to the sterile field.
5. Lay the tips of the forceps within the sterile field. Keep the handles on the outside of the field. If the forceps are needed again during the procedure, you can pick them up by the handles to use them again.