Chapter 4. Prior Authorization 4.1. Acroynms - Nevada · 1 EVS User Manual, Chapter 4 Updated...
39
1 EVS User Manual, Chapter 4 Updated 04/17/2018 (pv02/23/2018) Chapter 4. Prior Authorization The Nevada Medicaid and Nevada Check Up Provider Web Portal allows providers, or their delegates, the ability to create/submit, update, and view prior authorizations online using the Provider Web Portal. 4.1. Acroynms ABA – Applied Behavior Analysis ADHC – Adult Day Health Center BH – Behavioral Health DME – Durable Medical Equipment Inpt – Inpatient IOP – Intensive Outpatient Program M/S – Medical/Surgical Outpt – Outpatient PA – Prior Authorization PCS – Personal Care Services PHP – Partial Hospitalization Program RTC – Residential Treatment Center SDS – Self-Directed Skills 4.2. Creating a Prior Authorization To create a prior authorization on the Provider Web Portal: 1. Log into the Provider Web Portal. 2. On the “My Home” page, under Care Management tab click the “Create Authorization” link:
-
Upload
nguyenmien -
Category
Documents
-
view
217 -
download
1
Transcript of Chapter 4. Prior Authorization 4.1. Acroynms - Nevada · 1 EVS User Manual, Chapter 4 Updated...

1
EVS User Manual, Chapter 4
Updated 04/17/2018 (pv02/23/2018)
Chapter 4. Prior Authorization The Nevada Medicaid and Nevada Check Up Provider Web Portal allows providers, or their
delegates, the ability to create/submit, update, and view prior authorizations online using the
Provider Web Portal.
4.1. Acroynms
ABA – Applied Behavior Analysis
ADHC – Adult Day Health Center
BH – Behavioral Health
DME – Durable Medical Equipment
Inpt – Inpatient
IOP – Intensive Outpatient Program
M/S – Medical/Surgical
Outpt – Outpatient
PA – Prior Authorization
PCS – Personal Care Services
PHP – Partial Hospitalization Program
RTC – Residential Treatment Center
SDS – Self-Directed Skills
4.2. Creating a Prior Authorization
To create a prior authorization on the Provider Web Portal:
1. Log into the Provider Web Portal.
2. On the “My Home” page, under Care Management tab click the “Create Authorization”
link:

2
EVS User Manual, Chapter 4
Updated 04/17/2018 (pv02/23/2018)
Or
On the “My Home” page, click on the Care Management tab and click the “Create
Authorization” link:
3. The Create Authorization page displays and defaults to Medical. All of the fields marked
with a red asterisk (*) are required fields.

3
EVS User Manual, Chapter 4
Updated 04/17/2018 (pv02/23/2018)
4. Select the Dental radio button to create a Dental PA. All of the fields marked with a red
asterisk (*) are required fields.

4
EVS User Manual, Chapter 4
Updated 04/17/2018 (pv02/23/2018)
When the Create Authorization is first displayed, all of the panels are expanded.
Collapse:
Click on the (–) button on the right hand side of the panel to collapse that panel.
Click the “Collapse All” link on the top right hand corner of the page to collapse all of the panels.

5
EVS User Manual, Chapter 4
Updated 04/17/2018 (pv02/23/2018)
Expand:
Click on the (+) button on the right hand side of the panel to expand that panel.
Click the “Expand All” link on the top right hand corner of the page to expand all of the panels.

6
EVS User Manual, Chapter 4
Updated 04/17/2018 (pv02/23/2018)
4.3. Process Types
Create Authorization is a one-page process for all prior authorization requests.
1. Select Medical or Dental to indicate the type of authorization that is being created.
2. The Process Type drop-down lists will display all of the available process types based on
the type of authorization that was selected. The required information in the Service Details
section is dependent on the process type selected.
Medical – Select one of the following process types from the drop-down list:
ABA Inpt M/S Retro BH Inpt
ADHC Ocular Retro BH Outpt
Audiology Outpt M/S Retro BH PHP/IOP
BH Inpt PCS Annual Update Retro BH Rehab
BH Outpt PCS One-Time Retro BH RTC
BH PHP/IOP PCS SDS Retro DME
BH Rehab PCS Significant Change Retro Home Health
BH RTC PCS Temporary Auth Retro Inpt M/S
DME PCS Transfer Retro Ocular
Home Health Retro ABA Retro Outpt M/S
Hospice Retro Audiology
Dental – Select one of the following process types from the drop-down list:
Dental
Dental Orthodontia
Retro Dental
Retro Dental Orthodontia
2
1

7
EVS User Manual, Chapter 4
Updated 04/17/2018 (pv02/23/2018)
4.4. Provider Information
The Requesting Provider Information is automatically populated with the Provider ID and Name of
the provider that the signed-in user is associated with.
Medical Process Types:
Referring Provider Information
o If there is a referring provider, complete one of the following options:
1. Check the box to indicate - Referring Provider same as Requesting Provider
OR
2. Use the “Select from Favorites” drop-down list to select a provider from your
favorites list
OR
3. Enter Provider ID and ID Type
Service Provider Information
o Complete one of the following options:
1. Check the box to indicate – Service Provider same as Requesting Provider
OR
2. Use the “Select from Favorites” drop-down list to select a provider from your
favorites list
OR
3. Enter Provider ID and ID Type
Check the Add to Favorites checkbox to add the entered provider to the favorite providers
list
Select service location from the ”Location” drop-down list (Optional)
Required fields are marked with a red asterisk (*)

8
EVS User Manual, Chapter 4
Updated 04/17/2018 (pv02/23/2018)
Dental Process Types:
Rendering Provider Information
o If there is a rendering provider, complete one of the following options:
1. Check the box to indicate - Rendering Provider same as Requesting Provider
OR
2. Use the “Select from Favorites” drop-down list to select a provider from your
favorites list
OR
3. Enter Provider ID and ID Type
o Check the Add to Favorites checkbox to add the entered provider to the favorite
providers list.
o Select place of service from the “Place of Service” drop-down list (Required)
Required fields are marked with a red asterisk (*)

9
EVS User Manual, Chapter 4
Updated 04/17/2018 (pv02/23/2018)
4.5. Recipient Information
The Last Name, First Name, and Birth Date will be automatically populated based on the
Recipient ID that is entered.
Medical
Required fields are marked with a red asterisk (*)
Dental
The recipient information panel for dental PAs also includes a field to enter the initial X-Ray/Photo
Date, and a tooth chart to indicate which of the patient’s teeth are missing (if applicable).
Required fields are marked with a red asterisk (*)

10
EVS User Manual, Chapter 4
Updated 04/17/2018 (pv02/23/2018)
4.6. Service Information
The Process Type selected determines the fields presented in Service Details panel.
All authorizations require:
o At least one diagnosis code (enter without decimals)
o Service details (up to 27 service lines)
Attachments can be submitted:
o Electronically
o By Mail
o By Fax
Diagnosis Information
The first diagnosis entered is considered to be the principal or primary diagnosis code.
Portal allows for up to 9 diagnosis codes.
Diagnosis codes are searchable.
o Enter the first three letters or the first three numbers of the code to use the predictive
search.
Click “Add” button to add each diagnosis code.
Required fields are marked with a red asterisk (*)

11
EVS User Manual, Chapter 4
Updated 04/17/2018 (pv02/23/2018)
Service Details for Inpatient Process Types
Inpatient M/S, BH Inpatient, BH RTC, Hospice, Retro BH Inpatient, Retro BH RTC, Retro Hospice
and Retro Inpatient M/S
Inpatient Process Type authorizations can have up to 27 service lines.
For hospital inpatient concurrent reviews that are greater than 27 lines, beginning at what
would be line 28, please start a new PA with the next day’s date following the “through”
date from line 27.
For example:
– Line 27: 1/1 to 1/4
– Line 28 of new PA: 1/5
This is only for concurrent review PAs with more than 27 lines.
Note: Please remember that only one (1) PA is allowed per claim. If you have more than
one PA, please split bill the claim if it is for one continuous stay.
Revenue codes are searchable.
o Enter the first three numbers, or description of the code to use the predictive
search.
Enter the requested From Date. The Through date will automatically be calculated when
the service line is added to the PA by clicking the “Add Service” button.
o The Through date will be based on the # of Days requested without the addition of
a day for the Date of Discharge
o Service lines with overlapping dates are not allowed.
The Medical Justification field allows up to 6000 characters. Acceptable characters
include [a-z], [A-Z], [0-9], spaces and characters '.?!,()-+:;_%/\=&#*$^@.
If your National Provider Identifier (NPI) is tied to multiple provider types, i.e., 10, 11 and
12, 20, please enter the provider type associated with the authorization request in the
medical justification field.
Click “Add Service” button to add the service line to the PA
Use the Copy link to copy the service line information to the next line.
Use the Remove link to remove any service lines added in error.
Required fields are marked with a red asterisk (*)

12
EVS User Manual, Chapter 4
Updated 04/17/2018 (pv02/23/2018)
Service Details for Medical Non Inpatient Process Types
ABA, ADHC, Audiology, BH Outpatient, BH PHP/IOP, BH Rehab, DME, Home Health, Hospice, Ocular, Outpatient M/S, PCS Annual Update, PCS Informational Cancel, PCS Initial, PCS One-Time, PCS Significant Change, PCS SDS, PCS Temporary Auth, PCS Transfer, Retro ABA, Retro Audiology, Retro BH Outpatient, Retro BH PHP/IOP, Retro BH Rehab, Retro DME, Retro Hospice, Retro Home Health, Retro Ocular, and Retro Outpatient M/S
Non Inpatient Process Type authorizations can have up to 27 service lines.
CPT/HCPCS codes are searchable.
o Enter the first three numbers or description of the code to use the predictive search.
Enter the requested “From Date.” The “To Date” is optional but can be used to request a
date range.
Modifiers – If applicable, up to four modifiers can be entered.
Enter the number of units for the service being requested.
(Optional) Frequency – drop-down list that only appears for ADHC and PCS Process
Types. If applicable, select the frequency of the service being requested.
The Medical Justification field allows up to 6000 characters. Acceptable characters
include [a-z], [A-Z], [0-9], spaces and characters '.?!,()-+:;_%/\=&#*$^@.
If your National Provider Identifier (NPI) is tied to multiple provider types, i.e., 10, 11 and
12, 20, please enter the provider type associated with the authorization request in the
medical justification field.
Click “Add Service” button to add the service line to the PA.
Use the Copy link to copy the service line information to the next line.
Use the Remove link to remove any service lines added in error.
Required fields are marked with a red asterisk (*)

13
EVS User Manual, Chapter 4
Updated 04/17/2018 (pv02/23/2018)
Service Details for Dental Process Types
Dental, Dental Orthodontia, Retro Dental, and Retro Dental Orthodontia
Dental Process Type authorizations can have up to 27 service lines.
CPT/HCPCS and CDT codes are searchable.
o Enter the first three numbers or description of the code to use the predictive search.
Enter the requested “From Date.” The “To Date” is optional, but can be used to request a
date range.
o If a “To Date” is entered, it can’t exceed more than 365 days from the “From
Date.”
Modifiers – If applicable, up to four modifiers can be entered.
Enter the number of units for the service being requested.
Tooth Number – drop-down list to select the tooth number of the service being requested.
Tooth Surface – drop-down list to select the tooth surface of the service being requested.
Oral Cavity Area – drop-down list to select the oral cavity area of the service being
requested.
Requested Dollars – If applicable, enter a requested dollar amount.
The Medical Justification field allows up to 6000 characters. Acceptable characters
include [a-z], [A-Z], [0-9], spaces and characters '.?!,()-+:;_%/\=&#*$^@.
Click “Add Service” button to add the service line to the PA
Use the Copy link to copy the service line information to the next line.
Use the Remove link to remove any service lines added in error.
Required fields are marked with a red asterisk (*)

14
EVS User Manual, Chapter 4
Updated 04/17/2018 (pv02/23/2018)
Attachments
Attachments are required for all prior authorization requests. Requests are not considered
submitted unless there is an attachment. If an attachment is added at a later time, the request will
be considered submitted at the time the attachment is added.
To include attachments electronically with a prior authorization request:
Transmission Method – Electronic Only is selected by default
Upload File – click ”Browse” button and locate file to be attached and click to attach
Attachment type – select from the drop-down box the type of attachment being sent
Select the “ADD” button to attach your file
Repeat for additional attachments if needed (Note: the combined size of all attachments
cannot exceed 4 MB)
To remove any attachments that were attached incorrectly, use the Remove link
Note: Attachment section is required to be completed and at least one attachment is required if
the selected transmission method is Electronic Only.
Required fields are marked with a red asterisk (*)
To submit prior authorization attachments by fax or by mail:
Select the Transmission Method – By Mail or By Fax
Attachment type – select from the drop-down box the type of attachment being sent
You MUST reference the original prior authorization tracking number on your documents
to ensure the faxed or mailed documents will be matched up to the correct prior
authorization request
Include your National Provider Identifier (NPI) and provider type (i.e. 10, 11, 12, 20,
etc.) on the faxed or mailed documents. These elements can be written or typed on your
fax cover sheet or on the documents you are submitting, such as an “FA” prior
authorization form.
Prior authorization requests will not be reviewed until the attachments are received. If the
attachments are not received within 30 days, the PA will automatically be canceled.

15
EVS User Manual, Chapter 4
Updated 04/17/2018 (pv02/23/2018)
Fax attachments to:
Nevada Medicaid Prior Authorization department. Each form lists the correct fax number to use.
Dental: 855-709-6848
PASRR: 855-709-6847
PCS: 855-709-6846
All Other: 866-480-9903
Mail attachments to:
Dental and Personal Care Aid (PCA) Requests:
Nevada Medicaid
Attention: “Dental PA” or “PCA PA”
PO BOX 30042
Reno, NV 89520-3042
All Other Services (except Pharmacy):
Nevada Medicaid
Attention: Nevada Medicaid Prior Authorization
6511 SE Forbes Ave., Bldg 283
Topeka, KS 66619-0287
Unsaved Data Warning
For a new or resubmitted prior authorization request, when at least one service line has been
entered and there is another service line added but not saved by clicking the “Add Service”
button before clicking the “Submit” button, then the following error message will be displayed:

16
EVS User Manual, Chapter 4
Updated 04/17/2018 (pv02/23/2018)
Finalizing a Prior Authorization
Once all of the required information, service details lines, and attachment information has been
added, click the “Submit” button to go to the Confirm Authorization page. This page contains all
of the authorization details. Review the information for accuracy. Use the “Back” button to return
to the Create Authorization page if errors are present. After all of the information has been
reviewed, select the “Confirm” button to send your authorization for processing.
Authorization Receipt Page
The Authorization Receipt page will display the Authorization Tracking number; this number is
used to track your authorization in the portal.
Print Preview
Opens new window with all of the authorization information viewable
Printable page with date and time stamp
Copy
Copy recipient data or authorization data to a new authorization

17
EVS User Manual, Chapter 4
Updated 04/17/2018 (pv02/23/2018)
New
Create a new authorization for a different recipient
Copying an Authorization
The ability to copy an authorization, by recipient or service, is available on the authorization
receipt page, after successfully submitting an authorization.
Copy authorizations by Member Data
You can copy an authorization for an existing recipient when requesting a new service.
Only the recipient data is copied for the copy request.
Create Authorization:
Review pre-populated recipient data
Select process type
Enter provider information
Enter all required data
Add attachments
Click Submit
Review all information
Select Confirm
Authorization Receipt page
Copy authorizations by Authorization Data
You can copy an authorization by service, so a specialist can submit authorizations for
similar services but for a different recipient.
All of the authorization data is copied with the exception of the recipient data and the
attachments section.

18
EVS User Manual, Chapter 4
Updated 04/17/2018 (pv02/23/2018)
Create Authorization:
Enter recipient data
Review all pre-populated data
Add attachments
Select submit
Review all information
Select Confirm
Authorization Receipt page
4.7. Submitting Additional Information If you have submitted a PA request via the Provider Web Portal, but need to submit additional
information such as:
Requests for additional services
Attachments that were not submitted with original PA submission
FA-29 Prior Authorization Data Correction Form
FA-29A Request for Termination of Service
Resubmission process:
1. Search for the PA using the View Authorization Search page
2. Click on the Authorization Tracking Number in the Search Results grid
3. Click on the “Edit” button on the View Authorization Response page.
4. The PA is re-opened, new diagnosis codes, service details, and/or attachment can be
added.
o Changes cannot be made to previously submitted information. If you need to
update previously submitted information, attach the FA-29 Prior Authorization Data
Correction Form to the PA that needs to be updated.

19
EVS User Manual, Chapter 4
Updated 04/17/2018 (pv02/23/2018)
Note: PAs with a status of Not Certified or Cancel can not be resubmitted. The “Edit” button will
not appear on the View Authorization Response page.
5. Once the new information has been added to the PA, click on the “Resubmit” button to
review the PA information
6. Click the “Confirm” button to resubmit the PA.
7. The Authorization Tracking Number will remain the same.
4.8. Checking prior authorization status
Logged-in users are able to inquire on the status of any Prior Authorization (PA) request,
regardless of type of submission (i.e., electronic, paper or fax).
To check status of a PA:

20
EVS User Manual, Chapter 4
Updated 04/17/2018 (pv02/23/2018)
1. After logging in, click the Care Management tab at the top of the page.
You will be directed to the Authorizations page.
2. Click View Status of Authorizations.
You will be directed to the View Authorization Status page. Two tabs will be displayed.
3. The Prospective Authorizations tab displays a list of authorizations with dates of service
starting with the current date going forward, by either the requesting or servicing provider. If
there are no authorizations to view, you will see the following page.
1
2

21
EVS User Manual, Chapter 4
Updated 04/17/2018 (pv02/23/2018)
If there are authorizations to view, they will be listed under Prospective Authorizations. You can
click on the column heading to sort the view of the last 20 authorizations by Authorization
Tracking Number, Service Date, Recipient Name, Recipient ID, Authorization Type, Requesting
Provider, or Servicing Provider.
To view authorizations:
4. Click the Authorization Tracking Number to get the PA for the member listed.
5. Click “Expand All” or the “ ” icons to view the full PA details.
5
3
4

22
EVS User Manual, Chapter 4
Updated 04/17/2018 (pv02/23/2018)
By expanding the page, you can view:
1. Requesting Provider Information
2. Recipient Information
3. Diagnosis Information
4. Service Provider/Service Details Information
5. To view full page in printable format, click the “Print Preview” box that will appear at the
bottom of the page.
1
2
3
4
5

23
EVS User Manual, Chapter 4
Updated 04/17/2018 (pv02/23/2018)
6. An additional small page will display giving you a printable view. Click “Print” for printing
option.
7. You can also print using View Provider Request displayed on the View Authorization Response
page. The View Provider Request page will display all of the dates of service and units
requested by the provider.
8. To check status of another PA, click on “Back to View Authorization Status.”
6
8
7

24
EVS User Manual, Chapter 4
Updated 04/17/2018 (pv02/23/2018)
Medical Citation
If there is medical citation or notes to the provider, a View link will be displayed in the Medical
Citation Column.
To view the medical citation and notes to provider, click on the the View link.

25
EVS User Manual, Chapter 4
Updated 04/17/2018 (pv02/23/2018)
Search Options Tab:
You also have the ability to search for specific authorizations by clicking on the Search Options
tab instead of the Prospective Authorizations tab.
To search for authorizations under the View Authorization Status, enter at least one of the
following:
1. Authorization Information
o Authorization Tracking Number
o Day Range or Service Date
-OR-
2. Status Information
o Select a status from the Status drop-down list
o When searching using status you will have to also enter at least one of the following:
Authorization Tracking Number
Day Range or Service Date
Recipient Information
Provider Information
o Please allow up to one hour after the time of your PA submission before trying to search
using “Status Information.”
-OR-
3. Enter at least one of the following: Recipient Information
o Recipient ID
o Birth Date
o Last Name
o First Name
o If birth date or first name is entered, then member ID and/or last name must also be
entered.
-OR-
4. Enter the following: Provider Information
o Provider ID
o ID Type
o Servicing/Referring Provider selection
To search by Provider Information, you can search for servicing/rendering provider by
clicking on the magnifying glass icon “ ”. Clicking on the magnifying glass will
take you to the Provider Search page.
5. After the search criteria has been entered, click the “Search” button.

26
EVS User Manual, Chapter 4
Updated 04/17/2018 (pv02/23/2018)
Search Results
The Search Results grid will display the PAs that match the search criteria or display a message
that there are no results. Click on the “Authorization Tracking Number” to view the statuses of the
individual detail lines.
Prior authorization searches done without selecting a status will not display status information in
the search results. The service dates displayed in the search results are the overall service dates
of the PA.
Prior Authorization searches done using status will display service lines of all PAs with the
specified status. The service dates displayed in the Search Results grid are the service dates on the
service line and not the overall service dates of the PA. The results will also display the service line
details including the Procedure or Revenue Code.
1
2
3
4
5

27
EVS User Manual, Chapter 4
Updated 04/17/2018 (pv02/23/2018)
6. For additional searches, click the “Reset” button on the View Authorization Status page and
enter in required information. Click “Search” button again.
4.9. Checking PA status through member focused viewing
The Member Focused Viewing link allows you to view a summary of all recipients’ information on one
page, based on the last 10 recipients previously viewed in the Electronic Verification System (EVS).
When you search for other recipients in EVS, the Member Focused Viewing page remains available,
so you do not have to repeat searches.
To check on PA status:
1. Click Member Focused Viewing from the My Home page.
The Member Focus Search page displays two tabs. If you have previously viewed recipients, the
Last Member Viewed tab displays up to the last 10 searches. If no recipients have been previously
viewed, then only the Search tab displays. Selection of an individual recipient from either tab
1
County Hospital Outpatient
Services

28
EVS User Manual, Chapter 4
Updated 04/17/2018 (pv02/23/2018)
displays the Member In Focus bar at the top of the page, and summary information below,
including their recent activity.
2. Click the name that is listed on the Member Focus Search page.
-OR-
3. Click the Search tab and enter in required information.
The Search tab allows you to search for recipients and select a recipient to view. When searching
for recipients, you must enter complete information. Partial information will not generate a search.
To avoid generating a large number of search results, you should enter as
much information as possible to limit your searches.
4. After search criteria has been entered, click the “Search” button.
Search results display on the Search Results page.
5. Click recipient’s name in the search results for Member in Focus details.
3
2
4
5

29
EVS User Manual, Chapter 4
Updated 04/17/2018 (pv02/23/2018)
The recipient details show the recipient’s demographics, benefit plans (if applicable), pending
claims, authorizations, or no results. At the top of the page, the recipient will remain in focus even
if the user checks details on another recipient.
6. Click the authorization listed under the Your Member Authorizations heading. You will be
directed to the View Authorization Response page.
7. Click Expand All or the “ ” icons to view the PA details.
6
7
30
EVS User Manual, Chapter 4
Updated 04/17/2018 (pv02/23/2018)
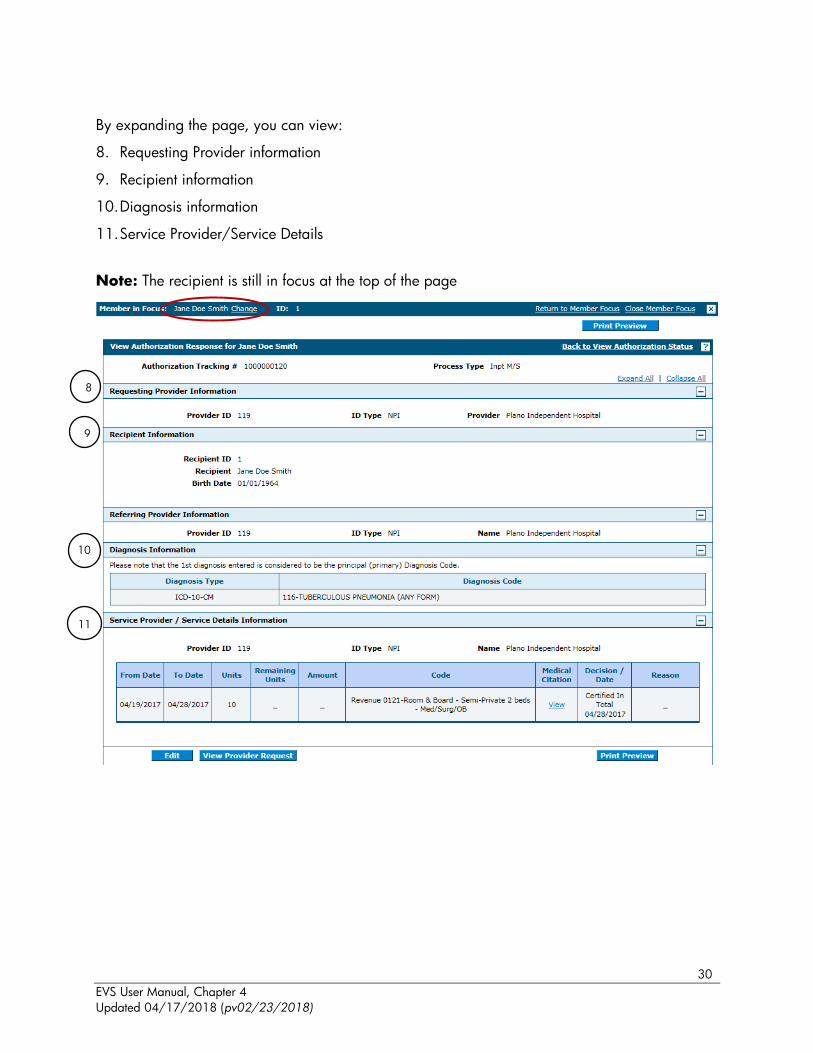
By expanding the page, you can view:
8. Requesting Provider information
9. Recipient information
10. Diagnosis information
11. Service Provider/Service Details
Note: The recipient is still in focus at the top of the page
8
9
10
11

31
EVS User Manual, Chapter 4
Updated 04/17/2018 (pv02/23/2018)
To print the Authorization Request:
1. To view full page in printable format, click Print Preview. An additional small page displays
giving you a printable view.
2. Click “Print” button for printing option.
1
2

32
EVS User Manual, Chapter 4
Updated 04/17/2018 (pv02/23/2018)
3. You can also print by clicking View Provider Request displayed on the View Authorization
Response page. This will show the units and “From” and “To/Through” dates requested by
the provider.
1. To check the status of another PA or for another recipient, click Back to View Authorization
Status.
2. To view the original requested dates of service and units on the PA, click View Provider
Request.
3. To change the recipient in focus, click Change next to the name in the Member in Focus bar.
This will take you back to the Member in Focus page. You can select from the other recipients
on the list.
4. To remove the member in focus while checking PA status on another recipient, click Close
Member Focus or click on the “ ” icon. The View Authorization Response page will then be
in view and the user will no longer be in Member Focused Viewing.

33
EVS User Manual, Chapter 4
Updated 04/17/2018 (pv02/23/2018)
4.10. Maintain Favorite Providers
Providers and delegates can add and remove providers from their favorites list using the Maintain
Favorite Providers page, located under the Care Manangement tab. The list of favorite providers
will be available for selection as the servicing provider, referring provider and rendering provider
when creating a prior authorization. Up to 20 providers can be added to the favorites list.
Add a Favorite Provider:
1. Enter the Facility or Provider ID and ID Type, then click Add.
2. If you do not know the ID and type, click the magnifying glass for a provider look up.
The Provider Search page allows you to Search By ID or search by name when clicking on
the Search By Name tab, and search by organization when clicking on the Search By
Organization tab.
1
2
3
4

34
EVS User Manual, Chapter 4
Updated 04/17/2018 (pv02/23/2018)
Delete a Favorite Provider:
1. To delete a provider, select the Remove link on the right side of the row.
4.11. Logging out of PA status
After verifying PA status, it is strongly recommended that you log off after each session. This will
ensure PHI is secure and makes the login readily available for the next user.
1. To log out, click Logout located at the top right-hand corner of the page.
This hyperlink is located in the same area on all pages within EVS.
After clicking Logout, the Logout Confirmation page displays.
2. Click OK or click Cancel to go back to previous page.
After clicking OK, you will be taken back to the Provider Login Home page.
1
`
2
`

35
EVS User Manual, Chapter 4
Updated 04/17/2018 (pv02/23/2018)
4.12. Authorization Criteria
The Authorization Criteria page allows providers and their delegates the ability to search criteria
for PA requirements for a procedure or revenue code based on provider type and specialty using
Provider Web Portal. The online authorization criteria search can be accessed through the
unsecured and secured areas of the Provider Web Portal.
Gaining access to Authorization Criteria
To access the Authorization Criteria page using the unsecured area of the Provider Web Portal:
1. Open a web browser such as Internet Explorer or Firefox.
2. Enter www.medicaid.nv.gov in the address bar.
3. The Provider Web Portal Home page opens as shown below. Then click EVS. The submenu
displays User Manual or Provider Login (EVS).
4. Click Provider Login (EVS). The EVS Home page opens.
5. Click Authorization Criteria.
To access the Authorization Criteria page using the secured area of the Provider Web Portal:
1. Open a web browser such as Internet Explorer or Firefox.
2. Enter www.medicaid.nv.gov in the address bar.

36
EVS User Manual, Chapter 4
Updated 04/17/2018 (pv02/23/2018)
3. The Provider Web Portal homepage opens as shown below. Then click EVS. The submenu
displays User Manual or Provider Login (EVS).
4. Click Provider Login (EVS). The EVS Home page opens.
5. Log in to the Provider Web Portal.
6. On the “My Home” page, under Care Management click the “Authorization Criteria” link to
open the Authorization Criteria page:

37
EVS User Manual, Chapter 4
Updated 04/17/2018 (pv02/23/2018)
When the Authorization Criteria link is clicked on either the unsecured or secured areas of the
Provider Web Portal, the Authorization Criteria provider portal page is displayed.
The following fields are displayed on the Authorization Criteria page:
1. Code Type (Dental, Medical (CPT/HCPCS) and Revenue Code)
2. Procedure Code or Description
3. Provider Type
4. Provider Specialty (optional)
The fields marked with a red * are required fields.
Note: The provider type will default to the logged in provider’s type when the Authorization
Criteria page is accessed from the secure portal. The defaulted provider type can be overridden.
1. Code Type select one of the following options:
2. Procedure Code or Description.
Enter Procedure Code:
OR
Enter Description of the code:
1
2
3
4

38
EVS User Manual, Chapter 4
Updated 04/17/2018 (pv02/23/2018)
3. Provider Type.
Enter Number: (If not using the default)
OR
Enter Description:
4. Provider Specialty.
Enter Specialty Code:
OR
Enter Description:
Please note: In most instances the Provider Specialty is not necessary and may not be required.
If you enter a specialty and the result you receive is “There are no records found based on the
search criteria entered,” please re-check with the Provider Specialty field blank.

39
EVS User Manual, Chapter 4
Updated 04/17/2018 (pv02/23/2018)
After all of the search criteria has been entered, click the “Search” button to display the search
results:
If multiple rows are returned, the search results can be sorted by:
Provider Specialty
Claim Type
PA Required
Age Restrictions
Effective date
The example below is sorted by Provider Specialty: