Chapter 4 - Lighting Migration to Campus Network Architecture · CHAPTER 4-1 Cisco Digital Ceiling...
22
CHAPTER 4-1 Cisco Digital Ceiling Cree Solution Implementation Guide 4 Lighting Migration to Campus Network Architecture This chapter covers the implementation details for migrating a lighting deployment installed as an initial install to a converged Campus Network architecture. Lighting migration to multiple topologies are also discussed in more details in Section 3.1, “System Topologies” of the Cisco Digital Building Cree Design Guide. Implementation of networking Layer 2, Layer 3, and security features required for Connected Lighting with Campus Network deployment is discussed in the following topics: • Network Topology, page 4-1 • Campus Network Core/Aggregation Switch Cisco Catalyst 4500-X, page 4-3 • Wiring Closet Access Switch (Cisco Catalyst 3850 Stack), page 4-10 • Wiring Closet Access Switch (Cisco Catalyst 4506-E), page 4-18 • Provisioning Light Fixtures (SmartCast Manager), page 4-22 Network Topology During migration, the access switches in the wiring closet (Cisco Catalyst 3850 stack and/or Cisco Catalyst 4506-E) connect to a production Campus Network core/aggregation switch with separate logical networks for Cree light fixtures, as shown in Figure 4-1.
Transcript of Chapter 4 - Lighting Migration to Campus Network Architecture · CHAPTER 4-1 Cisco Digital Ceiling...

Implementation Guide
C H A P T E R 4
Lighting Migration to Campus Network ArchitectureThis chapter covers the implementation details for migrating a lighting deployment installed as an initial install to a converged Campus Network architecture. Lighting migration to multiple topologies are also discussed in more details in Section 3.1, “System Topologies” of the Cisco Digital Building Cree Design Guide.
Implementation of networking Layer 2, Layer 3, and security features required for Connected Lighting with Campus Network deployment is discussed in the following topics:
• Network Topology, page 4-1
• Campus Network Core/Aggregation Switch Cisco Catalyst 4500-X, page 4-3
• Wiring Closet Access Switch (Cisco Catalyst 3850 Stack), page 4-10
• Wiring Closet Access Switch (Cisco Catalyst 4506-E), page 4-18
• Provisioning Light Fixtures (SmartCast Manager), page 4-22
Network TopologyDuring migration, the access switches in the wiring closet (Cisco Catalyst 3850 stack and/or Cisco Catalyst 4506-E) connect to a production Campus Network core/aggregation switch with separate logical networks for Cree light fixtures, as shown in Figure 4-1.
4-1Cisco Digital Ceiling Cree Solution

Chapter 4 Lighting Migration to Campus Network Architecture Network Topology
Figure 4-1 Cisco Digital Building Cree Solution Large Scale Deployment on Campus Network Architecture with Cisco Catalyst 3850 Access Switch Stack
4-2Cisco Digital Ceiling Cree Solution
Implementation Guide
Chapter 4 Lighting Migration to Campus Network Architecture Campus Network Core/Aggregation Switch Cisco Catalyst 4500-X
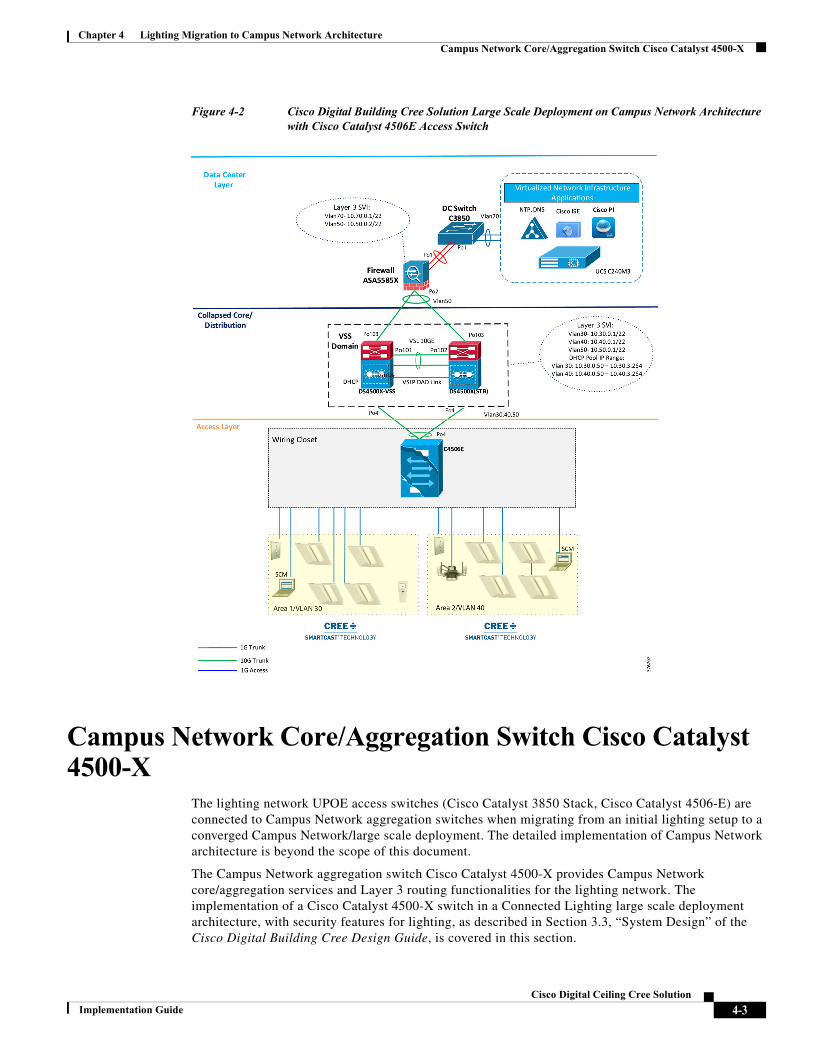
Figure 4-2 Cisco Digital Building Cree Solution Large Scale Deployment on Campus Network Architecture with Cisco Catalyst 4506E Access Switch
Campus Network Core/Aggregation Switch Cisco Catalyst 4500-X
The lighting network UPOE access switches (Cisco Catalyst 3850 Stack, Cisco Catalyst 4506-E) are connected to Campus Network aggregation switches when migrating from an initial lighting setup to a converged Campus Network/large scale deployment. The detailed implementation of Campus Network architecture is beyond the scope of this document.
The Campus Network aggregation switch Cisco Catalyst 4500-X provides Campus Network core/aggregation services and Layer 3 routing functionalities for the lighting network. The implementation of a Cisco Catalyst 4500-X switch in a Connected Lighting large scale deployment architecture, with security features for lighting, as described in Section 3.3, “System Design” of the Cisco Digital Building Cree Design Guide, is covered in this section.
4-3Cisco Digital Ceiling Cree Solution
Implementation Guide

Chapter 4 Lighting Migration to Campus Network Architecture Campus Network Core/Aggregation Switch Cisco Catalyst 4500-X
Configuring Virtual Switching System
The system topology in Figure 3-1 on page 3-2 shows one of the implementations of a Campus Network aggregation as a collapsed core/distribution model for this Cisco Digital Building Cree Solution. The aggregation Cisco Catalyst 4500-X switches implement Virtual Switching System (VSS) to provide network redundancy at the aggregation layer.
A VSS combines a pair of Cisco Catalyst 4500-X series switches into a single network element. The VSS manages the redundant links, which externally act as a single port channel. The VSS simplifies network configuration and operation by reducing the number of Layer 3 routing neighbors and by providing a loop-free Layer 2 topology.
Note The lighting network converges to a production Campus Network where VSS may not be implemented at network aggregation. In this case, VSS configuration steps discussed in this section are not required.
Refer to the Catalyst 4500 Series Switch Software Configuration Guide, IOS XE 3.7.xE and IOS 15.2(3)Ex for a detailed step-by-step implementation of VSS on a Cisco Catalyst 4500-X switch
• http://www.cisco.com/c/en/us/td/docs/switches/lan/catalyst4500/XE3-7-0E/15-23E/configuration/guide/xe-370-configuration/vss.html
Configuring Network Layer 2 and Layer 3
This section defines the implementation of VLANs and Layer 3 logical interfaces on the Cisco Catalyst 4500-X switch.
Step 1 Enable LLDP on the switch:
CL-4500X(config)#lldp run
Step 2 Configure VLANs, which must be created along with ports assignment on the Cisco Catalyst 4500-X switch:
CL-4500X(config)#vlan 30,40,50
Step 3 Create a Layer 3 SVI for the lighting VLANs. The example configuration below shows SVIs for the lighting VLANs and network management VLAN on the Cisco Catalyst 4500-X switch:
interface Vlan30 ip address 10.30.0.1 255.255.252.0 !interface Vlan40 ip address 10.40.0.1 255.255.252.0!interface Vlan50 ip address 10.50.0.1 255.255.252.0!
Note When migrating the lighting initial setup to a converged Campus Network, remove SVIs of lighting VLANs that you may have created on wiring closet access switches (Cisco Catalyst 3850 stack/Cisco Catalyst 4506-E). SVIs for lighting VLANs are configured at core/aggregation switches, which provide Layer 3 services to lighting network.
4-4Cisco Digital Ceiling Cree Solution
Implementation Guide

Chapter 4 Lighting Migration to Campus Network Architecture Campus Network Core/Aggregation Switch Cisco Catalyst 4500-X
Step 4 Create Port Channel interfaces on a Cisco Catalyst 4500-X to wiring closet switches (Cisco Catalyst 3850 stack and Cisco Catalyst 4506-E), and an ASA firewall in the network, as shown below:
interface Port-channel2 description Etherchannel Link to 3850 Switch Stack switchport switchport mode trunk switchport trunk allowed vlan 30,40,50end!interface Port-channel4 description Etherchannel Link to 4506E Switch switchport switchport trunk allowed vlan 30,40,50 switchport mode trunkend!interface Port-channel103 description Etherchannel Link to ASA5585 Firewall switchport switchport trunk allowed vlan 50 switchport mode trunkend
Step 5 Enable EtherChannel on the appropriate physical switch ports connected to the Cisco Catalyst 3850 stack, Cisco Catalyst 4506-E, and ASA. The following configuration shows the Port Channel assignment to switch physical ports:
Physical links to a Cisco Catalyst 3850 switch stack in a wiring closet:
interface TenGigabitEthernet1/1/11 channel-group 2 mode activeinterface TenGigabitEthernet2/1/11 channel-group 2 mode active
Physical links to a Cisco Catalyst 4506-E switch in a wiring closet:
interface TenGigabitEthernet1/1/13 channel-group 4 mode activeend !interface TenGigabitEthernet2/1/13 channel-group 4 mode activeend
Physical links to an Cisco ASA 5585 firewall switch:
interface TenGigabitEthernet1/1/3 channel-group 103 mode activeend !interface TenGigabitEthernet2/1/3 channel-group 103 mode activeend!
Step 6 The following commands add static default routes to the Cisco ASA 5585:
ip route 10.70.0.0 255.255.255.0 10.90.0.1
Step 7 Enable rapid per-vlan spanning tree:
!spanning-tree mode rapid-pvst
4-5Cisco Digital Ceiling Cree Solution
Implementation Guide

Chapter 4 Lighting Migration to Campus Network Architecture Campus Network Core/Aggregation Switch Cisco Catalyst 4500-X
Configuring DHCP Server for Light Fixture IP Addressing
When migrating the lighting initial setup to a converged Campus Network, the DHCP server IP addressing pool for light fixtures and wall dimmers is configured on a Cisco Catalyst 4500-X aggregation switch to assign IP addresses to Cree endpoints, as shown in Figure 4-1 on page 4-2.
Note Make sure to remove the DHCP server configuration on wiring closet access switches (Cisco Catalyst 3850 or Cisco Catalyst 4506-E), which was performed on initial lighting setup.
Table 4-1 shows an example DHCP pool range for Cree endpoints.
Complete the following to configure DHCP server pool on Cisco Catalyst 4500-X aggregation switch for lighting network.
Configure DHCP pools for light fixtures on Cisco Catalyst 4500-X:
ip dhcp pool Cree network 10.30.0.0 255.255.252.0 default-router 10.30.0.1!!ip dhcp pool CREE-VLAN40 network 10.40.0.0 255.255.252.0 default-router 10.40.0.1!ip dhcp exclude-address 10.30.0.1 10.30.0.50ip dhcp exclude-address 10.40.0.1 10.40.0.50!
Configuring Security Features
Security features in the lighting network are important to protect light fixtures from network attacks, such as an IP address from untrusted DHCP servers, ARP attacks, denial-of-service attacks, broadcast storms, and so on. If proper security configurations are not implemented on switches, the light fixtures and the whole network becomes more susceptible to such attacks. Hence, features such as DHCP snooping, port security, ARP inspection, and ARP rate limiting will enable security on the switch and its ports to keep the network safe.
This section defines the recommended Layer 2 security features to be enabled within the Campus Network on the Cisco Catalyst 4500-X. For a detailed description of all the Layer 2 Security features, refer to the Cisco Catalyst 4500X Configuration Guide at the following link:
• Catalyst 4500 Series Switch Software Configuration Guide, IOS XE 3.7.xE and IOS 15.2(3)Ex
Table 4-1 IPv4 DHCP Address Pool on Cisco Catalyst 4500-X
Pool Network Excluded IP Range Purpose
10.30.0.0/22 10.30.0.1 - 10.30.0.50 DHCP pool for Cree light fixtures in VLAN 30
10.40.0.0/22 10.40.0.1 - 10.40.0.50 DHCP pool for Cree light fixtures in VLAN 40
4-6Cisco Digital Ceiling Cree Solution
Implementation Guide

Chapter 4 Lighting Migration to Campus Network Architecture Campus Network Core/Aggregation Switch Cisco Catalyst 4500-X
IP DHCP Snooping
DHCP snooping is a security feature that acts like a firewall between untrusted hosts and trusted DHCP servers. The DHCP snooping feature determines whether traffic sources are trusted or untrusted. An untrusted source may initiate traffic attacks or other hostile actions. To prevent such attacks, the DHCP snooping feature filters messages and rate-limits traffic from untrusted sources.
When lights are powered on, they request an IP address from a DHCP server. To make sure that the IP address is not provided by an untrusted DHCP server, IP DHCP snooping makes sure that DHCP packets sent by the server that are received only on the trusted ports are forwarded to the lights.
Complete the following steps on the Cisco Catalyst 4500-X switch to configure IP DHCP snooping:
Step 1 Configure the required port as DHCP snooping trusted port:
interface Port-channel103 ip dhcp snooping trust!
Step 2 Enable IP DHCP snooping globally for the per-port command to take effect:
ip dhcp snooping!
IP Source Guard
IP Source Guard is a security feature that restricts IP traffic on untrusted Layer 2 ports by filtering traffic based on the DHCP snooping binding database or manually configured IP source bindings. This feature helps prevent IP spoofing attacks when a host tries to spoof and use the IP address of another host.
All of the IP to MAC bindings learned on the Cisco Catalyst 4500-X on trusted ports will only be allowed to send or receive traffic. All the packets received on trusted ports with a different binding to a particular MAC will be dropped.
To configure IP Source Guard on the Cisco Catalyst 4500-X switch, configure the IP Source Guard on the downlink port channel interfaces to Cisco Catalyst 3850 stack and Cisco Catalyst 4506-E switches, which have trusted IP to MAC bindings as shown below:
interface Port-channel2 description Etherchannel Link to 3850 Switch Stack ip verify sourceend!interface Port-channel4 description Etherchannel Link to 4506E Switch ip verify sourceend
ARP Inspection
Dynamic ARP Inspection (DAI) is a security feature that validates ARP packets in a network. DAI intercepts, logs, and discards ARP packets with invalid IP-to-MAC address bindings. This capability protects the network from some man-in-the-middle attacks.
Lights or any other devices connected on untrusted ports of Cisco Catalyst 4500-X will be automatically put in an error disabled state so that device won't be able to get access to the network.
Complete the following steps on the Cisco Catalyst 4500-X switch to configure ARP inspection:
4-7Cisco Digital Ceiling Cree Solution
Implementation Guide

Chapter 4 Lighting Migration to Campus Network Architecture Campus Network Core/Aggregation Switch Cisco Catalyst 4500-X
Step 1 Configure the required port channels as ARP inspection trusted ports, as shown in the following example:
interface Port-channel2 description Etherchannel Link to 3850 Switch Stack ip arp inspection trustend!interface Port-channel4 description Etherchannel Link to 4506E Switch ip arp inspection trustend
Step 2 Enable ARP inspection globally for the required VLANs, so that the per-port command takes effect:
ip arp inspection vlan 30,50
Storm Control
A traffic storm occurs when packets flood the LAN, creating excessive traffic and degrading network performance. You can use the traffic storm control feature to prevent disruptions on Layer 2 ports by a broadcast, multicast, or unicast traffic storm on physical interfaces.
A broadcast or unicast storm is usually capable of creating a loss of access to the light fixtures and SCM, depending on the port bandwidth consumed by the storm. So keeping storm control limits the propagation of such packets to the light fixtures and maintains proper access to the light fixtures for the SCM.
Perform the following configuration on the 4500x switch to configure Storm Control:
Configure the Storm control for broadcast or unicast traffic, according to the maximum and minimum allowable threshold percentage of line rates:
interface Port-channel2 description Etherchannel Link to 3850 Switch Stack storm-control broadcast level 20.00 10.00 storm-control multicast level 50.00 30.00end!interface Port-channel4 description Etherchannel Link to 4506E Switch storm-control broadcast level 20.00 10.00 storm-control multicast level 50.00 30.00end
Disabling Telnet
Since Telnet is not secure, it should be disabled from accessing the device. The following command disables Telnet and enables only Secure Shell (SSH) access to the Cisco Catalyst 4500-X switch:
line vty 0 15 transport input ssh!
4-8Cisco Digital Ceiling Cree Solution
Implementation Guide

Chapter 4 Lighting Migration to Campus Network Architecture Campus Network Core/Aggregation Switch Cisco Catalyst 4500-X
Configuring Network Management (Simple Network Management Protocol)
Simple Network Management Protocol (SNMP) is used in the lighting network to manage and monitor the switches in the lighting network.
SNMP traps are configured to send light fixtures ports up/down status alerts to a network management server (Cisco Prime Infrastructure 3.0) that helps monitor light fixture's port status.
Configuring Switch Network Management
SNMPv3 protocol configuration is used on the Cisco Catalyst 4500-X switch for Network Management. The flow is shown in Figure 4-3.
Figure 4-3 Network Management SNMP Configuration Flow
Complete the following steps to configure SNMP v3:
Step 1 Configure SNMP v3 view:
snmp-server view CREE iso included
Step 2 Configure SNMP v3 group:
snmp-server group CREE v3 auth read CREE write CREE
Step 3 Configure SNMP v3 user:
snmp-server user CREE CREE v3 auth md5 123456789012345 priv aes 128 123456789012345
Step 4 Configure SNMP Traps:
snmp-server enable traps port-securitysnmp-server enable traps snmp
Step 5 Verify that the SNMP user, group, and view have been created using the following CLI show commands:
CL-DS4500X-VSS#sh snmp user
User name: CREEEngine ID: 8000000903001CE85D161A80storage-type: nonvolatile activeAuthentication Protocol: MD5Privacy Protocol: AES128Group-name: CREE
CL-DS4500X-VSS#sh snmp groupgroupname: CREE security model:v3 authcontextname: <no context specified> storage-type: nonvolatilereadview : CREE writeview: CREEnotifyview: <no notifyview specified>row status: active
CL-DS4500X-VSS#sh snmp view
Configure SNMP view
Configure SNMP group
Configure SNMP User
3767
18
4-9Cisco Digital Ceiling Cree Solution
Implementation Guide

Chapter 4 Lighting Migration to Campus Network Architecture Wiring Closet Access Switch (Cisco Catalyst 3850 Stack)
CREE iso - included nonvolatile activecac_view ip - included read-only activecac_view dot1dBridge - included read-only activecac_view ipForward - included read-only activecac_view ipTrafficStats - included read-only activecac_view sysUpTime.0 - included read-only activecac_view ciscoPingMIB - included read-only activecac_view ciscoStpExtensionsMIB - included read-only activecac_view ciscoIpSecFlowMonitorMIB - included read-only activecac_view ciscoIPsecMIB - included read-only activecac_view ifIndex - included read-only activecac_view ifDescr - included read-only activecac_view ifType - included read-only activecac_view ifAdminStatus - included read-only activecac_view ifOperStatus - included read-only activecac_view snmpTraps.3 - included read-only activecac_view snmpTraps.4 - included read-only activecac_view snmpTrapOID.0 - included read-only activecac_view snmpMIB.1.4.3.0 - included read-only activecac_view lifEntry.20 - included read-only activecac_view cciDescriptionEntry.1 - included read-only active
Configuring Logging (Syslog)
Syslog is a way for network devices to send event messages to a logging server. This logging server is known as a Syslog server. Cisco Prime Infrastructure is configured as a Syslog server in the lighting network to monitor the events, such as, light fixture port security violation, port up/down status, and so on.
Configure logging to a Syslog server (Prime Infrastructure) on the switch, as shown below:
logging host 10.70.0.150logging trap
Note 10.70.0.150 is the IP address of the Prime Infrastructure (Syslog server).
Wiring Closet Access Switch (Cisco Catalyst 3850 Stack)This section covers wiring a closet access switch Cisco Catalyst 3850 stack, Layer 2, Layer 3 networking, security configuration, and network management configurations.
Configure Cisco Catalyst 3850 Stack
A switch stack can have up to nine stacking-capable switches connected through their StackWise-480 ports. The stack members work together as a unified system. Layer 2 and Layer 3 protocols present the entire switch stack as a single entity to the network.
4-10Cisco Digital Ceiling Cree Solution
Implementation Guide

Chapter 4 Lighting Migration to Campus Network Architecture Wiring Closet Access Switch (Cisco Catalyst 3850 Stack)
The switches in the stack are assigned roles as active, stand-by, and member. However, all the switches in the stack are operational. A switch stack always assigns one switch active role and one standby role. If the active switch becomes unavailable, the standby switch assumes the role of the active switch, and continues to keep the stack operational. The active switch controls the operation of the switch stack, and is the single point of stack-wide management.
In this system implementation, a stack of four Cisco Catalyst 3850 UPOE (24 UPOE ports per switch) switches are configured in the network topology according to system requirements. Since each of those switches have 24 UPOE ports, light fixtures connected to any of them can be configured via the active switch of the stack.
A higher priority value for a stack member increases the probability of it being elected active switch and retaining its stack member number. The priority value can be 1 to 15. The default priority value is 1. You can display the stack member priority value by using the show switch EXEC command.
Note We recommend assigning the highest priority value to the switch that you prefer to be the active switch. This ensures that the switch is re-elected as the active switch if a re-election occurs.
The following configuration steps provide an example configuration needed to bring up the stack.
To install a Cisco Catalyst 3850 Switch Data Stack and Stack Manager, refer to the C3850 Hardware Installation Guide at the following URL:
• http://www.cisco.com/c/en/us/td/docs/switches/lan/catalyst3850/hardware/installation/guide/b_c3850_hig/b_c3850_hig_chapter_010.html
To configure a switch stack, refer to the High Availability Configuration Guide at the following URL:
• http://www.cisco.com/c/en/us/td/docs/switches/lan/catalyst3850/software/release/3se/ha_stack_manager/configuration_guide/b_hastck_3se_3850_cg/b_hastck_3se_3850_cg_chapter_010.html
When migrating a lighting initial setup on a Cisco Catalyst 3850 switch on a wiring closet, complete the following steps to configure the Cisco Catalyst 3850 switch as a member of the switch stack:
Step 1 Make sure that all four switches that are going to be part of the stack have the same boot configuration. Use the following show boot command to verify their boot parameters:
sh boot---------------------------Switch 4---------------------------Current Boot Variables:BOOT variable = flash:cat3k_caa-universalk9.SPA.03.07.00.EX.152-3.EX.bin;
Boot Variables on next reload:BOOT variable = flash:cat3k_caa-universalk9.SPA.03.07.00.EX.152-3.EX.bin;Allow Dev Key = yesManual Boot = noEnable Break = yes
Step 2 The boot variable for all the switches should be the same image file, as shown above. To configure it, use the command, as shown below:
boot system flash: cat3k_caa-universalk9.SPA.03.07.00.EX.152-3.EX.binno boot manual
Step 3 Once all the switches boot up with the same image and license, connect them in ring form to bring up the stack. Provision each of the switches from master, as shown below:
switch 1 provision ws-c3850-24u
4-11Cisco Digital Ceiling Cree Solution
Implementation Guide

Chapter 4 Lighting Migration to Campus Network Architecture Wiring Closet Access Switch (Cisco Catalyst 3850 Stack)
switch 2 provision ws-c3850-24uswitch 3 provision ws-c3850-24uswitch 4 provision ws-c3850-24u
Step 4 The switch which is needed to be Active after a stack reload/reboot, should be configured with a higher stack priority value of 15. The priority of switch can be configured in the Enable mode as shown below:
switch 1 priority 15
Configuring Network Layer 2 and Layer 3
This section defines the implementation of VLANs and logical SVI for management traffic on the Cisco Catalyst 3850 switch stack.
Step 1 Enable LLDP on the switch stack and static power configuration as follows:
3850-switch (config)#lldp run3850-Switch(config)#interface range gi 1/0/1-24 3850-Switch(config-if-range)# power inline static max 60000
Step 2 Configure VLANs, which must be created along with port assignments on the Cisco Catalyst 3850 switch stack. The following is an example VLAN configuration:
3850-switch (config)#vlan 30,50
Step 3 Configure switch ports connecting to light fixtures/wall dimmers on the appropriate lighting VLANs in access mode:
interface GigabitEthernet 1/1 switchport mode access switchport access vlan 30!
Step 4 Create Layer 3 SVI for the VLANs and default gateway, as required. The following configuration is an example configuration of management VLAN SVI on the Cisco Catalyst 3850 switch stack.
interface Vlan50 ip address 10.50.0.11 255.255.252.0 !ip route 0.0.0.0 0.0.0.0 10.50.0.1
Step 5 Create Port Channel uplink interfaces on a Cisco Catalyst 3850 stack to Campus Network aggregation switch (Cisco Catalyst 4500-X), as shown in Figure 4-1 on page 4-2.
interface Port-channel2 description Etherchannel Link to 4500X Switch switchport switchport mode trunk switchport trunk allowed vlan 30,40,50end
Step 6 Enable Port Channel on the appropriate physical switch ports connected to the Cisco Catalyst 4500-X switch. The following configuration shows the Port Channel assignment to switch physical ports.
Physical links to Cisco Catalyst 4500-X active and standby VSS switches:
interface TenGigabitEthernet1/1 channel-group 2 mode active
4-12Cisco Digital Ceiling Cree Solution
Implementation Guide

Chapter 4 Lighting Migration to Campus Network Architecture Wiring Closet Access Switch (Cisco Catalyst 3850 Stack)
interface TenGigabitEthernet1/2 channel-group 2 mode active
Step 7 Enable per-vlan spanning tree.
!spanning-tree mode rapid-pvst!
Configuring UPOE Features
All of the light fixtures receive power via the Universal Power over Ethernet (UPOE) ports of the Cisco Catalyst 3850 switch. Based on the type of light fixtures connected to the switch, the switch allocates power to them. Perpetual PoE and Fast PoE are the features that can help sustain the PoE under specific circumstances, where a switch may undergo a power failure or a soft reload.
The configurations shown below are not mandatory during initial installation. They only have to be configured on those access ports of the Cisco Catalyst 3850 switch on which certain light fixtures need to illuminate, even during a reload, or you want to them to turn on quickly after power restoration on the switch.
Perpetual PoE
Perpetual POE is a PoE enhancement feature on the Cisco Catalyst 3850 switch, which enables light fixtures connected on certain ports to continue to receive power during a soft reload of the switch.
For light fixture access ports to configure Perpetual POE, configure the required edge port on the Cisco Catalyst 3850 stack switch with the poe-ha command, which enables perpetual POE on that port:
interface GigabitEthernet2/1/1 power inline port poe-ha
Fast PoE
The Fast PoE feature on the Cisco Catalyst 3850 switch ports enables Cree light fixtures to illuminate with low brightness within 10 seconds (~15W of power given via cable, two pair by switch hardware) after restoring the power on switch/stack of switches, where power interruption caused the switch to go down.
The same IOS configuration command used for Perpetual PoE feature enables Fast PoE as well for Cree light fixtures.
Note The light fixtures are initially at low brightness within 20 seconds after power restore, and turn into full brightness after the UPOE switch is fully up and operational (approximately at 6-8 minutes).
4-13Cisco Digital Ceiling Cree Solution
Implementation Guide

Chapter 4 Lighting Migration to Campus Network Architecture Wiring Closet Access Switch (Cisco Catalyst 3850 Stack)
Configuring Security Features
Cisco Catalyst 3850 switch stack integrated security features can provide threat defense capabilities, for mitigating man-in-the-middle attacks and protecting the critical network infrastructure. This section details the switch configurations necessary for basic Layer 2 security features to be enabled as specified in the Cisco Digital Building Cree Design Guide.
For more security configuration, refer to the Consolidated Platform Configuration Guide, Cisco IOS XE 3.7E and Later (Catalyst 3850 Switches) at the following URL:
• http://www.cisco.com/c/en/us/td/docs/switches/lan/catalyst3850/software/release/37e/consolidated_guide/b_37e_consolidated_3850_cg.html
IP DHCP Snooping
Complete the following steps on the Cisco Catalyst 3850 stack switch to configure IP DHCP snooping:
Step 1 Configure the required port as DHCP snooping trusted port:
interface Port-channel2 ip dhcp snooping trust!
Step 2 Enable IP DHCP snooping globally for the per-port command to take effect:
ip dhcp snooping!
IP Source Guard
To configure IP Source Guard on the Cisco Catalyst 3850 stack switch, configure the IP source guard on the ports which have trusted IP to MAC bindings:
interface Port-channel2 ip verify source! On luminaire access ports,interface GigabitEthernet2/1/14 ip verify source!
ARP Inspection
Complete the following steps on the Cisco Catalyst 3850 stack switch to configure ARP Inspection:
Step 1 Configure the required port as an ARP inspection trusted port:
interface Port-channel2 ip arp inspection trust!
On light fixture access ports,
interface GigabitEthernet2/1/14
4-14Cisco Digital Ceiling Cree Solution
Implementation Guide

Chapter 4 Lighting Migration to Campus Network Architecture Wiring Closet Access Switch (Cisco Catalyst 3850 Stack)
ip arp inspection trust!
Step 2 Enable ARP inspection globally for the required VLANs, so that the per-port command takes effect:
ip arp inspection vlan 30,50
ARP Rate Limiting
Complete the following on the Cisco Catalyst 3850 stack switch to configure ARP Rate Limiting:
Configure the ARP Rate limiting according to the maximum allowable packet rate on light fixture access ports. The following is an example:
interface GigabitEthernet2/1/14 ip arp inspection limit rate 100
Port Security
You can use Port Security with dynamically learned and static MAC addresses to restrict a port's ingress traffic, by limiting the MAC addresses that are allowed to send traffic into the port. When you assign secure MAC addresses to a secure port, the port does not forward ingress traffic that has source addresses outside the group of defined addresses. If you limit the number of secure MAC addresses to one and assign a single secure MAC address, the device attached to that port has the full bandwidth of the port.
With port security, the MAC address of light fixtures that are learned on any secured port will be the only MAC address permitted on that port. If any other device is connected on that port, then it will throw a security violation alert.
Complete the following on the Cisco Catalyst 3850 stack switch to configure Port Security:
Configure Port Security on light fixture access ports in sticky mode, with the maximum allowable number of MAC address as one. Keep the violation as restrict. The following is an example:
interface GigabitEthernet2/1/14 switchport access vlan 30 switchport mode access switchport port-security violation restrict switchport port-security mac-address sticky switchport port-security aging type inactivity switchport port-security
Storm Control
Complete the following on the Cisco Catalyst 3850 stack switch to configure Storm Control:
Configure the Storm Control for broadcast or unicast traffic, according to the maximum and minimum allowable threshold percentage of line rates on light fixture access ports, as follows:
interface GigabitEthernet2/1/14 storm-control broadcast level 20.00 10.00 storm-control multicast level 50.00 30.00
4-15Cisco Digital Ceiling Cree Solution
Implementation Guide

Chapter 4 Lighting Migration to Campus Network Architecture Wiring Closet Access Switch (Cisco Catalyst 3850 Stack)
PortFast and BPDU Guard
PortFast BPDU Guard prevents loops by moving a nontrunking port into an errdisable state when a BPDU is received on that port. When you enable BPDU Guard on the switch, the spanning tree shuts down PortFast-configured interfaces that receive BPDUs instead of putting them into the spanning tree blocking state.
The ports connected to lights don't have to do a BPDU check for spanning tree and hence those ports can be configured for PortFast BPDU Guard.
To configure PortFast and BPDU Guard on the Cisco Catalyst 3850 stack switch, enable PortFast on the light fixture access ports, since no BPDUs are expected on that port, and then enable BPDU Guard:
interface GigabitEthernet2/1/14 spanning-tree portfast spanning-tree bpduguard enable
Port Access Lists
Port Access Lists (PACLs) filter incoming traffic on Layer 2 interfaces using Layer 3 information, Layer 4 header information, or non-IP Layer 2 information. The PACL feature uses standard or extended IP ACLs or named MAC-extended ACLs that you want to apply to the port.
The ports on which lights are connected should be able to filter packets based on specific Layer 4 port numbers, so that unwanted traffic doesn't reach the light. PACLs in this scenario specifically filter the port numbers that MA uses to communicate with lights.
Complete the following steps on the Cisco Catalyst 3850 stack switch to configure PACL:
Step 1 Configure the IP access list to permit the incoming traffic only for Layer 4 port numbers specific to communication between lights and SCM:
ip access-list extended 101 10 permit udp any eq 55004 any eq 5500520 permit udp any eq bootpc any eq bootps30 permit udp any eq bootps any eq bootpc40 permit icmp any any50 permit udp any eq 55004 any eq 5500760 permit udp any any eq snmp70 permit udp any eq snmp any80 permit udp any eq 55004 any eq 55006
Step 2 Apply this IP access list for the ingress traffic on the light fixture access ports. The following is an example:
interface GigabitEthernet2/1/14 ip access-group 101 inip access-group 101 out
Disabling Telnet
Telnet should be disabled for accessing the device since it is not secure. The following commands disable Telnet and enable only (SSH) access to the Cisco Catalyst 3850 switch:
line vty 0 15
4-16Cisco Digital Ceiling Cree Solution
Implementation Guide

Chapter 4 Lighting Migration to Campus Network Architecture Wiring Closet Access Switch (Cisco Catalyst 3850 Stack)
transport input ssh!
Configuring Network Management (Simple Network Management Protocol)
SNMP is used for collecting information from network devices in order to manage the network. SNMP is also used by SCM for discovering the switch and its ports to control the switch ports through SCM. However, this SNMP Switch and Port Discovery feature available in SCM requires SCM to be directly connected to the switch that needs to be discovered.
Note The SNMP Switch and Ports Discovery feature in SCM requires an SVI with IP address configured on the switch for Cree light fixtures VLAN, to discover the switch and its ports. The configuration discussed in the next section is required, if you need to discover the switch and control switch ports through SCM only.
Note SNMP discovery of switch and its ports on SCM works with Cisco Catalyst 3850 Switch and SwitchStack only. It also requires SCM to be directly connected to the 3850 switches for its discovery.
Configuring Cisco Catalyst 3850 Switch for Device Discovery on SCM (Optional)
The device discovery on SCM enables users to control switch ports, as well as to know the interfaces to which the Cree endpoints are connected on the switch. Hence, the selective commissioning of the endpoints becomes easier, since the endpoints can be listed on SCM with the switch and port number to which they are connected.
Complete the following steps for enabling the device discovery using SNMP:
Step 1 Enable the SNMP service from Services on the PC running the SCM.
Step 2 Enable the SNMP trap from Services on the PC.
Step 3 Enable the Link-Layer Topology Mapper Services.
Step 4 Following are the SNMP commands required on the switch to enable the device discovery:
snmp-server community public RW
Step 5 Verify that the SNMP community string public is configured on the switch using the following CLI command:
CL-3850-1#sh run | i snmp-server communitysnmp-server community public RW
Step 6 Configure SVI for light fixture VLANs, as shown in the example below:
CL-3850-1(config)# interface vlan 30 ip address 10.30.0.5 255.255.252.0
4-17Cisco Digital Ceiling Cree Solution
Implementation Guide

Chapter 4 Lighting Migration to Campus Network Architecture Wiring Closet Access Switch (Cisco Catalyst 4506-E)
Configuring Switch Network Management
Refer to Configuring Switch Network Management, page 4-9 for the Cisco Catalyst 4500-X switch for configuring network management on a Cisco Catalyst 3850 stack.
Configuring Logging (Syslog)
Refer to Configuring Logging (Syslog), page 4-10 for the Cisco Catalyst 4500-X switch, for configuring a logging server on a Cisco Catalyst 3850 switch stack.
Wiring Closet Access Switch (Cisco Catalyst 4506-E)This section covers Cisco Catalyst 4506-E switch Layer 2, Layer 3 networking, security and network management configurations.
Configuring Layer 2 and Layer 3
Complete the following steps to implement VLANs and Layer 3 logical interfaces on the Cisco Catalyst 4506-E switch:
Step 1 Configure VLANs, which must be created along with ports assignment on the Cisco Catalyst 4506-E wiring closet switch:
CL-C4506E-1(config) #vlan 30, 40, 50
Step 2 Configure switch ports connecting to light fixture/wall dimmers on appropriate lighting VLAN in access mode. The following is an example:
interface GigabitEthernet 1/1 switchport mode access switchport access vlan 40!
Step 3 Create Layer 3 SVI for the management VLAN and default gateway:
interface Vlan50 ip address 10.50.0.4 255.255.252.0!ip route 0.0.0.0 0.0.0.0 10.50.0.1
Step 4 Create Port Channel uplink interfaces on Cisco Catalyst 4506-E to Campus Network aggregation switch (Cisco Catalyst 4500-X), as shown in Figure 4-1 on page 4-2.
interface Port-channel4 description Etherchannel Link to 4500X Switch switchport switchport mode trunk switchport trunk allowed vlan 30,40,50end
Step 5 Enable Port Channel on the appropriate physical switch ports connected to the Cisco Catalyst 4500-X switch. The following configuration shows the Port Channel assignment to switch physical ports.
Physical Links to Cisco Catalyst 4500-X active and standby VSS switches:
interface TenGigabitEthernet1/1
4-18Cisco Digital Ceiling Cree Solution
Implementation Guide

Chapter 4 Lighting Migration to Campus Network Architecture Wiring Closet Access Switch (Cisco Catalyst 4506-E)
channel-group 4 mode active
interface TenGigabitEthernet1/2 channel-group 4 mode active
Step 6 Enable rapid per-vlan spanning tree.
!spanning-tree mode rapid-pvst!
Configuring Security Features
This section covers security configurations on the Cisco Catalyst 4506-E switch for Cree light fixtures.
IP DHCP Snooping
Complete the following steps on the Cisco Catalyst 4506-E switch to configure IP DHCP snooping:
Step 1 Configure the required port as a DHCP snooping trusted port; for example, the uplink port channel interface to aggregation switch is configuration as trusted port:
interface Port-channel4 ip dhcp snooping trust!
Step 2 Enable IP DHCP snooping globally for the per-port command to take effect:
ip dhcp snooping
IP Source Guard
Complete the following configuration on the Cisco Catalyst 4506-E switch to enable IP Source Guard:
Step 1 Configure the IP source guard on the ports which have trusted IP to MAC bindings:
interface Port-channel2 ip verify source!
Step 2 On light fixture access ports:
interface GigabitEthernet1/1 ip verify source!
ARP Inspection
Complete the following steps on the Cisco Catalyst 4506-E switch to configure ARP Inspection:
4-19Cisco Digital Ceiling Cree Solution
Implementation Guide

Chapter 4 Lighting Migration to Campus Network Architecture Wiring Closet Access Switch (Cisco Catalyst 4506-E)
Step 1 Configure the required port as ARP inspection trusted port:
interface Port-channel4 ip arp inspection trust!
On light fixture access ports:
interface GigabitEthernet1/1 ip arp inspection trust!
Step 2 Enable ARP inspection globally for the required VLANs so that the per-port command takes effect:
ip arp inspection vlan 30,50
ARP Rate Limiting
Complete the following on the Cisco Catalyst 4506-E switch to configure ARP Rate Limiting:
Configure the ARP Rate limiting according to the maximum allowable packet rate on all light fixture access ports, as provided in the example below:
interface GigabitEthernet1/1ip arp inspection limit rate 100
Port Security
Complete the following on the Cisco Catalyst 4506-E switch to configure Port Security:
Configure the Port Security on light fixture access ports in sticky mode with the maximum allowable number of MAC addresses as one. Keep the violation as restrict:
interface GigabitEthernet2/1/14 switchport access vlan 30 switchport mode access switchport port-security violation restrict switchport port-security mac-address sticky switchport port-security aging type inactivity switchport port-security
Storm Control
Complete the following on the Cisco Catalyst 4506-E switch to configure Storm Control:
Configure the Storm Control for broadcast or unicast traffic, according to the maximum and minimum allowable threshold percentage of line rates on all light fixture access ports. The following is an example:
interface GigabitEthernet1/1 storm-control broadcast level 20.00 10.00 storm-control multicast level 50.00 30.00
PortFast and BPDU Guard
Complete the following on the Cisco Catalyst 4506-E switch to configure PortFast and BPDU Guard features:
4-20Cisco Digital Ceiling Cree Solution
Implementation Guide

Chapter 4 Lighting Migration to Campus Network Architecture Wiring Closet Access Switch (Cisco Catalyst 4506-E)
Enable PortFast on all of the light fixture access ports, since as no BPDUs are expected on that port, and then enable BPDU Guard. The following is an example:
interface GigabitEthernet1/1 spanning-tree portfast spanning-tree bpduguard enable
Port Access Lists
Complete the following steps on the Cisco Catalyst 3850 stack switch to configure PACL:
Step 1 Configure the IP access list to permit the incoming traffic only for Layer 4 port numbers specific to communication between lights and SCM:
ip access-list extended 101 10 permit udp any eq 55004 any eq 5500520 permit udp any eq bootpc any eq bootps30 permit udp any eq bootps any eq bootpc40 permit icmp any any50 permit udp any eq 55004 any eq 5500760 permit udp any any eq snmp70 permit udp any eq snmp any
Step 2 Apply this IP access list for the ingress traffic on the light fixture access ports. The following is an example:
interface GigabitEthernet2/1/14 ip access-group 101 inip access-group 101 out
Disabling Telnet
Telnet should be disabled for accessing the device, since it is not secure. The following commands only enable SSH on the C4506E switch:
line vty 0 15 transport input ssh!
Configuring Network Management (Simple Network Management Protocol)
SNMP is used for collecting information from network devices, in order to manage the network.
Configuring Switch Network Management
Refer to the Configuring Switch Network Management, page 4-9 for the configuration.
Configuring Logging (Syslog)
Refer to the Configuring Logging (Syslog), page 4-10 for the configuration.
4-21Cisco Digital Ceiling Cree Solution
Implementation Guide

Chapter 4 Lighting Migration to Campus Network Architecture Provisioning Light Fixtures (SmartCast Manager)
Provisioning Light Fixtures (SmartCast Manager)This section describes how to commission the light fixtures using the SCM. The light fixture can be commissioned by running the OneButton Setup, which groups the endpoints automatically.
The light fixtures can then be controlled via the SCM and the wall dimmer. Complete the following steps to provision the light fixtures:
Step 1 Connect the SCM to an access port on the switch in the same VLAN as the lighting network.
Step 2 Launch the SCM application.
Step 3 In the network interface selection, if prompted to select the network interface, choose the PoE Network.
Step 4 Click Continue.
Step 5 If light fixtures are commissioned already from the initial installation, conduct a factory reset on them, and then allow them to be rediscovered for commissioning them on a new area, as per the requirement.
Step 6 Once the devices are listed on the SCM, complete OneButton Setup.
Step 7 Click All.
Step 8 Once OneButton Setup is complete, click All Devices under the Settings tab to verify that all devices in the lighting network are assigned to Occupancy Groups and Switch Groups..
Step 9 Click Controls and change the dim level to verify that the switch group brightness changes when controlling it via the control screen. This verifies that the light fixture is provisioned and controllable by SCM.
4-22Cisco Digital Ceiling Cree Solution
Implementation Guide