Chapter 4 Disbursements - osa.state.mn.us
31
Chapter 4 Disbursements
Transcript of Chapter 4 Disbursements - osa.state.mn.us

Chapter 4
Disbursements

This Page Left Blank Intentionally

CTAS User Manual 4-1
Office of the State Auditor
Disbursements: Introduction
The Claims Module in CTAS allows you to post approved claims into disbursements. If you use a
manual claims process instead, you can enter approved claims directly into CTAS using the
Disbursement Module. Disbursements that are not required to go through the Claims process, such
as transfers, can also be entered through the Disbursement Module.
Accessing the Disbursements Section
To access the Disbursements section, select the Accounting tab (circled) in the Task bar, then select
the Disbursements icon (boxed). The Disbursements screen will open to the Disbursements List.

CTAS User Manual 4-2
Office of the State Auditor
Disbursements: Entering a Disbursement
From the disbursements screen you can Add, View/Edit, Void, or Delete disbursements. You can
also export a disbursement list to a CSV file (a spread sheet format) and Print disbursements from
the Disbursements List tab screen.
To begin entering a disbursement, click on the Add Disbursement tab (circled) in the Disbursement
section.
Once the tab is selected, the Add Disbursement screen will open, as shown on the next page.
CTAS User Manual 4-3
Office of the State Auditor
Disbursements: Entering a Disbursement (continued)
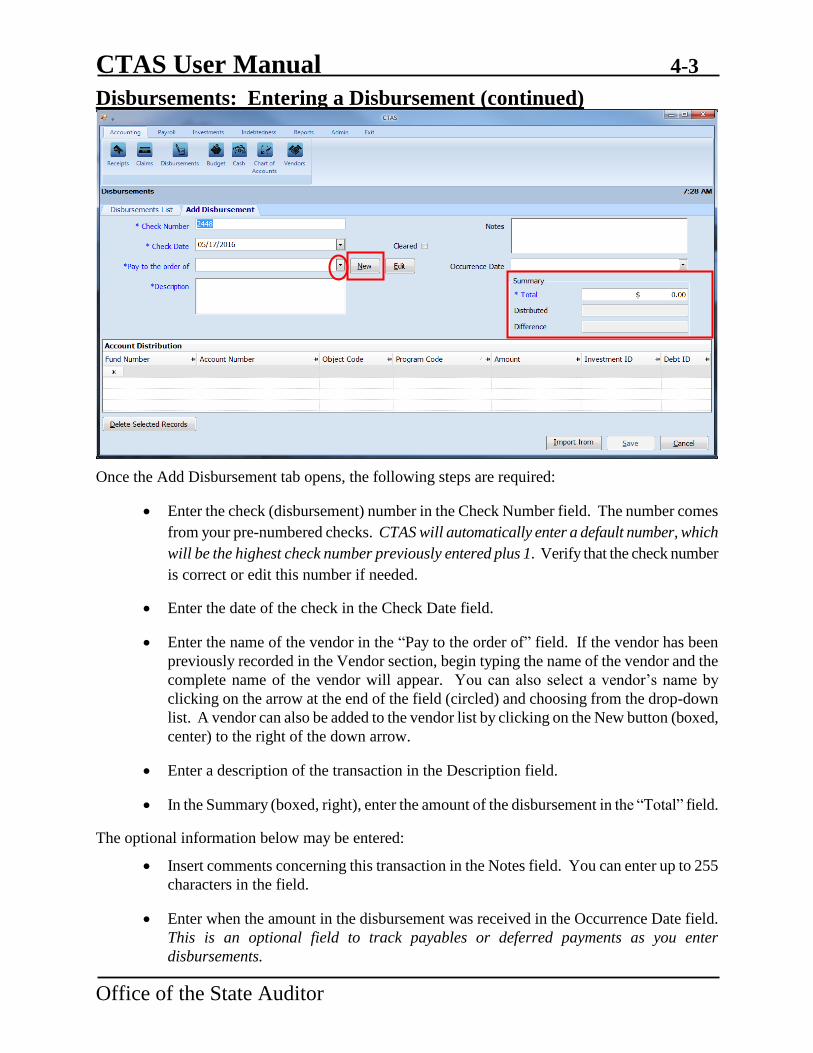
Once the Add Disbursement tab opens, the following steps are required:
Enter the check (disbursement) number in the Check Number field. The number comes
from your pre-numbered checks. CTAS will automatically enter a default number, which
will be the highest check number previously entered plus 1. Verify that the check number
is correct or edit this number if needed.
Enter the date of the check in the Check Date field.
Enter the name of the vendor in the “Pay to the order of” field. If the vendor has been
previously recorded in the Vendor section, begin typing the name of the vendor and the
complete name of the vendor will appear. You can also select a vendor’s name by
clicking on the arrow at the end of the field (circled) and choosing from the drop-down
list. A vendor can also be added to the vendor list by clicking on the New button (boxed,
center) to the right of the down arrow.
Enter a description of the transaction in the Description field.
In the Summary (boxed, right), enter the amount of the disbursement in the “Total” field.
The optional information below may be entered:
Insert comments concerning this transaction in the Notes field. You can enter up to 255
characters in the field.
Enter when the amount in the disbursement was received in the Occurrence Date field.
This is an optional field to track payables or deferred payments as you enter
disbursements.

CTAS User Manual 4-4
Office of the State Auditor
Disbursements: Entering a Disbursement (continued)
The Account Distribution section (boxed) allows you to enter information relating to which account
the disbursement is allocated to. In this section:
Enter a Fund Number to indicate which fund will expend the money.
Enter an Account Number to indicate which category to allocate the expenditure.
Enter an Object Code. This defines the type of expenditures, such as wages, supplies, gravel,
electricity, etc.
Enter a Program Code (Optional). An explanation of the Program Code is shown in Chapter
8 of this manual, Chart of Accounts.
Enter the amount of the disbursement. You may enter additional Account Distribution lines
until the amount of the disbursement has been completely allocated. As you enter values in
the Amount field, the sum of the values will be automatically calculated in the Distributed
field in the Summary box. When you have completed filling out the Account Distribution
lines, the number in the Difference field must be zero in order to save the transaction.
A Debt can be associated with a disbursement under the following condition:
o When a Disbursement is added or edited and the “Principal Payments” account codes
are selected, the user can select an existing debt instrument. When the disbursement
is saved, the associated debt information will be carried to the Indebtedness Module.
(see Chapter 18)
Click the Save button (circled) to continue.
CTAS User Manual 4-5
Office of the State Auditor
Disbursements: Adding or Editing Vendor Information
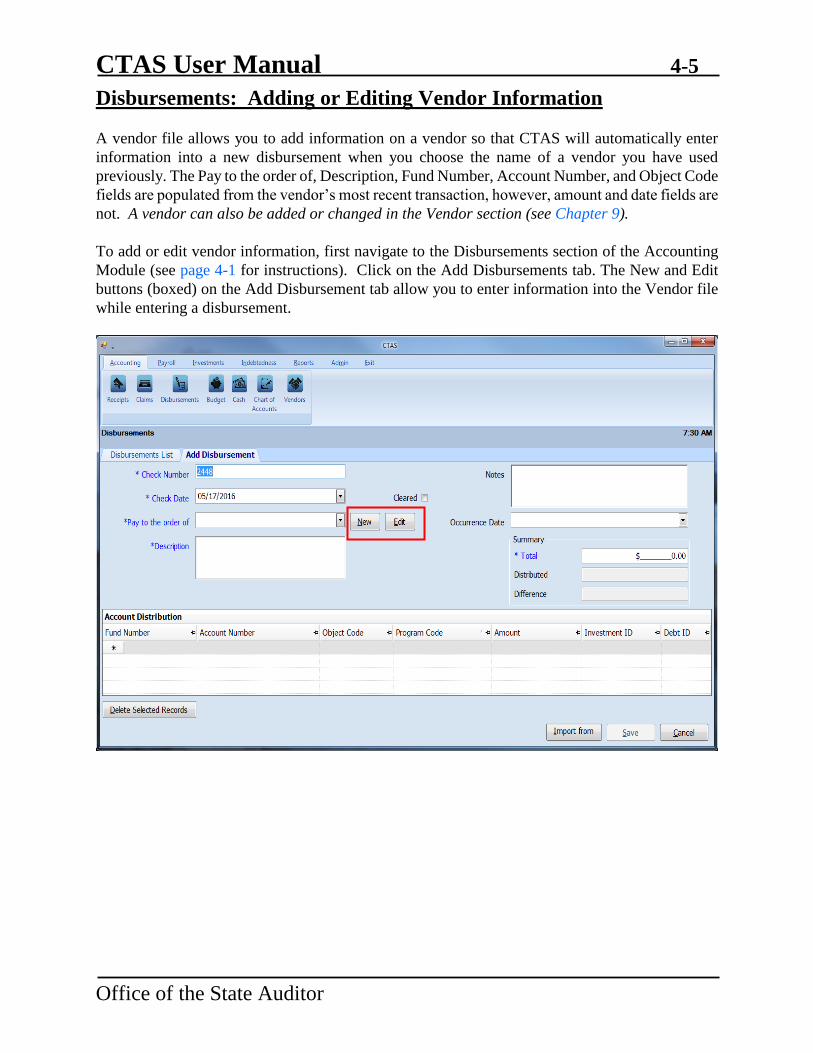
A vendor file allows you to add information on a vendor so that CTAS will automatically enter
information into a new disbursement when you choose the name of a vendor you have used
previously. The Pay to the order of, Description, Fund Number, Account Number, and Object Code
fields are populated from the vendor’s most recent transaction, however, amount and date fields are
not. A vendor can also be added or changed in the Vendor section (see Chapter 9).
To add or edit vendor information, first navigate to the Disbursements section of the Accounting
Module (see page 4-1 for instructions). Click on the Add Disbursements tab. The New and Edit
buttons (boxed) on the Add Disbursement tab allow you to enter information into the Vendor file
while entering a disbursement.

CTAS User Manual 4-6
Office of the State Auditor
Disbursements: Editing a Disbursement
To edit a disbursement, go to the Disbursements List (see page 4-1 for instructions). To narrow the
choices on the Disbursements List, you can use the Search Feature (See page 4-18 for instructions).
Highlight the disbursement you wish to edit and click the View\Edit button (circled) or double click
on the disbursement.

CTAS User Manual 4-7
Office of the State Auditor
Disbursements: Editing a Disbursement (continued)
The disbursement will open in a new tab, labeled with the check’s number (boxed). You can change
any field unless the disbursement has cleared the bank. If the disbursement has cleared, there will be
an “X” in the Cleared box (circled). Once the disbursement has cleared, the check number and the
total amount of the disbursement cannot be changed.
After completing your change(s), click the Save button.

CTAS User Manual 4-8
Office of the State Auditor
Disbursements: Recording a Transfer of Funds
The following section shows how to enter a transfer of funds into CTAS. This section contains
instructions on entering the transfer and is illustrated with a sample entity’s transaction records.
Note: When money comes from an investment (savings, CDs, money market, etc.) to checking
it would be a sale of investment to the designated fund rather than a transfer. When money
goes into an investment (savings, CDs, money market, etc) from checking it would be a
purchase of investment rather than a transfer. A transfer is recorded only when it moves from
one fund to another fund.
For our sample entity, a transfer of $3,000 from the General Fund to the Fire Fund was approved at
the January 18th meeting. This transaction will be recorded in both the Receipts and Disbursements
sections.
The first entry records the transfer into the Receipts section (see page 2-1 for instructions) by Adding
a Receipt (circled).
After the Add Receipt option is selected, the Add Receipt screen will appear, allowing you to enter
the information for your transfer.

CTAS User Manual 4-9
Office of the State Auditor
Disbursements: Recording a Transfer of Funds (continued)
Complete the following steps to record the transfer in:
Enter the receipt number in the Receipt Number field. In this example, “TRF” is used to
identify it is a transfer. The 1182016 indicates that the transfer was made on January 18,
2016.
Enter the receipt date in the Receipt Date field.
Enter the deposit date in the Deposit Date/ID field.
Enter the fund name of where the transfer is coming from in the Received From Field. In
this example it is from the General Fund.
Type a brief explanation of the transfer in the Description field.
Enter the amount in the Summary field on the right side of the screen.
In the Account Distribution section, enter the fund number (that is receiving the transfer) in
the Fund Number field.
Enter the Account Number to define the source of the receipt (see Appendix for transfer
account numbers).
Enter the amount.
Click the Save button (circle) to save the receipt.
CTAS User Manual 4-10
Office of the State Auditor
Disbursements: Recording a Transfer of Funds (continued)
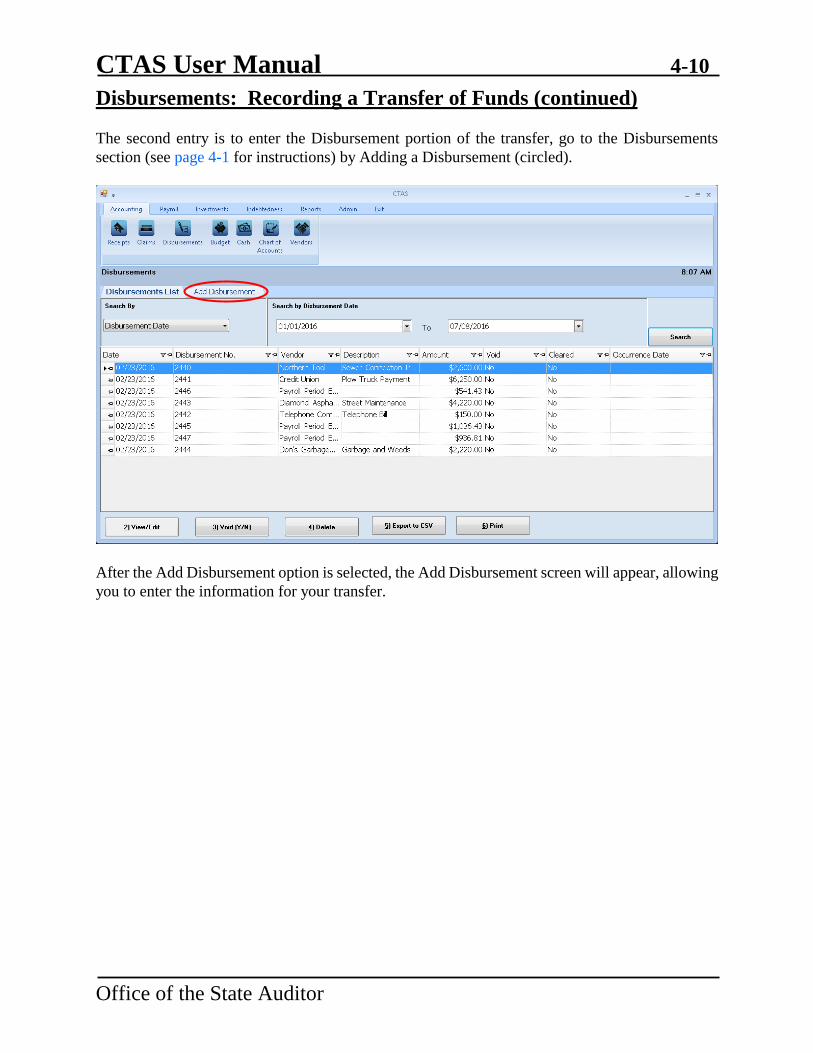
The second entry is to enter the Disbursement portion of the transfer, go to the Disbursements
section (see page 4-1 for instructions) by Adding a Disbursement (circled).
After the Add Disbursement option is selected, the Add Disbursement screen will appear, allowing
you to enter the information for your transfer.
CTAS User Manual 4-11
Office of the State Auditor
Disbursements: Recording a Transfer of Funds (continued)
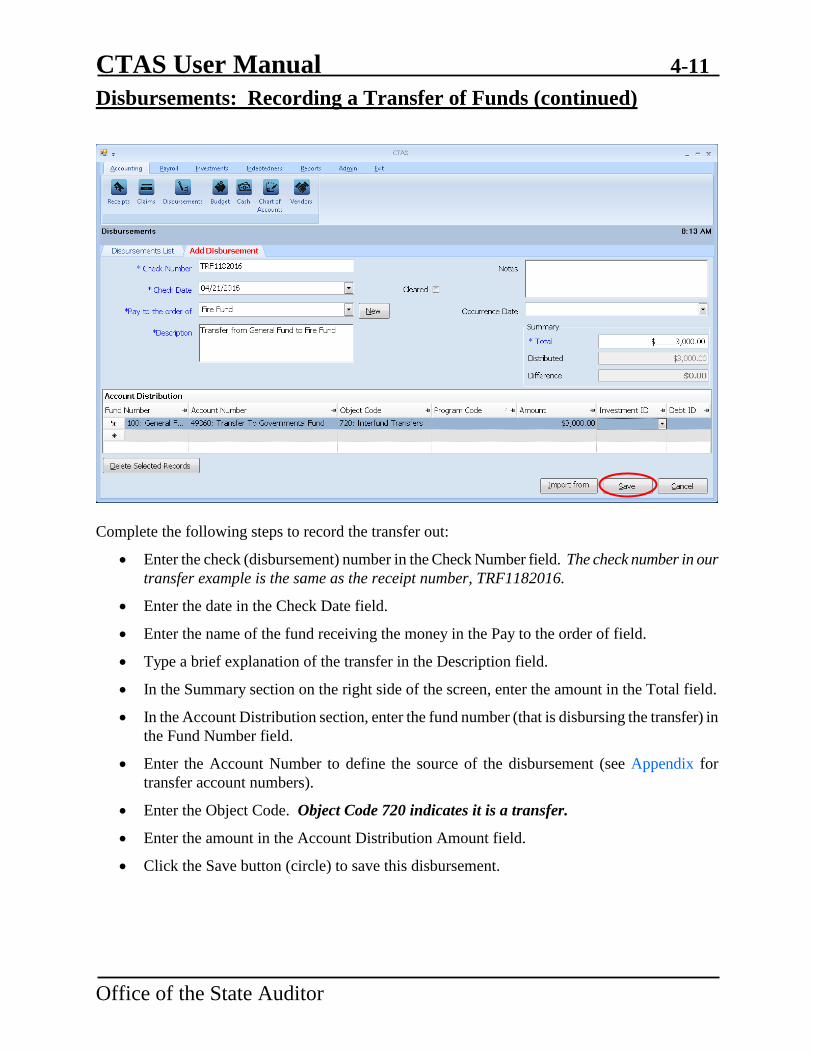
Complete the following steps to record the transfer out:
Enter the check (disbursement) number in the Check Number field. The check number in our
transfer example is the same as the receipt number, TRF1182016.
Enter the date in the Check Date field.
Enter the name of the fund receiving the money in the Pay to the order of field.
Type a brief explanation of the transfer in the Description field.
In the Summary section on the right side of the screen, enter the amount in the Total field.
In the Account Distribution section, enter the fund number (that is disbursing the transfer) in
the Fund Number field.
Enter the Account Number to define the source of the disbursement (see Appendix for
transfer account numbers).
Enter the Object Code. Object Code 720 indicates it is a transfer.
Enter the amount in the Account Distribution Amount field.
Click the Save button (circle) to save this disbursement.

CTAS User Manual 4-12
Office of the State Auditor
Disbursements: Recording a Transfer of Funds (continued)
You can then print a Schedule 1 to see that the transactions were recorded properly. See page 7-41
in the Financial Reports chapter for instructions on printing a Schedule 1. Below is a Schedule 1
showing the recording of the transfer.

CTAS User Manual 4-13
Office of the State Auditor
Disbursements: Voiding a Disbursement
The need to void a disbursement could result from a lost check or an error that was made when the
check was written. To void a disbursement, open the Disbursements List tab (see page 4-1).
To narrow the choices on the Disbursements List, you can use the Search Feature (see page 4-18).
To void a disbursement, click once on a disbursement line to highlight the disbursement, then click
on the Void (Y/N) button (circled). The Void Disbursement screen appears (below). Click on Yes to
void the disbursement.
You can void multiple disbursement by holding down the Control key (Ctrl) on your keyboard as you
click on the disbursements you wish to void. When you have selected the disbursements, click the
Void (Y/N) button and the Void Disbursement screen will appear.

CTAS User Manual 4-14
Office of the State Auditor
Disbursements: Deleting a Disbursement
The need to delete a disbursement could occur if an error was made when the disbursement was
entered. To delete a disbursement, open the Disbursements List tab (see page 4-1).
To narrow the choices on the Disbursements List, you can use the Search Feature (See page 4-18).
To delete a disbursement, click once on a disbursement line to highlight the disbursement, then click
the Delete button (circled). The Confirm Disbursement Delete screen will appear (below). Click
Yes to delete the disbursement.
You can delete multiple disbursements by holding down the Control key (Ctrl) on your keyboard as
you click on the disbursements you wish to delete. When you have selected the disbursements, click
the Delete button and the Confirm Delete Disbursement screen will appear.

CTAS User Manual 4-15
Office of the State Auditor
Disbursements: Export to CSV
CTAS allows you to export your data to a CSV file. The CSV ("Comma Separated Values") file
format is used by many spreadsheet applications, including Microsoft Excel. Some CTAS users
export data to CSV files to give them flexibility in analyzing and presenting their entity’s data.
You can choose which disbursements to export either by highlighting them on a Disbursements
List or narrow the choices on the Disbursements List by using the Search Feature (see page 4-
18).
Once the disbursements are selected to export, click the Export to CSV button (circled).
When the Save As window opens, select the location on your computer where you would like the
file to be saved (boxed) and change the file name if necessary. Click on Save when finished.

CTAS User Manual 4-16
Office of the State Auditor
Disbursements: Export to CSV (continued)
CTAS will save the data as a CSV file in the location selected. Below is an example of the CSV
file when opened.
CTAS User Manual 4-17
Office of the State Auditor
Disbursements: Print an Individual Disbursement
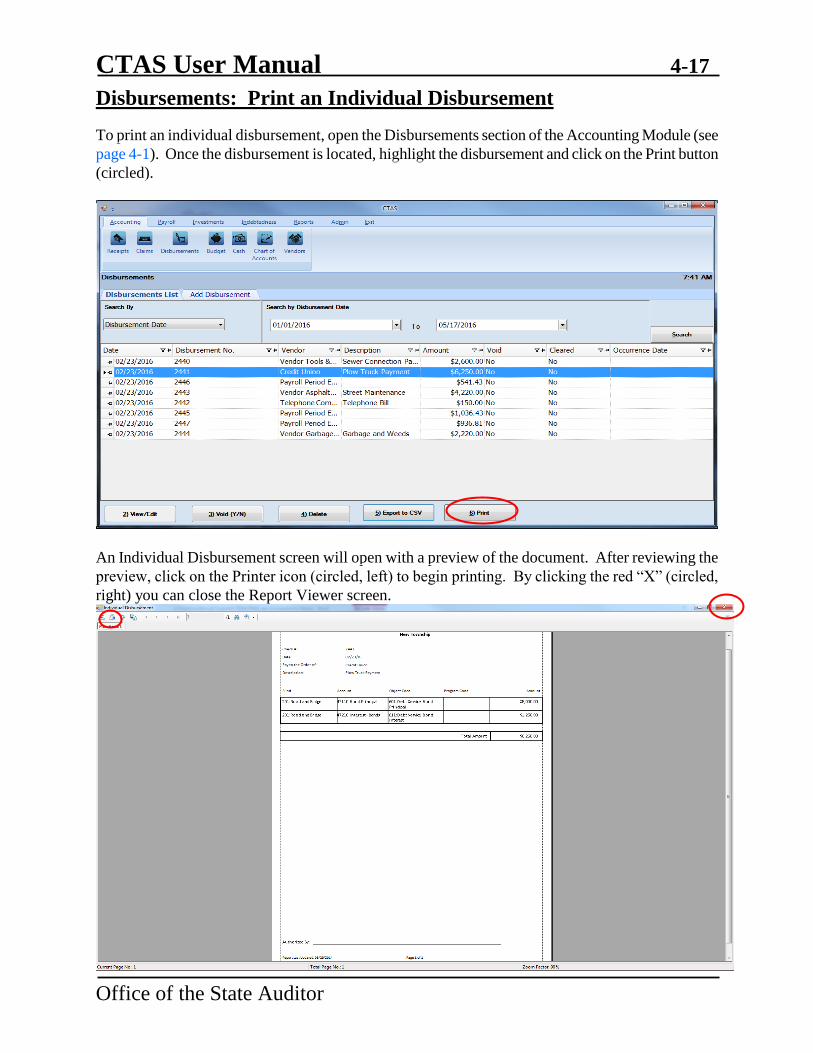
To print an individual disbursement, open the Disbursements section of the Accounting Module (see
page 4-1). Once the disbursement is located, highlight the disbursement and click on the Print button
(circled).
An Individual Disbursement screen will open with a preview of the document. After reviewing the
preview, click on the Printer icon (circled, left) to begin printing. By clicking the red “X” (circled,
right) you can close the Report Viewer screen.

CTAS User Manual 4-18
Office of the State Auditor
Disbursements: Using the Search Feature
In the Disbursements List tab, you can choose from a number of options to search for disbursements.
The first and default option is to search by Disbursement Date (boxed, left).
The default date search range is the last three weeks. To change the range of search dates:
Click on the first date field under Search by Disbursement Date (boxed, center) and enter
a new starting date or choose a new starting date from the calendar you can access by
clicking on the down arrow at the end of the field.
Click on the second date field and enter a new ending date (boxed, center), or choose a
date from the calendar by clicking on the down arrow.
Click the Search button (circled).
Transactions meeting the date criteria will be displayed.

CTAS User Manual 4-19
Office of the State Auditor
Disbursements: Using the Search Feature (continued)
The second option is to search by vendor.
To search by vendor:
Select the Search by Vendor option (boxed, left) from the Search By drop-down menu.
The screen will display the Search by Vendor field (boxed, center).
Click on the field below the Search by Vendor heading (boxed, center) and enter all or
part of the name of the vendor.
Click the Search button (circled, right). All vendor names matching the search criteria
will then be displayed.

CTAS User Manual 4-20
Office of the State Auditor
Disbursements: Using the Search Feature (continued)
The third option is to search by check number.
To search by check number:
Select the Check Number option (boxed, left) from the Search By drop-down. The
screen will display the Search by Check Number fields (boxed, center).
Click on the field below the Search by Check Number heading (boxed, center). Enter the
beginning number in the range of disbursements you want to search in the first field and
the ending number in the second field.
Click the Search button (circled). All of the check numbers within the specified range
will be displayed.

CTAS User Manual 4-21
Office of the State Auditor
Disbursements: Using the Search Feature (continued)
The fourth option is to search by Fund and Account Numbers.
To search by fund and account number:
Select the Fund and Account Number option (boxed, left) from the Search By drop-down
menu. The screen will display the Search by Fund and Account Number fields (boxed,
center).
Click on the down arrow in the first field (boxed, center) below the Search by Fund and
Account Number heading to choose a Fund number.
Click on the down arrow in the second field (boxed, center) to choose an Account
Number.
Click the Search button (circled). All of the disbursements with the specified Fund and
Account Number will be displayed.
Note: You must enter both a Fund Number and an Account Number.

CTAS User Manual 4-22
Office of the State Auditor
Disbursements: Using the Search Feature (continued)
The last search option is to search by Disbursement Total Amount.
To search by total amount:
Select the Disbursement Total Amount option (boxed, left) from the Search By drop-
down. The screen will then display the Search by Disbursement Total Amount fields
(boxed, center).
o If you want to search a range of amounts, enter the smaller number in the first
field under the Search by Disbursement Total Amount heading (boxed,
center) and enter the larger amount in the range in the second field.
o If you want to search for transactions with a particular amount, check the
Exact Amount box at the right of the search field (boxed, center) and enter
the amount in the field to the left of that box.
Click the Search button (circled). All of the disbursements with amounts within the
range will be displayed.

CTAS User Manual 4-23
Office of the State Auditor
Disbursements: Printing Reports
There are two reports that you can create and print for the Disbursements section: the Disbursements
Ledger and the Disbursements Register.
To select the report you want to create, click on the Reports tab (circled) from the Task Bar and then
choose the Disbursements icon (boxed). A screen will appear listing the two reports.
To run a report, highlight the report and click the Run button at the bottom of the screen. The
following pages describe each report and illustrate how to create and print each report.

CTAS User Manual 4-24
Office of the State Auditor
Disbursements: Printing Reports (continued)
Printing a Disbursements Ledger
A Disbursements Ledger is a detailed list of disbursements sorted by fund, account number, and
object code. The ledger should be printed and reviewed at least quarterly to identify any
disbursement that have not been coded correctly.
After the close of the fiscal year, print a Disbursements Ledger for the full year. Review this report
for any disbursement coded incorrectly. Print a finalized copy and store it as part of your permanent
records.
Highlight Disbursements Ledger and click the Run button (see previous page). The Disbursement
Ledger screen will appear.
To create a Disbursements Ledger:
Select a Fund or All Funds by clicking the down arrow (circled) in the Fund box.
You can use the checkboxes at the top of the screen (boxed, top) to choose whether the
ledger will only show fund(s) sorted by account, by object code, or by account and object
code. Leaving both boxes unchecked allows you to sort by both account and object code.
Select the account(s) to be printed by moving them from the Available Accounts box to the
Selected Accounts box. The “>>” button will move all accounts; the “>” button will move
individually-highlighted account(s). You can also move an individual account by double-
clicking on the account. The “<” and “<<” buttons allow you to move accounts out of the
Selected Accounts box. Repeat the same steps for the Object Codes (if desired).
At the bottom of the screen, use the up and down arrows to select the Budget Year (boxed,
bottom) and choose start and end dates for the report.
Click the Run button and the print preview (Report Viewer screen) opens.

CTAS User Manual 4-25
Office of the State Auditor
Disbursements: Printing Reports (continued)
Printing a Disbursements Ledger (continued)
After reviewing the preview, click on the Printer icon (circled, left) to begin printing the report. By
clicking the red “X” (circled, right) you can close the Report Viewer screen.

CTAS User Manual 4-26
Office of the State Auditor
Disbursements: Printing a Disbursements Ledger (continued)
After clicking on the Printer icon, the Print screen appears.
By clicking the Pages radio button (circled, left), you can choose to print only certain pages of the
report. The Number of copies box (circled, right) allows you to enter the number of copies you
would like printed. After selecting the printer details, click on the Print button to begin printing the
report. The following page has a sample of the report.
To close the report:
Click the red “X” icon on the Report Viewer screen (previous page).
Click the Cancel button on the Disbursement Ledger screen.

CTAS User Manual 4-27
Office of the State Auditor
Disbursements: Printing Reports (continued)
Sample Disbursements Ledger Report
CTAS User Manual 4-28
Office of the State Auditor
Disbursements: Printing Reports (continued)
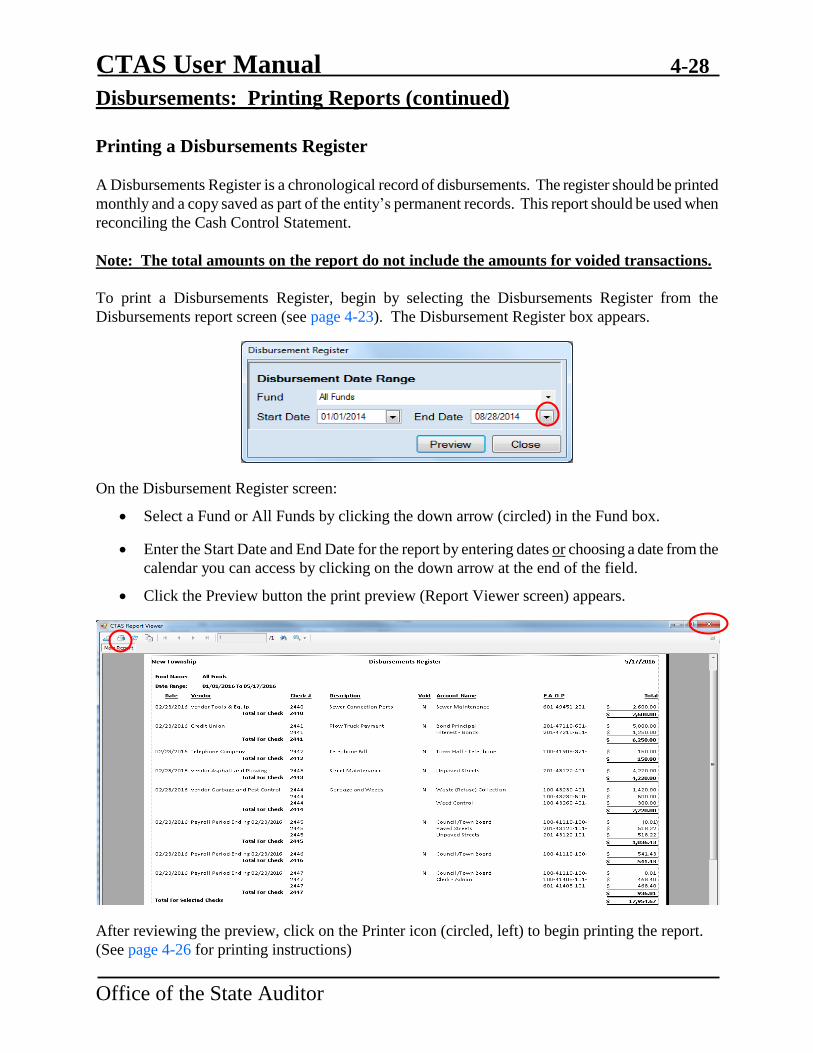
Printing a Disbursements Register
A Disbursements Register is a chronological record of disbursements. The register should be printed
monthly and a copy saved as part of the entity’s permanent records. This report should be used when
reconciling the Cash Control Statement.
Note: The total amounts on the report do not include the amounts for voided transactions.
To print a Disbursements Register, begin by selecting the Disbursements Register from the
Disbursements report screen (see page 4-23). The Disbursement Register box appears.
On the Disbursement Register screen:
Select a Fund or All Funds by clicking the down arrow (circled) in the Fund box.
Enter the Start Date and End Date for the report by entering dates or choosing a date from the
calendar you can access by clicking on the down arrow at the end of the field.
Click the Preview button the print preview (Report Viewer screen) appears.
After reviewing the preview, click on the Printer icon (circled, left) to begin printing the report.
(See page 4-26 for printing instructions)

CTAS User Manual 4-29
Office of the State Auditor
Disbursements: Printing Reports (continued)
To close the report:
Click the red “X” icon (circled, right) on the Report Viewer screen (previous page).
Click the Close button on the Disbursement Register screen.
Sample Disbursements Register Report