Chapter 23- UV Texture Mapping - Central Dauphin … will give you one 3D viewport and one UV Editor...
6
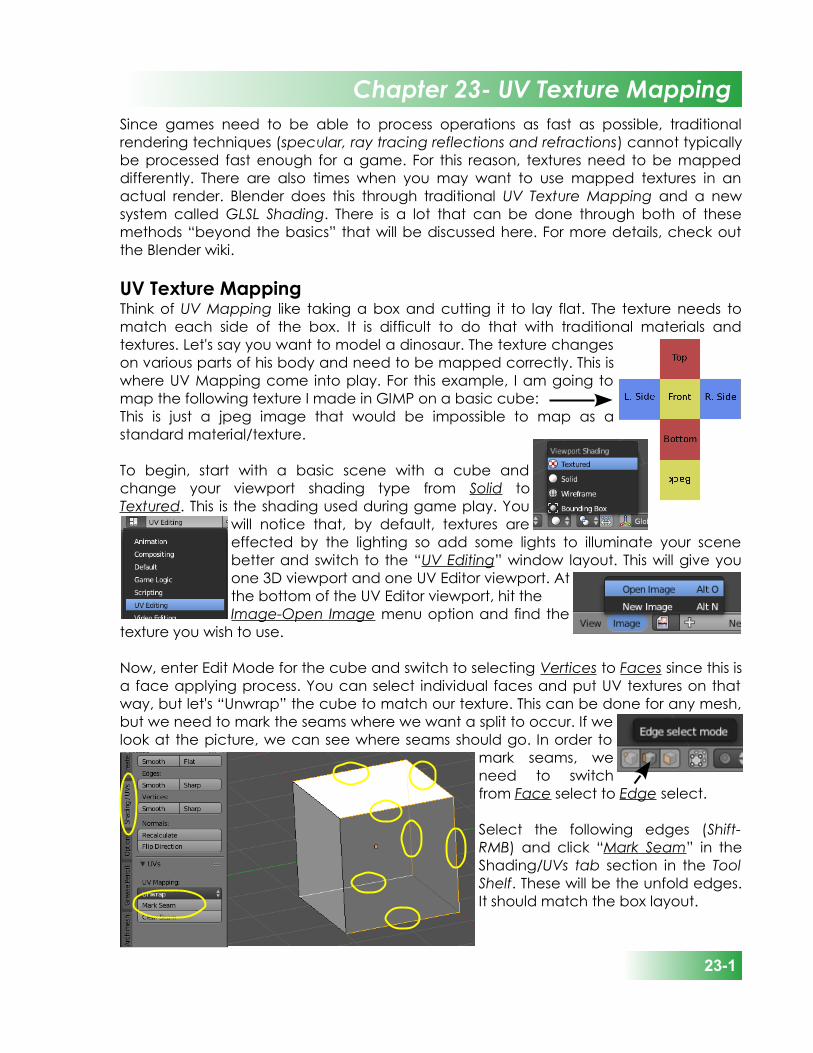
Since games need to be able to process operations as fast as possible, traditional rendering techniques (specular, ray tracing reflections and refractions ) cannot typically be processed fast enough for a game. For this reason, textures need to be mapped differently. There are also times when you may want to use mapped textures in an actual render. Blender does this through traditional UV Texture Mapping and a new system called GLSL Shading. There is a lot that can be done through both of these methods “beyond the basics” that will be discussed here. For more details, check out the Blender wiki. UV Texture Mapping Think of UV Mapping like taking a box and cutting it to lay flat. The texture needs to match each side of the box. It is difficult to do that with traditional materials and textures. Let's say you want to model a dinosaur. The texture changes on various parts of his body and need to be mapped correctly. This is where UV Mapping come into play. For this example, I am going to map the following texture I made in GIMP on a basic cube: This is just a jpeg image that would be impossible to map as a standard material/texture. To begin, start with a basic scene with a cube and change your viewport shading type from Solid to Textured . This is the shading used during game play. You will notice that, by default, textures are effected by the lighting so add some lights to illuminate your scene better and switch to the “UV Editing ” window layout. This will give you one 3D viewport and one UV Editor viewport. At the bottom of the UV Editor viewport, hit the Image-Open Image menu option and find the texture you wish to use. Now, enter Edit Mode for the cube and switch to selecting Vertices to Faces since this is a face applying process. You can select individual faces and put UV textures on that way, but let's “Unwrap” the cube to match our texture. This can be done for any mesh, but we need to mark the seams where we want a split to occur. If we look at the picture, we can see where seams should go. In order to mark seams, we need to switch from Face select to Edge select. Select the following edges (Shift- RMB) and click “Mark Seam ” in the Shading/UVs tab section in the Tool Shelf. These will be the unfold edges. It should match the box layout. Chapter 23- UV Texture Mapping 23-1
Transcript of Chapter 23- UV Texture Mapping - Central Dauphin … will give you one 3D viewport and one UV Editor...
Since games need to be able to process operations as fast as possible, traditionalrendering techniques (specular, ray tracing reflections and refractions) cannot typicallybe processed fast enough for a game. For this reason, textures need to be mappeddifferently. There are also times when you may want to use mapped textures in anactual render. Blender does this through traditional UV Texture Mapping and a newsystem called GLSL Shading. There is a lot that can be done through both of thesemethods “beyond the basics” that will be discussed here. For more details, check outthe Blender wiki.
UV Texture MappingThink of UV Mapping like taking a box and cutting it to lay flat. The texture needs tomatch each side of the box. It is difficult to do that with traditional materials andtextures. Let's say you want to model a dinosaur. The texture changeson various parts of his body and need to be mapped correctly. This iswhere UV Mapping come into play. For this example, I am going tomap the following texture I made in GIMP on a basic cube:This is just a jpeg image that would be impossible to map as astandard material/texture.
To begin, start with a basic scene with a cube andchange your viewport shading type from Solid toTextured. This is the shading used during game play. You
will notice that, by default, textures areeffected by the lighting so add some lights to illuminate your scenebetter and switch to the “UV Editing” window layout. This will give youone 3D viewport and one UV Editor viewport. Atthe bottom of the UV Editor viewport, hit the Image-Open Image menu option and find the
texture you wish to use.
Now, enter Edit Mode for the cube and switch to selecting Vertices to Faces since this isa face applying process. You can select individual faces and put UV textures on thatway, but let's “Unwrap” the cube to match our texture. This can be done for any mesh,but we need to mark the seams where we want a split to occur. If welook at the picture, we can see where seams should go. In order to
mark seams, weneed to switchfrom Face select to Edge select.
Select the following edges (Shift-RMB) and click “Mark Seam” in theShading/UVs tab section in the ToolShelf. These will be the unfold edges.It should match the box layout.
Chapter 23- UV Texture Mapping
23-1
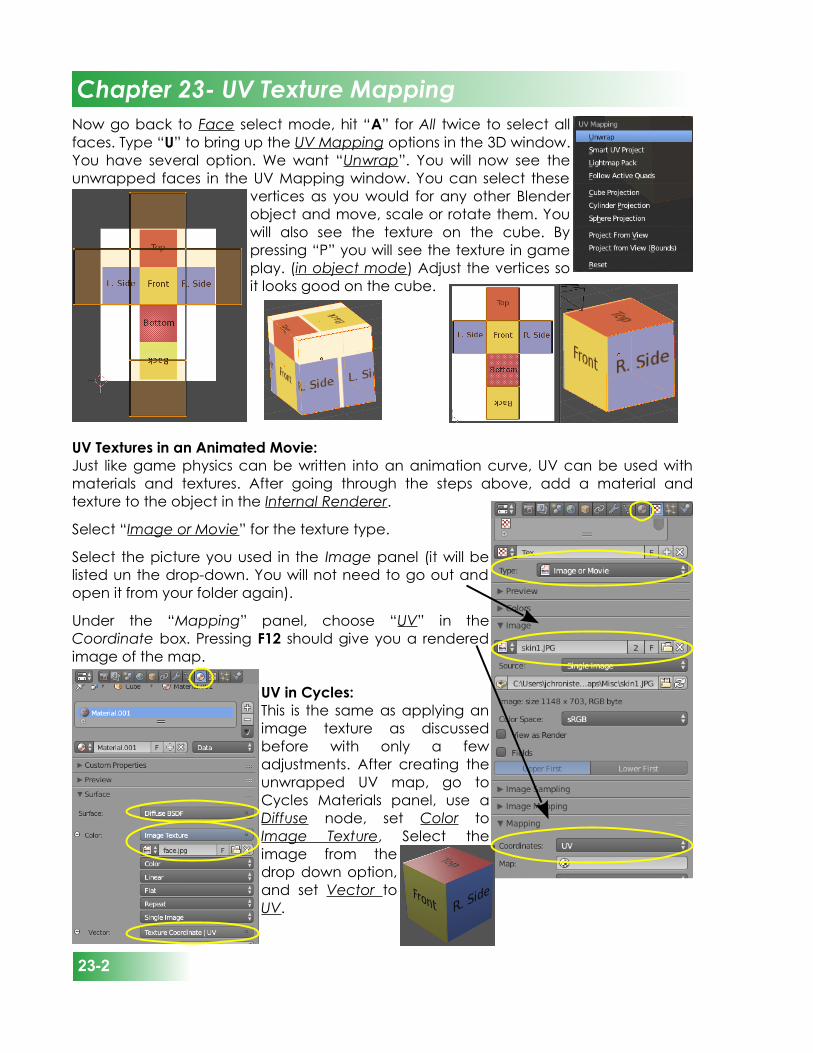
Chapter 1- The Blender InterfaceNow go back to Face select mode, hit “A” for All twice to select allfaces. Type “U” to bring up the UV Mapping options in the 3D window.You have several option. We want “Unwrap”. You will now see theunwrapped faces in the UV Mapping window. You can select these
vertices as you would for any other Blenderobject and move, scale or rotate them. Youwill also see the texture on the cube. Bypressing “P” you will see the texture in gameplay. (in object mode) Adjust the vertices soit looks good on the cube.
UV Textures in an Animated Movie:Just like game physics can be written into an animation curve, UV can be used withmaterials and textures. After going through the steps above, add a material andtexture to the object in the Internal Renderer.
Select “Image or Movie” for the texture type.
Select the picture you used in the Image panel (it will belisted un the drop-down. You will not need to go out andopen it from your folder again).
Under the “Mapping” panel, choose “UV” in theCoordinate box. Pressing F12 should give you a renderedimage of the map.
UV in Cycles:This is the same as applying animage texture as discussedbefore with only a fewadjustments. After creating theunwrapped UV map, go toCycles Materials panel, use aDiffuse node, set Color toImage Texture, Select theimage from thedrop down option,and set Vector toUV.
Chapter 23- UV Texture Mapping
23-2
GLSL ShadingGLSL shading is relatively new to Blender and is an area seeing a great deal ofdevelopment. It is an attempt to add many rendering-like features to the game engine,adding to a more realistic environment. As with the UV Mapping section, this unit willonly cover the basics to get you started.
Not all video cards are supported for GLSL shading. Some machines will be unable ituse this feature. See the Blender wiki for current specification.
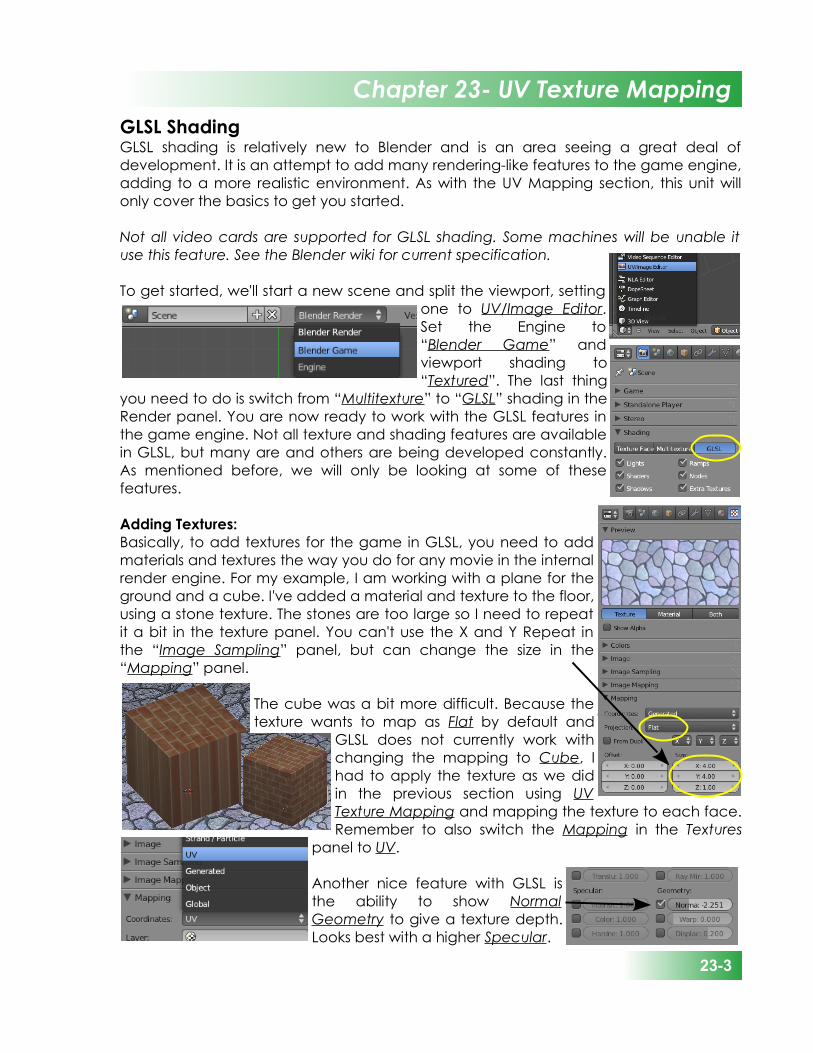
To get started, we'll start a new scene and split the viewport, settingone to UV/Image Editor.Set the Engine to“Blender Game” andviewport shading to“Textured”. The last thing
you need to do is switch from “Multitexture” to “GLSL” shading in theRender panel. You are now ready to work with the GLSL features inthe game engine. Not all texture and shading features are availablein GLSL, but many are and others are being developed constantly.As mentioned before, we will only be looking at some of thesefeatures.
Adding Textures:Basically, to add textures for the game in GLSL, you need to addmaterials and textures the way you do for any movie in the internalrender engine. For my example, I am working with a plane for theground and a cube. I've added a material and texture to the floor,using a stone texture. The stones are too large so I need to repeatit a bit in the texture panel. You can't use the X and Y Repeat inthe “Image Sampling” panel, but can change the size in the“Mapping” panel.
The cube was a bit more difficult. Because thetexture wants to map as Flat by default and
GLSL does not currently work withchanging the mapping to Cube, Ihad to apply the texture as we didin the previous section using UVTexture Mapping and mapping the texture to each face.Remember to also switch the Mapping in the Textures
panel to UV.
Another nice feature with GLSL isthe ability to show NormalGeometry to give a texture depth.Looks best with a higher Specular.
Chapter 23- UV Texture Mapping
23-3
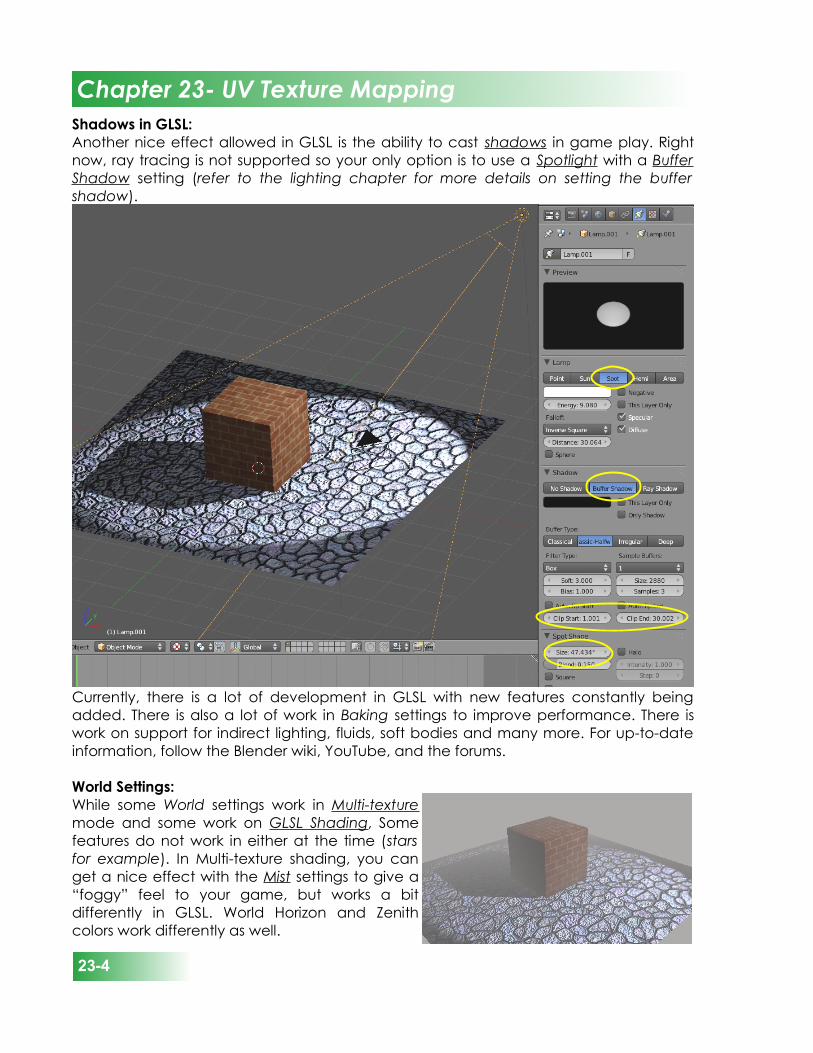
Chapter 1- The Blender InterfaceShadows in GLSL:Another nice effect allowed in GLSL is the ability to cast shadows in game play. Rightnow, ray tracing is not supported so your only option is to use a Spotlight with a BufferShadow setting (refer to the lighting chapter for more details on setting the buffershadow).
Currently, there is a lot of development in GLSL with new features constantly beingadded. There is also a lot of work in Baking settings to improve performance. There iswork on support for indirect lighting, fluids, soft bodies and many more. For up-to-dateinformation, follow the Blender wiki, YouTube, and the forums.
World Settings:While some World settings work in Multi-texturemode and some work on GLSL Shading, Somefeatures do not work in either at the time (starsfor example). In Multi-texture shading, you canget a nice effect with the Mist settings to give a“foggy” feel to your game, but works a bitdifferently in GLSL. World Horizon and Zenithcolors work differently as well.
Chapter 23- UV Texture Mapping
23-4
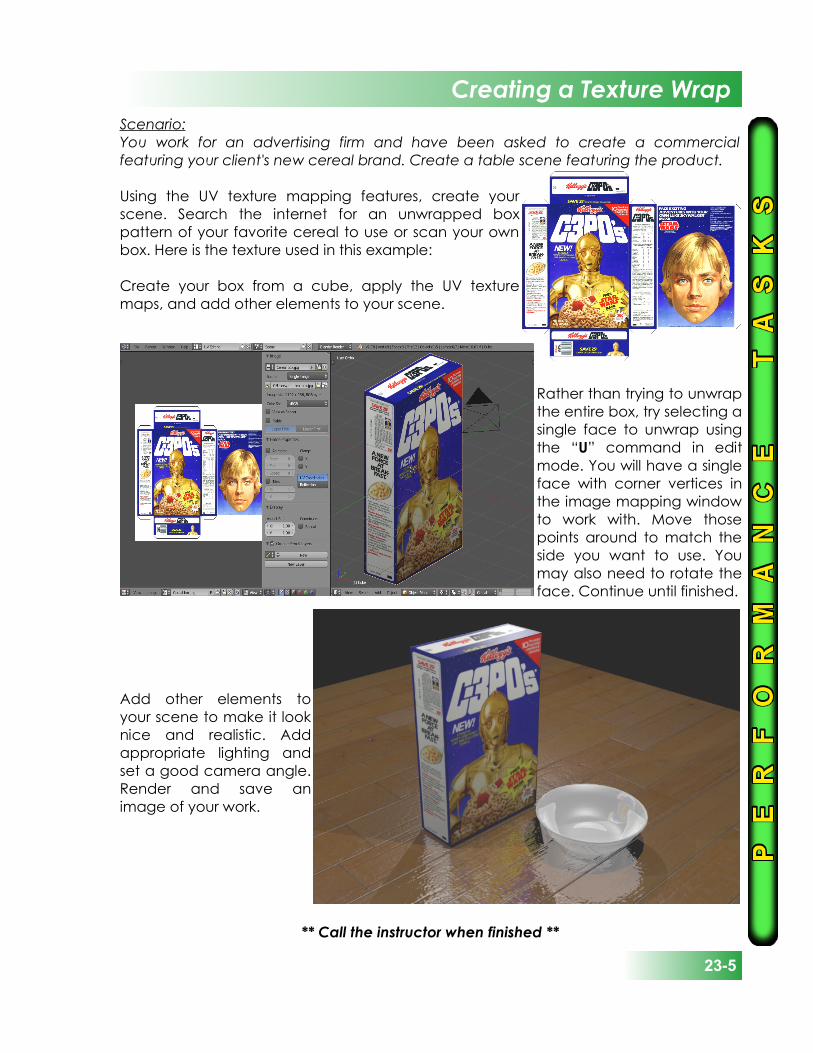
Scenario:You work for an advertising firm and have been asked to create a commercialfeaturing your client's new cereal brand. Create a table scene featuring the product.
Using the UV texture mapping features, create yourscene. Search the internet for an unwrapped boxpattern of your favorite cereal to use or scan your ownbox. Here is the texture used in this example:
Create your box from a cube, apply the UV texturemaps, and add other elements to your scene.
Rather than trying to unwrapthe entire box, try selecting asingle face to unwrap usingthe “U” command in editmode. You will have a singleface with corner vertices inthe image mapping windowto work with. Move thosepoints around to match theside you want to use. Youmay also need to rotate theface. Continue until finished.
Add other elements toyour scene to make it looknice and realistic. Addappropriate lighting andset a good camera angle.Render and save animage of your work.
** Call the instructor when finished **
Creating a Texture Wrap
23-5
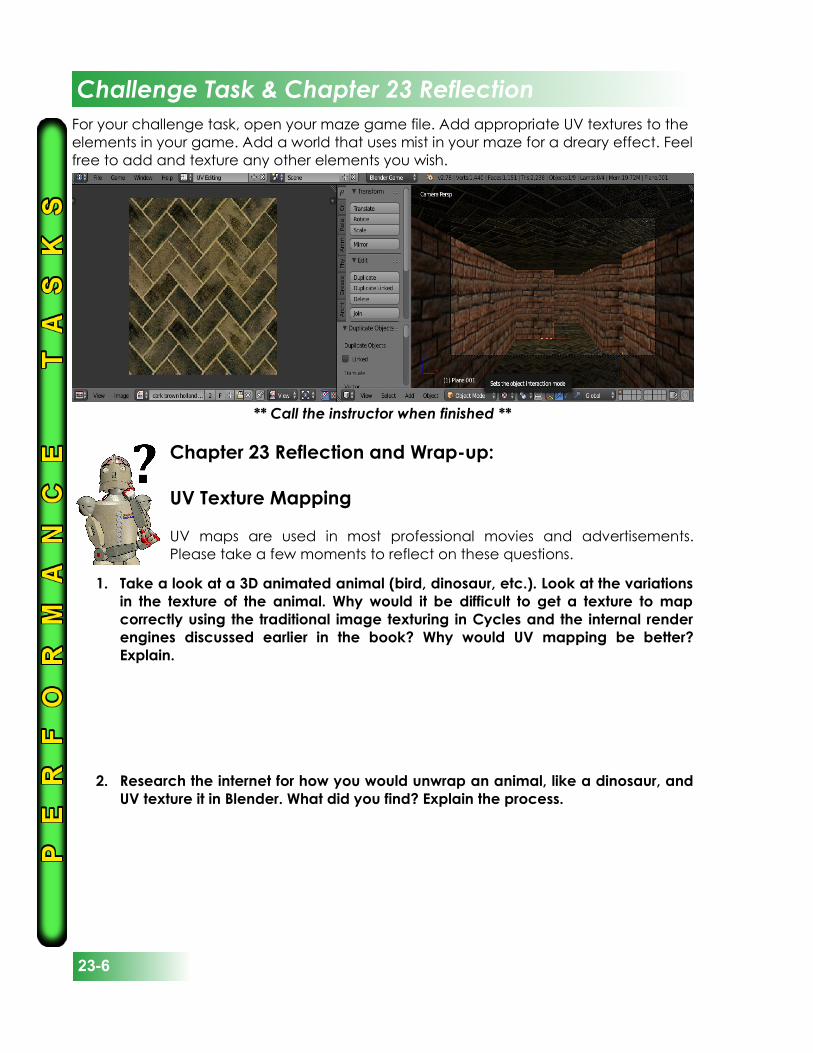
Chapter 1- The Blender InterfaceFor your challenge task, open your maze game file. Add appropriate UV textures to the elements in your game. Add a world that uses mist in your maze for a dreary effect. Feelfree to add and texture any other elements you wish.
** Call the instructor when finished **
Chapter 23 Reflection and Wrap-up:
UV Texture Mapping
UV maps are used in most professional movies and advertisements.Please take a few moments to reflect on these questions.
1. Take a look at a 3D animated animal (bird, dinosaur, etc.). Look at the variationsin the texture of the animal. Why would it be difficult to get a texture to mapcorrectly using the traditional image texturing in Cycles and the internal renderengines discussed earlier in the book? Why would UV mapping be better?Explain.
2. Research the internet for how you would unwrap an animal, like a dinosaur, andUV texture it in Blender. What did you find? Explain the process.
Challenge Task & Chapter 23 Reflection
23-6