Chapter 20 - University of Idaho Extension · CHAPTER 20 IDAHO MASTER GARDENER PROGRAM HANDBOOK ......
24
CHAPTER 20 IDAHO MASTER GARDENER PROGRAM HANDBOOK 20 - 1 Planning the Garden 2 Garden Design 2 Annual Planning 4 Vegetable Production Systems 5 Victory Garden Designs 5 Intensive Garden Designs 6 Buying, Saving, and Storing Seed 12 Buying Seed 12 Saving Your Own Seed 12 Storing Seed 12 Preparing the Soil 13 Testing the Soil 13 Adding Organic Matter 13 Fertilizing 14 Tillage 15 Planting 15 Planting Vegetable Seeds Outdoors 15 Producing and Establishing Transplants 17 Caring for Your Garden 20 Irrigating 20 Controlling Weeds 21 Controlling Pests 22 Controlling Plant Diseases 23 Further Reading and Resources 24 MASTER GARDENER IDAHO UNIVERSITY OF IDAHO EXTENSION Chapter 20 PRINCIPLES OF VEGETABLE CULTURE
-
Upload
duongduong -
Category
Documents
-
view
217 -
download
0
Transcript of Chapter 20 - University of Idaho Extension · CHAPTER 20 IDAHO MASTER GARDENER PROGRAM HANDBOOK ......

CHAPTER 20 IDAHO MASTER GARDENER PROGRAM HANDBOOK 20 - 1
Planning the Garden 2Garden Design 2Annual Planning 4
Vegetable Production Systems 5Victory Garden Designs 5Intensive Garden Designs 6
Buying, Saving, and Storing Seed 12Buying Seed 12Saving Your Own Seed 12Storing Seed 12
Preparing the Soil 13Testing the Soil 13Adding Organic Matter 13Fertilizing 14Tillage 15
Planting 15Planting Vegetable Seeds Outdoors 15Producing and Establishing Transplants 17
Caring for Your Garden 20Irrigating 20Controlling Weeds 21Controlling Pests 22Controlling Plant Diseases 23
Further Reading and Resources 24
MASTER GARDENERIDAHOUNIVERSITY OF IDAHO EXTENSION
Chapter 20PRINCIPLES OF VEGETABLE CULTURE

Few things in life are more rewarding than savor-ing a meal of home-grown vegetables. Vegetablegardening can be enormously satisfying. However,there can be no argument that it also is complex andfraught with problems, requires hard work, andinvolves many personal decisions. The most successful vegetable gardeners under-
stand basic concepts of botany, plant growth anddevelopment, plant health, irrigation, soil fertility,and pest and disease control. Many of these princi-ples are covered elsewhere in the Idaho MasterGardener Program Handbook. Detailed informationabout specific vegetable crops is found in the nextchapter. Many good books about vegetable garden-ing are also available.
PLANNING THE GARDEN
For some gardeners, planning a garden is aninteresting and satisfying activity. If this is you,have fun with the process and take all the time youwant. Get out the gardening books during the deep,dark months of winter, explore options for newcrops and varieties, make a graph-paper map, anddream about summer harvests. For others, planning seems to get in the way of
accomplishment. If this describes you, cut the plan-ning to a bare minimum and get on with buyingseed. However, some planning is essential to suc-cess in vegetable gardening. Planning can be broken into two phases: garden
design and annual planning. Garden designSome decisions need to be made early in the
planning process. A good approach is to take a fewminutes to answer some fundamental questions.Here are a few (but surely not all) of the questionsto consider.
How much time do I have for vegetable gardening? This question may seem trivial, but it will affect
everything else you do. Planting a garden and dis-covering you lack the time and resources to care forit properly leads to frustration. If you have only afew minutes a day to dedicate to gardening, plan asmall garden that contains two or three of yourfavorite vegetables. You may opt to grow plants onyour porch in pots or containers. At the otherextreme, if you have plenty of time and energy, thegarden can be more extravagant and include hobbyactivities such as testing unique varieties or growingunusual or marginally adapted crops. Or, if garden-ing is a life-sustaining activity, the scale of produc-tion may be quite large and your plans should bebased on food storage potential.What do I like to eat?Plan to produce only crops that you and your
family like and will prepare and consume. It’s awaste of time and resources to grow produce thatserves only as compost. Determine which vegeta-bles you will consume fresh and which will be pre-served and stored. Consider making room to experi-ment with small amounts of new crops or varieties.Over time, you may find a new favorite.How much room do I have for vegetable gardening?Sometimes the limitations for producing vegeta-
bles have less to do with time than with space. Inthis case, prioritize your goals and fit in only thosecrops you consider most valuable (your favorites).Plant crops that produce large quantities in limitedspace, such as tomatoes or cucumbers. Crops suchas corn and squash require a lot of space; placethem lower on the priority list.Where should I locate my garden?This can be a difficult question to answer, as it is
influenced by personal preference, impact on the
20 - 2 PRINCIPLES OF VEGETABLE CULTURE CHAPTER 20
Chapter 20
Principles of Vegetable CultureStephen Love, Extension Consumer Horticulture Specialist, Aberdeen Research & Extension Center, Aberdeen
Stuart Parkinson, Extension Educator, Franklin CountyIllustrations by Alissa Salmore, The Artemesia Studio

CHAPTER 20 IDAHO MASTER GARDENER PROGRAM HANDBOOK 20 - 3
appearance of the landscape, plant needs, and occa-sionally property ordinances. Public visibility cre-ates a need for more intense design and mainte-nance. Selecting a warm microclimate, e.g., next toa south-facing fence or wall, may make it possibleto grow crops, such as melons, that are otherwisemarginally adapted. Regardless of all other considerations, one
requirement must always be met: sunlight. Almostall vegetable crops require full sunlight to grow andproduce properly. Many books say that a vegetablegarden should get at least 6 hours of sunlight perday. The origin of this recommendation is unknown,but it probably did not come from an experiencedgardener. To maximize production and quality, agarden needs all-day sun, with the possible excep-tion of an hour or two of shade at dawn and dusk;the more sunlight, the better.Property features can place extreme limitations
on garden placement. If options are available, hereare a few tips to consider:• Avoid placing the garden in a low swale, at thebase of a hill, or at the foot of a slope borderedby a solid fence. Frost settles in these placesbecause cold air naturally drains toward thelowest spot in the yard.
• Avoid windy locations (hard to do in Idaho!).If you must plant in a windy spot, build orplant a windbreak.
• Avoid planting near trees and shrubs that willcompete for sunlight, nutrients, and water. Stay10 to 20 feet outside tree drip lines (an imagi-nary line on the ground at the edge of the treecanopy), if possible (figure 1).
• Choose a spot near your home so it is conven-ient to work in the garden when you have afew minutes.
• Locate the garden near a good and easilyaccessible supply of water.
• Avoid contaminated areas. Water runoff fromroads, sidewalks, or driveways can contami-nate the soil with salt, herbicides, or soil steri-lants. Do not plant near chemical manufactur-ing or storage facilities without investigatingsafety issues. Sites where lead-painted build-ings once stood may contain toxic amounts ofsoil lead. If you are unsure about your chosenlocation, check the lead (and other heavy
metals) content by having the soil or leafy veg-etable tissue analyzed.
What type of vegetable production system should I use? There are as many ways to lay out a vegetable
garden as there are gardeners (figure 2). Many peo-ple use some form of the traditional victory garden(straight, wide rows). Others use small beds, raisedbeds, trellis and stake systems, or containers. Part ofthis decision is based on garden size. Large gardensare usually best planted in rows so that tillers andother equipment can reduce the need for hand labor.Small gardens usually work best when laid out asintensively managed beds in order to maximize pro-duction in a limited space. Intensive production sys-tems can also reduce the amount of work needed forweed and pest control. Common production systemsare described later in this chapter.Where should I place perennial beds? Consider this question early in the design
process. Some vegetable, such as asparagus,rhubarb, chives, and many herbs, are perennial; theyregrow each spring and are a permanent part of thegarden. Locate these crops where they will notinterfere with annual garden operations. Perennialsare typically grouped along one side or in one cor-ner of the garden. Another technique is to use themas landscape features outside of the annually man-aged portion of the garden.
Figure 1. Locate vegetable gardens in full sun and atleast 20 feet from the drip line of trees and shrubs toavoid competing roots.

Annual planning Determination of gardening objectives, garden
size, and production system needs to be done onlyonce, although you probably will modify your planin subsequent years. Good gardeners are neverhappy with the status quo. However, some planningmust be done every year in order to maximize cropyield and quality.Choose the best vegetable varietiesVarieties differ not only in appearance and flavor,
but also in earliness, adaptation, and many othercharacteristics that influence growth in a specificclimate. In the short-season climates typical ofmuch of Idaho, choosing the right varieties is criti-cal to success. Information provided on seed pack-ets, such as days to harvest and general descriptionsof best production conditions, are typically inade-quate for determining suitability, given Idaho’spropensity for frost, cool nights, intense sunshine,low humidity, and/or alkaline soils. Obtain informa-tion about the best varieties from experienced gar-deners, Master Gardener volunteers, local nursery-men, and county educators.
Place and rotate the cropsDeciding where to plant individual crops each
year can be frustrating. However, these decisions arecritical. Crop rotation, the practice of changing thelocation of crops to avoid disease and nutritionalproblems, is a sound agricultural principle. Manyvegetable crops become weak and unproductive ifthey are planted in the same place every year. You can simplify these decisions by taking the
time to group plants into blocks based on geneticrelatedness and growth habit. Plants in the samefamily often have the same needs and problems.Each year, keep the crops in their established blocksand simply rotate the blocks through the availablespace (figure 3). If done properly, each block ofsimilar plants should end up in the same plot of soilonce every 3 to 5 years. Rotation to prevent disease problems is more
important for some crops than others. It is criticalfor the solanaceous crops (potatoes, tomatoes, pep-pers, eggplants, etc.), cucurbits (cucumbers, melons,squash, pumpkins, etc.), and cole crops (cabbage,broccoli, cauliflower, brussels sprouts, etc.).
20 - 4 PRINCIPLES OF VEGETABLE CULTURE CHAPTER 20
Figure 2. Productive vegetable garden designs range from the traditional open rows of a “victory garden” tospace-saving containers.

CHAPTER 20 IDAHO MASTER GARDENER PROGRAM HANDBOOK 20 - 5
Take into account plant height, spread, andgrowth habit. Don’t plant tall or aggressive plantswhere they will overgrow or shade smaller plants.
VEGETABLE PRODUCTION SYSTEMS
Vegetable gardening systems fall into two majorcategories: (1) low-intensity victory gardens plantedin wide rows or hills, and (2) intensive gardeningsystems planted in beds or containers. Victory gar-den layouts are best used in large gardens (morethan 500 square feet) where simplicity of operationsand use of motorized equipment is required. If spaceand/or time is limited, intensive garden designs arebest. The production systems described here areonly a sampling of the possibilities, but the conceptsapply to most garden systems.
Victory garden designsThe term victory garden originated during World
War II and was used to describe a vegetable garden-ing system consisting of wide, straight rows runningthe length of the garden (figure 4). It is the simplestdesign for a vegetable garden and the best methodwhen large amounts of produce are needed forpreservation, storage, or local sale. Any vegetablecan be produced in a victory garden arrangement,but it is especially good for crops needed in largequantities, such as corn, peas, beans, potatoes, andbroccoli.There are many adaptations to the single-row
planting design typical of the victory garden. Thefollowing are some common planting arrangements:
Year 1 Year 2
Year 4 Year 3
Figure 3. Example of crop rotation by grouping crops with similar growing requirements. Each shadowed squarerepresents the garden in a given year. Categories within the squares represent crop groups that are rotated withinthe garden space. Cole crops include broccoli, cauliflower, cabbage, brussels sprouts, and all of the kales andmustards. Vine crops include melons, cucumbers, squash, and pumpkins. Solanaceous crops include tomatoes,potatoes, peppers, and eggplant.

• Row planting. This arrangement consists oflong, straight rows, usually 2 or more feetapart, with a single line of plants in each row(figure 4, left). A string stretched betweenstakes or homemade row markers can providea guide for straight rows. Use a hoe handle, afurrow hoe, or a grub hoe to make a furrow ofthe appropriate depth. Space the seed uniform-ly and at a distance suitable for the crop.
• Broadcast row planting. In the victory gar-den, broadcast planting usually involves plac-ing seed in rows arranged as wide bands ratherthan single-wide plants (figure 4, center).Many crops, especially root crops such as car-rots, radishes, and beets, produce higher quali-ty vegetables when planted this way. Sow seedevenly across the planting band and rake it in.Lightly cover and press the soil over the seeds.
• Hill planting. Larger vegetables, such as mel-ons, squash, corn, and cucumbers, may beplanted in hills (figure 4, right). The hills canbe arranged in extra-wide rows to facilitatecultivation. Distance between hills is based onrecommendations for individual crops. Moundsoil a few inches high and a foot or so in diam-eter and plant in the center of the mound. Plantfour to six seeds per hill, firming the soil well.
Intensive garden designsIntensive garden designs require considerable
effort to plan and install, but are relatively easy tomaintain. Plans should include dimensions, con-struction materials, soil media, variety choice, andplant arrangement. Proven intensive garden designsinclude raised beds, vertical gardens, and container
gardens. When combined with production tech-niques such as interplanting, succession planting,relay planting, and edible landscaping, these gardendesigns maximize the use of limited space.Raised bedsThe typical “raised bed” garden consists of
defined borders of wood or masonry filled withheavily amended soil to a level above the surround-ing ground (figure 5). Raising the bed above groundlevel accomplishes two very important things: itimproves drainage and it allows the soil to warm upfaster in the spring. Both factors can improve plantgrowth and production potential.The actual garden design and the selection of
border materials are personal choices. Typical bedsare raised 6 to 8 inches, but they may be as much as3 feet above grade. Borders may be permanentstructures (made from concrete or other immovablematerials) or temporary. Wood landscape timbersare a common choice. Redwood or cedar timberswill minimize deterioration due to constant exposureto moisture. Pressure-treated landscape timbers arecommonly available. There is no evidence that thenew generation of treated timbers are toxic or harm-ful to plants or consumers, but older timbers or rail-road ties were commonly treated with creosote orpentachlorophenol (penta), both toxic to plants andpeople. If unsure, you may want to use only untreat-ed wood.There are no standard dimensions for raised bed
gardens. Typically they are narrow enough to allowthe gardener to reach to the center of the bed with-out stepping on the soil. The length is usually afunction of the location; beds may be only a fewfeet long or stretch across the yard.
20 - 6 PRINCIPLES OF VEGETABLE CULTURE CHAPTER 20
Figure 4. Possible row arrangements within a stan-dard victory garden design.
Figure 5. Example of a raised bed intensive gardeningsystem.

Soil preparation is an important aspect of raisedbed gardening. The final soil mix commonly con-sists of one part native soil and one part compost oraged organic matter. Many other choices for soilcomponents exist; for example, manure, peat, sand,vermiculite, or perlite may be added in variousquantities. The simplest method for preparing thesoil is to remove the top 12 inches of soil from thecompleted bed, place it in a pile, mix the pile withan equal amount of organic matter, and shovel themixture back into the bed. At this point, the bed willbe ready for plants.
Plant arrangement should optimize the use of thelimited space. Give each plant a square space largeenough for it to grow properly. The goal is to spaceplants equidistant from one another on all sides sothat, at maturity, plant leaves touch or slightly over-lap. Spacing recommendations for raised beds aresummarized in table 1. The use of dwarf or bush-type varieties will minimize space needed for manycrops, such as beans, cucumbers, tomatoes, andsquash.Vertical gardeningThe use of trellises, nets, strings, cages, or poles
to hold plants upright and limit horizontal spreadconstitutes vertical gardening (figure 6). Vining andsprawling plants, such as cucumbers, tomatoes, mel-ons, and pole beans, are obvious candidates for thistype of gardening. Tomatoes, for example, requireabout 10 square feet per plant when unstaked, butcan be grown in 1 square foot of space if supportedand trained upward. Vertical gardening can be usedin victory gardens, raised beds, containers, or byitself.
CHAPTER 20 IDAHO MASTER GARDENER PROGRAM HANDBOOK 20 - 7
Table 1. Plant spacing guide for raised bed or otherintensive vegetable garden designs.
Spacinga SpacingaPlant (inches) Plant (inches)
Asparagus 15 to 18 Leeks 3 to 6Beans, bush 4 to 6 Lettuce, head 10 to 12 Beans, lima 4 to 6 Lettuce, leaf 4 to 6Beans, pole 6 to 12 Melons 18 to 24Beets 2 to 4 Mustard 6 to 9Broccoli 12 to 18 Okra 12 to 18Brussels sprouts 15 to 18 Onions 2 to 4Cabbage 15 to 18 Peas 2 to 4Carrots 2 to 3 Potatoes 10 to 12Cauliflower 15 to 18 Peppers 12 to 15Chinese cabbage 10 to 12 Pumpkins 12 to 36Cucumbers 12 to 18 Radishes 2 to 3Chard, Swiss 6 to 9 Rutabaga 4 to 6Collards 12 to 15 Spinach 4 to 6Eggplants 18 to 24 Squash, summer 18 to 24Endive 15 to 18 Squash, winter 24 to 36Kale 15 to 18 Tomatoes 18 to 24Kohlrabi 6 to 9 Turnips 4 to 6
Note: To determine spacing for interplanting, add the inches forthe two crops to be planted together, and divide the sum by two.For example, if radishes are planted next to beans: 2 inches + 4 inches = 6 inches. Then, 6 inches ÷ 2 = 3 inches. Plant theradishes 3 inches from the beans.The use of miniature varieties or vertical gardening techniquesmay allow closer spacing and increase the square-foot productivi-ty.a Arrange plants in square grid patterns. The indicated spacing isthe distance to other plants in all directions. These recommen-dations for intensive gardening typically are for slightly closerspacing than the spacings suggested in the next chapter, whichare based on recommendations for a traditional victory garden.
Figure 6. Example of a structure used for vertical veg-etable gardening.

Supports for plants can be simple or extravagant.They can take advantage of existing structures, suchas buildings or fences, or can stand alone. Theheight of the support depends on the crop. Shorterplants, such as tomatoes, cucumbers, and polebeans, grow to a height of 5 to 6 feet. Squash mayneed 15 to 20 feet of vertical space or a structurethat will allow some horizontal growth at the top(e.g., a high tunnel). In Korea, gardeners plantsquash and other vine crops next to the walls ofbuildings, allowing them to climb a trellis and even-tually set fruit on the roof.Vertical gardening saves considerable space but is
labor-intensive. Staking, tying, pruning, and trainingnew growth upward takes time. Most plants do notclimb naturally, so simply planting next to a verticalstructure will not necessarily convince plants toreach skyward. Because vertically growing plants are more
exposed, they dry out faster and may need to bewatered more frequently than those allowed tospread over the ground. A vertical planting will casta shadow, so be sure to locate the structures wherethey will not shade non-vertical parts of the garden.
Container gardeningIf you don’t have yard space for a vegetable gar-
den, or if your garden is too small to produce every-thing you want, consider raising vegetables in con-tainers (figure 7). A window sill, patio, balcony, ordoorstep can provide sufficient space for a produc-tive container garden. Container gardens can alsomake gardening simpler by reducing problems withweeds and many other pests. Gardening in containers requires more attention
to detail than any other gardening method. Theplants have only a small amount of soil for rootgrowth, meaning that water and nutrients are limit-ed. Also, the plants are subject to heat and otherstresses. As a result, care requirements are morestringent than in a traditional garden. In addition tothe general vegetable gardening techniques dis-cussed later in this chapter, the following considera-tions apply specifically to container gardens.
20 - 8 PRINCIPLES OF VEGETABLE CULTURE CHAPTER 20
Figure 7. The ultimate in intensive vegetable garden-ing is container gardening. Tomatoes, peppers,cucumbers, and many other crops can be grown incontainers.
Table 2. Growing vegetables in containers.
Spacing Daysbetween from
Light Minimum plants in plantingrequire container containersb to
Vegetable -mentsa size (inches) harvest
Beans FS 2 gallon 2 to 3 45 to 60Beets FS/PS ½ gallon 2 to 3 50 to 60Cabbage FS/PS 5 gallon 1 plant 65 to 120Carrots FS/PS 1 gallon 2 to 3 65 to 80Cucumbers FS 5 gallon 1 plant 70 to 80Eggplants FS 5 gallon 1 plant 75 to 100Kale FS/PS 5 gallon 10 to 15 55 to 65Lettuce PS ½ gallon 4 to 6 30 to 35Mustard greens PS ½ gallon 4 to 5 35 to 40Onions FS/PS ½ gallon 2 to 3 70 to 100Peppers FS 2 gallon 8 to 12 110 to 120Spinach PS 1 gallon 4 to 6 30 to 40Squash FS 5 gallon 1 plant 50 to 60Swiss chard FS/PS ½ gallon 4 to 6 30 to 40Tomatoes FS 5 gallon 1 plant 55 to 100Turnips FS/PS 3 gallon 2 to 3 30 to 60
a FS = full sun (10 or more hours of direct sun each day), PS = part shade (6 or more hours of direct sun each day).
b Any vegetable that produces large plants should have only oneplant per container.

CHAPTER 20 IDAHO MASTER GARDENER PROGRAM HANDBOOK 20 - 9
Choosing containers. Containers can be made ofclay, wood, plastic, or metal. They can be purchasedor homemade. It’s best to use new containers toensure that they are free from contamination (e.g.,herbicide residue). The most important considera-tions are size, mobility, and drainage.Selecting the proper container size is a balance
between supplying adequate soil volume and mak-ing sure containers can be moved in case ofinclement weather or for winter storage. Table 2provides recommendations for minimum pot sizesfor several common vegetable crops, as well asother information needed to make good containerproduction decisions. Container depth is importantbecause most plants need at least 6 to 8 inches ofsoil for proper rooting.Wooden barrels make excellent vegetable pots.
Wooden planting boxes also work well and can bepurchased or constructed to preferred dimensions.Choose redwood or cedar, which resist breakdownand rot. Wood for container construction should notbe treated with creosote (used to preserve railroadties) or pentachlorophenol (penta) wood preserva-tives. These preservatives may be toxic to plants andharmful to people. Other options for homemadecontainers include vertical planters made out ofwood lattice lined with black plastic or welded wireshaped into cylinders. Regardless of whether you purchase or construct
a container, be sure there are holes in the bottom ofadequate size and number to allow drainage ofexcess water.
Choosing soil media. Native garden soil by itselfdoes not make good potting soil because it does notprovide adequate drainage or air exchange. The bestsoil media, ironically, are called “soilless mixes.”These mixes usually are porous combinations ofpeat moss, perlite, and sand. Some contain woodchips or bark. Packaged potting soil (available atlocal garden centers) is relatively lightweight andmakes a good container medium. It’s much cheaperto make your own soilless mix, but a lot more work. Soilless mixes are sterile and contain few nutri-
ents. Manufacturers usually add major plant nutri-ents to mixes, but may not add trace elements thatare necessary for good plant growth. This problemcan be solved by using the soilless mix as a baseand adding compost or a small amount of nativegarden soil (about 25 percent by volume).
Placing the containers. Providing adequate sun-light for the plants is the most important considera-tion when placing a container. Ideally, the containershould be positioned where plants receive sun allday. However, in limited space situations, this is notalways possible. Consequently, the amount of sun-light your container garden receives may determinewhich crops can be grown. Leaf crops generally cantolerate some shade, while vegetables grown fortheir roots or fruits need a minimum of 8 to 10 hours of direct sunlight each day. Available lightcan be concentrated somewhat by providing reflec-tive materials around the plants (e.g., aluminum foil,white-painted surfaces, marble chips on the soil sur-face). Containers should also be placed to avoid fre-quent strong winds.
Choosing vegetable crops and varieties forcontainers. Almost any vegetable crop can begrown successfully in a container. However, the bestcontainer crops are those that allow you to make thebest use of available space. Examples include manytypes of herbs, carrots, radishes, lettuce, and cropsthat bear fruits over a period of time, such as toma-toes, peppers, and cucumbers. Dwarf or miniaturevarieties of many crops are available, making themsuitable for containers even if the standard varietiesare too large. With increasing interest in containergardening, plant breeders and seed companies areworking to develop vegetables specifically for con-tainer culture. These varieties may or may not beminiature or dwarf, but they do grow well in potsand produce as well as standard varieties if properlymaintained.
Establishing plants in containers. Because con-tainers can be moved indoors during frost or inclementweather, you can plant vegetables 2 to 3 weeks earlierthan in the outdoor garden. Be careful not to plant tooearly, however, because plants that spend too muchtime indoors will not adapt well to outdoor conditionsonce the weather moderates. On the other hand, if acontainer is too large to move or is designated toremain permanently outdoors, plant the crops at thesame time as you would in a traditional garden.Make sure the potting soil is adequately moist.
Plant the seeds as you would in the garden. Use thespacing recommendations listed in table 2. It is agood idea to overplant and thin after emergence tothe recommended spacing. If cages, stakes, or othersupports are needed, install them just after plantingor thinning to avoid root damage later.

Table 2 also provides information on the expectedamount of time to first harvest. Your actual growingperiod may vary, depending on weather conditionsand pot location.
Irrigating container gardens. Improper irriga-tion is the most frequent cause of failure in contain-er gardens. Limited soil volume and extreme expo-sure results in a high demand for water. Inadequateor erratic irrigation will quickly reduce plant healthand productivity. However, overwatering is just as serious and may
be the more common problem. Overwatered plantsdo not show immediate detrimental effects, but willeventually decline and die due to a reduction in roothealth. Overwatering is often caused by the pres-ence of a water saucer or catch-pan under the pot. Ifthe catch-pan is constantly full, water will wickback into the pot through the drainage holes andkeep the soil too wet. Water only when the plantsand soil indicate a need. The soil should never besoggy or have water standing on the surface.Knowing when to water container plants is a little
tricky, but there are a few techniques that may help.Check containers at least once a day (twice on hotor windy days). Use your fingers to feel the soil. Itmay be dry on top, but should be damp (not soppingwet) below a depth of about 1 inch. If the soil feelsdry to a depth below the length of your finger, applywater until it runs out of the drainage holes in thebottom. Another trick is to watch the plants for theearliest signs of water stress—a change in color todark green followed by mild wilt symptoms. Don’tallow wilting to become severe. In the hottest part of the summer, you may need
to water daily or twice a day, depending on the sizeof the pot. In cool spring weather or on cloudy days,plants may need water only once every 3 or 4 days.If you must be away from the garden for long peri-ods of time, consider installing an automatic dripirrigation system.Clay pots and other porous containers allow evap-
oration through the sides of the pots. Plants grown inthese types of containers require irrigation moreoften than those grown in impermeable containers. To conserve water in containers, try the following
techniques:• Group containers so they shade one anotherand reduce evaporation.
• Place something impermeable, such as a plas-tic or rubber mat, under pots to prevent mois-ture from moving out of the pots and intocement or masonry surfaces.
• Use mulches and windbreaks.Fertilizing containers. If you purchase a soil
mix that includes fertilizer, your plants should haveenough nutrients to last 8 to 10 weeks. If plantsgrow for a longer period of time, you will need toadd water-soluble fertilizer, dry fertilizer (slow-release), well-aged manure, or compost at the raterecommended on the product label. Repeat every 2 to 3 weeks. An occasional dose of fish emulsionor compost will add trace elements to the soil.Do not add more than the recommended rate of
any fertilizer, because excess fertilizer may damageor kill the plants. Container soils do not have thebuffering capacity provided by large volumes of soiland humus to protect them from over-fertilization.Just because a little fertilizer is good for your plantsdoes not mean that a lot will be better.
Pest control. Vegetables grown in containers canbe attacked by the same insects and diseases that arecommon to any vegetable garden. They are moreprone to damage from some pests, such as spidermites. Inspect plants periodically for foliage- andfruit-feeding insects as well as disease symptoms.Treat as needed. For insects, control may be as easyas spraying the plants with a hard stream of water.See the section on pest control later in this chapterfor more information.Other intensive gardening techniques
Interplanting. Growing two or more types ofvegetables within the same space at the same time isknown as interplanting (figure 8). Interplanting hasbeen practiced for thousands of years in Europe andJapan, but is just now gaining widespread support inthis country.Interplanting can be accomplished by alternating
rows within a bed (for example, a row of peppersnext to a row of onion), by mixing plants within arow, or by distributing various species throughout abed. For the beginner, alternating rows may be theeasiest system to manage.To successfully plan an interplanted garden, con-
sider these factors for each plant:• Length of the plant’s growth period and itsgrowth pattern (tall or short, below or aboveground)
20 - 10 PRINCIPLES OF VEGETABLE CULTURE CHAPTER 20

• Possible negative effects on other plants (e.g.,sunflowers and Jerusalem artichokes producechemicals that can inhibit the growth of nearbyplants)
• Season of growth• Light, nutrient, and moisture requirementsOne of the best interplanting strategies is to com-
bine an early crop, such as peas, radishes, orspinach, with a late crop, such as carrots, cucum-bers, or squash. The early crop will be harvested bythe time the late crop needs the space. Another tech-nique is to plant smaller plants around larger plants(e.g., radishes at the base of beans or broccoli).Shade-tolerant species, such as lettuce, spinach, andcelery, can be planted in the shadow of taller cropssuch as corn. Plants that require large amounts ofnutrients, such as cabbage-family crops, can beinterplanted with less gluttonous plants such asbeans or beets.
Succession or relay planting. Succession plant-ing involves growing multiple crops of the same ordifferent plants in the same space by replanting assoon as harvest is complete. You may laugh at thisidea if you live in one of Idaho’s short-season cli-mates, which limit the potential of this technique.However, some rapidly maturing crops areamenable to succession planting. Spinach, lettuce,kale, radishes, beets, and peas are good candidates.A fall crop of broccoli or cauliflower may also bepossible with the proper succession of crops.
Relay planting is an effective option in cold-cli-mate areas. This technique involves planting cropsover a several-week period to allow for continuousharvest (figure 9). This method does not improveefficiency of land use, but does keep fresh vegeta-bles available for a longer period of time. Thismethod is especially effective for most salad cropsand sweet corn.
Edible landscaping. Although not a new idea,edible landscaping has recently come into its own asan effective vegetable and fruit production technique.It consists of utilizing vegetable and fruit crops aslandscape elements. For the vegetable gardener, itusually consists of planting edible crops among per-manent elements of the landscape. Vegetables replaceor are intermixed with flowers and other ornamentalplants in annual and perennial beds.Edible landscaping has much in common with the
interplanting technique described above. You mustconsider compatibility among vegetables and otherlandscape plants. Because they are integrated into thelandscape, the vegetable plants must not only be pro-ductive and healthy, but also must look good and con-tribute to the overall appearance of the property. Theyshould enhance rather than detract from the landscape. Vegetable crops are not all equal as edible land-
scape specimens. Appropriate edible landscape veg-etables are those that can be planted in limited num-bers, remain green for most of the summer, and pro-vide unique and attractive visual appeal. Some ofthe best crops for use in edible landscapes includebeets, cabbage, cauliflower, carrots, chard, collards,cucumbers, lettuce, onions, parsley, peppers,spinach, and tomatoes.
CHAPTER 20 IDAHO MASTER GARDENER PROGRAM HANDBOOK 20 - 11
Figure 8. Interplanting—planting different cropstogether in the same space—is a good way to maxi-mize production in limited space.
Figure 9. Relay planting can be used to extend theharvest season of many crops, such as corn. Plantson the right were planted first; those on the left plant-ed later.
Maintenance of an edible landscape is similar tothat for other intensive production systems. Theprocesses of soil management, fertilization, irriga-tion, weed control, and pest management are similarto those described throughout this chapter. Theunique part of edible landscaping is that the needsof the vegetable crops must be balanced with theneeds of the permanent landscape elements.Because no two edible landscapes have the sameplants and situation, it is difficult to provide detailedinstructions for installation and care. Experiencewill provide the best recipe for success.
BUYING, SAVING, AND STORING SEED
Buying seedChoose seed from a reputable seed company.
Make sure the seed was grown and packaged theprevious year, rather than stored by the seed compa-ny. The seed packet should show a package date. After buying seed, keep a record of the seed com-
pany, variety names, plant performance, productionproblems (including diseases), and your personalfeelings about the quality and flavor of the produce.This record will prove invaluable when selectingvarieties in the future. Don’t try to rely on memoryto recall your favorite varieties; even the best mindscreate memories that may last a shorter time thanthe gardening season!Saving your own seedSaving your own seed can create a sense of self
sufficiency and save money. However, the true ben-efit is the ability to maintain a vegetable variety thatis not available commercially. “Heirloom” or “her-itage” varieties are fun to grow and can have aunique appearance and/or quality, but the seed isoften hard to obtain. You can keep a steady supplyof seed available by saving your own. Participationin a seed-saver’s exchange can also be rewarding.You can trade extra seeds for unusual varieties notavailable through other sources.Keep the following factors in mind when saving
seed:• Hybrid varieties (usually designated as“hybrid” or “F1 hybrid” as part of the varietyname) produce seed that does not breed true.In other words, if you plant seed harvestedfrom these plants, the resulting offspring willvary in appearance, productivity, and quality.
Use only open-pollinated varieties (those thatare not hybrids) for home seed production.Some seed dealers have responded to theincreasing interest in seed saving by clearlymarking open-pollinated varieties in their cata-logs.
• Seed can carry diseases into the next year’scrop. This concern is minimal in most Idahoclimates, but be safe by taking seed only fromvery healthy plants.
• Completely clean and dry the seed before storingit. A good method is to place the seed on a drypaper towel in a sunny window. Store the driedseed in a cool place (not more than room temper-ature) where it will remain completely dry.
• Some crops are self pollinated (they produceseed using their own pollen), while others arecross pollinated (pollen is transferred fromother plants). Self-pollinated crops includepeas, beans, tomatoes, peppers, and eggplants.These are the simplest crops from which tosave your own seed.Cross-pollinated crops include cucumbers,melons, squash, pumpkins, broccoli, lettuce,radishes, and sweet corn. If you want to saveseed from cross-pollinated crops, you mustisolate the plants or transfer pollen by hand. Ifyou have ever saved squash seed and foundthe next crop to be full of unusual types, youknow what can happen. You can isolate plantsby growing only one variety of that crop, butonly as long as there are no other varietiesgrowing in gardens nearby (usually withinabout a quarter mile). The best way to ensureisolation is to cover the flowers with a paperbag before they open. Some plants have sepa-rate male and female flowers, and both mustbe covered. When the flowers open, use asmall artist’s brush to transfer the pollen. Thencover the flowers again until they fade.
• For corn, save seed only from open-pollinatedheirloom types.
• Some crops, such as beets, carrots, and onions,produce seed in their second year of growth. Itis difficult to save seed from these crops, butyou can do so by storing roots or bulbs overthe winter in the refrigerator and replantingthem in the spring.
20 - 12 PRINCIPLES OF VEGETABLE CULTURE CHAPTER 20
Many books and web sites provide more detailedinformation about saving vegetable seed. For exam-ple, see the outstanding web site maintained by theInternational Seed Saving Institute(http://www.seedsave.org/issi/issi.html).
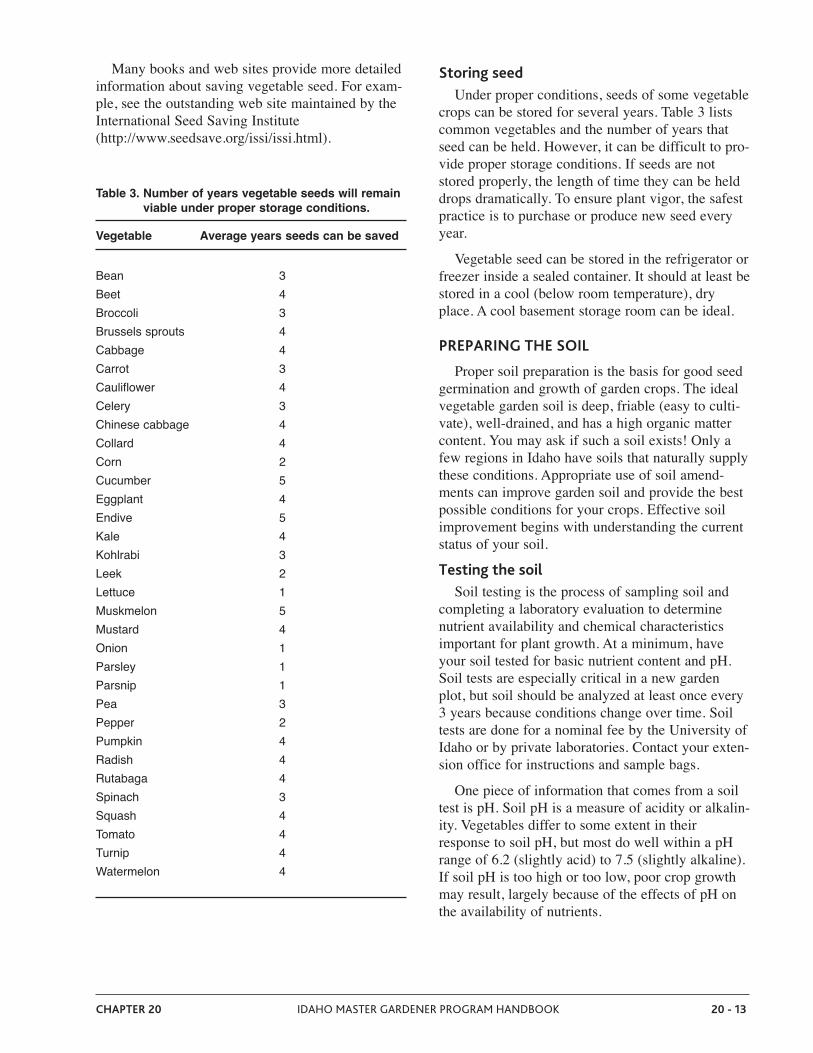
Storing seedUnder proper conditions, seeds of some vegetable
crops can be stored for several years. Table 3 listscommon vegetables and the number of years thatseed can be held. However, it can be difficult to pro-vide proper storage conditions. If seeds are notstored properly, the length of time they can be helddrops dramatically. To ensure plant vigor, the safestpractice is to purchase or produce new seed everyyear. Vegetable seed can be stored in the refrigerator or
freezer inside a sealed container. It should at least bestored in a cool (below room temperature), dryplace. A cool basement storage room can be ideal.
PREPARING THE SOIL
Proper soil preparation is the basis for good seedgermination and growth of garden crops. The idealvegetable garden soil is deep, friable (easy to culti-vate), well-drained, and has a high organic mattercontent. You may ask if such a soil exists! Only afew regions in Idaho have soils that naturally supplythese conditions. Appropriate use of soil amend-ments can improve garden soil and provide the bestpossible conditions for your crops. Effective soilimprovement begins with understanding the currentstatus of your soil.Testing the soilSoil testing is the process of sampling soil and
completing a laboratory evaluation to determinenutrient availability and chemical characteristicsimportant for plant growth. At a minimum, haveyour soil tested for basic nutrient content and pH.Soil tests are especially critical in a new gardenplot, but soil should be analyzed at least once every3 years because conditions change over time. Soiltests are done for a nominal fee by the University ofIdaho or by private laboratories. Contact your exten-sion office for instructions and sample bags.One piece of information that comes from a soil
test is pH. Soil pH is a measure of acidity or alkalin-ity. Vegetables differ to some extent in theirresponse to soil pH, but most do well within a pHrange of 6.2 (slightly acid) to 7.5 (slightly alkaline).If soil pH is too high or too low, poor crop growthmay result, largely because of the effects of pH onthe availability of nutrients.
CHAPTER 20 IDAHO MASTER GARDENER PROGRAM HANDBOOK 20 - 13
Table 3. Number of years vegetable seeds will remainviable under proper storage conditions.
Vegetable Average years seeds can be saved
Bean 3Beet 4Broccoli 3Brussels sprouts 4Cabbage 4Carrot 3Cauliflower 4Celery 3Chinese cabbage 4Collard 4Corn 2Cucumber 5Eggplant 4Endive 5Kale 4Kohlrabi 3Leek 2Lettuce 1Muskmelon 5Mustard 4Onion 1Parsley 1Parsnip 1Pea 3Pepper 2Pumpkin 4Radish 4Rutabaga 4Spinach 3Squash 4Tomato 4Turnip 4Watermelon 4
Unfortunately, in most cases we are stuck withthe soil we have regardless of whether pH is favor-able. It is possible to raise the pH of low-pH soils(common in northern Idaho and some high moun-tain valleys) by liming. It is nearly impossible, how-ever, to lower the pH of the alkaline soils commonto much of southern Idaho. However, you can par-tially compensate for the lack of nutrient availabilityin these soils by adjusting fertility practices. One ofthe best ways to improve nutrient availability is toincrease the amount of organic matter in the soil.Adding organic matterOrganic matter is derived from decomposing
plants. It is important because it improves tilth,increases water-holding capacity, improves fertility,and reduces problems with soil diseases. There is noreplacement for organic matter in improving soilhealth and providing good growing conditions forvegetables.Most Idaho soils are low in organic matter. It can
be added in the form of plant waste (such as leavesor lawn clippings), composts, green manures, oraged animal manures. You’ll need to add organicmatter consistently (every year or two) because itbreaks down rapidly in the soil. Compost is one of the simplest, safest, and most
effective organic amendments. You can purchasecompost or make it from landscape or householdplant-based waste. See the chapter titled “BackyardComposting” to learn the basics of this process.Apply compost by spreading a layer 3 to 6 inchesdeep on the soil surface. If possible, till it in to adepth of 10 to 12 inches.Green manure is living plant material that is
added to the soil. Effective green manure cropsinclude oats, corn, vetch, clover, and mustard. Growthe green manure crop on the area you want toamend. Mow the crop while it is still green and tillin the residue. In short-season areas, planting a green manure
crop may exclude planting a garden in that spot dur-ing the amending season. Regardless, this is still avery good practice in a new garden plot. A less dis-ruptive method is to schedule green manure cropsinto the garden rotation system; reserve a differentportion of the garden for a green manure crop eachseason.
Animal manures should be aged for a year or twoor properly composted before application. Manurescan be fairly high in salts and may be harmful inexcessive amounts. Add 2 to 4 inches of manure andtill it in to a depth of 10 to 12 inches. It’s best toapply manure in the fall so it has time to completelydecompose and salts can partially leach out of theroot zone before spring planting.FertilizingDecisions related to fertilizing vegetable gardens
can be complex. The type and amount of fertilizerneeded depends on factors such as the natural fertili-ty of the soil, soil texture, and amount of organicmatter present. Thus, it is impossible to provide uni-versal fertilizer recommendations that apply toevery gardening situation. Fertilizer requirements for individual vegetable
crops vary widely, further complicating fertilizerrate decisions. Some crops, such as peas, beans, andbeets, need very little fertilizer. Most long-seasoncrops, such as corn, potatoes, and melons, requirefairly large amounts. Fertilizer application decisionsfor a vegetable garden should take into accountthese crop differences.Nothing can replace a soil test for providing the
information required to make good fertilizer appli-cation decisions. If soil test results are not available,you must base fertilizer decisions on reasonableassumptions about existing conditions. Three suchassumptions are possible for most Idaho soils:• Nitrogen (N) is the nutrient most likely to bein short supply. Base fertilizer application rateson the nitrogen requirement.
• Consistent applications of phosphorus (P) andpotassium (K) are usually needed. Use a “com-plete” fertilizer—one that contains all threemajor nutrients (N, P, and K). The fertilizershould contain at least as much phosphorusand potassium as nitrogen. This assumption isnot always true, however; hence, the value ofan occasional soil test.
• Your garden soil is probably reasonably fertileto begin with and would grow a reasonablecrop of vegetables even if you added no fertil-izer. This last assumption can be validatedonly through experience.
20 - 14 PRINCIPLES OF VEGETABLE CULTURE CHAPTER 20

If you feel these assumptions are reasonably validfor your garden soil, the following three-stepprocess should work as a starting point for fertilizerapplications. These recommendations are appropri-ate for a typical Idaho clay loam, silt loam, or sandyloam soil with average nutrient content and a lowamount of organic matter.1. Purchase a fertilizer that contains a moderateamount of nitrogen, high levels of phosphorus,moderate to high levels of potassium, and pos-sibly some sulfur. Fertilizer labels list the con-tent of these nutrients in the order N-P-K.Examples of appropriate fertilizer grades forvegetables are 4-10-6, 5-10-5, 5-10-10, 6-10-10, 10-20-10, 10-45-10, and 15-30-15.It’s not necessary to use a product that matchesone of these grades exactly, but do seek aproduct with a similar ratio of major nutrients.
2. Before planting, add fertilizer at the rate of 2 to 3 pounds of actual nitrogen per 1,000square feet of garden area. (See the chaptertitle “Soils and Fertilizers” in this handbookfor information on how to determine the nutri-ent content in fertilizers.) This will supply thefull seasonal needs for crops that are consid-ered to be light feeders (beans, beets, carrots,chard, lettuce, parsnips, peas, early-harvestedpotatoes, radishes, rutabagas, spinach, toma-toes grown in a short-season area, and turnips).
3. After the crops are up and growing, sidedressthe heavy feeders (broccoli, cabbage, cauli-flower, celery, collards, corn, cucumbers, egg-plants, kohlrabi, leeks, melons, onions, pep-pers, late-harvested potatoes, pumpkins,squash, and tomatoes grown in a long-seasonarea) with an additional 2 to 3 pounds of nitro-gen per 1,000 square feet. Apply this fertilizerjust as the plants start their major growthphase—typically 3 to 6 weeks after planting ortransplanting, depending on the crop. Applythe fertilizer near the base of the plants. Forthis application, you might use ammonium sul-fate (20-0-0), which does not contain phospho-rus or potassium.
If you use a lot of compost or manure, you canuse less fertilizer. For example, if you apply 4 to 6 inches of manure or compost each year, you canreduce the amount of fertilizer applied by one-halfto two-thirds.
The principles described above apply to bothorganic and chemical fertilizers. However, the fertil-izer products used are different. Organic fertilizerproducts include bone meal, blood meal, feathermeal, etc. Organic gardeners often rely more heavilyon consistent applications of composts, manures,and green manures to supply plant nutrients.Sandy garden soils require some modification in
fertilizer application practices. If your soil is sandy,apply less of the total fertilizer before planting.Instead, make frequent, small applications through-out the growing season. This will provide the plantswith the nutrients they need, while reducing leach-ing losses. A soil test will help you determine yoursoil texture.The “Soils and Fertilizers” chapter in this hand-
book explains more about soils, soil fertility, fertiliz-er grades, and application methods. TillageThe final step in soil preparation is tillage.
Ideally, soil should be tilled to a depth of at least 10 inches. This can be very difficult with small gar-den equipment, however. If you can’t till deeply, itmay be beneficial to occasionally fracture the soil toa greater depth. Push a long-tine garden fork deepinto the ground and pull the handle backward tobreak up the hard lower layers. It is important to avoid working soil when it is
very wet. Tilling wet soil breaks down the soil struc-ture, causing it to become cloddy and hard. The neg-ative impact of tilling wet soil may last for years.You can tell if your soil is dry enough to work bytaking a handful and squeezing it tightly into a ball.If the ball breaks into granular pieces when pressedlightly between your fingers, the soil is ready towork. If the ball remains intact and feels sticky whenyou squeeze it, wait a few days before tilling.
PLANTING
Planting vegetable seeds outdoorsNo amount of care can rescue plants that get off
to a bad start due to incorrect planting. In order togerminate properly, seed must be planted at the rightdepth and must remain moist. As a general rule, vegetable seeds should be
planted to a depth about three times their width (nottheir length). However, there are exceptions. Some
CHAPTER 20 IDAHO MASTER GARDENER PROGRAM HANDBOOK 20 - 15
seeds require light for germination and should becovered with no more than ¼ inch of soil. Mostseed envelopes contain planting instructions. You can cover shallow-planted seed with clear
plastic film (such as plastic food wrap) or wetburlap to raise the soil temperature and hold mois-ture. Remove the covering immediately after theseedlings emerge to prevent burning or abnormalgrowth of the new plants.Optimal planting times vary from crop to crop.
There is no “one time fits all” for vegetables. Someplants grow well in cool spring weather. Plant thesecrops well before the last frost. Other vegetables canbe severely damaged by cold weather or light frost.The first step in deciding when to plant is to
determine the average date of the last frost in yourarea. This information can be found in many publi-cations, web sites (for example, http://www.hume-seeds.com/frost1.htm), or from your local extensionoffice.
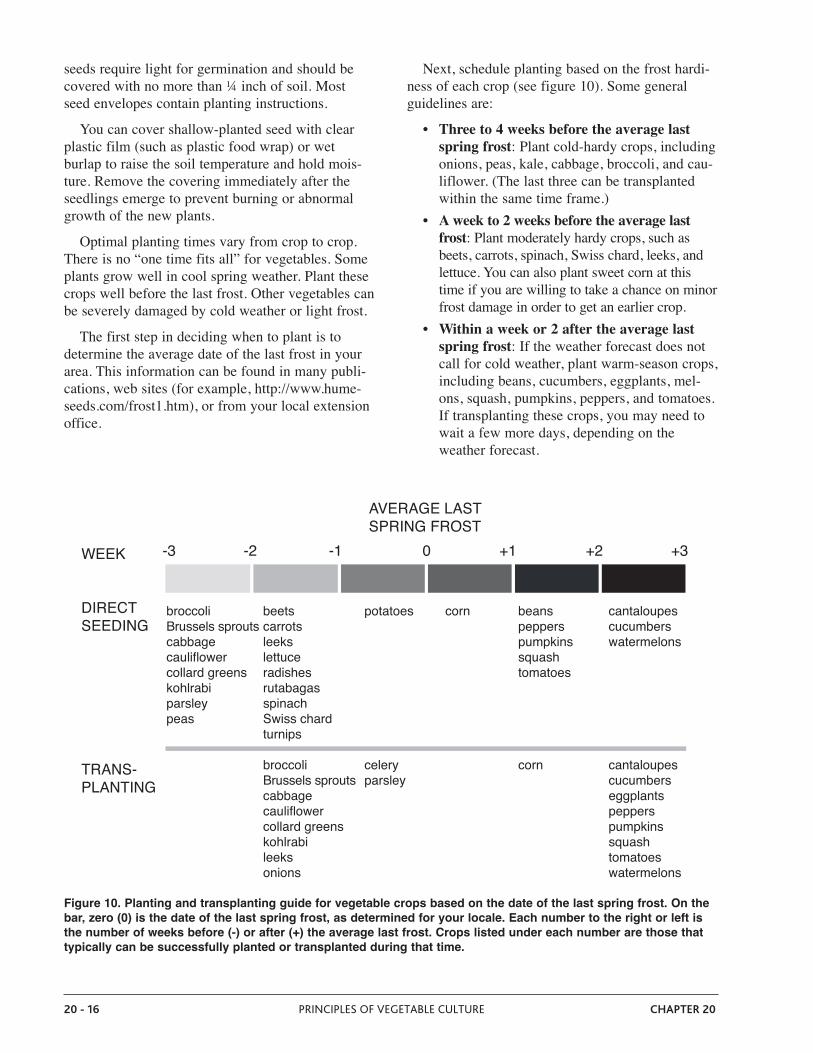
Next, schedule planting based on the frost hardi-ness of each crop (see figure 10). Some generalguidelines are:• Three to 4 weeks before the average last
spring frost: Plant cold-hardy crops, includingonions, peas, kale, cabbage, broccoli, and cau-liflower. (The last three can be transplantedwithin the same time frame.)
• A week to 2 weeks before the average lastfrost: Plant moderately hardy crops, such asbeets, carrots, spinach, Swiss chard, leeks, andlettuce. You can also plant sweet corn at thistime if you are willing to take a chance on minorfrost damage in order to get an earlier crop.
• Within a week or 2 after the average lastspring frost: If the weather forecast does notcall for cold weather, plant warm-season crops,including beans, cucumbers, eggplants, mel-ons, squash, pumpkins, peppers, and tomatoes.If transplanting these crops, you may need towait a few more days, depending on theweather forecast.
20 - 16 PRINCIPLES OF VEGETABLE CULTURE CHAPTER 20
WEEK
DIRECTSEEDING
TRANS-PLANTING
AVERAGE LASTSPRING FROST
-3 -2 -1 0 +1 +2 +3
broccoli beets potatoes corn beans cantaloupesBrussels sprouts carrots peppers cucumberscabbage leeks pumpkins watermelonscauliflower lettuce squashcollard greens radishes tomatoeskohlrabi rutabagasparsley spinachpeas Swiss chard turnips broccoli celery corn cantaloupes Brussels sprouts parsley cucumbers cabbage eggplants cauliflower peppers collard greens pumpkins kohlrabi squash leeks tomatoes onions watermelons
Figure 10. Planting and transplanting guide for vegetable crops based on the date of the last spring frost. On thebar, zero (0) is the date of the last spring frost, as determined for your locale. Each number to the right or left isthe number of weeks before (-) or after (+) the average last frost. Crops listed under each number are those thattypically can be successfully planted or transplanted during that time.
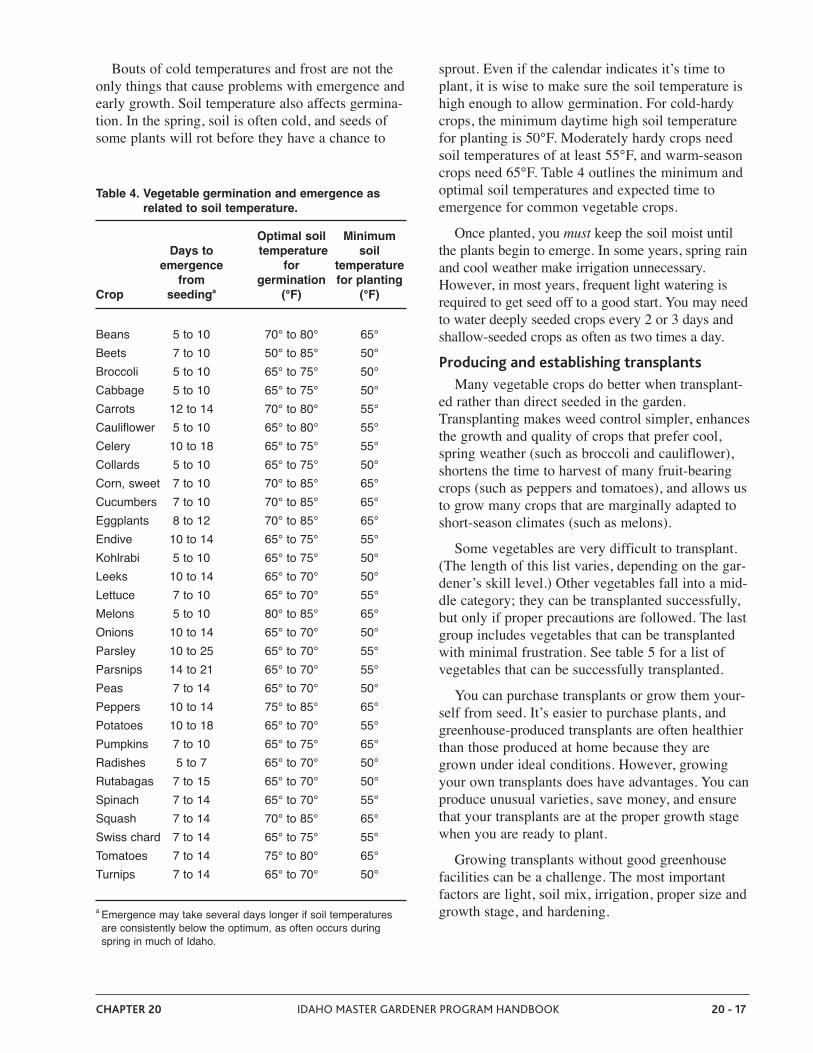
Bouts of cold temperatures and frost are not theonly things that cause problems with emergence andearly growth. Soil temperature also affects germina-tion. In the spring, soil is often cold, and seeds ofsome plants will rot before they have a chance to
sprout. Even if the calendar indicates it’s time toplant, it is wise to make sure the soil temperature ishigh enough to allow germination. For cold-hardycrops, the minimum daytime high soil temperaturefor planting is 50°F. Moderately hardy crops needsoil temperatures of at least 55°F, and warm-seasoncrops need 65°F. Table 4 outlines the minimum andoptimal soil temperatures and expected time toemergence for common vegetable crops.Once planted, you must keep the soil moist until
the plants begin to emerge. In some years, spring rainand cool weather make irrigation unnecessary.However, in most years, frequent light watering isrequired to get seed off to a good start. You may needto water deeply seeded crops every 2 or 3 days andshallow-seeded crops as often as two times a day.Producing and establishing transplantsMany vegetable crops do better when transplant-
ed rather than direct seeded in the garden.Transplanting makes weed control simpler, enhancesthe growth and quality of crops that prefer cool,spring weather (such as broccoli and cauliflower),shortens the time to harvest of many fruit-bearingcrops (such as peppers and tomatoes), and allows usto grow many crops that are marginally adapted toshort-season climates (such as melons).Some vegetables are very difficult to transplant.
(The length of this list varies, depending on the gar-dener’s skill level.) Other vegetables fall into a mid-dle category; they can be transplanted successfully,but only if proper precautions are followed. The lastgroup includes vegetables that can be transplantedwith minimal frustration. See table 5 for a list ofvegetables that can be successfully transplanted.You can purchase transplants or grow them your-
self from seed. It’s easier to purchase plants, andgreenhouse-produced transplants are often healthierthan those produced at home because they aregrown under ideal conditions. However, growingyour own transplants does have advantages. You canproduce unusual varieties, save money, and ensurethat your transplants are at the proper growth stagewhen you are ready to plant. Growing transplants without good greenhouse
facilities can be a challenge. The most importantfactors are light, soil mix, irrigation, proper size andgrowth stage, and hardening.
CHAPTER 20 IDAHO MASTER GARDENER PROGRAM HANDBOOK 20 - 17
Table 4. Vegetable germination and emergence asrelated to soil temperature.
Optimal soil MinimumDays to temperature soil
emergence for temperaturefrom germination for planting
Crop seedinga (°F) (°F)
Beans 5 to 10 70° to 80° 65°Beets 7 to 10 50° to 85° 50°Broccoli 5 to 10 65° to 75° 50°Cabbage 5 to 10 65° to 75° 50°Carrots 12 to 14 70° to 80° 55°Cauliflower 5 to 10 65° to 80° 55°Celery 10 to 18 65° to 75° 55°Collards 5 to 10 65° to 75° 50°Corn, sweet 7 to 10 70° to 85° 65°Cucumbers 7 to 10 70° to 85° 65°Eggplants 8 to 12 70° to 85° 65°Endive 10 to 14 65° to 75° 55°Kohlrabi 5 to 10 65° to 75° 50°Leeks 10 to 14 65° to 70° 50°Lettuce 7 to 10 65° to 70° 55°Melons 5 to 10 80° to 85° 65°Onions 10 to 14 65° to 70° 50°Parsley 10 to 25 65° to 70° 55°Parsnips 14 to 21 65° to 70° 55°Peas 7 to 14 65° to 70° 50°Peppers 10 to 14 75° to 85° 65°Potatoes 10 to 18 65° to 70° 55°Pumpkins 7 to 10 65° to 75° 65°Radishes 5 to 7 65° to 70° 50°Rutabagas 7 to 15 65° to 70° 50°Spinach 7 to 14 65° to 70° 55°Squash 7 to 14 70° to 85° 65°Swiss chard 7 to 14 65° to 75° 55°Tomatoes 7 to 14 75° to 80° 65°Turnips 7 to 14 65° to 70° 50°
a Emergence may take several days longer if soil temperaturesare consistently below the optimum, as often occurs duringspring in much of Idaho.

Starting transplantsIt can be tricky to know when to plant seeds for
transplants. The objective is to have the seedlings atthe optimal stage of growth when it’s time to trans-plant—assuming the unpredictable Idaho weatherwill be suitable for planting on the day you expectto transplant. It takes planning to ensure that trans-plants are neither too big nor too small when youare ready to move them to the garden. You need two pieces of information in order to
develop a planting schedule for vegetable trans-plants: (1) the date the transplants will be planted inthe garden, and (2) the amount of time needed toproduce appropriate-sized transplants. You can cal-culate the transplanting date if you know the lastaverage frost date for you locale. Use the followingguidelines (also see figure 10):• Cole crops (cabbage, broccoli, cauliflower,
kale, brussels sprouts, etc.) and onions:Transplant 2 to 3 weeks before the average lastfrost.
• Most salad crops (lettuce, Swiss chard,spinach, etc.): Transplant a week or so beforethe average last frost.
• Tender crops (tomatoes, peppers, eggplants,squash, melons, etc.): Transplant about 1 or 2 weeks after the average last frost if theweather forecast is for reasonably warm andstable conditions.
If you protect your transplants with hot caps, rowcovers, etc., you sometimes can move the transplantdate forward by a week or two. Once you know the anticipated date of transplant-
ing, see table 6 to find the number of weeks neededto produce transplants of your chosen crops. Thencount backward from the transplanting date to findthe date you should plant seeds.It is best to use a soilless planting mix containing
peat to start seedlings. Soilless mixes are usuallyfree of disease organisms that can cause
20 - 18 PRINCIPLES OF VEGETABLE CULTURE CHAPTER 20
Table 6. Number of weeks required to produce trans-plants from seed.
Crop Weeks to produce transplants from seeda
Broccoli 5 to 7Brussels sprouts 5 to 7Cabbage 5 to 7Cantaloupes 3 to 4Cauliflower 5 to 7Celery 8 to 10Collards 5 to 7Corn, sweet 3 to 4Cucumbers 3 to 4Eggplants 6 to 8Endive 4 to 8Kohlrabi 5 to 7Leeks 4 to 6Lettuce 3 to 5Onions 6 to 8Parsley 6 to 8Peppers 6 to 8Pumpkins 3 to 4Squash 3 to 4Tomatoes 5 to 9
a The number of weeks needed to produce transplants is basedon growth at room temperature.
Table 5. Ease of transplanting vegetables.
Appropriate for Appropriate for Inappropriate fortransplanting transplanting transplanting orand easy to but require extra do not easilyhandle care for success survive the process
Broccoli Celery BeansBrussels sprouts Cantaloupesa BeetsbCabbage Corn CarrotsbCauliflower Cucumbersa PeasChinese cabbage Pumpkinsa RadishesbCollards Squasha RutabagasbEggplants Swiss chard SpinachLeeks Watermelonsa TurnipsbLettuceOnions Parsley PeppersTomatoes
a Transplant vine crops (cucumbers, melons, squash, and pump-kins) when seedlings are very young (one or two true leaves)and very vigorous. Cover transplants and protect them fromwind and sunburn for about 2 weeks after transplanting.
b Root crops (beets, carrots, radishes, rutabagas, and turnips) areoften easy to transplant, but the roots will branch or have otherquality problems as a result of root disturbance.
damping-off, a fungal disease that causes youngseedlings to fall over and die. They also hold a largeamount of water and maintain the integrity of theroot ball when it is time to transplant. You can pur-chase premixed potting soil or mix your own. A mixof 50 percent vermiculite or perlite and 50 percentfine sphagnum peat (plus a little fertilizer) is excel-lent for starting seeds. To save space, you can plant the seeds in flats
and then transplant the small seedlings into smallpots or other individual containers to completegrowth in preparation for transplanting outside. Analternative is to plant the seed directly into individ-ual containers such as small pots, six-pack trays,peat pellets, or peat pots. With this method, it is bestto plant extra seed and thin the plants after emer-gence to the desired number in each pot (usuallytwo or three).Planted seeds and seedlings are extremely sensi-
tive to drying out. If the air in your home tends tobe dry, it may help to cover the flats or pots withclear plastic in order to maintain uniform moisture.Do not keep the soil soaking wet, however, sinceexcess moisture is conducive to damping-off. Youcan prevent or reduce damping-off by sprinkling athin layer of milled sphagnum moss, which containsa natural fungicide, on top of the soil.Caring for transplantsMore home-grown seedlings are lost to inade-
quate light than to any other factor. Vegetableseedlings grown under low-light conditions are like-ly to be spindly and weak. They frequently arekilled by damping-off. If they survive the earlygrowth phase, plants are often too tender to survivethe move to the garden. For these reasons, transplants should be grown
under conditions that include or mimic at least 10 hours of sunlight each day. If you do not have asunny room or back porch with a southern exposure,you will need supplemental lights. Grow-lights sup-ply a good spectrum of light. Mount the lights justabove and nearly touching the plants.Transplants must be healthy, growing rapidly, and
adapted to outside conditions before they go to thegarden. Thus, you must maintain optimum moistureand fertility conditions during growth. Never allowplants to dry out or run out of nutrients. Plantsshould be dark green and not lose any leaves. Ifgrowth is retarded, transplants may never recoversufficiently to produce a good crop.
Hardening offAbout a week before you plan to move trans-
plants to the garden, you should “harden them off.”Hardening off means to slowly adapt the plants tooutside conditions. This process reduces transplantshock and the risk of transplant death. Harden offthe plants over a 1-week period by moving themoutdoors for increasing amounts of time. Start withless than 1 hour the first day, and eventually leavethem outside for much of the day. Move themindoors at night (unless a warm night is forecast)and during inclement weather (especially if it iswindy). Transplants will use more water outside, sowater accordingly.
CHAPTER 20 IDAHO MASTER GARDENER PROGRAM HANDBOOK 20 - 19
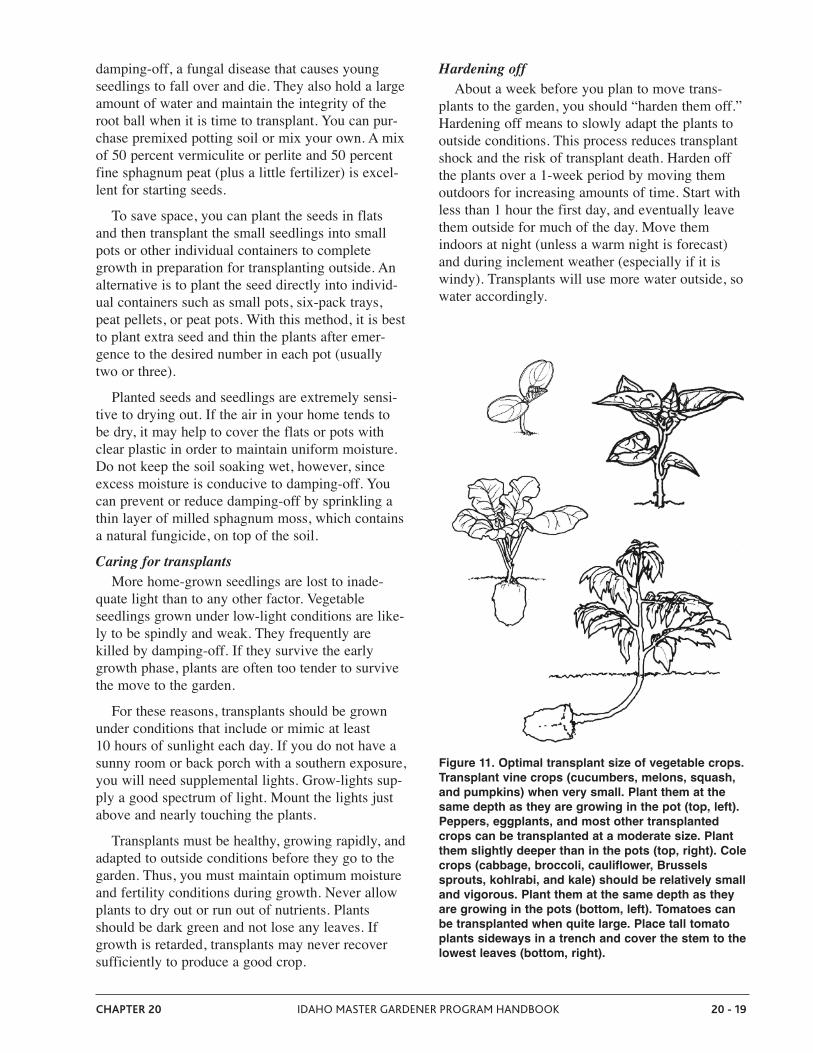
Figure 11. Optimal transplant size of vegetable crops.Transplant vine crops (cucumbers, melons, squash,and pumpkins) when very small. Plant them at thesame depth as they are growing in the pot (top, left).Peppers, eggplants, and most other transplantedcrops can be transplanted at a moderate size. Plantthem slightly deeper than in the pots (top, right). Colecrops (cabbage, broccoli, cauliflower, Brusselssprouts, kohlrabi, and kale) should be relatively smalland vigorous. Plant them at the same depth as theyare growing in the pots (bottom, left). Tomatoes canbe transplanted when quite large. Place tall tomatoplants sideways in a trench and cover the stem to thelowest leaves (bottom, right).

TransplantingSome vegetable transplants have specific require-
ments (figure 11): • Cole crops (cabbage, broccoli, cauliflower,brussels sprouts) should not be too large whentransplanted. If the stem diameter is larger thanabout ¼ inch, the plants likely will “button” or“bolt,” meaning they will produce very smallheads or go to seed after cold weather.
• Vine crops (cucumbers, melons, squash, pump-kins) should be very young when transplanted,having at the most only one or two true leaves.They should be very vigorous. Otherwise, theydevelop a root hardening problem that makesthem very slow to recover from transplantshock. Also, newly transplanted vine crops arevery susceptible to windburn and sunburn.Cover them with paper or plastic for about aweek after transplanting.
• Tomatoes are relatively easy to transplant.Even very large plants establish with few prob-lems, allowing you to get an early start on pro-duction.Here are a few additional tips for successfully-
transplanting vegetables:• Prepare garden soil before transplanting. Manysoil amendments, such as aged manures, sul-fur, limestone, rock fertilizers, and greenmanures, require time to break down. Mixthese materials into the soil the fall beforeplanting, or at least several weeks before plant-ing.
• Transplant on an overcast day, in late after-noon, or in early evening to minimize wilting.Water the potted plants thoroughly just beforetransplanting.
• Handle plants carefully. Avoid disturbing theroots or bruising the stems.
• Dig a hole large enough to hold the plantroots. Plant vegetables only very slightly deep-er than they were growing in their pots.Tomatoes are an exception. They will developroots all along the stems, and you can plantthem deeply enough to leave only two or threesets of leaves exposed.
• Press soil lightly around the roots and waterwell. Pour a cup of liquid starter fertilizer solu-tion around each plant, mixed at about half ofthe concentration recommended on the label.
• Protect plants from wind and sun for a fewdays after transplanting. Place newspaper orcardboard on the south side of the plants, orcover them with commercially availabledevices, milk jugs, baskets, or upside-downflower pots (use clear plastic so the sunlightwill pass through).
• Water the plants once or twice a day for about 1 week. Then water two or three times duringthe next week before going to a normal irriga-tion routine. Overwatering can cause transplantsto suffer from root rots, so don’t overdo it.
CARING FOR YOUR GARDEN
IrrigatingUnder Idaho conditions, proper irrigation is
essential for productive vegetable gardens. Wateringmaintains growth during the summer. It also canimprove seedling emergence, reduce soil crusting,improve germination and plant establishment, andstimulate growth of transplants. Proper irrigation—exactly meeting your plants’ water requirements—isthe single most important factor in growing a highyield of good quality vegetables. See the “Soils andFertilizers” chapter in this handbook for a discus-sion of general principles related to soil water andirrigation.Garden water demands and irrigation scheduling
are the result of complex interactions between cli-mate, weather, soil type, plant species, and irrigationpractices. Thus, no single recipe is suitable for allgardens. Taking the time to learn about proper irri-gation in your own situation will pay dividends. Thefollowing principles can help you make good irriga-tion decisions for your vegetable garden.• In most locations in Idaho, nearly all of a veg-etable garden’s water needs must be metthrough irrigation. Once they approach fullsize, most vegetable plants use ¼ inch of waterper day or slightly more. Thus, a summer gar-den will need around 2 inches of water perweek. Most soils will not hold this muchwater. In order to avoid plant stress, plan toirrigate twice each week, with the total of thetwo irrigations being about 2 inches.
• In the spring, when weather is cool and plantsare small, vegetable plants may use less thanhalf this amount of water. In the fall, whenplants start to mature, water use will alsodecline.
20 - 20 PRINCIPLES OF VEGETABLE CULTURE CHAPTER 20

• You can measure the amount of water appliedby a sprinkler by putting a can under the sprin-kler. If the water in the can is ¼ inch deep atthe end of the irrigation, you have applied ¼ inch.
• Plants use the same amount of water regardlessof soil type. However, sandy soils hold lesswater, so plants use the available water veryquickly and then become stressed. If your soilis sandy, water more frequently but apply lesswater each time.
• Sprinkler irrigation is a simple method forapplying water uniformly. However, sprinklerswet the leaves and encourage disease develop-ment. They also splash dirt on leaves, whichmay add some “grit” to your meals. If theseare problems in your garden, consider using abottom-up irrigation method such as soakerhoses or a drip system.
Controlling weedsWeeds are a constant source of frustration to veg-
etable gardeners. Weeds not only reflect negativelyon the gardener’s expertise (the neighbors arealways watching!), but they also use water andnutrients, compete for available light, and reduce theyield and quality of vegetables. Keeping the garden clean of weeds one year
doesn’t mean they won’t be back the next. The oldsaying, “One year’s weed, 7 years’ seed,” containsmore truth than myth. Although weeds will alwaysbe present, however, some control methods willmake them easier to live with.CultivationHand pulling and digging weeds is probably the
best choice for small gardens and raised beds. Youcan make the task more pleasant with the use ofknee pads. Hoeing is preferred in larger spaces.Hoeing can damage root systems of large plants, sopush the blade of the hoe into the soil just deeplyenough to sever weed roots. Stay several inchesaway from the base of vegetable plants. Manuallypowered rotary cultivators can supplement the useof a hoe. They do a good job on long rows and path-ways if the soil is not too wet or dry and if weedsare not too big.A power tiller may be the tool of choice for large
gardens that are arranged in wide rows. If you planto use a power tiller for weed control, plant the veg-etable rows far enough apart to till between the rows
without damaging the plants. Make rows at least 8 inches wider than the tiller blades. Once plants arelarge enough to touch neighboring plants across therows, stop power tilling in order to prevent damageto the roots or leaves.Cultivation is best done when the soil is some-
what moist, but not wet. The best time to cultivate is2 or 3 days after rain or irrigation. Working wet soilwill damage the soil structure, especially in the caseof fine-textured soils, making the soil compactedand cloddy. On the other hand, when the soil is dry,weeds are difficult to pull and hoeing is a chore.After hand-pulling weeds, you can lay them on
top of the soil to dry out and then turn them under(if they are not yet flowering). Turning under weedsprovides organic matter to the soil. Avoid irrigatingfor a day or two to prevent the weeds from rootingand “coming back to life.” Some common weeds, such as purslane, nutgrass,
quackgrass, and other rhizomatous grasses, willreroot with the first added water and continue togrow. It may be best to remove such difficult weedsfrom the garden. Also, if weeds are mature enoughto produce seed, remove them from the garden toprevent seed dispersal.MulchingMulching can reduce the need for weeding. A
thick layer of organic mulch will prevent mostannual weed seeds from germinating, and those thatdo germinate are usually easily pulled. Organicmulches can include straw, grass clippings (makesure they are free of herbicides), bark (small enoughto be tilled under at the end of the season), woodchips, or sawdust.Mulching with black plastic film can also be very
effective at reducing weed growth. Using blackplastic mulch on the rows and an organic mulchbetween the rows will nearly eliminate annual weedproblems. Mulches are less effective at controllingperennial weeds such as quackgrass and bindweed.Elimination of these difficult weeds will probablyrequire off-season (early-spring or late-fall) applica-tions of herbicides over a period of years.Close spacingWhen spaced close to each other, established veg-
etable plants shade the soil and prevent the growth ofmany weed seedlings. Close spacing is easilyachieved in a well-planned raised bed, but it alsoworks in victory gardens. Place plants closely
CHAPTER 20 IDAHO MASTER GARDENER PROGRAM HANDBOOK 20 - 21
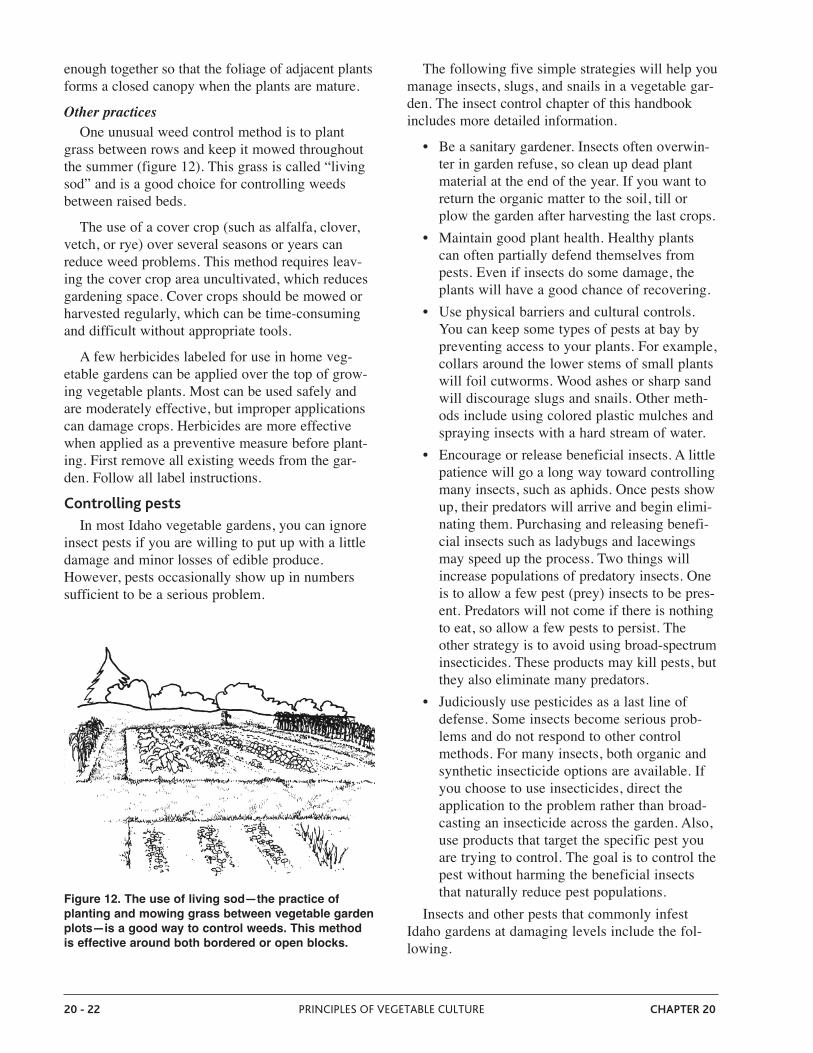
enough together so that the foliage of adjacent plantsforms a closed canopy when the plants are mature.Other practicesOne unusual weed control method is to plant
grass between rows and keep it mowed throughoutthe summer (figure 12). This grass is called “livingsod” and is a good choice for controlling weedsbetween raised beds.The use of a cover crop (such as alfalfa, clover,
vetch, or rye) over several seasons or years canreduce weed problems. This method requires leav-ing the cover crop area uncultivated, which reducesgardening space. Cover crops should be mowed orharvested regularly, which can be time-consumingand difficult without appropriate tools.A few herbicides labeled for use in home veg-
etable gardens can be applied over the top of grow-ing vegetable plants. Most can be used safely andare moderately effective, but improper applicationscan damage crops. Herbicides are more effectivewhen applied as a preventive measure before plant-ing. First remove all existing weeds from the gar-den. Follow all label instructions.Controlling pestsIn most Idaho vegetable gardens, you can ignore
insect pests if you are willing to put up with a littledamage and minor losses of edible produce.However, pests occasionally show up in numberssufficient to be a serious problem.
The following five simple strategies will help youmanage insects, slugs, and snails in a vegetable gar-den. The insect control chapter of this handbookincludes more detailed information.• Be a sanitary gardener. Insects often overwin-ter in garden refuse, so clean up dead plantmaterial at the end of the year. If you want toreturn the organic matter to the soil, till orplow the garden after harvesting the last crops.
• Maintain good plant health. Healthy plantscan often partially defend themselves frompests. Even if insects do some damage, theplants will have a good chance of recovering.
• Use physical barriers and cultural controls.You can keep some types of pests at bay bypreventing access to your plants. For example,collars around the lower stems of small plantswill foil cutworms. Wood ashes or sharp sandwill discourage slugs and snails. Other meth-ods include using colored plastic mulches andspraying insects with a hard stream of water.
• Encourage or release beneficial insects. A littlepatience will go a long way toward controllingmany insects, such as aphids. Once pests showup, their predators will arrive and begin elimi-nating them. Purchasing and releasing benefi-cial insects such as ladybugs and lacewingsmay speed up the process. Two things willincrease populations of predatory insects. Oneis to allow a few pest (prey) insects to be pres-ent. Predators will not come if there is nothingto eat, so allow a few pests to persist. Theother strategy is to avoid using broad-spectruminsecticides. These products may kill pests, butthey also eliminate many predators.
• Judiciously use pesticides as a last line ofdefense. Some insects become serious prob-lems and do not respond to other controlmethods. For many insects, both organic andsynthetic insecticide options are available. Ifyou choose to use insecticides, direct theapplication to the problem rather than broad-casting an insecticide across the garden. Also,use products that target the specific pest youare trying to control. The goal is to control thepest without harming the beneficial insectsthat naturally reduce pest populations.
Insects and other pests that commonly infestIdaho gardens at damaging levels include the fol-lowing.
20 - 22 PRINCIPLES OF VEGETABLE CULTURE CHAPTER 20
Figure 12. The use of living sod—the practice ofplanting and mowing grass between vegetable gardenplots—is a good way to control weeds. This methodis effective around both bordered or open blocks.

AphidsThese soft-bodied insects are usually found
crowded at the ends of succulent new growth.Insecticidal soaps or a hard stream of water thatknocks them off the plant usually are sufficient toeliminate damage. Also, aphids will almost alwaysbe eliminated by predators if you are patientenough to let their natural enemies do their work.Grubs and wirewormsThese soil dwellers often damage the roots and
lower stems of plants. They are difficult to controland may require the use of a soil-applied insecticidebefore planting. Thus, you must know the garden’shistory and realize the problem exists before damageappears. Once damage is visible, it is hard to applyeffective controls without damaging young plants. CutwormsThis pest often kills seedlings and transplants by
chewing through the stems at ground level.Cabbage, broccoli, tomatoes, and other soft-stemmed transplants are common victims. Placingcardboard collars around the base of plants is aneffective way to prevent damage. Some insecticidesare also effective.Corn earwormThis pest is common in the warmer regions of
Idaho. Control usually requires the use of an organicor synthetic insecticide, applied once or twice whilethe plants are in silk. Begin control measures whenthe silks appear and continue as long as they aregreen and pliable.Slugs and snailsSlugs and snails are less of a problem in our dry
climate than they are in wetter areas. In fact, if youhave a slug problem, you may be watering too muchand too often. Water less, and the problem may bereduced. If reducing irrigation doesn’t solve theproblem, baits and traps can be partially effective.Cabbage looperThese slender green caterpillars infest all cole
crops (broccoli, cabbage, cauliflower, kale, etc.).They chew holes in the leaves, deposit web-likematerial, and leave their frass (droppings) on theplants. They can be ignored in small numbers, butmay require control with Bacillus thuringiensis (theorganic pesticide sold as Bt) or another insecticide ifthey become very numerous.
Tomato hornwormsThese large, ferocious-looking caterpillars can be
very damaging to tomato and potato plants. Onelarge individual can defoliate a plant in a day ortwo. Physical control is the best method for elimi-nating this occasional pest. Pick them off the plantsand step on them or squeeze them between tworocks. For the squeamish, simply remove them fromthe garden.Colorado potato beetlesThese pests are a serious problem on potato
plants and occasionally on tomatoes. If only a feware present, you can remove them from plants byhand. If numerous, they may require an insecticide.A hard stream of water may knock them fromplants, but unless they are very small, they likelywill climb back onto the plant and keep eating.Mexican bean beetleThe bright-orange, prickly-looking larvae of this
beetle can quickly skeletonize leaves of bean plants.Heavy infestations may require an insecticide appli-cation.Controlling plant diseasesThe dry climates common to Idaho limit the
number of diseases in vegetable gardens. However,a few serious problems should be monitored.VirusesA number of common virus diseases occur on
vegetable crops. Examples include zucchini yellows,cucumber mosaic, potato leafroll virus, tomato spot-ted wilt, and tomato mosaic. Viruses are difficult tocontrol. Once a plant is infected, it cannot be cured.The only solution is to remove the affected plants toprevent spread to healthy plants. If you have recurring problems with any virus
disease, you will need to identify the virus and learnabout the disease and its vectors. Vectors are organ-isms, usually insects, that spread a disease. Developa strategy to control these vectors. You may need toseek help from a Master Gardener, extension educa-tor, nurseryman, or other qualified person.BacteriaMany fruit rots and some leaf spot diseases are
caused by bacteria. There are no chemical productsregistered for control of bacteria in vegetable gar-dens. The best methods for controlling these diseasesare cultural. Keep fruit off the ground and make sure
CHAPTER 20 IDAHO MASTER GARDENER PROGRAM HANDBOOK 20 - 23

to allow plant surfaces to dry between watering.Eliminate plant refuse from diseased plants.FungiThe most common plant diseases involve fungal
pathogens. Some fungal diseases live in the soil andattack the plant through the roots; others directlyattack leaves, stems, flowers, and fruits. Crop rotation—moving each vegetable to a dif-
ferent place in the garden each year—is a good wayto control soil fungi. Rotation is especially impor-tant for controlling verticillium wilt in potatoes,peppers, and tomatoes; club root in broccoli, cauli-flower, and other cole crops; and vine wilts in thevine crops (squash, cucumbers, and melons). Keeping fruit off the ground helps prevent fruit
damage. Limit the impact of foliar fungi by allow-ing foliage to dry between irrigations. However,some fungi, such as powdery mildew, may stillbecome a problem on many crops. Foliar fungalproblems that return every year may require fungi-cidal applications. Most fungicides work best if theyare applied before plants show symptoms. Thus, thedecision to use fungicides may need to be based onpast history.
FURTHER READING AND RESOURCES
Web SitesMany University of Idaho publications about gardeningare available from your county’s UI extension officeor online at http://info.ag.uidaho.edu.
The University of Idaho maintains a gardening web sitethat includes information on producing vegetables. Itis called “Idaho Landscapes and Gardens” and can beaccessed at http://www.extension.uidaho.edu/idahogardens/
20 - 24 PRINCIPLES OF VEGETABLE CULTURE CHAPTER 20
Published 1993. Revised 2009.