Chapter - 1 INTRODUCTION TO VBitechcomputereducation.com/admin/about_pic/ebook/VB_NET.pdf · Visual...
108
Visual Basic .Net I-TECH Computer Educati on 1 Chapter - 1 INTRODUCTION TO VB .NET Visual Basic 6.0 Visual Basic 6.0 is currently such a robust & exciting development platform among programmers. These are the key features why Visual Basic 6 is such popular among developers. VB6 applications are event-driven, that is the user is in the control of the application. The whole application in VB6 is divided into small programs or events. Your VB6 application responds to those events through the code you’ve written and attached to those events. VB6 supports the principles of object-oriented design. This means that you can compartmentalize different aspects of your application as objects and develop and test those objects independently of the rest of the application. Although VB6 does not comply with all the concepts and principles behind the object-oriented development model supported by C++ and other programming languages. Microsoft had designed VB6 to be a complete Windows application development system. VB6 is infinitely extensible through the use of ActiveX controls, dynamically linked libraries (DLLs). You can create these ActiveX controls, DLLs, or buy them off the shelf from a large number of third-party software vendors. If fact, one of the major influences driving the rapid adoption of VB6 is the desire of many developers to create ActiveX controls & DLLs for use in other Windows application such as Excel, Word, or Access. Shifting from Visual Basic 6.0 to Visual Basic .Net After having so many exciting features why Microsoft is shifting the developers to VB .Net that’ s the big question in every programmers mind. These are some of the key points to answer these questions. Limited Object Oriented capabilities. These are the things that VB6 does not support in Object Oriented Programming. 1. Code inheritance. 2. Method/operator overloading. 3. Parameterized constructors. 4. Shared members. 5. When building classes in previous versions of VB, each class got its own file. Simply, this solution could cause a larger OO project to have many files. VB.NET allows us to put more than one class in a single source file. While we don’t have to take this approach, it can be nice since we can reduce the overall number of files in a project – possibly making it more maintainable. No Structured Error (exception) Handling. Error handing in VB6 was always done in using Err. Description method, which was very much limited. No support for threading. Threadi n g is an important aspect in today’s networking environment and VB6 has done nothing in that part.
Transcript of Chapter - 1 INTRODUCTION TO VBitechcomputereducation.com/admin/about_pic/ebook/VB_NET.pdf · Visual...
Visual Basic .Net I-TECH Computer Education
1
Chapter - 1 INTRODUCTION TO VB .NET
Visual Basic 6.0
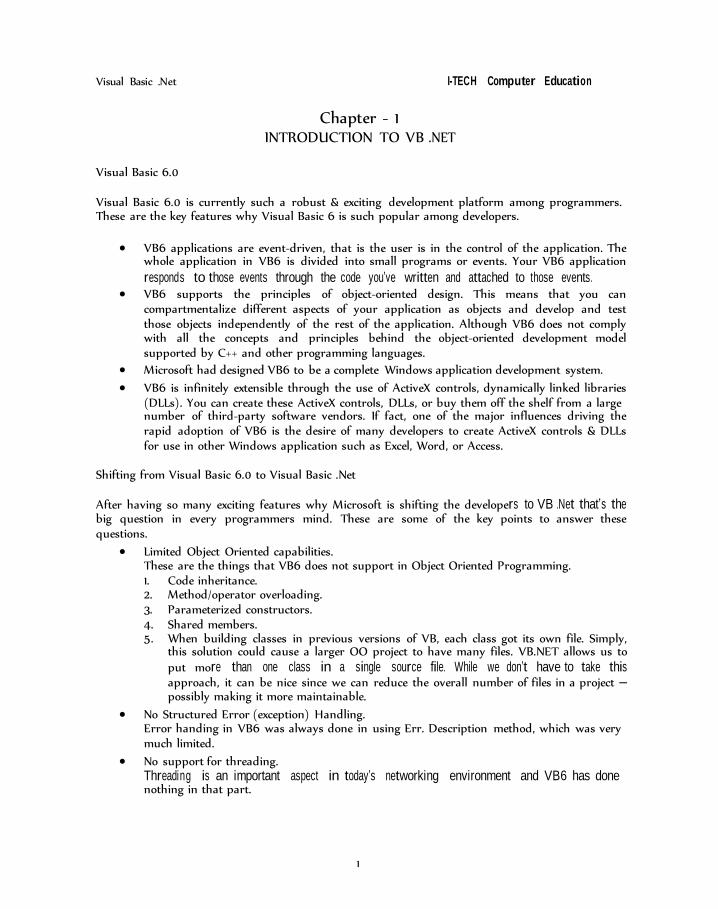
Visual Basic 6.0 is currently such a robust & exciting development platform among programmers. These are the key features why Visual Basic 6 is such popular among developers.
VB6 applications are event-driven, that is the user is in the control of the application. The
whole application in VB6 is divided into small programs or events. Your VB6 application
responds to those events through the code you’ve written and attached to those events. VB6 supports the principles of object-oriented design. This means that you can
compartmentalize different aspects of your application as objects and develop and test those objects independently of the rest of the application. Although VB6 does not comply with all the concepts and principles behind the object-oriented development model supported by C++ and other programming languages.
Microsoft had designed VB6 to be a complete Windows application development system.
VB6 is infinitely extensible through the use of ActiveX controls, dynamically linked libraries (DLLs). You can create these ActiveX controls, DLLs, or buy them off the shelf from a large number of third-party software vendors. If fact, one of the major influences driving the rapid adoption of VB6 is the desire of many developers to create ActiveX controls & DLLs for use in other Windows application such as Excel, Word, or Access.
Shifting from Visual Basic 6.0 to Visual Basic .Net
After having so many exciting features why Microsoft is shifting the developers to VB .Net that’s the big question in every programmers mind. These are some of the key points to answer these questions.
Limited Object Oriented capabilities. These are the things that VB6 does not support in Object Oriented Programming. 1. Code inheritance. 2. Method/operator overloading. 3. Parameterized constructors. 4. Shared members. 5. When building classes in previous versions of VB, each class got its own file. Simply,
this solution could cause a larger OO project to have many files. VB.NET allows us to put more than one class in a single source file. While we don’t have to take this approach, it can be nice since we can reduce the overall number of files in a project – possibly making it more maintainable.
No Structured Error (exception) Handling. Error handing in VB6 was always done in using Err. Description method, which was very much limited.
No support for threading. Threading is an important aspect in today’s networking environment and VB6 has done nothing in that part.
Visual Basic .Net I-TECH Computer Education
2
All these limitations in VB6 have been look after in Visual Basic .Net.
Visual Basic .Net is fully Object Oriented Programming Language.
Error handling in VB .Net is done using the try….cat c h block. VB .Net strongly supports Threading.
VB .Net the new trend
In July 2000 at the Professional Developers Conference (PDC), Microsoft announced the .NET initiative – a major shift in the technical direction of Microsoft, and a major shift for those engaged in developing software using Microsoft tools. Microsoft has staked its future on the .NET Framework, shifting away from the COM based world of today toward a more distributed, open, and dynamic environment.
Today, Visual Basic (VB) is the most widely used programming language in the world. Not surprisingly, Microsoft is carrying VB forward into the .NET Framework in the form of Visual Basic .NET. VB.NET is the natural progression for existing VB developers as they move to the .NET environment, and so is likely to be the most popular tool to develop in this Framework for the next few years.
The .NET Framework is a large change from the existing development environment, and VB.NET has some substantial changes from previous versions of VB.
.N ET is arguably the biggest thing to hit the VB community since VB4, when the ability to create 32- bit applications, classes and COM components was introduced. In fact, .NET is a much bigger and broader-reaching change since it provides a whole new inter-object communication mechanism that doesn’t rely directly on COM.
That means hundreds of thousands of existing VB developers will need to make the transition from VB6 to VB.NET, and this is a major leap.
Overview of Changes in VB.NET
There are many new technologies in VB.NET, which will be of interest to experienced VB developers, including:
Full object oriented (OO) capabilities:
Code inheritance
Method/operator overloading Parameterized constructors Shared members
Structured error (exception) handling New threading models
All of these are based on Microsoft’s .NET Framework, emphasizing the details of importance to a VB developer.
Visual Basic .Net I-TECH Computer Education
3
While the .NET Framework offers the long-awaited new capabilities. It also raises barriers to make the transition from older versions of VB to VB.NET. There are a significant number of syntactical differences and other incompatibilities. Fitting into the Microsoft.NET Framework required VB to make serious structural changes – including rationalization of data types and syntax to bring VB in line with other languages, and changing from traditional VB forms to WinForms.
VB.NET addresses this issue head-on by providing full OO capabilities, including inheritance, method overloading, method overriding, and more. These capabilities are integral to the .NET environment in general, as well as being of great benefit to the VB developer.
Besides changing traditional VB development, VB.NET will also open up the possibility of web programming to hundreds of thousands of developers who did not embrace Active Server Pages and its related technologies.
The key technologies in VB.NET that simplify the transition are Web Forms and Web Services. While many of the features of these technologies will look familiar to VB developers, there are some significant differences and pitfalls to be avoided, such as the problem of using events extensively when communicating with a server.
Over the years Microsoft has developed a continual string of data access technologies, which have been available to VB developers. We’ve worked with DAO, then RDO, and most recently the various versions of ADO. It should be no surprise then .NET comes with a whole new data access technology called ADO.NET. While it is possible for VB.NET programs to continue to use older data access technologies through interoperability mechanisms, most VB.NET developers will be likely to use ADO.NET since it provides the easiest and most direct approach.
Requirements of the Environment
There are specific hardware and software requirements for a VB.NET test environment, as well as optional software components that we’ll need to install in order to take full advantage of all that VB.NET has to offer.
Hardware
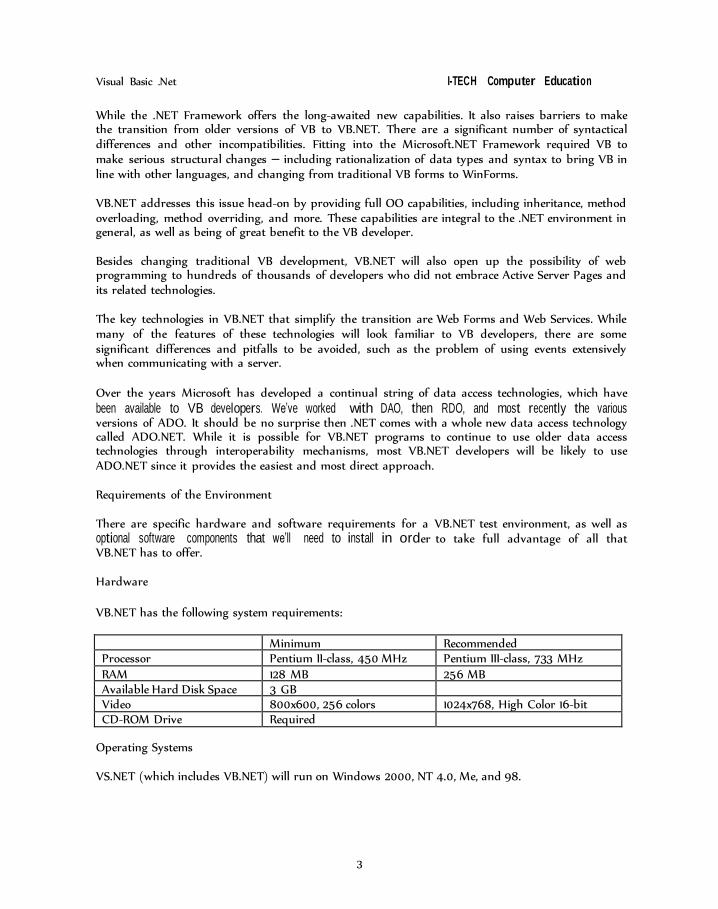
VB.NET has the following system requirements:
Minimum Recommended Processor Pentium II-class, 450 MHz Pentium III-class, 733 MHz RAM 128 MB 256 MB Available Hard Disk Space 3 GB Video 800x600, 256 colors 1024x768, High Color 16-bit CD-ROM Drive Required
Operating Systems VS.NET (which includes VB.NET) will run on Windows 2000, NT 4.0, Me, and 98.
Visual Basic .Net I-TECH Computer Education
4
The .NET Framework SDK will also install on Windows 95, but the VS.NET development environment will not. Windows 95 is only supported for running .NET applications, not for creating them.
Requirements for VS.NET
At a basic level, the only thing required to start installing VS.NET is the operating system. However, the WINUPD CD will upgrade several operating system and other software components during the install. This process includes:
Upgrade to Windows 2000 Service Pack 1
FrontPage 2000 Server Extensions Setup Runtime Files
Microsoft Office Shared Components Internet Explorer Web Forms Microsoft XML Parser (MSXML) 3.0 Microsoft Data Access Components (MDAC) 2.6 .NET Framework SDK
As with the plain .NET Framework SDK installation, in order to create applications that use Web Forms or Web Services, we must have an installation of IIS on our network.
Integrated Development Environment (IDE)
To get started, open up the Visual Studio IDE by choosing Start | Programs | Microsoft Visual Studio.NET 7.0 | Microsoft Visual Basic Studio.NET 7.0. This will bring up the IDE for the first time, as shown in the following diagram:
For most existing VB developers the appropriate choice will be to select Visual Basic Developer from the list in the Profile dropdown. Choosing this will change the other options, causing the screen to appear as shown in the following diagram:
From here we can simply click Get Started to proceed to the regular VS.NET start page. If we ever
feel the need to change the profile we’ve selected, we can return here by clicking on the My Profile link again.
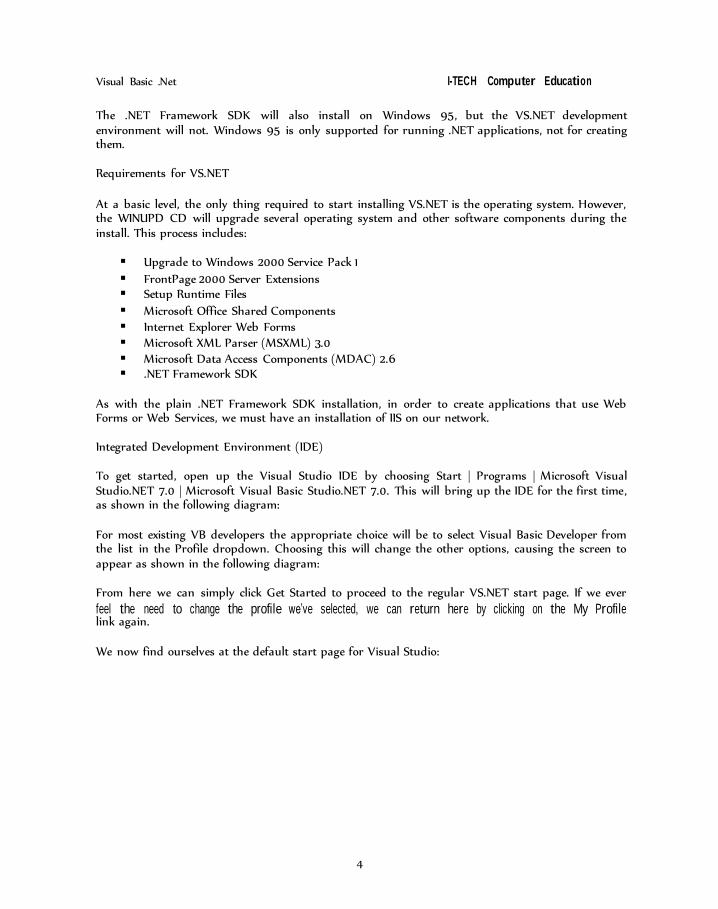
We now find ourselves at the default start page for Visual Studio:
Visual Basic .Net I-TECH Computer Education
5
This is the screen we’ll typically see when startingVS.NET from this point forward. From here we can open existing projects, start new projects, change our profile, search for help, and perform other useful operations.
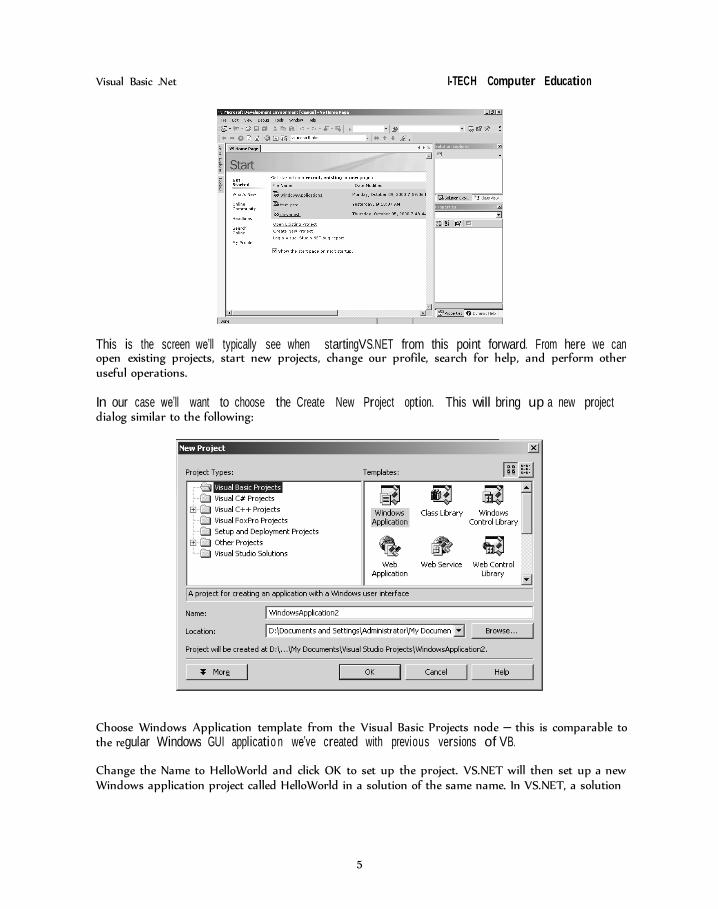
In our case we’ll want to choose the Create New Project option. This will bring up a new project dialog similar to the following:
Choose Windows Application template from the Visual Basic Projects node – this is comparable to the regular Windows GUI applicatio n we’ve created with previous versions of VB.
Change the Name to HelloWorld and click OK to set up the project. VS.NET will then set up a new Windows application project called HelloWorld in a solution of the same name. In VS.NET, a solution
Visual Basic .Net I-TECH Computer Education
6
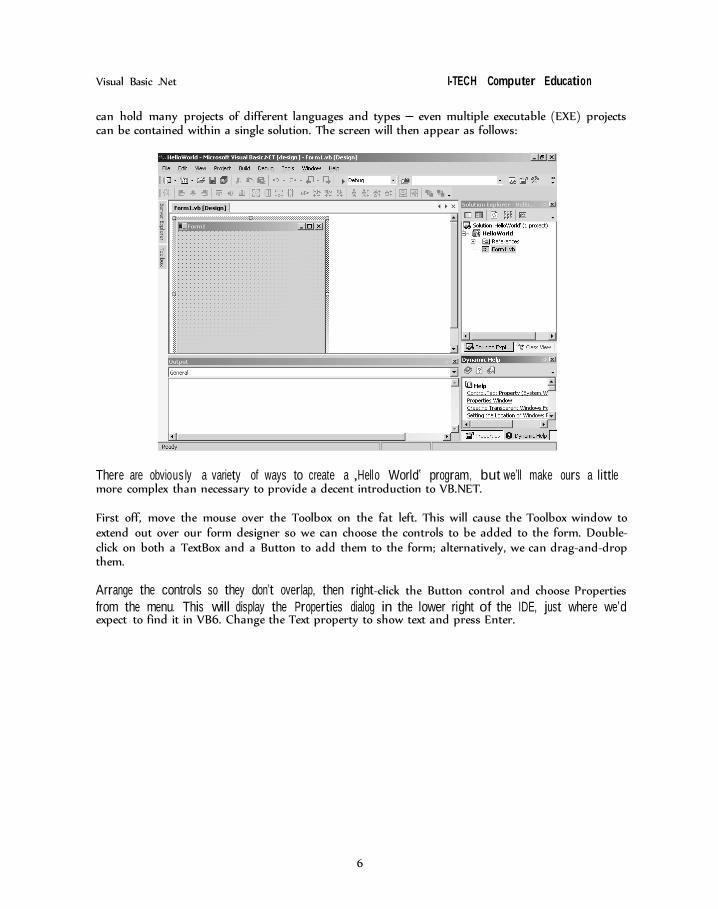
can hold many projects of different languages and types – even multiple executable (EXE) projects can be contained within a single solution. The screen will then appear as follows:
There are obvious ly a variety of ways to create a ‚Hello World‛ program, but we’ll make ours a little more complex than necessary to provide a decent introduction to VB.NET.
First off, move the mouse over the Toolbox on the fat left. This will cause the Toolbox window to extend out over our form designer so we can choose the controls to be added to the form. Double- click on both a TextBox and a Button to add them to the form; alternatively, we can drag-and-drop them.
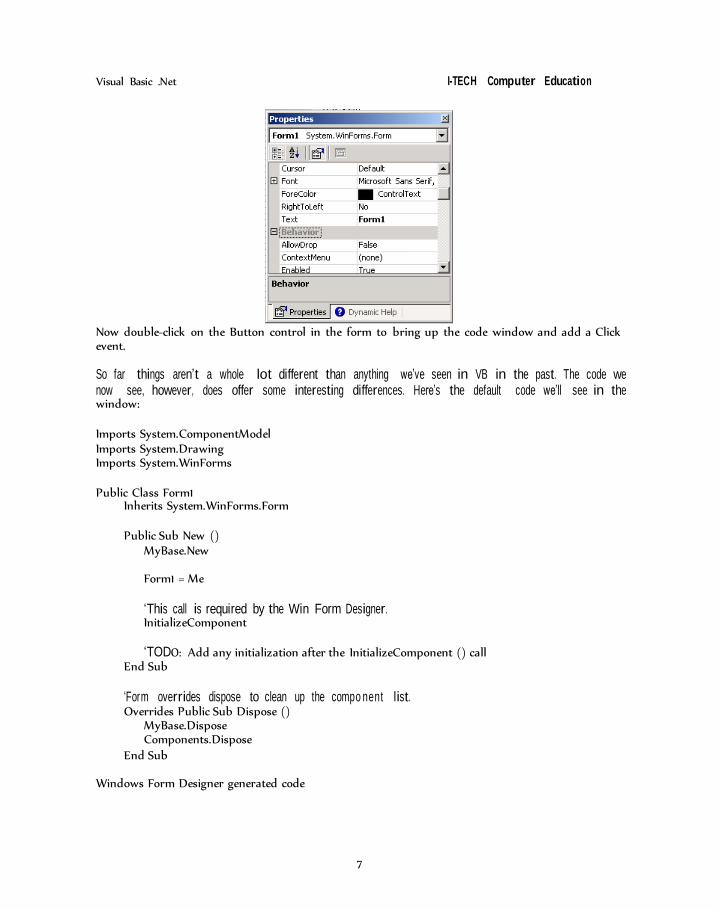
Arrange the controls so they don’t overlap, then right-click the Button control and choose Properties
from the menu. This will display the Properties dialog in the lower right of the IDE, just where we’d expect to find it in VB6. Change the Text property to show text and press Enter.
Visual Basic .Net I-TECH Computer Education
7
Now double-click on the Button control in the form to bring up the code window and add a Click event.
So far things aren’t a whole lot different than anything we’ve seen in VB in the past. The code we now see, however, does offer some interesting differences. Here’s the default code we’ll see in the window:
Imports System.ComponentModel Imports System.Drawing Imports System.WinForms
Public Class Form1
Inherits System.WinForms.Form
Public Sub New ()
MyBase.New
Form1 = Me
‘This call is required by the Win Form Designer. InitializeComponent
‘TODO: Add any initialization after the InitializeComponent () call
End Sub
‘Form overrides dispose to clean up the compo nent list. Overrides Public Sub Dispose ()
MyBase.Dispose Components.Dispose
End Sub Windows Form Designer generated code
Visual Basic .Net I-TECH Computer Education
8
Protected Sub Button1_Click (ByVal sender As Object, _
ByVal e As System.EventArgs)
End Sub
End Class
Overall, it looks very much like regular VB code but there are some striking differences, like the Imports statements, the fact that our from is class, the use of the Inherits keyword, and the box indicating some Windows Form Designer generated code.
To complete our application, let’s make a message box pop-up to display the text in the textbox when the button is clicked. This is done by adding the following code:
Protected Sub Button1_Click (ByVal sender As Object, _
ByVal e As System.EventArgs)
MsgBox (TextBo x1 .Text, MsgBox Style.Informati on, ‚Test‛)
End Sub In VB6, we could have achieved the same result like this:
Private Sub Button1_Click
MsgBox TextBox1, vbInformation, ‚Test‛
End Sub Other than the two new arguments to the Button1_Click event and the parentheses around the MsgBox arguments there’s not much different here from any VB code we might have written in the past. This will be generally true as we go through the rest of this book. Almost everywhere we look there are changes to the IDE or the language – but a great deal of those changes are trivial or beneficial and are easy to get used to.
Now just press F5 (sound familiar?) to run the program. After the solution is compiled, our application will run – displaying our form with its two controls:

Visual Basic .Net I-TECH Computer Education
If we type Hello world into the text box and click the button, up pops our message box:
Exercise
1. Explain the overview of VB .Net.
2. Write the steps to create a simple Hello World program.
Fill in the blanks:
1. VB .Net’s previous version was .
2. VB .Net is a part of _.
3. _method is used to destroy the form.
4. method is a constructor.
Chapter - 2 INTRODUCTION TO THE .NET FRAMEWORK
Visual Basic .Net I-TECH Computer Education
10
DC
The .NET Framework means changes for everyone who uses Microsoft technologies, and Visual Basic developers get more than their share. One goal Microsoft has for the .NET initiative is to bring together the best of all of their language platforms. In a broads sense, this means that other languages get many of Visual Basic’s ease-of-use features, such as easy drag-and-drop generation of forms, while Visual Basic receives new dramatic capabilities, such as full object orientation, that take away many of the limitations Visual Basic developers have put up with in the past.
What’s wrong with the current technology?
Starting in late 1995, Microsoft made a dramatic shift towards the Internet. The company was refocused on marrying their Windows platform to the Internet, and they have certainly succeeded in making Windows a serious Internet platform as well as a platform for all the business-oriented software developed with the Windows DNA (Distributed iNternet Architecture) programming model.
However, Microsoft had to make some serious compromises to quickly produce Internet-based tools and technologies. In particular, Active Server Pages (ASP) has always been viewed as a bit clumsy. After all, writing reams of interpreted script is a real step backwards from structured and object- oriented development. Designing, debugging and maintaining such unstructured code is also a headache.
Other languages such as Visual Basic have been used in Internet applications on Microsoft platforms, but mostly as components that worked through Active Server Pages. Presently, Microsoft tools lack the level of integration and ease-of-use for web development that would be ideal. A few attempts were made to place a web interface on traditional languages, such as WebClasses in VB, but none of these gained wide acceptance.
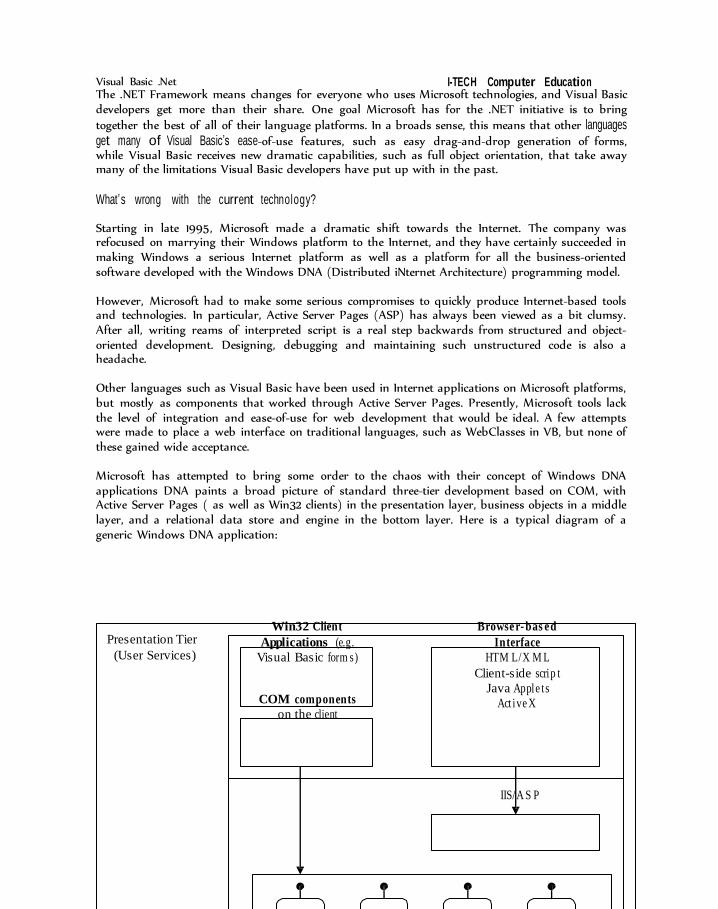
Microsoft has attempted to bring some order to the chaos with their concept of Windows DNA applications DNA paints a broad picture of standard three-tier development based on COM, with Active Server Pages ( as well as Win32 clients) in the presentation layer, business objects in a middle layer, and a relational data store and engine in the bottom layer. Here is a typical diagram of a generic Windows DNA application:
Presentation Tier
(User Services)
Win32 Client
Applications (e.g.
Visual Basic form s)
COM components
on the client
Browser- bas ed
Interface
HTM L/X M L
Client-side scrip t
Java Apple ts
Act ive X
IIS/A S P
Visual Basic .Net I-TECH Computer Education
11
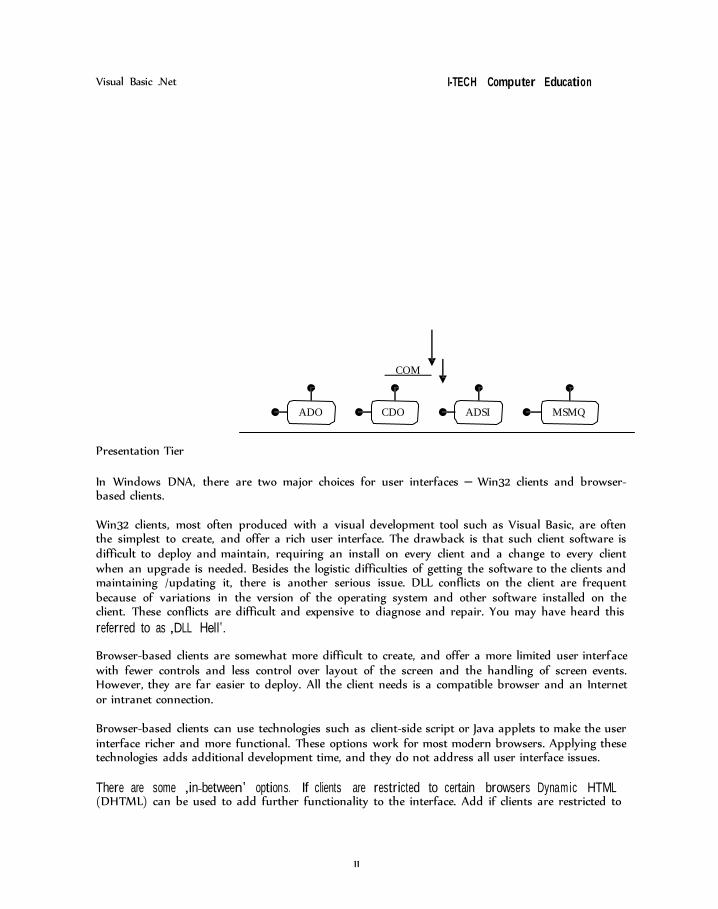
COM
ADO CDO ADSI MSMQ
Presentation Tier
In Windows DNA, there are two major choices for user interfaces – Win32 clients and browser- based clients.
Win32 clients, most often produced with a visual development tool such as Visual Basic, are often the simplest to create, and offer a rich user interface. The drawback is that such client software is difficult to deploy and maintain, requiring an install on every client and a change to every client when an upgrade is needed. Besides the logistic difficulties of getting the software to the clients and maintaining /updating it, there is another serious issue. DLL conflicts on the client are frequent because of variations in the version of the operating system and other software installed on the client. These conflicts are difficult and expensive to diagnose and repair. You may have heard this
referred to as ‚DLL Hell‛. Browser-based clients are somewhat more difficult to create, and offer a more limited user interface with fewer controls and less control over layout of the screen and the handling of screen events. However, they are far easier to deploy. All the client needs is a compatible browser and an Internet or intranet connection.
Browser-based clients can use technologies such as client-side script or Java applets to make the user interface richer and more functional. These options work for most modern browsers. Applying these technologies adds additional development time, and they do not address all user interface issues.
There are some ‚in-between‛ options. If clients are restricted to certain browsers Dynamic HTML (DHTML) can be used to add further functionality to the interface. Add if clients are restricted to
Visual Basic .Net I-TECH Computer Education
12
Internet Explorer. ActiveX Controls can be used to make an interface close to that available in a Win32 client. However, ActiveX controls add deployment issues of their own. Visual Basic can be used for ActiveX controls but then deploying the controls requires lots of supporting Visual Basic DLLs on the client. Active X controls are typically written in C++ instead to make the install as lightweight as possible. This adds to development time and requires a higher level of deployment expertise.
One important factor that is often overlooked in the DNA model is that there may be a need to implement both Win32 based and Internet based user interfaces. Or there may be a need to have different levels of user interfaces, say one for novice or occasional users and one for advanced users.
Middle Tier
The middle tier in a DNA application should encapsulate as much of the business processing is possible. Besides those rules needed to validate data on the client, most business rules should be in this layer. The middle tier often breaks down into multiple sub-tiers. One tier may handle the interface to the client, another handles the business rules, and another interface to the data repositories.
Visual Basic is the most common language used to write middle-tier components. This is a more sophisticated type of development than for typical forms-based Visual Basic programs, requiring a higher level of expertise in COM and object-oriented programming concepts. It is also important to understand how to create components that scale well, which often means developing components that are implemented using Microsoft Transaction Server on Windows NT or COM+Services on Windows 2000. Such components typically use stateless designs, which can look very different from the stateful designs often used in client-based.
Understanding the nuances of COM is important in constructing a middle tier because the components in this layer must work together. Versioning all the components properly so that they understand each other’s interfaces can be a challenge.
Components in the middle tier may talk to a variety of protocols and components to communicate data to the data tier. The diagram shows example such as HTTP, ADO, and CDO (Collaborative Data Objects), but that list is by no means exhaustive.
Data Tier
Most business applications must store information for long term use. The nature of the storage mechanism varies with the installation. Usually a relational database system (RDBMS) is required, with the most common options being Microsoft SQL Server and oracle.
Besides holding the data, the data tier may also have logic to process, retrieve, and validate data. Stored procedures, written in some variation of the SQL language, can be used in RDBMS databases to do this.
Limitations of Visual Basic for DNA Application Development
Visual Basic .Net I-TECH Computer Education
13
Visual Basic is easily the most popular language for developing applications with the DNA model. As noted above, it can be used in two major roles – forms-based VB clients and COM components (either on the client or the server).
There are other options, of course, including C++, J++, and various third-party languages such as Delphi and Perl. But the number of VB developers outnumbers them all put together.
That does not mean Visual Basic is without limitations in this environment. Some of the most serious limitations include:
No capacity for multithreading
Lack of implementation inheritance and other object-oriented features Poor error-handling ability
Poor integration with other languages such as C++ No effective user interface for Internet-based applications
All of these limitations needed to be addressed, but Microsoft decided to look beyond just Visual Basic and solve these problems on a more global level.
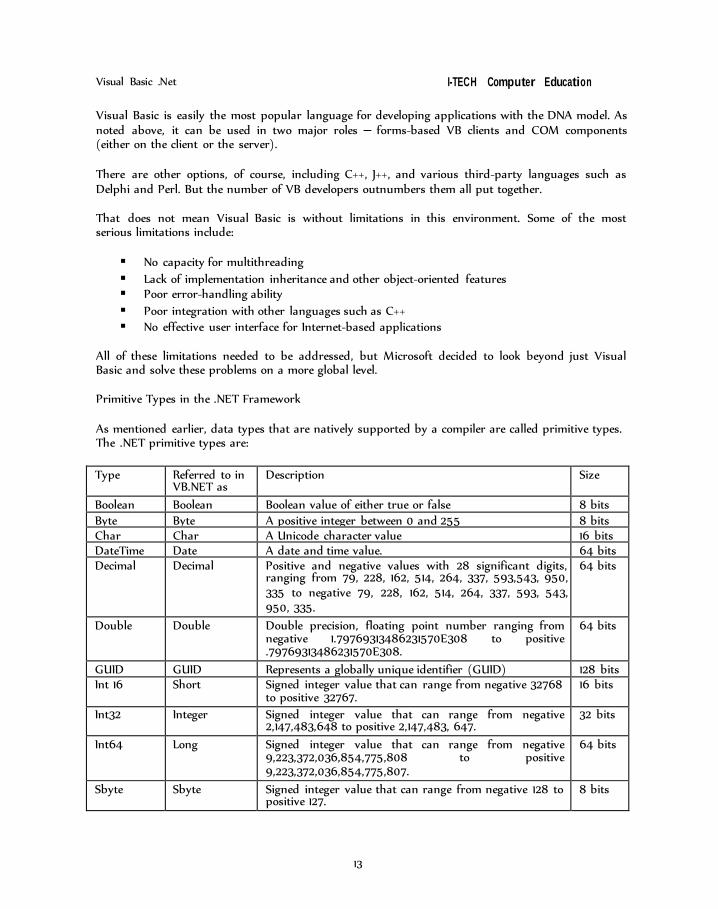
Primitive Types in the .NET Framework
As mentioned earlier, data types that are natively supported by a compiler are called primitive types. The .NET primitive types are:
Type Referred to in
VB.NET as Description Size
Boolean Boolean Boolean value of either true or false 8 bits Byte Byte A positive integer between 0 and 255 8 bits Char Char A Unicode character value 16 bits DateTime Date A date and time value. 64 bits Decimal Decimal Positive and negative values with 28 significant digits,
ranging from 79, 228, 162, 514, 264, 337, 593,543, 950, 335 to negative 79, 228, 162, 514, 264, 337, 593, 543, 950, 335.
64 bits
Double Double Double precision, floating point number ranging from negative 1.79769313486231570E308 to positive .79769313486231570E308.
64 bits
GUID GUID Represents a globally unique identifier (GUID) 128 bits Int 16 Short Signed integer value that can range from negative 32768
to positive 32767. 16 bits
Int32 Integer Signed integer value that can range from negative 2,147,483,648 to positive 2,147,483, 647.
32 bits
Int64 Long Signed integer value that can range from negative 9,223,372,036,854,775,808 to positive 9,223,372,036,854,775,807.
64 bits
Sbyte Sbyte Signed integer value that can range from negative 128 to positive 127.
8 bits
Visual Basic .Net I-TECH Computer Education
14
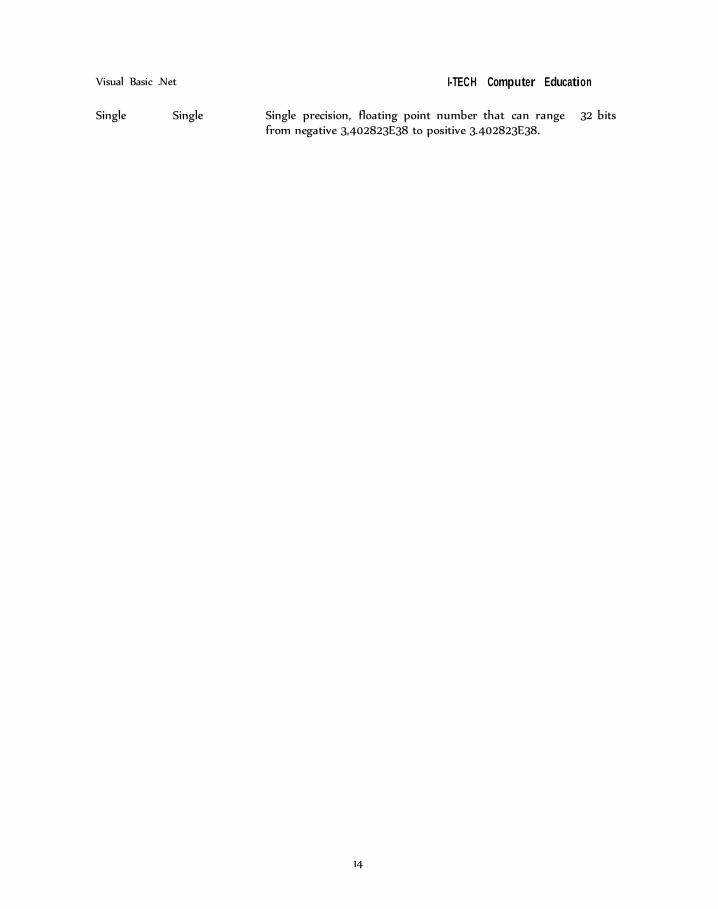
Single Single Single precision, floating point number that can range
from negative 3,402823E38 to positive 3.402823E38. 32 bits

Visual Basic .Net I-TECH Computer Education
15
Namespaces One of the most important concepts in Microsoft.NET is namespaces. They help organize object libraries and hierarchies, simplify object references, prevent ambiguity when referring to objects, and control the scope of object identifiers.
Namespaces are discussed in more detail in Chapter 3. For now, it is useful to know that class libraries are normally referenced in each language before they are used. The reference allows the types to be used in the code with abbreviations instead of detained library references. In VB, this is done with an Imports statement, and that this can be thought of as similar in concept to checking a box in the References dialog in Visual Basic 6. For example, a typical VB form module in .NET might have the following lines at the beginning:
Imports System.WinForms
Exercise
1. Explain the disadvantages of the current technologies.
2. Explain the limitations of Visual Basic DNA Application Development.
3. Explain the primitive data types in VB .Net.
4. Explain Namespaces.
Fill in the blanks:
1. _is a collection of classes.
2. data type takes 2 bytes.
3. _data type stores only two values true or false.
Visual Basic .Net I-TECH Computer Education
16
Chapter - 3 NEW IDE AND LANGUAGE FEATURES OF VB.NET
Visual Basic .NET preserves VB6’s general approach to programming with a WYSIWYG development environment, click-through forms to get at the underlying code, and so forth. However, VB.NET introduces quite a number of exciting changes that help make VB a premier development tool for the .NET platform.
These include:
New IDE features Full object-orientation Data type changes The introduction of namespaces Structured error handling
A new threading model Various other syntactic changes to the language
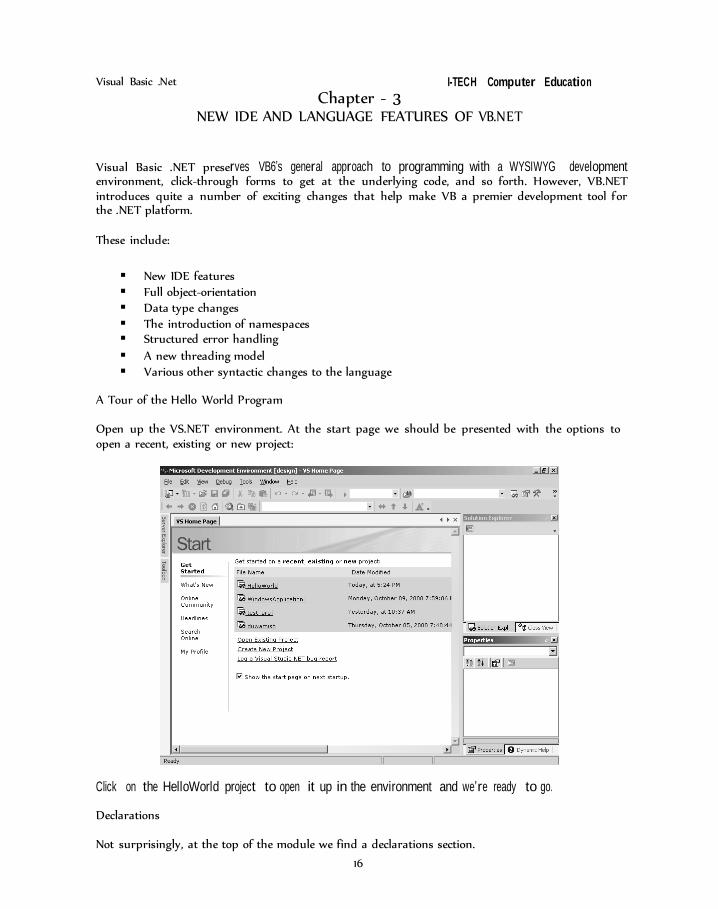
A Tour of the Hello World Program
Open up the VS.NET environment. At the start page we should be presented with the options to open a recent, existing or new project:
Click on the HelloWorld project to open it up in the environment and we’re ready to go. Declarations
Not surprisingly, at the top of the module we find a declarations section.
Visual Basic .Net I-TECH Computer Education
17
One thing to note is that there’s no explicit declaration, such as Option Explicit, to force all variables to be declared. This is because Option Explicit is the default setting, finally. If , for some reason, we
don’t want to declare all our variables we can add a line such as:
Option Explicit Off
Namespaces
At the top of the code window we see the following lines of code:
Imports System.ComponentModel Imports System.Drawing
Imports System.WinForms As we mentioned earlier, all VB.NET programs make use of the .NET system class libraries. These statements import the namespaces for three of these libraries. Namespaces are a way of grouping related classes together for convenience and they are a key part of the .NET Framework since they provide organization to the huge number of classes in the system class libraries.
Form Declaration, Initialization, and Termination
The remaining code is specific to our form – declaring the form, initializing it, and then making sure it can be properly destroyed.
Forms as Classes
The next line of code declares a class named Form1:
Public Class Form1
This is interesting. Since VB4 we’ve been able to treat a form module like a class, but form modules have never really been classes.
Now, in VB.NET, forms really are classes. They are just classes that happen to create a window and work with controls placed on that window.
We could also explicitly create an instance of the form using the following VB6 code:
Dim MyForm As Form1
Set MyForm = New Form1 Form1. Show
Notice how we create an explicit instance of Form1, then turn around and use the default instance to display the form. Of course the form that is displayed is the default instance – not the instance we explicitly created, and now we’ve got this extra form floating around in memory. This is one of the most common bugs in novice programmers’ VB applications – all caused by the inconsistent treatment of a form module as both VB.NET resolves this issue by always treating forms as classes. Now the only valid approach is to treat a form as a class and to create an instance of the form to interact with. This is illustrated by the following VB.NET code:
Visual Basic .Net I-TECH Computer Education
18
Dim MyForm As Form1
MyForm = New Form1 () MyForm.Show ()
Forms Created by Inheritance
The next line of code uses the new keyword, Inherits:
Inherits System.WinForms.Form
This statement indicates that Form1 is actually a subclass of the System.WinForms.Form class. This class is the root of all .NET GUI forms; any form we create in VB.NET will be inherited from this base class.
The Constructor Method
Because Form1 is actually a class, it has a constructor method. Constructor methods are also new to VB.NET. The constructor method is called as an instance of the class is created, somewhat like the Class_Initialize event in previous versions of VB.
In VB.NET, constructor methods are always named New. Here’s the New method for Form1:
Public Sub New () MyBase.New
Form1 = Me
‘This call is required by the Win Form Designer. InitializeComponent
End Sub
‘TODO: Add any initial iz at ion after the Initializ eC om po ne nt () call
19
Visual Basic .Net I-TECH Computer Education
The first thing that all constructor methods must do is call the constructor in their base class. If we try to move this line of code later in the routine we’ll get a syntax error.
The Dispose Method
If New is somewhat comparable to Class_Initialize or Form_Load, then it should come as no surprise that we also have a method, which is similar to Class_Teminate or Form_Unload. This method is named Dispose and it is called when the form is being destroyed, just like the Form_Unload method was in previous versions of VB.
‘Form overrides dispose to clean up the compone nt list. Overrides Public Sub Dispose ()
MyBase.Dispose Components.Dispose
End Sub Again we see that this method interacts with the base class by calling its Dispose method. This is important, as it allows the code in the base class to perform any required clean-up before the form is destroyed. We also call the Dispose method on variable named components.
Windows Form Designer Generated Code
When the VS.NET IDE created our form, it automatically generated all the code we’ve seen so far. It also generated another section of code that we normally never need to see or interact with. This section of code is collapsed by default:
Windows Form Designer generated code
Clicking on the plus (+) symbol expands this collapsed block of code, which is called a region.
The code in this region is generated and maintained by the VS.NET IDE on our behalf.
Typically we don’t need to see this code or worry what is going on within it. However, since we’re in the process of learning how VB.NET works, it is worth walking through this hidden code once just to get a feel for what goes on inside.
Click on the plus symbol to expand this section of code. We can see how the code creates instances of the various controls on the form and sets their positions, initial values and so forth:
Region ‚Windows Form Designer generated code‛
‘Required by the Windows Form Designer Private components As System.ComponentModel.Container Private WithEvents Button1 As System. WinForms.Button Private WithEvents TextBox1 As System.WinForms.TestBox
Dim WithEvents Form1 As System.WinForms.Form
20
Visual Basic .Net I-TECH Computer Education
‘NOTE: The followin g procedure is required by the Windows Form Designer
‘It can be modified using the Windows Form Designer. ‘Do not modify it using the code editor. Private Sub InitializeComponent ()
Me.components = New System.ComponentModel.Container () Me.Button1 = New System.WinForms.Button ()
Me.TextBox1 = New System.WinForms.TextBox ()
‘@design Me.TrayHeight = 0 ‘@design Me.Tray LargeI c on =False ‘@design Me.TrayAutoArrange = True Button1.Location = New System.Drawing.Point (24, 64) Button1.Size = New System.Drawing.Size (75, 23) Button1.TabIndex = 1
Button.T ext = ‚Show text‛
TextBox1.Location = New System.Drawing.Point (16, 24) TextBox1.Text = ‚TextBo x 1‛ TextBox1.TabIndex = 0 TextBox1.Size = New System.Drawing.Size (144 , 20) Me.Text = ‚Form1 ‛ Me.AutoScaleBaseSize = New System.Drawing.Size (5,13)
End Sub #End Region
Variable Declarations
Me.Controls.Add (Button1) Me.Controls.Add (TextBox1)
Within the bounds of this region we find the declarations of those variables that were used earlier – Form1 and components. Also declared as variables are the button and text box controls we placed on the form:
‘Required by the Windows Form Designer Private components As System.ComponentModel.Container Private WithEvents Button1 As System.WinForms.Button Private WithEvents TextBox1 As System.WinForms.TextBox
Dim WithEvents Form1 As System.WinFroms.Form
Notice too that the Form1 variable is declared using the WithEvents keyword. This ensures that any events that are raised by the form are echoed back into our code via the Form1 variable just as they are with the Me keyword.
InitializeComponentMethod
In this section of code we also find the InitailizeComponent method that we saw called earlier from the New method.
True to its name, this method initializes our form – first by creating instances of the constituent
21
Visual Basic .Net I-TECH Computer Education
objects such as the button and textbox controls:
Me.components = New System.ComponentModel.Container () Me.Button1 = New System.WinForms.Button ()
Me.TextBox1 = New System.WinForms.TextBox () Event Handler Code
The only thing left is the code that we wrote to handle the Click event from Button1:
Protected Sub Button1_Click (ByVal sender As Object,_ ByVal e As System.EventArgs)
22
Visual Basic .Net I-TECH Computer Education
MsgBox (TextBox1 .Text, MsgBoxStyle.Informati on, ‚Test‛)
End Sub
New IDE Features
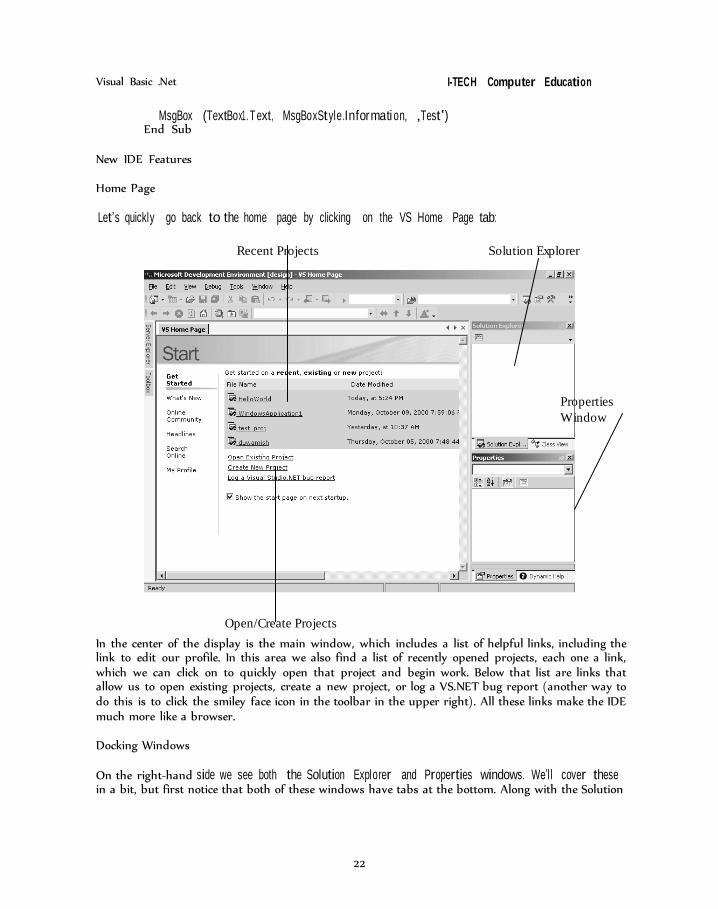
Home Page
Let’s quickly go back to the home page by clicking on the VS Home Page tab:
Recent Projects Solution Explorer
Properties
Window
Open/Create Projects
In the center of the display is the main window, which includes a list of helpful links, including the link to edit our profile. In this area we also find a list of recently opened projects, each one a link, which we can click on to quickly open that project and begin work. Below that list are links that allow us to open existing projects, create a new project, or log a VS.NET bug report (another way to do this is to click the smiley face icon in the toolbar in the upper right). All these links make the IDE much more like a browser.
Docking Windows
On the right-hand side we see both the Solution Explorer and Properties windows. We’l l cover these in a bit, but first notice that both of these windows have tabs at the bottom. Along with the Solution
23
Visual Basic .Net I-TECH Computer Education
Explorer we can also see a tab for a Class View, and along with the Properties window we have a tab for Dynamic Help.
This is a major feature of the VS.NET IDE – the ability to dock and arrange windows – including docking several windows in the same location such that they are displayed via tabs like we see here.
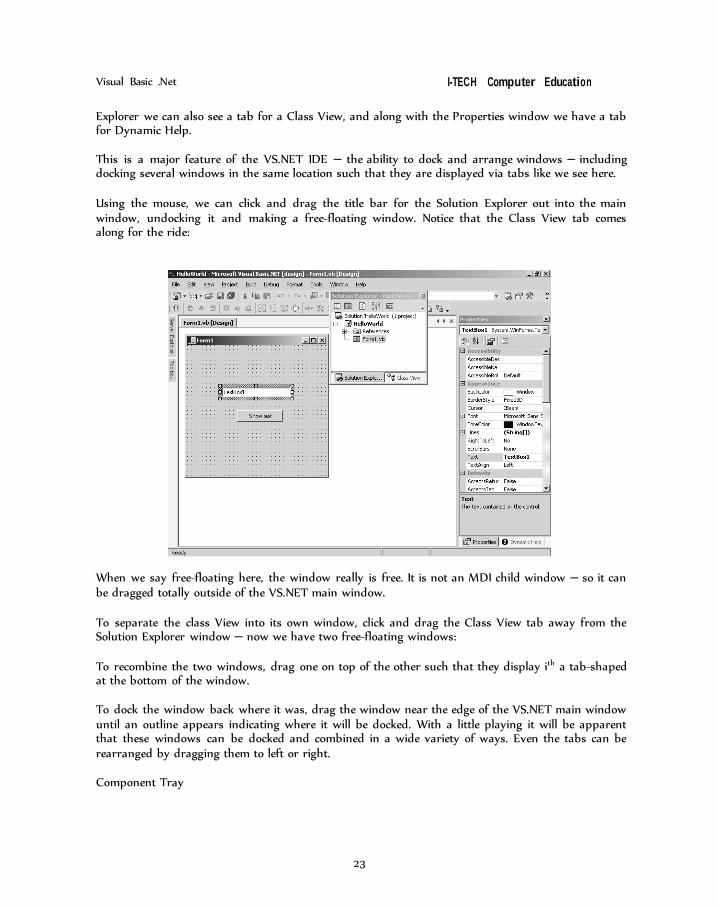
Using the mouse, we can click and drag the title bar for the Solution Explorer out into the main window, undocking it and making a free-floating window. Notice that the Class View tab comes along for the ride:
When we say free-floating here, the window really is free. It is not an MDI child window – so it can be dragged totally outside of the VS.NET main window.
To separate the class View into its own window, click and drag the Class View tab away from the Solution Explorer window – now we have two free-floating windows:
To recombine the two windows, drag one on top of the other such that they display ith a tab-shaped at the bottom of the window.
To dock the window back where it was, drag the window near the edge of the VS.NET main window until an outline appears indicating where it will be docked. With a little playing it will be apparent that these windows can be docked and combined in a wide variety of ways. Even the tabs can be rearranged by dragging them to left or right.
Component Tray
24
Visual Basic .Net I-TECH Computer Education
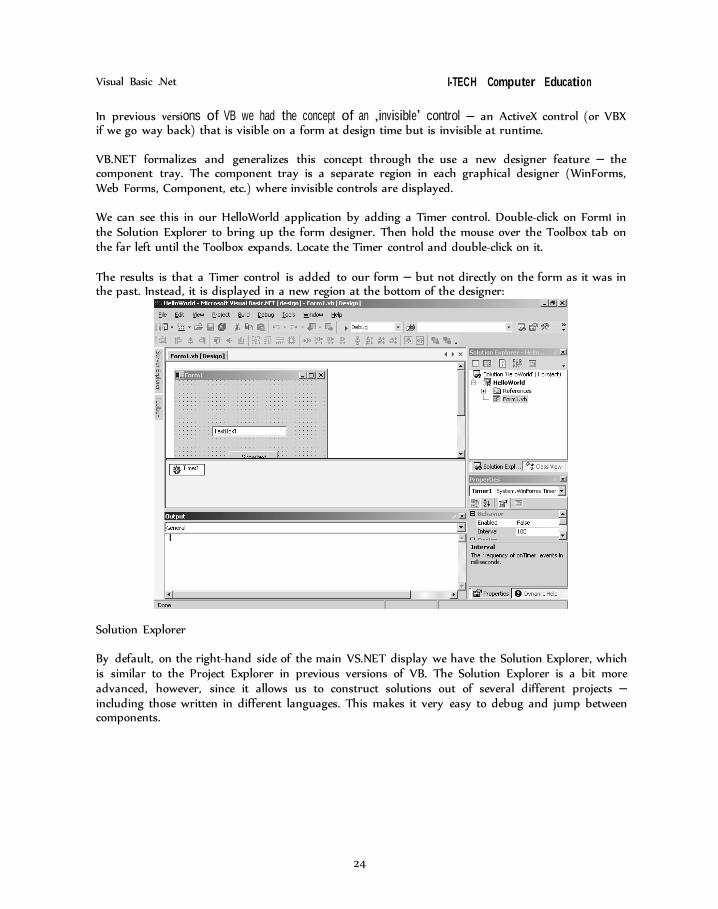
In previous versions of VB we had the concept of an ‚invisible‛ control – an ActiveX control (or VBX if we go way back) that is visible on a form at design time but is invisible at runtime.
VB.NET formalizes and generalizes this concept through the use a new designer feature – the component tray. The component tray is a separate region in each graphical designer (WinForms, Web Forms, Component, etc.) where invisible controls are displayed.
We can see this in our HelloWorld application by adding a Timer control. Double-click on Form1 in the Solution Explorer to bring up the form designer. Then hold the mouse over the Toolbox tab on the far left until the Toolbox expands. Locate the Timer control and double-click on it.
The results is that a Timer control is added to our form – but not directly on the form as it was in the past. Instead, it is displayed in a new region at the bottom of the designer:
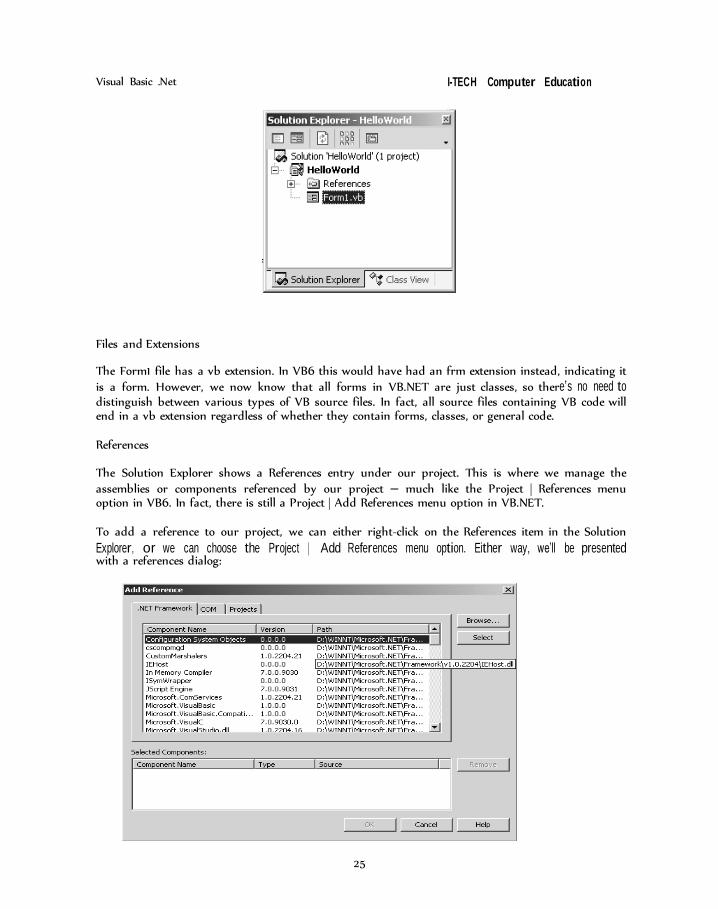
Solution Explorer
By default, on the right-hand side of the main VS.NET display we have the Solution Explorer, which is similar to the Project Explorer in previous versions of VB. The Solution Explorer is a bit more advanced, however, since it allows us to construct solutions out of several different projects – including those written in different languages. This makes it very easy to debug and jump between components.
25
Visual Basic .Net I-TECH Computer Education
Files and Extensions
The Form1 file has a vb extension. In VB6 this would have had an frm extension instead, indicating it is a form. However, we now know that all forms in VB.NET are just classes, so there’s no need to distinguish between various types of VB source files. In fact, all source files containing VB code will end in a vb extension regardless of whether they contain forms, classes, or general code.
References
The Solution Explorer shows a References entry under our project. This is where we manage the assemblies or components referenced by our project – much like the Project | References menu option in VB6. In fact, there is still a Project | Add References menu option in VB.NET.
To add a reference to our project, we can either right-click on the References item in the Solution
Explorer, or we can choose the Project | Add References menu option. Either way, we’ll be presented with a references dialog:
26
Visual Basic .Net I-TECH Computer Education
This dialog allows us to add references for .NET Framework components, COM objects, or other projects we’re working on.
Once a reference has been added, it will be listed in the Solution Explorer under the References entry. To remove a reference, simply right-click on the reference to be removed and then choose the Remove option.
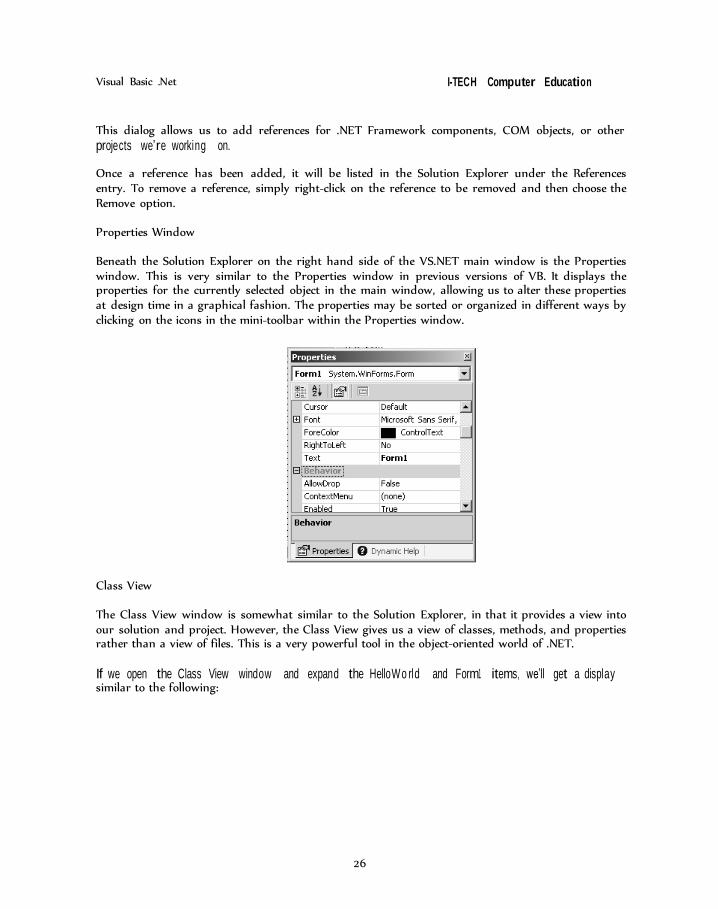
Properties Window
Beneath the Solution Explorer on the right hand side of the VS.NET main window is the Properties window. This is very similar to the Properties window in previous versions of VB. It displays the properties for the currently selected object in the main window, allowing us to alter these properties at design time in a graphical fashion. The properties may be sorted or organized in different ways by clicking on the icons in the mini-toolbar within the Properties window.
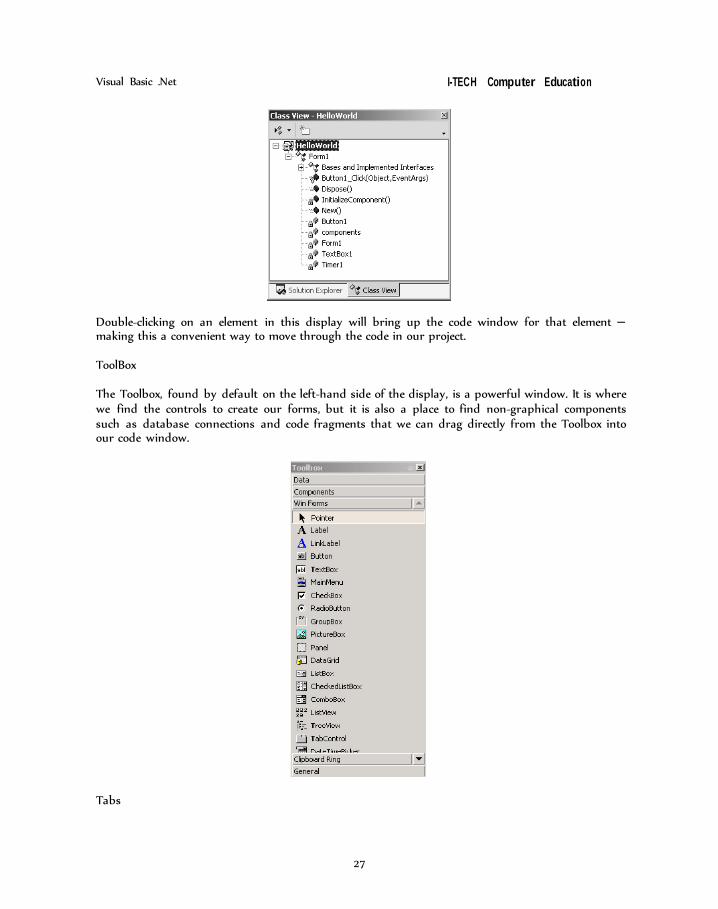
Class View
The Class View window is somewhat similar to the Solution Explorer, in that it provides a view into our solution and project. However, the Class View gives us a view of classes, methods, and properties rather than a view of files. This is a very powerful tool in the object-oriented world of .NET.
If we open the Class View window and expand the HelloWo rld and Form1 items, we’ll get a display similar to the following:
27
Visual Basic .Net I-TECH Computer Education
Double-clicking on an element in this display will bring up the code window for that element – making this a convenient way to move through the code in our project.
ToolBox
The Toolbox, found by default on the left-hand side of the display, is a powerful window. It is where we find the controls to create our forms, but it is also a place to find non-graphical components such as database connections and code fragments that we can drag directly from the Toolbox into our code window.
Tabs
28
Visual Basic .Net I-TECH Computer Education
The Toolbox is organized into different tabs; each containing related components, controls, or code. We can add our own tabs to the Toolbox by right-clicking and choosing the Add Tab option.
Tab Description Data Contains components that provide access to data and data sources. Components Contains various components such as reporting, message queuing, etc. Clipboard Ring
Contains a list of the most recent items copied to the system clipboard. This is somewhat comparable to the clipboard ring found in Microsoft Office 2000.
General Empty by default, this is a place for us to store general controls, components, and code fragments.
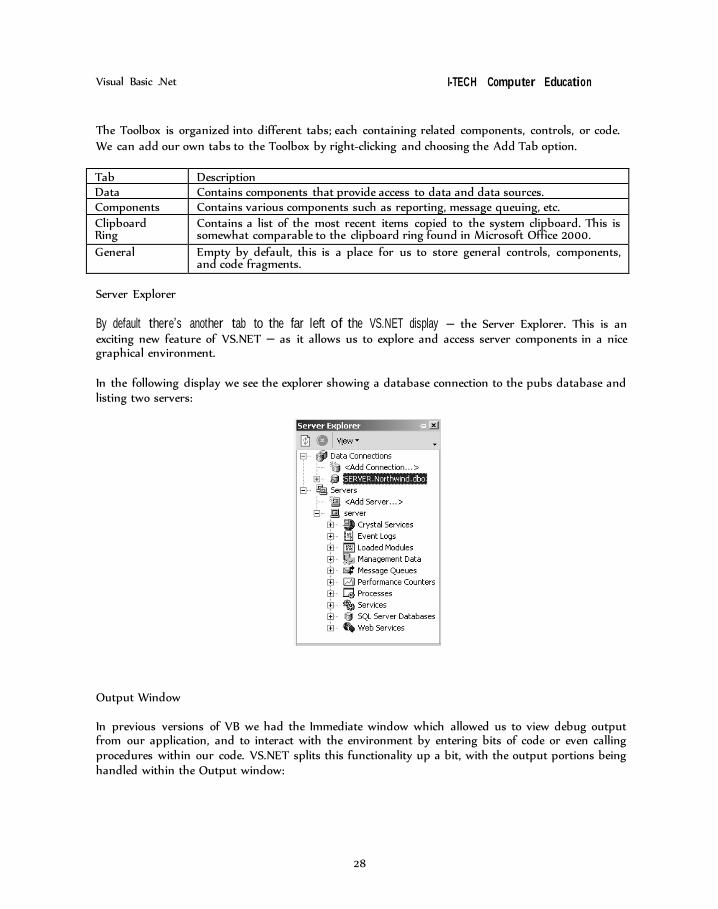
Server Explorer
By default there’s another tab to the far left of the VS.NET display – the Server Explorer. This is an exciting new feature of VS.NET – as it allows us to explore and access server components in a nice graphical environment.
In the following display we see the explorer showing a database connection to the pubs database and listing two servers:
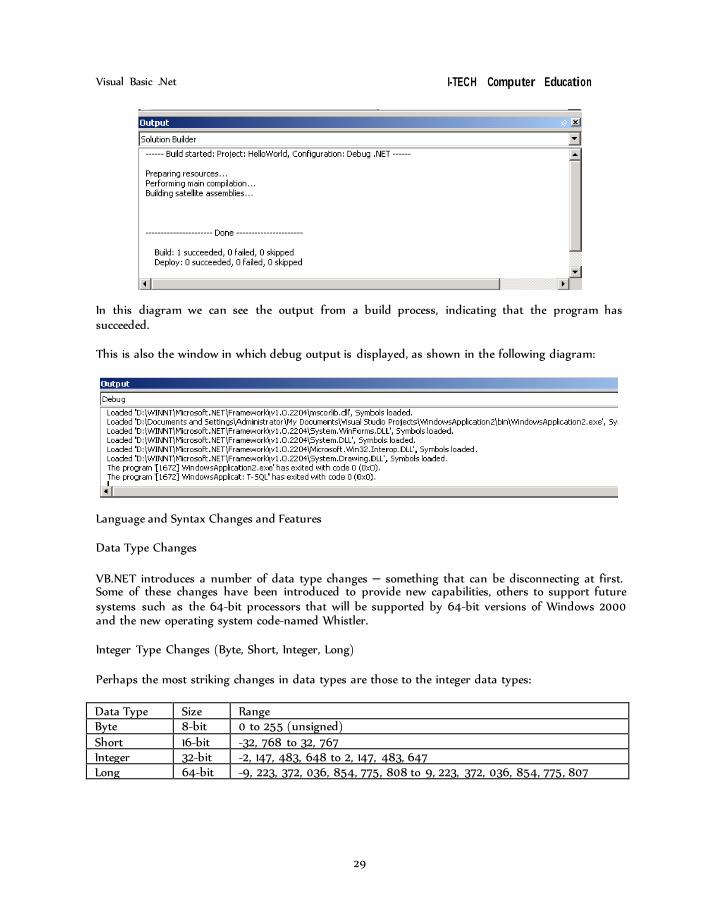
Output Window
In previous versions of VB we had the Immediate window which allowed us to view debug output from our application, and to interact with the environment by entering bits of code or even calling procedures within our code. VS.NET splits this functionality up a bit, with the output portions being handled within the Output window:
29
Visual Basic .Net I-TECH Computer Education
In this diagram we can see the output from a build process, indicating that the program has succeeded.
This is also the window in which debug output is displayed, as shown in the following diagram:
Language and Syntax Changes and Features
Data Type Changes
VB.NET introduces a number of data type changes – something that can be disconnecting at first. Some of these changes have been introduced to provide new capabilities, others to support future systems such as the 64-bit processors that will be supported by 64-bit versions of Windows 2000 and the new operating system code-named Whistler.
Integer Type Changes (Byte, Short, Integer, Long)
Perhaps the most striking changes in data types are those to the integer data types:
Data Type Size Range Byte 8-bit 0 to 255 (unsigned) Short 16-bit -32, 768 to 32, 767 Integer 32-bit -2, 147, 483, 648 to 2, 147, 483, 647 Long 64-bit -9, 223, 372, 036, 854, 775, 808 to 9, 223, 372, 036, 854, 775, 807
30
Visual Basic .Net I-TECH Computer Education
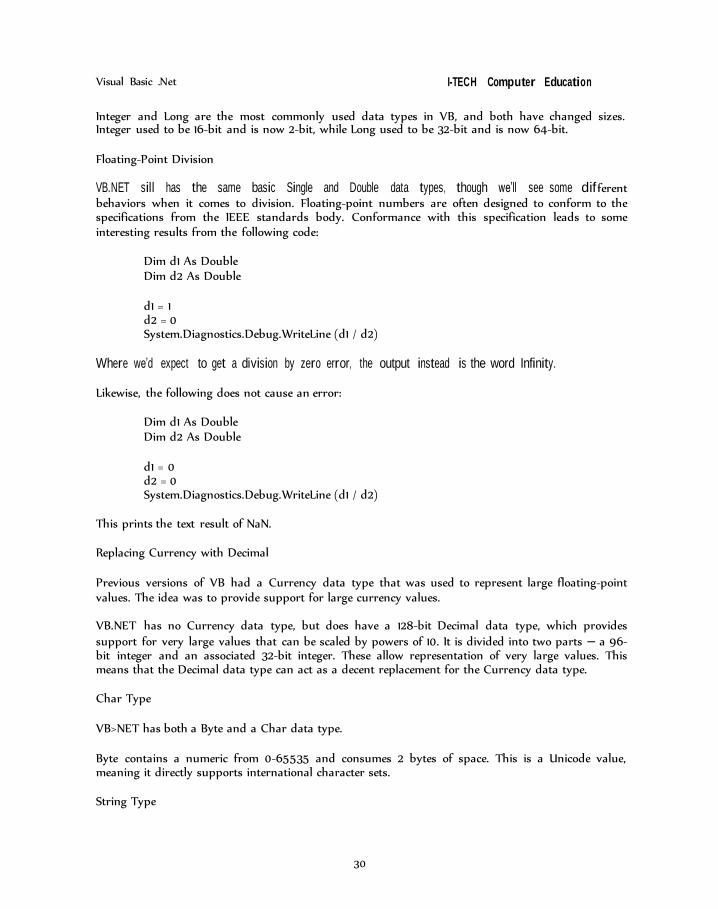
Integer and Long are the most commonly used data types in VB, and both have changed sizes. Integer used to be 16-bit and is now 2-bit, while Long used to be 32-bit and is now 64-bit.
Floating-Point Division
VB.NET sill has the same basic Single and Double data types, though we’ll see some different behaviors when it comes to division. Floating-point numbers are often designed to conform to the specifications from the IEEE standards body. Conformance with this specification leads to some interesting results from the following code:
Dim d1 As Double Dim d2 As Double
d1 = 1 d2 = 0 System.Diagnostics.Debug.WriteLine (d1 / d2)
Where we’d expect to get a division by zero error, the output instead is the word Infinity.
Likewise, the following does not cause an error:
Dim d1 As Double Dim d2 As Double
d1 = 0 d2 = 0 System.Diagnostics.Debug.WriteLine (d1 / d2)
This prints the text result of NaN.
Replacing Currency with Decimal
Previous versions of VB had a Currency data type that was used to represent large floating-point values. The idea was to provide support for large currency values.
VB.NET has no Currency data type, but does have a 128-bit Decimal data type, which provides support for very large values that can be scaled by powers of 10. It is divided into two parts – a 96- bit integer and an associated 32-bit integer. These allow representation of very large values. This means that the Decimal data type can act as a decent replacement for the Currency data type.
Char Type
VB>NET has both a Byte and a Char data type.
Byte contains a numeric from 0-65535 and consumes 2 bytes of space. This is a Unicode value, meaning it directly supports international character sets.
String Type
31
Visual Basic .Net I-TECH Computer Education
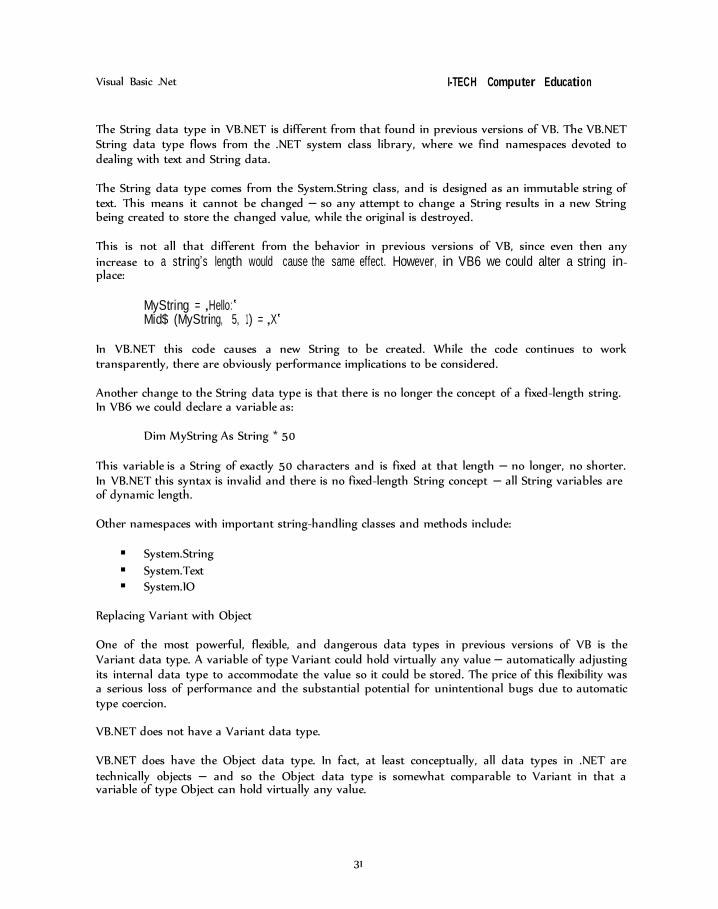
The String data type in VB.NET is different from that found in previous versions of VB. The VB.NET String data type flows from the .NET system class library, where we find namespaces devoted to dealing with text and String data.
The String data type comes from the System.String class, and is designed as an immutable string of text. This means it cannot be changed – so any attempt to change a String results in a new String being created to store the changed value, while the original is destroyed.
This is not all that different from the behavior in previous versions of VB, since even then any increase to a string’s length would cause the same effect. However, in VB6 we could alter a string in- place:
MyString = ‚Hello:‛ Mid$ (MyString, 5, 1) = ‚X‛
In VB.NET this code causes a new String to be created. While the code continues to work transparently, there are obviously performance implications to be considered.
Another change to the String data type is that there is no longer the concept of a fixed-length string. In VB6 we could declare a variable as:
Dim MyString As String * 50
This variable is a String of exactly 50 characters and is fixed at that length – no longer, no shorter. In VB.NET this syntax is invalid and there is no fixed-length String concept – all String variables are of dynamic length.
Other namespaces with important string-handling classes and methods include:
System.String
System.Text System.IO
Replacing Variant with Object
One of the most powerful, flexible, and dangerous data types in previous versions of VB is the Variant data type. A variable of type Variant could hold virtually any value – automatically adjusting its internal data type to accommodate the value so it could be stored. The price of this flexibility was a serious loss of performance and the substantial potential for unintentional bugs due to automatic type coercion.
VB.NET does not have a Variant data type.
VB.NET does have the Object data type. In fact, at least conceptually, all data types in .NET are technically objects – and so the Object data type is somewhat comparable to Variant in that a variable of type Object can hold virtually any value.
32
Visual Basic .Net I-TECH Computer Education
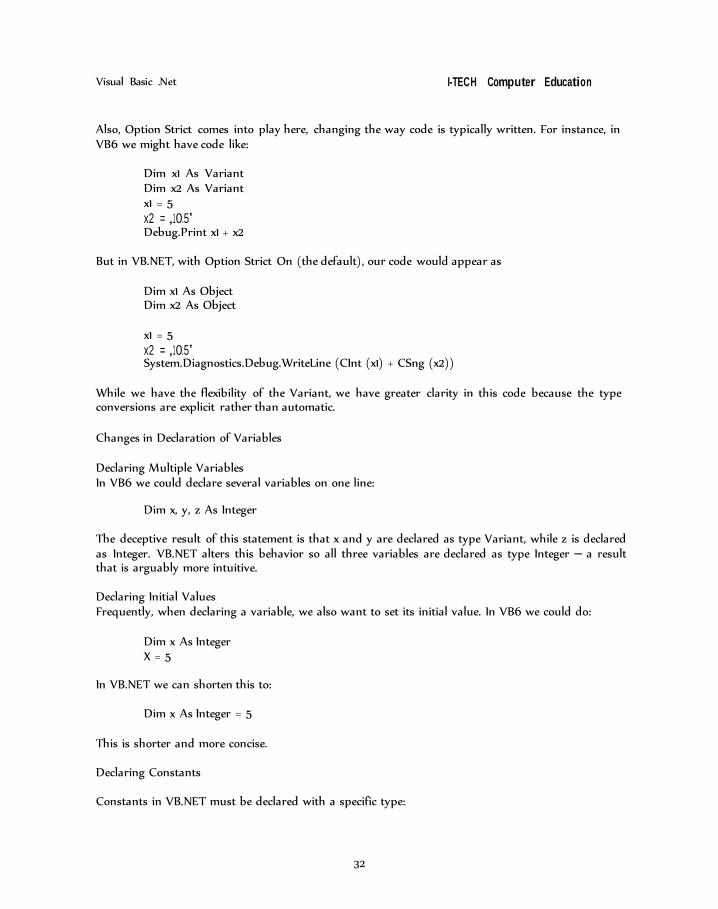
Also, Option Strict comes into play here, changing the way code is typically written. For instance, in VB6 we might have code like:
Dim x1 As Variant Dim x2 As Variant x1 = 5 x2 = ‚10.5‛ Debug.Print x1 + x2
But in VB.NET, with Option Strict On (the default), our code would appear as
Dim x1 As Object Dim x2 As Object
x1 = 5 x2 = ‚10.5‛ System.Diagnostics.Debug.WriteLine (CInt (x1) + CSng (x2))
While we have the flexibility of the Variant, we have greater clarity in this code because the type conversions are explicit rather than automatic.
Changes in Declaration of Variables
Declaring Multiple Variables In VB6 we could declare several variables on one line:
Dim x, y, z As Integer
The deceptive result of this statement is that x and y are declared as type Variant, while z is declared as Integer. VB.NET alters this behavior so all three variables are declared as type Integer – a result that is arguably more intuitive.
Declaring Initial Values Frequently, when declaring a variable, we also want to set its initial value. In VB6 we could do:
Dim x As Integer X = 5
In VB.NET we can shorten this to:
Dim x As Integer = 5
This is shorter and more concise. Declaring Constants
Constants in VB.NET must be declared with a specific type:

33
Visual Basic .Net I-TECH Computer Education
Publ ic Const My_CONST ANT As String = ‚The constant value‛ Public Const MAX_VALUE As Integer = 42
Scoping Changes
Variables declared in VB.NET may be subject to some different scope restrictions than those declared in previous versions of VB. In particular, VB.NET introduces the concept of block-level scope, where variables can be declared within specific blocks of code, such as an If … End If block.
In VB6, we could write code such as:
If True Then Dim x As Integer x = 5
End If x = 15
In Vb.NET, however, this code is invalid, since the variable x is not valid outside of the If … End If block. The same is true for any type of block structure, including Do…Loop, While…Wend, For…Next, and so forth.
Changes to Arrays
In previous versions of VB, arrays were a native data type of the language itself. In VB.NET, arrays flow from the .NET system class libraries and are common across all .NET languages, including VB.
Zero-Based Arrays
Perhaps the biggest change is that all arrays are now zero-based, meaning that the lowest array element of any array is 0 rather than 1. In VB6 we had the Option Base statement, which allowed us to specify whether arrays were zero-based or one-based. In VB.NET this statement is gone and all arrays are zero-based.
Dim myarray (10) As Integer
The result is an array with subscripts that range from 0 to 9 rather than from 1 to 10.
Another side effect of this change is that the To syntax is no longer supported, so we can no longer declare an array as:
Dim myarray (1 to 10) As Integer
This will cause an error.
Declaring Arrays As with previous versions of VB, we can declare arrays with explicit sizes such as:

34
Visual Basic .Net I-TECH Computer Education
Dim myarray () As Decimal
VB.NET allows us to preload an array with data as it is being declared. This is conceptually the same as initializing any other variable as it is being declared, but with arrays the syntax is a bit different since we are supplying a list of values instead of a single value:
Dim myarray () As Integer = {1, 3, 6, 2}
This has the effect of sizing the array to hold the data elements we provide, as well as placing those values into the array. To use this feature we can’t explicitly define the size of the array.
ReDim
The ReDim statement remains valid in VB.NET. this statement can be used to change the number of elements in an array, though it cannot be used to change the number of dimensions. This means we can write code such as:
Dim myarray() As String
ReDim myarray (5)
This declares an array and then change the number of elements in the array to 5. We can also redimension more complex arrays such as:
Dim myarray () As String
ReDim myarray (5)
Notice that the ReDim statement doesn’t alter the number of dimensions , just the number of elements in each dimension. ReDim Preserve
When using the ReDim statement, all existing data in the array is lost. To avoid losing this data, we can use the Preserve keyword. Use of this keyword places an additional restriction on the ReDim statement. In particular, when using the Preserve keyword, only the last dimension can be resized, so the following code is valid:
Dim myarray (0, 0) As String
ReDim myarray (5, 5)
ReDim Preserve myarray (5, 10) This is valid because only the last (right-most) dimension is resized using the ReDim Preserve statement.
35
Visual Basic .Net I-TECH Computer Education
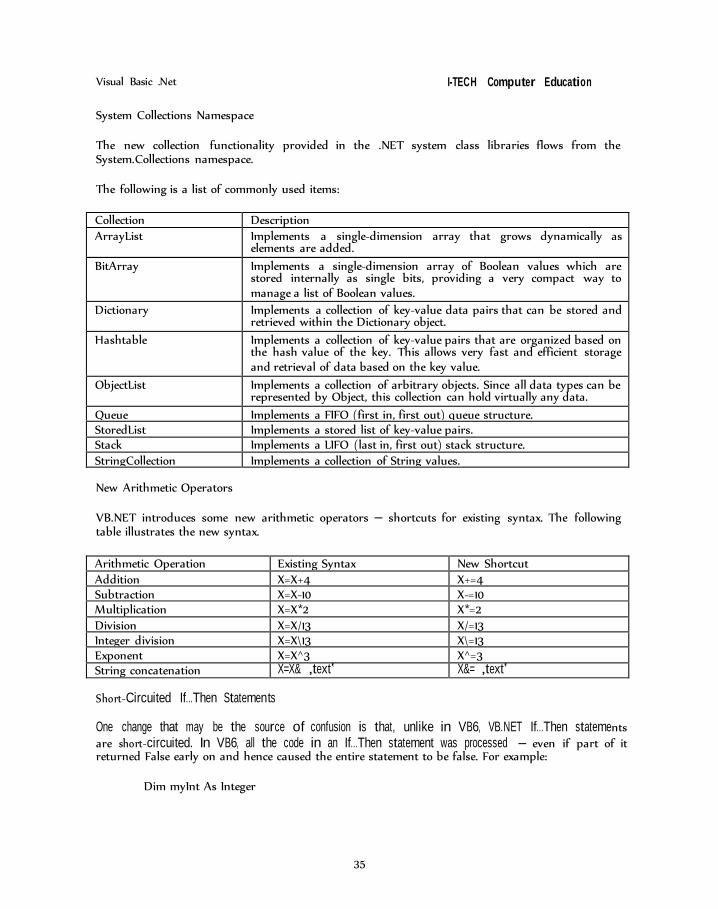
System Collections Namespace
The new collection functionality provided in the .NET system class libraries flows from the System.Collections namespace.
The following is a list of commonly used items:
Collection Description ArrayList Implements a single-dimension array that grows dynamically as
elements are added.
BitArray Implements a single-dimension array of Boolean values which are stored internally as single bits, providing a very compact way to manage a list of Boolean values.
Dictionary Implements a collection of key-value data pairs that can be stored and retrieved within the Dictionary object.
Hashtable Implements a collection of key-value pairs that are organized based on the hash value of the key. This allows very fast and efficient storage and retrieval of data based on the key value.
ObjectList Implements a collection of arbitrary objects. Since all data types can be represented by Object, this collection can hold virtually any data.
Queue Implements a FIFO (first in, first out) queue structure. StoredList Implements a stored list of key-value pairs. Stack Implements a LIFO (last in, first out) stack structure. StringCollection Implements a collection of String values.
New Arithmetic Operators
VB.NET introduces some new arithmetic operators – shortcuts for existing syntax. The following table illustrates the new syntax.
Arithmetic Operation Existing Syntax New Shortcut Addition X=X+4 X+=4 Subtraction X=X-10 X-=10 Multiplication X=X*2 X*=2 Division X=X/13 X/=13 Integer division X=X\13 X\=13 Exponent X=X^3 X^=3 String concatenation X=X& ‚text‛ X&= ‚text‛
Short-Circuited If…Then Statements
One change that may be the source of confusion is that, unlike in VB6, VB.NET If…Then statements are short-circuited. In VB6, all the code in an If…Then statement was processed – even if part of it returned False early on and hence caused the entire statement to be false. For example:
Dim myInt As Integer
36
Visual Basic .Net I-TECH Computer Education
myInt = 0 If myInt <> 0 And 17 \ myInt < 5 Then
The first part of this comparison (myInt <> 0) returns False. In VB6 the second part of the expression is evaluated anyway, resulting in a division by zero error.
In VB.NET this behavior is changed, so the evaluation is stopped a soon as the outcome is known. In this example, the entire expression is guaranteed to be False as soon as we know that myInt is zero and so evaluation stops. This means we won’t get the division by zero error since that portion of the expression is not evaluated.
No Set Statement
One of the most confusing syntax elements of previous version of VB is the use of the keyword Set when assigning objects to variable. This is confusing since it tends to set objects apart from any other data type.
In VB6 we might have statements such as:
Set x = New Customer Set y = x
In VB.NET the Set statement is gone, simplifying our code, and so in VB.NET we have statements such as:
x = New Customer () y = x
Changes to Property Routines
Since we no longer have a Set statement, it should come as no surprise that the meaning of Property Set and Property and Property Let are affected as well.
The concept of a Property Set doesn’t exist as it did in VB6. Beyond this, however, there are other substantial syntax changes that affect how Property routines are built. In VB6 we might have code in a class module such as:
Private mstName As String
Public Property Let Name (Value As String)
mstrName = Value
End Property
Public Property Get Name () As String Name – mstrName
End Property

37
Visual Basic .Net I-TECH Computer Education
In VB.NET things are quite different. The same code is written in a VB.NET class as follows:
Private mstrName As String
Public Property Name () As String Set
mstrName = Value End Set
Get Name = mstrName
End Get End Property
ReadOnly Properties
In VB6, implementing a read only property was as simple as writing a Property Get routine without a corresponding Property Set or Property Let. In VB.NET this remains true, but the syntax is more explicit = leading clarity to our code:
Public ReadOnly Property Age () As Integer
Get Age = 3
End Get End Property
WriteOnly Properties
If we have a ReadOnly keyword, it only makes sense that there would be a WriteOnly keyword for declaring write only properties:
Public WriteOnly Property Data () As Integer
Set
mintData = Value End Set
End Property Structured Error Handling
One area where VB has long been criticized is its lack of structured error handling.
Certainly we were able to do a lot with On Error Goto and On Error Resume Next, but these global error handlers lacked control and didn’t lend anything to our program’s readability. They also involved a huge amount of work.
Additionally, VB.NET introduces exception handling – including an Exception class to augment the existing Err object we’ve had in previous versions of VB.

38
Visual Basic .Net I-TECH Computer Education
The Try…Cat c h…Fin al ly Structure
The error handling is accomplished via a basic block structure. For example, we could create a bit of code that divides two values and traps any possible division error (such as division by 0):
Try
intResult = intValue1 \ intValue2 Catch
intResult = 0 Finally
System.Diagnostics.Debug.WriteLine (intResult) End Try
When using a Try block, at a minimum we must provide a Catch or a Finally block or we’ll get a syntax error.
Let’s take this apart to see what is going on.
The first part of our block structure is the Try section:
Try intResult = intValue1 \ intValue2
All code in the Try block is contained within an error trap. While this example shows just one line of code, it is possible to have many lines of code within a Try block – including nested Try … Catch blocks. If an error occurs in a Try block, the Catch block is invoked to handle the error:
Catch
intResult = 0
This code is only run in the case that an error occurs in the Try block. If no error occurs, this code is entirely skipped and does not run. If we get here, we know that an error has occurred and so this code exists to handle the error as appropriate. Again, this example shows just one line of code, but the Catch block may contain many lines of code if needed.
We may also want some code to run regardless of whether there was an error or not. In many cases we need to perform cleanup or take other actions in any case. This is where the Finally block comes into play:
Finally
System.Diagnostics.Debug.WriteLine (intResult) End Try
39
Visual Basic .Net I-TECH Computer Education
The Finally block is optional – we don’t need to have one if it doesn’t make sense in a given scenario. However, any lines of code that are contained in an Finally block are run after the code in the Try block if there is no error, or after the code in the Catch block if there is an error.
Return statement
VB.NET enhances how we return result values from Function procedures. Long ago, we had to create our functions along this line:
Public Function GetCustomer (ID As Long) As Customer
Dim objCust As Customer
Set objCust = New Customer objCust.Load ID
Set GetCustomer = objCust End Function
More recently, we were able to use this syntax:
Public Function GetCustomer (ID As Long) As Customer
Set GetCustomer = New Customer GetCustomer.Load ID
End Function
Now, in VB.NET, we can use the Return keyword to return our value:
Public Function GetCustomer (ID As Integer) As Customer Dim objCust As New Customer (ID)
Return objCust
End Function
The Return keyword sets the result value of the Function to the value provided as a parameter.
Delegates
There are times when it would be nice to be able to pass a procedure as a parameter to a method, a concept known as function pointers or callbacks. The classic case is when building a generic sort routine, where we not only need to provide the data to be sorted, but we need to provide a comparison routine appropriate for the specific data.
The concept of a delegate formalities the process of declaring a routine to be called and calling that routine. In our code we can declare what a delegate procedure must look like from an interface standpoint. This is done in a class by using the Delegate keyword:
Delegate Function IsGreater (v1 As Integer, v2 As Integer) _
As Boolean
40
Visual Basic .Net I-TECH Computer Education
Once a delegate has been declared, we can make use of it within our code:
Public Sub DoSort (ByRef theData () As Integer, GreaterThan As IsGreater)
Dim outer As Integer Dim inner As Integer Dim temp As Integer
For outer = 0 To UBound (theData)
For inner = outer + 1 To UBound (theData) If GreaterThan.Invoke (theData (outer), theData (inner)) Then
temp = theData (outer) theData (outer) = theData (inner) theData (inner) = temp
End If Next
Next End Sub
Note the use of the Invoke method, which is the way a delegate is called from our code. All that remains is to actually create the implementation of the delegate routine and all our sort method. Typically this would be done in a separate code module or class.
The only requirement of the method providing the delegate implementation is that its parameter list must exactly match those in our Delegate statement above:
Public Function MyIsGreater (v1 As Integer, v2 As Integer) As Boolean
If v1 > v2 Then Return True
Else Return False
End If End Function
We can then use this implementation when calling the sort routine with code such as:
Dim myData () As Integer = {3, 5, 2, 1, 6}
DoSort (myData, AddressOf MyIsGreater)
Exercise
1. Explain the hello world program.
2. Explain the new IDE features in VB .Net.
3. Explain some of the Language & Syntax Changes in VB.
4. Explain to the changes to arrays in VB .Net.
5. Explain the operators in VB .Net.
41
Visual Basic .Net I-TECH Computer Education
6. Explain Error Handling in VB .Net.
7. Explain Delegates in VB .Net.
Fill in the blanks:
1. code is generated automatically by the Visual Studio Environment.
2. _keyword in ReDim will keep all the values in the array intact.
3. Error handling in VB .Net is done using the block.
4. are just like function pointers.
5. Using the _statement the size of the array can be dynamically allocate in VB .Net.
6. The function will always return one less than the size of the array.
7. function return true or false depending whether the variable is an array or not.
42
Visual Basic .Net I-TECH Computer Education
Chapter - 4 NEW WINDOWS UI CAPABILITIES OF VB.NET
What Are Windows Forms ?
Windows Forms is a more advanced way to do standard Win32 screens. The technology behind Windows Forms was originally created for the Windows Foundation Classes (WFC), which were
developed for Visual J++ (Microsoft’s implementation of Java). All languages in the .NET Framework will use Windows Forms instead of whatever they are using now for graphical forms. For Visual Basic .NET that means that Windows Forms replaces the VB forms engine, and in fact the basic architecture of Windows Forms is very similar to the VB forms used in existing versions of Visual Basic. The expertise of Visual Basic developers in doing forms with Windows Forms translates over to any language based on the .NET Framework. Windows Forms provides a rich, unified set of controls and drawing functions for all languages, as well as a standard API for underlying Windows services for graphics and drawing. With Windows Forms, it is mostly unnecessary to use the native Windows graphical API for any graphical or screen functions.
Windows Forms is actually part of the .NET Framework base classes. The namespace used by Window Forms is System.WinForms.
Basics of Windows Forms
Chapter 3 covered a ‚Hello world‛ program that was created in Windows Forms. Here’s summary of the main points made in that example:
A Windows Form program is actually a class. There is no separat e ‚form module‛ syntax in
VB.NET. Since a form is actually a class, it cannot be implicitly loaded. That is, simply referring to a
form to get it to load is not valid syntax. It is necessary to instantiate the form and then show it, the way classes are done in VB6.
The class inherits the capability to be a Windows Form by inheriting from the
System.WinForms.Form class. As with all classes in the .NET Framework, Windows Forms have constructors and destructors.
The constructor, named Sub New, is a rough equivalent of Form Load in previous VB versions. The destructor, named Sub Dispose, is roughly equivalent to Form Unload.
The visual forms designer inserts a lot of code in the class to instantiate and manage the form and the controls it contains. This designer code takes the place of the beginning section of a VB6 .frm file (which contains definitions and settings for controls in VB6 and earlier).
Events are handled somewhat differently, and are more flexible than in VB6 forms. Events contain more information in their argument, for example, and using advanced techniques a single event routine can be applied to multiple controls.
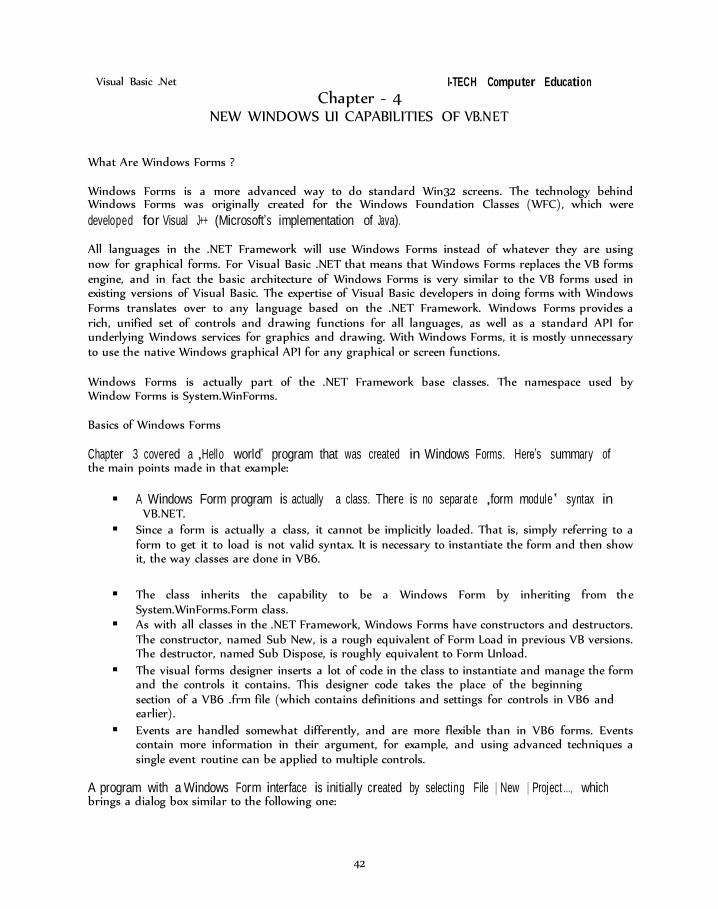
A program with a Windows Form interface is initially created by selecting File | New | Project …, which brings a dialog box similar to the following one:
43
Visual Basic .Net I-TECH Computer Education
The Windows Application template should be selected for a Windows Forms project, and an appropriate name should be entered. Then, upon pressing the OK button, a project is created with a blank form named Form1, just as in VB6.
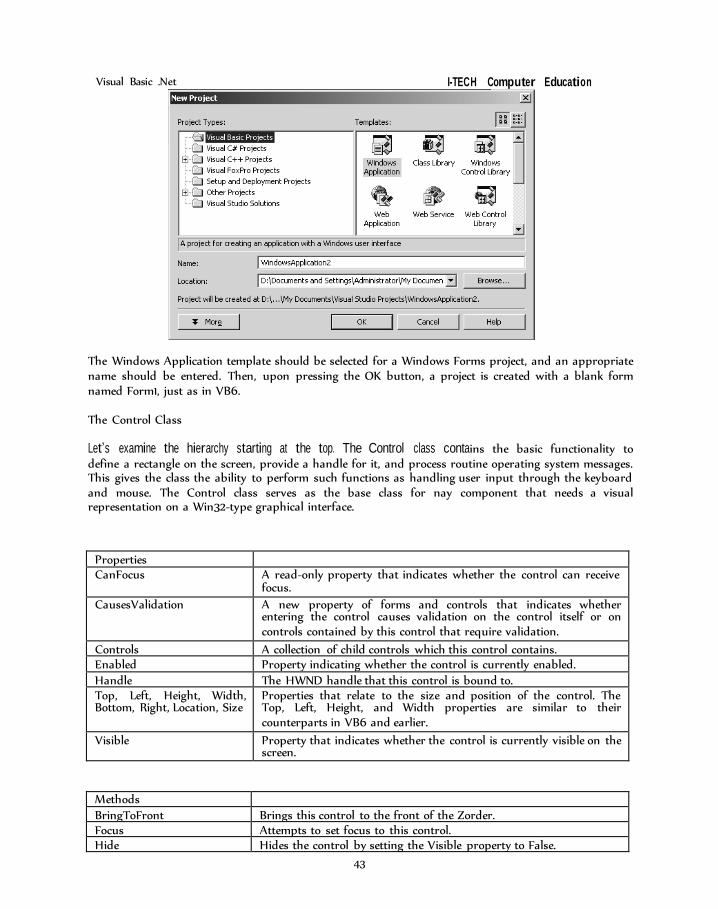
The Control Class
Let’s examine the hierarchy starting at the top. The Control class contains the basic functionality to define a rectangle on the screen, provide a handle for it, and process routine operating system messages. This gives the class the ability to perform such functions as handling user input through the keyboard and mouse. The Control class serves as the base class for nay component that needs a visual representation on a Win32-type graphical interface.
Properties CanFocus A read-only property that indicates whether the control can receive
focus.
CausesValidation A new property of forms and controls that indicates whether entering the control causes validation on the control itself or on controls contained by this control that require validation.
Controls A collection of child controls which this control contains. Enabled Property indicating whether the control is currently enabled. Handle The HWND handle that this control is bound to. Top, Left, Height, Width, Bottom, Right, Location, Size
Properties that relate to the size and position of the control. The Top, Left, Height, and Width properties are similar to their counterparts in VB6 and earlier.
Visible Property that indicates whether the control is currently visible on the screen.
Methods BringToFront Brings this control to the front of the Zorder. Focus Attempts to set focus to this control. Hide Hides the control by setting the Visible property to False.

44
Visual Basic .Net I-TECH Computer Education
Refresh Forces the control to repaint itself, and to force a repaint on any of its child controls.
Show Makes the control display by setting the Visible property to True. Update Forces the control to paint any currently invalid areas. WndProc A very important method that allows access to Windows messages.
Since this is implemented in the Control class, all Windows Forms classes can have easy access to Windows messages.
Events Click, DoubleClick, GotFocus, KeyDown, KeyPress, KeyUp, MouseDown, MouseEnter, MouseMove, MouseUp, Resize
Same as corresponding events in Visual Basic 6 and earlier.
Leave Occurs when the control is left (focus is lost). MouseHover New mouse event to determine when the mouse cursor has hovered
over the control.
PropertyChanged Occurs when a property of the control has changed
RichControl class The RichControl class inherits from the Control class.
Property AllowDrop If set to True then this control will allow drag and drop

45
Visual Basic .Net I-TECH Computer Education
operations and events to be used. Anchor Determines which edges of the control are anchored to the
container’s edges. Covered in detail below in the section on positioning and layout of forms and controls.
Dock Controls to which edge of the container this control is docked to. Covered in more detail below in the section on positioning and layout of forms and controls.
BackColor, Font, ForeColor Visual properties which are the same as corresponding properties in VB6 and earlier.
Methods
DoDragDrop Begins a drag operation.
Events DragDrop, DragEnter, DragLeave, DragOver
Events relating to drag and drop operations.
Paint Occurs when the control is forced to repaint itself to the screen.
ScrollableControl Class As the name suggests, the ScrollableControl class adds support for scrolling the client area
of the control’s window. It is typically not used directly. Almost all the members implemented by this class relate to scrolling. They include AutoScroll, which turns scrolling on or off, and controlling properties such as AutoScrollPostion, which gets or sets the position within the scrollable area.
ContainerControl Class
The ContainerControl class derives from ScrollableControl, and adds the ability to support and manage child controls.
Properties
ActiveControl An object reference pointing to the currently active child control, that is, the child control that has the focus.
ParentForm Indicates the form that a container control is assigned to. This allows, for example, controls on a form to indicate what form their container is (which could be the form, or a control on the form which can serve as a container).
Methods ActivateControl Activates a child control. A parameter indicates the control
to activate.
Validate Validates the last unvalidated control (the most recently changed control that has not had its validation event fired)
46
Visual Basic .Net I-TECH Computer Education
and its ancestors up through, but not including, the current control.
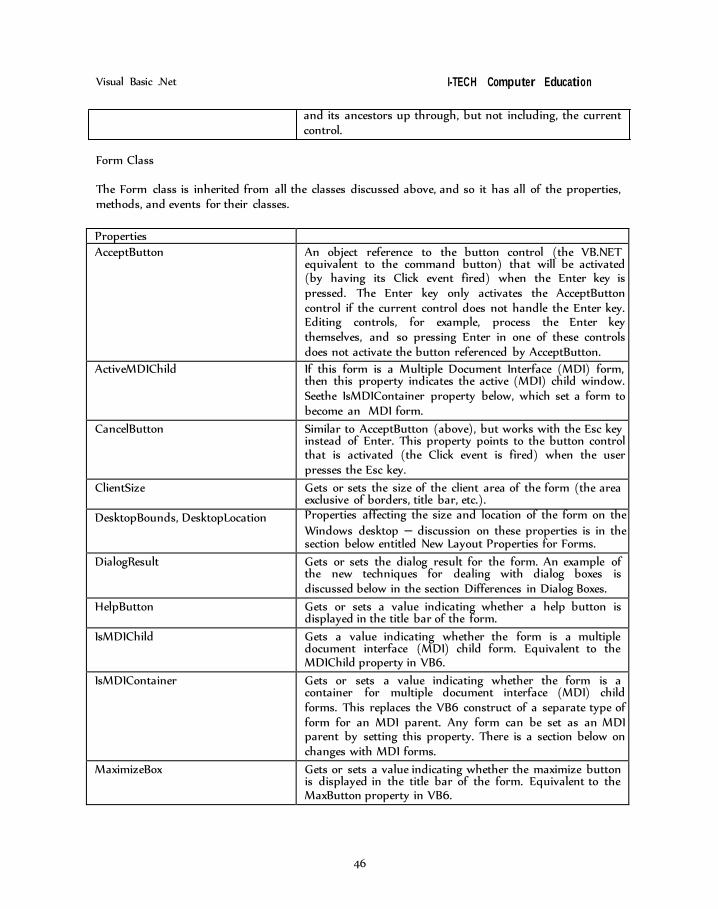
Form Class
The Form class is inherited from all the classes discussed above, and so it has all of the properties, methods, and events for their classes.
Properties AcceptButton An object reference to the button control (the VB.NET
equivalent to the command button) that will be activated (by having its Click event fired) when the Enter key is pressed. The Enter key only activates the AcceptButton control if the current control does not handle the Enter key. Editing controls, for example, process the Enter key themselves, and so pressing Enter in one of these controls does not activate the button referenced by AcceptButton.
ActiveMDIChild If this form is a Multiple Document Interface (MDI) form, then this property indicates the active (MDI) child window. Seethe IsMDIContainer property below, which set a form to become an MDI form.
CancelButton Similar to AcceptButton (above), but works with the Esc key instead of Enter. This property points to the button control that is activated (the Click event is fired) when the user presses the Esc key.
ClientSize Gets or sets the size of the client area of the form (the area exclusive of borders, title bar, etc.).
DesktopBounds, DesktopLocation Properties affecting the size and location of the form on the Windows desktop – discussion on these properties is in the section below entitled New Layout Properties for Forms.
DialogResult Gets or sets the dialog result for the form. An example of the new techniques for dealing with dialog boxes is discussed below in the section Differences in Dialog Boxes.
HelpButton Gets or sets a value indicating whether a help button is displayed in the title bar of the form.
IsMDIChild Gets a value indicating whether the form is a multiple document interface (MDI) child form. Equivalent to the MDIChild property in VB6.
IsMDIContainer Gets or sets a value indicating whether the form is a container for multiple document interface (MDI) child forms. This replaces the VB6 construct of a separate type of form for an MDI parent. Any form can be set as an MDI parent by setting this property. There is a section below on changes with MDI forms.
MaximizeBox Gets or sets a value indicating whether the maximize button is displayed in the title bar of the form. Equivalent to the MaxButton property in VB6.
47
Visual Basic .Net I-TECH Computer Education
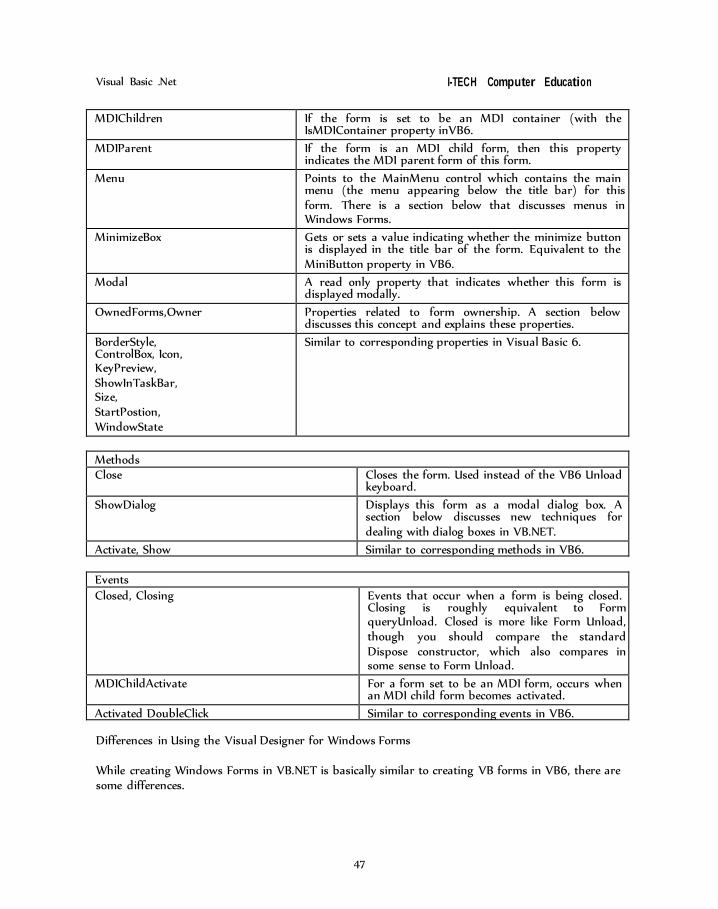
MDIChildren If the form is set to be an MDI container (with the
IsMDIContainer property inVB6.
MDIParent If the form is an MDI child form, then this property indicates the MDI parent form of this form.
Menu Points to the MainMenu control which contains the main menu (the menu appearing below the title bar) for this form. There is a section below that discusses menus in Windows Forms.
MinimizeBox Gets or sets a value indicating whether the minimize button is displayed in the title bar of the form. Equivalent to the MiniButton property in VB6.
Modal A read only property that indicates whether this form is displayed modally.
OwnedForms,Owner Properties related to form ownership. A section below discusses this concept and explains these properties.
BorderStyle, ControlBox, Icon, KeyPreview, ShowInTaskBar, Size, StartPostion, WindowState
Similar to corresponding properties in Visual Basic 6.
Methods Close Closes the form. Used instead of the VB6 Unload
keyboard.
ShowDialog Displays this form as a modal dialog box. A section below discusses new techniques for dealing with dialog boxes in VB.NET.
Activate, Show Similar to corresponding methods in VB6.
Events Closed, Closing Events that occur when a form is being closed.
Closing is roughly equivalent to Form queryUnload. Closed is more like Form Unload, though you should compare the standard Dispose constructor, which also compares in some sense to Form Unload.
MDIChildActivate For a form set to be an MDI form, occurs when an MDI child form becomes activated.
Activated DoubleClick Similar to corresponding events in VB6.
Differences in Using the Visual Designer for Windows Forms
While creating Windows Forms in VB.NET is basically similar to creating VB forms in VB6, there are some differences.
48
Visual Basic .Net I-TECH Computer Education
Invisible Controls Go in their Own Pane
In VB6, even controls that had no visible manifestation at run time were still located on the form surface at design time. The most common control used this way in VB6 was the timer control.
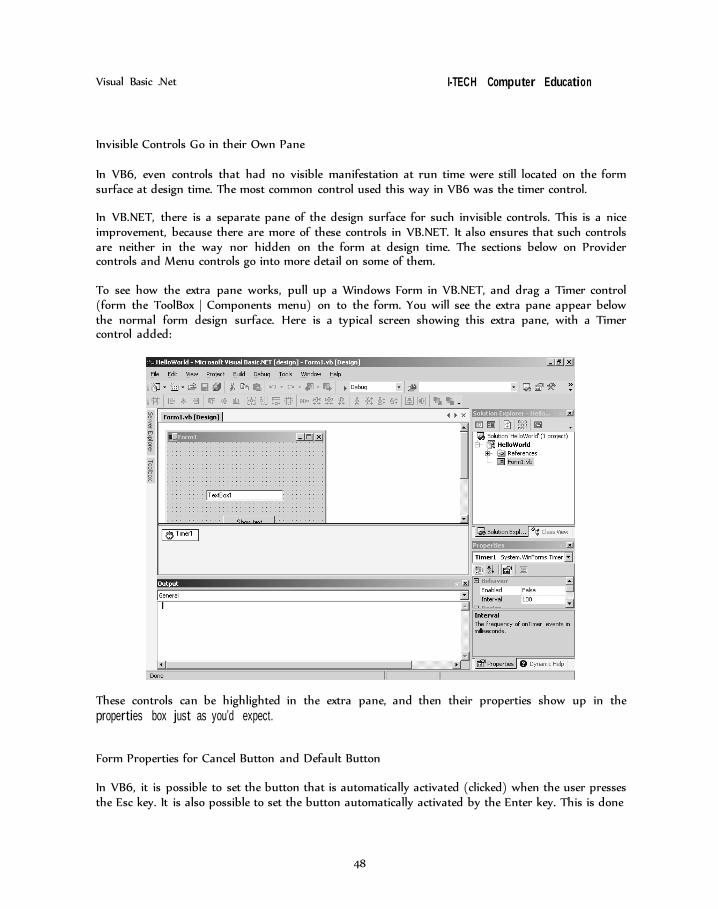
In VB.NET, there is a separate pane of the design surface for such invisible controls. This is a nice improvement, because there are more of these controls in VB.NET. It also ensures that such controls are neither in the way nor hidden on the form at design time. The sections below on Provider controls and Menu controls go into more detail on some of them.
To see how the extra pane works, pull up a Windows Form in VB.NET, and drag a Timer control (form the ToolBox | Components menu) on to the form. You will see the extra pane appear below the normal form design surface. Here is a typical screen showing this extra pane, with a Timer control added:
These controls can be highlighted in the extra pane, and then their properties show up in the properties box just as you’d expect.
Form Properties for Cancel Button and Default Button
In VB6, it is possible to set the button that is automatically activated (clicked) when the user presses the Esc key. It is also possible to set the button automatically activated by the Enter key. This is done
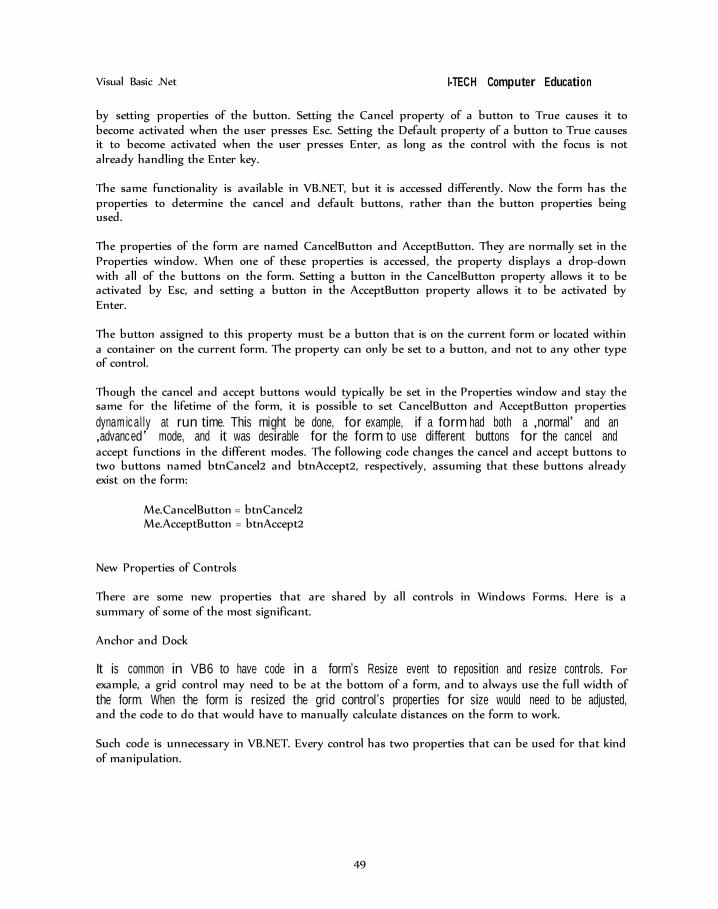
49
Visual Basic .Net I-TECH Computer Education
by setting properties of the button. Setting the Cancel property of a button to True causes it to become activated when the user presses Esc. Setting the Default property of a button to True causes it to become activated when the user presses Enter, as long as the control with the focus is not already handling the Enter key.
The same functionality is available in VB.NET, but it is accessed differently. Now the form has the properties to determine the cancel and default buttons, rather than the button properties being used.
The properties of the form are named CancelButton and AcceptButton. They are normally set in the Properties window. When one of these properties is accessed, the property displays a drop-down with all of the buttons on the form. Setting a button in the CancelButton property allows it to be activated by Esc, and setting a button in the AcceptButton property allows it to be activated by Enter.
The button assigned to this property must be a button that is on the current form or located within a container on the current form. The property can only be set to a button, and not to any other type of control.
Though the cancel and accept buttons would typically be set in the Properties window and stay the same for the lifetime of the form, it is possible to set CancelButton and AcceptButton properties
dynamic al ly at run time. This might be done, for example, if a form had both a ‚normal‛ and an ‚advanc ed‛ mode, and it was desirable for the form to use different buttons for the cancel and accept functions in the different modes. The following code changes the cancel and accept buttons to two buttons named btnCancel2 and btnAccept2, respectively, assuming that these buttons already exist on the form:
Me.CancelButton = btnCancel2 Me.AcceptButton = btnAccept2
New Properties of Controls
There are some new properties that are shared by all controls in Windows Forms. Here is a summary of some of the most significant.
Anchor and Dock
It is common in VB6 to have code in a form’s Resize event to reposition and resize controls. For example, a grid control may need to be at the bottom of a form, and to always use the full width of the form. When the form is resized the grid control’s properties for size would need to be adjusted, and the code to do that would have to manually calculate distances on the form to work.
Such code is unnecessary in VB.NET. Every control has two properties that can be used for that kind of manipulation.
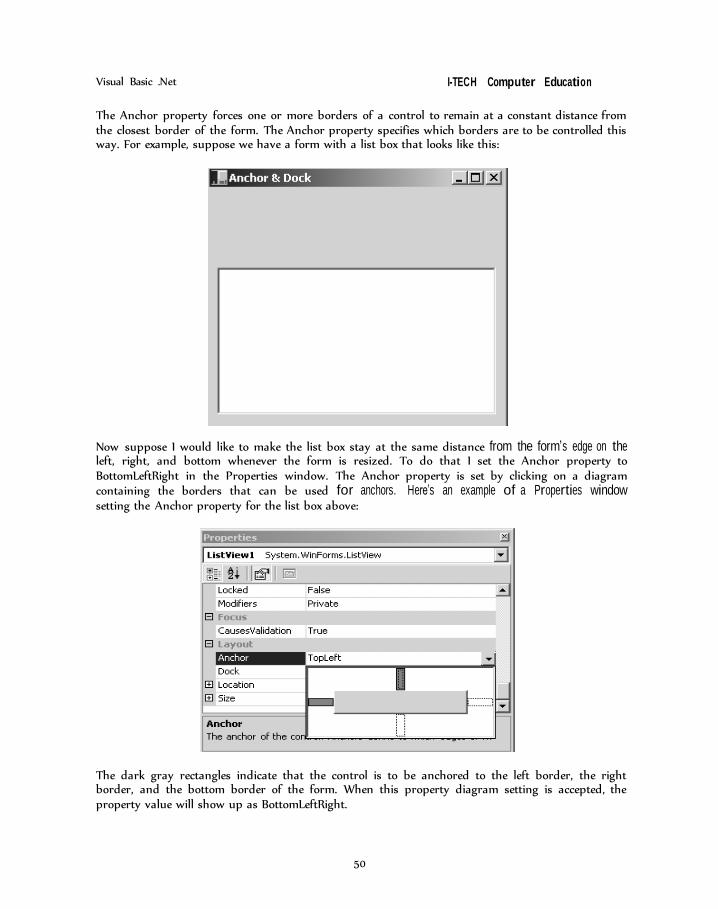
50
Visual Basic .Net I-TECH Computer Education
The Anchor property forces one or more borders of a control to remain at a constant distance from the closest border of the form. The Anchor property specifies which borders are to be controlled this way. For example, suppose we have a form with a list box that looks like this:
Now suppose I would like to make the list box stay at the same distance from the form’s edge on the left, right, and bottom whenever the form is resized. To do that I set the Anchor property to BottomLeftRight in the Properties window. The Anchor property is set by clicking on a diagram containing the borders that can be used for anchors. Here’s an example of a Properties window setting the Anchor property for the list box above:
The dark gray rectangles indicate that the control is to be anchored to the left border, the right border, and the bottom border of the form. When this property diagram setting is accepted, the property value will show up as BottomLeftRight.
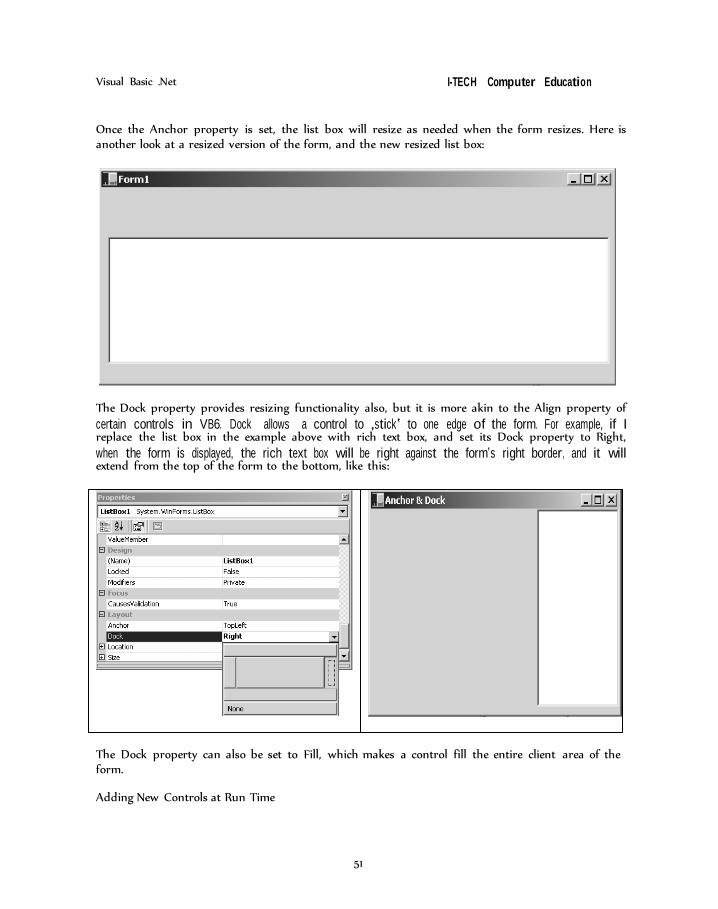
51
Visual Basic .Net I-TECH Computer Education
Once the Anchor property is set, the list box will resize as needed when the form resizes. Here is another look at a resized version of the form, and the new resized list box:
The Dock property provides resizing functionality also, but it is more akin to the Align property of
certain controls in VB6. Dock allows a control to ‚stick‛ to one edge of the form. For example, if I replace the list box in the example above with rich text box, and set its Dock property to Right,
when the form is displayed, the rich text box will be right against the form’s right border, and it will extend from the top of the form to the bottom, like this:
The Dock property can also be set to Fill, which makes a control fill the entire client area of the form.
Adding New Controls at Run Time
52
Visual Basic .Net I-TECH Computer Education
Visual Basic has had the capability to add controls to forms at run time, with the functionality increasing with various versions. Using the complete object-oriented capabilities of VB.NET, there is even more flexibility. However, the syntax for adding new controls is changing as a consequence of moving to the object-oriented paradigm for this capability.
The new syntax is simple. For example, if a button ’s Click event needed to cause a new list box control to be added, the Click event would contain code like this:
Private Sub Button_Click (ByVal sender As System.Object, _
ByVal e As System.EventArgs) Dim 1stNewListBox As New Listbox () 1stNewListBox.Size = New Size (150, 200) 1st NewListBox.Location = New Point (50, 50) 1st NewListBox.Items.Add (‚First listbox item‛) 1st NewListBox.Items.Add (‚Second listbox item‛)
End Sub
Me.Controls.Add (1stNewListBox)
As this code shows, a control is just a class that needs to be instantiated and have its properties set. In most cases, we need to set the control’s size and location. Also, since it’s a list box in this example, some items are added to it.
Controls which have VB6 Equivalents
Many of the controls in Windows Forms have almost exact equivalents in VB6 (either in the standard VB6 controls or the Window common controls). While some properties are changed in name, and additional properties are present, the following controls are similar enough to their VB6 equivalents that detailed discussion is unnecessary:
Button (called Command Button in VB6) CheckBox ComboBox
HScrollBar ImageList Label ListBox ListView PictureBox
ProgressBar RadioButton (called Option Button in VB6) RichTextBox StatusBar TextBox ToolBar
53
Visual Basic .Net I-TECH Computer Education
Tracker (called Slider in VB6)
TreeView VScrollBar
There are also some controls that offer equivalent functionality, but require slightly different usage in code. These include:
Common Dialog Boxes (File Open, File Save, Color, Font, Print)
Tab (combines VB6 SSTab and TabStrip) New Controls
VB6 has the ability to specify standard Windows menus that appear at the top of a form. It contains a menu editor specifically to design these menus.
VB6 also provides the ability to do pop-up menus (typically activated with a right mouse click). Such menus are designed with the same menu editor as the one used for standard Windows menus. A portion of such a menu can be popped up with the PopUpMenu method of a VB6 form.
To create a standard menu on a form, first drag a MainMenu control (from the WinForms group in the Toolbox) on to the form from the toolbox. The MainMenu control does not appear on the form surface, since it has no visible manifestation there. It appears in a separate pane below the design surface for the form.
When the MainMenu control is highlighted in the separate design pane, a visual menu designer appears close to the title bar of the form. Here is an example of a form with a MainMenu control dragged onto it, showing the visual menu designer:
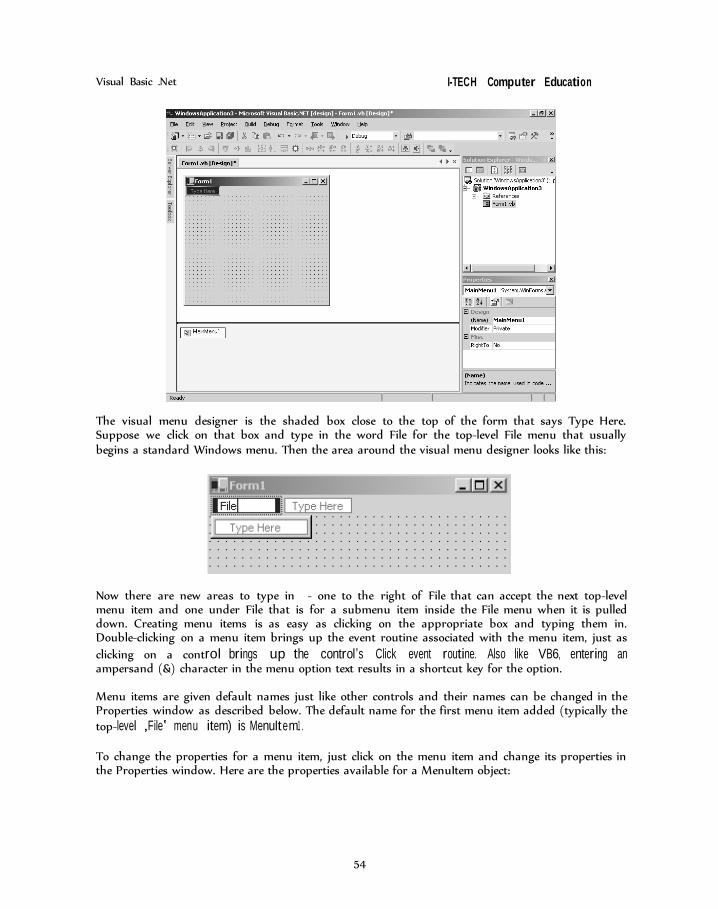
54
Visual Basic .Net I-TECH Computer Education
The visual menu designer is the shaded box close to the top of the form that says Type Here. Suppose we click on that box and type in the word File for the top-level File menu that usually begins a standard Windows menu. Then the area around the visual menu designer looks like this:
Now there are new areas to type in - one to the right of File that can accept the next top-level menu item and one under File that is for a submenu item inside the File menu when it is pulled down. Creating menu items is as easy as clicking on the appropriate box and typing them in. Double-clicking on a menu item brings up the event routine associated with the menu item, just as
clicking on a control brings up the control’s Click event routine. Also like VB6, entering an ampersand (&) character in the menu option text results in a shortcut key for the option.
Menu items are given default names just like other controls and their names can be changed in the Properties window as described below. The default name for the first menu item added (typically the top-level ‚File‛ menu item) is MenuItem1 .
To change the properties for a menu item, just click on the menu item and change its properties in the Properties window. Here are the properties available for a MenuItem object:
55
Visual Basic .Net I-TECH Computer Education
Property Usage Checked If True, the menu item has a checkmark beside it. If False, item is not
checked.
DefaultItem Indicates whether this item is the default item for the next higher menu in the hierarchy. If so, it becomes automatically selected if the user pressed Enter for that next higher level.
Enabled True if the menu item is currently available for selection, False if not. Items with the Enabled property set to False are grayed out on the menu.
MDIList Only applicable for MDI parent forms. Allows a menu to contain as submenu items a list of the currently loaded MDI child forms. There is an example later in chapter. True uses this property.
MergeOrder When this menu is merged with another menu, the MergeOrder determines the order in which the merged items are displayed.
MergeType When this menu is merged with another menu, the MergeType property determines how this item is treated in the merged menu. This property can be used to add the item to a merged menu, have it replace an equivalent item from the merged menu, or to be left off a merged menu.
RadioCheck If True, instead of using a checkmark to indicate that an item is checked, a radio button is used beside the item instead.
Shortcut Allows any of the non-ASCII keys on the keyboard (such as function keys, Insert, Delete, etc.) to directly access this menu item.
ShowShotcut If true and the Shortcut property is set to a key, then the shortcut key is shown in the menu.
Text The text in the menu item. Visible Determines whether the menu item can be seen.
Any of these properties can be manipulated at run time to dynamically affect the behavior of the menu.
Menu items can be added dynamically with code like this:
Dim mnuNewMenuItem As New MenuItem (0 mnuNewM enuItem.Text = ‚New menu item‛ MenuItem1.MenuItems.Add (mnuNewMenuItem)
This created a new item and placed it under the menu item identified as MenuItem11. For the example above his would menu that the menu item would appear under File.
LinkLabel Control
A LinkLabel is a new control that looks like a hyperlink in a web page. It displays text in hyperlink format, and provides a way to link to another window in the application, or to a web site. It is similar to a label control with different screen cosmetics. The linking action is actually accomplished in code in the control’s Click event. The LinkLabel control can also display an image instead of text.
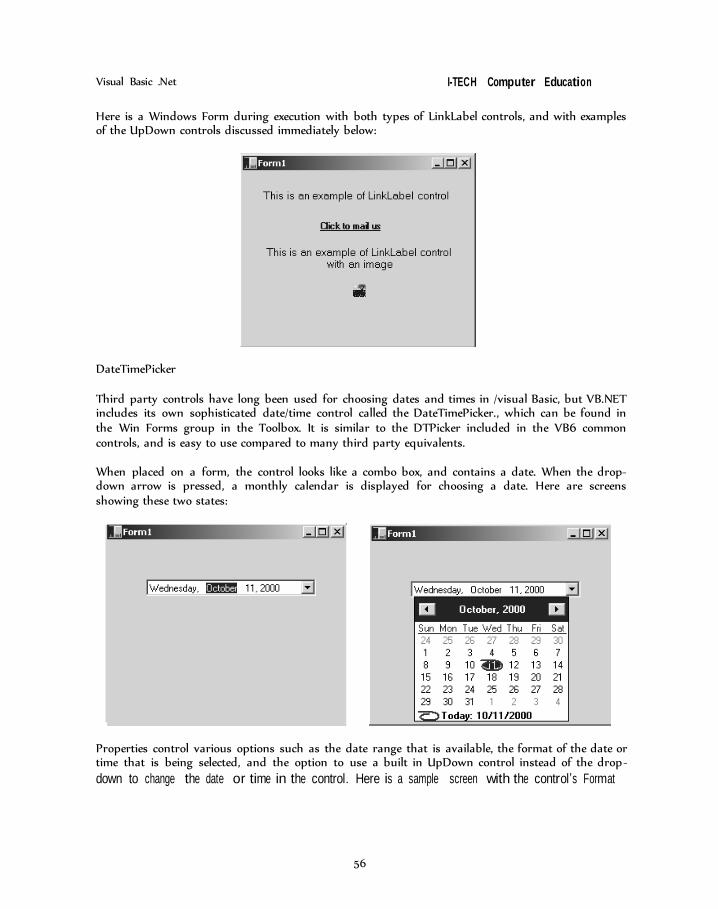
56
Visual Basic .Net I-TECH Computer Education
Here is a Windows Form during execution with both types of LinkLabel controls, and with examples of the UpDown controls discussed immediately below:
DateTimePicker
Third party controls have long been used for choosing dates and times in /visual Basic, but VB.NET includes its own sophisticated date/time control called the DateTimePicker., which can be found in the Win Forms group in the Toolbox. It is similar to the DTPicker included in the VB6 common controls, and is easy to use compared to many third party equivalents.
When placed on a form, the control looks like a combo box, and contains a date. When the drop- down arrow is pressed, a monthly calendar is displayed for choosing a date. Here are screens showing these two states:
Properties control various options such as the date range that is available, the format of the date or time that is being selected, and the option to use a built in UpDown control instead of the drop-
down to change the date or time in the control. Here is a sample screen with the control’s Format
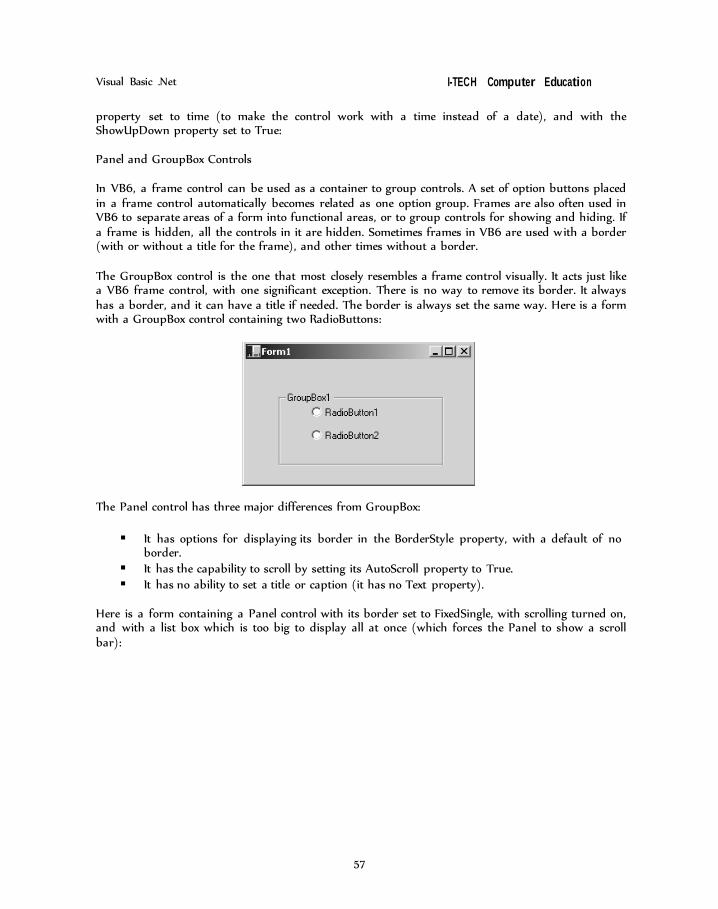
57
Visual Basic .Net I-TECH Computer Education
property set to time (to make the control work with a time instead of a date), and with the ShowUpDown property set to True:
Panel and GroupBox Controls
In VB6, a frame control can be used as a container to group controls. A set of option buttons placed in a frame control automatically becomes related as one option group. Frames are also often used in VB6 to separate areas of a form into functional areas, or to group controls for showing and hiding. If a frame is hidden, all the controls in it are hidden. Sometimes frames in VB6 are used with a border (with or without a title for the frame), and other times without a border.
The GroupBox control is the one that most closely resembles a frame control visually. It acts just like a VB6 frame control, with one significant exception. There is no way to remove its border. It always has a border, and it can have a title if needed. The border is always set the same way. Here is a form with a GroupBox control containing two RadioButtons:
The Panel control has three major differences from GroupBox:
It has options for displaying its border in the BorderStyle property, with a default of no
border. It has the capability to scroll by setting its AutoScroll property to True. It has no ability to set a title or caption (it has no Text property).
Here is a form containing a Panel control with its border set to FixedSingle, with scrolling turned on, and with a list box which is too big to display all at once (which forces the Panel to show a scroll bar):
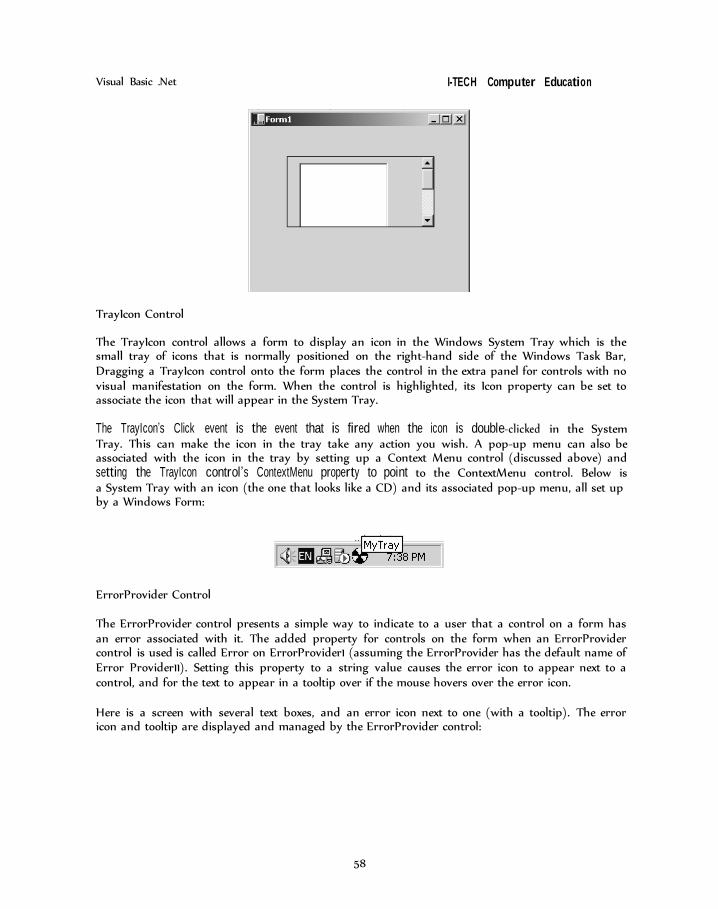
58
Visual Basic .Net I-TECH Computer Education
TrayIcon Control
The TrayIcon control allows a form to display an icon in the Windows System Tray which is the small tray of icons that is normally positioned on the right-hand side of the Windows Task Bar, Dragging a TrayIcon control onto the form places the control in the extra panel for controls with no visual manifestation on the form. When the control is highlighted, its Icon property can be set to associate the icon that will appear in the System Tray.
The TrayIcon’s Click event is the event that is fired when the icon is double-clicked in the System Tray. This can make the icon in the tray take any action you wish. A pop-up menu can also be associated with the icon in the tray by setting up a Context Menu control (discussed above) and setting the TrayIcon control’s ContextMenu property to point to the ContextMenu control. Below is a System Tray with an icon (the one that looks like a CD) and its associated pop-up menu, all set up by a Windows Form:
ErrorProvider Control
The ErrorProvider control presents a simple way to indicate to a user that a control on a form has an error associated with it. The added property for controls on the form when an ErrorProvider control is used is called Error on ErrorProvider1 (assuming the ErrorProvider has the default name of Error Provider11). Setting this property to a string value causes the error icon to appear next to a control, and for the text to appear in a tooltip over if the mouse hovers over the error icon.
Here is a screen with several text boxes, and an error icon next to one (with a tooltip). The error icon and tooltip are displayed and managed by the ErrorProvider control:
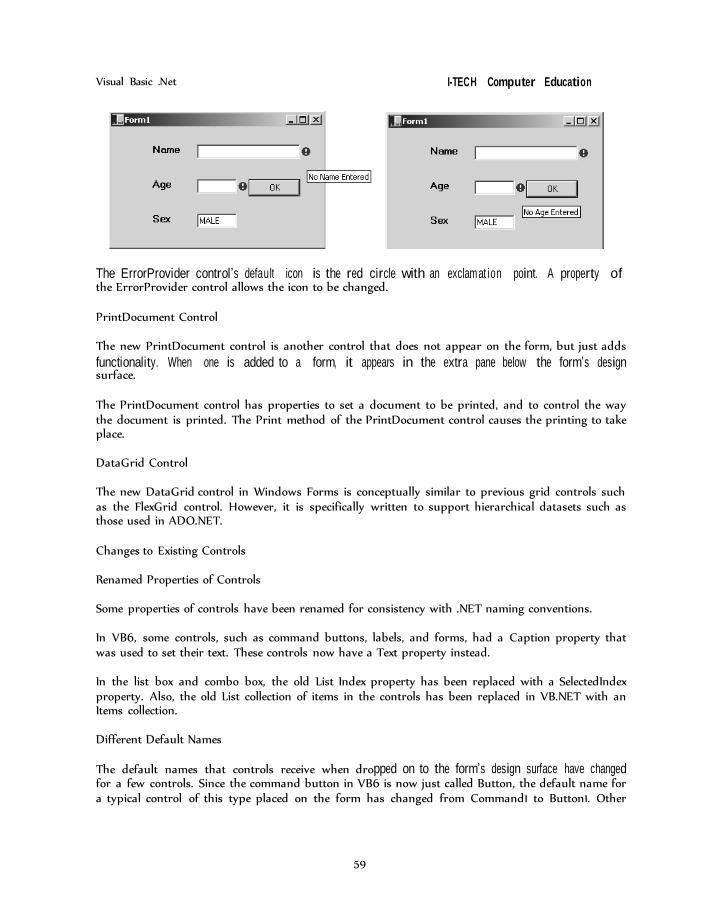
59
Visual Basic .Net I-TECH Computer Education
The ErrorProvider control’s default icon is the red circle with an exclamat ion point. A property of the ErrorProvider control allows the icon to be changed.
PrintDocument Control
The new PrintDocument control is another control that does not appear on the form, but just adds
functionality. When one is added to a form, it appears in the extra pane below the form’s design surface.
The PrintDocument control has properties to set a document to be printed, and to control the way the document is printed. The Print method of the PrintDocument control causes the printing to take place.
DataGrid Control
The new DataGrid control in Windows Forms is conceptually similar to previous grid controls such as the FlexGrid control. However, it is specifically written to support hierarchical datasets such as those used in ADO.NET.
Changes to Existing Controls
Renamed Properties of Controls
Some properties of controls have been renamed for consistency with .NET naming conventions.
In VB6, some controls, such as command buttons, labels, and forms, had a Caption property that was used to set their text. These controls now have a Text property instead.
In the list box and combo box, the old List Index property has been replaced with a SelectedIndex property. Also, the old List collection of items in the controls has been replaced in VB.NET with an Items collection.
Different Default Names
The default names that controls receive when dropped on to the form’s design surface have changed for a few controls. Since the command button in VB6 is now just called Button, the default name for a typical control of this type placed on the form has changed from Command1 to Button1. Other
60
Visual Basic .Net I-TECH Computer Education
renamed controls, such as option button (now RadioButton), and Slider (now Trackbar) similarly have default names changed.
Name Property Not Accessible at Run Time
In VB.NET, the Name property of controls and forms is no longer available at run time. This means, for example, that it is no longer possible to loop through a collection of forms or controls looking for one with a particular name.
Image Control Gone
The Image control has traditionally been used in VB6 and earliest as a lightweight alternative to the PictureBox. Saving system resources is not the priority it once was, so the Image control is being retired. All of its functions can be fulfilled by the PictureBox control in Windows Forms.
No Control Arrays
In VB6, controls can be associated into control arrays, in which all the controls have the same name, but they vary by index. Control arrays are not available in VB.NET. However, controls can be placed into arrays and various types of collections using code, providing a work-around.
Differences in Multiple Document Interface (MDI) Forms
Creating an MDI Parent Form
InVB6, an MDI parent form is created with an option on the Project menu called Add MDI Form. MDI forms are considered completely different from forms with a regular layout.
In VB.NET, a regular form is converted to an MDI parent form by setting the IsMDIContainer property of the form to True. This should normally be done in the Properties window. While a form can be made into an MDI parent at run time by setting the IsMDIContainer property to True in code, the design of an MDI form is usually too different from that of a normal form.
Different in MDI Parent Forms
In VB6, an MDI parent form automatically has a top-level menu, just like all forms do. It is only necessary to go into the menu editor and add options to the menu.
In VB.NET, a form never has a top level menu automatically, as discussed in the section on menu controls (above). A MainMenu control must explicitly be dragged on to an MDI parent form (as with any form in VB.NET) to give it a top-level menu.
In VB.NET, an MDI parent can contain any control that a regular form can contain. Buttons, labels, and such can be placed directly on the MDI surface. Such controls will appear in front of any MDI child forms that are displayed in the MDI client area.
Differences in MDI Child Forms
61
Visual Basic .Net I-TECH Computer Education
InVB6, an MDI child form is created by setting a form’s MDI Child property to True. Such a form can then only be used as an MDI child form, meaning it can only be loaded when an MDI parent is available for the form to use for display. Also, the MDIChild Property can only be set at design time. A form cannot be made into an MDI child at run time.
In VB.NET a form becomes an MDI child at run time by setting the form’s MDIParent property to point to an MDI parent form. This makes it possible to use a form as either a stand-alone form or an MDI child in different circumstances. In fact, the MDIParent property cannot be set at design time – it must be set at run time to make a form an MDI child.
As with VB6, it is possible to have any number of MDI child forms displayed in the MDI parent client area. And, as with VB6, the currently active child form can be determined with the ActiveForm property of the MDI parent form.
62
Visual Basic .Net I-TECH Computer Education
Exercise
1. Explain WinForms.
2. Explain Anchor & Dock properties.
3. Explain some of the new controls in VB .Net.
4. Explain the way of making MDI form in VB .Net. Fill in the blanks:
1. Forms are derived from class.
2. property is used instead of writing the whole resize event code.
3. The control presents a simple way to indicate to a user that a control on a form has an error associated with it.
4. A is a new control that looks like a hyperlink in a web page.
5. The control allows a form to display an icon in the Windows System Tray.
63
Visual Basic .Net I-TECH Computer Education
Chapter - 5
NEW OBJECT-ORIENTED CAPABILITIES OF VB.NET When Visual Basic 4.0 was released, it introduced a whole new era of programming for VB. Object- oriented (OO) programming was finally a possibility. Unfortunately, few OO features were included in the VB language at that point. Most notably lacking were inheritance capabilities, one of the key defining criteria for any OO language. VB was also missing a large number of secondary features such as method overloading and overriding, and constructors.
With VB.NET, the VB language finally completes the transition to a fully OO language.
Generally speaking, a language is considered to be OO if it supports four main features:
Abstraction. VB has supported abstraction since VB4. Abstraction is merely the ability of a
language to create ‚black box‛ code – to take a concept and create an abstract representation of that concept within a program. A Customer object, for instance, is an abstract representation of a real-world customer. A Recordset object is an abstract representation of a set of data.
Encapsulation. This has also been with us since version 4.0. It’s the concept of a separation between interface and implementation. The idea is that we can create an interface (public methods in a case) and, as long as that interface remains consistent, the application can interact with our objects. This remains true even it we entirely rewrite the code within a given method – thus the interface is independent of the implementation. Encapsulation allows us to hide the internal implementation details of a class. For example, the algorithm we use to compute Pi might be proprietary. We can expose a simple API to the end user, but we hide all of the logic used for our algorithm by encapsulating it within our class.
Polymorphism. Likewise, polymorphism was introduced with VB4. Polymorphism is reflected in the ability to write one routine that can operate an objects from more than one class – treating different objects from different classes in exactly the same way. For instance, if both Customer and Vendor objects have a Name property, and we can write a routine that calls the Name property regardless of whether we’re using a Customer or Vendor object, then we have polymorphism.
VB, in fact, supports polymorphism in two ways – through late binding (much like Smalltalk, a classic example of a true OO language) and through the implementation of multiple interfaces. This flexibility is very powerful and is preserved within VB.NET.
Inheritance. VB.NET is the first version of VB that supports inheritance. Inheritance is the idea that a class can gain the pre-exiting interface and behaviors of an existing class. This is done by inheriting these behaviors from the existing class through a process known as subclassing. With the introduction of full inheritance, VB is now a fully OO language by any reasonable definition
VB.NET OO Implementation
VB.NET not only provides us with new OO features, but it also changes the way we implement some of the features we are used to from VB6.
Creating Classes

64
Visual Basic .Net I-TECH Computer Education
When building classes in previous versions of VB, each class got its own file. While simple, this solution could cause a larger OO project to have many files. VB.NET allows us to put more than one class in a single source file. While we don’t have to take this approach, it can be nice since we can reduce the overall number of files in a project – possibly making it more maintainable.
Adding a class in VB.NET is similar to adding a class in VB6. In order to do this we need to create a new Windows Application project and choose the Project | Add Class menu option to bring up the Add New Item dialog:
We can name the class TheClass in this dialog and, when we click Open, a new file will be added to our project, containing very simple code:
Public Class TheClass
End Class
Though a .vb file can contain multiple classes, modules and other code, the normal behavior from the IDE is the same as we’ve had in VB since its inception – one class, module, or form per file. We can manually add other code to the files created by the IDE with no problem, but when we ask the IDE to create a class for us it will always do so by adding a new file to the project.
Class Keyword
As shown in this example, we now have a Class keyword along with the corresponding End Class. This new keyword is needed in order for a single source file to contain more than one class. Any time we want to create a class in VB.NET, we simply put all the code for the class within the Class…End Class block. For instance:
Public Class TheClass
Public Sub DoSomething ()
65
Visual Basic .Net I-TECH Computer Education
MsgBox (‚Hello world‛, MsgBoxStyle.Information, ‚TheClass‛)
End Sub End Class
Classes and Namespaces
Namespaces are central to the .NET environment, as they provide a mechanism by which classes can be organized into logical groupings, making them easier to find and manage.
Namespaces in BV.NET are declared using a block structure. For example:
Namespace TheNamespace
Public Class TheClass
End Class End Namespace
Any classes, structure, or other types declared within the Namespace…End Namespace block will be addressed using that namespace. In this example, our class is referenced using the namespace, so declaring a variable would be done as follows:
Private obj As TheNamespace.TheClass
Because namespace are created using a block structure, it is possible for a single source file to contain not only many classes, but also many namespaces.
Also, classes within the same namespace can be created in separate files. In other words, within a VB.NET project we can use the same namespace in more than one source file – and all the classes within those namespace blocks will be part of that same namespace.
Example:
Namespace TheNamespace
Public Class TheClass
End Class
End Namespace And we have a separate source file in the project with the following code:
Namespace TheNamespace
Public Class TheOtherClass
End Class
66
Visual Basic .Net I-TECH Computer Education
End Namespace
Then we’ll have a single namespac e – TheNamespace – with two classes-TheClass and TheOtherClass.
When we use the Namespace block structure, we are actually adding to that root namespace. So, in our example, if the project is named MyProject, then we could declare a variable as:
Private obj As MyProject.TheNamespace.TheClass
Creating Methods
Methods in VB.NET are created just like they are in VB6 – using the Sub or Function keywords. A method created with Sub does not return a value, while a Function must return a value as a result.
Sub DoSomething ()
End Sub
Function GetValue () As Integer
End Function
We retain the three scoping keywords we are used to, and have one more:
Private – callable only be code within our class
Friend – callable only by code within our project/component
Public – callable by code outside our class Protected – new to VB.NET; we’ll discuss this later when we cover inheritance. Protected Friend – callable only by code within our project/component and by code in our
subclasses; we’ll discus s this later when we cover inheritance. Creating Properties
In the past we’d create separat e routines for Property Get and Property Let. Now these are combined into a single structure:
Private mstrName As String
Public Property Name () As String
Get Return mstrName
End Get Set
mstrName = Value End Set
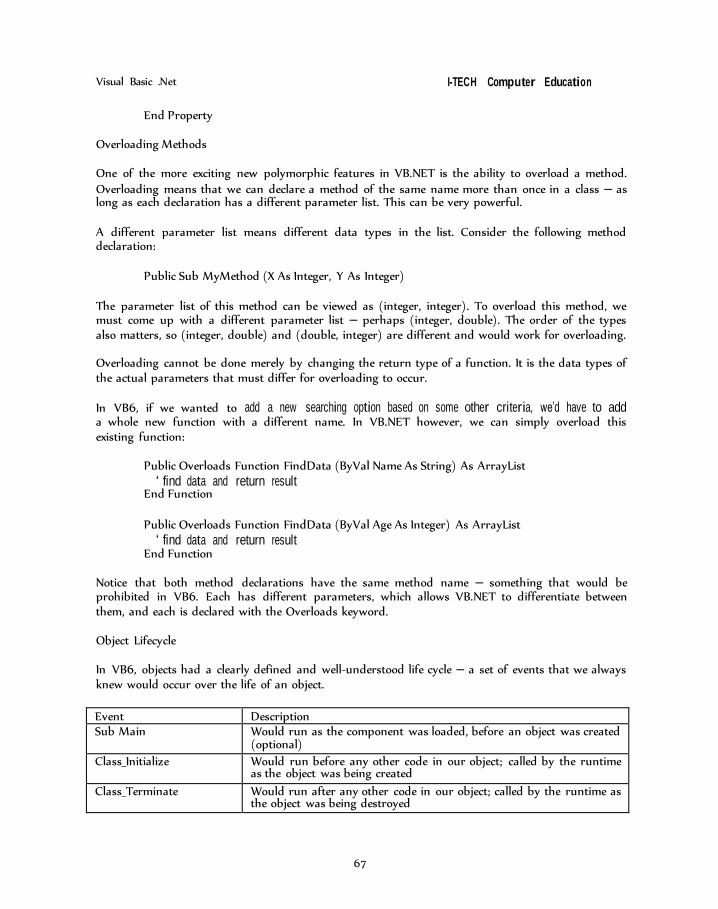
67
Visual Basic .Net I-TECH Computer Education
End Property
Overloading Methods
One of the more exciting new polymorphic features in VB.NET is the ability to overload a method. Overloading means that we can declare a method of the same name more than once in a class – as long as each declaration has a different parameter list. This can be very powerful.
A different parameter list means different data types in the list. Consider the following method declaration:
Public Sub MyMethod (X As Integer, Y As Integer)
The parameter list of this method can be viewed as (integer, integer). To overload this method, we must come up with a different parameter list – perhaps (integer, double). The order of the types also matters, so (integer, double) and (double, integer) are different and would work for overloading.
Overloading cannot be done merely by changing the return type of a function. It is the data types of the actual parameters that must differ for overloading to occur.
In VB6, if we wanted to add a new searching option based on some other criteria, we’d have to add a whole new function with a different name. In VB.NET however, we can simply overload this existing function:
Public Overloads Function FindData (ByVal Name As String) As ArrayList
‘ find data and return result End Function
Public Overloads Function FindData (ByVal Age As Integer) As ArrayList
‘ find data and return result End Function
Notice that both method declarations have the same method name – something that would be prohibited in VB6. Each has different parameters, which allows VB.NET to differentiate between them, and each is declared with the Overloads keyword.
Object Lifecycle
In VB6, objects had a clearly defined and well-understood life cycle – a set of events that we always knew would occur over the life of an object.
Event Description Sub Main Would run as the component was loaded, before an object was created
(optional)
Class_Initialize Would run before any other code in our object; called by the runtime as the object was being created
Class_Terminate Would run after any other code in our object; called by the runtime as the object was being destroyed
68
Visual Basic .Net I-TECH Computer Education
With VB.NET, objects also have a lifecycle, but things are not quite the same as in the past. In particular, we no longer have the same concept of a component-level Sub Main that runs as a DLL is loaded, and the concept of the Class_Terminate event changes rather substantially. However, the concept behind the Class_Intialize event is morphed into a full-blown constructor method that accepts parameters.
Thus, in VB.NET, we are only guaranteed the following:
Event Description New Would run before any other code in our object; called by the runtime as
the object was being created
Construction
Object construction is triggered any time we create a new instance of a class. This is done using the New keyword – a level of consistency that didn’t exist with VB6 where we got to choose between New and CreateObject.
Sub Main
Since VB6 was based on COM, creating an object could trigger a Sub Main procedure to be run. This would happen the first time an object was created from a given component – often a DLL. Before even attempting to create the object, the VB6 runtime would load the DLL and run the Sub Main procedure.
The .NET Common Language Runtime doesn’t treat components quite the same way, and so neither does VB.NET. This means that no Sub Main procedure is called as a component is loaded. In fact, Sub Main is only used once – when an application itself is first started. As further components are loaded by the application, only code within the classes we invoke is called.
This can be done easily by calling a central method from the constructor method in each class. For instance, we might create a centrally available method in a module such as:
Public Module CentralCode
Private blnHasRun As Boolean Public Sub Initialize ()
If Not blnHasRun Then blnHasRun =True ‘ Do initialization here
End If End Sub
End Module
New Method
Like the situation with Sub Main, Class_Initialize is called before any other code in a VB6 class. Again, it is called before the error handling mechanism is fully in place, making debugging very hard;
69
Visual Basic .Net I-TECH Computer Education
errors show up at the client as a generic failure to instantiate the object. Additionally, Class_Initialize accepts no parameter – meaning there is no way in VB6 to initialize an object with data as it is created.
VB.NET eliminates Class_Initialize in favor of full-blown constructor methods, which have full error handling capabilities and do accept parameters. This means we can initialize our objects as we create them – a very important and powerful feature. The constructor method in VB.NET is Sub New. The simplest constructor method for a class is one that accepts no parameters – quite comparable to Class_Initialize:
Public Class TheClass
Public Sub New ()
‘ initialize object here End Sub
End Class With this type of constructor, creating an instance of our class is done as follows:
Dim obj As New TheClass
However , more often than not we’d prefer to actually initialize our object with data as it is created. Perhaps we want to have the object load some data from a database, or perhaps we want to provide it with the data directly. Either way, we want to provide some data to the object as it is being created.
This is done by adding a parameter list to the New method:
Public Class TheClass Public Sub New (ByVal ID As Integer)
‘ use the ID value to initialize the object End Sub
End Class Now, when we go to create an instance of the class, we can provide data to the object:
Dim obj As New TheClass (42)
Termination In VB6 an object was destroyed when its last reference was removed. In other words, when no other code had any reference to an object, the object would be automatically destroyed – triggering a call to its Class_Terminate event. This approach was implemented through reference counting – keeping a count of how many clients had a reference to each object – and was a direct product of VB’s close relationship with COM.
While this behavior was nice – since we always knew an object would be destroyed immediately and we could count on Class_Terminate to know when – it had its problems. Most notably, it was quite
70
Visual Basic .Net I-TECH Computer Education
easy to create circular references between two objects, which could leave them running in memory forever. This was one of the few (but quite common) ways to create a memory leak in VB6.
Unlike COM, the .NET runtime does not use reference counting to determine when an object should be terminated. Instead it uses a scheme known as garbage collection to terminate objects. This means that in VB.NET we do not have deterministic finalization, so it is not possible to predict exactly when an object will be destroyed. Let’s discuss garbage collection and the termination of VB.NET objects in more detail.
Garbage Collection
In .NET, reference counting is not part of the infrastructure. Instead, objects are destroyed through a garbage collection mechanism. At certain times (based on specific rules), a task will run through all of our objects looking for those that no longer have any references. Those objects are then terminated; the garbage collected.
This means that we can’t tell exactly when an object will really be finally destroyed. Just because we
eliminate all references to an object doesn’t mean it will be terminated immediately. It will just hang out in memory until the garbage collection process gets around to locating and destroying it. This is an example of nondeterministic finalization.
The major benefit of garbage collection is that it eliminates the circular reference issues found with reference counting. If two objects have references to each other, and no other code has any references to either object, the garbage collector will discover and terminate them, whereas in COM these objects would have sat in memory forever.
There is also a potential performance benefit from garbage collection. Rather than expending the effort to destroy objects as they are dereferenced, with garbage collection this destruction process typically occurs when the application is otherwise idle – often decreasing the impact on the impact on the user. However, garbage collection may also occur with the application is active in the case that the system starts running low on resources.
We can manually trigger the garbage collection process through code:
System.GC.Collect ()
This process takes time however, so it is not the sort of thing that should be done each time we want to terminate an object.
Finalize Method
The garbage collection mechanism does provide some functionality comparable to the VB6 Class_Terminate event. As an object is being terminated, the garbage collection code will call its Finalize method – allowing us to take care of any final cleanup that might be required:
Protected Overrides Sub Finalize ()
‘ clean up code goes here End Sub
71
Visual Basic .Net I-TECH Computer Education
This code uses both the Protected scope and Overrides keyword – concepts we’ll discuss later as we cover inheritance. For now it is sufficient to know that this method will be called just prior to the object being terminated by the garbage collection mechanism – somewhat like Class_Terminate.
Implementing a Dispose Method
In some cases the Finalize behavior is not acceptable. If we have an object that is using some expensive or limited resource – such as a database connection, a file handle, or a system lock – we might need to ensure that the resource is freed as soon as the object is no longer in use.
To accomplish this, we can implement a method to be called by the client code to force our object to clean up and release its resources. By convention, this method is typically named Dispose:
Public Sub Dispose ()
‘ clean up code goes here End Sub
It is up to our client code to call this method at the appropriate time to ensure cleanup occurs. Again, the specific name of this method is up to us, though within the .NET system class libraries the convention is to use the name Dispose.
Inheritance
While the OO features of VB have been very powerful and useful, we have been held back in many cases by the lack of inheritance in the language. Inheritance is the ability of a class to gain the interface and behaviors of an existing class. The process by which this is accomplished is called subclassing. When we create a new class that inherits the interface and behaviors from an existing class, we have created a subclass of the original class. This is also known as an ‚is-a‛ relationship, where the new class ‚is-a‛ type of original class.
The original class, from which we inherit interface and behavior is known by the following:
Parent class
Superclass Base class
The new class that inherits the interface and behaviors is known by the following:
Child
class
Subclass Implementing Basic Inheritance
72
Visual Basic .Net I-TECH Computer Education
Consider an example with a sales order that has line items. We might have product line items and services line items. Both are examples of line items, but both are somewhat different as well. Using inheritance, we will be creating a LineItem class that contains all the code common to any sort of line item. Then we will be creating ProductLine class that inherit from LineItem – thus automatically gaining all the common code – including interface in an OO form.
LineItem class
Public Class LineItem Private mintID As Integer Private mstrItem As String Private msngPrice As Single Private mintQuantity As Integer Public Property ID() As Integer
Get Return mintID
End Get Set
mintID = value End Set
End Property Public Property Item() As String
Get Return mstrItem
End Get Set
mstrItem = value End Set
End Property Public Property Price() As Single
Get Return msngPrice
End Get
Set msngPrice = value
End Set
End Property Public Property Quantity() As Integer
Get
Return mintQuantity End Get Set
mintQuantity = value End Set
End Property Public Function Amount() As Single
Return mintQuantity * msngPrice End Function
End Class
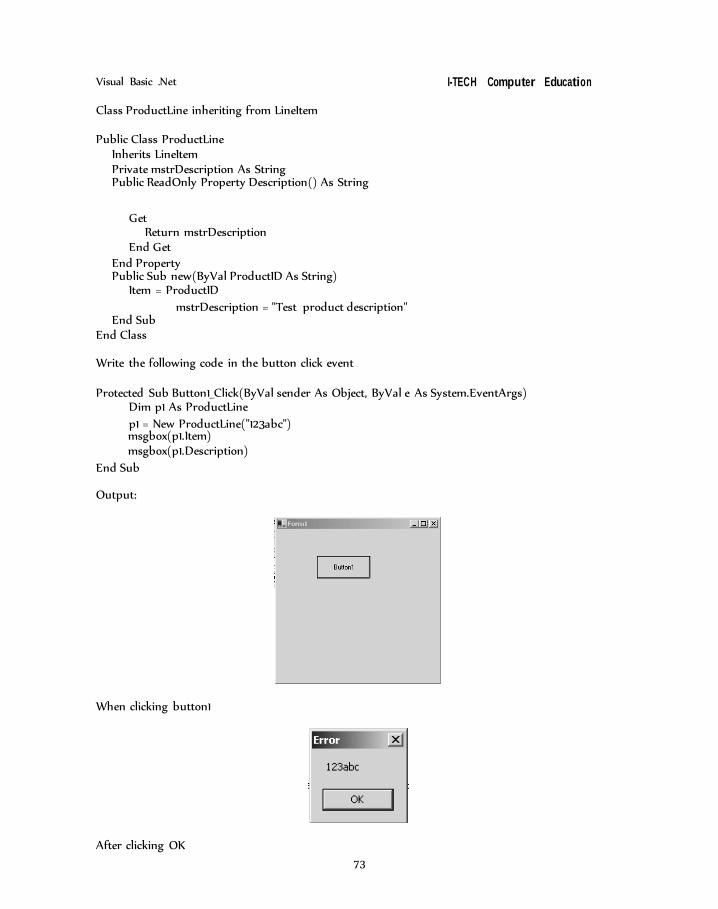
73
Visual Basic .Net I-TECH Computer Education
Class ProductLine inheriting from LineItem
Public Class ProductLine Inherits LineItem Private mstrDescription As String Public ReadOnly Property Description() As String
Get
Return mstrDescription End Get
End Property Public Sub new(ByVal ProductID As String)
Item = ProductID
mstrDescription = "Test product description" End Sub
End Class Write the following code in the button click event
Protected Sub Button1_Click(ByVal sender As Object, ByVal e As System.EventArgs)
Dim p1 As ProductLine
p1 = New ProductLine("123abc") msgbox(p1.Item) msgbox(p1.Description)
End Sub Output:
When clicking button1
After clicking OK
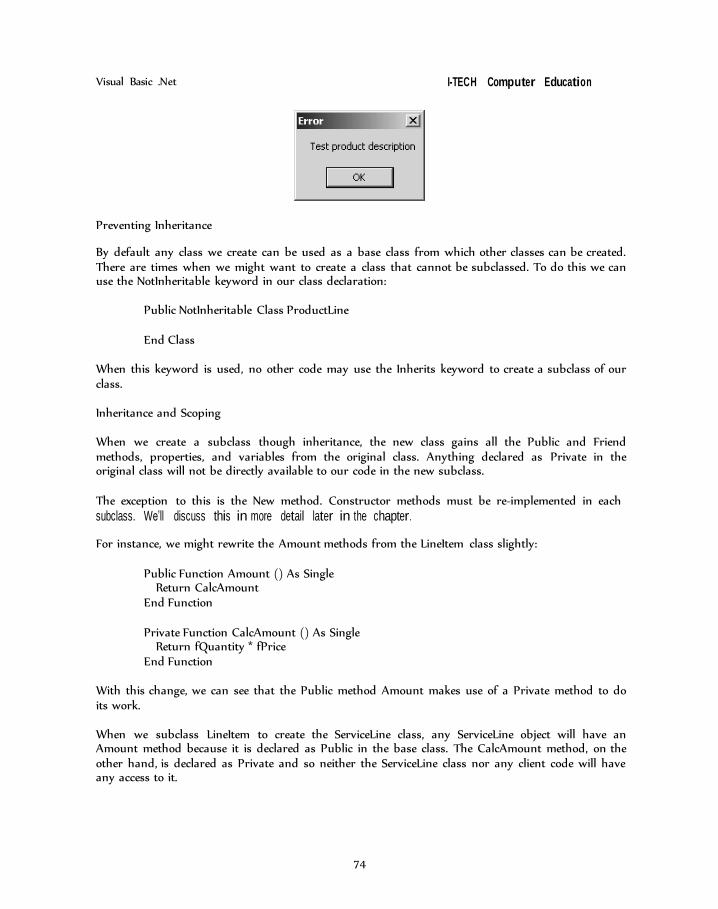
74
Visual Basic .Net I-TECH Computer Education
Preventing Inheritance
By default any class we create can be used as a base class from which other classes can be created. There are times when we might want to create a class that cannot be subclassed. To do this we can use the NotInheritable keyword in our class declaration:
Public NotInheritable Class ProductLine
End Class
When this keyword is used, no other code may use the Inherits keyword to create a subclass of our class.
Inheritance and Scoping
When we create a subclass though inheritance, the new class gains all the Public and Friend methods, properties, and variables from the original class. Anything declared as Private in the original class will not be directly available to our code in the new subclass.
The exception to this is the New method. Constructor methods must be re-implemented in each subclass. We’ll discuss this in more detail later in the chapter.
For instance, we might rewrite the Amount methods from the LineItem class slightly:
Public Function Amount () As Single Return CalcAmount
End Function
Private Function CalcAmount () As Single
Return fQuantity * fPrice End Function
With this change, we can see that the Public method Amount makes use of a Private method to do its work.
When we subclass LineItem to create the ServiceLine class, any ServiceLine object will have an Amount method because it is declared as Public in the base class. The CalcAmount method, on the other hand, is declared as Private and so neither the ServiceLine class nor any client code will have any access to it.
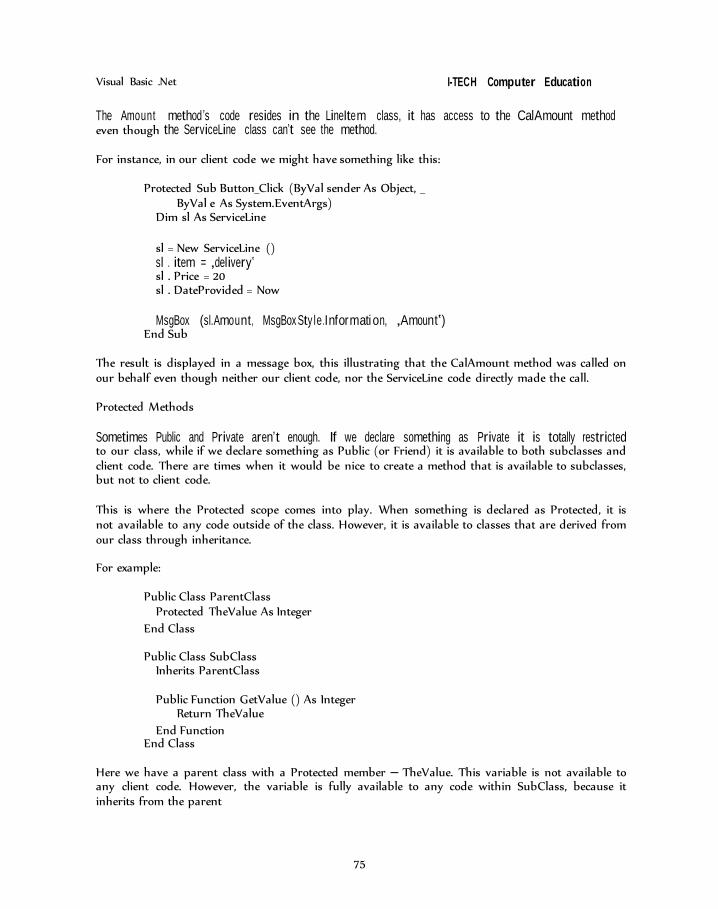
75
Visual Basic .Net I-TECH Computer Education
The Amount method ’s code resides in the LineItem class, it has access to the CalAmount method even though the ServiceLine class can’t see the method.
For instance, in our client code we might have something like this:
Protected Sub Button_Click (ByVal sender As Object, _ ByVal e As System.EventArgs)
Dim sl As ServiceLine
sl = New ServiceLine () sl . item = ‚delivery‛ sl . Price = 20 sl . DateProvided = Now
MsgBox (sl.Amount, MsgBox Sty le.Information, ‚Amount‛)
End Sub
The result is displayed in a message box, this illustrating that the CalAmount method was called on our behalf even though neither our client code, nor the ServiceLine code directly made the call.
Protected Methods
Sometimes Public and Private aren’t enough. If we declare something as Private it is totally restricted to our class, while if we declare something as Public (or Friend) it is available to both subclasses and client code. There are times when it would be nice to create a method that is available to subclasses, but not to client code.
This is where the Protected scope comes into play. When something is declared as Protected, it is not available to any code outside of the class. However, it is available to classes that are derived from our class through inheritance.
For example:
Public Class ParentClass
Protected TheValue As Integer
End Class
Public Class SubClass Inherits ParentClass
Public Function GetValue () As Integer
Return TheValue
End Function End Class
Here we have a parent class with a Protected member – TheValue. This variable is not available to any client code. However, the variable is fully available to any code within SubClass, because it inherits from the parent
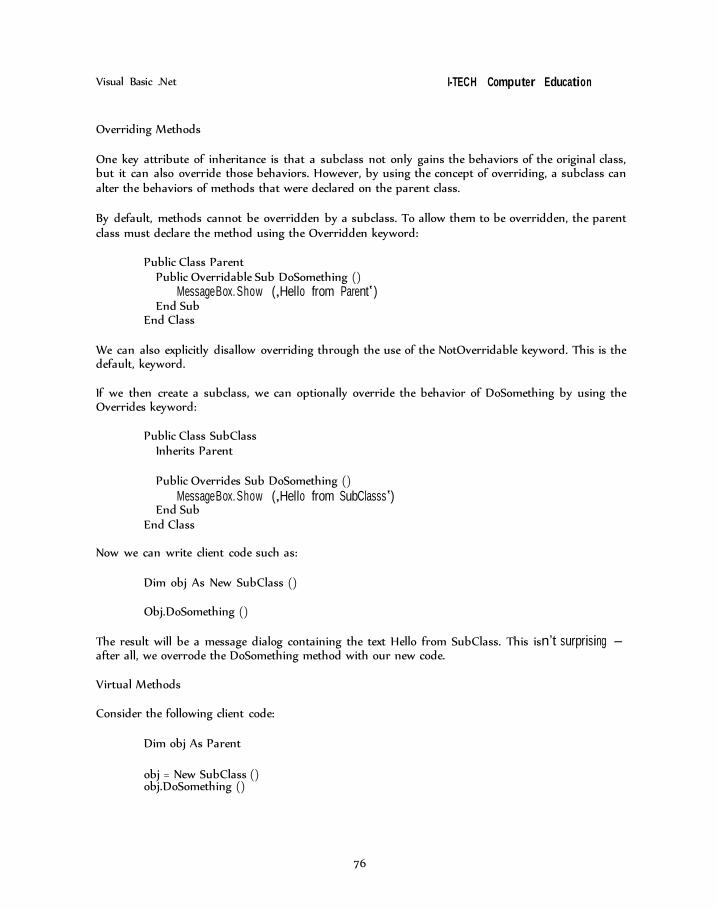
76
Visual Basic .Net I-TECH Computer Education
Overriding Methods
One key attribute of inheritance is that a subclass not only gains the behaviors of the original class, but it can also override those behaviors. However, by using the concept of overriding, a subclass can alter the behaviors of methods that were declared on the parent class.
By default, methods cannot be overridden by a subclass. To allow them to be overridden, the parent class must declare the method using the Overridden keyword:
Public Class Parent
Public Overridable Sub DoSomething () MessageBox. Show (‚Hello from Parent‛)
End Sub End Class
We can also explicitly disallow overriding through the use of the NotOverridable keyword. This is the default, keyword.
If we then create a subclass, we can optionally override the behavior of DoSomething by using the Overrides keyword:
Public Class SubClass
Inherits Parent
Public Overrides Sub DoSomething ()
MessageBox. Show (‚Hello from SubClasss‛) End Sub
End Class Now we can write client code such as:
Dim obj As New SubClass ()
Obj.DoSomething ()
The result will be a message dialog containing the text Hello from SubClass. This isn’t surprising – after all, we overrode the DoSomething method with our new code.
Virtual Methods
Consider the following client code:
Dim obj As Parent
obj = New SubClass () obj.DoSomething ()

Visual Basic .Net I-TECH Computer Education
pe, the implementation of DoSomething the object. In our previous example, we DoSomething implementation in that clas
75
First off, it seems odd to declare a variable of type Parent, but then create a SubClass object instead. This is perfectly acceptable however – it is yet another way of implementing polymorphism. Since SubClass ‚is-a‛ Parent, any Parent or SubClass variable can hold a reference to a SubClass object.
This is true in general. When using inheritance, variable of the parent type can always hold reference to any child type created from the parent.
What may be more surprising is the message that is displayed in our message box when this code is run. The message we see is Hello from SubClass.
The variable is declared as type Parent – shouldn’t the Parent implementation be called? The reason the DoSomething implementation from the child class is called is that the method is virtual. The concept of a virtual method is such that the ‚bottom-most‛ implementation of the method is always used in favor of the parent implementation – regardless of the data type of the variable being used in the client code.
Parent
+DoSo m eth ing ()
SubClass
+DoSo m eth ing ()
SubSubClass
Regardless of the variable data ty will be invoked based on the actual class we use to create created an object of type SubClass, thus ensuring that the s would be invoked. This is illustrated by the following diagram, which shows how the method calls are made:
Client SubClass Parent
DoSomething()
DoSomething()
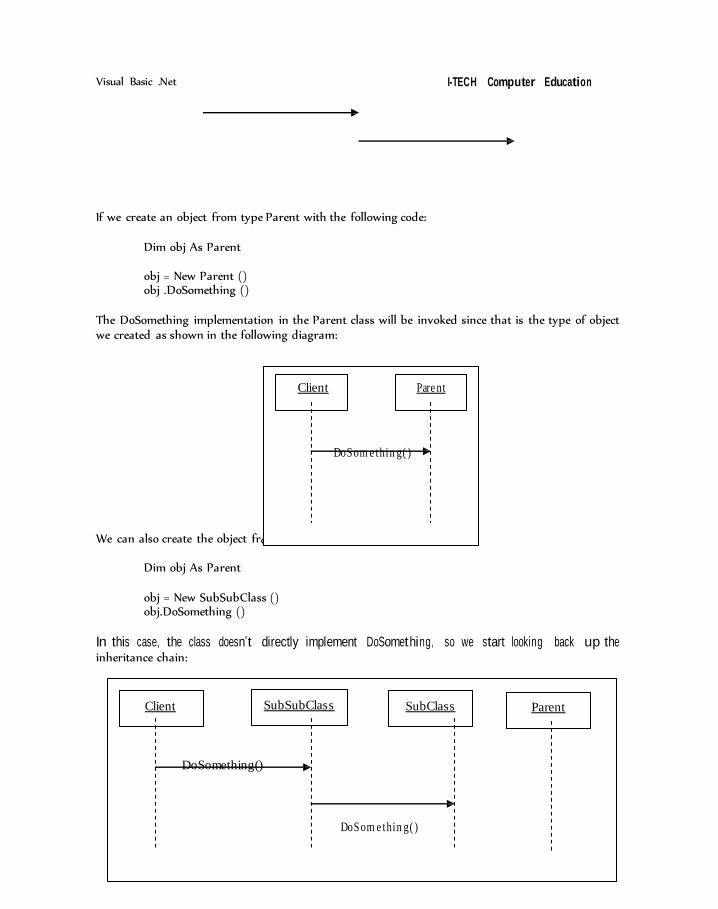
Visual Basic .Net I-TECH Computer Education
om the SubSubClass class:
76
If we create an object from type Parent with the following code:
Dim obj As Parent
obj = New Parent () obj .DoSomething ()
The DoSomething implementation in the Parent class will be invoked since that is the type of object we created as shown in the following diagram:
Client Pare nt
DoSom e thin g( ) We can also create the object fr
Dim obj As Parent
obj = New SubSubClass () obj.DoSomething ()
In this case, the class doesn’t directly implement DoSomething, so we start looking back up the inheritance chain:
Client SubSubClass SubClass Parent
DoSomething()
DoSom e thin g( )

Visual Basic .Net I-TECH Computer Education
77
The first class up that chain is SubClass, which does have an implementation – so it is that implementation which is invoked. No code from the Parent class is invoked at all.
Me Keyword
The Me keyword is used any time we want our code to refer to methods within the current object.
The Me keyword is usually optional, since any method call is assumed to refer to the current object unless explicitly noted otherwise. The exception is when we are working with shadowed variables. For instance:
Public Class TheClass
Private strName As String
Public Sub DoSomething ()
Dim strName As String
strName = ‚Fred‛ End Sub
End Class
The variable strName is declared at the class level and within the DoSomething method. Within that method only the local, or shadowed, variable is used unless we explicitly reference the class-level variable with the Me keyword:
Public Sub DoSomething ()
Dim strName As String
StrName = ‚Fred‛ ‘sets the local variable’s value Me.strName = ‚Mary‛ ‘sets the class level variable’s value
End Sub Here we can see that strName can be used to reference the local variable, while Me.strName can be used to reference the class-level variable.
MyBase Keyword
At times we might want to explicitly call into methods in our parent class. Remember that when we override a method it is virtual – so the method call will invoke the ‚bottom-most‛ implementation – not the parent implementation. However, sometimes we might need that parent implementation.
To invoke the parent class from within our subclass we can use the MyBase keyword. For instance:
Public Class SubClass
Visual Basic .Net I-TECH Computer Education
78
Inherits Parent
Public Overrides Sub DoSomething ()
MessageBox. Show (‚Hello from subclass‛) MyBase.DoSomething ()
End Sub End Class
If we run our client code now, we’ll get two message boxes. First we’ll get the message from the subclass, followed by the one from the parent class.
MyClass Keyword
A more complex scenario is one where the code in our class might end up invoking coded from other classes created from our class.
When we create a class, we’ll frequently make class from within our class to other methods within that same class. This occurs in the following code:
Public Class Parent
Public Sub DoSomething () OtherStuff ()
End Sub
Public Overridable Sub OtherStuff ()
MessageBox. Show (‚Parent other stuff‛) End Sub
End Class In this case, the DoSomething method calls the OtherStuff method to do some work. Notice however, that OtherStuff is marked as Overridable, so a subclass might provide a different implementation for the method. For example:
Public Class SubClass
Inherits Parent
Public Overrides Sub OtherStuff () MessgeBox. Show (‚SubClass other stuff‛)
End Sub End Class
As we discussed earlier, VB.NET methods are virtual – which means that an object of type SubClass will always invoke OtherStuff from SubClass rather than from the Parent class. This is true even for code in the Parent class itself – so when the DoSomething method calls the Other Stuff method it will invoke the overridden implementation in SubClass.
This can be illustrated by the following client code:
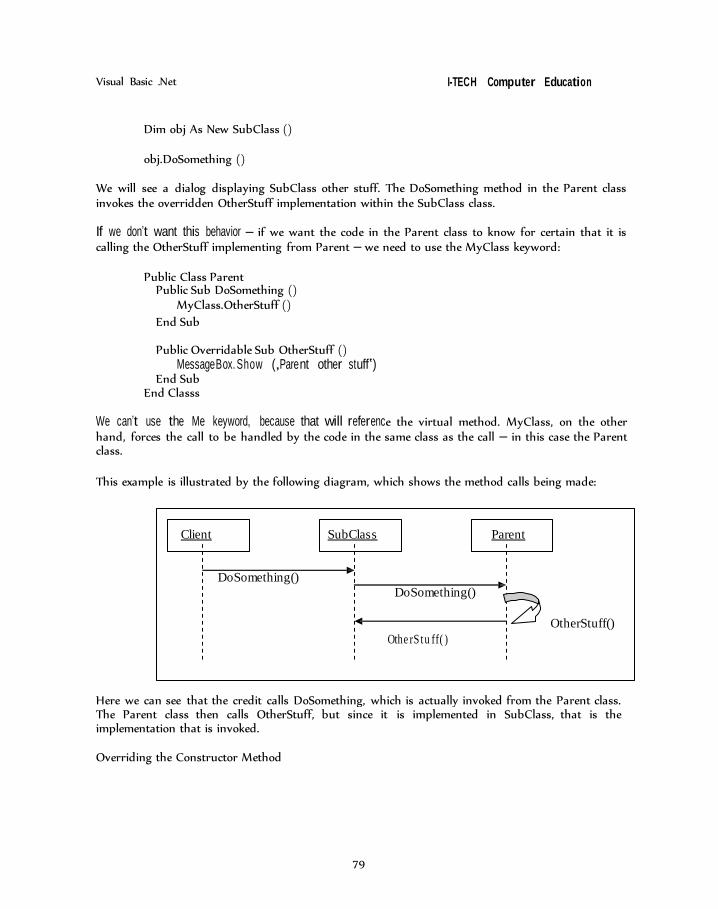
Visual Basic .Net I-TECH Computer Education
79
can see that the credit calls DoSomething, which is actually invoked from the Parent class.
Dim obj As New SubClass ()
obj.DoSomething ()
We will see a dialog displaying SubClass other stuff. The DoSomething method in the Parent class invokes the overridden OtherStuff implementation within the SubClass class.
If we don’t want this behavior – if we want the code in the Parent class to know for certain that it is calling the OtherStuff implementing from Parent – we need to use the MyClass keyword:
Public Class Parent
Public Sub DoSomething () MyClass.OtherStuff ()
End Sub
Public Overridable Sub OtherStuff () MessageBox. Show (‚Parent other stuff‛)
End Sub End Classs
We can’t use the Me keyword, because that will reference the virtual method. MyClass, on the other hand, forces the call to be handled by the code in the same class as the call – in this case the Parent class.
This example is illustrated by the following diagram, which shows the method calls being made:
Client SubClass Parent
DoSomething() DoSomething()
Othe rS tu ff( )
OtherStuff()
Here we The Parent class then calls OtherStuff, but since it is implemented in SubClass, that is the implementation that is invoked.
Overriding the Constructor Method

Visual Basic .Net I-TECH Computer Education
80
We’ve already seen how we can override methods, and how to use the Me, MyBase, and MyClass keywords to interact with the various overridden methods in our inheritance chain. However, there are special rules that govern the process of overriding the New constructor method.
New methods aren’t automatically carried from a parent to a subclass like normal methods. Each subclass must define its own constructors, though those constructors may call into the parent class using the MyBase keyword:
Public Class SubClass
Inherits Parent
Public Sub New ()
MyBase.New () ‘ other initialization code goes here
End Sub End Class
When calling the base class constructors, that call must be the first line in our constructor code – anything else is an error. This is totally optional, however, since the constructor of the parent class is automatically called on your behalf before our constructor code begins to run, unless we make that call manually.
Creating Base Classes and Abstract Methods
So far, we’ve seen how to inherit from a class, how to overload and override methods, and how virtual methods work. In all of our examples so far, the parent classes have been useful in their own right. Sometimes however, we want to create a class such that it can only be used as a base class of inheritance.
MustInherit Keyword
Returning to our original sales order line item example, it may make little sense for anyone to create an object based on the generic LineItem class. In fact, we may want to ensure that only more specific subclasses derived from LineItem can be created. What we want to create is something called a base class. This is done using the MustInherit keyword in the class declaration:
Public MustInherit Class LineItem
MustOverride Keyword
Another option we have is to create a method that must be overridden by a subclass. We might want to do this when we are creating a base class that provides some behavior, but relies on subclasses to also provide some behavior in order to function properly. This is accomplished by using the MustOverride keyword on a method declaration:
Public MustOverride Sub CalcPrice ()
Notice that there is no End Sub or any other code associated with the method.
Visual Basic .Net I-TECH Computer Education
81
Abstract Base Classes
We can combine these two concepts – using both MustInherit and MustOverride – to create something called an abstract base class. This is a class that provides no implementation, only the interface definitions from which a subclass can be created. An example might be as follows:
Public MustInherit Class Parent
Public MustOverride Sub DoSomething () Public MustOverride Sub DoOtherStuff ()
End Class This technique can be very useful when creating frameworks or the high-level conceptual elements of a system.
Shared or Class Members
While objects are very powerful and useful, there are times when we just want access to variables, functions, or routines that do useful work – without the need for an actual object instance.
Shared Methods
In VB.NET we have a better alternative. Not only can a class have all the regular methods and properties we’ve seen so far – methods and properties only available after creating an instance of the class – but they can also have methods that are available without creating an instance of the class. These are known as shared methods.
A shared method is not accessed via an object instance like a regular method, but rather is accessed directly from the class. The following is a simple example of a shared method:
Public Class Math
Shared Function Add (ByVal a As Integer, ByVal b As Integer) As Integer Return a + b
End Function End Class
We can use this method – without instantiating a Math object – as follows:
Dim result As Integer
result = Math.Add (5, 10) Notice how, rather than using an object variable, we use the actual class name to reference the method. With a normal method this would result in a syntax error, but with a shared method this is perfectly acceptable.
Shared methods can also be overloaded just like regular methods, so it is quite possible to create a set of variations on the same shared method, each having a different parameter list.
Visual Basic .Net I-TECH Computer Education
82
The default scope for a shared method is Public. It is possible to restrict the scope of a shared method to Friend, Protected, or Private by prefixing the declaration with the appropriate scope.
Shared Variables
There is another type of shared member we can create. There are times when it is nice to share a value across all instances of a class – when every object of a given type should share the same variable. This is accomplished through the use of shared variables.
A shared variable is declared using the Shared keyword, much like a shared method:
Public Class MyCounter Private Shared mintCount As Integer
End Class As with shared methods, we can scope the shared variable as required. Where Shared methods are public by default, Shared variables are Private by default.
The important thing about shared variables is that they are common across all instances of the class. We could enhance our class slightly as follows:
Public Class MyCounter
Private Shared mintCount As Integer
Public Sub New () mintCount += 1 End Sub
Public ReadOnly Property Count () As Integer
Get Return mintCount
End Get End Property
End Class
As we create each instance of the class the counter is incremented by one.
At any point, we can retrieve the count value via the Count property. Thus, if we run the following client code we’ll get a resulting value of 3:
Protected Sub Button4_Click (ByVal sender As Object, _
ByVal e As System.EventArgs) Dim obj As MyCounter
obj = New MyCounter () obj = New MyCounter () obj = New MyCounter ()
Visual Basic .Net I-TECH Computer Education
83
MsgBox (obj.Count, MsgBoxStyle.Information, ‚Counter‛)
If we run it again we’ll get 6, then 9, and so forth.
Global Values Another common use for shared variables is to provide a form of global variable. Given a Public scoped shared variable.
Public Class TheClass
Public Shared MyGlobal As Integer End Class
We can then use this variable throughout our client code:
TheClass.MyGlobal += 5 This variable will be available to any code within our application, providing a very nice mechanism for sharing values between components, classes, modules, and so forth.
Events
Events are fully supported within the context of inheritance. If a base class defines a Public event, then that event can be raised by both the code in that base class and from any subclasses derived from that base class.
For instance, we may have a simple base class such as:
Public Class Parent Public Event ParentEvnt ()
Public Sub DoEvent ()
RaiseEvent ParentEvent () End Sub
End Class It is no surprise that code in this class can raise the ParentEvent event. However, we can then create a subclass such as:
Public Class SubClass
Inherits Parent
Public Sub DoSomethig ()
RaiseEvent ParentEvent () End Sub
End Class This class is derived from Parent through the use of the Inherits keyword, gaining not only properties and methods, but also events from the base class.
Visual Basic .Net I-TECH Computer Education
84
Shared Events
Events may be declared as Shared. Shared methods can only raise shared events, not non-shared events. For instance:
Public Class EventSource
Shared Event SharedEvent ()
Public Shared Sub DoShared () RaiseEvent SharedEvent ()
End Sub End Class
A shared event can be raised by both shared and non-shared methods:
Public Class EventSource Public Event TheEvent () Shared Event SharedEvent ()
Public Sub DoSomething ()
RaiseEvent TheEvent () RaiseEvent SharedEvent ()
End Sub
Public Shared Sub DoShared () RaiseEvent SharedEvent ()
End Sub End Class
Interfaces
VB has, for some time, allowed us to create objects with more than one interface. This was done using the Implements keyword. Any time our class implemented a new interface we were required to write code to implements each method on the interface. While inheritance provides a preferable alternative to this in many case, there are still times when we may want to have our objects implement multiple interfaces.
VB.NET preserves the Implements keyword, and in fact the entire concept of interfaces is enhanced and made simpler as compared to VB6.
Working with Interfaces
Interface Declaration The most visible enhancement is the introduction of a formal syntax for declaring an interface. This is done by using the Interface keyword:
Public Interface MyInterface
Visual Basic .Net I-TECH Computer Education
85
Event MyEvent () Sub MyMethod () Function MyFunction (ByVal Paraml As Integer) As Integer
End Interface All the Elements described in this interface must be implemented by any class that chooses to implement this interface.
Overloading Methods
Methods (Sub and Function) can be declared in an interface using the Overloads keyword.
Declaring an interface with overloaded methods is done as in the following example:
Public Interface MyInterface Overloads Sub MyMethod () Overloads Sub MyMethod (Data As String) Overloads Function MyFunction (ByVal Paraml As Integer) As Integer Overloads Function MyFunction (ByVal Paraml As Single) As Integer
End Interface When a class uses the Implements keyword to implement an interface with overloaded methods, the class must implement each of the overloaded method declarations.
Implementing an Interface
Public Class TheClass Implements MyInterface
End Class VB.NET addresses this issue by providing a clear, concise syntax for implementing the interface – again through the application of the Implements keyword.
We can simply mark a method in our class as being the implementation of a specific method from the interface:
Public Sub MyMethod () Implements MyInterface.MyMethod
So, to implement our example interface, we’d have code such as:
Public Class TheClass
Implements MyInterface
Public Event MyEvent () Implements MyInterface.MyEvent
Public Function MyFunction (ByVal Paraml As Integer) _ As System.Integer Implements OOlib.MyInterface.MyMethod

Visual Basic .Net I-TECH Computer Education
86
End Function
Public Sub MyMethod () Implements OOlib.MyInterface.MyMethod
End Sub
Public Property MyProperty () As String _ Implements OOlib.MyInterface.MyProperty
Get
End Get Set
End Set
End Property End Class
We can now create client code that interacts with our object via this interface, in addition to the object’s normal interface:
Dim obj As MyInterface
obj = New Implementer () obj.MyMethod
Implementing Multiple Interfaces
A class can have more than one Implements statement – thus implementing more than one interface. Suppose we have the following interfaces:
Public Interface MyInterface
Sub DoSomething () End Interface
Public Interface OtherInterface
Sub DoWork () End Interface
We can construct a class that implements both interfaces:
Public Class TheClass Implements MyInterface Implements OtherInterface
End Class
Now we have a choice. We can either implement separate methods to handle DoSomething and DoWork:
Visual Basic .Net I-TECH Computer Education
87
Private Sub DoSomething () Implements MyInterface.DoSomething ‘ implementation goes here
End Sub
Private Overloads Sub DoWork () Implements OtherInterface.DoWork ‘ implementation goes here
End Sub
Or, if they do the same thing, we can have a single method implementation both methods:
Private Sub DoSomething () _ Implements MyInterface.DoSomething.OtherInterface.DoWork
‘implementatio n goes here
End Sub
This is done by combining the list of implemented methods in a comma-separated list following the Implements keyword.
Object Declaration and Instantiation
VB.NET doesn’t use the Creat eO bjec t statement for object creation. Creat eO bject was an outgrowth of VB’s relations hip with COM, and since VB.NET doesn’t use COM, it has no use for CreateObject.
New Statement
VB.NET relies on the New statement for all object creation. We can use New in a number of different locations within our code – all of them perfectly valid.
Dim obj As TheClass
Obj = New TheClass ()
We can shorten this by combining the declaration of the variable with the creation of the instance:
Dim obj As New TheClass ()
No Set Keyword Notice that nowhere do we use the Set statement when working with objects. In VB6, any time we worked with an object reference we had to use the Set command – differentiating objects from any other data type in the language.
Exercise
Visual Basic .Net I-TECH Computer Education
88
1. Explain some of the OO features in VB .Net. 2. Explain the way of creating class in VB .Net. 3. Explain the access specifers in VB .Net. 4. Explain properties in VB .Net. 5. Explain method overloading in VB .Net. 6. Explain Garbage collection in VB .Net. 7. Explain inheritance in VB .Net. 8. Explain Events in VB .Net. 9. Explain Interfaces in VB .Net.
Fill in the blanks:
1. access specifiers are callable only by code within our project/component and by code in our subclasses.
2. The object would be automatically destroyed – triggering a call to its _event. 3. _method is used to explicitly called the garbage collector. 4. _keyword is used to prevent a class from inheriting it. 5. The _keyword is used when we want our code to refer to methods within the current
object. 6. The combination of and to create an abstract base class.
Visual Basic .Net I-TECH Computer Education
89
Chapter 6 Advanced Topics
.NET Threading
One of the most anticipated features of VB.NET is the ability to create full multi-threaded or free- threaded applications. VB6 had some serious limitations in its design that prevented the use of free- threading, unless you were willing to jump through some tricky hoops.
With free-threading, we can now crate applications that do their work in the background while still allowing the user to interact with the user interface.
In VB.NET, using threads is quite easy due to the threading support built into the .NET system class library. In fact, we can not only create multi-threaded applications in VB, but the System.Threading namespace also provides facilities for thread pooling and other advanced features. In this section we’ll focus on basic multi-thread ing within VB.NET applications.
Starting a Thread
Every process has at least one thread. Typically, our applications run in processes that have just one. Unless some code explicitly creates another, our code will always run on this thread. New threads can be created directly by our code. Threads can also be created by other classes, including those in the .NET system class library. Often these threads are started because we requested an asynchronous operation – something we’ll discuss briefly after we get through basic thread creation.
To simplify our use of threads we can use the Imports statement:
Imports System.Threading
If we add this line to the top of a code module, then the code in that module can make easy use of the threading objects.
Before we create a thread, we’ll need some code for the thread to execute. In VB.NET, we use the AddressOf operator to find the address of any routine or method that is to be called in such a manner. So, as we create a thread, we’ll pass it the address of a method that is to be run.
Starting Windows Application project, add a ListBox control to Form1 and use the Dock property to make it fill the entire form. We’ll display output from our threads in this control.
In the code window, add the following method to the form:
Private Sub Worker () SynLock (ListBox1)
ListBox1 .Items.Add (‚Running on thread ‚ & _

Visual Basic .Net I-TECH Computer Education
90
CStr (ApoDomain.GetCurrentThreadId ()))
End SyncLock End Sub
This routine simply adds a line to the ListBox1 control indicating the thread on which the code is running. However, it is also making use of a new Vb.NET keyword – SyncLock.
SyncLock
When working with multiple threads, ay code we call must be written so as to be threadsafe, otherwise we risk introducing unforeseen bugs, very likely causing our application to crash entirely. Threadsafe code is code that will operate properly when more than one thread is running within that same code. Without extra effort, most code is not threadsafe.
If we are working with code that is not threadsaf e (or code that we don’t know is threadsafe) we can use various synchronization methods to ensure that only one thread uses that code at any one time.
To make this easier, VB.NET includes the Synclock keyword – a block structure that protects all the code in that block. SyncLock accepts an object as a parameter, and that object is used as the lock key. Any object can be used to synchronize our code, but keep in mind that each instance of the
same class is a different object. It is a singular instance of an object that is used here – not the class. Any time we are within a SyncLock block based on a given object, we know that no other code in our application can also be in a SyncLock block using that same object. SyncLock blocks based on other objects are a whole other matter.
In this code sample, the ListBox control is not threadsafe. Two threads attempting to interact with the ListBox control at the same time will cause our application to crash. By wrapping our code in a SyncLock block based on the ListBox1 control, we can know that only one thread at a time will ever attempt to run this code.
Any other code in our application that interacts with the ListBox1 control would need to be similarly placed in a SyncLock block structure.
We can call this routine 10 times from within a regular program, for instance:
Dim Index As Integer For Index = 1 To 10
Worker () Next
The ListBox1 control will display the exact same text over and over, since there’s only one thread involved here.

Visual Basic .Net I-TECH Computer Education
91
Creating Threads
However, we can create another method in Form1 that creates threads:
Private Sub SpinThreads () Dim Index As Integer Dim t As Thread
For index = 1 to 10
t = New Thread (AddressOf Me.Worker) t.Start ()
Next End Sub
This code declares a Thread variable, then creates 10 threads in a loop – each on calling Form1’s Worker method. We can call this method from Form1’s constructor, so when the form loads this code will run:
‘ TODO: Add any initialization after the InitializeComp onent () call SpinThreads ()
End Sub
The result will be a display with a different thread ID for each line, something like this:

Visual Basic .Net I-TECH Computer Education
92
Thread Lifetimes
We have code to start our threads – but how do they stop? A thread will continue running until one of the following occurs:
The method it is running completes
The process containing the thread terminates We call the Stop method on the thread object itself
In our example, as is typically the case, each thread stops when its method is complete. As soon as the code in the Worker method is done, the thread running that code will automatically terminate. However, if we had a method that went into an infinite loop then that thread would not terminate, but would continue running within that loop until either that thread’s Stop method was called or the process was terminated – typically due to the user closing our application.
Interacting with the Current Thread
Throughout our code we can use the Thread.CurrentThread object to interact with the currently active thread. This object has a number of methods that allow us to retrieve information about the thread and manipulate the thread in various ways, including alerting the thread’s priority and putting the thread to sleep for a time.
Using the Sleep method is very nice, since it stops the thread from processing without consuming any CPU time like a busy wait in a loop would. For instance, the following line of code will cause the current thread to sleep for 42 milliseconds:
Thread.CurrentThread.Sleep (42)
This method can be used even on the main thread created in a process – so we can use it in any applic at ion, even if we aren’t creating our own threads.
Visual Basic .Net I-TECH Computer Education
93
Passing Data to a Thread
If we need our new thread to have specific data we’ll have to take a different approach.
The easiest technique is to create a class that has properties for the data we’ll need, and then place the worker method into that class. For each thread we want to create, we can create a new instance of the class and start the thread within that instance. In this way, each thread has it own object – each object containing the data specific to that thread.
To illustrate this we’ll need to change Form1 and also create a new class. Let’s create the class first. Add a class with the following code:
Imports System.WinForms
Public Class ThreadObj Private theForm As Form1 Private Count As Integer
Public Sub New (ByVal Frm As Form1, ByVal ID As Integer)
theForm = Frm Count = ID
End Sub
Public Sub Worker () SyncLock (theForm)
theForm.Displ ay (CStr (Count) & ‚ Starting on thread ‚ & _ CStr (AppDomain.GetCurrentThreadId ()))
End SyncLock
End Sub End Class
So we can continue to display the output in Form1. we’re passing a reference to the form into this object. Additionally, this object will contain a numeric ID value – provided by the calling code via the
object’s constructor method. We’ve also moved the Worker method here from Form1, though it is slightly altered so it now calls a Display method on Form1 rather than interacting directly with the ListBox1 control.
Also notice that the SyncLock statement is now synchronizing against the form variable – ensuring that no two threads are ever talking to the form at the same time.
InVB.NET only code within a form can interact with that form’s controls. For outside code to make use of a control, the form class must expose methods to do that work.
We can now alter the Form1 code by removing the Worker method and adding a Display method as follows:
Public Sub Display (ByVal Data As String)
ListBox1.Items.Add (Data)
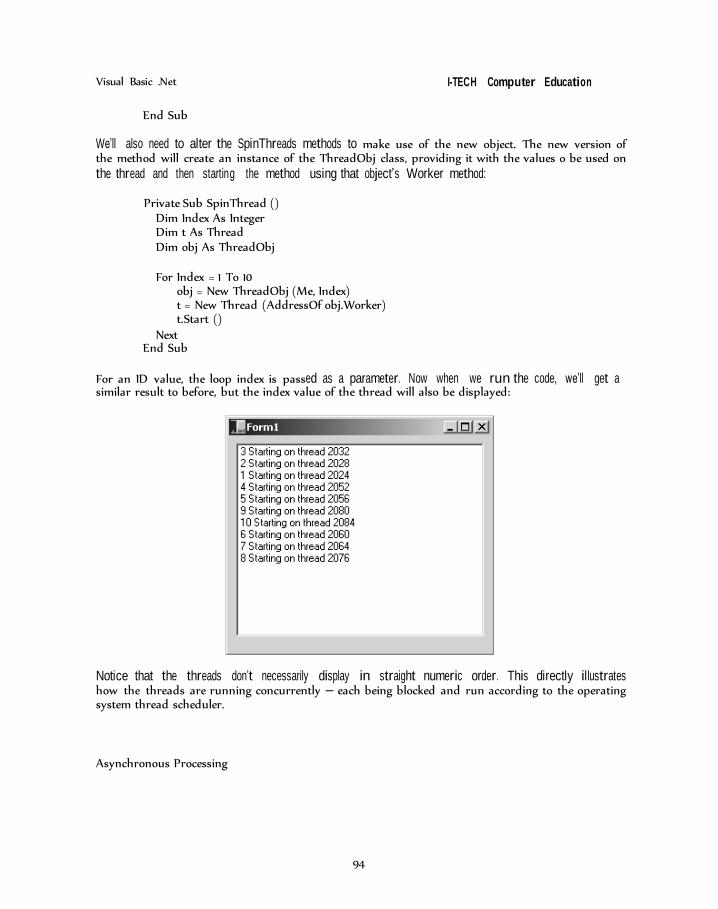
Visual Basic .Net I-TECH Computer Education
94
End Sub
We’ll also need to alter the SpinThreads methods to make use of the new object. The new version of the method will create an instance of the ThreadObj class, providing it with the values o be used on the thread and then starting the method using that object’s Worker method:
Private Sub SpinThread ()
Dim Index As Integer Dim t As Thread Dim obj As ThreadObj
For Index = 1 To 10
obj = New ThreadObj (Me, Index) t = New Thread (AddressOf obj.Worker) t.Start ()
Next End Sub
For an ID value, the loop index is passed as a parameter. Now when we run the code, we’ll get a similar result to before, but the index value of the thread will also be displayed:
Notice that the threads don’t necessarily display in straight numeric order. This directly illustrates how the threads are running concurrently – each being blocked and run according to the operating system thread scheduler.
Asynchronous Processing
Visual Basic .Net I-TECH Computer Education
95
Now that we’ve seen how to explicitly start threads through the use of the Thread object, let’s take a look at asynchronous processing – a concept frequently used within the .NET system class libraries that can also cause threads to be started.
Asynchronous processing is used in a number of places within the system class libraries. These include:
File I/O
IP sockets Sending and receiving MSMQ messages HTTP processing
Data access IP Socket Example
As a quick example of asynchronous coding, let’s take a look at some simple code to read data from an IP socket.
Create a new Windows Application named Chapter8IP. To use sockets we need to add a reference to the System.Net.dll assembly.
Next we need to add a new class module named IPRead. Here’s the code; we’ll walk through the key parts next:
Imports System.IO Imports System.Net Imports System.Net.Sockets
Public Class IPRead
Private s As Socket Private b (4096) As Byte ‘bytes just received
Public Sub New (ByVal Host As String, ByVal Port As Integer)
Connect (Host, Port)
s.BeginReceive (b, 0, b.length, AddressOf Me.ReceiveData, Nothing)
End Sub
Private Sub ReceiveData (ByVal ar As System.IAsyncResult) Dim cnt As Integer Dim idx As Integer Dim d () As Char Dim txt As String
cnt = s.EndReceive (ar)
ReDim d(cn)
Visual Basic .Net I-TECH Computer Education
96
For idx = 0 To cnt -1
d (idx) = CChar (b(idx)) Next
Txt = New String (d)
‘ do somet hing with the data in txt MsgBox (txt, MsgBox Style.O K O nly, ‚Text‛) ‘ for example
s.BeginReceive (b, 0, b.length, AddressOf Me.ReceiveData, Nothing)
End Sub
Private Sub Connect (ByVal Host As String, ByVal Port As Integer) s = New Socket (AddressFamily.AfINet, SocketType.SockStream, _
ProtocolType.ProtTCP)
Dim host_addr AS IPAddress = DNS.Resolve (Host) Dim ep As New IPEndPoint (host_addr, Port) If (s.Connect (ep) <> 0) Then
Err.Rais e (1, , ‚Client connect ion failed‛) End If
End Sub End Class
The constructor method accepts the host and port indicating the server to which we want to connect. The Connect method creates a Socket object and binds it to the host and port we provided.
We won’t get into detail here, since our focus is on the async hro nous reads. The call to BeginReceive starts the read process. This method accepts the address of the callback delegate method as a parameter, so we provide it with the address of our ReceiveData method:
s.BeginReceive (b, 0, b.length, AddressOf Me.ReceiveData, Nothing)
The method also accept a Byte array (b) into which to put the data, the position within the array to start writing the data, and the maximum number of bytes to be read and a state object – which we pass as Nothing.
Our application will continue to run, allowing the user to interact with our form or anything else. In the meantime, in the background we have a task waiting for input from the socket. As soon as the socket has data, our ReceiveData method will be called to process that data.
The first thing the ReceiveData method does is call the socket’s EndReceiv e method. This method returns the actual number of bytes read from the socket:
cnt = s.EndReceive (ar)
The next section of code converts the Byte array into a String so we can more easily work with the data:
ReDim d (cnt)
Visual Basic .Net I-TECH Computer Education
97
For idx = 0 To cnt – 1
d (idx) = b (idx) Next txt = New String (d)
At this point we can work with the data as required. Finally, the BeginReceive method is called again – restarting the background task to listen for further incoming via the socket:
s.BeginReceive (b, 0, b.length, AddressOf Me.ReceiveData, Nothing)
This illustrates the basic flow of an asynchronous process. By using this process, we’re implicitly creating a multi-threaded application, since the .NET system class libraries can and will create threads for us in the background in order to service the asynchronous tasks we request.
To finish our test application, open up the designer for Form1. We’ll create a quick IP listener that will send some text when a client such as IPRead connects. Add a button to the form and add the following code:
Protected Sub Button1_lick (ByVal sender As Object, _
ByVal e As System.EventArgs)
Dim objRead As New IPRead (‚localhost’ , 5000) End Sub
This will instantiate an IPRead object – having it connect to the local machine on port 5000. Our code to process the result is a MsgBox, so we’ll see any returned text display ed in a dialog.
Now let’s build the listener part of the app. Add a couple Imports stateme nt to Form1:
Imports System.Net Imports System.Net.Sockets
Now add a method to listen for incoming IP socket requests:
Private Sub DoListen () Dim myListener As TCPListener = New TCPListener (5000)
myListener.Start ()
‘ Program blocks on Accept() until a client connects Send (myListener.Accept ())
myListener.Stop ()
End Sub
This code makes use of a helper class in the System.Net namespace – the TCPListener. This class listens on the specified port and returns a new socket as the result of the Accept method. This
Visual Basic .Net I-TECH Computer Education
98
socket is connected to the new client. In our code, we’re passing this new socket to a Send method – sp let’s write that next:
Private Sub Send (ByVal s As Socket)
Dim txt As String = ‚Hello world‛ Dim c () As Char Dim b (Len (txt)) As Byte Dim idx As Integer
‘ convert the string to an array of char c = txt.ToCharArray
‘ convert the char array to a byte array For idx = 0 To c.Length – 1
B (idx) = CByte (c(idx)) Next
‘ send the byte array to the socket s.Send (b, b.Length, 0)
End Sub The Socket object also has a Send method – which accepts an array of bytes that it sends across the socket. In order to pass a String value through a socket, we need to convert it to a byte array. Unfortunately there’s no direct way to convert a String to an array of type Byte.
We have to convert the String to an array of type Char first – which is easy. We can then convert each Char in the array into a Byte in the target array. This obviously only works for ASCII text – if our text was in some other Unicode character set we’d also have to put the second byte in each Char into the Byte array.
Finally, updat e Form1’s constructor so the listener is running on a separate thread:
‘TODO: Add any initial iz at ion after the InitializeComponent () call Dim t As New System.Threading .Thread (AddressOf DoListen) t.Start ()
Now when the app starts it will start listening for incoming socket requests on a background thread, leaving the main thread available so the UI will be responsive to the user. If the user clicks our button, it will run the code to create an IPRead object – which will connect to our listener via a socket and get our text.
Console Applications
VB has always been about creating Windows GUI applications.
Console applications accept input and display output via a Windows text console, often called a DOS window. VB.NET allows us to easily create applications for this environment, including directly reading and writing from the standard input and output streams.
Visual Basic .Net I-TECH Computer Education
99
Use of the System.Console Namespace
Console applications get their input from the console and write their output back to the console window. The objects that support these, and other useful operations for console applications, come from the System.Console namespace. When creating console application it is often useful, though not always necessary, to import that namespace:
Imports System.Console
Writing Text to the Console
To write a line of text to the standard output stream, we can use the WriteLine method:
Sub Main () WriteLine (‚This is a test‛)
End Sub
Without importing the namespace, we can write this code as:
Sub Main (0 Console.WriteLine (‚This is a test‛)
End Sub
The WriteLine method can take different forms, including various control characters and replaceable parameters. For instance, we can print out a couple of values in the text as follows:
WriteLine (‚The number (0) is (1)‛, 5, ‚five‛) This will print out the following:
The number 5 is five
The WriteLine method always sends a carriage return and line feed at the end – causing the cursor to move to a new line. If we want to continue to append to the same line we can use the Write method:
Write (‚Hello‛) Write (‚World‛) WriteLine (‚!‛)
This will result in the following single line of output:
Hello World!
The Write method also supports control characters and replacement parameters. Reading from the Console
Visual Basic .Net I-TECH Computer Education
100
Likewise, we can read from the console by using the ReadLine method. This method accepts input from the console, returning it to our application when the user presses Enter.
Dim txt As String
txt = ReadLine ()
If we want to read character-by-character, we can use the Read method:
Dim txt As Char
Txt = CType (Read (), Char) ‘ type conversion because Read is Integer and txt is Char
Deployment in .NET
Perhaps the biggest single issue we had to deal with in the world of COM and VB6 was deployment. Deploying VB client applications, especially those that used COM, ActiveX, or DCOM components could be very complex – leading us deep into the realm of ‚DLL Hell‛.
The .NET Framework takes DLL Hell head on, making it much easier to deploy and update applications to our client workstations and to our web servers. In fact, one of the stated goals for . N ET is to enable ‚XCOPY deployment‛ – meaning that deploying an application should be as easy as using the venerable DOS XCOPY command to copy the application’s file to the target machine.
Installation Options
The Visual Studio.NET tool provides us with powerful installations options, including:
Self-installing Cab file
Setup via an msi file (Windows System Installer) Deployment to a web server
VS.NET will also create a merge module, which is a pre-built installation that can be used by another install option at a later time.
We also have two wizards at our disposal to help simplify the whole process:
Deploy Wizard – Assists us in deploying our application to a remote client machine or to a
remote web server.
Setup Wizard – assists us in creating setup applications that will install our application when run on the target machine.
The installation options available in VB.NET are displayed in the Visual Studio Setup and Deployment Projects menu choice, which is available via the File | New | Project or File | Add Project |
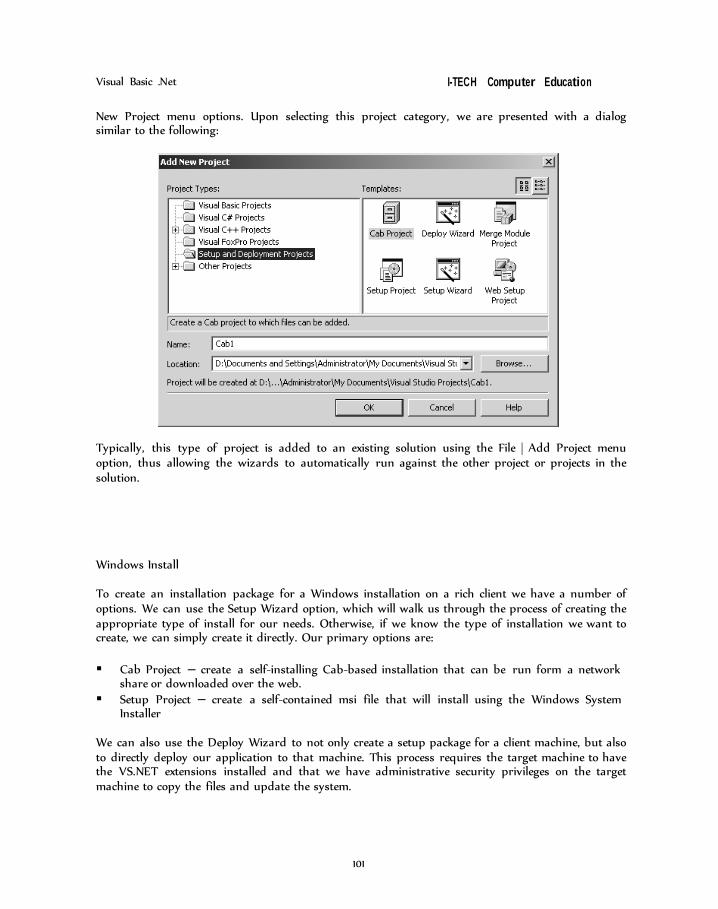
Visual Basic .Net I-TECH Computer Education
101
New Project menu options. Upon selecting this project category, we are presented with a dialog similar to the following:
Typically, this type of project is added to an existing solution using the File | Add Project menu option, thus allowing the wizards to automatically run against the other project or projects in the solution.
Windows Install
To create an installation package for a Windows installation on a rich client we have a number of options. We can use the Setup Wizard option, which will walk us through the process of creating the appropriate type of install for our needs. Otherwise, if we know the type of installation we want to create, we can simply create it directly. Our primary options are:
Cab Project – create a self-installing Cab-based installation that can be run form a network
share or downloaded over the web. Setup Project – create a self-contained msi file that will install using the Windows System
Installer We can also use the Deploy Wizard to not only create a setup package for a client machine, but also to directly deploy our application to that machine. This process requires the target machine to have the VS.NET extensions installed and that we have administrative security privileges on the target machine to copy the files and update the system.

Visual Basic .Net I-TECH Computer Education
102
Exercise
1. Explain .Net Threading. 2. Explain SyncLock. 3. Explain Thread lifetimes. 4. Explain Console applications in VB .Net.
Fill in the blanks:
1. In VB.NET, we use the operator to find the address of any routine or method that is to be called in such a manner.
2. accepts an object as a parameter, and that object is used as the lock key. 3. method is used to write a string to the console in VB .Net.

Visual Basic .Net I-TECH Computer Education
103
Chapter 7 Interoperability and Migration
Using the Migration Tool
Given all the difference between VB.NET and VB6, it is obviously not trivial to migrate an existing application from VB6 into the VB.NET environment. Fortunately, Microsoft is working on a
Migration Wizard to assist with this process. It will be a rare project that can be automatically migrated without any intervention on our part., but the wizard should help a great deal.
The Migration Wizard in Beta 1 is a very early version of the tool and, as such, is presumably only a hint of what the tool will eventually do for us. At this time, the tool is of relatively limited use, though it does save a lot of effort around repetitive code changes. For almost any project however, there is quite a lot of work to do by hand once the wizard is finished.
The Migration Process
The Migration Wizard is automatically invoked when we attempt to open a VB6 project in the VB.NET IDE. It will run through the code in the original project, generating a new VB.NET project. The new project will be partially upgraded and will have comments where the wizard was unable to upgrade the code. The wizard will also generate an upgrade report listing any problem that it was unable to address.
Running the Wizard
The wizard automatically detects the type of project being upgraded – whether it is an ActiveX EXE or ActiveX DLL, for instance. Based on this information, it creates the appropriate target project
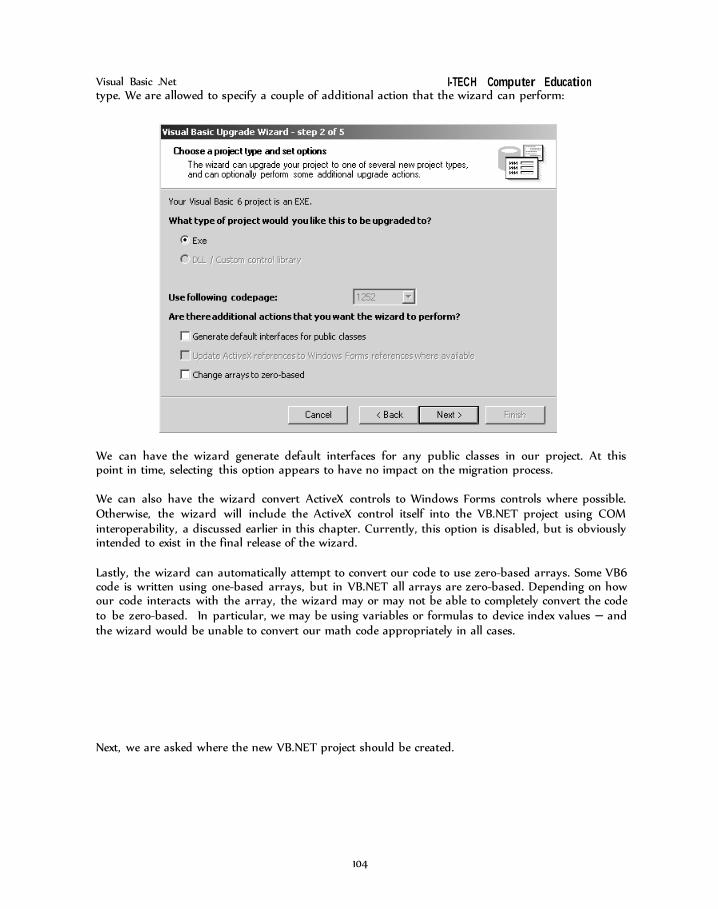
Visual Basic .Net I-TECH Computer Education
104
type. We are allowed to specify a couple of additional action that the wizard can perform:
We can have the wizard generate default interfaces for any public classes in our project. At this point in time, selecting this option appears to have no impact on the migration process.
We can also have the wizard convert ActiveX controls to Windows Forms controls where possible. Otherwise, the wizard will include the ActiveX control itself into the VB.NET project using COM interoperability, a discussed earlier in this chapter. Currently, this option is disabled, but is obviously intended to exist in the final release of the wizard.
Lastly, the wizard can automatically attempt to convert our code to use zero-based arrays. Some VB6 code is written using one-based arrays, but in VB.NET all arrays are zero-based. Depending on how our code interacts with the array, the wizard may or may not be able to completely convert the code to be zero-based. In particular, we may be using variables or formulas to device index values – and the wizard would be unable to convert our math code appropriately in all cases.
Next, we are asked where the new VB.NET project should be created.
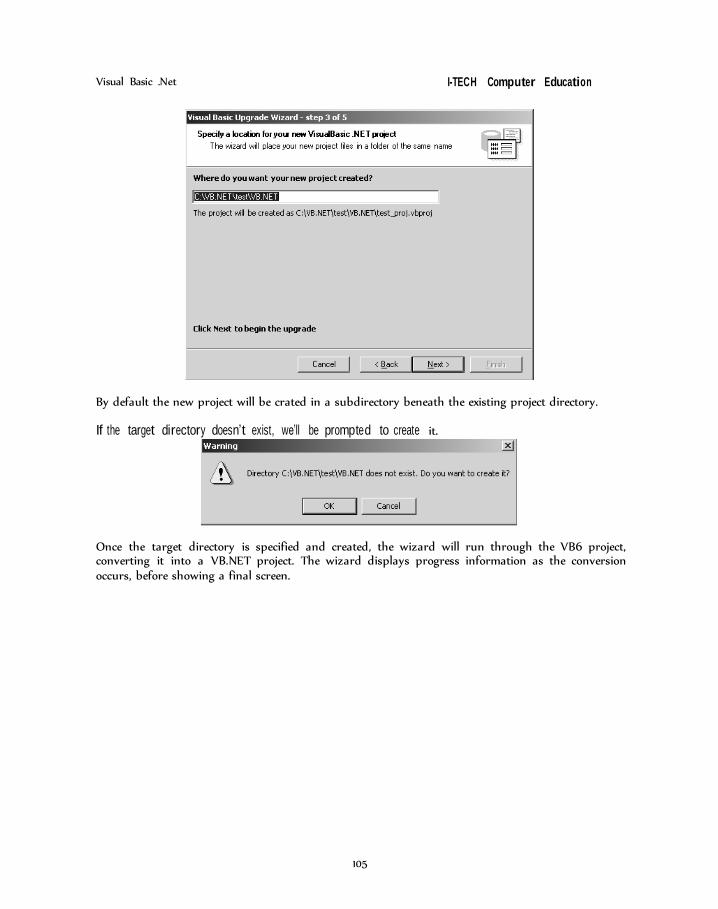
Visual Basic .Net I-TECH Computer Education
105
By default the new project will be crated in a subdirectory beneath the existing project directory. If the target directory doesn’t exist, we’ll be prompted to create it.
Once the target directory is specified and created, the wizard will run through the VB6 project, converting it into a VB.NET project. The wizard displays progress information as the conversion occurs, before showing a final screen.
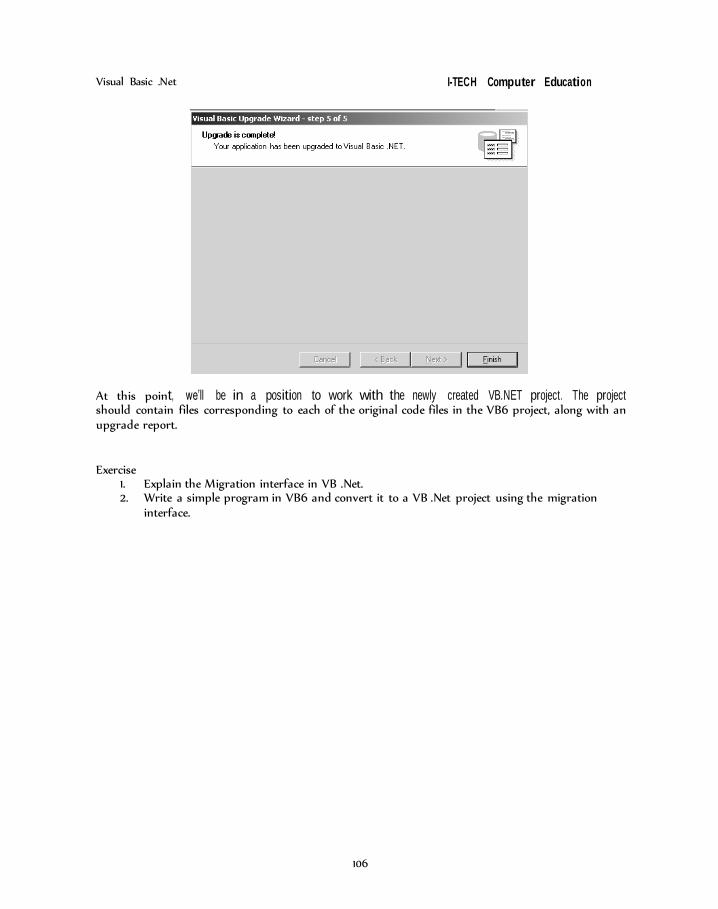
Visual Basic .Net I-TECH Computer Education
106
At this point, we’ll be in a position to work with the newly created VB.NET project. The project should contain files corresponding to each of the original code files in the VB6 project, along with an upgrade report.
Exercise
1. Explain the Migration interface in VB .Net. 2. Write a simple program in VB6 and convert it to a VB .Net project using the migration
interface.