Chapter 1 — Introduction Chapter 2 — Windows Software ultrasound classic/Ultrasound.pdf · Use...
67
UltraSound owners have a variety of sound needs. This is a guide to help you find the best way to use your new UltraSound for your own applications. Using your UltraSound with many games is as simple as selecting UltraSound from the list of sound cards in the game’s setup. You’ll hear extraordinary wavetable sound as soon as you begin the game. To use UltraSound with games that do not yet support the card directly, you may need some help getting started. UltraSound works with programs written for General MIDI, Sound Blaster, Ad Lib, Roland MT-32, and Roland SCC1. Read Chapter 6, “Game Sound Support,” for an explanation of the sound options available with UltraSound. Explore the file playing, recording, and mixing features of your UltraSound right away using the simple sound applets that come with Windows version 3.1 or later. Use Media Player to play sound files with your UltraSound. Or hook up a microphone and use Sound Recorder to record, mix, and play your own sounds. See the Windows manual or Sound Recorder’s on-line help for instructions. Open the UltraSound Mixer to enable inputs and outputs, set playback volume, and control CD and Microphone inputs. The settings you choose from the Mixer applet are only valid for the current Windows session until you save them. Once you have had a chance to explore your UltraSound’s features with these simple applications, try the great bonus software included in your UltraSound package. Advanced Gravis has included a number of terrific software applications for recording, playing, mixing, and composing sounds and music with your new UltraSound. You’ll find full instructions and tutorials in the Bonus Software User’s Guide. A few other useful programs are included as part of UltraSound’s base software. Read on in this user’s guide to learn how to use them: Playfile and Playmidi, DOS utilities with simple recording and playback features in an easy-to-use format. See Chapter 4: “DOS Software.” Patch Manager_, a Windows utility that lets you load and audition sound patches. You control which patches are loaded onto your UltraSound’s onboard memory. See Chapter 3: “Patch Manager_ and Patch Maker Lite_.” Patch Maker Lite_, a Windows application that lets you create new sound patches or modify existing ones for use in your games or MIDI files. UltraSound fully supports patch caching, a Windows 3.1 Multimedia feature that lets applications make optimal use of UltraSound’s onboard memory by preloading only the MIDI sound files (patches) needed to play a particular set of MIDI data. All of the Windows applications supplied with your UltraSound, and most other Windows MIDI players, support patch caching. If you use a music program that does not yet support patch caching, you can either load the patches you want using Patch Manager_ (see Chapter 3) or preload a subset of the General MIDI set (see “Patch Caching” in Chapter 2 for instructions). This will let you hear sound with any Windows application. Chapter 1 — Introduction Introduces you to UltraSound_ wavetable sound. Gives a brief overview of computer sound history and the basics of digital recording. Also introduces MIDI (Musical Instrument Digital Interface) and Focal Point 3D Sound. Chapter 2 — Windows_ Software Outlines the Windows_ software that comes with UltraSound. Explains how to use the UltraSound Mixer to control UltraSound’s audio input and output volumes. Details Windows drivers setup with UltraSound. Highlights UltraSound’s performance options and explains the driver initialization file and patch caching.
Transcript of Chapter 1 — Introduction Chapter 2 — Windows Software ultrasound classic/Ultrasound.pdf · Use...
UltraSound owners have a variety of sound needs. This is a guide to help you find the best way to use your new UltraSound for your own applications. Using your UltraSound with many games is as simple as selecting UltraSound from the list of sound cards in the game’s setup. You’ll hear extraordinary wavetable sound as soon as you begin the game. To use UltraSound with games that do not yet support the card directly, you may need some help getting started. UltraSound works with programs written for General MIDI, Sound Blaster, Ad Lib, Roland MT-32, and Roland SCC1. Read Chapter 6, “Game Sound Support,” for an explanation of the sound options available with UltraSound. Explore the file playing, recording, and mixing features of your UltraSound right away using the simple sound applets that come with Windows version 3.1 or later. Use Media Player to play sound files with your UltraSound. Or hook up a microphone and use Sound Recorder to record, mix, and play your own sounds. See the Windows manual or Sound Recorder’s on-line help for instructions. Open the UltraSound Mixer to enable inputs and outputs, set playback volume, and control CD and Microphone inputs. The settings you choose from the Mixer applet are only valid for the current Windows session until you save them. Once you have had a chance to explore your UltraSound’s features with these simple applications, try the great bonus software included in your UltraSound package. Advanced Gravis has included a number of terrific software applications for recording, playing, mixing, and composing sounds and music with your new UltraSound. You’ll find full instructions and tutorials in the Bonus Software User’s Guide. A few other useful programs are included as part of UltraSound’s base software. Read on in this user’s guide to learn how to use them: Playfile and Playmidi, DOS utilities with simple recording and playback features in an easy-to-use format. See Chapter 4: “DOS Software.” Patch Manager_, a Windows utility that lets you load and audition sound patches. You control which patches are loaded onto your UltraSound’s onboard memory. See Chapter 3: “Patch Manager_ and Patch Maker Lite_.” Patch Maker Lite_, a Windows application that lets you create new sound patches or modify existing ones for use in your games or MIDI files. UltraSound fully supports patch caching, a Windows 3.1 Multimedia feature that lets applications make optimal use of UltraSound’s onboard memory by preloading only the MIDI sound files (patches) needed to play a particular set of MIDI data. All of the Windows applications supplied with your UltraSound, and most other Windows MIDI players, support patch caching. If you use a music program that does not yet support patch caching, you can either load the patches you want using Patch Manager_ (see Chapter 3) or preload a subset of the General MIDI set (see “Patch Caching” in Chapter 2 for instructions). This will let you hear sound with any Windows application.
Chapter 1 — Introduction Introduces you to UltraSound_ wavetable sound. Gives a brief overview of computer sound history and the basics of digital recording. Also introduces MIDI (Musical Instrument Digital Interface) and Focal Point 3D Sound. Chapter 2 — Windows_ Software Outlines the Windows_ software that comes with UltraSound. Explains how to use the UltraSound Mixer to control UltraSound’s audio input and output volumes. Details Windows drivers setup with UltraSound. Highlights UltraSound’s performance options and explains the driver initialization file and patch caching.

Chapter 3 — Patch Manager_ and Patch Maker Lite_ Includes program requirements and quick-start tutorials for Patch Manager_, a patch loading and audition program, and Patch Maker Lite_, a patch making and editing program. Chapter 4 — DOS Software Details the DOS software that comes with UltraSound. Shows you how to use Playfile to play or record digital audio sound files and Playmidi to play MIDI songs and sequences. Chapter 5 — Joystick Support Describes UltraSound’s joystick support programs: GravUtil_ (GravTest and Find Card_) and UltraJoy. GravTest helps you determine the proper speed compensation value for your computer. FindCard locates game port circuit conflicts. Finally, UltraJoy lets you change the speed compensation setting right from the DOS prompt. Chapter 6 — Game Sound Support UltraSound can play sound for games in four ways: in native mode (with games that directly support UltraSound’s wavetable synthesis), or with Audio Interface Libraries (AIL)/Ultramid Drivers, Mega—Em Emulator, or Sound Board Operating System (SBOS_), UltraSound’s Sound Blaster_ emulator. This chapter explains each type of support and includes tips for sound in games. Chapter 7 — Troubleshooting Lists problems you may encounter with UltraSound and its DOS and Windows software and explains how to solve them. Chapter 8 — Customer and Technical Support Tells you how to Register and how to contact Technical Support personnel. Includes information about Gravis’ warranty policy. Chapter 9 — UltraSound Hardware Options and Accessories Describes some of the available UltraSound accessories. Appendix A — Hardware Configuration Information on the Base (I/O) Port Address and reserved jumpers. Refer to this if you need to change the I/O Port to avoid conflict with another device in your computer. Appendix B — Playfile & Playmidi Parameters More advanced command line parameters for Playfile and Playmidi, as well as some information about the Playmidi Configuration File and .CFG files. Appendix C — Mega—Em User’s Reference A brief reference for Mega—Em. UltraSound’s mega emulator solution lets you emulate the Roland® MT-32, Roland® Sound Canvas, and Sound Blaster_ (digital sound only). Appendix D — ULTRINIT ULTRINIT is a utility that sets up and configures your UltraSound on start-up and when you wish to change UltraSound’s settings. Appendix E — Manually Installing UltraSound’s Windows Drivers UltraSound’s installation program automatically installs the Windows Drivers, but you can also choose to install them manually. This Appendix shows you how to manually install both the Windows Drivers and the UltraSound Mixer. Appendix F — Shareware - What is it? A description of shareware from “What is Shareware?” by the Association of Shareware Professionals (ASP). Appendix G — General MIDI Instruments
A chart of General MIDI and UltraSound Instrument numbers. Appendix H — UltraSound Setup
An explanation of the settings available with your UltraSound and instructions for using the UltraSound Setup program. This appendix is also the place to look for instructions if you ever need to re-install the UltraSound software.
1
Thank you for choosing UltraSound_, the ultimate sound solution for IBM® compatible personal computers. UltraSound is a full-featured sound card capable of providing 16-bit, CD quality sound from your desktop personal computer, as well as giving you the latest in audio technology–3D sound. Whether you plan to use your UltraSound to add excitement to business applications, music, or games, the UltraSound will meet your sound needs for years to come. Your UltraSound is many products rolled into one: o A true wavetable music synthesizer with a full, expandable, 16-bit General MIDI
sound set o A Microsoft Windows_ 3.1 Multimedia (MPC) sound card for music, multimedia, and
business applications o A sound card for games, supporting Roland® MT-32, Roland® Sound Canvas, Ad Lib®,
Sound Blaster_, and native UltraSound games for the best sound. o A digital sound card capable of simultaneous recording and playback, with up to
32 simultaneous digital channels, full mixing capabilities, and built-in interfaces for Sony, Mitsumi, and Panasonic CD-ROM drives.
Computer Sound–A History The world of computer sound reproduction began simply as a bit that toggled voltage on and off at a set frequency. Although crude, this served its purpose: to produce a simple beep. The beep was improved by the development of additive synthesis, or the creation of sound by adding different types of waveforms to create a new sound. Subtractive synthesis, the creation of sound through filtration, followed shortly after. Unfortunately, both techniques produced inaccurate sounding instruments. FM Synthesis departed from previous technology. FM synthesis creates an instrument by frequency modulating one waveform against another to produce the sound of the desired instrument. Variables like wave shape, wave form, and modulation are manipulated until the sound more closely mimics the sound of the actual instrument.

UltraSound’s wavetable synthesis is superior to FM synthesis. Wavetable synthesis recreates the sound of an instrument by recording (digitizing) the actual instrument and playing it back. The result of this process is a precise electronic reproduction of real instruments. UltraSound’s RAM-based wavetable synthesis lets you reproduce an unlimited number of sounds with incredible accuracy.
Working with Digital Sound Sound Basics Any sound consists of pressure waves moving through the air. These waves move the diaphragm in your ear canal and the connected small pieces of bone that in turn vibrate synaptic tissue. This causes electrical impulses to be sent to the brain that you “hear” as sound. Waves have two important characteristics: frequency and amplitude. In the ocean, for example, frequency can be regarded as the number of waves that crash against the shore in a given amount of time. In the case of sound, frequency is measured in waves (called cycles) per second. The frequency of a sound wave determines the pitch of the sound. The higher the frequency (or the more cycles), the higher the pitch. Frequency is measured in units of Hertz (Hz). A Hertz is one cycle per second. The second characteristic of a wave is amplitude. You can visualize amplitude by thinking about the height of waves in the ocean. On a windy day, the waves are very high. On a calm day, they are small. Amplitude determines volume. The greater the amplitude of a sound wave, the louder it is. Recording Sound Waves Digital recording captures sound by storing a sound wave’s amplitude values at regular time intervals. Computer or digital recording has natural limitations. Sound waves are continuous or analog in nature, but the computer can only work with discrete (digital) on/off information. The computer looks at the amplitude of what you record at precise intervals (this is called the sampling period) and stores the amplitude data for each interval as a number. The computer re-creates the sound by converting the digital samples back to a smooth analog signal through a DAC (Digital to Analog Converter). The number samples per second that the computer takes (the sampling rate) affects the quality of the recording (more samples per second produce better quality). UltraSound can record and play back at sampling rates of up to 44,100 times per second, or 44.1 kHz (up to 48 kHz with the UltraSound MAX), the same frequency that compact discs (CDs) use. As a rule, sampled sounds should be recorded at twice the frequency that they occur in nature (or greater). Since humans can hear from 20 Hz to 20 kHz, 44.1 kHz sampling is sufficient to successfully re-create any sound we can hear. Another factor that influences the accurate reproduction of the original recorded signal is the sampling resolution, or bit depth. Bit depth relates to the number of steps, or levels of sound loudness, that can be measured. An 8-bit sample can achieve up to 256 different levels of sound, and a 16-bit, CD-quality sample can have 65,536 levels. UltraSound is capable of playing both 8-bit and 16-bit WAV and SND digital sound files to ensure the best sound possible from any application. Making your own recordings with 16-bit resolution however, requires an UltraSound MAX sound card. Recording at 8-bit resolution offers sound reproduction that matches or exceeds the quality of all but the best PC desktop speaker systems. If you use a sound card for professional applications, UltraSound MAX lets you choose the superior quality of 16-bit recording. Digital Recording Limitations It’s important to recognize the limitations of digital recording, and how you can avoid recording errors with your UltraSound. Aliasing is unwanted mixing of frequency information that often manifests itself as a harsh, high frequency distortion. Recording at 22 kHz or higher virtually eliminates aliasing. Clipping is distortion that occurs when the recording level is set too high. Loud pops and clicks will be heard when the recorded signal exceeds the limits of the analog to digital circuitry. Reducing the record level eliminates clipping. Quantization errors may result from the rounding off that the computer may do to store data. UltraSound greatly reduces these rounding off errors by a process called interpolation, where values are generated between each sample, resulting in smoother, more natural sound reproduction. HDD transfer rate limitations may also cause quantization errors.

Noise refers to digital hiss or pops and clicks. Hiss can be greatly reduced by recording near, but never exceeding, the maximum sound level. Most recording software includes recording level VU meters, or another method, to make this easy to accomplish. A small amount of digital hiss is unavoidable with 8-bit recording, although it is usually masked by the recorded signal when sound is present. As discussed previously, 8-bit resolution allows 256 steps of loudness. The inevitable digital noise caused by stray radio frequencies from your power supply or other computer components can produce a few steps of random digital numbers. Moving your UltraSound to a slot as far as possible from the power supply, hard disk controller, and video cards helps to reduce the amount of noise present in your digital recording. Because 16-bit recording allows 65,536 steps of loudness, the few random steps of digital noise are much less significant, so there is much less audible noise. Weigh the cost and disk space requirements carefully before deciding to record with 16-bit resolution. For Best Digital Recording - Read This Digital recording to hard disk requires very high data transfer speed (throughput). This means there should be no digital road blocks or speed bumps between your sound card and your hard disk. If you are having difficulty getting clean digital recording without pops, clicks, or gaps, try each of these suggestions in any combination, or simply reduce the sampling resolution. Disk Fragmentation Run a disk de-fragmenting program to optimize the free space on your hard drive so that your recorded data will be placed in one contiguous area of your hard disk. Norton Utilities’ Speed Disk, PC Tools’ Compress, Golden Bow’s V-Opt, and DOS 6.x’s disk defragmenter (DEFRAG) are some commercially available de-fragmenting programs. Note that you only have to optimize the free space on your hard disk, which should not take more than a few minutes. Optimize between takes when using high sampling frequencies and stereo recording. Disk Compression DoubleSpace, Stacker, or other disk compression schemes limit disk data throughput because data must first be compressed with a software algorithm before writing to disk. At high sampling rates, your disk subsystem may not be fast enough to allow recording without glitches. It’s best not to record onto a compressed disk. Memory Managers EMM386, QEMM, 386MAX, and other memory managers add processing time to disk reads and writes, which may result in problems getting your data onto the disk fast enough. Processor Speed For the best digital recording, the fastest processors are recommended. Some of the above conditions can be compensated for with a faster CPU. Sound Compression The UltraSound MAX also offers 4:1 ADPCM and 2:1 μ-law and A-law compression to help alleviate data throughput problems by reducing the amount of data before submitting it to the disk subsystem. DMA Channel Selection Because some motherboards do not have working 16-bit DMA channels, UltraSound’s default DMA is an 8-bit channel. (The 8-bit channels are 0—3; the 16-bit channels are 4—7. If the 16-bit DMA channels work on your computer, use one–performance, especially stereo recording, will be better. If strange things happen with the 16-bit channel, switch back to a free 8-bit channel.

UltraSound and Music UltraSound’s capacity to play simultaneously up to 32 notes from any combination of 32 real or digitally synthesized voices opens up a whole world of musical expression. Coupled with music creation and editing software, your UltraSound allows you to create and mix sounds into studio quality musical arrangements.
MIDI MIDI, or Musical Instrument Digital Interface, is a digital communication standard created in 1983 by music equipment manufacturers. The MIDI Standard lets you connect any MIDI-equipped music device to other MIDI devices for transferring music and performance data. This allows you to control keyboards, synthesizer modules, drum machines, etc., from your UltraSound-equipped computer. For example, connecting an inexpensive MIDI-equipped keyboard to your UltraSound via the (optional) MIDI connector port allows you to “play” any of your UltraSound’s instruments (patches), from an acoustic piano to a snare drum, to any of the myriad of digitized sounds supplied. Of course, you don’t need a keyboard to “play” your UltraSound: it is a self-contained music studio you can play with your computer’s MIDI software. MIDI Files MIDI is also a file format that records music or sound events such as a note being played, what instrument the note is playing, how long the note plays, how loud, etc. These events can then be reproduced exactly as they were entered, with the flexibility to change things such as the instrument, the loudness, or the note. MIDI music files also conserve disk space: only the events are recorded, not the actual sounds. The sounds that the UltraSound uses to play back the MIDI events are full 16-bit, CD-quality voices (patches) digitized from real musical instruments (or synthesized using digital wavetable synthesis) so that what you hear through your stereo or headphones is incredibly real and dynamic.
Important! Before using MIDI software with your UltraSound, read the section on “Patch Caching” at the end of Chapter 2. Focal Point 3D Holographic Sound
Most people hear 3D sound all the time. But for computer games and programs, audio virtual reality is cutting edge technology. UltraSound is engineered to take full advantage of Focal Point’s breakthrough 3D Holographic Sound. Unlike other “3D Surround Sound” systems, Focal Point 3D produces 360 by 360 degree audio that places sounds above and below the listener, and to the left, right, front, and back, all with just two speaker sources (headphones required) and with no additional hardware. A process called binaural convolution generates what each ear would actually hear in relation to the position of the sound source. UltraSound’s 32 independent digital channels are used to manipulate the apparent sound source in real time! Game and program developers are excited by the prospects. The addition of 3D sound will raise games and programs to a new level of realism. Look for games and demos supporting UltraSound 3D. Check out the 3D Demo that came with your UltraSound.
→→→→ Type: CD C:\ULTRASND\DEMO3D <enter> Type Conventions
To help you get the most from this User’s Guide, certain type and notation conventions are used: User Actions If you are to perform an action, it will be proceeded by a diamond (→) in the margin. Example: → Turn on your computer. Keyboard Key Characters Angled brackets enclose keyboard key characters. Example: <enter> indicates that you should press the Enter or Return key; <esc> means you should press the Escape key.
Key Combinations and Sequences A plus sign (+) used between key names or characters indicates that you must press both keys at the same time. For example: Press <Alt>+<F> means you should press the <Alt> and hold it down while pressing the <F> key. Text Entry Text or commands you should enter through your keyboard are displayed in upper case. Example: → Type: COPY A:*.* <enter> Variable Text Entry Items that you must enter using the keyboard, but which require you to choose from a number of parameters (like numbers for example), will be enclosed in square brackets ([ ]). Do not type the brackets, only the items between them. Special Notes Items or notes of special interest are displayed as follows:
Note! Read this note. It’s important!
2
UltraSound Windows Features
o Supports 8 and 16-bit playback in all Windows 3.1 .WAV formats (i.e., 8-bit, 16-bit, Mono, Stereo, 11025 Hz, 22050 Hz, 44100, and 48000 Hz).
o Supports 8-bit recording in all formats; 16-bit recording is available with the UltraSound MAX.
o Allows simultaneous recording and playback of different files. Just make sure that the frequencies are set the same for both files, and set different DMA channels for Recording and Playback.
o Support for the onboard 32-voice wavetable synthesizer is provided. o Provides a full General MIDI patch set comprised of 192 instruments, drums, and
sound effects for playing MIDI files. o Able to cache, or preload, patches from the General MIDI set into its onboard
memory. For applications that do not yet use patch caching, the capability to

load a small General MIDI set is provided. Patch Manager has the ability to load, unload, and audition patches.
o Provides an option to conserve patch memory which increases the number of patches you can load by using the space more effectively. (Selecting Conserve Memory causes a small reduction in a patch’s sound quality.)
o Full MIDI IN and MIDI OUT capabilities are supported. Note! The UltraSound driver is designed to work with Windows 3.1 in 386 enhanced mode only.
Windows Utilities Your UltraSound came with a number of Windows_ utilities and software applications. The utilities include a Windows Sound Converter and the UltraSound Mixer applet. Sound Converter The Windows Sound Converter is a utility that converts sound file formats to and from .SND, .WAV, and .VOC. UltraSound Mixer The UltraSound Mixer applet (installed in Windows) allows you to control the mixer facilities of your UltraSound card. Mixer facilities include input/output enable, Wave and MIDI playback volume, plus CD and Microphone volume control. The UltraSound Mixer functions allow you to modify the state of the inputs, output, and playback volumes of UltraSound. Simply click on the appropriate check box to enable the Microphone and Line inputs. Click on the Output Enabled checkbox to simultaneously enable the amplified and non amplified outputs. Click on any combination you need for mixing. Note that any combination of inputs is possible. For instance, you are not excluded from simultaneously enabling the Microphone and Line inputs. The scroll bars allow you to adjust the playback volumes of both .WAV and MIDI files. By default, the CD, Line, and Microphone inputs are muted to eliminate noise during playback. We recommend that you leave these inputs muted when not in use. Windows Programs Patch Manager_ UltraSound can play up to 32 digital or instrument sounds (called voices or patches) simultaneously. A full General MIDI set of patches, and additional patches for use in games are included with your UltraSound. Patch Manager_ lets you select and load patches easily into UltraSound’s onboard memory. Play, or audition the patches on Patch Manager’s on-screen synthesizer. Or, if you have a MIDI keyboard and the Gravis MIDI Adapter, plug them in and play your UltraSound through Patch Manager! Patch Maker Lite_ Patch Maker Lite_ allows you to make your own patches, or edit existing patches. See Chapter 4, “Patch Manager and Patch Maker Lite,” for instructions for using these programs. Windows Drivers Driver Configuration The Driver Configuration dialog window lets you customize different aspects of the UltraSound Windows driver. Any items in the dialog that are changed will be saved in the Windows SYSTEM.INI file when the OK button is pressed. The next time Windows is started, the new selections will be in effect. A change in any of the following items will require that Windows be restarted: Base Port, DMA, IRQ, or the Active Voices.
To access the Driver Configuration dialog window, locate and open the Windows Control Panel, usually found in the Main or Accessories program group. Select and click on the Drivers icon. If the UltraSound driver has been installed, there will be an entry in the Installed Drivers list box named Ultra Wave and MIDI Synth (the UltraSound audio driver). Activate the Driver Configuration dialog window by double-clicking the left mouse button on Ultra Wave and MIDI Synth. UltraSound Setup In the Drivers box, click on the Setup button to access the following items: Hardware Configuration The UltraSound Setup dialog asks you to enter settings for: Base Port, GF1 IRQ, MIDI IRQ, DMA Channel A (Playback), and DMA Channel B (Record). UltraSound MAX boards also require CODEC settings for 16-Bit Base Port. The Base Port Address must be the same address that is set on your UltraSound board–it’s factory preset to 220 Hex and can be adjusted by moving jumpers as described in Appendix A. The DMA and IRQ selections are programmable, and may be set to any of the available options, as long as there is no conflict with another device in your system. The settings you choose here must match your DOS settings.
Note! If you wish to record and play simultaneously, be sure to set different DMA channels for Playback and Recording. (The frequency must be the same for both files.)
Linear Volume. You can set the Linear Volume either on or off. Selecting “off” will base MIDI volumes on a logarithmic scale. By default, Linear Volume is set “on.” Active Voices. The valid range of active voices is 14 to 32. There are always two voices reserved for playback of stereo wave files; thus, the number of voices available for MIDI is two fewer than the number chosen. Note that a change in the number of active voices will not take effect until after the current Windows session is restarted. For an explanation of the significance of selecting a certain number of voices, see the section “Performance Considerations.” Verify Patches. When Verify Patches is on, all General MIDI patches located in ULTRASND.INI will be verified to make sure that they are present when Windows starts up. Turning off this option speeds up Windows start-up time. Patch Memory Options Patch Memory refers to the onboard memory used for storing patches. You may load patches at their original resolution by choosing High Fidelity (16-bit), or at a lower resolution by selecting Conserve Memory (8-bit). See the next section for more information regarding this option. Patch files contain the sound data used by the driver to play MIDI notes. Performance Considerations You can control certain aspects of UltraSound’s performance via the Performance Options section of the Driver Configuration Dialog Window. For example, Active Voices affects the number of active voices used by UltraSound to play MIDI and Wave files. The number of active MIDI voices in Windows is selectable to allow you to ‘reserve’ voices for digital playback. In High Fidelity mode there is a barely discernible loss of fidelity from 44.1K starting at 15 voices. Normally, you should set the number of active voices somewhere around the default of 22. The Patch Memory option affects the use of onboard patch memory. Choosing the option Conserve Memory effectively doubles the amount of memory available for patches, as the majority of the patches are created at a high resolution. The UltraSound card always deals with sound internally at a high resolution, so generally the loss of sound quality for choosing to load patch files at a lower resolution is minimal. Patch Caching Patch caching is one of the distinguishing features of the Windows 3.1 Multimedia capabilities. Patch caching loads patches into the UltraSound’s DRAM for use in applications. Patch caching allows the most efficient use of onboard UltraSound memory, since a sequencer, or other application, only needs to load the patches required for a particular set of MIDI data.
Patch files contain the sound data used by the driver to play MIDI notes. Patch caching allows you to add additional sounds simply by obtaining new patch files. Many applications already take advantage of this feature, including the Windows Media Player, Power Chords_, Midisoft_ Recording Session_, Studio, Music Mentor®, MCS Stereo Rack_, and DigiVox’s Multimedia Sound Studio_. If, however, you have an application that does not use patch caching, you can load a subset of the General MIDI set before running the application: - Click on the Drivers icon under the Control Panel, and select UltraWave and MIDI
Synth or the UltraSound audio driver. - Click on the Setup button. Then in the Performance Options section, click on the
Conserve Memory button. - Click on the MIDI Mapper (also under the Control Panel) to select the
appropriate setup for the amount of memory on your UltraSound. For example, select Ultra 512K in the name box if your card has 512K of RAM.
- Using Patch Manager, load patches from the MIDI file that corresponds to the amount of memory on your UltraSound. The MIDI files you can use are LOAD512.MID and LOAD1024.MID. You may also load all the patches for a particular MIDI file by using the Get from MIDI File option in the File menu of Patch Manager.
To revert to normal operation, select UltraSound Setup in the MIDI Mapper, and enable the High Fidelity option of the driver.
3
Patch Manager_
Early synthesizers achieved different sounds by connecting voltage-controlled oscillator filters and amp modules in different ways. Because cables were used to patch together the modules, the resulting sounds were called patches. For this reason, we use the word patch to refer to the sampled sounds and associated data used by your UltraSound’s internal waveform synthesizer to create instrument sounds. UltraSound patches are stored in disk files that must be loaded into onboard memory before a sound can be produced. This patch loading is normally done automatically by application software, but there may be times when you want to do it yourself. With the UltraSound Patch Manager_, you can control which instrument patches are loaded into your UltraSound’s onboard memory, and you can audition them. These patches are then available for use with your favorite Windows music composition or sequencer software. Patch Manager also adds MIDI capability so you can play your UltraSound from any MIDI input device. Program Requirements A correctly installed Gravis UltraSound card, Windows 3.1 in 386 Enhanced Mode, and the Windows driver in the installation disk set. Patch Manager Usage Notes
o Patch Manager is installed automatically during the UltraSound installation. o Patch Manager may not work correctly with earlier versions of the Windows
driver. Use it only with the Windows driver supplied on your new UltraSound disks.
o Run Patch Manager; select Quick Tour in the Help Index menu for an overview of operation.
o Patch Manager comes complete with an on-screen 88-key synthesizer keyboard. o Patch Manager’s “Memory Remaining” gauge shows how much memory is remaining to
hold patches. o An upgrade to the full 1 MB of RAM on the card is recommended if you intend to use your UltraSound card for MIDI music compositions using complex
orchestration. Quick Tutorial This quick tutorial tour will acquaint you with many of Patch Manager’s features. To start Patch Manager, launch Windows and double-click on the Patch Manager icon, found in the Gravis UltraSound group in the Program Manager window. 1. Start Patch Manager When you start Patch Manager, you will see four main windows that display patch numbers and the names of the corresponding General MIDI instruments. (Some percussion instruments are not in the General MIDI set, so their names are blank.) The two left windows show which patches are available on disk for melodic and percussion instruments. The two right windows show which melodic and percussion patches are currently loaded into UltraSound’s memory. The two right windows might be empty, unless you have previously loaded patches using Patch Manager or have played a MIDI file with a program such as Media Player. 2. Load a patch Select Acoustic Grand Piano (patch 0) in the upper left window by clicking on it with the mouse. Press the double right arrow button to load the patch (seeFig. 4—1). This patch now appears in the upper right window, indicating that it is loaded. Notice that the Memory Remaining number in the lower right corner has decreased, and the memory gauge below it is starting to fill up. 3. Audition a patch Select the patch name in the right-hand window by clicking on it with the mouse. Then move the mouse pointer onto the Patch Manager synthesizer. Press the left or right mouse button to play a note. Drag the pointer on the synthesizer keyboard to play several notes. If you have a MIDI device connected to your computer, you can use it to play the notes, too. Just select MIDI Thru from the options menu. 4. Audition a group of notes Click on the Note Memory button so that it is checked. Play a note on the synthesizer keyboard. Each note auditioned is now highlighted and saved. To deselect a note and remove it from Note Memory, click on it with the right mouse button. Select a few notes, then click on the patch name in the upper right window. The group of selected notes now plays with the patch name selected. 5. Audition other patches Load a few more melodic patches (as in Step 2) and click on each one in the Patches Loaded window. Each patch will play the notes selected on the synthesizer. 6. Audition drums
Load a few percussion patches as described in Step 2, and click on one of these. The Patch Manager synthesizer keyboard now displays a gray keyboard with some white keys. Each white key corresponds to an individual drum sound. Try some! The Note Memory option does not work for drum patches. 7. Adjust the volume on the synthesizer Press one of the buttons with an up or down arrow, in the middle top of the synthesizer to adjust the audition volume. Note that the red LEDs to the right of the buttons show the current volume. 8. Display several audition keyboards Choose All... from the Audition menu. A group of audition keyboards is displayed, one for each melodic patch loaded and one that contains all the loaded percussion sounds. Any of the audition keyboards can be played with the left mouse button. Notes will play as long as the left mouse button is held down. You can control the volume of the currently selected audition window with the Volume control in the toolbar at the top. For melodic patches, you can select a different instrument for the current keyboard by pressing Instruments... on the tool bar. If you have a MIDI device connected to your computer, you can use it to play notes for the currently selected patch. Notice that the note value of the note you are playing is displayed in the toolbar. Both the note name (e.g., “C5” for middle C) and the note number (e.g., “60” for middle C) are shown. 9. Load patches used by a MIDI file Get back to the initial Patch Manager window, the one with the four lists of patches. Choose Get from MIDI File... from the File menu. Select the name of a MIDI file. Patch Manager reads the MIDI file and loads the patches it needs. You can then play the MIDI file with a program that does not know how to load patches. 10. Change the patch names Choose Names... from the Options menu. Click the checkbox labelled Use Names from Patch File, then click OK. The names shown in the list of patches are now those that are stored in the patch files, rather than the General MIDI names for the corresponding patch number. (See Exhibit G for a list of General MIDI and UltraSound instruments, or select General MIDI Names from the Patch Manager Help menu.) Loading and Unloading Patches There are three methods for loading patches. 1. Select patch names in one of the left-hand boxes labelled Patches Available. You
can select several patches at a time by dragging the mouse, or using <shift>-click or <control>-click to extend a selection. Then press the button labelled >>. The patches loaded will be displayed in the right-hand box labelled Patches Loaded. A single patch can be quickly loaded by double-clicking its name in the Patches Available box.
Note! If there are more patches selected than can fit in memory, the melodic patches will be loaded first, numerically, then the percussion patches, numerically, until memory is full. Sometimes a patch won’t fit into memory even though the Memory Remaining display indicates that there is enough room. UltraSound memory is partitioned into segments of 256K, and patches won’t load across a segment boundary.
2. The patches required by a MIDI file can be loaded using the Get from MIDI File... command under the File menu.
3. Some Windows programs (such as Media Player) load patches when they play a MIDI file. When you start Patch Manager, these patches will appear in the Patches Loaded window.
To unload patches, select patch names in one of the right-hand boxes labelled Patches Loaded. Press the << button. The selected patches will move to the left-hand box labelled Patches Available. Auditioning Patches First load the patch you want to audition. Then audition the patch by playing the synthesizer, keyboard, or MIDI device, or by creating audition windows. You can create one or more audition windows for the loaded patches by selecting Melodic, Percussion, or All from the Audition Menu. In Percussion audition windows, each available patch is assigned to a key (in conformance with MIDI convention). Keys with an available patch are white; the rest are grayed out. If you select All, audition windows are created for each loaded melodic patch, and a single window is created for all of the percussion patches. Playing the Patch Manager Synthesizer First select a patch name in one of the Patches Loaded boxes. Then click the left mouse button on the notes you wish to play. Notes play as long as the mouse button is held down. Drag the mouse across the keys to play several notes. If Note Memory is on, the notes are colored gray as you click on them and are played when a patch name is selected in the Load Patches box. Click off notes with the right mouse button, or turn off Note Memory to clear all notes. Adjust the volume by clicking the volume buttons on the synthesizer. The red LEDs indicate the current volume. Playing Notes on the Computer Keyboard The row of keys from ‘Z’ to ‘M’ and the row from ‘Q’ to ‘U’ both represent the white piano keys from ‘C’ to ‘B.’ The upper row of keys plays one octave higher. The black piano keys are represented by the rows of keys from ‘S’ to ‘J’ and from ‘2’ to ‘7.’ The <shift> key causes all keys being held down to be restruck as if you lifted them all off and pressed them down again. The right and left arrow keys shift the whole keyboard up and down an octave. Playing Notes with a MIDI Device If you have a MIDI input device connected to your computer, you can use it to play the notes for the selected patch. Just select MIDI Thru from the Options menu. Changing Patches Available The patches available to load and audition with Patch Manager are those that are available in the current Windows session. The UltraSound ULTRADIR directory contains the file ULTRASND.INI, which lists the names of the patch files for each patch number. See the section on the Bank Manager to learn how to modify ULTRASND.INI to make different patches available. If there is no patch file listed for a number, or if the patch file name is BLANK.PAT, it will not appear in the list of Patches Available. Changing Patch Names By default, the files in the Patches Available and Patches Loaded boxes are displayed with General MIDI standard names. You can choose to view the patch name that is stored in the patch file instead by clicking Use Names from Patch Files, or you can view the patch file name. Changing Instruments You can change the instrument patch for a melodic audition window by pressing the Instruments... button on the toolbar. A list of available patches is displayed. Click on one to apply it.
MIDI In Velocity When you use a MIDI keyboard for input (playing notes), Patch Manager, by default, uses the velocity (volume) sent by the MIDI keyboard. If you do not wish to use the velocity sent by the keyboard: → Remove the checkmark from MIDI In Velocity in the Options menu. The volume will instead be determined by the volume control on the synthesizer bitmap. Saving and Loading Configuration To save the currently loaded patches: → Choose Save from the File menu. Enter a file name, and press <enter>. To retrieve a previously saved list of patches: → Choose Load from the File menu, select a file, and press <enter>. Patch Manager
will load all of the patches in the saved file. Unloading All Patches To unload all patches from the card’s memory: → Select Unload All Patches from the Options menu. Bank Manager Patch Manager’s Bank Manager lets you create and edit custom instrument sets. This lets you use other patches besides the General MIDI set that is provided with your UltraSound. You can make such patches yourself with Patch Maker Lite (in the next section), buy them from third-party vendors, or find them for free on bulletin boards and on-line services. Suppose you want to replace the supplied acoustic nylon guitar patch with one of your own (MYGUITAR.PAT), and have it used by Windows applications. The basic steps are as follows (details for each step follow in the next paragraphs). 1. Copy or move the file MYGUITAR.PAT to C:\ULTRASND\MIDI (or whatever your
UltraSound directory is). 2. Start Bank Manager, and create a new bank. 3. Map MYGUITAR.PAT to program number 25. 4. Save the bank to Bank 0. You don’t need to map all the other patches; if you
don’t specify a mapping, the existing mapping (usually a General MIDI instrument) is used.
Starting Bank Manager Select BankMan from the Patch Manager main screen. The Bank Manager main display appears. Creating a New Bank Select New Bank from Bank Manager’s File menu. A dialog box appears with the following fields: Bank Number. Enter a unique bank number (a drum bank and melodic bank can have the same number). Bank Type. Select the type of bank (Drum or Melodic). Copy Current Bank. If you wish to start the new bank as a copy of the currently selected bank, check this box.
Bank Name. Enter a descriptive name. Patch Directory. Enter the name of the bank’s patches’ directory. Use Browse if necessary to locate the directory. When you’re finished, press OK to create the new bank. Selecting a Bank Click the down arrow of the Selected Bank listbox to display the names of all the banks, then select a bank to view or edit. Editing a Bank The patches included in a bank are displayed in the Program Map (the largest window on the Bank Manager display). Patches are identified by program number, General MIDI name, and patch file name. The Patches Available box lists all of the patches available in the patch directory associated with the currently selected bank. To Load a patch into the bank Double-click on it, or select it and click Load Patch. To Map a patch to a program number in the bank (Do this to replace the standard General MIDI patch with another.) Select the program number from the Program Map listbox. If the program is not visible, press the Expand button (<–>). From the Patches Available listbox, select the patch file that you want to map to the selected program number. Click on the button marked << to add the program to the Program Map listbox, or double-click on the patch file name. To Unmap a program Select the program you wish to unmap in the Program Map listbox. Click on the button marked >> to remove the mapping. Saving a Bank Choose Save from the File menu to save the current bank. To save the current instrument mapping to the primary bank, choose Save to Bank 0. Save to Bank 0 is useful for maintaining alternate patch sets. For example, you could set up a bank containing a new set of brass instrument patches. Then, when you select Save to Bank 0 from the File menu, the brass instrument patches in the primary bank would be replaced by your new set. Also, if a MIDI playback program doesn’t respond to Continuous Controller 0 (bank change) messages, and you want to play a MIDI file that uses them, you can use the Get from MIDI File option to create a bank with the proper instrument patches, then use Save to Bank 0 to remap the bank-switched instruments. To restore a primary bank to its original condition, select Restore Primary Melodic Bank or Restore Primary Drum Bank from the Special menu. Renaming a Bank Select Rename Bank from the File menu. Enter the new name in the edit box and press OK. Creating a Bank Based on a MIDI File Select Get from MIDI File from the File menu to create a custom bank containing the instruments used in a MIDI file. In the dialog box that appears, select the MIDI file. After the file has been read, a New Bank dialog box comes up to let you name the bank and assign it a number. Both melodic and drum banks are created. Deleting a Bank Select Delete Bank from the File menu to delete the current program bank. Showing Patch Information Select Show Patch Information from the Special menu to display the name and size of a selected patch file. Get Patch Sizes displays the size of patch files in the current bank’s patch directory. Synchronizing to ULTRASND.INI
Select Synchronize to ULTRASND.INI if you have been directly modifying ULTRASND.INI or if you believe that an application has added banks to your ULTRASND.INI file. This option causes the program to re-read all the bank numbers and names from ULTRASND.INI. This should not normally be necessary. Restoring Primary Banks The first time you use Bank Manager, it saves a copy of the two primary banks. Select Restore Primary Melodic or Drum Bank from the Special menu to restore altered MIDI programs.
Note! You can force Bank Manager to save a new default copy of the Primary Banks by removing the line SavePrimary=FALSE from the BANKMAN.INI file in your
Windows directory. The program responds to Continuous Controller #0 messages. When a Program Change message or CC#0 message is received, Bank Manager attempts to retrieve the instrument patch from the selected Program/Bank combination. It uses the GS MIDI fallback arrangement if the requested Program/Bank does not exist. User banks (40H—7EH) and special effects programs (70H—7FH) do not use the fallback mechanism. If a program number is used on more than one channel, and different banks are selected for each channel, Bank Manager will remember only the last bank number selected for that program. Likewise, when on a drum channel, if a key is used with more than one Program Change number, only the last Program Change number selected is remembered..
Technical Note:

Patch Maker Lite_ Patch Maker Lite_ lets you create new patches, or modify existing ones, to use in your MIDI music compositions or games. To learn how to use the patches you create, see the previous section, “Bank Manager.” Quick Tutorial Patch Maker Lite’s quick tutorial will acquaint you with many of its features and take you step by step through the creation of a new patch. You can stop the tutorial at any time and resume it later. Make sure you save the patch you are working on before closing Patch Maker Lite. To resume working on a patch, open the saved patch. Starting the tutorial In the tutorial, it is assumed that you have installed Patch Maker Lite in the directory C:\ULTRASND\PMAKER. If you have chosen to install Patch Maker Lite in a different directory, use your directory name instead whenever you see C:\ULTRASND\PMAKER. To start the tutorial, double-click on Patch Maker Lite’s icon. When Patch Maker Lite starts, you’ll see an empty window with a menu bar at the top and a toolbar just below the menu bar. In the menu, under the Help file, select Contents. Click on Quick Tour and Tutorial to start the tutorial. From this point, please follow the tutorial instructions on screen. To keep the instructions handy, reduce the tutorial window so you can interactively read and do the tutorial. After the tutorial... By now you should have completed the Quick Tour and Tutorial, and you should be familiar with Patch Maker Lite’s features. The tutorial is a great way to get started, but you may need some further instructions to help you out when you are on your own. Menu Commands Before you can put the Menu Commands to use, you need to know how to load an existing patch for editing. There are three methods for loading patch files: 1. Use the File/Open command. 2. Drag and drop a patch file from the Windows File Manager into Patch Maker Lite’s
main window. (See your Windows documentation for more information about drag-and-drop.) The patch file extension must be .PAT. You can drop several files at the same time.
3. Include the name of the patch file in the command used to start Patch Maker Lite. For example, to load the patch file HELLO.PAT when Patch Maker Lite starts, you could create an icon with the command line PMAKER.EXE HELLO.PAT.
File Menu New. The New command creates an empty patch. Use New to create a new patch from scratch using waveforms. To edit an existing patch, use the File Open... command. Open... Brings an existing patch into Patch Maker Lite’s window for you to test or modify it. You can also open patches by specifying them on the command line or by dragging and dropping them. Open .WAV File... Opens a waveform file. Later, this can be added to a patch by dragging and dropping it onto a patch keyboard.
You can also open a waveform file by specifying its name on the command line when you run Patch Maker Lite, or by dragging and dropping a file with the extension .WAV from the File Manager onto Patch Maker Lite. Save. Saves a patch that you’ve created or modified. After you save your file, any changes you’ve made to the patch are permanent. Save As... Lets you save the current patch into a file with a different name, preserving the original patch file. Exit. Lets you leave Patch Maker Lite. Edit Menu Delete. Removes the current waveform from the current patch. Remove Silence. Eliminates periods of silence from the beginning and end of a waveform. It works on the current waveform by doing an analysis to find the first and last sample points that are louder than a threshold (which is determined automatically). You are then given the option to delete the sample points outside that range. Maximize Volume. If the current waveform is too quiet, you can use the Maximize Volume command to increase its volume. The sample data is analyzed to find the minimum and maximum values, then all points are multiplied by a factor which ensures that the maximum allowed range is used. At the same time, the average value of the samples is arranged to be zero (i.e., any DC offset is removed). Maximize Volume can help the patch sound better and avoid pops and clicks. Windows Menu Tile. Arranges the patch windows so that they do not overlap. Cascade. Arranges the patch windows so they overlap in an orderly fashion. Arrange Icons. Spaces icons evenly in the main window. Close All. Closes all patch keyboard windows, patch keyboard icons, and waveform icons. Help Menu Contents. Contains the Table of Contents for the UltraSound Patch Maker Lite on-line help. About. Tells you the version number of your copy of Patch Maker Lite. Tool Bar Display Patch Information Shows some information about the patch data. None of this information is necessary to make patches, but it is provided for the curious. Total Patch Size is the amount of UltraSound memory the patch uses. It is usually a little larger than the sum of the sizes of each waveform in the patch because the size of each waveform is rounded up to the next multiple of 32. Waveform Size is the size in bytes of the current waveform. Waveform Rate is the sampling rate of the current waveform. Type of Data. Waveform data can be 8-bit or 16-bit, signed or unsigned. Edit Patch Descriptions & Names This dialog lets you view and modify patch element descriptions. Patch Description lets you enter text to describe the patch. Instrument Name holds the name of the instrument for the patch. Instrument Name can be used by other applications ( for example, UltraSound Patch Manager) to help identify the patch. Waveform Name can hold any name. By default, Patch Maker Lite uses the name of the .WAV file that the waveform came from. Edit Loop Region
A waveform in a patch often has a loop region defined. A loop region is a portion of a waveform that plays repeatedly. This allows a note to be played for a long time, even if the waveform is short. The Edit Loop Region dialog lets you interactively modify loop region values to get high-quality sound over a long duration. Defining the Loop Region. A loop region has a start point and a length, which can be set by their respective sliders, marked coarse and fine. Coarse lets you set the value to an approximate position on the loop; Fine lets you fine tune the value more precisely for the best sound. You can’t have a start point and loop length combination that would put the end of the loop region past the end of the sample data. Thus the sliders may refuse to move beyond a certain point when you are dragging them to the right. Choosing loop parameters that result in a good sound can be tricky. For many waveforms, the Suggest button can help. When you press this button, the sample data is analyzed (this may take a few seconds), and a minimum loop length is suggested. The Suggest button changes to a Use button after it is pressed. Here’s an example. Lets say the suggested minimum loop is 127.909. You could use this value, but you can sometimes get better results by using a multiple of the loop’s minimum length. For example, a multiplier of 4 will give a loop length of 511 10/16. If you press the Use button, the loop length will be set to 511 10/16 samples, and the loop start point will be set as close to the end of the waveform as possible. Some fine tuning may still be needed, but this procedure will often get you into the right ballpark. Setting the Loop Type. The loop region can be played forward, backward, or in both directions. Check the appropriate box. Enabling looping. When you bring up this dialog, the Enable Looping checkbox is checked by default. If you do not want the patch to play the loop region repeatedly, uncheck this box. Choose Envelope The Envelope dialog lets you view or modify the envelope options for the current waveform. When the UltraSound plays a patch, three regions of the waveform are treated differently: the part before the loop region, the loop region, and the part after the loop region. There are two possible envelope points for each of those regions. They are called Attack 1, Attack 2, Sustain, Decay, Release 1, and Release 2. The Sustain rate applies when a Note On is being played and looping; the Decay rate applies when a “note off” is received. The Choose Envelope dialog offers a simplified set of options for modifying the envelope. You are allowed to modify the Sustain and Decay rates, but defaults are used for Attack and Release rates and the envelope offsets. Also, there are checkboxes for enabling sustaining and sampled release. Although limited, these options should suffice for most of the envelopes you will ever need. Note! Because only certain envelope options are available, if you modify a patch not created with Patch Maker, it may not sound good with the default envelope settings. Reduce the rate of decay to 0 as a starting point for modifying such an envelope. The Before note is turned off... part of the dialog lets you choose whether you want the note volume to decay while it is looping and if so, by how much. Use the slider and press the Play button to experiment. The Sustain option lets you have control over the volume of a note while it is playing and looping, before you turn it off. For most percussion instruments, the notion of turning the “note off” does not apply; you just want the sample to play through without looping. In this case, do not check Sustain. For melodic instruments, you typically want the note to continue playing (perhaps at decreasing volume) until a “note off” is sent. In this case, check Sustain. If you do not, the rate of decay does not apply, and the scroll bar to set the decay rate is disabled. The When note is turned off... options let you choose how quickly the note volume decreases when a “note off” is sent. Sometimes you can achieve an interesting sound by not decaying at all when a “note off” is sent, but instead just playing through whatever is in the waveform. Although you can choose a rate of decay of 0 to achieve this, it is usually better to choose Sampled Release.
Note! If looping is not enabled, the note sound will play only for the duration of the sample.
Use the Play button to interactively explore the effects of these options. You may need to stop and re-start the note to hear the effect of some options. Adjust Tuning

Adjust Tuning lets you tune the current waveform. When you press the Adjust Tuning button, you will hear your waveform and a reference tone ( at the correct pitch). Using the reference tone, you can tune your waveform accurately. You can set the pitch while the note is playing by adjusting the slider labeled Sample Pitch. You can play either the waveform note or reference tone alone, or play them together by choosing the appropriate option under the Play/Stop button. In many cases, you can press the Adjust Tuning button to get some help getting the patch in tune. When you press the Adjust Tuning button, the sample data is analyzed (this may take a few seconds), and a frequency is suggested to put the sample in tune. The label of the button changes to Use. Press the Use button to apply the suggested frequency to the patch to affect its pitch. Edit Vibrato/Tremolo This dialog lets you view or modify the vibrato (pitch variation) or tremolo (volume variation) characteristics of the current waveform. The effects of vibrato and tremolo are determined by the sweep, rate and depth of the effect. The sweep value for vibrato or tremolo determines how soon after the note is turned on that the effect takes place. The larger the value of sweep, the longer the delay. The rate value determines how quickly the pitch or volume varies. The depth value determines how large the variation is. You can set these values interactively by pressing the Edit Vibrato/Tremolo button and adjusting the sliders. In some cases, you’ll have to stop and re-start the note in order to hear the effect. Adjust Balance This dialog lets you adjust the balance of the current waveform. Each waveform in a patch can have its own balance. Panic Button The Panic Button reloads all patches that you are working on into UltraSound memory. There are two situations where you may want to use the Panic Button: 1. A note will not stop playing, no matter what you do. (We’ve tried to prevent
this from happening, but have provided the panic button, just in case.) 2. No sound, or incorrect sound, is heard when you play a patch note. This can happen if you run another program that uses your UltraSound while Patch Maker
Lite is running. The other program may have loaded its own patches.
4
Advanced Gravis has provided a number of DOS utilities and software applications for you to use with your UltraSound. DOS Utilities Gravutil A joystick and game card testing and calibration program. Also lets you adjust your UltraSound’s speed compensating game port to the speed of your computer. DOS Programs

Playfile A program for playing and recording digital audio sound files. Playmidi A program for playing back MIDI songs or sequences. Playfile and Playmidi have a full-screen display where you can perform actions with a mouse or keyboard.
Keyboard Commands: Tab: move cursor to next item Shift + Tab: move cursor back one item Left arrow: move cursor left Right arrow: move cursor right Up arrow: move cursor up one line Down arrow: move cursor down one line Backspace: delete character to left of cursor Del: delete character under cursor Ctrl + A: move cursor to beginning of line Ctrl + E: move cursor to end of line Ctrl + U: erase all characters to left of cursor Page Up: move up one page at a time Page Down: move down one page at a time Space bar: select an item or pulldown menu in a window with an arrow box in it Esc: void entry
Playfile Playfile is a stand-alone program for playing and recording digital audio (.SND or .WAV) files on your computer. With Playfile’s full-screen display, selection is easy and convenient. Playfile also supports command line instructions and options. To use the UltraSound Playfile Full-Screen Interface: → Type: PLAYFILE <enter> → On the playfile utility screen, select a File Format: ( ) .WAV or ( ) .SND. The File Mask displays the selection. Selections are made using the mouse or
keyboard. → Select a sound file (.WAV or .SND) in the file window. Only files with the
extension shown in the file mask will appear. The (DIR:) edit box displays the directory for the file. You may type into the DIR edit box to enter a directory. The (FILE:) edit box displays the file.
→ Set the Volume control. You can set this anywhere from 0–4095. The default is 3500, and should be loud enough.
→ Set the Balance control. This is like the balance control on your stereo, which controls the loudness of left and right speakers. You can set it from 0–15; the default is 7, the center position.
→ Select the Frequency of the .WAV or .SND file (44 kHz, 22 kHz, or 11 kHz). Frequency means the speed at which the sound file will play, so if you lower the frequency, the sound will play more slowly. The default setting is 22050 Hz, or 22 kHz. You can set the frequency anywhere from 0–48000 Hz. UltraSound programs use 22 kHz as a default. → Select 8-bit (on) or 16-bit (off). → Select Unsigned Data if required. (See the Glossary for a definition.) → Select Stereo to play a stereo file. → Select Microphone Enabled to record sound from a microphone connected to the
microphone jack. → Select Line Input Enabled to record from a CD player or stereo device attached
to the Line In connector on your UltraSound. → Select Amplified Output Enabled to play back through the speakers. → Select Play to play the file. To Use Playfile from a Command Line To play a sound using Playfile: → Go to the ULTRASND directory.
Type: CD C:\ULTRASND <enter> → Type: PLAYFILE, then a space, followed by the path and file name for the sound
you want to play. For example, try to play a sound using Playfile and the ENTER.SND sound file, which was put into the ULTRASND directory during installation . Type: PLAYFILE C:\ULTRASND\ENTER.SND <enter> The sound will play using Playfile’s default settings. If you want to change the way the sound plays, you must use a series of parameter switches. The basic parameters are found in the following section. More advanced parameters are found in Appendix B, “Playfile and Playmidi Parameters.” Playfile’s Basic Parameters for Command Line Use If you use the DOS command line for Playfile, the following parameters are probably all you’ll need to modify your digital sound files. For a more in depth list of Playfile’s commands, see Appendix B. The previous instructions for Playfile’s full-screen interface explained Playfile’s basic parameters; therefore, only some of the following commands are defined. The following commands are the same as the parameters located on Playfile’s full-screen interface. To Set: Type Command: Balance -B [ ] 0–16; 7 default Volume -V [ ] 0–4095; 3500 default

Frequency -F [ ] 0–41000 (48000 for MAX); 22000 default Loop: -L [ ] Loop stands for the number of times the file will repeat, or “loop.” The default is once, but you can loop the file as many times as you like.
When using Playfile, remember you can’t use your computer for anything else, so if you loop a sound many times, all you can do is listen to it until it’s finished. You can, however, press the Escape key to exit from Playfile at any time.
Stereo -S Record -R Microphone -M1 The -M1 command lets you record sound using a microphone in the microphone jack. In play mode, -M1 defaults to “off,” and in record
mode, -M1 defaults to “on.” Type: -M0 to turn it off. Line In -N1 Turns on Line In for CD Player or Stereo recording. Type: -N1 into the command line to record a sound from your CD or stereo (attached
to the Line In Connector on your UltraSound card). In play mode, this defaults to “off,” and in record mode this parameter defaults to “on.” Type: -N0 to turn it off.
Try Playfile’s parameters. Try playing the ENTER.SND file and experimenting with some of these parameters. The audio may sound strange as you change the default parameters, but it will give you an idea of how you can modify sound using Playfile. You can enter the parameters in any order you like. In both playback and recording mode, enter only the parameters you want to change. → Go to your UltraSound directory
Type: CD C:\ULTRASND <enter> → Type: PLAYFILE [parameters], then a space, followed by the path for ENTER.SND.
PLAYFILE -V4095 -F44100 -B0 -L2 C:\ULTRASND\ENTER.SND <enter> Playfile will play the ENTER.SND file at top volume, at twice its normal speed, only out of the left speaker, twice. Recording with Playfile Playfile can record and play sound files. To record a file using Playfile: → Connect your input device (CD player, microphone, etc.) to the appropriate
UltraSound connector. → Go to your UltraSound directory.
Type: CD C:\ULTRASND <enter> → Type: PLAYFILE [parameters], a space, the path where you would like to store your
sound on your hard disk, and a name for your sound. It will look something like this: PLAYFILE -R C:\ULTRASND\TEST.SND
→ Press <enter> and begin recording. UltraSound starts to record instantly. → Press the space bar to stop recording. All parameters and commands are the same for recording as they are for playing back sound, so a default sound will be recorded at 22 kHz, 8-bit mono. Using Playfile to Assign a Start-up Sound

Another way you can use Playfile is to add a start-up sound to your computer. With Playfile, you can add a command that plays your favorite sound through your AUTOEXEC.BAT file. Then, that sound will play every time your machine is turned on or rebooted. This is useful because it shows you whether UltraSound is working every time you start your machine. Here’s how: → Using any text editor, add the following lines to your AUTOEXEC.BAT file. These
lines must be added after the ULTRINIT.EXE line: PLAYFILE C:\ULTRASND\ENTER.SND
You may use any sound you like, and change any parameters you wish. Playmidi
UltraSound’s installation program installed your MIDI sound files in a separate directory called MIDI. The MIDI player, called Playmidi, was placed directly into your ULTRASND directory. Also located in the MIDI directory are the patches, or individual instruments, that were used to compose the MIDI sounds. The patches are identified by their .PAT extension. Included with UltraSound are several songs recorded as MIDI files. These are identified by .MID extensions. Playmidi has a full-screen display that is similar to Playfile’s. Playmidi also supports command line options. A demonstration of Playmidi was installed with your UltraSound software. If you would like to hear the MIDI demo: → Go to your ULTRASND directory:
Type: CD C:\ULTRASND <enter> → Run the Demo :
Type: MIDIDEMO Another MIDI demo is provided for those who have expanded their UltraSound to its full 1 Megabyte capacity. To Run the 1 Megabyte MIDI demo: → Type: MIDI1MB.BAT To use the UltraSound MIDI File Player full-screen interface: → Type: PLAYMIDI <enter> → On the Playmidi screen, the File Mask displays *.MID. → Select a sound file in the text window. Selections are made using the mouse or
keyboard. The DIR: displays the directory for the file; (.MID) files are in the MIDI directory. The FILE: displays the file.
→ Select Play to play the file. To use the UltraSound MIDI File Player from the Command Line ® Change to the UltraSound directory.
Type: CD C:\ULTRASND <enter> ® Type Playmidi, followed by the file name for the MIDI song you want to play. For
example:
Type: PLAYMIDI LATINDNC.MID <enter> ® To stop the MIDI sound from playing, press any key. The .CFG file for each MIDI song, like LATIN.MID for example, is used to set up the appropriate instruments to their respective channels. MIDI songs without .CFG files will default to the industry standard General MIDI set. See Appendix B, “Playfile and Playmidi Parameters” for an explanation of the command line parameters available with Playmidi and a discussion of Playmidi.CFG and Default .CFG files.
5
Your joystick must be in good condition and correctly calibrated (aligned) in order to work with the UltraSound game port. Calibration is the process of lining up the joystick’s electrical center with its mechanical center. Once the joystick is calibrated, the game port can be adjusted to the speed of your specific computer system. Calibration is sometimes called “trim.” → Start your computer with a joystick plugged into the game port. → Go to your UltraSound directory:
Type: CD C:\ULTRASND <enter> Running GravUtil
→ Type: GRAVUTIL <enter> and choose GravTest from the on-screen menu. → GravTest leads you through its Joystick Test Program, asking you to rotate your
joystick in a complete circle. Press the spacebar when you are finished. Repeat the process if you have a second joystick connected.
→ With the joystick handle(s) centered, adjust your joystick’s calibration (trim) adjusters to move the Joystick Position Indicator into the Target Box (see Figure 5—1). See your joystick’s manual for the location of the Calibration Adjusters. (Some joysticks can’t be adjusted.)
Note! The Indicator may not center exactly in the target box and may jitter. This is caused by a combination of the setting, screen resolution, and power supply noise – it is OK.
→ Press “F1” and repeat the previous step until the Joystick Position Indicator is positioned in the Target Box, without additional adjustment of the Calibration Adjusters.
Gravis Analog Joysticks have 3 buttons (Gravis Analog Pro has 5 buttons), each with adjustable functions. The Button Status Indicators can be used to confirm the function you have assigned to each of your Gravis Analog Joystick buttons, and to test whether they are working properly. UltraSound Game Port Speed Adjustment Once your joystick is correctly calibrated: → Press <Esc> to exit GravTest. → Leave your joysticks in the center position to allow the software to
automatically calculate the correct speed compensation value for your computer system.
→ Exit the program. GravUtil will display the final speed compensation value for your computer on screen. If you do not run GravUtil, your game port will use a default value of 27. → Add the line “ULTRAJOY [# displayed]” to your AUTOEXEC.BAT file after the SET
ULTRASND= line. For example: ULTRAJOY 8
Your game port is now set to the correct speed compensation setting for your computer system. FindCard_ FindCard_ locates game port circuit conflicts. All game ports use a common address (201 Hex) and will not function properly if there is another device (Multi I/O card, other sound card, etc.) using that address. If you are experiencing problems with games behaving erratically, you may have a circuit conflict. To determine whether this is the case, follow these steps.
Note! To accurately find conflicting game card circuits, FindCard must be run WITHOUT the UltraSound Card installed, or with its game port disabled (type: ULTRINIT -DJ to disable the game port).
→ Remove your UltraSound card from your computer. → Turn off your computer’s power for one minute, then restart. FindCard will only work accurately if run immediately after a cold boot (power turned off for 30 seconds or longer). If your AUTOEXEC.BAT file runs any TSRs (memory resident programs), start your computer with a boot disk that does not run these programs. → Start your computer. → Run FindCard. Type: GRAVUTIL <enter> and select FindCard from the menu. → Press any key to allow FindCard to check for conflicting game cards or game card
circuits. If a conflict is unlikely, FindCard will display a “Technical Reference Number (1)” or “(8)” message. If FindCard locates a conflicting card, it will display a message stating that it has verified a conflict. A number between 2—7 means that there is a possible conflict or game card detected. To correct a conflict, either remove or disable the conflicting device, or disable the UltraSound game port by running Ultrinit using a -DJ switch (OFF); i.e., ULTRINIT -DJ. Please refer to the README file or see “DOS Troubleshooting” in Chapter 7 if you have any problems.

UltraJoy If you experience problems with a particular game, you can change the speed compensation setting right from the DOS prompt. To change the setting: → Change to your ULTRASND directory.
Type: CD C:\ULTRASND <enter> → At the DOS prompt:
Type: ULTRAJOY [2—31]<enter> Values entered can range from 2 to 31. The default is 27. Faster machines require lower numbers. To determine the proper speed, run JoyComp as described in the previous section. If the game is still not behaving properly, try the following: → Run UltraJoy; substitute a number other than the one in your AUTOEXEC.BAT for
the speed compensation value. → Run the game and test joystick performance. → Quit and return to your ULTRASND directory. → Adjust the speed with UltraJoy and repeat the above steps until you are
satisfied with the control of your game. You can start problem games you have identified more easily if you write a batch file to run UltraJoy with the adjusted Speed Compensation Value, then start the game. To do this, in any text editor: → Type: ULTRAJOY [correct value] [game’s name and path]<enter> . For example:
ULTRAJOY 8 CD\GAMESDIR REVENGE OF THE GRAVOIDS <enter>
→ Save your work as “[whatever].BAT.”
6
Cards that use FM synthesis produce “computery” and indistinct sound. UltraSound uses a more advanced technology——wavetable synthesis– sampling real instruments to create music and sound effects for games. The result? Clear, natural, realistic sound. UltraSound can be supported by games in four ways: 1) Native (Direct) support
2) Audio Interface Libraries (AIL) drivers with Ultramid 3) Mega—Em emulator (to support Roland® MT-32 or SCC1 applications) 4) SBOS (to support Sound Blaster_ or Ad Lib® audio in most games) UltraSound Emulation Manager The UltraSound Emulation Manager lets you load and unload the sound emulation programs quickly and easily. → Type: E (to start the Emulation Manager) → Select one of the five options:
1) Sound Blaster Emulation 2) Ultramid Emulation 3) Mega—Em Emulation 4) Remove All Emulations 5) Exit
Note! When you choose an emulator, any previously loaded emulation programs are unloaded automatically. Step 1. Choose a Method of Sound Support Try the following game sound solutions, in order, to get the best sound possible from your games.
A) Native (Direct) Support If the game supports UltraSound directly, with no additional software drivers, UltraSound appears in the list of sound cards in the game’s Setup program. Games like this produce the best results–fantastic sound using UltraSound’s 32 digital channels. If your game supports UltraSound directly: → Select UltraSound from the list of supported sound cards, then start the game. Enjoy the best PC game sound available! Go to Step 2.
Note! More game developers are including direct UltraSound support in their games all the time. Check the Advanced Gravis BBS (see Chapter 8) or check with the game’s manufacturer for information on upgrades to make your game directly compatible with UltraSound. Check your software store for new game titles that support UltraSound.
B) Audio Interface Libraries (AIL) Drivers/Ultramid If a game does not include UltraSound in its list of sound cards, check whether the game came with AIL drivers and Ultramid: → After installing the game, check its directory to see whether there are any
files with the extension .ADV. If there are, the game probably uses the AIL drivers. To check whether Ultramid is included, look for the file “ULTRAMID.EXE.”
If your game came with the AIL Drivers and Ultramid, please refer to the game’s documentation for further information. If your game DID NOT come with the drivers:
→ If the game came with the files SBDIG.ADV and SBMID.ADV, make backups by copying them as SBDIG.SAV and SBMID.SAV. Replace the files with the drivers on the UltraSound disks:
Type: CD C:\ULTRASND\ULTRAMID <enter> COPY GF1DIG.ADV C:\[game directory]\SBDIG.ADV <enter> COPY GF1MID.ADV C:\[game directory]\SBMID.ADV <enter>
→ Load Ultramid from DOS: Type: ULTRAMID or type: E 2 → Run the game’s Setup again and choose Sound Blaster from the list of cards. If
your game works with sound, go to Step 2. Note! If you don’t get proper sound, check the Advanced Gravis BBS (see Chapter 8) or check with the game manufacturer for information on upgrades that will allow the game to work with AIL drivers. Or try the next method of sound support – C) Mega-Em.
How AIL Support Works AIL drivers are a set of translators that let game developers add sound capabilities to a game without programming it for a specific sound card. AIL drivers support General MIDI as well as digital sound, so they allow a MIDI-capable sound card (like UltraSound) to play great-sounding music as well as digital effects. These library drivers let developers use UltraSound’s wavetable synthesizer and digital interface to play 8 or 16-bit audio in either mono or stereo mode. Ultramid Ultramid is a utility that activates the AIL Drivers so that they can take advantage of UltraSound’s advanced features. Game publishers often include the AIL drivers and the Ultramid utility with their games; but, if they don’t, these drivers are provided on your UltraSound disks. Ultramid attempts to load itself partially or fully into upper memory, depending on the amount of upper memory available.
C) Mega-Em (Emulator) Support Mega—Em provides good quality music and sound effects for games that do not directly support UltraSound, but use General MIDI, Roland MT-32, or a Roland SCC1 and Sound Blaster combination. To load Mega—Em: →→→→ Type: MEGAEM <enter>EMUSET <enter> →→→→ or Type: E 3(to load Mega—Em from the Emulation Manager) See Appendix C for detailed instructions and specific parameters. One benefit of Mega—Em is that it loads completely into expanded memory (EMS). Mega—Em requires a memory manager to run. If the game works with sound after loading Mega—Em, go to Step 2.
Note! If your game will not allow you to use a memory driver, or if it was written in protected mode, Mega—Em may not work.
D) SBOS_
The Sound Board Operating System (SBOS) is a driver that allows your UltraSound to run programs written for a Sound Blaster_ or Ad Lib® sound card. During the UltraSound installation, you were prompted to choose whether you wanted to have SBOS load automatically at start-up. If you selected YES, SBOS loads into memory at start-up and stays in memory unless you free it (see Unloading SBOS from Memory). If you selected NO, you’ll have to manually run SBOS if you want to emulate Sound Blaster or Ad Lib: → At the C:> prompt:
Type: SBOS <enter> or type: E 1 <enter> After SBOS loads successfully, you will hear “SBOS installed.” With SBOS loaded, you can play games that support Sound Blaster or Ad Lib. Be sure to choose Sound Blaster (NOT Sound Blaster Pro) from the game’s setup to enable UltraSound’s capabilities.
Note! SBOS re-maps game sounds into stereo, even if they were designed for mono Sound Blaster or Ad Lib–so games played with SBOS on UltraSound often sound better than they do on a Sound Blaster.
Unloading SBOS from Memory The Sbosdrv program stays resident in memory until you turn your computer off or free the Sound Board Operating System from memory. (If you load another emulator using the Emulation Manager, SBOS is automatically freed from memory.) → To free SBOS, at the C:> prompt: Type: SBOS -F <enter> SBOS loads automatically into high memory whenever possible. SBOS Help To access on-line help for SBOS: → At the C:> prompt, Type: SBOS -H Specific Game Options Advanced Gravis has identified a few games that require additional parameters to run with SBOS. These parameters are included in the SBOS.CFG file. When you launch one of these games while SBOS is loaded, the correct parameter is applied automatically. Check your games’ documentation for other parameters that may be required for sound card recognition.
SBOS Parameters -K Enable Volume Control -M Disable auto load high -L Enable Line In -P Load without “SBOS Installed” message -F Free SBOS from memory
-H Help (also lists additional parameters) Step 2. Set Up Your Games for Sound
Games Already Installed on your Computer You may have to reconfigure games already installed on your computer before you can use them with UltraSound. See the game’s Setup instructions. You may need to reinstall the game and enter the appropriate settings (IRQ, DMA, Base Port Address) so that the game will work with UltraSound. New Games

When you install a new game, its installation program may ask you what type of sound board you are using. If UltraSound is in the menu: → Choose UltraSound. If UltraSound is NOT in the menu: → If the game works with AIL drivers, and you have loaded Ultramid (see Step 1),
choose Sound Blaster. If AIL drivers do not work, but General MIDI, Roland MT 32, SCC1, or Sound Canvas are listed, and you’ve loaded Mega—Em (see Step 1): ® Choose General MIDI, Roland MT 32, SCC1, or Sound Canvas, if available. For games written for Sound Blaster, after you’ve loaded SBOS (see Step 1): → Select Sound Blaster. A game’s installation may ask you for the UltraSound or Sound Blaster settings (IRQ, DMA, and Base Port Address). You can check or change your settings by running Setup: → Type: SETUP In the Installation Guide there is a chart to record your settings (it’s also in Appendix H). Refer to your chart and enter the values you selected in UltraSound Setup.
Step 3. Set the Volume You can control the volume in games that support UltraSound by changing the external volume on your speakers or stereo. For headphones, we recommend an inexpensive external volume control (Radio Shack #42-2459 or equivalent — about $5). Volume control for Ultramid: → Type: ULTRAMID -M[0—127] . The default is 127 (loudest). Volume control for Mega—Em: → Type: EMUSET -V[1—16]. The default is 16(loudest). Volume control for SBOS: You can adjust the volume in SBOS at any time, even in the middle of a game if you enabled keyboard control when you ran SBOS. To do this: → At the C:> prompt: Type: SBOS -K → During the game, Type: [ to raise the volume. → Type: ] to lower the volume. The volume changes each time you press one of these keys.
Note! Some games take control of the keyboard; the keyboard volume adjustment feature will not work in those cases.
You can also adjust the master volume for all applications that use SBOS to generate sound. Set the master volume to any level from 0—32; 0 is quietest and 32 is loudest. The default is 28. To adjust the master volume: → Type: SBOS -V[0—32] For example: SBOS -V32 raises the master volume to its maximum.
To adjust digital volume (sound effects) only, type: SBOS -VD[0—32]. To adjust FM volume (music) only, type: SBOS -VF[0—32].
Tips and Hints You can change the “SBOS installed” message to any other sound you would like using the SBOS.CFG file. To do this, start a text editor (for example, MS DOS users can type EDIT), then: → Open the SBOS.CFG file. → Type the full name of the sound file you would like to play instead of “SBOS
installed,” a comma, and the speed (in Hz) at which the file should play. For example: Type: ARROW.SND, 20050 Make sure it is the last line in your text file.
→ Make sure the .SND file is in the C:\ULTRASND\SBOS directory. You may also use a Windows .WAV file. Just make a copy of the sound file and change the extension .WAV to .SND (this will cause a click at the beginning of the sound) or use Sound Converter to convert the .WAV file to a .SND file.
→ Save your work. Games Requiring Large Amounts of Memory If a game you want to install requires a lot of conventional memory (base RAM), your best bet is to clean up your system’s memory to make room. Refer to your memory manager’s documentation in your DOS manual on how to free conventional memory. If you are using MS-DOS v.6.0 or later, you can use the MEMMAKER command to free memory. With QEMM or 386MAX, use MAXIMIZE. If you have problems with games that require a lot of memory, please refer to the “DOS Troubleshooting” section in Chapter 7. If Your Game Doesn’t Make Any Sounds If your game remains silent, look in the game’s documentation for answers. Also, refer to “DOS Troubleshooting” in Chapter 7.
7
Please refer to the “README” file for the most up-to-date technical information.
DOS Troubleshooting My UltraSound isn’t producing sound.
Your UltraSound may not be connected securely, and may not be seated properly in the bus slot. Reset the card, or try a different bus slot.
If you are running sound through your stereo: Make sure that your stereo is working correctly and connected properly. Make sure that you have selected the correct input at the back of your stereo and that the correct input selector switch is set at the front panel of your stereo. Use any input on your stereo except the phono input–it will sound terrible, and could damage your speakers and phono input!
Is there a conflict with another device or card? Change the settings of the conflicting card. To identify conflicts, remove all the non-essential cards from your machine one by one. After removing each card, run the software that is giving you trouble, and note whether the problem occurs. When you find the card causing the problem, check its DMA channel, IRQ, and Base (I/O) Port Address. Once you have identified the conflict, change the appropriate setting. Be careful not to cause a conflict with any other card in your system.
Is your UltraSound in a 16-bit slot? Make sure that the UltraSound card is in a 16-bit slot in your computer.
I can’t record sounds from my microphone. Your microphone may be plugged into the wrong connector. Check that it is plugged into the Microphone In connector, that it is a compatible dynamic or condenser microphone, and that it is turned on.
I can’t record sounds from my microphone. Your hard disk is probably fragmented or too slow. This is most often a problem when recording at a high sample rate and resolution. To prevent this problem, obtain and run a disk defragmenting utility. (If you have DOS 6.0 or later, you can use DEFRAG.) It is only necessary to optimize the “free space” on your hard disk, so look for this option in your disk optimizing software. When errors occur in a part of a recording, they can almost always be corrected by simply re-recording the same material–as long as the second recording is no longer than the first.

I’m having trouble with my game using SBOS. It either makes no sound at all, or it sounds garbled and funny. A number of problems could cause this.
1. Make sure that SBOSDRV and LOADSBOS were loaded successfully. Type: SBOS. You should hear “SBOS installed” when the files load properly.
Is SBOS loaded and running? 2. If you are trying to use a game in Sound Blaster or Ad Lib mode, make
sure that you run SBOS first. If you’re not sure, exit the game and type SBOS again.
Did you select a sound card? 3. Check the game’s setup. Did you select a sound card? Most games have a
specific configuration step where you have to “tell” the game to use a specific sound card. Usually, this step is called Setup and is available from the game’s main menu. Sometimes you select the sound card by running a separate program called Setup or Install. See your game’s documentation, and Chapter 6 of this guide, for details on configuring your game with UltraSound in SBOS mode.
Does your game require an additional parameter? 4. Some games require you to enter an additional parameter for sound
board support when starting the game. For example, you may have to type C:\KILLERCOWS SBLASTER. (Killer Cows is not a real game.) If your game requires this, load SBOS first, then start the game with this additional parameter.
Is your MIDI IRQ compatible? 5. This problem could also indicate that the MIDI IRQ variable (the last
one) in the SET ULTRASND string in your AUTOEXEC.BAT file is incompatible with SBOS. The MIDI IRQ must be either 2, 3, 5, or 7 (5 or 7 recommended). CAUTION: Be careful not to select a variable that is used by one of your other devices. Some programs require IRQ 7 as the default IRQ. Run Setup to change your MIDI IRQ to 7.
Some programs look only at the BLASTER environment string for IRQ and DMA. Make sure that SET ULTRASND and SET BLASTER commands in your AUTOEXEC.BAT file have the same IRQ and DMA channels selected.
Do you have enough free conventional memory? 6. Check that the application has enough conventional memory to run with
audio after loading SBOS. You may need to change your system configuration (i.e., by loading drivers high, removing drivers, etc.) to free more memory. Loading SBOS high saves 20K of memory. See your DOS manual for more information on memory management. If you are using QEMM, run Optimize to locate more free memory. DOS 6.0 and later versions can use MEMMAKER.
Are your SBOS files in the right directory? 7. Make sure that the files and patches required for SBOS (see Chapter 6)
are in the same directory, and that the directory is in the SBOS path. Is your UltraSound in a 16-bit slot? 8. Make sure that the UltraSound card is in a 16-bit slot in your
computer. I keep getting a “Bad or missing SBOSLIB.SBS file” message.
Make sure that there are no devices using DMA Channel 1 in your machine. If there are, change their DMA channels. DMA Channel 1 is hardware-set for Sound Blaster. Also make sure that the file is present in the SBOS directory. If you obtained an upgrade for SBOS (e.g., from our BBS), remove all old copies of SBOS from your system.
My sound plays, but it has lots of static. Check the connections. Some computers may have “noisy” power supplies or hard drives. These noises are picked up and amplified through UltraSound’s amplifier. Either turn down the volume, or use an external amplifier. I’m having trouble printing a document.

A conflict may occur if you have a printer connected to LPT1 (printer port 1) because LPT1 also uses IRQ 7 (the UltraSound and Sound Blaster IRQ default). A conflict occurs when two devices try to access the same IRQ at the same time. Disable your UltraSound card while you print, or use another printer port.
I receive the warning “NMI Procedure on this PC is disabled” when I load SBOS. Don’t panic. It may mean that the NMI functions were not implemented correctly. Make sure that the parity check circuitry on your PC is enabled: check whether PARITY is enabled in your extended CMOS setup or set jumpers on the motherboard. Here is an example for the Tandy 4850EP (486DX2/50): Under the power supply are four DIP switches. According to the manual, DIP 1 is marked “Reserved for factory use....” In fact, this switch enables parity checking for onboard memory because the NMI doesn’t work. In this case, you’ll have to replace the motherboard. NOTE: You don’t need to replace the CPU or memory. If the motherboard is not under warranty, a new one will range from $100 to $200. NMI stands for Non Maskable Interrupt. When an NMI is generated, the PC finishes executing its current instruction, then interrupts the current program procedure to handle whatever called the NMI. The PC services the NMI, then returns to the current program procedure. The NMI is usually caused by the parity-checking circuitry of your PC when an ONBOARD PARITY ERROR has occurred. SBOS requires a way of communicating with the UltraSound so that games will not interfere with it; to do this, SBOS communicates through the NMI. The SBOS emulation works well for most games, but may not work properly if a game also tries to use an NMI.
I’m having problems with the 16-bit DMA channels. UltraSound’s default DMA channel is an 8-bit channel because some motherboards do not have working 16-bit DMA channels. However, the 16-bit DMA channels may work fine on your computer. Try to run UltraSound on a 16-
bit channel–performance will be better. Using a 16-bit channel allows the UltraSound to transfer data twice as fast. The 8-bit channels are 0—3; the 16-bit channels are 4—7. Stereo recording will be better on 16-bit channels. If strange things happen with the 16-bit channel, switch back to a free 8-bit channel.

Windows Troubleshooting

I get no MIDI sound in any application. During initialization, the driver scans the ULTRASND.INI file for the names of the patch files that will be used to play MIDI data. Two problems could cause an error:
1. The PATCHDIR entry in the [UltraSound] section of ULTRASND.INI does not point to a directory containing all of the patch files listed in the [Melodic Patches] and [Drum Patches] sections of ULTRASND.INI.
→ Edit the ULTRASND.INI file, and correct any errors in the PATCHDIR entry. For example: [ULTRASOUND] PATCHDIR=C:\ULTRASND\MIDI\
2. The patch file listed in the error message, GUITAR.PAT, for example, has been misspelled, damaged, or does not exist.
→ Check the spelling and existence of the patch identified in the message in the ULTRASND.INI file. Note that the file extension, .PAT, is not included: [MELODIC PATCHES] 0=ACPIANO . [DRUM PATCHES] 27=HIGHQ
I have problems playing MIDI and .WAV files. If no sound occurs when you play MIDI files, or instruments seem to be missing:
→ Make sure that the UltraSound setup is selected in the MIDI Mapper. → Set the MIDI Volume scroll bar to the far right (the highest volume).
This scroll bar can be found in the Mixer Options in the Setup section of the Drivers dialog box.
→ Pause or stop playing the MIDI file, stop any .WAV file that is playing, and restart the MIDI file.
I get no MIDI sound or inappropriate sound in particular applications.

The application may not be using patch caching. (See “Patch Caching” at the end of Chapter 2.) If you have an application that does not use patch caching, you can load a subset of the General MIDI set before running that application. Do the following:
→ Click on the Drivers icon under the Control Panel, and select the UltraWave and MIDI Synth or the UltraSound audio driver (whichever one you have).
→ Click on the Setup button. Then click on Performance Options to access the Conserve Memory button.
→ Click on the MIDI Mapper (also under the Control Panel) to select the appropriate setup for the amount of memory on your UltraSound. For example, select Ultra 512K in the name box if you have a 512K card.
→ Load patches from the MIDI file that corresponds to the amount of memory on your UltraSound: LOAD512.MID or LOAD1024.MID.
To revert to normal operation: → Select UltraSound Setup in the MIDI Mapper, and enable the High
Fidelity option of the driver. I received a Windows Initialization Error.
An error may have occurred in the GRVSULTR.386 driver. Make certain that the line DEVICE=GRVSULTR 386 is in the [386ENH] section of the SYSTEM.INI. Also make sure that the GRVSULTR386 file is in your \WINDOWS\SYSTEM directory. The UltraSound driver requires Windows 3.1 or better, running in Enhanced mode. Check the Windows User’s Guide to make sure that your computer meets the requirements of enhanced mode Windows. (A 386 or greater with at least 4 MB of RAM is recommended.) The UltraSound driver may not have been initialized because of a DRAM failure or a Base (I/O) Port Address conflict. During Windows initialization, the driver may have been unable to validate the UltraSound

hardware. Exit Windows, and execute SETUP in the UltraSound installation directory. This diagnostic tool will verify that your hardware settings are correct and report any hardware failures.
Did you receive the message “The following initialization file cannot be opened... \xxx\ ULTRASND.INI”?
→ Exit Windows. → Set the DOS environment variable ULTRADIR to the UltraSound
installation directory. For example: Type: SET ULTRADIR=C:\ULTRASND <enter> (This is only set until you turn off your computer.)
→ Verify that the ULTRASND.INI file exists in the UltraSound installation directory.
→ Restart Windows. The driver needs the ULTRASND.INI file to locate MIDI patches for use with Windows and to initialize itself to play MIDI files.)
The volume increases after I pause and restart some MIDI files using Media Player. The Media Player only sends MIDI controller messages the first time a MIDI file begins to play. Since the MIDI controller messages that affect volume are not sent when playback is resumed, a default volume is used, and this may be louder than the composer intended. This is a bug in Media Player.
When I use Windows for Workgroups, I need more PC memory than I did with a standard Windows installation.
If you have installed Windows for Workgroups, note that it typically requires twice as much PC memory to regain the performance that you had with a standard Windows installation. An option is available to disable resource sharing under Windows for Workgroups. This option will conserve memory.
No sound occurs when I play a .WAV file.

A .WAV file uses extended RAM. For example, a 2 MB .WAV file uses 2 MB of extended RAM. If you don’t have enough extended RAM available–which varies with the number of applications you have open–you’ll have problems.
→ Quit as many applications as possible to free extended RAM. Is the Wave Volume set too low?
→ Set the Wave Volume scroll bar to the far right (highest volume). This scroll bar can be found in the Mixer Options in the Setup section of the Drivers dialog box.
Is another sound card conflicting with the UltraSound card? → If another audio card is installed, check that the UltraSound is set
up as the first Wave device in the SYSTEM.INI. The [DRIVERS] section of the SYSTEM.INI should have the following line: WAVE=ULTRASND.DRV Other audio cards will be designated as WAVE1, WAVE2, etc.
Some .WAV files seem to contain unexpected pauses and clicks. 386SX class machines are unable to play .WAV files from Video for Windows without pauses in the audio. See the topic “Performance Options” in Chapter 2 for more information.
8
Advanced Gravis is proud of the quality, design, and workmanship that goes into all of our products. However, occasionally a customer has difficulty installing or using a product. This section will put you in touch with Gravis Technical Support. Information about our warranty is also included here.
Registration It is important that you fill out and mail the enclosed registration card. Registration ensures that your name is added to our customer data base. Registered customers are eligible for: o Access to FREE technical support. o Notification of significant upgrades. o Access to special offers and discounts available only to registered users.
Technical Support

Technical support is available to all registered owners of Advanced Gravis products. But it is recommended that you first read the “README” file on your UltraSound installation diskettes. There is no charge for Technical Support, aside from possible long distance charges. Technical Support–Telephone Technical support is available by telephone 9AM—4PM Pacific Coast Time at (604) 431-1807. Fax: (604) 451-9358. Technical Support Tips
To keep your costs to a minimum, here are a few hints: o If only certain programs are affected, read their manuals for information
relating to sound cards and game cards. o Call from a phone where you have access to your computer so that you can test
suggestions and provide any additional information that may be required. o Please prepare the following information:
—Name, address, and telephone number —The name of the Gravis product —The make and model of your computer —Your system software and version —The Gravis software version number —The software affected by the problem —The symptoms of the problem, and what led to them
Technical Support–Electronic Mail Contact Advanced Gravis by modem at the following addresses: CompuServe®: GO PCVENB area #14 Advanced Gravis BBS: (604) 431-5927 Gravis BBS modem setting: V32bis N81 Or: (604) 431-7553
28.8 V.FC baud N81 Internet: [email protected] FidoNET: 1:153/978 FTP: archive.epas.utoronto.ca pub/pc/ultrasound Internet Mail List: [email protected] subscribe AOL(America On-line): email Adv Gravis go keyword Gravis When contacting Gravis via electronic mail, it is important that you provide all the information described above. Otherwise, it will take longer to get back to you with an answer.
Warranty Information

Advanced Gravis Computer Technology Ltd. (Hereinafter referred to as GRAVIS) warrants to the original purchaser of the Gravis UltraSound (hereinafter referred to as ULTRASOUND) manufactured by GRAVIS that it will be free of defects in materials and workmanship for a period of one year from the original date of purchase. (UltraSound MAX has a limited three year warranty.) Information on obtaining warranty services is provided in the Warranty Claim Instructions section. You must provide proof of purchase when requesting repairs during the warranty period. All warranty claims must be sent to GRAVIS–do not return your ULTRASOUND to your place of purchase. GRAVIS is not responsible for any indirect, special, incremental, consequential or similar damages or lost data or profits to you or any other person or entity regardless of the legal theory, even if we have been advised of the possibility of such damage. Some states do not allow the exclusion or limitation of consequential damages, so the above limitation or exclusion may not apply to you. Our liability for any damage to you or any third party in the event that any of the above limitations are held unenforceable shall not exceed three times the fee you paid for ULTRASOUND regardless of the form of any claim. During the warranty period, GRAVIS will repair (or at its option replace with a reconditioned ULTRASOUND at no extra charge) components that are defective, provided ULTRASOUND is returned with proof of purchase and shipped prepaid to: ADVANCED GRAVIS COMPUTER TECHNOLOGY LTD. Canadian and International Customers 101-3750 North Fraser Way Burnaby, B. C. V5J 5E9 Canada U. S. Customers 1790 Midway Lane Bellingham, WA 98226 U. S. A. Items returned to the Canadian address from the U.S. will be returned to sender due to customs, importation and tax regulations. Warranty Claim Instructions Carefully read the warranty section and provide a detailed description of the problem, including the make and model of your computer system, and the name, version, and publisher of the software you are using. Include the following information: o Your name and address. o Home and business telephone numbers. o Fax number (if applicable). o A copy of your original sales bill. U.S. customers are to send warranty claims to the Bellingham, Washington address. Canadian and all other International customers are to send warranty claims to the Canadian address. When sending claims internationally, please state on your customs form that it is a Canadian-made product you are returning for warranty repairs. The means of product shipment to GRAVIS is at your cost and discretion. We suggest that you insure your Gravis ULTRASOUND in case of loss or damage during shipment. GRAVIS is not responsible for product lost or damaged in shipment.
9
Gravis Joystick “Y” Cable
Because the joystick connector on your UltraSound is also a MIDI connector, regular Y-cable joystick adapters do not work with UltraSound. This is because some of the pins on the port are reserved for MIDI functions. We recommend the special Joystick “Y” Cable made by Advanced Gravis that lets you connect two joysticks to your UltraSound.
UltraSound MIDI Adaptor Only the UltraSound MIDI Adaptor from Advanced Gravis is truly Advanced. Features MIDI IN, OUT, and THRU connectors, two 15-pin joystick connectors, 4-foot cable, MIDI activity LEDs, and a bonus 6 foot MIDI cable. Works with any sound card with a 15-pin “D” connector UART/MPU 401 type MIDI interface including Sound Blaster, Pro Audio Spectrum, and of course, UltraSound!
Memory Upgrade Upgrade your UltraSound’s memory from 512K to 1 MB. All you need is one 256K x 16-bit memory chip, available directly from Advanced Gravis or from computer retailers. When you install your memory upgrade, UltraSound automatically detects the amount of memory installed–no jumper setting required. See the Check DRAM option in the Diagnostics section of the Advanced mode SETUP to test your UltraSound’s memory. Installing Memory
Caution! Power off your computer and ground yourself to a metal part of its case, or wear a wrist strap when installing memory.
The memory sockets are located at the top left of the sound card. Notice that one corner of each memory socket is beveled (angled — see figure above). One side of each memory chip is also slightly beveled. Look closely at the chip from the side view. Place a chip into a socket on the UltraSound card, matching the beveled edge of the chip with the beveled corner on the socket (the beveled edges designate pin 1). Press firmly until all of the pins are secure in the socket, and the top of the chip is flush with the top of the socket. Repeat this procedure to install each chip.
Caution! Before you power on your computer, double check that you have installed each chip correctly. If you install a chip backwards, it will heat up and cause damage to your UltraSound card or other components in your computer. Note! Installation in an UltraSound version 3.73 or earlier is similar, but the chips are DIP DRAM rather than surface mounted DRAM. Instructions are included with the upgrade kit from Gravis.

Ordering Information Please call, write or fax Gravis or your dealer for pricing and availability on these items. To place orders, please call Gravis Sales/Technical Support at (604) 431-5020 or (604) 431-1807.
10
3D sound UltraSound’s unique hardware and software creates 3D sound using Focal Point’s 3D sound technology. The new technology allows audio to place sounds above, below, and to the right, left and back of the listener with just two speakers. 16-bit A single binary unit (1 or 0) is 1 bit. One byte is 8 bits, and 2 bytes are 16 bits. With 1-bit sound, there are two possibilities: on or off. With 8-bit sound there are 256 possible combinations. With 16 bits, there are more than 65,000 possible digital configurations, resulting in richer and more detailed sound. 32-voice UltraSound is capable of producing a variety of sounds. These sounds are called voices or patches. UltraSound can play up to 32 voices — or synthesized music notes — at the same time. ADC Analog to Digital Converter. The ADC converts electrical signals into digital data. UltraSound has one ADC. Applet This is a Windows term for a small program. Applets are visually represented by icons in Windows. CD Quality The standard measure of CD quality is a frequency of 44.1 kHz, at a depth of 16 bits. UltraSound is capable of exceeding these specifications. CD ROM A personal computer compact disc drive. CD ROM is an affordable way to store lots of data. Contiguous A file is contiguous if the whole file is located in one area on the disk or hard drive and all blocks are adjacent to each other in order from beginning to end. DAC An acronym for Digital to Analog Converter. The DAC converts digital information to electrical signals (voltages), and sends the sound through the speakers. All CD players and synthesizers contain a DAC. UltraSound has one DAC. Depth The depth value for tremolo or vibrato determines how large the variation in pitch or volume is.
DMA Channel An acronym for Direct Memory Access Channel. UltraSound can use 2 DMA channels — one for recording, the other for playing — but both must be set in the AUTOEXEC.BAT file. (The AUTOEXEC.BAT file is set automatically with the Install program.) Direct Memory Access is used by UltraSound to transfer sound data directly, without using the CPU. This allows, for example, simultaneous play of sounds and graphics in a game. UltraSound supports full 16-bit DMA transfers if plugged into a 16-bit ISA bus slot. FM Synthesis An outdated technology which recreates or mimics an instrument’s sound by manipulating a wave (sound) shape or form until the sound is close to that of the actual instrument. General MIDI A music industry standard that specifies the basic capabilities of a music synthesis device. It maps instruments sounds into standard MIDI codes. IRQ An acronym for Interrupt Request. This is how UltraSound checks and updates information sent to it through your computer. When you set the IRQ, it tells UltraSound how and where to look for information. If another device shares the same IRQ, UltraSound will not work properly. MIDI Musical Instrument Digital Interface. A digital communication standard that lets electronic musical instruments talk or communicate with each other. Think of MIDI as a language for electronic musical instruments. MIDI conveys many different things at once: for example, when you play a note, MIDI sends the information on what note is being played, how loud, and when it starts and stops. MIDI Channels Sixteen separate channels that send or receive MIDI data. MIDI Files MIDI files or MIDI song files identified by the .MID extension. MIDI song files contain instructions that allow your PC to play the synthesizer on your sound board, or to control external MIDI synthesizers or sound modules. MIDI Mapper A Windows tool that allows you to change MIDI data being sent through Windows_’s MIDI software drivers. Mixer Allows you to change audio levels in a sound card. The UltraSound Mixer lets you control UltraSound’s audio levels. MPC Multimedia PC or MPC is an equipment specification standard for personal computers. MPC currently has two standards: MPC Level 1 or MPC Level 2. MPC Level 2 has stricter specifications than MPC Level 1. MPU-401 A board interface that allows personal computers to connect to MIDI devices like keyboards or drum machines. Offset Offset refers, in general, to where information begins. Patch A patch is one voice, typically an instrument or a digital sound. UltraSound can play up to 32 voices at once and comes with a number of patches for playing MIDI songs, as well as separate patches for use in games with the Sound Board Operating System (SBOS).

Rate The rate value for vibrato and tremolo determines how quickly the pitch or volume of a sound varies. Root Frequency The root frequency of a waveform in a patch determines the pitch at which a note will play. The root frequency is normally the frequency that the note was played at when it was sampled; however, it might be different to allow for fine tuning of the note. Sample A sample is a single number representing one point in a digitized sound. Sampling Rate The number of digital audio samples recorded per second. A sampling rate of 22 kHz means that 22,000 digital samples are recorded each second of audio. The higher the sampling rate, the better the sound quality. One drawback to using a high sampling rate, for instance 44 kHz, is that it uses more disk space. SCSI Small Computer Systems Interface. A hardware and software standard for sending data between computers or computer peripherals and devices. There are two types of SCSI: SCSI 1 and SCSI 2. The essential difference is that a device with SCSI 2 transfers data faster. Sequencing A method whereby a computer, or hardware sequencer, records MIDI information. Sequencing is also achieved by sequencer software like Power Chords_ for UltraSound and Midisoft®’s Recording Session_ included with your UltraSound software. With sequencer software, you can compose you own MIDI files or modify MIDI songs. Sustain If a waveform’s envelope has sustain selected, a note will play through the first part of the envelope, then maintain a constant rate of increase or decrease of volume for as long as it is on. When the note is turned off, the note plays through the remainder of the envelope. Sweep Sweep determines how soon after a note is turned on that an effect takes place. The larger the value of sweep, the longer the delay. Twos Complement (Signed) Data The data format used by most sound cards to store and record digital information. UltraSound’s GF1 automatically converts unsigned binary data to Twos Complement data, so if you have REAL twos complement data, you must “tell” the chip, to prevent it from attempting conversion. Unsigned Data The most common type of digital data for sound. Most Sound Blaster and compatible sounds are unsigned data, as are UltraSound and Macintosh sounds. You don’t have to enter any parameters when playing these types of sounds with Playfile. VOC Files A format for storing digital audio, .VOC files can be converted into .WAV format by software. For example, WinConvert, which came with your UltraSound software, can convert .VOC files to .WAV. WAV Files Waveform audio is digitized sound that is stored in a file with a .WAV extension. A format for storing digital audio, standardized by Microsoft. Waveform A collection of samples of a sound. In Windows, waveforms are usually stored in a file with a .WAV extension. A patch contains one or more waveforms, which contain the sampled sounds of an instrument.

Wavetable Synthesis Also know as waveform synthesis, wavetable synthesis creates sounds by recording the actual instruments to produce natural and realistic sound files, or patches, for applications and games. The result of this process is an accurate electronic reproduction of real instruments.
Appendix A Setting Jumpers
UltraSound’s DMA and IRQ settings are software selectable. These can be adjusted without physically touching the card. The Base Port Address setting, however, cannot be reliably selected by software means. We have provided jumpers to allow you to change the Base Port Address if necessary. Jumpers are small plastic clips covering metal strips, used like switches. By placing a plastic clip (provided) over one pair of pins, you are setting those jumpers on. Base Port Address The default (factory set) base (I/O) Port Address for the UltraSound is 220 Hex, shown in Figure A-1 (next page). On the UltraSound MAX card, the Base Port Address is located just to the right of center. The UltraSound cannot have the same Base Port Address as another device in your computer. In case of a conflict, you must change one device’s address. For Sound Blaster support, the base address for the UltraSound must be 220 (the default) or 240 Hex. See the next page for the address settings.
Pin Pair: Addresses Used Addresses Used Ad Lib Range 4 5 6 7 at 200 Range at 300 Range (always) *off on on on 210 210H...215H 310H...31FH 388H...389H on off on on **220 220H...22FH 320H...32FH 388H...389H off off on on 230 230H...23FH 330H...33FH 388H...389H on on off on 240 240H...24FH 340H...34FH 388H...389H off on off on 250 250H...25FH 350H...35FH 388H...389H on off off on 260 260H...26FH 360H...36FH 388H...389H * Off indicates that no jumper clip is used on that jumper pin set. **220 Hex is the factory-set default address. 220 or 240 hex is required for Sound Blaster
support. Appendix B
Playfile Parameters
Playfile has a number of parameters that let you modify the way you play sounds from the command line. Don’t type the square bracket characters ([ ]); they are merely a warning that you need to enter a number after the letter. -P Play a file.
-P allows you to play a .SND file. -P is the default setting and doesn’t have to be entered.

-R Record a file. This parameter lets you record a sound. To record a sound, enter -R in the command line, plus the full name for the sound you wish to record, and the path you want it saved to. For example: -R C:\ULTRASND\NOISE.SND.
-B[ ] Set the balance for the digital channel. (Enter 0—15). The default setting is 7, or in the center. To change it, enter -B plus the desired balance in the command string. (Mono playback only.)
-V[ ] Set the volume of the digital channel. (Enter 0—4095). The default setting is 3500.
-L[ ] Set the number of repeats. The default for this setting is once. If you would like a sound to play more than once, include -L[ ] plus the number of times you want the sound to repeat, or loop, in the command string. The maximum number of loops is 65,535.
-F[ ] Set the frequency (speed) of the digital channel in Hz. (Enter 4000—48000 Hz.) The default setting is 22050 Hz, which is usually adequate. If your sound was recorded at a different frequency, it may sound strange at this frequency. Increasing the frequency will make it sound faster; decreasing it, slower. Add -F[ ] plus the desired frequency to the command line if a speed other than the default is required. The lowest recommended setting is 4000 Hz, although you can set the frequency lower if you want.
-S Specify a stereo digital file. The default setting is mono, so if you wish to record a sound in stereo, or play a sound recorded in stereo, you must enter -S in the command line.
-O[ ] Supply the starting offset into the digital file. You can tell the program to start playing your sound file X number of bytes into the sound. Enter -O plus the number of bytes in the command line.
-T[ ] Length (in bytes) of how long to play or record.

The only limit to this parameter is the size of your hard drive. -T[ ] is also useful when used with -O, because by entering a starting offset and a value for -T, you can play just a portion of a sound.
-I Information Display about the status of a channel. The -I switch, when typed while a sound is playing using Playfile, displays the status of UltraSound’s channels on your monitor. By default there is no display.
-D[1/0] Enables or disables the UltraSound GF1 DAC output. Turn on or off the Gravis chip’s (GF1) Digital to Analog converter by typing -D while a sound is playing; 1 enables output and 0 disables output.
-N[1/0] Enables or disables the line level input. This turns on or off the inputs from the UltraSound card; 1 enables line input and 0 disables line input.
-M[1/0] Microphone enable or disabl; 1 enables the microphone and 0 disables the microphone.
-16 Specify a 16-bit digital file. The default is 8-bit. To play a 16-bit file, be sure to enter -16 into the command line.
-2 Specify twos complement (signed) data. Most sound files use unsigned (offset binary) data, so this parameter is usually unnecessary. Most Sound Blaster and compatible sound cards, Forte boards, and Mac sounds use unsigned data. If a sound will not play, and you don’t know its source, try entering -2 into the command line.
These parameters do not have to be entered in order, but the way the sound was recorded determines which parameters you enter. The only rule is that you must enter the file name last if it is required. Not all sounds require you to enter all parameters, and most files will play using UltraSound’s default settings.
Playmidi Parameters Playmidi, like Playfile, has several options, or parameters, that can be entered to control MIDI playback. These options are: -C[ ] Removes a MIDI channel. Enter the channel number you wish to remove in
place of the square brackets. +C[ ] Adds a MIDI channel. Enter the channel number you wish to add in place
of the square brackets. -DEBUG Displays debugging and text information. +D[ ] Increases the delay between MIDI events.

-D[ ] Decreases the delay between MIDI events. -8 Forces patches to 8-bit to conserve UltraSound DRAM. +GS This parameter makes channel 10 play from the rhythm set. -GS This parameter makes channel 10 play from the tone set. -H Help. Type: PLAYMIDI -H for Playmidi’s on-screen help file. -ICHANNEL Entering this parameter causes UltraSound to ignore channel information
and play all channels on channel 0. -IPROGRAM Entering this parameter causes UltraSound to ignore all instrument
changes. -ICONTROL Causes UltraSound to ignore all control changes. -IPITCHBEND Entering this parameter causes UltraSound to ignore all pitchbend
information. -IAFTERTOUCH Entering this parameter causes UltraSound to ignore aftertouch
information. -T[ ] Removes a track. Enter the track number you wish to remove after the T. +T[ ] Adds a track. Enter the track number you wish to add after the T. -TSR Play MIDI files in background. This option may conflict with SBOS. Free
SBOS (SBOS -F), if you use this option. Press both shift keys simultaneously to stop MIDI playback.
-P Allows you to play whatever can fit into on-card memory, ignoring all errors.
-DEBUG Turns on UltraSound debug. -V Displays the version number of your Playmidi software. -V[ ] Sets the master volume anywhere from 0—4095. The default is 3095. -VERBOSE Displays text information about what you are playing. -VIDEO Disables graphic display. Playmidi Configuration File Playmidi will look for a configuration file called xxxxxxxx.CFG in the following way: first, Playmidi looks in your current directory; second, it looks in the MIDI subdirectory for the environment variable called ULTRADIR; and finally, Playmidi goes through your specified path to find the .CFG file. Playmidi will also look for a default configuration file called DEFAULT.CFG. If it does not find both the .MID and .CFG files, it will quit.

After Playmidi finds the files, it looks for the instrument patch files. Playmidi uses the search pattern noted above to find DEFAULT.CFG. Once it finds all the necessary files, it passes the configuration file, downloads the appropriate patches and starts the MIDI sequence. The .CFG file has different types of lines to aid Playmidi in playing a file. A line starting with a # is ignored. Here’s an example: CHANNEL 10 RYTHM_SET or CHANNEL 10 TONE_SET Tells a MID channel to pick instruments from either the tone-set or rhythm-set. The configuration file also has lines like the following: [instrument #] [patch name] [% of max volume] [de-tune parameters]
: : : : : : : : : : : : The file should have one line per instrument. The instrument number is defined inside the
specific MIDI sequence file (xxxxxx.MID). Instrument #0 is the default instrument for the tone set that is used if a patch isn’t found. If the correct patch is not found, Instrument #129 is the default instrument for the rhythm set. Instruments #1—128 are the tone instruments for programs #1—128. Instruments #129—256 are the rhythm instruments (drums) for programs #1—128. The patch name is the file that contains the patch information for that particular instrument. If a patch does not exist for an instrument, choose a patch for a similar instrument. Many sequences do not follow the General MIDI set; for these, you must select a patch file by guessting what instrument the MIDI file was written for. Playmidi makes it easy to play a piece that was written for one instrument on another. The next parameter raises or lowers the volume of that instrument relative to the others. This is used to lower the volume of a particularly loud instrument, like a percussion, or raise the volume of a softer instrument. The number is a percentage of the maximum volume. Therefore, 100 is ‘normal’ volume, 50 is half volume, etc. The default setting for this volume parameter is 100. This parameter is optional. The last parameter “detunes” an instrument. This is the number of semitones that will be added to each note played. This parameter is also optional. Default.Cfg Files The configuration files for each MIDI song on your disk tell the computer which instruments to use on what channel. When Playmidi plays a file, it looks for this .CFG file using the ULTRADIR application. You can change instruments by rearranging the instruments assigned to the program numbers. A typical file looks something like this: 1 MIRACLE.PAT 129-256 PERCS.PAT 60 13 MARIMBA.PAT 80 32 ACOUSTIC.PAT 74 WOODFLUT.PAT 66 TENORSAX.PAT 80 The first number is the instrument that will play. The instrument number is defined inside the specific MIDI sequence file. Instrument 0 is the default instrument for the tone set that is used if a patch isn’t found. Instrument 129 is the default instrument used for the rhythm set. The next parameter in the .CFG file is the patch name. After the patch name is a parameter for changing the volume of a MIDI instrument. The default is 100, and 50 is half volume. This parameter is optional. The final optional parameter “detunes” the instrument. The number you enter here is the number of semitones that will be added to each note played. If you swapped the program numbers for flute and marimba, the flute would play where the marimba did in the original version, and vice-versa. You can create interesting effects this way, but remember to note the original configuration or make a copy of it, or you could lose your original song. If no .CFG file is found, Playmidi will use DEFAULT.CFG, a standard MIDI set.

For more information, open one of the .CFG files, using any text editor, and read the information displayed on screen.
Appendix C Introduction
Mega—Em is a program that allows you to emulate the Roland MT-32, Roland Sound Canvas General MIDI, and the Sound Blaster (Digital Only) using your Gravis UltraSound. Sound Blaster Music and Roland MPU-401 MIDI interface emulation through the UltraSound MIDI port may be available in future releases of Mega—Em. Mega—Em Features o High quality Roland Sound Canvas and MT-32 music emulation o Sound Blaster digital emulation, with generally improved sound quality over a
real Sound Blaster card o Loads entirely into the EMS memory space – uses no lower or upper DOS memory o Fast: entirely written in Assembler o Many custom options, but easy to use Mega—Em Requirements o 386 or better AT class personal computer o Hard drive o Gravis UltraSound card o Expanded Memory Manager, such as EMM386.EXE, QEMM386 or 386MAX o Approximately 80K of free Expanded Memory (EMS). Mega—Em uses no low or high DOS
memory (i.e., no conventional memory) Important Notes Mega—Em does not work with most protected mode software (e.g., Windows, Commanche, and Privateer). Mega—Em is constantly improved and updated. Please read the README file supplied with the Mega—Em software for the latest information regarding usage, features, command line options, and problem solving.
Using Mega—Em To load Mega—Em, from your UltraSound directory, type the following: → MEGAEM [options] <enter> → EMUSET [options] <enter> All options are up to you to choose. Valid options for MEGAEM and EMUSET are listed below. * Future versions of Mega—Em may incorporate EMUSET into the MEGAEM program. Valid options for Mega—Em

For each option type: MEGAEM [option] <enter>. For example: → Type: MEGAEM -U <enter> to unload MEGAEM. You must do this to use other
UltraSound software. -H or -? Displays the Mega—Em help screen. -U or -F Unloads Mega—Em from memory. You must do this to use other UltraSound
software. -ROFF Turns off Roland emulation. -SBOFF Turns off Sound Blaster emulation. -RIRQx Specifies Roland IRQ number. By default, Mega—Em will not generate a
Roland IRQ since very little software requires it. If your software fails on Roland initialization, you should use this option, preferably using IRQ 2. Valid IRQ values are x=2, 3, 5 or 7.
-NOEMS Forces Mega—Em to load when EMS services are disabled (for example, when the NOEMS option is used in your EMM386 command line). Note that you must still have a memory manager loaded to run Mega—Em.
Valid options for EMUSET -H or -? Displays the EMUSET help screen. -MT Emulates a Roland MT-32/LAPC1. The default is to emulate a Roland Sound
Canvas. However, if your software does not have Sound Canvas/SCC1/General MIDI support, use MT-32/LAPC1/Roland support (“Roland” alone usually refers to the MT-32/LAPC1 devices).
-L Enables the UltraSound line input. -Mxx Specifies music volume level. The default level is 12. The valid range
is xx =1—16 (loudest). -Vxx Specifies master volume level. The default level is 16. The valid range
is xx =1—16 (loudest). -COx Coexists with real MPU-401 MIDI interface. While Mega-Em will function
correctly with a real MPU-401 MIDI interface installed in the system, no software will be able to access the real interface while emulation is active. This option allows Mega—Em to be used together with a real MPU-401 MIDI interface. This can be useful for DOS based MIDI sequencers.

X=1 Allows both input and output to real MPU-401. With this option, music will play through both the external MIDI device(s) and the UltraSound synthesizer.
X=2 Only allows input from real MPU-401. Music will only play through the UltraSound. Using this option may also increase Mega—Em’s compatibility on systems with a real MPU-401.
Configuring Software for Mega—Em Software programs are configured for different sound devices in many different ways. Some will attempt to auto-detect sound devices and use the best one they find; others will prompt you during the running of the program or require you to delete a configuration file, so you can change the configuration. Most common is the use of a setup program, usually called SETUP, INSTALL or CONFIG. For the correct procedure for a specific program, you should consult the program’s manual. OK, I know how to configure my software; now what? First make sure Mega—Em is loaded and emulation is on. If the program has auto-detect, simply running the program should detect the devices you are emulating. If you are prompted to select a sound device, select the one you have your emulation set up for. But there are too many options. What do I choose? For the Roland MT-32 emulation you should look for ‘MT-32’ or ‘LAPC1’. Some software just lists ‘Roland’ as an option. This usually refers to the MT-32. Remember that if you select this option you must run EMUSET -MT; otherwise Mega—Em will emulate a Sound Canvas by default. For Roland Sound Canvas emulation (the default), look for ‘Sound Canvas,’ ‘SCC1’ or ‘General MIDI.’ If you have the option of MT-32 or Sound Canvas, select Sound Canvas because in most cases, selecting it will give better performance. For Sound Blaster emulation, look for Sound Blaster. Remember, Mega—Em will not play Sound Blaster Music, only digital effects. Now the program is asking for my sound card settings. What should they be? If prompted for: o A MIDI interface — Select Roland MPU-401. o A Roland base address — Select 330 hex. o A Roland IRQ setting — Select IRQ 2 or 9. If your software fails to initialize
the Roland, try using the -RIRQx switch with MEGAEM.EXE. o A Sound Blaster base address — Select your UltraSound Base Port Address unless
you have used the -SBBxxx switch with MEGAEM.EXE. o A Sound Blaster IRQ — Select your UltraSound MIDI IRQ unless you have used the -
SBIx switch with MEGAEM.EXE. o A Sound Blaster DMA channel — Select 1. By now you should be ready to run your software. Always remember to load Mega—Em and turn on emulation before running the software. Many programs will crash if they’re set up for a certain music device but can’t locate it. Using Mega—Em. A Step-by-Step Example

This example assumes that your program’s manual tells you to configure your sound options with a program called INSTALL, and that the program is run by typing START <enter>. Step 1. Load MEGAEM.EXE by typing : MEGAEM <enter>. If you need to use any
options, type : MEGAEM [options] <enter>.
Step 2. Turn on emulation by typing EMUSET <enter>. Many programs will only allow you to select sound devices they can detect.
Step 3. Load the installation program by typing: INSTALL <enter>. Step 4. Answer any prompts until you are prompted to select a sound device.
Assume you are given the following options: o Ad Lib o Sound Blaster o Roland MT-32/LAPC1 o Roland Sound Canvas o Roland MT-32/LAPC1 with Sound Blaster o Roland Sound Canvas with Sound Blaster
Step 5. In this case you should select “Roland Sound Canvas with Sound Blaster” because it will probably give the best music performance and digital sound effects. Note that any of the above examples will work with Mega—Em, although the “Ad Lib” option will not give any sound, and the “Sound Blaster” option will not play any music or “FM” effects.
Step 6. Complete the rest of the prompts from the installation program. If prompted whether or not to save the configuration, select YES.
Step 7. Load your program by typing: START <enter>. That’s it. Note! You shouldn’t have to configure the program again. Just make sure you have loaded Mega—Em and turned on the emulation by running EMUSET. Appendix D ULTRINIT.EXE
ULTRINIT.EXE is a utility used to initialize your UltraSound for use. Gravis strongly recommends that you leave the following line in your AUTOEXEC.BAT file after the SET ULTRASND=... line. For example: SET ULTRASND=220, 1, 1, 11, 5 C:\ULTRASND\ULTRINIT.EXE SET ULTRA16=32C,0,0,1,0 (required for MAX)
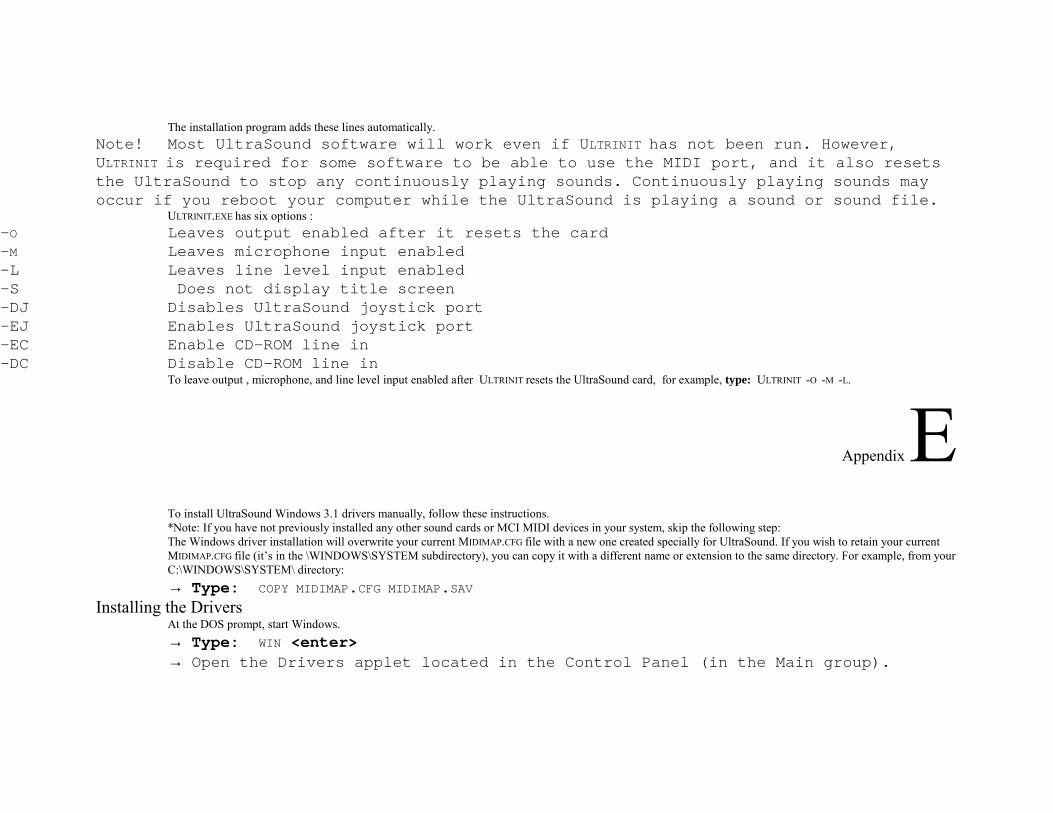
The installation program adds these lines automatically. Note! Most UltraSound software will work even if ULTRINIT has not been run. However, ULTRINIT is required for some software to be able to use the MIDI port, and it also resets the UltraSound to stop any continuously playing sounds. Continuously playing sounds may occur if you reboot your computer while the UltraSound is playing a sound or sound file.
ULTRINIT.EXE has six options : -O Leaves output enabled after it resets the card -M Leaves microphone input enabled -L Leaves line level input enabled -S Does not display title screen -DJ Disables UltraSound joystick port -EJ Enables UltraSound joystick port -EC Enable CD-ROM line in -DC Disable CD-ROM line in
To leave output , microphone, and line level input enabled after ULTRINIT resets the UltraSound card, for example, type: ULTRINIT -O -M -L.
Appendix E
To install UltraSound Windows 3.1 drivers manually, follow these instructions. *Note: If you have not previously installed any other sound cards or MCI MIDI devices in your system, skip the following step: The Windows driver installation will overwrite your current MIDIMAP.CFG file with a new one created specially for UltraSound. If you wish to retain your current MIDIMAP.CFG file (it’s in the \WINDOWS\SYSTEM subdirectory), you can copy it with a different name or extension to the same directory. For example, from your C:\WINDOWS\SYSTEM\ directory: → Type: COPY MIDIMAP.CFG MIDIMAP.SAV
Installing the Drivers At the DOS prompt, start Windows. → Type: WIN <enter> → Open the Drivers applet located in the Control Panel (in the Main group).

These Windows 3.1 drivers must be installed for UltraSound to work: MIDI Mapper, TIMER, {MCI} MIDI Sequencer, and {MCI} Sound drivers. If any of these drivers are missing, click on the ADD button to install them now. You will be prompted for certain Windows 3.1 diskettes. Restart Windows to activate the changes. One final note before installing the UltraSound driver. If you are upgrading from a Sound Blaster, Media Vision, or other sound card, you must first remove their associated drivers from Windows. Select each driver, and click on the Remove button. Remove several drivers, if you like, before restarting Windows to activate the changes.
Note! It is possible to leave your old sound card in if it is used only for DOS applications.
Now, install the UltraSound driver. → Click on the ADD button. Select the Unlisted or Updated Driver in the Drivers
list box, and click OK. A new dialog box appears in which you must enter the path to your UltraSound driver. For example: → C:\ULTRASND\WINDOWS (assuming you installed UltraSound to drive C:)
Note! If for some reason you have deleted the UltraSound drivers, you can re-install them from your UltraSound disks. By default, they are located in the ULTRASND directory.
The Ultra Wave and MIDI Synth driver description should appear in another dialog box. → Click on it , then click OK.
Note! There is also an UltraSound MIDI Port Driver. The UltraSound driver and associated files are installed automatically in the appropriate directories. The UltraSound Setup dialog box appears. → Click on the appropriate boxes, and change the setup parameters if needed to
match your UltraSound configuration. Refer to the Setup Record you filled out in the Quick Installation Guide. Click on Restart Now to activate the changes.
If you have your UltraSound output hooked up to a stereo or headphones, you should hear a start-up .WAV sound played (the default sound sounds like ‘Ta Da’...) when Windows starts. To further test .WAV file playing, open the Windows Sound applets (in the Control Panel) or Sound Recorder (in the Accessories group) and experiment. To test MIDI file playing, open Media Player in the Accessories group, and look for the CANYON.MID MIDI file. Press the ‘triangle’ play button to hear the song. You are now ready to use any Windows based MIDI sequencer or MIDI player to create or hear songs with UltraSound’s full 16-bit digitized instrument set. Consult your software application’s manual or the Windows 3.1 manual for an explanation of the MIDI Mapper applet in the Control Panel. If the UltraSound is your only output device, the current MIDI Mapper settings should be fine.
Installing and Using the UltraSound Mixer We have included a simple Windows applet to allow volume control, output on/off, and selection of line and microphone input. Here’s how to install it manually: → Select the group you want the Mixer applet to reside in, then select New from
the Program Manager’s File menu.
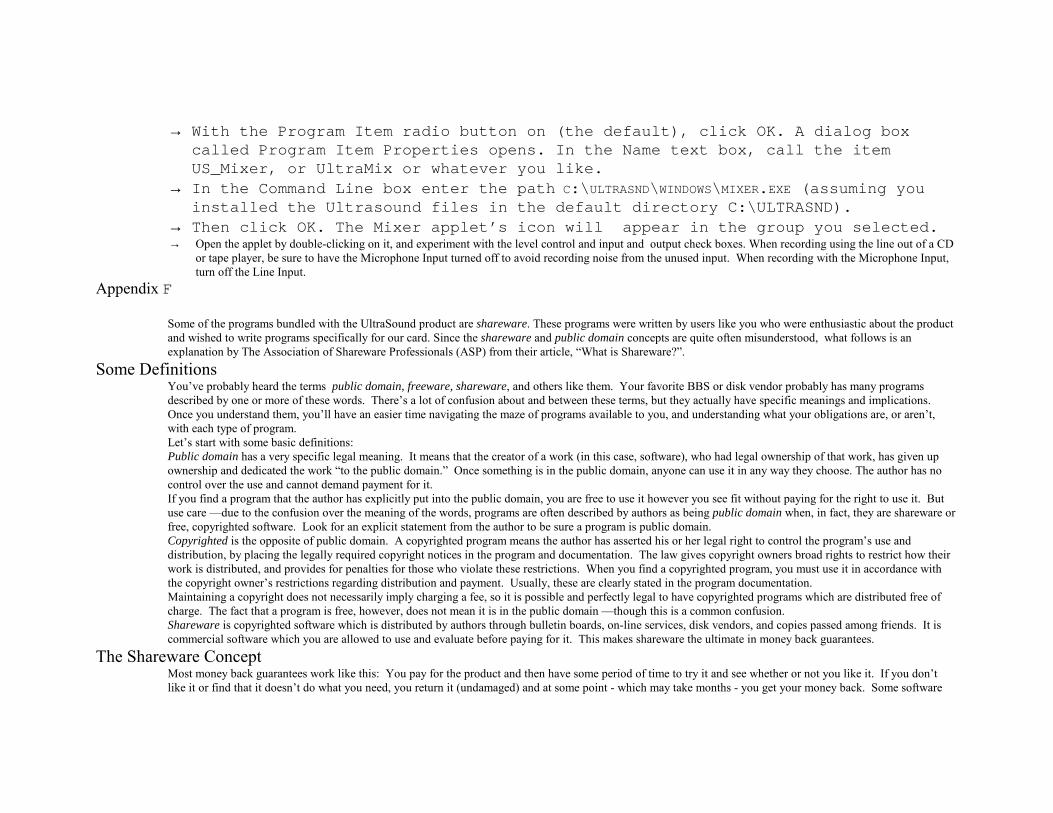
→ With the Program Item radio button on (the default), click OK. A dialog box called Program Item Properties opens. In the Name text box, call the item US_Mixer, or UltraMix or whatever you like.
→ In the Command Line box enter the path C:\ULTRASND\WINDOWS\MIXER.EXE (assuming you installed the Ultrasound files in the default directory C:\ULTRASND).
→ Then click OK. The Mixer applet’s icon will appear in the group you selected. → Open the applet by double-clicking on it, and experiment with the level control and input and output check boxes. When recording using the line out of a CD
or tape player, be sure to have the Microphone Input turned off to avoid recording noise from the unused input. When recording with the Microphone Input, turn off the Line Input.
Appendix F
Some of the programs bundled with the UltraSound product are shareware. These programs were written by users like you who were enthusiastic about the product and wished to write programs specifically for our card. Since the shareware and public domain concepts are quite often misunderstood, what follows is an explanation by The Association of Shareware Professionals (ASP) from their article, “What is Shareware?”.
Some Definitions You’ve probably heard the terms public domain, freeware, shareware, and others like them. Your favorite BBS or disk vendor probably has many programs described by one or more of these words. There’s a lot of confusion about and between these terms, but they actually have specific meanings and implications. Once you understand them, you’ll have an easier time navigating the maze of programs available to you, and understanding what your obligations are, or aren’t, with each type of program. Let’s start with some basic definitions: Public domain has a very specific legal meaning. It means that the creator of a work (in this case, software), who had legal ownership of that work, has given up ownership and dedicated the work “to the public domain.” Once something is in the public domain, anyone can use it in any way they choose. The author has no control over the use and cannot demand payment for it. If you find a program that the author has explicitly put into the public domain, you are free to use it however you see fit without paying for the right to use it. But use care —due to the confusion over the meaning of the words, programs are often described by authors as being public domain when, in fact, they are shareware or free, copyrighted software. Look for an explicit statement from the author to be sure a program is public domain. Copyrighted is the opposite of public domain. A copyrighted program means the author has asserted his or her legal right to control the program’s use and distribution, by placing the legally required copyright notices in the program and documentation. The law gives copyright owners broad rights to restrict how their work is distributed, and provides for penalties for those who violate these restrictions. When you find a copyrighted program, you must use it in accordance with the copyright owner’s restrictions regarding distribution and payment. Usually, these are clearly stated in the program documentation. Maintaining a copyright does not necessarily imply charging a fee, so it is possible and perfectly legal to have copyrighted programs which are distributed free of charge. The fact that a program is free, however, does not mean it is in the public domain —though this is a common confusion. Shareware is copyrighted software which is distributed by authors through bulletin boards, on-line services, disk vendors, and copies passed among friends. It is commercial software which you are allowed to use and evaluate before paying for it. This makes shareware the ultimate in money back guarantees.
The Shareware Concept Most money back guarantees work like this: You pay for the product and then have some period of time to try it and see whether or not you like it. If you don’t like it or find that it doesn’t do what you need, you return it (undamaged) and at some point - which may take months - you get your money back. Some software

companies won’t even let you try their product! In order to qualify for a refund, the diskette envelope must have an unbroken seal. With these “licensing” agreements, you only qualify for your money back if you haven’t tried the product. How absurd! Shareware is very different. With shareware you get to use it for a limited time, without spending a penny. You are able to use the software on your own system(s), in your own special work environment, with no sales people looking over your shoulder. If you decide not to continue using it, you throw it away and forget all about it. No paperwork, phone calls, or correspondence to waste your valuable time. If you do continue using it, then — and only then —do you pay for it. Shareware is a distribution method, NOT a type of software. Shareware is produced by accomplished programmers, just like retail software. There is good and bad shareware, just as there is good and bad retail software. The primary difference between shareware and retail software is that with shareware you know if it’s good or bad BEFORE you pay for it. As a software user, you benefit because you get to use the software to determine whether it meets your needs before you pay for it, and authors benefit because they are able to get their products into your hands without the hundreds of thousands of dollars in expenses it takes to launch a traditional retail software product. There are many programs on the market today which would never have become available without the shareware marketing method. The shareware system and the continued availability of quality shareware products depend on your willingness to register and pay for the shareware you use. The registration fees you pay allow us to support and continue to develop our products. Please show your support for shareware by registering those programs you actually use and by passing them on to others. Shareware is kept alive by YOUR support!
Contacting ASP Members Via CompuServe There is an easy and convenient way to speak directly to many ASP Members (both authors and vendors). Visit the shareware forum on CompuServe. Simply type “GO SHAREWARE,” “GO SHARE,” or “GO ASPFORUM” from any CompuServe ! prompt. Here you will be able to talk to the authors of your favorite shareware programs, learn about other programs, ask questions, make suggestions, and much more. We’d love to meet you on-line, please come visit us today!
Copyright © 1990,1991 by Falk Data Systems. All Rights Reserved.
UltaSound General MIDI Drum Set Program General MIDI UltraSound Number Note Name Name Size (k) 27 D#1 High Q HIGHQ 3.9 28 E1 Slap SLAP 12.1 29 F1 Scratch Push SCRATCH1 9.1 30 F#1 Scratch Pull SCRATCH2 4.9 31 G1 Sticks STICKS 8.8 32 G#1 Square Click SQRCLICK 0.6 33 A1 Metronome Click METCLICK 0.6 34 A#1 Metronome Bell METBELL 0.6 35 B1 Acoustic Bass KICK1 9.6 36 C2 Bass Drum 1 KICK2 10.4 37 C#2 Side Stick STICKRIM 6.0 38 D2 Acoustic Snare SNARE1 17.5 39 D#2 Handclap CLAPS 11.8 40 E2 Electric Snare SNARE2 8.6 41 F2 Low Floor Tom TOMLO2 19.6
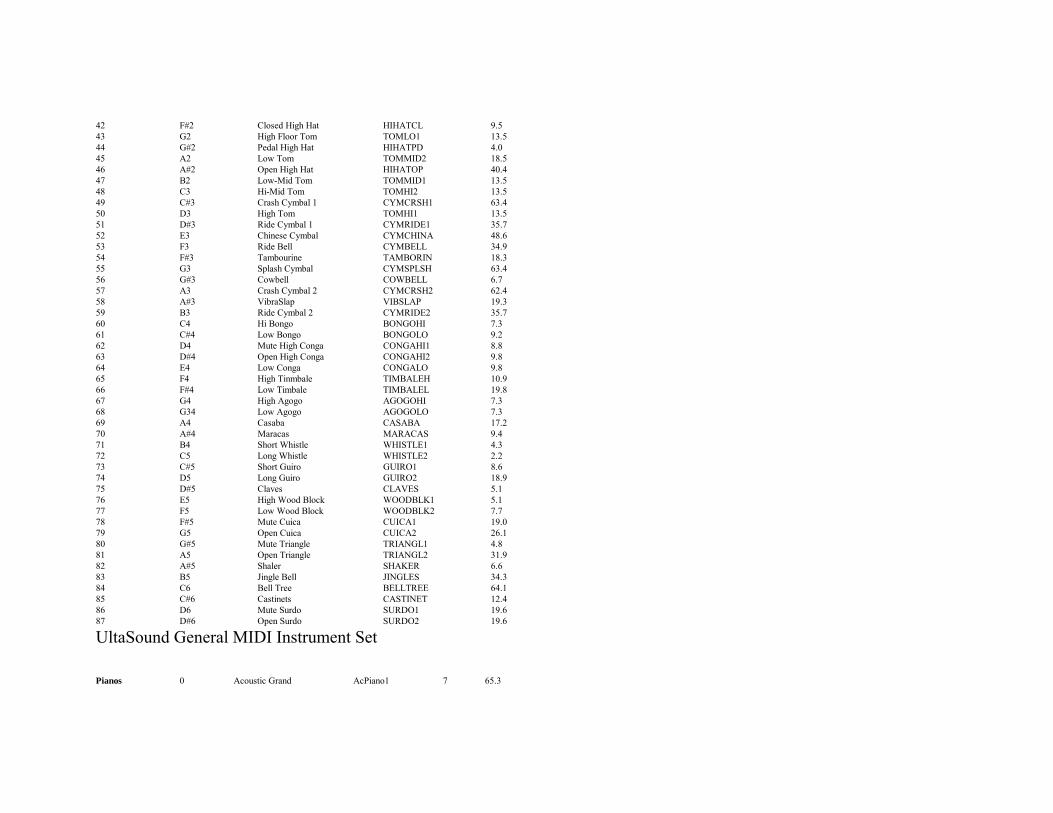
42 F#2 Closed High Hat HIHATCL 9.5 43 G2 High Floor Tom TOMLO1 13.5 44 G#2 Pedal High Hat HIHATPD 4.0 45 A2 Low Tom TOMMID2 18.5 46 A#2 Open High Hat HIHATOP 40.4 47 B2 Low-Mid Tom TOMMID1 13.5 48 C3 Hi-Mid Tom TOMHI2 13.5 49 C#3 Crash Cymbal 1 CYMCRSH1 63.4 50 D3 High Tom TOMHI1 13.5 51 D#3 Ride Cymbal 1 CYMRIDE1 35.7 52 E3 Chinese Cymbal CYMCHINA 48.6 53 F3 Ride Bell CYMBELL 34.9 54 F#3 Tambourine TAMBORIN 18.3 55 G3 Splash Cymbal CYMSPLSH 63.4 56 G#3 Cowbell COWBELL 6.7 57 A3 Crash Cymbal 2 CYMCRSH2 62.4 58 A#3 VibraSlap VIBSLAP 19.3 59 B3 Ride Cymbal 2 CYMRIDE2 35.7 60 C4 Hi Bongo BONGOHI 7.3 61 C#4 Low Bongo BONGOLO 9.2 62 D4 Mute High Conga CONGAHI1 8.8 63 D#4 Open High Conga CONGAHI2 9.8 64 E4 Low Conga CONGALO 9.8 65 F4 High Tinmbale TIMBALEH 10.9 66 F#4 Low Timbale TIMBALEL 19.8 67 G4 High Agogo AGOGOHI 7.3 68 G34 Low Agogo AGOGOLO 7.3 69 A4 Casaba CASABA 17.2 70 A#4 Maracas MARACAS 9.4 71 B4 Short Whistle WHISTLE1 4.3 72 C5 Long Whistle WHISTLE2 2.2 73 C#5 Short Guiro GUIRO1 8.6 74 D5 Long Guiro GUIRO2 18.9 75 D#5 Claves CLAVES 5.1 76 E5 High Wood Block WOODBLK1 5.1 77 F5 Low Wood Block WOODBLK2 7.7 78 F#5 Mute Cuica CUICA1 19.0 79 G5 Open Cuica CUICA2 26.1 80 G#5 Mute Triangle TRIANGL1 4.8 81 A5 Open Triangle TRIANGL2 31.9 82 A#5 Shaler SHAKER 6.6 83 B5 Jingle Bell JINGLES 34.3 84 C6 Bell Tree BELLTREE 64.1 85 C#6 Castinets CASTINET 12.4 86 D6 Mute Surdo SURDO1 19.6 87 D#6 Open Surdo SURDO2 19.6
UltaSound General MIDI Instrument Set Sound Instrument General MIDI UltraSound No. of Group Number Name Name Samples Size (k) Pianos 0 Acoustic Grand AcPiano1 7 65.3
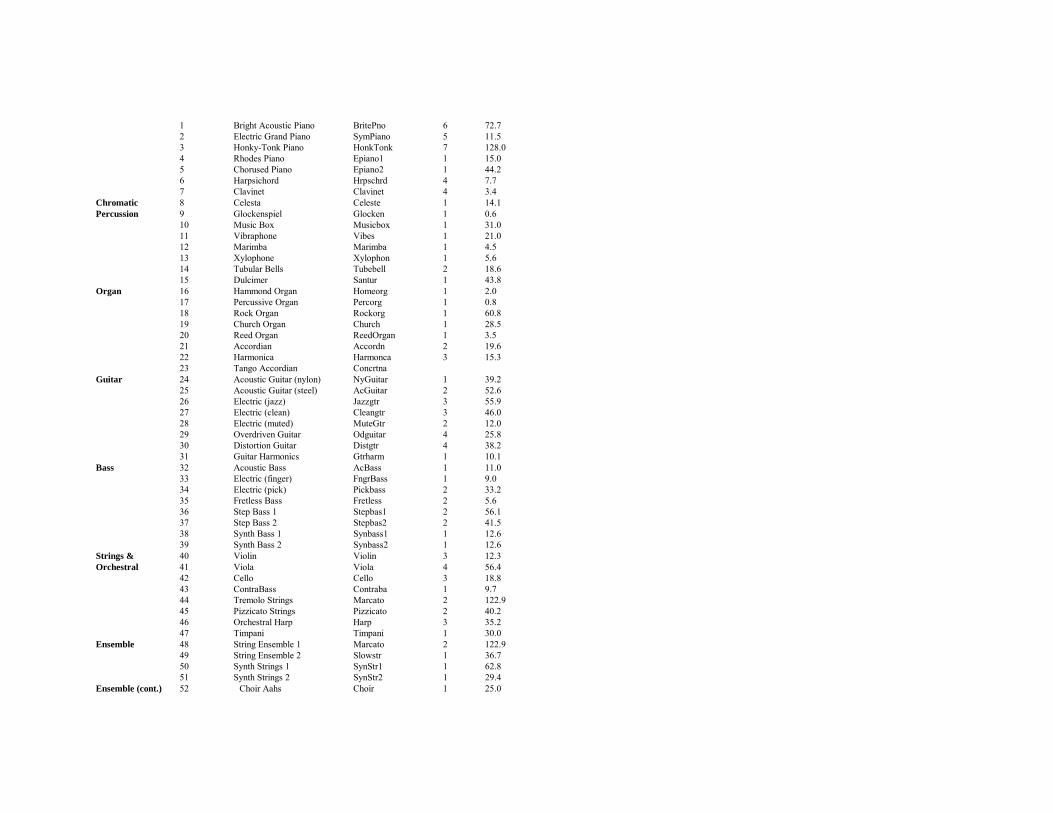
1 Bright Acoustic Piano BritePno 6 72.7 2 Electric Grand Piano SymPiano 5 11.5 3 Honky-Tonk Piano HonkTonk 7 128.0 4 Rhodes Piano Epiano1 1 15.0 5 Chorused Piano Epiano2 1 44.2 6 Harpsichord Hrpschrd 4 7.7 7 Clavinet Clavinet 4 3.4
Chromatic 8 Celesta Celeste 1 14.1 Percussion 9 Glockenspiel Glocken 1 0.6
10 Music Box Musicbox 1 31.0 11 Vibraphone Vibes 1 21.0 12 Marimba Marimba 1 4.5 13 Xylophone Xylophon 1 5.6 14 Tubular Bells Tubebell 2 18.6 15 Dulcimer Santur 1 43.8
Organ 16 Hammond Organ Homeorg 1 2.0 17 Percussive Organ Percorg 1 0.8 18 Rock Organ Rockorg 1 60.8 19 Church Organ Church 1 28.5 20 Reed Organ ReedOrgan 1 3.5 21 Accordian Accordn 2 19.6 22 Harmonica Harmonca 3 15.3 23 Tango Accordian Concrtna
Guitar 24 Acoustic Guitar (nylon) NyGuitar 1 39.2 25 Acoustic Guitar (steel) AcGuitar 2 52.6 26 Electric (jazz) Jazzgtr 3 55.9 27 Electric (clean) Cleangtr 3 46.0 28 Electric (muted) MuteGtr 2 12.0 29 Overdriven Guitar Odguitar 4 25.8 30 Distortion Guitar Distgtr 4 38.2 31 Guitar Harmonics Gtrharm 1 10.1
Bass 32 Acoustic Bass AcBass 1 11.0 33 Electric (finger) FngrBass 1 9.0 34 Electric (pick) Pickbass 2 33.2 35 Fretless Bass Fretless 2 5.6 36 Step Bass 1 Stepbas1 2 56.1 37 Step Bass 2 Stepbas2 2 41.5 38 Synth Bass 1 Synbass1 1 12.6 39 Synth Bass 2 Synbass2 1 12.6
Strings & 40 Violin Violin 3 12.3 Orchestral 41 Viola Viola 4 56.4
42 Cello Cello 3 18.8 43 ContraBass Contraba 1 9.7 44 Tremolo Strings Marcato 2 122.9 45 Pizzicato Strings Pizzicato 2 40.2 46 Orchestral Harp Harp 3 35.2 47 Timpani Timpani 1 30.0
Ensemble 48 String Ensemble 1 Marcato 2 122.9 49 String Ensemble 2 Slowstr 1 36.7 50 Synth Strings 1 SynStr1 1 62.8 51 Synth Strings 2 SynStr2 1 29.4
Ensemble (cont.) 52 Choir Aahs Choir 1 25.0

53 Voice Oohs Doo 2 17.3 54 Synth Voice Voices 1 61.4 55 Orchestra Hit OrchHit 1 28.8
Brass 56 Trumpet Trumpet 2 13.6 57 Trombone Trombone 2 26 58 Tuba Tuba 1 11.9 59 Muted Trumpet Mutetrum 5 19.0 60 French Horn Frenchhrn 2 28.6 61 Brass Section Hitbrass 62 Synth Brass 1 Synbras1 1 61.7 63 Synth Brass 2 Synbras2 1 60.6
Reed 64 Soprano Sax Sprnosax 4 14.7 65 Alto Sax AltoSax 3 11.7 66 Tenor Sax TenorSax 3 17.4 67 Baritone Sax Barisax 1 0.7 68 Oboe Oboe 15 9.3 69 English Horn Englhorn 3 24.7 70 Bassoon Bassoon 6 16.8 71 Clarinet Clarinet 7 19.2
Pipe 72 Piccolo Piccolo 1 8.9 73 Flute Flute 1 9.2 74 Recorder Recorder 1 5.6 75 Pan Flute WoodFlut 1 4.2 76 Blow Bottle Bottle 1 25.0 77 Shakuhachi Shakazul 1 62.6 78 Whistle Whistle 1 12.0 79 Ocarina Oscarina 1 3.5
Synth Lead 80 Lead 1 (square) Sqrwave 1 30.4 81 Lead 2 (sawtooth) Sawwave 2 54.5 82 Lead 3 (Calliope lead) Calliope 1 46.3 83 Lead 4 (Chiff lead) Chiflead 1 63.4 84 Lead 5 (Charang) Charang 4 80.0 85 Lead 6 (voice) Voxlead 1 30.3 86 Lead 7 (fifths) lead5th 1 13.2 87 Lead 8 (bass + lead) Bass & Lead 2 53.4
Synth Pad etc 88 Pad 1 (new age) Fantasia 1 47.2 89 Pad 2 (warm) Warmpad 1 36.5 90 Pad 3 (polysynth) Polysyn 1 60.7 91 Pad 4 (choir) Ghostie 1 63.3 92 Pad 5 (bowed) Bowglass 1 50.5 93 Pad 6 (metallic) Metalpad 1 60.9 94 Pad 7 (halo) Halopad 1 60.3 95 Pad 8 (sweep) Sweeper 1 62.7
Synth SFX 96 FX 1 (rain) Aurora 1 65.5 97 FX2 (soundtrack) Soundtrk 1 40.0 98 FX 3 (crystal) Crystal 1 60.8 99 FX 4 (atmosphere) Atmosphr 1 63.0 100 FX 5 (brightness) Freshair 1 58.3 101 FX 6 (goblin) Unicorn 1 60.5 102 FX 7 (echoes) Echovox 30.2 103 FX 8 (sci-fi) Startrak 1 55.1
Ethnic 104 Sitar Sitar 2 37.0
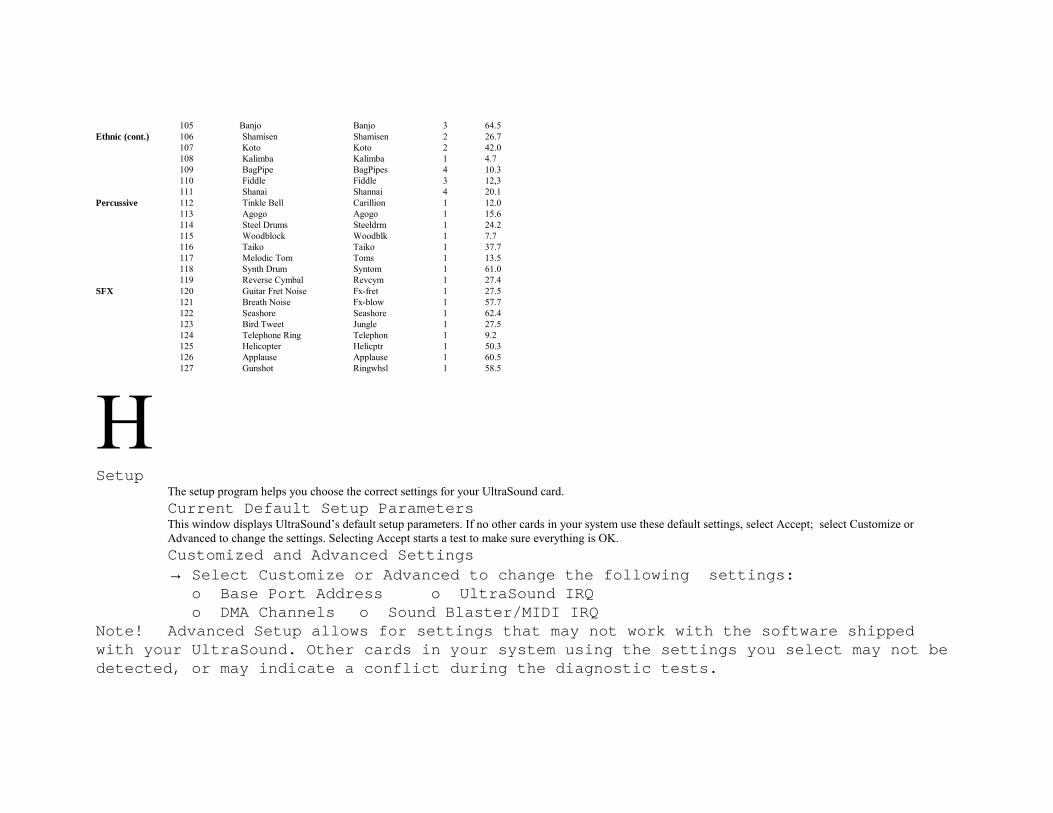
105 Banjo Banjo 3 64.5 Ethnic (cont.) 106 Shamisen Shamisen 2 26.7
107 Koto Koto 2 42.0 108 Kalimba Kalimba 1 4.7 109 BagPipe BagPipes 4 10.3 110 Fiddle Fiddle 3 12,3 111 Shanai Shannai 4 20.1
Percussive 112 Tinkle Bell Carillion 1 12.0 113 Agogo Agogo 1 15.6 114 Steel Drums Steeldrm 1 24.2 115 Woodblock Woodblk 1 7.7 116 Taiko Taiko 1 37.7 117 Melodic Tom Toms 1 13.5 118 Synth Drum Syntom 1 61.0 119 Reverse Cymbal Revcym 1 27.4
SFX 120 Guitar Fret Noise Fx-fret 1 27.5 121 Breath Noise Fx-blow 1 57.7 122 Seashore Seashore 1 62.4 123 Bird Tweet Jungle 1 27.5 124 Telephone Ring Telephon 1 9.2 125 Helicopter Helicptr 1 50.3 126 Applause Applause 1 60.5 127 Gunshot Ringwhsl 1 58.5
H
Setup The setup program helps you choose the correct settings for your UltraSound card. Current Default Setup Parameters This window displays UltraSound’s default setup parameters. If no other cards in your system use these default settings, select Accept; select Customize or Advanced to change the settings. Selecting Accept starts a test to make sure everything is OK. Customized and Advanced Settings → Select Customize or Advanced to change the following settings:
o Base Port Address o UltraSound IRQ o DMA Channels o Sound Blaster/MIDI IRQ
Note! Advanced Setup allows for settings that may not work with the software shipped with your UltraSound. Other cards in your system using the settings you select may not be detected, or may indicate a conflict during the diagnostic tests.
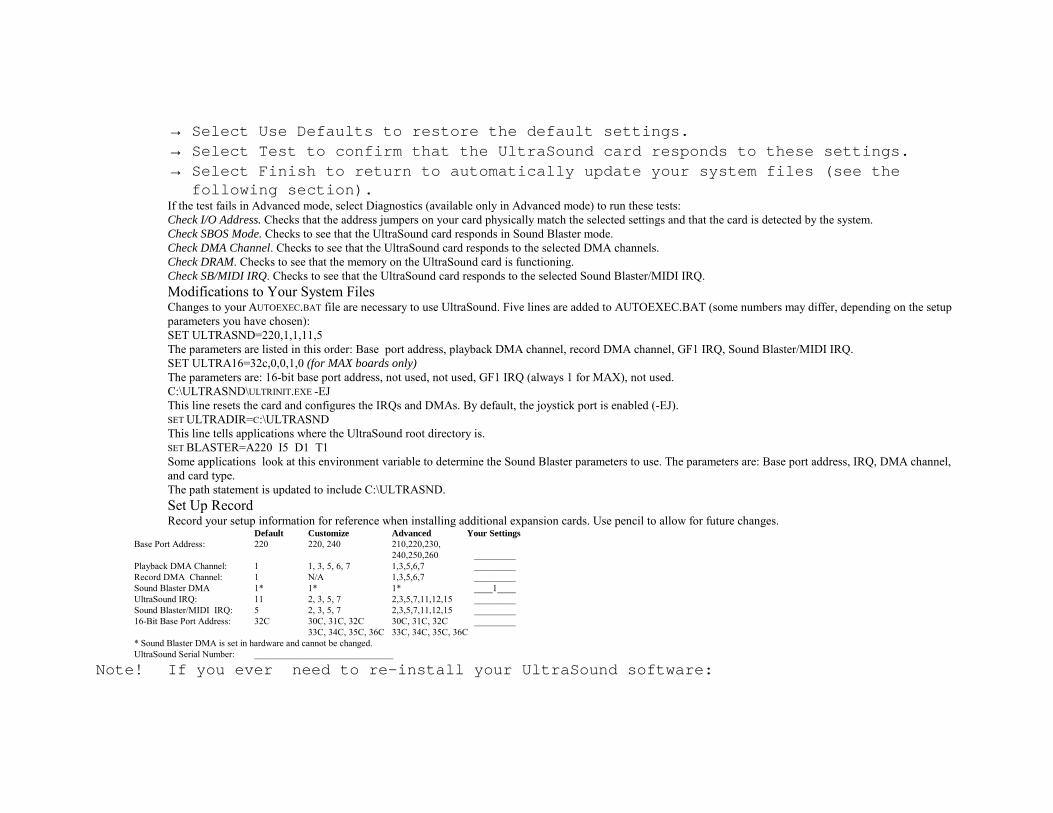
→ Select Use Defaults to restore the default settings. → Select Test to confirm that the UltraSound card responds to these settings. → Select Finish to return to automatically update your system files (see the
following section). If the test fails in Advanced mode, select Diagnostics (available only in Advanced mode) to run these tests: Check I/O Address. Checks that the address jumpers on your card physically match the selected settings and that the card is detected by the system. Check SBOS Mode. Checks to see that the UltraSound card responds in Sound Blaster mode. Check DMA Channel. Checks to see that the UltraSound card responds to the selected DMA channels. Check DRAM. Checks to see that the memory on the UltraSound card is functioning. Check SB/MIDI IRQ. Checks to see that the UltraSound card responds to the selected Sound Blaster/MIDI IRQ. Modifications to Your System Files Changes to your AUTOEXEC.BAT file are necessary to use UltraSound. Five lines are added to AUTOEXEC.BAT (some numbers may differ, depending on the setup parameters you have chosen): SET ULTRASND=220,1,1,11,5 The parameters are listed in this order: Base port address, playback DMA channel, record DMA channel, GF1 IRQ, Sound Blaster/MIDI IRQ. SET ULTRA16=32c,0,0,1,0 (for MAX boards only) The parameters are: 16-bit base port address, not used, not used, GF1 IRQ (always 1 for MAX), not used. C:\ULTRASND\ULTRINIT.EXE -EJ This line resets the card and configures the IRQs and DMAs. By default, the joystick port is enabled (-EJ). SET ULTRADIR=C:\ULTRASND This line tells applications where the UltraSound root directory is. SET BLASTER=A220 I5 D1 T1 Some applications look at this environment variable to determine the Sound Blaster parameters to use. The parameters are: Base port address, IRQ, DMA channel, and card type. The path statement is updated to include C:\ULTRASND. Set Up Record Record your setup information for reference when installing additional expansion cards. Use pencil to allow for future changes.
Default Customize Advanced Your Settings Base Port Address: 220 220, 240 210,220,230,
240,250,260 _________ Playback DMA Channel: 1 1, 3, 5, 6, 7 1,3,5,6,7 _________ Record DMA Channel: 1 N/A 1,3,5,6,7 _________ Sound Blaster DMA 1* 1* 1* ____1____ UltraSound IRQ: 11 2, 3, 5, 7 2,3,5,7,11,12,15 _________ Sound Blaster/MIDI IRQ: 5 2, 3, 5, 7 2,3,5,7,11,12,15 _________ 16-Bit Base Port Address: 32C 30C, 31C, 32C 30C, 31C, 32C _________
33C, 34C, 35C, 36C 33C, 34C, 35C, 36C * Sound Blaster DMA is set in hardware and cannot be changed. UltraSound Serial Number: ______________________________
Note! If you ever need to re-install your UltraSound software:

→ Put Disk 1 in your floppy drive and type: INSTALL. Follow the instructions on screen to complete the installation.
UltraSound Default Settings I/O Port Address: 220 Playback DMA Channel: 1* Record DMA Channel: 1* Sound Blaster DMA Channel: 1** UltraSound GF1 IRQ: 11 Sound Blaster/MIDI IRQ: 5 16-Bit Base Port 32C (for UltraSound MAX) * If you wish to record and play back files simultaneously, you must set different DMA channels for Record and Playback.
**Like the real Sound Blaster, this DMA channel is set in hardware and cannot be changed. Other cards in your system using DMA channel 1 must be changed to another DMA channel.