Chapter 1 - Getting To Know Word - University of Oxford · Web viewChapter 1 Getting To Know Word...
16
Word 2007 - Full manual CHAPTER 1 GETTING TO KNOW WORD © Watsonia Publishing Page 1 Chapter 1 - Getting To Know Word In this session you will: gain an understanding of the Word 2007 screen learn how to use the Ribbon learn how to use the keytip badges learn how to minimise the ribbon gain an understanding of shortcut menus learn how to use shortcut menus gain an understanding of dialog boxes gain an understanding of the Quick Access Toolbar learn how to customise the Quick Access Toolbar gain an understanding of the Office button learn how to use the Office button gain an understanding of the status bar learn how to customise the status bar learn how to exit Word. Microsoft Word is a word processing application that is usually part of a suite of Microsoft applications, known as Microsoft Office. You can use Word to create all sorts of documents, including letters, reports, faxes, forms, emails, web pages, invitations and certificates. Before you leap into creating anything, it is worth taking some time to become familiar with the Word FOCUS I n BSP_W701
Transcript of Chapter 1 - Getting To Know Word - University of Oxford · Web viewChapter 1 Getting To Know Word...

Word 2007 - Full manual
CHAPTER 1 GETTING TO KNOW WORD
© Watsonia Publishing Page 1 Chapter 1 - Getting To Know Word
In this session you will: gain an understanding of the Word 2007 screen learn how to use the Ribbon learn how to use the keytip badges learn how to minimise the ribbon gain an understanding of shortcut menus learn how to use shortcut menus gain an understanding of dialog boxes gain an understanding of the Quick Access Toolbar learn how to customise the Quick Access Toolbar gain an understanding of the Office button learn how to use the Office button gain an understanding of the status bar learn how to customise the status bar learn how to exit Word.
Microsoft Word is a word processing application that is usually part of a suite of Microsoft applications, known as Microsoft Office.You can use Word to create all sorts of documents, including letters, reports, faxes, forms, emails, web pages, invitations and certificates.Before you leap into creating anything, it is worth taking some time to become familiar with the Word window and its features.
FOCUSIn
BSP_W701

Word 2007 - Full manual
THE WORD SCREEN
© Watsonia Publishing Page 2 Chapter 1 - Getting To Know Word
The Office Button is used to access file management functions such as saving, opening, closing, printing, etc. Word Options are also available so that you can set your working preferences for Word
2007 (this replaces Tools > Options in previous versions).The Ribbon is the tabbed band that appears across the top of the window. It is the control centre of Word 2007. Instead of menus, you can now use the tabs on the Ribbon to access commands which have been categorised into groups. The commands include galleries of formatting options that you can select from, such as the Styles gallery
shown here.The Insertion point shows where the text will appear if you start typing.The Mouse Pointer is used, amongst other things, to move the insertion point to different locations in the document. It may appear as a pointer or an I-bar, as in this example, or any number of other forms depending upon
its function at that position on the screen.The Status Bar appears across the bottom of the window and displays the current location of the insertion point, including page number, section number, column,
and so on. It can also be used to access navigation commands such as Go To.The View buttons and the Zoom Slider are used to change the view or to increase/decrease the zoom ratio for your
document.The Scroll bar indicates your current position in the document and lets you move to other positions in the document by clicking or dragging. The arrows can also be used to move through the document.
Once you know your way around the Word screen you’ll find it much easier to use. The Word screen is made up of a number of different elements. Some of these elements, like the Office button, Ribbon and Status bar may be familiar to you if you have used another Office application such as Excel. If not, don’t worry, they soon will be.
1
2
3
4
5
7
6
Word 2007 - Full manual
USING THE RIBBON
© Watsonia Publishing Page 3 Chapter 1 - Getting To Know Word
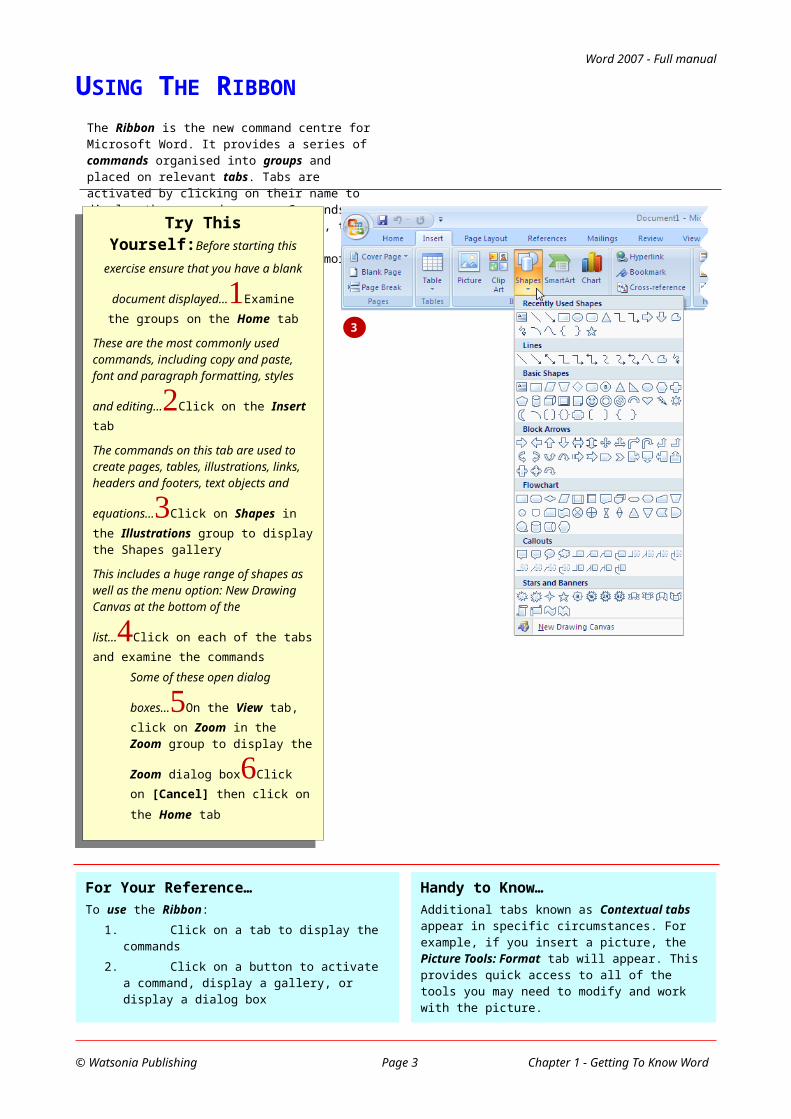
The Ribbon is the new command centre for Microsoft Word. It provides a series of commands organised into groups and placed on relevant tabs. Tabs are activated by clicking on their name to display the command groups. Commands are activated by clicking on a button, tool or gallery option. The Ribbon is intended to make document design more intuitive.Try This Yourself:Before
starting this exercise ensure that you have a blank document displayed…
Examine the groups on the Home tab
These are the most commonly used commands, including copy and paste, font and paragraph formatting, styles and
editing...Click on the Insert tab
The commands on this tab are used to create pages, tables, illustrations, links, headers and footers, text objects and
equations...Click on Shapes in the Illustrations group to display the Shapes gallery
This includes a huge range of shapes as well as the menu option: New Drawing
Canvas at the bottom of the list...Click on each of the tabs and examine the commands
Some of these open dialog
boxes...On the View tab, click on Zoom in the Zoom group to display the Zoom dialog
boxClick on [Cancel] then click
on the Home tab
For Your Reference…To use the Ribbon:
1. Click on a tab to display the commands2. Click on a button to activate a command,
display a gallery, or display a dialog box
Handy to Know…Additional tabs known as Contextual tabs appear in specific circumstances. For example, if you insert a picture, the Picture Tools: Format tab will appear. This provides quick access to all of the tools you may need to modify and work with the picture.
3

Word 2007 - Full manual
USING KEYTIP BADGES
© Watsonia Publishing Page 4 Chapter 1 - Getting To Know Word
You can use the keyboard to access commands on the Ribbon. To make this possible, letters will appear next to commands on the ribbon when you press . These letters are known as keytip badges. You can also use and arrow keys to move through the commands and even the scroll wheel on your mouse if you have one. Keytip badges are also known as access keys.Try This Yourself:Before
starting this exercise ensure that you have a blank document
displayed…Press to display the
keytip badgesPress to activate the Page Layout tab and display the keytip badges for the Page
Layout commandsPress to display the Margins options
Notice the keytip badge for Custom Margins at the bottom
of the menu...Press twice to return to the previous level
of access keysPress to access the Mailings
tabPractise using the arrow keys and to move through the tabs and into
commandsPress to return
to text entry mode
For Your Reference…To use KeyTip Badges to access commands:
1. Press to display the KeyTip Badges
2. Press the letter key of the command or tab that you want to select
Handy to Know…You can still use the shortcut keys for menu commands that were available in previous versions of Office. For example, + applies bold to selected text.
2
3

Word 2007 - Full manual
MINIMISING THE RIBBON
© Watsonia Publishing Page 5 Chapter 1 - Getting To Know Word
The Ribbon is a band across the top of the window made up of a series of tabs and related groups of commands. The wide band and use of icons make it very quick and easy to find and apply commands and settings. However, if you are working on a large document with a lot of text, it may suit you to hide the ribbon, either temporarily or permanently, while you are working.
Try This Yourself:Before
starting this exercise ensure that you have a blank document displayed…
Click on the Insert tab to display
the Insert commandsDouble-click on the Insert tab to minimise the
ribbon
The tabs stay visible, but the rest of the
commands are hidden...Click on the Page Layout tab to redisplay the ribbon, this time with the Page Layout
commandsClick back in the document
The ribbon will hide again – it only becomes visible when you need it. You can redisplay it permanently
though...Double-click on the References tab
The ribbon is redisplayed...Click in the document
This time the ribbon has been redisplayed permanently and doesn’t disappear when you aren’t
using it...Click on the Home
tab
For Your Reference…To hide/display the Ribbon:
1. Double-click on the active tab to hide the ribbon
2. Click on a tab to see the ribbon temporarily
3. Double-click on a tab to redisplay the ribbon permanently
Handy to Know…You can also right-click anywhere on the ribbon (other than on a command) to display a shortcut menu. Select Minimise the Ribbon to hide or display the ribbon.
1
2
5

Word 2007 - Full manual
SHORTCUT MENUS
© Watsonia Publishing Page 6 Chapter 1 - Getting To Know Word
Shortcut menus are menus that appear when you right-click in an area on the screen or on an object. They are also known as contextual menus because the content of the menu varies depending upon where you click. Shortcut menus provide a list of commands that are specific to the object or area on which you clicked to display the menu. Here are some examples.

Word 2007 - Full manual
USING SHORTCUT MENUS
© Watsonia Publishing Page 7 Chapter 1 - Getting To Know Word
Word provides a range of context-sensitive menus called shortcut menus that appear when you right-click in specific areas on the screen or on objects in the text. Shortcut menus are designed to save you time by presenting you with only the menu commands that apply to the object or area in which you have clicked. In some situations, the mini-toolbar will also appear.
Try This Yourself:Before starting
this exercise ensure that a blank
document is displayed…Move the mouse pointer to the middle of the document and click with the right
mouse button to display a shortcut or contextual menu
Because you have clicked in the body of the document the menu includes Font and Paragraph options. As no text is actually selected the Cut, Copy and Paste options
are greyed out...Click anywhere on the page with the left mouse button to close
the shortcut menuMove the mouse pointer over any of the tabs on the
ribbonRight-click on a tab to display a shortcut menu
Notice how it differs from the previous menu by displaying toolbar and ribbon options instead of text. Word has made an educated guess about what you want to do based on
what you have clicked on...Click anywhere on the page with the left mouse button to close the shortcut menu
For Your Reference…To display a shortcut menu:
1. Point to the object or area of the screen on which you want to perform an operation
2. Right-click to display the shortcut menu
Handy to Know…Once a shortcut menu appears, the options in it are selected by clicking on them with the left mouse button, or pressing the letter underlined in the menu option.
1
4

Word 2007 - Full manual
UNDERSTANDING DIALOG BOXES
© Watsonia Publishing Page 8 Chapter 1 - Getting To Know Word
Dialog boxes contain a series of controls that are used to adjust settings for a particular aspect of a document. They appear either when you click on a dialog box launcher at the bottom right-hand corner of a group, or when you click on a command that displays a dialog box. Dialog boxes are often used for adjusting some of the more advanced aspects of a document.Dialog Box Controls
Dialog boxes, in their simplest form, have a series of controls that enable you to specify values or select from a series of options. They also have common buttons that appear at the bottom of the dialog box, labelled [OK] and [Cancel]. The [OK] button is used to apply the settings that you have selected, and [Cancel] is used to close the dialog box without saving any changes.At the top right-hand corner of a dialog box there are two buttons. Help displays the Word Help window and Close closes the dialog box without saving the changes.Dialog boxes include a wide range of controls that make changing settings easier. The controls in the Zoom and Paragraph dialog boxes show you some examples.

Word 2007 - Full manual
THE QUICK ACCESS TOOLBAR
© Watsonia Publishing Page 9 Chapter 1 - Getting To Know Word
The Quick Access Toolbar, also known as the QAT, is a small toolbar that appears at the top, left-hand corner of the Word window. It is designed to provide access to the tools you use most frequently, such as Save, and includes by default the Undo and Redo buttons. You can add buttons to the Quick Access Toolbar to make finding your favourite commands easier.The Quick Access Toolbar
The Quick Access Toolbar is positioned immediately to the right of the Office Button. In its default state, it includes the Save tool, the Undo tool and the Redo tool.
The Customise Quick Access Toolbar ButtonAppearing immediately to the right of the Quick Access Toolbar, the Customise Quick Access Toolbar tool displays a list of commonly used commands that you can add to the toolbar. You can select the items that you want to add. The ticks that appear to the left of the menu options show you that an option is already displayed.
You can add any command you like to the toolbar by selecting More Commands to display the Word Options dialog box. From here you can choose commands or tabs to add to the toolbar. You can even shift the Quick Access Toolbar below the ribbon if this suits the way you work.
Word 2007 - Full manual
CUSTOMISING THE QUICK ACCESS TOOLBAR
© Watsonia Publishing Page 10 Chapter 1 - Getting To Know Word
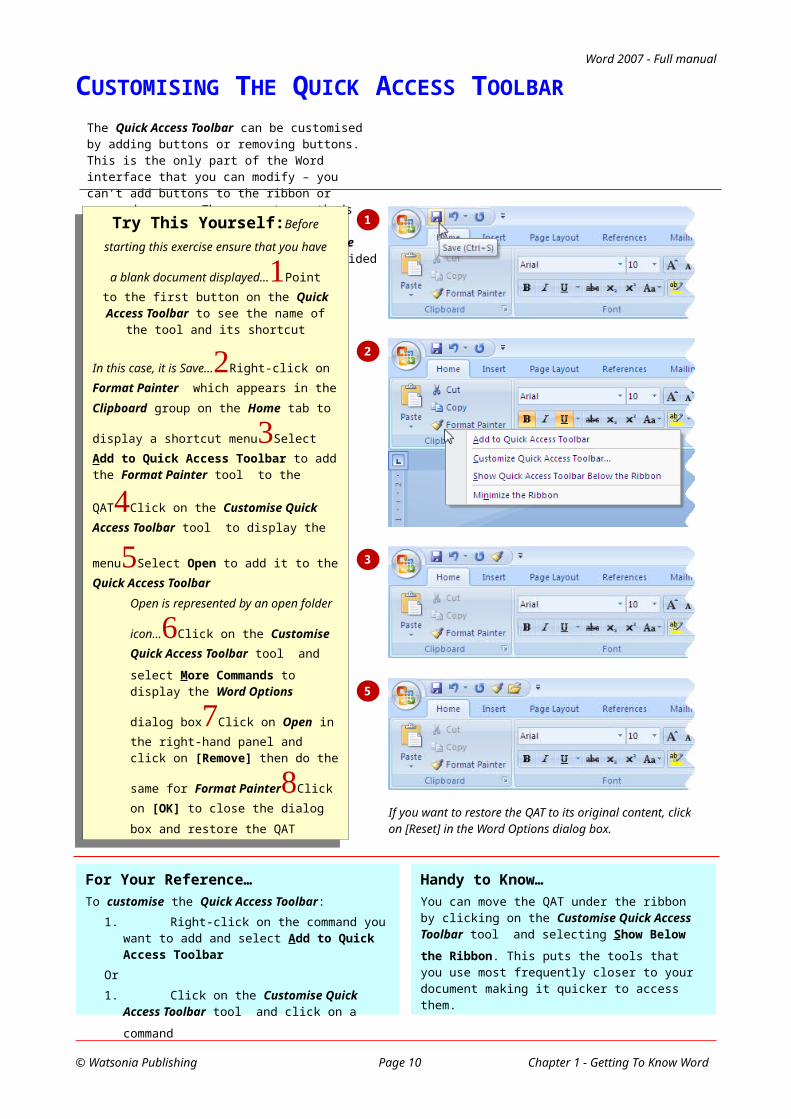
The Quick Access Toolbar can be customised by adding buttons or removing buttons. This is the only part of the Word interface that you can modify – you can’t add buttons to the ribbon or command groups. There are two methods that can be used to customise the toolbar, including using the Customise Quick Access Toolbar tool which is provided just for the purpose.
If you want to restore the QAT to its original content, click on [Reset] in the Word Options dialog box.
Try This Yourself:Before starting
this exercise ensure that you have a blank
document displayed…Point to the first button on the Quick Access Toolbar to see the name of the tool and its shortcut
In this case, it is Save...Right-click on Format Painter which appears in the Clipboard group on the Home tab to display
a shortcut menuSelect Add to Quick Access Toolbar to add the Format Painter
tool to the QATClick on the Customise Quick Access Toolbar tool to display the
menuSelect Open to add it to the Quick Access Toolbar
Open is represented by an open folder
icon...Click on the Customise Quick Access Toolbar tool and select More Commands to display the
Word Options dialog boxClick on Open in the right-hand panel and click on [Remove] then do the same for
Format PainterClick on [OK] to close the dialog box and restore the QAT
For Your Reference…To customise the Quick Access Toolbar:
1. Right-click on the command you want to add and select Add to Quick Access Toolbar
Or1. Click on the Customise Quick Access
Toolbar tool and click on a command
Handy to Know…You can move the QAT under the ribbon by clicking on the Customise Quick Access Toolbar tool and selecting Show Below the Ribbon. This puts the tools that you use most frequently closer to your document making it quicker to access them.
1
2
3
5

Word 2007 - Full manual
THE OFFICE BUTTON
© Watsonia Publishing Page 11 Chapter 1 - Getting To Know Word
The Office Button is one the major changes in Word 2007. Replacing the File menu that appeared in earlier versions of Word, the Office Button provides access to all of the file-related commands such as Open, Save and Print. The Office Button is positioned at the top left-hand corner of the Word window.
What the Commands and Buttons Will Do…
Creates a new document, based either on a blank template, an installed template or an online template.
Opens an existing document.
Saves your current document using the default file format.
Saves the current document with the option to change the file format, name or location.
Previews your document or sends it to the printer of your choice.
Prepares your document for distribution. You can control how and who can access your file as well as setting some of the document properties, such as the title, author, etc.
Sends your document via email or Internet fax.
Publishes your document as a blog (web-based journal), or on a document management server, or as a new document workspace (shared area).
Closes your existing document.
Opens the Word Options dialog box so that changes to the default settings can be made.
Exits from Microsoft Word. If any unsaved documents are open, you will be prompted to save them.

Word 2007 - Full manual
USING THE OFFICE BUTTON
© Watsonia Publishing Page 12 Chapter 1 - Getting To Know Word
The Office Button provides access to the file management commands in Microsoft Word. The Office Button menu comprises a series of menu options, some of which have a submenu that appears when you point to the menu option or click on the arrow next to the option. Fortunately, each submenu option includes a description explaining its purpose.Try This Yourself:Before starting
this exercise ensure that you have a
blank document displayed…Type your name into the blank document and
then click on the Office Button
Select Save to display the Save As dialog box
Your name will appear as the File name because it is the first thing that appears in
the document...Click on [Save] to save
the fileClick on the Office Button then point to Save As to display the
submenuSelect Word 97-2003 Document
The same File name will be used but this time the document will have
a different format...Click on
[Save] to save the fileClick on the Office Button and select
CloseClick on the Office Button select New then click on [Create]
to create a new blank document
For Your Reference…To access the file management options:
1. Click on the Office Button
2. Select an option or submenu of your choice
Handy to Know…The Office Button menu displays a list of Recent Documents. If you want a document to stay on this list, click on the Pin button . The Pin button icon changes to a pushed in pin and can be clicked again to unpin the document.
2
6

Word 2007 - Full manual
THE STATUS BAR
© Watsonia Publishing Page 13 Chapter 1 - Getting To Know Word
The Status Bar is the bar across the bottom of the Word window. It is a very useful navigation aid that tells you not only the status of Word, but information such as the current page number and the number of words in the document. It also includes tools that can be used to change the document view. You can customise the status bar to change the information shown.
Page Numbers The Page Number indicates the position of the insertion point in the document. In this example, the insertion point (where text will appear when you type) is on page 1. This indicator also tells you how many pages there are in total – in this case, 1. If you click on the page number, the Go To page of the Find and Replace dialog box will be displayed.
Word Count This tells you the total number of words in a document. Be careful – it doesn’t count words in text boxes – only those that appear directly on the page. You can click on the Word Count tool to display the Word Count dialog box with complete details.
Proofing Indicator If a tick appears in the Proofing Indicator, you can rest assured that your spelling and grammar are correct. If a red cross appears , then proofing errors have been detected. You can click on the indicator to correct the errors.
Language The Language tool displays the current language and can be used to display the Language dialog box so that you can change the language settings.
Macro Recorder(not currently showing)
A macro is a series of recorded actions and/or commands that you can save and replay. This button allows you to either start or stop recording commands.
View Tools The Document View tools allow you to change the view of the document. You can select from Print Layout, Full Screen Reading, Web Layout, Outline and Draft.
Zoom Level This button displays the current zoom percentage. If you click on the button, the Zoom dialog box will appear so that you can select a specific zoom percentage.
Zoom Slider The Zoom Slider indicates the current zoom level, where the centre mark indicates 100%. You can either drag the marker to the left or right, or click on a specific point of the slider to set a zoom percentage. You can also click on the buttons at either end of the slider to zoom in or zoom out .
Resize Icon The Resize icon is visible in the Word window if the screen is not maximised. It allows you to change the size of the Word window by dragging in or out.
51 3 4 92 6 7 8

Word 2007 - Full manual
CUSTOMISING THE STATUS BAR
© Watsonia Publishing Page 14 Chapter 1 - Getting To Know Word
The Status Bar at the bottom of the Word window comprises two parts. The left-hand side displays options and information relevant to the current document, and the right-hand side displays viewing and zoom options. You can customise the settings of the Status Bar by adding or removing information to suit your working requirements.Try This Yourself:Before starting
this exercise ensure that a blank
document is displayed…Click on the centre mark in the Zoom slide to zoom to
100% then type:
The quick brown fox jumps over the lazy
dog.Read the status bar
You’ll notice that it says Words: 9...Right-click on the status bar to display the Customise Status Bar menu
This shows additional information about the document as well as listing settings you can
choose...Click on Section and Line Number then click outside the menu to close it
The Section number and Line number will
be added to the Status bar...Right-click on the status bar to display the menu
againClick on Section and Line Number to remove the ticks then click outside the menu to close it
The status bar will be restored to the original view
For Your Reference…To customise the status bar:
1. Right-click on the status bar2. Click on the options that you want to add
or remove3. Click outside the menu to close it
Handy to Know…If you prefer working with the keyboard, you can press to jump to the status bar. Use the arrow keys to move between options and press to activate an option. To deactivate the status bar selection, press .
2
3
4

Word 2007 - Full manual
EXITING SAFELY FROM WORD
© Watsonia Publishing Page 15 Chapter 1 - Getting To Know Word
When you have finished working with Word and no longer need to have it available you should exit in the proper manner. This can be done in several ways which include using the menus and the close button. If you exit Word without saving your work or naming the document, a message box will appear prompting you to do so. Try This
Yourself:Continue using
the document from the
previous exercise…Click on the Office Button and
click on [Exit Word]
Word will prompt you to save
the file...If you want to retain the changes, click on [Yes] otherwise click on [No]
If you click on [Yes], the Save As dialog box will
be displayed...Name your file then click on [Save]
For Your Reference…To exit Word:
1. Select File > Exit2. Save changes if prompted
Handy to Know…There are a number of other ways to exit Word:Click on the close button at the top right-hand corner of the Word window.Double-click on the Office Button until all documents and Word close.
1
2

Word 2007 - Full manual
NOTES:
© Watsonia Publishing Page 16 Chapter 1 - Getting To Know Word
1
4