
Chapter 1 – Getting Started · ... Author: Dan Harding. Chapter 1 ... Backup and Restore Clubber...
56
Revised 6/8/2018 Page 1 Computer Services Missionary TECH Team 903-757-4530 [email protected] www.techteam.org (Software) Author: Dan Harding Version 7-11-2011 ARK Documentation ArkWeb [email protected] www.arkweb.org 903-808-0214 (by appt) (Software) Author: Dan Harding
Transcript of Chapter 1 – Getting Started · ... Author: Dan Harding. Chapter 1 ... Backup and Restore Clubber...

Revised 6/8/2018 Page 1
Computer ServicesMissionary TECH Team
(Software) Author: Dan Harding
Ver
sion
7-1
1-20
11
ARK Documentation
903-808-0214 (by appt)
(Software) Author: Dan Harding

Chapter 1 – Getting StartedFor clarification purposes in this documentation, Clubber will generally refer to a child. However, in some instances, as in some reports, other groups may be selected, e.g. leaders, listeners, etc. even thoughit is called a Clubber report. The term “menu” will refer to the options in the menu bar at the top of the Ark Individual screen. The term “field” will refer to the space you write something into (or in some instances, select what goes into the space from a drop-down list).
Set-up OptionsThe set-up menus will allow definition of individual areas to fit each club’s needs. The first four setup options should be done before entering Clubber data. On Setup menu, click on option desired.
Options: will allow selection of specific options for your club. See Setup/Options. For options relating specifically to Check-in, see Setup/Session Fields.
Calendar: necessary to set dates that your club meets. The program will automatically post subsequent dates based on the criteria you set. See Setup/Calendar.
User Defined Fields: Enter options specific to your club. See Setup/Custom Contact Fields.
Using Awana™ Shares: Shares can be awarded based on session information, sections, and any awards. (Book Unit, Book, Additional Awards). See Session Fields, and Setup/Options to configure this.
Using Smart Phone: A smart phone (iPhone or Android) can be used to enter check in or section information. See Smart Phone App and Phone App Setup
Browser-based (Online) ARKMost screens on the Online version of ARK operate exactly like their Desktop counterparts. One difference is on controls that contain dates, most of the time there is a plus button just to the right of the date button allowing you to pick a date from a calendar. The desktop version can accomplish the same thing by just clicking in the field.
If you are moving from the Desktop version to the online version, you may notice that there are a lot of maintenance screens that are not available. Almost always, these screens should be modified only underthe supervision of Ark Support and were not included. Should there be a need to modify this information, please contact Ark Support and we will be happy to do so.
Entering Current Clubber InformationAfter setup has been completed, data on each clubber can be entered on the Ark Individual screen. It is helpful to have as much information as possible available on each clubber before starting to enter data. Completing entry of current clubbers before the beginning of the club year will make check-in much easier and faster. Registration forms should be available for new clubbers to fill out. See Entering Clubber Data.
Chapter 2 – Entering, Maintaining and Using Clubber DataFor clarification purposes in this documentation, List means a compilation of information viewed on your computer screen; Report means a compilation of information to be printed on paper.
Last modified 06/08/18 Page 2

Entering Clubber DataEntering Clubber Information: On the Ark Individual screen, enter Clubber information. If there is existing information already in the fields, you are modifying existing information. Please click Add firstto enter new information.
When entry is completed, click “Add”. The entry will be added to the database, and the screen will be cleared, ready to enter the next clubber. If you do not wish to continue the current entry for a new Clubber, click “Cancel”. The entry will be deleted and you will be returned to the previous screen beforethe entry was begun. If you are making changes on an existing Clubber, clicking “Cancel” will delete only the current changes made for that Clubber.
First: Enter the clubber’s First Name.
Last: Enter the clubber’s Last Name.
Address: Enter one or two lines of text for Address.
Postal Code: Enter five or nine digit Zip code. If zip is entered first, the city and state will automaticallybe filled in. To set a specific zip code as a default, see Setup/Options.
City: Enter City.
State: From drop-down list, select state.
Last modified 06/08/18 Page 3

Country: From drop-down list (below), select country. To set a specific country as a default, see Setup/Options.
Grade: From drop-down list, select current grade of Clubber. When entering a new Clubber, selecting a grade automatically selects club group for that Clubber.
Gender: Male or Female
Birthday: Enter Clubber’s birthday. The month, day and year may be separated by a slash (/) or a dash (-). (Ex. MM/DD/YY or MM-DD-YYYY) The program calculates the clubber’s age automatically based on the birthday.
Phone Number: Enter Phone Number including area code.
Cell Number: Enter Cell Number including area code.
E-Mail: Enter E-Mail address, if available.
Family Name: Click the ‘Find’ button to select a family name already entered or to add a new one. See Add/Edit Family Name.
Church: Enter the name of the church where the Clubber attends. To set a specific church as a default, see Setup/Options.
Brought By: Enter or select the name of the person who brought the new Clubber. If the name is in the database select it, otherwise if it not (such as “Grandmother”) it can be just typed in.
Allergies: Enter here any additional information you may want to remember about a Clubber, such as various allergies. This field will print on the Clubber List.
Notes: Enter here any additional information you may want to remember about a Clubber, such as a favorite sport, or a note about the family. The note will print on the Clubber List.
Entering Clubber Status
Image Button: An image can be selected that will be stored in the database. A thumbnail will print instead of the button and clicking on the thumbnail will bring up a larger size. For better performance, include a lower resolution picture.
Active: Checked means to include it in all lists, uncheck will make the clubber inactive and not appear in reports unless Include Inactive is checked on the selection screen. The exception would be time-sensitive reports that relate to session, awards, etc. which will list data for all Clubbers who have met selected criteria even though they may have been checked as inactive after it was met.
No address label: When checked this individual will not be part of the Mailing Labels report.
Last modified 06/08/18 Page 4

Dues Paid: In order for this feature to work properly, Setup/Session Fields (first) and Setup/Options (second) must be completed. After these have been completed, setting Dues Paid to Yes will default the dues session field as checked on the Individual Check-in screen and Blank Check-in reports.
If a portion of the dues have been paid for the year, choose a number representing this. Each time a session entry is made for this individual, the number will be decremented. Once it reaches zero, the box will no long be automatically checked on check-in.
To enter actual payment of dues, see Maintaining Clubber Data/Payments (for a single Clubber) or Payment Entry (for multiple Clubbers).
Club: Using the drop-down list of active clubs, select the current Club for this Clubber. To edit this list,see Setup/Club Definition.
Book: Using the drop-down list, select the Book where this Clubber is currently working. This may be different from the club they are in, if desired (e.g. if a leader or clubber is “catching up”). To edit this list, see Setup/Book Definition .
Team: Using the drop-down list, select a Team where this Clubber is to be assigned. To edit the main grouping, i.e. Sparks, etc. see Setup/Group Type. To edit a sub-group, e.g. color teams within the Group Type, see Setup/ Group . In some churches, only color teams might be used, or only Group Type, depending on your choice of options.
Color: Using the drop-down list, select a Color for this Clubber (if colors are used). To edit this list, see Setup/Team Colors and Team Group Color to indicate which colors will show with which Team Groups.
Group: Using the drop-down list, select the correct classification for the person being entered (i.e. Clubber, Leader, Listener, etc.) This list is maintained by Maintenance/Setup/Group and Group Type .
Payments: This button on the Ark Individual screen for a specific Clubber will allow recording paymentfor that Clubber only. To enter payments for several Clubbers, see Payment Entry .
Custom Data: You may enter data that may be unique to your club. It will appear on the lower right quarter of the Ark Individual screen. See Custom Contact Fields to set this up.
Registration/Permission forms: Registration and permission forms are available to help you gather information on the first club meeting or when new clubbers arrive. Theses reports are available on the Registration sub-menu under the Reports menu.
Blank Registration and Permission forms – forms that do not have existing clubber names andinformation on them, just lines.
Preprinted Registration and Permission forms – prints existing information with blank lines for any missing information allowing review and marking any changes if necessary. Reports thatprint by family are combination on a single form of all clubbers that have selected the same parents.
Last modified 06/08/18 Page 5

Add/Edit Family Name
The first time you click on the Find button for Family Name you will need to add a name, similar to the Add screen below. Otherwise the screen above will show, defaulting to the last name of the individual, if it has already been entered. If you do not have the appropriate family name, click the add button to add the correct family name. If the child's last name is different than the family name, then it can be chosen from the last name drop down list in the Select screen or just added as desired in the Add screen. If you want to change the family name in any way, click the Edit button rather than Add so that all existing family members will reflect this change immediately.
All other family members associated with this name will also display with the street address and group associated with each. You can double-click on the name to go to their screen.
Backup and Restore Clubber Data Backup: To backup the Ark Database, on the File menu, click Backup Database. Use the defaults or change the folder and/or name of the backup copy.
Last modified 06/08/18 Page 6

Restore: To restore the Ark database from a previous backup, on the File menu, click Restore DatabaseChoose a file previously created from the Backup option. A prompt will confirm the point (time) at which the backup was created.
Maintaining Clubber Data
Finding Clubber To find an individual Clubber, click on Find Individual on the Ark Individual screen. The Find Ark Individual screen will appear.
Sort Options: Select the option(s) you wish to use to create your list of Clubbers. To create a list of all the Clubbers, on the Groupdrop-down list, select Clubbers.
List: When sort options have been selected, a list will appear in the large window. Double clicking on one of them or clicking on one and then the Select button will take you to the Ark Individual screen for that Clubber. To scroll from one to the other within the selected list, click the right/left arrows at the bottom of the Ark Individual screen.
New Ark Individual: A new Clubber can beentered from the Find Ark Individual screen by clicking on New Ark Individual.
Individual Check-inOn the Individual menu, click Check-In. The List Options screen will appear. Select options to determine what will be included on the Check-in screen and how it will be arranged. There are 3 types of check-in screens. The names only and check-in list provide alternatives if the full check-intakes too long to load and save.
Check-in Data: Select each criteria that each Clubber has met.
Last modified 06/08/18 Page 7

When completed, click OK. Default letters at the top of the Check-in screen are P (Present), U (Uniform), H (Handbook), B (Bible), D (Dues). To change these options, or select other options, see Setup/Session Fields. To allow individual selection of Dues Paid (D) instead of automatic entry, see Setup/Options.
The date may be changed at the bottom of the screen, without leaving and going to the options screen again. It is recommended if you are leaving the device for a while to click the Update button to save data, in case something should happen before you return.
Note: If a paper copy of Check-in is preferred or the computer is not accessible at the check-in location, a blank form is available for printing. On Reports menu, under the Attendance sub-menu, click on BlankCheck-in Form.
Most award information (including Attendance and Book awards) is calculated automatically from Check-in information and/or information entered in Sections from an individual Clubber’s screen. For further information on Awards, see Reports/Awards.
Individual Session
On the Ark Individual screen for the specific Clubber, click on Sessions.
This will display a list of all session dates entered for this Clubber. If you wish to add a new entry, click Add before changing any data or you will be modifying an existing entry.
If you wish to change an existing entry, select the proper date from the list, and then make the changes to the appropriate fields.
Last modified 06/08/18 Page 8

Sections UpdateOn the Ark Individual screen for the specific Clubber, click on Sections. For a range of clubbers based on some criteria, on menu bar, click on Individual, then Sections
List Options: Select criteria for the list you wish to use. For a list of all Clubbers, simply select session date and click OK. Clubber and alphabetical sort are defaults. Data will appear in window to the right or on the next page. (Click Next, Previous, First, Last to move from one Clubber to another.) Click OK when completed. For more details see List Options ,
One Year Record: Select sections that this Clubber has completed this session. When the list has been completed, click OK. Note: A right mouse click on any section that has been completed will give the date when that section was completed. A right mouse click on a section that has not been completed willallow all prior sections to be filled in. Any section can be changed with a left mouse click. For a printoutof this information, see One Year Record report. Book awards will be calculated automatically from Sections information. See Reports/Awards .
It may be helpful to print out One Year Record reports sorted in a particular way, and then go through the sections screen using the same sort. You may find this is a faster way to enter sections. This will require someone to resort the paper list before you start entry.
Special Mouse Actions: You can right-click on an empty section box and a prompt will appear to automatically fill in all sections before and including this box. If you are clicking in a box that is a required section for the book, then only the required book boxes will be checked, otherwise all boxes required or optional before and including this section, will be checked.
On the desktop version, you can click on a previously entered section and it will prompt for if you want to clear it. A right-click on a checked section will give you the date that it was passed.
On the online version, hover over the checkbox to see when it was completed. You will need to change the date to match what shows in order to clear it.
Last modified 06/08/18 Page 9

There is list of names at the top of the screen if you wish to jump around from individual to individual, rather than going through in order.
There is a button on the bottom of the screen to quickly check all required sections on an empty screen, or uncheck all boxes where you have some entries already made.
Group Points:
On Individual menu, select Group Points. Click on Add to begin a new entry.
Club Year: Using scroll buttons, you can change club year. The default will be current club year.Date: Enter session date that the points were earned. Team Group/Main Group: Using the drop-down lists, select either a Main Group OR a Team Group. Reference: Enter additional information about source of points, e.g. Game points or Council Time points.Colors: Enter points earned for each of the color teams.
When finished with this entry, click Add. The screen will be cleared for the next entry. When all entries have been completed, click Done.
Points entered here will appear in the Point Totals report, but not in the Individual Points reports.To enter points to be assigned to multiple individual, use the Individual Points screen.
Last modified 06/08/18 Page 10

Promote Clubbers This feature is designed to be used at the end of the club year to promote Clubbers to the next grade, and to the next club if applicable. On the Individual menu, select Promote Clubbers. This should be done only once a year. It will promote all Clubbers at once.
There are additional options to set Dues Paid to No and clear Color selection or set it to no color. This can be done repeatedly if desired, by selecting Promote Clubbers and answering no to promote, but yes to the appropriate feature that follows.
Shares Spent
Enter shares used (for example at the Awana™ store). See Using Awana™ Shares to determine how and how much shares are used. Shares report displays all share information together with a balance.
Book Award Exceptions: Processes all clubber book history and reports any inconsistencies regarding book history. (For example, a clubber has worked on climber handbook - 3rd year Sparks - but has no information for the 1st or 2nd years.)
Book History: Previous book history may be added by changing the book to a previously completedbook. Enter an estimated date for the book completion and check the book award box. Repeat foreach previously completed book. This will ensure that correct book awards are calculated for thecurrent year. When finished, remember to change the book back to the current book. See Sections Update for explanation of some mouse click functions to save time entering history.
Make Individuals inactive: By group, make some or all individuals inactive at once. Typically used at the beginning of the club year to make individuals inactive, then making them active again one by one as registration or another process is completed.
Last modified 06/08/18 Page 11

Additional Awards Give an award not covered automatically, to a specific clubber.
Use Group Type to set up one Group Type (if needed) with Additional Award Group locationUse Group to set up one or more Award Groups using the above Group TypeUse Award Definition to define an Awards that will be used in these groups.Finally, use Additional Award Definition to enter the relationship and order between one or more groupsand the awards for each group.
Using Clubber Data –Reports and Awards
List Options will be offered for eachreport selected (as well as other placesin the program), though individualselections may vary slightly in someplaces. In general, the drop-down listswill determine who/what will beincluded in the report. The sort optionswill determine how the information isarranged on the screen/printed page.
Last modified 06/08/18 Page 12

Clubber ReportsBlank Check-In FormUsed for manual check-in if so desired, or computer is not available at the check-in site. On the Reports menu, under the Attendance sub-menu, click on Blank Check-In Form. On List Options, select criteria by which you want the form(s) listed. E.g. selecting Clubber from the drop-down lists and alphabetical from the Sort Options will create an alphabetical listing of all of the Clubbers. If theclub is large, selecting Club in the Sort Options will create a separate list for each club group, i.e. Cubbies, Sparks, etc. Click Preview when ready to view the list and/or print it.
Last modified 06/08/18 Page 13

Clubber List
List of Clubbers with information on Ark Individualscreen. By default, this list will not include inactiveClubbers, but that option may be selected if desired. Onthe Reports menu, under the Data sub-menu, click onClubber List. On Attendance Options, select optionsdesired.
To create a list of all Clubbers who have ever attended atleast one day, select 1 in the Present at least field andleave all the other fields blank. More commonly, theClubber List is used to create a list of Clubbers for a specific period, e.g. those absent for three consecutive club meetings to call or send a note/card. For the above example, select a date range (From and Until), then select a date within that range (Absent from). The report will list Clubbers absent from that date to the end of the date range selected.
On List Options, selectcriteria for the reportdesired. When finished,click on Preview to viewthe list and/or print it.
Last modified 06/08/18 Page 14
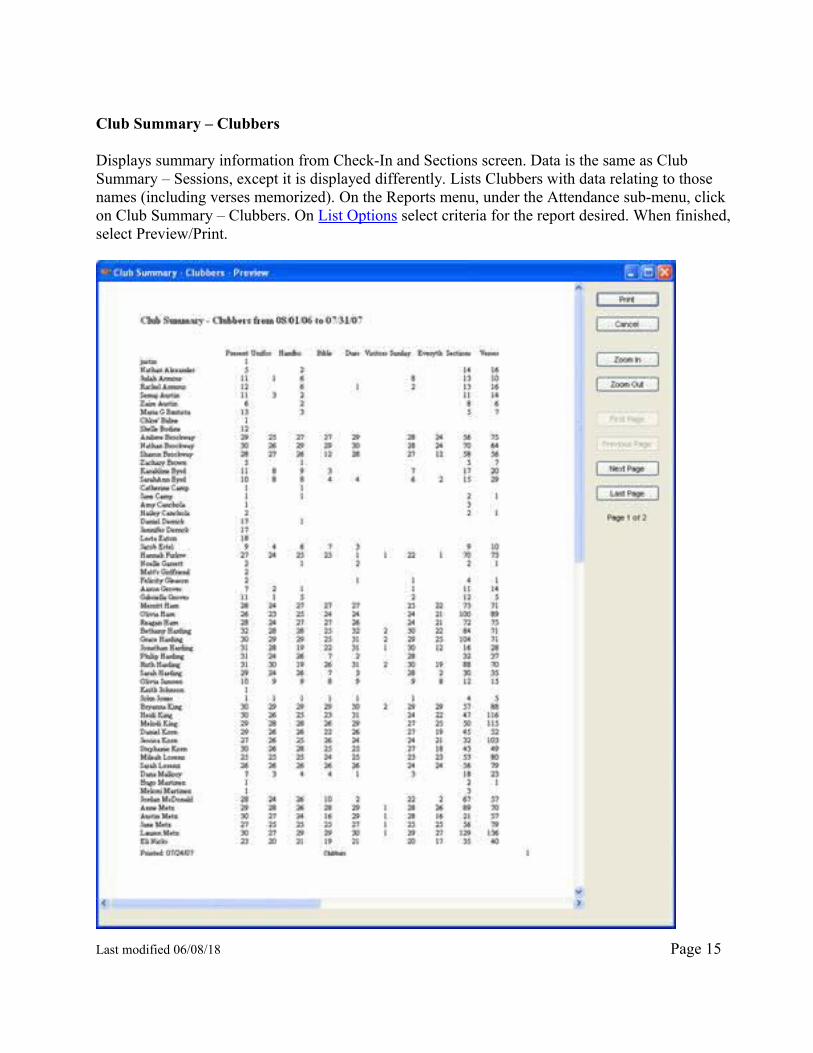
Club Summary – Clubbers
Displays summary information from Check-In and Sections screen. Data is the same as Club Summary – Sessions, except it is displayed differently. Lists Clubbers with data relating to those names (including verses memorized). On the Reports menu, under the Attendance sub-menu, click on Club Summary – Clubbers. On List Options select criteria for the report desired. When finished, select Preview/Print.
Last modified 06/08/18 Page 15

One Year Record
Lists sections for individual Clubbers for leader to fill in at handbook time and return to secretary. This also becomes a file record for that Clubber. On the Reports menu, under the Sections sub-menu,click on One Year Record. On List Options, select criteria for report desired.
Last modified 06/08/18 Page 16

Current Clubber’s Sessions
One Clubber’s data by sessions. On Reports menu, under the Attendance sub-menu, click on CurrentClubber’s Sessions. On List Options, select criteria for report desired, including range of Session dates. Click Preview.
Last modified 06/08/18 Page 17
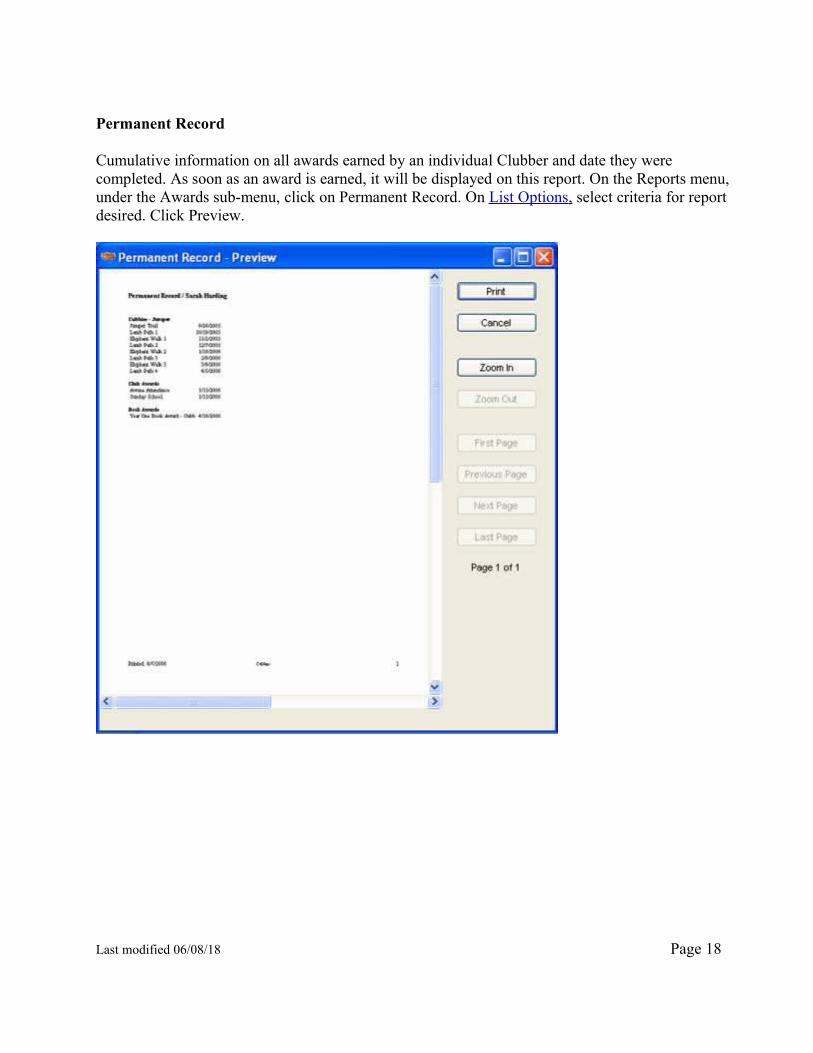
Permanent Record
Cumulative information on all awards earned by an individual Clubber and date they were completed. As soon as an award is earned, it will be displayed on this report. On the Reports menu, under the Awards sub-menu, click on Permanent Record. On List Options , select criteria for report desired. Click Preview.
Last modified 06/08/18 Page 18

Points by Clubber
Total points earned for individual Clubbers for date range selected. Purpose is for fair team selectionand to display Clubber standing in a contest. On the Reports menu, under the Points/Shares sub-menu, click on Points by Clubber.
On List Options, select date range for sessions to be included in report, then select other criteria for report needed. Click Preview.
Last modified 06/08/18 Page 19

YTD Progress/Projection
Note: The projection portion of this report will work only if session dates for the year have been entered on the Calendar. Some books will lots of columns should be printed in landscape mode.
On Reports menu, under the Awards sub-menu, click on YTD Progress/Projection. The projection portion of the report will print in italics, the progress portion (representing work already accomplished) in regular type. Percentage of overall club completion (based on calendar setup) and percentage of book completion for each clubber can be compared to determine progress. For information on setup, see Setup/Calendar.
Last modified 06/08/18 Page 20

Mailing LabelsOn Reports menu, under the Data sub-menu, click on Mailing Labels. See Clubber List for details onAttendance Options screen. The default label size is Avery-5160.
Shares ReportOn Reports menu, under the Points/Shares sub-menu, click on Shares Report. Details the shares earned in each category, the amount of shares spent and the balance.
Birthday ListOn Reports menu, under the Data sub-menu, click on Birthday List. This report is similar to Clubber List except the List Options are set to sort by birthday.
Last modified 06/08/18 Page 21

Sessions ReportsAdditional AwardsLists customized awards not covered by standard Awana™ award structure. On Reports menu, underthe Awards sub-menu, click on Additional Awards. On List Options, select criteria, including Start & End Dates for report. Click Preview.
Last modified 06/08/18 Page 22

Book Awards
Lists Book awards earned (calculated automatically from Sections information). On Reports menu, under the Awards sub-menu, click on Book Awards. On List Options, select criteria, including Start & End Dates for report. Click Preview.
In addition to Book Awards, there is also another report of the same format called Awards By Type. This report can display based on user configuration awards grouped by various types.
Last modified 06/08/18 Page 23

Club Summary – Sessions
This displays summary information from Check-In and Sections screen. Data is the same as Club Summary – Clubbers, except it is displayed differently. Lists Sessions with data relating to those sessions (including verses memorized). On Reports menu, under the Attendance sub-menu, click on Club Summary – Sessions. On List Options, select session or session range desired, and other criteria defining the report needed. When finished, click Preview.
Last modified 06/08/18 Page 24

Current Session’s Clubbers
This is one session’s data by Clubbers. On Reports menu, under the Attendance sub-menu, click on Current Session’s Clubbers. On List Options, select session date desired (defaults to current date) and other criteria for report desired. Click Preview.
Last modified 06/08/18 Page 25
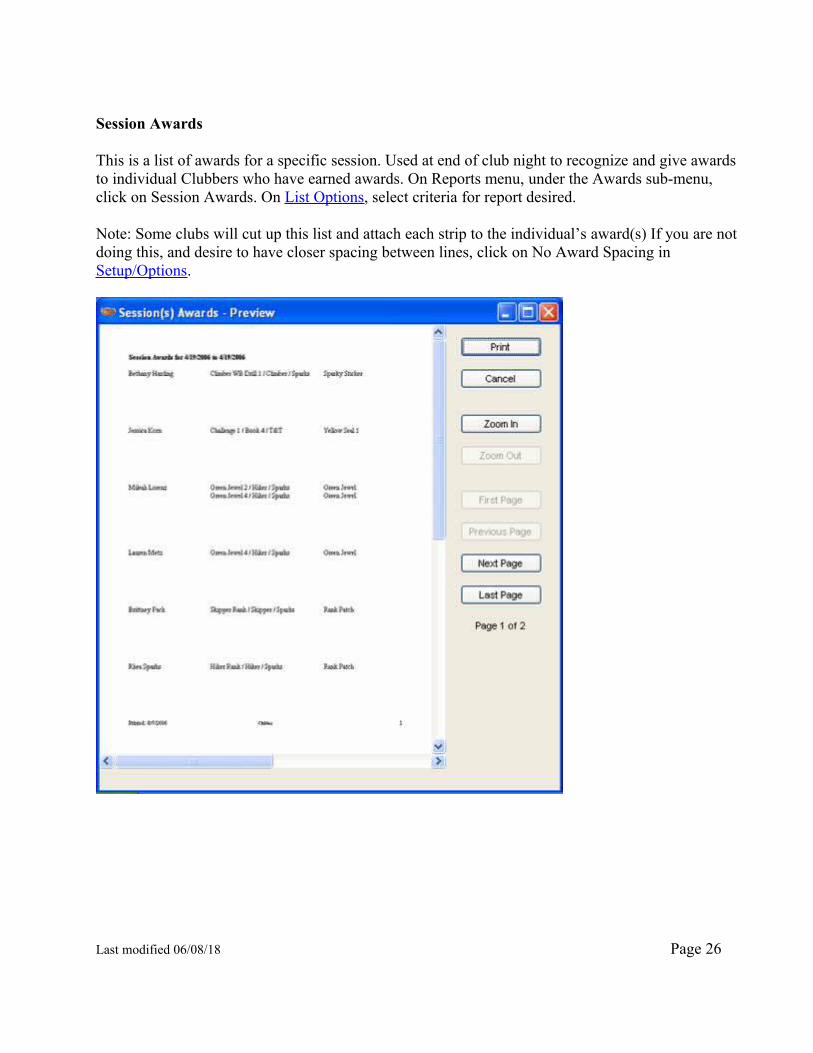
Session Awards
This is a list of awards for a specific session. Used at end of club night to recognize and give awards to individual Clubbers who have earned awards. On Reports menu, under the Awards sub-menu, click on Session Awards. On List Options, select criteria for report desired.
Note: Some clubs will cut up this list and attach each strip to the individual’s award(s) If you are not doing this, and desire to have closer spacing between lines, click on No Award Spacing in Setup/Options.
Last modified 06/08/18 Page 26

Group Reports
Color TeamsDefines how the club is grouped. Used for game time, counsel time, etc. On Reports menu, under thePoints/Shares sub-menu, click on Color Teams. On List Options, select criteria for report desired. Toedit Colors, see Maintenance/Team Color . To edit colors used in each Team Group (i.e. Cubbies, Sparks, etc.), see Maintenance/Team Group Color . When finished, click Preview.
Last modified 06/08/18 Page 27

Points Totals
Cumulative points by team. Purpose is to determine team winners for each session. Typically done for a specific day (session). On Reports menu, under the Points/Shares sub-menu, click on Points Totals. On List Options, select Session date desired (defaults to current date), then other criteria for report desired. Click Preview.
Other custom reports are available in the reports menu that do not have examples here. We have shown the most common ones here.
Inventory ReportsOrder Print ReportSee Printing/Mailing Order in Inventory Control/Order Entry.Inventory ReportSee Inventory Report in Inventory Control/Inventory Entry.Payment ReportSee Payment Report in Inventory Control/Payment Entry.
Last modified 06/08/18 Page 28

AwardsUnit AwardsData for determining the weekly handbook awards is obtained from information entered in Sections for an individual or range of individuals. The data is collected in the Sessions Awards report. On Reports menu, under the Awards sub-menu, click on Sessions Awards. These awards are usually presented at the end of each club session. Team AwardsData for determining these awards is obtained from the Points Totals report. On Reports menu, under the Points/Shares sub-menu, click on Points Totals. These awards are usually presented at the end of each club session.
Additional AwardsData for Additional Awards is obtained from information entered in Individual/Individual Awards. The information is collected in the Additional Awards report. On the Reports menu, under the Awards sub-menu, click on Additional Awards. .
Book AwardsData for Book awards is obtained from information entered in Sections on an individual or a range of individuals. The information is automatically calculated and collected in the Book Awards report. On the Reports menu, under the Awards sub-menu, click on Book Awards. These awards are usually presented at the end-of-year ceremonies.
Attendance Awards (and Sunday School, if used) Data for this award is calculated automatically each time it is entered in Sessions on an individual Clubber’s screen or in Check-in . When an award has been earned for that quarter, it will be listed automatically on the Sessions Awards report. Dates for each quarter are set up for the current year inSetup/Calendar . Labels (name used) for Attendance and Sunday School (if used) are determined in Setup/Session Fields. Whether or not an award is received for these is determined in Setup/Options (to identify label (name) used for each in Session Fields).
Smart Phone AppThe smart phone app allows entry of either check-in information or section information from an iPhone/iPad or Android phone/tablet. The app is available from the appropriate app store by searching for ArkWeb.
After downloading the app, when it is started for the first time, you are prompted to choose Desktop or Web. If you are using the Desktop version of ARK (does not require internet) choose that option. If you accessing via either a browser or Remote Desktop, choose Web. You also need to enter your ChurchID (if using online) and the username and password you use when running ARK.
On the screen there is a button with a date. Initially it defaults to today and can be changed at any time to another date to enter history. The setup button does not typically need to be accessed, but can
Last modified 06/08/18 Page 29

be used to reset the app if problems occur. Removing and re-installing the app might also resolve anissue.
Once you choose any of the 4 buttons (Check-in, Book Record, Individual or Reports) you will see an option screen where you can select all or a partial list of information, just as you would on the fullapplication.
The first time the authentication information is entered, it may take a few minutes for all the check-in or book information to be downloaded to the phone. On subsequent times to each screen it will not be download unless the information is changed.
Once the information is downloaded, lists of names to either enter check-in information or section information will appear. Asterisks appear before names indicating that some information has already been entered for that individual during this session on this device. The book unit screens also give a count (number) of sections done so far or a D if that book unit is Done.
The database stores the most recent selection for each of the screens in the app and will use that same criteria as default when going back into that screen. There can be a different list of names for check-in than for sections on the same smart phone. The individuals screen allows you to see main page information (or enter a new individual). The information has links and allows you press on a phone number, email or address, to call, text, email or get map directions (respectively) for that individual. Since there are grouping and sorting options on this screen, it has many uses for game director, other directors or leaders to see information that islimited to just their responsibilities.
Last modified 06/08/18 Page 30

Chapter 3 – Inventory ControlIf you are using this Inventory Control feature for the first time, but have existing inventory, this inventory needs to be entered in order for certain features of the program to work properly. See Inventory Entry .
Order EntryOn menu bar, click on Inventory, then Order Entry. This feature is generally used to enter items for an Awana™ order. It is added to inventory after the order has been received and verified. Items not ordered from Awana™ or already in stock can be added to inventory individually in Inventory Entry. See Inventory Entry/Adding Inventory .
New OrdersTo begin a new order, click the Add order button.
Customer InformationCustomer Number: Enter Customer Number assigned to the Club by Awana™ headquarters. The default is the last Customer Number entered.
Last modified 06/08/18 Page 31

Order Date: Enter the date of the order (month, day and year, i.e. MM/DD/YY or MM-DD-YYYY. The default is the current date.Church Name: Enter the name of the Church placing the order (usually where the Club is held). Default is the last Church Name entered.City: Enter city where church is located. Default is last city entered.State/Province: Select state/province from drop-down list. Default is last state/province entered.Postal Code: Enter the five or nine digit postal code. Default is last postal code entered.Shipping Method: From the drop-down list, select the shipping method used. Default is the last shipping method entered.PO Number: Optional. If required by your church, enter the PO number relating to this order.Contact Name: Enter name of person that Awana™ Headquarters should call if there is a question about the order. Default is the last Contact Name entered.Phone: Enter phone number where Contact Person can be reached. Default is last phone number entered.E-Mail: Enter e-mail address for Contact Person. Default is last e-mail address entered.
Order InformationAt bottom of Order Entry screen, click Add item, then enter each item. The item will be added to thelist in the window just above. The program will keep a running total of your order amount as you add each item.
Catalog Number: Enter catalog number of item, or click Find to select item from drop-down list. Description of item selected will appear in the Description field.Quantity: Enter quantity of catalog item to be ordered. Item price will appear in Price field. This number may be edited if price has changed.
Printing/Mailing OrderOn the Order Entry screen, select the order to be printed, then click Order Print. Note: DO NOT fill in the “Ship To” box unless the information is different from what was given to Awana™ at registration.
Last modified 06/08/18 Page 32

Previous OrdersSelect order from the list at top of Order Entry screen.
Editing an OrderAdding Awana™ Order Number: When order has been received, enter number assigned tothe order by Awana™ Headquarters. This will become your reference number to a particular order.
Editing/Changing an Order Item: Select order to be edited from list at top of Order Entry screen, then select item to be edited from list in window in bottom half of screen. If an item has been discontinued or is on back order and therefore not received, delete the item from theorder. Make all editing adjustments before adding the order to inventory.
Last modified 06/08/18 Page 33

Adding an Order to Inventory: When an order has been received and editing adjustments have been made, click on the Add to Inventory button at top of the Order Entry screen. This will add increments of each item in the order to your inventory (e.g. if one set of 50 red jewels was ordered, it will be added to inventory as 50 red jewels).
If desired, instead of adding the whole order at once, items may be added individually to inventory by selecting from the listbox each item to be added to inventory, then clicking the Add to Inventory box at the bottom of the screen. This will add only that one item to inventory. Or, the entire order may be added to inventory by clicking the Add to Inventory button at the top, then selecting an item from the listbox that is to be removed from inventory, then unclicking the Add to Inventory box at the bottom of the screen. This will remove only that one item from inventory. It will not remove it from the order list.
Inventory EntryOn the menu bar, click Inventory, then Inventory Entry. This feature is generally used to enter items already in stock, or items kept in inventory that have not been purchased from Awana™. Items purchased will usually be added to inventory when the order has been received and verified in Order Entry. See Order Entry/Adding Order to Inventory.
The inventory list may be limited by entering/selecting various fields above the list. For example, entering “spark” will list only those items that contain “spark” in the description.
Last modified 06/08/18 Page 34

Adding InventoryTo add a new inventory item, click on Add on the Inventory Entry screen.Item: Enter item’s catalog number or click on Catalog to select from drop-down list. Items not in the catalog may also be entered and assigned a number, e.g. Store items not purchased through Awana™ catalog.Description: A catalog item will default to the catalog description when the catalog number is entered. Otherwise, enter a brief description of item.Sell Price: Sell Price default will reflect the individual cost of a catalog item (e.g. in a set of 50 Red Jewels, it will show the cost of one Jewel). For non-catalog items, enter the price paid for the item. Note: this will also be the default price in Payment Entry when an inventory item is purchased and entered in Payment Entry, therefore if your charge is different from the catalog price, you may want to modify (edit) the Sell Price here to reflect that. The default on Payment Entry will then reflect the actual payment for the item.Quantity: Enter quantity currently in inventory. Default is one (or the number of units if the item is a set).Order Level: Enter quantity at which the item is to be re-ordered (e.g. if number entered is 6, when inventory for this item drops to six or less, the Replenish Inventory feature (when used) will select this item for re-ordering. Order Quantity: Enter re-order quantity. Default is one (or number of units if item is a set).When finished, click Done. The screen will be cleared for the next item to be entered.
Inventory ReportOn Reports menu, under the Inventory sub-menu, click Inventory Report. In Inventory Options, select quantity level and sort order desired, then preview and/or print.
Last modified 06/08/18 Page 35

Replenishing InventoryThis feature will check quantities on each inventory item, and create a new order of those that are at or below Order Level chosen for each item. It will automatically translate units in sets to catalog quantity (e.g. re-ordering 10 of something that comes in sets of five will be listed on the order as two(sets of five).
Payment EntryOn menu bar, click Inventory, then Payment Entry.
NOTE: Payment entries are also made automatically each time an award is earned. The entry will be made with the description of the inventory item. An amount of $0.00 will be used and the ReduceInventory field will not be checked. See the Distribute Awards for automatically setting that field.
Last modified 06/08/18 Page 36

Adding PaymentsTo enter a new payment, click on Add on the Payment Entry screen.
Individual: Click Find, then select Clubber from the selection window on the Find Ark Individual screen.Payment Date: Enter date payment was made.Inventory Item: If an inventory item, enter the item’s inventory number, or click Catalog, then enter name of item under Description. (If the specific name is not known, enter a general group name, e.g. jewel.) Click Tab on your keyboard (or click in another field) and the item or a list of items will appear in the window below. Select the one desired. The current quantity in inventory will be displayed to the right of the description. If payment is not for an inventory item (e.g. Dues), leave this field blank.Description: Inventory items will default to catalog description. Otherwise, enter descriptionof payment (e.g. Dues).Amount Paid: The default on an inventory item is the Sell Price listed in Inventory Entry. For other payments, enter amount paid.Reference: Enter note for future reference (e.g. check number).
To save this entry, click Add. The screen will be cleared for the next entry. When all entries are completed, click Done.
Reducing InventoryThe default is a checked box. Uncheck this box if you do not want inventory to be adjusted (reduced) by this purchase.
Last modified 06/08/18 Page 37

Recording PaymentThe default is a checked Paid box. Uncheck Paid if payment has not been received. This feature allows recording of a Clubber’s receipt of an item (to keep record and/or reduce inventory) before payment is made. To record a payment made later: From the list on the Payment Entry screen, select the Clubber making payment (be sure to match item(s) purchased for which payment is being made),then check the Paid box. Click Add if more payments are to be entered. Click Done when entries are completed.
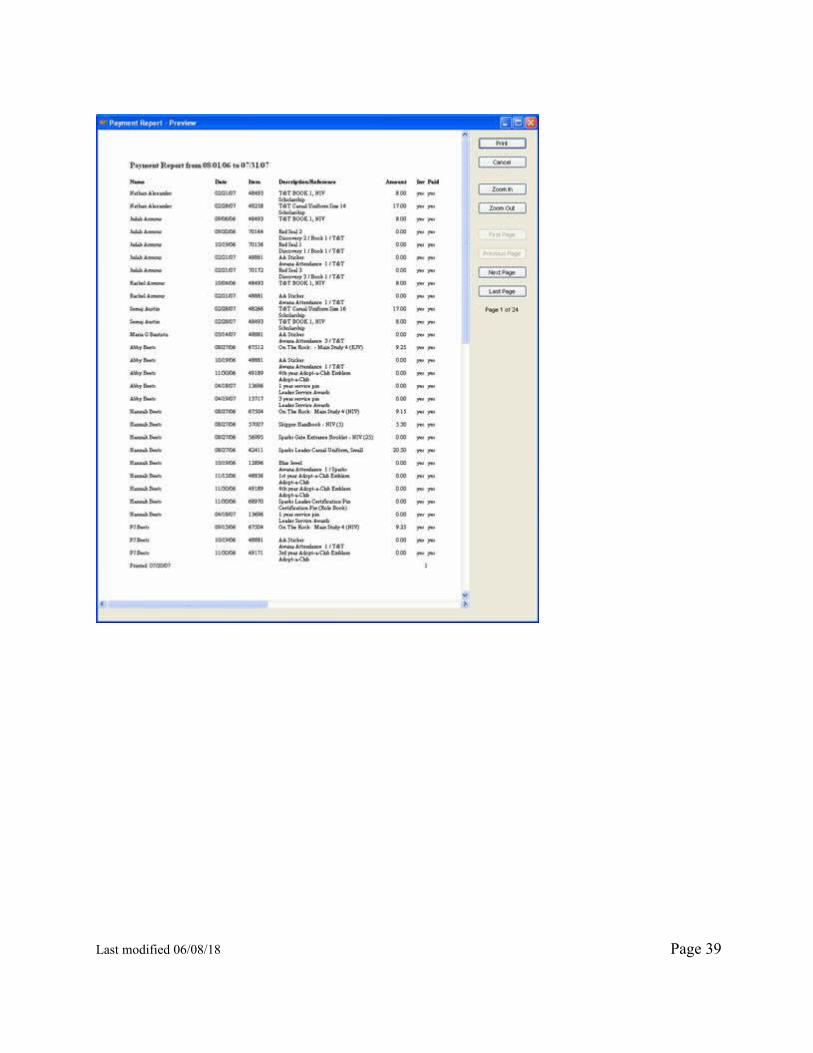
Payment ReportOn Reports menu, under the Inventory sub-menu, click Payment Report. On Payment Options, selectoptions to create the report desired.
Last modified 06/08/18 Page 38
Last modified 06/08/18 Page 39

Distribute AwardsOn menu bar, click Inventory, then Distribute Awards. This feature is used to reduce items from inventory as they are distributed to Clubbers. Select from List Options create the list desired.
Select All: All items listed will be selected. To unselect an item, hold CTRL key down, then click on items you do not want selected. Clear All: Clears selection (not items selected). Can be used to “start over”. If only some items are to be selected, hold CTRL key down, and click on items you want selected.Reduce Inventory: Reduces inventory by one for each item selected by checking the “Reduce Inventory” field of the existing payment record.
Last modified 06/08/18 Page 40

Last modified 06/08/18 Page 41

Chapter 4 – SetupIn general, to delete an entry, select the item in the list box, then press the Delete key on the keyboard or right-click an item and choose delete from the menu. If the deletion is allowed, a pop-upscreen will ask you to confirm. If it is not allowed by pressing Delete, a message will appear with thereason it is not allowed and when possible, how to proceed. In some instances, deletion is not allowed at all (for programming reasons), and nothing happens when you press Delete.
Getting Started Options:
OptionsIdentifying these labels here, and thus associating them with Check-in and Sessions information is necessary for certain features to work properly, e.g. Dues Paid. On Setup menu, click on Options.
Labels: From the drop-down menus, select the words you have chosen (in Session Fields) to identify Attendance, Sunday School and Dues. If you are not using one of these features, leave the space blank.No Award Spacing: Check if normal line spacing is desired on the report. If wide spaces between lines is desired, leave box unchecked. See Session Awards .Check first box toggles all others: Check this box if you want to have all boxes (in Check-in) checked automatically when the first box is checked for that Clubber. Section Points and Review: Enter points to be assigned when Clubber completes each section or review.Section Shares and Review: Enter Awana™ shares to be earned when Clubber completes each section or review.
Last modified 06/08/18 Page 42
Set default unit and book shares: Enter Awana™ shares to be earned when Clubber completes each unit or book. This will set all units or books to that value. Individual Awardscan be set to different shares under the Award Definition menu item.Default Postal Code: If most of your Clubbers live in the same area and have the same postal code, enter the postal code here and it will appear automatically when a new Clubber is entered on Ark Individual screen. Default Country: Enter country you wish to appear as default when entering a new Clubber on Ark Individual screen..Default Church: If most of your Clubbers attend the same church, that church can be entered here and will be the default when a new Clubber is entered on Ark Individual screen.Club Start Date: Enter here the date that you consider the beginning of your club year, usually prior to the first club session. This date is used in various calculations and reports. This should not be your first club meeting. For example, 8/1/2000 would fit for most – year doesn't matter. (Dates for club sessions are set up in Setup/Calendar.)Warning for “not first book”: Choose one of the three choices to control when the messageis display. Setting it to Never is NOT recommended because it can cause incorrect calculation of book awards without any warning.T&T Ultimate Challenge as separate club: If this box is checked, 5th and 6th grade clubberswill be assigned to Ultimate Challenge Book 1 by default rather than Ultimate Adventure Book 1. (This is for legacy setup. With the new Grace T&T books, they would not be treatedas separate clubs.)Phone / Cell Mask: This would automatically format the phone or cell field (not custom fields) if you entered just numbers to add the appropriate delimeters.
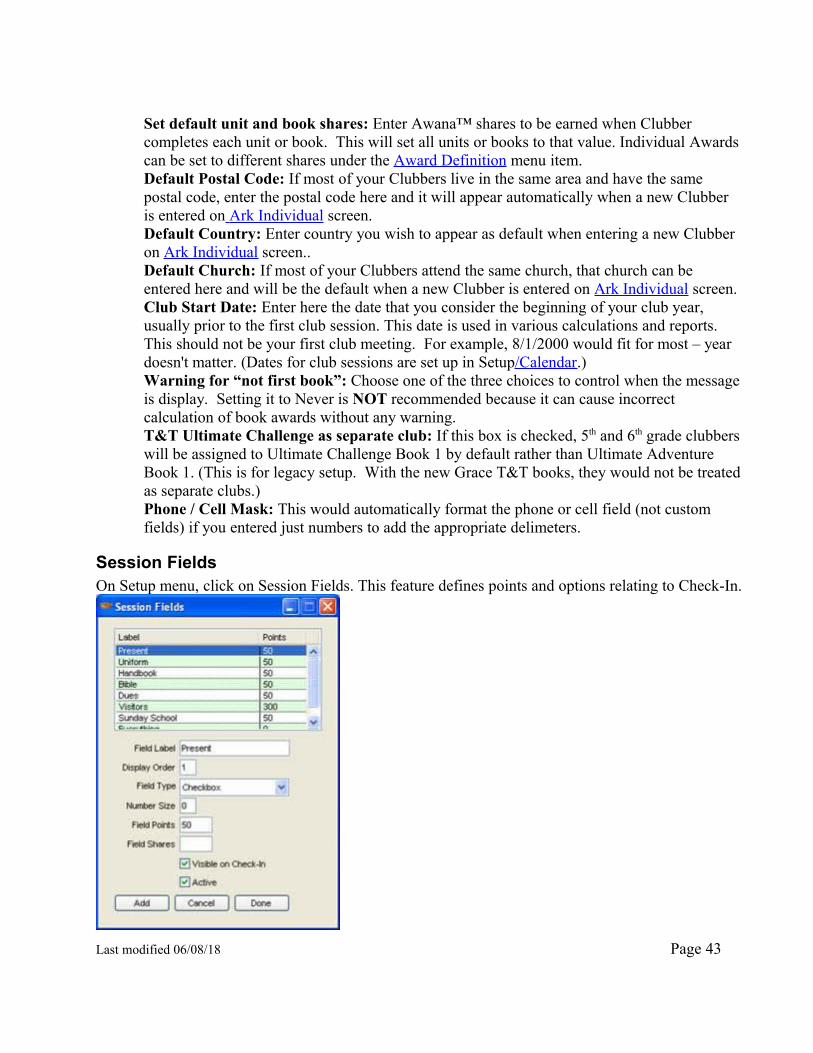
Session FieldsOn Setup menu, click on Session Fields. This feature defines points and options relating to Check-In.
Last modified 06/08/18 Page 43

In Field Label: Enter the word(s) that will identify this information on Sessions Reports. Thefirst letter will be used to identify the word in Check-in.Display Order: Select the order in which you want each item to appear in Check-in and Session Reports. Field Type: Select the type of field for the way the field will be used. Integer would be a number, Checkbox would require just a click, no data entry. Number Size: For Number (if selected in Field Type), enter the maximum number of digits that might be used in this field. Size for Checkbox (if selected in Field Type) is predetermined. The program will automatically enter 0.Field Points: Enter the number of points that are to be assigned to this Field Label. Field Shares: Enter the number of Awana™ shares that are to be assigned to this Field Label.Visible on Check-in: If you want this Field Label to be included on Check-in, this box should be checked.Active: Unchecking this box will temporarily take this Field Label off of Sessions Reports and Check-in. Check the box when you want it included again. When finished with this Field Label, click on Add. A new blank form appears to enter another Session Field. When finished entering Session Fields, click on Done.
Calendar SetupOn Setup menu, click on Calendar. Defines dates of sessions for the year.
First, verify that the club year and quarter are correct and change them if necessary.Next, click Prev Day, Next Day or Next Week until the first date for Week 1 represents the first session of the quarter. Click the check box under valid.
Last modified 06/08/18 Page 44

The row of buttons will drop down one row and default to one week later. Change this if you have aweek or more off between club sessions.When you have defined all dates for the first quarter, click the up arrow to advance to the next quarter and repeat this procedure until you have defined all 4 quarters.
If you do not know the dates for all 4 quarters yet, define those that you do know, but define a quarter before you start entering session information for it.
You may add descriptions for each club meeting on the Calendar setup by clicking on each date button. Enter the description in the box that pops up and Click Ok. The description will appear to the right of the check box for the corresponding date. (See image above)
If you make changes after the awards have been calculated for a quarter, you can click the Recalculate Awards button to calculate for the displayed quarter based on your new changes.
Custom Field DefinitionYou may set up fields that may be unique to your club. They will appear on the lower right quarter of the Ark Individual screen. On the Setup menu, click on Custom Field Definition.
In Field Label, enter the word(s) you want to show on the Ark Individual screen.
Location: Ark Custom or Ark Family Custom. Choose ARK Family Custom to have the data entered persist among all individuals in a family (Enter it once for one family member and it appears for all other individuals in that family.
Last modified 06/08/18 Page 45

Display Order: Select the order in which you want each item to appear on the Ark Individual Screen.
Field Type: Select the type of field for the type of data you want to enter in the field. Text could be both words and numbers. When using only numbers, use Integer if the entry will always be a whole number, use Number if a decimal point may be needed (as in dollars and cents).
Field Size: Refers to the width of the field you write into. Options are any number between 25 and 300. About 200 would be sufficient for most names, 25 would be sufficient for a two or three digit whole number. Size for Date and Checkbox is predetermined. No number is needed for these.
When finished, click on Add. A new blank form appears to enter another Custom Contact Field, if desired. When finished entering fields, click on Done.
Group Options
Group TypeOn Setup menu, click on Group Type.This has 3 distinct functions.
- Create a new Group Type (this shows on the ListOptions, for example)- Create a new Main Group (used in managing teamreports, for example Point Totals). The Main Groupis also a sort option for most reports.- Create a new Additional Award Group. Createonly one group type of Additional Award Groupfor all Additional Award definitions.
Display Order determines what order the group typeswould display on various screens or reports
Last modified 06/08/18 Page 46

GroupOn Setup menu, click on Group.The 3 corresponding functions for group based on whatthe group type is:
Group Type – Create a Group that can be chosenon the main Contact Screen for a clubber, or in ListOptions for most reports.Main Group – Create a Team (Group) that can bechosen on the main Contact Screen. in ListOptions, it can be used to select just that Team oras a sort option.Additional Award Group – Create a group foreach type of Additional Award you wish to create. Some examples would be Leader Service Awardsor Adopt-a-club Awards. This is used for anyspecial awards that have a series associated withthem.
Display Order determines what order the groups would display on various screens or reports.
Phone App Setup
(This applies only to the desktop version – the Online version does not require any setup to work)On Setup menu, click on Phone App Setup. This is used if you are using one of the smart phone appswith the desktop version of ARK.
At least one username is required to use this feature. This same username and password will be required on the phone app to download the appropriate information.
If this field is blank, go to User Administration on the Security menu to set up one or more logins. One benefit of having additional logins is that each login can be configured to a specificlist of individuals.
The list of individuals will be the same as the last check-in options chosen for this user. Go to Check-in to see what individuals would be sent.
Each time you need to update the list of names for check-in on the smart phone app, select a user login and click Go to send the list of names for the smart phone apps to use. Choose refresh list to retrieve a new list on the app.
Last modified 06/08/18 Page 47

Report DefinitionOn Setup menu, click on Report Definition. This would be used to add/update any custom reports, change the display order or menu structure of any reports, or hide a report from the menu.
Maintenance OptionsPlease contact [email protected] for assistance with any of these items.
Team Color: Defines colors available for teams. Does not create a connection to any team. On Setup menu, scroll to Maintenance, then click on Team Color.
Club Definition: On Setup menu, scroll to Maintenance, then click on Club Definition.
Book Definition: On Setup menu, scroll to Maintenance, then click on Book Definition.
Book Unit Definition: On Setup menu, scroll to Maintenance, then click on Book Unit Definition.
Section Definition: On Setup menu, scroll to Maintenance, then click on Section Definition.
Team Group Color: Defines the color (from Team Color) assigned to each team within a Team Group. Usually used during game time within the game circle. On Setup menu, scroll to Maintenance, then click on Team Group Color.
Team Group Club: Assigns one or more clubs to be part of this team group. For example, in a smaller church, Trek and T&T might be combined into one team group, allowing Clubbers from
Last modified 06/08/18 Page 48

both groups to be assigned to the same team group on the Ark Individual screen. On Setup menu, scroll to Maintenance, then click on Team Group Club.
Award Definition: On Setup menu, scroll to Maintenance, then click on Award Definition.
Award Type: On Setup menu, scroll to Maintenance, then click on Award Type. This allows you the ability to add any number of Award Types that you desire, then go back to Award Definition andset various awards to that type. There is a corresponding report that will then allow you to display/print just those awards of that type.
Club Award: On Setup menu, scroll to Maintenance, then click on Club Award.
Additional Award Definition: On Setup menu, scroll to Maintenance, then click on Additional Award Definition. Once you have set up one or more Groups for Additional Awards (such as LeaderService Pins), use this screen to enter all the awards associated with each group. For example, you would make several entries where Leader Service pin is the Group and you would pick the various Service pin years that you had entered as Awards.
The display order determines the order in which the awards will be given, by default, in the Additional Award entry screen.
Note: Before you can enter anything here, you need to have entered at least one Group for Additional Awards and one or more Awards to correspond to each Group. This screen defines for the system how those new Awards are grouped together and in what order.
Grade: On Setup menu, scroll to Maintenance, then click on Grade. Email SMTP Settings: On Setup menu, scroll to Maintenance, then click on Email SMTP Settings. This corresponds to settings found in the email client on the same computer as ARK. Award Inventory Link: On Setup menu, scroll to Maintenance, then click on Award Inventory Link. Define one or more Inventory items to be used for a defined award. Catalog Inventory Link: On Setup menu, scroll to Maintenance, then click on Catalog Inventory Link. Defines packages of items that can be purchased in the catalog where a single catalog item may be distributed into several different inventory items that could have been purchased separately. This is only for viewing. Changes must be made in the catalog file before it is imported. Award Series: On Setup menu, scroll to Maintenance, then click on Award Series. Give a specifiedaward based on a series of other awards.
Award Series Detail: On Setup menu, scroll to Maintenance, then click on Award Series Detail. Defines the list of awards that must be earned before the Award defined in Award Series will be given.
Last modified 06/08/18 Page 49

Security
User AdministrationUser administration maintains various users and their privileges. If no users are present, nologin validation will be made. (Desktop only, Online requires at least one user)
User Name: This would be the user’s login name.
Full Name: The user’s full name.
Link to Contact: Leave blank. Password: Up to 12 character password
Last modified 06/08/18 Page 50

Retype Password: Because the password is not visible, this helps to prevent mistakes in typing.
Startup Window: Leave blank. Active: When a user no longer needs access to this database remove the Active check mark and their account is disabled.
Last Login: Provides the viewer with the date and time the user was logged-in. Suggested Configuration for Users:
1. Setup the first user as an "Admin" user type - see all records and do all functions. 2. Setup a second user from within the “Admin” user. This will cause Admin to be the Parent of each user. 3. Setup each user with the screens they are allowed to access with the Window Security window.
If it is desired to have more than one Administrator (do everything), click on the Make Admin User button.
Once you have set up a user with the permissions that you desire, you can copy this configuration to other users. Even if you have slight differences between users, this may save you time setting up multiple users.
Last modified 06/08/18 Page 51

Window Security
The default is the user listed in the User’s Name box will be given the opportunity to see all windows that the Parent can see. If the parent of a user is limited to some number of screens that user at most can see everything the parent can see, never more.
If you want to limit particular items on a given screen but not the whole screen double click on the name of the screen.
The screen that comes up will give you total control of each field. Click on the history field and uncheck the Visible check box, nowthis user can not even see this field. You may also add a Tool Tip for each field. Which can give the user instructions as to howto complete this field.
Last modified 06/08/18 Page 52

Change Password
The User Name will display the name you are logged in as. This screen gives a place for you to type in a new password, and a field to type it in again.
Groups By User
Here is the control for groups. You may not care who has access to which groups.Just in case you do care we give you the tool to enable or disable any or all groupsfrom the each user.
Last modified 06/08/18 Page 53

Report By User
Some reports by nature of the information they contain are sensitive. If you setup user administration so that a number of users can get to their mail list and be able to maintain their own list. This is the way you can limit the reports those users have access.
Clubs By User
This is similar to the above two screens.
Last modified 06/08/18 Page 54

Table of Contents:Chapter 1 – Getting Started....................................................................................................................2
Set-up Options...................................................................................................................................2Browser-based (Online) ARK............................................................................................................2Entering Current Clubber Information...............................................................................................2
Chapter 2 – Entering, Maintaining and Using Clubber Data.................................................................3Entering Clubber Data.......................................................................................................................3Entering Clubber Status.....................................................................................................................5Add/Edit Family Name .....................................................................................................................6Backup and Restore Clubber Data ....................................................................................................7Maintaining Clubber Data..................................................................................................................8
Finding Clubber.............................................................................................................................8Individual Check-in.......................................................................................................................8Individual Session..........................................................................................................................9Sections Update...........................................................................................................................10Group Points:...............................................................................................................................11
Promote Clubbers.............................................................................................................................12Shares Spent.................................................................................................................................12Additional Awards.......................................................................................................................13
Using Clubber Data – Reports and Awards.....................................................................................13Clubber Reports...........................................................................................................................14Sessions Reports..........................................................................................................................23Group Reports..............................................................................................................................28Inventory Reports.........................................................................................................................29Awards.........................................................................................................................................30
Smart Phone App.............................................................................................................................30Chapter 3 – Inventory Control.............................................................................................................32
Order Entry......................................................................................................................................32New Orders..................................................................................................................................32Previous Orders............................................................................................................................34
Inventory Entry................................................................................................................................35Adding Inventory.........................................................................................................................36Inventory Report..........................................................................................................................37Replenishing Inventory................................................................................................................38
Payment Entry..................................................................................................................................38Adding Payments.........................................................................................................................38Reducing Inventory......................................................................................................................39Recording Payment......................................................................................................................39Payment Report............................................................................................................................39
Distribute Awards............................................................................................................................41Chapter 4 – Setup.................................................................................................................................43
Getting Started Options:..................................................................................................................43Options.........................................................................................................................................43Session Fields...............................................................................................................................44
Last modified 06/08/18 Page 55

Calendar Setup.............................................................................................................................45Custom Field Definition..............................................................................................................46
Group Options..................................................................................................................................47Group Type..................................................................................................................................47Group...........................................................................................................................................47Phone App Setup..........................................................................................................................48Report Definition.........................................................................................................................49
Maintenance Options.......................................................................................................................49Security............................................................................................................................................51
User Administration.....................................................................................................................51 Window Security........................................................................................................................52Change Password.........................................................................................................................53Groups By User............................................................................................................................53 Report By User...........................................................................................................................54Clubs By User..............................................................................................................................54
Last modified 06/08/18 Page 56