
Chapte Chapter 6r 6 -...
74
Transcript of Chapte Chapter 6r 6 -...

ChapteChapter 6r 6
Beauty RetouchingLights, camera, action. Time to turn the glitz on and spin raw
beauty into pure perfection. Take a peek at Tinsel Town’s newest
plastic surgeon. Watch this glittery gal perform virtual nose jobs,
eye-lifts, and collagen injections right before your very eyes. Put
on your shiny, bright lab coat and accompany me on my rounds.
Get geared up to gain your Ph.D. in pretty pixels…beware flawless
faces ahead!

92 Beauty Retouching
DisclaimerI want to preface this section with a disclaimer. All the women in this chapter are perfect before I touch a pixel. They are smart, charismatic, and incredibly beautiful inside and out. These gorgeous women are human,however, and that is no longer acceptable in today’s beauty and fashionworld. I am asked to make them superhuman, perfect beyond reality. On theupside, I do love to make beautiful women into super-beautiful women, andthat’s important because retouching is often the meat and potatoes of thejobs I do.
Styles of RetouchingI like to think of retouching techniques as falling into three different stylesor categories: reality retouching, plastic surgery, and fantasy. These cate-gories serve an artistic purpose. By establishing a goal for the ultimate look and feel of the image, they provide the parameters that decide therange of techniques I’m willing to use and give me the boundaries for the job at hand.
As I’ve mentioned in previous chapters, it’s very important to have a conceptof where you’re trying to go before you start working. This is especially truefor retouching—you don’t want to just go in and start hacking away!Deciding in advance what kind of style you’re aiming for will keep yourwork focused and help you produce a more unified final image.
These categories also prove quite helpful when working with clients. Youcan show them the range of possibilities, including before and after imagesto illustrate each style, to give them an idea of what they can expect to seewhen you’re done. This helps ensure the client will understand the processand be satisfied with the end result.
If your portfolio doesn’t have examples of all the different styles in it, youcan use examples from magazines to get across the different possibilities. I suggest trying to incorporate these different styles into your portfolio,however, because it will help you broaden your client base and give youmore work opportunities.
You will need to download the following files from the
glitterguru on Photoshop website to complete this project:
chapter6_1.tif
chapter6_2.tif
chapter6_3.tif
chapter6_4.tif
chapter6_5.tif
chapter6_6.tif
chapter6_7.tif
chapter6_8.tif
chapter6_9.tif
chapter6_10.tif
chapter6_11.tif

93Styles of Retouching
1 Before and after images showingreality retouching.
Reality retouching (see Image 1) is also the first step in retouching for a large majority of my images. It establishes a foundation upon which to do fantasy retouching and plastic surgery.
Reality RetouchingReality retouching is the kind of retouching you do when the client doesn’twant anyone to know that you have altered the image. I find this style ofretouching the most challenging, because there is an art to having your work go completely unnoticed. When doing this style of retouching, we usually don’t remove every wrinkle, but instead just make the subject moreattractive. What do I mean by “more attractive”? Well, it’s subjective, but Ilike to concentrate on the idea of removing what’s distracting me from theperson I’m retouching. In real life we are animated, and this makes those little lines and spots much less noticeable. In fact, the little imperfections, as part of a real-live person, can add character and charm. When you freezea moment in time and give the eye a chance to concentrate on these minorimperfections, however, they become more pronounced. This is where reality retouching comes in. The idea is to do the minimal amount of worknecessary to lessen those slight imperfections. Among the things that you’llwant to work on are blemishes that need removing, deep wrinkles that needsoftening, tired eyes that need whitening, and yellow teeth that need to be brightened.

Plastic SurgeryAnother category of retouching is plastic surgery. This is where you reallytransform the person, perhaps even removing years from the person’s face,by lifting and altering her features. Plastic surgery can involve drasticchanges: nose jobs, eye-lifts, liposuction, and hair extensions. However, the goal is still to achieve the desired result without making the person lookcompletely unrealistic.
94 Beauty Retouching
2 Before and after images showing a plastic surgery eye-lift.

95Styles of Retouching
3 Before and after images showing a plastic surgery nose job.

96 Beauty Retouching
Fantasy RetouchingThe final category I use is fantasy retouching. This is where things start toget a little surreal. With a fantasy retouch, you’re no longer trying to imitatereality or conceal your work. In fact, the effect you create will become anintegral artistic component of the whole image, and almost anyone lookingat the image will immediately realize that it has been artificially enhanced.
Many times, when you retouch this intensely, you almost turn the modelinto a painted figure. When you do this, you’ll probably want to extend thislook out to the whole image, creating a dreamy surreal quality so that theretouched model still looks as though she fits into her surroundings. Asyou’ll see later, this kind of effect can be achieved in an image by playingwith light, color, or focus.
4 Before and after images showing fantasy retouching.
AVOIDING BEGINNERS’ MISTAKES
A few things jump out when I see a badretouching job. First and foremost is
when I see a face on which parts of theskin have been retouched and otherparts haven’t. Also, remember your
edges! The edges of anything are key tomaking something look “right”; so if you
blur the edge of a lip line too muchwhile retouching, it will look wrong.
Working evenly and paying attention toyour edges will keep you from making
beginners’ mistakes.

97Reality Retouching
This chapter will give examples of each of the three categories I’ve defined.As usual, you can find the images used in this chapter on the web site, soyou can try things out for yourself.
This discussion starts first with reality retouching, which is not only a useful technique in and of itself, but forms the basis for the moreadvanced styles.
Reality RetouchingReality retouching should be invisible. Your mission is to be as stealthy aspossible—get in and out without being detected. You will probably notreceive any credit for this mission because nobody’s supposed to knowabout it. You, your client, and your team (if any) are the only ones who will receive the quiet satisfaction of a job well done.
For the first example, consider an image that was designed as a point of purchase (POP) display for Reflexxions. As is typical with makeup companies, the client wants the girl in the display to look as natural as possible, while still being “perfect”—definitely a job for reality retouching.
5 An example of reality retouching.

98 Beauty Retouching
Assessing the ImageIt’s important to start by assessing the image as a whole, and deciding moreor less what you want to do beforehand. Working with the image on thescreen, make notes of the areas that need to be changed. By taking the timeto do this assessment before “jumping right in,” you will develop a clearermental image of the final product. This will keep you from over- or under-doing any one area and will help you produce a better-balanced final image.It’s a good idea to have a mental checklist that you go over when assessingthe image. Here’s an example check list:
✿ Overall skin (including forehead, nose, cheeks, chin, and jaw)✿ Smooth the texture, remove bumps or major wrinkles.✿ Even out the color, conceal and blend blemishes or
uneven makeup.✿ Remove any unwanted shininess.
✿ Hair✿ Eliminate any fly-aways. ✿ Fill in gaps.✿ Fix color on roots.
✿ Eyebrows✿ Check overall shape. Reshape if necessary.✿ Corral any loose or wild hairs.✿ Divide unibrow.
✿ Eyes✿ Brighten whites of eyes.✿ Check for and remove mascara clumps. ✿ Check for crow’s feet, and blend away as needed.✿ Soften under-eye circles.✿ Remove unwanted or distracting catch lights.
✿ Nose✿ Even out or blend away unwanted shadows on sides of nose.
✿ Lips✿ Check shape of lips. Define and reshape as necessary.✿ Clean up bleeding lipstick.✿ Clean up and even out highlights on lips.
✿ Teeth✿ Whiten teeth.✿ Correct slightly crooked teeth.
✿ Cheeks, chin, and jaw✿ Lessen deep smile lines or wrinkles.✿ Smooth evenness of blush on apple of cheek.
✿ Body parts (legs, arms, and so on)✿ Smooth tone and texture.✿ Improve contours of highlights and shadows.

99Reality Retouching
As part of your assessment, decide what to leave and what to remove sothat the job is believable. Often art directors will give you specific guidelinesfor what they’d like to see done. On this particular job, I worked closelywith the art director to decide what to remove and fix. Image 6 shows theart director’s marks indicating the changes she wanted made. As you can seefrom all the marks, there’s a lot of work to be done for something that’ssupposed to look natural!
After going over the raw image with the art director, I then begin the basicsof retouching.
6 The marked-up image showing changes requested by the art director.
Fill-in with hair
Lift end of brow Remove hair
Whiten teeth
Remove wrinkle

100 Beauty Retouching
7 Removing the forehead wrinkle using a small brush.
Start by choosing a brush just big enough to cover the area that needs to beeliminated. You can use the left and right bracket keys ([ and ]) to reduce orincrease the brush size.
For the type of wrinkle shown here, which is small and very linear, click oneend of the wrinkle, hold down the Shift key (which makes the tool work ina straight line), and click to the end of that wrinkle line. You also can usesmall short strokes with the tool to accomplish the same effect.
Next, using the same technique, work on any stray hairs covering the face.Continue this process until you have eliminated all of these fine lines, hairs,and wrinkles.
8 The Fade Healing Brush dialog box.
KEEPIN’ IT REAL: 1
Don’t eliminate all the wrinkles
when cleaning up the skin. If the
person is smiling and you take
away all the wrinkles, it will look
odd and unnatural. Be aware of
what you remove and make sure
it’s not crucial to the expression
in the face. You also can quickly
assess your work by turning on
and off the retouching layer. This
is a visual aid in identifying
unnatural changes.
Removing WrinklesBefore you even think about touching your Tool palette, be sure to duplicateyour original layer. To do this, right-click the layer and select DuplicateLayer. Name the layer model copy. Work on the copy layer, and leave youroriginal layer untouched. That way you will always have a copy to go backto for reference. I usually begin by using the Healing Brush tool to removesmall wrinkles and any stray hairs that may have moved over the face during the shoot.
KEEPIN’ IT REAL: 2When working with the Healing Brush, if you want to lessen but not remove the wrinklescompletely, go to the Edit menu andselect Fade Healing Brush. You canuse the slider to lessen the effect of the brush and bring back some of the natural wrinkles.

101Reality Retouching
Flawless SkinI like to retouch in a little different way than most people. I discovered,when I started looking through the different channels to find out where allthe garbage was hidden, that generally speaking on Caucasian models the“junk” can be seen more readily in the Green channel. (For other ethnicities,it may be seen more readily through one of the other channels.) To highlightthose bad areas that I need to concentrate on, I open a window (Window >Documents > New Window) with a view of the Green channel, in additionto my view of the full-color version. As you can see in the image, this Greenchannel view helps you to see those areas of rough skin texture more easily.Note that in the Green channel window, even though you’re only looking atthe Green channel, you want all the channels to be active. Otherwise, whenyou retouch, you’ll be painting in the color green only. Active channelsappear highlighted in the Channels palette as seen in Image 10.
To activate all channels while viewing only the Green channel, go to theChannels palette and click the RGB channel. Then click the eye icons next to the RGB, Red, and Blue channels to hide them.
9 The Channelspalette in itsdefault state.
11 Window setup for retouching.
10 The Channels palette,showing the setup forretouching while viewingthe Green channel.
All the colors youcan see on your
screen are createdby mixing different
amounts of the threeprimary colors: red,green, and blue. For
example, mixing red andgreen together producescolors such as orange,
yellow, and brown.
Photoshop stores the colorinformation of your image by
keeping track of how much red,green, and blue to use for every
pixel. Normally, Photoshop auto-matically mixes the red, green, andblue together for you and displays
the result. There is, however, a way toview the individual colors separately,
before they are mixed, using what arecalled color channels. To view the differentchannels of an image, go to the Window
menu and select Channels. (The Channelspalette will display.) You will see (for a normalcolor image) four channels: one called RGB,
which contains the mixture of all three colors;and one each for Red, Green, and Blue, which
contains just the information about how muchred, green, or blue is used at a specific spot.
You can view one channel at a time by clicking it inthe Channels palette. Color channels can prove very
useful for retouching because, when viewed in iso-lation, they can highlight subtle details that
might be harder to spot in the full-color image.In the retouching examples here, I use theGreen channel to help visualize areas wherethe texture of the model’s skin needs to be
smoothed.
Note: There are other systems besidesthe three-color RGB mode for keepingtrack of color information in an image.The CMYK system (for cyan, magenta,
yellow, and black) is commonly usedwhen preparing images for four-color
printing and has four channels ofcolor rather than three.
102 Beauty Retouching
Next, make a layer (Ctrl+Shift+N) and call it retouching. This layer is where you’ll do the work of smoothing the skin and making it flawless. Upuntil now, you’ve been using the Healing Brush. For the next step, however,switch to the Clone Stamp tool. The Healing Brush is great for creatingrepairs without disturbing texture and tone. At this stage, however, youwant to disturb the texture and tone. That is why you will be using theClone Stamp to smooth and even out the skin. After you’ve selected the Clone Stamp tool, go to the Options settings and select an Opacity setting of between 20% and 30%. Also, make sure the Use All Layersoption is checked. The basic approach is to use the Clone Stamp like an air-brush. For open areas such as the forehead, use a large brush size of about100 pixels, going down to a smaller 60-pixel brush for more detailed work.
Working in the Green channel window, clone onto areas that need smooth-ing from adjacent areas of similar surface texture and color tone. Thisrequires a bit of practice until you get the “feel” of it, but it basically comesdown to blending the tones and smoothing the texture—all the textures and tones need to match and smoothly blend together. Remember, you arecreating a layer that will be superimposed over the original, so don’t beafraid of being too heavy handed. You will need to push some pixels around(be nice) to get the desired results. This will become second nature at somepoint, but for now just think “smooth, blended, and polished.” Whenyou’re done, you’ll have a layer of perfect smoothness that you can thenblend back with your original layer to get the desired effect. Don’t forget the neck area as well.
One of the great challenges, and most frequently asked questions, has to do with figuring out from where to clone. Looking at the image throughthe Green channel enables you to concentrate more on tone than color. Find a clean area of skin with the same tone of gray and use this as yourcloning source.
When you’ve smoothed out all the rough spots, you can look at yourretouching layer by itself to see what areas you’ve retouched and also whatparts you may have missed. You should have a layer that looks somethinglike Image 12.
Looking at the image now, you may feel it’s flat or overdone. Well, you’reright; it is! But don’t worry—you aren’t done quite yet. The trick is to getback some of the skin’s original texture while retaining the smoothness youhave just created. Close the new window showing the Green channel and goto the color one. In the Layers palette, select your retouching layer andchange its Opacity to 55%. Now you have skin texture back, with eventone. (Yes, you can have your cake and eat it too!) The difference is subtle,

103Reality Retouching
but subtlety is exactly what reality retouching is all about. As you can seefrom Image 13, cutting back that bit of texture makes it look like flawlessreal skin, not digitally smoothed skin.
12 The retouching layer by itself, showing the areas retouched.
13 The effect of changing the opacity of the retouching layer.
Before Retouching Retouching 100% Retouching 55%
PIXEL MEASUREMENTS
Throughout this chapter, you will
encounter various pixel dimensions
for things such as brush size and
feathering of selections. These
dimensions are based on the 300
dots per inch (dpi) resolution of the
example images. If you are working
on higher- or lower-resolution
images, you must scale these
example pixel dimensions up
or down accordingly.
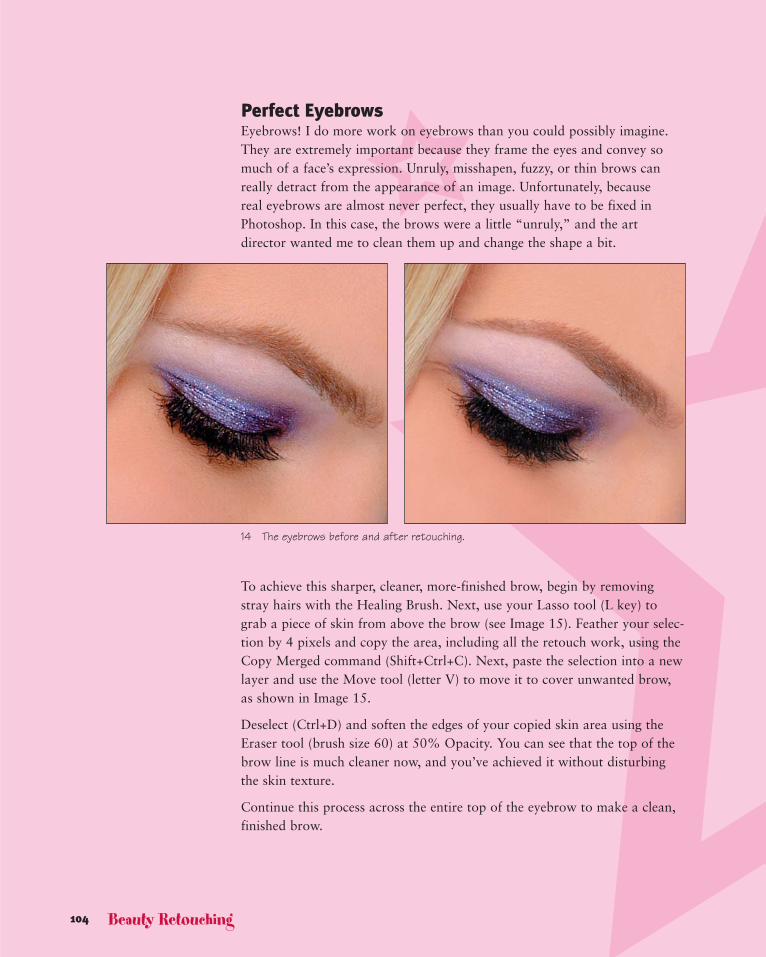
Perfect EyebrowsEyebrows! I do more work on eyebrows than you could possibly imagine.They are extremely important because they frame the eyes and convey somuch of a face’s expression. Unruly, misshapen, fuzzy, or thin brows canreally detract from the appearance of an image. Unfortunately, because real eyebrows are almost never perfect, they usually have to be fixed inPhotoshop. In this case, the brows were a little “unruly,” and the art director wanted me to clean them up and change the shape a bit.
104 Beauty Retouching
14 The eyebrows before and after retouching.
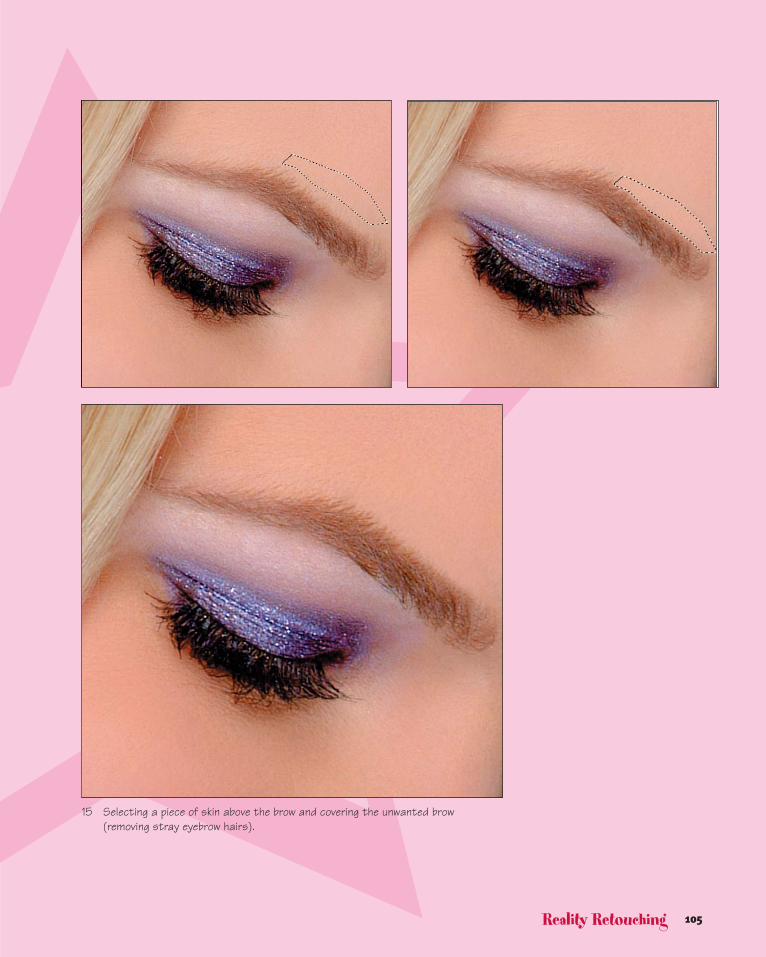
To achieve this sharper, cleaner, more-finished brow, begin by removingstray hairs with the Healing Brush. Next, use your Lasso tool (L key) tograb a piece of skin from above the brow (see Image 15). Feather your selec-tion by 4 pixels and copy the area, including all the retouch work, using theCopy Merged command (Shift+Ctrl+C). Next, paste the selection into a newlayer and use the Move tool (letter V) to move it to cover unwanted brow, as shown in Image 15.
Deselect (Ctrl+D) and soften the edges of your copied skin area using theEraser tool (brush size 60) at 50% Opacity. You can see that the top of thebrow line is much cleaner now, and you’ve achieved it without disturbingthe skin texture.
Continue this process across the entire top of the eyebrow to make a clean,finished brow.
105Reality Retouching
15 Selecting a piece of skin above the brow and covering the unwanted brow (removing stray eyebrow hairs).

A Little DentistryNext, we whiten the teeth. This is a simple thing, but it makes the imagemuch more attractive. First choose your Magic Wand tool (letter W), set theTolerance to 25, and click the teeth to establish an initial selection. Next,hold down the Shift key and continue clicking areas of teeth that were notincluded in the initial selection, until all the teeth are part of the selection.
106 Beauty Retouching
16 The selection for whitening the teeth.
To refine your selection, go to Quick Mask mode (letter Q) and use yourPaintbrush (letter B) tool to modify the mask. Remember, in Quick Maskmode, painting in white removes masking from an area, adding it to yourselection, whereas painting in black adds in masking, removing areas fromyour selection.
Now that you have a refined mask, feather the selection radius by 4 pixels(Select > Feather) to give a nice blended edge.
Next, use the Levels control to adjust the whiteness of the teeth. Click themodel copy layer to activate it, and then open the Levels dialog box byadding an adjustment layer (Layer > New Adjustment Layer > Levels), andmove the middle slider to the left a bit. Different amounts of whitening arecalled for in every image, so use your own judgment and experiment until it looks right to you.

107Reality Retouching
19 Using the Levels control to whiten the teeth.
17 The quick mask of the selected teeth.
20 Before and after whitening the teeth.
CHANGING THE QUICK MASK COLOR
When using the quick mask in an area
where red is a predominant color, you
will want to change it from its standard
color red to something else, such as
blue, as I have done in Image 16. To do
this, double-click the quick mask icon in
the toolbar, and then double-click again
the color box in the dialog box that
appears. Your color picker displays,
and from it you can choose whichevercolor you like.
18 The Channels palette in Quick Mask mode.

108 Beauty Retouching
Happenin’ Hair All right, now for one of my specialties…hair! As is often the case, I havesome areas that need hair added, and others that need hair removed. Let’sstart with the right side, where I am going to pop the model out of the background, removing some hair and part of the shoulder in the process.The hardest part of removing this background will be to keep the eyelashesintact, because they stick out past the edge of the model’s face and are over-lapping into the area I need to remove. When you attempt this, make sureyou are on the model copy layer. Then, begin by selecting large areas of thebackground with the Magic Wand. After you’ve gotten most of the back-ground selected, begin refining the mask in Quick Mask mode by using abrush to clean up and define the edges that delineate the model from thebackground. Good masks are the key to getting good edges! The longer youspend in this mode refining the mask, the less work you’ll have later on.Good masks are your friends!
After you’ve finished your mask, exit Quick Mask mode and feather theselection by 2. Then save your painstakingly created selection. To do this,click the layer mask icon at the bottom of the Layers palette. This creates alayer mask from the selection. After you have converted your selection to a layer mask, it will appear as a new alpha channel in the Channels palette.This alpha channel of your selection enables you to further refine your maskin the subsequent steps. Deselect the active selection, open the Channelspalette, and click the alpha channel you just created. This turns off all thecolor, leaving you with a black-and-white silhouette of your mask. Any bitsand pieces you may have missed will now be easily visible, and you’ll beable to go in with a white paintbrush and eliminate them. Also, because youfeathered the edge, you’ll want to go back and cut-in the mask around theeyelashes with a small, fairly hard-edged paintbrush.
After you have perfected your mask, it’s time to pop the model out of thebackground. Turn the RGB channel back on by clicking it in the Channelspalette. This activates and makes visible all the RGB color channels, anddeactivates and hides the alpha channel with your mask in it. The Channelspalette should now look like Image 24.

109Reality Retouching
23 The alpha channel of the hair mask.
21 The quick mask for the hair. Note that the quick mask color is set to blue. 22 The Save Selection dialog box.
24 The Channels palette showing the alpha channel deactivated.

ADJUSTMENT LAYERS
Always use adjustment layers to make these kinds of corrections; that way you don’t alter
any valuable pixels. If you don’t use an adjustmentlayer, you lose the flexibility to change your mind
later. With adjustment layers, you can keep playingwith the settings without making any changes to
any of the pixels.
Adjustment layers will become your friends. The greatthing about changing things with adjustment layersis that if the art director comes back and says “No,it needs to be purple,” you already have your selec-tion, and all you have to do is double-click to bringthe dialog box back up. This proves very useful given
how often art directors change their minds!
110 Beauty Retouching
Next you need to turn your mask back into a selection. Ctrl+click the alphachannel you created; marching ants outlining your selection should appearin the image. Make sure your bottom “original” layer is hidden, activateyour model copy layer by clicking it, and press the backspace key. Voilá, the background disappears (see Image 25)! You may still need to go in andrefine those lashes one more time, but everything else should be pretty goodright at this point.
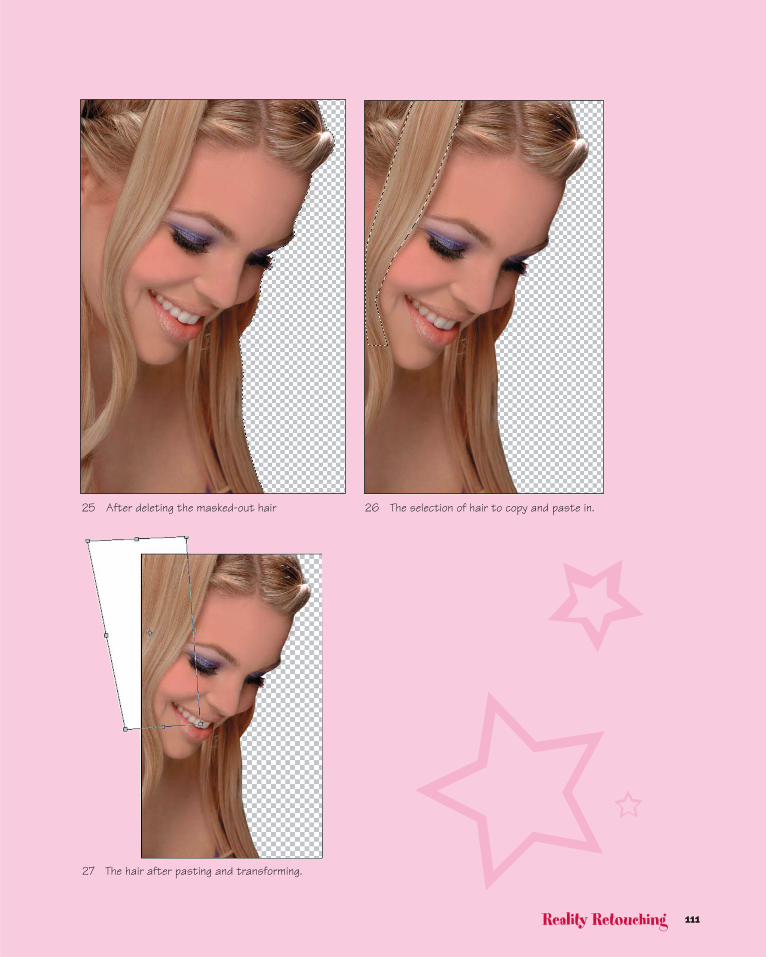
Retouching hair is tricky because you can’t clone it, and healing it onlyworks in small areas. So here is my secret: I never retouch hair. I only copy,paste, and transform. That’s the only way I have found to keep the textureof the hair from getting muddy. In this example, the first thing you aregoing to do is crop the image down. You need plenty of room on the rightfor type anyway, and cropping will also leave you with less hair to fill in.
After you’ve cropped the image, you really only have a corner to deal with.By luck of the draw, you also have one very nice piece of blonde hair thatlooks like a good candidate for the copy/paste/transform technique. Selectthat piece using the lasso, feather it by 5, and then use Copy > Paste (Ctrl+Cand Ctrl+V, respectively) to make a copy and paste it back into the file as anew layer.
Now just move the pasted hair over to the left. Then, using the FreeTransform command (Ctrl+T), pull up and out on the upper-left corner androtate the selection slightly counterclockwise. The idea is to match the waythe hair is falling. After feathering out the edges with a soft brush, the hairtransplant should be virtually undetectable if done properly.
111Reality Retouching
25 After deleting the masked-out hair 26 The selection of hair to copy and paste in.
27 The hair after pasting and transforming.

Overall Look and FeelNow that all the retouched elements are in place, you need to take a final look at the overall appearance of the image. The image at this pointlooks a little flat and a little dark, so you’re going to use an adjustmentlayer to adjust the curves. First, make sure you are on the top layer of yourdocument so that the adjustment layer will affect all the layers below. Then make an adjustment layer for the curves (Layer > New AdjustmentLayer > Curves).
Place the cursor over the image and click the image where you think thetones look flat; you will see a small circle appear on the line in the dialogbox. This will give you an idea of where to grab the bar. Ctrl+click to markthis spot. Pull up and down to lighten and darken. Play around here untilthe image looks a little more bright and punchy.
A Few Final TouchesWhen you have it where you like it, take a break. Step back from the computer, remove your hands from the keyboard…go look at a tree. Youneed to get some distance so that you can tell whether you need to do any-thing else. I often find things that the art director has missed. Why? Becausethe art director hasn’t had the luxury of seeing it in this state, you have thechance to see it before anyone else, and sometimes things will just jump outat you. For instance, now that I have lightened the image considerably, I cansee that the lips need to be more pink and maybe a little more intense. Iremember when I shot this image the lip color was a little more vibrant. So, what can I do? Well…it’s easy.
First you need to select the lips using the Polygon Lasso tool (see Image 28)and feather by 2. When you have an active selection, the selection willbecome a layer mask for your adjustment layer. This mask controls wherethe subsequent effect shows up in the image. Now add an adjustment layerfor Selective Color (Layer > New Adjustment Layer > Selective Color) andadjust the reds to the desired tone. I love Selective Color adjustment becauseyou can really change hues so subtly (see Image 29).
112 Beauty Retouching

113Reality Retouching
28 The selection around the lips.
29 Using the Selective Color options to adjust the intensity of the lip color.
114 Beauty Retouching
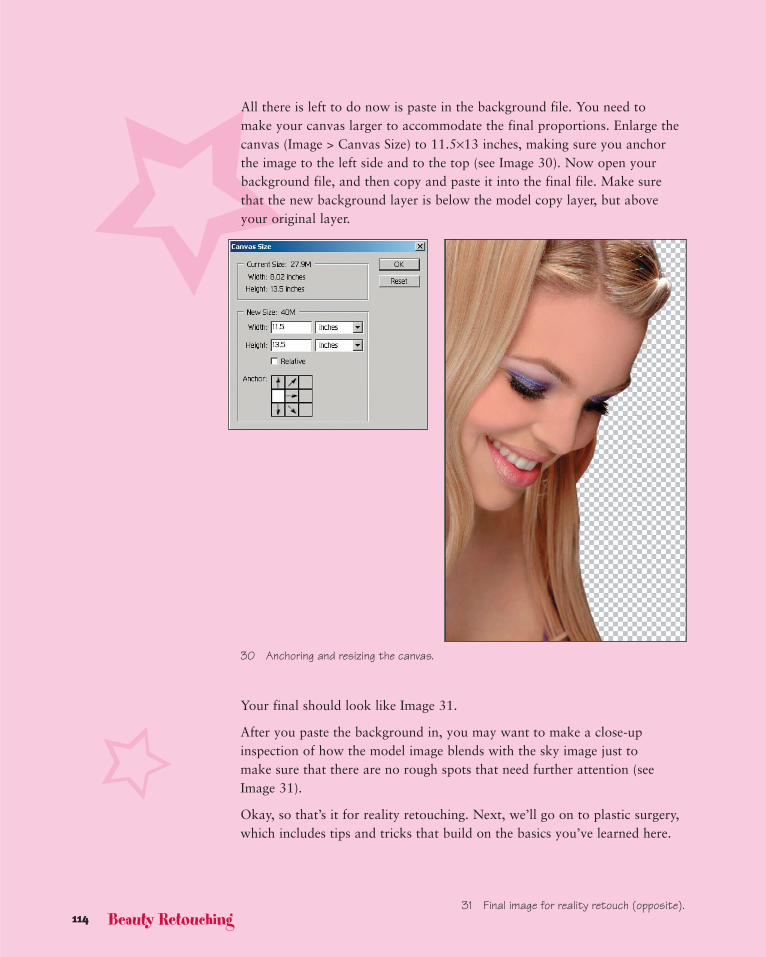
30 Anchoring and resizing the canvas.
Your final should look like Image 31.
After you paste the background in, you may want to make a close-upinspection of how the model image blends with the sky image just to make sure that there are no rough spots that need further attention (seeImage 31).
Okay, so that’s it for reality retouching. Next, we’ll go on to plastic surgery,which includes tips and tricks that build on the basics you’ve learned here.
31 Final image for reality retouch (opposite).
All there is left to do now is paste in the background file. You need to make your canvas larger to accommodate the final proportions. Enlarge thecanvas (Image > Canvas Size) to 11.5×13 inches, making sure you anchorthe image to the left side and to the top (see Image 30). Now open yourbackground file, and then copy and paste it into the final file. Make surethat the new background layer is below the model copy layer, but aboveyour original layer.

Plastic SurgeryIf, after you’ve finished the work of a reality retouching, more drastic workis needed, you can move on to plastic surgery. First, do everything you can to give the image a finished appearance. I don’t like to cut and paste partsuntil the basics are done. Also, note that you can make dramatic changes by stretching highlights and deepening shadows. This simple technique canchange the shape of a cheekbone or nose. When I do my initial retouchinglayer, I pay close attention to the light and shadows. This becomes especiallyimportant in some lighting conditions and with older models. You canrecontour someone’s face by widening and lessening shadows and highlights.Pay close attention to where these shadows fall on the face, and how darkthey are, and you’ll be able to take years off someone’s face without needingto change anything in the underlying structure.
When you open this file, it will already have a retouching layer in it. You’llclearly be able to see where the highlights and shadows have changed. Ihave included this so that you can see exactly what this layer looks like. In asoft yet dramatic lighting situation such as this one, there are shadows onthe right side of the face that do not enhance her face structure. I blendedthe contours, took a little tuck in on the outer edge, and lightened the noseshadow. If you turn the layer on and off, you will see the dramatic differ-ence it makes in her overall appearance. Just this technique alone will takeyears off. But wait…there’s much more.
116 Beauty Retouching

117Plastic Surgery
32 Before and after plastic surgery collagen injection.

118 Beauty Retouching
Collagen InjectionsWith the initial retouching out of the way, it’s time to move on to the surgery section of this image. Image 32 shows the before and after of realityretouch with some additional plastic surgery. Unfortunately, the model’s lipswere not as full as the client wanted, so we’re going to work on them a bit,removing some wrinkles and enlarging them.
To work on the lips, pop them into their own layer. Create a rough selectionaround the lips, making sure you have a good amount of skin on the outsideas well (see Image 33). Feather it at about 5, and then use the Layer viaCopy command (Ctrl+J) to create a new layer from your selection. We’ll do our work on the lips in this newly created layer.
The first thing to do with these lips is remove the wrinkle on the left side of the lower lip with the Healing Brush. To do this, Alt+click above thewrinkle to establish a sample point, and then click the wrinkle to heal onesmall section at a time. To make the lips look fuller, continue to heal theother wrinkles that go horizontally and vertically across the lip. Don’tremove them all, but definitely eliminate the larger ones. Just removing these wrinkles gives the lips an appearance of more fullness.

119Plastic Surgery
33 The selection used for working on the lips.
34 After using the Heal Brush on the lower lip.

The next step is to adjust the shape of the lips. The shape in the originalimage is good but a little bit thin. To fix the problem, use the FreeTransform command to stretch the layer ever so slightly.
Press Ctrl+T to launch the Free Transform command, and then, while hold-ing down the Ctrl key, pull the center-top handle slightly up and to the left,as shown in Image 35. This action increases the smirk a little and makes thelips slightly fuller. You must reposition the lips slightly by using the arrowkeys to nudge the layer. Move them back down so that the upper lip on thetransformed top layer fits over the original. The following figure shows anexample of the new lip superimposed over the old.
As you can see from Image 36, the upper lip stays anchored in its originalposition, and the bottom lip is now extending slightly below the originallower lip.
Now that you have the new lip in place, you need to become a dentist for amoment. Switch back to your original layer. Go in with the healing brushand adjust the shape of the teeth, eliminating the gaps.
120 Beauty Retouching
35 Transforming the shape of the lips to add fullness.

121Plastic Surgery
37 Areas to work on the teeth.
36 The transformed lips superimposed over the untransformed lips.
122 Beauty Retouching
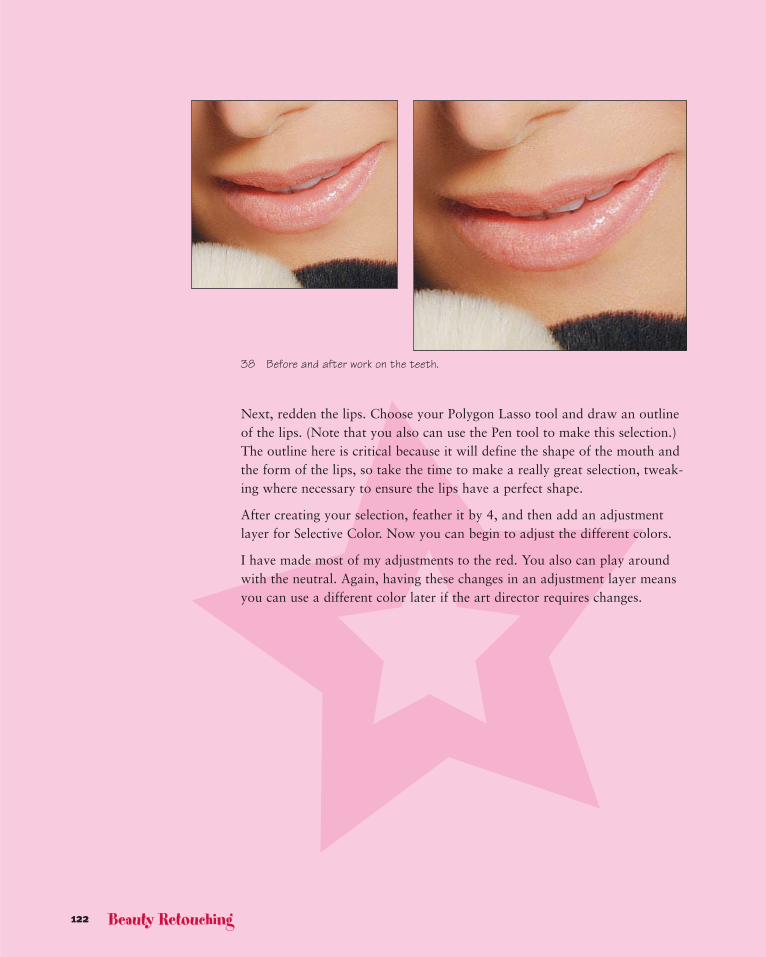
38 Before and after work on the teeth.
Next, redden the lips. Choose your Polygon Lasso tool and draw an outlineof the lips. (Note that you also can use the Pen tool to make this selection.)The outline here is critical because it will define the shape of the mouth andthe form of the lips, so take the time to make a really great selection, tweak-ing where necessary to ensure the lips have a perfect shape.
After creating your selection, feather it by 4, and then add an adjustmentlayer for Selective Color. Now you can begin to adjust the different colors.
I have made most of my adjustments to the red. You also can play aroundwith the neutral. Again, having these changes in an adjustment layer meansyou can use a different color later if the art director requires changes.

123Plastic Surgery
39 The selection for adjusting lip color.
40 The Layers palette showing the adjustment layer forSelective Color.
41 Using the Selective Color options to redden the lips.

The Eye-LiftIn this next image, we are going to fix the model’s right eye. Even thoughthis model is quite young and beautiful, her right eye appears smaller thanthe left due to the angle of the shot. The task here is to transform it so thatthe eyes look more even. First begin by lassoing the area around the model’sright eye (see Image 43).
124 Beauty Retouching
42 Before and after images of a plastic surgery eye-lift.

125Plastic Surgery
43 Selecting and transforming the eye shape.

Feather the selection by 5, and then use the Layer via Copy command tocreate a new layer from your selection. Next enlarge the eye and lift the eyebrow in one transformation by pulling the upper-left corner up, and the lower-left corner out (see Image 43). After doing so, you must lower theOpacity of the layer so that you can line up the transformed layer. Loweringthe Opacity enables you to see the two layers simultaneously. Line up thenew layer with the original so that the bottom of the eye on both layers is in the same place. After placing it where you want it, reset the Opacity to100%. You’ll probably have some cleanup to do on the outer edge. Getyour Eraser tool and, with an Opacity of 50%, use a large soft brush towork the edges. This technique creates a flawless and invisible eye-lift.
As you can see in the final retouched image, the model’s right eye seems lesspuffy and more symmetrical with the other. Even though this difference issubtle, it gives a more fresh and appealing look.
126 Beauty Retouching
44 The before and after of the final retouched image.

127Plastic Surgery
The Nose JobThis next image was initially shot for stock, and was picked up byBombshell Studio Make-up (bombshellstudiomakeup.com) for their campaign.Even though the model has stunning looks at certain angles, her nose photographed unevenly. As with all of my images, I begin with the basicretouching. After the standard smoothing and cleanup, using my mentalchecklist as discussed earlier, I move on to the nose.
45 Before and after images of plastic surgery with a nose job.
46 Before the retouch, with notes on areas needing work.

I first assess what work needs to be done. In Image 46, I marked the partsof the nose I wanted to see fixed in the final image. On the right side of themodel’s nose, I must add definition, because it isn’t clear where the bridge ofthe nose is. I also need to lessen or remove the knob on the right side of themodel’s nose. Finally, I will reduce the width of the nostril on the right,which will in turn lessen the nose’s overall width.
In this next image, I have done all the necessary retouching to the eyebrows,lips, and skin. I also have lessened the shadow on the right side of the noseusing the Dodge tool and burnt the edge, using the Burn tool, with a verysmall brush. The goal was to make the bridge more defined.
Now we will begin working on the right side of the model’s nose. Noticethat the basic retouching techniques—smoothing the skin, making the shad-ows less dark—have already reduced the appearance of the knob on thisside, taking us halfway to the desired result.
Start on this side by copying the right half of the nose. Be sure to grabenough skin on the right side—when you transform this, you’ll need theextra to cover.
Feather the selection by 5 so that you have a smooth edge, and then create anew layer from the selection.
128 Beauty Retouching
47 After the initial retouch, before plastic surgery.
129Plastic Surgery
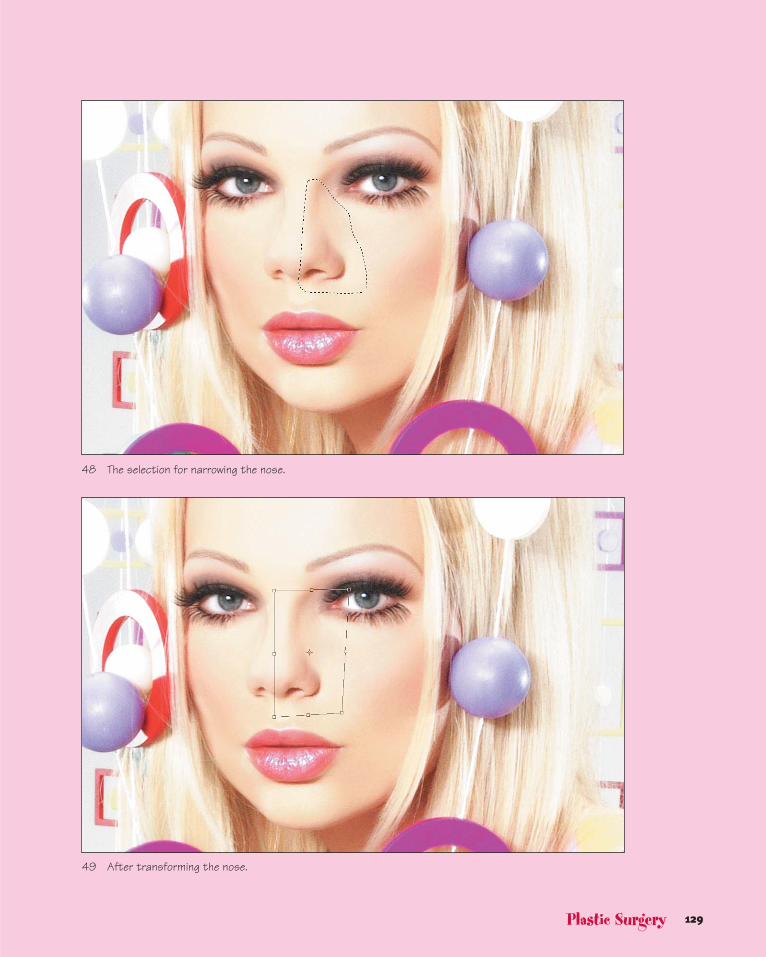
48 The selection for narrowing the nose.
49 After transforming the nose.

130 Beauty Retouching
50 The selection for transforming the nostril.
THE SANITY CHECK
When working on individual parts, I
always turn on and off the layers a
few times to see the before and
after of the change. This is helpful
to see whether it’s looking realistic
and whether the placement of the
transformed part is correct.
Next we’re going to free transform the shape of the right side of the nose to lessen the overall width. We don’t really need to change much. Becausethis is a small adjustment, make small changes until you have reached the desired effect. First drag the right side of the transform box toward thecenter. This action reduces the width of the nostril as well as the bridge ofthe nose. When the width of the bridge looks good, drag the lower-rightcorner of the transform box in to further reduce the size of the nostril whileleaving the width of the bridge the same.
Finish off the tip of the nose by creating a new, empty layer for retouching,and then use the Clone tool to smooth out the bump on the tip.
The final step is to even out the nostrils. Because the model’s head is at anangle, the nostrils appear to be two different sizes. I think the discrepancybetween the two is too large and needs to be a little more even. So first
131Plastic Surgery
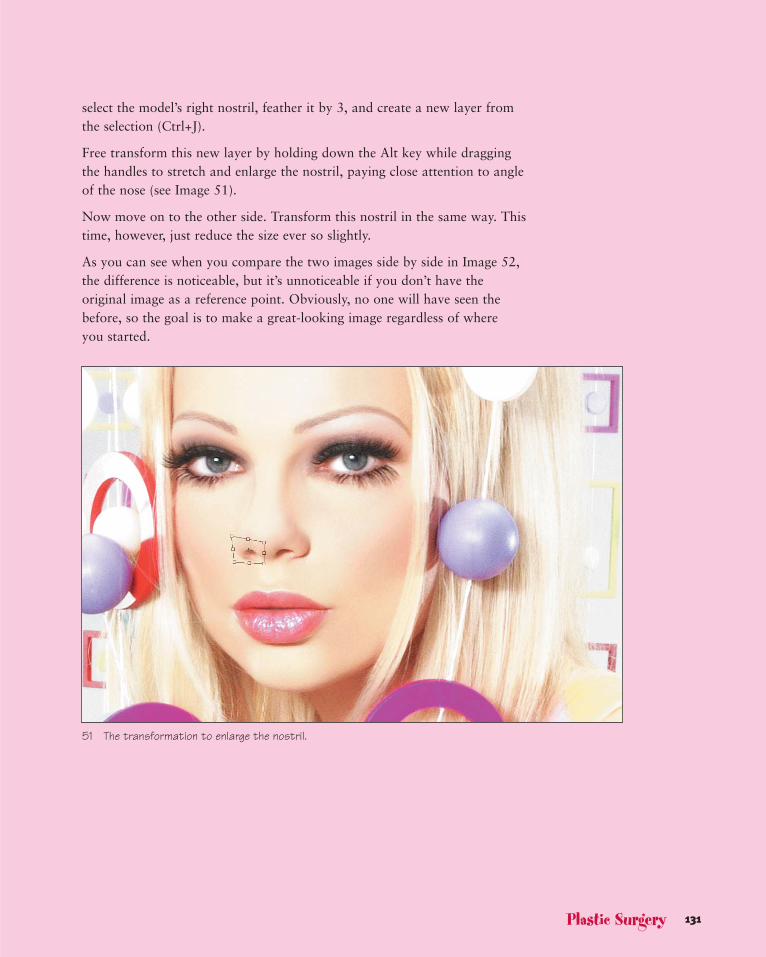
select the model’s right nostril, feather it by 3, and create a new layer fromthe selection (Ctrl+J).
Free transform this new layer by holding down the Alt key while draggingthe handles to stretch and enlarge the nostril, paying close attention to angleof the nose (see Image 51).
Now move on to the other side. Transform this nostril in the same way. Thistime, however, just reduce the size ever so slightly.
As you can see when you compare the two images side by side in Image 52,the difference is noticeable, but it’s unnoticeable if you don’t have the original image as a reference point. Obviously, no one will have seen thebefore, so the goal is to make a great-looking image regardless of where you started.
51 The transformation to enlarge the nostril.

52 Before and after the retouch.
132 Beauty Retouching

133Plastic Surgery
Xtreme HairI have one other item I want to show you in the plastic surgery category. It’snot really plastic surgery, but more like a really big bottle of Rogaine. We’regoing to add heaps of hair!
53 The original shot before the hair extension treatment.
As you can see from Image 53, the model already has plenty of beautifulhair. However, I want to add even more to get the “extreme hair” effect Iwant in the final image.

134 Beauty Retouching
54 The final image with more hair.
I work with hair using three basic moves: Copy/Paste, Transform, and Twirl.Let’s start by copying chunks of hair from other source images from theshoot. Here are the three images to use as the hair transplant sources.

135Plastic Surgery
55 The first hair transplant source image.
56 The second hair transplant source image.
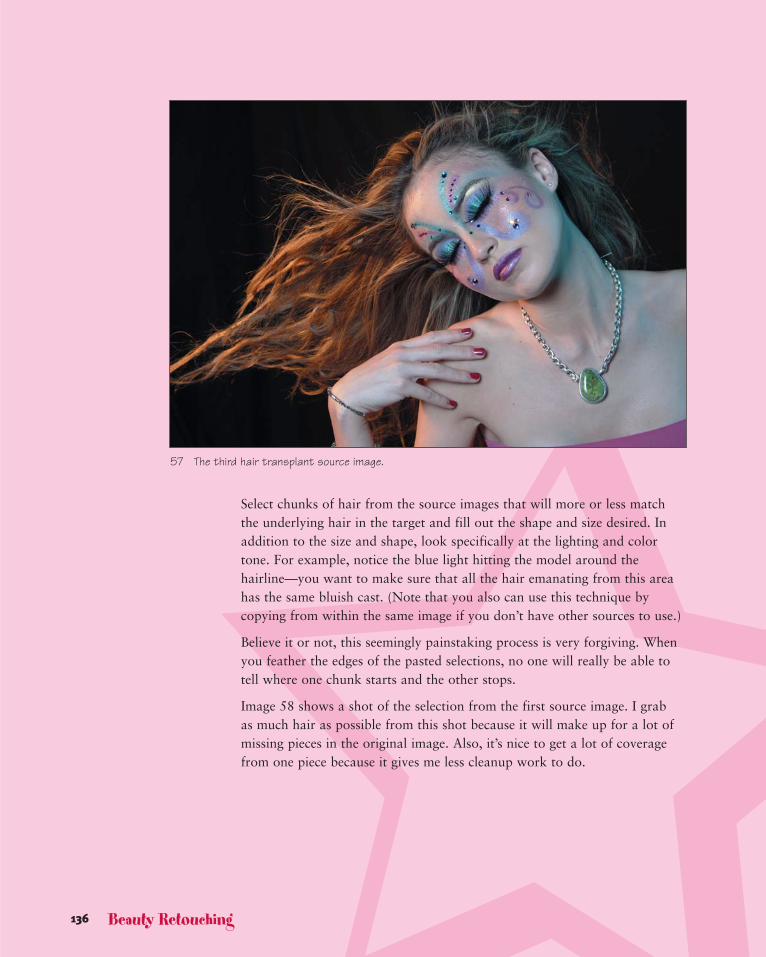
Select chunks of hair from the source images that will more or less matchthe underlying hair in the target and fill out the shape and size desired. Inaddition to the size and shape, look specifically at the lighting and colortone. For example, notice the blue light hitting the model around the hairline—you want to make sure that all the hair emanating from this areahas the same bluish cast. (Note that you also can use this technique by copying from within the same image if you don’t have other sources to use.)
Believe it or not, this seemingly painstaking process is very forgiving. Whenyou feather the edges of the pasted selections, no one will really be able totell where one chunk starts and the other stops.
Image 58 shows a shot of the selection from the first source image. I grab as much hair as possible from this shot because it will make up for a lot ofmissing pieces in the original image. Also, it’s nice to get a lot of coveragefrom one piece because it gives me less cleanup work to do.
136 Beauty Retouching
57 The third hair transplant source image.

137Plastic Surgery
58 The selection of the first chunk of hair for copying.
First, duplicate your background layer and turn the bottom one off. Then,extend your canvas (Image > Canvas Size) so that you have room to work.Anchor the image to the right side and create extra space on the left. Usingthe Eyedropper tool, sample the color from the existing background, and fillin the new background space using the Paint Bucket.
59 The target image with the first chunk of copied hair pasted in.

After copying and pasting the selected hair into your file, you should havesomething that looks like Image 59. Next you are going to copy a chunk forthe top portion of the hair from the second source image and paste it intothe file as well.
138 Beauty Retouching
60 The target image with the second chunk of hair pasted in.
As you can see from Image 60, this is not far off from where you want to beeventually. Now you paste one more piece from the third source file andbegin the transforms and twirls.
61 The target image with the third chunk of hair pasted in.

139Plastic Surgery
Now you twirl the ends of the hair to better match the existing hair andgive it a softer, more fluid effect. Using the Lasso, grab just the parts thatyou want to change. Then use the Twirl filter (Filter > Distort > Twirl) toadd a slight swirl effect to the selected hair (see Images 62 and 63).
62 The image after some initial twirling, showing a selection for twirling.
63 The Twirl dialog box.
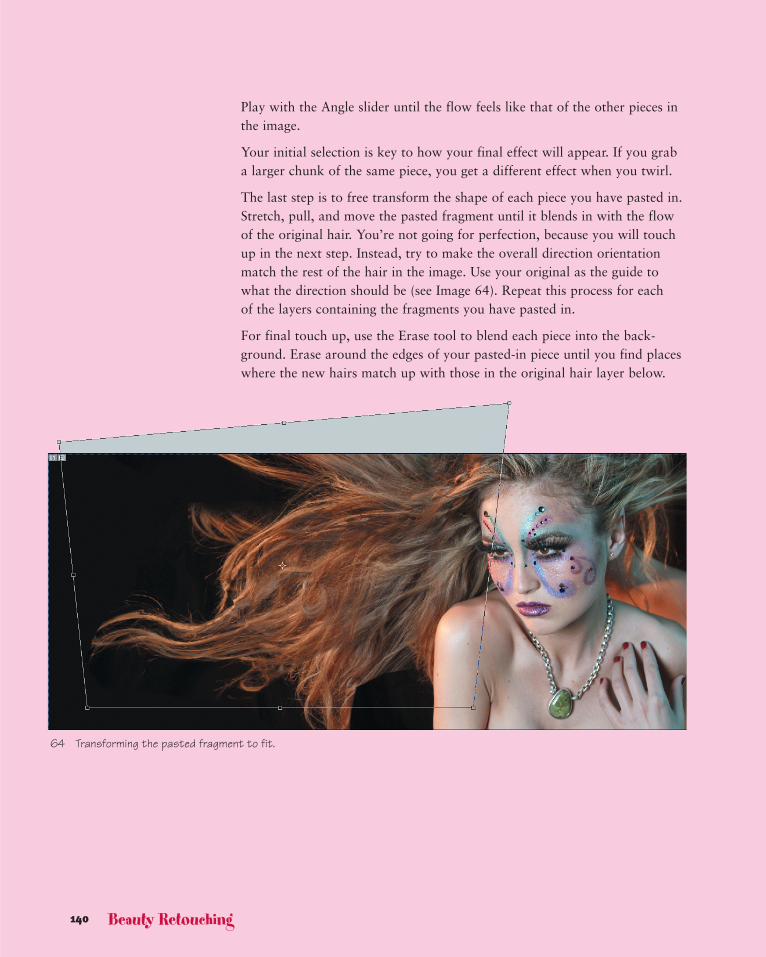
Play with the Angle slider until the flow feels like that of the other pieces inthe image.
Your initial selection is key to how your final effect will appear. If you graba larger chunk of the same piece, you get a different effect when you twirl.
The last step is to free transform the shape of each piece you have pasted in.Stretch, pull, and move the pasted fragment until it blends in with the flowof the original hair. You’re not going for perfection, because you will touchup in the next step. Instead, try to make the overall direction orientationmatch the rest of the hair in the image. Use your original as the guide towhat the direction should be (see Image 64). Repeat this process for each of the layers containing the fragments you have pasted in.
For final touch up, use the Erase tool to blend each piece into the back-ground. Erase around the edges of your pasted-in piece until you find placeswhere the new hairs match up with those in the original hair layer below.
140 Beauty Retouching
64 Transforming the pasted fragment to fit.

141Fantasy Retouching
Fantasy RetouchingFantasy retouching is my favorite kind of retouching. It’s basically the sametechnique as the reality retouching except that it is designed to give a moreobviously enhanced, “painted-on” look. Whereas a reality retouch will goundetected if done well, a fantasy retouch will be noticeable to all but themost casual observers. Because fantasy retouching often goes hand in handwith plastic surgery, I begin this section with an image that combines fantasy retouching with a fair bit of plastic surgery.
Yummy Skin and Body SculptingI refer to this style of heavily retouched skin as “yummy skin.” When aclient asks for “yummy skin,” I know that texture is not important and thatthe photograph is supposed to have a painted quality when it’s finished.
65 Before and after the skin retouching, with the retouch layer at 90% Opacity.

142 Beauty Retouching
66 Using the Spherize filter. 67 After spherizing and cutting in the waistline.
BRUSH HARDNESS
If you’re working on a sharp edge, a
harder brush is needed, whereas a
fuzzy edge requires a more feathered
brush. This takes practice; learning to
make the curve feel natural isn’t easy,
so don’t be discouraged, and keep at
it until you’re satisfied. Use Shift+[
and Shift+] to soften or harden your
current brush.
Having read the preceding section on reality retouching, you will alreadyknow the techniques used to accomplish this initial step. The only differ-ences for a “fantasy” retouch are that the Opacity is set to 90% on theretouch layer rather than 30% to 60% and that broader retouch strokes are used over larger areas of skin.
As you can see from Image 65, a dramatic difference has been achieved withretouching alone. Now let’s nip and tuck.
Nip and TuckYou can give a little more definition to the model’s waist in two ways. Firstcopy a portion of the buttocks and create a new layer from the selection.Then use the Spherize filter (Filter > Distort > Spherize). This pushes thearch out to the right a little (see Image 66). You may need to erase aroundthe edges of your selection to blend the transformed area when the filter is complete.
Now add more curvature to the waistline by using the Clone Stamp tool,with the Use All Layers option checked, on this same layer and carefullychanging the shape. Use the tool to clone background over the unwantedareas, cutting-in the skin with the black background and carefully changingthe shape (see Image 67). Make sure to analyze the edge you are workingon, and use the right brush hardness accordingly.

143Fantasy Retouching
68 Using the Shear tool to add a curve to the waistline.
So here is where we’re at now.
As you can see from Image 69, the difference is quite dramatic. We havemade a big difference in just a few quick moves.
The next step is to narrow the width of the waist. What are we going forhere? Well it’s pretty much up to you. I like curves in women—I have a fewmyself—and so my preference is for a more curvaceous silhouette.
To start, grab a chunk of the left side with the Polygon Lasso. Then featherby 2 and create a new layer from your selection.
The Shear filter is very handy for adding slight curves to just about any-thing. I especially love this tool for the waistline. We are going to distort this section of the waist so that it is more indented, giving it a little bit morecurve and shape. Use the Shear filter (Filter > Distort > Shear) by draggingthe center of the line slightly to the left, adding curvature to the waistline.
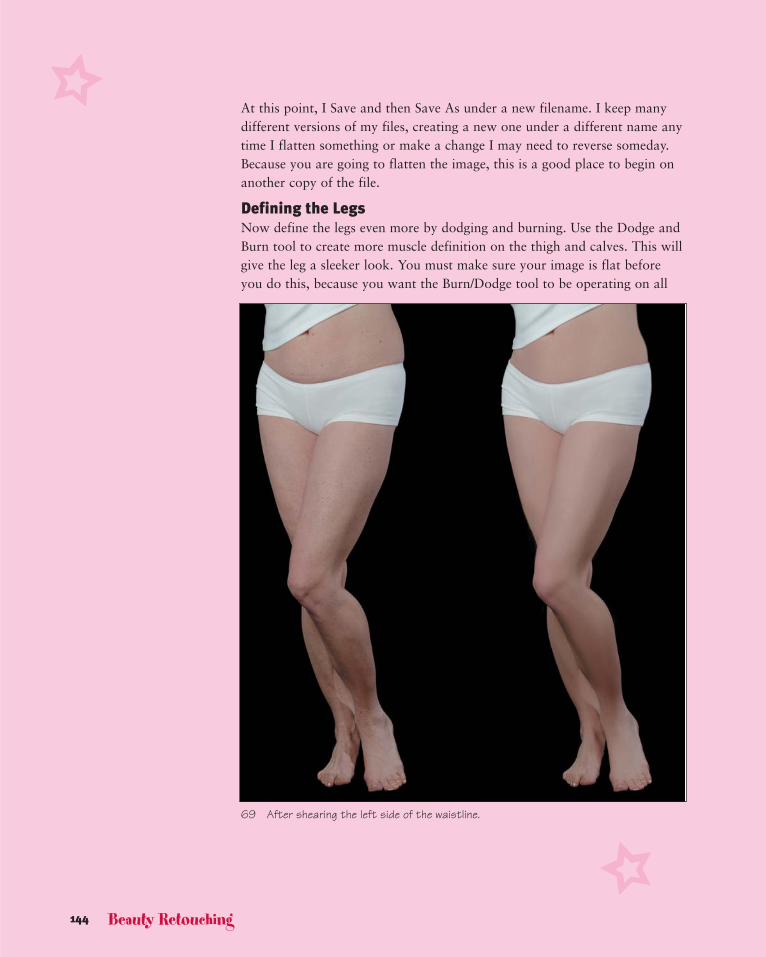
At this point, I Save and then Save As under a new filename. I keep manydifferent versions of my files, creating a new one under a different name anytime I flatten something or make a change I may need to reverse someday.Because you are going to flatten the image, this is a good place to begin onanother copy of the file.
Defining the LegsNow define the legs even more by dodging and burning. Use the Dodge andBurn tool to create more muscle definition on the thigh and calves. This willgive the leg a sleeker look. You must make sure your image is flat beforeyou do this, because you want the Burn/Dodge tool to be operating on all
144 Beauty Retouching
69 After shearing the left side of the waistline.

145Fantasy Retouching
your work to this point. Flatten (Layer > Flatten Image), and then make aduplicate of your main layer as backup. Now, go to your top layer andbegin burning and dodging the highlights and shadows with the Burn/Dodgetool to create more muscle definition (see Image 70).
The reason a copy layer is so important is that, after you’re done dodgingand burning, you may take a look and realize that you did a little too muchhere and there. You can easily remedy this by using the Eraser tool on thetop layer. By altering the Opacity to adjust the intensity of any of the dodg-ing and burning effects you have just done, you can get things just right.
70 After burning and dodging the leg muscles.

A few last things are bothering me. First is the dip at the top of the right thigh.
Grab a piece of the upper thigh, feather by 2, and create a new layer fromthe selection. Free transform the selection by pulling up and out on itsupper-right corner. You need to rotate the selection a little counterclockwiseto make it match up. For final cleanup, touch up the edge of your selectionwith a soft brush.
146 Beauty Retouching
71 Transforming the shape of the back of the thigh.

147Fantasy Retouching
72 Shearing the right side of the waistline.
You can grab the bar at different points to make just the right curve and narrow her waist a bit. Again there should be minimal cleanup afterthis step.
The left side of the waist needs some work; I don’t think it curves in quiteenough. I will again grab a chunk of the waist and use the Shear tool as seenin Image 72.

148 Beauty Retouching
73 Before and after of the fantasy retouch.
As you can see from image 73, all of these small changes make a big difference in the overall shape of the body.
The secret behind what I refer to as fantasy retouching is the “painterly”approach to the retouching itself, using long brush strokes with the CloneStamp tool. Because we are retouching on a Caucasian model, we also canuse the Green channel to our benefit when working.
Overall, the important thing to remember is that you will be blending toneswhile doing large, flowing strokes. As opposed to reality retouching, whereyou want to leave detail in the image, with fantasy retouching you are obliterating the detail and going for smooth and “yummy” skin that lookslike it would be incredibly sleek and soft to the touch.
This chapter provides one more image from start to finish to give youanother example of the fantasy retouching style.

149Fantasy Retouching
74 Completed “L’amour” shot.
L’amourQuite a lot has actually gone into this image. This section covers the majorsteps so that you can get an idea of the workflow and the order in whichthings were done. In this part, I also include information on how I createdher surroundings—even though this information goes beyond the “retouch-ing” focus of this chapter.

150 Beauty Retouching
75 Before the retouching.
Star CurtainI began by putting the stars into the background. In preparation for this, Itook a shot of the set before we began shooting the model.
Using the Marquee, select a group of stars from the shot of the backgroundand copy them. Then, in your main image, use the Magic Wand to select thebackground area where you’ll be inserting the extra stars. Use the Paste Intocommand (Shift+Ctrl+V) to paste the copied stars into the background areayou have selected. Finally, free transform what you’ve inserted so that thestars follow the pattern of their preexisting neighbors.
Repeat the star copying and pasting all the way across until you have created a curtain along the back (see Image 78). I like to create a layer set(Layer > New > Layer Set) for these parts just because it’s easier to workwith a file when things are organized as much as possible (see Image 79).This will complete your background for the moment.

76 Selection of stars to copy 77 Selection of background area to paste into.
78 Two steps showing the pasting and transforming of stars in the background
79 Separate folder for background layers.
On every job I do, I always
photograph the set alone. Even
if it’s just a gray backdrop I
shoot a picture of it. I do this
because I never know when I’ll
need to extend something.
Suppose, for instance, that
someone needs a billboard and
needs a lot more background
to the right or left. With the
set shot alone, I can create
extra space more easily without
having to get rid of the subject first.
151Fantasy Retouching

RetouchingNow it’s time to begin retouching. Begin as you did at the start of this chapter, by opening two views: your normal window, which shows the full-color image; and a Green channel window, which shows only the grayscaleview of the image’s Green channel (see Image 80). Your Channels paletteshould look like Image 81.
152 Beauty Retouching
80 Using a view of the Green channel to retouch.
81 The Channels palette with the Green channel on.
82 During the blending process using in the Green channel.

153Fantasy Retouching
Image 82 shows the retouching in progress. Really work on creating evenblends from tone to tone. I find that if I click and drag in medium strokes, I can create a beautiful and flawless skin tone. The shadows and highlightscan also be worked with at this stage to create more definition in the face.To see the actual work you’ve done, view the retouching layer in isolation.This will give you a look at the areas you’ve retouched and make it easier tosee whether you may have missed something.
83 The retouching layer viewed in isolation.
After you have retouched the model’s skin. The next thing to do is fix theeye makeup. Notice, on the right eye, the prominence of the pearlescenthighlight of the eye shadow. I want to make the left eye just as pearly and shiny.
84 Selection of the eye shadow.

To copy the highlight area from the right eye, make a selection using the Lasso and feather the selection by about 10 (see Image 84). Copy theselection into a new layer, and then flip it horizontally and move it over the brow bone of the left eye. Adjust the pasted eye shadow using the FreeTransform command to fit it into its new space.
154 Beauty Retouching
85 Pasting and transforming the eye shadow.
By turning on and off the layer you just created, you can check your work,and hopefully see that the result is much more even than the original.
86 Before and after duplicating the eye shadow.
Now it’s time to do some dental work. Begin by smoothing the teeth andblending the highlights using the Clone Stamp tool. Then select the leftmosttooth and create a new layer from your selection.

155Fantasy Retouching
Move and transform the pasted tooth to fit into the empty space on theright side. Use the Levels command, moving the middle slider to the right, to bring down the overall brightness of the tooth (see Image 88). Go back inwith your Clone Stamp to touch up the shape for a more uniform look (seeImage 89).
87 Selection of the left tooth for copying and pasting.
88 Using the Levels command to darken the tooth.
89 After pasting and transform-ing to create a new tooth onthe right.

One other thing that makes the teeth look less straight is that the big white highlight is only on the right tooth. If you copy, paste and blend thathighlight on the left tooth as well; this makes the teeth appear more even(see Image 90).
Image 91 shows the current state of the Layers palette at this point.
156 Beauty Retouching
90 Before and after pasting and blendingthe highlights on the teeth.
91 Snapshot of the Layers palette at this point.
As a final step, before working on the image as a whole, lighten the eyebrows a bit.
92 The selection for lightening the eyebrows.93 Using the Selective Color options to
lighten the eyebrows.

157Fantasy Retouching
First select the eyebrows and feather them by 5. Then use an adjustmentlayer for Selective Color to go in and lighten the blacks. This way you leavethe light and midtone areas untouched and simply adjust the dark parts ofthe brow to be a bit lighter.
As you can see from Image 94, the eyebrow adjustment is subtle but justsoftens her noticeably.
94 Before and after lightening the eyebrows.
Final EnhancementsFor some final adjustments, work the light and shadows with the Dodge andBurn tool. These are very subtle yet very powerful tools.
94 Before and after dodging and burning to change light and shadows.

It looks as if I have adjusted the whole image (see Image 94); in actuality,however, I just dodged and burned key areas. I significantly lightened thehair without changing any of the other tones. I also burned in the lineraround her eyes, her lipstick, and under her chin, but the eyebrows remainlight. I love this tool. It can really transform an image because it’s likepainting with light.
Warped SurroundingsThe warped surroundings are all that’s left to be created to finish off theimage. First make a selection around the model, feather it by 50, and thencreate a new layer from your selection.
158 Beauty Retouching
95 A layer without the model.
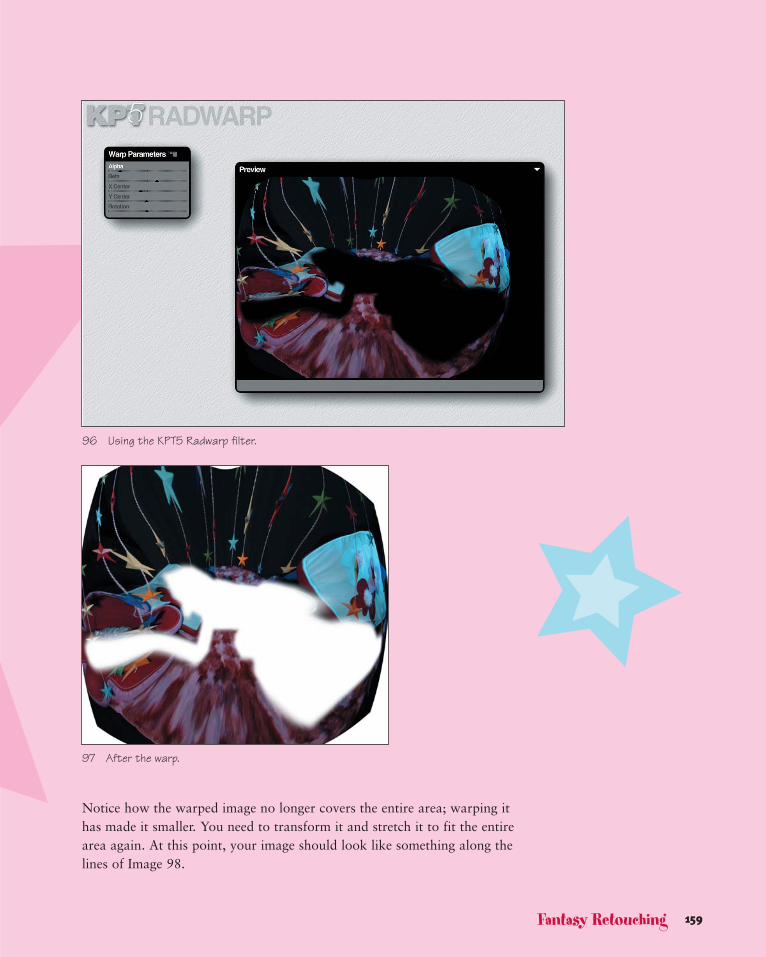
The result should be a layer that looks something like Image 95. Next, Iused a KPT5 filter called Radwarp, from Corel (see Image 96). This filterdoes a great job of warping images—something that would take many different native Photoshop filters to create.
You can see my settings in Image 96. I play with this until I have the feel I’mlooking for.
You should get a layer that looks something like Image 97.
159Fantasy Retouching
97 After the warp.
Notice how the warped image no longer covers the entire area; warping ithas made it smaller. You need to transform it and stretch it to fit the entirearea again. At this point, your image should look like something along thelines of Image 98.
96 Using the KPT5 Radwarp filter.

98 The original layer under the warped layer.
Okay, now what? Well, you need to combine the two backgrounds into one.The easiest way to do that is to lower the Opacity of the new warped layerto see where you need to blend and erase to make it work with the originalbackground.
160 Beauty Retouching
99 Lowering the Opacity to see the layer underneath.

161Fantasy Retouching
This gives you some idea of what needs to be done. You need to erase thelayer where it overlaps the model, as well as in other key areas, such as the pink fur, that you may want to retain from the original.
To get back the original background, carefully erase between the star curtains to reveal the original pink fur. This is a time-consuming part; ittakes patience, and you may have to go back if you make a mistake. Makesure during this process that you keep putting the Opacity back to 100% so that you can see how the blending and erasing are looking in the finalcomposite (see Image 100).
100 Erasing the warped layer.
After you have done this, you should end up with something like Image 101.
101 After uncovering thebackground layer.

My final step is to flatten the image and add a little bit of blur. Everything isa little too sharp, and I think adding blur will give it a more dreamy quality.Open the History palette (Window > History) and make a new snapshot onthe History palette by selecting New Snapshot from the History palette’sdrop-down menu. Name the snapshot Final. Then run the Blur filter—I usedKPT5 Blurrr filter, and chose the Gaussian Weave setting because it givesthat small crosshatch effect I was looking for (see Image 102).
162 Beauty Retouching
102 Using the KTP5 Blurrr filter.
Make another new snapshot on the History palette and name it Blur.Then use the Step Backward menu command to step back one step in yourHistory palette. Click in the box to the left of your Blur snapshot to activateit as the source for the History Brush (see Image 103), and choose theHistory Brush from your Tool palette.
Now you can begin to paint with the blurred image, adding blur into the image according to your individual taste. By varying the brush Size,Hardness, and Opacity of the History Brush, you can vary the amount and
103 The History palette, showing snapshots used
for the History Brush.

intensity of blur that gets added in. This is very much a thing of individualtaste, so it’s up to you where to use it and with how much intensity.
Image 104 shows the final image. I hope that breaking this down has givenyou an idea how to achieve something like this in your own work. Arrivingat this image has definitely required a lot of steps, but the end result doesn’t“look” like it.
163Where We Are
104 Final image.
Where We AreYou have learned the degrees of retouching from reality to fantasy. Now you are going to see some of these skills put into action. In the next threechapters, I present three images and discuss what went into their creation. I hope what you have learned in this chapter adds to your repertoire ofretouching and reconstruction techniques, and I hope the next few chaptersinspire you to create fantastic images of your own.