Versioni / Versions / Ausführungen / Versions / Versiones ...

Learning Windows 7: Create a Homegroup & Join a New Computer To It
One of the cool new features in Windows 7 is the Homegroup feature that allows easy sharing of files between machines. Today we take a look at how to add a new Windows 7 machine to an existing Homegroup.In this example we’ll assume you have a desktop and a laptop both running Windows 7 and a Homegroup wasn’t created during installation. We’ll create the Homegroup on the desktop computer, then join the laptop to it.Create a HomegroupTo start using the Homegroup feature we need to create one first. On the desktop computer type homegroup into the search box in the Start Menu and hit Enter.
In the window that pops up click on the Create a homegroup button.

In the next screen select what you want to share with the other computers in the homegroup and hit Next.

The Homegroup is created and a password will be generated that other computers will need to join it.

You may need to wait a few moments while the sharing of the libraries of the Homegroup are completed. The items under Share libraries and printers will be grayed out until the the sharing is completed.

Change Homegroup PasswordYou can certainly stick with the password Windows created for the Homegroup, or can change it to something that’s easier for you to remember. Under Other homegroup actions click on Change the password.

In the next screen type in the password you want to use and click Next.

You will get a screen letting you know it was successfully changed…click Finish.

Join Computer to HomegroupNow that we have the Homegroup established, it’s time to join another computer to it. On the laptop click on Start and type homegroup into the search box and hit Enter.
In the next screen you will see a description of the Homegroup we just created—click theJoin now button.

Decide what to share on the laptop with the Homegroup and click Next.

Type in the password to join the Homegroup and click Next.

Provided the network connection is established and you entered in the correct password…you’ll get the following screen indicating the join was successful.

Now you can open up Windows Explorer and should see the Homegroup you just joined in the Navigation Pane and be able to share files, folders, and printers.

Also on the laptop, if you go to Start \ Devices and Printers…

There you should see the printer connected to the desktop and can set it as your default printer.
The Homegroup feature in Windows 7 makes sharing files and printers extremely easy. You’ll also have access to shared media libraries in Windows Media Player and Windows Media Center to stream media using the Play To option. This should get you started with the Homegroup feature in Windows7. You can create and join a Homegroup in Windows 7 Home Premium and higher. Basic and Starter editions only allow you to join an existing HomegroupChange Which Files are Shared in a Homegroup in Windows 7 Sometimes you might be sharing too much or not enough with your Homegroup in Windows 7. Today we take a look at how to change what files you’re sharing.The Homegroup feature in Windows 7 makes sharing music, video, and other files with other Windows 7 users in your household very easy. Sometimes you might want to limit the libraries or specific files users have access to.

Change Homegroup SharingFirst type homegroup into the search box in the Start menu.
This opens up the Change homegroup settings window where you just need to uncheck what libraries or printers that you don’t want shared.

What if you want to share a library but not certain files? Go into the library and choose the file(s) you don’t want shared, and in on the toolbar select Share with and Nobody.
You can also access the same options from the context menu.

Notice that there will be a lock icon associated with files you’re not sharing with everyone.
You can also use this to control what type of permissions a user has with different files. For instance you might want a user in the group to be able to read a document but not make any changes, so then you would make it Read only.
The Homegroup feature in Windows 7 makes sharing easy, and with these steps, you can better control who has access to what.There are some instructions on that IPv6 issue elsewhere, but here’s my guide to this if the HomeGroup doesn’t work as is:

1. Do the following on ALL computers:2. start / Change workgroup name -> Change workgroup = MYWORKGROUP3. start / HomeGroup -> Create a homegroup, follow instructions = join the samehomegroup from the other computer(s), use the predetermined random password4. start / Credential Manager -> Add a Windows credential ->– Internet or network address = remote computer’s name, eg. UpstairsPC– User name: MyUser– password: [yourPassword] (can be put to “remember” by the connecting computer later)5. start / Computer Management / System Tools / Local Users and Groups / Users ->New User (= right click):– User name: MyUser– Password: [yourPassword]– tick ONLY [x] Password never expires– Create, Close6. At this point you may have to wait for a short while or reboot computersto have those settings updated in the network.7. Share the folders you want like this:– navigate to your folder (double click eg. “ShareThisFolder”, not a whole drive)– Share with (located on top bar) -> Specific people– from the pulldown menu choose MyUser, Add, change permission to Read/Write, Share8. Now you should be able to connect to the shared folder from other computers like this:Open Computer (start / Computer). Top bar Organize / Layout / Navigation pane should beenabled for this. On the left you should see both Homegroup (and other user-computers in it) andNetwork with other computers in CAPS. From either, you should be able to go to the sharedfolder and for the first time it should ask for user (PrivateNetworkUser) and password.9. If the previous works, you can also Map network drive (top) or Add network location (right click)in Computer.
3 Ways to Back Up & Restore Your Wi-Fi Passwords

Windows remembers Wi-Fi passwords to save you time, but you can save more time by exporting the saved passwords and transfering them to other computers. LastPass, WirelessKeyView, and Windows itself can back up your wireless passwords.
Both LastPass and Windows itself allow you to import the saved settings on other computers, while WirelessKeyView generates a text file listing the information you’ll need.
LastPass
The LastPass password manager, which we’ve covered in-depth, recently added the ability to import and export your Wi-Fi passphrases. If you’re a LastPass user, you can save your Wi-Fi passphrases in your LastPass vault and automatically sync them between your computers.
To find this option, click the LastPass button, point to “Import From” and select “Wi-Fi Passwords.”

If you don’t see this option, you may not have an up-to-date version of LastPass installed. This feature requires LastPass 1.90 or later. You may also see an error message after you click this option — if you do, you’ll have to run the LastPass Universal Installer to install its Wi-Fi utility on your system.
You may see an error message when you click this option. If you do, you’ll have to run the LastPass Universal Installer to install the Wi-Fi utility.

Click the Import button on the new tab to import the saved Wi-Fi passwords and settings from your computer. You can toggle the check boxes to the left of each network if you only want to import settings from specific networks.

Export the passphrases on another computer by using the “Export To” menu to select the “Wi-Fi Passwords” option. LastPass will restore the saved networks, so you can connect to Wi-Fi access points without manually entering their passphrases.
Windows
Windows has its own way to backup Wi-Fi settings, which we’ve covered in the past. The drawback to this method is that you can only import one Wi-Fi network’s settings at a time.

First, open the Network and Sharing Center from the list of available Wi-Fi Networks.

Click the “Manage Wireless Networks” option at the left side of the window to see your saved Wi-Fi networks.

Use the Properties option in the right-click menu to select a specific network.

Click the “Copy this network profile to a USB flash drive” link and Windows will prompt you for a flash drive.

After the process is complete, you can plug the USB flash drive into another computer and double-click the ”setupSNK.exe” file on the flash drive to import your saved network settings.
You can also click over to the Security tab in a network’s properties window and click the “Show characters” check box to view its password.

WirelessKeyView
If you have a lot of Wi-Fi passwords saved, you can use NirSoft’s free WirelessKeyView utility to view them all at the same time and export them to a text or HTML file.

Download the utility, double-click its .exe file in the .zip file and you’ll see a list of every saved wireless password on your system.
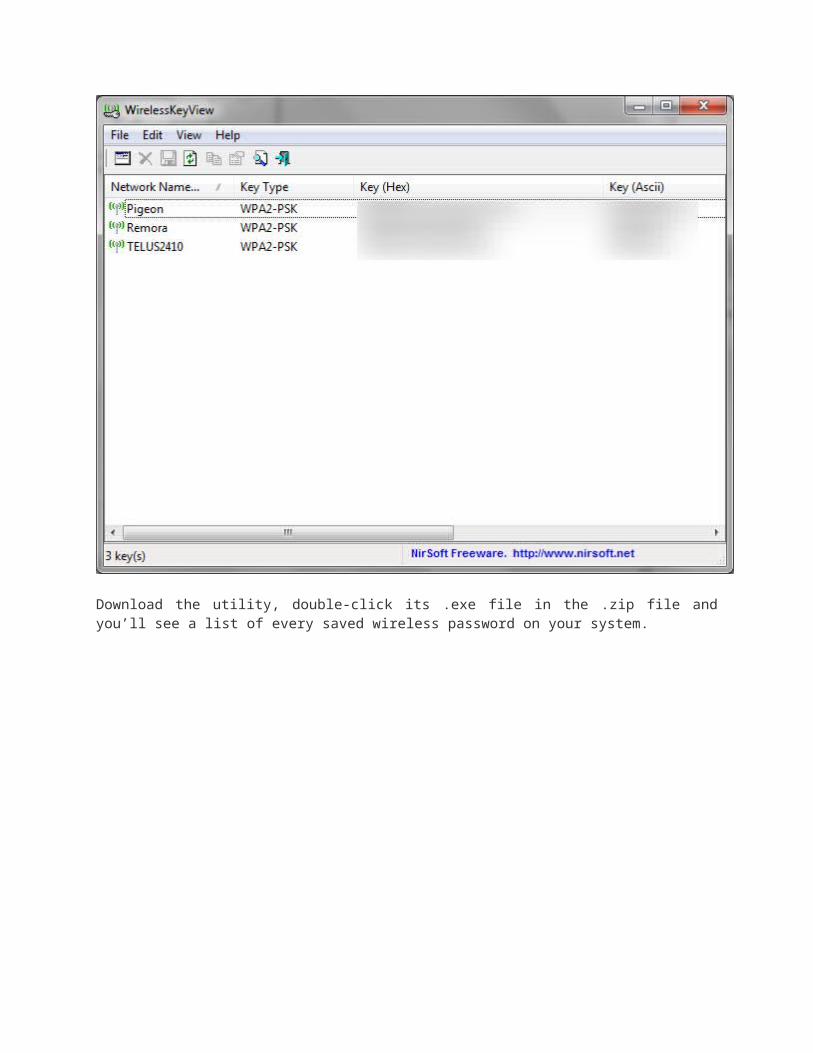
Select the networks you want to export and use the “Save Selected Items” option in the File menu to export them to a text file. You can also use the “HTML Report” option under the View menu to view the list in your web browser.

Each tool has its pros and cons. LastPass is ideal if you already use LastPass, while the method built into Windows itself is great for sharing a Wi-Fi network’s settings with people around you. WirelessKeyView saves the passwords to a simple text file, which is ideal for printing.
How to Find Your Computer’s Private & Public IP Addresses

An IP address (or Internet Protocol address) identifies each networked computer and device on a network. When computers communicate with each other on the Internet or a local network, they send information to each other’s IP addresses.
Your computer likely has public and private IP addresses. You’ll need the IP address if you’re hosting server software – the client computers will need your computer’s IP address to connect to it.
Public vs. Private IP Addresses
IP addresses can be either public or private. “Public” means an IP address can be reached from the Internet, while “private” means it can’t. For example, in a typical home network, a router has a public IP address on the Internet. The computers, smartphones, game consoles, and other devices behind the router all have unique private IP addresses on the home network. The router acts as an intermediary, forwarding traffic to the local IP addresses that request it. From an outside perspective, all devices on the home network are communicating with the Internet from a single public IP address.
Assuming you’re behind a router performing network address translation, you have two IP addresses that matter. Your computer’s IP address is likely a private IP address, probably starting with 192.168 — is a range of IP addresses specially allocated to private networks. You also likely have a public IP address, which is used when communicating with other computers over the Internet.

For example, if you’re hosting a server on your computer, people on the Internet will need the public IP address from your router to connect to your server. People behind your router — on the same local network as your computer — will need the local IP address from your computer to connect.
If your computer is connected directly to the Internet with no router sitting in between, your computer’s IP address is a public IP address.
Finding Your Private IP Address
To find your computer’s IP Address on Windows, open the Control Panel and select View network status and tasks.
Click the name of your Internet connection to view its status.

Click the Details button in the connection’s status window.

You’ll find the IP address listed in the Network Connection Details window – look for the IPv4 Address field

A quick way to find your IP address in Windows is by running the ipconfig command in a Command Prompt window. You’ll see your IP address in the IPv4 Address row beneath the name of your connection.

If you’re using Ubuntu or another Linux distribution,
Finding Your Public IP Address
The easiest way to find your public IP address is by asking a website, since that website sees your public IP address and can tell it to you – for example, you can search for what is my ip or what is my ip address on Google. Google will display your public IP address.
You can also access your router’s administration page to find this information. This page displays your public IP address and other information about your Internet connection. Different routers have different administration page layouts and different default local IP addresses – consult your router’s manual if you need more information.

Unlike street addresses, IP addresses aren’t necessarily fixed. Your Internet service provider may regularly assign you a new IP address, just as your router may occasionally assign your devices new IP addresses.
What is VPN?Hamachi is a true VPN client, not a cloud-based remote access service such as GoToMyPC. Hamachi uses a secure connection to transfer data via the Internet. Hamachi differs from traditional hardware and software VPN solutions, however, in that it's an on-demand virtual networking service. By "on-demand" I mean that it's a real VPN solution that doesn't require you to set up an on-premise VPN server, hence, "on-demand." It's also closed and proprietary, unlike open-source VPN solutions from OpenVNS or Wippien.Installing HamachiLogMeIn's website offers two free versions of Hamachi for download: Unmanaged and Managed. "Unmanaged" lets you to create an on-the-fly

mesh network VPN in which each client connects to one another with no one client managing the connection traffic. The other mode, "Managed," lets you create not only a mesh network VPN, but a hub-and-spoke network configuration or a gateway VPN. In a hub-and-spoke VPN, each client (or spoke) connects to a designated client which manages the connection traffic (or hub). Gateway mode is a simpler configuration which essentially connects two separate networks via a VPN connection.
Both modes are easy to configure (requiring no more than selecting a button, in the LogMeIn interface) and each is useful for a different scenario. For example, if you want to build a mobile office LAN for workers who use their laptops in the office while connected to the company network, both hub-and-spoke and gateway modes work as configurations for this scenario. If you have a small business without an actual physical LAN, or maybe you are among a group of friends or colleagues who want to share data, mesh mode is the way to go to setup a virtual LAN.
As part of the install process, users are prompted to create a hostname for the Hamachi client—by default Hamachi uses the machine name. Once installed, the Hamachi service associates that hostname with an IP address delegated from Hamachi. You can see the IP address right in the client interface.
Beginner: How to Use LogMeIn Hamachi to Access Your Files Anywhere

Whether you’re at work and forgot some file on your home computer, want to play some music on a train, or just want to move some files between your computers, accessing your files from anywhere is a life saver.
What we are going to do is download and install Hamachi, setup a network name and password and then join the network from another computer. Still think it’s hard? Here’s a detailed how-to, but first let’s get to know Hamachi.
Hamachi is a VPN client. It creates a Virtual Private Network over a public network like the Internet. When this client runs, it implements a virtual network adapter, and you’re given an additional IP address that identifies you on any virtual network you join. You then create a virtual network by name, assigning it a password. Now anyone running the Hamachi client can join your network by connecting to it by name, and supplying the password.
Note: LogMeIn Hamachi is not a remote control application so you don’t get control of the computers, you just access the network shares files.
We’ll start by downloading LogMeIn Hamachi from the link at the end of the article. Get it installed then fire it up. Once you start it, it will tell you to click the Power On button so press it.
When the dialog pops-up enter a name for this computer then click create.

Now Hamachi is up and running but we need a network to connect all the computers. Click on Create a new network to create one.
When this window pops-up enter the Network ID and a password

After entering the Network ID (name) and the password click create and the network will be created immediately. The network is created but there is only one computer in the network. To get other computers in the same network you’ll have to install Hamachi on them and set it up just like you did on the first computer but instead of creating a new network, click join an existing network and enter the network ID and the password.
Congratulations! You have got your own network and can access all the computers that are connected to it. Just right-click the computer that you want to access and select Browse. You will see the shared files just like you do with computers on you LAN network.Let’s try it, right-click and select Browse

These are the files, folders and printers that are shared on the target computer.

LogMeIn Hamachi has two great features. First, all connection are encrypted so you are safe. Second, it is transparent, meaning all technical stuff are done behind the scenes so no IP address, Gateway Address or DNS is required to be set. Awesome!
Map a Network Drive from XP to Windows 7 We’ve received a lot of questions about mapping a drive from XP to Windows 7 to access data easily. Today we look at how to map a drive in Windows 7, and how to map to an XP drive from Windows 7.
With the new Homegroup feature in Windows 7, it makes sharing data between computers a lot easier. But you might need to map a network drive so you can go directly into a folder to access its contents. Mapping a network drive may sound like “IT talk”, but the process is fairly easy.
Map Network Drive in Windows 7

Note: All of the computers used in this article are part of the same workgroup on a home network.
In this first example we’re mapping to another Windows 7 drive on the network. Open Computer and from the toolbar click on Map Network Drive.
Alternately in Computer you can hit “Alt+T” to pull up the toolbar and click on Tools \ Map Network Drive.
Now give it an available drive letter, type in the path or browse to the folder you want to map to. Check the box next to Reconnect at logon if you want it available after a reboot, and click Finish.

If both machines aren’t part of the same Homegroup, you may be prompted to enter in a username and password. Make sure and check the box next to Remember my credentials if you don’t want to log in every time to access it.

The drive will map and the contents of the folder will open up.

When you look in Computer, you’ll see the mapped drive under network location.

This process works if you want to connect to a server drive as well. In this example we map to a Home Server drive.

Map an XP Drive to Windows 7
There might be times when you need to map a drive on an XP machine on your network. There are extra steps you’ll need to take to make it work however.
Here we take a look at the problem you’ll encounter when trying to map to an XP machine if things aren’t set up correctly. If you try to browse to your XP machine you’ll see a message that you don’t have permission.

Or if you try to enter in the path directly, you’ll be prompted for a username and password, and the annoyance is, no matter what credentials you put in, you can’t connect.

In this example we’re mapping from a Windows 7 x64 Ultimate machine to an XP Media Center Edition Laptop on a wireless connection where each machine as a different password.
To solve the problem we need to set up the Windows 7 local account as a user on the XP machine and make it part of the Administrators group to access the full drive. Right-click My Computer and select Manage.

Under Computer Management expand Local Users and Groups and click on the Users folder. Right-click an empty area and click New User.
Add in the user credentials, uncheck User must change password at next logon, then check Password never expires then click Create.

Close out of the New User Screen and you’ll see the user you created in the list. After the user is added, you may need to reboot XP before proceeding to the next step.

At this point you should be able to access the shared folders on the XP machine but not the entire drive. Here we’re browsing to the XP Media Center Edition machine.

Now we can enter in the user name and password we just created.
Now we can browse to and map specific shared folders on the XP machine.

However, when we try to map to the full drive, we get the annoyance of not being able to log in…

To access the full drive we need to make the user part of the Administrators group. So go back into Computer Management \ Local Users and Groups \ Groups then double click on Administrators.

Click the Add button in Administrators Properties window.

Enter in the new user you created and click OK. An easy way to do this is to enter the name of the user you created then click Check Names and the path will be entered in for you.
Now you see the user as a member of the Administrators group…click Ok.

Now we can map to the entire drive. Enter in the drive path where in this example it’s “\\XPMCE\C$” –Don’t forget the “$” sign after the local drive letter.

Then login…
Again the contents of the drive will open up for you to access.

Here you can see we have two drives mapped. One to another Windows 7 machine on the network, and the other to the XP computer.

If you ever want to disconnect a drive, just right-click on it and then Disconnect.

There are several scenarios where you might want to map a drive in Windows 7 to access specific data. It takes a little bit of work but you can map to an XP drive from Windows 7 as well. This comes in handy where you have a network with different versions of Windows running on it.
Adding a TCP/IP Route to the Windows Routing Table The Routing table dictates where all packets go when they leave your system. On most environments, all packets that leave your system will be forwarded over to your router or hub, and from there out to the internet.
In some circumstances, you may have a testing network configured to duplicate another environment, or you may be configuring a more complex network topology that requires the use of additional routes. Adding routes to your machine is a useful testing tool for some of these situations.
Syntax:
route ADD xxx.xxx.xxx.xxx MASK xxx.xxx.xxx.xxx xxx.xxx.xxx.xxxMeans:route ADD “network” MASK “subnet mask” “gateway ip”

For example, if you were on the 192.168.1.0 network, and you had a gateway on 192.168.1.12 configured to access the 10.10.10.0/24 network, you would use a route add statement like this:
route ADD 10.10.10.0 MASK 255.255.255.0 192.168.1.12
Your routing table should now reflect that change, and all traffic to the 10.10.10.x range will now be sent over to the gateway machine.
The route add change will only stick across reboots if you add it with the -p flag, as in the following:
route -p ADD 10.10.10.0 MASK 255.255.255.0 192.168.1.12
Get the Classic Style Network Activity Indicator Back in Windows 7 Are you looking for a Network Activity Indicator that shows more life than the default one in Windows 7? Now you can get the classic dual monitor icon style version back and see when network activity is occurring.
Before
Here is the default “Network Activity Indicator” in one of our example systems…regardless of what is going on it looks pretty lifeless (and boring).
Setup
When you download the app it will be in a zip file and contain only three files. Once you have unzipped the contents you will need to create a “Program Files” folder, place the contents inside, and create a convenient shortcut. Now you are ready to “replace” the default “Network Activity Indicator” and enjoy some classic goodness.

After
As soon as you start the app you will have two “Network Activity Indicator” icons temporarily displaying in your “System Tray”.
Time to make the default “Network Activity Indicator” disappear. Use the “Customize Command” to open the “Notification Area Icons Window”.
Scroll through and set the default “Network Activity Indicator” to “Hide icon and notifications”…

And set “NetworkIndicator.exe” to “Show icon and notifications”. Click “OK” when you are finished.

Now you can easily see when network activity is occurring.
Menus & Settings
This is the “Right Click Menu” for the app… You can access the settings from here and to close it you will actually need to click on “Close Menu”.

Here are the settings. You can customize the “Blink Duration” and set the app to automatically load when Windows starts.
Conclusion
If you have been wanting a “Network Activity Indicator” that shows more life than the default built into Windows 7, then you should definitely give this app a try.
How To Easily Access Your Home Network From Anywhere With DDNS

Whether you’re hosting a web page or running a Minecraft server, it’s a pain to keep track of IP addresses. Using a free dynamic DNS, you can turn 174.45.19.242 into mygeekydns.dyndns.org and be free from changing IPs.
DDNS
Dynamic Domain Name System services can be found in many places online for varying costs, but they all work more or less the same way. We’ve talked about DNS before – mainly when mentioning OpenDNS, Google’s Public DNS, and NameBench – but, essentially, DNS servers are like address books which convert IP addresses into host names. As you can imagine, this makes the web much easier to work with.
Getting your hands on a .com can be tough and expensive, but if you have your own server you can sign up with a dynamic DNS service. Signing up will get you a simple hostname, and by configuring your router, your ISP-assigned ever-changing IP will be updated automatically. No more looking up and writing down IPs!
There are a few different DDNS services out there, such as FreeDNS and No-IP Free, but we’re going to focus our article on DynDNS. Why? Well, it’s one of the more popular services, they have really great uptime and support, and I’ve never had to mess with it in the 6 years that I’ve been using it. They all more or less work the same, though, so if you decide to go with another provider, you should still be able to follow along or figure things out.
Signing Up WIth DynDNS
Head over to DynDNS.com.

Click on Services & Pricing.
You’ll see a more detailed group of options appear.

Click on DynDNS Free, since we want a free account. You’ll see a page come up that asks you to pick a hostname. You’ll also see a list of possible suffixes for your free hostname.

Be sure to click “Your current location’s IP address” or manually enter the IP address of your home’s router in the appropriate box. If you have a mail server configured with a different name and need to add an MX record, be sure to check the box. If you have no idea what that means, you’re safe to skip it. Click “Add To Cart” when you’re done. On the next page, you’ll have to create an account.

Check and make sure your hostname is the correct one. Fill out the details for a new account, check the “I Agree” item, and uncheck the “Subscribe to DynDNS.com newsletter” item. When you’re all set, click “Create Account” and you’ll see a confirmation page come up.

Click on the link in the email to confirm everything. You should then be able to log in toDynDNS.com.
Under My Services, you’ll see a link for “Add Host Services.” That’s the one we want, so click it and you’ll see a host services list come up.

The hostname you previously chose should be listed, so just click the “Checkout to Activate” link.
You’ll see one more step where DynDNS advertises their pro package and where you can remove your hostname if you want to change it. Click the “Proceed to checkout” button. Note that the price here is still $0.00.

And, you’ll see yet another confirmation screen. Luckily for us, this is the last one, so just click the “Activate Services” button, and you’re all set!
You can log out of DynDNS.com, and you really won’t have to log back in. Any important notifications like account expiration will be emailed to you.
Configuring Your Router
DynDNS’s free account requires at least one IP update a month, otherwise your hostname will expire automatically. Since your IP is changing anyway, this really shouldn’t be a problem. Most routers have a built-in method of updating to popular DDNS services, ours included, so the next step is logging into your router’s admin page.
Depending on your router’s software, look under either Advanced, Tools, or Setup. You’re looking for an entry like “DDNS,” or “Dynamic DNS.”

Click the above image to view it full size.
The Server Address field should be your provider’s main site. Again, most routers will have pre-configured entries for DynDNS and other popular services. The hostname should match what you chose earlier, and then enter your DDNS account’s username and password.
Depending on your router, you may see a “Timeout” or “Force Update Interval” option. If your IP has not changed, your router will update the IP anyway after this interval of time. Since DynDNS requires an update at least once a month, you can enter 29 days (or 696 hours). Save your changes, wait for your router to reboot, and you’re done!
If you have port 80 forwarded to a web server, pop in your DDNS address in a browser and you should see your web page. If you see the login page of your router, you may want to try it from an outside source, or you may have to check your router’s “remote administration” settings.

Using a Client
The vast majority of routers have built-in support for DDNS, especially because it’s becoming increasingly popular for home users. However, if yours doesn’t, you can run a DDNS updating client on a computer in your network. It’s best to have it running all the time, or at least often enough that it catches any IP changes on your router and updates properly. There are hosts of clients for all operating systems. Check out DynDNS’s Supported Clients page to see what software they support and how to configure everything properly. If that’s not enough, FreeDNS has a prodigiously populated list of more clients.
How To Plan, Organize, and Map Out Your Home Network
Whether you’re setting up a new home network or overhauling the one you’ve got, planning and mapping out your devices and intended uses can save you a lot of headaches.
(Banner image credit: karindalziel)

Count Your Devices and Plan
(Image credit: Docklandsboy)
When setting up your home network, take a tally of what kinds of devices will be on your network. I’ve got two desktops, three laptops, five phones/PMPs, a printer, an XBOX 360, and a Wii to keep track of. Of course, when we have guests over, I want to make their setup as painless as possible. I also use a repeater to expand my wireless range. Things can get pretty complicated, but knowing what you have and anticipating special cases makes it significantly easier to map out your network. It also helps you decide what kind of networking equipment you need.
Consider Your Router
Let’s start at the top, and work our way down. Your router is arguably the most important device in your home network. Your router’s job is three-fold:
Joining your network to the internet. Managing your network’s traffic. Providing basic security.

(Image credit: Horrortaxi)
Whether you’ve got DSL, cable, or satellite, your broadband really only hooks up to one device. If you make that device a router, then any number of other devices can connect and disconnect as they come and go. This allows you to share you internet connection over a wide area.
Now, since you’ve got a bunch of devices that are thirsty for the internet-juice, they need a way to connect. Not only that, but they need their traffic properly directed. Streaming a movie to your gigantic TV only to have it show up on your phone doesn’t work. Your router handles everything appropriately by assigning devices an IP address and forwarding ports and so on.
Lastly, if you’re worried about people stealing your personal information – and you SHOULD be – then you’ll have some sort of security in place. If you’re wireless, then this means requiring a password to connect. In addition, you can enable blocking of ActiveX scripts and other things in your router’s settings. This acts as a basic firewall.
You can see why your routers are an integral component of any home network. Consider turning yours into a Super-Powered Router with DD-WRT.
Wired Devices

(Image credit: orcmid)
How many wired devices do you have? If you have more than four, then you’ll exceed what most routers are equipped with. That means you’ll need to buy a switch so you can plug in more ethernet cables.
Where are your devices and where is your router? Will you need to run ethernet wires across your house to make sure everything gets online? Could you move the router so it’s closer to your devices?
Wireless Devices
Where will your wireless devices see the most activity? If your router is on one side of the house but your bedroom is on the other, then you’ll likely have trouble getting decent speeds when browsing in bed. Can you move your router to a more central location? If you really need a range boost, consider buying a wireless access point. This can be set up to repeat your main router’s signal, and as a bonus you can tether other devices via ethernet, too. If you have an old router lying around, you can put DD-WRT on it and turn it into a repeater for free.
Map It Out

(Image credit: willspot)
Draw a map of your home and try to fit everything. Consider where things should be placed for best range, fastest speeds, and so on. Physically doing a tour and drawing as you go can really make the difference up-front. Believe me, there’s little worse than having everything configured and wired only to find that you forgot your HTPC in the living room. Wireless streaming 1080P from across the house didn’t cut it for me, and I had to redo a good portion of my network.
Connecting Devices
Plugging in wired devices is easy enough, but what about wireless devices? Before we can connect, we need to consider how IP addresses will be assigned to your devices.
Dynamic and Static IPs
DHCP – Dynamic Host Configuration Protocol – is easy. You set up parameters on your router – how many IPs can be given out, what range these addresses should be in, etc. – and your devices will automagically connect and work. The downside? Your computer can have one IP address, but after a restart (or after power-cycling the router), it can be totally different. This makes it difficult to route traffic from outside of the web. If you use Subsonic or Plex while out and about to stream your home music and video, you’ll have to reconfigure your port forwarding settings.

Static IP routing is really tedious on your devices. You basically tell every device which IP it should use, what gateway to go through (HINT: it’s your router’s IP), and what subnet mask to use (again, look at your router’s configuration). This is a time-consuming hassle, but you won’t have worry about shifting IPs.
So which is better? Well, in my experience, it’s both. Yes, that’s right, you can use both simultaneously. What I do is set up DHCP for everything, but manually configure the IP of the two computers that stream or need to be accessed from outside of the network. Odds are, these are going to be devices that are connected to your router via ethernet – the speed of wireless for stuff like this can be ridiculously slow. I also use static IPs with printers, just in case using the printer-name or searching for it over the network takes too long or gets

wonky. These manually assigned IPs can be outside of the DHCP’s range of IPs. Devices in my “server” list usually start at 192.168.1.200.
Your laptops and phones will connect as they need and work without hassle. My DHCP range of IPs is between 192.168.1.100-150. The router, itself, is 192.168.1.1, and my repeaters are 192.168.1.10 and 20. My printer is manually assigned 192.168.1.254 – the last available IP (.255 is the network broadcast address) because printing is the last thing I want to do, and it’s pretty easy to remember.
DD-WRT, as well as newer router firmwares, can actually do “Static DHCP” or “DHCP reserving,” negating the need to go through this tedious process. What this means is that you can assign devices (based on their MAC addresses) to certain IPs in your router, without worry of changes. All of your devices can connect via DHCP, but their IPs won’t change because the router knows which devices are connecting. Definitely look into this and take the time to set it up.
An Address Book
Draw a table of all of your devices, splitting them up into one of two categories: clients and servers.
If something is going to be sending information – like your desktop packed with 2 TB hard drives full of movie and music – then stick it in the “server” column. Everything else goes in the “client” column. The one exception to this is wireless printers. They can finicky, so it’s best to treat them as a server, at least when assigning IPs.
Now consider which of you computers you may want to access from outside of the house. If you’ve got a web server or a Linux computer that you remotely control, then make note of it. In the end, write up an address book of all of your devices and which IPs they’ll use (or if they’ll use DHCP) and what ports you need to forward. It’s also a good idea to list each device’s MAC address, in case you need it during configuration or when checking your router’s logs.
(Above image credit: k0a1a.net)
Wireless Security
What kind of security should you use for your home network? I get asked this question a lot, and I almost always say WPA2.

(Image credit: k0a1a.net)
It only takes a matter of minutes to crack a WEP-secured wireless network. Now, while the odds of someone doing this to get access to your network are low – especially if your neighbor’s is wide open – WEP is also more restrictive to what passcodes you can use. Most people I know use their home telephone number – it’s 10 digits, which fits the length and hexadecimal requirement, and is easy to remember. If you don’t know the person’s phone number, odds are you shouldn’t be on their network anyway.
WPA is also fairly easy to crack, but as not all devices are compatible yet with WPA2 (I’m looking at you, old gaming consoles!), WPA can work. You can create long alpha-numeric passwords to make it difficult for others to guess and get in, though it doesn’t help against those who may crack your network.

One of my favorite things to do is name my wireless network something specific, so it’s a clue to my password. Inside jokes work the best, but you may decide to use a geeky reference instead. For example, my wireless SSID could be “AnswerToLifeUniverseAndEverything” and the password would be “fortytwo.” If someone gets the reference, then they get to be on my network, but that’s just out of my benevolence. Just remember, security risks, no matter how minor, are still risks.
For more information, check out Debunking Myths: Is Hiding Your Wireless SSID Really More Secure?
Naming Schemes and File Sharing
(Image credit: tlgjaymz)
Speaking of naming things, a lot of geeks come up with clever schemes to name the computers and devices on their network. At a previous job, all of the office workstations were named after sci-fi AI: Hal, Skynet, WOPR, etc. One friend of mine names his network devices after Greek gods, another after language families. Coming up with a scheme and

fitting computers to it is not only fun, but practical. By naming my devices based on their characteristics, I know exactly which computer I’m connecting to. When I see “sarasvati,” I know that’s the computer that has my eBook and music collections. When I connect to “indra,” I know it’s my quad-core rig. When I need to add a new ringtone to my iPhone, I can SSH into “narad”. It’s as much a mnemonic device as it is geek pride.
Lastly, consider what operating systems you have in your home. If all of them run one OS, you probably don’t need to worry about anything. If you’re mixing and matching, however, you’ll have to think of how to share files properly. If you’re using Linux to download and serve files, this means using NFS or Samba. Windows 7 has the new Homegroup setup as well, and Macs can work with Samba as well as their own native AFP.
EDIT: As several commenters have pointed out, this article originally mentioned my printer being on 192.168.1.255 – the network broadcast address. Problems can ensue if a device is leasing this IP, so the mistake has been corrected above.
Planning and putting together a network is big project. Planning and mapping things out in advance can help make it easier to avoid gaffes, and using geeky references can make working the details a lot less tedious.
How many devices are in your home network? What’s your favorite naming scheme? Share your home networking experience and your geekiness with us in the comments!
Make Your PC Shut Down at Night (But Only When You’re Not Using It)
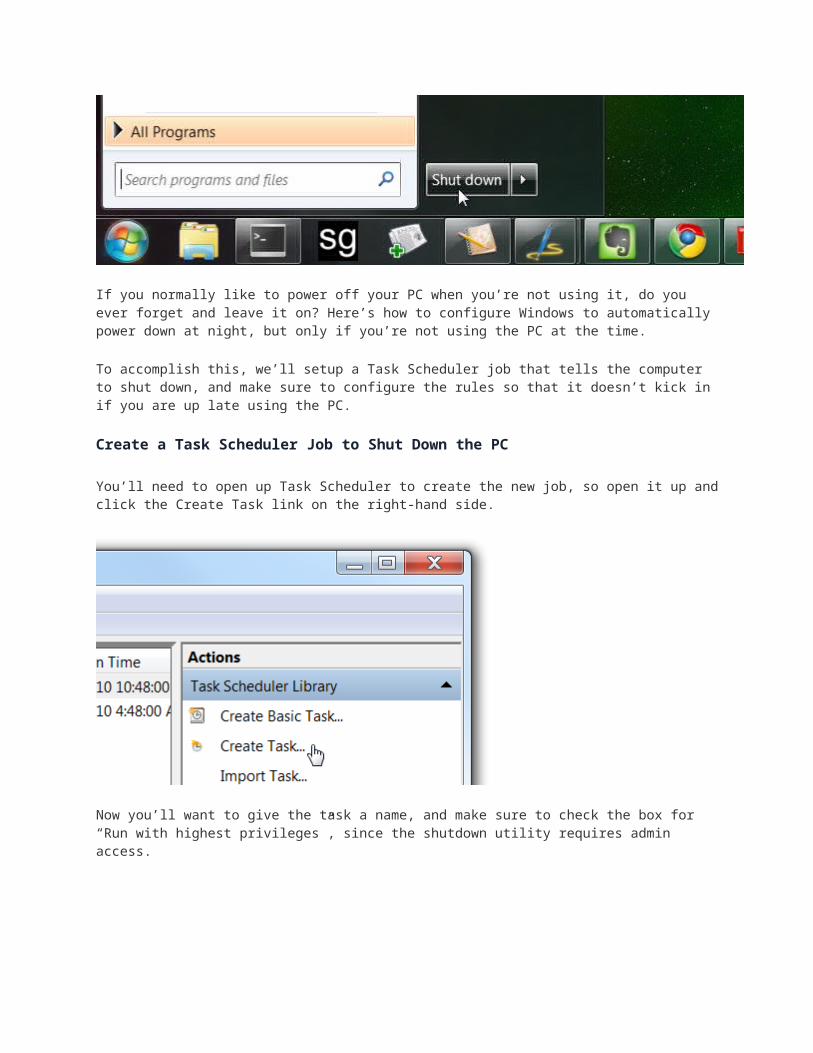
If you normally like to power off your PC when you’re not using it, do you ever forget and leave it on? Here’s how to configure Windows to automatically power down at night, but only if you’re not using the PC at the time.
To accomplish this, we’ll setup a Task Scheduler job that tells the computer to shut down, and make sure to configure the rules so that it doesn’t kick in if you are up late using the PC.

Create a Task Scheduler Job to Shut Down the PC
You’ll need to open up Task Scheduler to create the new job, so open it up and click the Create Task link on the right-hand side.
Now you’ll want to give the task a name, and make sure to check the box for “Run with highest privileges”, since the shutdown utility requires admin access.

Now switch to the Triggers tab, click New, and then setup a schedule that makes sense for you, like every night at midnight.
Now flip over to the Actions tab, click New, and then enter shutdown into the Program box, and /S into the parameters box. If you want to force a shutdown and kill every app, you can use /S /F to force it to happen right away.
Next head to the Conditions tab, and make sure to check the box to only start the task if the computer is idle for more than x minutes. You can also choose to stop the task if the PC isn’t idle to help make sure it doesn’t kick in if you are on the PC.

Lastly, head to the Settings tab, and you can choose to restart the task every 30 minutes if the task fails—that way, if you are on the PC for a while past the normal time, the job will start up later on and shut down the PC.
Once you’re done, your PC will shut down automatically. Enjoy!