Change Manager (Advanced Copy) SharePoint … Manager (Advanced Copy) SharePoint Migration. ......
61
Last Updated 7 August 2013 User's Guide ControlPoint Change Manager (Advanced Copy) SharePoint Migration v. 4.0
Transcript of Change Manager (Advanced Copy) SharePoint … Manager (Advanced Copy) SharePoint Migration. ......
Last Updated 7 August 2013
User's Guide
ControlPoint Change Manager (Advanced Copy)
SharePoint Migration v. 4.0

i
Contents
Preface 3
What's New in Version 4.0 .................................................................................................................................. 3 Components ......................................................................................................................................................... 3
The ControlPoint Central Website 5
Logging Into the ControlPoint Central Website .................................................................................................. 5 ControlPoint Central Home Page ......................................................................................................................... 7 Monitoring Managed Farms................................................................................................................................. 9 Viewing License Details .................................................................................................................................... 11
The Batch Builder Client Application 13
Launching the Batch Builder Application .......................................................................................................... 13 Planning Your Advanced Copy or Migration Operation ................................................................................... 15 Special Considerations When Copying InfoPath Forms .................................................................................... 32
Copying/Migrating SharePoint Sites 34
Batches and Tasks .............................................................................................................................................. 34
Performing an Incremental Advanced Copy/Migration 44
Setting General Options for the Batch Builder Client Application 48
General Settings ................................................................................................................................................. 49 General Options - Site Settings .......................................................................................................................... 49 General Options - List Settings .......................................................................................................................... 50 General Options - Cross Domain Mapping ........................................................................................................ 51 General Options - Workflow Settings ................................................................................................................ 53 General Options - Advanced .............................................................................................................................. 55
Ensuring ControlPoint Change Management Services Communicate with the Appropriate Server When Network Load Balancing is Used 57

ii Contents
Technical Support 59
3
Preface This guide contains detailed information about a powerful and flexible tool within the ControlPoint family of products that consists of two separately-licensed components:
The Change Manager (Advanced Copy) component enables administrators to copy site content either within or between SharePoint 2010 or 2013 farms.
The Migration component enables administrators to migrate content from SharePoint 2007 and 2010 to SharePoint 2013.
Why ControlPoint Change Manager/SharePoint Migration?
Advanced Copy and Migration operations are carried out via the Batch Builder client application, which consists of two canvases: Plan and Execute.
The Plan canvas allows you to organize your data to meet your project needs. Set up your Content Set by team, by site administrator, by date, by content type—you define what is to be copied/migrated, and when.
The Execute canvas provides a filtering option that allows you to include or exclude only the components (lists, Web Parts, and Features, and so on) that you specify. You can either perform the Advanced Copy or Migration interactively or schedule it for later execution.
What's New in Version 4.0 Change Manager (Advanced Copy) now supports copying between SharePoint 2013 farms.
Components Below are descriptions of installed components.
Component Description
ControlPoint Central Website A Web site created during the installation process that is the starting point for using the application. Through the ControlPoint Central Website you:
configure the application check log files and server connections install and run the Batch Builder client application.
ControlPoint Change Management Central service
The service that runs on the SharePoint 2010 or 2013 farm where the product is licensed and is the primary service responsible for communicating between all SharePoint farms and the ControlPoint Central Website.

4 ControlPoint Change Manager/SharePoint Migration User's Guide
Component Description
ControlPoint Change Management Connector service
The service that is created when the Connector is installed and reads and writes all of the data being copied and/or migrated between SharePoint sites.
Batch Builder client application A click-once application that is installed locally from the ControlPoint Central Website and is used as the interface for performing Advanced Copy and/or Migration between SharePoint sites.
NOTE: Every time you launch the Batch Builder from the ControlPoint Central Website, it ensures that you are running the latest version installed on your server.

The ControlPoint Central Website 5
The ControlPoint Central Website The ControlPoint Central Website is set up as part of the installation process and is the portal through which the Batch Builder application is launched. Use this site to:
• install and monitor your managed servers • test connectivity • track scheduled Advanced Copy or Migration operations (batches) • review completed operations, and • export activity logs.
Logging Into the ControlPoint Central Website
To log into the ControlPoint Central Website: 1 Use one of the following options:
From the ControlPoint SharePoint Administration application's Manage ControlPoint panel, choose ADVANCED COPY or MIGRATION (depending on the component(s) for which you are licensed).
6 ControlPoint Change Manager/SharePoint Migration User's Guide
OR
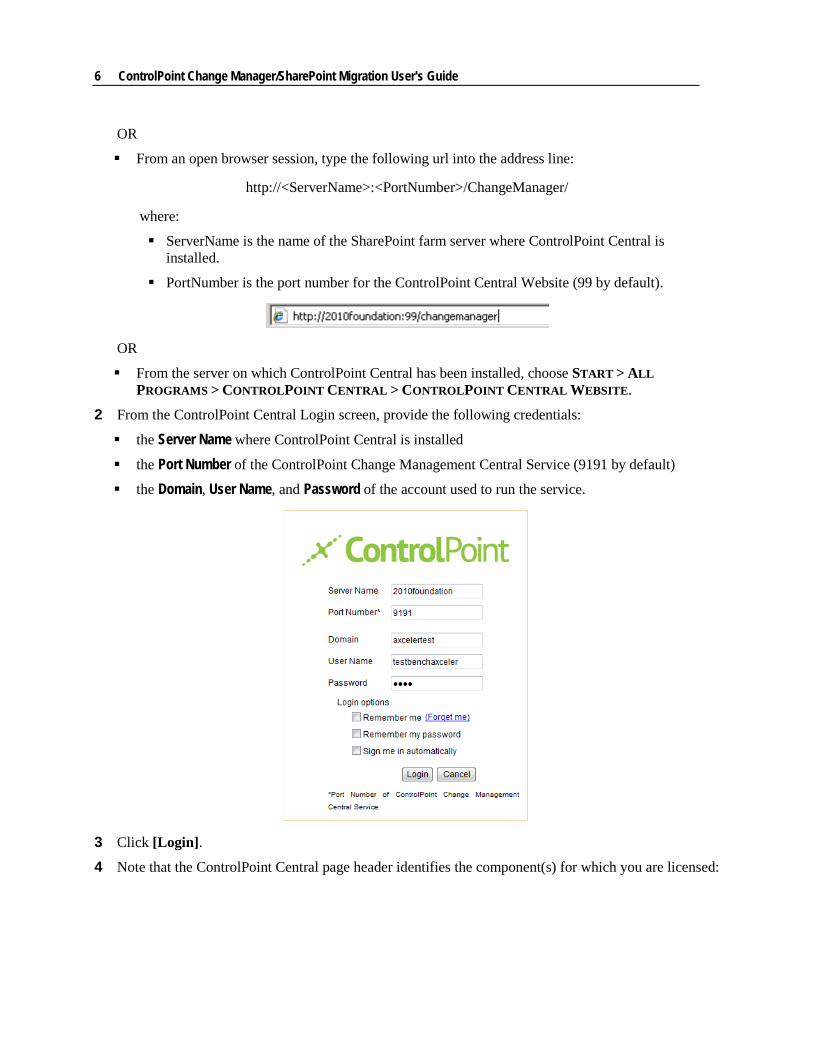
From an open browser session, type the following url into the address line:
http://<ServerName>:<PortNumber>/ChangeManager/
where:
ServerName is the name of the SharePoint farm server where ControlPoint Central is installed.
PortNumber is the port number for the ControlPoint Central Website (99 by default).
OR
From the server on which ControlPoint Central has been installed, choose START > ALL PROGRAMS > CONTROLPOINT CENTRAL > CONTROLPOINT CENTRAL WEBSITE.
2 From the ControlPoint Central Login screen, provide the following credentials:
the Server Name where ControlPoint Central is installed
the Port Number of the ControlPoint Change Management Central Service (9191 by default)
the Domain, User Name, and Password of the account used to run the service.
3 Click [Login].
4 Note that the ControlPoint Central page header identifies the component(s) for which you are licensed:
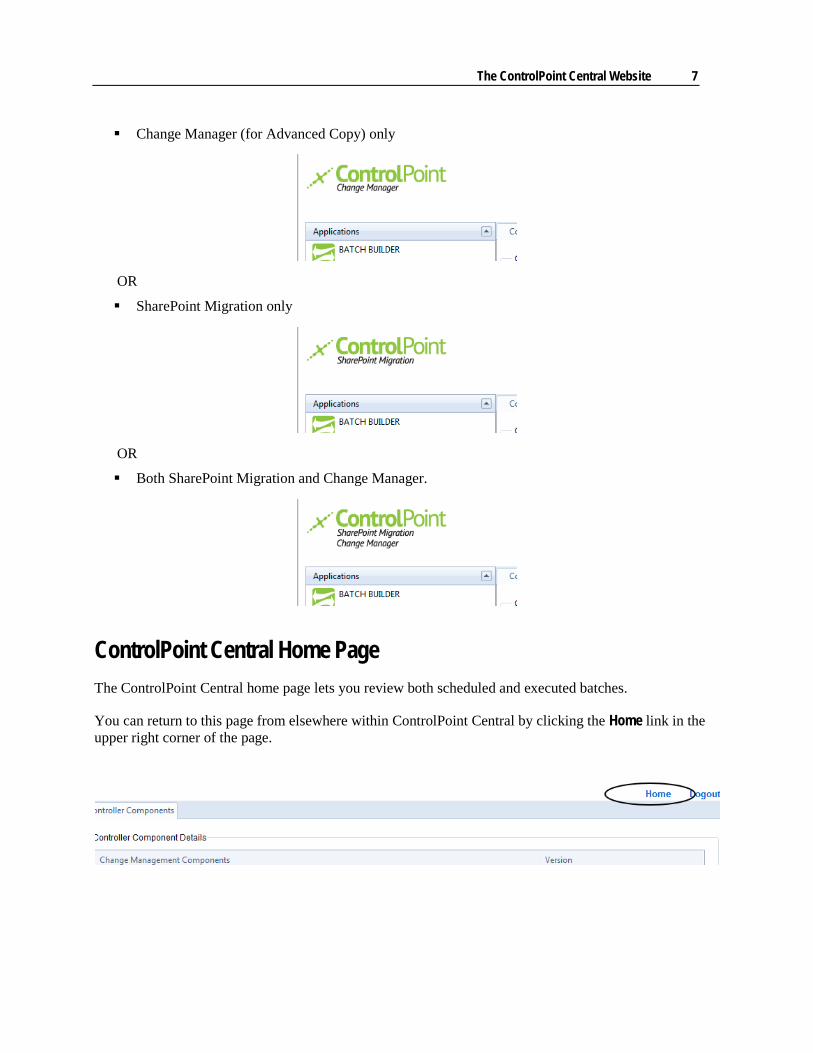
The ControlPoint Central Website 7
Change Manager (for Advanced Copy) only
OR
SharePoint Migration only
OR
Both SharePoint Migration and Change Manager.
ControlPoint Central Home Page The ControlPoint Central home page lets you review both scheduled and executed batches.
You can return to this page from elsewhere within ControlPoint Central by clicking the Home link in the upper right corner of the page.
8 ControlPoint Change Manager/SharePoint Migration User's Guide
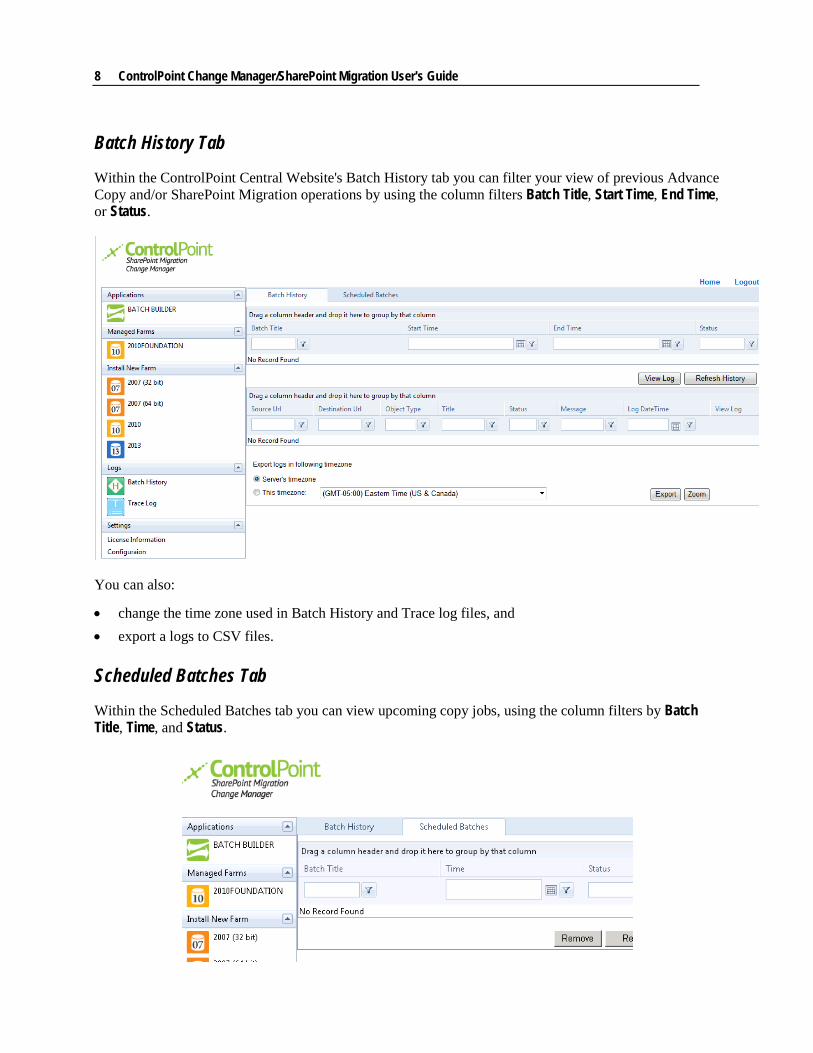
Batch History Tab
Within the ControlPoint Central Website's Batch History tab you can filter your view of previous Advance Copy and/or SharePoint Migration operations by using the column filters Batch Title, Start Time, End Time, or Status.
You can also:
• change the time zone used in Batch History and Trace log files, and • export a logs to CSV files.
Scheduled Batches Tab
Within the Scheduled Batches tab you can view upcoming copy jobs, using the column filters by Batch Title, Time, and Status.
The ControlPoint Central Website 9
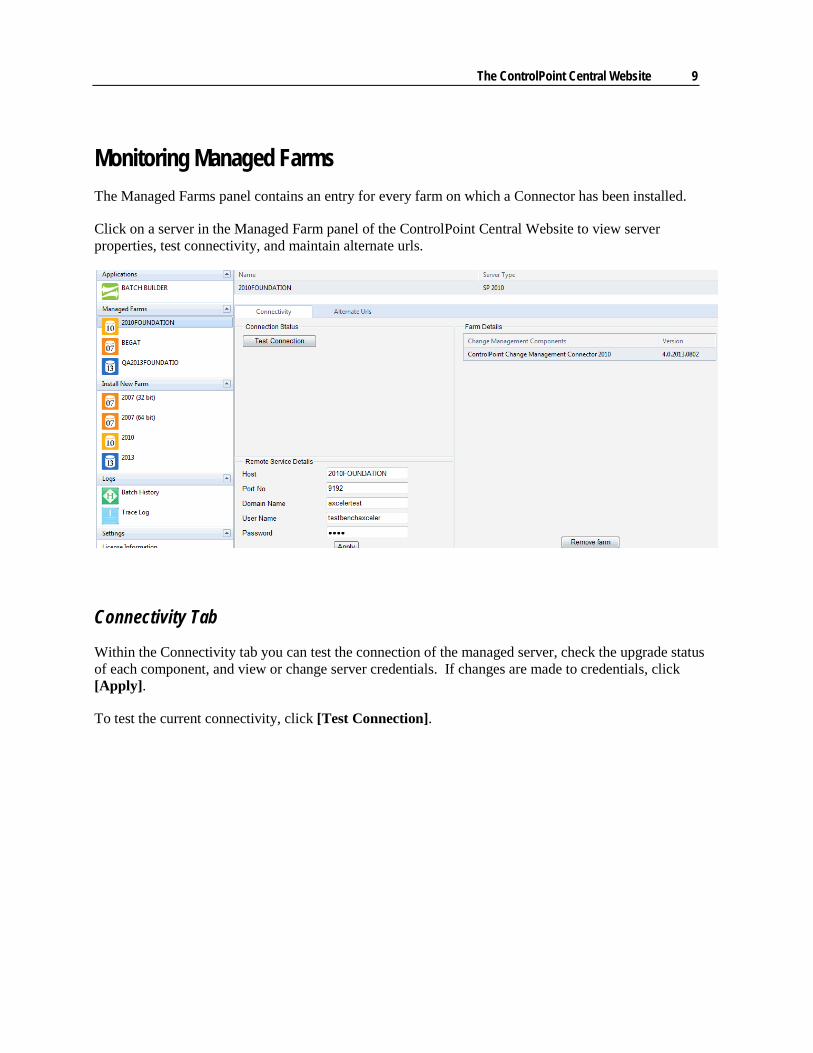
Monitoring Managed Farms The Managed Farms panel contains an entry for every farm on which a Connector has been installed.
Click on a server in the Managed Farm panel of the ControlPoint Central Website to view server properties, test connectivity, and maintain alternate urls.
Connectivity Tab
Within the Connectivity tab you can test the connection of the managed server, check the upgrade status of each component, and view or change server credentials. If changes are made to credentials, click [Apply].
To test the current connectivity, click [Test Connection].
10 ControlPoint Change Manager/SharePoint Migration User's Guide
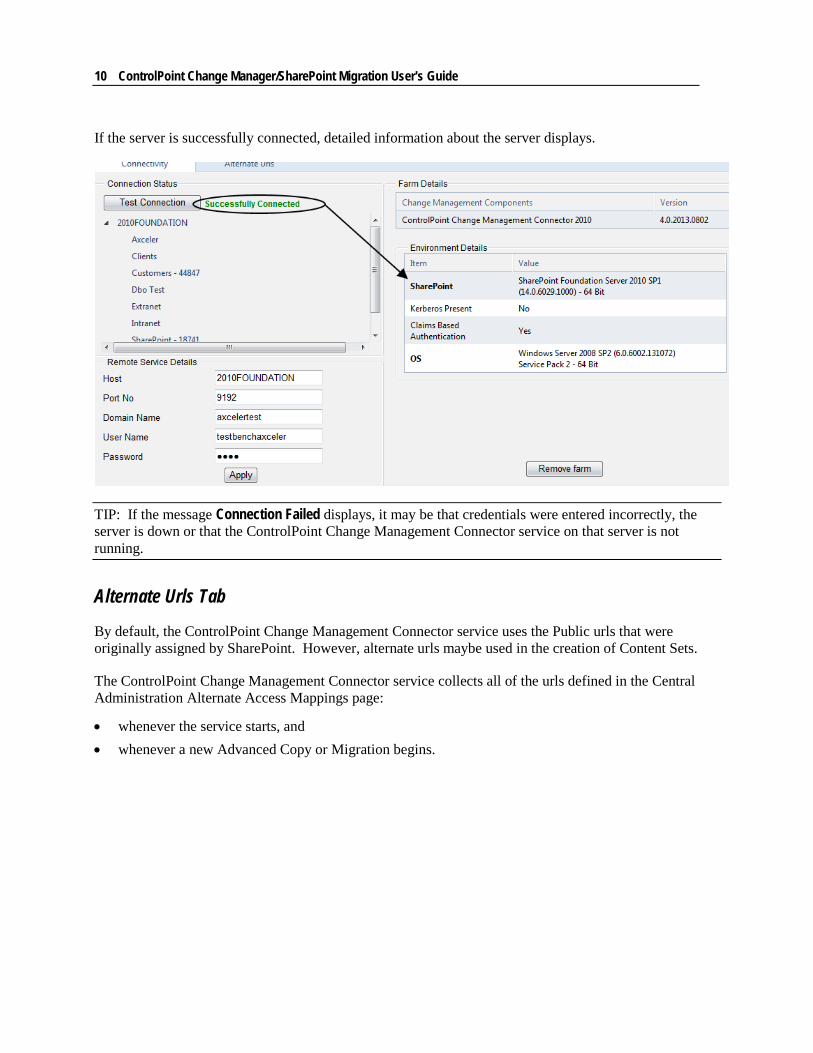
If the server is successfully connected, detailed information about the server displays.
TIP: If the message Connection Failed displays, it may be that credentials were entered incorrectly, the server is down or that the ControlPoint Change Management Connector service on that server is not running.
Alternate Urls Tab
By default, the ControlPoint Change Management Connector service uses the Public urls that were originally assigned by SharePoint. However, alternate urls maybe used in the creation of Content Sets.
The ControlPoint Change Management Connector service collects all of the urls defined in the Central Administration Alternate Access Mappings page:
• whenever the service starts, and • whenever a new Advanced Copy or Migration begins.
The ControlPoint Central Website 11
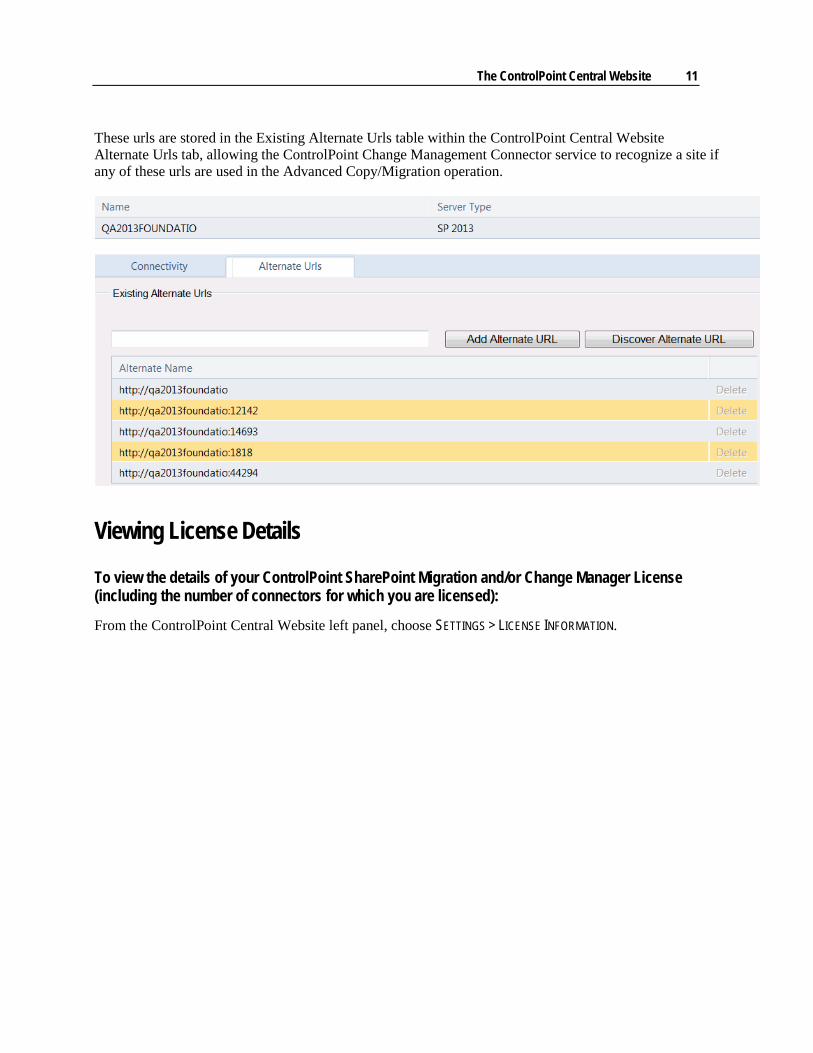
These urls are stored in the Existing Alternate Urls table within the ControlPoint Central Website Alternate Urls tab, allowing the ControlPoint Change Management Connector service to recognize a site if any of these urls are used in the Advanced Copy/Migration operation.
Viewing License Details
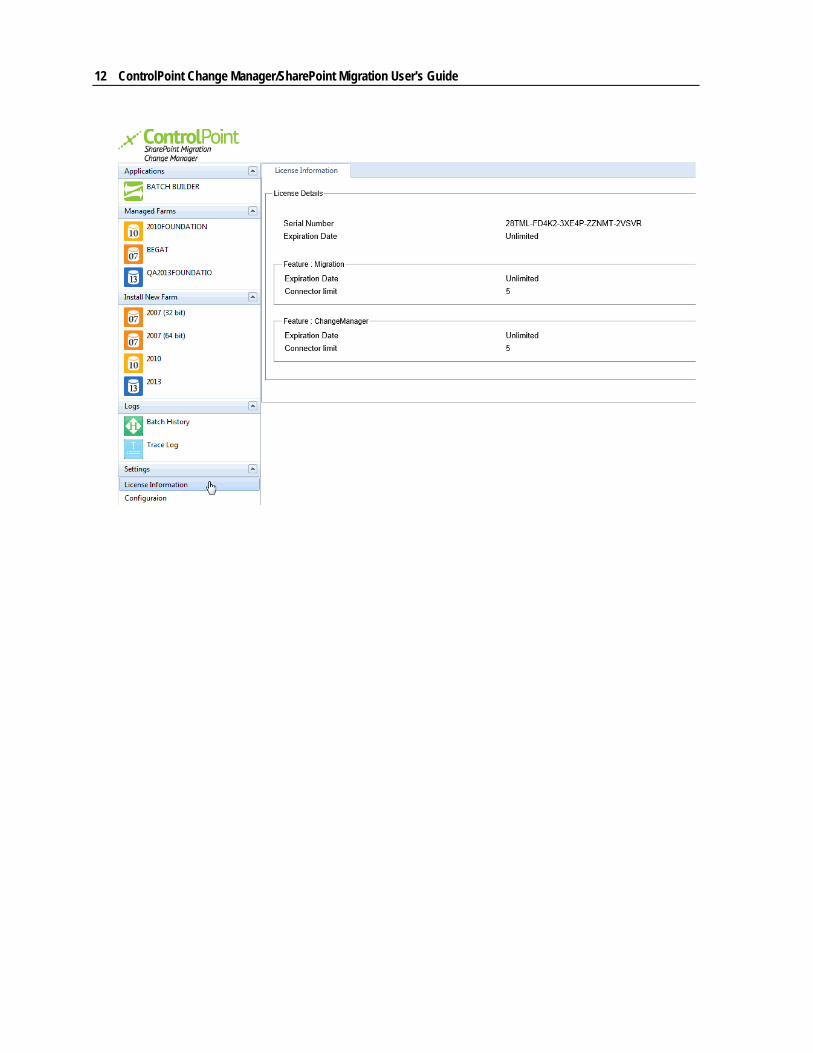
To view the details of your ControlPoint SharePoint Migration and/or Change Manager License (including the number of connectors for which you are licensed):
From the ControlPoint Central Website left panel, choose SETTINGS > LICENSE INFORMATION.
12 ControlPoint Change Manager/SharePoint Migration User's Guide
The Batch Builder Client Application 13
The Batch Builder Client Application The Batch Builder client application allows you to:
• carry out the detailed planning for Advanced Copy/Migration operations, and • perform the operation either interactively or in a scheduled batch.
The Batch Builder application is a locally executed application that is downloaded from the ControlPoint Central Website to the machine from which the browser is run. Every time the application is opened, any updates are automatically downloaded from the server and installed to your system, ensuring that you always have the latest updates.
Launching the Batch Builder Application The Batch Builder application can be launched either:
• from the ControlPoint Central Website, or • from within the ControlPoint for SharePoint Administration application.
NOTE: If you are launching the Batch Builder application for the first time, a File Download dialog displays, prompting you to save or run the application. Click [Run] to install the application locally. If a Security Warning dialog displays, asking you if you trust the application, click [Yes].
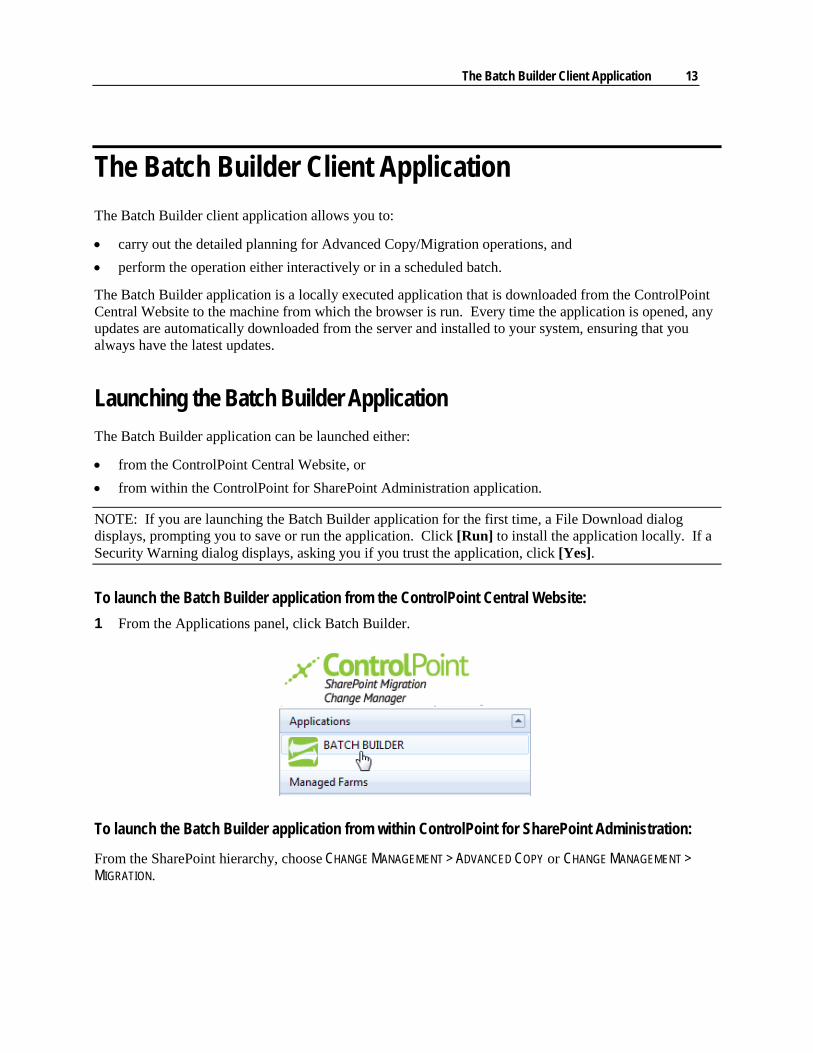
To launch the Batch Builder application from the ControlPoint Central Website: 1 From the Applications panel, click Batch Builder.
To launch the Batch Builder application from within ControlPoint for SharePoint Administration:
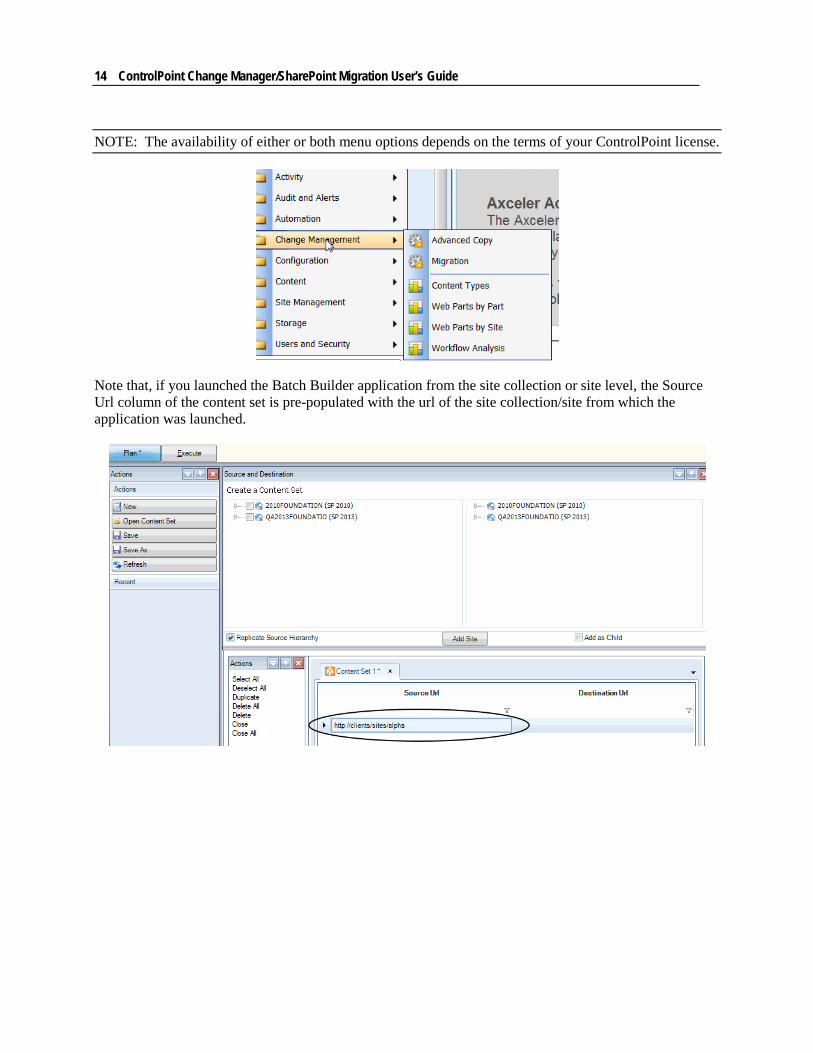
From the SharePoint hierarchy, choose CHANGE MANAGEMENT > ADVANCED COPY or CHANGE MANAGEMENT > MIGRATION.
14 ControlPoint Change Manager/SharePoint Migration User's Guide
NOTE: The availability of either or both menu options depends on the terms of your ControlPoint license.
Note that, if you launched the Batch Builder application from the site collection or site level, the Source Url column of the content set is pre-populated with the url of the site collection/site from which the application was launched.
The Batch Builder Client Application 15
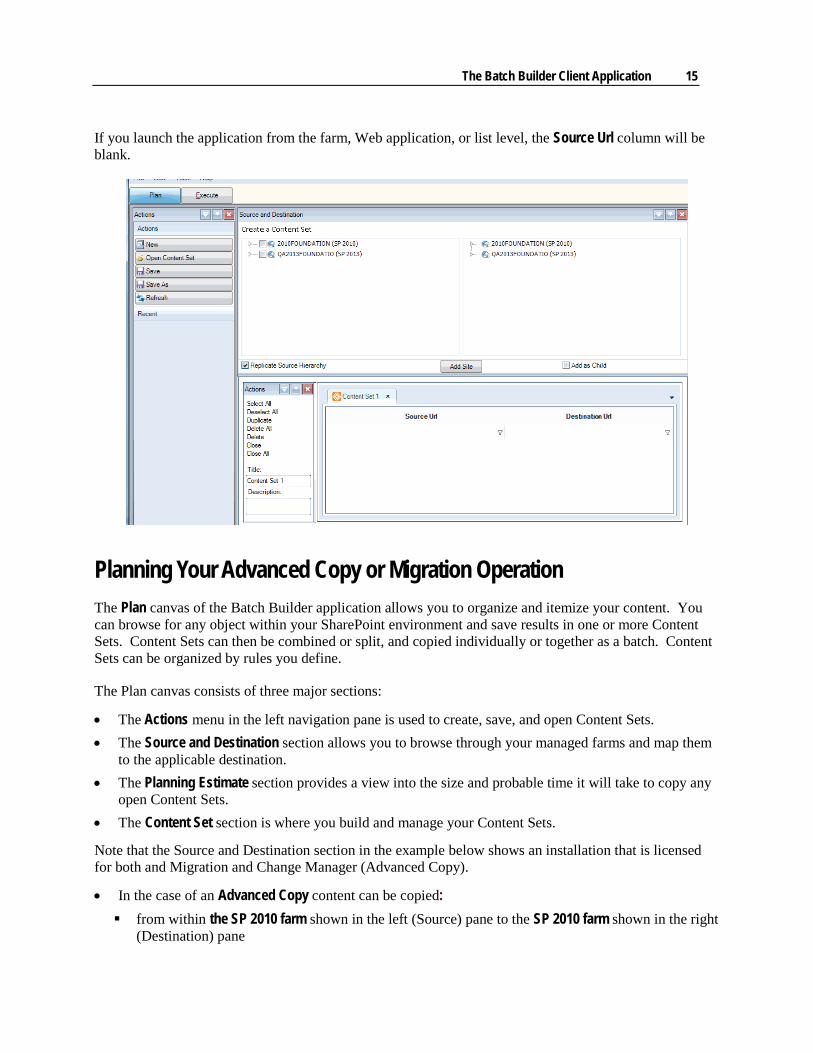
If you launch the application from the farm, Web application, or list level, the Source Url column will be blank.
Planning Your Advanced Copy or Migration Operation The Plan canvas of the Batch Builder application allows you to organize and itemize your content. You can browse for any object within your SharePoint environment and save results in one or more Content Sets. Content Sets can then be combined or split, and copied individually or together as a batch. Content Sets can be organized by rules you define.
The Plan canvas consists of three major sections:
• The Actions menu in the left navigation pane is used to create, save, and open Content Sets. • The Source and Destination section allows you to browse through your managed farms and map them
to the applicable destination. • The Planning Estimate section provides a view into the size and probable time it will take to copy any
open Content Sets. • The Content Set section is where you build and manage your Content Sets.
Note that the Source and Destination section in the example below shows an installation that is licensed for both and Migration and Change Manager (Advanced Copy).
• In the case of an Advanced Copy content can be copied: from within the SP 2010 farm shown in the left (Source) pane to the SP 2010 farm shown in the right
(Destination) pane
16 ControlPoint Change Manager/SharePoint Migration User's Guide
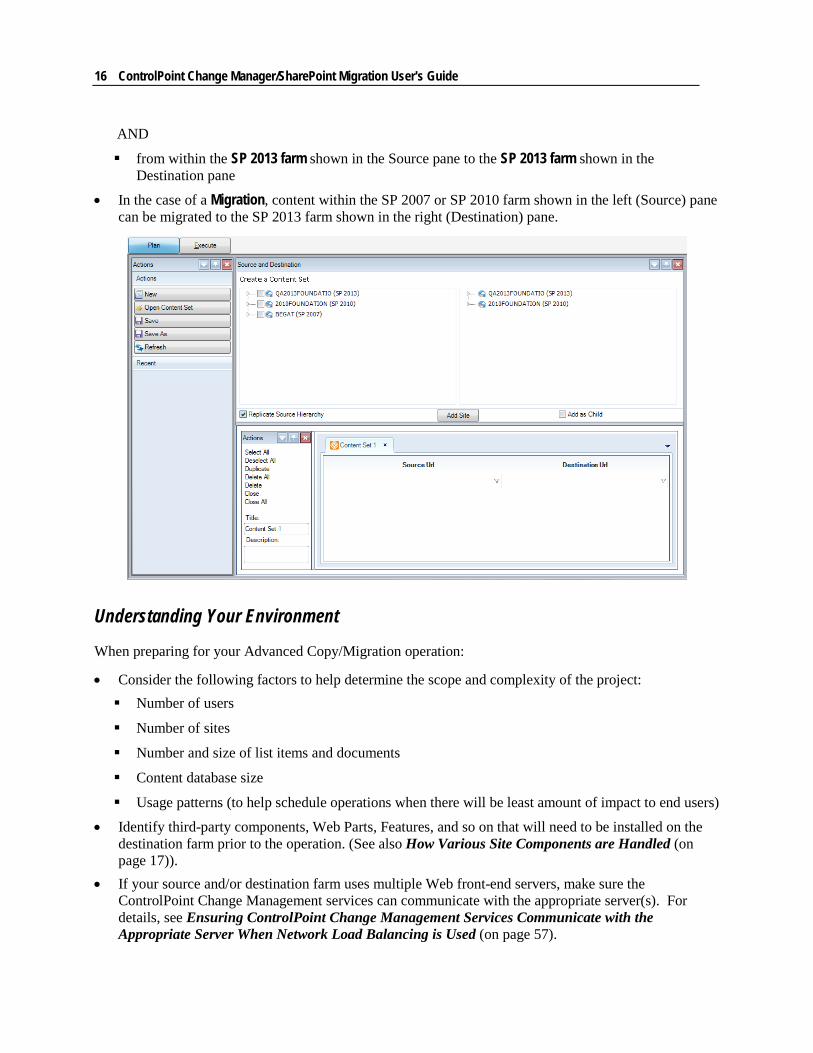
AND
from within the SP 2013 farm shown in the Source pane to the SP 2013 farm shown in the Destination pane
• In the case of a Migration, content within the SP 2007 or SP 2010 farm shown in the left (Source) pane can be migrated to the SP 2013 farm shown in the right (Destination) pane.
Understanding Your Environment
When preparing for your Advanced Copy/Migration operation:
• Consider the following factors to help determine the scope and complexity of the project: Number of users
Number of sites
Number and size of list items and documents
Content database size
Usage patterns (to help schedule operations when there will be least amount of impact to end users)
• Identify third-party components, Web Parts, Features, and so on that will need to be installed on the destination farm prior to the operation. (See also How Various Site Components are Handled (on page 17)).
• If your source and/or destination farm uses multiple Web front-end servers, make sure the ControlPoint Change Management services can communicate with the appropriate server(s). For details, see Ensuring ControlPoint Change Management Services Communicate with the Appropriate Server When Network Load Balancing is Used (on page 57).
The Batch Builder Client Application 17
You can use a variety of analyzes within the ControlPoint for SharePoint Administration application to identify key environmental factors.
How Various Site Components are Handled MIGRATION OPERATIONS The following table provides a general overview of how various SharePoint site components are handled during 2007 or 2010 to 2013 Migration.
NOTE: For more specific information, contact Axceler Technical Support (see "Technical Support" on page 59).
Component What ControlPoint Migration Can Migrate
Notes
Site Templates SharePoint "out-of-the-box" (OOTB) site templates.
EXCEPTION: In the case of Meeting Workspace templates, ControlPoint Migration may not be able to properly map meeting instances.
Custom templates can either be: installed at the destination prior to migration
OR
if the source template does not exist on the destination farm, mapped to an OOTB template (for example, a Team Site or a Blank Site) or another custom template that has been installed at the destination.
The "Fab Forty" templates developed for SharePoint 2007 are not supported in SharePoint. ControlPoint Migration will, however, attempt to create a compatible site (usually a Team site) and migrate content as completely as possible.
Web Parts
The placement and configuration of the following SharePoint "out-of-the-box" (OOTB) Web Parts:
default.aspx document libraries page libraries
Currently, ControlPoint Migration does not migrate Web Parts from home.aspx
All third-party and custom Web Parts must be deployed to the Global Assembly Cache (GAC) on both the source and destination farm for migration to be successful. (If even one custom Web Part is missing from the GAC, the migration will fail for all.)
NOTE: For custom Web Parts to be functional, the full assembly details (assembly, version, public key token, namesake, and type name) must be the same in the web.config of both the source and destination. For example:
<SafeControl Assembly="ACME.WebParts, Version=1.0.0.0, Culture=neutral, PublicKeyToken=913f6bae0ca5ae12" Namespace="ACME.CustomWebParts.CustomWebPart" TypeName="*" Safe="True" SafeAgainstScript="False" />

18 ControlPoint Change Manager/SharePoint Migration User's Guide
Component What ControlPoint Migration Can Migrate
Notes
Columns Site and list columns You also have the option of mapping list columns to "matching" site columns at the destination.
NOTE: ControlPoint Migration evaluates the following criteria (and in the following order) to find a "match" between source and destination, for mapping and inheritance:
field ID internal name display name and data type
Content Types Site- and list-level definitions, and the inheritance of content types
ControlPoint Migration evaluates the following criteria (and in the following order) to determine inheritance at the destination:
ID display name.
Site Security Users and Permissions Users' SharePoint alerts
The ControlPoint Central Service Account is always added to Site Collection Administrators groups on the destination farm.
You also have the option of:
adding users with direct permissions in the source farm to SharePoint groups at the destination
creating user mappings between source and destination (for example, in different domains or to reassign permissions of a user on the source to a different user at the destination).
Features Features must be installed on the destination farm prior to migration.
ControlPoint Migration can, however, activate features as part of the migration.
Views SharePoint "out-of-the-box" (OOTB) Views
Personal Views Custom Views Discussion Board Views
The look and feel of Discussion Boards is different due to changes in 2013, but the view is migrated.
For Survey lists, SharePoint does not provide the option to create or update views, so ControlPoint Migration creates the list at the destination with the default out-of-the-box view.
Page Layouts SharePoint "out-of-the-box" (OOTB) page layouts
ControlPoint Migration does not migrate custom page layouts. These must be copied to the destination manually.
The Batch Builder Client Application 19
Component What ControlPoint Migration Can Migrate
Notes
Workflows Completed (including cancelled) workflow instances, including history, of the following types:
SharePoint "out-of-the-box" (OOTB) workflows
workflows created in SharePoint Designer
Nintex® Workflows (including constants and workflow templates)
EXCEPTION: ControlPoint Migration will not migrate scheduled Nintex Workflows.
For Nintex workflows, the following software must be installed prior to migration:
on a 2007 source farm: Nintex Version 2007 (Build 11101 or 11201) Nintex Database Version 1.0.4.0 or higher
on a 2010 source farm: Nintex Version 2010 (2.3.0.0) or higher Nintex Database Version 2.0.1.0 or higher
on the 2013 destination farm: Nintex Version 2013 (Build 3.0.1.0) Nintex Database Version 3.0.0.0
(While the software needs to be installed on the destination farm, ControlPoint Migration will activate the Nintex features at the site collection as part of the migration.)
ControlPoint Migration maps:
the source lists used as part of the workflow to a destination list by title
the source folders by the relative url in the library.
IMPORTANT: Currently, ControlPoint Migration will not migrate instances of workflows that are in progress.
InfoPath Forms
(2007 to 2013)
Forms based on the following templates: Document Library Site Content Type
The following four lists and libraries: Submitted forms library Data source list Data connection library
(if used) InfoPath Form library
ControlPoint Migration does not migrate custom code (and therefore, cannot migrate forms that use the Administrator-approved form template).
If the InfoPath lists and libraries are migrated in different migration sets: the order in which they are migrated is
important, and ControlPoint Migration will assume that they
are being migrated to the same relative location on the destination farm.
For detail, see Special Considerations When Copying InfoPath Forms (on page 32).
ADVANCED COPY OPERATIONS The following table provides a general overview of how ControlPoint Change Manager handles various SharePoint site components for SharePoint 2010 to 2010 or 2013 to 2013 Advanced Copy operations.
NOTE: For more specific information, contact Axceler Technical Support (see "Technical Support" on page 59).
20 ControlPoint Change Manager/SharePoint Migration User's Guide
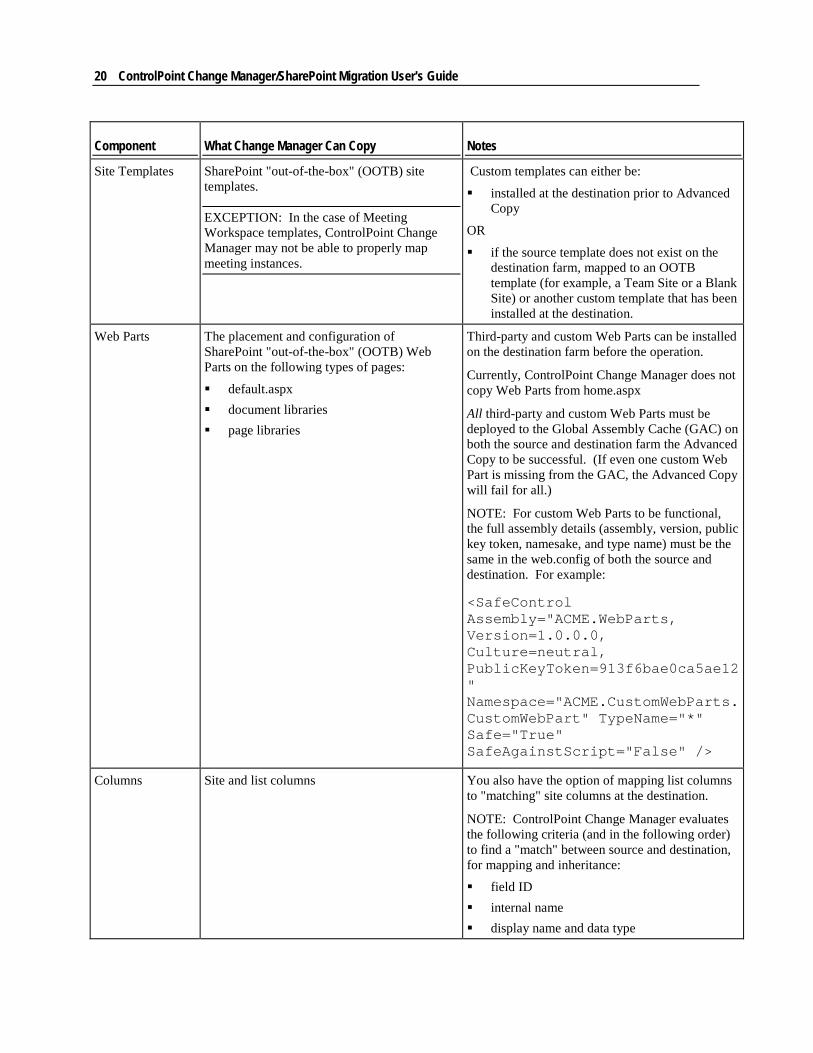
Component What Change Manager Can Copy Notes
Site Templates SharePoint "out-of-the-box" (OOTB) site templates.
EXCEPTION: In the case of Meeting Workspace templates, ControlPoint Change Manager may not be able to properly map meeting instances.
Custom templates can either be:
installed at the destination prior to Advanced Copy
OR
if the source template does not exist on the destination farm, mapped to an OOTB template (for example, a Team Site or a Blank Site) or another custom template that has been installed at the destination.
Web Parts The placement and configuration of SharePoint "out-of-the-box" (OOTB) Web Parts on the following types of pages:
default.aspx document libraries page libraries
Third-party and custom Web Parts can be installed on the destination farm before the operation.
Currently, ControlPoint Change Manager does not copy Web Parts from home.aspx
All third-party and custom Web Parts must be deployed to the Global Assembly Cache (GAC) on both the source and destination farm the Advanced Copy to be successful. (If even one custom Web Part is missing from the GAC, the Advanced Copy will fail for all.)
NOTE: For custom Web Parts to be functional, the full assembly details (assembly, version, public key token, namesake, and type name) must be the same in the web.config of both the source and destination. For example:
<SafeControl Assembly="ACME.WebParts, Version=1.0.0.0, Culture=neutral, PublicKeyToken=913f6bae0ca5ae12" Namespace="ACME.CustomWebParts.CustomWebPart" TypeName="*" Safe="True" SafeAgainstScript="False" />
Columns Site and list columns You also have the option of mapping list columns to "matching" site columns at the destination.
NOTE: ControlPoint Change Manager evaluates the following criteria (and in the following order) to find a "match" between source and destination, for mapping and inheritance:
field ID internal name display name and data type
The Batch Builder Client Application 21
Component What Change Manager Can Copy Notes
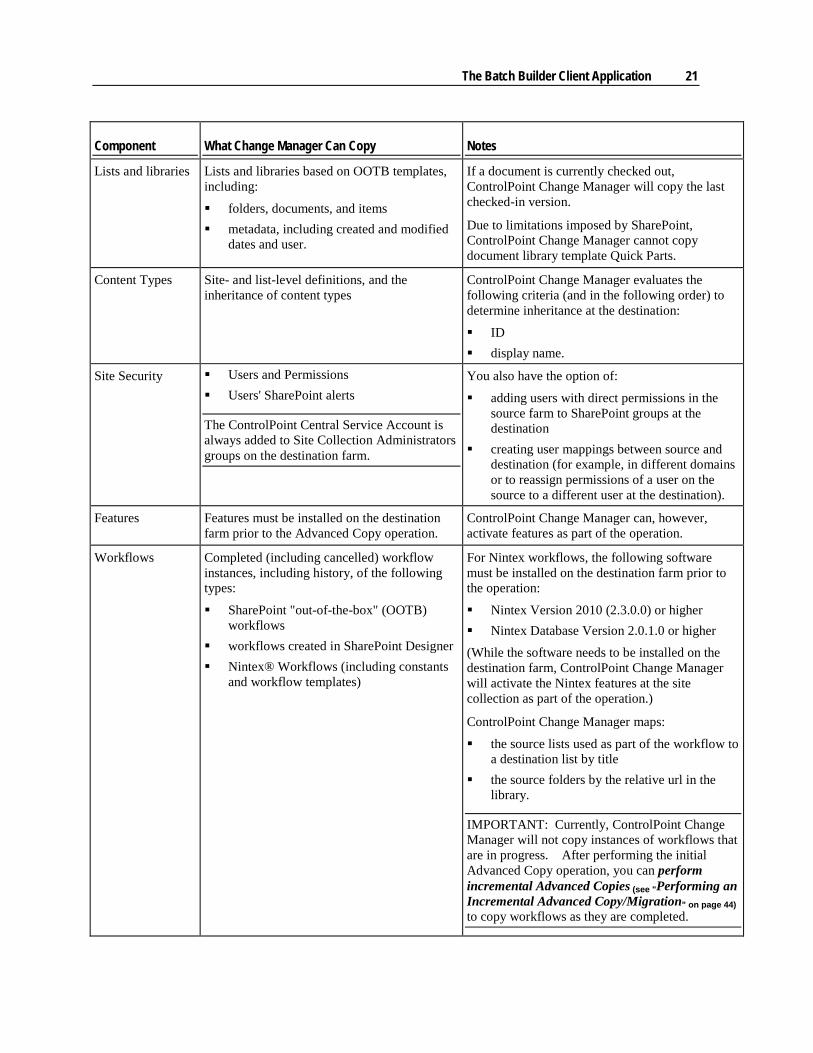
Lists and libraries Lists and libraries based on OOTB templates, including:
folders, documents, and items metadata, including created and modified
dates and user.
If a document is currently checked out, ControlPoint Change Manager will copy the last checked-in version.
Due to limitations imposed by SharePoint, ControlPoint Change Manager cannot copy document library template Quick Parts.
Content Types Site- and list-level definitions, and the inheritance of content types
ControlPoint Change Manager evaluates the following criteria (and in the following order) to determine inheritance at the destination:
ID display name.
Site Security Users and Permissions Users' SharePoint alerts
The ControlPoint Central Service Account is always added to Site Collection Administrators groups on the destination farm.
You also have the option of:
adding users with direct permissions in the source farm to SharePoint groups at the destination
creating user mappings between source and destination (for example, in different domains or to reassign permissions of a user on the source to a different user at the destination).
Features Features must be installed on the destination farm prior to the Advanced Copy operation.
ControlPoint Change Manager can, however, activate features as part of the operation.
Workflows Completed (including cancelled) workflow instances, including history, of the following types:
SharePoint "out-of-the-box" (OOTB) workflows
workflows created in SharePoint Designer Nintex® Workflows (including constants
and workflow templates)
For Nintex workflows, the following software must be installed on the destination farm prior to the operation:
Nintex Version 2010 (2.3.0.0) or higher Nintex Database Version 2.0.1.0 or higher
(While the software needs to be installed on the destination farm, ControlPoint Change Manager will activate the Nintex features at the site collection as part of the operation.)
ControlPoint Change Manager maps:
the source lists used as part of the workflow to a destination list by title
the source folders by the relative url in the library.
IMPORTANT: Currently, ControlPoint Change Manager will not copy instances of workflows that are in progress. After performing the initial Advanced Copy operation, you can perform incremental Advanced Copies (see "Performing an Incremental Advanced Copy/Migration" on page 44) to copy workflows as they are completed.
22 ControlPoint Change Manager/SharePoint Migration User's Guide
Component What Change Manager Can Copy Notes
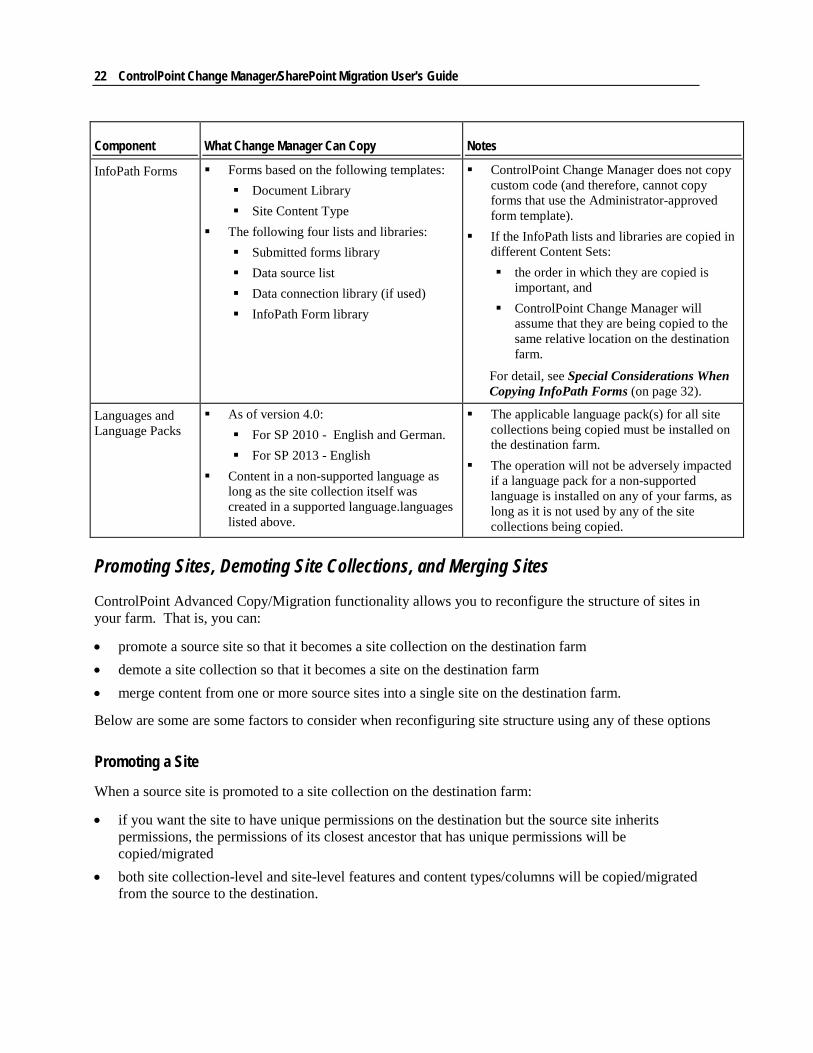
InfoPath Forms Forms based on the following templates: Document Library Site Content Type
The following four lists and libraries: Submitted forms library Data source list Data connection library (if used) InfoPath Form library
ControlPoint Change Manager does not copy custom code (and therefore, cannot copy forms that use the Administrator-approved form template).
If the InfoPath lists and libraries are copied in different Content Sets: the order in which they are copied is
important, and ControlPoint Change Manager will
assume that they are being copied to the same relative location on the destination farm.
For detail, see Special Considerations When Copying InfoPath Forms (on page 32).
Languages and Language Packs
As of version 4.0: For SP 2010 - English and German. For SP 2013 - English
Content in a non-supported language as long as the site collection itself was created in a supported language.languages listed above.
The applicable language pack(s) for all site collections being copied must be installed on the destination farm.
The operation will not be adversely impacted if a language pack for a non-supported language is installed on any of your farms, as long as it is not used by any of the site collections being copied.
Promoting Sites, Demoting Site Collections, and Merging Sites
ControlPoint Advanced Copy/Migration functionality allows you to reconfigure the structure of sites in your farm. That is, you can:
• promote a source site so that it becomes a site collection on the destination farm • demote a site collection so that it becomes a site on the destination farm • merge content from one or more source sites into a single site on the destination farm.
Below are some are some factors to consider when reconfiguring site structure using any of these options
Promoting a Site
When a source site is promoted to a site collection on the destination farm:
• if you want the site to have unique permissions on the destination but the source site inherits permissions, the permissions of its closest ancestor that has unique permissions will be copied/migrated
• both site collection-level and site-level features and content types/columns will be copied/migrated from the source to the destination.
The Batch Builder Client Application 23
Demoting a Site Collection
When a source site collection is demoted to a site within an existing destination site collection:
• the groups, users, and permissions levels from the source site collection will be added to the destination site collection
• you can choose to either: have the site created on the destination with unique permissions (with permissions from the source
site collection carried over)
OR
have the site inherit permissions from its parent at the destination (including permissions levels, permissions for the site itself, and any list and item permissions that had been unique on the source).
Merging Site Content
When one or more source sites are merged into an existing destination site collection or site:
• site and list settings from the source will overwrite destination settings
NOTE: If multiple source sites are being merged into a single destination, the settings of the most recently copied or migrated source site will prevail.
• users, groups and permissions from the source will be merged with those at the destination (for example, if a user is a member of the Visitors group on the source site and the Contributors group on the destination site, after migration the user will be a member of both Visitors and Contributors on the destination site)
• if an alert with the same User, Title, Frequency, Event Type already exists at the destination, it will not be copied/migrated from the source (that is, alerts will not be duplicated)
• workflows from the source site will be appended to those on the destination site, even those with matching names.
Adding Source and Destination Sites to a Content Set
Your SharePoint managed farms appear (in both source and destination farm trees) based on:
• the functionality for which you are licensed (Advanced Copy and/or Migration)
24 ControlPoint Change Manager/SharePoint Migration User's Guide
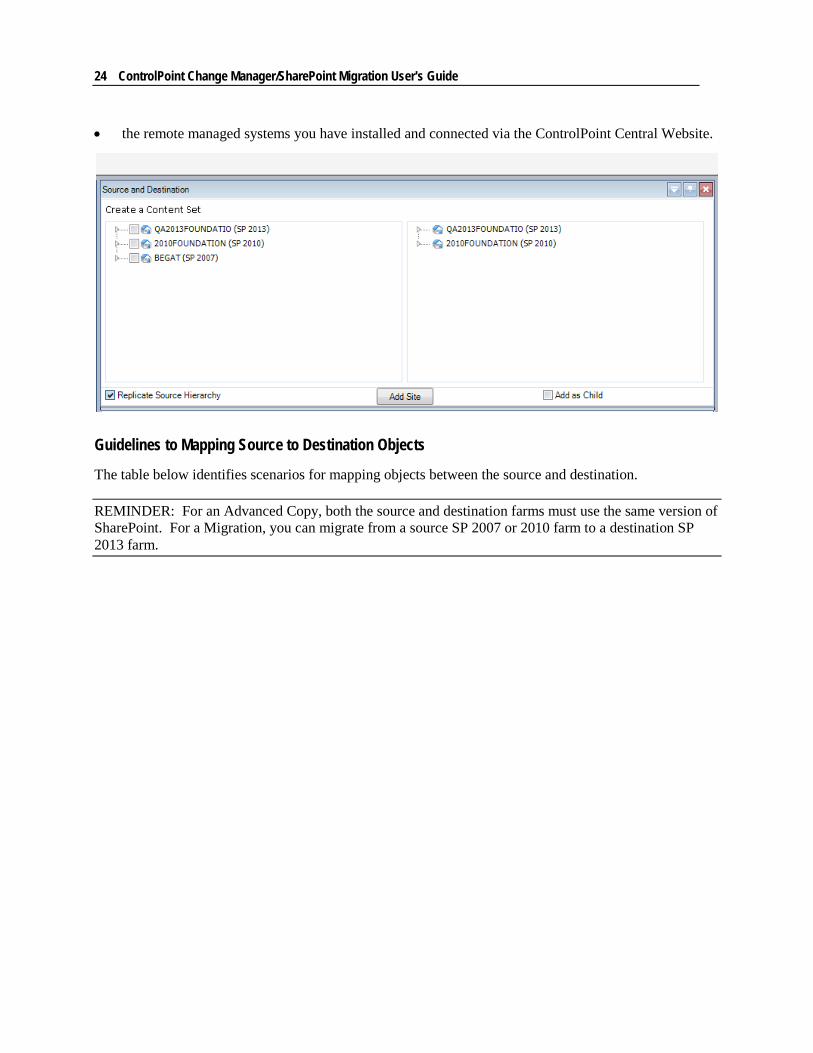
• the remote managed systems you have installed and connected via the ControlPoint Central Website.
Guidelines to Mapping Source to Destination Objects
The table below identifies scenarios for mapping objects between the source and destination.
REMINDER: For an Advanced Copy, both the source and destination farms must use the same version of SharePoint. For a Migration, you can migrate from a source SP 2007 or 2010 farm to a destination SP 2013 farm.
The Batch Builder Client Application 25
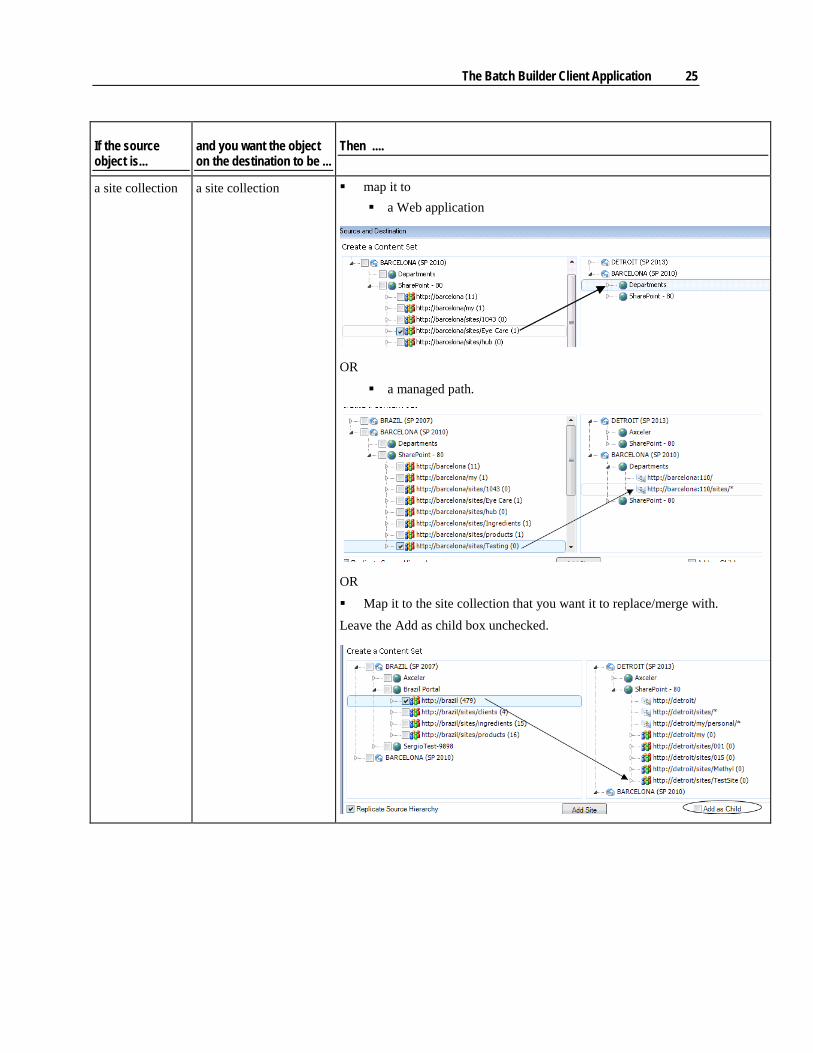
If the source object is...
and you want the object on the destination to be ...
Then ....
a site collection a site collection map it to a Web application
OR
a managed path.
OR
Map it to the site collection that you want it to replace/merge with.
Leave the Add as child box unchecked.
26 ControlPoint Change Manager/SharePoint Migration User's Guide
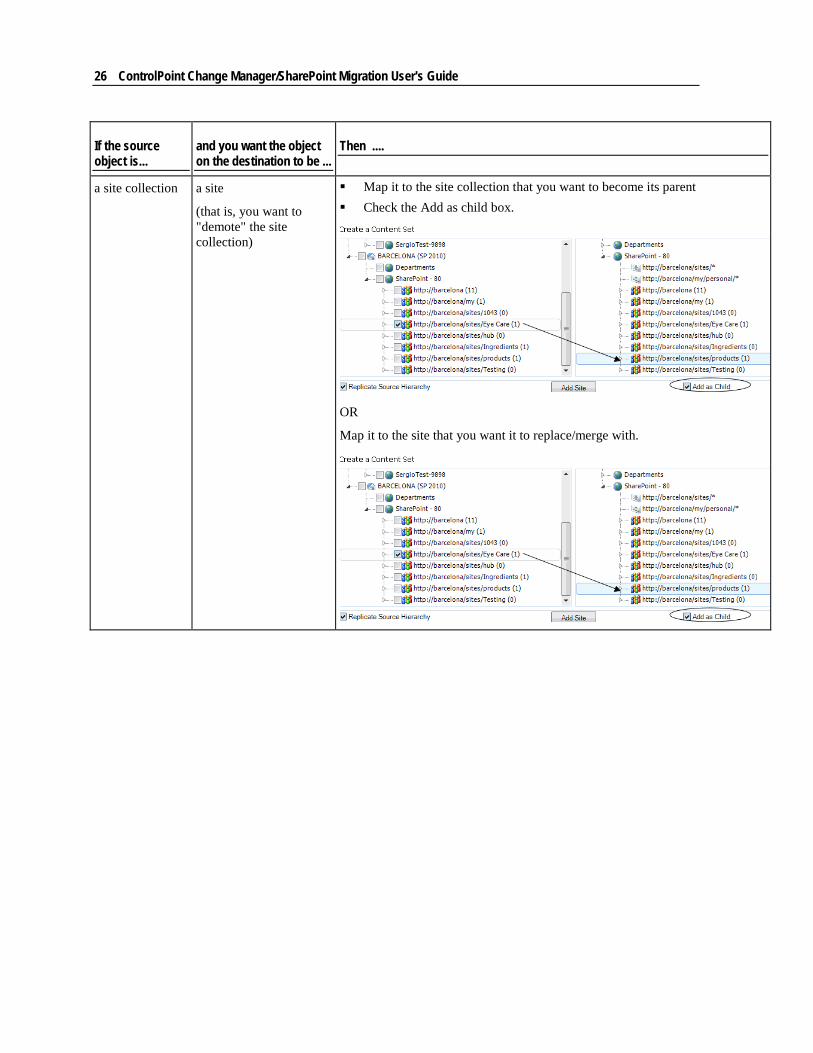
If the source object is...
and you want the object on the destination to be ...
Then ....
a site collection a site
(that is, you want to "demote" the site collection)
Map it to the site collection that you want to become its parent Check the Add as child box.
OR
Map it to the site that you want it to replace/merge with.
The Batch Builder Client Application 27
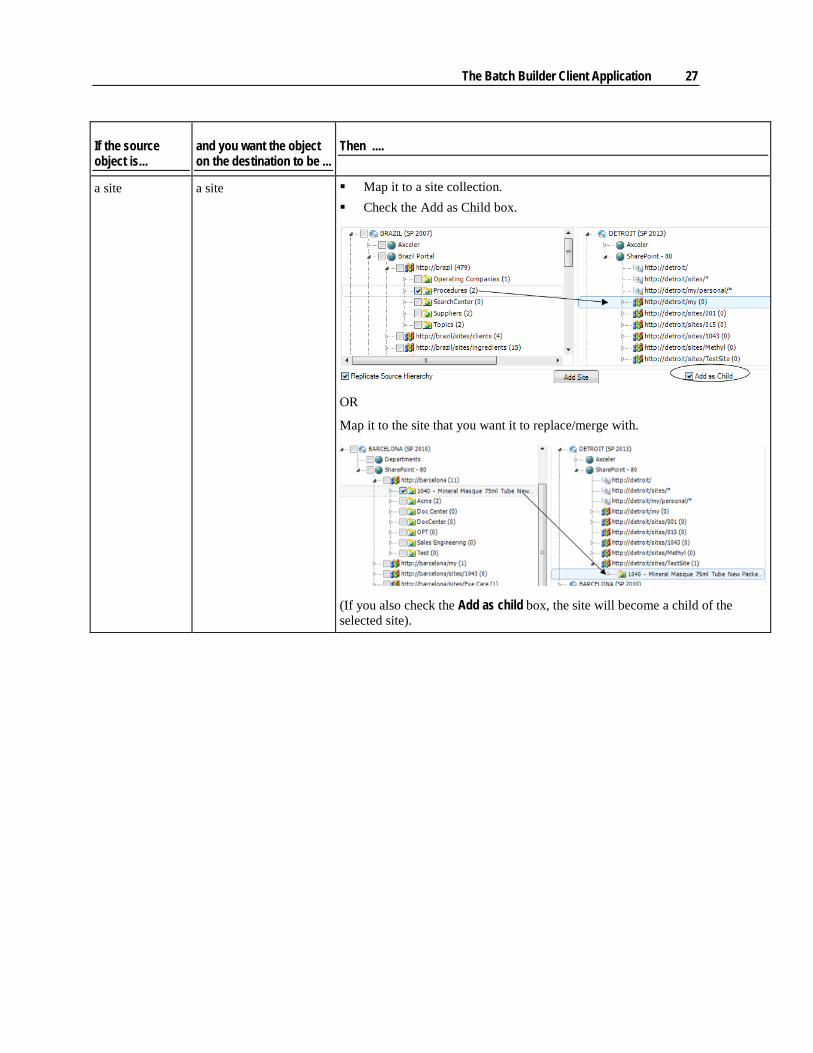
If the source object is...
and you want the object on the destination to be ...
Then ....
a site a site Map it to a site collection. Check the Add as Child box.
OR
Map it to the site that you want it to replace/merge with.
(If you also check the Add as child box, the site will become a child of the selected site).
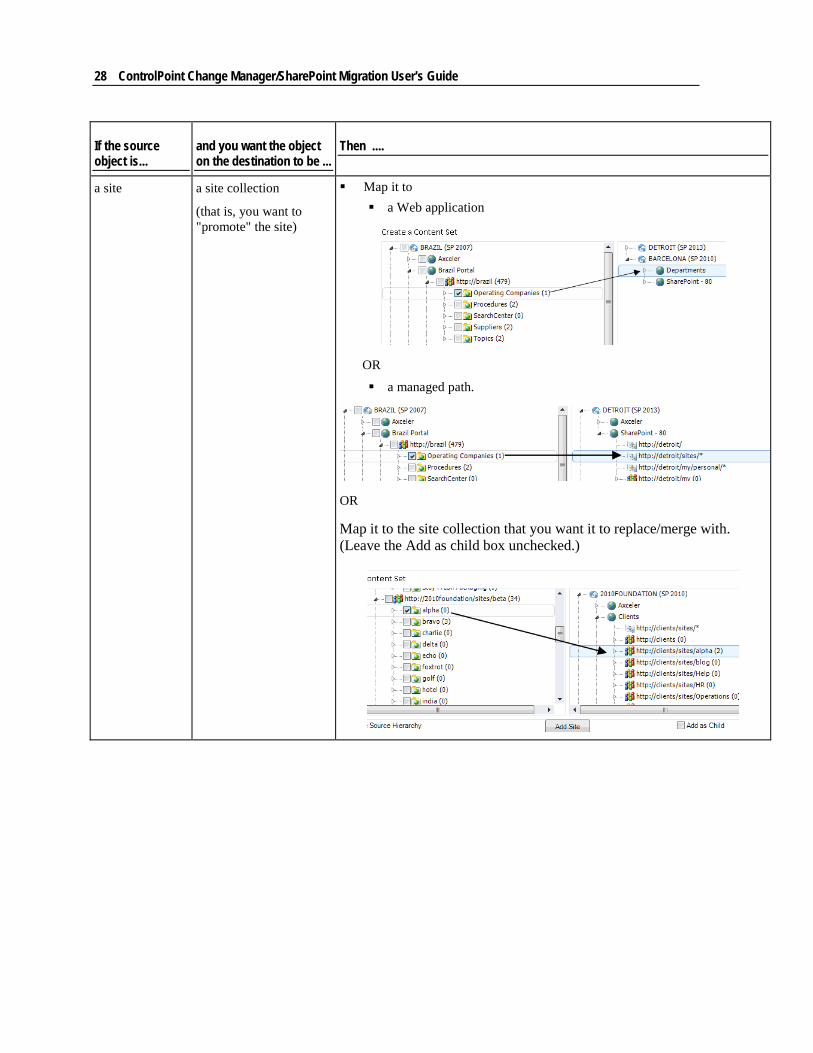
28 ControlPoint Change Manager/SharePoint Migration User's Guide
If the source object is...
and you want the object on the destination to be ...
Then ....
a site a site collection
(that is, you want to "promote" the site)
Map it to a Web application
OR
a managed path.
OR
Map it to the site collection that you want it to replace/merge with. (Leave the Add as child box unchecked.)

The Batch Builder Client Application 29
To add source and destination sites to a Content Set: 1 Make sure that you have a Content Set open.
2 Expand the server node for the source farm containing the content that you want to copy. You can then drill down to the Web applications, site collections, and sites on that farm.
3 Check the box to the left of each site collection and/or site in the source farm that you want to add to the Content Set.
4 Use the information in the following table to determine the appropriate action to take.
If you want to ... Then ...
add selected items to the current Content Set
Click [Add Site] to populate the Source Url column of the Content Set grid with selected object(s).
If a corresponding (and permissible) object is selected in the destination farm tree, it will populate the Destination Url column.
30 ControlPoint Change Manager/SharePoint Migration User's Guide
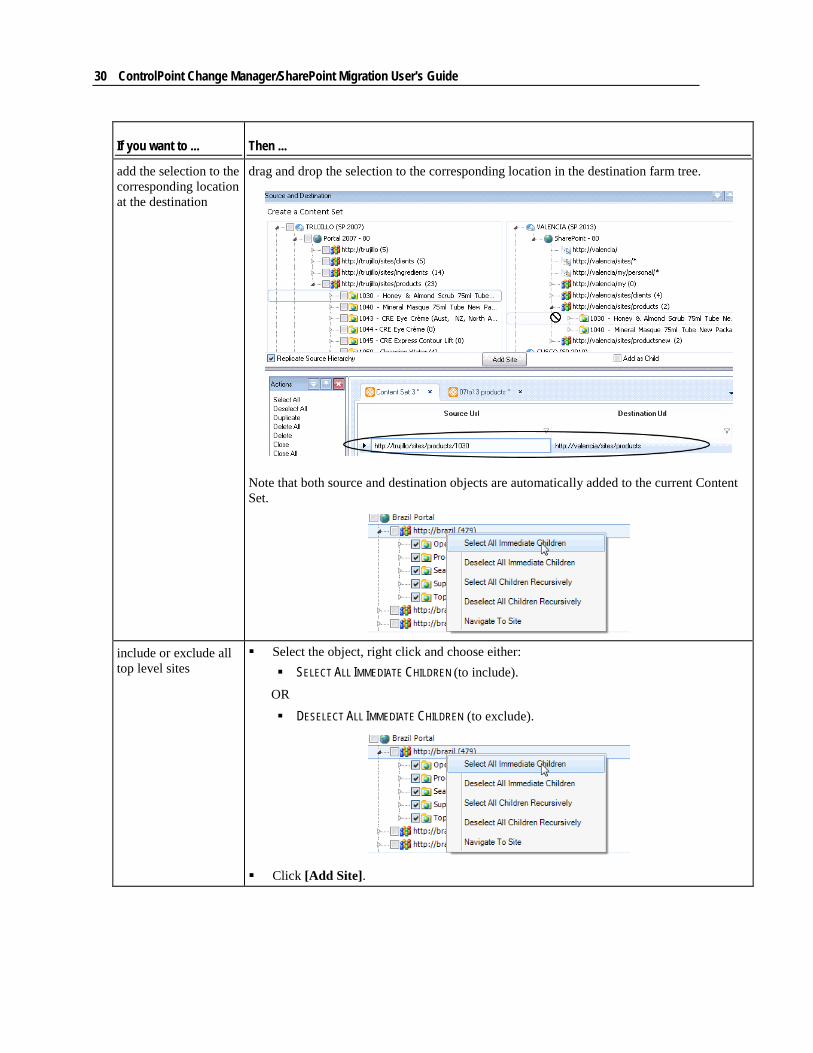
If you want to ... Then ...
add the selection to the corresponding location at the destination
drag and drop the selection to the corresponding location in the destination farm tree.
Note that both source and destination objects are automatically added to the current Content Set.
include or exclude all top level sites
Select the object, right click and choose either: SELECT ALL IMMEDIATE CHILDREN (to include).
OR
DESELECT ALL IMMEDIATE CHILDREN (to exclude).
Click [Add Site].
The Batch Builder Client Application 31
If you want to ... Then ...
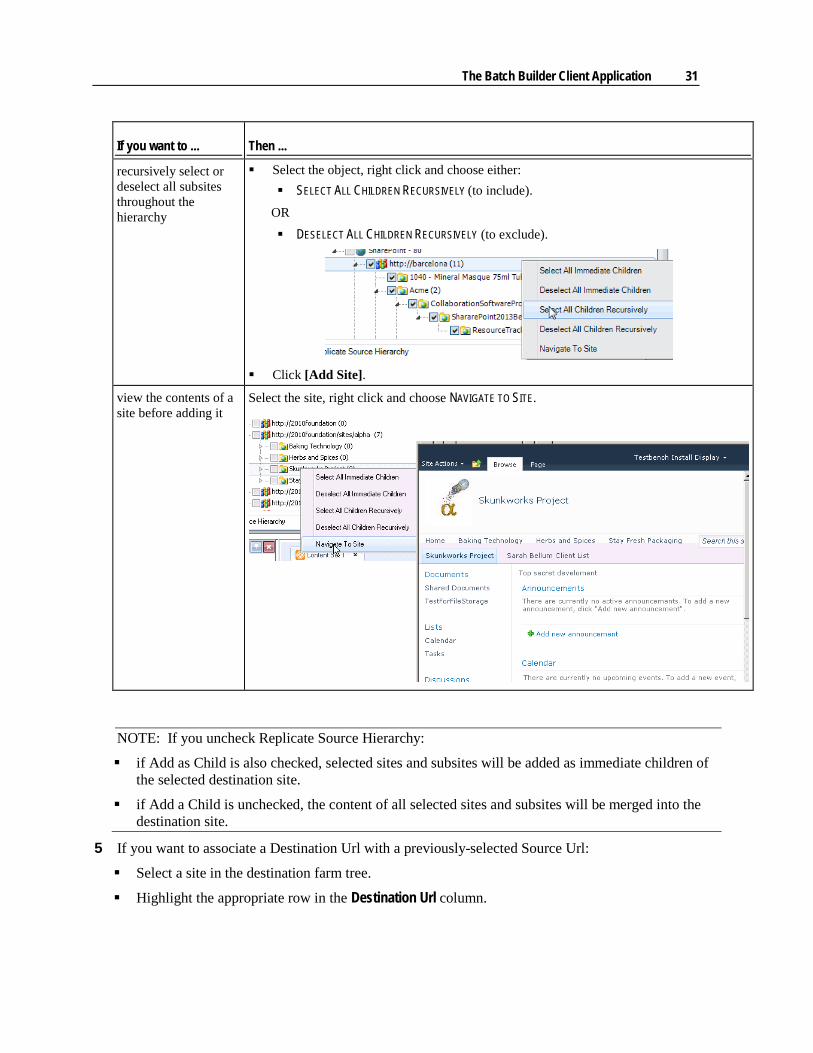
recursively select or deselect all subsites throughout the hierarchy
Select the object, right click and choose either: SELECT ALL CHILDREN RECURSIVELY (to include).
OR
DESELECT ALL CHILDREN RECURSIVELY (to exclude).
Click [Add Site].
view the contents of a site before adding it
Select the site, right click and choose NAVIGATE TO SITE.
NOTE: If you uncheck Replicate Source Hierarchy:
if Add as Child is also checked, selected sites and subsites will be added as immediate children of the selected destination site.
if Add a Child is unchecked, the content of all selected sites and subsites will be merged into the destination site.
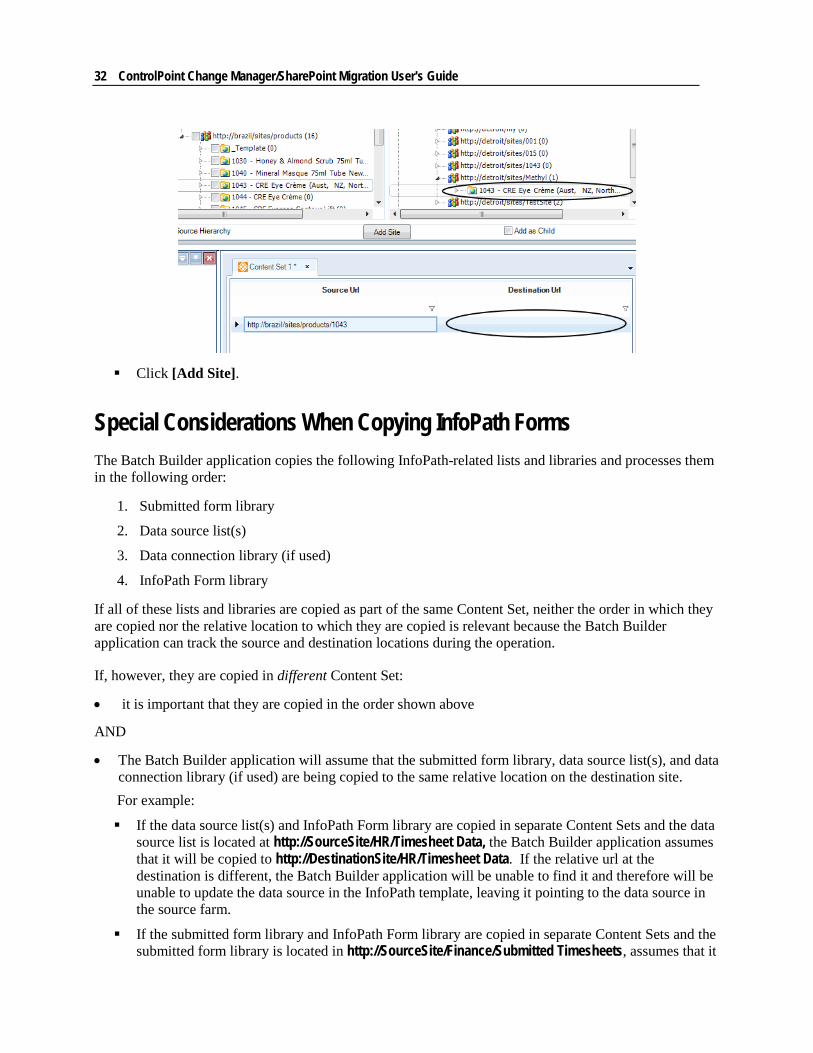
5 If you want to associate a Destination Url with a previously-selected Source Url:
Select a site in the destination farm tree.
Highlight the appropriate row in the Destination Url column.
32 ControlPoint Change Manager/SharePoint Migration User's Guide
Click [Add Site].
Special Considerations When Copying InfoPath Forms The Batch Builder application copies the following InfoPath-related lists and libraries and processes them in the following order:
1. Submitted form library
2. Data source list(s)
3. Data connection library (if used)
4. InfoPath Form library
If all of these lists and libraries are copied as part of the same Content Set, neither the order in which they are copied nor the relative location to which they are copied is relevant because the Batch Builder application can track the source and destination locations during the operation.
If, however, they are copied in different Content Set:
• it is important that they are copied in the order shown above
AND
• The Batch Builder application will assume that the submitted form library, data source list(s), and data connection library (if used) are being copied to the same relative location on the destination site. For example:
If the data source list(s) and InfoPath Form library are copied in separate Content Sets and the data source list is located at http://SourceSite/HR/Timesheet Data, the Batch Builder application assumes that it will be copied to http://DestinationSite/HR/Timesheet Data. If the relative url at the destination is different, the Batch Builder application will be unable to find it and therefore will be unable to update the data source in the InfoPath template, leaving it pointing to the data source in the source farm.
If the submitted form library and InfoPath Form library are copied in separate Content Sets and the submitted form library is located in http://SourceSite/Finance/Submitted Timesheets, assumes that it

The Batch Builder Client Application 33
will be copied to http://DestinationSite/Finance/Submitted Timesheets. If the relative Url at the destination is different, the InfoPath form will be unable to find the submitted forms library when the forms are submitted.
34 ControlPoint Change Manager/SharePoint Migration User's Guide
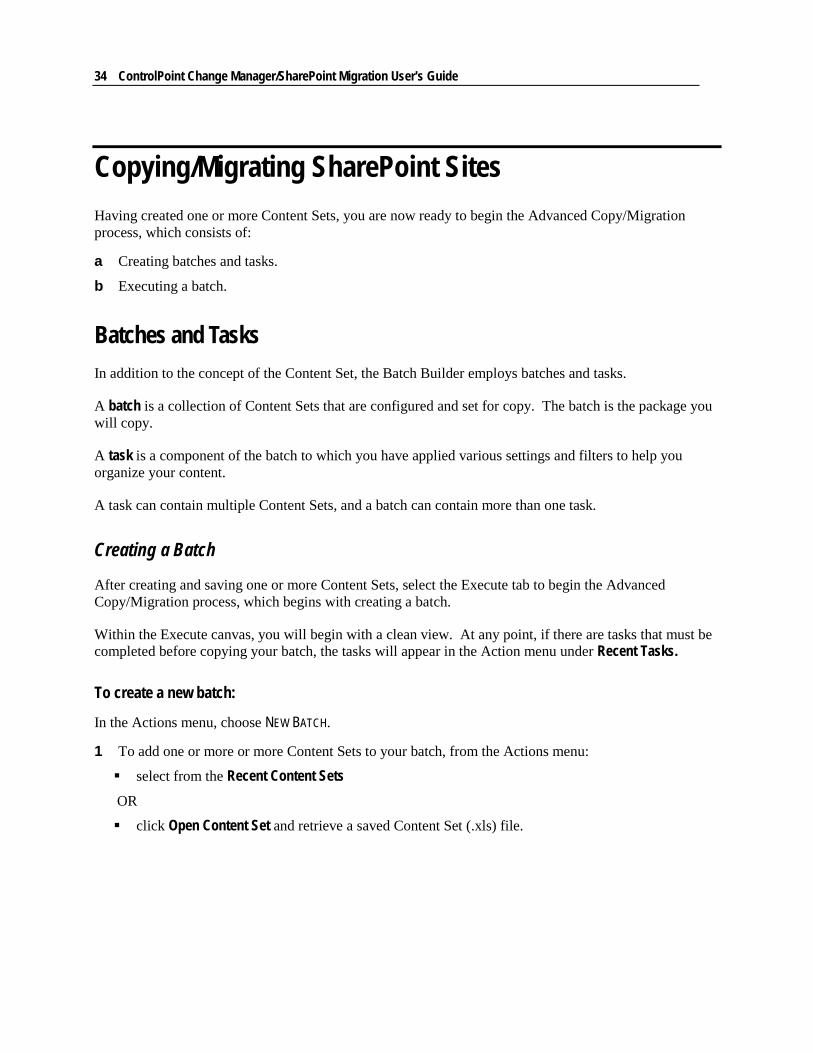
Copying/Migrating SharePoint Sites Having created one or more Content Sets, you are now ready to begin the Advanced Copy/Migration process, which consists of:
a Creating batches and tasks.
b Executing a batch.
Batches and Tasks In addition to the concept of the Content Set, the Batch Builder employs batches and tasks.
A batch is a collection of Content Sets that are configured and set for copy. The batch is the package you will copy.
A task is a component of the batch to which you have applied various settings and filters to help you organize your content.
A task can contain multiple Content Sets, and a batch can contain more than one task.
Creating a Batch
After creating and saving one or more Content Sets, select the Execute tab to begin the Advanced Copy/Migration process, which begins with creating a batch.
Within the Execute canvas, you will begin with a clean view. At any point, if there are tasks that must be completed before copying your batch, the tasks will appear in the Action menu under Recent Tasks.
To create a new batch:
In the Actions menu, choose NEW BATCH.
1 To add one or more or more Content Sets to your batch, from the Actions menu:
select from the Recent Content Sets
OR
click Open Content Set and retrieve a saved Content Set (.xls) file.
Copying/Migrating SharePoint Sites 35
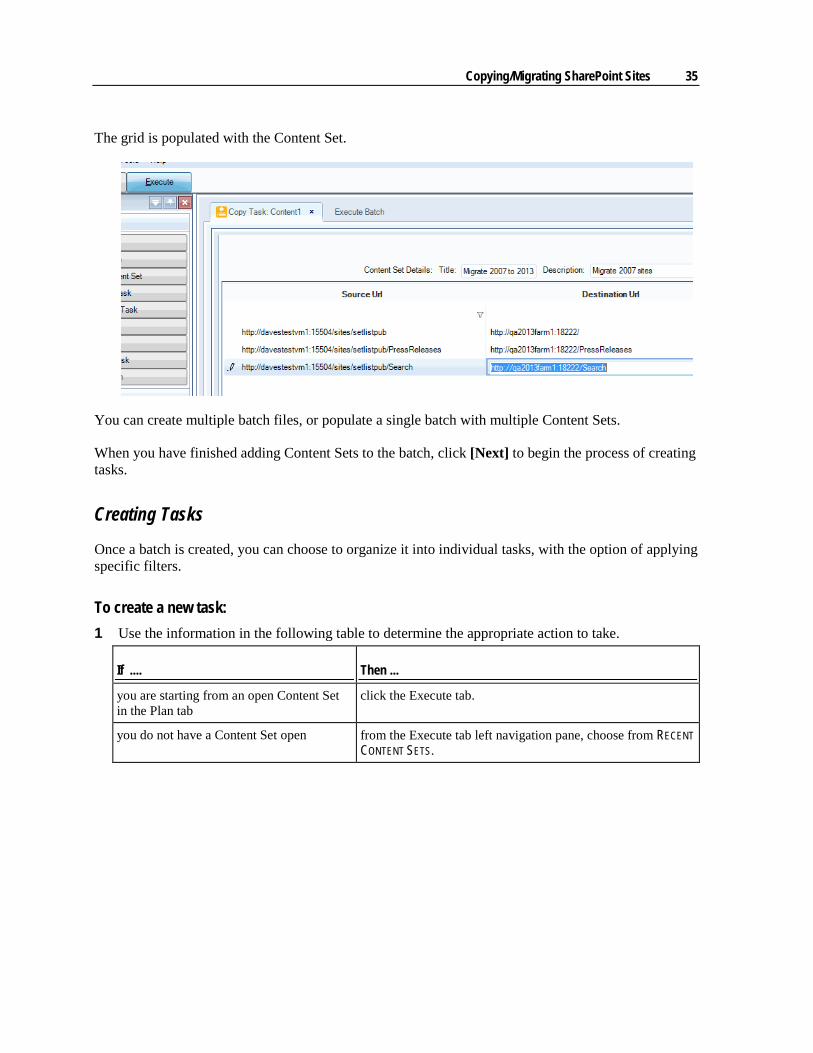
The grid is populated with the Content Set.
You can create multiple batch files, or populate a single batch with multiple Content Sets.
When you have finished adding Content Sets to the batch, click [Next] to begin the process of creating tasks.
Creating Tasks
Once a batch is created, you can choose to organize it into individual tasks, with the option of applying specific filters.
To create a new task: 1 Use the information in the following table to determine the appropriate action to take.
If .... Then ...
you are starting from an open Content Set in the Plan tab
click the Execute tab.
you do not have a Content Set open from the Execute tab left navigation pane, choose from RECENT CONTENT SETS.
36 ControlPoint Change Manager/SharePoint Migration User's Guide
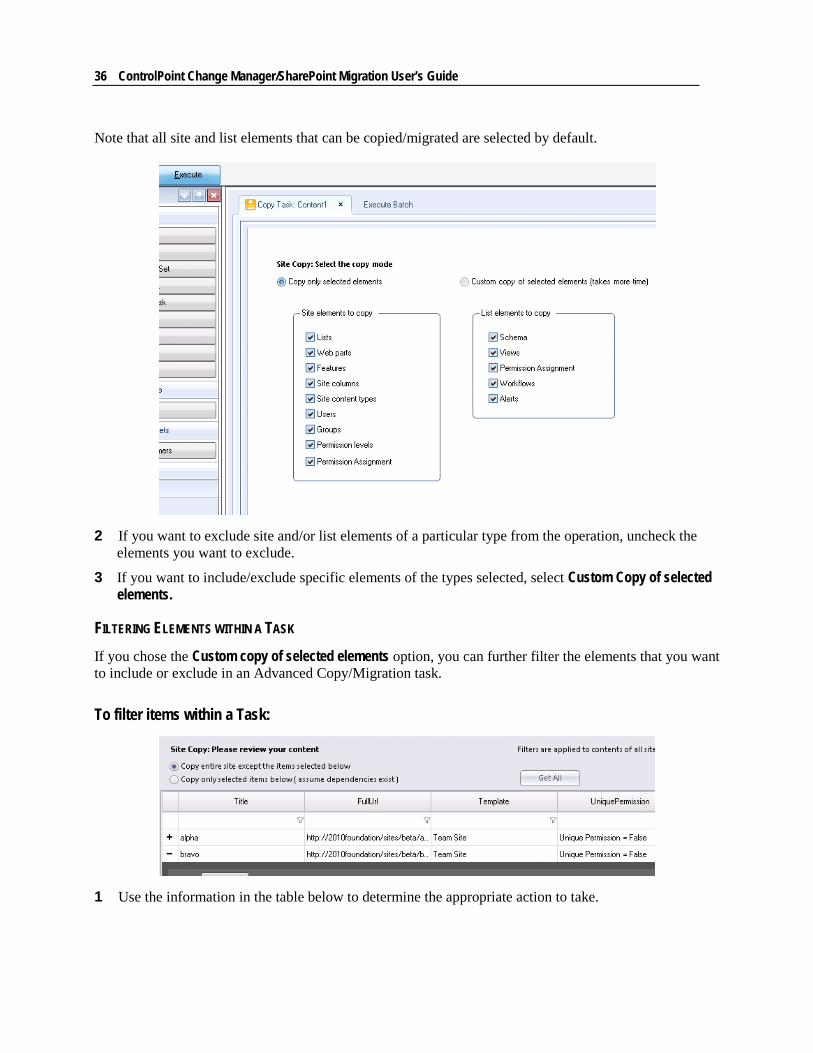
Note that all site and list elements that can be copied/migrated are selected by default.
2 If you want to exclude site and/or list elements of a particular type from the operation, uncheck the elements you want to exclude.
3 If you want to include/exclude specific elements of the types selected, select Custom Copy of selected elements.
FILTERING ELEMENTS WITHIN A TASK If you chose the Custom copy of selected elements option, you can further filter the elements that you want to include or exclude in an Advanced Copy/Migration task.
To filter items within a Task:
1 Use the information in the table below to determine the appropriate action to take.
Copying/Migrating SharePoint Sites 37
If you want to ... Then ...
copy the entire site but exclude selected items
Select Copy entire site except items selected below.
copy selected items but exclude the site itself
Select Copy only selected items below.
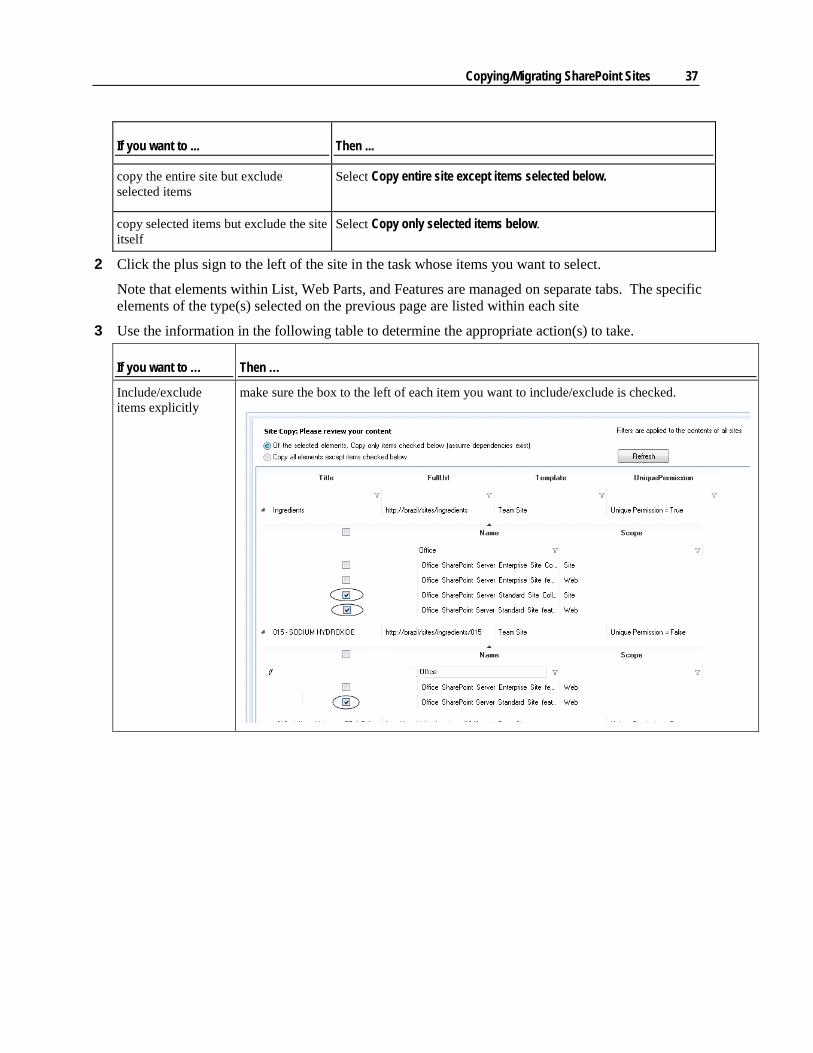
2 Click the plus sign to the left of the site in the task whose items you want to select.
Note that elements within List, Web Parts, and Features are managed on separate tabs. The specific elements of the type(s) selected on the previous page are listed within each site
3 Use the information in the following table to determine the appropriate action(s) to take.
If you want to … Then …
Include/exclude items explicitly
make sure the box to the left of each item you want to include/exclude is checked.
38 ControlPoint Change Manager/SharePoint Migration User's Guide
If you want to … Then …
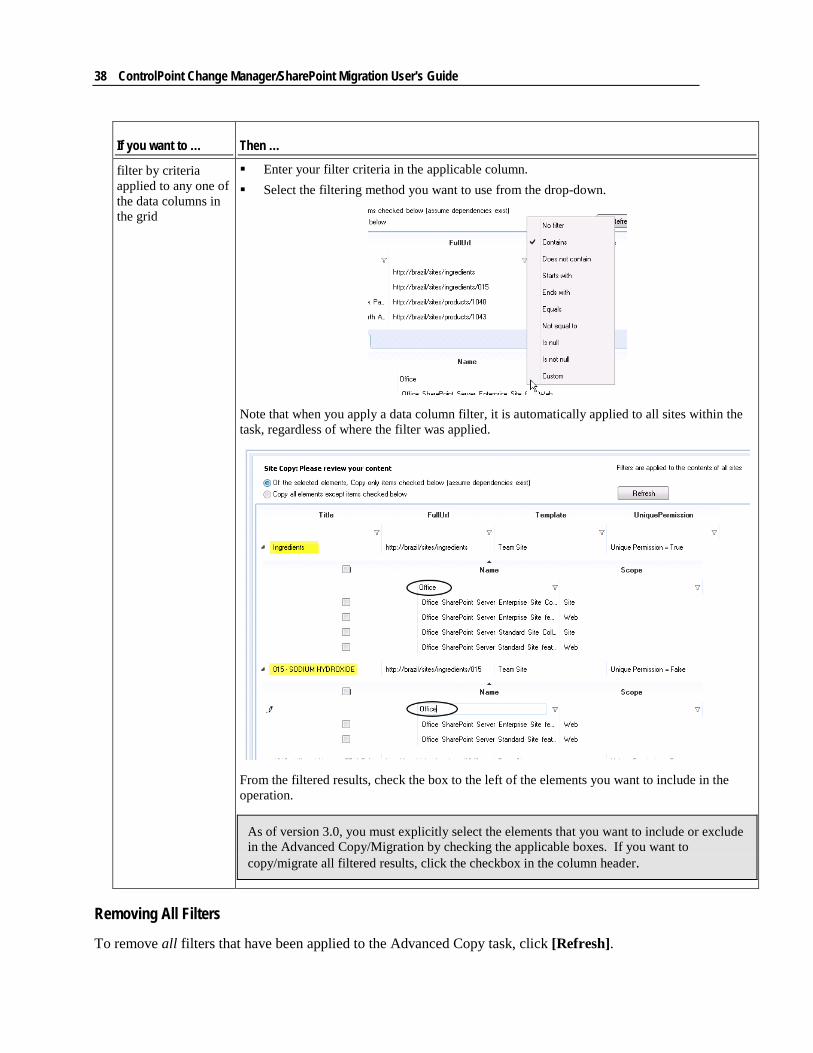
filter by criteria applied to any one of the data columns in the grid
Enter your filter criteria in the applicable column. Select the filtering method you want to use from the drop-down.
Note that when you apply a data column filter, it is automatically applied to all sites within the task, regardless of where the filter was applied.
From the filtered results, check the box to the left of the elements you want to include in the operation.
As of version 3.0, you must explicitly select the elements that you want to include or exclude in the Advanced Copy/Migration by checking the applicable boxes. If you want to copy/migrate all filtered results, click the checkbox in the column header.
Removing All Filters
To remove all filters that have been applied to the Advanced Copy task, click [Refresh].
Copying/Migrating SharePoint Sites 39
Saving a Content Set
Whenever a new Content Set is opened or changes are made to an existing Content Set, an asterisk (*) appears on the Plan tab, as well as on the unsaved Content Set tab.
To save a Content Set:
From the Action panel, select Save, then save it to the File System location of your choice.
The Content Set will be saved as an Excel file, which can be reviewed by stakeholders in your organization prior to being copied/migrated. The Excel file itself can be modified, then re-opened in the Batch Builder application.
Changing Default Settings
The General Options feature lets you specify global settings for batch processing. You can, however, override the following global settings on a batch-by-batch basis:
• Site Settings • List Settings • User Mapping • Workflow Settings.
NOTE: The option to overwrite a site is selectable only if the Enable settings which can remove destination data option is selected on the General Options - Advanced Settings tab (see "General Options - Advanced" on page 55).
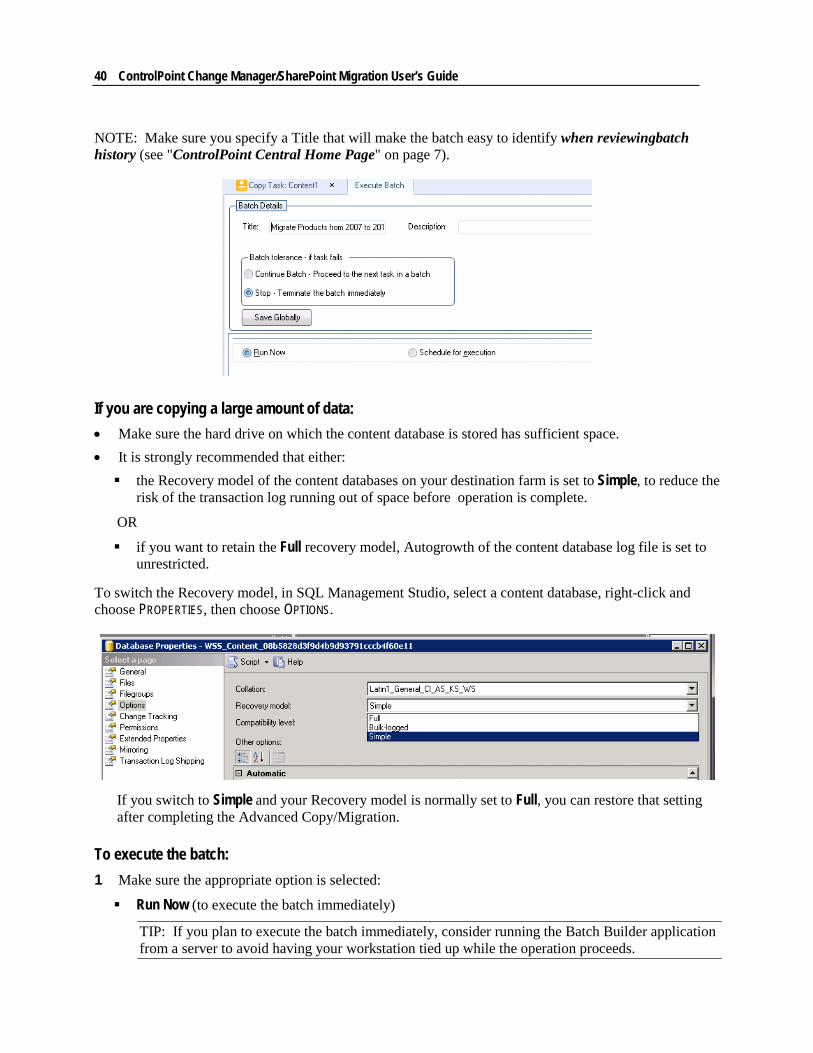
Executing the Batch
The final step before copying your batch is to determine your batch tolerance and schedule. The batch tolerance tells the Batch Builder how to proceed if a task fails—either continuing the Advanced Copy/Migration by moving to the next task or stopping the batch immediately so that corrective action can be taken.
40 ControlPoint Change Manager/SharePoint Migration User's Guide
NOTE: Make sure you specify a Title that will make the batch easy to identify when reviewingbatch history (see "ControlPoint Central Home Page" on page 7).
If you are copying a large amount of data: • Make sure the hard drive on which the content database is stored has sufficient space. • It is strongly recommended that either: the Recovery model of the content databases on your destination farm is set to Simple, to reduce the
risk of the transaction log running out of space before operation is complete.
OR
if you want to retain the Full recovery model, Autogrowth of the content database log file is set to unrestricted.
To switch the Recovery model, in SQL Management Studio, select a content database, right-click and choose PROPERTIES, then choose OPTIONS.
If you switch to Simple and your Recovery model is normally set to Full, you can restore that setting after completing the Advanced Copy/Migration.
To execute the batch: 1 Make sure the appropriate option is selected:
Run Now (to execute the batch immediately)
TIP: If you plan to execute the batch immediately, consider running the Batch Builder application from a server to avoid having your workstation tied up while the operation proceeds.
Copying/Migrating SharePoint Sites 41
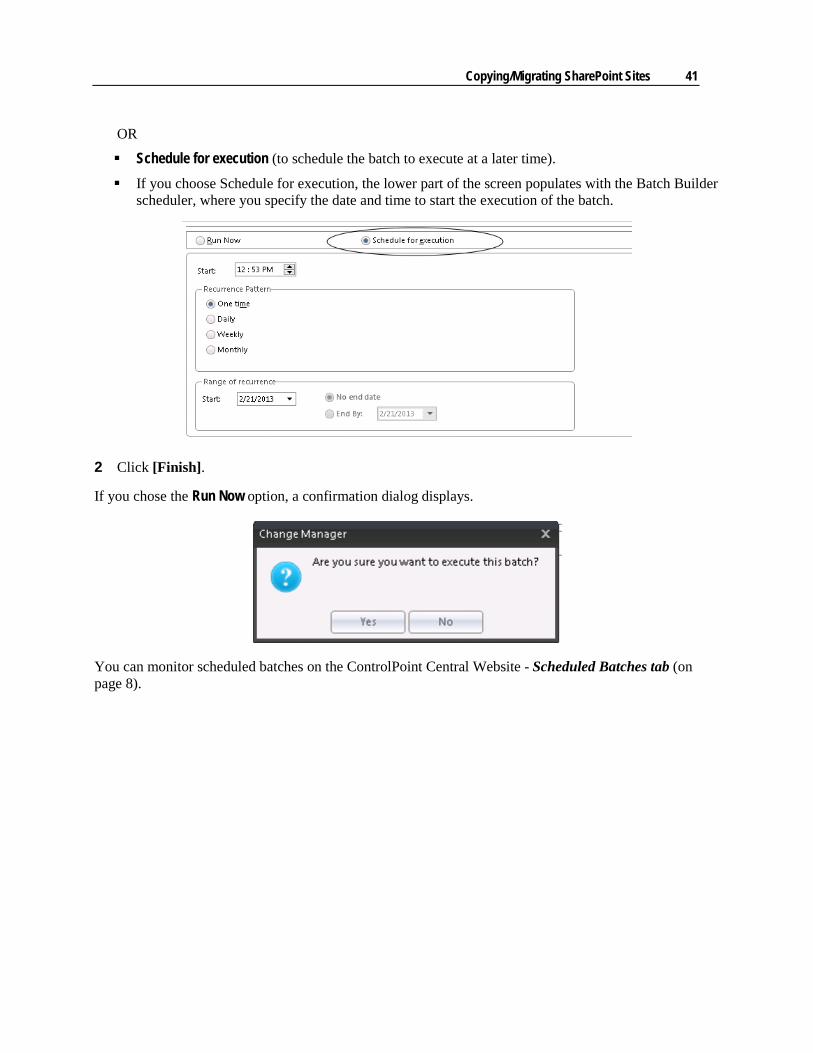
OR
Schedule for execution (to schedule the batch to execute at a later time).
If you choose Schedule for execution, the lower part of the screen populates with the Batch Builder scheduler, where you specify the date and time to start the execution of the batch.
2 Click [Finish].
If you chose the Run Now option, a confirmation dialog displays.
You can monitor scheduled batches on the ControlPoint Central Website - Scheduled Batches tab (on page 8).
42 ControlPoint Change Manager/SharePoint Migration User's Guide
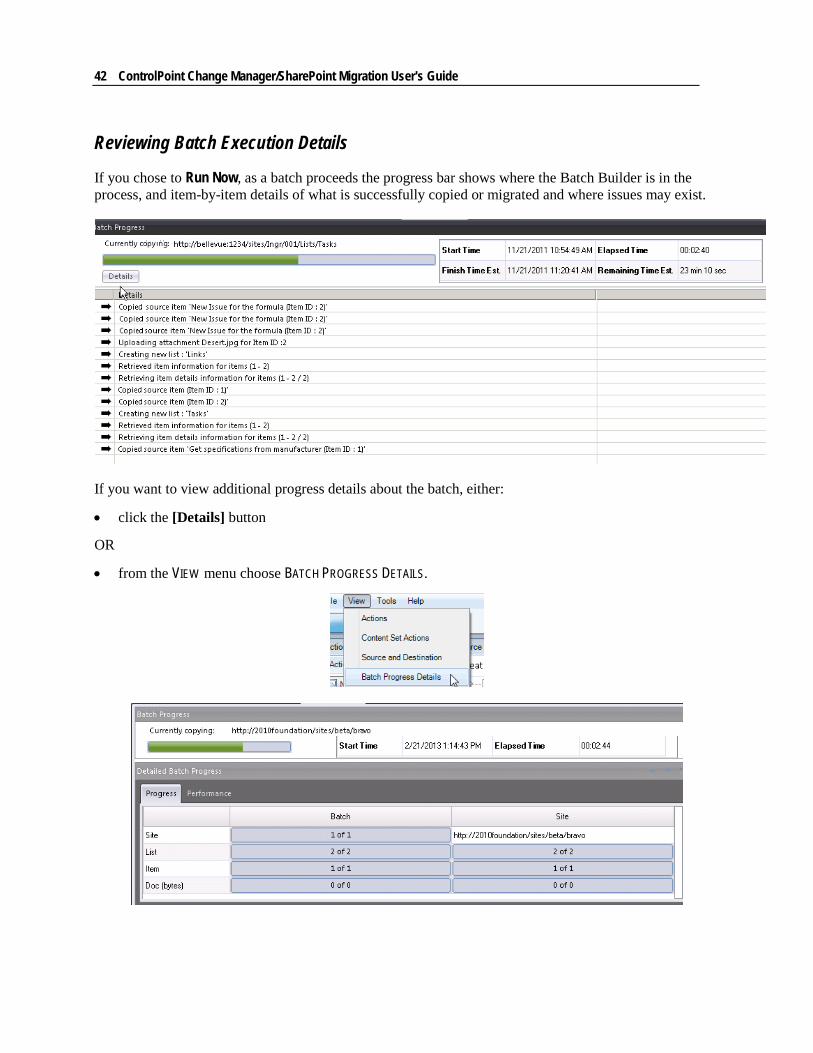
Reviewing Batch Execution Details
If you chose to Run Now, as a batch proceeds the progress bar shows where the Batch Builder is in the process, and item-by-item details of what is successfully copied or migrated and where issues may exist.
If you want to view additional progress details about the batch, either:
• click the [Details] button
OR
• from the VIEW menu choose BATCH PROGRESS DETAILS.
Copying/Migrating SharePoint Sites 43
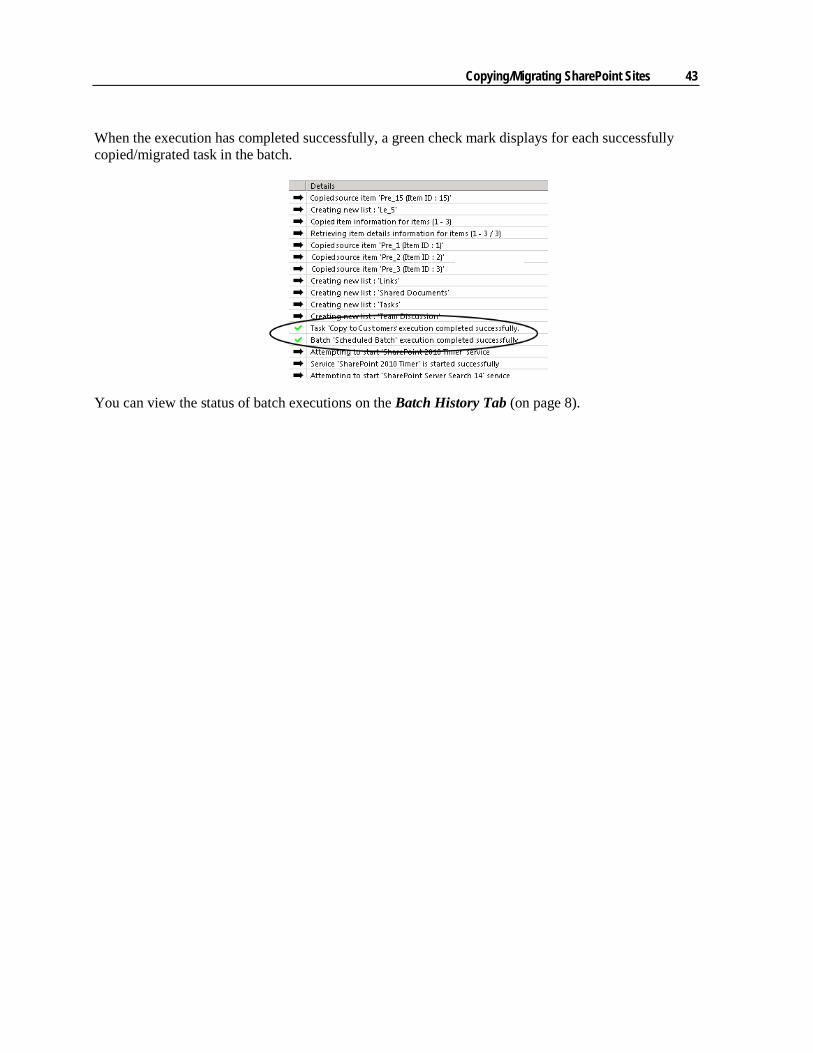
When the execution has completed successfully, a green check mark displays for each successfully copied/migrated task in the batch.
You can view the status of batch executions on the Batch History Tab (on page 8).
44 ControlPoint Change Manager/SharePoint Migration User's Guide
Performing an Incremental Advanced Copy/Migration After you have copied or migrated a site, you can perform "incremental" operations to update any changes that may have been made to
• lists and libraries
EXCEPTION: Incremental operations cannot be performed on Survey lists.
• Web Parts on the source farm(s), and/or • workflows
How Incremental Copying of List/Library Items are Handled
For document libraries, the source and destination libraries are matched based on file name and location.
NOTE: If a file name has changed or the file has been moved to a different folder, it will be copied as a new file.
For other list types (events, calendars, announcements, tasks, and so on), the source and destination lists are matched based on the source List ID and Item ID.
Any new files and items from the source will be appended to the destination list or library as a new version.
NOTE: As with native SharePoint, if versioning is turned off items at the destination will be overwritten with "matching" items from the source.
The operation will not, however, delete items from the destination that no longer exist on the source.
In addition:
• list settings are taken from the source • fields, content types, views, and permissions from the source list are merged with those of the
destination list.
How the Incremental Copying of Web Parts is Handled
Web Parts on the source and destination are matched by type and title. If the Web Part zone where the Web Part resides on the source does not exist at the destination, you can chose whether you want to copy to the first Web Part zone on the page or to skip copying of that Web Part and record a message in the batch execution details.
How the Incremental Copying of Workflows is Handled
For SharePoint "out-of-the-box" workflows, workflows on the source and destination are matched by Workflow Association title and template.

Performing an Incremental Advanced Copy/Migration 45
For SharePoint designer and Nintex workflows, workflows on the source and destination are matched by Workflow Association title and special keys that were created by the Batch Builder application during the initial copy.
Excluding Objects from an Incremental Operation
Make sure that you exclude any components that you do not want to "re-copy" from the task. See Filtering Elements within a Task (on page 36).
If you want to exclude workflows from an incremental Advanced Copy, on the Workflow Settings tab make sure both the Workflow Association and Completed workflow instance boxes are unchecked.
To perform an incremental Advanced Copy/Migration:
Follow the procedures for Copying/Migrating SharePoint Sites (on page 34), with the following options selected:
• For SITE SETTINGS - SITE OPTIONS, select Do not overwrite destination site and Use existing site.
46 ControlPoint Change Manager/SharePoint Migration User's Guide
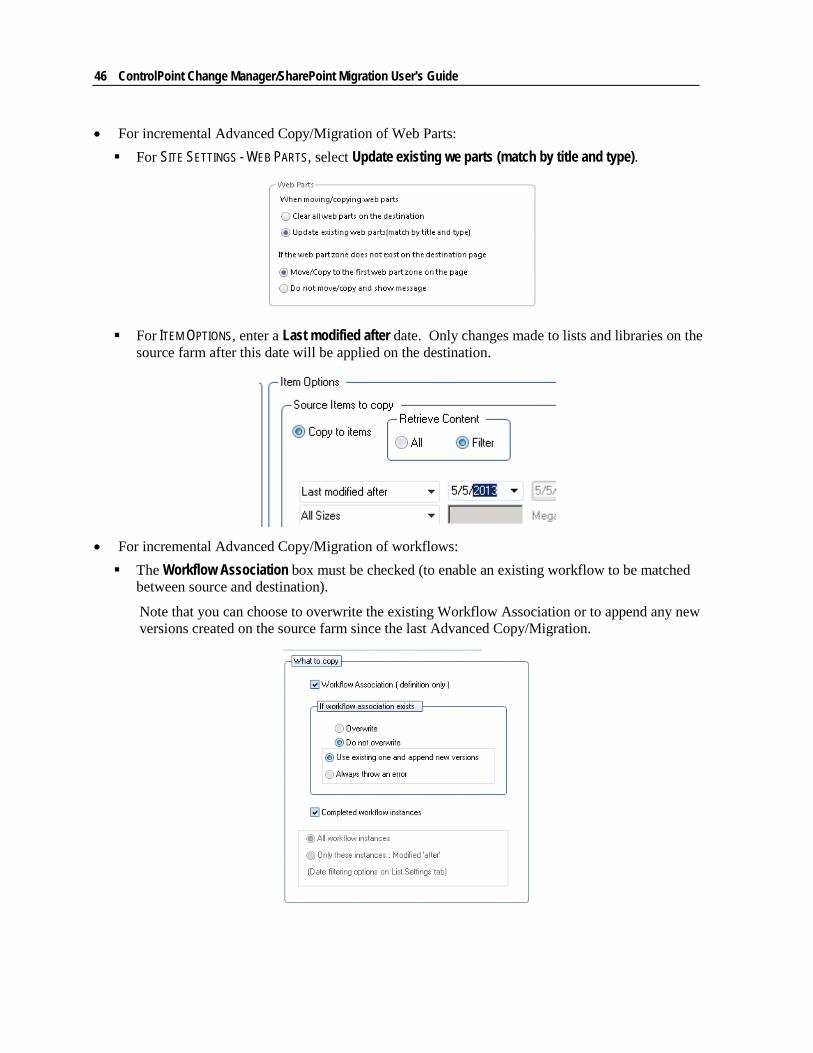
• For incremental Advanced Copy/Migration of Web Parts: For SITE SETTINGS - WEB PARTS, select Update existing we parts (match by title and type).
For ITEM OPTIONS, enter a Last modified after date. Only changes made to lists and libraries on the source farm after this date will be applied on the destination.
• For incremental Advanced Copy/Migration of workflows: The Workflow Association box must be checked (to enable an existing workflow to be matched
between source and destination).
Note that you can choose to overwrite the existing Workflow Association or to append any new versions created on the source farm since the last Advanced Copy/Migration.
Performing an Incremental Advanced Copy/Migration 47
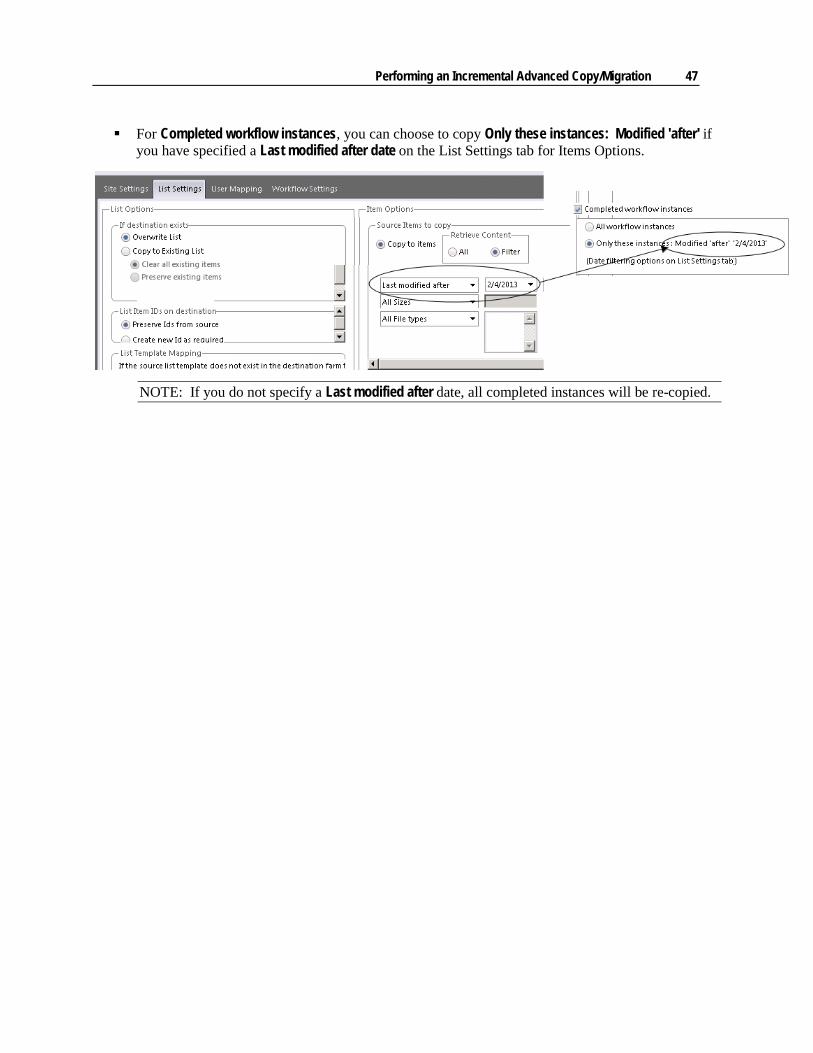
For Completed workflow instances, you can choose to copy Only these instances: Modified 'after' if you have specified a Last modified after date on the List Settings tab for Items Options.
NOTE: If you do not specify a Last modified after date, all completed instances will be re-copied.

48 ControlPoint Change Manager/SharePoint Migration User's Guide
Setting General Options for the Batch Builder Client Application While many of the controls and settings within the Batch Builder application are contextual—meaning they apply to the open screens—there are a number of settings that can be applied globally.
To access General Options:
From the Batch Builder application Tools menu, choose GENERAL OPTIONS.
The General Options screen consists of the following tabs:
• General • Site Settings • List Settings • Cross Domain Mapping • Workflow Settings • Advanced

Setting General Options for the Batch Builder Client Application 49
General Settings Within the General Options - General Settings tab you can define the number of Content Sets, tasks, and batches to display in the Actions menu, as well as the number of progress messages to display in the batch progress screen.
General Options - Site Settings Within the General Options - Site Settings tab you can determine how to proceed when copying/migrating a site that already exists on the destination. You have the option to overwrite the entire site, or use the existing site and merge any lists and content. You can even choose to map the template of the source site to a different template on the destination site in the event that the source template doesn't exist there.
NOTE: The option to overwrite a site is selectable only if the Enable settings which can remove destination data option is selected on the General Options - Advanced tab. See General Options - Advanced (on page 55).
You can also set rules for permissions, site administration settings, and general look and feel. These are important if your goal is to replicate the exact settings of the source site.
50 ControlPoint Change Manager/SharePoint Migration User's Guide
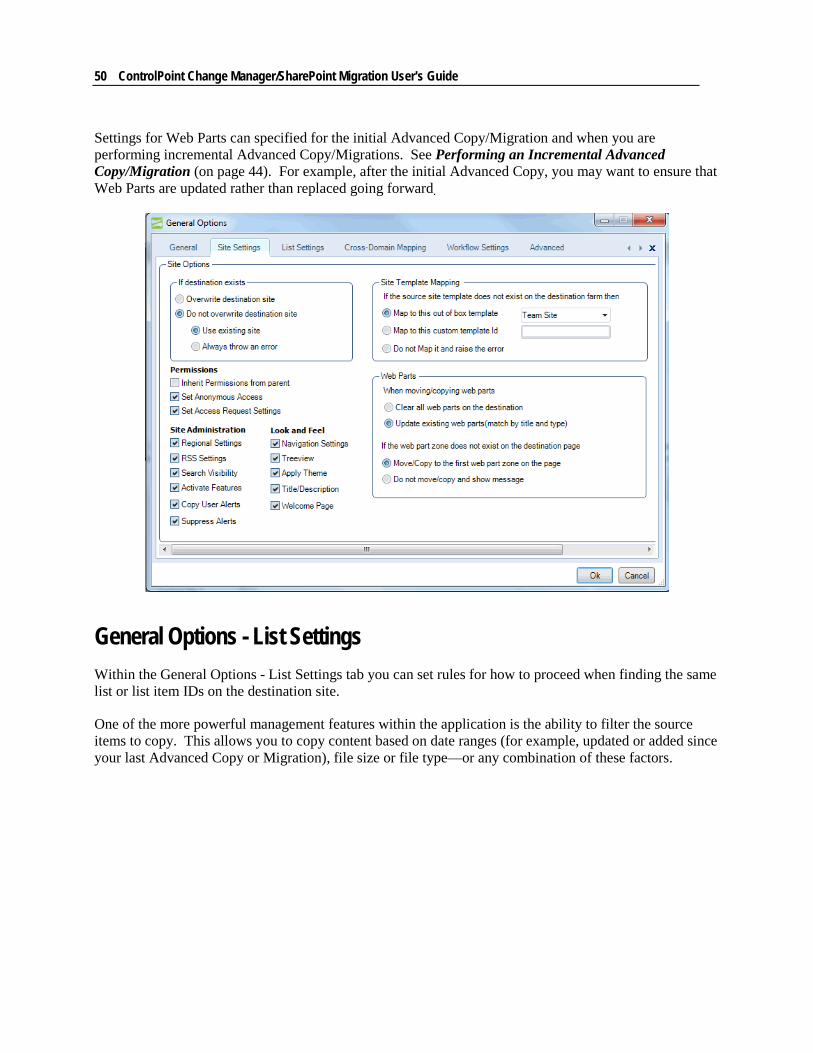
Settings for Web Parts can specified for the initial Advanced Copy/Migration and when you are performing incremental Advanced Copy/Migrations. See Performing an Incremental Advanced Copy/Migration (on page 44). For example, after the initial Advanced Copy, you may want to ensure that Web Parts are updated rather than replaced going forward.
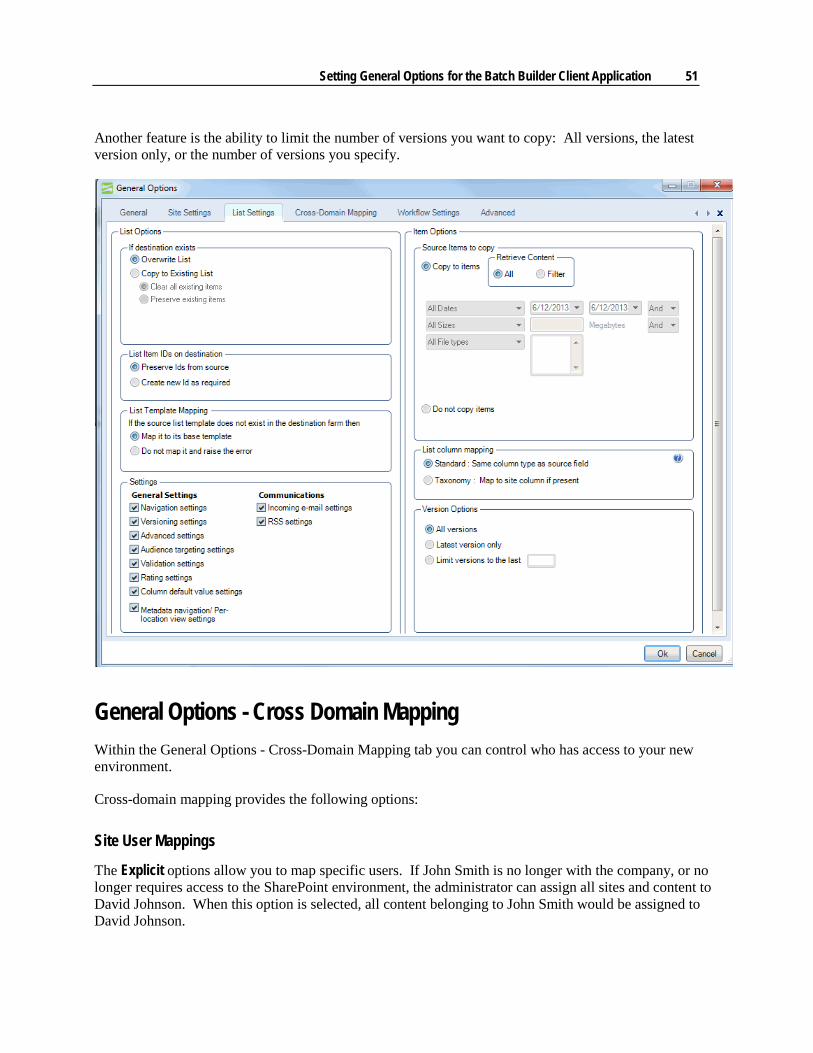
General Options - List Settings Within the General Options - List Settings tab you can set rules for how to proceed when finding the same list or list item IDs on the destination site.
One of the more powerful management features within the application is the ability to filter the source items to copy. This allows you to copy content based on date ranges (for example, updated or added since your last Advanced Copy or Migration), file size or file type—or any combination of these factors.
Setting General Options for the Batch Builder Client Application 51
Another feature is the ability to limit the number of versions you want to copy: All versions, the latest version only, or the number of versions you specify.
General Options - Cross Domain Mapping Within the General Options - Cross-Domain Mapping tab you can control who has access to your new environment.
Cross-domain mapping provides the following options:
Site User Mappings
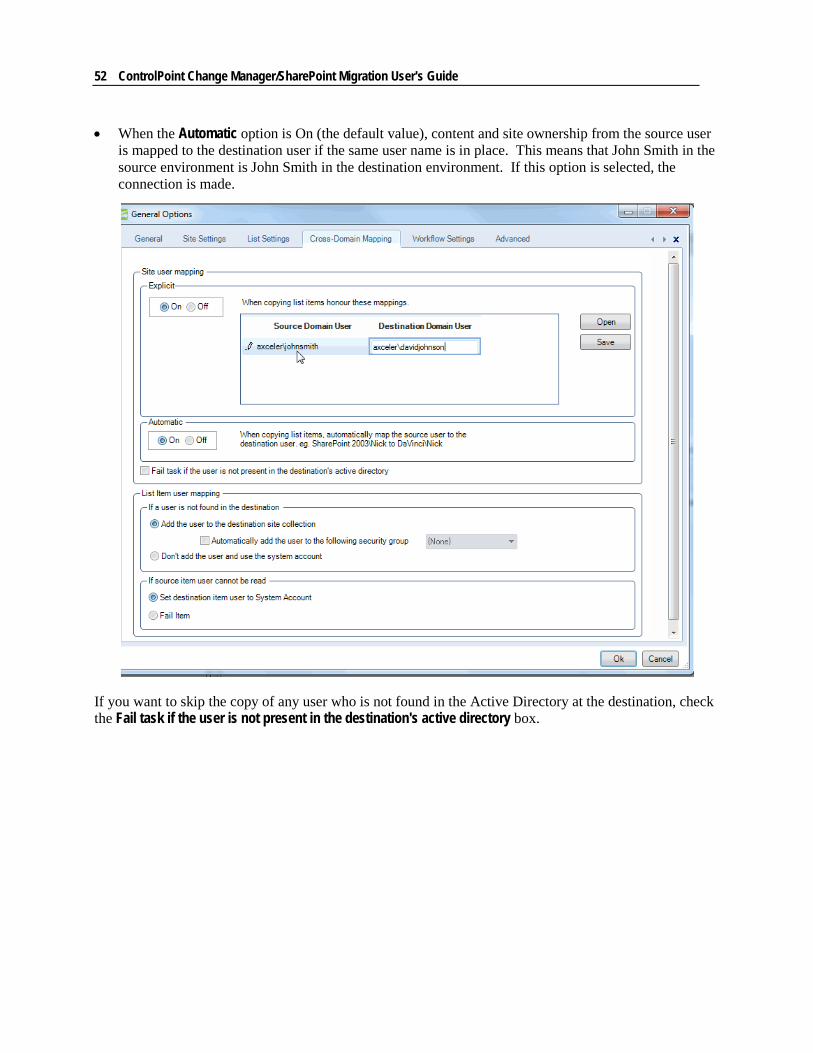
The Explicit options allow you to map specific users. If John Smith is no longer with the company, or no longer requires access to the SharePoint environment, the administrator can assign all sites and content to David Johnson. When this option is selected, all content belonging to John Smith would be assigned to David Johnson.
52 ControlPoint Change Manager/SharePoint Migration User's Guide
• When the Automatic option is On (the default value), content and site ownership from the source user is mapped to the destination user if the same user name is in place. This means that John Smith in the source environment is John Smith in the destination environment. If this option is selected, the connection is made.
If you want to skip the copy of any user who is not found in the Active Directory at the destination, check the Fail task if the user is not present in the destination's active directory box.
Setting General Options for the Batch Builder Client Application 53
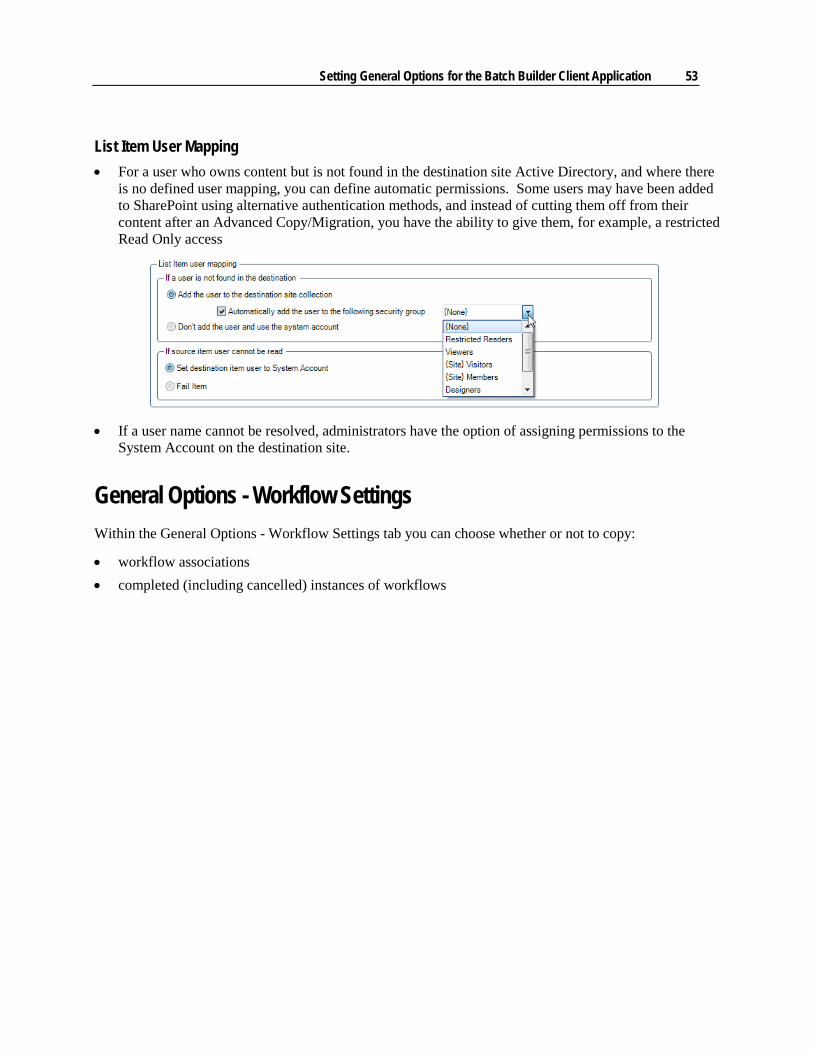
List Item User Mapping • For a user who owns content but is not found in the destination site Active Directory, and where there
is no defined user mapping, you can define automatic permissions. Some users may have been added to SharePoint using alternative authentication methods, and instead of cutting them off from their content after an Advanced Copy/Migration, you have the ability to give them, for example, a restricted Read Only access
• If a user name cannot be resolved, administrators have the option of assigning permissions to the System Account on the destination site.
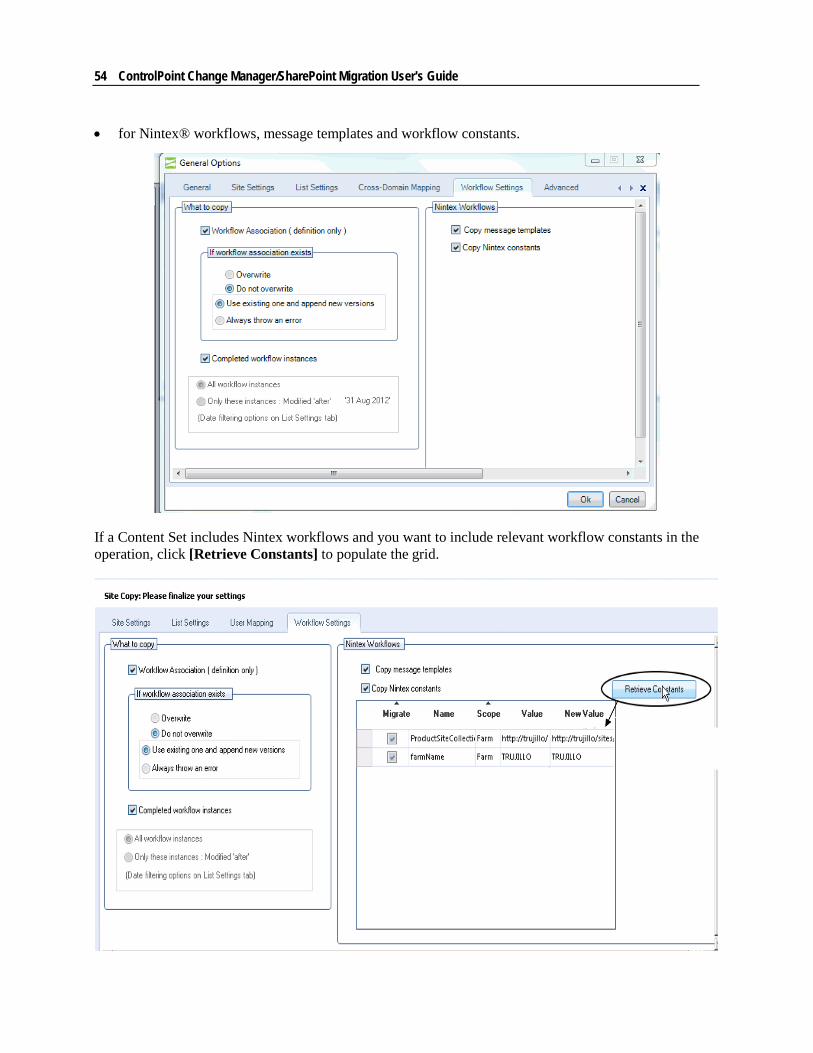
General Options - Workflow Settings Within the General Options - Workflow Settings tab you can choose whether or not to copy:
• workflow associations • completed (including cancelled) instances of workflows
54 ControlPoint Change Manager/SharePoint Migration User's Guide
• for Nintex® workflows, message templates and workflow constants.
If a Content Set includes Nintex workflows and you want to include relevant workflow constants in the operation, click [Retrieve Constants] to populate the grid.
Setting General Options for the Batch Builder Client Application 55
You can then choose whether to include/exclude constants individually by checking/unchecking the corresponding Migrate box.
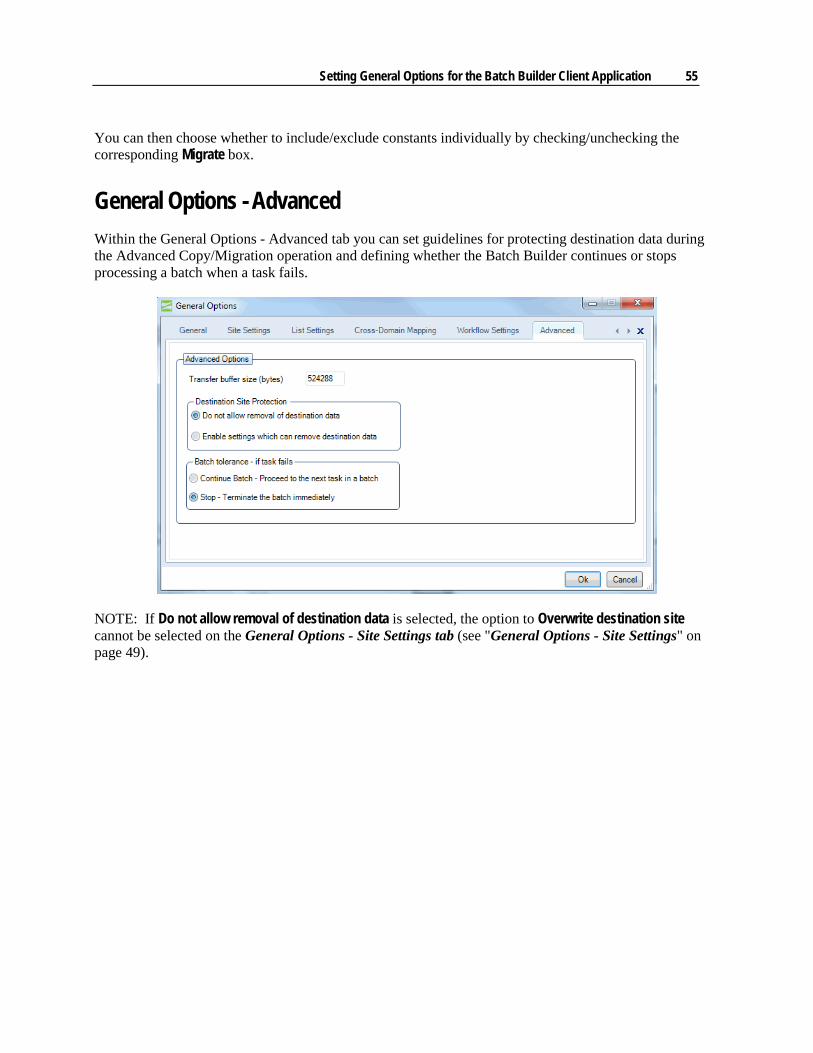
General Options - Advanced Within the General Options - Advanced tab you can set guidelines for protecting destination data during the Advanced Copy/Migration operation and defining whether the Batch Builder continues or stops processing a batch when a task fails.
NOTE: If Do not allow removal of destination data is selected, the option to Overwrite destination site cannot be selected on the General Options - Site Settings tab (see "General Options - Site Settings" on page 49).

57
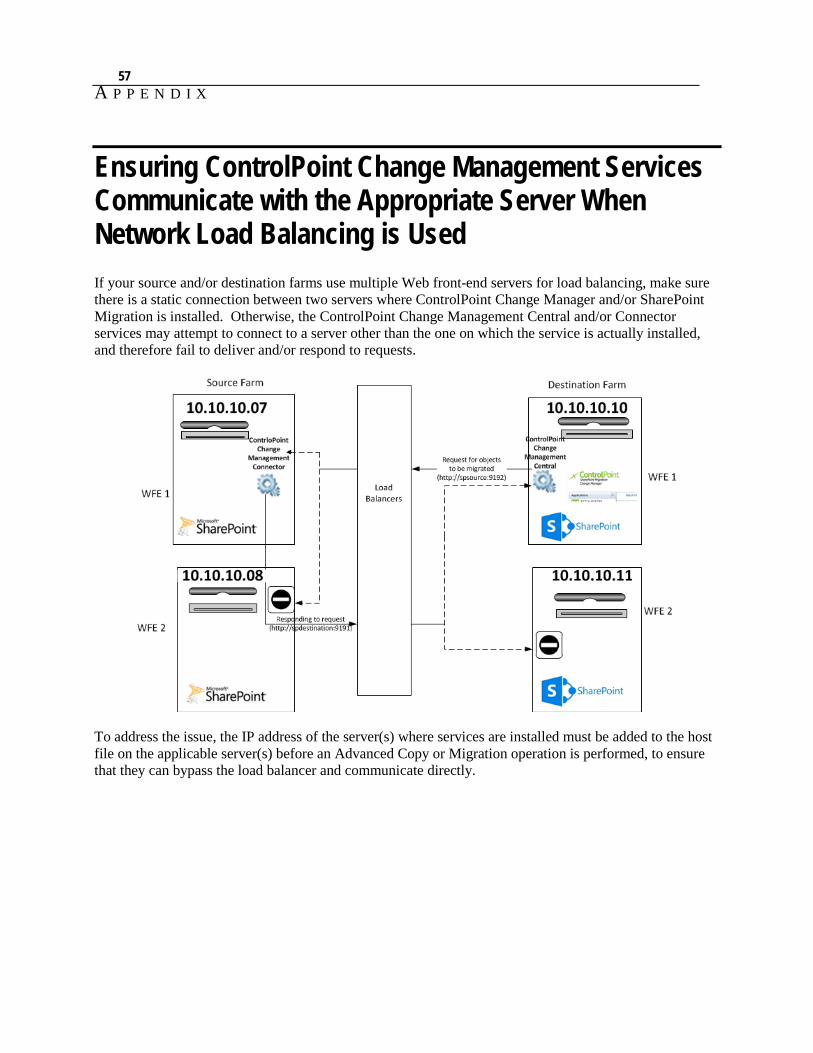
Ensuring ControlPoint Change Management Services Communicate with the Appropriate Server When Network Load Balancing is Used If your source and/or destination farms use multiple Web front-end servers for load balancing, make sure there is a static connection between two servers where ControlPoint Change Manager and/or SharePoint Migration is installed. Otherwise, the ControlPoint Change Management Central and/or Connector services may attempt to connect to a server other than the one on which the service is actually installed, and therefore fail to deliver and/or respond to requests.
To address the issue, the IP address of the server(s) where services are installed must be added to the host file on the applicable server(s) before an Advanced Copy or Migration operation is performed, to ensure that they can bypass the load balancer and communicate directly.
A P P E N D I X

58 ControlPoint Change Management User's Guide

Appendix Error! No text of specified style in document. 59
Technical Support Axceler is committed to providing timely and effective customer support to its customers worldwide. Axceler Technical Support is available to help you solve problems. The standard customer support contract guarantees technical support during contractually specified hours. To obtain technical support, have your customer license number ready.
To contact Axceler Technical Support, telephone, fax, or e-mail the nearest office listed below.
Axceler - North America Axceler - Europe
600 Unicorn Park Drive
Woburn, MA 01801
Phone: 781.995.0063
Toll Free: 866.767.0173
Fax: 781.287.0180
e-mail: [email protected]
7 Swallow Place
London W1B 2AG, UK
Phone: +44 (0) 20 7850.0199
Fax: +44 (0) 20 7850.0270
e-mail: [email protected]
The Axceler Customer Portal
If you are have an active support contract with Axceler and your email address is in Axceler's Technical Support database, you can log into the Axceler Customer Portal at https://support.axceler.com nand access the following product resources:
• announcements of new versions, critical maintenance releases, and other information that may be useful to users of Axceler products
• the product Knowledge Base, which includes training videos, product documentation, and FAQs • articles, use cases, white papers, and company blogs
You can also connect directly with Axceler's support team and file and manage your own support tickets.
If you are visiting the portal for the first time, enter your email address in the log in screen then click the [Retrieve Password] button. You will promptly receive a temporary password for your account via email from Axceler Technical Support.