
CHANDELIER 11/17 - canarm.com · CHANDELIER Tige en verre 1x 68pcs Anneau de métal Écrou Étape 1...
4
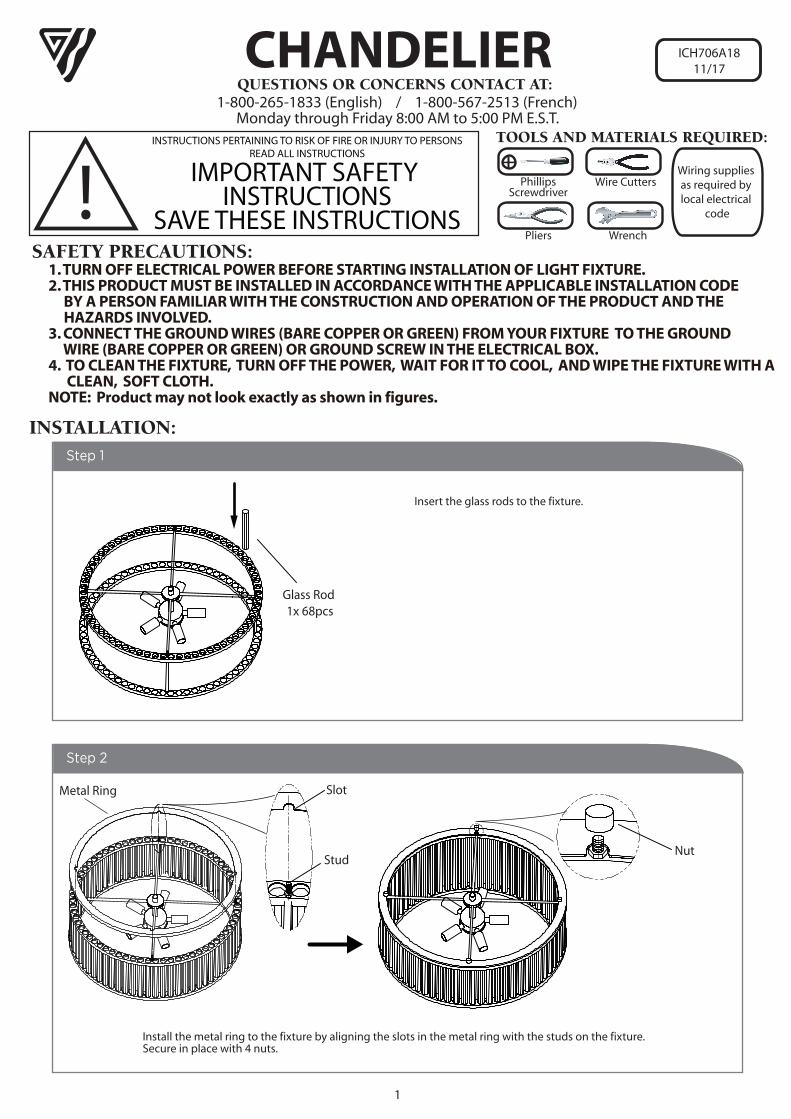
ICH706A18 11/17 CHANDELIER INSTALLATION: Glass Rod 1x 68pcs Metal Ring Nut Step 1 Step 2 Insert the glass rods to the fixture. Install the metal ring to the fixture by aligning the slots in the metal ring with the studs on the fixture. Secure in place with 4 nuts. 1 Slot Stud SAFETY PRECAUTIONS: TOOLS AND MATERIALS REQUIRED: Phillips Screwdriver Wire Cutters Pliers Wrench ! INSTRUCTIONS PERTAINING TO RISK OF FIRE OR INJURY TO PERSONS READ ALL INSTRUCTIONS IMPORTANT SAFETY INSTRUCTIONS SAVE THESE INSTRUCTIONS QUESTIONS OR CONCERNS CONTACT AT: 1-800-265-1833 (English) / 1-800-567-2513 (French) Monday through Friday 8:00 AM to 5:00 PM E.S.T. Wiring supplies as required by local electrical code 1. TURN OFF ELECTRICAL POWER BEFORE STARTING INSTALLATION OF LIGHT FIXTURE. 2. THIS PRODUCT MUST BE INSTALLED IN ACCORDANCE WITH THE APPLICABLE INSTALLATION CODE BY A PERSON FAMILIAR WITH THE CONSTRUCTION AND OPERATION OF THE PRODUCT AND THE HAZARDS INVOLVED. 3. CONNECT THE GROUND WIRES (BARE COPPER OR GREEN) FROM YOUR FIXTURE TO THE GROUND WIRE (BARE COPPER OR GREEN) OR GROUND SCREW IN THE ELECTRICAL BOX. 4. TO CLEAN THE FIXTURE, TURN OFF THE POWER, WAIT FOR IT TO COOL, AND WIPE THE FIXTURE WITH A CLEAN, SOFT CLOTH. NOTE: Product may not look exactly as shown in figures.
Transcript of CHANDELIER 11/17 - canarm.com · CHANDELIER Tige en verre 1x 68pcs Anneau de métal Écrou Étape 1...
ICH706A1811/17CHANDELIER
INSTALLATION:
Glass Rod 1x 68pcs
Metal Ring
Nut
Step 1
Step 2
Insert the glass rods to the fixture.
Install the metal ring to the fixture by aligning the slots in the metal ring with the studs on the fixture. Secure in place with 4 nuts.
1
Slot
Stud
SAFETY PRECAUTIONS:
TOOLS AND MATERIALS REQUIRED:
PhillipsScrewdriver
Wire Cutters
Pliers Wrench
!INSTRUCTIONS PERTAINING TO RISK OF FIRE OR INJURY TO PERSONS
READ ALL INSTRUCTIONS
IMPORTANT SAFETY INSTRUCTIONS
SAVE THESE INSTRUCTIONS
QUESTIONS OR CONCERNS CONTACT AT:1-800-265-1833 (English) / 1-800-567-2513 (French)
Monday through Friday 8:00 AM to 5:00 PM E.S.T.
Wiring supplies as required by local electrical
code
1. TURN OFF ELECTRICAL POWER BEFORE STARTING INSTALLATION OF LIGHT FIXTURE. 2. THIS PRODUCT MUST BE INSTALLED IN ACCORDANCE WITH THE APPLICABLE INSTALLATION CODE BY A PERSON FAMILIAR WITH THE CONSTRUCTION AND OPERATION OF THE PRODUCT AND THE HAZARDS INVOLVED.3. CONNECT THE GROUND WIRES (BARE COPPER OR GREEN) FROM YOUR FIXTURE TO THE GROUND WIRE (BARE COPPER OR GREEN) OR GROUND SCREW IN THE ELECTRICAL BOX.4. TO CLEAN THE FIXTURE, TURN OFF THE POWER, WAIT FOR IT TO COOL, AND WIPE THE FIXTURE WITH A CLEAN, SOFT CLOTH.NOTE: Product may not look exactly as shown in figures.

Step 3 Step 4
Step 5 Step 6
Step 7
2Tel: (613) 342-5424, Fax: (800) 263-4598
Center rod
NippleLoop
Screw the upper loop (with internal threads) to the nipple. Screw the rod to the lower loop (with external threads).
Install the length of rod(s) that is required by threading wire through the rod(s) and screwing it to the fixture. Studs
“B”
Loosen “B”. Adjust stud to desired length and lock in place with “B”.
Electrical Box Screws(not included)
Electrical Box
MountingBracket
Mount the mounting bracket to electrical box using electrical box screws (not included). Make sure the studs on the mounting bracket are facing out from the electrical box.
White
BlackHouse supply
Ground wire
FixtureGround wire
Connect the ground wires(bare copper or green) from yourfixture to the ground wire (bare copper or green) or ground screw in the electrical box. Connect the black wire (or wire with marking) from the fixture to the black wire in the electrical box and connect the white wire from the fixture tothe white wire in the electrical box.
Step 8
Step 9
Install specified bulb type and wattage (not included).Secure the glass in place by the finial.
Glass
StarWasher Cap
Nut
Fixture
Stud
Once connections of wires are completed, carefully tuck wires and wire nuts into the electrical box making sure no bare wire (on the black and white) is visible at the wire nuts.
Tuck electrical wires into electrical box and position fixture over studs on mounting bracket assembly. Secure fixture in place with star washers and cap nuts.
Bulb
Fixture
Mounting Bracket
Suspending Wire
Use the suspending wire to hang the fixture as shown for wiring connection.
Finial

CHANDELIER
Tige en verre1x 68pcs
Anneau de métal
Écrou
Étape 1
Étape 2
Poser les tiges en verre au luminaire.
Poser l’anneau de métal au luminaire en alignant les ouvertures sur l’anneau avec les goujons sur le luminaire. Fixer en place à l’aide des 4 écrous
1
INSTALLATION:
Goujon
Ouverture
Tournevis APhillips
Coupeur De Fils
Pinces Clef!
INSTRUCTIONS CONCERNANT LE RISQUE D’INCENDIES OU LES DOMMAGES CORPORELS
LISEZ TOUTES LES INSTRUCTIONS
INSTRUCTIONS DE SÛRETÉ IMPORTANTES
GARDEZ CES INSTRUCTIONS
Fournitures électriques telles
que prescrites par les normes
locales
MISE EN GARDE:
OUTILS ET MATERIAUX REQUIS:
QUESTIONS OU INFORMATION COMMUNIQUE AVEC AU:1-800-265-1833 (Anglais) / 1-800-567-2513 (Français)
Du lundi au vendredi entre 8:00H et 17:00H H.N.E.
1. FERMER LE COURANT AU DISJONCTEUR AVANT DE DÉBUTER L’INSTALLATION DE LA FIXTURE.2. CE PRODUIT DOIT ÊTRE INSTALLÉ SELON LE CODE D’INSTALLATION PERTINENT, PAR UNE PERSONNE QUI CONNAIT BIEN LE PRODUIT ET SON FONCTIONNEMENT AINSI QUE LES RISQUES INHÉRENTS.3. BRANCHER LES FILS DE LA MISE A TERRE (CUIVRE NU OU VERT) DE VOTRE LUMINAIRE AU FIL DE LA MISE À TERRE (CUIVRE NU OU VERT) OU VIS DE LA MISE À TERRE DANS LA BOÎTE ÉLECTRIQUE.4. POUR NETTOYER LE LUMINAIRE, L’ÉTEINDRE, ATTENDRE QU’IL SOIT FROID, PUIS LE NETTOYER AVEC LINGE PROPRE ET DOUX. N.B.: Peut différer de illustration.
ICH706A1811/17

PH: (450) 665-2535, FX: (450) 665-0910
Étape 3 Étape 4
Étape 5 Étape 6
Étape 7 Étape 8
FleuronVitre
Bout Fileté Boucle
Tige centrale
Visser la boucle du haut (avec les filets internes) à l’embout. Visser la tige àla boucle du bas (avec les filets internes).
Posez la longueur de tige voulue en faufilant le fil en travers de la tige eten la posant à la fixture.
“B”
Goujon
Dévissez l’écrou B. Ajustez le poteau à la longueur désirée et barrez en place avec cet écrou.
Posez la ferrure d’installation à la boîte de sortie électrique à l’aide des vis de la boîte (en sus). Assurez-vous que les goujons de la ferrure d’installation font face vers l’extérieur de la boîte électrique.
Ferrure DeMontage
BoîteÉlectrique
Vis De La Boîte Électrique (en sus)
Ferrure De Montage
Luminaire
Fil de suspension
Uitliser le fil de suspension pour suspendre le luminaire tel qu’illustré afin de faciliter la connexion des fils.
Blanc
NoirFil de mise àla terre ducâblagedomestique
Fil de miseà la terre du
luminaire
Branchez les fils de la mise a terre (cuivre nu ou vert) de votre montage au fil de la mise a terre (cuivre nu ou vert) ou vis de la mise a terre dans la boite electrique. Posez le fil noir de la fixture au fil noir dans la boite électrique et posez le fil blanc de la fixture au fil blanc dans la boite.
Rondelleen étoile
Luminaire
Écrouà tête
Goujon
Une fois les connexions terminées, poussez soigneusement les fils et les connecteurs dans la boîte électrique en vous assurant qu'aucun fil dénudé (sur les fils noirs et blancs) est visible des connecteurs.Poussez délicatement les fils à l’intérieur de la boîte électrique et placez le luminaire sur les goujons sur la ferrure de montage. Serrez le luminaire en place à l’aide des écrous étoilés et les écrous à capuchon.
Poser l'ampoule de type et de wattage requis (en sus).Fixez le globe en place à l’aide du fleuron.
Étape 9
Ampoule