Chameleon Scarf - Adafruit Industries · Overview Ever wish your clothes could change color to...
35
Chameleon Scarf Created by Becky Stern Last updated on 2017-06-01 05:29:15 PM UTC
Transcript of Chameleon Scarf - Adafruit Industries · Overview Ever wish your clothes could change color to...

Chameleon ScarfCreated by Becky Stern
Last updated on 2017-06-01 05:29:15 PM UTC

236
1013222533
Guide Contents
Guide ContentsOverviewTools & SuppliesLayout & Circuit DiagramSew CircuitCodeConstruct Ruffle ScarfWear it!
© Adafruit Industries https://learn.adafruit.com/chameleon-scarf Page 2 of 35

Overview
Ever wish your clothes could change color to match each other? Make a chameleon scarf to matchevery outfit using the Flora color sensor and 12 color-changing LED pixels diffused by a ruffly knitscarf.
Prerequisite guides:
Getting Started with FLORA (http://adafru.it/aSZ)Flora NeoPixels (http://adafru.it/aRT)Adafruit Color Sensors (http://adafru.it/cb8)Conductive Thread (http://adafru.it/aVx)
© Adafruit Industries https://learn.adafruit.com/chameleon-scarf Page 3 of 35

© Adafruit Industries https://learn.adafruit.com/chameleon-scarf Page 4 of 35

Portraits by Johngineer!
© Adafruit Industries https://learn.adafruit.com/chameleon-scarf Page 5 of 35

Tools & Supplies
Bill of materials:
FLORA main board (http://adafru.it/659)12 FLORA RGB NeoPixels (http://adafru.it/1260)Flora color sensor (http://adafru.it/1356)3xAAA battery pack (http://adafru.it/727) or 150mAh LiPo battery (http://adafru.it/1317)Conductive thread (http://adafru.it/641)Standard threadOld sweater or other long piece of loosely knit fabric3/4" wide ribbon (~5 feet)
© Adafruit Industries https://learn.adafruit.com/chameleon-scarf Page 6 of 35

Sharp scissors are a must!
Clear nail polish or fray check to seal knots
To mark out your circuit use a water-solubleembroidery marker or tailor's chalk.
© Adafruit Industries https://learn.adafruit.com/chameleon-scarf Page 7 of 35

You'll use a needle (http://adafru.it/615) andto stitch up the circuit.
You will need a good quality basicmultimeter that can measure voltage andcontinuity.
Click here to buy a basicmultimeter. (http://adafru.it/71)
Click here to buy a top of the linemultimeter. (http://adafru.it/308)
Click here to buy a pocketmultimeter. (http://adafru.it/850)
Don't forget to learn how to use yourmultimeter too! (http://adafru.it/aOy)
A sewing machine helps make this projectfun and easy.
© Adafruit Industries https://learn.adafruit.com/chameleon-scarf Page 8 of 35

© Adafruit Industries https://learn.adafruit.com/chameleon-scarf Page 9 of 35
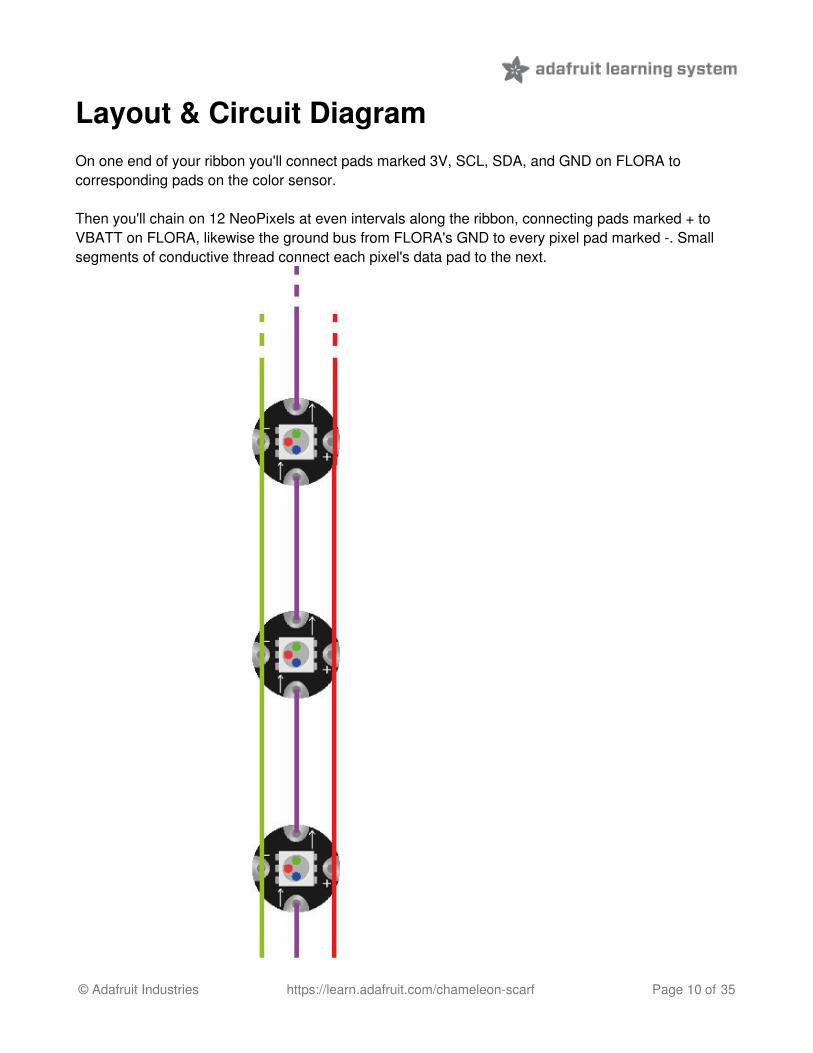
Layout & Circuit DiagramOn one end of your ribbon you'll connect pads marked 3V, SCL, SDA, and GND on FLORA tocorresponding pads on the color sensor.
Then you'll chain on 12 NeoPixels at even intervals along the ribbon, connecting pads marked + toVBATT on FLORA, likewise the ground bus from FLORA's GND to every pixel pad marked -. Smallsegments of conductive thread connect each pixel's data pad to the next.
© Adafruit Industries https://learn.adafruit.com/chameleon-scarf Page 10 of 35

© Adafruit Industries https://learn.adafruit.com/chameleon-scarf Page 11 of 35

© Adafruit Industries https://learn.adafruit.com/chameleon-scarf Page 12 of 35

Sew Circuit
First, stitch power and ground rails alongyour ribbon by using a zigzag stitch. Onestrand of 3-ply thread works fine for thisscarf's power delivery, which is about 4.5feet long.
If your ribbon is longer or you're using morethan 12 pixels, consider zigzagging aroundtwo strands of conductive thread togetherfor less total resistance.
On one end, stop short of the ribbon's endand leave tails about 10 inches long forsewing to FLORA.
© Adafruit Industries https://learn.adafruit.com/chameleon-scarf Page 13 of 35

Thread one tail onto a needle and handstitch it to VBATT by way of D12 on FLORA.The ribbon is not quite wide enough toreach to VBATT without forcing the othertwo connections to be impractically closetogether, so it's ok to short D12 to VBATT tohelp space things out better, since D12 isnot used in this circuit.
Pick up the other tail and stitch around GNDon FLORA.
Tie knots and seal with clear nail polish orfray check. As it dries, pull knots tight, thencut tails short when the adhesive is dry. Formore tips, check out our ConductiveThread (http://adafru.it/aVx) guide.
© Adafruit Industries https://learn.adafruit.com/chameleon-scarf Page 14 of 35

On the other side of the FLORA board,stitch connections between the SCL andSDA to the color sensor.
These thread connections are pretty closetogether. To help prevent the knots fromknocking into each other, alternate whichside of the ribbon you tie off. For example,tie knots for GND and SDA on the front sideand SCL and 3.3V on the back side.
Seal all knots.
© Adafruit Industries https://learn.adafruit.com/chameleon-scarf Page 15 of 35

Another option is to solder the color sensorto the FLORA, as shown, using a piece offoam tape to affix the two together in adelicious circuit sandwich.
Stitch the first pixel close to the FLORAboard, connecting pad D6 to the inward-facing arrow on the pixel. Tie off and sealthe knot.
With another piece of conductive thread,stitch around the pad marked - on the pixelto secure it to the ribbon, then weave the
© Adafruit Industries https://learn.adafruit.com/chameleon-scarf Page 16 of 35

needle under your zigzag stitch to put it inmore contact with the conductive threadground line. The more thread in contact withthis line, the better the power delivery will beto the pixels.
Use a marking pen to measure where eachother pixel will go-- ours are 4.5 inchesapart.
Using the same zigzag technique as earlier,affix data lines to the ribbon. At each mark,cut a long tail, then pick up again on theother side of the mark. This way you canpick up and hand stitch the tails withouthaving to stitch long distances betweenpixels.
© Adafruit Industries https://learn.adafruit.com/chameleon-scarf Page 17 of 35
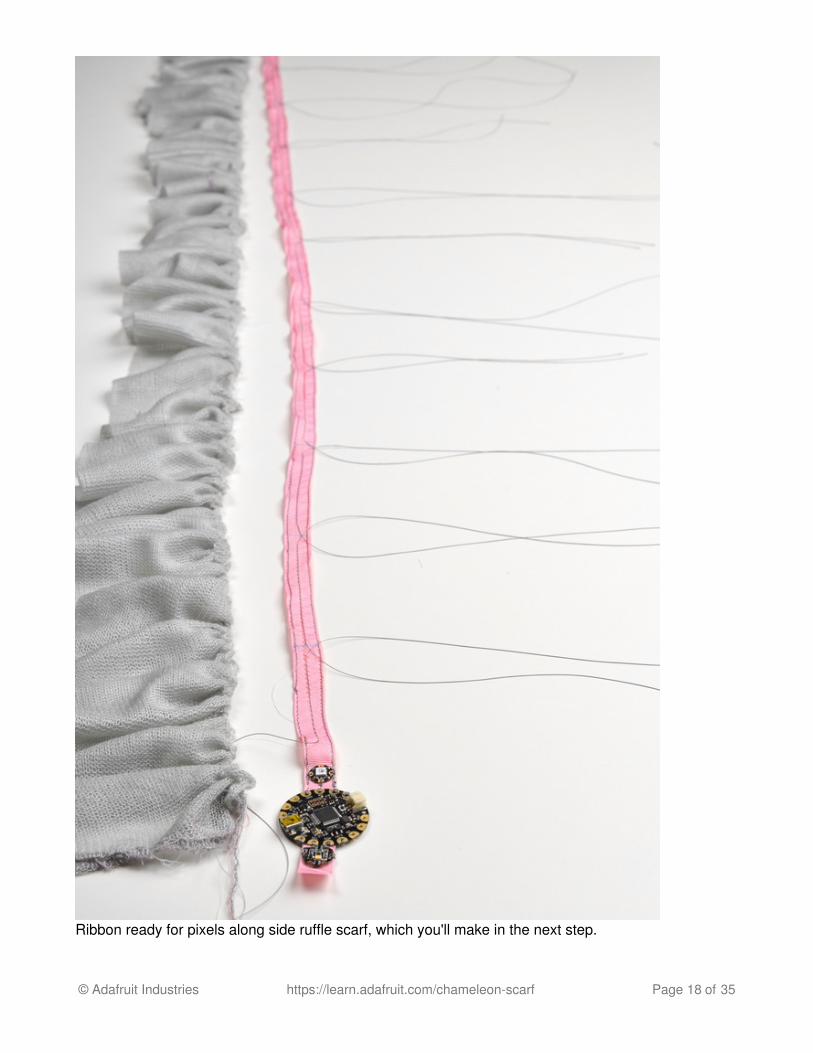
Ribbon ready for pixels along side ruffle scarf, which you'll make in the next step.
© Adafruit Industries https://learn.adafruit.com/chameleon-scarf Page 18 of 35

Closeup of pixel sewn with lots of contact on+ and - sides.
© Adafruit Industries https://learn.adafruit.com/chameleon-scarf Page 19 of 35

© Adafruit Industries https://learn.adafruit.com/chameleon-scarf Page 20 of 35

In version 2, we used narrow conductiveribbon for the data bus, and sewed thepixels on the opposite side of the ribbonfrom the power/ground rails.
© Adafruit Industries https://learn.adafruit.com/chameleon-scarf Page 21 of 35
CodeFirst run the NeoPixel test sketch to make sure all your pixels are connected and receiving goodsignal. Reinforce connections with more conductive thread as needed.
Follow instructions on the color sensor guide (http://adafru.it/cb8) for installing the code library. Runthe test code with your serial monitor to be sure your color sensor is hooked up properly and working.
For this project, copy and paste this code into the Adafruit Arduino IDE:
#include <Wire.h>#include "Adafruit_TCS34725.h"#include <Adafruit_NeoPixel.h>
// Parameter 1 = number of pixels in strip// Parameter 2 = pin number (most are valid)// Parameter 3 = pixel type flags, add together as needed:// NEO_RGB Pixels are wired for RGB bitstream// NEO_GRB Pixels are wired for GRB bitstream// NEO_KHZ400 400 KHz bitstream (e.g. FLORA pixels)// NEO_KHZ800 800 KHz bitstream (e.g. High Density LED strip)Adafruit_NeoPixel strip = Adafruit_NeoPixel(12, 6, NEO_GRB + NEO_KHZ800);
// our RGB -> eye-recognized gamma colorbyte gammatable[256];
Adafruit_TCS34725 tcs = Adafruit_TCS34725(TCS34725_INTEGRATIONTIME_50MS, TCS34725_GAIN_4X);
void setup() { Serial.begin(9600); Serial.println("Color View Test!"); strip.begin(); strip.show(); // Initialize all pixels to 'off' if (tcs.begin()) { Serial.println("Found sensor"); } else { Serial.println("No TCS34725 found ... check your connections"); while (1); // halt! } // thanks PhilB for this gamma table! // it helps convert RGB colors to what humans see for (int i=0; i<256; i++) { float x = i; x /= 255; x = pow(x, 2.5); x *= 255;
© Adafruit Industries https://learn.adafruit.com/chameleon-scarf Page 22 of 35

gammatable[i] = x; //Serial.println(gammatable[i]); } for (int i=0; i<3; i++){ //this sequence flashes the first pixel three times as a countdown to the color reading. strip.setPixelColor (0, strip.Color(188, 188, 188)); //white, but dimmer-- 255 for all three values makes it blinding! strip.show(); delay(1000); strip.setPixelColor (0, strip.Color(0, 0, 0)); strip.show(); delay(500); } uint16_t clear, red, green, blue;
tcs.setInterrupt(false); // turn on LED
delay(60); // takes 50ms to read tcs.getRawData(&red, &green, &blue, &clear);
tcs.setInterrupt(true); // turn off LED Serial.print("C:\t"); Serial.print(clear); Serial.print("\tR:\t"); Serial.print(red); Serial.print("\tG:\t"); Serial.print(green); Serial.print("\tB:\t"); Serial.print(blue);
// Figure out some basic hex code for visualization uint32_t sum = red; sum += green; sum += blue; //sum += clear; // clear contains RGB already so no need to re-add it float r, g, b; r = red; r /= sum; g = green; g /= sum; b = blue; b /= sum; r *= 256; g *= 256; b *= 256; Serial.print("\t"); Serial.print((int)r, HEX); Serial.print((int)g, HEX); Serial.print((int)b, HEX); Serial.println();
Serial.print((int)r ); Serial.print(" "); Serial.print((int)g);Serial.print(" "); Serial.println((int)b ); colorWipe(strip.Color(gammatable[(int)r], gammatable[(int)g], gammatable[(int)b]), 0);}
// Fill the dots one after the other with a colorvoid colorWipe(uint32_t c, uint8_t wait) { for(uint16_t i=0; i<strip.numPixels(); i++) { strip.setPixelColor(i, c); strip.show(); delay(wait); }}
void loop() {
© Adafruit Industries https://learn.adafruit.com/chameleon-scarf Page 23 of 35

//loop is empty because it only takes the color reading once on power up! Turn the scarf off and on again to change the color. }
The first pixel in the chain will flash three times as a countdown to the color sensor reading. Place anobject over the sensor during this time, then the LEDs will all light up in the color that was sensed.
To update the color, press the reset button on FLORA (while connected via USB or battery) or turn theboard off and back on (only available while on battery power).
© Adafruit Industries https://learn.adafruit.com/chameleon-scarf Page 24 of 35

Construct Ruffle Scarf
Create a super long (~12 feet) strip oflightweight knit fabric. The easiest way is torecycle an old sweater by cutting it intostrips with a rotary cutter, as seen in thesecond picture from Brookelynn Morris'CRAFT ruffle scarftutorial (http://adafru.it/cb9). Her guide wasan inspiration for our scarf, go check it out!You can also head to the fabric store andlook for a very sheer knit.
If you have one handy, a knitting machinemakes fast work of this long strip. We usedup a bunch of yarn we had that's too thin forpretty much anything but gauzy ruffledscarves.
Fold the long strip in half, right sidestogether, and pin. Use an iron if your fabricis very curly.
It was helpful to us while ironing to roll thepinned part of the (very long) strip around acardboard tube.
© Adafruit Industries https://learn.adafruit.com/chameleon-scarf Page 25 of 35

Pull both the needle and bobbin threadsfrom your sewing machine to exceed thelength of your knit strip-- mine needed to beabout 15 feet long.
Use a zigzag stitch to capture these threadsas you sew the seam on the scarf-- thesethreads are now a drawstring on which youcan bunch up the fabric to create ruffles.
© Adafruit Industries https://learn.adafruit.com/chameleon-scarf Page 26 of 35

Evenly distribute the ruffles on your drawstring threads and match the overall length to the ribboncircuit-- this one is about 4.5 feet long, bunched up from about 12 feet of knit fabric.
© Adafruit Industries https://learn.adafruit.com/chameleon-scarf Page 27 of 35

Tack your ribbon circuit to the ruffled seamon the scarf every so often using plainthread and a needle. You may wish to hemthe ends of your scarf at this time: fold overthe rough edges of both the knitting and theribbon and stitch them in place.
Version 2 uses 3D printed flexible diffusers to even out the light inside the scarf. Download the 3D filefrom Thingiverse (http://adafru.it/d5Z) and print in NinjaFlex flexible filament (http://adafru.it/d4Y), thensew the diffusers over your NeoPixels.
© Adafruit Industries https://learn.adafruit.com/chameleon-scarf Page 28 of 35
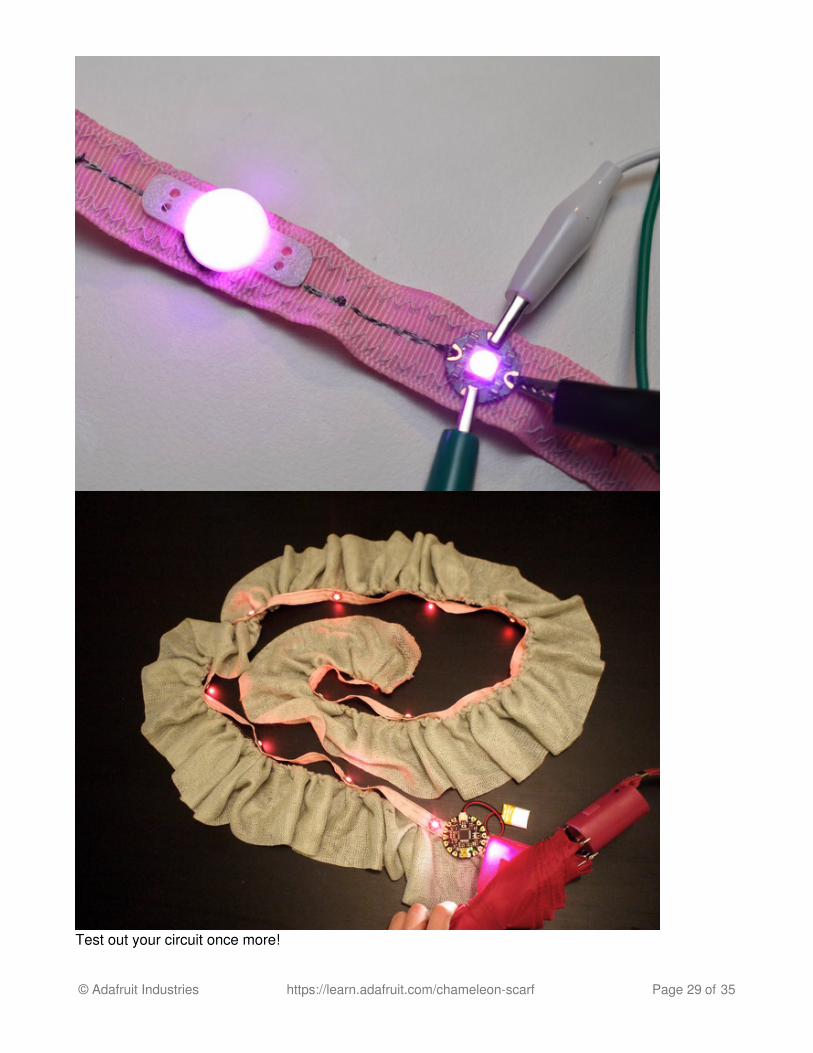
Test out your circuit once more!
© Adafruit Industries https://learn.adafruit.com/chameleon-scarf Page 29 of 35

We used a tiny lithium polymer battery forthis project-- CAUTION these batteries haveadditional safety concerns that you shouldread about and observe on the productpage. If in doubt, use a battery pack thattakes AAAs!
Turn the entire scarf right side out bysticking your arm through the knit tube,gathering up the tube on your arm, thengrasping the end while pulling the tube backoff of your arm.
Version 2 is a circle scarf, giving us theopportunity to connect the power andground rails at each end, which will moreevenly distribute power to the pixels.
© Adafruit Industries https://learn.adafruit.com/chameleon-scarf Page 30 of 35

Your finished chameleon scarf!Hey! Don't dunk your scarf in water while it's on! If you need to wash it, remove the battery and handwash in the sink. Allow to air dry thoroughly before reconnecting the battery!
In version two, overlapping ends of the circle scarf hide the FLORA when you're wearing the scarf,and allow for easy access to the color sensor and battery.
© Adafruit Industries https://learn.adafruit.com/chameleon-scarf Page 31 of 35

© Adafruit Industries https://learn.adafruit.com/chameleon-scarf Page 32 of 35

Wear it!
© Adafruit Industries https://learn.adafruit.com/chameleon-scarf Page 33 of 35
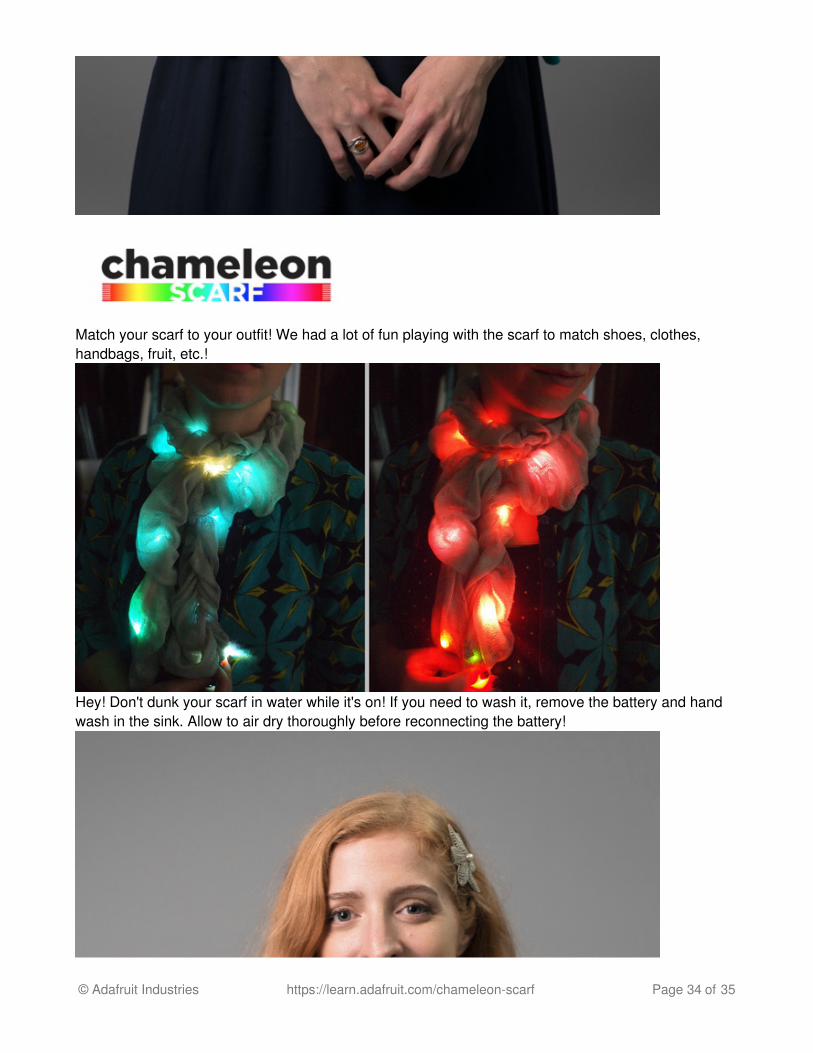
Match your scarf to your outfit! We had a lot of fun playing with the scarf to match shoes, clothes,handbags, fruit, etc.!
Hey! Don't dunk your scarf in water while it's on! If you need to wash it, remove the battery and handwash in the sink. Allow to air dry thoroughly before reconnecting the battery!
© Adafruit Industries https://learn.adafruit.com/chameleon-scarf Page 34 of 35

Portraits by Johngineer!
© Adafruit Industries Last Updated: 2017-06-01 05:29:14 PM UTC Page 35 of 35