Cerner Scheduling (Level 1) - Welcome to LHSC...Cerner Scheduling (Level 1) QUICK GUIDE 2 Completing...
12
1 Online Manual is located at: www.c3project.ca/epr_priv/education/index.htm Email training requests to: eHIM [email protected] Cerner Scheduling (Level 1) QUICK GUIDE
Transcript of Cerner Scheduling (Level 1) - Welcome to LHSC...Cerner Scheduling (Level 1) QUICK GUIDE 2 Completing...
1
Online Manual is located at:
www.c3project.ca/epr_priv/education/index.htm
Email training requests to:
eHIM [email protected]
Cerner Scheduling (Level 1)
QUICK GUIDE

2
Completing a Proper Patient Search
Many records exist in the Cerner EPR‟s Central Patient Index (CPI), some with incomplete or incorrect information. To find an existing record it is important to do a complete patient search.
Note : You must perform 2 separate searches to ensure that all person records for the patient are found. Many records from 16 hospitals comprise the CPI and therefore duplicates do exist.
Conduct the 2 separate searches in this order:
Search #1: Last name, first name Search #2: Ontario health card number DO NOT combine the above 2 into 1 search
Should you NOT find your patient record, continue searching using the following filters:
3. Hospital PIN specific to your site or Hospital RMRN (LRCP only) 4. Last name, first name initial 5. Last name, middle name in the first name field 6. Last name, age range of 10 years (based on given date of birth) 7. Other last name (e.g. maiden, previous), first name 8. Last name, abbreviated first name or common nickname (e. g. for Elizabeth try Betty) 9. Last name, first name of “Baby”, “Male” or “Female”
Important Notes to Remember when Searching: Searches done with too many filters (search fields) entered might prevent your patient record from
being found
If the result of a search is "too many persons found", add a limited amount of information to the search screen so that the search is narrowed
Punctuation (e.g. hyphens, quotation marks) and letter case do not effect the search
An age range search will not find matches on the minimum and maximum of the range, only ages in between
Do not search a PIN and/or HCN along with a patient Name as this will slow your search
Do not select any of the following person records to schedule or register:
1) “900” series PIN record (represents referred-in lab patients, research patients etc.)
2) Employee Personnel record (PIN, birth date and sex fields are all blank) if selected displays the following error message; “The record you have selected to add this visit to is a personnel record. Please do another search to find appropriate person or create a new record.”
3) Historical Blood Bank record (patient name displayed all in UPPER CASE, PIN is blank)
When patient record is found and selected for scheduling or registration, enter all parts of the patient‟s name (Last Name, First Name AND Middle Name)
If your search finds multiple valid records for the same patient (excluding above types), contact your CPI Auditor

3
Guidelines for Naming Convention
The patient‟s full legal name must be used. The legal name is defined as the first or given name, middle name (if applicable) and the surname as is entered on the patient‟s birth certificate or as altered via a legal name change event such as marriage, adoption or court approved name changes.
Legal names will be entered with proper punctuation, i.e., periods, commas, hyphens etc., as well as upper and lower case letters when applicable. For patients with only ONE legal name, the name is entered into the Last Name field, and NONE is entered into the First Name field.
Abbreviations of a first name will not be used unless this is the patient‟s legal first name. If a patient prefers to be called something other than their legal name, enter this into the preferred name field.
The following exceptions may apply to naming convention:
i. Newborns are entered using the mother‟s last name (unless otherwise informed) and the first name will be „Baby‟. In the case of multiple births, use letters to distinguish between babies. For example, Baby A Smith and Baby B Smith.
ii. Titles such as Dr. or Reverend and name suffixes such as Junior are recorded ONLY in the preferred name field unless documented as a legal name.
Last names that include Saint will be entered as St.iii.
Schedule An Appointment
Highlight bookshelf.
Left-click OK.
1. Left-click on the Appointment Tab.
2. Left-click the ellipses button beside the Patient Name field.
3. Conduct a proper patient search and select your patient.
4. Enter the appointment criteria.
5. Left-click the Move button to transfer appointment criteria to Work-In-Progress area.
6. Ensure appropriate resource is highlighted.
7. Select date on calendar.
8. Left-click in the desired time slot under clinic resource.
Left-click on the Bookshelf Bar to select appropriate bookshelf
4
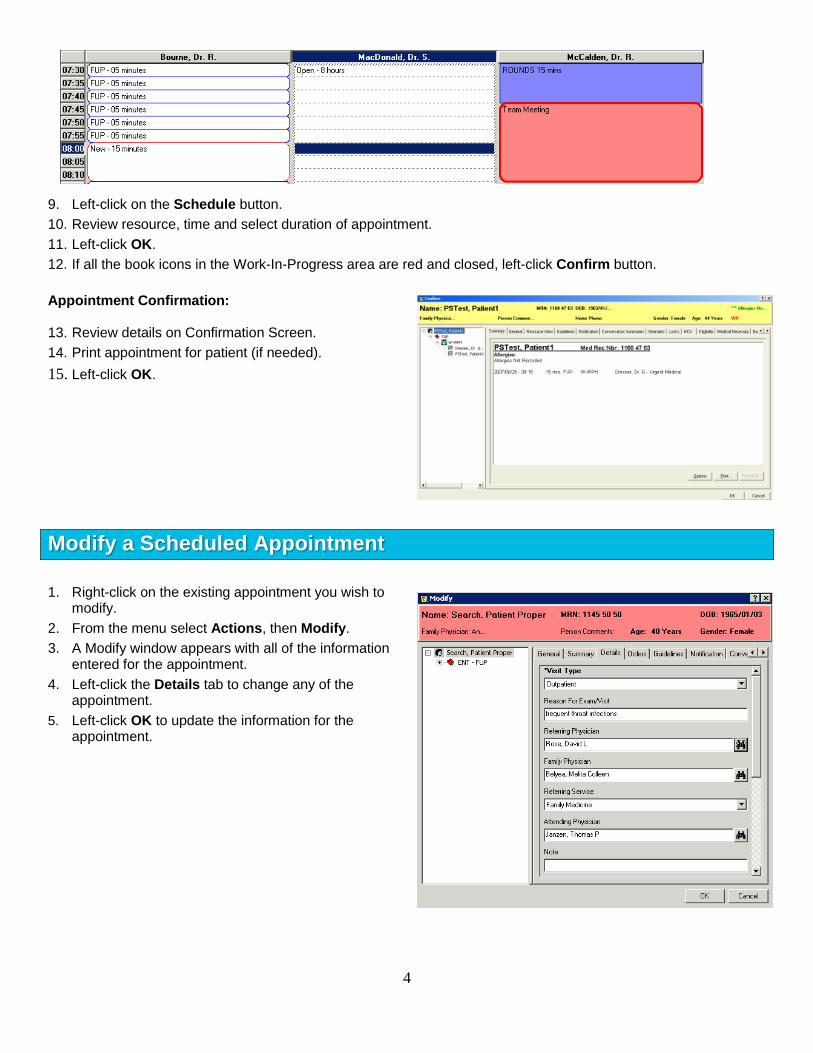
9. Left-click on the Schedule button.
10. Review resource, time and select duration of appointment.
11. Left-click OK.
12. If all the book icons in the Work-In-Progress area are red and closed, left-click Confirm button.
Appointment Confirmation: 13. Review details on Confirmation Screen.
14. Print appointment for patient (if needed).
15. Left-click OK.
Modify a Scheduled Appointment
1. Right-click on the existing appointment you wish to modify.
2. From the menu select Actions, then Modify.
3. A Modify window appears with all of the information entered for the appointment.
4. Left-click the Details tab to change any of the appointment.
5. Left-click OK to update the information for the appointment.

5
Remove a Patient from Work In Progress
1. Right-click on the patient‟s name in the Work in Progress Window.
2. Left-click Remove.
Cancel an Appointment
1. Right-click on the Patient Appointment.
2. Select Actions then Cancel.
The Cancel screen will appear.
3. Select a reason for cancel from the list; add any comments if necessary and left-click OK.
No Show an Appointment
1. Right-click on the Patient Appointment.
2. Select Actions then No Show.
The No Show screen will appear.
3. Enter an optional comment and left-click OK.

6
Reschedule an Appointment
1. Right-click on the appointment and select Actions then Reschedule.
The patient appointment information appears in the appointment tab and Work-In-Progress area of the screen.
2. Make any necessary changes, move the changes to Work-In-Progress and then left-click Schedule.
3. Select the appropriate resource, time and duration and left-click OK to accept the new appointment information.
4. Select the most appropriate reason for rescheduling from the drop-down menu, e.g., Scheduled in Error. Add comments if necessary.
5. Left-click OK.
Batch Reschedule
To reschedule more than one appointment:
1. Left-click on the Resource name or if using the proportional multiple-day view, left-click on the header for the correct date.
2. Right-click on any appointment that requires rescheduling.

7
3. Select Actions and then Batch Reschedule.
A Batch Reschedule window will appear.
4. Left-click on each of the appointments that need to be rescheduled.
5. Select the start date.
6. Change the end date if necessary. The default is 3 months out.
7. Select the reason for rescheduling from the drop down menu.
8. Place a check mark next to „Use originally scheduled resource‟ if the appointment needs to be reschedule under the same resource as the original appointment, otherwise leave blank and the system will find the first available appointment matching the criteria under any available resource.
9. Left-click on the reschedule button. The books will turn red and the new appointment date will appear in the window.
Note: This feature will only work for those areas who have a resource list. If a user receives an error message, they should contact the Scheduling team through the HelpDesk to request setup for batch rescheduling.

8
Appointment Inquiry
Used to view a list of scheduled appointments for a patient.
1. Left-click on the Appointment Inquiry icon,
then left-click the Person tab.
2. Left-click the Ellipses button beside person and search for the patient.
3. Left-click on the appropriate patient and left-click OK.
4. Set the start date for the search. You may want to go back at least one month in case the patient missed their appointment.
5. Do not enter an end date or time.
6. Left-click the Find button to search for the appointment.
Once the appointment list appears in the screen, as shown above, you can print the list by left clicking on Task and then Print.
You may also right-click on the appointment to see a list of options for that patient. For example, you can reschedule an appointment from the appointment inquiry.
Modify a Patient Record
1. Right-click on the appointment for the person you wish to modify.
2. From the menu select Person, then Modify Person.
3. You may now update your patient demographic changes.
4. Left-click OK to update the file and save the changes.

9
Patient Assistance and Privacy
What system should I be using to look up information to help visitors or family find patients?
In keeping with a patient-centered approach, the electronic patient care systems enable staff to help patients locate their appointment location and assist visitors or other hospital staff in finding patients.
Outpatients
The Scheduling Appointment Inquiry is an appropriate tool to use for providing patients with information about the time and place of their appointment
Inpatients / Emergency / Urgent Care / One Day Stays
The Patient Locator is an appropriate tool to use for giving directions (way finding) to family and visitors to locate patients who are currently registered.
Audits All patient system access is stamped with your electronic signature. Regular audits are conducted to ensure that patient privacy has not been breached. Remember to access only the patient data you require to perform your job. Privacy Office staff are always willing to come to departments for discussion or in-service on any privacy-related topic. To request an in-service, call ext. 32996.
View Cancelled, Rescheduled Appointments, and Empty Schedules
Viewing of Cancels, Reschedules and Empty Schedules can be toggled on/off. A check mark to the left indicates the view is toggled on. Appointments can still be scheduled to an empty schedule by toggling Empty Schedules on and clicking on the resource. Once an appointment has been scheduled to this resource, it will appear in the resource window for that day.
1. Left-click on the View Toolbar 2. Left-click on Cancels, Reschedules or Empty Schedules to Toggle On/Off
Physician (Resource) Prompting
Physician (or Resource) prompting is clinic and appointment type-dependent and may not be available on some templates. 1. Type in the first few letters of the appointment type. Left-click
on the Ellipses button to select the appropriate appointment type from the list.
2. Enter the appointment location or select from drop down list by clicking on the arrow
3. Press TAB to move to the Physician Field 4. Left-click on the Ellipses button to select Resource 5. Left-click Move to move appointment to Work In Progress 6. Physician Resource will automatically open
Note: Other resources (e.g., room, dietician, nurse, chair, educator, procedure) may prompt for selection, depending upon the appointment type/clinic selected. Some prompts allow the user to deselect the

10
Suggesting An Appointment
Use to find next available appointment for a resource: 1. Enter appointment criteria and move appointment to Work in Progress area. 2. Left-click Suggest. 3. In the Preferences tab, select the number of suggested
appointments to return. 4. In the Suggest Criteria tab, indicate days of the week and time
ranges to search for available times. 5. Left-click Suggest. 6. A list of possible appointment times will appear. 7. Left-click on the desired appointment time. 8. Left-click Select. A red checkmark will appear next to the appointment in the top window. 9. Left-click OK. The appointment information will return to the Scheduling screen 10. Left-click Confirm.
Check In an Appointment
Right-click on the Patient Appointment. 1. Select Actions then Check In.
The Check In screen appears with the detailed information for the patient‟s appointment.
Note: The check in time defaults to the current date and time. This will need to be changed if the check in process is not occurring in real time.

11
Check In Without Registration: 2. Left-click Set Enc.
The Encounter Selection window opens.
3. Select the appropriate encounter and left-click OK.
The Check In screen will return.
4. Left-click OK to complete the process.
Check In With Registration:
2. Left-click Set Enc.
The Encounter Selection window opens. Make sure an Encounter does not already exist for your clinic.
3. Select Add Enc.
The Registration Conversation will launch
4. Complete all appropriate fields.
5. Left-click OK.
6. The Check In screen will return. Left-click OK to complete the process.
Shortcuts and Defaults t = for today‟s date Unknown age = 1875/01/01
n = for current time s = to add self to a field
pat = to fill in patient demographics in other tabs after it is initially entered in the patient tab
“” = enter double quotes in the preferred name field to delete a previous entry
nok = next of kin Unknown postal code = X9X9X9
guar = Guarantor nfa = no fixed address-will add all necessary information
clr = clear all associated fields unk = unknown address-will add all necessary information
12
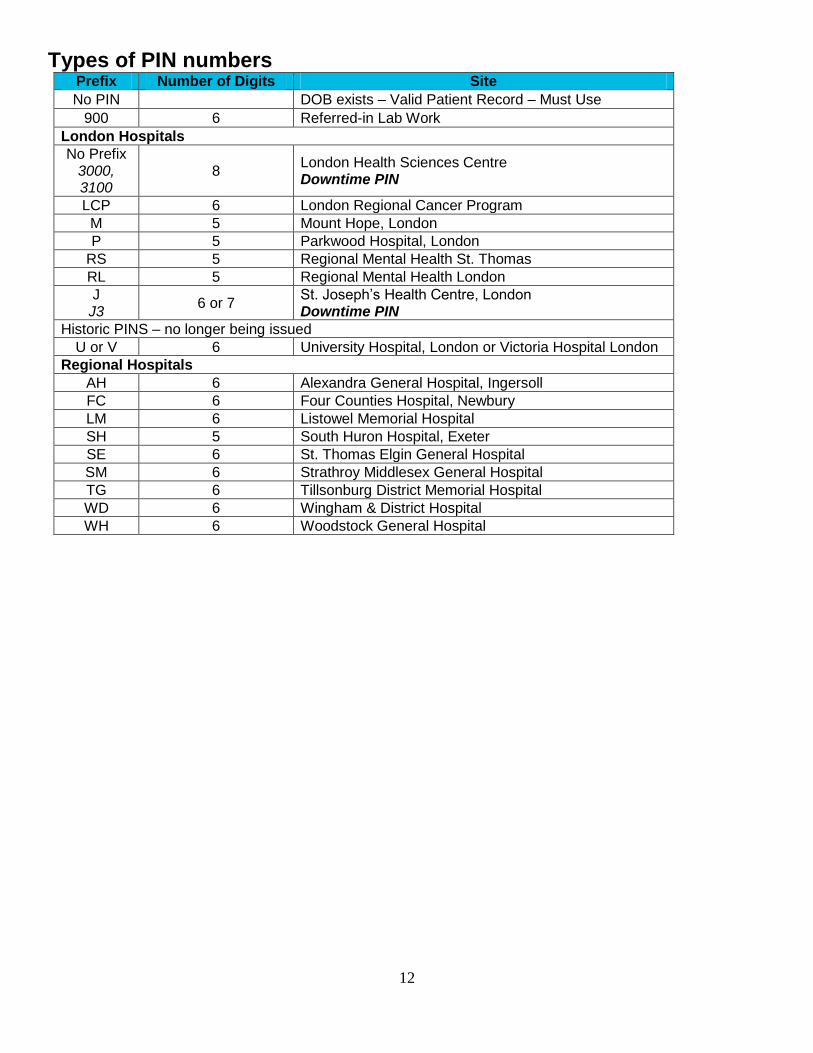
Types of PIN numbers Prefix Number of Digits Site
No PIN DOB exists – Valid Patient Record – Must Use
900 6 Referred-in Lab Work
London Hospitals
No Prefix 3000, 3100
8 London Health Sciences Centre Downtime PIN
LCP 6 London Regional Cancer Program
M 5 Mount Hope, London
P 5 Parkwood Hospital, London
RS 5 Regional Mental Health St. Thomas
RL 5 Regional Mental Health London
J J3
6 or 7 St. Joseph‟s Health Centre, London Downtime PIN
Historic PINS – no longer being issued
U or V 6 University Hospital, London or Victoria Hospital London
Regional Hospitals
AH 6 Alexandra General Hospital, Ingersoll
FC 6 Four Counties Hospital, Newbury
LM 6 Listowel Memorial Hospital
SH 5 South Huron Hospital, Exeter
SE 6 St. Thomas Elgin General Hospital
SM 6 Strathroy Middlesex General Hospital
TG 6 Tillsonburg District Memorial Hospital
WD 6 Wingham & District Hospital
WH 6 Woodstock General Hospital