Central Line Care - Intermountain Healthcare
28
Central Line Care Implanted Central Line Patient Education intermountainhealthcare.org In Partnership with Primary Children’s Hospital
Transcript of Central Line Care - Intermountain Healthcare

Central Line Care I m p l a n t e d C e n t r a l L i n e
P a t i e n t E d u c a t i o ni n t e r m o u n t a i n h e a l t h c a r e . o r g
I n P a r t n e r s h i p w i t h P r i m a r y C h i l d r e n ’ s H o s p i t a l

II Central Line Care
Central Line Care — Implanted Central Line
One of the goals of Intermountain Healthcare is to ensure you feel comfortable
caring for your child once you go home. Experts at Primary Children’s Hospital
created the content of this booklet to ensure you have the best and most
complete information.
Caring for your child now that he has a central line, will take time, practice, and
patience. This booklet will help you feel comfortable in caring for and managing
his central line at home. This booklet will teach you the following:
• How the central line is placed
• How to change the dressing at home
• How to change a needleless connector
• How to flush a central line
• How to give medicine using a central line
• How to prevent a central line infection
• What to do in an emergency with a central line
As you begin to learn these new skills, please ask questions so you feel
confident in caring for your child and his central line. Your child's healthcare
team will be there to help you learn every step of the way.

What’s Inside:
Introduction . . . . . . . . . . . . . . . . . . . . . . . . . . . . . . . . . . . . . . . . . . . . . . . . 2
WHAT IS AN IMPLANTED CENTRAL LINE OR PORT? . . . . . . . . . . . . . . 3
How is the port placed? . . . . . . . . . . . . . . . . . . . . . . . . . . . . . . . . . . . . . . . . . . . . . . . . . . . . . . . . . . 4
What makes the port different than other central line? . . . . . . . . . . . . . . . . . . . . . . . . . . . . . . . . . . . 4
Is there any special care needed for the port? . . . . . . . . . . . . . . . . . . . . . . . . . . . . . . . . . . . . . . . . . . 5
Parts of the port . . . . . . . . . . . . . . . . . . . . . . . . . . . . . . . . . . . . . . . . . . . . . 6
PORT CARE AT HOME . . . . . . . . . . . . . . . . . . . . . . . . . . . . . . . . . . . . 6
What will I have to do at home? . . . . . . . . . . . . . . . . . . . . . . . . . . . . . . . . . . 6
HOW DO I ACCESS A PORT? . . . . . . . . . . . . . . . . . . . . . . . . . . . . . . 7
Heparin . . . . . . . . . . . . . . . . . . . . . . . . . . . . . . . . . . . . . . . . . . . . . . . . . . . . . . . . . . . . . . . . . . . . . . . 7
Supplies needed to access a port and apply the dressing . . . . . . . . . . . . . . . . 8
Steps for accessing a port . . . . . . . . . . . . . . . . . . . . . . . . . . . . . . . . . . . . . . 9
HOW DO I DE-ACCESS THE PORT? . . . . . . . . . . . . . . . . . . . . . . . . . . 12
Steps for de-accessing a port . . . . . . . . . . . . . . . . . . . . . . . . . . . . . . . . . . . 12
TIPS TO REMEMBER EVERY TIME YOU USE THE PORT . . . . . . . . . . . . 14
HOW DO I FLUSH A PORT? . . . . . . . . . . . . . . . . . . . . . . . . . . . . . . . 15
How often do I flush the port? . . . . . . . . . . . . . . . . . . . . . . . . . . . . . . . . . . 15
Steps for flushing a port . . . . . . . . . . . . . . . . . . . . . . . . . . . . . . . . . . . . . . 15
HOW DO I GIVE MEDICINES THROUGH A PORT? . . . . . . . . . . . . . . . . 17
Steps for giving medicine through a port . . . . . . . . . . . . . . . . . . . . . . . . . . 17
HOW DO I PREVENT MY CHILD FROM GETTING A PORT INFECTION? . . 20
Where should I do my child’s port care? . . . . . . . . . . . . . . . . . . . . . . . . . . . . . . . . . . . . . . . . . . . . . 20
How can I prevent a port infection? . . . . . . . . . . . . . . . . . . . . . . . . . . . . . . . . . . . . . . . . . . . . . . . . 20
What should I look for to see if my child has a port infection? . . . . . . . . . . . . . . . . . . . . . . . . . . . . 21
WHAT DO I DO IN AN EMERGENCY? . . . . . . . . . . . . . . . . . . . . . . . . . 22
What should I do if the tubing on the port needle is cut or breaks? . . . . . . . . . . . . . . . . . . . . . . . . . 22
What should I do if the port needle accidently comes out a little bit or all the way . . . . . . . . . . . . . 22
What should I look for when giving medicine or flushing the port? . . . . . . . . . . . . . . . . . . . . . . . . . 22
What should I do if the dressing becomes wet or loose when I am not at home or have not been trained how to replace the needle? . . . . . . . . . . . . . . . . . . . . . . . . . . . . . . . . . . . . . 23
FREQUENTLY ASKED QUESTIONS . . . . . . . . . . . . . . . . . . . . . . . . . . . 23
GLOSSARY . . . . . . . . . . . . . . . . . . . . . . . . . . . . . INSIDE BACK COVER
SPECIAL CARE FOR MY CHILD’S PORT . . . . . . . . . . . . . . . .BACK COVER
1 Implanted Central Line
Introduction Your child has received a central line. You may also hear it called a central venous catheter (CVC), catheter, or line. These all mean the same thing. A central line is a type of intravenous line (IV). An IV is a small tube placed in a vein to give a person fluids and medicines. Regular IVs are short and last for only a few days. Central lines are placed through the skin into a larger vein. Central lines are longer and can stay in place for weeks or months. This allows your child to receive IV fluids, nutrition, and medicine (for example, chemotherapy and antibiotics). A central line also may be used to collect blood for tests.
You may be concerned about how you will care for the central line at home and how you will learn all the skills you need. This is normal. The nurses will teach you about the central line. They will teach you how to flush the catheter, change the dressing, how to give medicine, and what to do in an emergency. When you perform these tasks properly, you will help prevent an infection in your child. It is best to start learning these skills while your child is in the hospital and get lots of practice before your child goes home.
You can take this booklet home and use it whenever you need it. It will help you remember how to do central line care once you leave the hospital. The information in this booklet is a general guide. If your child’s doctor recommends care that is different for your child, follow your doctor’s instructions instead of this booklet.
As you learn about central lines you will hear many new words. There is a guide where words are explained on the last page of this booklet. We encourage you to ask questions and practice skills so you feel comfortable with the central line when your child leaves the hospital.
Asking QUESTIONS along the way is the best way to learn.
2 Central Line Care

What is an implanted central line or port? This booklet has information about a specific type of central line called an implanted port.
An implanted central line, "port" or "port-a-cath" is a small hollow button (port) with a catheter attached. The port end will be placed under your child’s skin in the chest, arm, or belly and held in place with stitches. The catheter end will then be placed into a large vein near the heart. A port is different from other central lines because you can’t see it. You will only see or feel a bump under your child’s skin. To use a port, a special needle will be placed through your child’s skin and into the port.
Chest with an implanted port
3 Implanted Central Line
catheter
implanted port
small vein
heart
large vein
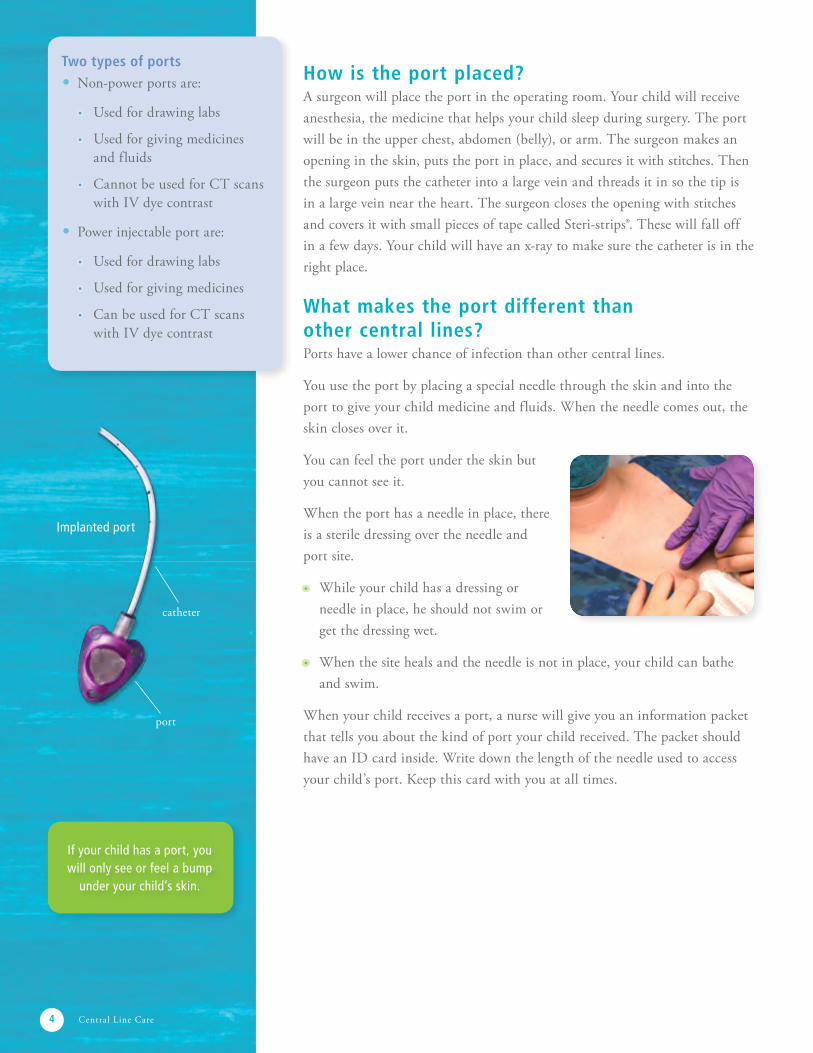
How is the port placed? A surgeon will place the port in the operating room. Your child will receive anesthesia, the medicine that helps your child sleep during surgery. The port will be in the upper chest, abdomen (belly), or arm. The surgeon makes an opening in the skin, puts the port in place, and secures it with stitches. Then the surgeon puts the catheter into a large vein and threads it in so the tip is in a large vein near the heart. The surgeon closes the opening with stitches and covers it with small pieces of tape called Steri-strips®. These will fall off in a few days. Your child will have an x-ray to make sure the catheter is in the right place.
What makes the port different than other central lines? Ports have a lower chance of infection than other central lines.
You use the port by placing a special needle through the skin and into the port to give your child medicine and fluids. When the needle comes out, the skin closes over it.
You can feel the port under the skin but you cannot see it.
When the port has a needle in place, there is a sterile dressing over the needle and port site.
• While your child has a dressing or needle in place, he should not swim or get the dressing wet.
• When the site heals and the needle is not in place, your child can bathe and swim.
When your child receives a port, a nurse will give you an information packet that tells you about the kind of port your child received. The packet should have an ID card inside. Write down the length of the needle used to access your child’s port. Keep this card with you at all times.
If your child has a port, you will only see or feel a bump
under your child’s skin.
4 Central Line Care
Two types of ports• Non-power ports are:
• Used for drawing labs
• Used for giving medicines and fluids
• Cannot be used for CT scans with IV dye contrast
• Power injectable port are:
• Used for drawing labs
• Used for giving medicines
• Can be used for CT scans with IV dye contrast
Implanted port
port
catheter

Is there any special care needed for the port?The area around the stitches may be swollen and sore for a few days after surgery. This is normal. Once the swelling is gone you will be able to feel, and may see, a small bump under the skin. This is the port. After the site heals there will be a small scar.
It is important for you to know the right needle length for your child’s port. A nurse will tell you how long the needle should be. It is important you write this down on the ID card.
When the needle is in the port it is called “accessed.” Whenever the port is accessed, there will be a special dressing over the area. The needle and dressing needs to be changed every seven days. When the port is not accessed (no needle in it) there is no dressing.
If the port is not in use for a period of time, it will need to be accessed every 30 days.
You will put heparin medicine into the port. Heparin prevents blood from clotting. How you do this is discussed later in this booklet. When the port is accessed there will also be a clamp on the tubing. This helps to keep the port closed when it is not being used. Make sure the clamp is closed when the port is not being used.
When your child first receives a port, you will need to look at the incision site a few times a day. It is rare for ports to get infected, but it can happen. If you see redness, swelling, or drainage at the port site contact your child’s doctor.
When doing cares don’t tug or pull on the port and avoid using scissors around the central line.
It is important your child does not “play” with the port under the skin. Some children with ports can turn the port and flip them around. This can make the catheter attached to the port move out of place so it is no longer near the large vein in the heart. The catheter can move into a smaller vein. This is very dangerous because some medicines can hurt smaller veins. If you see your child playing with the port, ask them to stop.
Change the needle and dressing every 7 days.
7 DAYS
If you see redness, swelling, or drainage at the port site,
contact your child’s doctor.
5 Implanted Central Line
30 DAYS
Access the port every 30 days, if not in use.
Patient’s accessed port with dressing

Parts of the port
Port care at home
What will I have to do at home?Once you arrive home, you will need to continue to care for the port. You should keep the port information card with your child at all times. You will also want to have an extra 100 unit heparin syringe with your child at all times just in case you need to remove the port needle unexpectedly.
You may need to change the needle and dressing, access and de-access the port. If you will be doing these tasks at home the nurses will give you extra training.
You may need to flush the port with heparin every 30 days, give medicine, give IV fluids, or IV nutrition. Much of this information is discussed later in this booklet. Your home care company will provide you with the supplies you will need. The first time the home care company visits you, talk with the nurse about the services they will provide.
6 Central Line Care
port
tubing
port access device
catheter
vein
port needle
Cross-section showing placement of a port under the skin
skin

7 Implanted Central Line
How do I access a port? It takes a little more training and practice to access and de-access a port. The best way to learn is to practice as much as you can while your child is in the hospital.
When the port is being used for medicines or fluids, (called “accessed”), do the following:
• De-access and access the port every seven days.
• Flush the port with heparin as directed.
When the port is NOT being used, do the following:
• Access the port every 30 days, flush it with 5 mL of 100 unit/mL of heparin as directed by your doctor, then remove the needle.
On the following pages, we will look at the supplies you will need, what to do before you start the process, and then show the steps to access an implanted port and change the dressing.
Your home care company or pharmacy will provide you with all the supplies you will need to care for your child’s port at home. Some of the supplies may come in a kit. Some of the supplies may come as individual items. If your home care company does not provide a kit, all of the supplies will come as individual items. The brand and name of the kit and individual items may be different than what is pictured in this booklet. This is okay.
7 DAYS
De-access and access the port every 7 days while in use for medicines or fluids.
Heparin Heparin is a medicine that helps prevent the port from clotting. There are two different strengths of heparin for ports.
100 unit/mL heparin is used whenever you de-access the port and once a month. Using the 100 unit/mL heparin helps keep the port from clotting when the needle is not in place. This heparin is ten times stronger than the 10 unit/mL heparin.
10 unit/mL heparin is used after medicines have been given and when you use the port frequently.
Flush the port every 30 days with heparin if the port is NOT in use.
30 DAYS
Central Line Care
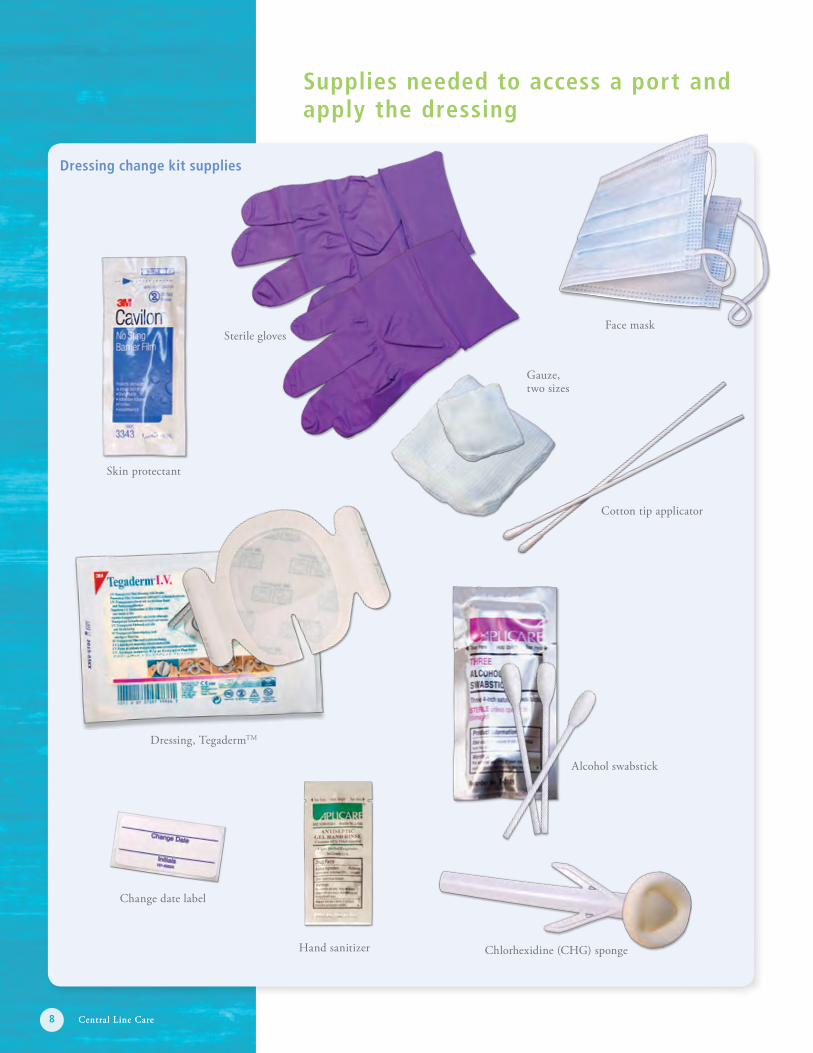
Sterile gloves
Cotton tip applicator
Face mask
Dressing change kit supplies
Gauze, two sizes
Hand sanitizer
Change date label
Chlorhexidine (CHG) sponge
Skin protectant
Alcohol swabstick
Dressing, TegadermTM
Supplies needed to access a port and apply the dressing
8 Central Line Care

9
Normal saline syringe
Needleless connector
Disinfectant cap
Supplies not in the dressing change kit
Steps for accessing a port Before you startConsider having an extra person help you. You may find it easier to access the port with your child lying down. If you are using a numbing cream, put it on one hour before you access the port.
1 Locate the dressing change kit.
2 Gather the supplies, not in the dressing change kit, see above.
3 Wash or sanitize your hands.
Dressing change kit
Steri-StripTM
9
10 mL syringe with 3 mL of 10 unit/mL of heparin
Implanted Central Line
Port needle with tubing (port access device)
Needle
Plastic cover

Central Line Care
Steps for accessing a port (continued)
Clean the skin with Chlorhexidine (CHG)
1 Look at the port site and make sure there are no signs of infection.
2 Open the dressing change kit. 3 Put on mask and then sterile gloves. Once you have on the sterile gloves, only touch the supplies you will use to access the port.
4 Connect the needless connector to the end of the port needle tubing.
Needle
Plastic cover
5 Leave the plastic cover on the port needle.
6 Remove the cap on a sterile normal saline syringe and attach it to the needleless connector.
7 Push enough fluid from the normal saline syringe into the tubing to get a few drips out of the needle. Leave the syringe attached.
8 Place syringe on a sterile or clean surface.
1 Take the CHG sponge and squeeze the wings. This will break the liquid container and wet the sponge.
2 Press the sponge lightly over the port site until you see liquid on the skin.
3 Clean the site and the skin around the site with the CHG sponge for 30 seconds. Scrub in many different directions.
4 Clean all the areas that will be covered by the dressing.
5 Allow the area to dry all the way. This may take one to two minutes. This will keep the skin from getting irritated and allow the dressing to stick better.
6 After cleaning the skin with CHG, apply skin protectant if available (see next page)
30 sec.
Do not wipe away the CHG, blow on, or
fan the site.
Get the needle ready to use
10
1 – 2 minutes

1111
3a Insert the needle straight into the skin. Push the needle into the skin until you feel it touch the back of the port.
3b The port is now accessed. The next step is to secure the needle in place.
4 Secure the needle with 2-3 steri-strips making an “X” over the needle.
5 Gently pull back on the syringe until you see blood in the tubing. Blood in the tubing means that the needle is in the right place.
6 Once you see blood, gently push on the saline syringe. The blood and saline in the syringe will go back into the catheter.
Skin protectant is used as a shield to help protect the skin from breakdown when dressings are used on the skin for long periods of time.
1 Put the protectant on the skin in a picture frame shape where the dressing will be.
2 Leave a one inch space around the insertion site where you do not apply protectant.
3 Let the protectant dry all the way. This will keep the skin from getting irritated and allow the dressing to stick better.
1 Take the plastic covering off the needle.
2 With a sterile gloved hand feel the port’s bump under the skin. Place your fingers on the sides of the port to keep it from moving around.
7 Clamp tubing and then remove syringe.
8 Flush the port with heparin. For details, see page 15-16.
1 Place a new sterile dressing over the needle.
2 Secure the tubing with a piece of tape.
3 Place a new disinfectant cap on the needleless connector if you have them
4 Write date and time on the label and place it on the port tubing.
Place the new dressing
Put the needle into the port: Apply skin protectant if available
Put the skin protectant here
Implanted Central Line

How do I de-access a port?Every 7 days while your child is using the port you will need to remove the dressing, change the port needle and put on a new dressing.
2 Wash or sanitize your hands after you have
the necessary supplies.
If replacing the needle,
use these supplies.
If not replacing the needle, you may need a
small bandage.
Small bandage
Disinfectant cap
Needle
Plastic cover
Normal saline syringe
12 Central Line Care
Steps for de-accessing a port1 Before you start, gather the supplies
you need:
Needleless connector
Dressing change kit
Alcohol pad
10 mL syringe with 5 mL of 100 unit/mL of heparin
Port needle with tubing (port access device)

1313
1 Put on procedure gloves. Clean the end of the needleless connector with an alcohol pad or remove the disinfectant cap.
2 Remove the cap on the heparin syringe.
3 Attach syringe to the needleless connector and unclamp the tubing.
4 Gently push the heparin into the port.
5 Clamp the tubing. 6 Remove the dressing carefully.
7 Gently pull the safety needle straight up and out of the skin until the needle clicks and locks in place. Then lift off the rest of the port access device.
8 If the site bleeds, apply gentle pressure until the bleeding stops.
9 If you are going to re-access the port, clean the skin and access the port as already discussed.
10 If you are not replacing the needle, place a small bandage over the site if needed.
De-access a port
Implanted Central Line
Make sure you throw away the disinfectant cap.
They are small and can be a choking hazard.
Disinfectant caps
Disinfectant caps are used at the ends of the needleless connector. These caps have a disinfectant (like alcohol) inside the cap to help keep the needleless connector clean and to help prevent infection. At the hospital, disinfectant caps are used on all central lines.
When your child is discharged, your home care company may provide these caps. However, not all companies have them or they may use a different brand. This is okay. If your home care company provides them, make sure your child has one in place whenever the line is not in use. If your home care company does not provide disinfectant caps, make sure you scrub the end of the needleless connector with an alcohol pad for 15 seconds and let it dry for 15 seconds every time you use the line.
The most common brands of disinfectant caps.
DualCap®
SwabCap®
Curo®

14 Central Line Care
Tips to remember every time you use the port Once you arrive home, you will need to continue to care for the port. As you work with the port needle, take care not to pull on it. Whenever you need to use your child’s port (for example, to start antibiotics or connect fluids) the following tips will help to prevent a port infection.
REMEMBER After you have cleaned the needleless connector, do not let the end of the connector touch anything until you attach the tubing or syringe. If you accidently touch the end of the connector, clean it again.
1 Wash your hands with soap and water.
2 If you have procedure gloves, use them.
Without a disinfectant cap
3 Scrub the end of the needleless connector very quickly back and forth for 15 seconds with an alcohol pad.
4 Let the site dry for 15 seconds.
With a disinfectant cap
3 Remove the disinfectant cap. The needless connector is ready for use if the cap has been in place for at least 5 minutes. No need to scrub with alcohol.Special consideration:
if your child is immunocompromised,
do both.
Make sure you throw away the disinfectant cap.
They are small and can be a choking hazard.
14 Central Line Care
15 sec.

How do I flush a port? Heparin is a medicine that thins the blood. A small amount of heparin in the port will keep it free from blood clots. This is called a “heparin lock.” It is important to keep the port free of clots so it will work properly. Normal saline is also used to flush the catheter before and after medicine is given through the port. This will ensure the entire catheter does not have medicine left in it before and after each use.
How often do I flush the port?• Every 12 hours when the port is accessed and you are not using the port
for medicine.
• If your child is receiving medicines you will be flushing the catheter before and after each medicine.
• If the port is not accessed you will need to access it and flush it every 30 days.
Steps for flushing a port 1 Before you start, gather the supplies
you need:
10 mL syringe with 3 mL of 10 unit/mL of heparin
Alcohol pad
Procedure gloves if you have them
Every 12 hours
Disinfectant cap
15 Implanted Central Line
Instructions continue on page 16.
2 Wash or sanitize your hands after
you have the necessary supplies.
30 DAYS
Access the port every 30 days, if not in use.

Central Line Care
Steps for flushing a port (continued)
Do not touch, fan, or blow on the end of the needleless
connector. Do not let it touch anything else.
Flush the catheter
1 Put on procedure gloves. 2a If the port has a disinfectant cap, remove it and throw it away.
2b If the port does not have a disinfectant cap, scrub the end of the needleless connector with an alcohol pad quickly in a back and forth motion for 15 seconds. Let the alcohol dry for 15 seconds.
3 Remove the cap on a heparin syringe. Make sure there are no air bubbles in the syringe.
4 Attach the heparin syringe to the needleless connector.
5 Unclamp the tubing 6 Gently push the heparin into the port. If you notice any air in the syringe stop before you push air into the line.
7 Clamp the tubing.
8 Remove the syringe. 9 Place a new disinfectant cap on the needless connector, if you have them.
16 Central Line Care
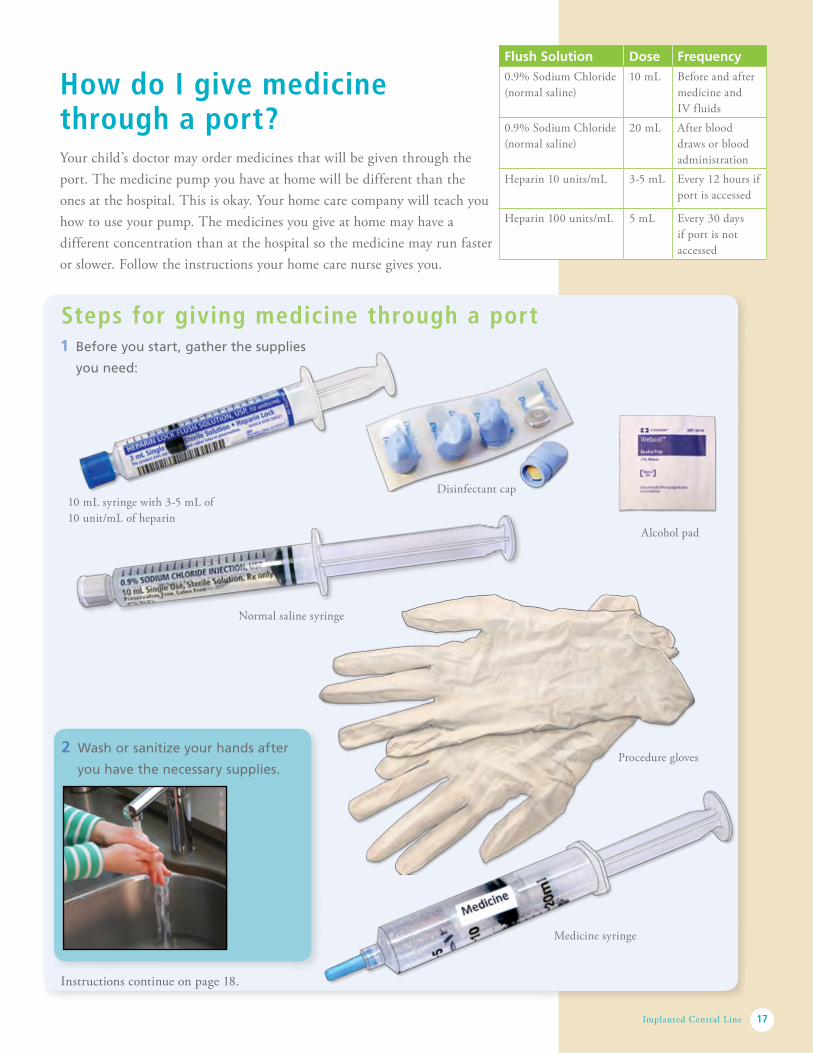
Flush Solution Dose Frequency0.9% Sodium Chloride (normal saline)
10 mL Before and after medicine and IV fluids
0.9% Sodium Chloride (normal saline)
20 mL After blood draws or blood administration
Heparin 10 units/mL 3-5 mL Every 12 hours if port is accessed
Heparin 100 units/mL 5 mL Every 30 days if port is not accessed
17
How do I give medicine through a port? Your child’s doctor may order medicines that will be given through the port. The medicine pump you have at home will be different than the ones at the hospital. This is okay. Your home care company will teach you how to use your pump. The medicines you give at home may have a different concentration than at the hospital so the medicine may run faster or slower. Follow the instructions your home care nurse gives you.
1 Before you start, gather the supplies
you need:
Implanted Central Line
Steps for giving medicine through a port
Normal saline syringe
10 mL syringe with 3-5 mL of 10 unit/mL of heparin
Alcohol pad
Disinfectant cap
Procedure gloves
Medicine syringe
2 Wash or sanitize your hands after
you have the necessary supplies.
Instructions continue on page 18.

Central Line Care18 Central Line Care
S.A.S.H.An easy way to remember the steps for giving medicine: SASH
S Saline
A Antibiotic/medicine
S Saline
H Heparin
Steps for giving medicine through a port? (continued)
Prepare to give medicine
1 Put on procedure gloves. 2a If the port has a disinfectant cap, remove it and throw it away.
2b If the port does not have a disinfectant cap, scrub the end of the needleless connector with an alcohol pad quickly in a back and forth motion for 15 seconds. Let the alcohol dry for 15 seconds.
3 Remove the cap on a normal saline syringe and attach it to the needleless connector
4 Unclamp the tubing.
1 Gently pull back on the syringe. You should get a small amount of blood into the syringe. If you can’t get blood return, contact your child’s doctor.
2 Gently push 10 mL of normal saline into the port.
3 Clamp the tubing again and remove the normal saline syringe.
Check for blood return
18
Make sure you throw away the disinfectant cap.
They are small and can be a choking hazard.

19
1 Remove any caps that may be on the syringe or tubing and attach the medicine syringe or medicine tubing to the needleless connector.
2 Unclamp the tubing.
3 Give the medicine as directed by your pharmacist or home care nurse.
4 Once you have given the medicine, clamp the tubing and remove the medicine syringe or medicine tubing.
5 Remove the cap on a normal saline syringe and attach it to the needless connector.
6 Gently push 10 mL of normal saline into the port.
7 After giving the normal saline repeat steps 5 and 6 with 3-5 mL of 10 unit/mL heparin.
8 Place a new disinfectant cap on the needleless connector if you have them.
Give medicine
19
NOTE: If your child has IV fluids, hook up the tubing
and start them again.
Implanted Central Line

20 Central Line Care
How do I prevent my child from getting a port infection? Port infections can be very serious and can make your child very sick. This can sometimes lead to more time spent in the hospital, more antibiotics, removal of the port, or in the most serious cases death. An infection can also cause a delay in treatment for your child’s illness. The best way to prevent a port infection is to take good care of it.
Where should I do my child’s port care?• When you do port care (for example, give medicine or change the
dressing) make sure the area where you work is clean. Do not do port care in the bathroom because there are a lot of germs in the bathroom.
• If you are going to access or de-access the port, have your child lean back on a couch or in a chair. If the port is already accessed and you are going to give him medicine or flush the port, he can choose what position is most comfortable. Place a clean towel under your child.
• A kitchen counter or table is a good place to put the supplies you will be using. Before you begin port care, clean the area you will be working in. Use an all-purpose cleaner for hard surfaces. Place a clean towel on the surface after you have cleaned it. Gather all the supplies you need and place them on the clean towel. Make sure the supplies are in a location that is easy to reach while you are doing cares.
How can I prevent a port infection?• Make sure you, your child, your family, and any visitors do one of
the following:
• Wash their hands frequently with soap and water
• Sanitize their hands frequently with an alcohol-based hand sanitizer
• If the dressing comes off or becomes loose, wet, or soiled, change the needle and dressing right away.
• Do not let family or friends touch the port unless they put on clean procedure gloves.
• If you use disinfectant caps on the port tubing, make sure they are always in place. Once the cap has been in place for more than 5 minutes, you will not need to scrub the needleless connector with alcohol before you use it. Allow 15 seconds for the needless connector to dry before you attach anything. During this time, make sure the end does not touch anything.
Do not do port care in the bathroom because there are a lot
of germs in a bathroom.

• If your child is immunocompromised, make sure you scrub the needleless connector for 15 seconds after you remove the disinfectant cap. For details, see page 14.
• If your child does not have a disinfectant cap on the needleless connector, you will need to scrub the needleless connector with an alcohol pad for 15 seconds and let it dry for 15 seconds before you access the port.
• If the medicine tubing becomes disconnected, clean both the needleless connector and the end of the tubing with an alcohol pad for 15 seconds and let it dry for 15 seconds. Then reconnect the needleless connector to the tubing.
• If your child wears diapers, make sure the needleless connector does not get into the diaper area.
• Do your best to keep the dressing and catheter dry. When you bathe your child cover the dressing and the catheter with plastic wrap and tape the edges to your child. For details, see page 26.
What should I look for to see if my child has a port infection? While the port is healing, look at your child’s port site every day. Infections can happen even if you do your best to keep the port clean. Watch the port site for signs or symptoms of infection.
Signs of infection include the following:
• Redness around the site
• Swelling
• Warm to the touch
• Your child complains of pain
• Your child has a fever for no known reason
• Any drainage at the site
Check the following once a day when your child's port is accessed.
• Check the skin around the dressing for signs of irritation.
• Make sure the dressing is clean, dry, and sealed to the skin.
• Make sure the next date you need to change the needle is written on the dressing. If your child’s port is not accessed, you will need a reminder to access the port and flush with heparin every 30 days.
If the dressing gets wet, change the needle and the dressing as
soon as possible.
Call your child’s doctor right away if you notice any of
these things.
21 Implanted Central Line
15 sec.
30 DAYS
Infected port site

22 Central Line Care
What do I do in an emergency?When you are at home and your child’s port is accessed, you will need to ensure the port is protected so the dressing does not get wet or loose and the needle stays in place.
What should I do if the tubing on the port needle is cut or breaks?If the port tubing is accidently cut or breaks you might notice a little bit of blood back up into the tubing. Remove the dressing and de-access the port.
• If you have been trained and feel comfortable re-accessing the port, do this right away. Once you have re-accessed the port and have been able to get a blood return, flush the port with 20 mL of normal saline. You can then heparin lock the line.
• If you do not feel comfortable re-accessing the port, call your child’s home care company or your child’s doctor.
What should I do if the port needle accidently comes out a little bit or all the way?Remove the dressing and finish de-accessing the port.
• If you have been trained and feel comfortable re-accessing the port, do this right away. Once you have re-accessed the port and have been able to get a blood return, flush the port with 20 mL of normal saline. You can then heparin lock the line.
• If you do not feel comfortable re-accessing the port, call your child’s home care company or child’s doctor right away.
What should I look for when giving medicine or flushing the port? Occasionally, the port needle can come out of the port. If you are giving a medicine or flushing the port, look for any of the following:
• Redness
• Swelling
• Pain
If you notice any of these signs or symptoms, stop flushing or giving the medicine. Call your child’s home care company right away.
• Tenderness
• Difficulty flushing
DE-ACCESS THE PORT See pages 12 – 13
ACCESS THE PORT See pages 9 – 11
Flushing the port with normal saline.

23 Implanted Central Line
What should I do if the dressing becomes wet or loose when I am not at home or have not been trained how to replace the needle?If you do not have the supplies you need or you have not been trained to replace the needle you will need to remove the dressing and de-access the port.
1 Flush the port with 5 mL of 100 unit/mL of heparin.
2 Clamp the tubing.
3 De-access the port by stabilizing the base of the port against the skin and lift up fully on the needle to engage the safety mechanism. Then lift off the rest of the port access device.
4 If the site bleeds, apply gentle pressure and place a bandage if needed.
Once you arrive home you can replace the needle and dressing if needed. If you have not been trained to replace the needle, call your home care company right away.
Frequently Asked Questions How do I prevent an air bubble from getting into my child's port?To decrease the risk of getting air into the line, remove air in the saline/heparin syringes before flushing the port. To get air bubbles out of the syringe, point the end you will attach to the needleless connector up. Tap the syringe with your finger to move the air bubble to the top of the syringe. Once all the air is at the top, slowly push the plunger up until all the air is gone and you have a little bit of liquid coming out the top of the syringe.
What do I do if the end of the catheter touches something after I clean it?Clean the end of the needless connector again for 15 seconds with an alcohol pad and let it dry for 15 seconds. If the tubing end touches something after you take off the disinfectant cap, clean the end with an alcohol pad for 15 seconds and let it dry for 15 seconds. If the disinfectant cap, normal saline or heparin syringe touches something, throw it away and get a new one.
DE-ACCESS THE PORT See pages 12 – 13
10 mL syringe with 5 mL of 100 unit/mL of heparin
15 sec.
air bubble

Central Line Care
Frequently Asked Questions (continued)
How do I bathe my child with a port?You will need to cover the site where the port was placed until the port site is healed. Cover the port area with plastic wrap and tape the edges to your child’s skin. Do your best to make sure the site stays dry.
Can my child go swimming with a port?You should only take your child swimming if the port is de-accessed. If the infection fighting cells are at a good level and the port incision is fully healed, your child can go swimming. It takes about 6-8 weeks for the incision to heal all the way. Until then do not fully submerge the port site in water.
Can my child go to school or out in the community with the port?Yes. If the port is accessed make sure no one touches the end of the tubing. Do your best to keep the end tucked under clothes so it will not be pulled on. Your child can be active but should not play contact sports such as football, soccer, or basketball. Avoid activities that may pull out the line.
What should I do if my child has an allergy to CHG?It is very rare for someone to have an allergy to CHG. Sometimes the skin can get red and itchy if the dressing is put on before the CHG is allowed to dry. It is best to have a doctor decide if your child has an allergy to CHG. Until you see your doctor again, use betadine to clean the port site. Ask your home care nurse for help.
Tape all edges of the plastic wrap to your child's skin.
Place plastic wrap over the entire dressing.
24 Central Line Care

2525 Implanted Central Line
Glossary access or accessed When a port needle is placed into an implanted port. A port needs to be accessed in order to give medicine or fluids.
alcohol prep pad or swab sticks A small square pad or application stick with alcohol used to clean and kill germs.
Betadine® Brand name for iodine used to clean and kill germs on the skin.
catheter A hollow tube inserted into the body.
central line dressing A protective covering over a port needle site to prevent infection.
central venous catheter (CVC) An intravenous or IV catheter that is placed into a large vein that leads to the heart for the purpose of giving long term medicine, nutrition, and drawing blood.
chlorhexidine (CHG) A cleaner used to kill germs and prevent them from growing on the skin.
de-access or de-accessed When a needle is removed from an implanted central line.
flush To wash out the central line with normal saline or heparin in order to clear the catheter of medicine or blood.
gauze A thin piece of cotton with an open weave.
heparin A medicine that thins the blood and is used to help prevent blood from clotting inside the central line.
implanted central line or “port” A device placed under the skin that has a small tube several inches long made of soft flexible plastic called a catheter. The catheter ends in the large vein that enters the heart. You cannot see the port but you can feel it under the skin.
insertion site The location of the port under the skin.
intravenous (IV) A tiny flexible tube inserted into a vein to give medicine or fluid into the blood stream.
needleless connector A device placed at the end of the central line to keep germs from getting into the blood. It also keeps blood from coming out of the central line.
normal saline A fluid used to flush or clear out medicine from a central line.
parenteral nutrition (TPN) A special fluid mixture of nutrients given though an IV.
port See implanted central line.
port needle with tubing (port access device) The special needle placed through the skin and into the port.
procedure gloves Clean gloves.
sterile Free from germs.
sterile gloves Gloves that are specially packaged to be completely free from germs.
TPN See parenteral nutrition.
vein A blood vessel that returns blood to the heart.

26 Central Line Care
©2017 INTERMOUNTAIN HEALTHCARE, Primary Children’s Hospital All rights reserved .
The content presented here is for your information only . It is not a substitute for professional medical advice, and it should not be used to diagnose or treat a health problem or disease . Please consult your healthcare provider if you have any questions or concerns . More health information is available at intermountainhealthcare .org .
Pediatric Education, Practice, and Research 801 .662 .3500 PCH004E – 07/15
Special care for my child’s port
Contact information
Home care company:Home care company phone number:Home care pharmacy:Home care pharmacy phone number:Other important phone numbers:
Port and dressing information
Port brand:Port size:Needle length:Dressing type:How often to change the dressing and needle:Dressing change cleanser:
Flushing information
De-accessing the port: Concentration of heparin f lush
100 units/mL
De-accessing the port: Amount of heparin f lush
5 mL
Accessing the port and giving medicine: Concentration of heparin f lush
10 units/mL
Accessing the port and giving medicine: Amount of heparin f lush
3-5 mL
Amount of normal saline f lush given before and after medicine:
10 mL
Notes
To read this booklet on your mobile device, download a free Quick Response (QR) code reader from iTunes or Google Play. Next scan the code below. www.intermountainhealthcare.org/centralline/implanted
To watch our Implanted Central Line video scan this code to learn more.
Click to watch the video and learn more.
Intermountain Healthcare complies with applicable federal civil rights laws and does not discriminate on the basis of race, color, national origin, age, disability, or sex.
Se proveen servicios de interpretación gratis. Hable con un empleado para solicitarlo. 我們將根據您的需求提供免費的口譯服務。請找尋工作人員協助