Incandescent Hand Lamps Fluorescent Hand Lamps Wide Area ...
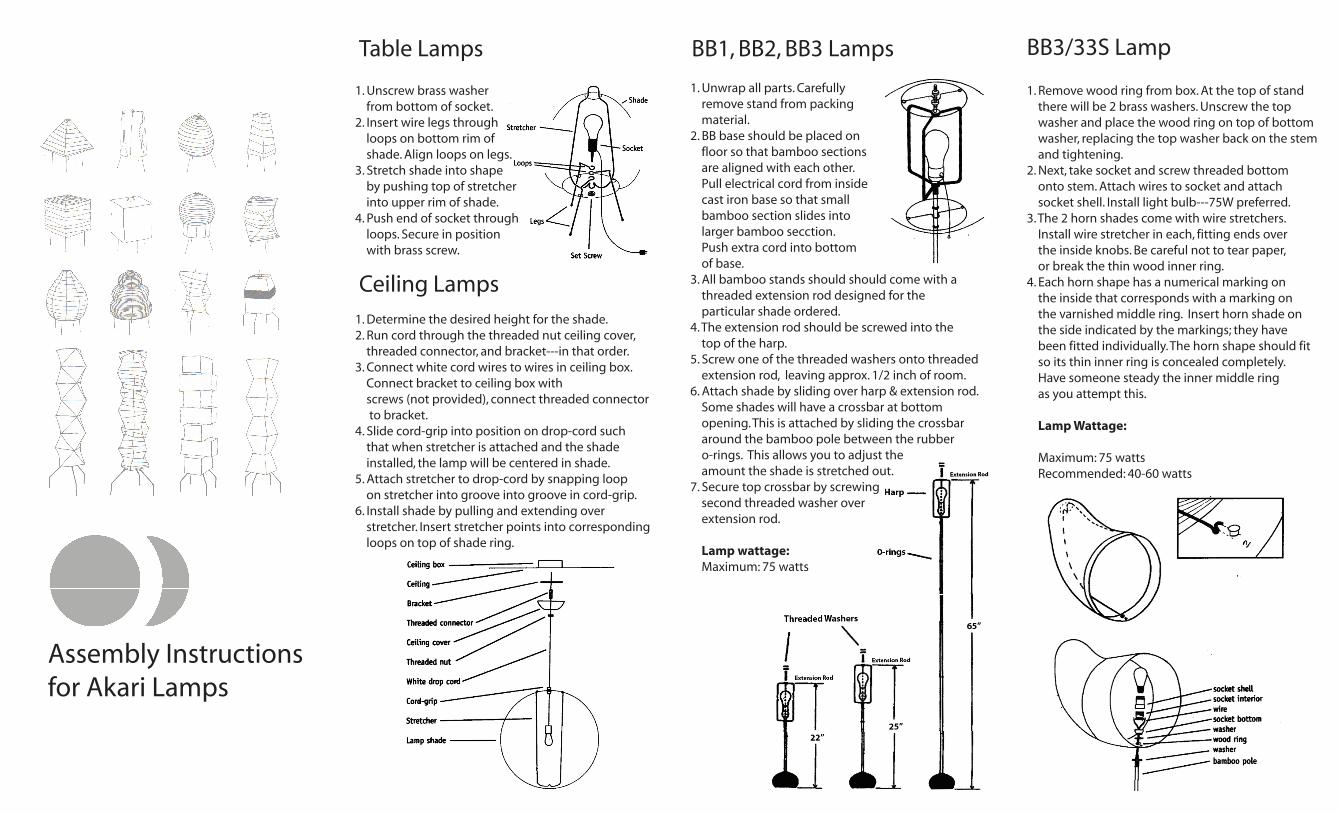
Assembly Instructionsfor Akari Lamps
Table Lamps
1. Unscrew brass washer from bottom of socket.2. Insert wire legs through loops on bottom rim of shade. Align loops on legs.3. Stretch shade into shape by pushing top of stretcher into upper rim of shade.4. Push end of socket through loops. Secure in position with brass screw.
Ceiling Lamps1. Determine the desired height for the shade.2. Run cord through the threaded nut ceiling cover, threaded connector, and bracket---in that order.3. Connect white cord wires to wires in ceiling box. Connect bracket to ceiling box with screws (not provided), connect threaded connector to bracket.4. Slide cord-grip into position on drop-cord such that when stretcher is attached and the shade installed, the lamp will be centered in shade.5. Attach stretcher to drop-cord by snapping loop on stretcher into groove into groove in cord-grip.6. Install shade by pulling and extending over stretcher. Insert stretcher points into corresponding loops on top of shade ring.
1. Unwrap all parts. Carefully remove stand from packing material.2. BB base should be placed on floor so that bamboo sections are aligned with each other. Pull electrical cord from inside cast iron base so that small bamboo section slides into larger bamboo secction. Push extra cord into bottom of base.3. All bamboo stands should should come with a threaded extension rod designed for the particular shade ordered.4. The extension rod should be screwed into the top of the harp.5. Screw one of the threaded washers onto threaded extension rod, leaving approx. 1/2 inch of room.6. Attach shade by sliding over harp & extension rod. Some shades will have a crossbar at bottom opening. This is attached by sliding the crossbar around the bamboo pole between the rubber o-rings. This allows you to adjust the amount the shade is stretched out.7. Secure top crossbar by screwing second threaded washer over extension rod.
Lamp wattage: Maximum: 75 watts
BB1, BB2, BB3 Lamps BB3/33S Lamp
1. Remove wood ring from box. At the top of stand there will be 2 brass washers. Unscrew the top washer and place the wood ring on top of bottom washer, replacing the top washer back on the stem and tightening.2. Next, take socket and screw threaded bottom onto stem. Attach wires to socket and attach socket shell. Install light bulb---75W preferred.3. The 2 horn shades come with wire stretchers. Install wire stretcher in each, fitting ends over the inside knobs. Be careful not to tear paper, or break the thin wood inner ring.4. Each horn shape has a numerical marking on the inside that corresponds with a marking on the varnished middle ring. Insert horn shade on the side indicated by the markings; they have been fitted individually. The horn shape should fit so its thin inner ring is concealed completely. Have someone steady the inner middle ring as you attempt this.
Lamp Wattage:
Maximum: 75 watts Recommended: 40-60 watts
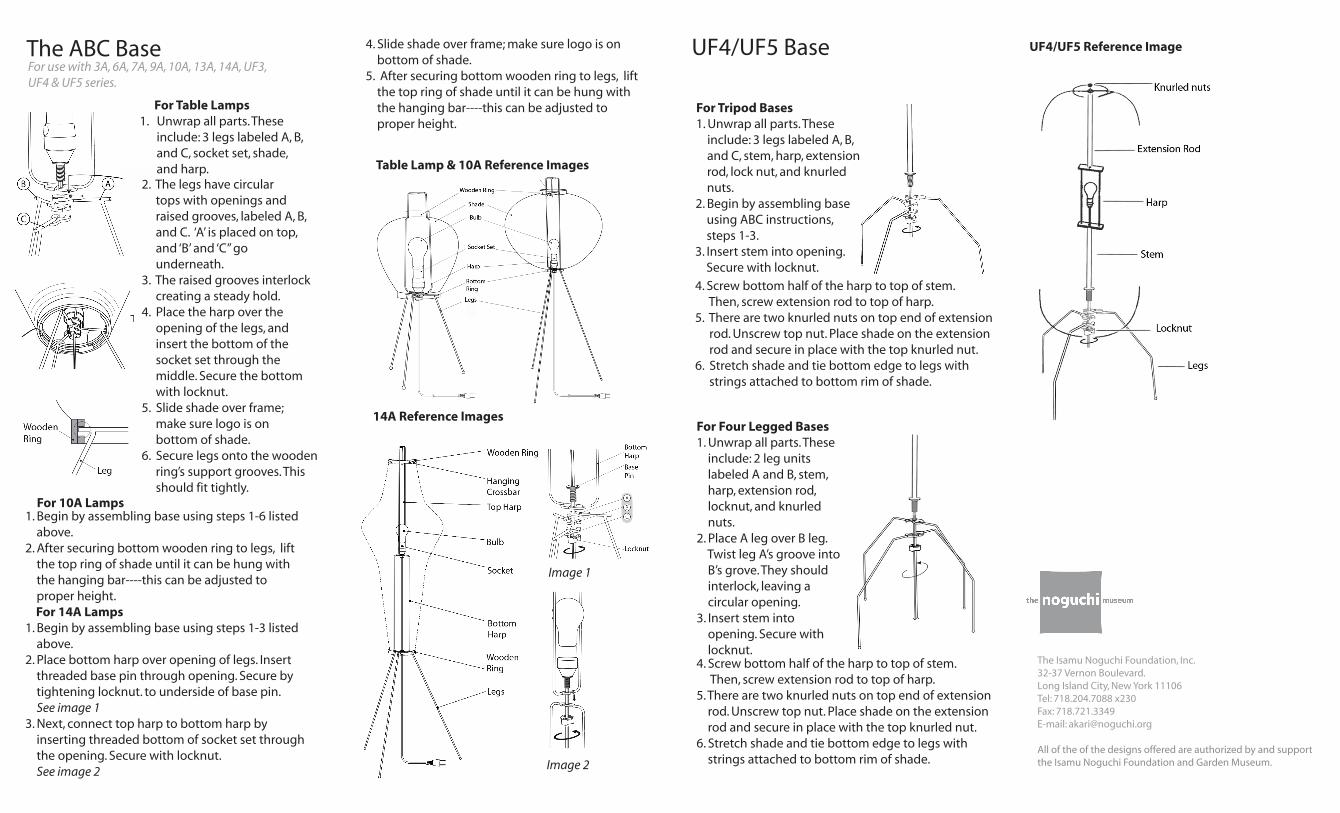
Image 2
14A Reference Images
4. Slide shade over frame; make sure logo is on bottom of shade.5. After securing bottom wooden ring to legs, lift the top ring of shade until it can be hung with the hanging bar----this can be adjusted to proper height.
Table Lamp & 10A Reference Images
Image 1
UF4/UF5 Base
For Tripod Bases1. Unwrap all parts. These include: 3 legs labeled A, B, and C, stem, harp, extension rod, lock nut, and knurled nuts.2. Begin by assembling base using ABC instructions, steps 1-3.3. Insert stem into opening. Secure with locknut.
4. Screw bottom half of the harp to top of stem. Then, screw extension rod to top of harp.5. There are two knurled nuts on top end of extension rod. Unscrew top nut. Place shade on the extension rod and secure in place with the top knurled nut.6. Stretch shade and tie bottom edge to legs with strings attached to bottom rim of shade.
The ABC Base For use with 3A, 6A, 7A, 9A, 10A, 13A, 14A, UF3, UF4 & UF5 series.
1. Unwrap all parts. These include: 3 legs labeled A, B, and C, socket set, shade, and harp.2. The legs have circular tops with openings and raised grooves, labeled A, B, and C. ‘A’ is placed on top, and ‘B’ and ‘C” go underneath.3. The raised grooves interlock creating a steady hold.4. Place the harp over the opening of the legs, and insert the bottom of the socket set through the middle. Secure the bottom with locknut. 5. Slide shade over frame; make sure logo is on bottom of shade.6. Secure legs onto the wooden ring’s support grooves. This should fit tightly.
1. Begin by assembling base using steps 1-6 listed above. 2. After securing bottom wooden ring to legs, lift the top ring of shade until it can be hung with the hanging bar----this can be adjusted to proper height. For 14A Lamps 1. Begin by assembling base using steps 1-3 listed above.2. Place bottom harp over opening of legs. Insert threaded base pin through opening. Secure by tightening locknut. to underside of base pin. See image 13. Next, connect top harp to bottom harp by inserting threaded bottom of socket set through the opening. Secure with locknut. See image 2
For Table Lamps
For 10A Lamps
For Four Legged Bases1. Unwrap all parts. These include: 2 leg units labeled A and B, stem, harp, extension rod, locknut, and knurled nuts.2. Place A leg over B leg. Twist leg A’s groove into B’s grove. They should interlock, leaving a circular opening.3. Insert stem into opening. Secure with locknut. 4. Screw bottom half of the harp to top of stem. Then, screw extension rod to top of harp.5. There are two knurled nuts on top end of extension rod. Unscrew top nut. Place shade on the extension rod and secure in place with the top knurled nut.6. Stretch shade and tie bottom edge to legs with strings attached to bottom rim of shade.
UF4/UF5 Reference Image
The Isamu Noguchi Foundation, Inc.32-37 Vernon Boulevard.Long Island City, New York 11106Tel: 718.204.7088 x230Fax: 718.721.3349E-mail: [email protected]
All of the of the designs offered are authorized by and support the Isamu Noguchi Foundation and Garden Museum.