C:Documents and SettingsenricoDocumentiKX3-IT-GB.prn · degli accordi completi in modo tradizionale...
24
1 M u s i c a l I n s t r u m e n t s KX 3 Portable Keyboard M a n u a l e d' u s o O w n e r’ s M a n u a l
Transcript of C:Documents and SettingsenricoDocumentiKX3-IT-GB.prn · degli accordi completi in modo tradizionale...

1
M u s i c a l I n s t r u m e n t s
KX 3 Portable Keyboard
M a n u a l e d' u s o O w n e r’ s M a n u a l

2
3
M u s i c a l I n s t r u m e n t s
KX 3 Portable Keyboard
M a n u a l e d' u s o

4
Tastiera Portatile Modello KX 3
INTRODUZIONE ACCENSIONE Collegate il connettore DC dell’alimentatore esterno alla presa DC IN posta nel pannello posteriore. Inserite poi la spina AC dell’alimentatore alla presa di corrente. Accendete lo strumento tramite l'interruttore ON/OFF. VOLUME GENERALE Il Volume Generale viene controllato dal potenziometro rotativo Master Volume. Questo controlla anche il volume della cuffia, se collegata. Girare in senso orario per aumentare il volume, in senso antiorario per abbassarlo. DEMO E' possibile selezionare dei brani dimostrativi (Demo Songs) che daranno un’idea pelle potenzialità dello strumento. Accendere lo strumento e regolare la manopola del volume a circa la metà della sua corsa. Premere il pulsante DEMO. Le Demo Song suoneranno ora in sequenza. Premere il pulsante DEMO per fermare il brano dimostrativo. SELEZIONARE I SUONI Nella memoria interna sono disponibili 128 suoni elencati da 01 a 128. Per selezionare i suoni premere il pulsante VOICE/STYLE per selezionare VOICE ed il suo numero relativo appare sul display. Utilizzare i numeri da 0 a 9 per selezionare i suoni. E’ possibile selezionare i suoni disponibili anche tramite i pulsanti (+) e (-).
5
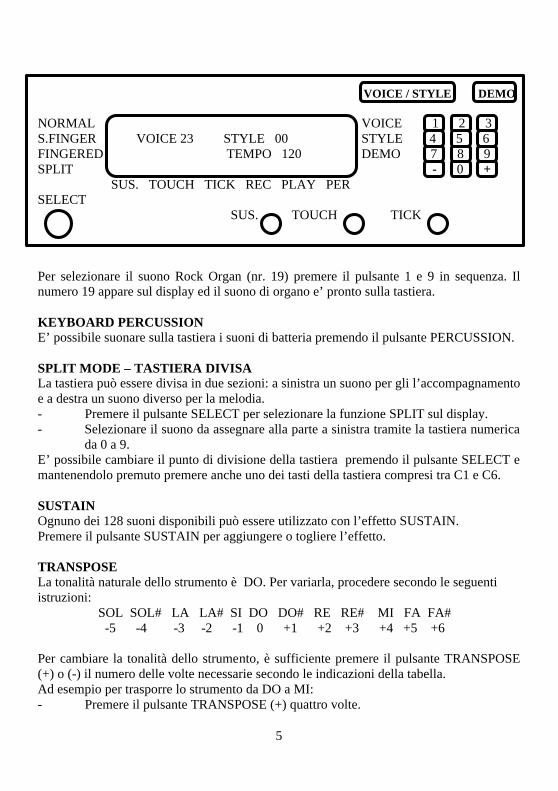
VOICE / STYLE DEMO NORMAL VOICE 1 2 3 S.FINGER VOICE 23 STYLE 00 STYLE 4 5 6 FINGERED TEMPO 120 DEMO 7 8 9 SPLIT - 0 + SUS. TOUCH TICK REC PLAY PER SELECT SUS. TOUCH TICK Per selezionare il suono Rock Organ (nr. 19) premere il pulsante 1 e 9 in sequenza. Il numero 19 appare sul display ed il suono di organo e’ pronto sulla tastiera.
KEYBOARD PERCUSSION E’ possibile suonare sulla tastiera i suoni di batteria premendo il pulsante PERCUSSION. SPLIT MODE – TASTIERA DIVISA La tastiera può essere divisa in due sezioni: a sinistra un suono per gli l’accompagnamento e a destra un suono diverso per la melodia. - Premere il pulsante SELECT per selezionare la funzione SPLIT sul display. - Selezionare il suono da assegnare alla parte a sinistra tramite la tastiera numerica
da 0 a 9. E’ possibile cambiare il punto di divisione della tastiera premendo il pulsante SELECT e mantenendolo premuto premere anche uno dei tasti della tastiera compresi tra C1 e C6. SUSTAIN Ognuno dei 128 suoni disponibili può essere utilizzato con l’effetto SUSTAIN. Premere il pulsante SUSTAIN per aggiungere o togliere l’effetto. TRANSPOSE La tonalità naturale dello strumento è DO. Per variarla, procedere secondo le seguenti istruzioni: SOL SOL# LA LA# SI DO DO# RE RE# MI FA FA# -5 -4 -3 -2 -1 0 +1 +2 +3 +4 +5 +6 Per cambiare la tonalità dello strumento, è sufficiente premere il pulsante TRANSPOSE (+) o (-) il numero delle volte necessarie secondo le indicazioni della tabella. Ad esempio per trasporre lo strumento da DO a MI: - Premere il pulsante TRANSPOSE (+) quattro volte.

6
- Non appena il pulsante TRANSPOSE (+) viene premuto il display indica l'avvenuta trasposizione
Transp = +4 Per riportare lo strumento alla tonalità originale in DO, premere contemporaneamente i due pulsanti TRANSPOSE (+) e (-). Per trasporre lo strumento in LA#: - Premere il pulsante TRANSPOSE (-) due volte.
Non appena il pulsante TRANSPOSE (-) viene premuto il display indica l'avvenuta trasposizione
Transp = -2 Per riportare lo strumento alla tonalità originale in DO, premere contemporaneamente i due pulsanti TRANSPOSE (+) e (-) ACCOMPAGNAMENTO AUTOMATICO Il vostro strumento a 100 ritmi con accompagnamento automatico. Quando l’accompagnamento automatico e’ inserito, lo strumento suonerà in modo automatico degli accompagnamenti che daranno una dimensione orchestrale alla vostra musica. E’ possibile suonare gli accordi automatici sui primi 19 tasti a sinistra della tastiera. SELEZIONARE I RITMI Nella memoria interna sono disponibili 100 ritmi. Per selezionare i ritmi premere il pulsante VOICE/STYLE per selezionare STYLE ed il suo numero relativo appare sul display. Utilizzare i numeri da 0 a 9 per selezionare i ritmi. E’ possibile selezionare i ritmi disponibili anche tramite i pulsanti (+) e (-). VOICE / STYLE DEMO NORMAL VOICE 1 2 3 S.FINGER VOICE 23 STYLE 00 STYLE 4 5 6 FINGERED TEMPO 120 DEMO 7 8 9 SPLIT - 0 + SUS. TOUCH TICK REC PLAY PER SELECT SUS. TOUCH TICK

7
Per selezionare il Ritmo BIG BAND (nr. 50) premere il pulsante 5 e 0 in sequenza. Il numero 50 appare sul display ed il ritmo BIG BAND e’ pronto sulla tastiera. ACCOMPAGNAMENTO FINGERED Selezionare tramite il pulsante SELECT la funzione FINGERED e’ possibile suonare degli accordi completi in modo tradizionale premendo il pulsante FINGERED. Di seguito viene indicata la tabella degli accordi disponibili.
ACCOMPAGNAMENTO SINGLE FINGER Selezionare tramite il pulsante SELECT la funzione SINGLE FINGER E’ possibile suonare degli accordi completi con un solo dito premendo il pulsante S.FINGER.
Accordi Maggiori Premere il tasto relativo alla nota fondamentale dell’accordo. Per un accordo di DO Maggiore premere la nota Do.
8
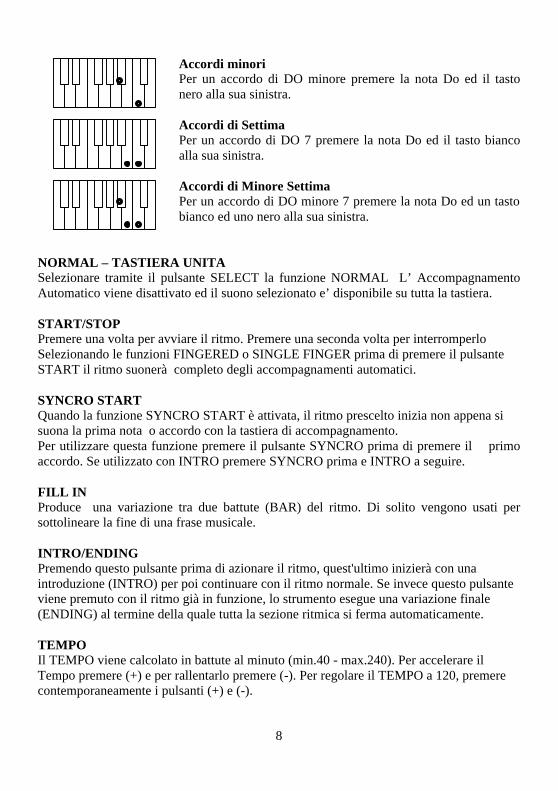
Accordi minori Per un accordo di DO minore premere la nota Do ed il tasto nero alla sua sinistra.
Accordi di Settima
Per un accordo di DO 7 premere la nota Do ed il tasto bianco alla sua sinistra.
Accordi di Minore Settima
Per un accordo di DO minore 7 premere la nota Do ed un tasto bianco ed uno nero alla sua sinistra.
NORMAL – TASTIERA UNITA Selezionare tramite il pulsante SELECT la funzione NORMAL L’ Accompagnamento Automatico viene disattivato ed il suono selezionato e’ disponibile su tutta la tastiera. START/STOP Premere una volta per avviare il ritmo. Premere una seconda volta per interromperlo Selezionando le funzioni FINGERED o SINGLE FINGER prima di premere il pulsante START il ritmo suonerà completo degli accompagnamenti automatici. SYNCRO START Quando la funzione SYNCRO START è attivata, il ritmo prescelto inizia non appena si suona la prima nota o accordo con la tastiera di accompagnamento. Per utilizzare questa funzione premere il pulsante SYNCRO prima di premere il primo accordo. Se utilizzato con INTRO premere SYNCRO prima e INTRO a seguire. FILL IN Produce una variazione tra due battute (BAR) del ritmo. Di solito vengono usati per sottolineare la fine di una frase musicale. INTRO/ENDING Premendo questo pulsante prima di azionare il ritmo, quest'ultimo inizierà con una introduzione (INTRO) per poi continuare con il ritmo normale. Se invece questo pulsante viene premuto con il ritmo già in funzione, lo strumento esegue una variazione finale (ENDING) al termine della quale tutta la sezione ritmica si ferma automaticamente. TEMPO Il TEMPO viene calcolato in battute al minuto (min.40 - max.240). Per accelerare il Tempo premere (+) e per rallentarlo premere (-). Per regolare il TEMPO a 120, premere contemporaneamente i pulsanti (+) e (-).
9
TICK -METRONOMO La funzione TICK o Metronomo e' sempre disponibile. Il Metronomo sarà selezionato tramite il pulsante TICK quando la batteria e’ in movimento. VOLUME ACCOMPAGNAMENTO AUTOMATICO Utilizzare i due pulsanti (+) e (-) dell’accompagnamento automatico per bilanciare il volume. Il volume minimo e’ 0 (zero) il massimo 16 sedici). La variazione viene visualizzata sul display. MEMORIZZARE I SETTAGGI E’ possibile memorizzare delle situazioni di pannello sui pulsanti M1-M6. E’ sufficiente preparare il settaggio desiderato con il suono e il ritmo preferiti e per memorizzare premere e mantenere premuto il pulsante STORE ed in seguito premere il pulsante M1-M6 dove si desidera memorizzare la configurazione. Mantenere premuti i pulsanti per alcuni secondi e poi rilasciarli.
RECORD SONG E’ possibile registrare dei brevi brani musicali. Premere il pulsante RECORD per iniziare la registrazione e premere una seconda volta per terminare la registrazione.
PLAY SONG Per riascoltare la registrazione premere il pulsante PLAY dopo aver registrato il brano musicale. CONNESSIONI - Pannello Posteriore Cuffia È possibile collegare la cuffia stereo per esercitarsi senza essere uditi. La presa si trova nella parte posteriore dello strumento. Non appena si inserisce la cuffia, gli altoparlanti si disattivano automaticamente ed è possibile suonare senza essere disturbati dal rumore dell'ambiente circostante. Uscita Audio L’uscite audio permette di inviare il segnale ad un amplificatore esterno, ad un mixer esterno o ad un impianto di registrazione. Connessioni Midi Il connettore Midi IN riceve i dati Midi da un dispositivo Midi esterno che può essere utilizzato per controllare lo strumento ORLA. Il connettore Midi OUT trasmette i dati Midi generati dallo strumento ORLA ad altri strumenti Midi.

10
KX3 Style List 1 16 Beat Pop 34 Funk 67 Modern ChaCha
2 8 Beat Pop 35 Funk Shuffle 68 Latin Rock 3 8 Beat Light 36 Hard Rock 69 Ska 4 Folk Rock 37 Rock Boogie 70 Calipso 5 Detroit Pop 38 Rock Pop 71 Reggae 16 6 Pop Shuffle 39 Rock Shuffle 72 Reggae 12 7 Pop Rock 40 6/8 Rock 73 Bluegrass 8 Showtime 41 Rock Ballad 74 Country Pop 9 16 Beat Ball 42 Rock Classical 75 Country Rock
10 Pop Ballad 43 Rock & Roll 76 Country Ball 11 Big Ballad 44 Boogie Woogie 77 Country Pop 12 Piano Ball 45 Twist 78 Country Shuffle 13 Epic Ballad 46 Rockabilly 79 West Shuffle 14 6/8 Ballad 47 60 R&Roll 80 Polka 15 Eurobeat 48 Rag Time 81 Trad. Waltz 16 Dance Pop 49 Dixieland 82 Sevillana 17 Casa – House 50 Big Band 83 Bolero Lento 18 Dance Shufl 51 B. B. Ballad 84 Espagnole 19 Ground Beat 52 Swing 85 Dangdut 20 Synth Boogie 53 Swing Waltz 86 March 21 Disco Party 54 Bebop 87 6/8 March 22 Disco Soul 55 Jazz Ballad 88 Tarantella 23 Disco Trop 56 Jazz Waltz 89 Slow Waltz 24 Disco Funk 57 Fusion 90 Tango Argentine 25 Disco Pop 58 Fusion Shuffle 91 Tango Habanera 26 Polka Pop 59 Mambo 92 Slowfox 27 R & Blues 60 Merengue 93 Viennese 28 R&B Ballad 61 Beguine 94 Fox Trot 29 Fast Gospel 62 Bomba 95 Jive 30 Gospel 63 Guaguanco 96 Rhumba 31 6/8 Blues 64 Pop Bossa 97 Samba 32 Blues Shuffle 65 Bossa Slow 98 Cha Cha 33 Soul 66 Jazz Samba 99 Pasodoble
100 Rap

11
KX3 Sound List
1 Grand Piano 44 Contrabass 87 Fifths 2 Brigth Piano 45 Tremolo Strings 88 Bass+Lead 3 Electric Grand 46 Pizzicato Strings 89 New Age 4 Honky Tonk 47 Orchestral Harp 90 Warm Pad 5 El. Piano 1 48 Timpani 91 Polisynth 6 El. Piano 2 49 String Ensem. 1 92 Choir 7 Harpsichord 50 String Ensem. 2 93 Bowed Pad 8 Clavinet 51 Synth Strings 1 94 Metallic Pad 9 Celesta 52 Synth Strings 2 95 Halo Pad
10 Glockenspiel 53 Choir Aahs 96 Sweep Pad 11 Music Box 54 Choir Oohs 97 Rain 12 Vibraphone 55 Synth Voice 98 Sound Track 13 Marimba 56 Orchestral Hit 99 Crystal 14 Xylophone 57 Trumpet 100 Atmospere 15 Tubolar Bells 58 Trombone 101 Brightness 16 Dulcimer 59 Tuba 102 Goblins 17 Drawbar Organ 60 Muted Trumpet 103 Echoes 18 Percussive Org. 61 French Horn 104 Sci-Fi 19 Rock Organ 62 Brass Section 105 Sitar 20 Church Organ 63 Synth Brass 1 106 Banyo 21 Reed Organ 64 Synth Brass 2 107 Shamisen 22 Accordion 65 Soprano Sax 108 Koto 23 Harmonica 66 Alto Sax 109 Kalimba 24 Tango Accord. 67 Tenore Sax 110 Bag Pipe 25 Nylon Guitar 68 Baritone Sax 111 Fiddle 26 Steel Guitar 69 Oboe 112 Shanai 27 Jazz Guitar 70 English Horn 113 Thinkle Bell 28 Clean Guitar 71 Basson 114 Agogo 29 Muted Guitar 72 Clarinet 115 Steel Drum 30 Overdriven Guit. 73 Piccolo 116 Wood Block 31 Distortion Guitar 74 Flute 117 Taiko Drum 32 Guitar Harmaon. 75 Recorder 118 Melodic Tom 33 Acoustic Guitar 76 Pan Flute 119 Synth Drum 34 Finger Bass 77 Blown Bottle 120 Reverse Cymbal 35 Pick Bass 78 Shakuhachi 121 Guit. Fret Noise 36 Fretless Bass 79 Whistle 122 Breath Noise 37 Slap Bass 1 80 Ocarina 123 Seashore 38 Slapp Bass 2 81 Square 124 Birds 39 Synth Bass 1 82 Sawthooth 125 Telephone 40 Synth Bass 2 83 Calliope 126 Helicopter 41 Violin 84 Chiff 127 Applause 42 Viola 85 Charang 128 Gunshot 43 Cello 86 Voice 129 Percussions

12
NOTE ……………………………………………………………………………………………… ……………………………………………………………………………………………… ……………………………………………………………………………………………… ……………………………………………………………………………………………… ……………………………………………………………………………………………… ……………………………………………………………………………………………… ……………………………………………………………………………………………… ……………………………………………………………………………………………… ……………………………………………………………………………………………… ……………………………………………………………………………………………… ……………………………………………………………………………………………… ……………………………………………………………………………………………… ……………………………………………………………………………………………… ……………………………………………………………………………………………… ……………………………………………………………………………………………… ……………………………………………………………………………………………… ……………………………………………………………………………………………… ……………………………………………………………………………………………… ………………………………………………………………………………………………

13
M u s i c a l I n s t r u m e n t s
KX 3 Portable Keyboard
O w n e r’ s M a n u a l

14
KX 3 Portable Keyboard
INTRODUCTION POWER SUPPLY Plug the DC output cable from the Power adapter into the DC IN jack on the rear panel of your instrument , then plug the Power adapter (or the AC cable of the Power Adapter) into a convenient wall AC power socket. LISTENING TO THE DEMO Once you've set up your instrument, try listening to the pre-programmed demonstration songs - they'll give you a good idea of what the instrument can do. Before playing the demo, turn the power on by pressing the POWER switch (the panel Indicators and MULTI DISPLAY will light) and set the MASTER VOLUME about half way between the "MIN" and "MAX" settings. You can adjust the volume to accommodate your play. Press DEMO button to start and all demo songs will play in sequence repeatedly. You can select one of the demonstration by pressing the Number buttons or the [+] and [-] buttons. Press DEMO button again to stop demo playback.
SELECTING AND PLAYING THE VOICES Your instrument has 128 GM standard voices that you can select and play. Press the VOICE/STYLE button to let the Active Input Arrow point to string "VOICE". The voice number will appear on the MULTI DISPLAY. Use the [+] and [-] buttons or the number buttons to select the required voice number (01-128). The [+] and [-] buttons can be used to increment (increment by one) or decrement (decrement by one) the currently selected voice number.

15
VOICE / STYLE DEMO NORMAL VOICE 1 2 3 S.FINGER VOICE 23 STYLE 00 STYLE 4 5 6 FINGERED TEMPO 120 DEMO 7 8 9 SPLIT - 0 + SUS. TOUCH TICK REC PLAY PER SELECT SUS. TOUCH TICK To select "CLASSIC GUITAR" (number 23), for example, first press 2 and 3. The number "23" should the appear on the MULTI DISPLAY. If you select "100"-"128",you should press 1 for a short time until "1 " shown on the LCD, then you can select the numbers 2 and 8 normally. KEYBOARD PERCUSSION Your instrument has 61 different percussions that can be played on right 61 keys of the keyboard when selecting percussion function. SPLIT MODE Your keyboard can be split into two sections which means different voices can be played with the left and right hands at the same time. - Press SELECT button so that the Finger Select Arrow points to string "SPLIT" - Select the sounds that will be assigned to the Left of the split point using the
Number keypad. It is possible to change the split point holding the SELECT button while press any key on the keyboard. SUSTAIN Press SUSTAIN button so that its flag appears to turn Sustain ON. It can be used as a damper pedal. Turning Sustain on to sustain notes after the keys are released. Press SUSTAIN button again to turn sustain OFF. TOUCH Press TOUCH button, you can turn ON/OFF the touch function. When the Touch function is ON, the volume will be varied according to how hard you play on the keyboard. TRANSPOSE It is possible to Transpose the natural key ( C ) of your instrument up or down.
G G# A A# B C C# D D# E F F# -5 -4 -3 -2 -1 0 +1 +2 +3 +4 +5 +6

16
- Press the Transpose button Up 4 times to transpose into E Key. - Press the Transpose button Down 2 times to transpose into A# key. - Press both Transpose buttons to restore the C key. The display indicates all changes. AUTO ACCOMPANIMENT Your instrument has 100 accompaniment styles which can be used to provide fully-orchestrated Auto Accompaniment. When the Auto Accompaniment function is turned ON, the instrument create fully-orchestrated rhythm, bass and chord accompaniments. SELECTING A STYLE Any of your instrument's 100 styles can be selected via the normal editing procedure. This can be done either before or during accompaniment playback. VOICE / STYLE DEMO NORMAL VOICE 1 2 3 S.FINGER VOICE 23 STYLE 00 STYLE 4 5 6 FINGERED TEMPO 120 DEMO 7 8 9 SPLIT - 0 + SUS. TOUCH TICK REC PLAY PER SELECT SUS. TOUCH TICK - Press the VOICE/STYLE button to select Style on display. The style number will
appear on the DISPLAY. - Refer to the STYLE list , use the [+] and [-] buttons or the number buttons to
select the required style number (00 through 99). AUTO ACCOMPANIMENT MODES Your instrument has two Auto Accompaniment fingering mode: FINGERED and SINGLE FINGER. Press SELECT button to let the Arrow point to FINGERED to select Multi Fingered Mode; while point to string SINGLE to select Single Finger Mode.
17
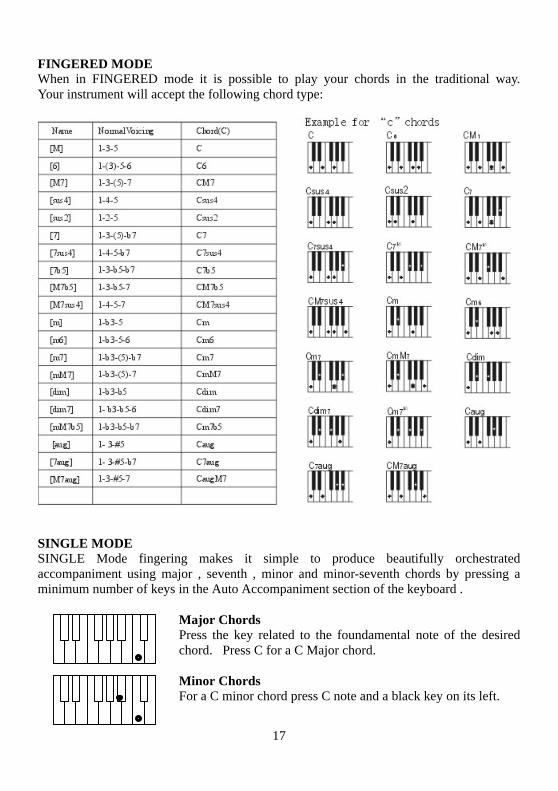
FINGERED MODE When in FINGERED mode it is possible to play your chords in the traditional way. Your instrument will accept the following chord type:
SINGLE MODE SINGLE Mode fingering makes it simple to produce beautifully orchestrated accompaniment using major , seventh , minor and minor-seventh chords by pressing a minimum number of keys in the Auto Accompaniment section of the keyboard . Major Chords
Press the key related to the foundamental note of the desired chord. Press C for a C Major chord.
Minor Chords
For a C minor chord press C note and a black key on its left.
18
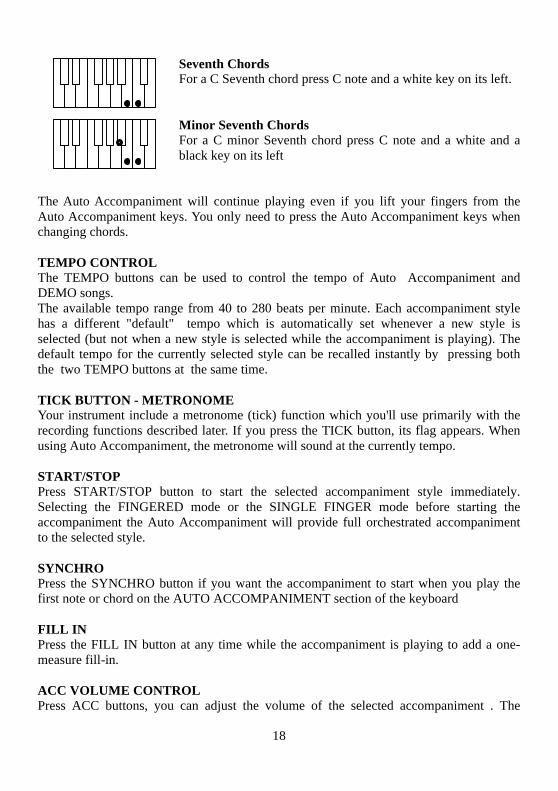
Seventh Chords For a C Seventh chord press C note and a white key on its left.
Minor Seventh Chords
For a C minor Seventh chord press C note and a white and a black key on its left
The Auto Accompaniment will continue playing even if you lift your fingers from the Auto Accompaniment keys. You only need to press the Auto Accompaniment keys when changing chords. TEMPO CONTROL The TEMPO buttons can be used to control the tempo of Auto Accompaniment and DEMO songs. The available tempo range from 40 to 280 beats per minute. Each accompaniment style has a different "default" tempo which is automatically set whenever a new style is selected (but not when a new style is selected while the accompaniment is playing). The default tempo for the currently selected style can be recalled instantly by pressing both the two TEMPO buttons at the same time. TICK BUTTON - METRONOME Your instrument include a metronome (tick) function which you'll use primarily with the recording functions described later. If you press the TICK button, its flag appears. When using Auto Accompaniment, the metronome will sound at the currently tempo. START/STOP Press START/STOP button to start the selected accompaniment style immediately. Selecting the FINGERED mode or the SINGLE FINGER mode before starting the accompaniment the Auto Accompaniment will provide full orchestrated accompaniment to the selected style. SYNCHRO Press the SYNCHRO button if you want the accompaniment to start when you play the first note or chord on the AUTO ACCOMPANIMENT section of the keyboard FILL IN Press the FILL IN button at any time while the accompaniment is playing to add a one-measure fill-in. ACC VOLUME CONTROL Press ACC buttons, you can adjust the volume of the selected accompaniment . The

19
volume range is from 0 (no sound) to 16 (max volume). The current accompaniment volume value will appear on the MULTI DISPLAY. REGISTRATION MEMORY Your instrument REGISTRATION MEMORY can be used to store 6 sets of VOICE and AUTO ACCOMPANIMENT settings that can be recalled during you playing at the touch of one single button. The main voice number (right hand), split voice number (left hand), sustain and touch status, tempo value, transpose value, Auto Accompaniment volume (ACC VOL) and finger selecting status can be restored to REGISTRATION MEMORY. - The panel settings listed above can be stored to any one of the six REGISTRATION
MEMORY buttons by pressing the button-[M1] ,[M2] , [M3] , [M4], [M5]or [M6] while holding the STORE button . The [S-1]-[S-6] will appear on the MULTI DISPLAY . Please note that anytime you store to a REGISTRATION MEMORY button, all settings previously stored in that button will be erased and replaced by the new settings.
- The settings stored to a REGISTRATION MEMORY button can be recalled simply by pressing the appropriate button. The [E-1]-[E-6] will appear on the MULTI DISPLAY .
RECORDING FUNCTION Your instrument allows you to record and play back song including chord sequences created using the Auto Accompaniment feature and melody like you play on the keyboard. Press the RECORD button to start recording. Press it again to stop recording. Press PLAY to listen to your recording. PITCH BEND The PITCH BEND wheel is located on the left side of your keyboard that can be used to tune the pitch of the keyboard. Push the wheel upward, the keyboard pitch will be increased and pull wheel downward will decreased the keyboard pitch. Push the wheel to the top position for about 2 seconds, LCD will display the pitch range (pitch sensitivity). You can use the [+] and [-] or the number [0]-[9] buttons or the digital dial to set the pitch sensitivity: 1~ 12 semitones. When the power is turned ON, the preset sensitivity is +/- 2 semitones. USING HEADPHONES OR AN EXTERNAL SOUND SYSTEM A standard pair of stereo headphones can be plugged into the rear-panel PHONES jack for private practice or late-night playing. The internal speaker system is automatically shut off when a pair of headphones is plugged into the PHONE jack. The LINE OUT jack can be used to deliver the output of the sound to a keyboard amplifier, stereo sound system, mixing console or tape recorder.

20
THE SUSTAIN PEDAL An optional foot switch can be plugged into the rear-panel SUSTAIN PEDAL jack. The Sustain Pedal is a damper pedal controlling sustain function. Press the pedal you can sustain the notes after the keys are released. Don't press the pedal while inserting the plug into the SUSTAIN PEDAL jack or while turning the power on. MIDI MIDI OUT: Output MIDI data of this instrument to control other MIDI device. MIDI IN: Press MIDI IN button, your instrument only can receive MIDI data from an external MIDI device which can be used to control yours.

21
KX3 Style List 1 16 Beat Pop 34 Funk 67 Modern ChaCha
2 8 Beat Pop 35 Funk Shuffle 68 Latin Rock 3 8 Beat Light 36 Hard Rock 69 Ska 4 Folk Rock 37 Rock Boogie 70 Calipso 5 Detroit Pop 38 Rock Pop 71 Reggae 16 6 Pop Shuffle 39 Rock Shuffle 72 Reggae 12 7 Pop Rock 40 6/8 Rock 73 Bluegrass 8 Showtime 41 Rock Ballad 74 Country Pop 9 16 Beat Ball 42 Rock Classical 75 Country Rock
10 Pop Ballad 43 Rock & Roll 76 Country Ball 11 Big Ballad 44 Boogie Woogie 77 Country Pop 12 Piano Ball 45 Twist 78 Country Shuffle 13 Epic Ballad 46 Rockabilly 79 West Shuffle 14 6/8 Ballad 47 60 R&Roll 80 Polka 15 Eurobeat 48 Rag Time 81 Trad. Waltz 16 Dance Pop 49 Dixieland 82 Sevillana 17 Casa – House 50 Big Band 83 Bolero Lento 18 Dance Shufl 51 B. B. Ballad 84 Espagnole 19 Ground Beat 52 Swing 85 Dangdut 20 Synth Boogie 53 Swing Waltz 86 March 21 Disco Party 54 Bebop 87 6/8 March 22 Disco Soul 55 Jazz Ballad 88 Tarantella 23 Disco Trop 56 Jazz Waltz 89 Slow Waltz 24 Disco Funk 57 Fusion 90 Tango Argentine 25 Disco Pop 58 Fusion Shuffle 91 Tango Habanera 26 Polka Pop 59 Mambo 92 Slowfox 27 R & Blues 60 Merengue 93 Viennese 28 R&B Ballad 61 Beguine 94 Fox Trot 29 Fast Gospel 62 Bomba 95 Jive 30 Gospel 63 Guaguanco 96 Rhumba 31 6/8 Blues 64 Pop Bossa 97 Samba 32 Blues Shuffle 65 Bossa Slow 98 Cha Cha 33 Soul 66 Jazz Samba 99 Pasodoble
100 Rap
22
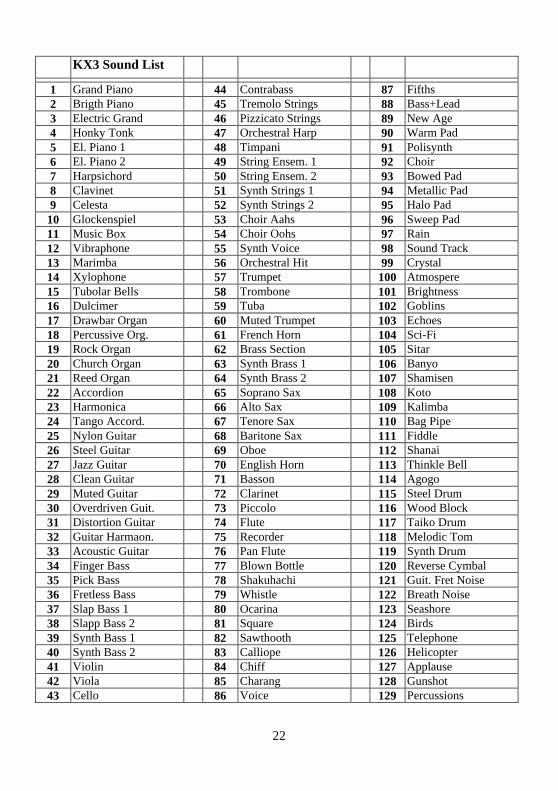
KX3 Sound List
1 Grand Piano 44 Contrabass 87 Fifths 2 Brigth Piano 45 Tremolo Strings 88 Bass+Lead 3 Electric Grand 46 Pizzicato Strings 89 New Age 4 Honky Tonk 47 Orchestral Harp 90 Warm Pad 5 El. Piano 1 48 Timpani 91 Polisynth 6 El. Piano 2 49 String Ensem. 1 92 Choir 7 Harpsichord 50 String Ensem. 2 93 Bowed Pad 8 Clavinet 51 Synth Strings 1 94 Metallic Pad 9 Celesta 52 Synth Strings 2 95 Halo Pad
10 Glockenspiel 53 Choir Aahs 96 Sweep Pad 11 Music Box 54 Choir Oohs 97 Rain 12 Vibraphone 55 Synth Voice 98 Sound Track 13 Marimba 56 Orchestral Hit 99 Crystal 14 Xylophone 57 Trumpet 100 Atmospere 15 Tubolar Bells 58 Trombone 101 Brightness 16 Dulcimer 59 Tuba 102 Goblins 17 Drawbar Organ 60 Muted Trumpet 103 Echoes 18 Percussive Org. 61 French Horn 104 Sci-Fi 19 Rock Organ 62 Brass Section 105 Sitar 20 Church Organ 63 Synth Brass 1 106 Banyo 21 Reed Organ 64 Synth Brass 2 107 Shamisen 22 Accordion 65 Soprano Sax 108 Koto 23 Harmonica 66 Alto Sax 109 Kalimba 24 Tango Accord. 67 Tenore Sax 110 Bag Pipe 25 Nylon Guitar 68 Baritone Sax 111 Fiddle 26 Steel Guitar 69 Oboe 112 Shanai 27 Jazz Guitar 70 English Horn 113 Thinkle Bell 28 Clean Guitar 71 Basson 114 Agogo 29 Muted Guitar 72 Clarinet 115 Steel Drum 30 Overdriven Guit. 73 Piccolo 116 Wood Block 31 Distortion Guitar 74 Flute 117 Taiko Drum 32 Guitar Harmaon. 75 Recorder 118 Melodic Tom 33 Acoustic Guitar 76 Pan Flute 119 Synth Drum 34 Finger Bass 77 Blown Bottle 120 Reverse Cymbal 35 Pick Bass 78 Shakuhachi 121 Guit. Fret Noise 36 Fretless Bass 79 Whistle 122 Breath Noise 37 Slap Bass 1 80 Ocarina 123 Seashore 38 Slapp Bass 2 81 Square 124 Birds 39 Synth Bass 1 82 Sawthooth 125 Telephone 40 Synth Bass 2 83 Calliope 126 Helicopter 41 Violin 84 Chiff 127 Applause 42 Viola 85 Charang 128 Gunshot 43 Cello 86 Voice 129 Percussions

23
NOTE ……………………………………………………………………………………………… ……………………………………………………………………………………………… ……………………………………………………………………………………………… ……………………………………………………………………………………………… ……………………………………………………………………………………………… ……………………………………………………………………………………………… ……………………………………………………………………………………………… ……………………………………………………………………………………………… ……………………………………………………………………………………………… ……………………………………………………………………………………………… ……………………………………………………………………………………………… ……………………………………………………………………………………………… ……………………………………………………………………………………………… ……………………………………………………………………………………………… ……………………………………………………………………………………………… ……………………………………………………………………………………………… ……………………………………………………………………………………………… ……………………………………………………………………………………………… ………………………………………………………………………………………………