CD Stereo System Panasonic SC-AK90/SC-AK91 SC … · SC-AK90/SC-AK91 SC-AK70/SC-AK71 Panasonic ......
40
CD Stereo System SC-AK90/SC-AK91 SC-AK70/SC-AK71 Panasonic ° Operating Instructions The illustrations show SC-AKg0 DIGITAL AUDIO Before conn_mg_ operating or adlushng this pro- duct, please read these instructions thoroughly. Please save this manual. RQT3884-2P
-
Upload
trinhthien -
Category
Documents
-
view
295 -
download
14
Transcript of CD Stereo System Panasonic SC-AK90/SC-AK91 SC … · SC-AK90/SC-AK91 SC-AK70/SC-AK71 Panasonic ......
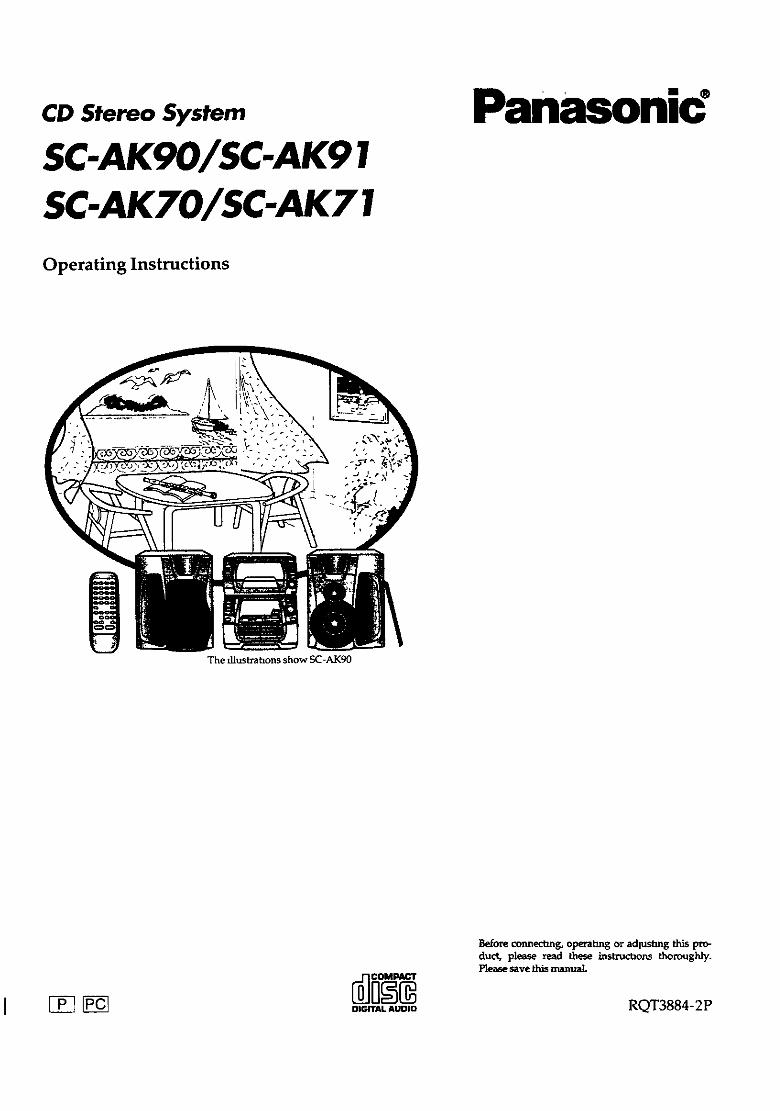
CD Stereo System
SC-AK90/SC-AK91SC-AK70/SC-AK71
Panasonic °
Operating Instructions
The illustrations show SC-AKg0
DIGITAL AUDIO
Before conn_mg_ operating or adlushng this pro-duct, please read these instructions thoroughly.Please save this manual.
RQT3884-2P

I@
@m
Dear customer
Thank you for purchasing this product.For opl_xnum performance and safety, please read these instructionscarefully.
These operating instructions are appEcabla to the following systems.These operating instructions, however, fundamentally explain theoperation of system SC-AK90.
System SC-AK90 SC-AK91 SC-AK70 SC-AK71
Main unit SA-AKgO SA-AKgl SA-AK70 SA-AKTI
Speakers SB-AKgO SB-AKg9 SB-AK70 SB-AK70
System SC-AK91 and SC-AK71 are not available in Canada.
The model number and serial number of this product can befound on either the bach or the bottom of the unit.
Please note them in the space provided below and keep f6rfuture reference.
Main unit
Speakers
MODEL NUMBER SERIAL NUMBER
U_rmemo:
DATE OF PURCHASEDEALER NAMEDEALER ADDRESS
TELEPHONE NUMBER
CAUTION!THIS PRODUCT UTIMZES A LASER.USE OF CONTROLS OR ADJUSTMENTS OR PERFORM-ANCE OF PROCEDURES OTHER THAN THOSE SPECI-FIED HEREIN MAY RESULT IN HAZARDOUS RADIATIONEXPOSURE.DO NOT OPEN COVERS AND DO NOT REPAIRYOURSELF. REFER SERVICING TO QUALIFIEDPERSONNEL.
Supplied accessories ...................... 2Precautions .............................. 4Concerning the remote control .............. 5Connections ............................. 6
Basic connections (for supplied accessories) .................. 6Placement of speakers .................................... 7
Optional surround speaker connections ..................... 7External unit connection .................................. 7
Optional antenna connections .............................. 7
Front panel controls ....................... 8
Demo function ............................ 9
Setting the time ........................... 9Presetting radio broadcasts ................ 10
Listening to radio broadcasts ............... 11
Listening to CDs .......................... 12Setting/Removing CDs ................................... 12
Normal play ............................................. 13Direct access play ........................................ I4Single CD play ........................................... I5Repeat play .............................................. 15
Random play ............................................ 15Program play ............................................ 16
To listen to special CDs and t_acks(CD MANAGER function) .............................. 18
CAUTION:TO PREVENT ELECTRIC SHOCK MATCHWIDE BLADE OF PLUG TO WIDE SLOT,FULLY INSERT.
Listening to tapes ........................ . 20
Please check and identify the supplied accessories.Use numbers indicated in parentheses when askingfor replacement pans.
(Only for U.S.A.)To order accessories ca]] PASC Accessory Dept.1-800-332-5368
] AC power supply cord .............................. 1 pc.
1SJA172)
] FMindoorantenna(RSA0(X)6) ........................ ] pc.
] AM loop antenna set (RSA0022)eAM loop antenna .................................. 1 pc.eAM antenna holder ................................ 1 pc,

Before recording .......................... 21Recording from radio broadcasts ............ 22Recording from CDs ....................... 23
To record special CDs and tracks(CD MANAGER function) .............................. 24
Tape-to-tape recording ..................... 26
Sound quality, field, etc ..................... 27
Singing along with KARAOKE ............... 28"
Timers ................................... 30Using the play timer ....................... 31Using the record timer ..................... 32Using the sleep timer ...................... 33To use two timers together .................. 34
Convenient functions ...................... 34
Using an external unit ...................... 35
Remote control buttons and functlons ........ 36Concerning CDs .......................... 37Concerning cassette tapes .................. 37Troubleshooting guide ..................... 38Maintenance .............................. 39Technical specifications ............ Back coverProduct service ................... Back coverBefore moving or shipping this
system ........................ Back cover
] Notebook-like
binder ............. 1 pc.[Liner notes organizer]
(RFA0860-_
] Remote controltransmitter ......... 1 pc.
(EUR644376)
] Adhesivenumber ...Ipc.
(RQLA0321)
%.] Bakeries .......... 2pcs.
(R6/LR6, AAsize, UM-3)
THE FOLLOWING iS APPLIED ONLY FOR U.S.A.:
CAUTION:This equipment has been tested and found to complywith thelimitsfor a Class B digital device, pursuant to Part 15 of theFCC Rules.These limits are designed to provide reasonable protectionagainst harmful interference in a residential installation. Thisequipment generates, uses and can radiate radio frequencyenergy and, if not installed and used in accordance wRh theinstructions, may cause harmful interference to radio commu-nications. However, there is no guarantee that intefferencewill not occur in a particular installa_on. If this equipment doescause harmful interference to radio or television reception,which can be determined by tumingthe equipment off and on,the user is encouraged to try to correct the interference by oneof the following measures:eReorient or relocate the receiving antenna.elncrease the separation between the equipment and ra-
seiver.eConnect the equipment into an oubet on a circuit different
from that to which the receiver is connected.
eConsuR the dealer or an experiensed radio/3V technician forhelp.
FCC Notice: This system complies with new Part 15, exceptfor the radio receiver, which complieswith o!d Part 15, SubpartC of the FCC Rules. Operation is subject to the following twoconditions: (1) This device may not cause harmful interfe-rense, and (2) this device must accept any interferanse re-ceived, including interference that may cause undesirableoperation. The radio receiver is not subject to above item (2).
Any unauthorized changes or modifications to this equipmentwould void the user's authority to operate this device.
WARNING:TO REDUCE THE RISK OF FIRE, ELECTRICSHOCK OR PRODUCT DAMAGE, DO NOTEXPOSE THIS APPLIANCE TO RAIN,SPLASHING, DRIPPING OR MOISTURE.
CAUTION
CAUTION: TO REDUCE THE RISK OF ELECTRICSHOCK, DO NOT REMOVE SCREWS.NO USER-SERVICEABLE PARTSINSIDE.REFER SERVICING TO QUALIFIEDSERVICE PERSONNEL.
The lightning flash with arrowhead symbol, within
an equilateral triangle, is intended to alert the user
to the presence of uninsulatad =dangerous voltage"within the product's enclosure that may be of suffi-cient magnitude to constitute a riskof electric shockto persons.
The exclamation point w_thinan equilateral trhangleis intended to alert the user to the presence ofimportant operating and maintenance (servicing)instructions in the literature accompanying the ap-
em
BJ

Before using this unit please read these operating instructions cea_fully. Take special care to follow the warnings indicated on the unititself as well as the safety suggestions listed below.Afterwards keep them handy for future reference.
|@
,2¢Dm
1. Power Source--The unit should be connected to power supplyonly of the type described in the operating instructions or asmarked on the unit.
2. Polarizatin,a--lf the unit is equipped with a polarized AC powerplug (a plug having one blade wider than the other), that plug w0Jfit into the AC outlet only one way. This is a safety feature. If youare unable to insert the plug fully into the outlet, try reversing theplug. If the plug should still fail to fit, contact your elec_ricizn toreplace your obsolete outlet. Do not defeat the safety purpose ofthe polarized plug.
3. Power Cord Protection--AC power supply cords should berouted so that they are not likely to be walked on or pinched byitems placed upon or against them. Never take hold of the plug orcord if your hand is wet, and always grasp the plug body whenconnecting or disconnecting it.
4. Nonuse Perlods--When the unit is net used, turn the power off.When left unused for a long period of time, the unit should beunplugged from the household AC outlet.
[W_fl_ rAql_
[1.
Environment ]
Outdoor Antenna Groundlng--If an outside antenna is con-nected to the receiver, be sure the antenna system is grounded soas to provide some protection against voltage surges and built-upstatic charges. Sec_on 810 of the National Electrical Code,ANSI/NFPA No. 70-1990, ivrovides information with respect toproper grounding of the mast and supporting structure, ground-ing of the lead-in wire to an antenna discharge unit, size ofgrounding conductors, location of antenna-discharge unit, con-nection to grounding electrode_, and requirements for thegrounding electrode. See figure below.
_i ANTENNA
LEADINGROUND WIRE
CLAMp
ANTENNA
DISC_IARGE UNIT
(NECSECTION810-20)
GROUNDINGCONDUCTORS(NEC SECTION810-21)
CLAMPS
\POWER SERVICE GROUNDING
ELECTRODE SYSTEM
(NECART250,PARTH)
NEC--NAT]ONALELECTRICALCODE
2. Water and Moistuze--Do not use this unit near water-- for exam-
ple, near a bathtub, washbowl, swimming pool, or the like.Damp basementsshouldalsobe avoided.
3.
4.
Heat--The unit should be situated away from heat sources suchas radiators and the like.
It also should not be placed in tempera_wes less than 5_C (41°P) orgreater than 35°C (95_b').
Condensation--Moisture may form on the lens in the followingconditions...
omunediately after a heater has been turned on.oina steamyorveryhumid room.
ewhen theunitissuddenlymoved from acoldenvironmenttoawaFff[ one.
Ifmoistureformsinsidethisunit,itmay notoperateproperly.To
correctthisproblem,turnon thepower and waitaboutone hourforthem_isturetoevaporate.
I Placement [
1. Ventllatlo_a--The unit should be situated so that its location orposition does not interfere with its proper ve_ttilatlon. AllowI0 cm (49 clem-ance from the rear of the unit.
2. Foreigu Material--Care should be taken so that objects do net fallinto and liquids are not spilled into the unit. Do not subject thisunit to excessive smoke, dust, mechanical vibration, or shock.
3. Maguetimn--The unit should be situated away from equipmentor devices that generate strong magnetic fields.
4. StackingmDo not place heavy objects, other than system compo-nents, on top of the unit.
5. Surface--Place the unit on a fiat, level surface.
6. Carts and Stands--The unit should be used only with a cart orstand that is recommended by the manufacturer.The unitand cartcombinationshouldBe moved
with care.Quick stops,excessiveforce,and un-even surfacesmay causetheunitand cartcombi-nationto overturn.
7. WallozCeilingMounting--The unitshouldnotbemounted toa
wallorceiling,unlessspecifiedinthisoperatinginstructions.
(See page 39 for details.)
Clean the calumet, paneland controlswith a softcloth lightly m(Ytst-enedwithmilddetergentsolution.
Do notuseany typeofabrasivepad,scouringpowder orsolventsuchasalcoholorbenzine.
1. Damage Requiring Service--The unit should be serviced byqualified service personnel when:(a) The AC power supply cord or the plug has been damaged; or(b) Objects have fallen or liquid has been spilled into the unit; or(c) The unit has been exposed to rain; or(d) The unit does not appear to operate normally or exhibits a
marked change in performance; or(e) The unit has been dropped, or the enclosure damaged.
2. Servicing--The user should not attempt to service the unit be-yond that described in the operating insh-ucfions. All other servic-
ing should be ref_ to an authorized service personnel.(Only for U.S.A.)Call 1-800-545-2672 for the address of an authorized factoryservicenter.

Selecting fine audio equipment such as the unit you've just pur-
chased is only the start of your musical enjoyment. Now it's time toconsiderhow you can maximize thefun and excitementyourequip-ment offers.This manufacturer and the mech-onlcIndustries
Association'sConsumer ElectronicsGroup want you togetthemost
out ofyourequipmentby playingitata safelevel.One thatletsthesound come throughloud and clearwithout annoying blaringor
distortion--and,most importantly,withoutaffectingyoursensitive
hearing.
We recommend you to avoid prolonged exposure to excessive noise.
Sound can be deceiving. Over time your hearing "comfort level"
adapts to higher volumes of sound. So what sounds "normal" canactually be loud and harmful to your hearing.Guard against this by setting your equipment at a safe level BEFOREyour hearing adapts.To establish a safe level:
oStert your volume control at a low setting.
• Slowly increase the sound until you can hear it comfortably and
clearly, and without distortion.
Once you haveestablisheda comfortablesound level:•Setthedialand leaveitthem.
Taking a minute to do this now will help to prevent heating damage
or loss in the future. After all, we want you listening for a lifetime.
Insertthebatteriesinthecorrect
polarities((_,8).
(R6/LR6AA size, UM-3)
I Use of batteries I
sDo not mix old and new batteries, or batteries of different types(manganese and alkaline, etc.).
• Never subject batteries to excessive heat or flame; do not attempt todisassemble them; and be sure they are not short-circuited.
elf the remote control is not to be used for a long period of time,remove the batteries and store them in a cool dark place.
• Do not attempt to recharge alkaline or manganese batteries.
• Do not use zechargeable type batteries.
The battery life is about one year.
The batteries shouid be replaced if commands from the remote con-trol transmitter do not operate the unit even when the transmitter isheld close to the front panel.
@
@m
About 7meters in frontof thesignalsensor
window
I Operations notes I
• Do not place obstacles betwaen the remote conh'ol signal sensor andremote control unit.
• Do not expose the remote control signal sensor to _ sunlight Or
to the bright light of an invertor fluor'_nt light.•Take caretokeep the_mote controlsignalsensorand end oftheremotecontrolunitfreefromdust.
• If this system is installed in a rack with glass doors, the glass doors"thickness or color might make it necessary to use the remote controla shorter distance fTom the system.
I To prevent damage
• Do notplace heavy items.• DO notdisassembleorreconstruct.
,,Do not spill water or other liquids.

|Before making connections:
eMake sure you correctly identify the left/rlght sides before placing the speakers. (see page 73
ePlug the AC power supply cord into a household AC outlet onl, after all other connections have been made.
FM indoor antenna
Tape the antenna to a wall or column, in a positionwhere radio signals are received with the least amountof interference.
Adhesive tape _ :3
F'Mindoor
antenna _l _'_" " "
For best reception sound quality:An FM outdoor antenna is recommended. (See page 7.)
AM Ioop antenna
After attaching the antenna, turn on the system an(
bane in a broadcast station. Then, turn the antenna to
the angle of best reception and least interference.
@
OAM loopantannaholder
AM
loopantenna
Right speaker Left speaker
Household AC outlet
(AC 120 V/60 Hz)
AC power supply cord
Speaker cords
Match thecords tothe terminalsby colorandconnect.
Red(+)Black(--)
Red(+)Black(--)
To preventdamage tocircuiri'y,nevershort_-'ircuitpositive(+)and
negative(- )speakerwires.

Mamurd_(mduded)
ra
(included) (included)
Surround speaker (Left) L_ Sunound speaker (Right)
(not included) _ (not included)
I Placement of front speakers I(Left) (Right)
//
net is on the outside. ___ t
(Left) (P-.ight)Place the speakersso that the
For your referenceeYou can take the #ont net oft speakers.eFor your listening pleasure, keep your speakers from touching the
system.
Caution
Use the speakers only with the recommended
A system, Failure to do so may Iced to damage tothe amplifier and/or the speakers, and mayresult in the risk of fire. Consult a qualifiedservice person if damage has occurred or If youexperience a sudden change in performance.
t Placement of surround speclkers I
We recommend thatsurround speakersbe placedon thesideofor
slightlybehindthelisteneratearlevel.
However the positionshould be adjustedto your personalprefe-rence,becausetheeffectvariestosome degreedependingupon the
typeofmusicand themusic source.
[]
Connectingthesurround speakersproducesa feelingofdepth andmovement of sound, and providesthe listenerwith a feelingof
presencelikethatofamovie theater.
(Left) (Right)
t___)
If only one of the surround speakers is connected, no sound will comeout. Be sure to connect both speakers.
• For details, refer to the instruction manuel of the units which are tobe connected.
eThis example shows how to connect the analog player with thePHONO OUT/LINE OUT switch.
eWhen units other than those described below are to be connected,
please consult with your audio dealer.(L) Rear panel of
J Analog player _ "-------_ this unit
i (notincluded) _1 (R)_
"LINE OUT" position
• Only an analog player with a built-in phono equalizer can be con-nected.
eSet the switch to the "LINE OUT" position at the back of the anelog
player.
You may need an outdoor antenila if you use this system in amoun-tainous regionorinsideareinforced-concretebuilding,etc.
I FM ouh:ioor antenna 1Disconnectthe FM indoor antenna ifan FM outdoor antenna is
instalied.FM outdoorantenna
(not induded)
75fi coaxialcable (not included)
) Remove a piece of the outer
vinyl insulator.
Twistthe shieldbraid.
Shieldbraid
(_ Exposethecorewire.15mm 0%2")
Core
f" wire
An outdoor antenna should be installed by a qualified technician
only.
I AM outdoor antenna
Connect the outdoor antenna without removing the AM loop an-tenna. Run 5 to 12 m of vinyl-covered wire horizontally along awindow or other convenient location.
When the unit is not in use, disconnect the outdoor antenna to pre-
vent possible damage that may be caused by lightmng, Never use an _outdoor antenna during an electrical storm.

No. Name Ref. page
(T) Power "STANDBY _/ON" switch(POWER, STANDBY (_/ON) 9
(_ Single play button (SINGLE I_) 15
(_ -'-" _*L •
KARAOKE button (KARAOKE) 28
Microphone volume control (MIC VOL) 28
Microphone jacks (MIC 1, MIC 2) 28
CD button (CD) 13
(_ Tuner/band select button (TUNER, BAND) 10
Tape/deck select button (TAPE, DECK 1/2) 20
.................................................35Deck I open button (DECK t, ---_OPEN) 20
_) Clock/timer button (CLOCK/TIMER) 9, 31, 32
Record timer/play timer button(_ REC/_ PLAY) 31, 32
Deck I cassette holder 20
...................................................................._) CD rack panel 12
CD rack penei open button (OPEN) 12
CD MANAGER button (CD MANAGER) 18
_) Disc/track select button and indicator(DiSCrrRACK) 13,14
Play button (CD I_) 13
Jog dial (JOG) 13, 14
No. Name Ref. page
_) Headphone Jack (PHONES) 35
Super woofer ON/OFF button (SUPER WOOFER) 27Ik,'l"_ ] _rlllk'!lll I 4rJ
V. BASS button (V. BASS) 27
Super woofer level select button (LEVEL) 27
Volume control (VOLUME) 11
_) Deck 2 open button (DECK 2, _--OPEN) 20
Deck 2 cassette holder 20
_) Basic operating buttonsButtonscha-ngeaccordingtothesource.
Display select/demonstration button(-DISPLAW-DEMO) 9, 34
_) 3D space EQ button (3D SPACE EQ) 27
Tape edit button (TAPE EDIT) 26
_) Reverse moda select button (REV MODE) 20
F:]
.._ ......... ..................°..
%
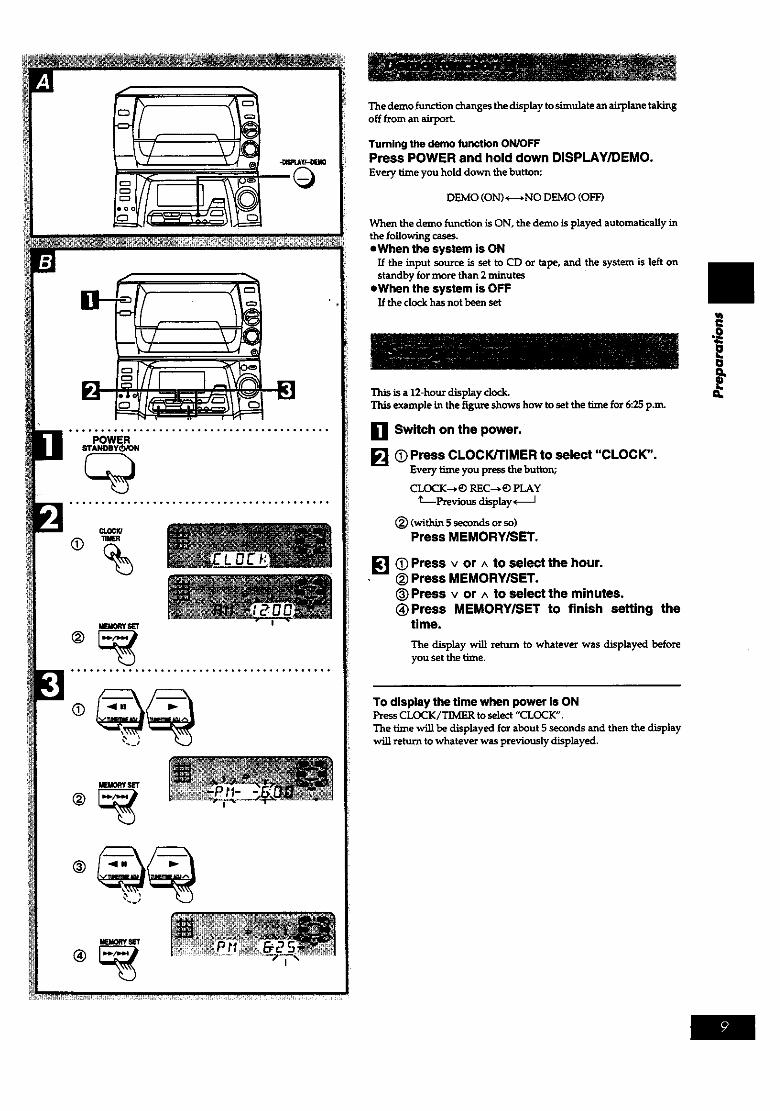
Thedemo function changesthe display to simulataan airplane takingoff from an an-port
Turning the demofunction ON/OFFPress POWER and hold down DISPLAY/DEMO.Every time you hold down the button;
DEMO (ON)_--+NO D_O (OFF)
When the demo function is ON, the demo is played automatically inthe following cases.eWhen the system is ON
If the input source is set to CD or tape, and the system is left onstandby for more than 2 minutes
eWhen the system is OFFIf the clock has not been set
This is a 12-hour display dock.This example in the figure shows how to set the time for 6:25p.m.
[] Switch on the power.
[] O Press CLOCK/TIMER to select "CLOCK".Every time you pr--,:_sthe button;
CLOCK---*_ REC---*_ PLAYL--Previous display (----I
(_) (_rlthi_t5 seconds or so)Press MEMORY/SET.
[] (_)Press v or ^ to select the hour.• _) Press MEMORY/SET.
(__)Pressv or ^ to select the minutes._)Press MEMORY/SET to finish setting the
time.
The display will reVarn to whatever was displayed beforeyou set the time.
To display the time when power is ONPress CLOCK/_ to select "CLOCK".
The time will be displayed for about 5 seconds and then the displaywill return to whatever was previously displayed.

|i
..... .......... ..,...... ......... t. ......
Presetchannel
SUp to12stationscaneachbe setintheFM and AM bandsautomat-
ically.
elfbroadcastfrequenciesare pz_setinthememory, you can easilytuneinany ofthesefrequenciesfrom thesystemorremotecontrolunit.
eYou can alsopresetjustthosestationsyou like.
(See"Presettingonlyyourfavoritestations"below.)
Press TUNER BAND to select "FM" or "AM".The power willcome on automatically.Everytimeyou pressthebutton;"FM" _ "AM".
Press TUNE MODE to select "MANUAL".Every time you press the button; "MANUAL"<--._. "PRESET".
[] Press v or ^ until the display shows the fre-quency from which you want to begin auto-matic memory presetting.
[]
Tips on tuning in radio stations(_) Hold down either v or ^ until the frequency numbers start
sc_oRing._) When nearingthe d_ frequency,pressthe button to
stop the scrolling and then fine ttme the broadcast.
Press and hold down MEMORY/SET until thefrequency begins to change.This willstartpresettingautomatically.When finished,theradiowilltuneinlaststationmemorized.
If auto presetting is not possible because radio signals are weakor for some other reason, do the following.
[ Presetting only your favorite stations ]
Preset the stations one at a time.1.. Perform above stel_ 1 and 2. Then, select a station with v and ^,
and press MEMORY/SET. "PRGM" will flash on the display.
2. While "PRGM" is flashing, select a preset chmlnel with v or ^,and press MEMORY/SET again. "PRGM" will go out and the
station will be stored in memory.
FM allocation setting ]
The FM f_quency step is set to 0.2 MHz at the time of shipment.By adjusting the allocation as shown below, you can enable the
systemtoreceiveFM broadcastsallocatedin0.1MHz steps.
1.Pressand holdTUNER BAND forapproximately5 seconds.The f_quency display will be returned to the minimum frequencyof the FM band and the display will begin to flash.Keep holding for approximately 5 more seconds.
2. When the display stops flashing and indicates a diffe_nt fre-quency number (the frequency step is changed to 0.1 MHz.), re-lease TUNER BAND.
To return to the original frequency, repeat steps 1 to 2 above.
Afterchanging the "allocation"setting,the frequenciesyou pre-
viouslypresetinthememory willbe cleared.
Memory retentionYour p_set frequencies are _tained in memory for about 2 weekswhile the system is unplugged.

• ..... •.•.. .... ......°,.••.. ..... ••......
With preset stations
With non-preset stations
Received frequency
E] Press TUNER BAND to select "FM" or "AM".The power will come on automatically.Every time you press the button; "FM" <---.*"AM".
[] Press TUNE MODE to select "PRESET" or"MANUAL".Everytimeyou pressthebutton; "MANUAL",-----> "PRESET".
PRESET: For preset stationsMANUAL: For non-preset stations
_ Press v, or ^ to select the desired broadcast."STEREO lightswhen anFM stereobroadcastisbeing_e-ceived. "TUNED" lights when you precisely tune in a broadcaststation.
[] Adjust the volume level.
For tuning by remote control
Specify the channel you want with the numeric keys (see page 36). m
TO designate channels 1-9Fresstheappropriate(1-9)preset-toningbutton.To designate channels 10-12 i(Example: Channel 12)->10 -.I -,2
(within 10 sec.) (within10 sec.)
[ Autohining ] i
Auto tuning is an easy way to tunein non-presetstations(select
"MANUAL" instep2).
Hold down either v or ^, and release the button
when the frequency starts scrolling.The radiofrequencywillstopautomaticallyon thefirststationitpicksup.eWhen there is outside interference, the radio may stop on a non-broadcastfrequency.Hold down eitherv or^ toresumeautotuning.
To stop auto tuningPresseither v or ^ again.
If noise is excessive in the FM stereo mode [] IPress FM MODE/BP. ("MONO" willlightup.)
Sound will be produced in monaural, but this also reduces noise.
Press the button again to cancel. "MONCY' will go out.
• ' " " ' isNormally, you IIwant to listen m stereo, so leave MONO' off. Th
way, you can listen to stereo broadcasts in stereo, and monauralbroadcasts in mono.
Sound is momentarily interrupted if you load/unload tapes while
listening to an AM broadcast.

|
i8
You can setCDs m the rack and remove them too, while playing CDs.
I How to set CDs
1. Open the rack panel.
Except when _g or removing CI_, keep hands out of the changerwhile open. You could injure yourself if somehow entangled in theinternal mechanism.
2. Slide the loader carriage to the slot you want.
The loadercarnage has a LOCK position(when the leveris
down) and aRELEASE position(whentheleverisup).When youslidetheloadercarriagetoselecttheslotyou want,make sureit
isintheRELEASE position(when theleverisup).You can readthenumbers between theprongsasshown below.
Slotnumber
3•
4.
•Loadercarriage
I Slot No. 0 (SINGLE) is reserved for CD [single play (p. 15).I
(_ Lower the lever on the loader carriage and setthe CD in the groove with the label facing tothe right.
(_ Raise the lever.Label side
Raise the lever.
Close the rack panel gently.You willhearacatchingsound when therackpanelcloses.
PX_SSon
centerpiece,
I How to CDsremove
1. Open the rack panel.
2. Slide the loader carriage to the slot you want•
Do notslidetheloadercarriagewhen theleverisdown.
3. Lower the end of the lever and then remove CDs.
How to know whut CD is in what slot ]
Thissystem comes with a notebook-likebinder(linernotesorga-nizer)inwhich you cankeepyourCD liners.Therearealsoadhesive
ntunbersforindicatingslotnumbers in thebinder.Thisisa conve-nientway tokeeptrackofwhat CD isinwhat slot.
Adhesive Pocket
Put two linershack-to-beckinsideeachpocket,asshown above.
Do notputCD cases in the binder.
To prevent damage ]
Always observethefollowing points.
• Never loadmore thanone CD inany givenslot.•Do notuse 3"(8cm) CDs fittedwithexpanderrings.
•Do notPot anythingotherthanCDs inthechanger.
• Do notsetaCD intheslotoftheCD beingplayed(slotflashes).#Sometimes therackpanelcannotbe opened whilea CD isplaying.
Itisaquestionoftime.Insuchcase,waituntilyou can open it.•Do notopen tharackpanelwhilethechangerischangingCDs.
•Do not use cleaningCDs or CDs which are badly warped orcracked.
• Set the system on a fiat, level surface.
DO not set it on top of magazines, inclined surfaces, etc.
•Always unload all CDs before moving the system.•Do notuse CDs withpoorlyattachedlabelsorstickers.Adhesive protrudingfrom underneathstickersor leftoverfrompeeledoffstickerscan causethesystemtomalfunction.
eDo notuse irregularshapeCDs (heart-shape,octagonal,etc.).
x@ xQ

*..°.. o......,..°.........,..,....., .....
@
_ ..... .. ....... ...°... .........
.... °.°°,°°.°,..... ...... ,°,,o ...........
Track number
• i
CD number in play Elapsed playing t_ne(Of cu_ent CD number)
,....°..* .................... _.°.,*...oo°
VOLUME
Current CD Total playing time
,?_ Total number of tracks
[] Press CD.The power will come on automatically.
_J set CDs in the rack.mini
(For details, see page 123While the changer checks which slots have CDs and whichdon't, you will hear the internal mechanism working. In the
meantime, "SEARCH" will flash on the display.
k_ Press DISC/TRACK to select the CD selectionM mode.
(The indicator illuminates with a green color,)
[] Turn JOG to select the desired CD number.
_1 While the CD number is flashing (approx. 10 seconds)PreSS CD _'. (Play willbegin.)The changer will play all CDs up through the one before the CDyou started with, and it will stop automatically after playing thelast track on it.
[] Adjust the volume level.
To stop the CD play []PressI.
To select a disc with the remote control (See page 36.)_) PressDISC._) while "--" flashing (approx. 10 seconds)
Press the numeric button(s) to select the desu_l CD.
To select a two-digit CDI>_ss _>10and then the two numbers you want within 10 secondsor
• SO.
For exampleCDno. 20:-_0--.2--*0CD no. 35:->10--_3--,5
When" _" appears on the displayIt indicates there are 13 or more tracks on the CD at the playing
osition.
To pause Press I I during playback.
To resume playback, pros I_.
To search forward/ Hold down I-<_/-_1_ (backward)
backward (Search) or _-/I.._! (forward) duringplayback.
To skip forward/ Press I<_/-_._ (backward) orbackward I._-/I.._1 (forward) during
playback.
I
Q
• If you leave the front panel open while a CD is in play, when the CDis over, the changer will stop.
• During random play (page 15), you cannot skip to tracks whichhave already been played.
• During program play (page 16) or random play, you cannot searchforward or backward over tracks.
• During program play, skipping is always in the programmed order,whether forward or backward.
One-touch playWhen the system is OFF, playing starts automatically when you pressCD.
For your reference mm........................ 1 In step 5, you can also begin playback by pressing the basic operating
button _. I

|
i...°.°°,,°°.*,°..°..°.°°°°,..,o.,,....°°°
©°,,°°°°,°°°°*,°°.°,.°°°°..,°,,°°,°°,°,°..
©
You can listen to a particular track on a particular CD.
[] Press CD.
_'] Press DISCrrRACK to select the CD selectionmmm_ mode.
Cl'he indicator OJumJnates with a g_een color.)
[] Turn JOG to select the desired CD number.
L_ While the CD number is flashing (approx. 10 seconds)Press DISC/TRACK to select the track selectionmode.(The indicator illuminates with a red color.)
[] While the track number is flashing (approx. 10 seconds)Tom JOG to select the desired track number.
r_ While the track number is flashing (approx. 10 seconds)Press CD I_.The CD will be played from the selected track.
To stop the CD play
To so|_t a disctlrackwith "_neremote control (Seepage36.)
O I_ss DISC.(_ While "--" isflashing(approx.10seconds)
Press the numeric button(@ to select the desired CD,(_ Press the numeric button(s) to select the track.
TO select a two-digR trackPress->10and thenthetwo numbers you want withinI0 secondsorSO.
For exampleTrack no.2_. _0--_2--*0Trackno. 35:_>10-+3-+5

;3C_C_C3:_QQO:_CDQQ;DQQ_Z)_OC____ -- REPEAT
QOQ_Q Q
[+"_i-a_ri_';31 _ m L,
QQQQ
QQQQQQQQQQQQ MHOOM
Q QQOO0
QQQQQ Q
[]
Single CD play is for that special CD of yours, perhaps one you justbought. You see, the changer has a slot forone special CD which youcanuse even when the rackis full (max.50CDs).
Press OPEN to open the rack panel, and set theCD in the slot No. 0.
[] Close the rack panel and press SINGLE _.TheCD in the slot No. 0will beplayed from the first trackto thelast.
For your referenceWhile "SINGLE" appears on the display, you can start play from the• button as web as the SINGLE • button.
[]
Press REPEAT before or during play.Alltrackson theloaded CD arerepeated.
To cancel repeat playREPEATonce again.
To repeat a favorite track1. Program thetrackyou want (page 16).2. Px_ss REPEATand make sure" _ " is displayed.3. Pz_s •. Playbackwill start.
• To repeat just one track
Set the I-TRACK mode (page 18), press REPEAT before or duringplayback, and make sure" _" is displayed.
To repeat all tracks on a specific CD
Set the 1-DISC mode (page 19), px_ss REPEAT before or duringplayback,and make sure"_-D" isdisplayed.
[]
Press RANDOM.
All tracks on the loaded CDs will be played in random order. Play-back will stop automatically when the maximum of 72 tracksfromthe loaded CDs have been played.
To cancel random playPress RANDOM once again.
For random play wRh just one specific CDSetthe 1-DISCmode (page 19) and press RANDOM.
*You can use random play with your program. Only the pro-grammed tracks will be played, but in random order.
*Once more than 25 tracks have been played in random mode, thesame track may be played twice.
HHt8
h ,... ...Ir_l_l_
|i0
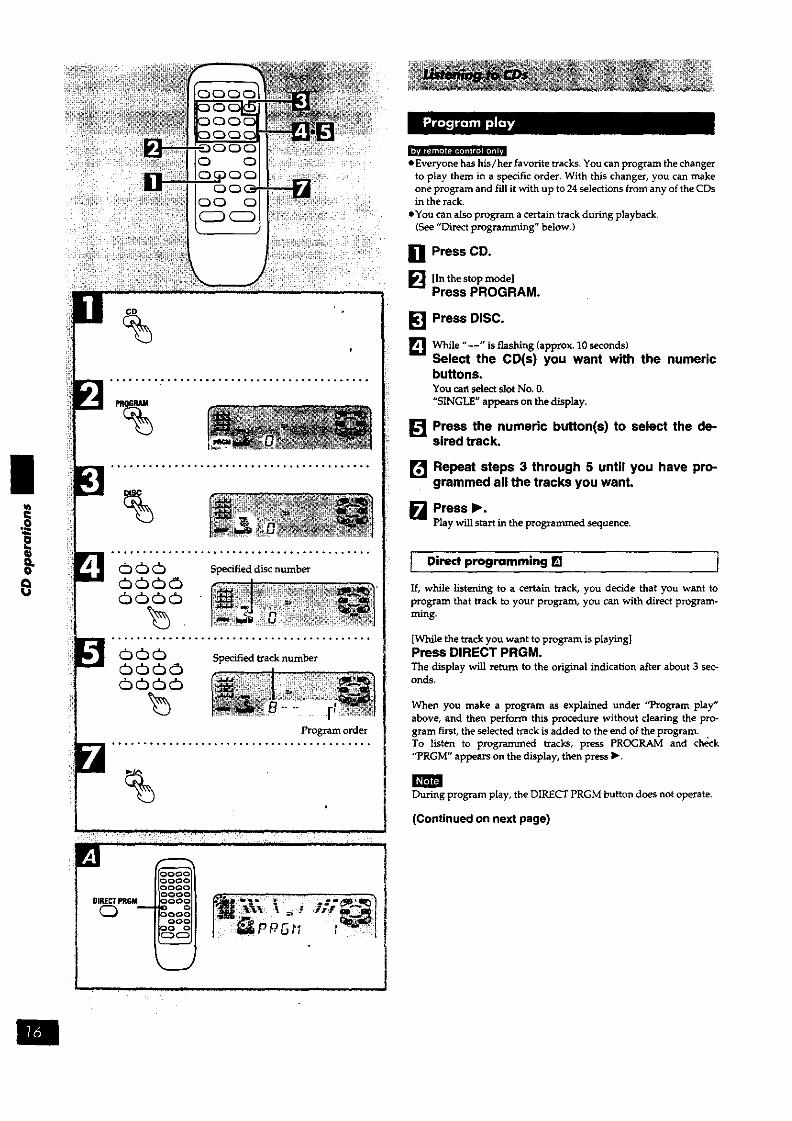
Specified track number
Program order
%
• Everyone has his/her favorite tracks. You can program the changerto play them in a specific order. With this changer, you can makeone program and fill it with up to 24 selections from any of the CDsin the rack.
eYou can also program a certain track during playback•(See "Direct programming" below.)
iT Press CD.
_'_ [Inthe stop modelPress PROGRAM.
[] Press DISC.
[] While "--" is flashing (approx. 10seconds)Select the CD(s) you want with the numericbuttons.You cad select slotNo. O,"SINGLE" appears on the display.
[] Press the numeric button(s) to select the de-sired track.
[] Repeat steps 3 through 5 until you have pro-grammed all the tracks you want.
[] P_s_S'lls_tartin theprogrammedsequence.
If, while listening to a certain track, you decide that you want toprogram that track to your program, you can with direct program-ming.
[While the track you want to program is piaying]Press DIRECT PRGM.The display wilI return to the original indica_on after about 3 sec-onds.
When you make a program as explained under "Program play"above, and then perform this procedure without clearing the pro-gram first, the selected track is added to the end of the program..To listen to programmed tracks, press PROGRAM and check"PRGM" appears on the display, then press I_.
DuriNgprogram play, the DIRECT PRGMbutton does not operate.
(Continued on next page)

Indicates program mode
oOOO_NCEL_OQQQ
To cancel program play modePressPROGRAM in the stop mode.Programmed contentswill besaved in memory.Pressing • will cancel program play, and it will also erase the entire
program.
To select a two-digit trackPress ->10and then the two numbers you want.For exampleTrack no. 2(3:_>10---,2--,0Track no. 35:->10_,3_5
When "CD FULL" appears []
The number of programmed tracks is lindted to 24. No further trackscan be programmed.
You can do the following during program mode []eCheck program contents.
Press I.<4/.<-_ or IH_/IH,-I in the stop mode.Everytime you press one of the buttons, the track and program No.are shown on the display.
eAdd to the program.In stop mode, repeat steps 3 through 5 on page 16.
eCancel entries. []
From the last
programmedtrack
A specified trackonly
Press CANCEL.
Select the track with I_/-_< or1_/1_,4, and press CANCEL within3 seconds.
Press 1.An tracks
Memory retentionYour program is retained in memory for about 2 weeks while thesystem is unplugged.
To replay your programIf you tvJ'ned OFF your program with PROGRAM, you can play it
again as explained below.1. Press PROGRAM.
2. Press I_.
IIIe
If you program a track not on your CDsThe track is initially programmed, but during program play, the
changer will skip that track and will continue playing from the nextprogrammed item.

©
4
$
4
Specified CD number
This function makes it easier for you to select special CDs and tracksfTom amongst those loaded in the changer.
You can use this function to make recordings as weU.
There are 3 CD/track seleotion modes.
eFor playing beck l track on 1CD only from all loaded CDs1-Track mode (I-TRACK)
4,
eFor playing back 1 CD only from all loaded CDs1-Disc mode (1-DISC)
4
• For playing back the same numbered track (1 t_ack) on all loadedCDs1-Track All-Disc mode (1-ALL)
4. 4. 4. 4. 4.J"
4. 4. 4. 4. 4.
.P j, ._ J,
I To listen to ! track only (I-TRACK)
[] Press CD.
[] Press CD MANAGER to select "J-TRACK". []Every time you press the button;
1-TRACK-*1-DISC-+I-ALLt---NORMAL ,-------Previous dLsplay_
(OFF)
Press DISC/TRACK to select the CD selectionmode.("/'heindicator i_umlnates with a greencolor.)
[] Turn JOG to select the desired CD number, r_
[] Press DISC/TRACK to select the track selectionmode.('/he indicator i]luminates with a red color.)
[] Turn JOG to select the desired track number. []
Press CD IP.The selected tTack wi_ stm't.

I To listen to I CD only (1-DISC)
[] Press CD.
_1 Press CD MANAGER to select "l-DISC". I_1Every _me you press the button;
1-TRACK--+ 1-DISC --_1-ALLt--NORMAL <------Previous display*-]
(OFF)
Press DISC/tRACK to select the CD selectioh,mode.(The indicator illuminates with a green color.)
[] Turn JOG to select the desired CD number. []
[] Press CD •.The selected CD will be played from the first txack to the last.
[_
To listen to the same numbered h_ck on allI COs0-A")
[] Press CD.
_'_ Press CD MANAGER to select "l-ALL". []Every time you press the button;
I-TRACK--* 1-DISC--* 1-ALL-_-NORMAL +-----Previous display_
(OFF)
Press DISC/TRACK to select the track selectionM
mode.(The indicator illuminates _dth a red color.)
[] Turn JOG to select the desired track number. []
I_ Press CD •.The same numbered track on all loaded CDs will be played inorder.
When playback ends"NORMAL" will appear on the display for about 3 seconds,then the CD MANAGER function will turn OFF automati-
cany.
To stop playPressII.
When you select the wrong CD or trackel-TRACK mode
To reselect a track on the same CDFollow steps [] and [_.Toreselect a track on another CDFollow steps
el-DISC modeReselact aCD with ste_ [] and
el-ALL modeReselect thetrackwithsteps[]and [_
• You can use the repeat function (page 15) and random play(page 15) at the same _me. However, you can ordy select therepeat ban_'tionin1-TRACK mode.
eDuring 1-ALL mode, you cannot skip to a CD which hasalready finished.
eDuring 1-ALL mode, if the selected track is not found on acertain CD, the changer automatically skips that CD andcontinues playing from the next CD.
i
i8

|
[_:K 1 DECX2
O@IIN AOPEN
- Front side
€
Tape direction
mm
\\ Jl H', I"1#_.tJO--a#_-
Type ot tape which can be played correctlyThe system automatically identifies the type of tape.
NORMAL POSmON/TYPE I I C)
HIGH POSITION/TYPE II I OMETAL POSIT_ON/TYPE W O
You can use either deck I or deck 2 for tape playback.
[_1 Press TAPE DECK 1/2.M
The power will come on automatically,
Press DECK 1 A OPEN or DECK 2 A_ OPEN,and then insert the tape.Insert the tape with the exposed tape facing down.Closethe holderby hand•
Press REV MODE to select the reverse mode.Every time you press the button;
=: One side is played,then playbackstops automatically."_'D: Bothsides(frontside-_reverseside)areplayedone Rme
each,thenplaybackstopsautomatically.C=_: Bothsidesareplayed8 timeseach,thenplaybackstops
automatically.
[] Prose _I or • to start playback.• :Theforwardside(frontside)willplay."(: The _verse side will play.
[] Adjust the volume level.
To stoptape playbackPressn,
To change the deck to be used []Pl_SS TAPE DECK 1/2 to select the deck you want to use when youloadcassettesintobothdecks.
To listen to 2 tapes consecutivelyLoad a tape into each deck and selectC-_. Both tapes will be played8 times each.
Playback is momentarily interrupted while playing back tapes, if youopen the other deck.
One-touch play
When thesystemisOFF,playingstartsautoraaticaUywhen you pressTAPE DECK I/2.

J To fast-forward or rewind the tape J
Press _e_/_ or k._/_,_! in the stop mode.
Tape direction Torewind Tofast-forward
"1_" 1_/4-€ m._/_
"4" _,_/t,_,_ M4/4-4
To find the beginning of a program(TIPS: Tape Program Sensor)
Press _t4/4-9 or )_/_,_1 during play.
Tape To play the current t_ne To play the next tune "direction from the beginning from the beginning
"I_" t_e/4,9 )._/_,d
The TPS functionsearchesforsilentpartsofabout4secondsinlength
which are normallyfound between tunes.As a x_sult,itmay not
functionproperlyinthefollowingcases.sWith shortsilentparts• "vVhennoise occurs betw_n tunes
•With silentpartsfoundwithintunes
Type tape can correctly 1of which be recorded
The system automatically identifies the type of tape.
NORMAL POSITION/TYPE I O
HIGH POSITION/TYPE II O
METAL POSITION/TYPE IV x
This system cannot correctly make a recording or erasing, if metalposition tapes are used.
I To record from the beginning of the tape I
You cannot record on the leader part of the tape. Before recording,wind the tape past the leader to a pcYmtwhere recording can startimmediately.
Recordingpart --
Leader tape(no recording canbe made)
How volume, sound quallty/field, super
woofer and V. BASS effect recording
The tape you are recording is not affected whatsoever by changesin volume, sound quality/field, super woofer (SC-AK90/SC-AK91)or V. BASS (SC-AK70/SC-AK71).
• In recording, sound quality/field are set automatically to "FLAT".• You can change volume, super woofer and V. BASS effect for the
playback sound.
To erase a recorded sound I
1. P_ss TAPE DECK I/2.
2. insert the recorded tape into deck 2.3. Press REV MODE to select reverse mode.4. Press 0 REC/STOP.
eyou cannot open the deck 1 while ix,cording,• You cannot fast-forward or rewind one deck while recording with
the other.
|I8U,
|i
I
Tape direction
• *° .... °°°.°o°°.°°°,° ....................
_m
o°°°°,° .................... °oo°o°*,o°o°*°oREC_
%
€,,.
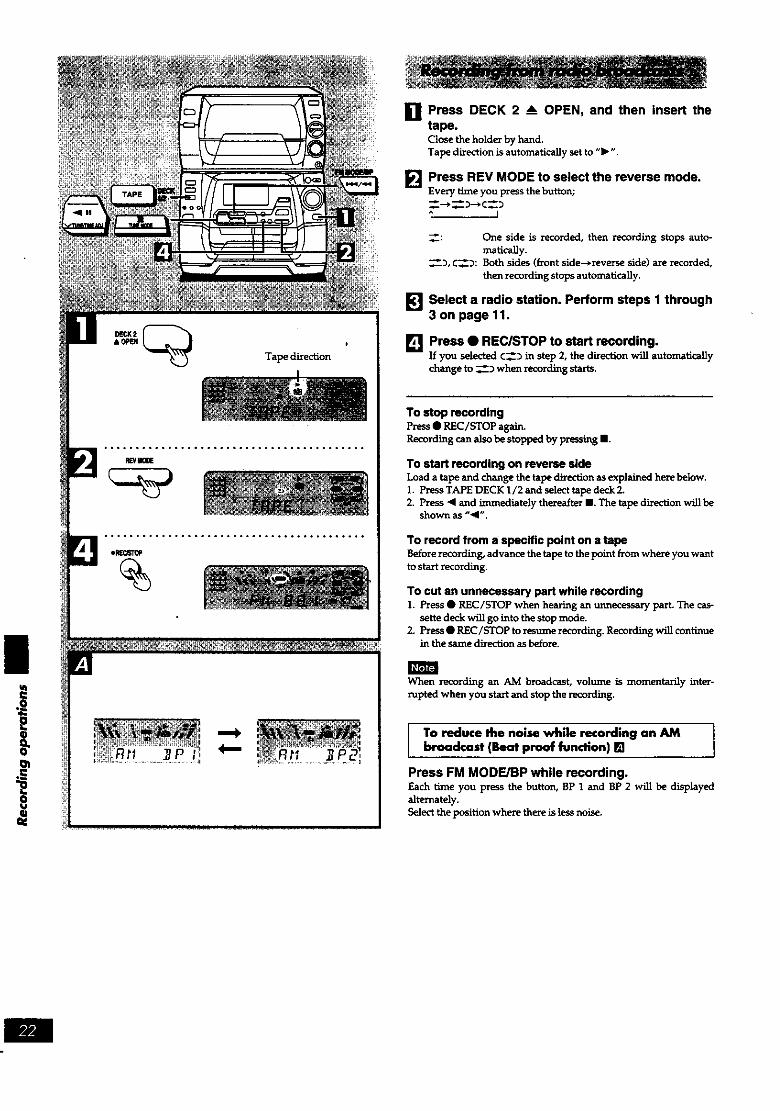
[] Press DECK 2 _ OPEN, and then insert thetape.Close the holder by hand.Tape direction is automatically set to "b,".
[] Press REV MODE to select the reverse mode.Every time you press the button;
* I
--_: One side is recorded, then recording stops autc-
maticany.--_'3, C_-3: Both sides (front side-*reverse side) are recorded,
then recording stopsautomatically.
[] Select a radio station. Perform steps 1 through3 on page 11.
[] Press • REC/STOP to start recording.If you selected C=_ in step 2, the direction will automaticallychange to --"3 when ix.cording starts.
To stop recordingPress• REC/STOP again.Recordingcanalsobestoppedby pressingIlL
To start recording on reverse sideLoad a tape and change the tape d_ection asexplained here below.1. Press TAPE DECK 1/2 and select tape deck 2.2. Press • and immediately thereafter II. The tape direction will be
shown as _• ".
To record from a specific point on a tapeBefore recording, advance the tape to the point from where you wantto start recording.
To cut an unnecessary pert while recording1. Press • REC/STOP when hearing an unnecessary part. The cap
sette deck will go into the stop mode.2. Fress • REC/STOP to resume recording. Recording will continue
in the same direction as before.
When recording an AM broadcast, volume is momentarily inter-rupted when you start and stop the recording.
To reduce the noise while recording an AM ]broodcast (Beat proof function) [] ]
Press FM MODF_JBPwhile recording.Each _rae you press the button, BP 1 and BP 2 will be displayedalternately.Select the position where there is less noise.

Tape direction
[] Press DECK 2 _---OPEN, and then insert thetape.Close the holder by hand.Tape directionisautomaticallysetto"I_%
Press REV MODE to select the reverse mode.Every time you press the button;=-_ -" )-+ C=")t
__: One side is _corded, then recording stops auto-matically.
_'v"),(=): Both sides(frontside-+reverseside)are recorded,
thenrecordingstopsautomatically.
[] Press CD.
_J Set CDs in the rack.(See page 12.)
I_ Press DISC/TRACK to select the CD selectionmode.(Theindicatorilluminateswith a greencolor.)
[] Turn JOG to select the desired CD number.
_'_ WhiletheCD numberisflashing(approx.10seconds)Press • REC/STOP to start recordingelf you selected (_-3 in step 2, the direction will automatically
change to "_3 when recording starts.
*The recording will proceed from the first track on the selectedCD.
To stop recording
eTo add a 4second_llentintervalbeforestopping.PressII.The CD willstopautomaticallytoo.
• To stoprecording withouta silentintervalPress • REC/STOP. The CD will stop automatically too.
To recordon reversesideBefore recording, Ioad a tape and change the tape direction as ex÷plained here below.1. Press TAPE DECK 1/2 and select tape deck 2.2. Press • and immediately thereafter II. The tape directionwillbe
shown as "•".
To record from a specific point on a tapeBefore recording, advance the tape to the point from where you wantto start recording.
I To record programmed tracks I
1. Afterstep4,program thetrackyou want (performssteps2-6 onpage16).
2. Press• REC/STOP tostartrecording.
IIi
]

This function makes it easier for you to select special CDs and tracksfrom amongst those loaded in the changer.• WhiJe recording, if a track is cut off in the middle at the end of the
front side, it is re-recorded from the beginning, on the reverse side.
f CD I L
L CD2 II IThe interrupted track is re-recordedin its entirety on the reverse side.
• Recording is interrupted definitively at the end of the reverse side.
; *
II
Specified CD number
Prepare the tape you want to use. Performs steps 1 and 2 on page 23.
To record Ih'ock only (t-TRACK) ]
li] Press CD.
_l Press CD MANAGER to select "l-TRACK". []Every time you press the button;
1-TRACK-+ 1-DISC--> ] -ALL-L---NORMAL<----Previous display_----]
(OFF)
1_1 Press DISC/TRACK to select the CD selectionM
mode.(The indicator illuminates with a g;een color.)
[] Turn JOG to select the desired CD number. []
_-] Press DISC/TRACK to select the track selectionmode.(The indicator illuminates with a red color.)
[] Turn JOG to select the desired track number. []
[] Press • REC/_TOP.The selected track will be recorded.
©

To record I CD only (1-DISC) ]
[] Press CD.
[] Press CD MANAGER to select "l-DISC". []Every time you press the button;
1-TRACK--, 1-DISC--, 1-ALL-L---NORMAL,-----Previous display_
(OFF)
k'l Press DISC/TRACK to select the CD selectionM
mode.(*/'heindicator ill_ates with a _n color.)
[] Turn JOG to select the desired CD number. []
l_J Press • REC/STOP.The selected CD will be recorded.
To record the same numbered track on allCDs(1-ALL)
[] Press CD.
[] Press CD MANAGER to select "l-ALL". []Every time you press the button;
1-TRACK--, 1-DISC---*1-ALL-L-- NORMAL _----Pr evious display_
(OFF)
[] Press DISC/TRACK to select the track selectionmode.(Theindicatorilluminateswitharedcolor.)
[] Turn JOG to select the desired track number. []
[] Press • REC/STOP.The same numbered track on all loaded CDs will be recorded inorder.
When recording ends
"NORMAL" will appear on the display for about 3 seconds,then the CD MANAGER function will turn OFF automati-cally.
To stop recording
eTo add a 4 second silent interval before stoppingPress e. The CD will automatically stop too.
eTo stoprecordingwithouta silentintervalPress• REC/STOP. The CD willstopautomaticallytoo.
When you select the wrong CD or trackThe same _selectlonprocedureisused withallthreemodes.Perform this procedure before recording starts.To reselect a CDI.PressDISC/TRACK toselecttheCD selectionmode.
2.Turn JOG toselect thedesiredCD number.To reselect a track1. Press DISC/TRACK to select the track selection mode.2. Turn JOG to select the desired track number.
For your reference
During 1-ALL recording mode, if the selected track is not
found on a certain CD, the changer automatically skips thatCD and continues recording from the next CD.
IIi?

|
II
...°,.. ............... ................*.,
Tape direction
El
LW_
T#M_?
%
!
Tape dilec_on of thetape you are recording onto
i
The recording level will be recorded as they are on the tape beingplayed back.
[] Press TAPE DECK 1/2.
_',1 Press & OPEN on both decks, and then insertthe tapes.For playback: Into deck 1For recording: Into deck 2Close each deck's holder by hand.Tapedirectionisautomaticallysetto"_".
Press REV MODE to select the reverse mode.Every _rne you press the button;_--,'.._:_-_ c_-_,
--_: One side is z_:orded, then recording stops auto-matically.
_-._, ¢-_'_: Both sides (front side-+reverse side) are recorded,
then recording stops automatically.
[] Press TAPE EDIT to start recording.eIf you selected ¢_'_ in step 3, the direction will automatically
change to --" _ when recording starts.
To stop recordingPress II.
Both decks will stop.
To record on side B
Beforei_cording,load a tape and change the tapedirectionas ex-plainedhere below.1. Press TAPE DECK 1/2 and select tape deck 2.2. Press "11and immediately thereafter II. The tape direction will be
shown as "<l".
To record from a specific point on a tapeBefore Rcording, advance the tape to the point from where you wantto start recording.

imr_.l
Base youz selection on the type of music and how you want to listento it.
Press 3D SPACE EQ to select sound quality andfield.
Eachtime you press the button;
FL_THEAVY--'_CLEAR---_ SOFT__-DISCO +---LIVE_---HALL_
HEAVY: Use to add "punch" to rock and other music.CLEAR: Use to cla_ the t_eblerange of jazz, etc.SOFT: Use to listen to background music, etc.HALL: Use th impar,' a deep bass and spread which win make you
feel as if you were th a large concer_ hall.UVE: Use primarily for vocaI pieces to add gloss to the vocals.DISCO: Use to reproduce a long reverberating sound like that
heard in discotheques.
In recording, the sound quality/field will set automatically to"FLAT".
To cancel the mode
Press3D SPACE EQ and check "FL,AT"lights up.
• . i _,L. I*
You can adjust bass below 120 Hz to 5 different levels.
[] Press SUPER WOOFER.(Thebuttonlightsup.)
_1 Press LEVEL to select the desired level.Each time you press the button, the level indication will changeconsecutively from "LEVEL 1" through to "LEVEL 5".
TO cancel the mode
PressSUPER WOOFER again.
ra
,. | _,. 0.
Press V. BASS.Press the button again to cancel."V, BASS" goes out.
You cannot record V. BASS effect, but you can use it for playbacksound.
IIi
gY,I

,_T ,_. ., o I
mvt
i
IOtRAOKIE
%VOLUME
• MIC VOL.G_uP
This unit lets you enjoy the KARAOKE fun with audio CDs andaudio tapes.
[] First, lower volume with MIC VOL, then, con-nect the microphone to the MIC 1 and/or MIC 2jacks.Plug type: 3,5 ram(_ in.) monaural
_l Press KARAOKE to select the voice mode.mm_
Eve_ thne you press the button;V ,,MUTE -,, MONO • L--*MONO,,R
t...............--_OFF)__J
Voice mode selection
If you want to play with the KARAOKE function, check firstwhether or not your software is formatted for KARAOKE andthen select the voice mode as indicated below.
O: Appropriate0: For practice, etc,
sm
(OFF)
V,,MUTE
MONOoL
Non-KARAOKE
KARAOKE
SoundStereo
multiplex
(Background 0music+ Voice)
0(Background
music)
(Voice)
(For singingalong)
O
MONO.R
A bar is indicated in the above table when the voice mode is
least effective. It is better to avoid using the mode in such cases.
V-MUTE function
The voice portion of the track is blocked out but not the back-ground music.You need software recorded in stereo sound i_ wanting to usethe voice mute function. Voice and/dr static may be reproducedwith the following types of software.• _f_are recorded monaural
• Classic music, or works performed by a limited number ofinstruments
OChorus works or duets
[] Start the source (CD, etc.).
[] Adjust volume with VOLUME and MIC VOL andsing along.
To cancel the KARAOKEPressKARAOKEto select"(OFF)" mode.
olt a strange noise (squealing or howling) is emitted during use,
move the microphone far away from the speakers, or turn down the
microphone volume•
• When you are not using the microphone, disconnect it from the
MIC jack, and turn down the microphone volume level to MIN.
• Sound field cannot be used with KARAOKE nor can the radio

To record your "KARAOKE" performance I
_1 Firet, lower volume with MIC VOL then, connectthe microphone to MIC 1 and/or MIC 2 jacks.
_l Press DECK 2 A OPEN to insert the tape andthen select the reverse mode.
[] Press KARAOKE to select the voice mode.
[] Start recording and KARAOKE performance.eWhen singing off CDs
Press• 2J_C/STOp and start KAP_OKE performanceeWhen singing off tapes
Press TAPE EDIT and start KARAOKE performance.
.........°. ..... ...... ...... ..... ........
• .. .... ..... ..... ...... .... ,.........,.,,
• To playback the recorded tape, be sure to press KARAOKE to selectthe "(OFF)" mode.
eyou cannot record sound field or bass effect with KARAOKE, orradio-backed KARAOKE.
[ To record your voice
I. First, lower volume with MIC VOL then, connect the microphoneto MIC 1 and/or MIC 2 jacks.
2. Press DECK 2 -- OPEN to insert a tape and then select the reversemode.
3. Press TAPE, DECK 1/2.
4. Press • REC/STOP to start zecording.5. Speak through the microphone ancl adjust volume with VOLUME
and MIC VOL.
IIvs
i

Thissystemhas 3 timers:PlayTimer,RecordTimer,SleepTin_er.
Play Timer (_ PLAY) !
Select this _ner when you want to use the timer as an alarm dock.
You can wake up while listening to music (CD, _ner, tape or aux) ata desired volume level and time.
vs
i] Record Timer (_ REC)
Select this timer when you want to use the timer to record a midnightprogram or while you _e out.
I Sleep Timer (SLEEP) I
This timerturnsyour s_sternOFF at the settime (Max.2 hours,
settableat30 minuteintervals).Itletsyou fallasleepwhilelisteningtomusic.
BI_]

•Make surethatyou havecompleted"Seudngthetime"on page9.•Switchon thepower.
The figureshows how tosetthe playtimerforplayinga CD from6:30a.m.to7:40a.m.
H Press CLOCK/TIMER to select "_) PLAY".M
(_)Everytimeyou pressthebutton;
CLOCK-_ _ REC-*O PLAYt---Previous display ¢-3
(_ (Within t0 seconds or so)
Press MEMORY/SET.
[] I "ON" 'llme seltlng '1"
_) Press v or ^ to select the starting hour._) Press MEMORY/SET._) Press v or ^ to select the starting minutes.
Press MEMORY/SET.
[] [ "OFF" llme setting(_ Press v or ^ to select the ending hour.
Press MEMORY/SET.Press v or ^ to select the ending minutes.
@ Press MEMORY/SET.
L_J I Source seledlon ]
Select the desired source and then prepare forplaying.
When you play CD(s)PressCD and insert CD(s).If more than I CD is loaded
(_) Press DISC/TRACK to select the CD selection mode.
(The indicator illuminateswitha greencolor.)Turn JOG to select the desired CD number.
(_ PressCD it-and thenpressm.
When you play tape(s)Press TAPE DECK 1/2 and insert tape(s).Iftapesaxeloadedinbethdecks, playback will startfrom deckZ
When you play the radioPressTUNER BAND and tuneinthedeshed station.
When you play a unit connected to the "AUX" terminalsPress AUX.
[] I PIm/volume seltlng
Set the playback volume.
r_4j press _) REC/_ PLAY to select "_) PLAY".Every thne you press the button;_) REC--------_) FLAY
_---Out (OFF)<-J
The system will be turned OFF automatically in a few seconds.
The timer play will start at the preset time with volume increas-ing gradually up to the volume level you preset.
To switch the timer OFFPress E) REC/_ PLAY and check "_) PLAY"goes out.
If you set the timer wronglyPress (9 REC/E) PLAY so that "_ PLAY" goes out. Then, repeat the
procedurefrom step 1.
To check settings, Press CLOCK/TIMER to select "_ PLAY".
Two secondslater,thedisplaywillchangeinthefollowingorder.
_) PlaystartOme
_) Playovertime
_) sourceand volumePlay playback
You can check settings even when the system is OFF.
To enjoy the desired source after the timer setting IscompletedEven if you change the volume level or music source, the timer play
willstartwiththe presetcondition.
1. Followingstep6,turnON thepower and startplayingthedegn'edsource.
When you selectaCD as theprogram sourceAfterthe CD finishes,ifmore than 2 CDs are loaded in the
changerfollowtheprocedurebelow.
(D Press DISC/TRACK to selectthe CD selection mode.(The indicator illuminates with agreen color.)Turn JOGto select the des'n-edCD number to start the play.
@ PressIn.
2. PressPOWERto standby mode after enjoying the play, and con-firmCD(s) or tape(s) has (have) been inserted.
Tumlng the timer ON/OFFAs long as "_ PLAY" is displayed, the play timer will come ONeveryday as set.You can turn the timer ON/OFF by pressing _) REC/_) FLAY whilethe systemisOFF.Remembe_ that when "0 PLAY" isdisplayed,the timer is ON. Whennotdisplayed, the timer is OFF.
elf thePower ison,thetimerwillnotfunction.The systemmust beinthestandbymode.
•Ifyou switchthePower tothestandbymode whiletheplaytimerisfunctioning,theOFF timesettingwillnotbeactivated.
• IfAUX isselectedas the source,when the timercomes ON, the
systemwillhun ON and willengage "ALEX"asthesource.Ifyou
want playback from a connected component to start,set thecomponent'stimerto thesame time.(Seetheinstructionmanual
thatcame withthecomponent.)
O
_RE__DLAy
%
Time seti_ng
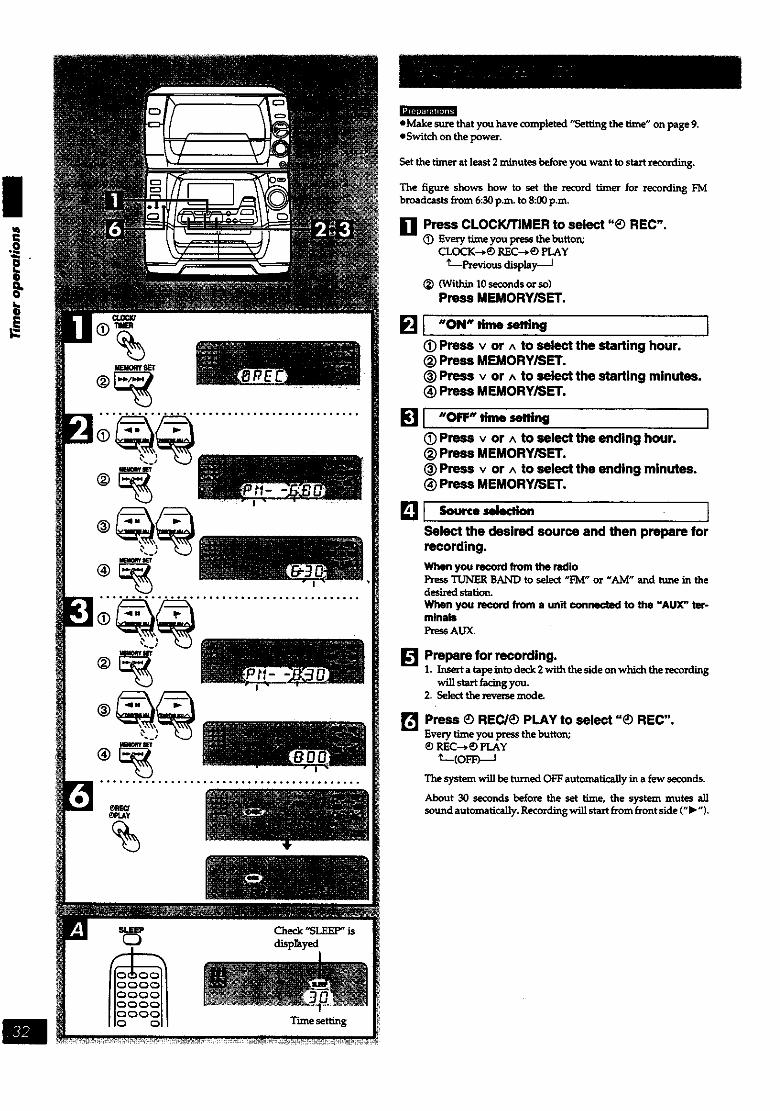
eMake sure that you have completed "Serimg the time" on page 9.
• Switch on the power.
Setthetimeratleast2 minutesbeforeyou want tostartrecording.
The figure shows how to set the record timer for recording FMbroadcasts from 6:30 p.m. to 8:00 p.m.
IT Press CLOCK/TIMER to select "_ REC".O Evez7 time _ Z_'essthe Imito_
CLOCK--.(9 REC--+_)PLAY
di,p y---J(_ (WithinI0secondsorso)
Press MEMORY/SET.
_]I "ON" Hme senlng I
(_)Press v or ^ to ssk..ot the starting hour._) Press MEMORY/SET._) Press v or ^ to select the starting minutes.(_) Press MEMORY/SET.
[] I "OFF" tim setting
(_ Press v or ^ to select the ending hour.(_)Press MEMORY/SET.(_ Press v or ^ to select the ending minutes.(_ Press MEMORY/SET.
Lql [Select the desired source and then prepare forrecording.
When you reourd from the radioPressTUNER BAND to select "FM" or "AM" and tune in thedesired station.When you record from a unit connected to the "AUX" ter-minalsPressAUX.
[] Prepare for recording.1. Insert a tape into deck 2 with the side on which the recording
will start facing you.2. Select the _ mode.
r_ Press _ REC/_ PLAY to select "_) REC".Every time you press the button;_)REC---*_)HAY_---(OFF)----_
The systemwillbe turnedOFF automaticallyinafew seconds.
About 30 secondsbeforethe settime,the system mutes all
soundautomatically.Recordingwillstartfromfrontside(")"").

To switch the timer OFF
Press_)REC/_ PLAY andcheck"_)REC" goesout.it_mlllt_$_lDLI]lKl_t
If you set the timer wronglyPress_) I_EC/_) PLAY sothat "_) I_C" goesout.The_ _peat thepzocedm-efrom step1.
TO check settingsPressCLOC_/TIlv_R toselect"_ REC".Twosecondslater, thedisplaywill c-hansem thefo]lowingo_en0 Recording start time(_ Recording ove_ time_) Recording source
You can check settings even when the system is OFF.
To enjoy the desired source after the timer setting is"
completed.Eve_ ff you change the music source, the _ _*ording will startwith the preset condition.
1. Fol]owi_ step 6 on page 32, turn ON the power and start playingthe desL,_Msomo_.
2. Press POWER to standby mode af_ you have mljoyed listening toyour desiredsource,and confirmatapeisinse_ indeck2.
Tumlng the timer ON/OFFAs long as "(9 REC" isdisplayed,thez_-'ordtimerwillcome ONeverydayasset.
You can turnthe _ ONIOFF by pressing "(DREC/(_ PLAY"
whilethesystemisOFF.Remember thatwhe_ "(DREC" isdisplayed,thetimerisON. Whennotdisplayed,thetimerisOFF.
Switch on the power.
While enjoying the desired source:
Press SLEEP to select the desired time• []
Every time you press the button;
The figure shows how to setthe system to standbymode aftex30minutes.
The syste_m is t_rned off aft_ the set time has elapsed.
' To cancel the sleep timerPress SLEEP to select "OFF".
To confirm the remaining time(only while power is ON)Pr'-_,sSLEEP.
To change the time remaining during operationPress SLEEP to show the remaining time, and thea_ press SLEEP toselect the desired time.
The sleep timer turns OFF automaticallythemoment you attempttorecord a CD usingCD MANAGER function.
IIitJ
_FFJ
elfthePower isON, the_dme¢win notfunction.The systemmttstbeinthestandbymode.
oil you switchthepower tothestandbymode whiletherecordtim_
is functJol_ng, the OFF time setting will not be activated.elf AUX is selected as the source, when the Rmer comes ON, thesystemwillturnON, willengage "AUX" asthesourceand willstart
recording. If you want to reco_ _rom a connected compon_mt, set
the component's timer to the same time. (Refer to your equipment'soperating instructions.)
m
I
e,
O
Normal
Peak hold
The sleeptimeralwayshasl_ority.Be surenottooverlaptimersettings.
Record timer and sleep timerTo go to sleep listening to a compact disc, and then to make a timerrecordingfrom a radiobroadcast,0 Progsam the record timer.
Follow stepsI-6 on page 3l_) Switchon the power,_) StartCD and setthevolume.
_) Setthesleeptimer(page33).
Be sure to set the sleep timer to finish before the timer recording
Play timer and sleep timerTo go to sleep listeningtoan FM broadcast, and wake up the next
morning listening to a compact disc.Progsam a CD for play timer.Follow stepsI-6on page31.Switch on the power.
Tune inthestationand setthevolume.
® Set tbe sk.ep timer (page 33).
For your referenceThe play timer cannot be used in combinationwiththe record timer.
• . - . . []
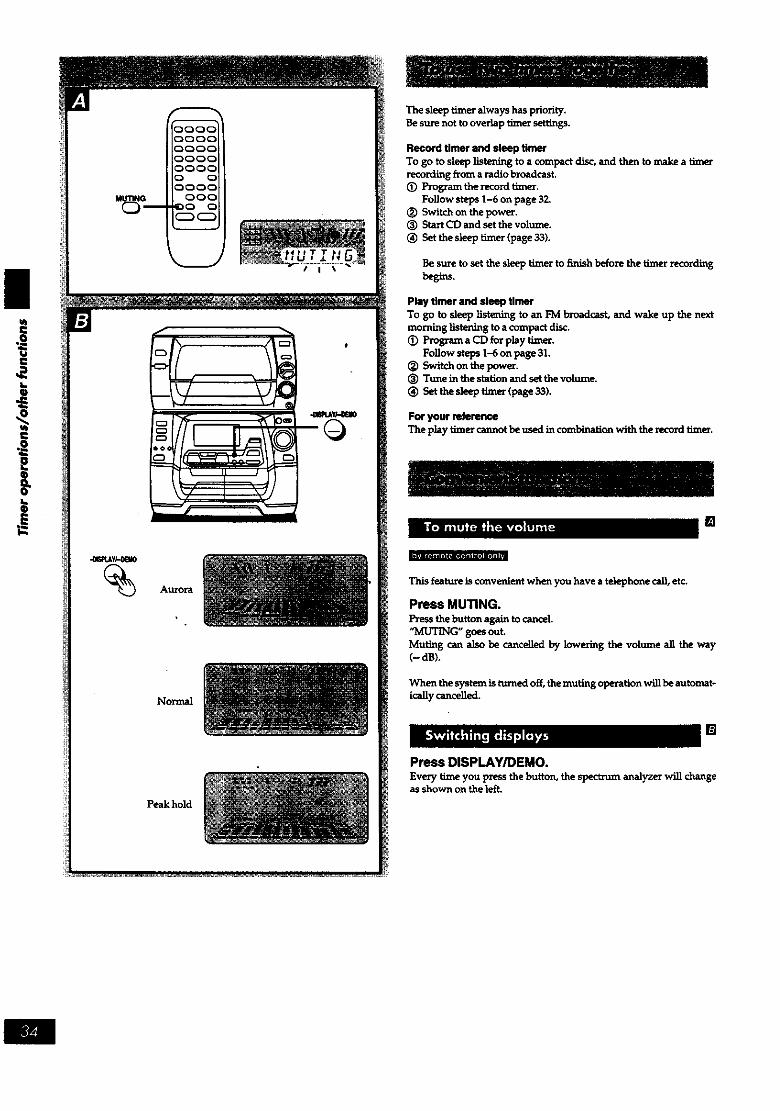
This feature is convenient when you have a telephone call, etc,
Press MUTING.Press the button again to cancel"MUTING" goes out.
Muting can also be cancelled by lowering the volume all the way(- dB).
When the system is turned off,themutingoperationwillbe automat-icaUycanceUed.
Press DISPLAY/DEMO.
[]
Every time you pressthe button,the specttumanalyzerwillchangeasshown on the left.

I Ustening to an external source
(See page 7 forextemsl unit connedion.)
1. Press AUX.
The power will come on automaticaUy.2. Start playback from the extenud source. (Refer to your equip-
ment's operating inslructions.)
I Recording from an extemal source
1. Follow steps 1-2 on page 22.2. Press AUX.
3. Press • REC/STOP (recording starts).4. Start playback fTom the exte_ source. (Refer to your equi_
mentPs operating instlu_dons.)
[ Listening with headphones [
Reduce the volume level and connect the headphones.
Plug iTpe: 33 mm (Vsin) stereo ,_
0
Avoid listening for prolonged pe_ods of time to prevent hearingdamage.

Reference pages are given as Mack circled numbers.
|
Turns the unit ON/OFF.
For setting sleep timer _)
For stationselection
(v, ^)
_PRESIUf mode)
For station selection
_}PRESET mode)
Pause(I|)
s p®.O
eSkipping
brward/backward
•CD selection•Trackselection
O.@
CD selectmode
0.@
input.
Engagesprograminputwhile
_ening totracks
Playback (4, _.) _}
For selecting repeatplayback mode (_
oFast-forward/Rewind
(while stopped)• Finding the
_ginning of a tune
m
B
m
_dom playback
,,When thesystemisOFF
One-touchplaybackbeginsby pressingTUNER, CD orTAPE.oWhen thesystemisON
Band can be switched with TUNER, and tape deck switchedwithTAPE.
Sound quality/field ON/OFF and selection
For setting super woofer level
Mutes volume temporarily. _)
-- Cancelspro_gram -- --contents.

x@ x®How to return CDs to their case
Face label
upwards andpress downwardfrom above.
How to hold CDs
O X
Do not touch therecorded surface
How to clean CDs
©
Wipe from inside outward.
How to take up tape slack
Side A
Tab for Tab forside "B" side ",4." Use a scxewdriver or
similar object tobreak out the tab.
To re-record on n protactod casseltoCover the hole with adhesive tape
Normal position tapeHi-positiontape
Donotcover the _\_"detectionhole
on hi-position
tapes
Detectionhole
|i
mWith thischanger,you canonlyplayCDs ,..J__._
having this mark. @U6 L However, do notuseirregularshapeCDs
(heart-shape, octagonal, etc.). CDs of the DIGITAL AUDIOsort can damage the unit. []
[ Handling precautions I
Be sure to handle CDs according to the pc•cautions shown onthe left (_-[_. Failure to do so may damage the CD or the CDchanger unit.
• If you are taking the CD from a cold to a warm environm_a_t,moisture may form on the CD. Wipe this off with a soft, dry,lint-_ee clothbeforeusing the CD.
• Do not write on the label side with a ban-puint pen or other writinginstrmnent.
• DO not use record cleaning sprays, benzine, fi'dnner, static electricity
prevention liquids or any other solvenL•DO not attachlabelsor stickersto CDs. (DO not use CDs with
exposedadhesivehorn tapeorleft•vetpeeledoffstickers.)•Do notusescratch-prcofprotactorsorcoversotherthanthosespec-ifiedforusewiththissystem.
] Storage precautions J iBe sure to store CDs in their cases to protect th_smfrom dust,scratches,andwarping.
DO not place or store CDs in the following placeseLocations exposed to direct sunlight•Humid ordustylocations
•Locationsdirectlyexposedtoaheatventorheatingappliance
•Intheglovecompartmentoron thereardeckofan automobile
I Selection of cassette tapes I
Tapes can get caught on the capstans.Use cauUonwith the followingtypes of tapes.
Cassette tapes exceeding 100 mlnuiseTapes are made of a thin film material. DO not repeatedly advanceand stop the tape, fast-forward it or rewind it.
Endless-tapesFor this unit, it is recommended to use tapes which are appropriate tothe auto reverse mechanism.
Always read the instructions provided with your tapes.
Tape slack []
Tapeslackmay causethetapetobreak.
Erasure prevention []
Stamge precautions
Do not place or store tapes in the following places;• In high temperature (35_ or higher) or high humidity (80% orhigher)areas
• In astrongmagneticfield (neara speaker,on topofa TV, etc.)Thiscan erase a recording.•Locationsexposedtodirectsunlight
E
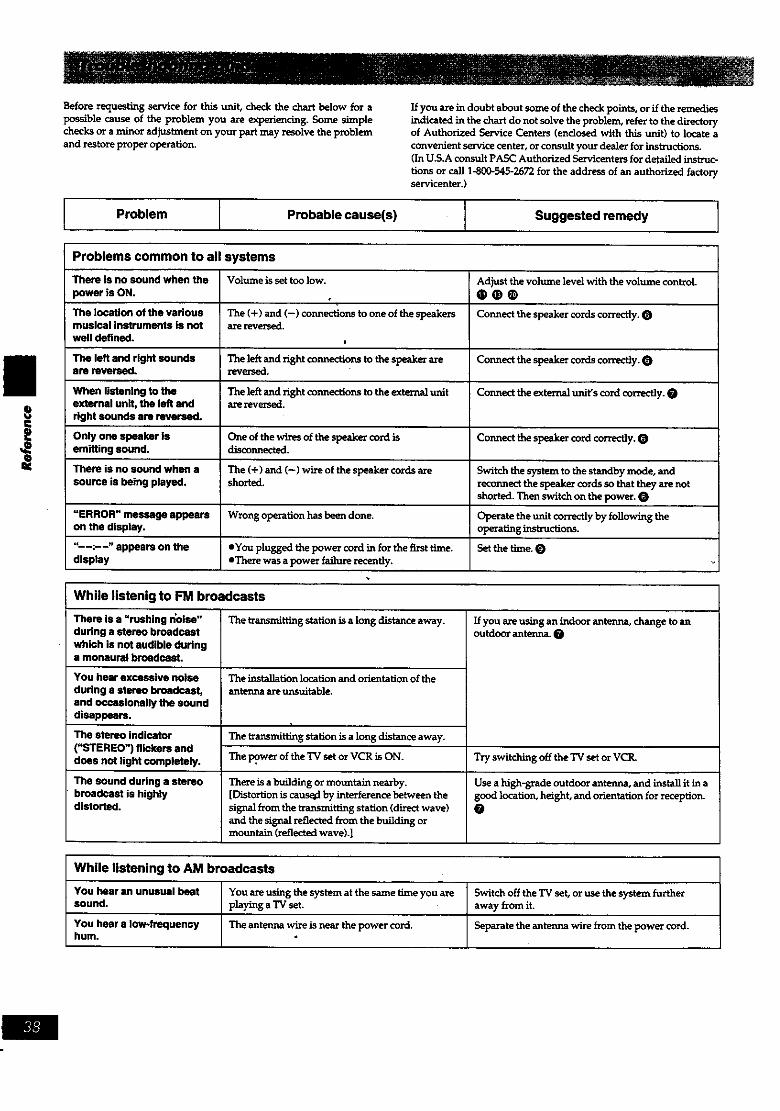
Before requesting service for this unit, check the chart below for apossible cause of the problem you are experiencing. Some simplechecks or a minor adjustment on your part may resolve the problemand i_,store proper operation.
If you are in doubt about some of the check points, or if the remedies
indicated in the chart do not solve the problem, refer to the direct olyof Authorized Service Centers (enclosed with this unit) to locate a
convenient service center, or consult your dealer for instTuctions.(In U.S.A consult PASC Authorized Servicenters for detailed instruc-
tions or call 1-800-545-2672 for the address of an authorized factoryservicenter.)
Problem Probable cause(s) Suggested remedy
Problems common to all systems
There Is no sound when the
power is ON.
The location of the vsdouemusical instruments is notwell defined.
Volume is set too low.
The (+) and (-)connectionstoone of thespeakersreverse.
e
The leftand rightconnectionsto the speake_arereversed.
Adjust the volume level with the volume conizol.0®o
Connect thespeakercordscor_ctly.0
The left and right sounds Connect the speaker €on:iscorrectly. Oare reversed.
When listening to the The left and right cormectinnsto the external unit CorLnect the external unit's cord correctly. Oexternal unit, the left end are reversed.
right sounds are revered.
Only one speaker is One of the wires of the speaker cord is Connect the speaker cord correclly. 0emittingsound, disconnected.
There is no sound when a The (+) and (-) wL,'eof the speaker cordsare Switch the s/stem to the standby mode, _mdsource is being played, shorted, reconnect the speaker cords so that they are not
shorted. Then switch on the power. O
"ERROR" message appears Wrong operation has been done. Operate the unit correctly by following theon the display, operating instructions.
"- -:--" epbears on the eYou plugged the Power cord in Inr the first time. Set the time. 0
display eThers was a power failure recently.
While listenig to FM broadcasts
The _ansmitting station is a long distance away.There is a "rushing n;ofso"dudng a stereo broadcast
which is not audible duringa monaural brcadcasL
You hear excessive noise
during a stereo broadcast,and occasionally the sounddisappears.
The installation location and orientation of theantenna are unsuitable.
If you are using an indoor antenna, change to anoutdoor antenna. O
The stereo indicator The l_r_smitl_g station is a long distance away.("STEREO") flickers enddoes not light sompletely. The p.o.wer of the TV set or VCR is ON. Try switching off the TV set or VCR.
The sound during s stereo There is a building or mountain nearby. Use a high-grade outdoor antenna, and install it in abroadcast is highly [Distortion is cause_ by interference between the good location, height, and orientation for reception.distorted, signal from the transmitting station (di.,ect wave) O
and thesignal reflected from the building ormountain (reflected wave).]
While listening to AM broadcasts
You hear an unusual beat You are using the system at the same tingeyou are Switch off the TV set, or use the s/stem furthersound, playing a "IV set. away from it.
YOU hear s low-frequency The antenna wire is near the power cord. Separate the antenna wire from the power cord.hum.

Prob,°mI Prob°0,eo°us ,I Sug0.,edrem yIWhen there is a television set nearby
The picture on the TV The location and orientation of the antenna are If you are using an indoor antenna, change to andisappears or stripes incorrect, outdoor anterma. Oappear on the screen.
The wiring at the back of the system is unsuitable. Separate the antenna wire of the TV set from thesystem.
When listening to tapes
Sound is low, intermittent, Heads are dirty. Clean the heads.poor quality, noisy, ' ,scratchy, Heads are dirty.
The deck does not enter the The erase-prevention tabs are removed from the Attach tape to cover the space left by removal of therecording mode. cassette, erase-p_evenlion tabs.
While listening to CDs
display does not show Set the CD with the label facing right.the correct indication. CDplay does not start when Wipe the CD with a soft cloth.
you pre_s the play button. Replace the CD with a new one.
The CD label is facing left.
The CD is dfrty.
The CD is scratched.
The CD is badly warped.
The CD is nonstandard_
There is condensation inside the CD changer.
The CD is dirty.
Repface the CD with adifferent one. (_
Wait for 60 minutes before using the CD changer.
A cerlkqinmusic passage Wipe the CD with asoft cloth. _)can't be played correctly.
The error messsge "DISC A disc has been put in the slot of the CD in play. Remove the CD whose number is displayed andTAKE OUT" appears on the closethe rack paneldisplay and the changerstops operating.
The CD does not return te Becauseof light or noise, the changer has detected Check whether another CD is in theslot or not. If
its sloL a CD in the slot of the CD be'rag played, even not, hold down the • (stop) button for 4 seconds.("DISC TAKE OUT" appears though it is empty. The changer will then eject the CD. If this proves toon the display.) be ineffective, contact the place of purchase.
While using the remote control
The system cannot beoperated with the remotecontrol.
The batteries are installed in the reverse polarity.
The batteries are run_lown.
Re-insert the batteries in the correct polarity. O
Replace the batteries with new batteries.
To clean this unit, wipe with a soft, dry cloth.If the surfaces are extremely dirty, use a soft cloth dipped in a soap-and-water solution or a weak detergent solution.
• Never use alcohol, paint thinner, benzine, or chemically treatedcloths to clean this unit.
eBefore using chemically impregnated cloth, read the'instructionsthat came with the cloth carefully.
We recommend that you periodically clean parts (the shaded portion
in the figure below) the tape contacts like the heads.Do not use any solution other than alcoliol for head cleaning.

AMPLIFIER SECTION
Rated minimum sine wave
RMS power output0.9% total harmonic distortion50 Hz-120 Hz both channels driven
75W perchannel(6Q)120 Hz-20 kHz both channels driven
25W perchannel(6Q)Total BI-AMP power 100 W per channel
Input sensitivityAUX 250 mVM1C [SC-AK91 only] 0.6 mV
Input impedanceAUX 15 k_
MIC [SC-AK91 only] 600Q
AMPLIFIER SECTION
Rated minimum sine wave
RMS power output0.9% total harmonic distortion50 Hz-12 kHz both channels driven
60 W pet dmnnel (6fl)1 kHz continuous power output
both channels driven0.9% total harmonic distortion
70 W per channel (6_)Input sensitivity
AUX 250mVMIC [SC-AK71 only] 0,6 mV
input impedanceAUX 15 !_
MIC [SC-AK71 only] _
FM TUNER SECTION
Frequency range87.9-107.9 MHz (200 kHz steps)87.5-108.0 MHz (100 kHz steps)
Sensitivity 23.3 dBf (4.0/_V, IHF '58)Antenna terminal(s) " 75_ (unbalanced)
AM TUNER SECTIONFrequencyrange 520-1710 kHzSensitivity
S/N 20 dB 500/_V/m
CASSETrE DECK SECTIONTrack system 4 track, 2 channel
Heads
Record/playback Solid perrnalloy headErasure Double gap ferrite head
Motor DC servomotor
Recording system AC bias 10(3kHzErasing system AC eraseTape speed 4.8 cm/s (17/8ips)Frequency response(+3,-6 dB) at DECK OUT
NORMAL 35 Hz-14 kHzHIGH POSITION 35 Hz-14 kHz
SiN 50 dB (A weighted)Wow and flutter 0.18% (WRMS)Fast forward and rewind times
Approx. 120 seconds
• , with C-60 cassava tape
CD SECTION
Sampling frequency 44.1 kHzDecoding' 16 bit linearBeam source/wave length
Semiconductor iaser/780 ranNumber of channels StereoSSq
SP OUT 87 dB (]IS.A)WOW and flutter Below measurablelimlt
Digital fl_er 8 fsDIA converter MASH (1 bit DAC)
SPEAKER SECTION
Type 4 way speaker systemSpeaker(s)
Super woofer 17 cra cone typeWoofer 12 cra cone typeMidrange 6 cmcone typeTweeter 6 cmcone type
Impedance HIGH (6_), LOW (6_)Input power
HIGH 80 W (MUSIC) 40 W (DIN)
LOW 200 W (MUSIC) 100 W (DIN)
Output sound pressure level87 dB/W (1.0 in)
Cross over frequency120 Hz, 4 kHz, 8 kI-IzFrequency range 38 Hz-22 kHz (-16 dB)
45 Hz-20 kHz (-10 dE)
Dimenslons 0NXHXD) 285x345x326 mm(117/32"x 131%2_× 1227/3_')
• Weight 6.2 kg (13.7 lb.)
SPEAKER SECTION
Type 3 way speaker systemSpeaker(s)
Woofer 14 cm cone typeMidrange 6 cra cone typeTweeter 6 cm cone type
Impedance 6flInput power 160 w (MUSIC), 80 W (DIN)
Output sound pressure level85 dB/W (1.0 m)
Cross over frequency 2 kHz, 8 kHzFrequency renge 41Hz-22 kHz (-I6 dB)
52 Hz-20 kHz (--10 dB)
Dimensions (Wx HX D) 246x345x257 mm(91V16"x 131%2_X 10V_)
Weight 3.3 kg (7.3 lb.)
GENERALPower supply AC 120V,60Hz
Power consumption[SC-AKgO/SC-AKgl ] 155 W[SC-AKT0/SC-AK71 ] 125W
Dimensions 0Nx HX D) 270x345x394 mm(1C6/_X 131%2"x 15V20
Weight[SC-AK90/SC-AK911 !0,3 kg (217 lb.)
[SC-AK70/SC-AK7119.5 kg (20.9 lb.)
Notes:
I. Specifications are subjectto changewithout notice.
Weight and dimen,_lons are approximate.2. Total harmonic distottlon ia measumd
by the digital spectrum analyzer.
I MASH is a trademark of NTT. II I
Do not attempt to remove the cover(s) or Rpazr the unit yourself.Refer serwcing to qualified personnel only.The servicer will require allcomponents to service your system.
Therefore, should service ever be necessary, be sure to bring theentire system.
I Product informcdion IFor productservice, productinformation or assistance with productoperation, refer to the servicenter directory.
Before moving your system to another location, be suretoremove all discs f_m the rack and barn off the system.The changer mechanism automatically locks when the system
is turned off, to protect it against damage in transport.Therefore, always press POWER and make sure "GOOD
BYE" appears on the display before you unplug the system.Failure to do so will expose the CDs and the system to the riskof severe damage.
Panasonic Consumer ElectronicsCompany, Division of MatsushitaElectric Corporation of AmericaOne Panasoinc Way Secaucus,New Jersey 07094
Panasonic Sales Company,Division of Mateushita Electric of
Puerto Rico, Inc. ("PSC")Ave. 65 de infanteria, Kin.9.5San GabrielIndustrialPark,Carolina,Puerto Rico 00985
Panasonic Canada Inc.
5770 Ambler Drive,
Mis_tssauga, OntarioL4W 2T3
RQT3884-2PF] 296C0 (D)