CD-M4000W/CP-M4000 sr-uUH= SERVICE...
54
CD-M4000W/CP-M4000 sr-uUH= SERVICE MANUAL DIGITAL AUDIO No. S9156CDM4000W MINI COMPONENT SYSTEM MODEL CD-M4000W SPEAKER SYSTEM MODEL CP-M4000 9 In the interests of user-safety the set should be restored to its original condition and only parts identical to those specified be used. / CONTENTS -. Page SAFETY PRECAUTION FOR SERVICE MANUAL ........................................................................................................... 2 VOLTAGE SELECTION ..................................................................................................................................................... 2 AC POWER SUPPLY CORD AND AC PLUG ADAPTOR ................................................................................................. 3 SPECIFICATIONS .......... . ................................................................................................................................................. 3 NAMES OF PARTS ........................................................................................................................................................... 4 OPERATION MANUAL.. ...... AL.. ... - .. ................................................................................................................................... 6 DISASSEMBLY.. ................... ............................................................................................................................................. REMOVING AND REINSTALLING THE MAIN PARTS.. ................................................................................................. 1: ADJUSTMENT ................................................................................................................................................................. 13 BLOCK DIAGRAM ........................................................................................................................................................... 17 SCHEMATIC DIAGRAM/WIRING SIDE OF P.W.BOARD.. ........................................................................................... .20 VOLTAGE ............ ............................................................................................................................................................ 38 NOTES ON SCHEMATIC DIAGRAM .............................................................................................................................. 39 TYPES OF TRANSISTOR AND LED.. .............................................................................................................................. 39 WAVEFORMS OF CD CIRCUIT.. .................................................................................................................................... 40 TROUBLESHOOTING.. . ................................................................................................................................................. 41 FUNCTION TABLE OF IC ................................................................. .:. ............................................................................ 45 FL DISPLAY.. .................................................................................................................................................................... 53 REPLACEMENT PARTS LIST/EXPLODED VIEW SHARP CORPORATION This document has been published to be used for after sales service only. The contents are subject to change without notice.
Transcript of CD-M4000W/CP-M4000 sr-uUH= SERVICE...

CD-M4000W/CP-M4000
sr-uUH= SERVICE MANUAL
DIGITAL AUDIO
No. S9156CDM4000W
MINI COMPONENT SYSTEM
MODEL CD-M4000W
SPEAKER SYSTEM
MODEL CP-M40009 In the interests of user-safety the set should be restored to its
original condition and only parts identical to those specified beused.
/ CONTENTS -.
PageSAFETY PRECAUTION FOR SERVICE MANUAL ........................................................................................................... 2VOLTAGE SELECTION ..................................................................................................................................................... 2AC POWER SUPPLY CORD AND AC PLUG ADAPTOR ................................................................................................. 3SPECIFICATIONS .......... . ................................................................................................................................................. 3NAMES OF PARTS ........................................................................................................................................................... 4OPERATION MANUAL.. ...... AL.. ...- .. ................................................................................................................................... 6DISASSEMBLY.. ................... .............................................................................................................................................REMOVING AND REINSTALLING THE MAIN PARTS.. ................................................................................................. 1:ADJUSTMENT ................................................................................................................................................................. 13BLOCK DIAGRAM ........................................................................................................................................................... 17SCHEMATIC DIAGRAM/WIRING SIDE OF P.W.BOARD.. ........................................................................................... .20VOLTAGE ............ ............................................................................................................................................................ 38NOTES ON SCHEMATIC DIAGRAM .............................................................................................................................. 39TYPES OF TRANSISTOR AND LED.. .............................................................................................................................. 39WAVEFORMS OF CD CIRCUIT.. .................................................................................................................................... 40TROUBLESHOOTING.. . ................................................................................................................................................. 41FUNCTION TABLE OF IC ................................................................. .:. ............................................................................ 45FL DISPLAY.. .................................................................................................................................................................... 53REPLACEMENT PARTS LIST/EXPLODED VIEW
SHARP CORPORATIONThis document has been published to be usedfor after sales service only.The contents are subject to change without notice.

Cd-M4000W/CP-M4000
SAFETY PRECAUTION FOR SERVICE MANUALWARNINGS
THE AEL (ACCESSIBLE EMISSION LEVEL) OF THE LASER POWER OUTPUT IS LESS THAN CLASS 1 BUT THE LASERCOMPONENT IS CAPABLE OF EMITTING RADIATION EXCEEDING THE LIMIT FOR CLASS 1. THEREFORE IT ISIMPORTANTTHATTHE FOLLOWING PRECAUTIONS ARE OBSERVED DURING SERVICING TO PROTECT YOUR EYESAGAINST EXPOSURE TO THE LASER BEAM.l-WHEN THE CABINET IS REMOVED, THE POWER IS TURNED ON WITHOUT A COMPACT DISC IN POSITION AND THE
PICKUP IS ON THE OUTER EDGE THE LASER WILL LIGHT FOR SEVERAL SECONDS TO DETECT A DISC. DO NOTLOOK INTO THE PICKUP LENS.
P-THE LASER POWER OUTPUT OF THE PICKUP UNIT AND REPLACEMENT SERVICE PARTS ARE ALL FACTORYPRESET BEFORE SHIPMENT.DO NOT ATTEMPT TO READJUST THE LASER PICKUP UNIT DURING REPLACEMENT OR SERVICING.
3-UNDER NO CIRCUMSTANCES STARE INTO THE PICKUP LENS AT ANY TIME.4-CAUTION-USE OF CONTROLS OR ADJUSTMENTS, OR PERFORMANCE OF PROCEDURES OTHER THAN THOSE
SPECIFIED HEREIN MAY RESULT IN HAZARDOUS RADIATION EXPOSURE.
CLASS 1 LASER PRODUCTAPPAREIL i LASER DE CLASSE 1PRODUCT0 LASER DE CLASE 1
Laser Diode PropertiesMaterial: GaAlAsWavelength: 780 nmEmission Duration: continuousLaser Output: max. 0.6 mW
VOLTAGE SELECTIONBefore operating the unit on mains, check the preset voltage. If the voltage is different from your local voltage, adjust the yoltageas follows.Turn the selector with a screwdriver until the appropriate voltage number appears in the window (1 IO V, 127 V, 220 V or 230 V-240 V AC).
-2-

CD-M4000W/CP-M4000
AC POWER SUPPLY CORD AND AC PLUG ADAPTORQACCA0003AWOO
BzjggK 1
QACCE0008AWOO
QACCL0005AWOO
a -
G-Dj0 I
I 1 K=
QPLGA0003AWZZ QPLGA0004AWZZ
FOR A COMPLETE DESCRIPTION OF THE OPERATION OF THIS UNIT, PLEASE REFERTO THE OPERATION MANUAL.
SPECIFICATIONS
n AmplifierMPO: 520 W (260 W + 260 W) (10 % T.H.D.)RMS: 300 W (150 W + 150 W) (10 % T.H.D.)
Video/Auxiliary (audio signal): 500 mV/47 kohms
n CD player
n TunerFrequency range FM: 88 - 108 MHz
AM: 531 1,602 kHz
w Cassette deckFrequency response 50 14,000 Hz (Normal tape)Signal/noise ratio / 55 dB (TAPE 1, Dlavbackl
150 dB (TAPE 2, &&din&playback)Wow and flutter IO.3 % IWRMS1
TYPO 4-way type speaker systemSuper Tweeter
8 cm (3-118”) Tweeter
8 cm (3-118”) Midrange25 cm (lo”) Woofer
Maximum input power 300 W(Total)
Rated input power 150w(Total)Impedance 6 ohmsDimensions Width: 422 mm (16-518”)
Height’ 330 mm (13”)Depth: 306 mm (12-1116”)
Weight 8.5 kg (18.7 Ibs.)/each
Specifications for this model are subject to change withoutprior notice.
-3-

CD-M4000W/CP-M4000
n Front panel
1. Disc TrayP.Timer Set Indicator3.On/Stand-by Button4. Tape 2 Cassette Compartment5. Tape 1 Cassette Compartment
6. Equalizer Mode Select Button7. Volume Control8. Monster Bass/Demo Mode Button (with Indicator)
29. Disc Tray Open/Close Button
lO.Disc Number Select Buttons (with indicator) 311 .Disc Skip ButtonlZ.Tuning and Time Up Button13.Tape 2 Reverse Play Button (with Indicator)14.CD Button15Tuner (Band) Button16.Tape (1 - 2) Button17.Video/Auxiliary B u t t o n .18.Dimmer Button19.Clock ButtonSO.Timer/Sleep Button21 .Headphone Socket22.CD or Tape Stop Button (with indicator)23.CD Play or Repeat, Tape 1 Play,
r
Tape 2 Forward Play Button (with Indicator)24.Tape 2 Reverse Mode Select Button25.CD Track Up or Fast Forward, Tape 2 Fast Wind,
Tuner Preset Up Button26.Tuning and Time Down Button27.Memory/Set Button28.Tape 2 Record Pause Button29.CD Track Down or Fast Reverse, Tape 2 Fast Wind,
Tuner Preset Down Button30,Microphone Level Control31 .Microphone Socket
n Display
1. FM Stereo Mode Indicator2. FM Stereo Receiving Indicator3. Karaoke Mode Indicator4. CD Repeat Play Indicator5. CD Pause Indicator6. CD Play Indicator7. Tape 2 Record Indicator8. Tape Reverse Mode Indicator9. Disc Number Indicators
lO.Timer Play Indicator11 .Memory IndicatorlP.Tape 2 Reverse Play Indicator13.Tape 1 Play or Tape 2 Forward Play Indicator14.Sleep Indicator15.Timer Recording Indicator16.Spectrum AnalyserNolume Level Indicator
26 27 28 293031
12 13 14 1516 17
2 3 4 5 61 1R I ii 13i4i5
-4-

CD-M4000W/CP-M4000
n Rear panel
1. FM 75 Ohms Aerial Terminal2. FM Aerial Earth Terminal3. AM Loop Aerial Socket4. Span Selector SwitchS.Video/Auxiliary (Audio Signal) input Sockets6. Speaker Terminals7. AC Power Lead8. AC Voltage Selector
n Remote control 1
1. Remote Control Transmitter2. Echo Level Up and Down Buttons3. Karaoke Mode Button4. Disc Number Select Buttons5. CD Clear Button
6. Tape 2 Record Pause Button7. CD Track Down or Fast Reverse, Tape 2 Fast Wind,
Tuner Preset Down Button8. Equalizer Mode Select Button9. Tape 2 Reverse Play Button
lO.CD Button11 .Tuner (Band) Button12.0n/Stand-by Button13.Monster Bass Button
A 2
* 3
‘414 Q
15A5 16 is
6 1718
7 198 209
IO21
11 2212
14.CD Random Button15.CD Memory Button16.CD Pause Button17.CD Track Up or Fast Forward, Tape 2 Fast Wind,
Tuner Preset Up Button18.CD or Tape Stop Button19.CD Play or Repeat, Tape 1 Play,
Tape 2 Forward Play ButtonPO.VideolAuxiliary Button2l.Tape (1 - 2) Button - .-22.Volume Up and Down-Buttons
13
Buttons with “A” mark in the illustration can be operated on the remote controlonly.Other buttons can be operated both on the main unit and the remote control.
-5-

Cd-M4000W/CP-M4000
n Speaker system
1. Tweeter2. Super Tweeter3. Midrange4. Woofer5. Bass Reflex Due6. Speaker Terminals
1 52 4
63
OPERATION MANUAL
System Connections
n Setting the AC voltage selectorCheck the setting of the AC voltage selector located an the rear panel before plug-ging the unit into a wall so&et. If necessary, adjust the selector to correspond to theAC power voltage used I” your area.
Turn the selector with a screwdriver until the appropriate voltage num-ber appears in the window (110 V, 127 V, 220 V or 230 V - 240 V AC).
q Connecting the AC power leadAfter making all connections, plug the unit. If you plug the unit first,the unit will enter the demonstration mode.
Note:Unplug the AC power lea&from the wall socket if the unit will not be in use for a pro-longed period of time.
AC Plug AdaptorIn areas (or countries) where a wall socket as shown I” illustration Q is used, connectthe unit using the AC plug adaptor supplled with the urxt, as illustrated The AC plugadaptor IS not included in areas where the wall socket and AC power plug can bedirectly connected (see lllustratlon 0).
n Setting the FM/AM span selector
The International Telecommuntcatlon Union (ITU) has establlshed that member coun-trues should maintain either a 100 kHz or a 50 kHz interval between broadcasting fre-quencles of FM statons and 10 kHz or 9 kHz for AM station. The illustration showsthe 5019 kHz zones (regons 1 and 3), and the lOOI kHz zone (region 2)Before “sing the ““It, set the SPAN SELECTOR swtch (on the rear panel) to theInterval (span) Of your area
To change the tuning zone:1 Press the ON/STAN D-B,’ button to enter the stand-by mode.2 Set the SPAN SELECTOR switch (on the rear panel) as follows.
. For 50 kHz FM interval (9 kHz in.AM) + 5019
. For 100 kHz FM Interval (10 kHz ,n AM) --* iOO/lO3 Whilst pressmg down the t button and the MONSTER-BASS button. press the ON,
STAND-BY burton until “CLEAR AL” appears.
Caution:This operation will erase all data stored in memory Including clock, timer settings,tuner preset, and CD programme.
-6-

CD-M4000W/CP-M4000
Setting the Clock
In this example, the clock is set for the 24.hour CO:001 disolav.._Press the ON/STAND-BY button to turn the power on.
! Press the CLOCK button and within 5 seconds, press the MEMO.RY/SET button.
1 Press the TUNING/TIME (v or A) button to select 24-hour or 12.hour display and then press the MEMORY/SET button.
“0:oo” + The 24-hour display will appear.(0:OO - 23:59)
“AM 12:OO” + The 12.hour display will appear.(AM 12’00 -PM ,159)
“AM OXlO” + The 12-hour display will appear.(AM O:OO. PM 11:59)
Note that this can only be set when the unit IS first installed or it has been reset.
4 Press the TUNlNGfrlME (v or A) button to adjust the hour and thenpress the MEMORY/SET button.
. Press the TUNlNG,TlME (v or A) button once to advance the time by 1 hour.Hold it down to advance contnuousiy.
Press the TUNING/TIME (v or A) button to adjust the minutes andthen press the MEMORYISET button.
\I 1,I /3;30,:- * 1%qg:’
. Press the TUNlNG,TlME (v or A) button once to advance the time by 1minute. Hold it down to change the bme in 5mmute Intervats.
s The hour will not advance even if minutes advance from “59” to “00’ Il The clock begins counting from “0” seconds. (Seconds are not displayed.)
The time dlsptay will disappear after a few seconds.
To confirm the time display:Press the CLOCK button.The time display will appear for about 5 seconds.
Note:The “CLOCK” or iime will flash at the push of the CLOCK button when the AC powersupply is restored after a power failure or unplugging the “nit.Readjust the clock as follows.
To readjust the clock:Perform “Setting the Clock” from the begrnning. If the time display IS flashing, step 3(for selecting the 24.hour or 12.hour display) will be skipped.
To change the 24-hour or Is-hour display:1 Clear ali the programmed contents.2 Perform “Setting the Clock” from the beginning.
Remote Controlw Test of the remote controlFace the remote control directly to the rem& sensor on the wt.
The remote control can be used within the range shown below:Press the ON/STAND-BY button Does the power turn on? Now. you can enjoy themusic.
Remote sensor
t
O.Zm-6m(8” - 20’)
-7-

CD-M4000W/CP-M4000
Troubleshooting ChartMany potential problems can be resoived by the owner without calling a service tech-nicran.
n Cassette deckIf something is wrong with this product, check the following before calling your autho-rn?d SHARP dealer or service centre.
n GeneralSymptom Possible cause
. The clock IS not on time. . Did a power failure occur? Reset the
Symptom Possible cause. Cannot record. . Is the erase-prevent,on tab removed?. Cannot record tracks with proper . f?. it a normal tape? (You cannot record on
sound quality.l Ca nno t er a se comoletelv.
a metal or 00, tape.)
l Sound skipping. . Is there any slack?
When a button is pressed, the unit Set tfx unit to the power stand-by mode
If the unit still malfuncbons, reset it.
Are the capstans, p,nch roifers, or heads
. Are the headphones connected?l Are the speaker wires disconnected?
the heads remkln engaged with the tape.Do not open the comparfment forcibly.Walt until electrfcity resumes.
. Is the karaoke modesetto “L-CH”. “R-CH”or”V-CANCEL”? n Karaoke
w CD playerSymptom I Possible cause
l The vocal part of a multiplexed . Is the karaoke inodeset to “L-CH”, “R-0,’disc IS not heard. or “V-CANCEL”?
Symptom Possible cause. Playback does not start. l Is the disc loaded upside down? w Remote control. Playback stops m the middle or is . Does the disc satisfy the standards?
not performed properly. l Is the disc distorted or scratched?. Playback sounds are skipped. or l Is the unit located near excessive vibra- l The remote control does not oper- . Is the AC power lead of the unit plugged
stopped in the middle of a track. l :?e?discverydIm/, . Is the battery ;olarfty respected?
. Has condensation formed inside the unit?. Is the distance or angle incorrect?
w Tuner . Does the rem& control sensor recewe
l Radio makes unusual noise con- Is the unit placed near the TV or comput-
Is the FM aerial or AM loop aerial placedproperly? Move the AC power lead awayfrom the aerial if located near.
Troubleshooting Chartw If trouble occursWhen this product is subjected to strong external interference (mechanical shock,excessive statrc efectncity, abnormal supply voltage due to lightning, etc.) or if It isoperated incorrectly, it may malfunction.
If such a problem occurs, do the following:1 Set the unit to the stand-by mode and turn the power on again2 If the unit IS not restored !n the previous operabon, unplug and plug in the unit,
and then turn the power on.
Note:if neither operation above restores the unit, clear all the memory by resetting it
w Clearing all the memory (reset)1 Press the ON/STAND-BY button to enter the power stand-by mode.2 Whilst pressing down the + button and the MONSTER-BASS button, press the
ON/STAND-BY button until “CLEAR AL” appears.
Caution:This operation will erase ail data stored in memory including clock, trmer settings,tuner preset, and CD programme.
n Before transporting the unit1 Press the ON/STAND-BY button to t”rn the power on.2 Press the CD button.3 Press the & OPEN/CLOSE button to open the disc tray.
Remove all CDs inserted in the unit.4 Press the 6 OPEN/CLOSE button to close the disc tray.
5Make sure that “NO DISC” IS dlspiayedPress theON/STAND-BY button toenterthestand-by mode, and then unplugthe AC power lead from the wall socket.
-8-

CD-M4000W/CP-M4000
DISASSEMBLY
t-
Caution on DisassemblyFollow the below-mentioned notes when disassemblingthe unit and reassembling it, to keep it safe and ensureexcellent performance:1. Take cassette tape and compact disc out of the unit.2. Be sure to remove the power supply plug from the wall
outlet before starting to disassemble the unit.3. Take off nylon bands or wire holders where they need to
be removed when disassembling the unit. After servicingthe unit, be sure to rearrange the leads where they werebefore disassembling.
4. Take sufficient care on static electricity of integratedcircuits and other circuits when servicing.
Rear Panel with
1. Turn on the power supply, 9-2open the disc tray, take outthe CD tray cover, and close.(Note 1)
2. Screw ....................... (Cl) xl3. Hook.. ....................... (C2) x34. Hook.. ....................... (C3) x25. Socket ...................... (C4) x2
1. Screw ..................... (Dl) x10 9-22. Socket ...................... (D2) x l
1. Screw ....................... (El) xl 9-22. Flat Cable.. ............... (E2) xl IO-23. Socket ...................... (E3) x4 IO-2,1O-:
1. Screw ....................... (Fl) x7 IO-32. Socket ...................... (F2) x2 IO-23. PWB Holder ............. (F3) x3 10-34. Flat Wire. .................. (F4) xl1. Screw.. ..................... (Gl) xl 10-32. Socket ...................... (G2) xl2. Hook.. ....................... (G3) x21. Knob.. ....................... (Hl) xl2. Screw ..................... (H2)
jO-4x12
3. Flat Cable ................. (H3) xl1. Open the cassette holder. 1 o-42. Screw (Ji) x5
1. Screw:. ..................... (Kl) xl lo-4
1. Screw.. ..................... (Ll) x2 10-4
1. Hook ........................ (Ml) x2 10-52. Cover ...................... (M2) xl
1. Turn fully the lock lever in the. 9-3arrow direction.
2. While holding the lock lever,rotate 1 O-lthe cam gear until the cam gearrib engages with the clamp lever.
3. Push the slide chassis backward to 1 O-6engage the claw with the grooveand remove it in the directionof the arrow. ................. (Nl) x6
1. Screw. ...................... (Pi) xl 11-12. Hook ......................... (P2) x23. Socket ...................... (P3) x4
1. Hook . . . . . . . . . . . . . . . . . . . . . . . . . fQ1) x2 1 11-2 1/ 2. Hook ..____......_............ iQ2j x3
Note 1: How to open the changer manually. (Fig. 9-3)I
1. In this state, turn fully the lock lever in the arrow direction throughthe hole on the loading chaissis bottom.
2. While holding the lock lever, rotate the cam gear anticlockwise until thecam gear rib engages with the clamp lever. (Fig. 10-l)
3. After that, push forward the slide Chaissis.
PROCEDURE FIGURI1. Screw ....................... (Al) x4 9-l
1. Screw ....................... (Bl) x8 9-l
Top CabinetI
03 x 1Omm
R’earPanel
Figure 9-1
CD Tray Cover
Transformer
- -03xlOmm
Figure 9-2
Figure 9-3Note 2:1. After removing the connector for the optical pickup from the
connector, wrap the conductive aluminium foil around the front endof the connector so as to protect the optical pickup from electro-static damage.
Note 3:1. Be careful not to break the claw of the CD mechanism.2. When fining back the cam gear assembly, let it lock by front
movement.
-9-

CD--M4000W/CP-M4000
Clamp Lever
CD Player Unit(Top View)
Cam Gear Rib
Figure 10-l
(E3) x1-y b
Figure 1 O-2
(Push iPush 1
Figure 1 O-3
w
Figure 1 O-4
urntable
Figure 10-5
(Nl) x 3
Figure 10-6

CD-M4000W/CP-M4000
Figure 1 l-l
Net . . . . . . . . . . . . . . . . . . . . . . .2. Catching Holder . . . . . (A2) x4
3 Woofer 1. Screw ..................... (Cl) x4 1 l-5
4 Tweeter 1. Screw ..................... (Dl) x4 11-5
5 Midrange 1. Screw ..................... (El) x4 11-5
Mechanism
Figure 11-2
Front Panel,
&moxAss!
3. Screw ..................... (A3) x4
2 Super Tweeter 1. Screw ..................... (Bl) x2 11-5
Figure 11-4
Figure 11-3
Sneaker Box Ass’y
Figure l-l-5
--ll-

CD-M4000W/CP-M4000
REMOVING AND REINSTALLING .THE MAIN TART;STAPE 2TAPE MECHANISM SECTION
Perform steps 1 to 7 and 9 of the disassembly method toremove the tape mechanism.
How to remove the record/playback and eraseheads (TAPE 2) (See Fig. 12-I)1. When you remove the screws (Al) x 2 PCS., the recording/
playback head and three-dimensional head of the erasinghead can be removed.
How to remove the playback head (TAPE 1)(See Fig. 12-2)1. When you remove the screws (Bi) x 2 PCS., the playback
head.
Erase Head
How to remove the pinch roller (TAPE l/2)(See Fig. 12-3)1. Carefully bend the pinch roller paw1 in the direction of the
arrow <AZ, and remove the pinch roller (Cl) x 1 PC., in thedirection of the arrow cB>.
Note:When installing the pinch roller, pay attention to the springmounting position.
How to remove the belt (TAPE 2)(See Fig. 12-4)1. Remove the main belt (Dl) x 1 PC., from the motor side2. Remove the FF/REW belt (D2) x 1 pc.
How to remove the belt (TAPE 1)(See Fig. 12-4)1. Remove the main belt (El) x 1 PC., from the motor side.2. Remove the FF/REW belt (E2) x 1 pc.
How to remove the motor (See Fig. 12-5)1. Remove the screws (Fl) x 2 PCS., to remove the
T a p emotor.
ti2 x 6mm
Figure 12-l
1 TAPE 1 /
(Bl) x 102x9m
Figure 12-2
h
Pinch
KY
Figure 12-3/z---l
T
/n \ Main Belt
Flvwheel
v 1%Flywheel FFlREWAss’y Roller
Figure 12-4-Figure 12-5
-12-

CD MECHANISM SECTIONPerform steps 1, 2, 3, 12, 13, 14 and 15 of the disassemblymethod to remove the CD mechanism.
How to remove the CD loading motor(See Fig. 13-1)1. Bend the hooks (Al) x 5 PCS., to remove the CD loading
motor.2. Remove the drive belt (A2) x 1 pc.
How to remove the pickup (See Fig. 13-2)1. Remove the stop washer (Bl) x 1 PC., to remove the gear
(B2) x 1 pc.2. Remove the screws (B3) x2 PCS., to remove the shaft (84).3. Remove the pickup.
NoteAfter removing the connector for the optical pickup from theconnector wrap the conductive aluminium foil around the frontend of connector so as to protect the optical pickup fromelectrostatic damage.
CD-M4000W/CP-M4000
CD Loading Motor
Figure 13-1
(B4) x 1 Gear(B2) x 1
Figure 13-2
ADJUSTMENTMECHANISM SECTION l Tape Speedl Driving Force Check
Torque Meter
Play: TW-2111
Specified Value
Tape 1: Over 80 gTape 2: Over 80 g
l Torque Check
Test Tape Adjusting Specified InstrumentPoint Value Connection
Normal MTT-111 Variable 3,000 k 30 Hz S p e a k e r ispeed Resistor in terminal
motor. (Loadresistance:6 ohms)
/ TAPE MECHANISM 1 , ,
Figure 13-3
- 1 3
CD-M4000W/CP-M4000
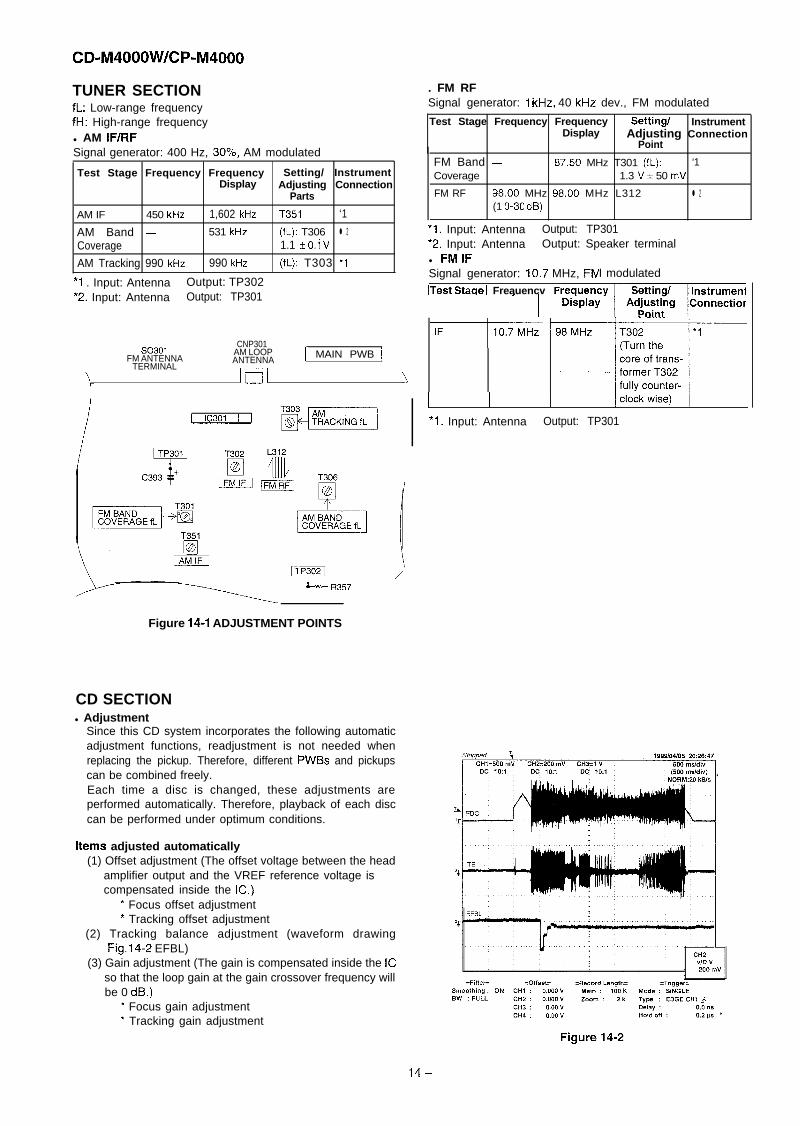
TUNER SECTIONfL: Low-range frequencyfH: High-range frequencyl AM IF/RFSignal generator: 400 Hz, 30%, AM modulated
Test Stage Frequency Frequency Setting/ InstrumentDisplay Adjusting Connection
Parts
AM IF 450 kHz 1,602 kHz T351 ‘1AM Band - 531 kHz (fL): T306 l 2Coverage 1.1 F 0.i vAM Tracking 990 kHz 990 kHz (fL): T303 *l
*l . Input: Antenna Output: TP302*2. Input: Antenna Output: TP301
so301CNP301
FM ANTENNAAM LOOP
TERMINALANTENNA 1 MAIN PWB j
jl \
[ IC301 I I
L+ R357
Figure 14-1 ADJUSTMENT POINTS
CD SECTIONl Adjustment
Since this CD system incorporates the following automaticadjustment functions, readjustment is not needed whenreplacing the pickup. Therefore, different PWBs and pickupscan be combined freely.Each time a disc is changed, these adjustments areperformed automatically. Therefore, playback of each disccan be performed under optimum conditions.
Items adjusted automatically(1) Offset adjustment (The offset voltage between the head
amplifier output and the VREF reference voltage iscompensated inside the IC.)
* Focus offset adjustment* Tracking offset adjustment
(2) Tracking balance adjustment (waveform drawingFig.14-2 EFBL)
(3) Gain adjustment (The gain is compensated inside the ICso that the loop gain at the gain crossover frequency willbe 0 dB.)
* Focus gain adjustment’ Tracking gain adjustment
. FM RFSignal generator: 1 kHz, 40 kHz dev., FM modulatedTest Stage Frequency Frequency Setting/ Instrument
Display Adjusting ConnectionPoint
FM Band - 87.50 MHz T301 (fL): ‘1Coverage 1.3 V i 50 mV
FM RF 98.00 MHz 98.00 MHz L312 l 2(1 O-30 dB)
*I. Input: Antenna Output: TP301*2. Input: Antenna Output: Speaker terminall FMIFSignal generator: 10.7 MHz, FNITest Staae / Freauencv / Freauenc
I modulated
- 1 D&play-
, , ^‘;”*I. Input: Antenna Output: TP301
14-

TEST M,ODE
CD-M4000W/CP-M4000
l Setting the test modeAny one of test mode can be set by pressing several keys as follows.<X-BASS> + <CD> + <POWER> TEST:CD operation test
Function:-CD test mode.-Enter test mode.
’ IL isn’t done
OPEN/CLOSE operation is using manual.
c~~77, ccc+> buttons’ make pick’s slide possible.
<<PLAY>> key input.
Do TOC IL. Do normal playWhen these following key is inputinto PLAY key, track number can
<<MEMORY>>key input
be appoint directly
Adjustment resultautomatically willdisplay as belowfor each 2 set :a) “FOF-XXXX”b) “TOF-XXXX”c) “TBA-XXXX”d) “TGA-XXXX”f) “FGA-XxXx”g) “RFL-XXXX”
<<@ 177 key: Track 4<<@2>7 key: Track 9<<@3>> key: Track 15
explanation:a) Focus off set =“FOF XXXX” Ib) Tracking off set =“TOF;XXXX”c) Tracking balance =“TBA-XXXX”d) Tracking Gain =“TGA-XXXX”f) Focus Gain =“FGA-XXXX”g) RF level shift =“RFL-XXXX”
VOL - Last memoryBAL - CENTERP.GEQ - FLATX-BASS - OFF
To cancel : Power OFF
I
+
Laser ON.
<<MEMORY>> key input.
Tracking OFF play at thatspecific point.
6
<<MEMORY>> key input.
<<MEMORY>> key input.It
1 Adjustment result automaticallywilldisplay as below for each 2 set :a) “FOF-XxXx”b) “TOF-XXXX”c) “TBA-XXXX”d) “TGA-XxXx”f ) “FGA-XXXX”g) “RFL-XXXX”
3/ <<STOP: key input. /
( S T O P )
Sliding the PICKUP with<<DD>>, <cc+> buttonmust only be in STOP mode.
-15-

CDh/l4000W/CP-M4000
Standard Specification of Stereo System Error Message Display ContentsError Contents Display
Output while Device Protection Operation ‘PROTECT
TAPE Mechanism Error ‘E R-TA**’
CDIVCD Pickup Mechanism Error ‘ER-CD**’
CD Changer Mechanism Error ‘ER-CD**’
Tray Error ‘ER-CD**’
Micon Communication Error ‘ER-CD**’
Focus Not Match ‘NO DISC’IL Time Over ‘NOT READ’
TUN PLL Unlock ‘ER-TU**’
Notes
00: While in Protect Circuit Operate01: Over Current Detection02: DC Detection03:
00: Tape Mechanism Error01: Initial Error02:03:
00: Pickup Mechanism Error01: PU-IN SW Detection NG02:03:
10: Changer Error11: Initial Error .~12:13:
20: Tray Error21:22:23:
30: System-VCD31: System-CD Servo
00: TUN Error01: PLL Unlock
I 02:03:
-16-

CD-M4000W/CP-M4000
TO DISPLAY SECTION
c-61 CE
62 CL
63 DI
64 DO
65 wmo
6 VRES
6 DRF
ICILC78645ECD SERVO
CONSTANTVOLTAGE
SW4PICKUF
IN
Figure 17 BLOCK DIAGRAM (i/3)
-17-

AM LOOPANTENNA
vr, x352 I I I rm-4.5MHZ
JKl
ICKl I - - I I IM65656SPMIC AMP.
+B4
f-
JK601VIDEO/AUX
IC601P-7CO”,CNSllKIR
FROM CDSERVOSIS~TION
WIL-CH esF&BACK R-CH &
SWITCt REC,
MOTORDRIVER
BIAS
Figure 18 BLOCK DIAGRAM (2/3)
-18-

CD-M4000W/CP-M4000
FL701FL DISPLAY
JOG701
RX701
II II - y--
-I+B5
-SW701 -SW703sw709-SW717SW722-SW734
IC701 (l/2)IXO46OAW
I I_ _ _.
SYSTEM MICROCOMPUTER -“--El‘ 1 / I ‘“&
+B5 ’
4.1943 MHz
SP. DET.1 Q901.Q9iq
-2OdBATT
IC!B7‘605‘606g
SP RELAYON-OFF 1
so901SPEAKERTERMINAL
T601POWER TRANSFORMER
RECIPLAY
F607+-
T2A L 250V IA
SW801VOLTAGE
SELECTOR ,
VFl
TliJ2
-VFAC POWERSUPPLY CORDAC 1 I Oil 27/220/230-240 V, 50/60 Hz
BIAS
Figure 19 BLOCK DIAGRAM (3/3)
-19-

CD-M4000W/CP-M4000
PICKUP-UNIT-z--l.---e---wCD SER”O PWB-C r-----~----~--.
C
~
m2 d
Y12
i
J3 ^ ._
L 45
I 11 1676
tCl
L--------I I I III’E
1111 II,/ /
PUINGND
I Y-- NP3
F
I...Fk=L-w I
I I//L
G
I
)) CD SIGNAL
E]VCC IVREF
1E *“1 EC LASER
DRIVER-I
H
l NOTES ON SCHEMATIC DIAGRAM can be found on page 39.
1 2 3 j 4 1 5 6 JFigure 20 SCHEMATIC DIAGRAM (l/10)
-2o-

CD-M4000W/CP-M4000
I I WRQ, $[ DRF, 9
CE=@DoI @n, h
CNPT
ASDFINASDACKASLRCK1 GMOUT
EFLG
c51 I0.022 T
1R-CH, ,
AGND 8
-L-CH _
c- DGND- y-
, , +5v _ 5I +5v _ 6
-II- -C42 ’3.01r- I CNP;
..- _2TtNi E ICl
’ C78645Ef53trwu
hrrs\Ih
C48D.022+I-
mKTC%03 Y
l The numbers @ to @ are waveform numbers shown in page 40.
7 8 9 10
Figure 21 SCHEMATIC DIAGRAM @/IO)-2l-
11 12 I

CDrM4000W/CP-M4000
IC601LC75341
AUDIO PROCESSOR
r
- -
l NOTES ON SCHEMATIC DIAGRAM can be found on page 39.
Figure 22 SCHEMATIC DIAGRAM (3/l 0)- 22 -

CD-M4000W/CP-M4000
__-------- ~__-_--_------_-__-_----_-I) FM SIGNAL
/ MAIN PWB-~(l/z) (
w PLAYBACK SIGNAL> RECORD SIGNALN CD SIGNALDD VIDEO SIGNAL
-_---_-_-_-_-_ ---ICNPGD1
1 7 8 9 10
Figure 23 SCHEMATIC DIAGRAM (4/l 0)-23-
11 12 I

CDiM4000W/CP-M4000
NSPLAY PWB-Bl
A
B
C
D
E
F
G
:
H
MICRC
IC704KIA4558POPE AMP.
--
l NOTES ON SCHEMATIC DIAGRAM can be found on page 39.
1 2 3 4 5 6 1
Figure 24 SCHEMATIC DIAGRAM (5/l 0)- 24 -

CD-M4000W/CP-M4000
3 R7W ,“/ >K
INPUTiOUTPUTEXPANDER
I I I I I i” i i i i
7 8 9 10
Figure 25 SCHEMATIC DIAGRAM (6/l 0)- 25 -
11 12 I

CD;M4000W/CP-M4000
.-_-__-------__-__-__----P-F_-
POWER AMP
I POWER PWB-Di AdI_-_-_ -------_.
l NOTES ON SCHEMATIC DIAGRAM can be found on page 39.
1 I 2 I 3 I 4 I 5 I 6 IFigure 26 SCHEMATIC DIAGRAM (7/10)
- 26 -

CD-M4000W/CP-M4000
- .-- .----* FM
.--_-____-------SIGNAL
R-CH 1=wJ SC&mSPEAKER
GND TERMINAL
I I CSI J ' I- - - - - - - - - - - - - - I-------_-- ---------
1 !-_--___--------- I
7 a 9 10 11 12 IFigure 27 SCHEMATIC DIAGRAM (8/10)
-27-

CD-*iil4000W/CP-M4000
A
3
_.,
-
D
E
F
-
G
H
1so301
FM ANTENNATERMINAL
,-P-P--_-_ -------
MAIN PWB-A (2/2) r------_-_
c3140.0047 D305,DS1SSW---I?c315 0.0047^^.” ^^^^
FM FRONT END-
22P R309CF303 (WI iOK
FM SIGNALR316 (fS
AM SIGNAL 47K I-e
I s
IC302LC72131
PLL(TUNER‘
IC303LA1 8328
FM IF DET./FM MPX./AM IF
.I
l NOTES ON SCHEMATIC DIAGRAM can be found on page 39.
1 2 3 4 5 I 6 JFigure 28 SCHEMATIC DIAGRAM (9/l 0)
- 28 -

CD-M4000W/CP-M4000
MIC PW@-H /
bD MIC SIGNAL
I I!
---.--~--~-‘-----------------------------------------.~-
l NOTES ON SCHEMATIC DIAGRAM can be found on page 39.
Figure 29 SCHEMATIC DIAGRAM (IO/lo)
MAIN PWBP30 6-A
7 a 9 11 12Figure
I29 WIRING SIDE OF P.dmLOARD (l/9)
-29-

TO CD SERVO PWB TO MIC PWBP36 5-A P29 12-G
2 3 4 5 6 7 8 9 1 0-I>I>I>T>>3o3fl3:a3fl
A
B
C
D
E
F
G
~
H
L
r FM75 OHM!so301
FM ANTENNATERMINAL
L- GND
AM LOOPANTENNA
SPANSELECTOR9 kHdfi0 kHz r - -
2 - L-10 kHd’100 kHz
$! l
R606 g- - -
R613e3 e
-----i%-
1L
112 3 4 ,I 5 6
Figure 30 WIRING SIDE OF P.W.BOARD (2/9)- 30 -

CD-M4000W/CP-M4000
TO DISPLAY PWBP33 11-A
3122 R156EEi
,--------------------------------I -IF+R158I R146
I ‘*‘-II ‘u&L..-
IIIIII
-
40EE--4’42 E33R132
TV”- C14Om -jtC124+ R142B+ -ii-C136
s j :
t--.-.3 mR126
102 CNS102R124 lclltm .).
-___ -___, EERlO5
EElR?o6-II-c154
-1
IP3711-F/
TA:: 2RECORD/PLAYBACK
ERASE HEAD
---I P37 10-F/FROM TAPE 1
PLAYBACK HEAD
-+-%607--f l.
-k-C621 cd59 ’ ----.
-ii-C609 + -- -w-
R653+- C625 -i t- C852
C629 l
-+I+-- R624
+ R852
/TO AMP PWB
P35 12-E
a 9 10 11 12 IFigure 31 WIRING SIDE OF P.W.BOARD (3/9)
-31-

CNS
CNS
DISPLAY PWB-Bl
P34 3-G
S7025 tflcs713
. .
’ J CNP702
r ,-------2‘q%702
IJ&q MONSTER BASS PWB-B3
TO TAPEMEC@;‘SM i31kf-,Bl704,
------_---- ------ -----------_-----_-
1 2 3 4 5 I 6
Figure 32 WIRING SIDE OF P.W.BOARD (4/9)- 32 -

CD-M4000W/CP-M4000
TO MAIN PWBP31 9-Aj5Fzi-j
tFC701
1 IIII,IIIIIII1,/,,,,,,,/ 2,---------n701---R~27e.------------------
R728=
-
.._: .,
:.
- I_‘ - .: r-7 I
t ‘L-: 1I LED722
L--JI
.r7,-v, -, .,I\-b-r-b STAND-BYrilY”rn%! R789m
I LL6ciccrra R76483Fi768m
788EE[787m I
ss:“k &II I
R763ttJ. . R765ffl
.-I .A zz . *l
EE
. .l ☺
RD03SW734 SK22
r- -11 ,-\ I
EEI.TUNER .w....r - 7 r - - i
’ ‘-: ‘SW723r - - i I I._: 1
D36f3 I ,-\ I L- -J$ * JTAPE
I ,-\ II ‘. -,’ I C’, .1 ._: I 1 -18 SW71 14
Dl3B - L- -J , ,L--d RI 7111-&AL“-‘-’ 1.. a L DIMME- 1R
LED702 RL70rn 515I I-n-r,%iLCUC”,
1n m705-- - . . . 3 E
LED705 Ir---7 SW732 IC702 , I-\ , IN716
&U.+LIZER E I : _ I’ I-.\ ‘+ E%g L- -J
’ I :s-1r-7 r- -1.,
J-_ I :_,-‘I ; ;W?&8 1 s-. ,
, : _ 3’ ,I *-\ II ‘. :t
RDOl @=J
-RLi06=L--J RD32
RD3:& -mL--;J * .SW730
RD02 EEj
;~RL707&j ,. RD3O’m -B r--7I ,-. IRL708= - - 1 RD29 EERSE“_ , ,-\: 1 I‘_, I ‘gg7 r--7 ii-:;
IL- -,FORWARD f a:;;~ ; : T--l SW726
I‘s ‘FAST
; 1-l; REWINDE&D25
SW703TIMER ’
L--J--’ / 1 YL /YELLOW1
7 8 9 10Figure 33 WIRING SIDE OF P.W.BOARD (5/9)
- 33 -

CD-M4000W/CP-M4000
COLOR TABLE 1
/VL i VIOLET 1
TRANSFORMER PWB-D3 1I
AC POWERSUPPLY CORDf AC I 1 Oil 27/220/230-240 V.50160 Hz
I T801: POWER, TRANSFORMER
HEADPHONES PWB-B2/ I I I
I-- -----1
JK670HEADPHONES ;
fk5-J
i c~q!.--~
1--- -----
I 1 2 3 4 5 6
Figure 34 WIRING SIDE OF P.W.BOARD (6/g)- 34 -

CD-M4000W/CP-M4000
MD01 BRFAN MOTOR
CNS904
CNS903
Jt
+Cf
I0908~---+--- -. 1
+---i--T--IIT---I
8’
I_Bl903
--i-II$
;
i-7- i
I +R949 D913
I
+ +C946 *Fl950+
c952++w
I R943e
I1234 CNS902
,mw,P3, 7-H
7 8 9 10Figure 35 WIRING SIDE OF P.W.BOARD (7/9)
-35-
11 12

$D-M4000W/CP-M4000
/ CD SERVO PWB-C /P32 1-B
FROM DISPLAY PWBP30 4-A
FROM MAIN PWB
CNSlA CNSll
CNS2A CNS:
/ PICKUP UNIT(306) j
l The numbers @ to @ are waveform numbers shown in page 40
CNSBA
CNSBB
1 I 2 I 3 4 I 5 I 6 JFigure 36 WIRING SIDE OF P.W.BOARD (8/9)
- 36 -

CD-M4000W/CP-M4000
TAPE MECHANISM PWB-F
SOLENOID
A M3
jTAPdlJPLAYBACK HEAD
P31 12-FTO MAIN PWB
CD LOADING MOTORPWB-E
SOLENOID
ITAPE2/RECORDIPLAYBACWERASE HEAD
P31 12-DFROM MAIN PWB
7 a 9 10 11 I 12 IFigure 37 WIRING SIDE OF P.W.BOARD (9/9)
-37-

CD-iVi4000W/CP-M4000
VOLTAGE
- 38 -

CD-M4000W/CP-M4000
NOTES ON SCHEMATIC DIAGRAMl Resistor:
To differentiate the units of resistors, such symbol as K andM are used: the symbol K means 1000 ohm and the symbolM means 1000 kohm and the resistor without any symbol isohm-type resistor. Besides, the one with “Fusible” is a fusetype.
. Capacitor:To indicate the unit of capacitor, a symbol P is used: thissymbol P means pica-farad and the unit of the capacitorwithout such a symbol is microfarad. As to electrolyticcapacitor, the expression “capacitance/withstand voltage”is used.(CH), (TH), (RH), (UJ): Temperature compensation(ML): Mylar type(P.P.): Polypropylene type
l Schematic diagram and Wiring Side of P.W.Board for thismodel are subject to change for improvement without priornotice.
9 The indicated voltage in each section is the one measuredby Digital Multimeter between such a section and the chas-sis with no signal given.1. In the tuner section,
indicates AMindicates FM stereo
2. In the main section, a tape is being played back.3. In the deck section, a tape is being played back.
( ) indicates the record state.4. In the power section, a tape is being played back.5. In the CD section, the CD is stopped.
l Parts marked with “A ” ( iI= = 17 ) are important formaintaining the safety of the set. Be sure to replace theseparts with specified ones for maintaining the safety andperformance of the set.
SW734 TUNER ON--m
SW801 VOLTAGE SELECTOR 230-240 V
E C B(9 (G) WV(1) (2) (3)
KTAI 266 GR KTC3203 YKTA1273 Y KRC102 MKTAI 274 Y KRC104 MKTC3194 Y KRCI 07 MKTC3199 GR 2SA1015 GR
2SC1845 F
TYPES OFTRANSISTOR AND LED
BCE(1) (2) (3)KTC2026KIA7810 APKIA7805 AP
FRONTVIEW
I I
4204s RT74204UYT74204UGT731 URT21
- 39 -

CD-M4000W//CP-M4000
WAVEFORMS OF CD CIRCUIT
. ..~...~...,~,IIII.,.l.l....~...I..,.,.,,,,,,.,.,,
$DRF
Q ICl@
Q Cl@
Q ICI@
Q lCl@
Q Cl @
@ ICl @I
@ Cl @
@ ICl @
CH4 : cum” Hold’on : 0.2 ps
40-

CD-M4000W/CP-M4000
TROUBLESHOOTINGWhen the CD does not functionWhen the CD section does not operate when the objective lens of the optical pickup is dirty, this section may not operate. Cleanthe objective lens, and check the playback operation. When this section does not operate even after the above step is taken, checkthe following items.Remove the cabinet and follow the trouble shooting instructions..“Track skipping and/or no TOC (Table Of Contents) may be caused by build up of dust other foreign matter on the laser pickuplens. Before attempting any adjustment make certain that the lens is clean. If not, clean it as mentioned below.”
Turn off the power, and wipe the lens softly using a cleaning paper moistened with commercially available cleaning solution soas not to damage it. Be careful not to touch the lens with bare hands.
Dust gradually accumulates on the objective lens during use, and it may degrade performance. To avoid this problem, use acleaning disc designed for CD optical pickup lenses..
Parts code1. 1 CD optical pickup Lens cleaner disc 1 UDSKA0004AFZZ
1. Using the brush in the cleaner cap, apply 1 or 2 drops of th:e cleaning fluid to thebrush on the CD cleaner disc which has the mark next to it.
2. Place the CD cleaner disc onto the CD disc tray with the brush side down,thenpress the play button.
Cleaning fluid\
3. You will hear music for about 20 seconds and the CD player will automatically stop.If it continuous to turn, press the stop button.
l The CD lens cleaner should be effective for 30-50 operations, however if thebrushes become worn out earlier then please the cleaner disc.
0 If the CD cleaner brushes become very wet then wipe off any excess fluid with a softcloth.
0 Do not drink the cleaner fluid or allow it to come in contact with the eyes. In theevent of this happening then drink and/or rinse with clean water and seek medicaladvice.
0 The CD cleaner disc must not be used on car CD players or on computer CD-ROMdrives.
Cleaner disc
l All rights reserved. Unauthorized duplicating, broadcasting and renting this productis prohibited by law.
When a CD cannot be played1. “E-CD01 ” is displayed.
(1) Check the power to ICI (LC78645E), the presence of the clock signal (33.8688 MHz) and the status of the RESET terminal(pin 66 on ICI).
(2) Does the pickup move to the PICKUP-IN Switch (SW4) position?
If (1) and (2) are OK, check the system microcomputer (especially the communication line with the DSP).
2. Pressing the CD operation key is accepted, but playback does not occur.(1) Focus-HF system check(2) Tracking system check(3) Spin system check(4) PLL system check(5) Others
-4l-

CD-M4000W//CP-M4000
:.(I) ,Focus-HF system.check. ‘,‘. :
Although a CD is inserted and the cover is closed, “NODISC” is displayed.
r-Press the OPEN/CLOSE switch (SWl) without inserting adisc, and try starting the playback operation.
c1. Does the pickup move to the PICKUP-IN Switch (SW4)
oosition ? I-No Sled motor (MZ).
Figure 42-1
2. Does the focus (lens) move up and down ?(Waveform drawing Figure 42-l)
Not-4 Check the focus peripheral circuit.I I
No3. Is the laser lit ? ) Check the laser diode driver Cl peripheral circuit.
4. Is the turntable rotating ?
When a disc is loaded, start playback operation.
No) Spindle motor (Ml).
1. Is focus servo activated ?(Waveform drawing Figure 42-2)
No)
Pins 7-12, 79 and 80 on IClCheck the laser diode driver Cl peripheral circuit.
I Yes
No) Is the disc rotating ?
No---) Check the spin system.
I I I I ,
If the disc is spinning and a HF waveform is generated,DRF will go H.
3. Is the HF waveform normal ? (Waveform drawing If the level is not normal.Figure 42-3)
Figure 42-2 Figure 42-3
-42-

CD-M4000W/CP-M4000
If the waveform shown in Figure 43-1 appears and soon after tNO DISC appears ? Yes
The tracking servo is not activated.Check the peripheral circuits at pins 14, 15 and 20 on IC1, andCNSl A/B.
“Initialization” is possible, but play is not possible ? 11 Yes
-) A normal jump operation cannot be completed or the beginning ofthe track cannot be found.
No Check the around pin 20 on ICl.
v“Initialization” is not possible. I Data cannot be read. Check the VCO-PLL system.
Figure 43-1
Press the OPEN/CLOSE switch without inserting a disc, andthen try starting the play operation.
1. The turntable rotates a little ? (Waveform drawing -- The spin driver circuit is OK.Figure 43-2) Yes
No-- -
2. The turntable doesn’t rotate. Check around pin 22 on ICI, pins 15 and 16 on IC3, and CNSBAIB.
Figure 43-2
- 43 -

CD-iu14000W//CP-M4000
When a disc is loaded, start play operation.I
The HF waveform is normal, but the TOC data cannot beread.
1Check the PDO waveform. (Figure 44-l)
Check around pins 73-78 on ICl.
ix3 0.W”CH4 0.W”
Figure 44-1
The HF waveform is normal and the time is displayednormally, but no sound is produced. Or the soundhas dropouts.
No& There are too many error flags on a damaged disc which
makes error correction impossible.
1. When playing at normal speed.Check the peripheral circuit at pin 39 (DOUT) on ICl andthe waveform (Figure 44-2). 1 Check again using a known good disc.
/ If OK. Check the unit. 1
-44-

CD-M4000W/CP-M4000
FUNCTION TABLE OF ICICl VHiLC78645E-1: CD Servo (LC78645E) (l/2)
For slice level
8 FIN2 Input - B+D signal input terminal.
9 TIN1 Input - E signal input terminal.
IO TIN2 Input - F signal input terminal.
11 VREF output RFVDD/2 VREF voltage output terminal.
12 REFI Input - Reference supply setting terminal.
13’ FE output ZHI FE signal monitor terminal.
14 TEC output -
15% TE output ZHI
1 6 RFMON output ZHI
17 JR-K - -
18 ADAVDD Input -
19 ADAVSS - -
LPF capacitor connection terminal for TE signal.
TE signal monitor terminal.
RF internal signal monitor terminal.
Capacitor connection terminal for jitter detection.
Power terminal for servo A/D, D/A.
Earth terminal for serve A/D. D/A. To be connected to 0 V.
I 20 1 TDO 1 Outout 1 ADAVDD/2 1 Outout terminal for trackina control. D/A output. I
I 21 1 FDO / Output I ADAVDD/2 I Output terminal for focus control. D/A output. II 22 1 SPDO I Output / ADAVDD/2 1 Output terminal for spindle control. D/A output. II 23 1 SLDO 1 Output 1 ADAVDD/2 1 Output terminal for sled control. D/A output. I
24* 1 GPDAC 1 output 1 ADAVDD/2 / Servo D/A general-purpose output terminal.
25
26
27*
CONT4 Input/Output Input Mode General-purpose I/O terminal 4. Controlled by commands from the
CONT.5 Input/Output Input Mode General-purpose I/O terminal 5.microcomputer. When not used, setthem as input terminals and connect
SBCWCONTG Input/Output Input Mode General-purpose I/O terminal 6 or to 0 V, or set them as outputSubcode reading clock input terminal. terminals and leave open.
I SBCK’FG
Subcode reading clock input terminal/FG signal input terminal/external
j not used, connect to O’V.emphases setting termrnal. Terminal functions are set by commands. When
29* 1 DEFECT 1 output L Defect terminal.
/ 30* Iv’*’ / Output / H 1 rough servo, “L”: phase servo.Auto switching monitor output terminal for rough servo phase control. “H”:
31* FSEQ o u t p u t
32’ MONll Outout
L Sync signal detection output terminal.The status changes to “H” when the sync signal detected in EFM and thesync signal of internal generation are identified.
L Internal sianal monitor terminal 1.
33* MONl2
34* MONl335’ MON1436* MONl537 v s s38 VDD39* DOUT40 TEST
output L Internal signal monitor terminal 2.
output L Internal signal monitor terminal 3.
output L Internal signal monitor terminal 4.
output L Internal signal monitor terminal 5.- -* Digital system earth terminal. To be connected to 0 V.
Input - Digital system power terminal.
output L Digital OUT output terminal. (EIAJ format)
lnout L lnout terminal for test. To be connected to 0 V.41 LVDD Input42 LCHO output43 LVSS -
-
LVDDMLeft channel
Power supply for Left channel.
DIA converterLeft channel output.
GND for Left channel. Must be connected to 0 V.
In this unit, the terminal with asterisk mark (*) is (open) terminal which is not connected to the outside.
- 45 -

CD-M4000W//CP-M4000
lC1 1 VHiLC78645E-1: CD Servo (LC78645E) (2/2)
enera purpose lnpuoutput terminal 7. set it as the input terminal and open
1 LDD / Output / ~~ -
In this unit, the terminal with asterisk mark (*) is (open) terminal which is not connected to the outside.
Be sure to supply the same potential to each power terminal. (VVDD, ADAVDD, VDD, LVDD, RVDD, XVDD)Terminal witch is controlled by the power terminal (VDD5V) for a microcomputer interface :CE(61 pin), CL(62 pin), Di(63 pin), DO(64 pin), WRQ(65 pin), RES(66 pin), DRF(67 pin)
-46-

CD-M4000W/CP-M4000
ICl VHiLC78645E-1: CD Servo (LC78645E)
E.2 8F58Ed8
60 79 78 77 76 75 74 73 72
a DATA
3 DATACKEFMIN 3 z? LRSY
RF
RFVDD
RFVSS
FIN1
FIN2
TIN1
TIN2
VREF
REFI
FE
TEC
TE
RFMON
JITTC
ADAVDD
ADAVSS
TDO
LC78645E
CORRECTIONA”DlO CD
Figure 47 BLOCK DIAGRAM OF IC
-47-

CDhIl4000W//CP-M4000
IC7pl RH-iX0460AWZZ: System Microcomputer (llX0460AW) (i/2)
8 j P31 / DRF I Input CD RF level detection.
9 P30 WRQ Input CD DSP write request.
20 P24
21 P23
22 P22
23 P21
24 P20
25 AVSS
26 AN17
CD CE
CE
CLK
DI
DO
AVSS
o/c SW
DISC NO SW
DSA-DATA
output CD DSP CE output.
output CE output.
output Clock output.
output Data output.
Input Data input.- Analog ground.
Input CD open/Close switch.
Input CD disc number switch.
Irlput/Output DS data input.
27
28
29
30
31-33
34
35
AN16 NO USE Input GND.
TUNER SM Input Tuner signal meter input.
DSA-ACK Input/Output DSA acr.
AN15 SPEANA 2 Input Speana data input 16 kHz.
AN14 SPEANA 1 Input Speana data input 1 kHz.
AN13 SPEANA 0 Input Speana data input 63 kHz.
ANl2-AN10 KEY P-KEY 0 Input Key input.
AVDD AVDD Input Analog VDD.
AVREF AVREF lnout Analoa REF voltaae.
36 1 lNTP3 1 P-IN I lnout 1 Power failure detect. I37 PO2 JOG 1 Input JOG volume input 1.
38 PO1 JOG 0 Input JOG volume input 0.
39 INTPO REMOCON Input Remocon input.
40 v s s v s s - Ground voltage.
41 P74 SMUTE output System mute control.
42 P73 T-SOL-B output Tape 2 solenoid control.
43 P72 T-SOL-A output Tape 1 solenoid control.
44 P71 T-MOTOR output Tape motor control.
45 P70 TIMER LED OUtDUt Timer LED control.
46 VDD VDD Input (+) Power supply.
47’ P127 AC RLY-CONT output AC relay control.
48 P126 SP-RLY output Speaker output relay control.
45 P125 SP-DET Input Speaker output detection.
In this unit, the terminal with asterisk mark (*) is (open) terminal which is not connected to the outside.
- 48 -

CD-M4000W/CP-M4000
IC701 RI+iX0460AWZZ: System Microcomputer (IX0460AW) (2/2)
57 j Pl15
58 / P114
MIC SW
/ LCKO
Input 1 Mic switch.
1 Output 1 LED driver Ick.
59 I PI13 1 DISTOUT 1 Output 1 Des t ina t ion ou tpu t . I
60 1 FIP39 t NO USE 1 OUtDUt 1 GND I
61 1 FIP38 I KARAOKE LATCH I Output 1 Karaoke latch. I
I FIP32 I P22 I Output / FL d isp lay dr iver .
68
69
70
P102 DIST2 Input Destination input.
FIP31 P21 output FL display driver.
PlOl DlSTl Input Destination input.
FIP30 P20 output FL display driver.
Pl 00 DISTO lnout Destination input.
I FIP29 I Pl9 I Output I FL displav driver. I71-78 I FIP28-FIP21 / Pl8-PI1 I Output I FL displav driver. I79 VLOAD VLOAD Input FL driver (-) power supp. -30 V
80-89 j FIP20-FIPll 1 PlO-PI I Output I FL display driver.
I gO-100 1 FIPlO-FIPO 1 Gli-Gl I Output I FL display driver. I
In this unit, the terminal with asterisk mark (*) is (open) terminal which is not connected to the outside.
- 49 -

CD;M4000W//CP-M4000
IC6pl VHiLC75341bl: Audio Processor (LC75341)
+- -*iE
LOUT 4-+
’ LBASS 50.1 UF
LTRE
LIN
h :l -F:
I1 ROUT
g RBASSO.luF
g RTRE
g RlN
3 RSELO
CD-M4000W/CP-M4000
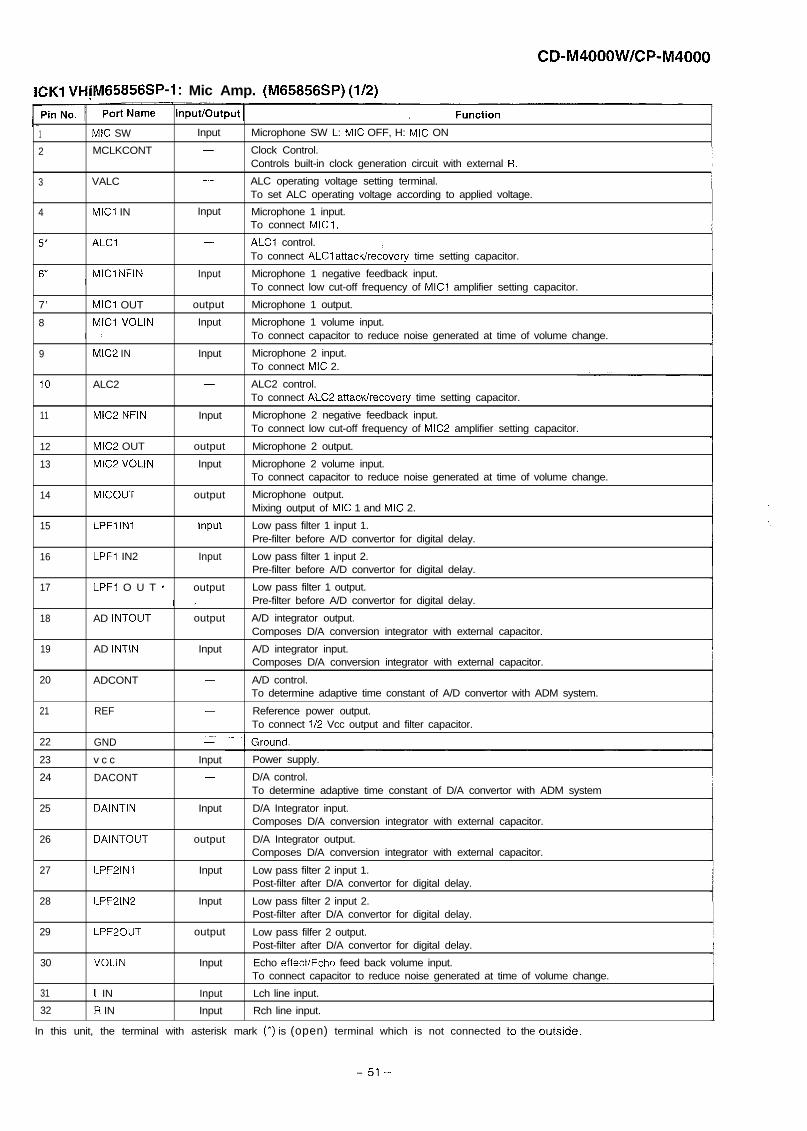
ICKl VHjM65856SF1: Mic Amp. (M65856SP) (l/2)
1 MIC SW Input Microphone SW L: MIC OFF, H: MIC ON
2 MCLKCONT - Clock Control.Controls built-in clock generation circuit with external R.
3 VALC - ALC operating voltage setting terminal.To set ALC operating voltage according to applied voltage.
4 MlCl IN Input Microphone 1 input.To connect MIC 1,
5* ALCl - ALCl control.To connect ALCl attackirecovery time setting capacitor.
6* MlClNFlN Input Microphone 1 negative feedback input.To connect low cut-off frequency of MlCl amplifier setting capacitor.
7’ MlCl OUT output Microphone 1 output.
8 MICI VOLIN Input Microphone 1 volume input.To connect capacitor to reduce noise generated at time of volume change.
9 MIC2 IN Input Microphone 2 input.To connect MIC 2.
IO ALC2 - ALC2 control.To connect ALM attackirecovery time setting capacitor.
11 MIC2 NFIN Input Microphone 2 negative feedback input.To connect low cut-off frequency of MIC2 amplifier setting capacitor.
12 MIC2 OUT output Microphone 2 output.
13 MIC2 VOLIN Input Microphone 2 volume input.To connect capacitor to reduce noise generated at time of volume change.
14 MICOUT output Microphone output.Mixing output of MIC 1 and MIC 2.
15 LPFl IN1 input Low pass filter 1 input 1.Pre-filter before A/D convertor for digital delay.
16 LPFl IN2 Input Low pass filter 1 input 2.Pre-filter before A/D convertor for digital delay.
17 LPFI O U T * output Low pass filter 1 output.Pre-filter before A/D convertor for digital delay.
18 AD INTOUT output A/D integrator output.Composes D/A conversion integrator with external capacitor.
19 AD INTIN Input A/D integrator input.Composes D/A conversion integrator with external capacitor.
20 ADCONT - A/D control.To determine adaptive time constant of A/D convertor with ADM system.
21 REF - Reference power output.To connect l/2 Vcc output and filter capacitor.
22 GND
23 v c c Input Power supply.
24 DACONT - D/A control.To determine adaptive time constant of D/A convertor with ADM system
25 DAINTIN Input D/A Integrator input.Composes D/A conversion integrator with external capacitor.
26 DAINTOUT output D/A Integrator output.Composes D/A conversion integrator with external capacitor.
27 LPF2lNl Input Low pass filter 2 input 1.Post-filter after D/A convertor for digital delay.
28 LPF2lN2 Input Low pass filter 2 input 2.Post-filter after D/A convertor for digital delay.
29 LPF20UT output Low pass filfer 2 output.Post-filter after D/A convertor for digital delay.
30 VOLIN Input Echo effect/Echo feed back volume input.To connect capacitor to reduce noise generated at time of volume change.
31 L IN Input Lch line input.
32 R IN Input Rch line input.
In this unit, the terminal with asterisk mark (*) is (open) terminal which is not connected to the outside.
-5l-

Cd-M4000W//CP-M4000
Et<1 VHiM65856SP-1: Mic Amp. (M65856SP) (2/2)Pin No. Port Name Input/Output Function33+ KEYCONIN Input Monaural input for external KEYCONTROL IC.
Input/Output interface terminal for external KEYCONTROL IC.
34’ SOURCEOUT output Monaural input for external KEYCONTROL IC.Input/Output interface terminal for external KEYCONTROL IC.
3.6 R OUT output Rch mixing output.
36 L OUT output Lch mixing output.
37 VCF IL - Vocal cut filter.Processes frequencies lower then the vocal band.
38* PSI Input Phase shift input 1.Determines a constant at time of phase shift.
39’ PS2 Input Phase shift input 2.Determines a constant at time of phase shift.
40 LATCH Input Latch input via serial bus.
41 ’ CLOCK input Clock input via serial bus.
42 DATA input Data input via serial bus.
In this unit, the terminal with asterisk mark (*) is (open) terminal which is not connected to the outside.
p-COM I/F
It
ECHO ECHO
- MAIN LOGIC
Figure 52 BLOCK DIAGRAM OF IC
- 52 -

CD-M4000W/CP-M4000
FL DISPLAYFL701 VVKBJll LM02Ti : FL Display
11G IOG 6’ Sl Si Sl , gf(
d q

CD-M4000W/CP-M4000
S H A R PCOPYRIGHT @ 2001 BY SHARP CORPORATION
ALL RIGHTS RESERVED.
No part of this publication may be reproduced,stored in a retrieval system, or transmitted inany form or by any means, electronic, mechanical,photocopying, recording, or otherwise, withoutprior written permission of the publisher.
SHARP CORPORATIONAV Systems GroupAudio Systems DivisionHigashihiroshima, Hiroshima 739-0192, Jaw
Printed in Japa,L
A01 09-l 463DSeHAeM
SA*St*EX