CCCCommand oommmmaanndd ommand LLLLine iinnee ine ... · key. A command-line interpreter then...
14
Command Line Interface GWR Series Router 1 C C Command ommand ommand ommand L L Line ine ine ine I I Interface nterface nterface nterface Documentation Documentation Documentation Documentation CLI (command line interface) is a user text-only interface to a computer's operating system or an application in which the user responds to a visual prompt by typing in a command on a specified line and then receives a response back from the system. In other words, it is a method of instructing a computer to perform a given task by "entering" a command. The system waits for the user to conclude the submitting of the text command by pressing the "Enter" or "Return" key. A command-line interpreter then receives, parses, and executes the requested user command. On router's Web interface, in Management menu, click on Command Line Interface tab to open the Command Line Interface settings screen. Use this screen to configure CLI parameters (Figure 1). Figure 1 – Command Line Interface www.4Gon.co.uk [email protected] Tel: +44 (0)1245 808295 Fax: +44 (0)1245 808299
Transcript of CCCCommand oommmmaanndd ommand LLLLine iinnee ine ... · key. A command-line interpreter then...
Command Line Interface GWR Series Router
1
CCCCommand ommand ommand ommand LLLLine ine ine ine IIIInterfacenterfacenterfacenterface DocumentationDocumentationDocumentationDocumentation
CLI (command line interface) is a user text-only interface to a computer's operating system or an
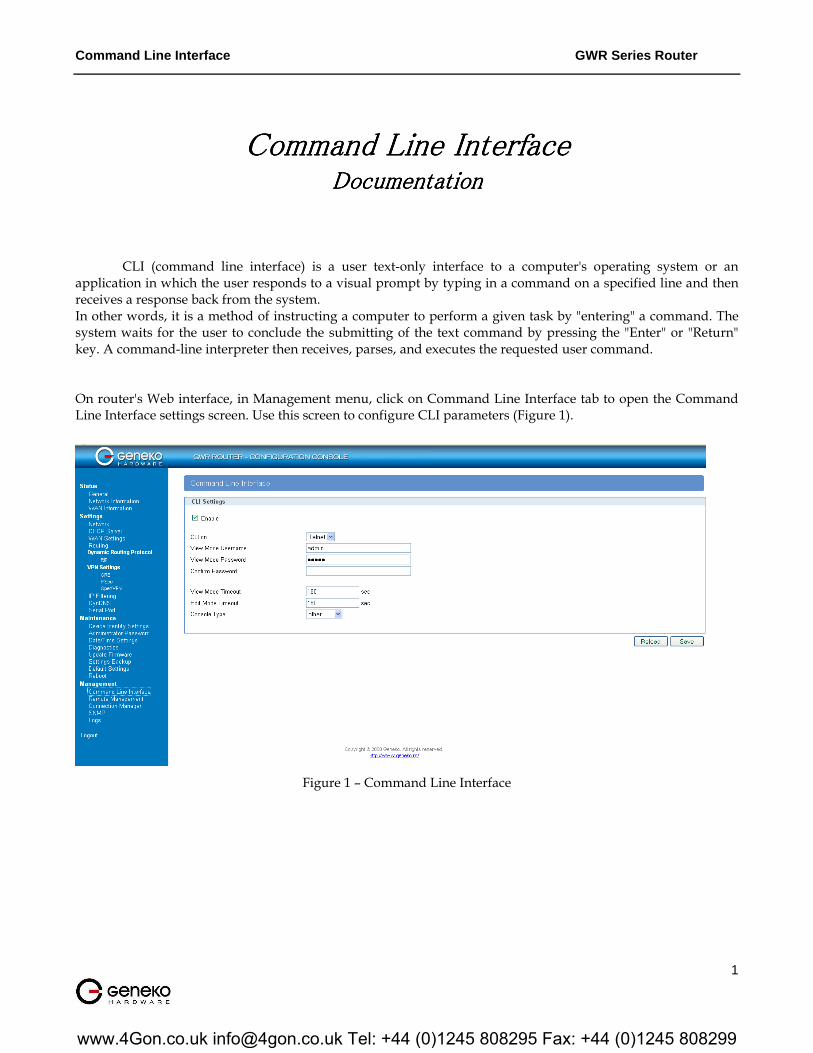
application in which the user responds to a visual prompt by typing in a command on a specified line and then receives a response back from the system. In other words, it is a method of instructing a computer to perform a given task by "entering" a command. The system waits for the user to conclude the submitting of the text command by pressing the "Enter" or "Return" key. A command-line interpreter then receives, parses, and executes the requested user command. On router's Web interface, in Management menu, click on Command Line Interface tab to open the Command Line Interface settings screen. Use this screen to configure CLI parameters (Figure 1).
Figure 1 – Command Line Interface
www.4Gon.co.uk [email protected] Tel: +44 (0)1245 808295 Fax: +44 (0)1245 808299
Command Line Interface GWR Series Router
2
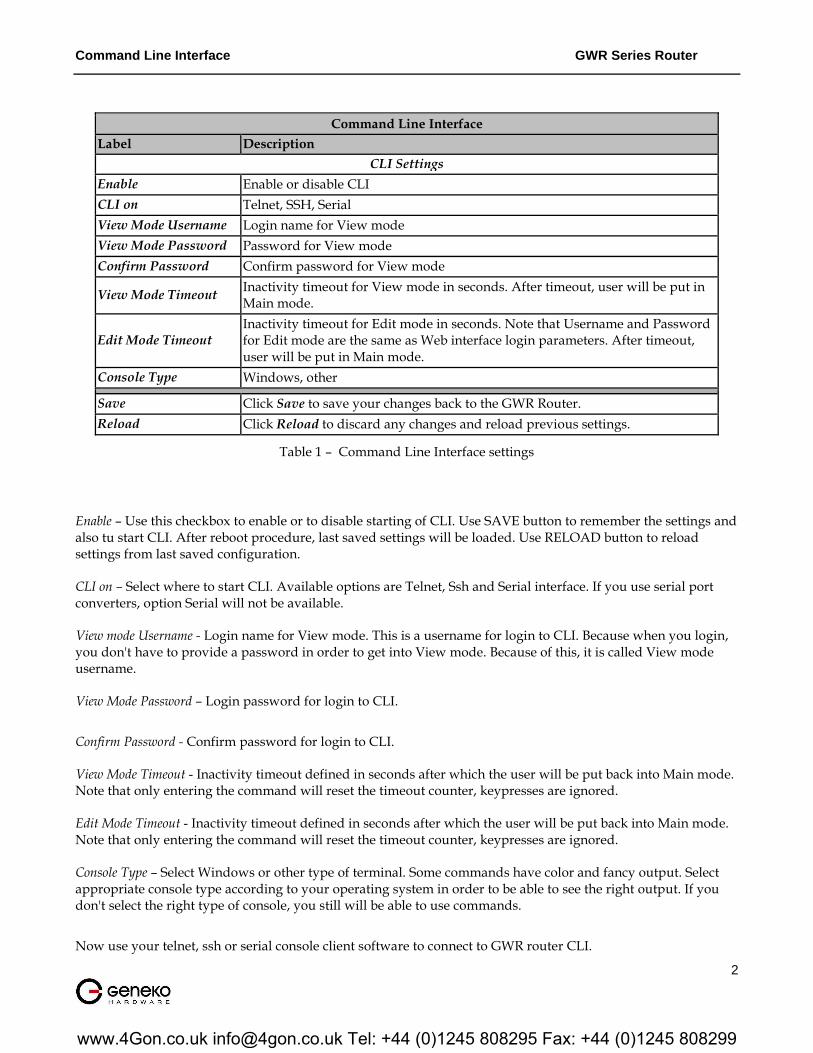
Command Line Interface
Label Description
CLI Settings
Enable Enable or disable CLI
CLI on Telnet, SSH, Serial
View Mode Username Login name for View mode
View Mode Password Password for View mode
Confirm Password Confirm password for View mode
View Mode Timeout Inactivity timeout for View mode in seconds. After timeout, user will be put in Main mode.
Edit Mode Timeout Inactivity timeout for Edit mode in seconds. Note that Username and Password for Edit mode are the same as Web interface login parameters. After timeout, user will be put in Main mode.
Console Type Windows, other
Save Click Save to save your changes back to the GWR Router.
Reload Click Reload to discard any changes and reload previous settings.
Table 1 – Command Line Interface settings
Enable – Use this checkbox to enable or to disable starting of CLI. Use SAVE button to remember the settings and also tu start CLI. After reboot procedure, last saved settings will be loaded. Use RELOAD button to reload settings from last saved configuration.
CLI on – Select where to start CLI. Available options are Telnet, Ssh and Serial interface. If you use serial port converters, option Serial will not be available.
View mode Username - Login name for View mode. This is a username for login to CLI. Because when you login, you don't have to provide a password in order to get into View mode. Because of this, it is called View mode username.
View Mode Password – Login password for login to CLI.
Confirm Password - Confirm password for login to CLI. View Mode Timeout - Inactivity timeout defined in seconds after which the user will be put back into Main mode. Note that only entering the command will reset the timeout counter, keypresses are ignored. Edit Mode Timeout - Inactivity timeout defined in seconds after which the user will be put back into Main mode. Note that only entering the command will reset the timeout counter, keypresses are ignored. Console Type – Select Windows or other type of terminal. Some commands have color and fancy output. Select appropriate console type according to your operating system in order to be able to see the right output. If you don't select the right type of console, you still will be able to use commands.
Now use your telnet, ssh or serial console client software to connect to GWR router CLI.
www.4Gon.co.uk [email protected] Tel: +44 (0)1245 808295 Fax: +44 (0)1245 808299
Command Line Interface GWR Series Router
3
If it is successfully started, you will see CLI the following prompt:
GWR252 login:
At this point you need to enter username and password defined on Web interface in CLI Settings page – text fields View mode username and View mode password.
Default parameters for CLI login are username: admin, password: admin.
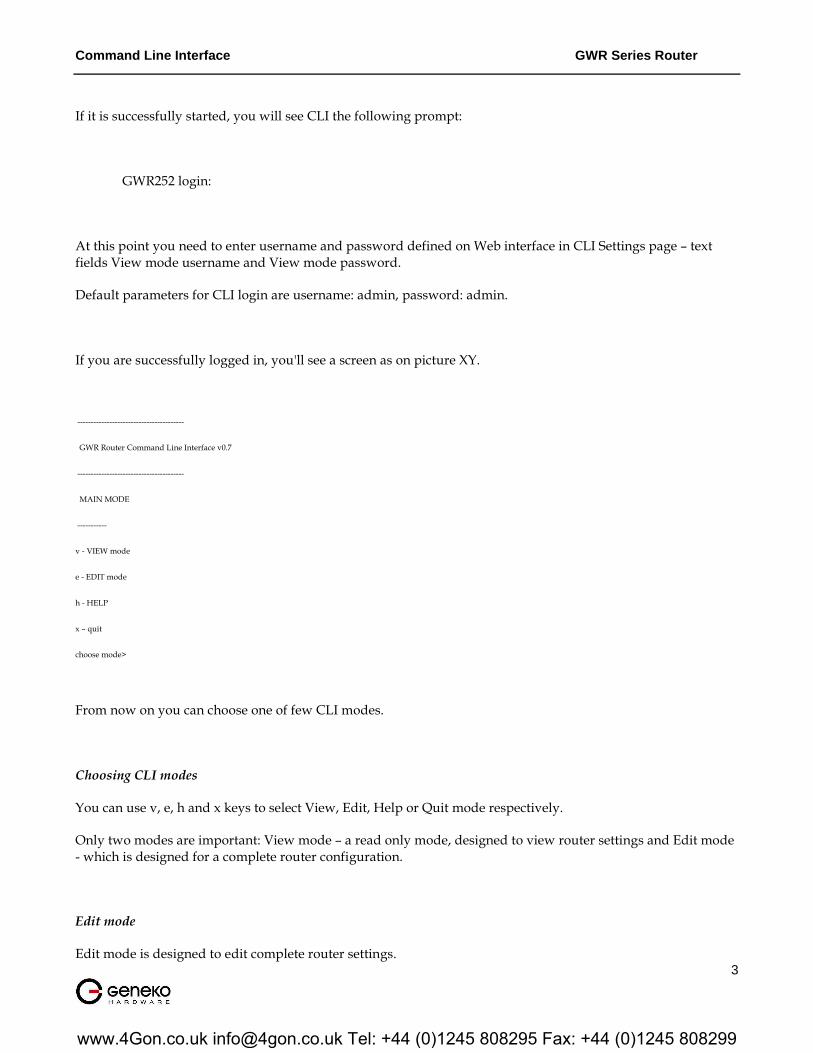
If you are successfully logged in, you'll see a screen as on picture XY.
----------------------------------------
GWR Router Command Line Interface v0.7
----------------------------------------
MAIN MODE
-----------
v - VIEW mode
e - EDIT mode
h - HELP
x – quit
choose mode>
From now on you can choose one of few CLI modes.
Choosing CLI modes
You can use v, e, h and x keys to select View, Edit, Help or Quit mode respectively.
Only two modes are important: View mode – a read only mode, designed to view router settings and Edit mode - which is designed for a complete router configuration.
Edit mode
Edit mode is designed to edit complete router settings.
www.4Gon.co.uk [email protected] Tel: +44 (0)1245 808295 Fax: +44 (0)1245 808299

Command Line Interface GWR Series Router
4
You must enter correct username and password which are the same parameters as for the Web interface.
Once you are logged in, you can press TAB key twice to display available commands specific only for this mode.
Also, you can use this key to complete command names.
After a defined period of seconds of inactivity (command not entered), session will automaticaly exit from current mode. It is very important for this mode that a valid timeout is defined, because only one session at the same time is allowed.
For security reasons and in order to preserve router configuration integrity, one Edit mode can be started at the same time. Also Edit mode is not available if the user is already logged in on Web interface.
Enter x key to quit from this mode and to return to Main mode.
View mode
View mode is designed only for informational purposes and parameters can't be changed in this mode.
You don't need to enter username and password for this mode because it is a read only mode.
You can press TAB key twice to display available commands specific only for this mode. Also, you can use this key to complete command names.
After a defined period of seconds of inactivity (command not entered), session will automaticaly exit from current mode.
View mode can be started more than once at the same time.
Enter x key to quit from this mode and to return to Main mode.
Help mode
Help mode gives you a brief description how CLI works and also a short description of each command specific for previously choosed mode.
Press x key to quit from this mode and to return to Main mode.
EDIT MODE To enter Edit mode you need to type password for this mode. Password can be configured on the Web interface CLI tab. Once when is entered in Edit mode, password can be changed with command: passwd-edit-mode
www.4Gon.co.uk [email protected] Tel: +44 (0)1245 808295 Fax: +44 (0)1245 808299

Command Line Interface GWR Series Router
5
In Edit mode are available all 64 commandes of CLI interface. When tab key is pressed twice the list of the commands in alphabetical order is displayed. IPSEC commands
ipsec-start – Starts all configured IPSec tunnels ipsec-stop - Stops all configured IPSec tunnels ipsec-restart – Restarts all configured IPSec tunnels ipsec-routes – Dispalys IP routes used by the IPSec tunnel ipsec-sa-status - Lists ISAKMP and IPSec Security Associations information ipsec-sa-status-detail - Lists detailed ISAKMP and IPSec Security Associations information, including interfaces, IKE and ESP algorithms ipsec-status - View of the status of each tunnel and its mode of connection Options: -h, --help print this help message -v, --version print program version -i, --ipsec display IPSec status -t, --tunnel IPSec tunnel number -m, --mode display tunnel mode Example: ipsec_status -i display IPSec status ipsec_status -t 1 display IPSec tunnel 1 status ipsec_status -t 1 -m display IPSec tunnel 1 mode ipsec-mode – Configures mode of the IPSec tunnel and list the status for each tunnel Options: -h, --help print this help message -v, --version print program version -t, --tunnel tunnel number -c, --connect connnect mode -w, --wait wait mode -l, --list display tunnel mode Example: ipsec_mode -t 1 -c tunnel 1 connect mode ipsec_mode -t 2 -w tunnel 2 wait mode ipsec_mode -t 3 -l display tunnel 3 mode ipsec-settings – Command for configuration of IPSec tunnel Options:
www.4Gon.co.uk [email protected] Tel: +44 (0)1245 808295 Fax: +44 (0)1245 808299
Command Line Interface GWR Series Router
6
-t --tunnel IPSec tunnel selection(valid value 1-5) -c --configure Configure IPSec parameters -d --delete Delete IPSec parameters -l --list Display IPSec parameters -h --help Print this help information Example: ipsec_settings -t 1 –l tunnel 1 list of parameters ipsec_settings -t 2 –c tunnel 2 configuration mode ipsec_settings -t 3 –d tunnel 3 delete When command configure is entered configuration dialog is started. Example for configuration dialog for IPSec tunnel number 3: edit-mode>ipsec-settings -t 3 -c ================================================================= Tunnel Number [3]:> Tunnel Name []:>test Tunnel Enable [], --> (true / false):>true ================================================================= Local Security Gateway Type [], --> (0-IP Only, 1-SIM Card):>0 Gateway Type IP Address []:>1.1.1.1 Gateway Type Custom Peer ID Enable [], --> (true / false):>false Local Security Group Type [], --> (0-IP, 1-Subnet):>0 Group Type IP Address []:>1.1.1.1 ================================================================= Remote Security Gateway Type [], --> (0-IP Only):>0 Gateway Type IP Address []:>2.2.2.2 Gateway Type Custom Peer ID Enable [], --> (true / false):>false Remote Security Group Type [], --> (0-IP, 1-Subnet):>0 Group Type IP Address []:> Group Type IP Address []:>2.2.2.2 ================================================================= Keying Mode [], --> (0-IKE with preshared key):>0 Phase 1 DH Group [], --> (1-Group2, 2-Group5):>1 Phase 1 Encryption [], --> (0-3des, 1-aes-128, 2-serpent, 3-blowfish):>0 Phase 1 Authentication [], --> (0-md5, 1-sha):>0 Phase 1 SA Life Time [sec], --> (1 - 86400):>86400 Phase 1 Perfect Forward Secrecy [], --> (true / false):>false Phase 2 Encryption [], --> (0-null, 1-des, 2-3des, 3-aes-128, 4-blowfish, 5-serpent):>0 Phase 2 Authentication [], --> (0-null, 1-md5, 2-sha):>0 Phase 2 SA Life Time [sec], --> (3600 - 86400):>3600 Preshared Key []:>ABCDE ================================================================= Enable Failover [], --> (true / false):>true Ping IP []:>1.1.1.1 Ping Interval [sec], --> (30 - 3600):>30 Packet Size [], --> (32 - 1300):>32 Advanced Ping Interval [sec], --> (1 - 60):>30 Advanced Ping Wait For A Response [sec], --> (1 - 60):>1 Maximum Number Of Failed Packets [%], --> (0 - 100):>40 Enable IKE Failover [], --> (true / false):>true
www.4Gon.co.uk [email protected] Tel: +44 (0)1245 808295 Fax: +44 (0)1245 808299
Command Line Interface GWR Series Router
7
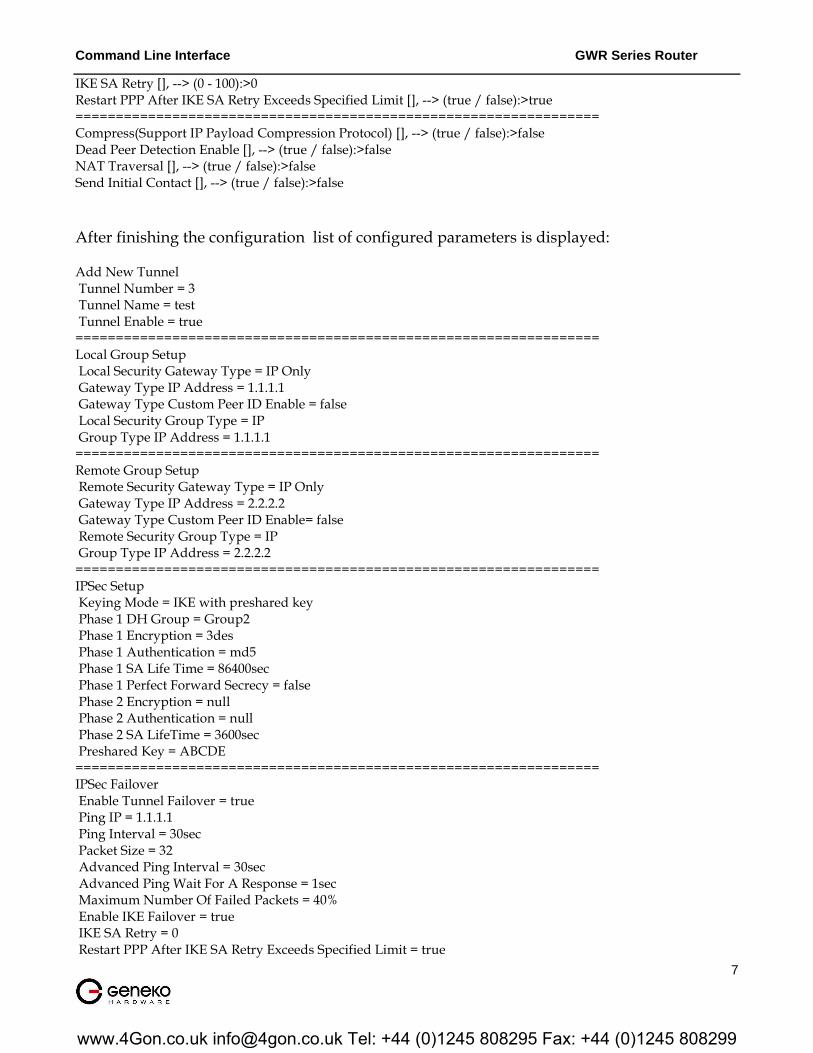
IKE SA Retry [], --> (0 - 100):>0 Restart PPP After IKE SA Retry Exceeds Specified Limit [], --> (true / false):>true ================================================================= Compress(Support IP Payload Compression Protocol) [], --> (true / false):>false Dead Peer Detection Enable [], --> (true / false):>false NAT Traversal [], --> (true / false):>false Send Initial Contact [], --> (true / false):>false
After finishing the configuration list of configured parameters is displayed: Add New Tunnel Tunnel Number = 3 Tunnel Name = test Tunnel Enable = true ================================================================= Local Group Setup Local Security Gateway Type = IP Only Gateway Type IP Address = 1.1.1.1 Gateway Type Custom Peer ID Enable = false Local Security Group Type = IP Group Type IP Address = 1.1.1.1 ================================================================= Remote Group Setup Remote Security Gateway Type = IP Only Gateway Type IP Address = 2.2.2.2 Gateway Type Custom Peer ID Enable= false Remote Security Group Type = IP Group Type IP Address = 2.2.2.2 ================================================================= IPSec Setup Keying Mode = IKE with preshared key Phase 1 DH Group = Group2 Phase 1 Encryption = 3des Phase 1 Authentication = md5 Phase 1 SA Life Time = 86400sec Phase 1 Perfect Forward Secrecy = false Phase 2 Encryption = null Phase 2 Authentication = null Phase 2 SA LifeTime = 3600sec Preshared Key = ABCDE ================================================================= IPSec Failover Enable Tunnel Failover = true Ping IP = 1.1.1.1 Ping Interval = 30sec Packet Size = 32 Advanced Ping Interval = 30sec Advanced Ping Wait For A Response = 1sec Maximum Number Of Failed Packets = 40% Enable IKE Failover = true IKE SA Retry = 0 Restart PPP After IKE SA Retry Exceeds Specified Limit = true
www.4Gon.co.uk [email protected] Tel: +44 (0)1245 808295 Fax: +44 (0)1245 808299
Command Line Interface GWR Series Router
8
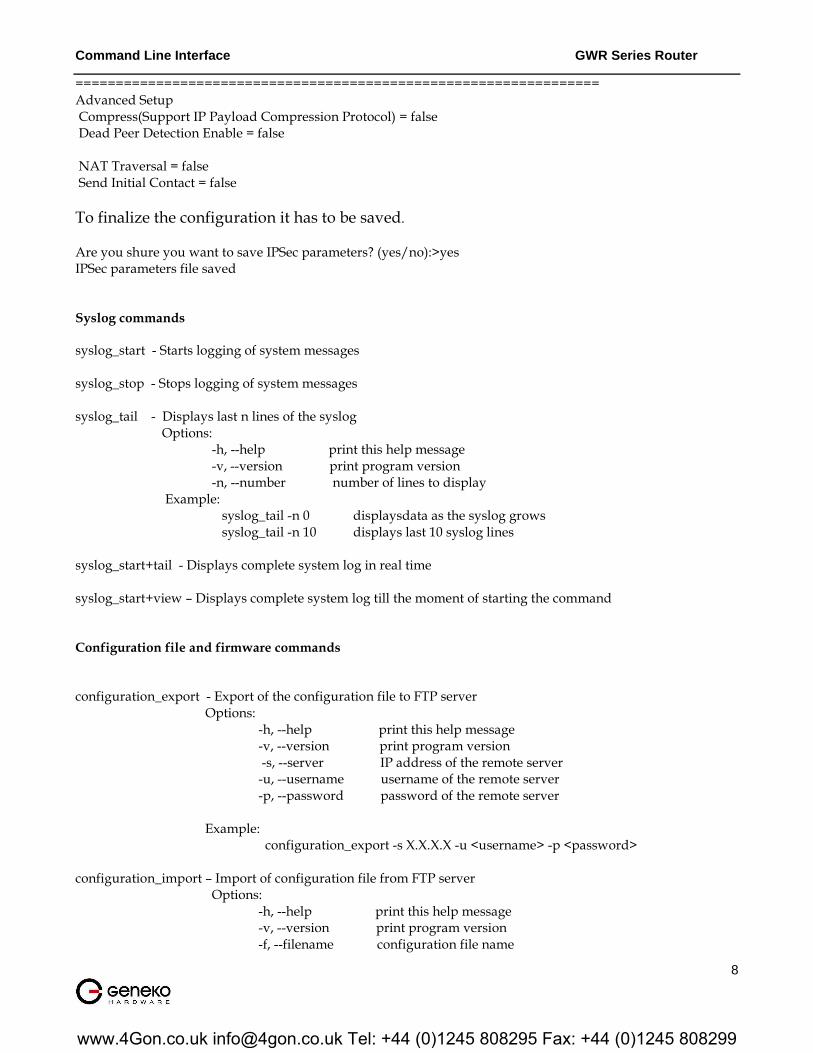
================================================================= Advanced Setup Compress(Support IP Payload Compression Protocol) = false Dead Peer Detection Enable = false NAT Traversal = false Send Initial Contact = false
To finalize the configuration it has to be saved.
Are you shure you want to save IPSec parameters? (yes/no):>yes IPSec parameters file saved Syslog commands
syslog_start - Starts logging of system messages syslog_stop - Stops logging of system messages syslog_tail - Displays last n lines of the syslog Options: -h, --help print this help message -v, --version print program version -n, --number number of lines to display Example: syslog_tail -n 0 displaysdata as the syslog grows syslog_tail -n 10 displays last 10 syslog lines syslog_start+tail - Displays complete system log in real time syslog_start+view – Displays complete system log till the moment of starting the command Configuration file and firmware commands
configuration_export - Export of the configuration file to FTP server Options: -h, --help print this help message -v, --version print program version -s, --server IP address of the remote server -u, --username username of the remote server -p, --password password of the remote server Example: configuration_export -s X.X.X.X -u <username> -p <password> configuration_import – Import of configuration file from FTP server Options: -h, --help print this help message -v, --version print program version -f, --filename configuration file name
www.4Gon.co.uk [email protected] Tel: +44 (0)1245 808295 Fax: +44 (0)1245 808299
Command Line Interface GWR Series Router
9
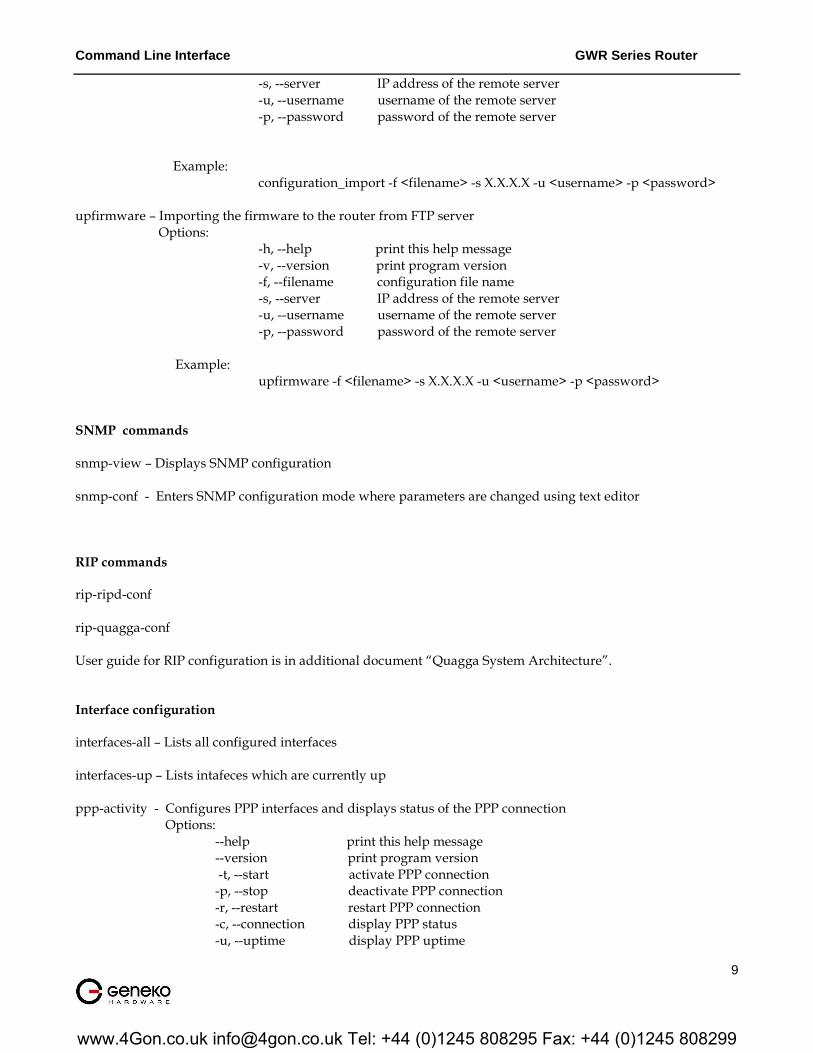
-s, --server IP address of the remote server -u, --username username of the remote server -p, --password password of the remote server Example: configuration_import -f <filename> -s X.X.X.X -u <username> -p <password> upfirmware – Importing the firmware to the router from FTP server Options: -h, --help print this help message -v, --version print program version -f, --filename configuration file name -s, --server IP address of the remote server -u, --username username of the remote server -p, --password password of the remote server Example: upfirmware -f <filename> -s X.X.X.X -u <username> -p <password> SNMP commands
snmp-view – Displays SNMP configuration snmp-conf - Enters SNMP configuration mode where parameters are changed using text editor RIP commands rip-ripd-conf rip-quagga-conf User guide for RIP configuration is in additional document “Quagga System Architecture”. Interface configuration interfaces-all – Lists all configured interfaces interfaces-up – Lists intafeces which are currently up ppp-activity - Configures PPP interfaces and displays status of the PPP connection Options: --help print this help message --version print program version -t, --start activate PPP connection -p, --stop deactivate PPP connection -r, --restart restart PPP connection -c, --connection display PPP status -u, --uptime display PPP uptime
www.4Gon.co.uk [email protected] Tel: +44 (0)1245 808295 Fax: +44 (0)1245 808299
Command Line Interface GWR Series Router
10
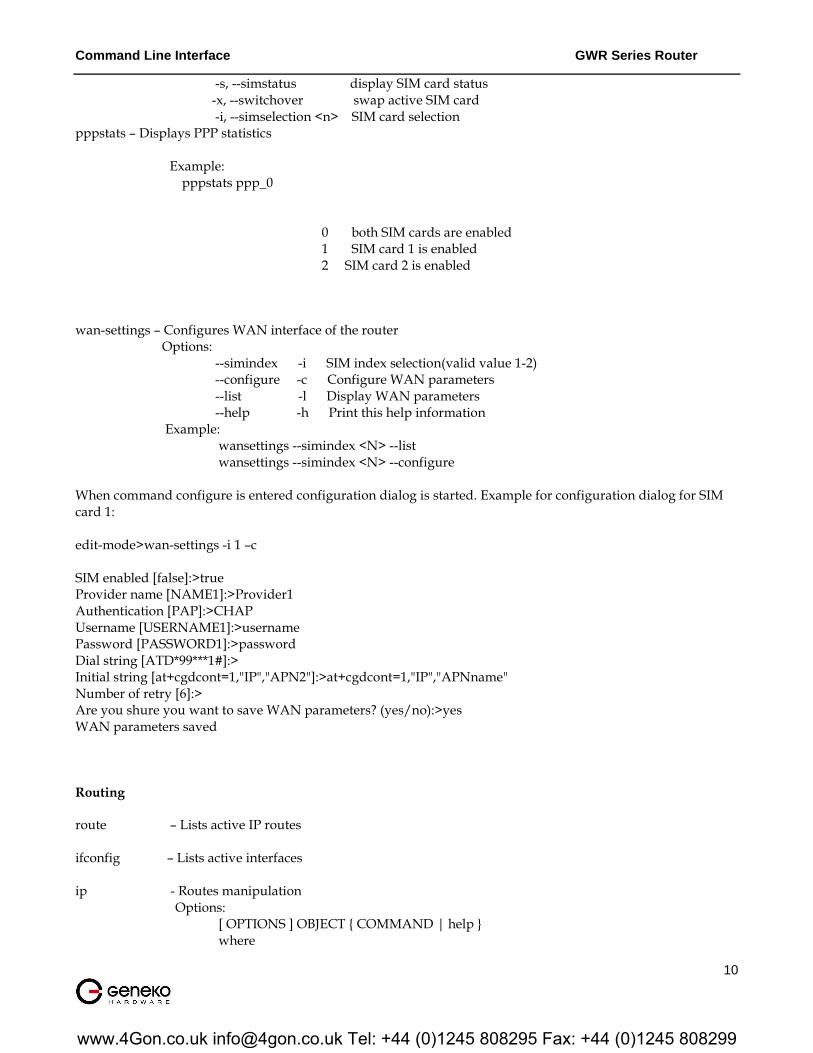
-s, --simstatus display SIM card status -x, --switchover swap active SIM card -i, --simselection <n> SIM card selection pppstats – Displays PPP statistics
Example: pppstats ppp_0 0 both SIM cards are enabled 1 SIM card 1 is enabled 2 SIM card 2 is enabled
wan-settings – Configures WAN interface of the router Options: --simindex -i SIM index selection(valid value 1-2) --configure -c Configure WAN parameters --list -l Display WAN parameters --help -h Print this help information Example: wansettings --simindex <N> --list wansettings --simindex <N> --configure When command configure is entered configuration dialog is started. Example for configuration dialog for SIM card 1: edit-mode>wan-settings -i 1 –c SIM enabled [false]:>true Provider name [NAME1]:>Provider1 Authentication [PAP]:>CHAP Username [USERNAME1]:>username Password [PASSWORD1]:>password Dial string [ATD*99***1#]:> Initial string [at+cgdcont=1,"IP","APN2"]:>at+cgdcont=1,"IP","APNname" Number of retry [6]:> Are you shure you want to save WAN parameters? (yes/no):>yes WAN parameters saved Routing route – Lists active IP routes ifconfig – Lists active interfaces ip - Routes manipulation Options: [ OPTIONS ] OBJECT { COMMAND | help } where
www.4Gon.co.uk [email protected] Tel: +44 (0)1245 808295 Fax: +44 (0)1245 808299

Command Line Interface GWR Series Router
11
OBJECT := { link | addr | route | tunnel } OPTIONS := { -f[amily] { inet | inet6 | link } | -o[neline] } Example: ip [ OPTIONS ] { address | link | route | tunnel } { COMMAND | help } iptables-view – Displays iptables file iptables – Configures routes Commands: --append -A chain Append to chain --delete -D chain Delete matching rule from chain --delete -D chain rulenum Delete rule rulenum (1 = first) from chain --insert -I chain [rulenum] Insert in chain as rulenum (default 1=first) --replace -R chain rulenum Replace rule rulenum (1 = first) in chain --list -L [chain] List the rules in a chain or all chains --flush -F [chain] Delete all rules in chain or all chains --zero -Z [chain] Zero counters in chain or all chains --new -N chain Create a new user-defined chain --delete-chain -X [chain] Delete a user-defined chain --policy -P chain target Change policy on chain to target --rename-chain -E old-chain new-chain Change chain name, (moving any references) Options: --proto -p [!] proto protocol: by number or name, eg. `tcp' --source -s [!] address[/mask] source specification --destination -d [!] address[/mask] destination specification --in-interface -i [!] input name[+] network interface name ([+] for wildcard) --jump -j target target for rule (may load target extension) --match -m match extended match (may load extension) --numeric -n numeric output of addresses and ports --out-interface -o [!] output name[+] network interface name ([+] for wildcard) --table -t table table to manipulate (default: `filter') --verbose -v verbose mode --line-numbers print line numbers when listing --exact -x expand numbers (display exact values) [!] --fragment -f match second or further fragments only --modprobe=<command> try to insert modules using this command --set-counters PKTS BYTES set the counter during insert/append [!] --version -V print package version. Example: iptables -[AD] chain rule-specification [options] iptables -[RI] chain rulenum rule-specification [options] iptables -D chain rulenum [options] iptables -[LFZ] [chain] [options] iptables -[NX] chain iptables -E old-chain-name new-chain-name iptables -P chain target [options] iptables -h (print this help information) netstat – Lists active network connections
www.4Gon.co.uk [email protected] Tel: +44 (0)1245 808295 Fax: +44 (0)1245 808299
Command Line Interface GWR Series Router
12
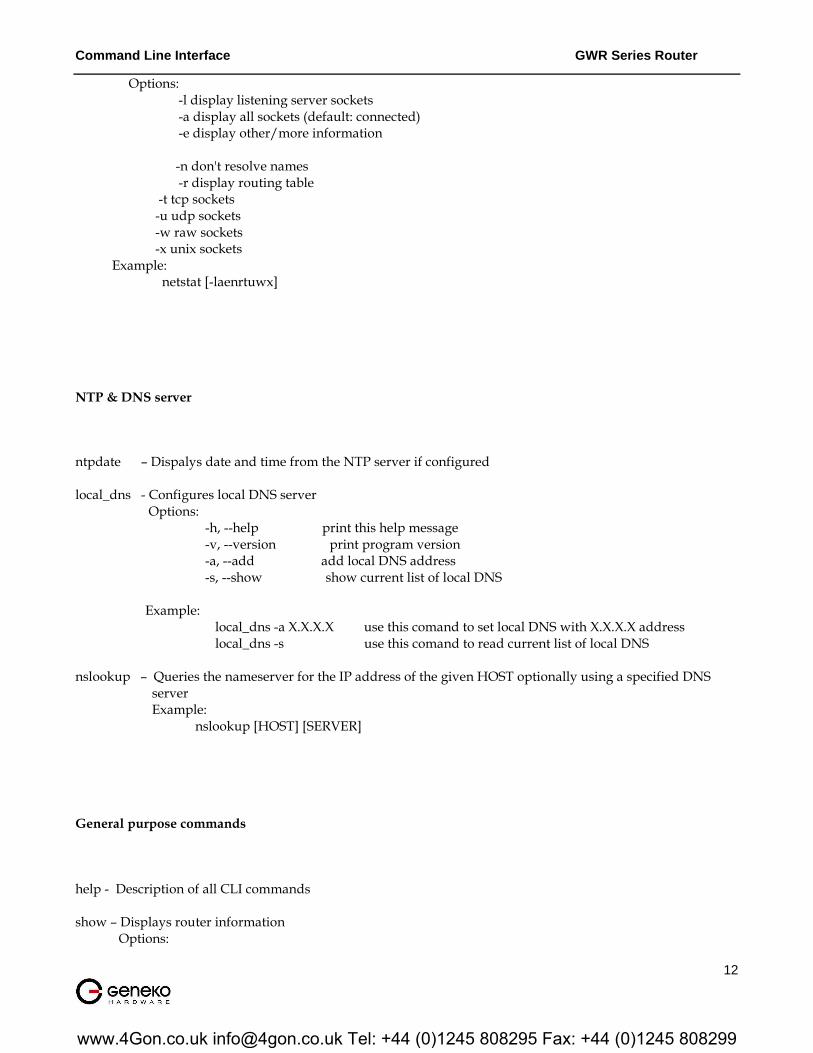
Options: -l display listening server sockets -a display all sockets (default: connected) -e display other/more information
-n don't resolve names -r display routing table -t tcp sockets -u udp sockets -w raw sockets -x unix sockets Example: netstat [-laenrtuwx] NTP & DNS server
ntpdate – Dispalys date and time from the NTP server if configured local_dns - Configures local DNS server Options: -h, --help print this help message -v, --version print program version -a, --add add local DNS address -s, --show show current list of local DNS Example: local_dns -a X.X.X.X use this comand to set local DNS with X.X.X.X address local_dns -s use this comand to read current list of local DNS nslookup – Queries the nameserver for the IP address of the given HOST optionally using a specified DNS server Example: nslookup [HOST] [SERVER] General purpose commands help - Description of all CLI commands show – Displays router information Options:
www.4Gon.co.uk [email protected] Tel: +44 (0)1245 808295 Fax: +44 (0)1245 808299
Command Line Interface GWR Series Router
13
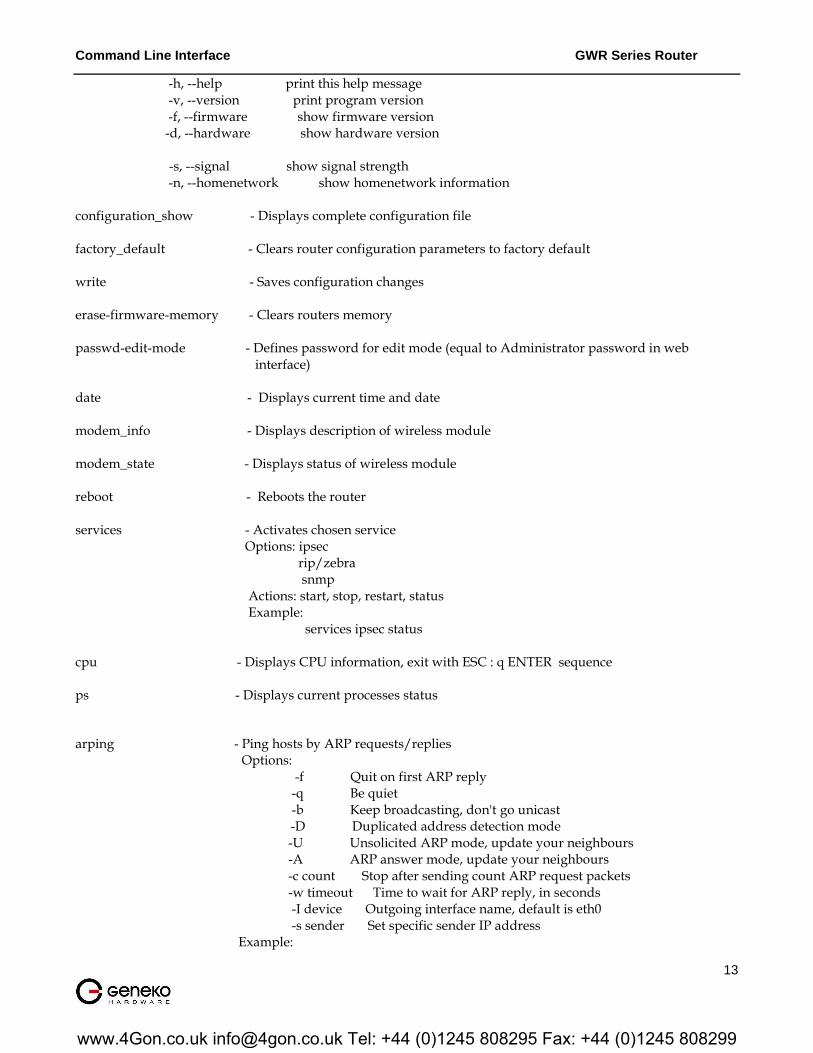
-h, --help print this help message -v, --version print program version -f, --firmware show firmware version -d, --hardware show hardware version -s, --signal show signal strength -n, --homenetwork show homenetwork information configuration_show - Displays complete configuration file factory_default - Clears router configuration parameters to factory default write - Saves configuration changes erase-firmware-memory - Clears routers memory passwd-edit-mode - Defines password for edit mode (equal to Administrator password in web interface) date - Displays current time and date modem_info - Displays description of wireless module modem_state - Displays status of wireless module reboot - Reboots the router services - Activates chosen service Options: ipsec rip/zebra snmp Actions: start, stop, restart, status Example: services ipsec status cpu - Displays CPU information, exit with ESC : q ENTER sequence ps - Displays current processes status
arping - Ping hosts by ARP requests/replies Options: -f Quit on first ARP reply -q Be quiet -b Keep broadcasting, don't go unicast -D Duplicated address detection mode -U Unsolicited ARP mode, update your neighbours -A ARP answer mode, update your neighbours -c count Stop after sending count ARP request packets -w timeout Time to wait for ARP reply, in seconds -I device Outgoing interface name, default is eth0 -s sender Set specific sender IP address Example:
www.4Gon.co.uk [email protected] Tel: +44 (0)1245 808295 Fax: +44 (0)1245 808299

Command Line Interface GWR Series Router
14
arping [-fqbDUA] [-c count] [-w timeout] [-I device] [-s sender] target dmesg - Displays kernel messages ipcalc – Calculate IP network settings from a IP address Options: -b --broadcast Display calculated broadcast address -n --network Display calculated network address -m --netmask Display default netmask for IP -p --prefix Display the prefix for IP/NETMASK -h --hostname Display first resolved host name -s --silent Don't ever display error messages Example: ipcalc [OPTION]... <ADDRESS>[[/]<NETMASK>] [NETMASK] killall – Send a signal (default is SIGTERM) to the specified process(es) Options: -l List all signal names and numbers -q Do not complain if no processes were killed Example: killall [-q] [-signal] process-name [process-name ...] uptime – Displays system uptime cal – Displays current month clear – Clear current CLI page free – Displays memory status hwclock - Shows system clock pidof – Processes ID traceroute – Shows IP addresses of every hop to destination IP asddress df - Partition availability ping - Checks availability of IP address
ping_extended – General use ping command
x - Exit
www.4Gon.co.uk [email protected] Tel: +44 (0)1245 808295 Fax: +44 (0)1245 808299


![ESC/POS Command Manual - Support Technique AURES ESCPOS.pdf · ESC/POS Command Manual 3 Command Descriptions Command Notation [Name] The name of the control command. [Format] The](https://static.fdocuments.in/doc/165x107/5a9d989d7f8b9a21688cc662/escpos-command-manual-support-technique-escpospdfescpos-command-manual-3-command.jpg)