Ccboot
52
CCBoot Diskless Boot WinXP/Win2003/Vista/Win7/Win2008 with iSCSI www.ccboot.com User Manual 2010.01
-
Upload
tuan-phan-anh -
Category
Documents
-
view
460 -
download
7
Transcript of Ccboot

CCBoot Diskless Boot WinXP/Win2003/Vista/Win7/Win2008
with iSCSI
www.ccboot.com
User Manual
2010.01

1 Content
1 Content ...................................................................................................................................... 2
2 Introduction ............................................................................................................................... 3
3 Features ..................................................................................................................................... 4
4 System Requirements ................................................................................................................ 5
5 Quick Start ................................................................................................................................ 6
5.1 Install and Configure CCBoot Server ....................................................................... 6
5.2 Create Boot Image for Win XP and 2003 ................................................................ 13
5.3 Create Boot Image for Vista, Win7 and 2008.......................................................... 19
5.4 Diskless Boot Client ................................................................................................ 22
6 Server Settings ........................................................................................................................ 26
6.1 Menu ....................................................................................................................... 26
6.2 Server Settings ........................................................................................................ 27
6.2.1 DHCP Settings ................................................................................................ 27
6.2.2 Client Default Settings .................................................................................... 28
6.2.3 Cache Settings ................................................................................................. 30
6.2.4 Other Settings .................................................................................................. 31
6.3 Properties of CCBoot Client ................................................................................... 33
7 Game Disk Settings ................................................................................................................. 36
8 CCBoot Client Installation ...................................................................................................... 38
9 Cache Settings ......................................................................................................................... 40
10 Super Client..................................................................................................................... 41
11 Update Image .................................................................................................................. 43
12 Update Game Disk .......................................................................................................... 44
13 Load balance and redundancy ......................................................................................... 45
14 PnP Different Devices ..................................................................................................... 48
15 nForce Chip NIC Solution .............................................................................................. 50
16 FAQs ............................................................................................................................... 51
17 Contact ............................................................................................................................ 52

2 Introduction
CCBoot enables diskless boot Windows XP, Windows Server 2003, Vista, Windows 7 and
Windows Server 2008 with iSCSI.
Diskless boot makes it possible for computers to be operated without a local disk. The 'diskless'
computer is connected to a hard drive over a network and boots up an operating system from a
remotely located machine. CCBoot is the convergence of the rapidly emerging iSCSI protocol with
gPXE diskless boot technology.
Remote boot over iSCSI, or CCBoot, pushes the iSCSI technology even further, opening the door to
the exciting possibility of the diskless computer. CCBoot technology allows a diskless boot of most
Windows OS from an iSCSI target machine remotely located over a standard IP network.
CCBoot offers a seamless diskless boot. Eliminating the need for a local hard drive opens a wide
range of possibilities for network management. Using this configuration, the disks for many
network computers can be centrally managed, thereby facilitating backup, redundancy, and
dynamic allocation of valuable storage resources while at the same time reducing cost to the
enterprise.
Booting from iSCSI makes system administration considerably easier. Freeing a server of its boot
volume allows administrators to manage investments in their iSCSI SANs, attaining improved data
security, integrity and recovery, higher availability, quicker server deployment & repurposing, and
more efficient utilization of storage resources.
Benefits
Significantly reduce initial capital and implementation costs
Reduce power and cooling requirements
Accelerate deployments, upgrades, and server repurposing
Reduce complexity and risk
Improve critical system availability
Implement enhanced Disaster Recovery solutions

3 Features
Boot Windows XP, Windows 2003, Vista, Windows 7 and Windows 2008 from iSCSI
storage/target.
Inside DHCP, gPXE, TFTP, Image Upload and iSCSI Target. It's all-in-one solution for iSCSI
boot.
Support physical drive, volume drive and VMWare disk file.
Support upload boot image to the server and save with VMDK format.
Clients can recovery to a new clear system after reboot.
Clients can keep own system data after reboot.
Every client can boot from different images.
Support image read cache and client write-back cache.
Support RAM cache with huge memory access (AWE).
Support SSD cache.
Support “Save to Image”.
Support multiple servers, multiple NICs and load balance.
Support multiple disks.
Auto assigns write-back files for clients.
Support super clients for image writing.
Support multi DNS.
Support client write cache.
Support one image compatible with different devices (PnP).

4 System Requirements
Server Requirements
1. Windows 2000, Windows XP, Windows 2003, Vista or Windows 2008. We recommend
Windows 2003.
2. Install latest service packs.
Client Requirements
1. Windows XP, Windows 2003, Vista, Windows 7 or Windows 2008.
2. PXE 2.x compliant network adapter
Recommended Server Hardware
25 clients
CPU: 1.7G
RAM: 2G
System Image Disk: SATA HDD 120G
Game Disk: RAID with 2 SATA HDD
Client Write-back Disk: SATA HDD 120G
Main Board: With SATA support
Network: 100Mb Ethernet
50 clients
CPU: 2G
RAM: 4G
System Image Disk: SATA HDD 120G
Game Disk: RAID with 2 STAT HDD
Client Write-back Disk: 2 SATA HDD 120G
Main Board: With RAID support
Network: 1000Mb Ethernet
100 clients
CPU: 2.8G
RAM: 8G
System Image Disk: RAID with 2 SATA HDD
Client Write-back Disk: 4 SATA HDD
Main Board: With RAID support
Network: 1000Mb Ethernet, 2 - 3 NICs
> 100 clients Using multiple servers and load balance.

5 Quick Start
5.1 Install and Configure CCBoot Server
Before install CCBoot, you would do two modifications in the server system.
1. Grant the “Lock Pages in memory” right to “everyone”.
a) Run “gpedit.msc” to open the Group Policy editor:
Figure 5-1-a
b) “Computer Configuration”->”Windows Settings”->”Security Settings”->”User Rights
Assignment”->”Lock pages in memory”->”Properties”:

Figure 5-1-b
c) Add user “Everyone” here:
Figure 5-1-c
2. Add “PAE” option in “C:\Boot.ini”.
a) Edit “C:\Boot.ini” file properties and remove the “Read Only” property.
b) Open “C:\Boot.ini”, go to the first line in the section [operating systems], add “/PAE” to
the end of the line. For example,
multi(0)disk(0)rdisk(0)partition(2)WINDOWS="Windows Server 2003, Enterprise"
/fastdetect /PAE
After finished two modifications, reboot the server machine.
Download CCBoot server installation package from:
http://www.ccboot.com/download/ccbootsetup.exe.
Launch ccbootsetup.exe on the server and keep press the next button to the end (Figure 5-1).

Figure 5-1
CCBoot will use the following ports – 67 (DHCP), 69 (TFTP), 3260 (iSCSI), 1000 (Image Upload),
8001 (Service Control). You need to open those ports on the server firewall.
Note: Please shut off other DHCP service in your LAN especially the DHCP service in the router.
Launch CCBoot and you will get the main panel as bellow (Figure 5-2):

Figure 5-2
Demo Environment
Server IP: 192.168.1.100
Gateway: 192.168.1.1
DNS Address: 192.168.1.1
IP Mask: 255.255.255.0
DHCP Range: 192.168.1.101-192.168.1.250
Image Save Path: D:\CCBootImage
Write-back File path: F:\CCBootWrite-back
Menu “Options”->”Options Wizard” and configure step by step as bellow:

Figure 5-3
You need to select correct local IP address as “DHCP Server IP”. Press “Scan DHCP” to check if
there are other DHCP services on the LAN. You need to stop other DHCP services on the LAN.

Figure 5-4
Set “Image Server IP” and “Game Server IP”. Normally, they are same as “DHCP Server IP”. Set
“Write-back File Path” and “Image Save Path” as you want.

Figure 5-5
Keep default values in “Cache Settings”.

Figure 5-6
Press the “Finish” and confirm the popup dialog box.
5.2 Create Boot Image for Win XP and 2003
1. Choose one client PC to create boot image. Attach a hard disk on the PC.
2. Allocate a small partition about 10G size and format the partition with NTFS and cluster size is
32K. Install Windows (XP or 2003) and the latest SP in to the partition.
3. After complete Windows installation, open the local area connection network properties and
configure as bellow:

Figure 5-7
Click “Properties”.

Figure 5-8
Select “Internet Protocol (TCP/IP)” and click “Properties”.
Figure 5-9
Select “Obtain an IP address automatically” and “Obtain DNS server address automatically”, then
click “OK” to save.
4. Go to CCBoot server and you will find a client in the client list (Figure 5-10) that was added by
CCBoot automatically when the client PC got IP address from the CCBoot DHCP service.

Figure 5-10
Double click the client to edit and check “Enable Upload Image” (Figure 5-11).

Figure 5-11
5. Go back to the client, download Microsoft iSCSI boot client from:
http://download.microsoft.com/download/9/D/D/9DDCBA19-26D6-4B63-B769-242A39
91E4EA/Fre-Boot/Initiator-2.08-boot-build3825-x86fre.exe
6. Install iSCSI boot client with all default settings.
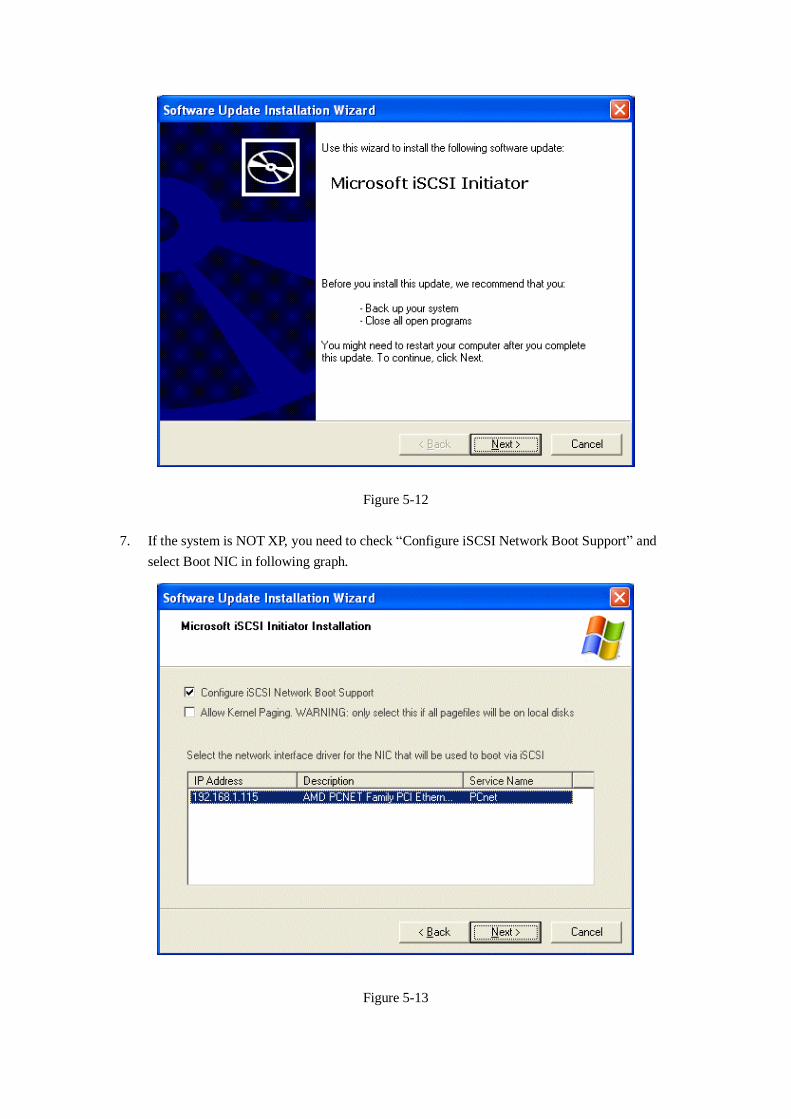
Figure 5-12
7. If the system is NOT XP, you need to check “Configure iSCSI Network Boot Support” and
select Boot NIC in following graph.
Figure 5-13

8. Download CCBoot client installation package from:
http://www.ccboot.com/download/ccbootsetupclient.exe
Launch ccbootsetupclient.exe and keep press the next button to the end. Then launch CCBoot client
and you will see the main panel as bellow (Figure 5-14).
Figure 5-14
Press the “Install CCBoot Client” button. After finished, it will require reboot system. After reboot
system, launch CCBoot client again, input the “Server IP address” and press “Upload Image” to
upload the image to the CCBoot server. Then CCBoot will create a VMDK file named
“D:\CCBootImage\XP01.vmdk” on the server. You can use this vmdk file to boot XP or Win2003.
5.3 Create Boot Image for Vista, Win7 and 2008
Take Win7 for example (Vista and Windows 2008 are the same)
1. Go to the install directory of CCBoot server, you will find a file named“20G.vmdk”. Copy it
to the directory that you want to save your images to. Press the “Options” button and select
“DHCP Settings”, set the “IP Gateway” as CCBoot server’s IP (Figure 5-15).

Figure 5-15
2. Edit the client properties in CCBoot. Specify “20G.vmdk” as the system image for this client
and then check “Keep Write-back File”. Press “Save” button to save these configurations.

Figure 5-16
3. Start the client PC and enter BIOS, set “first boot from LAN” and “second boot from CDROM”.
Insert Win7 installation disk into the DVD box and then restart the client.
4. The client will boot from LAN first. It will report that “No more network devices” and
then boot from DVD to install Win7. When you get to the interface where you can select the
install directory of Win7, you will find an iSCSI disk with 20G size. Install Win7 to this disk. If
you cannot find the 20G iSCSI disk, please attach a hard disk on the PC and try it again.
5. If the Win7 installation finished, please input “iscsicpl.cpl” in the Run window to active the
iSCSI service.
6. Install CCBootClient into Win7. Click the “Install CCBoot Client” on the CCBootClient
interface and then shutdown Win7.
7. Go back to CCBoot server and open the client properties dialog box, press “Save to Image”
button to save the image. Now you can use 20G.vmdk to boot Win7.

Figure 5-18
5.4 Diskless Boot Client
Edit the client properties on the CCBoot and select the correct image and you can diskless boot the
client PC.
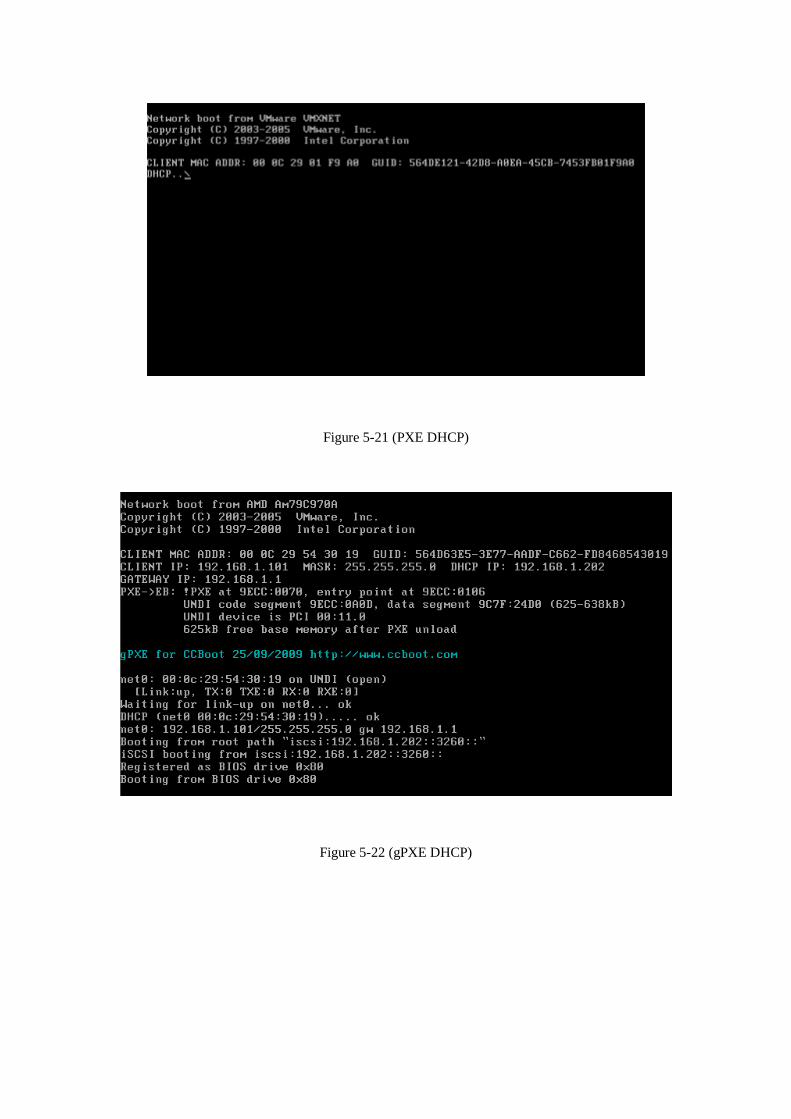
Figure 5-21 (PXE DHCP)
Figure 5-22 (gPXE DHCP)

Figure 5-23 (Win XP Boot)
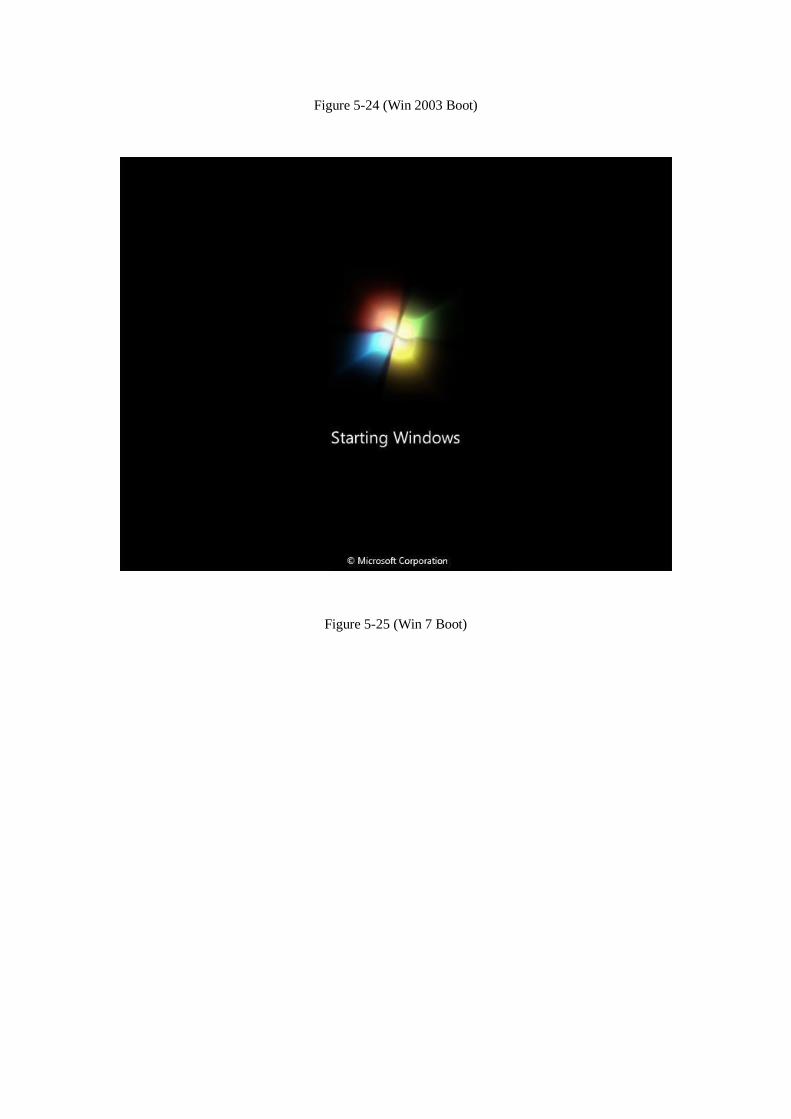
Figure 5-24 (Win 2003 Boot)
Figure 5-25 (Win 7 Boot)

6 Server Settings
6.1 Menu
“File” -> “Start Service”: Start DHCP, TFTP and iSCSI service.
“File” -> “Stop Service”: Stop all services.
“File” -> “Close UI”: Close the main interface but the service is still running.
“Options” -> “Settings”: Configure server settings.
“Options” -> “Options Wizard”: A Wizard for a beginner.
“Client” -> “Add”: Add a new client.
“Client” -> “Edit”: Edit the property of a selected client.
“Client” -> “Delete”: Delete a selected client or clients.
“Client” -> “Auto Scan”: Retrieve all power on clients’ MAC address, IP address and computer
name. You can set an IP range for auto scanning.
Figure 6-1
“Client” -> “Wake On LAN”: Remotely start the selected clients. The function requires the NIC
and motherboard supports “Wake on LAN”. Please enable “Wake on LAN” in the client BIOS.
“Client” -> “Delete Private Package”: Delete the selected client’s private package.
“Client” -> “Delete Write-back File”: Delete the selected client’s write-back files
“Client” -> “Delete All Write-back File”: Delete the all clients’ write-back files.
“Help” -> “Help”: Open the user manual.
“Help” -> “About & Register”: Get the version information and enter the license information.

6.2 Server Settings
6.2.1 DHCP Settings
Figure 6-2
Start DHCP: Start DHCP service.
Start TFTP: Start TFTP service.
DHCP Server IP: If the server has multiple IP, you can specify the DHCP Server IP here.
IP Allocated Start: The first IP address allocated for the clients.
IP Allocated End: The last IP address allocated for the clients.
IP Mask, IP Gateway and DNS Address 1: CCBoot’s DHCP will push this mask, gateway and
DNS information to clients.
DNS Address 2: You can set the “Alternate DNS Server” here for clients.
Scan DHCP: Press this button to check out whether there’re other DHCP servers on the LAN.

6.2.2 Client Default Settings
.
Figure 6-3
Client Default Settings is used to define the settings for the auto-added clients.
Image Server IP: Define the image server IP of the client. Pressing the “>>” button to add multiple
IP addresses. The client will boot from the first IP, if failed, it will try the next one.

Figure 6-4
Game Server IP: Define the game server IP of the client. Pressing the “>>” button to add multiple
IP addresses. The client will get game disk from the first IP, if failed, it will try the next one.
Write-back File Path: Define the write-back file path of the client. Pressing the “>>” button to add
multiple write-back path.
Enable Cache: Define the client write cache size. CCBoot clients will store disk-writing data to the
client RAM instead of writing back to server. The first number is the write cache size of the image
disk and the second one is the write cache size of the game disk. Pressing the “Recommend” button
to get recommended cache settings based on the client physical RAM size.
The cache works as the following steps:
1. Write into the client cache.
2. If client cache is full, write back to server cache.
3. If the server cache is full, write back to the write-back path.
Client Write-back Limit: Define the maximum write-back size. We do NOT recommend setting a
limitation here if unnecessary.
Image Save Path: Define the image save path. All images uploaded from the clients will be saved
to this path. It should be large enough to store the images.
Disk Group: Define the system image and game disk of the client. Pressing “>>” button to define
the details.
Figure 6-5
System Image Selection: Select the image from the combo box list or press the “Other Image”

button to select other image for diskless booting.
Merge Image: If you use “Save to image” in client’s properties dialog box many times, it will
created many additional packages such as XP01-001.vmdk, XP01-002.vmdk. It will make diskless
booting slowly. “Merge Image” can merge all those packages to one vmdk file. You need to stop
CCBoot service before you do “Merge Image”.
Game Disk Selection: You can select a partition or a whole hard disk as game disk.
Apply All Clients: Press this button to apply the client default settings to the existing clients.
6.2.3 Cache Settings
Figure 6-6
Enable Cache: Enable cache function.
Enable Huge Memory Access: CCBoot can access memory over 2G if enable this option. You
need to do two modifications if you want to use this function. Please refer to chapter 5.1.
Available Physical Memory: The current free physical memory of the server.
System Image Read Cache: The image read cache size for all clients.
Game Disk Read Cache: The game disk read cache size for all clients.
All Clients Write-back: Total cache size for all clients write-back.

Per Client Write-back: Each client cache size for write-back.
Enable SSD Cache: SSD (Solid State Disk) is a new technology hard disk that disk read and write
speed than normal disk. CCBoot can use SSD as the cache storage. If the clients request data from
the game disk, CCBoot will search it from SSD first, if existing, it will read the data from SSD. If
non-existing, it will read from the physical game disk and store it into SSD. SSD cache will improve
the disk read speed.
SSD Path: Define the SSD path. For example: E:\
SSD Size: Define the SSD file size.
Auto Update Cache When Game Disk Updated: When the disk files are modified by some
applications, for example, game update application, CCBoot will update the cache immediately.
6.2.4 Other Settings
Figure 6-10
Start iSCSI Service: Start the iSCSI target service.
iSCSI Port: Define the iSCSI target service port.
Enable Super Client Update Game Disk: If you want to update game by super client, you need to
select this option to lock the read and write operations of the game disk.
Auto Add Client: All clients on the LAN will be added into CCBoot with the "Client Default
Settings" automatically.
Auto Connect Game Disk: If this option checked, the client will get the game disk automatically.

Computer Name Prefix: Define the computer name prefix.
Server and Client Disk Mapping: Define the client’s disk letters. Normally used to define the
game disk letters. For example, the game disk letter is F on the server and you want to share it to the
client with disk letter G.
Figure 6-11
Enable Modify Computer Name at Client: Enable client modify the computer by CCBootClient.
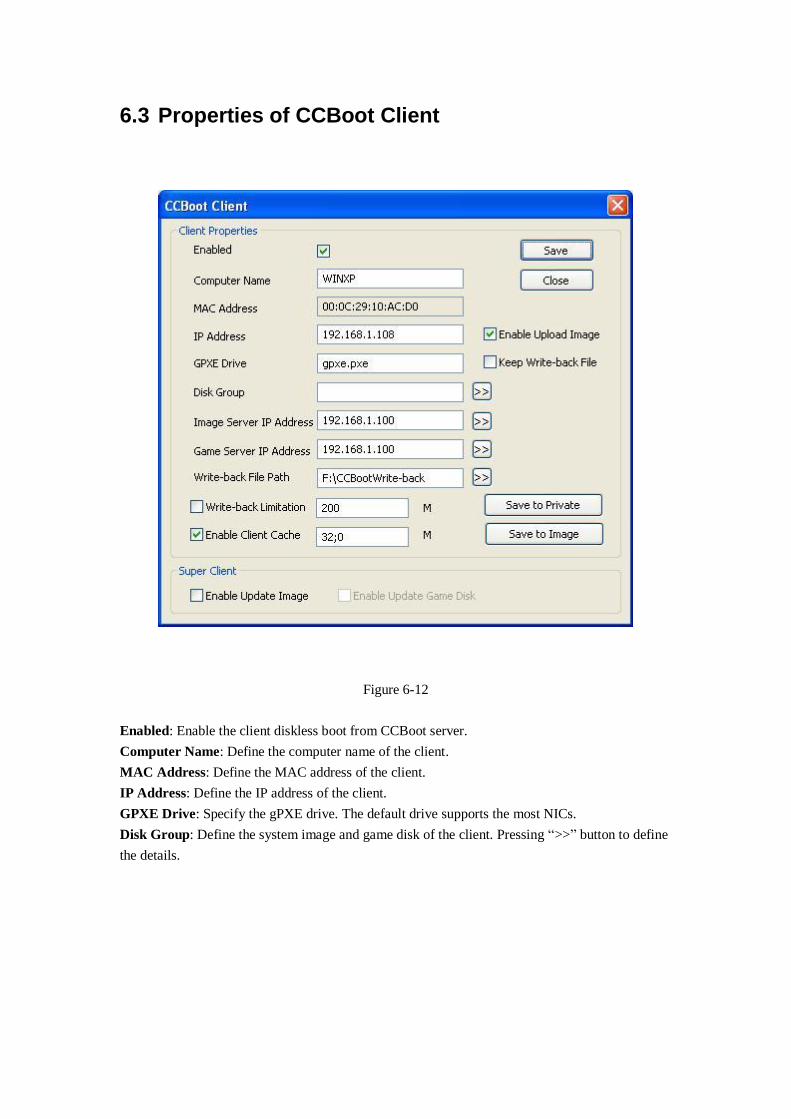
6.3 Properties of CCBoot Client
Figure 6-12
Enabled: Enable the client diskless boot from CCBoot server.
Computer Name: Define the computer name of the client.
MAC Address: Define the MAC address of the client.
IP Address: Define the IP address of the client.
GPXE Drive: Specify the gPXE drive. The default drive supports the most NICs.
Disk Group: Define the system image and game disk of the client. Pressing “>>” button to define
the details.
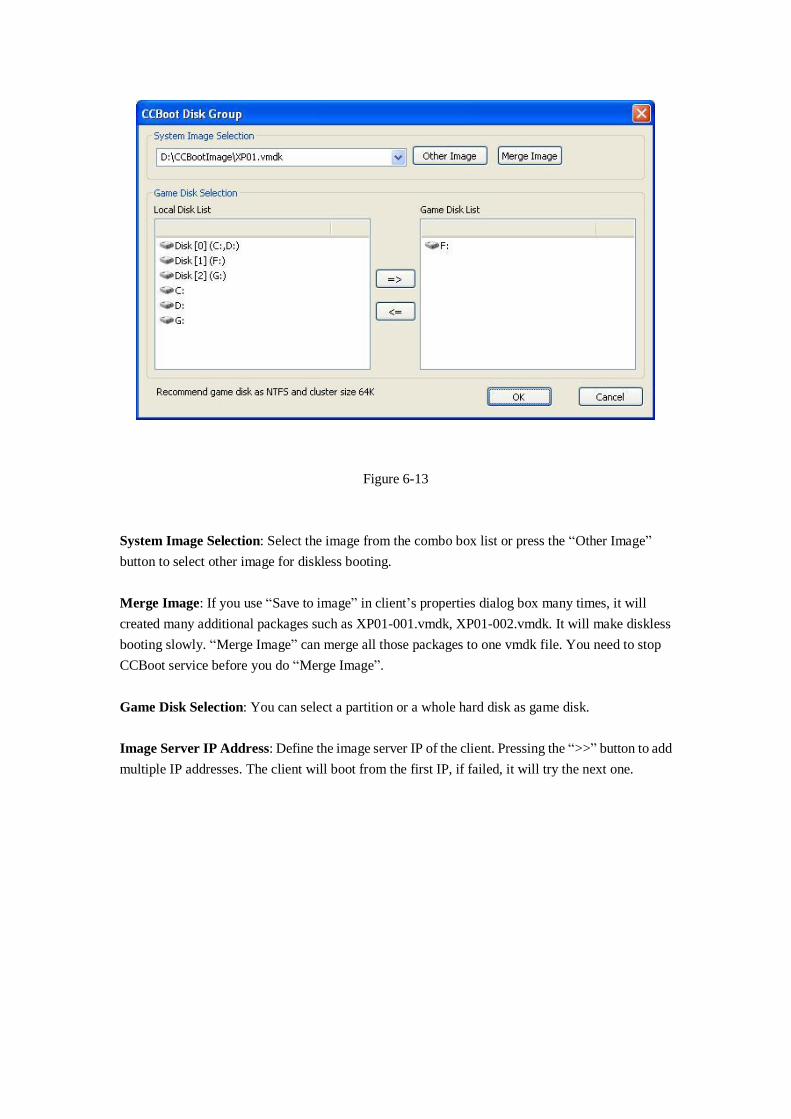
Figure 6-13
System Image Selection: Select the image from the combo box list or press the “Other Image”
button to select other image for diskless booting.
Merge Image: If you use “Save to image” in client’s properties dialog box many times, it will
created many additional packages such as XP01-001.vmdk, XP01-002.vmdk. It will make diskless
booting slowly. “Merge Image” can merge all those packages to one vmdk file. You need to stop
CCBoot service before you do “Merge Image”.
Game Disk Selection: You can select a partition or a whole hard disk as game disk.
Image Server IP Address: Define the image server IP of the client. Pressing the “>>” button to add
multiple IP addresses. The client will boot from the first IP, if failed, it will try the next one.
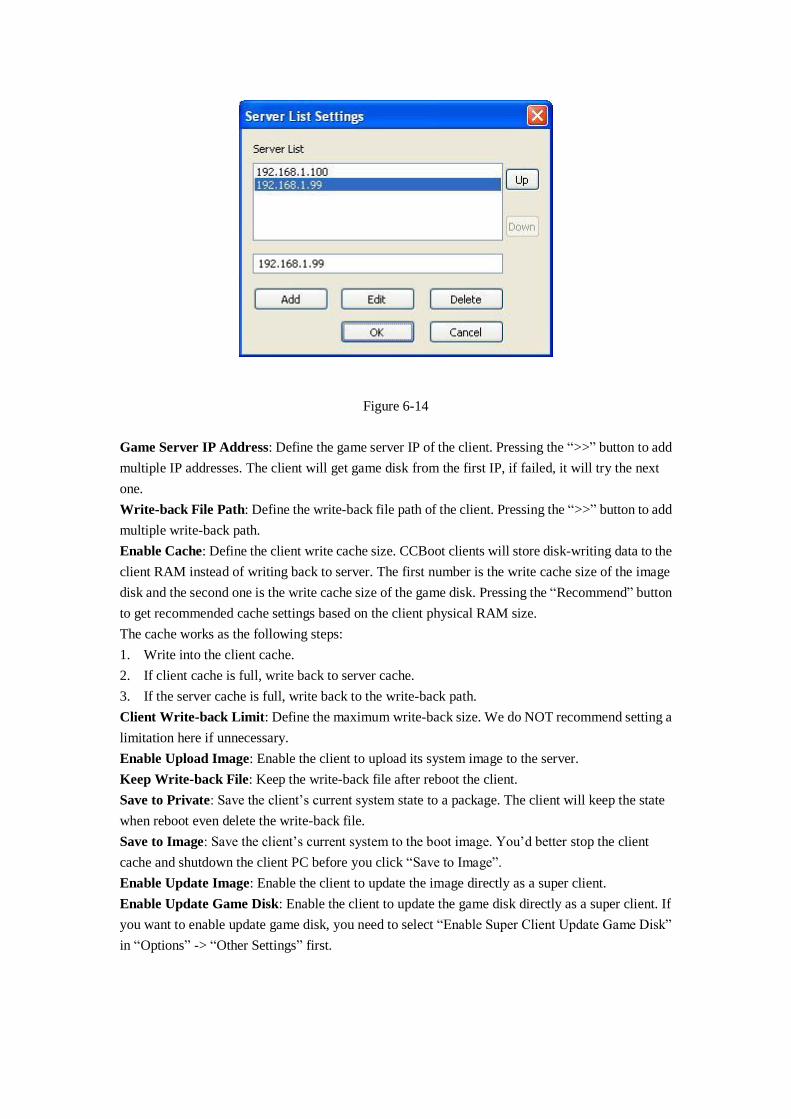
Figure 6-14
Game Server IP Address: Define the game server IP of the client. Pressing the “>>” button to add
multiple IP addresses. The client will get game disk from the first IP, if failed, it will try the next
one.
Write-back File Path: Define the write-back file path of the client. Pressing the “>>” button to add
multiple write-back path.
Enable Cache: Define the client write cache size. CCBoot clients will store disk-writing data to the
client RAM instead of writing back to server. The first number is the write cache size of the image
disk and the second one is the write cache size of the game disk. Pressing the “Recommend” button
to get recommended cache settings based on the client physical RAM size.
The cache works as the following steps:
1. Write into the client cache.
2. If client cache is full, write back to server cache.
3. If the server cache is full, write back to the write-back path.
Client Write-back Limit: Define the maximum write-back size. We do NOT recommend setting a
limitation here if unnecessary.
Enable Upload Image: Enable the client to upload its system image to the server.
Keep Write-back File: Keep the write-back file after reboot the client.
Save to Private: Save the client’s current system state to a package. The client will keep the state
when reboot even delete the write-back file.
Save to Image: Save the client’s current system to the boot image. You’d better stop the client
cache and shutdown the client PC before you click “Save to Image”.
Enable Update Image: Enable the client to update the image directly as a super client.
Enable Update Game Disk: Enable the client to update the game disk directly as a super client. If
you want to enable update game disk, you need to select “Enable Super Client Update Game Disk”
in “Options” -> “Other Settings” first.

7 Game Disk Settings
1. Add game disk in “Options” -> “Client Default Settings” -> “Disk Group” -> “>>”.
Figure 7-1
2. Set disk mapping between server and client in “Options” -> “Other Settings”.
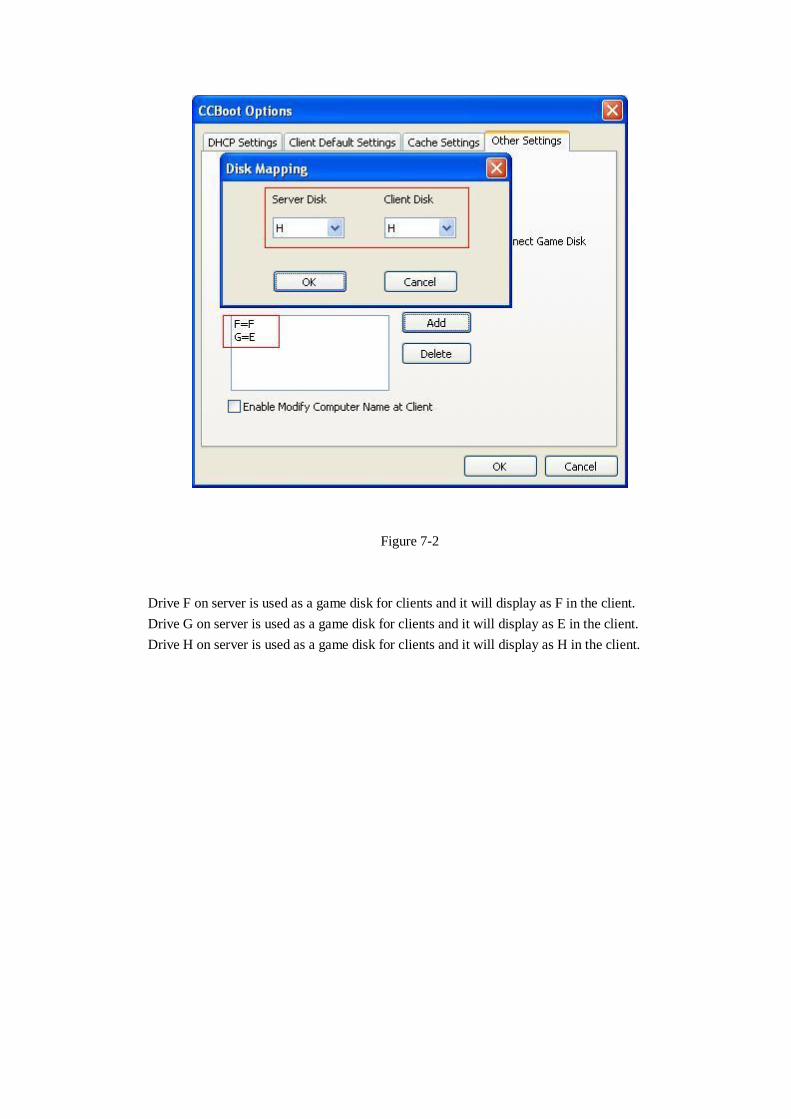
Figure 7-2
Drive F on server is used as a game disk for clients and it will display as F in the client.
Drive G on server is used as a game disk for clients and it will display as E in the client.
Drive H on server is used as a game disk for clients and it will display as H in the client.

8 CCBoot Client Installation
Download CCBoot client installation package from:
http://www.ccboot.com/download/ccbootsetupclient.exe
Launch it and keep pressing the next button till the end and then you can see the client main panel
(Figure 8-2).
Figure 8-1

Figure 8-2
Install Cache Driver: Install cache driver for client.
Start Cache After Login Windows: If checked, the client cache will be unavailable until the
windows login onto the desktop. If it’s unchecked, the client cache will be available at the
beginning.
Save Cache When Shutdown: If checked, the client will write the cache data back to server when
the client shutdown.
Install CCBoot Client: Press to install CCBoot client’s drivers and applications.
Computer Name: Define the computer name for the client. You need to select “Enable Modify
Computer Name at Client” in CCBoot server “Options” -> “Other Settings” first.
System Disk Image: Select the system disk.
Server IP Address: Input the CCBoot server’s IP address.
VMDK File Name: Define the VMDK file name.
Upload Image: Press it to upload image.
Start Cache: Press it to start client cache function.
Stop Cache: Press it to stop client cache function.
Notes:
If the "Keep Write-back File", "Enable Upload Image" or “Super Client” is checked in the client
properties, the client cache will be unavailable.
Figure 8-3

9 Cache Settings
Recommended Server Settings
Server Physical RAM Image Cache Game Cache Write-back Cache
2G 256M 512M 256M
4G 512M 1024M 1024M
8G 1024M 4096M 2048M
16G 1024M 10240M 4096M
32G 1024M 20480M 10240M
Recommended Client Cache Settings
Client Physical RAM Image Disk Cache #1 Game Disk #2 Game Disk
1G 256M 64M 64M
2G 384M 128M 128M
4G 512M 256M 256M
Sometimes, the client cache will cause blue screen when boot Windows. You can fix it by three
methods.
Method 1 - Reduce the client cache size. If still failed, try method 2.
Method 2 - Disable the client cache.
Method 3 - Reinstall CCBootClient with select “Start Cache After Login Windows”.
10 Super Client
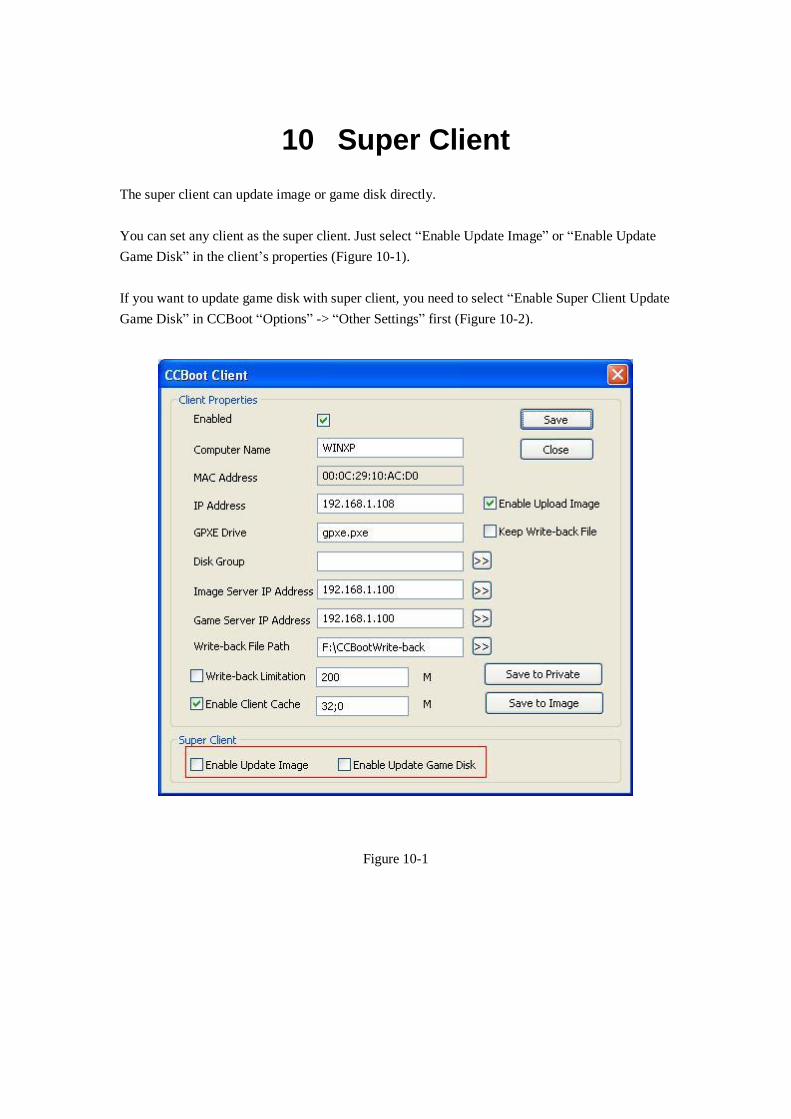
The super client can update image or game disk directly.
You can set any client as the super client. Just select “Enable Update Image” or “Enable Update
Game Disk” in the client’s properties (Figure 10-1).
If you want to update game disk with super client, you need to select “Enable Super Client Update
Game Disk” in CCBoot “Options” -> “Other Settings” first (Figure 10-2).
Figure 10-1

Figure 10-2
The super client updates image and disk directly and the updating is unrecoverable. But “Save to
Image” in the client properties is recoverable.

11 Update Image
Method 1: Use "Keep Write-back File" and “Save to Image”
1) Choose one client PC as the update client. Select "Keep Write-back File" in the client’s
properties.
2) Diskless boot the client and do some modifications as you wish. For example, upgrade
software in the system.
3) Shutdown the client PC. Click the “Save to Image” button in the client’s properties. Don’t
forget unselect “Keep Write-back File” when finished.
With this method, you will find a series of vmdk files such as xp.vmdk, xp-001.vmdk,
xp-002.vmdk and so on. “Save to Image” will create a new file xp-nnn.vmdk. If you want to recover
to the last image state, you can stop CCBoot service and delete the latest xp-nnn.vmdk. That’s to say
“Save to Image” is recoverable.
However, if you have created many xp-nnn.vmdk files, that will degrade operation
performance of the image. In this case, you need to upload the image again or use “Merge Image” to
merge all of them to one image (Chapter 6.2.2).
Method 2: Use “Super Client”
1) Choose one client PC as the update client. Select “Super Client” -> “Enable Update Image” in
the client’s properties.
2) Diskless boot the client and do some modifications as you wish.
3) Shutdown the client PC. Unselect “Enable Update Image” in the client’s properties.
With this method, the client will update the image directly, so you cannot recover the image to
previous state.

12 Update Game Disk
Method 1: Update game disk on the server.
You can update game disk on the server directly. After reboot clients, they can get new game data.
Method 2: Update game disk with super client.
1) Choose one client PC as the update client. Select “Enable Super Client Update Game Disk” in
CCBoot “Options” -> “Other Settings”. Select “Super Client” -> “Enable Update Game Disk”
in the client’s properties.
2) Diskless boot the client and update the games in the game disk.
3) Shutdown the client PC. Unselect “Enable Update Game Disk” in the client’s properties.

13 Load balance and redundancy
CCBoot supports multiple NICs and servers.
Suppose
Server A has two NICs – 192.168.1.1 for image accessing and 192.168.1.3 from game accessing.
Server B has two NICs – 192.168.1.2 for image accessing and 192.168.1.4 from game accessing.
Both of them have write-back file path: E:\CCBootWrite-back and F:\CCBootWrite-back.
Settings
Go to Server A, open “Options” -> “Client Default Settings”.
1. Add 192.168.1.1 and 192.168.1.2 to “Image Server IP” (Figure 13-1)
Figure 13-1
2. Add 192.168.1.3 and 192.168.1.4 to “Game Server IP” (Figure 13-2).

Figure 13-2
3. Add “E:\CCBootWrite-back” and “F:\CCBootWrite-back” to “Write-back File Path” (Figure
13-3).
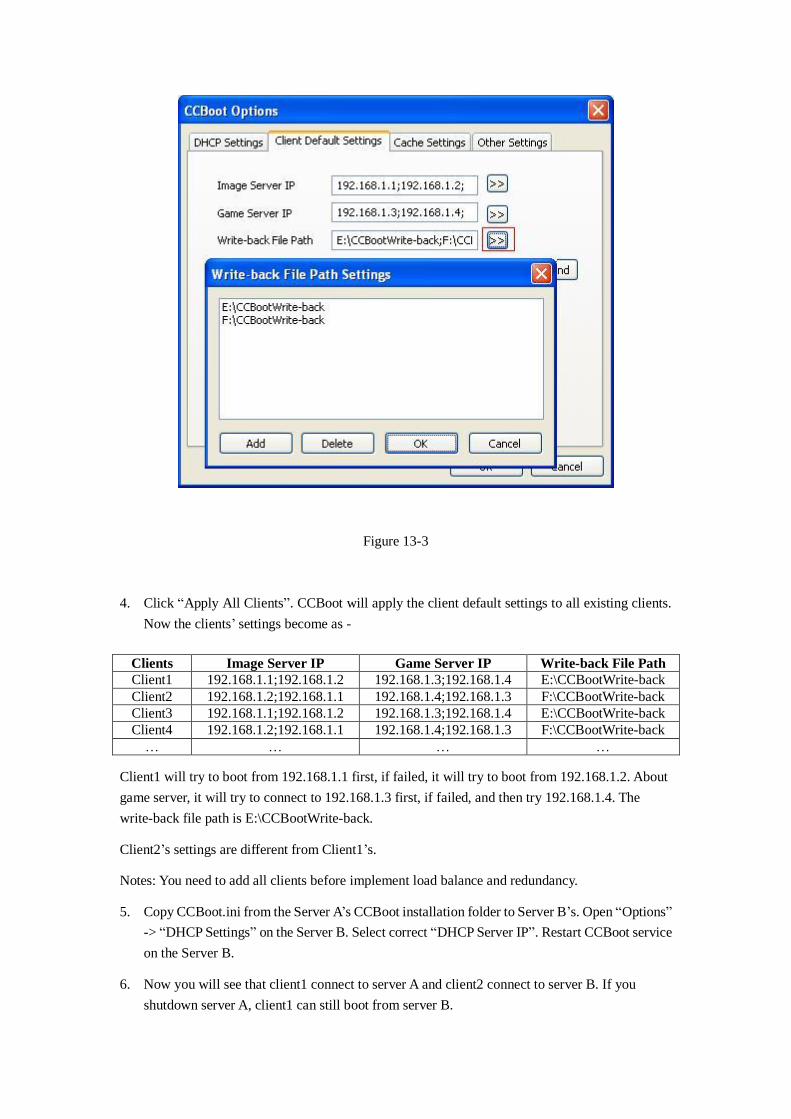
Figure 13-3
4. Click “Apply All Clients”. CCBoot will apply the client default settings to all existing clients.
Now the clients’ settings become as -
Clients Image Server IP Game Server IP Write-back File Path
Client1 192.168.1.1;192.168.1.2 192.168.1.3;192.168.1.4 E:\CCBootWrite-back
Client2 192.168.1.2;192.168.1.1 192.168.1.4;192.168.1.3 F:\CCBootWrite-back
Client3 192.168.1.1;192.168.1.2 192.168.1.3;192.168.1.4 E:\CCBootWrite-back
Client4 192.168.1.2;192.168.1.1 192.168.1.4;192.168.1.3 F:\CCBootWrite-back
… … … …
Client1 will try to boot from 192.168.1.1 first, if failed, it will try to boot from 192.168.1.2. About
game server, it will try to connect to 192.168.1.3 first, if failed, and then try 192.168.1.4. The
write-back file path is E:\CCBootWrite-back.
Client2’s settings are different from Client1’s.
Notes: You need to add all clients before implement load balance and redundancy.
5. Copy CCBoot.ini from the Server A’s CCBoot installation folder to Server B’s. Open “Options”
-> “DHCP Settings” on the Server B. Select correct “DHCP Server IP”. Restart CCBoot service
on the Server B.
6. Now you will see that client1 connect to server A and client2 connect to server B. If you
shutdown server A, client1 can still boot from server B.

14 PnP Different Devices
Suppose you have 3 clients (A, B, and C) with different devices, and you want to create only one
image to boot all of them.
1. Install same version of Windows XP on these 3 clients.
2. Install CCBoot client on these 3 clients. Press the “Install CCBoot Client” button to install.
Figure 14-1
3. Copy “CCBootPNP” from the installation folder to a USB disk.

Figure 14-2
4. Insert the USB disk on the client B. Launch CCBootPNP from the USB disk and press the “Get
Local PCI Drivers” button to collect drivers of the client B.
Figure 14-3
5. Plug the USB disk from the client B and insert it on the client C. Launch CCBootPNP from the
USB disk and press the “Get Local PCI Drivers” button to collect drivers of the client C.
6. Plug the USB disk from the client C and insert it on the client A. Launch CCBootPNP from the
USB disk and press the “Get Local PCI Drivers” button to collect drivers of the client A.
7. Press the “Install All PCI Drivers” button to install these 3 clients’ drivers on the client A.
8. Upload image from the client A and this image can be used for booting the client A, B, and C.

15 nForce Chip NIC Solution
Some kind of nForce Chip motherboard NIC cannot boot from CCBoot. You can get solution as
below.
1. Uninstall nForce NIC default driver if installed. Uninstall the "NVIDIA Network Bus
Enumerator" from the device manager.
2. Download nForce RISC driver from http://www.ccboot.com/download/nforcerisc.rar. Expand
it, right click on the INF file and select “Install”.
3. Reinstall CCBootClient again. Click the “Install CCBoot Client” button and reboot.
4. Upload image.
5. Now you can use this image to boot nForce NIC
The default driver of nForce cannot support diskless boot. So you have to replace it with the nForce
RISC driver.

16 FAQs
1. Why it got about 1 minute delay when I get into desktop?
Please disable this service - Windows Firewall/Internet Connection Sharing (ICS).
2. Why the client cache doesn’t work?
If the "Keep Write-back File", "Enable Upload Image" or “Super Client” is checked in the client
properties, the client cache will be unavailable.
3. Some already known situations which can lead to blue screen.
a) Wrong version of NIC driver.
b) Some antivirus software will cause a blue screen, please check it out.
c) The client cache is too large, please modify.
d) The client has not been installed correctly. Please make sure you have pressed the "Install
CCBoot Client" and complete it with a reboot before uploading the image.
For more FAQs, please refer to http://www.ccboot.com/faq.htm.

17 Contact
Product Page: http://www.ccboot.com
Technical Support Email: [email protected]
Sales Support Email: [email protected]