CBCL Limited Tool Palettes Tutorial · AutoCAD objects can be added to any Tool Palette simply by...
12
1 | Page CBCL Limited Tool Palettes Tutorial CBCL Design Management & Best CAD Practices 2012 REV. 01 Our Vision “To be the most respected and successful Atlantic Canada based employee- owned firm, delivering multidiscipline engineering and technical services.”
Transcript of CBCL Limited Tool Palettes Tutorial · AutoCAD objects can be added to any Tool Palette simply by...

1 | P a g e
CBCL Limited
Tool Palettes Tutorial CBCL Design Management & Best CAD Practices
2012 REV. 01
Our Vision
“To be the most respected and successful Atlantic Canada based employee-owned firm, delivering multidiscipline engineering and technical services.”
2 | P a g e
CBCL Limited AutoCAD Tutorial
Using Tool Palettes
Contents
1. What Are Tool Palettes
2. What Are The Benefits
3. Open & Close Tool Palettes
4. Components of Tool Palettes
5. Accessing a Tool Palette
6. Using Tool Palette Tools
7. Creating a Custom Tool Palette
8. Adding Tools to a Tool Palette
9. Modifying Tools on a Tool Palette
3 | P a g e
1. What Are Tool Palettes
Tool palettes are tabbed areas within the Tool Palettes window containing icons (aka “tools”) that provide an efficient method for organizing, sharing, and placing AutoCAD objects into the current drawing as well as initiate AutoCAD commands. With a single click, Tool Palettes can import
• Geometric objects such as lines, circles, and polylines • Dimensions • Blocks • Hatches • Solid fills • Gradient fills • Raster images • External references (xrefs)
2. What Are The Benefits
SPEED: The main benefit to using Tool Palettes is SPEED. With a single click on an icon, a block definition can be inserted from another drawing file as its source.
SETTINGS: Inserting blocks and other AutoCAD entities or launching commands with a
single click of a tool icon may be fast, but custom settings can be applied as well. Custom settings unique to the object being inserted can be pre-assigned to the icon tool. For example, a hatch pattern can be assigned a particular pattern and scale factor.
SIMPLE TO CREATE: Tool Palettes are quick and easy to create. Once a Tool Palette
Group is created, tools can be added simply by dragging AutoCAD entities onto the palette, or block definitions can imported from Design Center. With the CUI open, AutoCAD commands can be dragged from the Command List pane onto a tool palette.
4 | P a g e
3. Open & Close Tool Palettes
To OPEN Tool Palettes, it can be done one of four ways: 1. Enter the command TOOLPALETTES
2. Click the Tool Palettes icon on the Standard toolbar
3. Click the “Tools” pull-down menu: Select “Palettes” and select “Tool Palettes”
4. Click the “View” on the Ribbon: on the “Palette” group, click “Tool Palettes”
5. Press “Ctrl+3” on the keyboard
To CLOSE Tool Palettes, it can be done one of two ways
1. Click the ‘X’ on the Tool Palettes property bar
2. Enter the command TOOLPALETTESCLOSE
3. Press “Ctrl+3” on the keyboard

5 | P a g e
4. Components of Tool Palettes
Tool Palettes has three major components: 1. Tool Palette Window: The main floating window which hosts the Tool Palettes. The
window can be docked, set to auto hide, and resized to the user’s needs 2. Tool Palette: The Tool Palette itself is where it stores the Tool Icons. The palettes are
saved with unique names and can appear on the tool palette window simultaneously, or, they can be collected into groups for easier access.
3. Tool Icons: The icon that performs the assigned function. The tool action can be
customized simply by right-clicking on the icon and selecting “Properties”.
6 | P a g e
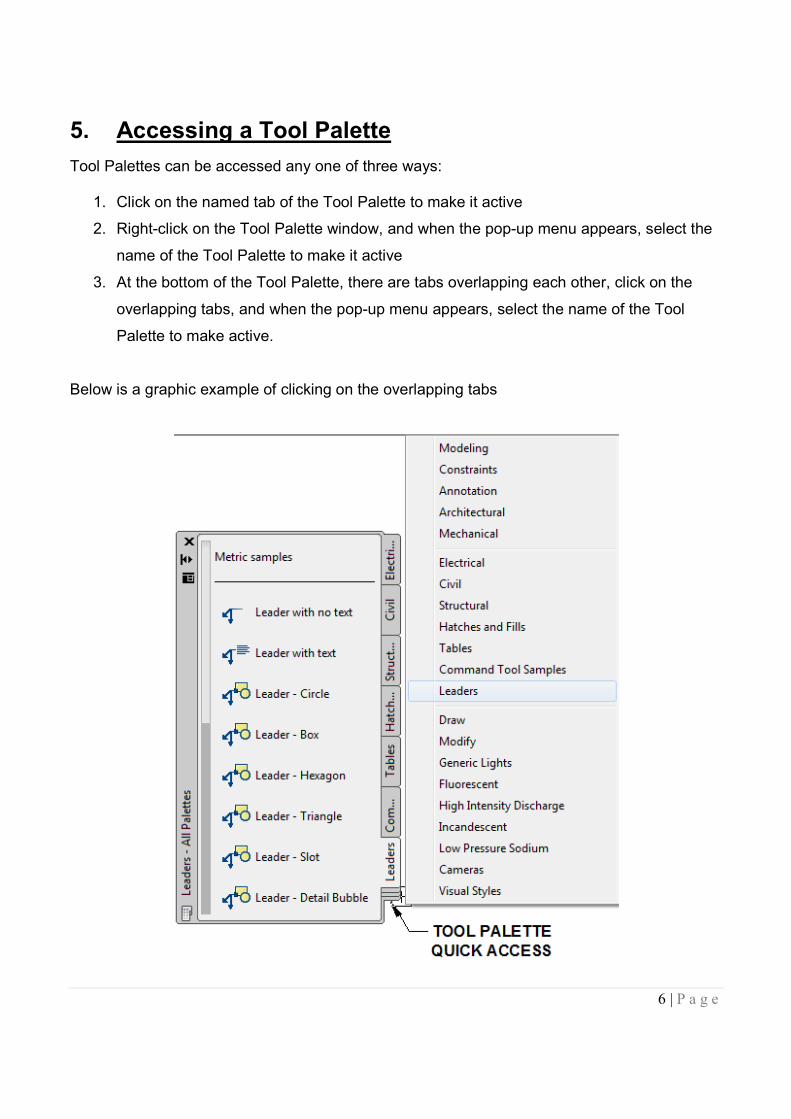
5. Accessing a Tool Palette
Tool Palettes can be accessed any one of three ways:
1. Click on the named tab of the Tool Palette to make it active
2. Right-click on the Tool Palette window, and when the pop-up menu appears, select the
name of the Tool Palette to make it active
3. At the bottom of the Tool Palette, there are tabs overlapping each other, click on the
overlapping tabs, and when the pop-up menu appears, select the name of the Tool
Palette to make active.
Below is a graphic example of clicking on the overlapping tabs

7 | P a g e
6. Using Tool Palette Tools
Using the tools on a Tool Palette will be the quickest lesson in this tutorial. With the appropriate Tool Palette active, simply click on the desired icon and the command correlating with the icon will immediately start. Then, simply follow any command prompts that present themselves.
7. Creating a Custom Tool Palette
As stated previously, Tool Palettes are where tool icons are collected and used, and Tool Palette Groups offer a way of organizing the palettes in a logical manner. There are four methods to create Tool Palette. The first two methods create an empty Tool Palette where no tools are present. The last two methods take advantage of using the Design Center environment. Create a Blank Tool Palette [Option 1]
1. With the Tool Palette window open, right-click on the Tool Palette window and select “Customize Palettes” [note: alternatively, you can simply enter the command CUSTOMIZE]
2. When the “Customize” dialog box appears, right-click in the “Palettes” pane and select “New Palette” when the pop-up menu appears.
3. In the Palettes pane, a new tool palette is created called “New Palette”, which can be renamed.
See the graphic example below

8 | P a g e
Creating a Custom Tool Palette (cont’d...)
Create a Blank Tool Palette [Option 2] 1. With the Tool Palette window open, right-click on the Tool Palette window and select
“New Palette”
2. A new blank tool palette is created on the current palette group called “New Palette”,
which can be renamed with a custom name.
See the graphic example below
9 | P a g e
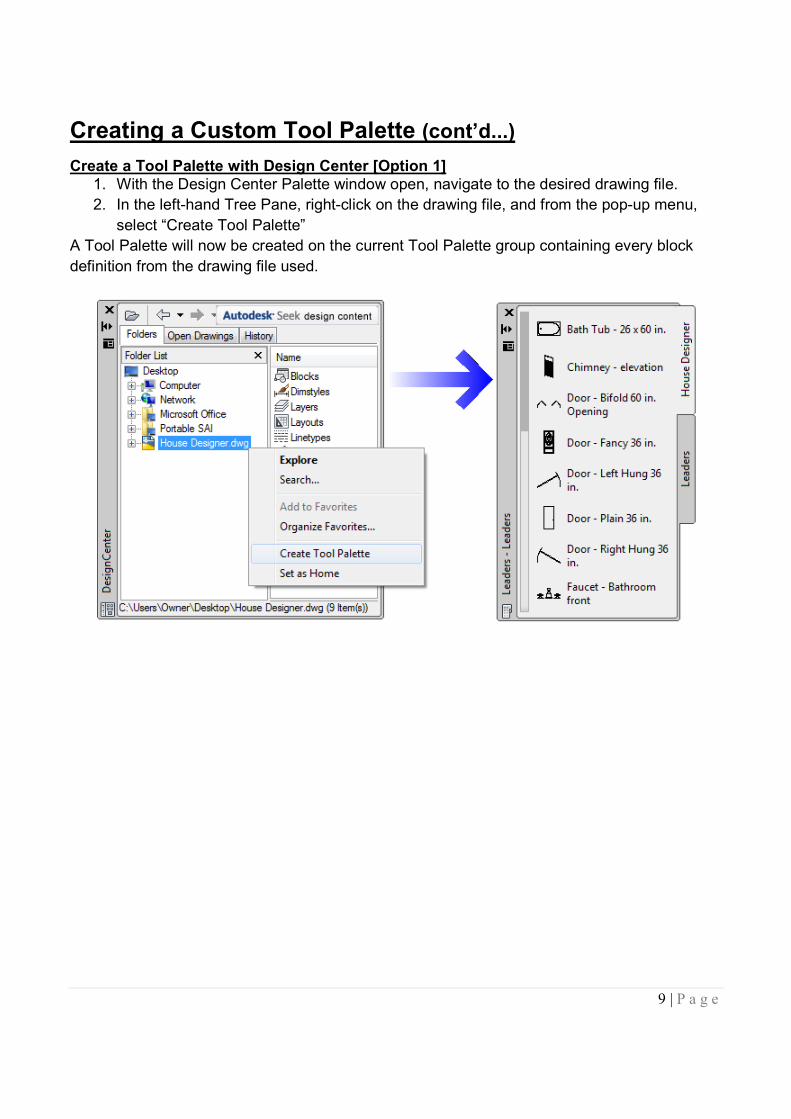
Creating a Custom Tool Palette (cont’d...)
Create a Tool Palette with Design Center [Option 1] 1. With the Design Center Palette window open, navigate to the desired drawing file.
2. In the left-hand Tree Pane, right-click on the drawing file, and from the pop-up menu,
select “Create Tool Palette”
A Tool Palette will now be created on the current Tool Palette group containing every block
definition from the drawing file used.
10 | P a g e
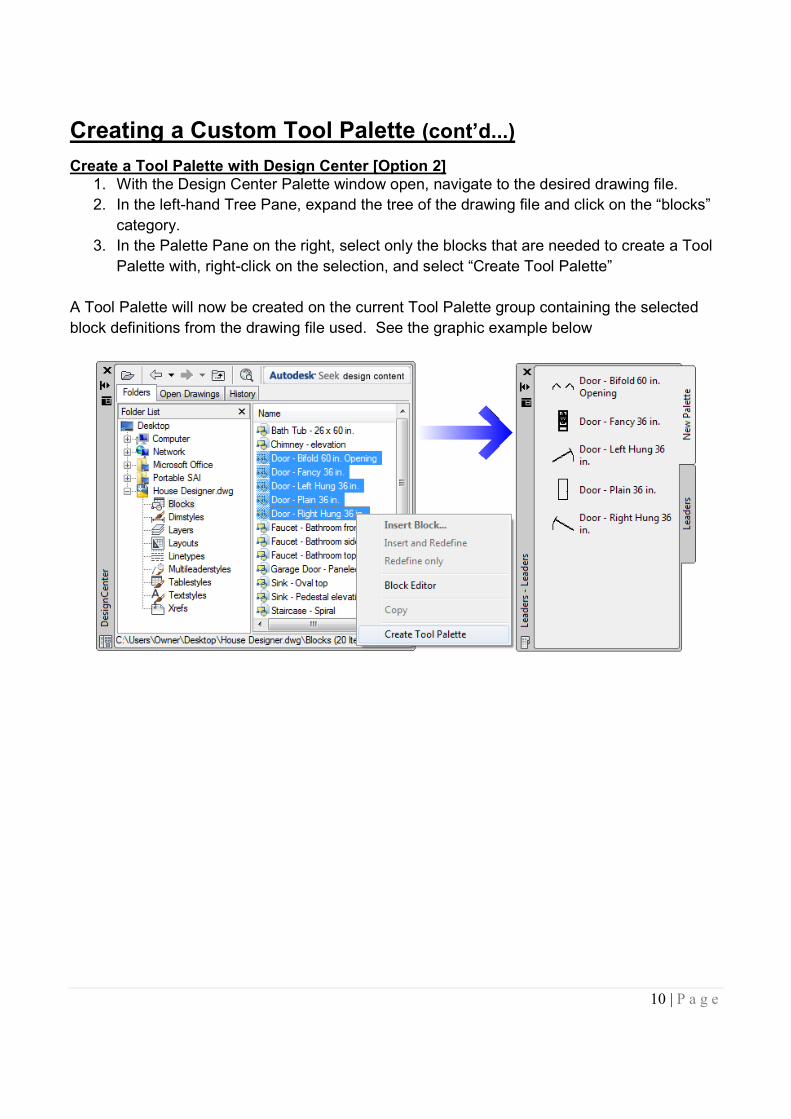
Creating a Custom Tool Palette (cont’d...)
Create a Tool Palette with Design Center [Option 2] 1. With the Design Center Palette window open, navigate to the desired drawing file.
2. In the left-hand Tree Pane, expand the tree of the drawing file and click on the “blocks”
category.
3. In the Palette Pane on the right, select only the blocks that are needed to create a Tool
Palette with, right-click on the selection, and select “Create Tool Palette”
A Tool Palette will now be created on the current Tool Palette group containing the selected
block definitions from the drawing file used. See the graphic example below

11 | P a g e
8. Adding Tools to a Tool Palette
AutoCAD objects can be added to any Tool Palette simply by dragging the object from the
drawing screen.
1. With the Tool Palette window open, make the desired Tool Palette to add tools to
current.
2. Locate the item to add on the drawing screen, click on the object and hold down the
left mouse-button.
3. While still holding down the left mouse button, drag the object onto the Tool Palette.
See graphic example below
When an object is dragged from the drawing screen onto the tool palette, the Properties of the object are maintained. For example, if a dynamic block was inserted into the drawing at a particular scale, on a particular layer, with a particular dynamic property active, those properties will be maintained when the object is dragged onto the palette. IMPORTANT!
1. In order to drag an object onto the Tool Palette, the current drawing must be saved.
2. When a block is dragged onto the Tool Palette, it will always use that particular drawing
to obtain the block in the future. It is best to have a master file for often used symbols.

12 | P a g e
9. Modifying Tools on a Tool Palette
Once custom tools have been added to the Tool Palette, they can be modified further.
1. With the Tool Palette open, right-click on the tool icon and when the pop-up menu appears, select “Properties”
2. The “Tool Properties” dialog box will appear where the custom properties can be changed.
Below is a graphic example for modifying a Hatch Pattern object that was dragged onto the Tool Palette.