CBC Reach Getting Started · 5.3 CONFIGURE TEMPLATES ... table describes those conventions: ... CBC...
48
CBC Reach Getting Started
Transcript of CBC Reach Getting Started · 5.3 CONFIGURE TEMPLATES ... table describes those conventions: ... CBC...

CBC Reach Getting Started

CBC Reach Getting Started
2
WELCOME TO CBC REACH ..................................................................................................................................... 4
1.1 CONVENTIONS ......................................................................................................................................................... 4 1.2 CBC REACH HELP .................................................................................................................................................... 4
1.2.1 Help at screen level ......................................................................................................................................... 4 1.2.2 CBC Reach Helpdesk ........................................................................................................................................ 4
STARTING TO WORK WITH CBC REACH .................................................................................................................. 6
2.1 SETTING UP PREFERRED LANGUAGE IN CBC REACH .......................................................................................................... 6 2.2 LANDING PAGE ........................................................................................................................................................ 6 2.3 NAVIGATION ........................................................................................................................................................... 7 2.4 DATA TABLES........................................................................................................................................................... 9
CBC REACH MODULES ......................................................................................................................................... 11
3.1 CASH MANAGEMENT .............................................................................................................................................. 11 3.2 PAYMENTS............................................................................................................................................................ 11 3.3 ADMINISTRATION ................................................................................................................................................... 12 3.4 PERSONALISATION .................................................................................................................................................. 13 3.5 INFORMATION ....................................................................................................................................................... 13
CASH MANAGEMENT .......................................................................................................................................... 14
4.1 BALANCES ............................................................................................................................................................ 14 4.2 ACCOUNT STATEMENTS ........................................................................................................................................... 15 4.3 INTRADAY REPORTS ................................................................................................................................................ 15 4.4 TRANSACTIONS ...................................................................................................................................................... 16 4.5 BANK REPORTS ...................................................................................................................................................... 17
PAYMENTS .......................................................................................................................................................... 18
5.1 VIEW CREDITS / DEBITS ........................................................................................................................................... 18 5.1.1 Open Payments ............................................................................................................................................. 18
5.1.1.1 Create Bill of Exchange (LCR) ................................................................................................................ 19 5.1.2 Transmitted Payments .................................................................................................................................. 20 5.1.3 Payments in Batches ..................................................................................................................................... 21 5.1.4 Periodic Payments......................................................................................................................................... 22 5.1.5 Imported Payment Files ................................................................................................................................ 23
5.2 CREATE CREDITS / DEBITS ........................................................................................................................................ 23 5.2.1 Credit Transfer .............................................................................................................................................. 23 5.2.2 Direct Debit ................................................................................................................................................... 25 5.2.3 Cheque .......................................................................................................................................................... 28 5.2.4 Import Payment File ...................................................................................................................................... 28
5.3 CONFIGURE TEMPLATES ........................................................................................................................................... 30 5.3.1 Address book (Counterparties) ..................................................................................................................... 30 5.3.2 Payment Templates ...................................................................................................................................... 31
ADMINISTRATION ............................................................................................................................................... 33
6.1 ADMINISTRATIVE TASKS ........................................................................................................................................... 33 6.1.1 Modifications ................................................................................................................................................ 33
6.2 CONFIGURE CUSTOMER OBJECTS ............................................................................................................................... 33 6.2.1 Companies .................................................................................................................................................... 33 6.2.2 Accounts ....................................................................................................................................................... 34 6.2.3 Permission Profiles ........................................................................................................................................ 35 6.2.4 Users ............................................................................................................................................................. 36
CBC Reach Getting Started
3
PERSONALISATION .............................................................................................................................................. 38
7.1 CONFIGURE MOBILE DEVICES ................................................................................................................................... 38 7.1.1 Mobile Credentials ........................................................................................................................................ 38
7.2 CONFIGURE ALERTING ............................................................................................................................................. 38 7.2.1 Alert Setup .................................................................................................................................................... 38 7.2.2 Alert Channel Setup ...................................................................................................................................... 39
INFORMATION .................................................................................................................................................... 40
8.1 ALERTS ................................................................................................................................................................ 40 8.2 MESSAGES ............................................................................................................................................................ 40
ANNEX 1 PERMISSION PROFILES .................................................................................................................................. 42
ANNEX 2 PROCEDURE USER ENROLLMENT CBC REACH APP ......................................................................................... 43
ANNEX 3 VIEWING ACCOUNT STATEMENTS AND PAYMENTS AND AUTHORISING PAYMENTS IN CBC REACH APP ......... 45
A3.1 START WITH USER LOGIN .............................................................................................................................................. 45 A3.2 DASHBOARD .............................................................................................................................................................. 45 A3.3 VIEWING ACCOUNT STATEMENTS .................................................................................................................................... 46 A3.4 AUTHORISING PAYMENTS .............................................................................................................................................. 46

CBC Reach Getting Started
4
Welcome to CBC Reach Thank you for choosing CBC Reach as your corporate international treasury solution. The CBC Reach eBanking application is a highly secure, client browser based solution that will satisfy all your international cash management needs. This guide is designed to get you acquainted with the CBC Reach eBanking application. It will lead you through the essential functionalities of CBC Reach to get started, and provide some background information on its possibilities.
1.1 Conventions This guide uses various conventions in the text to help you more quickly identify special terms. The following table describes those conventions:
Convention Use
Bold Bold typeface indicates important terms that are used or defined in the text.
Bo l d and F i x ed ‐wid th f on t A f i x ed ‐wid th f on t i s used t o i d en t i f y CBC Reach modu l e s , s c r een s and t ab shee t s .
Bold and italic Bold and italic typeface is used to identify hyperlinks and buttons.
An exclamation mark indicates additional information
1.2 CBC Reach Help
1.2.1 Help at screen level Context‐sensitive help is available at screen level in the CBC Reach eBanking application. You can open the online help by clicking on the ’Help’‐link on any software page.
1.2.2 CBC Reach Helpdesk An experienced Helpdesk has been installed to support CBC Reach users with questions or problems. The CBC Corporate eBanking Helpdesk staff will gladly provide assistance in the language of your choice. When you come across inconsistencies or need help on any CBC Reach matter, please do not hesitate to contact them. You find the contact information on the CBC Corporate Banking website.

CBC Reach Getting Started
5

CBC Reach Getting Started
6
Starting to work with CBC Reach Log in: via the website of CBC Corporate Banking (www.cbccorporate.be).
2.1 Setting up preferred language in CBC Reach The CBC Reach application is available in 4 languages : Dutch, French, English and German. The language of the application corresponds to the language preference of your web browser. To change it in Internet Explorer:
Select menu ‘Tools’ or use Keyboard shortcut Alt + X.
Select menu item ‘Internet Options’.
Select tab ‘Gene r a l ’ .
Click button ‘Languages’.
Click button ‘Add...’
Mark a language e.g. English (United Kingdom) and click ‘OK’.
Use button ‘Move Up’, to place your language at the top of the list.
Click twice ‘OK’.
2.2 Landing Page After logging in you arrive on the ‘L and i ng Page ’ The ‘L and i n g Page ’ displays overview information
retrieved from some of the main screens. You can always return to the ‘L and i ng Page ’ by clicking the Home icon on any of the other main screens.
The information retrieved is displayed in different containers. The containers and information displayed vary depending on your role, permissions and data available on other screens.
The ‘L and i n g Page ’ includes:
Display of items you should pay attention to
Alerts activated by the system to be handled by you
All unread Messages addressed to you
Information on Open Payments and Balances

CBC Reach Getting Started
7
This function is discussed in more detail in the CBC Reach Online Help functionality.
2.3 Navigation
Menu
The screen displays all main menu options. Move the mouse over the main menu to open the submenu .
Breadcrumb trail
The breadcrumb trail is displayed next to the Home icon on main screens. The breadcrumb trail displays your current location and the menu path leading to it. Each part of the breadcrumb trail is clickable and leads back to the corresponding screen. Click ‘Home’ to return to the Landing Page. New alert available
The ‘Alerting’ feature is used to inform users about important business events. If you click the bell icon on any screen, a small ‘Alerts’ pop‐up window is displayed. It is displayed whenever a new alert occurs. It is located on the right side of the screen on the left of the user name.

CBC Reach Getting Started
8
Sitemap
The ‘Sitemap’ gives an overview of all functions available for your user profile. A click on a function leads you to the desired screen.
Help
Use ‘Help’ if you have questions or problems in any screen.
Main screens and detail screens A main screen usually contains a data table. By clicking on the line of a specific topic, a pop‐up will appear providing information about the selected line in the main screen.
Infobox
Below the menu bar you can find the infobox with information on the displayed screen. Click the ‘i’ icon on the right to activate the infobox.
Related actions While on a main screen, you can quickly and easily perform actions related to the current screen. A list of these
actions is provided in the ‘Related actions’ area on the left hand side of the screen. You can collapse the ‘Related Actions’ area to the left border and expand it again by clicking the small arrow next to it.
CBC Reach Getting Started
9
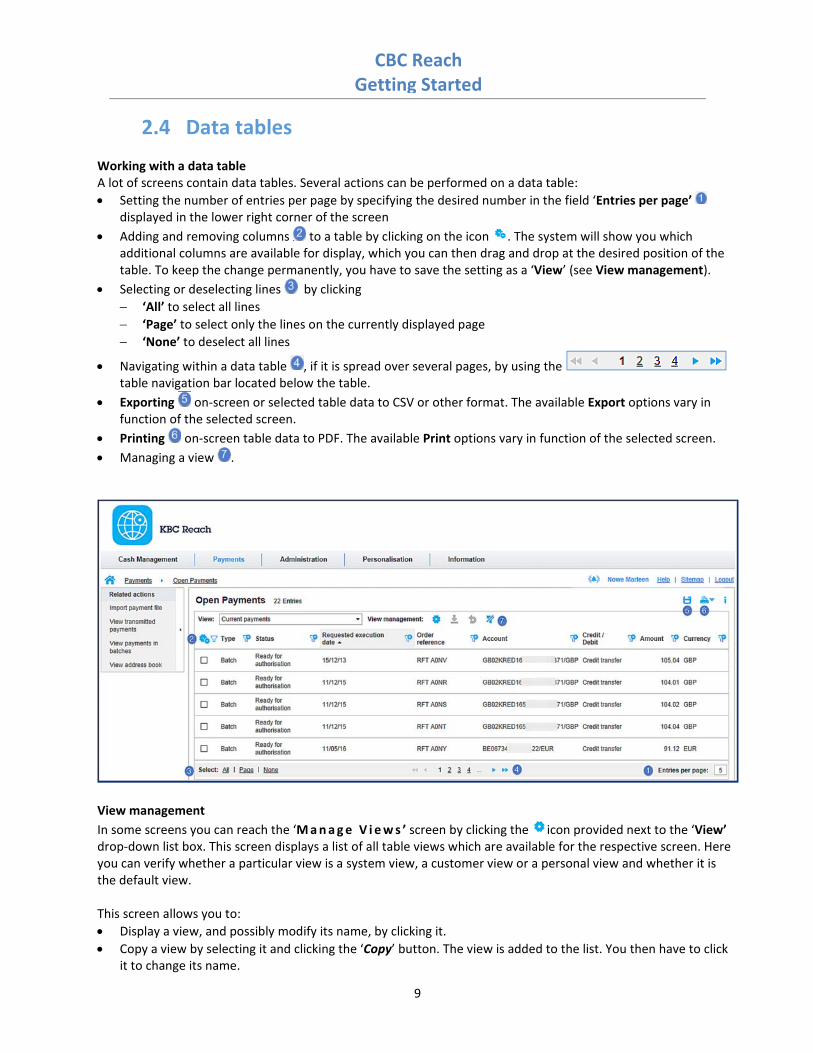
2.4 Data tables Working with a data table A lot of screens contain data tables. Several actions can be performed on a data table:
Setting the number of entries per page by specifying the desired number in the field ‘Entries per page’ displayed in the lower right corner of the screen
Adding and removing columns to a table by clicking on the icon . The system will show you which additional columns are available for display, which you can then drag and drop at the desired position of the table. To keep the change permanently, you have to save the setting as a ‘View’ (see View management).
Selecting or deselecting lines by clicking
‘All’ to select all lines
‘Page’ to select only the lines on the currently displayed page
‘None’ to deselect all lines
Navigating within a data table , if it is spread over several pages, by using the table navigation bar located below the table.
Exporting on‐screen or selected table data to CSV or other format. The available Export options vary in function of the selected screen.
Printing on‐screen table data to PDF. The available Print options vary in function of the selected screen.
Managing a view .
View management
In some screens you can reach the ‘Manage V iews ’ screen by clicking the icon provided next to the ‘View’ drop‐down list box. This screen displays a list of all table views which are available for the respective screen. Here you can verify whether a particular view is a system view, a customer view or a personal view and whether it is the default view. This screen allows you to:
Display a view, and possibly modify its name, by clicking it.
Copy a view by selecting it and clicking the ‘Copy’ button. The view is added to the list. You then have to click it to change its name.

CBC Reach Getting Started
10
Delete a view by selecting it and clicking the ‘Delete’ button. System views cannot be deleted.
Set a new default view by selecting it and clicking the ‘Set as default’ button to set this view as your default view for the respective screen. This is the view which will be loaded when you open the screen the next time.
Click the ‘Save’ button to save your changes and leave the screen.
Click the ‘Cancel’ button to leave the screen without saving any changes. Creating or configuring a view System views are views created by the developers of the application. System views cannot be modified, but you can copy and save them under a different name as a personal view and customize them to your preferences by adding or removing columns, changing sorting criteria, and filtering data. Exporting table data You can export table data into a CSV file:
All lines up to a maximum of 100 will be exported. If a selection is made, the selected lines will be exported (up to a maximum of 100)
Click on the download icon , next to the Print icon, in the upper right corner of the screen above the table.
In the bottom line, click the arrow next to the Save button. Choose a destination and save the file.
The file is saved in CSV format (Comma Separated Value). The separator for CSV files can be configured in the Personalisation menu.
Printing on‐screen table data You can print information from a data table. The printing creates a PDF file:
All lines up to a maximum of 500 will be printed. If a selection is made, the selected lines will be printed (up to a maximum of 500).
The print contains all columns visible on the screen.
Click on the printer icon .
In the bottom line, if you click on ‘Open’, the file will be opened in the PDF‐reader. You can print it or save it.
If you click the arrow next to ‘Save’, you can choose a destination and save the file in PDF‐format.

CBC Reach Getting Started
11
CBC Reach Modules The CBC Reach eBanking application provides a consistent user interface, which the CBC Reach users can access to open the following modules:
Cash Management
Payments
Administration
Personalisation
Information
3.1 Cash Management The ‘Cash Management ’ module enables you to receive reports from the bank on assets and initiated transactions that have been processed by the banks (this reported data will include cash account statements and transactions for both end‐of‐day and intra‐day). In addition, this module allows you to generate reports with the information that was supplied by the bank. You can also export some reporting data from the CBC Reach Corporate eBanking application to your local network and/or local drive and download files from the bank's back‐office. The following options are available:
Option Description
Balances Provides account balances and transactions that were booked on previous business days.
Account Statements Provides available statements of your accounts.
Intraday Reports Provides intra‐day balances and transactions already processed.
Transactions Using different filters allows you to search transactions corresponding to specific search criteria. You can search by date, counterparty, account, currency, amount, remittance information,…
Bank Reports Provides end‐of‐day and intra‐day bank reports. These reports can be downloaded in an customised version.
Download & Export All information can be downloaded and/or exported in customized files.
For more information see Cash Management.
3.2 Payments The ‘Payment s ’ module enables you to create payments (credit transfers, direct debits, cheques and bill of exchange (LCR)). You can create transactions from scratch, from a template, from a file. After full authorisation the system sends the payments automatically to the addressed bank server system. Other features include the monitoring of previously initiated transactions, template management and address book.

CBC Reach Getting Started
12
The following options are available:
Option Description
View Credits / Debits Provides information on transmitted and not transmitted (still to be authorised and/or to be send to the bank) payments or payment batches. These transactions can be viewed and depending on their status modified and authorised. You can create new payments. You can also create periodic payments and bills of exchange (LCR)
Create Credits / Debits Allows you to create and save payments (credit transfer, direct debit and cheque) and payment templates and to import payment files.
Configure Templates Allows you to manage your address book to store the details of your creditors and/or debtors and to consult and even create transactions from your payment templates.
Download & Export All information can be downloaded and/or exported in customised files via the
download icon .
For more information see Payments
3.3 Administration The ‘Admin i s t r a t i on ’ module enables you to view, create and modify your customer administration settings. The main options are:
Option Description
Administrative Tasks This option is limited to the management of the Modifications of administrative data. Modifications of administrative data have to be authorized by one or more persons before they have an effect. This sub option allows you to view and authorise the modifications.
Configure Customer Objects
The sub options Companies and Accounts provide overviews of the companies and accounts set up by CBC based on the informations received from you. The sub options Permission Profiles and Users allow you to view, create and modify permission profiles and users.
For more information see Administration

CBC Reach Getting Started
13
3.4 Personalisation The ‘Pe r sona l i s a t i on ’ module enables you to manage the connection of mobile devices for the use of the CBC Reach App and to manage your personal alerts. The main options are:
Option Description
Configure Mobile Devices
The main sub option Mobile Credentials allows you to see the list of all mobile devices which are connected to CBC Reach and to release or remove them for the use of the CBC Reach App.
Configure Alerting The sub options Alert Setup and Alert Channel Setup allow you to view and create your personal alerts and to choose the communication channel to receive them.
For more information see Personalisation
3.5 Information The ‘I n f o rma t i on ’ module enables you to handle the information you receive from the bank by means of Alerts and Messages. The main sub options are:
Sub option Description
Alerts Allows you to handle the alerts triggered by the application.
Messages Allows to read the messages sent to you by the bank.
For more information see Information

CBC Reach Getting Started
14
Cash Management
4.1 Balances
The balances on your accounts can be viewed by choosing ‘Cash Management’ and ‘Balances’ in the menu bar. The ‘Ba l an ce s ’ screen displays a list of current balances per account and a summary of balances per currency below. The screen shows the entry balance and the value balance on the account.
In the ‘View’ section you can filter to only see certain types of balances. The ‘Balances based on account statements’ is the default view. Possible actions:
Click a table row to view the Balance Details of the respective account.
Select one or more accounts and click ‘Show latest statements’ button to view the latest account statement for the selected accounts. The ‘Accoun t S t a t emen t s ’ screen will be displayed with the default view option ‘Latest statement of selected accounts’. Other view options are available for selection in that screen.
Download or export balance information for selected accounts via the download icon .
Select one or more accounts and click the ‘Request intraday reports’ button to send a SWIFT MT920 message to the bank to request intraday reports for the selected accounts.
The accounts for which balances are displayed depend on your current system configuration and the user permissions you hold.
This function is discussed in more detail in the CBC Reach Online Help functionality.

CBC Reach Getting Started
15
4.2 Account Statements
You can view the available statements of your accounts by choosing ‘Cash Management’ and ‘Account
Statements’ in the menu bar or clicking the ‘Show latest statements’ button on the ‘Ba l ance s ’ screen.
In the ‘View’ section you can filter to only see certain types of statements. The ‘Latest statement per account’ is the default view. Possible actions:
Click a table row to view further details of an account statement.
Select one or more accounts and click ‘Show latest statements’ button to view only the latest account statements for the selected accounts. The ‘Ac coun t S t a t ement s ’ screen will be displayed with the default view option ‘Latest statement of selected accounts’. Other view options are available for selection.
Download or export account statement(s) for selected accounts via the download icon .
The accounts for which account statements are displayed depend on your current system configuration and the user permissions you hold.
This function is discussed in more detail in the CBC Reach Online Help functionality.
4.3 Intraday Reports
You reach the intraday reports by navigating to ‘Cash Management’ and ‘Intraday Reports’ in the menu bar. The ‘I n t r aday Repo r t s ’ screen lists intraday transactions of your accounts as received during the current day. Possible actions:
Click a table row to view the transaction details.
Download or export intraday report(s) for selected accounts via the download icon .

CBC Reach Getting Started
16
The accounts for which intraday reports are displayed depend on your role and permissions.
This function is discussed in more detail in the CBC Reach Online Help functionality.
4.4 Transactions
You can view the transactions by choosing Cash Management and Transactions in the menu bar. The ‘T ran sa c t i on s ’ screen lists transactions related to your accounts.
In the ‘View’ section you can filter to only see certain types of transactions. The ‘Last 7 days including today’ is the default view.
Possible actions:
Click on a transaction to enter its details.
Download or export information for selected transaction(s) via the download icon .
The accounts for which transactions are displayed depend on your role and permissions.
This function is discussed in more detail in the CBC Reach Online Help functionality.

CBC Reach Getting Started
17
4.5 Bank Reports
You can view the bank reports by navigating to ‘Cash Management’ and ‘Bank Reports’ in the menu bar. The ‘ B ank Repo r t s ’ screen displays the encrypted account information files ready for download in different formats, e.g. reports in SWIFT‐MT, Coda, CAMT, AFB format. Possible action:
Download or export selected bank report(s) via the download icon .
The availability of the Bank Reports screen and the data displayed on it depends on your current system configuration and the permissions you hold.
This function is discussed in more detail in the CBC Reach Online Help functionality.

CBC Reach Getting Started
18
Payments
5.1 View Credits / Debits
5.1.1 Open Payments
You can access the ‘Open Paymen t s ’ screen by navigating to ‘Payments’ and then ‘Open Payments’ in the menu bar. The screen shows all payments and batches which have not yet been fully authorised and/or have not been sent to the payment processing system. The default sort order is chronological by requested execution date (ascending).
In the ‘View’ section you can filter to only see certain types of payments. The default view is ‘Current Payments’. Possible actions:
Click on a table row to view, modify or authorize a payment or a batch.
Click the ‘Create’ or ‘More actions’ buttons to see all actions that are available on this screen.
Click the ‘Create ‐ Batch’ button to create a batch from the selected payments.
Click the ‘Create ‐ Credit transfer’ button to create a new credit transfer.
Click the ‘Create ‐ Direct debit’ button to create a new direct debit.
Click the ‘Create ‐ Cheque’ button to create a new cheque payment.
Click the ‘Create ‐ Bill of exchange (LCR)’ button to create a new French Bill of Exchange.
Click the ‘More actions ‐ Add description’ button to add a description to a selected batched
Click the ‘More actions ‐ Delete’ button to delete a selected payment or batch.
Click the ‘More actions ‐ Reject’ button to reject a selected batched payment or batch.
Click the ‘Authorise’ button to authorise selected entries.
Not all actions are available to all users. Availability of actions depends on your role and permissions.
This function is discussed in more detail in the CBC Reach Online Help functionality.

CBC Reach Getting Started
19
5.1.1.1 Create Bill of Exchange (LCR) You reach this screen by clicking the ‘Create’ button and selecting Bill of Exchange (LCR) on the ‘Open Paymen t s ’ screen. On the ‘C rea t e B i l l o f Ex change ( L CR ) ’ screen you can enter an LCR payment. The French LCR (Lettre de Change Relevé) is a payment format for domestic French payments. An LCR is an electronic commercial trade bill. This is widely used to finance trade and, when discounted with a financial institution, to obtain credit. The ‘C r ea t e B i l l o f Ex change ( L CR ) ’ screen is divided into two parts: in the first part, the generic screen, you enter some basic data related to the Remitter , the Debtor and the Payment details . The second part of the screen is intended for Further payment details. As soon as you have completed all the mandatory fields in the first part of the screen, you click outside the fields to continue the input of the Further payment details necessary for your payment in the second part of the screen. First part of the screen:

CBC Reach Getting Started
20
Second part of the screen:
In this section you can enter further details for your LCR.
Possible actions:
Click the ‘Authorise’ button to authorise your LCR payment.
Click the ‘More actions ‐ Save and next’ button to save your LCR payment and enter the next LCR payment.
Click the ‘More actions ‐ Save as incomplete’ button to save your incomplete LCR payment.
Click the ‘Save’ button to save your completely entered LCR payment.
Click the ‘Cancel’ button to close the screen without saving your settings.
The availability of this screen depends on your system configuration.
This function is discussed in more detail in the CBC Reach Online Help functionality.
5.1.2 Transmitted Payments
You can view this screen by choosing ‘Payments’ and ‘Transmitted Payments’ in the menu bar. The ‘T ran sm i t t ed Paymen t s ’ screen shows the list of transmitted payments (individual or in batch) with their status.
In the ‘View’ section you can filter to only see certain types of payments. The default view is ‘Recent payments’. Possible actions:
Click on a table row to view the details of a payment or batch.
Click the ‘Delete’ button to delete a selected payment or batch.
Click the ‘Reject’ button to delete a selected payment or batch.

CBC Reach Getting Started
21
The display of information may depend on your permissions and role.
Not all actions are available to all users. Availability of actions depends on your role and permissions.
This screen and its functions is discussed in more detail in the CBC Reach Online Help functionality.
5.1.3 Payments in Batches
You can view this screen by choosing ‘Payments’ and ‘Payments in Batches’ in the menu bar. The ‘Paymen t s i n Ba t che s ’ screen shows a list of all payments contained in any batch.
In the ‘View’ section you can filter to only see certain types of payments. ‘Current payments’ is the default view. Possible actions:
Click a table row to view the (read‐only) details of a payment.
Click the ‘Save as template’ button to save the selected payment as a template.

CBC Reach Getting Started
22
The display of individual payments may depend on your permissions and role.
The available actions depend on your permissions.
This screen and its functions is discussed in more detail in the CBC Reach Online Help functionality.
5.1.4 Periodic Payments
You reach this screen by navigating to ‘Payments’ and ‘Periodic Payments’ in the menu bar. The ‘Pe r i od i c Paymen t s ’ screen contains a list of available periodic payments (periodic credit transfers and periodic direct debits) registered in the system. Periodic payments (= standing orders) are created to specify templates for payments which are to be generated periodically in more or less identical form, e.g. regular leasing rates or rent payments.
In the ‘View’ section you can filter to only see certain types of periodic payments. ‘All periodic payments’ is the default view. Possible actions:
Click on a table row to access the details of a ‘Periodic Payment’.
Click the ‘Create periodic credit’ button to create a new periodic credit transfer.
Click the ‘Create periodic debit’ button to create a new periodic direct debit.
Click the ‘Delete’ button to delete one or more selected periodic payments from the system. Effectively, here you delete the periodic payment template only and not the payments which have already been created from the periodic payment.
The periodic payments displayed vary depending on your permissions.
Depending on your permissions, not all of the action buttons may be available.
This screen and its functions is discussed in more detail in the CBC Reach Online Help functionality.

CBC Reach Getting Started
23
5.1.5 Imported Payment Files
To access this screen, navigate to ‘Payments’ and ‘Imported Payment Files’ in the menu bar. The ‘Impor t ed Paymen t F i l e s ’ screen displays information about each import of a payment file recorded in the database.
In the ‘View’ section you can filter the desired selection. The default view is ‘Imported during last 7 days’.
Possible actions:
Click a table row to view the details of an ‘Imported Payment File’.
Click the ‘Import’ button to access the ‘Impo r t Paymen t F i l e ’ screen and import a new payment file.
Click the ‘Delete’ button to delete a selected entry from the list. Only the file import information will be deleted, not the imported batches / payments. However, in case of service files which have not been allocated everything will be deleted.
The display of individual payment files may depend on your permissions, role and system configuration.
This screen and its functions is discussed in more detail in the CBC Reach Online Help functionality.
5.2 Create Credits / Debits
5.2.1 Credit Transfer You reach the ‘C rea t e C red i t T r an s f e r ’ screen by navigating to ‘Payments’ and ‘Credit Transfer’ or by clicking the ‘Create payment from template’ button in the ‘Paymen t Temp l a t e s ’ screen or clicking the ‘More actions ‐ Create credit transfer’ button in the ‘Add re s s Book ’ screen.
The ‘C r ea t e C red i t T r an s fe r ’ screen is divided into two parts: in the first part, the generic screen, you enter some basic data that the system needs to define the target product and tne format of the payment. The attributes on the second part of the screen, the format‐specific part, depend on the product, the format and the configuration of the payment entry.

CBC Reach Getting Started
24
In the first part of the screen you see the sections as described below. Depending on your input, some additional fields may be displayed. Mandatory fields are marked with an asterisk. If you choose to load a template, some or all of the fields below will be populated, depending on your template.
Template This section allows you to select a template for the creation of a credit transfer. This template already contains some data and can be used as a basis for your payment. For more information on payment templates, please go to Payment Templates.
Remitter This section allows you to enter the remitter data.
Beneficiary This section allows you to enter the beneficiary data.
Payment details This section allows you to enter the details of the payment.
As soon as you have completed all the mandatory fields in the first part of the screen, you click outside the fields and the system determines the Further payment details fields necessary for your payment in the second part of the screen. The displayed fields depend on the payment format, its configuration, and the user's permission. Possible actions:
Click the ‘Authorise’ button to authorise the current credit transfer. The system will save your changes and lead you directly to the ‘C red i t T r an s fe r Deta i l s → Autho r i s a t i on ’ screen where you can authorise the payment.
Click the ‘More actions – Save and next’ button to save the current credit transfer and directly open a new screen to create another new credit transfer of the same type with some fields already pre‐filled from the current credit transfer.
Click the ‘More actions – Save as incomplete’ button to save the credit transfer in an incomplete status, which may be necessary when not all data are available yet.

CBC Reach Getting Started
25
Click the ‘More actions – Save as template’ button to save the current credit transfer as a template.
Click the ‘Save’ button to save your credit transfer and close the screen.
Click the ‘Cancel’ button to leave the screen without saving your settings.
You need to hold the relevant permission to be able to view this screen.
Not all actions are available to all users. Availability of actions depends on your role and permissions.
Some fields are only visible if the section has been expanded. To expand or collapse a section, click the arrow icon at the upper right corner of the section.
This screen and its functions is discussed in more detail in the CBC Reach Online Help functionality.
5.2.2 Direct Debit You reach the ‘C rea t e D i r e c t Deb i t ’ screen by navigating to ‘Payments’ and ‘Direct Debit’ in the menu bar or by clicking the ‘Create payment from template’ button in the ‘Paymen t Temp l a t e s ’ screen or by clicking the ‘More actions ‐ Create direct debit’ button in the ‘Add re s s Book ’ screen. A direct debit is a financial transaction based on an agreement between a creditor and a debtor to collect payments from the debtor’s account.

CBC Reach Getting Started
26
To start with SEPA‐Direct‐Debit following conditions must be fulfilled. You need:
an agreement with your collecting bank
a SEPA Creditor Identifier provided by your collecting bank. Similar to the ‘C rea t e C r ed i t T ran s fe r ’ screen, the ‘C rea t e D i r e c t Deb i t ’ screen is divided into two parts: in this first part, the generic screen, you enter some basic data that the system needs to define the target product and the format of the payment. The attributes on the second part, the format‐specific screen, depend on the product, the format and the configuration of the payment entry. In the first part of the screen, you see the fields as described below. Depending on your input, some additional fields may be displayed. Mandatory fields are marked with an asterisk. If you choose to load a template, some or all of the fields below will be completed, depending on your template.
Template This section allows you to select a template for the creation of a direct debit. This template already contains some data and can be used as a basis for your payment. For more information on payment templates, please go to Payment Templates.
Remitter This section allows you to enter the remitter data.
Debtor This section allows you to enter the debtor data.
Payment details This section allows you to enter the details of the payment.
As soon as you have completed all the mandatory fields in the first part of the screen, you click outside the fields and the system determines the Further payment details fields necessary for your payment in the second part of the screen. The displayed fields depend on the payment format, its configuration, and the user's permission.

CBC Reach Getting Started
27
Possible actions:
Click the ‘Authorise’ button to authorise the current direct debit. The system will save your changes and lead you directly to the ‘D i re c t Deb i t De ta i l s → Au tho r i s a on ’ screen where you can authorise the payment.
Click the ‘More actions – Save and next’ button to save the current direct debit and directly open a new screen to create another new direct debit of the same type with some fields already pre‐filled from the current payment.
Click the ‘More actions – Save as incomplete’ button to save the direct debit in an incomplete status, which may be necessary when not all data are available yet.
Click the ‘More actions – Save as template’ button to save the current direct debit as a template.
Click the ‘Save’ button to save your direct debit and close the screen.
Click the ‘Cancel’ button to leave the screen without saving your settings.
You need to hold the relevant permission to be able to view this screen.
Not all actions are available to all users. Availability of actions depends on your role and permissions.
Some fields are only visible if the section has been expanded. To expand or collapse a section, click the arrow icon at the upper right corner of the section.
This screen and its functions is discussed in more detail in the CBC Reach Online Help functionality.

CBC Reach Getting Started
28
5.2.3 Cheque To access the ‘C rea t e cheque ’ screen navigate to ‘Payments’ and ‘Cheque’ in the menu bar. Here you can initiate a cheque transfer. When you choose for a cheque transfer the beneficiary of the payment will receive a paper bankcheque instead of a credit on his bank account. The screen is built very similar to the ‘C rea te C red i t T r an s f e r ’ screen. The screen is divided into two parts: the first part, the generic screen, contains the sections Template, Remitter, Beneficiary and Payment details, where you can enter some basic data that the system needs to determine the target product and the format of the payment. The second part of the screen contains the Further payment details section with the format‐specific attributes which depend on the product, the format and the configuration of the payment entry. Possible actions:
Click the ‘Authorise’ button to authorise the current cheque payment. The system will save your changes and lead you directly to the ‘C h e q u e D e t a i l s → A u t h o r i s a t i o n ’ screen where you can authorise the cheque payment.
Other options are similar to the ‘C rea t e C red i t T r an s fe r ’ screen.
Periodic cheque payments are not supported.
You need to hold the relevant permission to be able to view this screen.
Not all actions are available to all users. Availability of actions depends on your role and permissions.
Some fields are only visible if the respective section has been expanded. To expand or collapse a section, click the arrow icon at the upper right corner of the section.
This screen and its functions is discussed in more detail in the CBC Reach Online Help functionality.
5.2.4 Import Payment File To access the ‘Impo r t Paymen t F i l e ’ screen you have to navigate to ‘Payments’ and ‘Import Payment File’ in the menu bar or navigate to ‘Payments’ and ‘Imported Payment Files’ and then click the ‘Import’ button. This screen enables you to import payments and payment batches.
You can import a file in the following ways :
Import file as Batch (payment details can be displayed): This option is used to import batch files. The details of the contained payments will be imported as well.
Import file as Individual payments without batch creation: This option is used to import payment files.
Import file as Individual payments with subsequent batch creation: This option is used to import payment files and automatically compose the imported payments into one or several batches.
After selecting the way of importing the file, you have to specify ‘Format’, ‘Product’ and ‘Payment category’. Different formats are available:
BE‐CIRI51 (Belgian format for foreign credit transfers)
CSV ‐ domestic and SEPA credit transfers
CSV ‐ international credit transfers
CZ‐SK‐DTCFA (Czech / Slovak format for foreign credit transfers)

CBC Reach Getting Started
29
CZ‐SK‐DTCFD (Czech format for domestic payments)
DE‐DTAZV AZV (German format for foreign credit transfers and urgent Euro credit transfers)
DE‐SEPA‐CT (German format for SEPA credit transfers)
DE‐SEPA‐DD (German format for SEPA direct debits)
FR‐AFB160‐LCR (French format for Bills of Exchange LCR)
HU‐CT (Hungarian format for domestic credit transfers)
NL‐BTL91 (Dutch format for foreign credit transfers)
SEPA‐SCT (Format for SEPA credit transfers)
SEPA‐SDD (Format for SEPA direct debits)
SWIFT‐MT101 (SWIFT Format request for transfer)
UNIFI‐XML‐CT (UNIFI XML based format for domestic and international credits)
The Payment category is related to the nature of the payments you are importing. When the default value ‘Automatic’ is selected, the system will determine itself the relevant ‘Payment category’ based on the content of the (payments in the) file. If one of the values ‘Intra‐company’, ‘Salary’ or ‘Standard’ is selected the system will check whether the selected ‘Payment category’ is indeed valid based on the content of the (payments in the) file. When the system decides the selected ‘Payment category’ can not be applied, this will result in an error. We therefore recommend you to use the option ‘Automatic’.
Possible actions:
Click the ‘Import and next’ button to import the selected file and to reload the import screen for another import.
Click the ‘Import’ button to import the selected file and close the current screen. If the file has already been imported into CBC Reach before, a warning message regarding a duplicate file import will be displayed. Click ‘Yes’ to import the file anyway, or ‘No’ to cancel the import.
Click the ‘Cancel’ button to leave the screen without importing any payment files.
If the import has been successful, you can view the file in the list displayed on the ‘Impor t ed Payment F i l e s ’ screen. If it was unsuccessful, you can see an error displayed in the same list.

CBC Reach Getting Started
30
We recommend not to use the function ‘Save new addressees’.
You need to hold the relevant permission to be able to view this screen.
The import functionality is not supported on tablets.
Depending on your current system configuration you can import either a single file or several files at a time.
This screen and its functions is discussed in more detail in the CBC Reach Online Help functionality.
5.3 Configure Templates
5.3.1 Address book (Counterparties)
To navigate to this screen choose ‘Payments’ and ‘Address Book’ in the menu bar. The ‘Add re s s Book ’ screen provides you with a list of addressees registered in the system. An addressee represents a company, an organisation, or a natural person that appears in a financial transaction. The addressee can assume one of two roles: that of the beneficiary (in case of an outgoing credit transfer) or of the debtor (in case of an outgoing direct debit). Possible actions:
Click a table row to view and edit details of an addressee.
Click the ‘Create addressee’ button to create a new addressee from scratch.
Click the ‘Delete’ button to delete the selected addressee.
Click the ‘More actions – Import’ button to import addressees.
Click the ‘More actions‐ Create credit transfer’ button to access the ‘C rea t e C red i t T r an s fe r ’ screen

CBC Reach Getting Started
31
where you can create a new credit transfer with the selected addressee's data already filled in the corresponding fields.
Click the ‘More actions ‐ Create direct debit’ button to access the ‘C rea t e D i r e c t Deb i t ’ screen where you can create a new direct debit with the selected addressee's data already filled in the corresponding fields.
The addressees displayed in the address book vary depending on the permissions you hold.
This screen and its functions is discussed in more detail in the CBC Reach Online Help functionality.
5.3.2 Payment Templates
You reach this screen by navigating to ‘Payments’ and ‘Payment Templates’ in the menu bar. The ‘Paymen t Temp la te s ’ screen shows available payment templates you can use to easily create frequently occurring similar payments. The payment templates already contain some data you can reuse as a basis for new payments. They specify a subset of payment fields which serve as default values for a new payment if a payment template is applied.
You can choose different views from the ‘View’ drop‐down list box. The default view is ‘All payment templates’. Possible actions:
Click on a table row to view the details of a payment template.
Click the ‘Create payment from template’ button to create a payment from a selected payment template. The precondition for this is that you selected exactly one entry from the list.
Click the ‘Delete’ button to delete one or more selected payment templates from the system.

CBC Reach Getting Started
32
The availability of templates depends on your permissions, role and system configuration.
The availability of actions depends on your permissions and your current system configuration.
This screen and its functions is discussed in more detail in the CBC Reach Online Help functionality.
CBC Reach Getting Started
33
Administration
6.1 Administrative Tasks
6.1.1 Modifications
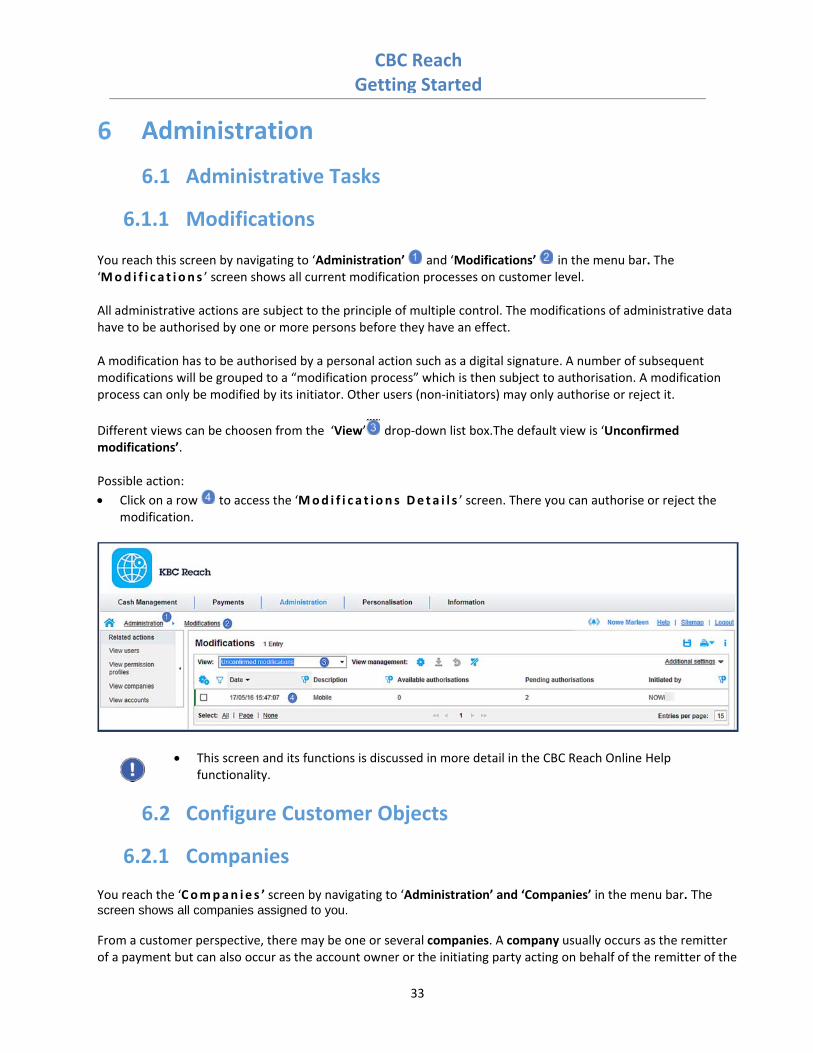
You reach this screen by navigating to ‘Administration’ and ‘Modifications’ in the menu bar. The ‘Mod i f i c a t i on s ’ screen shows all current modification processes on customer level. All administrative actions are subject to the principle of multiple control. The modifications of administrative data have to be authorised by one or more persons before they have an effect. A modification has to be authorised by a personal action such as a digital signature. A number of subsequent modifications will be grouped to a “modification process” which is then subject to authorisation. A modification process can only be modified by its initiator. Other users (non‐initiators) may only authorise or reject it.
Different views can be choosen from the ‘View’ drop‐down list box.The default view is ‘Unconfirmed modifications’. Possible action:
Click on a row to access the ‘Mod i f i c a t i on s Deta i l s ’ screen. There you can authorise or reject the modification.
This screen and its functions is discussed in more detail in the CBC Reach Online Help functionality.
6.2 Configure Customer Objects
6.2.1 Companies You reach the ‘Compan ie s ’ screen by navigating to ‘Administration’ and ‘Companies’ in the menu bar. The screen shows all companies assigned to you. From a customer perspective, there may be one or several companies. A company usually occurs as the remitter of a payment but can also occur as the account owner or the initiating party acting on behalf of the remitter of the

CBC Reach Getting Started
34
payment. A company needs to be registered by CBC before it can be used in a payment. For larger corporations usually more companies must be created by CBC representing subsidiaries or affiliated organisations. Companies are related to accounts: The company either owns certain accounts or has accounts explicitly assigned to it. In the payment creation process, the possible combination of companies and remitter accounts is restricted to those that are linked accordingly. This means that the company must either own the account or must be assigned to it to be able to use this account as a remitter account in a payment. Possible action:
Click a table row to view the details of a company.
Click the ‘Leave customer administration’ link or the X icon at the upper right corner of the screen to leave the workflow. A warning message will be displayed. After confirming the warning message you will return to the main screen.
This screen is discussed in more detail in the CBC Reach Online Help functionality.
6.2.2 Accounts You reach the ‘Accoun t s ’ screen by navigating to ‘Administration’ and ‘Accounts’ in the menu bar. This screen displays all your accounts. The setup of the accounts in CBC Reach is done by CBC based on the information received from you. Possible action:
Click a table row to view the details of an account.
Click the ‘Leave customer administration’ link or the X icon at the upper right corner of the screen to leave the workflow. A warning message will be displayed. After confirming the warning message you will return to the main screen.

CBC Reach Getting Started
35
This screen is discussed in more detail in the CBC Reach Online Help functionality.
6.2.3 Permission Profiles To access the ‘Pe rm i s s i on pro f i l e s ’ screen, navigate to ‘Administration’ and ‘Permission Profiles’ in the menu bar. The screen displays a list of permission profiles available to you. Users need a set of permissions to fulfil their roles within the CBC Reach system. Permissions are not assigned individually to users, but are combined into permission profiles which then are assigned to users. A permission profile contains a set of individual permissions required to fulfil a particular user role. Once it has been created, you assign it to those users who are expected to perform that role. The permission profiles are not only used to give functional permissions (can I create payments, manage counterparties, … ) but also to set up transaction signing (limits). CBC Reach provides a number of standard ‘Permission Profiles’. The ‘Super user Permission Profile’ ‘will be assigned to the Super user(s)’ mentioned in your contract and will be registered by CBC. A ‘Super user’ can perform the necessary set up with respect to Users and Profiles. You can find more information on ‘Permission Profiles’ in annex 1 of this document. Possible actions:
Click a table row to view and modify a permission profile.
Click the ‘Create’ button to create a new permission profile.
Click the ‘Copy’ button to create a new permission profile.
Click the ‘Delete’ button to delete a selected permission profile.
Click the ‘Finish’ button to authorise newly created or updated permission profiles contained in the table.
Click the ‘Cancel’ button to close the screen without saving your settings.
Click the ‘Leave customer administration’ link or the X icon at the upper right corner of the screen to leave the workflow. A warning message will be displayed. After confirming the warning message, all the changes you have done so far will be discarded and you will return to the main screen.

CBC Reach Getting Started
36
This screen is discussed in more detail in the CBC Reach Online Help functionality.
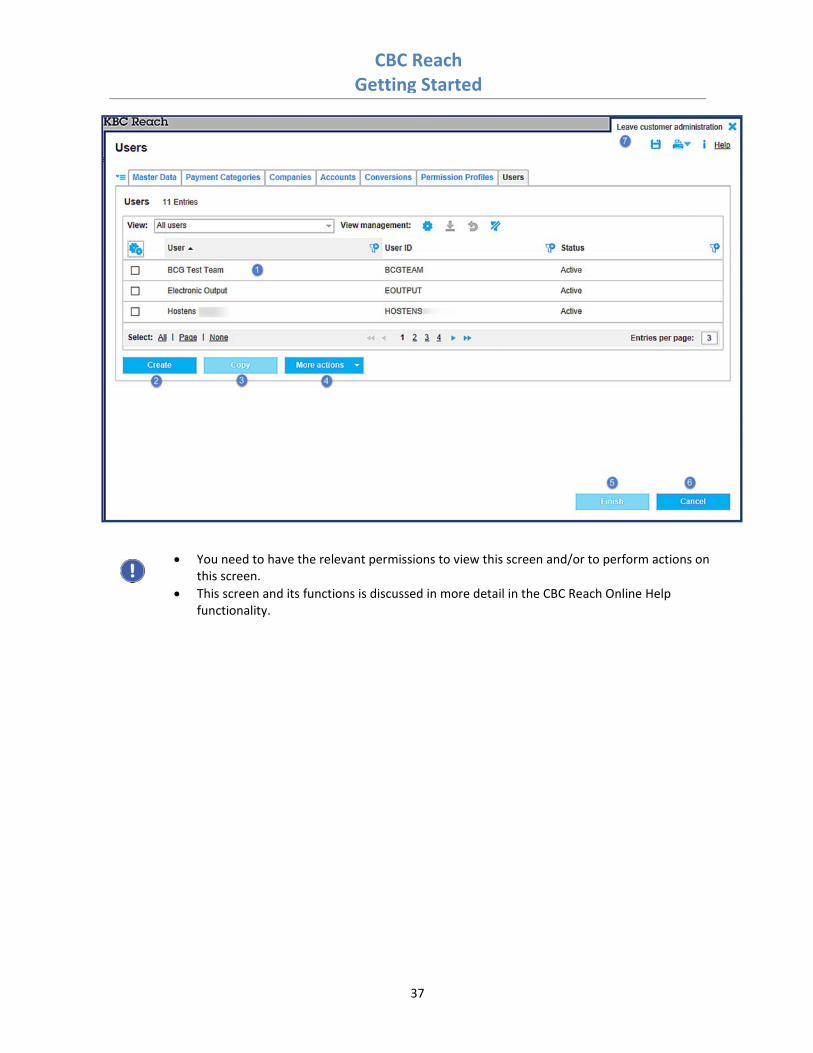
6.2.4 Users You can reach the ‘Use r s ’ screen by navigating to ‘Administration’ and ‘Users’ in the menu bar. This screen shows the list of all your users. A ‘User’ represents a person with a user account and permissions to work in the CBC Reach application. Depending on his permissions, a user can act in different roles. Possible actions:
Click on a table row to access the details of the respective user.
Click on the ‘Create’ button to create a new user and assign the necessary permission profiles to this user.
Click on the ‘Copy’ button to copy a selected user.
Click on the ‘More actions – Deactivate’ button to deactivate a selected user.
Click on the ‘More actions ‐ Delete’ button to delete a selected user.
Click on the ‘More actions – Reactivate’ button to reactivate a previously deactivated user.
Click the ‘Finish’ button to authorise newly created or updated users contained in the table.
Click the ‘Cancel’ button to close the screen without saving your settings.
Click the ‘Leave customer administration’ link or the X icon at the upper right corner of the screen to leave the workflow. A warning message will be displayed. After confirming the warning message, all the changes you have done so far will be discarded and you will return to the main screen.
CBC Reach Getting Started
37
You need to have the relevant permissions to view this screen and/or to perform actions on this screen.
This screen and its functions is discussed in more detail in the CBC Reach Online Help functionality.

CBC Reach Getting Started
38
Personalisation
7.1 Configure Mobile Devices
7.1.1 Mobile Credentials You access this screen by navigating to ‘Personalisation’ and ‘Mobile Credentials’ in the menu bar. On the ‘Mob i l e C r eden t i a l s ’ screen you see the list of all your mobile devices which are connected to CBC Reach, including the status of their keys. This connection is needed for setting up the use of the CBC Reach App.
The CBC Reach App is an application for mobile devices, which has to be downloaded through the respective app store of your device to then connect to CBC Reach. You can find more information on the ‘User Enrolment’ in the ‘Procedure User Enrolment CBC Reach App’ (annex 2).
The CBC Reach App allows you to access the electronic banking services offered by CBC Reach such as viewing account balances and transactions or authorising payments. More info to be find in ‘Viewing account statements and payments and authorising payments in CBC Reach App’ (annex 3).
The availability of this screen depends on your permissions and system configuration.
This screen and its functions is discussed in more detail in the CBC Reach Online Help functionality.
7.2 Configure Alerting
7.2.1 Alert Setup
You reach this screen by navigating to ‘Personalisation’ and ‘Alert Setup’ The ‘A le r t Se t up ’ screen displays the list of your personal alerts. An alert rule defines when an alert event shall be triggered. On this screen, you see the list of alerts that were configured for your use, and you can create new alerts.
Possible actions:
Click a table row to view the details of an alert and to access the ‘Mod i f y i n g A le r t ’ screen.
Click the ‘Create’ button to create a new alert.
Select the checkbox in front of the respective alert and click the ‘Delete’ button to delete an alert.
Select the checkbox in front of the respective alert and click the ‘More actions ‐ Activate’ button to activate an alert.
Select the checkbox in front of the respective alert and click the ‘More actions ‐ Deactivate’ button to deactivate an alert.

CBC Reach Getting Started
39
The availability of this screen depends on your permissions and system configuration.
This screen and its functions is discussed in more detail in the CBC Reach Online Help functionality.
7.2.2 Alert Channel Setup
You reach this screen by navigating to ‘Personalisation’ and ‘Alert Channel Setup’ in the menu bar. The ‘A l e r t Channe l Se tup ’ screen shows a list of the available alert channels and allows their configuration.
Possible actions:
Select the checkbox in front of the channel and click the ‘Activate’ button to ‘set a channel as to be used’. The red cross changes to a green checkmark. The alert channel will be used for the current user throughout the system within the customer context.
Select the checkbox in front of a channel in use and click the ‘Deactivate’ button to ‘set a channel as not to be used’. The green checkmark changes to a red cross.
The availability of this screen depends on your permissions and system configuration.
This screen and its functions is discussed in more detail in the CBC Reach Online Help functionality.

CBC Reach Getting Started
40
Information The Information module enables you to monitor the Alerts and Messages.
8.1 Alerts
You reach this screen by navigating to ‘Information’ and ‘Alerts’ in the menu bar. The ‘A le r t s ’ screen shows the list of active alerts which were triggered by the system and need to be handled. This screen can also be accessed by clicking ‘Go to main screen’ in the ‘Alerts box’ on the ‘L and i n g Page ’.
Possible actions:
Click a table row to access the screen that is affected by the underlying alert rule.
Select the checkbox in front of that alert and click the ‘Confirm’ button to confirm the receipt of an alert.
The availability of this screen depends on your permissions and system configuration.
The functionalities are discussed in more detail in the CBC Reach Online Help functionality.
8.2 Messages
You reach this screen by navigating to ‘Information’ and ‘Messages’ in the menu bar. The ‘Message s ’ screen displays all messages you have received from the bank. You can read and close the Messages. Possible actions
Click a table row to display the message details.

CBC Reach Getting Started
41
The availability of some of the functionalities depends on your permissions and system configuration.
Messages are automatically removed from the list when they are not valid anymore. The validity is defined on the administration side while creating the message.
This screen and its functions is discussed in more detail in the CBC Reach Online Help functionality.

CBC Reach Getting Started
42
Annex 1 : Permission Profiles Users must have been assigned at least one Permission profile to perform any function. A User may also have been assigned several profiles. In this case the permissions included in the profiles add up. This means that if a permission is part of at least one permission profile assigned to the User, it will be granted. CBC as well as the Super user(s) can manage (create, update, copy, delete, assign users) Permission profiles and can (un)assign Permissions to profiles, depending on certain parameters. Permission profiles can be created from scratch, but they can also be based on an existing profile of which a copy has been made. Any customer recorded by CBC will have 6 to 7 standard ‘functional’ Permission Profiles that have been set by CBC:
Mobile APPs: a profile needed for Users who are allowed by the customer to use the CBC Reach app
Super user permissions dual: a profile needed for Users that are indicated by the customer to be Super
user in a dual Super user context
Super user permissions SINGLE: a profile needed for Users that are indicated by the customer to be Super
user in a SINGLE Super user context.
Remark: this profile is only present in case of a SINGLE Super user context.
Template ‐ Counterparties: a profile needed for Users who are allowed by the customer to manage
(create, update, delete) counterparties that are not INTC counterparties.
Template – INTC Counterparties: a profile needed for Users who are allowed by the customer to manage
(create, update, delete) all counterparties (INTC included).
Template ‐ Payments and collections: this profile will serve as Template to create the set of payments
and collections permissions profiles you need for Users who are allowed by the customer to manage
payments and collections (create, update, delete, …).
Template ‐ Reporting permissions: this profile will serve as Template to create the set of reporting permissions profiles you need for Users who are allowed by the customer to work with reporting.
The profiles ‘Mobile Apps’, ‘Super user permissions dual’, ‘Super user permissions SINGLE’ (if present), ‘Template – Counterparties’ and ‘Template – INTC Counterparties’ can be assigned to Users directly. Permissions profiles regarding Payments and collections:
These profiles can be created based on the profile ‘Template – Payments and Collections’
Therefore, a copy has to be made of the ‘Template – Payments and Collections’ and the necessary set up has to be done.
Permissions profiles regarding Reporting (account information):
These profiles can be created based on the profile ‘Template – Reporting permissions’
Therefore, a copy has to be made of the ‘Template – Reporting permissions’ and the necessary set up has to be done.
Permissions profiles regarding transaction Signing:
These profiles have to be created from scratch.

CBC Reach Getting Started
43
Annex 2 : Procedure User Enrolment CBC Reach App The following describes the steps that have to be taken to ensure a full enrolment of CBC Reach users in the CBC Reach App. The assumption is made that CBC granted the customer the permission to use the App (which will be the standard). When all mentioned steps have been successfully executed, the user will be able to log on to the CBC Reach App and use its functionalities.
STEP WHO ACTIONS
1 Super user in browser version
KBC Reach
a. Make sure the User has the permission to use Mobile apps by assigning the Permission profile ‘Mobile APPs’.
b. Go to ‘Admin i s t r a t i on ’ and click on ‘Master Data’. c. Look for the Customer ID via the tab ‘Mas te r Da ta ’ and the User ID of the
User via the tab ‘Use r s ’. d. Provide the Customer ID and User ID to the User.
2 User on his mobile device
a. Install the KBC Reach App from the relevant ‘App store’. b. Start the KBC Reach App. c. Choose and enter a password and reconfirm it.
d. Enter your Customer ID and User ID received from the Super user on the next screen. Other unknown (combinations of) Customer IDs and User IDs will fail during the further registration process.
e. A screen is now shown that explains the next steps and shows a
unique‘Registration code’ .(see example below).

CBC Reach Getting Started
44
3 User in browser version
KBC Reach
a. You have to be authorized by the Super user to use the KBC Reach App (see previous steps). Log in as User in the KBC Reach browser application.
b. Go to ‘Pe r sona l i s a t i on ’ and click on ‘Mobile Credentials’. c. A list of mobile devices will be shown.
d. Click on your device, which has the status ‘Waiting for release’, and you will be prompted to fill in a hash value which is actually the ‘Registration code’ that was shown on the mobile device in step 2 e. Do not use any spaces (see example below).
e. If the value is correct, the next screen will show you that the device has been released.
4 User on his mobile device
a. Select ‘Finish’. b. The KBC Reach App can now be used on the device.

CBC Reach Getting Started
45
Annex 3 : Viewing account statements and payments and authorising payments in CBC Reach App
The following description is based on the CBC Reach App for Iphone. The functionalities of the CBC Reach App for Android Phones are similar but the screens are slightly different.
A3.1 Start with User Login
Enter the Password you have chosen when you installed the CBC Reach App.
A3.2 Dashboard The ‘Dashboa rd ’ screen can be reached directly after login or by clicking on the icon.
CBC Reach Getting Started
46
The following sections are available:
Favourites: this section allows to add favourite accounts (subject to the user’s permissions) and then displays the account balances of these accounts
Balances: this section displays a list of current balances per account (based on the user’s permissions).
Account statements: this section displays the available account statements (based on the user’s permissions).
Intraday reports: this section displays the intraday transactions of your accounts as received during the current day (based on the user’s permissions).
Authorise: this section shows the payments and batches which the user can authorise (based on his permissions).
Transmitted: this section displays the status of existing payments/batches that where already fully signed (subject to the user’s permissions).
Messages: this section displays messages received from the bank.
Settings: this section allows the user to change the configuration settings.
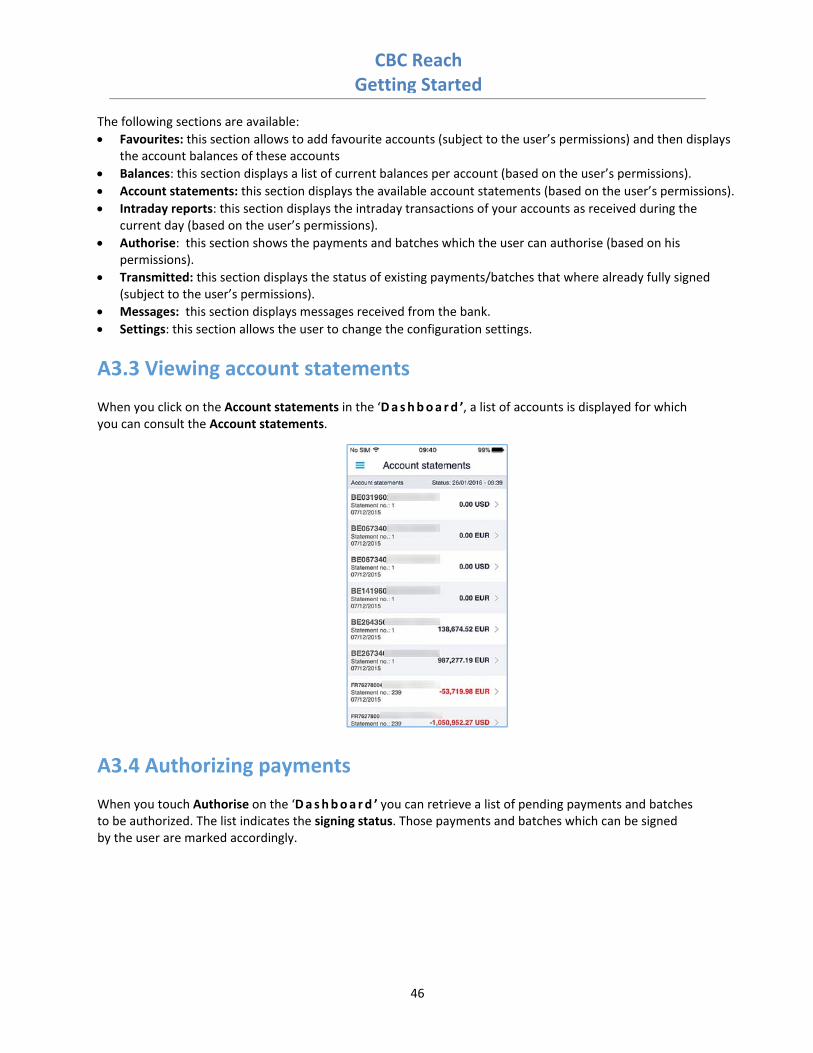
A3.3 Viewing account statements When you click on the Account statements in the ‘Dashboa rd ’, a list of accounts is displayed for which you can consult the Account statements.
A3.4 Authorizing payments When you touch Authorise on the ‘Dashboa rd ’ you can retrieve a list of pending payments and batches to be authorized. The list indicates the signing status. Those payments and batches which can be signed by the user are marked accordingly.

CBC Reach Getting Started
47
A further touch on one of the payment items displays a screen with the ‘Payment de ta i l s ’. When you touch Authorise at the end of the transaction overview, the following screen is displayed.

CBC Reach Getting Started
48
The field Description is optional. Continue the authorising process by entering your Password. Next screen will be displayed when the authorisation was successful.