Caws and Effect - Amazon S3
77
Created by © UW Bothell Office of Research; Sarah Verlinde [email protected] © Pacific Science Center Thursday, July 18, 2019 Caws and Effect Grades: 4-5 ©2019 Pacific Science Center Developed by UW Bothell Office of Research for Camps 2019 Written by Sarah Verlinde and Jessica Rouske Contributions made by: Ingrid Bautista, Esha Krishnan, Ethan Stone, Victoria Hsieh, and Sriya Paluvayi.
Transcript of Caws and Effect - Amazon S3

Created by © UW Bothell Office of Research; Sarah Verlinde [email protected] © Pacific Science Center Thursday, July 18, 2019
Caws and Effect Grades: 4-5
©2019 Pacific Science Center Developed by UW Bothell Office of Research for Camps 2019
Written by Sarah Verlinde and Jessica Rouske
Contributions made by: Ingrid Bautista, Esha Krishnan, Ethan Stone, Victoria Hsieh, and Sriya Paluvayi.

Created by UW Bothell Office of Research – Draft form Thursday, July 18, 2019 Contact Sarah Verlinde with questions: [email protected]
INTRODUCTION
STATEMENT OF PURPOSE We admire birds for their beautiful colors, exotic feathers, and elaborate songs, but crows and ravens often are left aside from this admiration. Caws and Effect summer camp focuses on the complex natural history that crows and ravens have with humans, basic bird anatomy, and detailed out-in-nature observations. Students will walk away from a week steeped in science and art to enjoy and appreciate the mysterious world of corvids. MAIN CONCEPTS
1. Learn about the anatomy, form, and lifecycle of birds in the Corvid family focusing on crows and ravens 2. Explore how humans view and personify corvids, incorporating them into mythology and folklore 3. Learn many art techniques and use them to express newly learned science and history concepts
LEARNING OBJECTIVES Campers will be able to:
1. Describe the major morphological differences between crows and ravens 2. Maintain a nature journal and add entries throughout the week 3. Describe how people view and relate to crows and ravens, both now and historically 4. Become aware of human’s impact on the environment and learn to respect and care for native habitats
CURRICULUM DESCRIPTION Crows and ravens are smart, quirky, and mysterious. UW Bothell is home to thousands of crows that roost on campus every night creating a unique environment for research and creative expression. Join us for a week-long exploration that combines science, art and corvids. Learn how crows and ravens communicate and use tools to gather food. Study their distinct anatomy, create crow-inspired artwork and discover their meanings in cultures around the globe. How will these clever creatures inspire your curiosity? OVERVIEW OF THE WEEK
Day Topic Highlights Monday Introduction to Crows, Habitat, and
Nature Journaling Students learn about sketching and watercolor, and create their own nature journal. They are introduced to crows and ravens, and go on a nature walk.
Tuesday Anatomy and Life Cycle Students learn about the differences between ravens and crows, and what makes up the corvid family. Students learn about external and internal bird anatomy, have a feather lesson, and learn about the bird lifecycle. Corresponding art projects include a feather bookmark and a mixed-media photo-painting.
Wednesday Natural History and Personifying Crows Students will learn about personifying animals and how humans have used crows and ravens in folklore and mythology. Emphasis includes Nordic and Native American stories. Students will write their own

Created by UW Bothell Office of Research – Draft form Thursday, July 18, 2019 Contact Sarah Verlinde with questions: [email protected]
stories, create collages personifying crows, and act out Native American creation myths.
Thursday
Communication and Intellect Students will learn about the methods that scientists use to determine if an animal is intelligent or not. They will learn about three UW researchers that study crow intellect and behavior and what they have learned from their research. Art projects include improving watercolor technique, color theory, and creating an upcycled bird feeder.
Friday Watershed and Habitat Awareness Students will be introduced to what a watershed is and the seven Leave No Trace principles. A connection between what animals eat and what humans leave behind will be made. At the end, a Good Morning Ameri-caw performance will to done, wrapping up an excellent and creative week.

Created by UW Bothell Office of Research – Draft form Thursday, July 18, 2019 Contact Sarah Verlinde with questions: [email protected]
SUMMARY OUTLINE Monday Outline: Introduction to Crows, Habitat, and Journaling
ACTIVITY ACTIVITY TYPE TIME SCHEDULE Nametags & Welcome Activities Arrival – Morning Circle
Administration 15 minutes 8:45 – 9:00am
Expectations and Overview of the Week Group Contract
Discussion 15 minutes 9:00 – 9:15
Safety Talk Discussion 10 minutes 9:15 – 9:25 Crows at UW Bothell Lesson 30 minutes 9:25 – 9:55 Introduction to Nature Journaling Lesson 20 minutes 9:55 – 10:15 Snack Break 15 minutes 10:15 – 10-30 Wetlands and Restoration Introduction Lesson 15 minutes 10:30 – 10:45 New Art Technique! Sketching Lesson/Activity 45 minutes 10:45 – 11:30 New Art Technique! Frottage and Leaves Art Activity 30 minutes 11:30 – 12:00pm Lunch Break 30 minutes 12:00 – 12:30 Nature Journaling Time at the Boardwalk Activity 60 minutes 12:30 – 1:30 Crow Charades Activity 30 minutes 1:30 – 2:00 Snack Break 15 minutes 2:00 – 2:15 New Art Technique! Watercolors Activity/Lesson 20 minutes 2:15 – 2:35 New Art Style! Surrealism Activity 55 minutes 2:35 – 3:30 Closing Circle Discussion 15 minutes 3:30 – 3:45 Check out - - 3:45
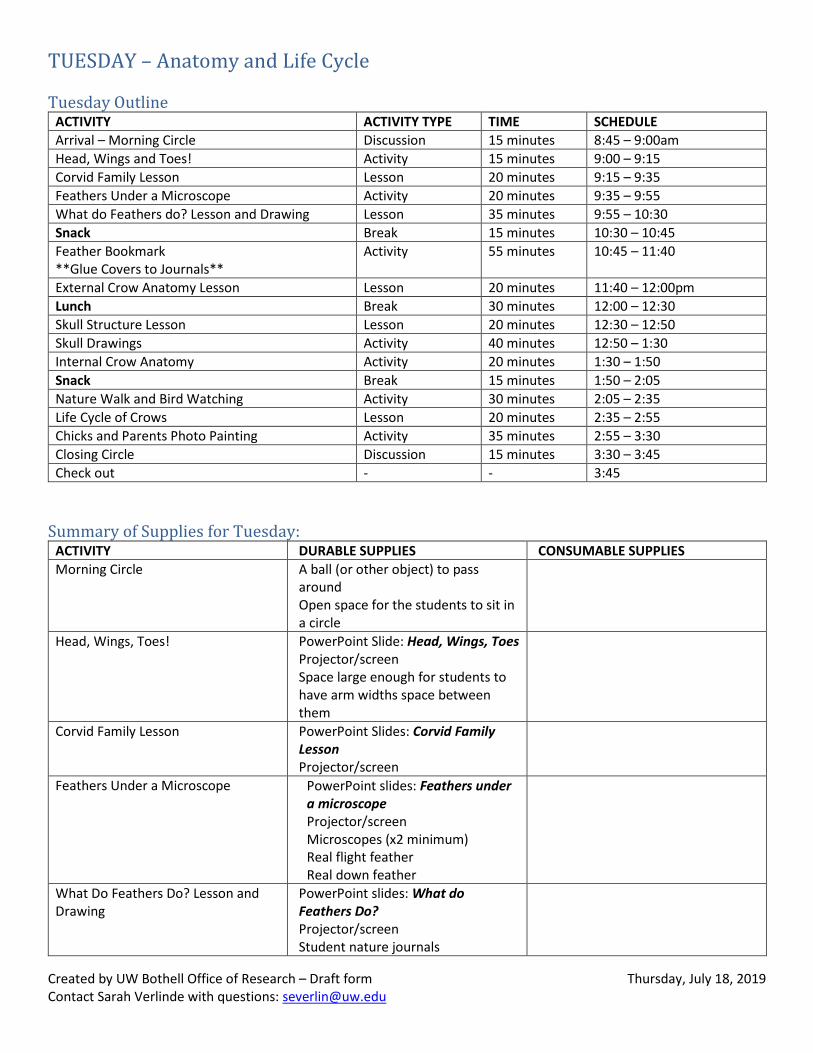
Tuesday Outline: Anatomy and Life Cycle
ACTIVITY ACTIVITY TYPE TIME SCHEDULE Arrival – Morning Circle Discussion 15 minutes 8:45 – 9:00am Head, Wings and Toes! Activity 15 minutes 9:00 – 9:15 Corvid Family Lesson Lesson 20 minutes 9:15 – 9:35 Feathers Under a Microscope Activity 20 minutes 9:35 – 9:55 What do Feathers do? Lesson and Drawing Lesson 35 minutes 9:55 – 10:30 Snack Break 15 minutes 10:30 – 10:45 Feather Bookmark **Glue Covers to Journals**
Activity 55 minutes 10:45 – 11:40
External Crow Anatomy Lesson Lesson 20 minutes 11:40 – 12:00pm Lunch Break 30 minutes 12:00 – 12:30 Skull Structure Lesson Lesson 20 minutes 12:30 – 12:50 Skull Drawings Activity 40 minutes 12:50 – 1:30 Internal Crow Anatomy Activity 20 minutes 1:30 – 1:50 Snack Break 15 minutes 1:50 – 2:05 Nature Walk and Bird Watching Activity 30 minutes 2:05 – 2:35 Life Cycle of Crows Lesson 20 minutes 2:35 – 2:55 Chicks and Parents Photo Painting Activity 35 minutes 2:55 – 3:30 Closing Circle Discussion 15 minutes 3:30 – 3:45 Check out - - 3:45

Created by UW Bothell Office of Research – Draft form Thursday, July 18, 2019 Contact Sarah Verlinde with questions: [email protected]
Wednesday Outline: Natural History and Personifying Corvids ACTIVITY ACTIVITY TYPE TIME SCHEDULE Arrival – Morning Circle Discussion 15 minutes 8:45 – 9:00am What are Fossils? Lesson 15 minutes 9:00 – 9:15 Make Your Own Fossil Bag Activity 35 minutes 9:15 – 9:50 Animal Perception/Fear Check-in Discussion 10 minutes 9:50 – 10:00 Crow Myths from Around the World Lesson 30 minutes 10:00 – 10:30 Snack Break 15 minutes 10:30 – 10:45 Crow Personality Writing Warm Up Activity 20 minutes 10:45 – 11:05 Crow-llective Feather Collage Activity 55 minutes 11:05 – 12:00pm Lunch Break 30 minutes 12:00 – 12:30 Corvid Morphology – Unusual Characteristics Lesson 15 minutes 12:45 – 12:45 Personifying Animals Introduction Lesson 15 minutes 12:45 – 1:00 Personification Artwork – Collage Activity 60 minutes 1:00 – 2:00 Snack Break 15 minutes 2:00 – 2:15 Story Time Writing Activity 25 minutes 2:15 – 2:40 Crow and Raven Creation Skits - Prep Activity 30 minutes 2:40 – 3:10 Crow and Raven Creation Skits – Performance Activity 20 minutes 3:10 – 3:30 Closing Circle Discussion 15 minutes 3:30 – 3:45 Check out - - 3:45
Thursday Outline: Communication and Intellect
ACTIVITY ACTIVITY TYPE TIME SCHEDULE Arrival – Morning Circle Discussion 15 minutes 8:45 – 9:00am Intelligent Animals Check-In Discussion 15 minutes 9:00 – 9:15 How Do you Measure Intelligence? Lesson 15 minutes 9:15 – 9:30 Memory Puzzle Game Activity 30 minutes 9:30 – 10:00 Animal Videos: Instinct vs. Intellect? Lesson/Discussion 30 minutes 10:00 – 10:30 Snack Break 15 minutes 10:30 – 10:45 Caw-munication Lesson Lesson 20 minutes 10:45 – 11:05 Are You Smarter than a Crow? Activity 35 minutes 11:05 – 11:40 Silent Journal Time Activity 20 minutes 11:40 – 12:00pm Lunch Break 30 minutes 12:00 – 12:30 Paint Bird Feeder Components Activity 45 minutes 12:30 – 1:15 Crow Mask Study Lesson 20 minutes 1:15 – 1:35 Crow-munication Relay Activity 30 minutes 1:35 – 2:05 Snack Break 15 minutes 2:05 – 2:20 Art Lesson - Color Theory & Watercolor Swatches Activity 20 minutes 2:20 – 2:40 Watercolor Doodles Activity 30 minutes 2:40 – 3:10 Nature Walk Activity 20 minutes 3:10 – 3:30 Closing Circle (outside) Discussion 15 minutes 3:30 – 3:45 Check out - - 3:45
Friday Outline: Watershed and Habitat Awareness
ACTIVITY ACTIVITY TYPE TIME SCHEDULE Arrival – Morning Circle Discussion 15 minutes 8:45 – 9:00am Watershed Introduction Lesson 20 minutes 9:00 – 9:20

Created by UW Bothell Office of Research – Draft form Thursday, July 18, 2019 Contact Sarah Verlinde with questions: [email protected]
Nature Walk: Human Effects on Environment Activity 60 minutes 9:20 – 10:20 Snack Break 15 minutes 10:20 – 10:35 Crows and Hunters Activity 35 minutes 10:35 – 11:10 Bird Beak Buffet Introduction Lesson Lesson 10 minutes 11:10 – 11:20 Bird Beak Buffet Activity Activity 40 minutes 11:20 – 12:00pm Lunch Break 30 minutes 12:00 – 12:30 Bird Feeder Activity Activity 45 minutes 12:30 – 1:15 Nature Journaling Time/Open Art Time Activity 45 minutes 1:15 – 2:00 Snack Break 15 minutes 2:00 – 2:15 Crow Skits - Good Morning Ameri-caw – Prep Activity 50 minutes 2:15 – 3:05 Crow Skits - Good Morning Ameri-caw Performance
Activity 25 minutes 3:05 – 3:30
Closing Circle Discussion 14 minutes 3:30 – 3:44 Raffle for Crow Plush/Skull Activity 1 minute 3:44 – 3:45 Check out - - 3:45

Created by UW Bothell Office of Research – Draft form Thursday, July 18, 2019 Contact Sarah Verlinde with questions: [email protected]
DAILY OUTLINE
MONDAY– Introduction to Crows, Habitat, and Journaling Monday Outline
ACTIVITY ACTIVITY TYPE TIME SCHEDULE Nametags & Welcome Activities Arrival – Morning Circle
Administration 15 minutes 8:45 – 9:00am
Expectations and Overview of the Week Group Contract
Discussion 15 minutes 9:00 – 9:15
Safety Talk Discussion 10 minutes 9:15 – 9:25 Crows at UW Bothell Lesson 30 minutes 9:25 – 9:55 Introduction to Nature Journaling Lesson 20 minutes 9:55 – 10:15 Snack Break 15 minutes 10:15 – 10-30 Wetlands and Restoration Introduction Lesson 15 minutes 10:30 – 10:45 New Art Technique! Sketching Lesson/Activity 45 minutes 10:45 – 11:30 New Art Technique! Frottage and Leaves Art Activity 30 minutes 11:30 – 12:00pm Lunch Break 30 minutes 12:00 – 12:30 Nature Journaling Time at the Boardwalk Activity 60 minutes 12:30 – 1:30 Crow Charades Activity 30 minutes 1:30 – 2:00 Snack Break 15 minutes 2:00 – 2:15 New Art Technique! Watercolors Activity/Lesson 20 minutes 2:15 – 2:35 New Art Style! Surrealism Activity 55 minutes 2:35 – 3:30 Closing Circle Discussion 15 minutes 3:30 – 3:45 Check out - - 3:45
Summary of Supplies for Monday: ACTIVITY DURABLE SUPPLIES CONSUMABLE SUPPLIES Nametags & Welcome Activities Arrival – Morning Circle
Ball/Passing Object x1 $7 Markers
Name tags
Expectations and Overviews Group Contract
Dry Erase Boards/Dry Erase Markers OR Wide Tip Markers
- Butcher Paper (6’)
Safety Talk PowerPoint Slides: Safety Talk Projector/screen
Crows at UW Bothell PowerPoint Slides: Crows at UW Bothell Projector/screen
Intro to Nature Journaling PowerPoint Slides: Introduction to Nature Journaling. Projector/screen Journals and books about journaling for students to look at
Butcher paper (6’) 1 Nature Journal/Student $40/x24 1 Black Pen and 1 Pencil/Student Plastic Cover $40/x20 (optional) Print packet Sample Nature Journal Pages with example nature journal pages. 1-2 packs per class
Wetland and Restoration Intro PowerPoint Slides: Wetlands and
Restoration Projector/screen

Created by UW Bothell Office of Research – Draft form Thursday, July 18, 2019 Contact Sarah Verlinde with questions: [email protected]
New Art Technique! Sketching PowerPoint Slides – New Art Techniques! Sketching Projector/screen Dry erase board/dry erase markers Student’s Nature Journal Pencils (with erasers) Thin colored markers
Markers and Butcher paper (6’)
New Art Technique! Frottage and Leaves
PowerPoint Slides: New Art Technique! Frottage and Leaves Projector/screen Nature journals Pencils Example leaf rubbings
Clean Leaves from Outside Cheap/thin copy/print paper Wax paper (12”/student) Students can make a tortillon/blending stump by rolling up copy paper to blend pencil marks.
Nature Journaling time at the Boardwalk
PowerPoint Slides: Nature Journaling Time at the boardwalk Projector/screen Nature Journal Pen/pencil
Crow Charades Space 2 Large bowls
Print-out Crow Charades Worksheet (1 per team) and cut into strips, fold in half
New Art Technique! Watercolors
PowerPoint Slides: New Art Technique! Watercolors Projector/screen Assorted Paint Brushes Water container/trays, one/table Black thin permanent markers Watercolor sets, one/table
9x13 Watercolor paper (cold press, economy) –1 sheet/student Wax paper (18”/student) to protect surface Paper towels or cloth rags to clean brushes in between colors
New Art Style! Surrealism
PowerPoint slides: New Art Style! Surrealism Projector/screen Assorted Paint Brushes Water container/trays, one per table Black thin permanent markers Watercolor sets, one/table White glue to glue paper to journal
Watercolor paper (cold press, economy) precut to wrap around journal –1 sheet/student -When precutting paper, leave room for the paper to fold in half. If your journal is 8x10 laid out flat (book is 8x5 folded) cut paper at 8x10.25” to leave room for the fold/spine. Wax paper (18”/student) Paper towels or cloth rags Templates of Crows: Surrealism-Journal Templates
Closing Circle Nature Journal
Ball/passing object

Created by UW Bothell Office of Research – Draft form Thursday, July 18, 2019 Contact Sarah Verlinde with questions: [email protected]
Materials Links: Ball- https://www.amazon.com/Wildlife-Artists-Play-Critters-Stuffed/dp/B071HBHLVK/ref=sr_1_5?keywords=crow+stuffed+toy&qid=1555113181&s=gateway&sr=8-5 Journal- https://www.amazon.com/Notebook-Journals-Travelers-Sketchbook-Notebooks/dp/B07DZTQ91Q/ref=sr_1_13?keywords=bulk+journals+-lined&qid=1551834080&s=gateway&sr=8-13 Cover: https://www.amazon.com/Vista-Gloves-Slip-Book-Covers-Fits/dp/B008H47GOE/ref=pd_sim_229_1/147-2034791-5291047?_encoding=UTF8&pd_rd_i=B008H47GOE&pd_rd_r=5dc1a7a9-41d6-11e9-870e-afb0e07225f8&pd_rd_w=PuDsY&pd_rd_wg=D1qpZ&pf_rd_p=90485860-83e9-4fd9-b838-b28a9b7fda30&pf_rd_r=1F54G34WHNR9SRXB9RNV&psc=1&refRID=1F54G34WHNR9SRXB9RNV Teacher Notes: Please make sure to emphasize that art techniques are a SKILL and with practice, people get better over time. The idea of talented artists vs the rest of the world discourages people from getting started, or thinking they are not creative. These artists are good at what they do because they do it all of the time. Think about this great quote as you teach by Alan Alda which states, “Art requires rigor, and science requires creativity.” Required Preparation:
• Collect sturdy, clean, and interesting leaves from outside for leaf rubbings. Recommended leaves: maples, alders, roses, birch. Collect 2-3 leaves per student.
• Print: o Print packet Sample Nature Journal Pages with example nature journal pages. 1-2 packs per class o Print-out Crow Charades Worksheet (1 per team) and cut into strips, fold in half o Templates of Crows: Surrealism-Journal Templates
• During break, fill up containers for watercolor painting • If unfamiliar with the area, walk nature walk spaces before taking students outside.
Safety Guidelines: • Outside activities/Nature Walks
o If unfamiliar with the area, walk nature walk spaces before taking students outside. o Ask students if there are any health concerns or allergies you should be aware of for outdoor activities
(bee/plant allergies) o Remind students to not touch things they are unfamiliar with and to stay in a group o Have students dress for the weather. If it’s cool, have them bring their jacket. If they did not put
sunscreen on, try to pick activities with them spending time in the shade. o Make sure they stay hydrated.
Nametags & Welcome Activities: Morning Circle 15 minutes Monday Concepts: Allows students to introduce themselves and is a meeting time to discuss activities for the day
Learning Objectives: Campers will be able to Introduce the person sitting next to them, say what activities and concepts we are learning that day Materials:
• A ball (or other object) to pass around, open space for the students to sit in a circle • Name tags and markers
Process:
1. Have students fill out name tag with marker 2. Get students to form a circle and sit down

Created by UW Bothell Office of Research – Draft form Thursday, July 18, 2019 Contact Sarah Verlinde with questions: [email protected]
3. Ask students to turn to the person to their right and say their name and their favorite animal and why (5 min) 4. Ask students to introduce the person sitting to their right to the rest of the class, going around the circle (5 min) 5. Introduce the days concepts and activities (five minutes)
Expectations and Overview of the Week and Group Contract 15 minutes Monday Concepts: Setting behavioral expectations early in the week will help all campers know the appropriate behavior for the week.
Learning Objectives: Campers will be able to identify appropriate behavior at camp. Materials:
• Markers • Butcher paper, 6-foot piece
OR • Dry erase boards • Dry erase markers
Process:
1. Talk about expectations of the week 2. Remind students arrival and dismissal starts in circle format for discussions 3. Make a group contract on the dry erase board or butcher paper with 3 rules for the week:
a. PSC campers are 1. SAFE, 2. RESPECTFUL AND 3. FUN b. Have campers help give examples of how to follow each of these rules. c. Have all campers sign the contract in agreement
Safety Talk 10 minutes Monday Concepts: Teach students how to be safe around the wetlands and in the classroom
Learning Objectives: Campers will be able to explain safety protocol and know what not to do Materials:
• PowerPoint with pictures on what to look out for: Safety Talk • Projector/screen
Process:
1. Pull up PowerPoint presentation: Safety Talk (4 slides) 2. Explain safety concepts
a. Don’t leave the group alone, especially out of the class room b. Don’t pick plants without asking a teacher first, some plants (poison ivy, brambles) can hurt you! c. Only walk on designated paths (trails, boardwalk, pavement) d. When on the Burke Gilman trail, keep an eye out for bicyclists and move to the edge of the trail when
they pass.

Created by UW Bothell Office of Research – Draft form Thursday, July 18, 2019 Contact Sarah Verlinde with questions: [email protected]
e. Basic classroom safety (don't run with scissors, don't throw things, etc...) 3. Talk about emotional safety
a. Don’t put someone down b. Don’t call people names c. Be respectful! (refer to group contact here) d. Remember, everyone learns differently, don't call people names for learning at a different pace or get
irritated if someone asks a question that you already know! Crows at UW Bothell 30 minutes Monday Concepts: Students learn some basics on the research being done on crows at UW Bothell
Learning Objectives: Students will be able to ask questions about crow research at UW Bothell Materials:
• PowerPoint Slides: Crows at UW Bothell • Projector/screen
Process:
1. Show students YouTube video of the crows on campus 2. Discuss video with students (20min), asking questions like: *There are notes in the slides for the teachers.
a. What stood out to you? b. Why do you think they come to this campus? c. How many crows come here? d. Where do they come from, where do they hang out during the day? e. How does this make you feel?
3. Have students ask their own questions and encourage discussion! 4. Extra video and resources about the crows can be found at https://www.uwb.edu/visitors/crows
Introduction to Nature Journaling 20 minutes Monday Concepts: People keep nature journals for a variety of reasons; to deepen their observations of the natural world, to record observations, to increase and practice artistic skills, and just for fun! Learning Objectives: Campers will be able to analyze components of a successful naturalist’s journals and gain ideas for their personal notebooks. Materials:
• Print packet Sample Nature Journal Pages with example nature journal pages. 1-2 packs per class • There are three PowerPoint slides to help with class flow: Introduction to Nature Journaling. • Journals and books about journaling for students to look at • Butcher paper OR whiteboard and markers • 1 journal per student – students will decorate later in the day • Plastic covers can be passed out after they decorate

Created by UW Bothell Office of Research – Draft form Thursday, July 18, 2019 Contact Sarah Verlinde with questions: [email protected]
Process: 1. Start with the Introduction to Nature Journaling slides and look at the example from Bigelow’s page. 2. Tape example journal pages around the room and take a “gallery walk” of the journal pages, books, and journals 3. The following books from the library are recommended:
a. Marsh, Janet. Janet Marsh's Nature Diary. Mermaid ed. London: M. Joseph, 1984. Print. Mermaid Books. ISBN 0718117964.
b. Bigelow, Deborah. "The Curious Nature Guide: Explore the Natural Wonders All Around You." Library Journal 140.15 (2015): 64. Web.
c. Ludwig, L. K. Mixed-media Nature Journals : New Techniques for Exploring Nature, Life, and Memories. Beverly, Mass.: Quarry, 2008. Print. 9781592533671
d. Cohen, Fiona, and Fylling, Marni. Curious Kids Nature Guide: Explore the Amazing Outdoors of the Pacific Northwest. Seattle, WA: Little Bigfoot, an Imprint of Sasquatch, 2017. Print.
e. Nature Anatomy: The Curious Parts and Pieces of the Natural World (Julia Rothman) Paperback – January 27, 2015
4. Discuss the qualities of a naturalist; a curious and detailed observer of the natural world, who is able to make connections between components in an ecosystem. Ask the students to look at the different components in the pages (data, artistic methods and formatting)
5. As a group create a list of useful journal components – write up on the board a. Observations: weather, time, date b. Artistic methods: use of color, shading, perspective, poetry c. Formatting: scale, arrows, borders, font
6. Toolkit for nature journaling a. Weather appropriate clothing b. Journal! c. Art supplies like a pencil and sharpener, markers, pens etc.
7. How to begin the practice of nature journaling? a. If observing a moving target, try to study one body part at a time b. If observing something stationary, start with the big picture and then add the details c. If observing something for identification, create accurate sketches with a lot of details and annotation
8. How to start? a. Phrases like
i. I wonder... ii. I notice...
b. Observe and go to places that you like and that inspire you i. Your favorite park, the playground, a houseplant and even a pet
Wetlands and Restoration Introduction 15 minutes Monday Concepts: The North Creek Wetlands weren’t always the lush landscape that they are now, 15 years ago it was a field of reed canary grass and not much else. Restoration efforts by the University of Washington transformed the field to a thriving wetland full of life. This area is an excellent example of the amazing impacts that restoration can have on an area. Wetlands are some of the most important landscapes, not only for the animals that call it home but for you and me! Wetlands can help clean water and keep our watersheds healthy!
Learning Objectives: Campers will be able to explain what restoration means and define what a wetland is.

Created by UW Bothell Office of Research – Draft form Thursday, July 18, 2019 Contact Sarah Verlinde with questions: [email protected]
Materials: • PowerPoint Slides: Wetlands and Restoration • Projector/screen
Process:
1. What is a wetland? a. “Wetlands are areas where water covers the soil, or is present either at or near the surface of the soil all
year or for varying periods of time during the year, including during the growing season.” -EPA b. Wetlands are exactly what the name implies, an area of land that is wet most of the time!
2. What lives in this wetland? a. Beavers, birds, fish like salmon, deer and more! b. Plants like willows, black cottonwood, red cedar, mushrooms, grasses and more!
3. Restoration a. UW Bothell wetlands
i. UW Bothell has a wetland that is part of campus ii. Started as a farm with only grass on it.
iii. Restoration started in 1997 and took at least 5 years to complete iv. 58 acres v. We will walk down to the boardwalk later today
b. Before and After Restoration i. Photo (L) UWB 1997 – compare grassy field and straightened channels, no bog/lake, no school
ii. Photo (R) UW Bothell 2016 – compare trees and meandering river/creek paths (starts as 1, splits into 2, combines as one), with bog/lake.
c. Process i. Scraped the soil to prevent regrowth of the reed canary grass
ii. Added a meandering stream iii. Added pits and mounds so a greater diversity of plants could live in the area iv. Took five years to install all the plants! v. Two caretakers work all year to keep the wetlands healthy!
4. Why restoration? a. Brought back animals like the beaver and salmon b. Improved water quality c. Removed harmful plants d. Even though a habitat is disturbed now, is doesn’t mean it can never come back or be healthy again! e. Ask students if they know any examples of restoration
New Art Techniques! Sketching 45 minutes Monday Concepts: Teach students art basics in sketching, then allow them to practice these new concepts by sketching in their new journals.
Learning Objectives: Campers will be able to practice art techniques introduced and explain why each method is useful.
Materials:
• PowerPoint Slides – New Art Techniques! Sketching • Projector/screen
Created by UW Bothell Office of Research – Draft form Thursday, July 18, 2019 Contact Sarah Verlinde with questions: [email protected]
• Markers and butcher paper OR dry erase board/dry erase markers • Student’s Nature Journal • Pencils • Thin colored markers
Process: Work through the New Art Techniques! Sketching slides. As a new technique comes up, demonstrate how it’s done up on the white board. I recommend watching some videos and familiarize yourself with the techniques. Please emphasize that good artists are good at what they do because they learn new techniques and practice!
• Hatching • Cross-hatching • Stippling • Blending • Using Colors • Practicing
New Art Technique! Frottage and Leaves 30 minutes Monday Concepts: To show the differences in leaf shape and vein patterns. Students will also learn a new technique, called Frottage, that they can use in their nature journals. Learning Objectives: Campers will be able to make a leaf rubbing on their own. Materials:
• PowerPoint Slides: New Art Technique! Frottage and Leaves • Projector/screen • Various leaves (clean) • Nature journals • Pencils • Example leaf rubbing • Cheap/thin copy/print paper • Wax paper • Students can make a tortillon/blending stump by rolling up copy paper to blend pencil marks.
Process: 1. Start with the PowerPoint Slides New Art Technique! Frottage and Leaves 2. People use this technique all the time using coins, laces, and fabrics

Created by UW Bothell Office of Research – Draft form Thursday, July 18, 2019 Contact Sarah Verlinde with questions: [email protected]
3. Place wax paper on table to protect surface, place fresh leaf on wax paper
4. Cover with white copy/print paper (thinner the better, but not tracing paper) 5. Tape white paper to wax paper or desk so the paper and leaf don’t shift during rubbing
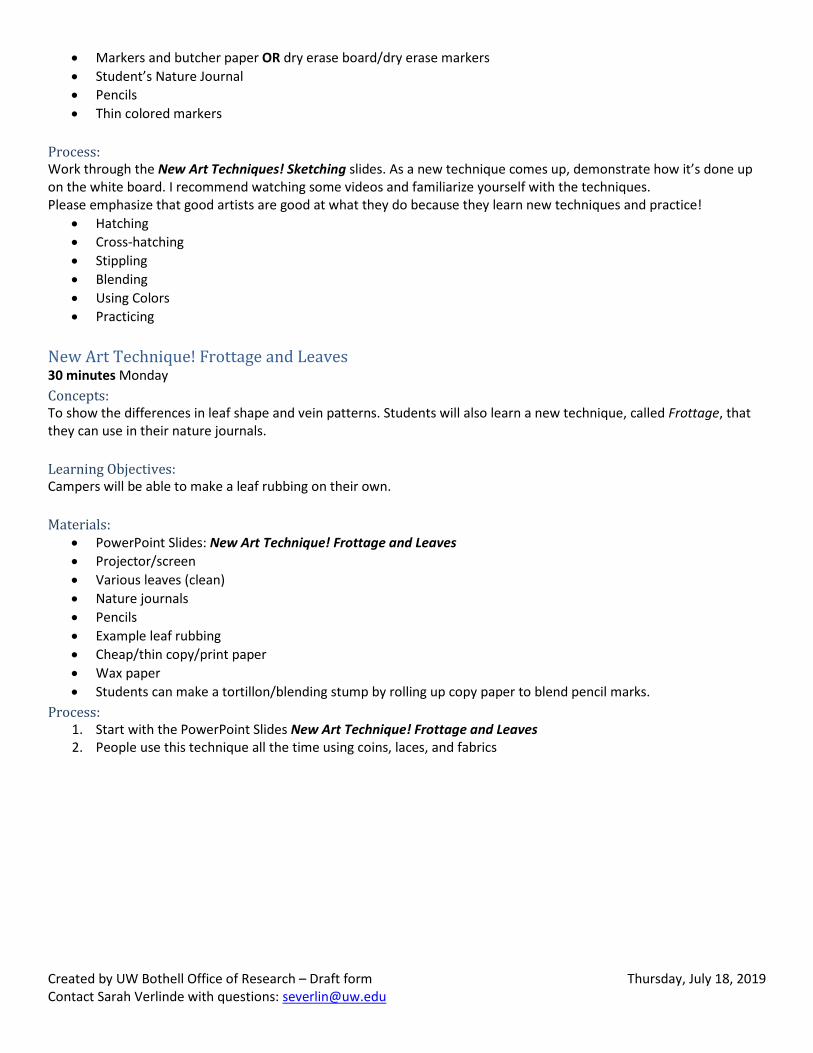
6. Start by rubbing down the veins with your hands, and then shade in the main veins first with your pencil. This
will give you a good idea of where the leaf edges are so you don’t go over. Use the sides of the pencil lead (not tip) and rub over leaf – careful around the edges.
Created by UW Bothell Office of Research – Draft form Thursday, July 18, 2019 Contact Sarah Verlinde with questions: [email protected]
7. Using the eraser, erase the areas around the leaf that were not part of the leaf and clean-up the mistakes.
Sometimes, they don’t always come out, but it’s worth trying.
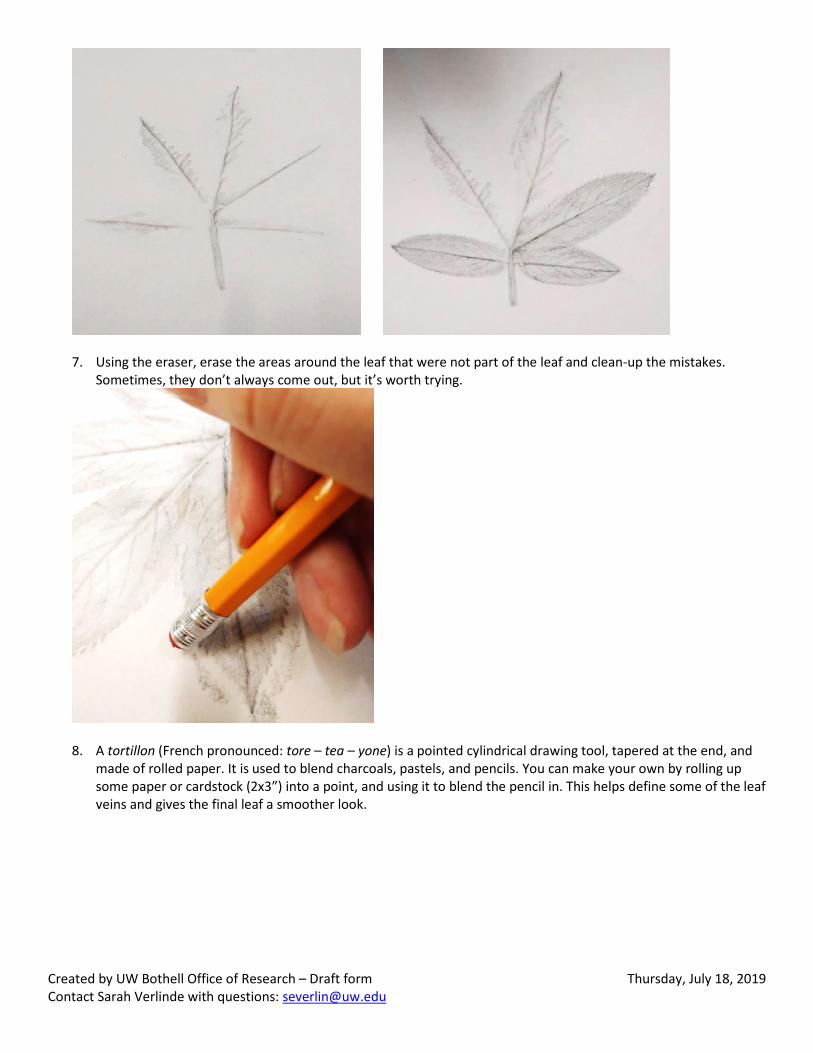
8. A tortillon (French pronounced: tore – tea – yone) is a pointed cylindrical drawing tool, tapered at the end, and
made of rolled paper. It is used to blend charcoals, pastels, and pencils. You can make your own by rolling up some paper or cardstock (2x3”) into a point, and using it to blend the pencil in. This helps define some of the leaf veins and gives the final leaf a smoother look.
Created by UW Bothell Office of Research – Draft form Thursday, July 18, 2019 Contact Sarah Verlinde with questions: [email protected]
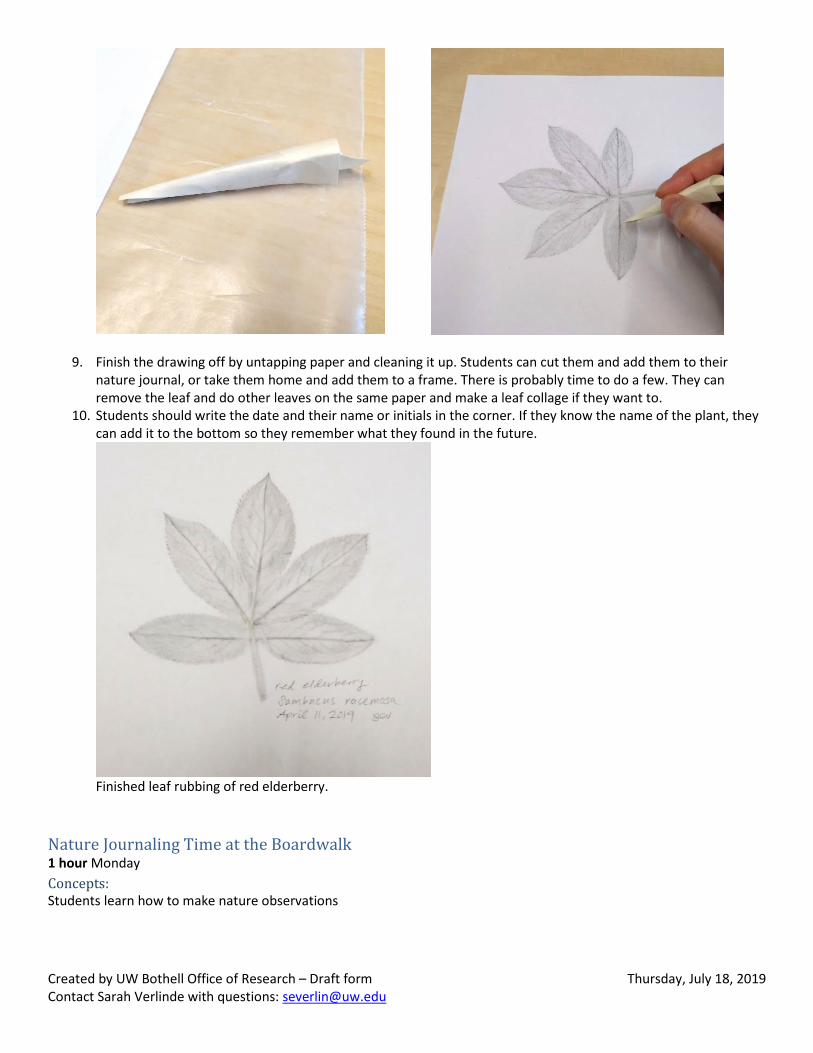
9. Finish the drawing off by untapping paper and cleaning it up. Students can cut them and add them to their nature journal, or take them home and add them to a frame. There is probably time to do a few. They can remove the leaf and do other leaves on the same paper and make a leaf collage if they want to.
10. Students should write the date and their name or initials in the corner. If they know the name of the plant, they can add it to the bottom so they remember what they found in the future.
Finished leaf rubbing of red elderberry.
Nature Journaling Time at the Boardwalk 1 hour Monday Concepts: Students learn how to make nature observations

Created by UW Bothell Office of Research – Draft form Thursday, July 18, 2019 Contact Sarah Verlinde with questions: [email protected]
Learning Objectives: Students will be able to make descriptive observations and record them in their nature journal.
Materials:
• PowerPoint Slides: Nature Journaling Time at the boardwalk • Projector/screen • Nature Journal • Pen/pencil
Process:
1. Go over PowerPoint slides Nature Journaling Time at the boardwalk. Feel free to change subtitle’s location to fit a different location’s name. This PowerPoint serves as a reminder for what students learned earlier in the day and how they will apply it during their nature walk (5-10 minutes)
2. Students need to bring: nature journal and writing utensils. They can bring a few markers if they want, and appropriate clothing/jacket if needed.
3. Walk down to the wetland boardwalk, on the way there talk about making observations both for science and art a. Stop at a planter for example, point out how talking about the size, shape, location, color and other
details about a flower/plant can be useful in science for identifying the species of the flower/plant and also useful if you were to draw/paint it later.
4. Some things you should tell campers to pay attention to when making observations a. Position- Is it near the path or by the water? Is it growing on the ground or on a log? Is it sitting in the
sun or shade? b. Size- large or small? Be specific, is it large compared to other things in the area or is it large as in a
specific amount of feet? Is it small for its species or more general? c. Color- This one is more self-explanatory! d. General Description- Is it a bird, flower, tree, stream?
5. Have students take observations from the boardwalk in their nature journals, this should be quiet time! a. Make sure to tell students that there is no wrong way to make observations so they shouldn’t feel like
they have to ask others for help, they should know that their observations just need to make sense to them!
6. After students make observations have them share them to the class, if there are no takers at first maybe give an example observation!
a. Have a class discussion on the observations, was there anything that a lot of people wrote about? Was there anything that not many people wrote about? How were the observations similar and different?
Crow Charades 30 minutes Monday Concepts: Students will personify the crow or raven Learning Objectives: Campers will be able to show personality traits using gestures and body language without using spoken words/sounds. Materials:
• Space • Print-out Crow Charades Worksheet (1 per team) and cut into strips, fold in half • 2 Large bowls

Created by UW Bothell Office of Research – Draft form Thursday, July 18, 2019 Contact Sarah Verlinde with questions: [email protected]
Process: 1. Divide the students into 2 groups. Provide each team with a bowl full of words cut into strips. 2. Choose one student to be the starting player from each team (choose by next birthday, alphabetically backward
by middle name etc.) 3. For each team, the starting student will pick a personality trait word from the bowl and act it out without words
(teams will likely draw different words). Team gets 15 minutes to work through the bowl. When team guesses player 1’s word, the teammate to the student’s right goes next, chooses a second word, and acts it out.
4. Recommend if the team doesn’t get the word after 1-2 minutes they can pass. That student and word will stop play and the next teammate to the student’s right can pick and act out a new word.
5. Team with the most guessed words win. 6. Begin discussion – have students write words up on board:
a. What words did teams not get? (left side of board) b. What words did teams get? (right side of board) c. Have you ever heard these words used with crows/ravens or other animals?
i. In what stories/movies/pictures/context?
Villain/Bad Guy A character whose evil actions or motives are important to the story
Sly / Sneaky / Spy having or showing a cunning and deceitful nature
Clever / Smart quick to understand, learn, and devise or apply ideas; intelligent.
Singer/Performer
Ravenous / Hungry having a strong desire or craving for food
Annoying causing irritation/bothering
Curious / Nosy eager to know or learn something/Strange/unusual
Thief a person who steals another person's property
Shapeshifter/Transformer the ability of a being or creature to transform its physical form or shape
Selfish Only caring about yourself, and not thinking about others’ feelings or needs
Vain / Proud / Stuck-up thinks one is superior or better than another.
Caring / Nurturing displaying kindness and concern for others.
Bad Luck / Bad Omen A symbol of as a sign of something bad to come
Fortune Teller/Seeing the future able to predict the future
Patient / Calm / Gentle able to accept delays or problems without becoming annoyed
Prankster/Trickster/Pranking A mischievous/funny person who plays tricks on others.
New Art Technique! Watercolors 20 minutes Monday Concepts: Teach students some watercolor painting basics like wet wash, blending, and outlining with black pen. Then allow them to practice these new concepts by practicing on some swatches.
Learning Objectives: Campers will be able to complete the art techniques introduced and explain why each technique is useful.
Materials:
• PowerPoint Slides: New Art Technique! Watercolors • Projector/screen • Assorted Paint Brushes • Water container/trays, one/table • Black thin permanent markers

Created by UW Bothell Office of Research – Draft form Thursday, July 18, 2019 Contact Sarah Verlinde with questions: [email protected]
• Watercolor sets, one/table • 9x13 Watercolor paper (cold press, economy) –1 sheet/student • Wax paper (18”/student) to protect surface • Paper towels or cloth rags to clean brushes in between colors
Process:
1. Prep area for painting a. Cover space with wax paper or newsprint b. Provide rags or paper towels to clean brushes in between c. Fill up containers with a few inches of water. Best scenario they have one they keep clear for washes,
and then a second one for washing brushes in-between 2. Give students one sheet each, and have then divide it into fourths with a pencil 3. In the sections, practice the following:
a. Wet wash b. Wet on wet painting c. Wet on dry painting d. Painting tints – try three colors going from very concentrated to very diluted
4. Allow items to dry. If there’s time later, you can fill in some details with pen, if desired. 5. Sometimes, it’s fun to draw things in pen over the plain wet wash. Try dots, squares, outlines of animals, hearts,
etc.
(image source unavailable)
New Art Style! Surrealism 55 minutes Monday Concepts: Teach students about surrealism by choosing to blend two types of ideas into one painting. After the lesson, students can choose to paint one for their journal cover.
Learning Objectives: Campers will be able to explain at a very basic level what surrealism and practice some watercolor skills.
Materials:
• PowerPoint slides: New Art Style! Surrealism • Projector/screen • Templates of Crows: Surrealism-Journal Templates • Assorted Paint Brushes • Water container/trays, one per table
Created by UW Bothell Office of Research – Draft form Thursday, July 18, 2019 Contact Sarah Verlinde with questions: [email protected]
• Black thin permanent markers • Watercolor sets, one/table • Watercolor paper (cold press, economy) precut to wrap around journal –1 sheet/student
o When precutting paper, leave room for the paper to fold in half. If your journal is 8x10 laid out flat (book is 8x5 folded) cut paper at 8x10.25” to leave room for the fold/spine.
• Wax paper (18”/student) • Paper towels or cloth rags • White glue to glue paper to journal
Process:
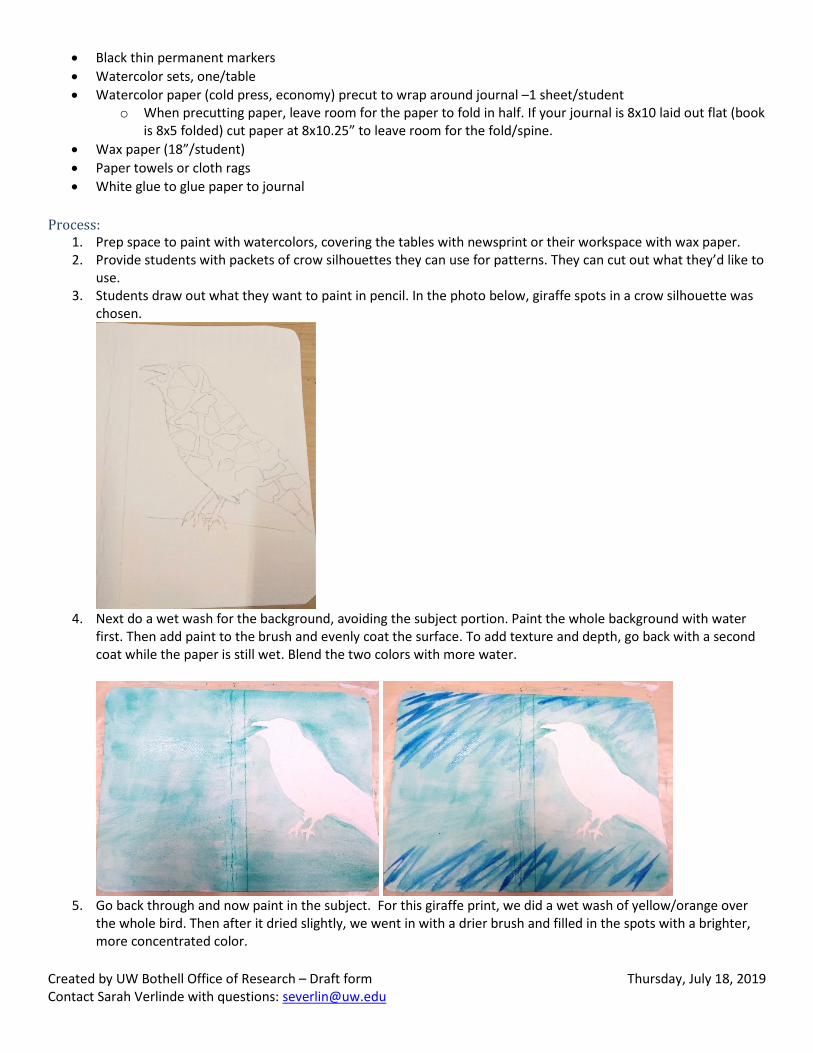
1. Prep space to paint with watercolors, covering the tables with newsprint or their workspace with wax paper. 2. Provide students with packets of crow silhouettes they can use for patterns. They can cut out what they’d like to
use. 3. Students draw out what they want to paint in pencil. In the photo below, giraffe spots in a crow silhouette was
chosen.
4. Next do a wet wash for the background, avoiding the subject portion. Paint the whole background with water
first. Then add paint to the brush and evenly coat the surface. To add texture and depth, go back with a second coat while the paper is still wet. Blend the two colors with more water.
5. Go back through and now paint in the subject. For this giraffe print, we did a wet wash of yellow/orange over
the whole bird. Then after it dried slightly, we went in with a drier brush and filled in the spots with a brighter, more concentrated color.

Created by UW Bothell Office of Research – Draft form Thursday, July 18, 2019 Contact Sarah Verlinde with questions: [email protected]
6. After the paint has dried, students can fill in accents with a thin black permanent marker. In these photos, we used a thicker marker, but didn’t like the results as much.
7. Allow covers to dry completely – tomorrow they will glue the covers on and cover them with a plastic cover to
make them more durable. Closing Circle 15 minutes Monday Concepts: Students will reflect on what they learned that day
Learning Objectives: Campers will be able to share something that they learned, share their favorite thing that they learned/did
Materials:
• Nature Journal • Ball/passing object
Process:
1. Students will sit in a circle and reflect on what they learned that day in their journals (5min) 2. Students will go around and share their favorite thing they learned or activity they did
Student Reminders!
1. Students should bring in one clean can for Thursday for the bird feeder activity (if they weren’t purchased) 2. Students should bring in magazines, newsprint, or other items for collages in artwork 3. Parents are invited to watch the Good Morning Ameri-caw skits on Friday at 3pm.
Created by UW Bothell Office of Research – Draft form Thursday, July 18, 2019 Contact Sarah Verlinde with questions: [email protected]
TUESDAY – Anatomy and Life Cycle
Tuesday Outline ACTIVITY ACTIVITY TYPE TIME SCHEDULE Arrival – Morning Circle Discussion 15 minutes 8:45 – 9:00am Head, Wings and Toes! Activity 15 minutes 9:00 – 9:15 Corvid Family Lesson Lesson 20 minutes 9:15 – 9:35 Feathers Under a Microscope Activity 20 minutes 9:35 – 9:55 What do Feathers do? Lesson and Drawing Lesson 35 minutes 9:55 – 10:30 Snack Break 15 minutes 10:30 – 10:45 Feather Bookmark **Glue Covers to Journals**
Activity 55 minutes 10:45 – 11:40
External Crow Anatomy Lesson Lesson 20 minutes 11:40 – 12:00pm Lunch Break 30 minutes 12:00 – 12:30 Skull Structure Lesson Lesson 20 minutes 12:30 – 12:50 Skull Drawings Activity 40 minutes 12:50 – 1:30 Internal Crow Anatomy Activity 20 minutes 1:30 – 1:50 Snack Break 15 minutes 1:50 – 2:05 Nature Walk and Bird Watching Activity 30 minutes 2:05 – 2:35 Life Cycle of Crows Lesson 20 minutes 2:35 – 2:55 Chicks and Parents Photo Painting Activity 35 minutes 2:55 – 3:30 Closing Circle Discussion 15 minutes 3:30 – 3:45 Check out - - 3:45
Summary of Supplies for Tuesday:
ACTIVITY DURABLE SUPPLIES CONSUMABLE SUPPLIES Morning Circle A ball (or other object) to pass
around Open space for the students to sit in a circle
Head, Wings, Toes! PowerPoint Slide: Head, Wings, Toes Projector/screen Space large enough for students to have arm widths space between them
Corvid Family Lesson PowerPoint Slides: Corvid Family Lesson Projector/screen
Feathers Under a Microscope PowerPoint slides: Feathers under a microscope Projector/screen Microscopes (x2 minimum) Real flight feather Real down feather
What Do Feathers Do? Lesson and Drawing
PowerPoint slides: What do Feathers Do? Projector/screen Student nature journals

Created by UW Bothell Office of Research – Draft form Thursday, July 18, 2019 Contact Sarah Verlinde with questions: [email protected]
Pen/pencils Feather bookmark PowerPoint slides: Feather
Bookmarks shows an example for students to see and the Inspirational Quotes slide that has quote ideas Projector/screen Hole punch (2/class) Scissors Black thin permanent markers Assorted Paint Brushes Water container/trays, one/table Watercolor sets, one/table
Watercolor paper (cold press, economy) precut to wrap around journal –1/2 sheet/student Wax paper (18”/student) Paper towels or cloth rags Ribbon/Twine 1 Bead/Student Print-out: Feather Templates for Bookmarks (1 print-out, 2 pages, per two students)
External Crow Anatomy Lesson PowerPoint slides: External Crow Anatomy Projector/screen Preserved stuffed crow (borrow from Eastside Audubon or similar organization)
Skull Structure Lesson PowerPoint slides: Skull Structure Lesson Projector/screen
Skull Drawings Markers Crow skull models 1/table Student Nature Journal
Corvid skull diagram worksheet – print one per student, front and back.
Internal Crow Anatomy PowerPoint slides: Internal Anatomy of Birds Projector/slides
Nature Walk and Bird Watching Nature Journal Pen/pencil Binoculars
Print out and fold: T-Bird Brochure. One per student, printed front and back, flip on short side, in full color.
Life Cycle of Crows Lesson PowerPoint slides: Life Cycle of Crows Projector/screen
Chicks and Parents Photo Painting Paint brushes Paint trays, one/table PowerPoint slides: Chicks and Parents Painting
Acrylic paint: medium blue, white, black, and other colors Wax paper 18”/students Print out photos: T-nature journaling chicks- sunset background. There are 6 images in a deck, so print 1 deck per 3 students. That gives them an option to choose some that they like, and they can make a second one if they want to. Please print in full color, on cardstock, one-sided only. Laser printers are best and won’t bleed when water is mixed on it.
Closing circle Nature Journal Ball/Passing Object

Created by UW Bothell Office of Research – Draft form Thursday, July 18, 2019 Contact Sarah Verlinde with questions: [email protected]
Materials Links
• Corvid skull model: https://www.etsy.com/listing/628961181/natural-effect-replica-adult-crow-skull?ga_order=most_relevant&ga_search_type=all&ga_view_type=gallery&ga_search_query=crow+skull&ref=sr_gallery-1-5&organic_search_click=1&bes=1
Required Preparation:
• Print: o Feather Templates for Bookmarks (1 print-out, 2 pages, per two students) o Corvid skull diagram worksheet – print one per student, front and back. o T-Bird Brochure. One per student, printed front and back, flip on short side, in full color. o T-nature journaling chicks- sunset background. There are 6 images in a deck, so print 1 deck per 3
students. That gives them an option to choose some that they like, and they can make a second one if they’d like. Please print in full color, one-sided only. Laser printers are best and won’t bleed when water is mixed on it.
• Set out taxidermy specimens for students to view at the beginning of class. Maybe set them in the front/back so they aren’t played with during the day.
• Set up microscopes early in the day for the feather lesson. • During the last break, fill up containers for acrylic painting • If unfamiliar with the area, walk nature walk spaces before taking students outside.
Safety Guidelines: • Outside activities/Nature Walks
o If unfamiliar with the area, walk nature walk spaces before taking students outside. o Ask students if there are any health concerns or allergies you should be aware of for outdoor activities
(bee/plant allergies) o Remind students to not touch things they are unfamiliar with and to stay in a group o Have students dress for the weather. If it’s cool, have them bring their jacket. If they did not put
sunscreen on, try to pick activities with them spending time in the shade. o Make sure they stay hydrated.
Morning Circle 15 minutes Tuesday Concepts: Allows students to introduce themselves and is a meeting time to discuss activities for the day
Learning Objectives: Campers will be able to introduce the person sitting next to them, say what activities and concepts we are learning that day. Materials:
• A ball (or other object) to pass around • Open space for the students to sit in a circle
Process:
1. Get students to form a circle and sit down (Ask they sit next to a different person then they did the previous day) 2. Ask students to turn to the person to their right and say their name and one interesting thing they learned the
previous day (5 min) 3. Ask students to introduce the person sitting to their right to the rest of the class, going around the circle (5 min)

Created by UW Bothell Office of Research – Draft form Thursday, July 18, 2019 Contact Sarah Verlinde with questions: [email protected]
4. Introduce the days concepts and activities (five minutes) Head, Wings and Toes! 15 minutes Tuesday Concepts: Teach students the basics of crow/raven anatomy
Learning Objectives: Campers will be able to explain the basic aspects of bird anatomy Materials:
• PowerPoint Slide: Head, Wings, Toes • Projector/screen • Space large enough for students to have arm widths space between them
Process:
1. Display slide Head, Wings, Toes 2. Have students put arms out to get arms width away from each other 3. Point out bird anatomy on yourself to the tune of “arms, shoulders, knees and toes” song
Head and wings, tarsus, toes Tarsus and toes Head and wings, tarsus, toes Tarsus, toes Eyes and ears And nostrils, beak Head and wing, tarsus, toes Tarsus, toes!
4. Go through the song once with the students watching them go through step by step having them follow along
5. Give students time to practice in groups for a few rounds 6. Do the Head, Wings and Toes dance together
Corvid Family Lesson 20 minutes Tuesday Concepts: Students will learn about the corvid family
Learning Objectives: Campers will be able to describe the corvid family and explain what a family is in biology Materials:
• PowerPoint Slides: Corvid Family Lesson • Projector/screen
Process:
1. When explaining taxonomic groups, make sure to go slower through the Family/Genus/Species slides to make sure students are understanding the material
Created by UW Bothell Office of Research – Draft form Thursday, July 18, 2019 Contact Sarah Verlinde with questions: [email protected]
2. Who’s related: try to lead them slightly astray with wings as a grouping (butterflies and birds aren’t related), Round things: ball, apple, lady bug; etc.
3. Show Corvid Family Lesson PowerPoint and talk about how the corvid (Corvidae) family includes magpies, crows, ravens, and jays.
4. Explain that the scientific names are in Latin, which can be hard to pronounce. Tell them to just confidently pronounce them and try their best!
Feathers Under a Microscope 20 minutes Tuesday Concepts: Students will learn how feathers look under a microscope and how their form affects function Learning Objectives Students will be able to explain the microscopic structures of contour and down feathers. Materials • PowerPoint slides: Feathers under a Microscope • Projector/screen • Microscopes (x2 minimum) • Real flight feather • Real down feather
Process: Set up at least 2 microscopes, one with a contour feather, the other with a downy feather. If microscopes are not available, show students the slides as references. When you get to the slide with the real microscope images, stop and have student point out differences that they see in the images, and how they think those differences could affect the structure/function of the feathers. If using real microscopes/feathers have students draw in their journals what the feathers look like through the microscopes. What do Feathers do? Lesson and Drawing 35 minutes Tuesday Concepts: Teach students the types of bird feathers and their different uses Learning Objectives: Campers will be able to explain the what different feathers do and draw the different feather shapes Materials:
• PowerPoint slides: What do Feathers Do? • Projector/screen • Student nature journals • Pen/pencils
Process:
1. Show students the three different feather types and explain what they do for the bird

Created by UW Bothell Office of Research – Draft form Thursday, July 18, 2019 Contact Sarah Verlinde with questions: [email protected]
a. Background article for teacher: http://www.thewildclassroom.com/biodiversity/birds/aviantopics/feathersandPlumage.html
i. Contour feather- flight ii. Down feather- insulation iii. Filoplume- sensory
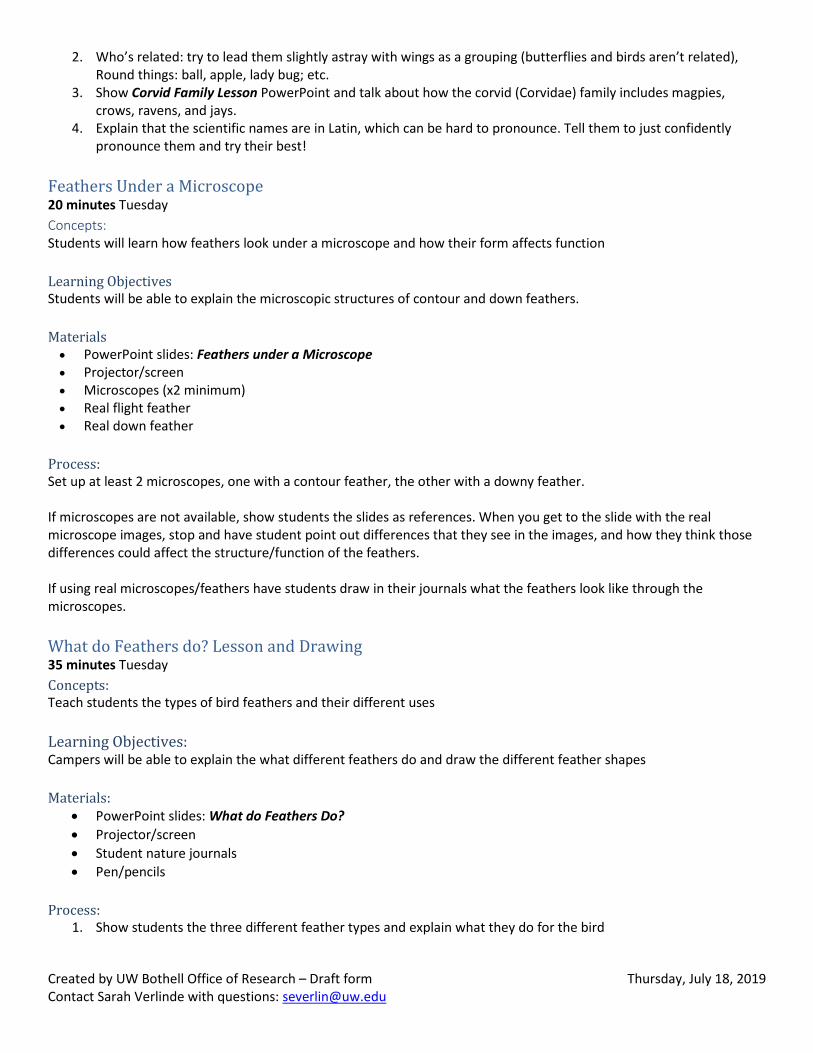
2. Have students draw each type in their journals, labeling them Feather Bookmark 55 minutes Tuesday Concepts: Teach Students what different feather types look like and make a bookmark for them to keep. **while paint dries, glue covers from Monday to journals**
Learning Objectives: Students will be able to guess what a feathers function by its appearance Materials:
• PowerPoint slides: Feather Bookmarks shows an example for students to see and the Inspirational Quotes slide that has quote ideas
• Projector/screen • Print-out: Feather Templates for Bookmarks (1 print-out, 2 pages, per two students) • Hole punch • Scissors • Black thin permanent markers • Assorted Paint Brushes • Water container/trays, one/table • Watercolor sets, one/table • Watercolor paper (cold press, economy) precut to wrap around journal –1/2 sheet/student • Wax paper (18”/student) • Paper towels or cloth rags • Ribbon/Twine • 1 Bead/Student
Process: 1. Students can choose one feather type to recreate from template print-out 2. Have students draw their choice of feather on construction paper and cut them out. This will create a pattern. 3. Trace the feather pattern out on watercolor paper lightly with a pencil. Cut out watercolor paper feather. Make
sure to leave base of feather large enough to punch hole in.
4. There are two options for drawing on it: before or after

Created by UW Bothell Office of Research – Draft form Thursday, July 18, 2019 Contact Sarah Verlinde with questions: [email protected]
a. Before: Drawing with markers before painting is easier because the paper is dry. You may have to
reprint some of the items after they get covered up with some of the paint pigments. Students can also have something to paint around, so I think they come out a little better and use less paint for a more translucent interesting color. Ideas to draw:
i. Write a quote or phrase they like ii. Draw simple patterns like zig-zags or checker board
iii. Draw your favorite animal or place iv. Tell students it’s their bookmark, so they can be as creative as they want!
b. After: Drawing afterward is good too, just wait until the paint is completely dry. 5. Have students use watercolors to paint/decorate their feather cutouts, tell students to be as creative as they
want and that the feathers do not have to be black like a crow feather! a. Start with a wet wash covering the feather completely in water.
b. Add the first color and let it absorb and run into the water
c. Use a second color and let everything blend in together
6. Let the feathers dry, in this time have students tell each other the feather type they chose, why they chose it
and a function that that feather type provides the bird 7. **While you’re waiting for paint to dry, have students glue their surrealism journal covers to the front of their
nature journal. Set something on top to press down. After they dry, they can take the plastic covering and cover their journal to protect it**
8. Once the feathers are dry, students can continue to draw on their feather with permanent thin markers. 9. Attach the twine/ribbon and bead

Created by UW Bothell Office of Research – Draft form Thursday, July 18, 2019 Contact Sarah Verlinde with questions: [email protected]
a. Hole punch lower part of feather b. Fold twine in half and feed looped/folded end through punched hole, leaving about a half-inch loop.
c. Put twine ends through the half-inch loop and pull
i. Other knot option: run the twine through the ribbon until it’s half way through, tie a knot
loosely near the feather (purple ribbon example) d. Tie a knot near the end where you want the bead to be (about 5” from feather base). Run one piece of
twine through bead, and then tie a second knot securing the bead. If using ribbon, use tape at the end to make the ribbon sturdy to easily go through the bead hole.
e. Bookmarks are finished!
Created by UW Bothell Office of Research – Draft form Thursday, July 18, 2019 Contact Sarah Verlinde with questions: [email protected]
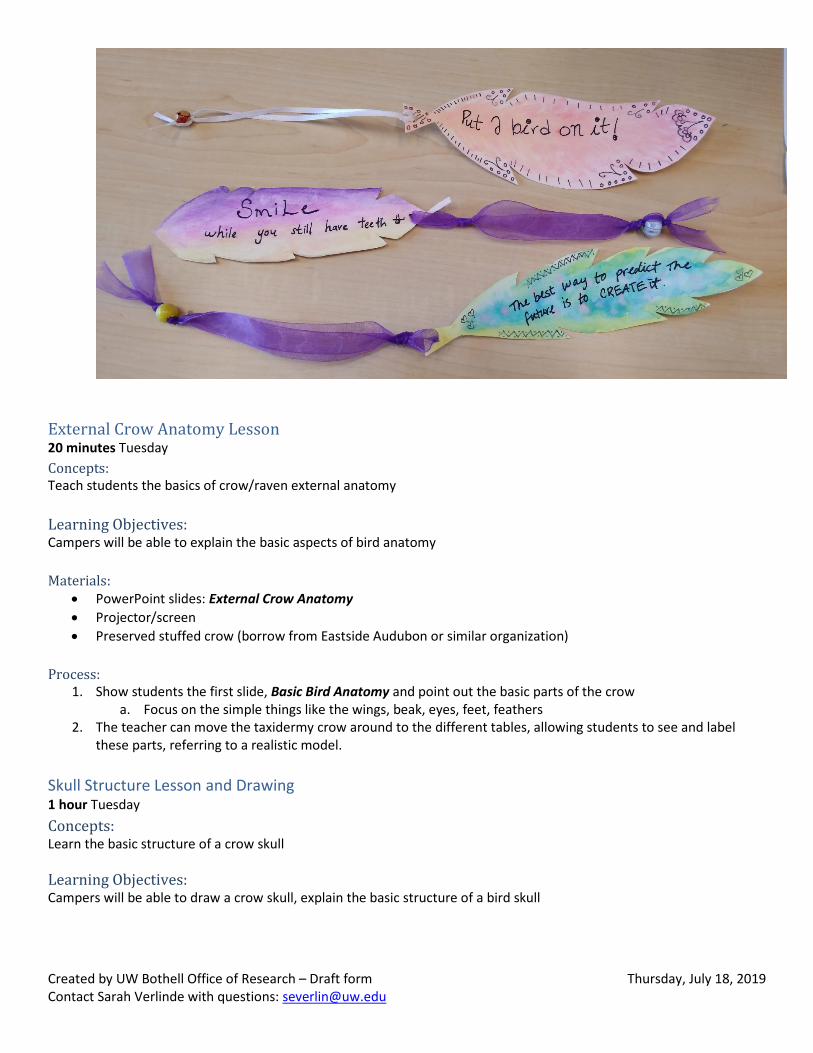
External Crow Anatomy Lesson 20 minutes Tuesday Concepts: Teach students the basics of crow/raven external anatomy
Learning Objectives: Campers will be able to explain the basic aspects of bird anatomy Materials:
• PowerPoint slides: External Crow Anatomy • Projector/screen • Preserved stuffed crow (borrow from Eastside Audubon or similar organization)
Process:
1. Show students the first slide, Basic Bird Anatomy and point out the basic parts of the crow a. Focus on the simple things like the wings, beak, eyes, feet, feathers
2. The teacher can move the taxidermy crow around to the different tables, allowing students to see and label these parts, referring to a realistic model.
Skull Structure Lesson and Drawing 1 hour Tuesday Concepts: Learn the basic structure of a crow skull
Learning Objectives: Campers will be able to draw a crow skull, explain the basic structure of a bird skull
Created by UW Bothell Office of Research – Draft form Thursday, July 18, 2019 Contact Sarah Verlinde with questions: [email protected]
Materials: • PowerPoint slides: Skull Structure Lesson • Projector/screen • Markers • Crow skull models 1/table • Student Nature Journal • Corvid skull diagram worksheet – print one per student, front and back.
Process: 1. Show crow skull with labels to students, explaining the different basic parts
a. Nostrils, eye socket, beak (maxilla and dentary), lobes (frontal, occipital, parietal) 2. Give each table a crow skull model, allowing students to name the different parts together in groups 3. Give students the skull diagram worksheet and markers. They can color and name parts of the skull 4. If they are up for a challenge, encourage them to draw the skull (or component) freehand in their nature
journals. Internal Crow Anatomy 20 minutes Tuesday Concepts: Students will learn about the basic anatomy of corvids and how they compare with human anatomy. Learning Objectives: Students will be able to explain a few characteristics of a bird’s anatomy, including how it benefits birds for flight. Materials:
• PowerPoint slides: Internal Anatomy of Birds • Projector/screen
Process: Divide students into four groups and pass out anatomy packets accordingly. Each group should have a piece of butcher paper, a tub of markers, and a few pairs of scissors. Distribute a packet to each group, either through an assignment or asking what each group wants. There will be one slide on each of the following topics:
• Digestive system • Circulatory system • Metabolism • Respiratory system • Skeletal system
Nature Walk and Bird Watching 30 minutes Tuesday Concepts: Students learn how to make nature observations

Created by UW Bothell Office of Research – Draft form Thursday, July 18, 2019 Contact Sarah Verlinde with questions: [email protected]
Learning Objectives: Students will be able to make descriptive observations and record them in their nature journal.
Materials:
• Nature Journal • Pen/pencil • Binoculars • Print out and fold: T-Bird Brochure. One per student, printed front and back, flip on short side, in full color.
Process:
1. Before heading out, pull up the Audubon Birdcall app and play around with it, inside. Try not to overuse the calls in the field. Read the article https://www.audubon.org/news/how-use-birdcall-apps for some of the reasons to modestly use the sounds outside. Audubon Bird Guide is available as a free app. If you navigate to the hamburger menu on the left, select field guide > Crows, magpies, jays. You can click on the sound icon, next to a bird, to hear a call. However, if you select a species, there will be pictures on top (very helpful!) and below several songs and calls. For example, the American Crow has six different calls to listen to.
2. Students need to bring: nature journal and writing utensils. They can bring a few markers if they want, and appropriate clothing/jacket if needed. If there are binoculars available, bring those too!
3. Walk down to the wetland boardwalk, on the way there talk about making observations both for science and art a. Stop at a planter for example, point out how talking about the size, shape, location, color and other
details about a flower/plant can be useful in science for identifying the species of the flower/plant and also useful if you were to draw/paint it later.
4. Some things you should tell campers to pay attention to when making observations (reminder) a. Position- Is it near the path or by the water? Is it growing on the ground or on a log? Is it sitting in the
sun or shade? b. Size- large or small? Be specific, is it large compared to other things in the area or is it large as in a
specific amount of feet? Is it small for its species or more general? c. Color- This one is more self-explanatory! d. General Description- Is it a bird, flower, tree, stream?
5. Have students take observations from the boardwalk in their nature journals, this should be quiet time! a. Make sure to tell students that there is no wrong way to make observations so they shouldn’t feel like
they have to ask others for help, they should know that their observations just need to make sense to them!
6. Remind students that they should use their senses when making observations a. Sight- Looking around their environment, what is up high or down low, the colors and texture of
different aspects of the environment, if something is moving or still b. Sound- Do they hear animal sounds? Things like bird calls and frogs croaking are obvious but what about
the rustle of grass or a splash of water indicating an animal’s presence? c. Smell- Can students smell flowers? What about the smell of dirt or mud?
7. Bird Watching Tips a. Look for signs of birds, think about droppings, owl pellets, nests, feathers etc.
i. Owl pellets are the parts of the animals that the owl cannot digest, so it regurgitates them as a golf ball sized pellet. These contain hair, fur, and bones. They may look like feces at first, but they are dry.
b. Listen for bird calls, try to identify the type of bird by the call. Is it a song bird’s song or a crow’s caw? c. Look at birds flying, is it a soaring hawk or a vulture? Is it a small bird flitting from branch to branch? d. Look at feather patterns/colors. A yellow finch’s bright yellow pattern is much different than the bald
head and black shaggy feathers of a vulture!

Created by UW Bothell Office of Research – Draft form Thursday, July 18, 2019 Contact Sarah Verlinde with questions: [email protected]
8. After students make observations have them share them with the class, if there are no takers at first maybe give an example observation!
a. Have a class discussion on the observations. Was there anything that a lot of people wrote about? Was there anything that not many people wrote about? How were the observations similar or different?
9. Teacher tip: If you’re on UWB/CC campus, there is a hummingbird feeder in a flower bed between UW1 and LBA (library annex). It is directly across from Subway. There is most often, a hummingbird closeby.
Life Cycle of Crows 20 minutes Tuesday Concepts: Teach students about the bird/crow lifecycle
Learning Objectives: Campers will be able to describe the crow’s life cycle, describe eggs, hatchlings, juveniles, and adults
Materials:
• PowerPoint slides: Life Cycle of Crows • Projector/screen
Process:
1. Feel free to draw a lifecycle circle on the board so students can reference it throughout the afternoon. 2. Life cycle
a. Ask students if they know what a life cycle is? b. A life cycle is the cycle of how an animal grows up, from a baby to an adult! c. Show the slides: Life Cycle of Crows
i. A crow, like other birds is hatched from an egg ii. When the crow is a chick, or a baby bird, its mom has to feed it all the time! Unlike some other
birds, the mom and dad crow will both watch over the nest iii. After the chick has grown its flying feathers (about a month), the family unit will often stick
together iv. Crows roost all together, but during the day they go out in smaller family groups! v. For the first two years of the crow's life it will help its mom and dad build the nest where the
mom lays her eggs and incubates them by sitting on them vi. By 2-3 years old, the crow is old enough to be a mom or dad and have eggs of their own
vii. The mom crow lays the eggs and incubates them while the dad goes to find food to bring to her, she can't fly because she is keeping her eggs warm!
viii. The baby hatch after 19 days and the cycle continues! ix. Crows in the wild can live for as long as 30 years
Chicks and Parents Photo Painting 35 minutes Tuesday Concepts: Students will review what they learned about nests and the crow life cycle Learning Objectives: Campers will be able to explain the basics of the crow life cycle and paint something about it to remember the lesson.

Created by UW Bothell Office of Research – Draft form Thursday, July 18, 2019 Contact Sarah Verlinde with questions: [email protected]
Materials:
• Paint brushes • Paint trays, one/table • Acrylic paint: medium blue, white, black, and other colors welcomed • Wax paper 18”/students • PowerPoint slides: Chicks and Parents Painting • Projector/screen • Print out photos: T-nature journaling chicks- sunset background. There are 6 images in a deck, so print 1 deck
per 3 students. That gives them an option to choose some that they like, and they can make a second one if they’d like. Please print in full color, one-sided only. Laser printers are best and won’t bleed when water is mixed on it.
Process: 1. Print out: T-nature journaling chicks- sunset background 2. Give students the sunset photo, nest, or sky photos and show some examples of the art style in the PowerPoint
slides: Chicks and Parents Painting a) Have students draw a tree with a nest, tell them to be creative! b) Students can use their journals to practice first c) Draw the mom and dad crow, draw a predator, draw a hatchling or eggs!
3. Make sure to have students sketch their idea with pencil fist as it is difficult to fix mistakes made in the black paint 4. Once students have a sketch finished have them fill it in with black acrylic paint Closing Circle 15 minutes Tuesday Concepts: Students will reflect on what they learned that day
Learning Objectives: Campers will be able to share something that they learned, share their favorite thing that they learned/did
Materials:
• Nature Journal • Ball/Passing Object
Process:
1. Students will sit in a circle and reflect on what they learned that day in their journals (5min) 2. Students will go around and share their favorite thing they learned or activity they did
Created by UW Bothell Office of Research – Draft form Thursday, July 18, 2019 Contact Sarah Verlinde with questions: [email protected]
WEDNESDAY – Natural History and Personifying Corvids Wednesday Outline
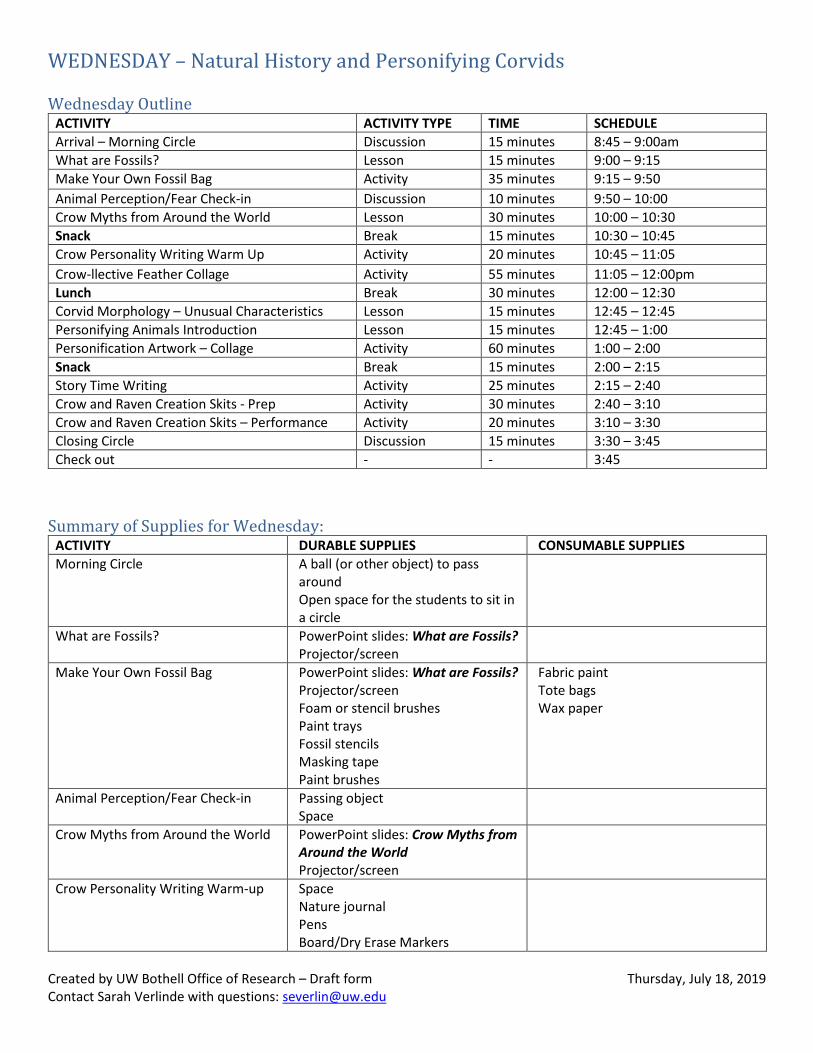
ACTIVITY ACTIVITY TYPE TIME SCHEDULE Arrival – Morning Circle Discussion 15 minutes 8:45 – 9:00am What are Fossils? Lesson 15 minutes 9:00 – 9:15 Make Your Own Fossil Bag Activity 35 minutes 9:15 – 9:50 Animal Perception/Fear Check-in Discussion 10 minutes 9:50 – 10:00 Crow Myths from Around the World Lesson 30 minutes 10:00 – 10:30 Snack Break 15 minutes 10:30 – 10:45 Crow Personality Writing Warm Up Activity 20 minutes 10:45 – 11:05 Crow-llective Feather Collage Activity 55 minutes 11:05 – 12:00pm Lunch Break 30 minutes 12:00 – 12:30 Corvid Morphology – Unusual Characteristics Lesson 15 minutes 12:45 – 12:45 Personifying Animals Introduction Lesson 15 minutes 12:45 – 1:00 Personification Artwork – Collage Activity 60 minutes 1:00 – 2:00 Snack Break 15 minutes 2:00 – 2:15 Story Time Writing Activity 25 minutes 2:15 – 2:40 Crow and Raven Creation Skits - Prep Activity 30 minutes 2:40 – 3:10 Crow and Raven Creation Skits – Performance Activity 20 minutes 3:10 – 3:30 Closing Circle Discussion 15 minutes 3:30 – 3:45 Check out - - 3:45
Summary of Supplies for Wednesday:
ACTIVITY DURABLE SUPPLIES CONSUMABLE SUPPLIES Morning Circle A ball (or other object) to pass
around Open space for the students to sit in a circle
What are Fossils? PowerPoint slides: What are Fossils? Projector/screen
Make Your Own Fossil Bag PowerPoint slides: What are Fossils? Projector/screen Foam or stencil brushes Paint trays Fossil stencils Masking tape Paint brushes
Fabric paint Tote bags Wax paper
Animal Perception/Fear Check-in Passing object Space
Crow Myths from Around the World PowerPoint slides: Crow Myths from Around the World Projector/screen
Crow Personality Writing Warm-up Space Nature journal Pens Board/Dry Erase Markers
Created by UW Bothell Office of Research – Draft form Thursday, July 18, 2019 Contact Sarah Verlinde with questions: [email protected]
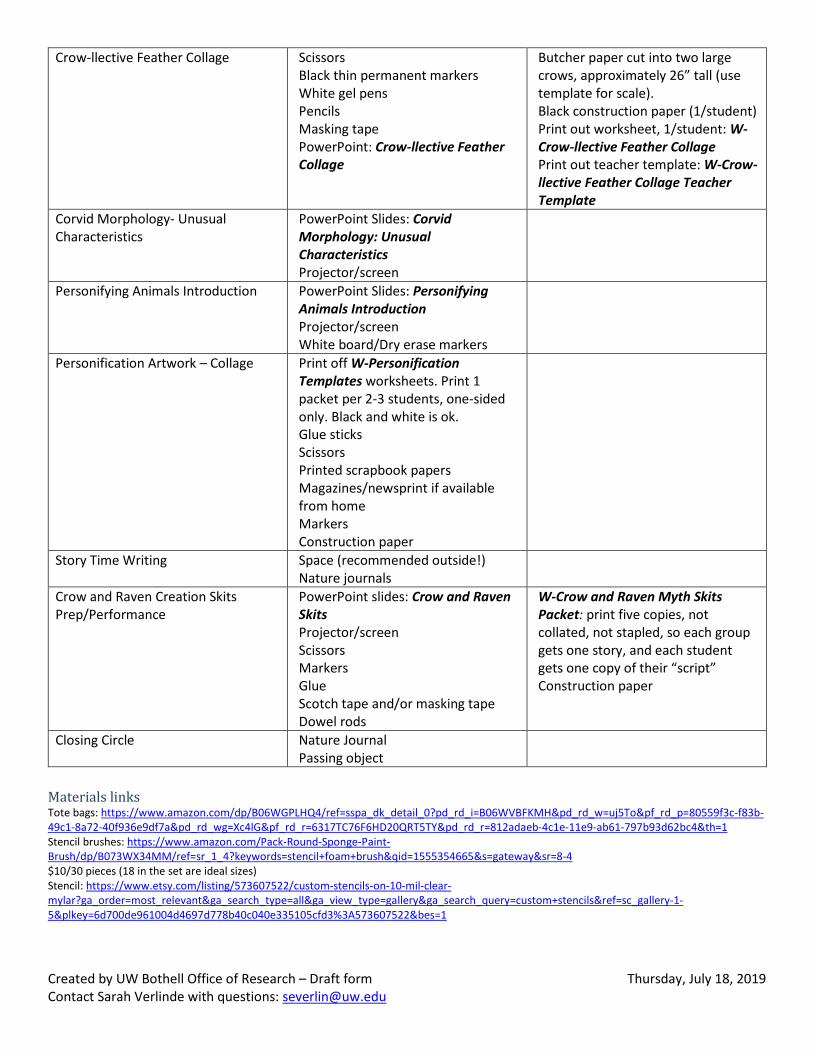
Crow-llective Feather Collage Scissors Black thin permanent markers White gel pens Pencils Masking tape PowerPoint: Crow-llective Feather Collage
Butcher paper cut into two large crows, approximately 26” tall (use template for scale). Black construction paper (1/student) Print out worksheet, 1/student: W-Crow-llective Feather Collage Print out teacher template: W-Crow-llective Feather Collage Teacher Template
Corvid Morphology- Unusual Characteristics
PowerPoint Slides: Corvid Morphology: Unusual Characteristics Projector/screen
Personifying Animals Introduction PowerPoint Slides: Personifying Animals Introduction Projector/screen White board/Dry erase markers
Personification Artwork – Collage Print off W-Personification Templates worksheets. Print 1 packet per 2-3 students, one-sided only. Black and white is ok. Glue sticks Scissors Printed scrapbook papers Magazines/newsprint if available from home Markers Construction paper
Story Time Writing Space (recommended outside!) Nature journals
Crow and Raven Creation Skits Prep/Performance
PowerPoint slides: Crow and Raven Skits Projector/screen Scissors Markers Glue Scotch tape and/or masking tape Dowel rods
W-Crow and Raven Myth Skits Packet: print five copies, not collated, not stapled, so each group gets one story, and each student gets one copy of their “script” Construction paper
Closing Circle Nature Journal Passing object
Materials links Tote bags: https://www.amazon.com/dp/B06WGPLHQ4/ref=sspa_dk_detail_0?pd_rd_i=B06WVBFKMH&pd_rd_w=uj5To&pf_rd_p=80559f3c-f83b-49c1-8a72-40f936e9df7a&pd_rd_wg=Xc4lG&pf_rd_r=6317TC76F6HD20QRT5TY&pd_rd_r=812adaeb-4c1e-11e9-ab61-797b93d62bc4&th=1 Stencil brushes: https://www.amazon.com/Pack-Round-Sponge-Paint-Brush/dp/B073WX34MM/ref=sr_1_4?keywords=stencil+foam+brush&qid=1555354665&s=gateway&sr=8-4 $10/30 pieces (18 in the set are ideal sizes) Stencil: https://www.etsy.com/listing/573607522/custom-stencils-on-10-mil-clear-mylar?ga_order=most_relevant&ga_search_type=all&ga_view_type=gallery&ga_search_query=custom+stencils&ref=sc_gallery-1-5&plkey=6d700de961004d4697d778b40c040e335105cfd3%3A573607522&bes=1

Created by UW Bothell Office of Research – Draft form Thursday, July 18, 2019 Contact Sarah Verlinde with questions: [email protected]
Fabric Paint: https://www.amazon.com/Speedball-Products-465283-Printing-8-Ounce/dp/B0010DV4G0/ref=sr_1_3?crid=3PEXLB18KUYKU&keywords=white+screen+printing+ink+fabric&qid=1555354976&s=arts-crafts&sprefix=white+screen+print%2Carts-crafts%2C175&sr=1-3 White $11/10 students, Black $8.48/10 students White Gel Pens: https://www.amazon.com/12-Piece-Sketching-Artists-Illustration-Supplies/dp/B072C442CK/ref=sr_1_10?keywords=white+gel+pen+gelly+roll&qid=1555356974&s=arts-crafts&sr=1-10 $10/x12 Dowel rods: https://www.amazon.com/Wooden-Dowel-Rods-16-12/dp/B00YZ0IAD0/ref=sr_1_1_sspa?keywords=dowel+rods&qid=1555358376&s=arts-crafts&sr=1-1-spons&psc=1 $12/x100 pieces Teacher Notes: Please be sensitive to at least the following concerns:
1. Blood and Gore: some people can be very sensitive to some of the stories surrounding crows and ravens. The stories of Odin’s raven can include bloodied raven’s feet as they eat the flesh of bodies on battlefields… Don’t scare the children. All the stories and video clips chosen avoid gore, and keep things very clean. If students share stories that they’ve heard with the potential to gross the class out, please try to buffer and control the conversation before you end up with upset students.
2. Good vs. Evil: Many people across the world have connotations with crows and ravens for having the power of evil and detriment, or that death may be around the corner by their presence alone. Please remember that children may carry some of these feelings with them. Teaching them about the trickster and fun stories can help them broaden their idea of what is good and evil, and that ultimately, these are just animals.
3. Cultural Sensitivity: Some of these stories are very old and come from all over the world. When working with the skits especially, please discourage campers from acting out stereotypes of Native Americans (see lesson notes).
Required Preparation: • Print:
o W-Crow-llective Feather Collage print worksheet 1/student o Print out teacher template: W-Crow-llective Feather Collage Teacher Template (1 copy) o W-Crow and Raven Myth Skits Packet: print five copies, not collated, not stapled, so each group gets
one story, and each student gets one copy of their “script” • For the skits, try to make a “stage” area. Get creative with furniture in the room and butcher paper.
Morning Circle 15 minutes Wednesday Concepts: Allows students to introduce themselves and is a meeting time to discuss activities for the day
Learning Objectives: Campers will be able to introduce the person sitting next to them, say what activities and concepts we are learning that day Materials:
• A ball (or other object) to pass around • Open space for the students to sit in a circle
Process:
1. Get students to form a circle and sit down 2. Ask students to turn to the person to their right and say their name and something they want to put into their nature journals (5 min) 3. Ask students to introduce the person sitting to their right to the rest of the class, going around the circle (5 min) 4. Introduce the days concepts and activities (five minutes)
Created by UW Bothell Office of Research – Draft form Thursday, July 18, 2019 Contact Sarah Verlinde with questions: [email protected]
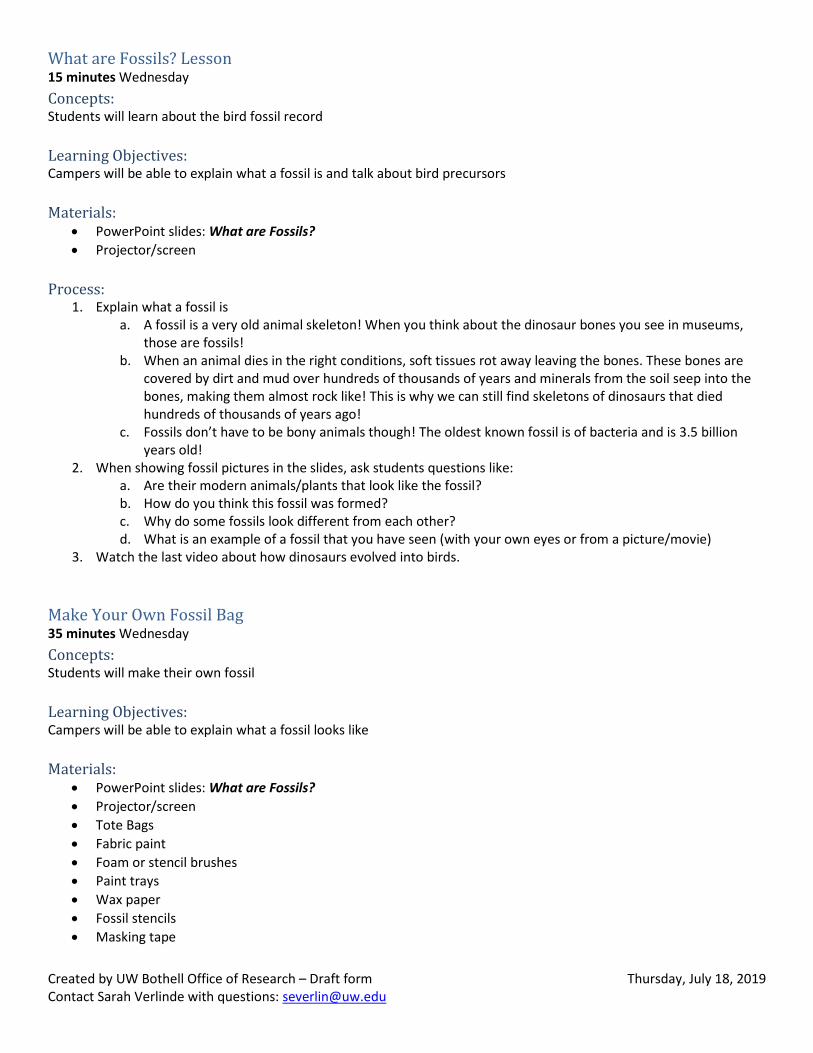
What are Fossils? Lesson 15 minutes Wednesday Concepts: Students will learn about the bird fossil record
Learning Objectives: Campers will be able to explain what a fossil is and talk about bird precursors
Materials:
• PowerPoint slides: What are Fossils? • Projector/screen
Process:
1. Explain what a fossil is a. A fossil is a very old animal skeleton! When you think about the dinosaur bones you see in museums,
those are fossils! b. When an animal dies in the right conditions, soft tissues rot away leaving the bones. These bones are
covered by dirt and mud over hundreds of thousands of years and minerals from the soil seep into the bones, making them almost rock like! This is why we can still find skeletons of dinosaurs that died hundreds of thousands of years ago!
c. Fossils don’t have to be bony animals though! The oldest known fossil is of bacteria and is 3.5 billion years old!
2. When showing fossil pictures in the slides, ask students questions like: a. Are their modern animals/plants that look like the fossil? b. How do you think this fossil was formed? c. Why do some fossils look different from each other? d. What is an example of a fossil that you have seen (with your own eyes or from a picture/movie)
3. Watch the last video about how dinosaurs evolved into birds.
Make Your Own Fossil Bag 35 minutes Wednesday Concepts: Students will make their own fossil
Learning Objectives: Campers will be able to explain what a fossil looks like
Materials:
• PowerPoint slides: What are Fossils? • Projector/screen • Tote Bags • Fabric paint • Foam or stencil brushes • Paint trays • Wax paper • Fossil stencils • Masking tape

Created by UW Bothell Office of Research – Draft form Thursday, July 18, 2019 Contact Sarah Verlinde with questions: [email protected]
• Paint brushes Process:
1. Add wax paper in between bag layers, add student’s name on wax paper edge with sharpie 2. Tape stencil to fabric using masking tape 3. Take sponge/stencil brush and fill in stencil area using an up and down motion 4. Remove stencil before paint dries. Clean and dry stencil for another student to use 5. Student can add other paint decorations on the edges 6. Put bag aside and allow to dry 7. Clean-up paint tray and brushes 8. Students can look at other fossil examples and recreate fossils in their nature journals while others finish up.
Line the bag with wax paper so the paint doesn’t glue the bag shut
Tape stencil onto the bag in the position that you want. Dab on paint with the foam paint brush, making sure you paint with an up-down dabbing motion to avoid smears. Make sure the paint layer is opaque so none of the bags color shows through

Created by UW Bothell Office of Research – Draft form Thursday, July 18, 2019 Contact Sarah Verlinde with questions: [email protected]
Before the paint dries, carefully peel off the stencil so you don’t smudge the paint. Allow the paint to dry fully before handling the bag
You can add some small decorations to the bag! Stripes were made by using the edge of the brush and polka dots were made with the flat painting edge. It is best to do this extra painting once the stencil design is dry so it is not accidently smudged! Animal Perception/Fear Check-in 10 minutes Wednesday Concepts: Students will talk about what animals scare them and why Learning Objectives: Campers will be able to explain why they might be afraid of something Materials:
• Passing object • Space
Process:
1. Have students sit in a circle 2. Students will go around, talking about what animals scare them and why

Created by UW Bothell Office of Research – Draft form Thursday, July 18, 2019 Contact Sarah Verlinde with questions: [email protected]
3. Take discussion back to myths, myths can sometimes try to scare people from danger (be afraid of wolfs, woods etc.). Did myths or stories (like movies, books, something a friend told you) have an effect on your fear?
Crow Myths from Around the World 30 minutes Wednesday Concepts: Introduce students to mythology surrounding crows and ravens, teach students what a myth is
Learning Objectives: Campers will be able to explain what a myth is, campers will learn about a Nordic and a Native American raven stories. Materials:
• PowerPoint slides: Crow Myths from Around the World • Projector/screen
Process:
1. Read the Myth about Oden’s ravens a. Point out the different origin of this myth, different culture and area (Scandinavian) b. This myth is also attached to other myths, the Norse gods (point out that Odin is Thor’s dad!). Myths can
be connected to other myths as well as being just a single story. Bring up that myths are passed down by word of mouth so additions to stories are common!
c. Point out that Huggin and Muggin names translate to thought and memory, representing the raven’s intelligence as well as the intellect of Odin himself, the ravens are real in the story but represent more abstract ideas
d. Ravens were associated with battle, and their presence on the battlefield was a sign of good fortune for the Norse people, they would also bring them on their ships for good luck and the raven would be carved into boats shields, homes and everything in-between.
i. What symbols do you use? Bring up symbols of luck like a four-leaf clover, symbols of bad luck like black cats and walking under ladders.
e. Have students answer the discussion questions 2. Read the myth out-loud to the class (they’re in the slides) Raven and How the Tides Began
a. It’s important to point out that this is a Native American legend, have student keep the myths origin and original writer in mind when listening.
b. Have students answer the discussion questions . 3. After students have discussed Raven and How the Tides Began myth ask students to compare it to the Odin’s
Ravens myth. Ask questions like: a. What were some similarities and differences between the two myths? b. Was raven portrayed in the same way in both? If not, what were the differences? c. Why do you think these myths were created?
Teacher's notes: Positive viewpoint:
• Native American legends do not show the crow as a death omen as many other cultures do, but a good luck sign! The most prominent feature portrayed in myth is the crow’s intelligence, similar to stories with ravens. Ravens are seen not as gods, but as a trickster and transformer. They create change, sometimes on purpose and sometimes out of selfish desire and mischievousness.
Crow Personality Writing Warm Up 15 minutes Wednesday

Created by UW Bothell Office of Research – Draft form Thursday, July 18, 2019 Contact Sarah Verlinde with questions: [email protected]
Concepts: Students will be able to apply the concepts of personification to make their own poem/writing piece
Learning Objectives: Campers will be able to explain what personify means, students will be able to use personification in their own writing Materials:
• Space • Nature journal • Pens
Process:
1. Write on board at beginning of day a few examples of poetry forms a. Haiku
i. A Haiku is a short Japanese poem used to evoke images. Line one has 5 syllables, line 2 has 7, and line three has 5 syllables. Haiku is a mood poem and it doesn’t use metaphors or similes. Ex. 1a Pleasant summertime
A little, fuzzy crow hops despite the tall grass This example is good, but does not personify the crow.
Ex. 1b Pleasant summertime The generous wizard crow Walks through the tall grass This example is better, the crow now has a human title (wizard) and walks (like a human, rather than hops like a bird). Generous is also a human trait.
Ex 2a Stormy red morning
A solid, rugged rock bears an old dark raven Typical for a normal raven to sit on a rock.
Ex 2b Stormy red morning The wise old raven sits in
her wooden armchair This second version provides a gender for the raven (her), she is wise (human trait) and she is sitting in an armchair (unusual for a bird)
b. Acrostic
i. An Acrostic poem formal uses the first letter of each line to make a word down the paragraph/stanza. Here the crow is has a job and does human things. Ex. 1
Celeste, the crow princess Rarely takes a break from her royal work - Only to stop and smell the roses Which bloom in June
c. Rhyming couplets AABB i. A rhyming couplet have the first and second line rhyme, and the third and fourth lines rhyme.
Ex Corvid Poetry Raven is much larger than crow This is something that we all know

Created by UW Bothell Office of Research – Draft form Thursday, July 18, 2019 Contact Sarah Verlinde with questions: [email protected]
Raven soars and glides among clouds up high While crow flaps through the city sky But did you know when the sun sets at night Raven and crow read poetry in moonlight? With candles lit and their spectacles on they recite the funny limericks ‘til dawn!
2. Have students write a short poem/haiku or a short story where they personify a crow (10 minutes) 3. Have students get into small groups and explain how they personified their crow and why
a. For example: I wrote about a crow that always interrupted people and yelled as they walked by because I always here crows calling all day and they are very loud!
Crow-llective Art Project-Feather Collage 55 minutes Wednesday Concepts: Reflecting on the connotations/reputations of crows and depict them in a visual form Learning Objectives: Campers will understand both the positive and negative connotations of crows in the human culture using white as good and black as evil. Materials:
• Scissors • Black thin permanent markers • White gel pens • Pencils • Masking tape • Print out worksheet, 1/student: W-Crow-llective Feather Collage • Print out teacher template: W-Crow-llective Feather Collage Teacher Template • PowerPoint: Crow-llective Feather Collage • Butcher paper cut into two large crows, approximately 26” tall (use template for scale). • Black construction paper (1/student) • Students can make 4 feathers each
o Two black ones from one sheet of construction paper o One dedicated white one from the cut-out worksheet o One white one that was used as a pattern, but is now usable as a white feather
Process:
1. Provide each student with a feather template (white paper with black outline) 2. Pull up PowerPoint slides Crow-llective Feather Collage for some examples and ideas 3. Students will cut out template 4. Trace out template on at least one white and one black construction paper
a. Students can just cut out the white one and use that, but will need to trace a feather onto black paper.
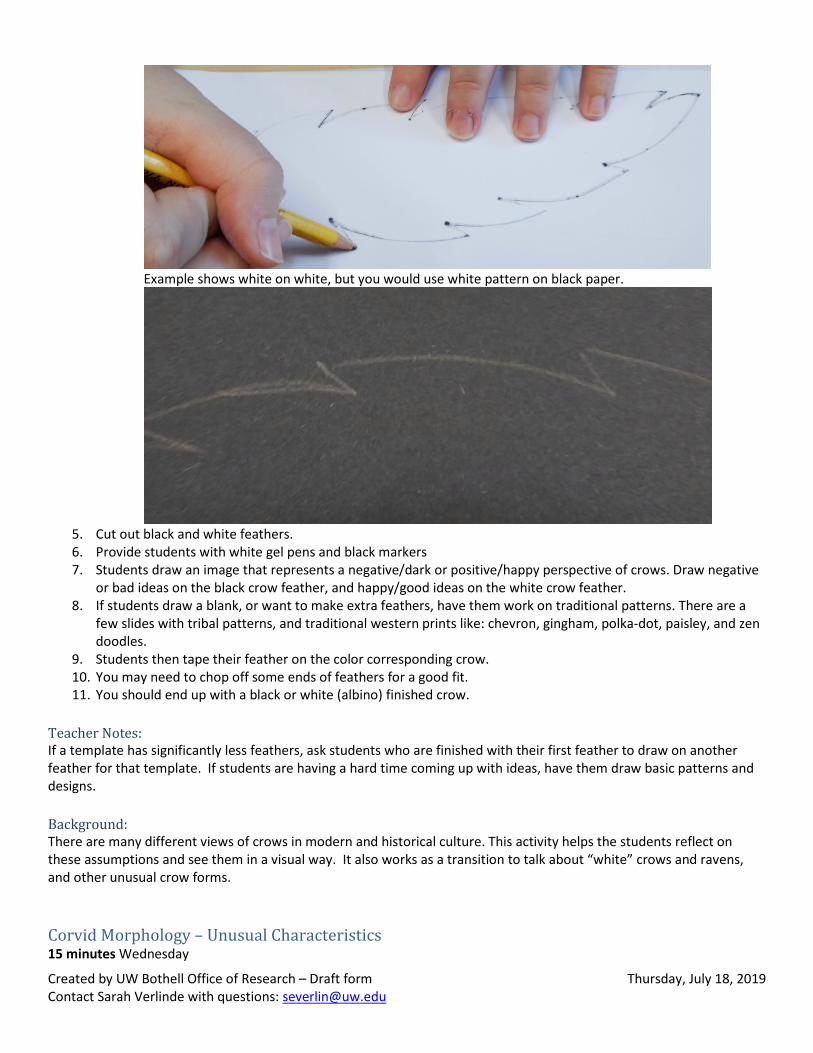
Created by UW Bothell Office of Research – Draft form Thursday, July 18, 2019 Contact Sarah Verlinde with questions: [email protected]
Example shows white on white, but you would use white pattern on black paper.
5. Cut out black and white feathers. 6. Provide students with white gel pens and black markers 7. Students draw an image that represents a negative/dark or positive/happy perspective of crows. Draw negative
or bad ideas on the black crow feather, and happy/good ideas on the white crow feather. 8. If students draw a blank, or want to make extra feathers, have them work on traditional patterns. There are a
few slides with tribal patterns, and traditional western prints like: chevron, gingham, polka-dot, paisley, and zen doodles.
9. Students then tape their feather on the color corresponding crow. 10. You may need to chop off some ends of feathers for a good fit. 11. You should end up with a black or white (albino) finished crow.
Teacher Notes: If a template has significantly less feathers, ask students who are finished with their first feather to draw on another feather for that template. If students are having a hard time coming up with ideas, have them draw basic patterns and designs. Background: There are many different views of crows in modern and historical culture. This activity helps the students reflect on these assumptions and see them in a visual way. It also works as a transition to talk about “white” crows and ravens, and other unusual crow forms. Corvid Morphology – Unusual Characteristics 15 minutes Wednesday
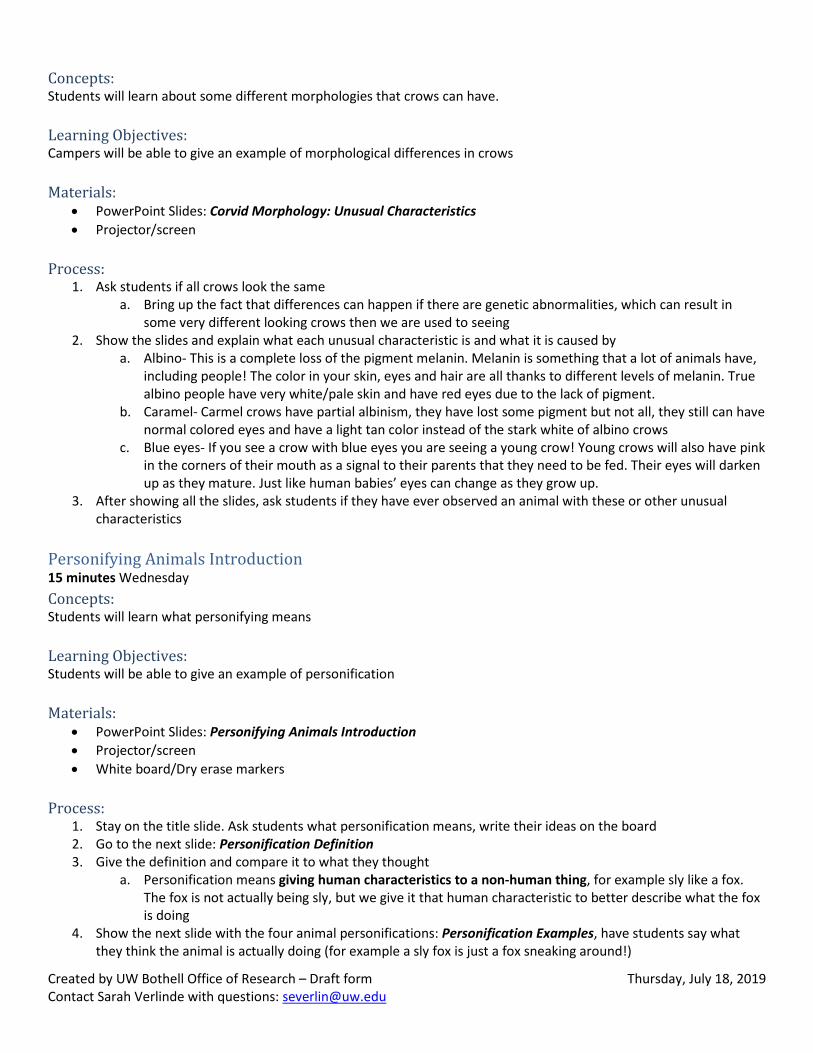
Created by UW Bothell Office of Research – Draft form Thursday, July 18, 2019 Contact Sarah Verlinde with questions: [email protected]
Concepts: Students will learn about some different morphologies that crows can have. Learning Objectives: Campers will be able to give an example of morphological differences in crows Materials:
• PowerPoint Slides: Corvid Morphology: Unusual Characteristics • Projector/screen
Process:
1. Ask students if all crows look the same a. Bring up the fact that differences can happen if there are genetic abnormalities, which can result in
some very different looking crows then we are used to seeing 2. Show the slides and explain what each unusual characteristic is and what it is caused by
a. Albino- This is a complete loss of the pigment melanin. Melanin is something that a lot of animals have, including people! The color in your skin, eyes and hair are all thanks to different levels of melanin. True albino people have very white/pale skin and have red eyes due to the lack of pigment.
b. Caramel- Carmel crows have partial albinism, they have lost some pigment but not all, they still can have normal colored eyes and have a light tan color instead of the stark white of albino crows
c. Blue eyes- If you see a crow with blue eyes you are seeing a young crow! Young crows will also have pink in the corners of their mouth as a signal to their parents that they need to be fed. Their eyes will darken up as they mature. Just like human babies’ eyes can change as they grow up.
3. After showing all the slides, ask students if they have ever observed an animal with these or other unusual characteristics
Personifying Animals Introduction 15 minutes Wednesday Concepts: Students will learn what personifying means Learning Objectives: Students will be able to give an example of personification Materials:
• PowerPoint Slides: Personifying Animals Introduction • Projector/screen • White board/Dry erase markers
Process:
1. Stay on the title slide. Ask students what personification means, write their ideas on the board 2. Go to the next slide: Personification Definition 3. Give the definition and compare it to what they thought
a. Personification means giving human characteristics to a non-human thing, for example sly like a fox. The fox is not actually being sly, but we give it that human characteristic to better describe what the fox is doing
4. Show the next slide with the four animal personifications: Personification Examples, have students say what they think the animal is actually doing (for example a sly fox is just a fox sneaking around!)

Created by UW Bothell Office of Research – Draft form Thursday, July 18, 2019 Contact Sarah Verlinde with questions: [email protected]
5. Have students discuss how personification can be used in writing and what examples they have seen a. Have you seen an example of personification before? Where? b. How do you think personification can be used in writing or storytelling? c. Why would you use personification instead of just writing about what the animal is actually doing?
6. After students have discussed their own examples, show them the personification example videos in the next two slides. After both are shown have students discuss how the sloth was personified and how the cartoons sloth behavior compared with the actual sloths behavior.
Personification Artwork - Collage 60 minutes Wednesday Concepts: Students will decorate their own crow to give it personality. Learning Objectives: Campers will be able to show personality traits through design. Materials:
• Print off W-Personification Templates worksheets. Print 1 packet per 2-3 students, one-sided only. Black and white is ok.
• Glue sticks • Scissors • Printed scrapbook papers • Magazines/newsprint if available from home • Markers • Construction paper
Process:
1. Have each student cut out a crow silhouette. They can use the print out or trace and make one with colored paper.
2. Students can decorate their crow with whatever they want! Have them keep in mind personalities that we have learned about when they are decorating
3. Cut out the decorations/accessory’s and crow outline

Created by UW Bothell Office of Research – Draft form Thursday, July 18, 2019 Contact Sarah Verlinde with questions: [email protected]
4. Trace the cutouts onto construction paper/scrapbooking paper/news paper/magazines
5. Cut out your traced design. Lay them out on the background paper to see how you should glue them down

Created by UW Bothell Office of Research – Draft form Thursday, July 18, 2019 Contact Sarah Verlinde with questions: [email protected]
6. Glue down the pieces and add some extra touches (like the stripe on the top hat or the buttons on the phone!) Story Time Writing 25 minutes Wednesday Concepts: Students will write their own short story in their journals Learning Objectives: Campers will be able to write a short story, campers will be able explain what makes a myth a myth and not just a story Materials:
• Space (recommended outside!) • Nature journals
Process:
1. Have students sit with their journals and write their own myth, reminding them of the differences between a story and a myth
2. After giving students work time (about 20 min) allow students to read their myths out loud to the class a. If no one wants to share have a class discussion on myths!
Crow and Raven Myth Skits 50 min Wednesday Prep = 30 minutes, Performance = 20 minutes Concepts: Students will learn about the cultural importance of the crow/raven and be introduced to Native American crow and raven stories.
Learning Objectives: Campers will be able to describe typical roles of crows and ravens in Native American mythology, campers will work with a team to act out a story and share their story with the class. Materials:
• W-Crow and Raven Myth Skits Packet: print five copies, not collated, not stapled, so each group gets one story, and each student gets one copy of their “script”
• PowerPoint slides: Crow and Raven Skits • Projector/screen • Items for making props:
o Scissors o Markers o Glue o Construction paper o Scotch tape and/or masking tape o Dowel rods
Process:
1. Divide students into groups of four (or so) and pass out one story/myth per group. Each group should perform a different legend/myth. Assign the myth for each group.

Created by UW Bothell Office of Research – Draft form Thursday, July 18, 2019 Contact Sarah Verlinde with questions: [email protected]
2. Give the groups time to read through the packet. 3. After the reading period is over (about 10 minutes), the groups will have the remaining time to plan out their
skit and build the props necessary to perform their 3-5 minute skit. 4. There is a separate title slide for each skit, including some information or questions about the skit. 5. Now, each group will perform their skit. 6. Take time after each skit to talk about the overall takeaways from each skit. Try to identify what the moral or
objective of the story was. Teacher Notes:
• All the skits provided show Crow and Raven as positive/important characters. • Please discourage students in representing Native Americans in old and stereotypical fashion. For example,
they should not being saying “how” and not using full sentences. Encourage them to talk in their normal voices and cadence, and to attempt to pronounce the native names provided. Allow them to substitute the names with other names if needed.
• If there’s time afterward, have students sketch a scene in their journal of a story they liked to serve as a reminder of what they learned.
• Masks can be made out of construction paper and taped to dowels to look like photo booth props. This is helpful if one student needs to play two different roles.
Closing Circle 15 minutes Wednesday Concepts: Students will reflect on what they learned that day
Learning Objectives: Campers will be able to share something that they learned, share their favorite thing that they learned/did
Materials:
• Nature Journal • Passing object
Process:
1. Students will sit in a circle and reflect on what they learned that day in their journals (5min) 2. Students will go around and share their favorite thing they learned or activity they did

Created by UW Bothell Office of Research – Draft form Thursday, July 18, 2019 Contact Sarah Verlinde with questions: [email protected]
THURSDAY - Communication and Intellect Thursday Outline
ACTIVITY ACTIVITY TYPE TIME SCHEDULE Arrival – Morning Circle Discussion 15 minutes 8:45 – 9:00am Intelligent Animals Check-In Discussion 15 minutes 9:00 – 9:15 How Do you Measure Intelligence? Lesson 15 minutes 9:15 – 9:30 Memory Puzzle Game Activity 30 minutes 9:30 – 10:00 Animal Videos: Instinct vs. Intellect? Lesson/Discussion 30 minutes 10:00 – 10:30 Snack Break 15 minutes 10:30 – 10:45 Caw-munication Lesson Lesson 20 minutes 10:45 – 11:05 Are You Smarter than a Crow? Activity 35 minutes 11:05 – 11:40 Silent Journal Time Activity 20 minutes 11:40 – 12:00pm Lunch Break 30 minutes 12:00 – 12:30 Paint Bird Feeder Components Activity 45 minutes 12:30 – 1:15 Crow Mask Study Lesson 20 minutes 1:15 – 1:35 Crow-munication Relay Activity 30 minutes 1:35 – 2:05 Snack Break 15 minutes 2:05 – 2:20 Art Lesson - Color Theory & Watercolor Swatches Activity 20 minutes 2:20 – 2:40 Watercolor Doodles Activity 30 minutes 2:40 – 3:10 Nature Walk Activity 20 minutes 3:10 – 3:30 Closing Circle (outside) Discussion 15 minutes 3:30 – 3:45 Check out - - 3:45
Summary of Supplies for Thursday:
Activity Durable Consumables Morning Circle A ball (or other object) to pass
around Open space for the students to sit in a circle
Intelligent Animals Check In Open space for the students to sit in a circle White board Dry erase markers Ball/Passing Object
How Do you Measure intelligence? PowerPoint slides: How Do You Measure Intelligence? Projector/screen
Memory Puzzle Game 20-30 small random objects. Ideas for objects can be but are not limited to: Hair ties/rubber band, nail file, toothbrush, pencil, sticks, spoon, key chain, rocks, small can, coins, nuts, ping pong ball, chopstick, paintbrush, tweezers, etc. A tray to place the objects A white sheet to place on top of the tray to cover the objects Student nature journals to write in

Created by UW Bothell Office of Research – Draft form Thursday, July 18, 2019 Contact Sarah Verlinde with questions: [email protected]
Pencils/pens (something to write with)
Animal Videos: Instinct vs. Intellect PowerPoint Slides: Instinct vs. Intellect? Animal Videos
Projector/screen
Caw-munication Lesson PowerPoint slides: Caw-munication Lesson Projector/screen
Are You Smarter than a Crow? PowerPoint slides: Are you Smarter than a Crow? Projector/screen Pen/Marker
Sticky notes 1 pad/group in 4 different colors Masking Tape Print packet Th – Mascots for Smarter than a Crow. You need 1 bird per team, so print the four images out, on cardstock preferred, front sides only.
Silent Journal Time • Nature Journals • Pens/pencils/markers
Paint Bird Feeder Components Paint brushes Paint brushes Containers to mix paints in, if desired
Clean tin can Bright acrylic paints Table coverings like newspaper or wax paper White school glue
Crow Mask Study PowerPoint Slides: The Mask Study Projector/screen
Crow-munication Relay Pen/markers Scissors
Print: Th-crow-munication relay word bank Plain paper
Art Lesson - Color Theory & Watercolor Swatches
PowerPoint slides: Art Lesson: Color, Hue, Tint, & Shades Projector/screen Assorted Paint Brushes Water container/trays, one/table Black thin permanent markers Watercolor sets, one/table
9x13 Watercolor paper (cold press, economy) –1 sheet/student Wax paper (18”/student) to protect surface Paper towels or cloth rags to clean brushes in between colors
Watercolor Doodles Watercolors Watercolor brushes Water container/trays, one/table Pencils/pens/markers
9x13 Watercolor paper (cold press, economy) –1 sheet/student Wax paper (18”/student) to protect surface Paper towels or cloth rags to clean brushes in between colors
Nature Walk Nature Journals Pens/pencils/markers
Closing Circle Ball/Passing Object Nature Journal

Created by UW Bothell Office of Research – Draft form Thursday, July 18, 2019 Contact Sarah Verlinde with questions: [email protected]
Required Preparation: • Print:
o Print packet Th – Mascots for Smarter than a Crow. You need 1 bird per team, so print the four images out, on cardstock preferred, front sides only.
o Th-crow-munication relay word bank (1 per team, max 4) • During break, fill up containers for watercolor painting • If unfamiliar with the area, walk nature walk spaces before taking students outside.
Safety Guidelines: • Outside activities/Nature Walks
o If unfamiliar with the area, walk nature walk spaces before taking students outside. o Ask students if there are any health concerns or allergies you should be aware of for outdoor activities
(bee/plant allergies) o Remind students to not touch things they are unfamiliar with and to stay in a group o Have students dress for the weather. If it’s cool, have them bring their jacket. If they did not put
sunscreen on, try to pick activities with them spending time in the shade. o Make sure they stay hydrated.
• Be careful with the raw edge of the aluminum can when making the bird feeder. Morning Circle 15 minutes Tuesday Concepts: Allows students to introduce themselves and is a meeting time to discuss activities for the day
Learning Objectives: Campers will be able to introduce the person sitting next to them, say what activities and concepts we are learning that day Materials:
• A ball (or other object) to pass around • Open space for the students to sit in a circle
Process:
1. Get students to form a circle and sit down 2. Ask students to turn to the person to their right and say their name and something they want to put into their nature journals (5 min) 3. Ask students to introduce the person sitting to their right to the rest of the class, going around the circle (5 min) 4. Introduce the days concepts and activities (five minutes)
Intelligent Animals Check-In 15 minutes Thursday Concepts: Students will have a discussion on animal intelligence focusing on different types of animals they are already familiar with. Learning Objectives: Campers will be able to talk about what makes an animal intelligent, ask questions on what intelligence means

Created by UW Bothell Office of Research – Draft form Thursday, July 18, 2019 Contact Sarah Verlinde with questions: [email protected]
Materials: • Space • White board • Dry erase markers • Ball/Passing Object
Process:
1. Have students sit in a circle 2. Ask students “How do you define intelligence?” write up on board key ideas 3. How would you describe really smart people? 4. Which animals have you seen that are really smart? 5. Using the definitions they came up with, ask how it relates to animal intelligence
Teacher’s Notes: Some examples of smart animals and different types of intelligence. Don’t teach them about these animals, but allow them to offer up an animal, like a dog, and then steer them in the right direction. Offer up the other animal examples to hit on different types of intelligence (memory, tool use, etc.). Start with household animals then move to the broader kingdom.
• Dogs: able to learn tasks (work dogs), learn behaviors/tricks, and have social networks/packs. • Dolphins, chimpanzees, whales, ravens, crows, magpies, rats, elephants • Octopus: The mimic octopus can impersonate other species in order to protect itself from predators (this may
be instinctual or intelligent) • Dolphins can help one another if another dolphin is injured or sick and can communicate to each other with
special calls. They also use sponges as a tool to dig up clams and other animals from the sand. • Chimpanzees form sociable and elaborate communities. They use tools to carry out tasks (sticks to eat termites)
and rocks to open fruit. They have a great memory and are able to use sign language to communicate with humans.
• Parrots are able to recognize different human faces and impersonate human voices. They also have a great memory.
• Elephants are social and have a range of emotions, including happiness, compassion, pain, and grief (they can cry). They have very long-term memories!
How Do you Measure intelligence? 15 minutes Thursday Concepts: Students will learn how we measure animal intelligence Learning Objectives: Campers will be able to explain how we measure animal intelligence, understand differences in testing intelligence without communication Materials:
• PowerPoint slides: How Do You Measure Intelligence? • Projector/screen
Process: 1. Before you begin the slides, ask the campers how they think we can measure intelligence. Ask if the way we
measure intelligence is different for people and animals. If so, why? a. We can test human intelligence, and ASK them afterward why they did something or survey them.
Created by UW Bothell Office of Research – Draft form Thursday, July 18, 2019 Contact Sarah Verlinde with questions: [email protected]
2. The questions in these slides are more open-ended to encourage campers to support their answers with what they have learned in the camp so far.
3. Campers should be able to explain some ways on how we test animal intelligence and why intelligence matters for an animal. They should also be able to talk about how brain size and intelligence are not the same thing, and have a passing knowledge on what neurons are and what they do.
Memory Puzzle Game 30 minutes Thursday Concepts: Crows have a high memory intelligence, especially with faces, and they are extremely resourceful, by using what’s surrounding them to help them out. Learning Objectives: Campers will be able to understand that crows have a high memory intelligence and their resourcefulness for using what’s around them. They can test their own memories by playing this game. Materials:
• 20-30 small random objects. Ideas for objects can be but are not limited to: o Hair ties/rubber band, nail file, toothbrush, pencil, sticks, spoon, key chain, rocks, small can, coins, nuts,
ping pong ball, chopstick, paintbrush, tweezers, etc. • A tray to place the objects • A white sheet to place on top of the tray to cover the objects • Student nature journals to write in • Pencils/pens (something to write with)
Process:
1. Pass the tray of objects around and have the students try to memorize them. We recommend 1 minute per table. It’s ok if students peek over at the other groups’ time, getting a max of 4 minutes to view.
2. Remove and cover the tray up. 3. Have students pull out their nature journals 4. Give the students 3 minutes to write down as many of the objects as they can recall in their journals. 5. Show them they tray again (just up front) to see how many objects they managed to recall. Work through their
answers and see who got the most items in the class. a. We recommend pulling each object out and asking them to raise hands if they wrote it down
“This is a bobby pin, who got the bobby pin, raise your hand?” 6. Talk about the crow’s ability to remember faces (talk about studies done or stories of crows remembering faces,
and say how you’re going to cover some lessons later in afternoon). 7. Next ask, if you were a crow, how might you use these tools? 8. Ask why is it helpful for an animal to have a good memory?
a. Find food, avoid danger, remember who your offspring is, etc.
Animal Videos: Instinct vs Intellect 30 minutes Thursday Concepts: Introduce the differences between instinct and intellect Learning Objectives Campers will understand the differences between instinct and intelligence in animals.

Created by UW Bothell Office of Research – Draft form Thursday, July 18, 2019 Contact Sarah Verlinde with questions: [email protected]
Materials • PowerPoint Slides: Instinct vs. Intellect? Animal Videos • Projector/screen
Process: 1. When showing the videos, have students hold their thoughts until you reach the discussion slides between the
videos, these have a black brain icon and are text slides. 2. When students are discussing the questions, make sure to remind them to try to support their ideas with what
they have learned in the lecture as well as in previous lessons! 3. Students should be able to identify different aspects of animal intelligence from the previous lessons in the
videos. 4. Note, the “Mirror test” with animals recognizing their reflection, may have been debunked, thanks to a “dumb
fish”. https://www.quantamagazine.org/a-self-aware-fish-raises-doubts-about-a-cognitive-test-20181212/?utm_source=Quanta+Magazine&utm_campaign=76f7850d96-RSS_Daily_Biology&utm_medium=email&utm_term=0_f0cb61321c-76f7850d96-389739793&mc_cid=76f7850d96&mc_eid=9104444c07
Caw-munication Lesson 20 minutes Thursday Concepts: Campers will understand that crows communicate well with one another Learning Objectives: Campers will be able to understand the basics behind animal communication and ask questions about how animals communicate Materials:
• PowerPoint slides: Caw-munication Lesson • Projector/screen
Process:
1. When introducing the slides, make sure to mention that crow research is done here on the UW Bothell campus! 2. When showing the rooftop video, have students keep thoughts to themselves until after the video and then
have a discussion. 3. Ask if the crows could be communicating with body language as well as with verbal communication. 4. Have students consider what they think researches look for in videos like the rooftop recording. 5. After playing the crow language call types videos (the begging and mob call) have students talk about what was
similar and different between the two call types. Are You Smarter Than a Crow? 35 minutes Thursday Concepts: Review corvid habitat, anatomy, and facts about corvids. This knowledge will help them retain all the facts and information from the last few days. Learning Objectives: Campers will have the chance to review information and facts they have learned.

Created by UW Bothell Office of Research – Draft form Thursday, July 18, 2019 Contact Sarah Verlinde with questions: [email protected]
Teacher Notes: Depending on the size of the class, students can play the game with 2 - 4 teams. Materials:
• Print packet Th – Mascots for Smarter than a Crow. You need 1 bird per team, so print the four images out, on cardstock preferred, front sides only.
• PowerPoint slides: Are you Smarter than a Crow? • Projector/screen • Sticky notes 1 pad/group in 4 different colors • Pen/Marker • Masking Tape
Preparation: Print out the paper bird mascots. Process: Getting Ready
• Separate the campers into 2-4 groups and give them a bird. • Students will have to identify their bird before moving on (do this as a class. It’s Crow, Raven, Magpie, and Blue
Jay). • Have students make up a fun team name: “Victory Ravens”, “Quirky Commanding Crows”, etc. • Give each team a color post-it pad and marker/pen. Have them write in the corner the point values. • Ask the students if they’ve ever seen “Are You Smarter Than a 5th Grader”. • If there are extra dowels, students can tape their mascot to the dowel to make a sign. • Have students put nature journals and worksheets away.
Game rules:
• The teacher will read the question out-loud (from PowerPoint Are you Smarter than a Crow?). Each question has a point value assigned to it. The students can work within their teams (quietly or out-loud) to come up with their response.
• Give students up to 2 minutes to work out the answer • Students will write their answers on their post-it and one student will walk it up to the teacher for each round. • At the end of each round, read the post-its out loud (maybe behind a colored piece of paper) and use this
moment to teach about what the right answer is and why. • When the answer is correct, the team can re-collect the correct post-it at the very end (this is their receipt).
Post-its with the wrong answer are not returned. • After the questions, campers can add up their points from the post-its. Team with the most points win! • You can say that 525points is smarter than a fifth grader… of course, most of them are fifth graders! • If any of the teams end up tying in the end, use the bonus questions, whoever answers correctly end up winning.
Have them right them on post-its so it’s not a blurting match. At the end ask everyone what interesting fact they thought was cool and intriguing. Silent Journal Activity 20 minutes Thursday Concepts: Students will have a chance the review what they have learned and apply concepts from the day

Created by UW Bothell Office of Research – Draft form Thursday, July 18, 2019 Contact Sarah Verlinde with questions: [email protected]
Learning Objectives Students will gain a better understanding of what they have learned in camp and be able to creatively express themselves. Materials • Slides: Silent Journal Activity • Nature Journals • Pens/pencils/markers
Process:
1. Have students sit quietly with their nature journals 2. Students can:
a. Write about what they have learned so far in camp b. Write a short story c. Draw something that they have learned about (plant/animal seen on nature walk, crow structure, habitat) d. Write about their favorite things they have learned in camp e. Or something else!
3. Students can be very creative in this process as they are adding to their personal journals! Paint Bird Feeder Components 45 minutes Thursday Concepts: Students will prepare for making a bird feeder, students will discuss what birds eat Learning Objectives: Students will review what they have learned about bird eating habits while prepping a bird feeder. They will finish the feeder tomorrow. Materials:
• Clean tin can • Bright acrylic paints • Paint brushes • Containers to mix paints in, if desired • Table coverings like newspaper • White school glue
Process:
1. Cover workspace with newsprint to prepare for painting 2. Have students gather their tin can, remove paper label from can. Make sure can is clean and dry.
**Most cans don’t have sharp edges, but please tell them to be careful incase one came in with a sharper edge. Use masking tape on the inside to act as a buffer**

Created by UW Bothell Office of Research – Draft form Thursday, July 18, 2019 Contact Sarah Verlinde with questions: [email protected]
3. Students can choose the color of paint they want and may want to change tables depending on color they
choose. For example, have all the blues at one table, yellows at another, pink at the third… 4. Using acrylic paint, paint the outsides of the can, including the bottom. We recommend painting the sides first,
and the bottom last. 5. Leave time for a second or third coat. While students are painting have them discuss what birds eat. For
example, what types of birds might eat the seeds that will go into the bird feeder? Tomorrow there will be a more detailed lesson on what/how birds eat.
6. To review from Tuesday, talk about what baby birds eat (worms and insects mostly). 7. Once the acrylic paint is dried, cover with a layer of white school glue to make the outside a little more water
resistant.

Created by UW Bothell Office of Research – Draft form Thursday, July 18, 2019 Contact Sarah Verlinde with questions: [email protected]
8. Have students put their finished cans on a scrap piece of paper, tell students to write their names on the paper so they can get the correct can the next day.
Crow Mask Study Lesson 20 minutes Thursday Concepts: Campers will learn about what type of research is done on crows by UW/UWB researchers. Their research helps us better understand crow behavior, intellect, and communication. Learning Objectives Campers will be able to understand what the mask study showed and how it was performed. Campers will be able to explain what type of research has been done on crows. Materials
• PowerPoint Slides: The Mask Study • Projector/screen
Process:
1. After going through the mask study and then the Kaeli Swift study slides, have campers compare the two studies.
a. What was similar? What was different? b. What did they tell us about crows? c. Do these studies show that crows are intelligent?
Crow-munication Relay 30 minutes Thursday Concepts: Campers will learn how to communicate efficiently as humans and in different ways using drawing, acting, and Learning Objectives: Campers will learn how to communicate efficiently as humans and in different ways. Afterward, they can think about different ways crows may communicate with one another. Materials:
• White board markers • White boards • Print: Th-crow-munication relay word bank • Scissors • 1 bowl per group
Word Bank
Food Worm Danger Hello Tree Murder/Flock
Smart Tools Chicks Eggs
Nest Roost Feather Hatch Collection Friend Insects Play Family Drink
Call Garbage Flying Goodbye Perch Eat Communication
Beak Wing Attack

Created by UW Bothell Office of Research – Draft form Thursday, July 18, 2019 Contact Sarah Verlinde with questions: [email protected]
Process:
1. Print out Th-crow-munication relay word bank, one per group 2. Cut the word bank out on the dotted lines 3. Fold them in half and place them into one bowl per group. 4. Divide the students into equal teams of 4 and assign a number 1-4 to each student (you can use the four
mascots from the other game). 5. Give each student a pencil. 6. Give the 2nd, 3rd, and 4th members a sheet of paper each. 7. Space out the team members across the room in a line from end to end. Each team should be parallel to the
next forming an array of students. 8. Let the first members of each group pick a word from the bowl. Give them time to memorize before putting
away (in their pocket preferred). 9. Start the game. The first member runs over to the second. They need to communicate WITH SPOKEN WORDS
the word without using the word itself or any word in it; (ex: land that’s wet for wetland is not acceptable). 10. If the second member thinks they got the word, they write it down on the paper they have. If it’s correct, the
first member nods/shakes head, or says yes/no. The first member continues trying to explain the word until the second member gets it right.
11. Once the second member gets the answer, they draw a new word. They perform with ACTING/NO SPOKEN WORDS charades over to the third member (no words written or speaking allowed). The third member writes down their guess, and if it’s correct, the second member nods/shakes head.
12. Once the third member gets the word, they go over to the fourth member and DRAW out the word (no speaking or acting out the word).
13. The fourth member writes the guess on the paper, and if it’s correct, the third member nods/shakes head, or says yes/no.
14. Members who’ve completed their role may watch the other members as long as they don’t give hints (verbal or visual).
15. First team to finish communicating the words to all members, wins. All members must raise their hands to indicate completion.
16. Check with an adult to ensure truthfulness. Evidence should be visible on the scratch papers. 17. Can play multiple rounds; remove previously used words.
Teacher Notes: If students are struggling, remove the step that’s hardest. If there’s not enough students, make groups of three. All groups should have the same number of members. If groups of three don’t work, there can be a rotation of the students. If groups of five work, there can be two people at step three (acting it out) because it’s the hardest step. Run the round 2-4 times if there is extra time after the first round. Background: Crows are social creatures; communicating dangers, locations, and other information to their families. As humans, we don’t always understand their means of communication - we can only assume. This activity helps the students comprehend the various ways crows could potentially communicate with one another; demonstrating just how mysterious these intelligent creatures are. Art Lesson - Color Theory & Watercolor Swatches 20 minutes Thursday Concepts: Campers will learn about basic color theory and how to use different shades and tints

Created by UW Bothell Office of Research – Draft form Thursday, July 18, 2019 Contact Sarah Verlinde with questions: [email protected]
Learning Objectives Campers will learn about basic color theory and how to use different shades and tints and practice with swatches using watercolor paints. Materials
• PowerPoint slides: Art Lesson: Color, Hue, Tint, & Shades • Projector/screen • Assorted Paint Brushes • Water container/trays, one/table • Black thin permanent markers • Watercolor sets, one/table • 9x13 Watercolor paper (cold press, economy) –1 sheet/student • Wax paper (18”/student) to protect surface • Paper towels or cloth rags to clean brushes in between colors
Process:
1. After the lesson slides, have campers create their own watercolor swatches using what they have learned about color
2. Have campers cover their work surface with news paper 3. Capers will make watercolor color swatches and practice mixing colors
Watercolor Doodles 20 minutes Thursday Concepts: Students will apply watercolor concepts they have learned previously Learning Objectives: Students will improve their watercolor abilities by practicing a simple exercise. Materials • Slides: Watercolor Doodles – includes a YouTube video with instructions • Watercolors • Watercolor brushes • Cups/container for water • Watercolor paper • Pencils/pens/markers
Process:
1. Set up tables with watercolor supplies 2. Have students paint circles in random colors (encourage a color palette like blues and purples, or yellows and
greens. a. Allow the circles to dry, use paint/markers/pencils to make patterns or designs within them, so each circle is
a pattern swatch, or its own separate picture. Nature Walk 20 minutes Thursday Concepts: Students will apply what they have learned from previous nature walks/lessons to make observations in the natural world

Created by UW Bothell Office of Research – Draft form Thursday, July 18, 2019 Contact Sarah Verlinde with questions: [email protected]
Learning Objectives Students will be able to make better observations of the natural world Materials • Nature Journals • Pens/pencils/markers
Process:
1. Go outside to a space not previously observed (if possible) 2. Have students spend about 5-10 minutes making silent observations of the space
a. Remind students of previous lessons on making observations, having them use not just sight and to be specific when recording observations
3. After the silent observation time, have a discussion with what students observed a. Did anyone see any animals like birds, insects, deer b. What plants did students observe? Did they recognize any? c. What human signs were observed? Think about litter, buildings/structures, graffiti
Closing Circle - OUTSIDE 15 minutes Thursday Concepts: Students will reflect on what they learned that day
Learning Objectives: Campers will be able to share something that they learned, share their favorite thing that they learned/did
Materials:
• Nature Journal • Passing object
Process:
1. Students will sit in a circle and reflect on what they learned that day in their journals (5min) 2. Students will go around and share their favorite thing they learned or activity they did

Created by UW Bothell Office of Research – Draft form Thursday, July 18, 2019 Contact Sarah Verlinde with questions: [email protected]
FRIDAY: Watershed and Habitat Awareness Friday Outline
ACTIVITY ACTIVITY TYPE TIME SCHEDULE Arrival – Morning Circle Discussion 15 minutes 8:45 – 9:00am Watershed Introduction Lesson 20 minutes 9:00 – 9:20 Nature Walk: Human Effects on Environment Activity 60 minutes 9:20 – 10:20 Snack Break 15 minutes 10:20 – 10:35 Crows and Hunters Activity 35 minutes 10:35 – 11:10 Bird Beak Buffet Introduction Lesson Lesson 10 minutes 11:10 – 11:20 Bird Beak Buffet Activity Activity 40 minutes 11:20 – 12:00pm Lunch Break 30 minutes 12:00 – 12:30 Bird Feeder Activity Activity 45 minutes 12:30 – 1:15 Nature Journaling Time/Open Art Time Activity 45 minutes 1:15 – 2:00 Snack Break 15 minutes 2:00 – 2:15 Crow Skits - Good Morning Ameri-caw – Prep Activity 50 minutes 2:15 – 3:05 Crow Skits - Good Morning Ameri-caw Performance
Activity 25 minutes 3:05 – 3:30
Closing Circle Discussion 14 minutes 3:30 – 3:44 Raffle for Crow Plush/Skull Activity 1 minute 3:44 – 3:45 Check out - - 3:45
Summary of Supplies for Friday:
Activity Durables Consumables Morning Circle A ball (or other object) to pass
around Open space for the students to sit in a circle
Watershed Introduction PowerPoint Slides – Watershed Introduction and Leave no Trace Principles Projector/screen
Nature Walk: Human Effects on Environment
Nature journals Pencils/pens/markers
Crows and Hunters Game Open space 3x hula hoops or any object to mark locations on the floor Masking tape would work to mark the floor, if inside. Prize for the most elaborate /dramatic crow death (optional)
Bird Beak Buffet Introduction Lesson PowerPoint Slides – Bird Beak Buffet: How do birds eat? Projector/screen
Bird Beak Buffet Activity Tweezers Tongs Pipette Beads
Pipe cleaners Chop sticks

Created by UW Bothell Office of Research – Draft form Thursday, July 18, 2019 Contact Sarah Verlinde with questions: [email protected]
Ping pong balls Foam block Container of dirt Large container of water Skinny necked container
Bird Feeder Activity Pencils Scissors Foam brush Small container for holding glue
Crafting foam sheets in bright colors (at least 7”x7” large) Wax paper 12” square sheet (minimum) Newspaper for stuffing – about 4 sheets/student White glue Twine 3ft/student Colored beads x10-16/student Ziplock sandwich bags (1/student) Large bag of bird seed (3/4 cup/student)
Nature Journaling Time/Open Art Time
Nature Journal Assorted Paint Brushes Water container/trays, one/table Black thin permanent markers Watercolor sets, one/table Pens/pencils Markers
9x13 Watercolor paper (cold press, economy) –1 sheet/student Other art supplies leftover to use up Wax paper (18”/student) Paper towels or cloth rags
Crow Skits Good Morning Ameri-Caw Prep and Performance
Leftover Props from Wednesday Crow and Raven Myth Skits Markers Paint and or Foam brushes White board Dry erase markers Masking tape Clear tape White glue
Print out F-Good Morning Americaw prompts, 1/class. Cut on dotted lines Construction paper Dowel rods x20-30/class Fake feathers Butcher paper to make reporting desk/set, about 9’ Acrylic paints
Closing Circle Nature journal Passing object
Raffle for Crow Plush/Skull Passing object Materials Links: Ping pong balls: https://www.amazon.com/Beer-Balls-Washable-Drinking-White/dp/B003VRRO6C/ref=sr_1_1_sspa?crid=34RPIOLDSUZBR&keywords=ping+pong+balls&qid=1553874695&s=arts-crafts&sprefix=ping+pong+ba%2Carts-crafts%2C220&sr=1-1-spons&psc=1&smid=A1D4QGXNJXE7HW Pipettes: https://www.amazon.com/Jack-Richeson-101080-25-Paint-Pipettes/dp/B00PEFFU6K/ref=sr_1_7?crid=3SSDJQC0MUBPZ&keywords=pipettes&qid=1553874917&s=arts-crafts&sprefix=pipette%2Carts-crafts%2C218&sr=1-7 Tweezers: https://www.amazon.com/Jack-Richeson-101080-25-Paint-Pipettes/dp/B00PEFFU6K/ref=sr_1_7?crid=3SSDJQC0MUBPZ&keywords=pipettes&qid=1553874917&s=arts-crafts&sprefix=pipette%2Carts-crafts%2C218&sr=1-7 Beads: https://www.amazon.com/Assorted-Cartoon-Jewelry-Handmade-Childrens/dp/B07L4G5Z5P/ref=sr_1_27?keywords=wood+beads+colored&qid=1555373924&s=gateway&sr=8-27 Twine: https://www.amazon.com/Tenn-Well-Gardening-Applications-Turquoise/dp/B07HFV5LCZ/ref=sr_1_19?keywords=colored+twine&qid=1551220981&s=gateway&sr=8-19 Foam: https://www.amazon.com/Fibre-Craft-Foam-Sheets-2-Inch-50-Pack/dp/B00284NN82/ref=sr_1_4?crid=3N9BNV0N8PC10&keywords=craft+foam+sheets&qid=1553874260&s=arts-crafts&sprefix=craft+fo%2Carts-crafts%2C291&sr=1-4

Created by UW Bothell Office of Research – Draft form Thursday, July 18, 2019 Contact Sarah Verlinde with questions: [email protected]
Teacher Notes: Remind parents that they can come in around 3pm to watch the Good Morning Ameri-caw skits. Required Preparation:
• Print: Print out F-Good Morning Americaw prompts, 1/class. Cut on dotted lines • For the skits, try to make a “stage” area. Get creative with furniture in the room and butcher paper. • If unfamiliar with the area, walk nature walk spaces before taking students outside.
Safety Guidelines: • Outside activities/Nature Walks
o If unfamiliar with the area, walk nature walk spaces before taking students outside. o Ask students if there are any health concerns or allergies you should be aware of for outdoor activities
(bee/plant allergies) o Remind students to not touch things they are unfamiliar with and to stay in a group o Have students dress for the weather. If it’s cool, have them bring their jacket. If they did not put
sunscreen on, try to pick activities with them spending time in the shade. o Make sure they stay hydrated.
• Be careful with the raw edge of the aluminum can when making the bird feeder. Morning Circle 15 minutes Friday Concepts: Allows students to introduce themselves and is a meeting time to discuss activities for the day
Learning Objectives: Campers will be able to introduce the person sitting next to them, say what activities and concepts we are learning that day Materials:
• A ball (or other object) to pass around • Open space for the students to sit in a circle
Process:
1. Get students to form a circle and sit down 2. Ask students to turn to the person to their right and say their name and something they want to put into their
nature journals (5 min) 3. Ask students to introduce the person sitting to their right to the rest of the class, going around the circle (5 min) 4. Introduce the days concepts and activities (five minutes)
Watershed Introduction 20 minutes Friday Concepts: Teach students the seven no trace principles, introduce students to what a watershed is and how they function Learning Objectives: Campers will be able to explain what no trace principles mean, define a watershed

Created by UW Bothell Office of Research – Draft form Thursday, July 18, 2019 Contact Sarah Verlinde with questions: [email protected]
Materials: • PowerPoint Slides – Watershed Introduction and Leave no Trace Principles • Projector/screen
Process: 1. Because watersheds are an area of drainage they can also be areas with a lot of pollution! That is why it is
important to keep the environment clean everywhere, oil from a car in a neighborhood can be washed down and make its way into bodies of water that wildlife and people use
a. In the What are some sources of pollution? Make sure to make this point after students point out sources of pollution in the picture.
2. Some ways to help prevent pollution are remembering the seven no trace principles, these are used when camping and hiking but are useful in your everyday life to
a. Plan and prepare! If you are packing lunch plan ways to avoid waste like using reusable silverware and Tupperware
b. Remain on solid surfaces- don’t trample on grass and other plants walking in a natural area, stick to the path!
c. Dispose of waste properly! Don’t just throw garbage on the ground, pack it out with you where you can dispose of it properly
d. Leave what you find/take only pictures! When you go to a natural area, don’t pick plants or take animals with you, they belong where you found them!
e. Fire safety. Although you aren’t starting any fires, it's important to remember that even one fire work or small camp fire can start huge fires, be safe and always put fires out properly
f. Respect wildlife! Leave animals alone! Don’t feed them/try to pet them/scare them, wild animals can be dangerous and we don’t want to disturb them
g. Respect others! When in a natural area be respectful to others visiting, leave the area like you found it so others can enjoy it
3. In the Protecting our watersheds have students discuss things they have done or can do to help improve watershed health
4. The next activity is a nature walk that focuses on practicing the seven principles, looking at human impact, and observe the watershed from where you are (if possible).
Nature Walk – Human Effects on Environment 60 minutes Friday Concepts: Students will use concepts learned previously to make observations and ask questions about their environment. Learning Objectives: Campers will be able to make observations, ask questions about their environment. Materials:
• Nature journals • Pencils/pens/markers
Process:
1) Remind students to keep together in the group and to not touch anything without asking! 2) Explain to students that they should observe with their eyes, ears and nose! Make sure to tell students that they
should use quiet voices so that everyone can hear and so you don’t scare away any wildlife! 3) Have students bring their nature journals outside

Created by UW Bothell Office of Research – Draft form Thursday, July 18, 2019 Contact Sarah Verlinde with questions: [email protected]
4) Walk around and ask students to make observations in their journal a) Look for trash or human influence that may be affecting the habitat negatively or positively. b) Look for a space that you can recognize where you are in a watershed. At UW Bothell, walk to the outside
balcony, on the second floor of the North Creek Events center. From there you can see the evergreen tree line on the hillside, and then the lower wetland area where North Creek runs through. North Creek is part of the North Creek Basin, inside the Cedar/Sammamish Watershed which starts in the mountains.
5) Have students sit outside and quietly draw/write in their journals, asking them to keep previous lessons in mind a) If students need some ideas, have them do drawings of natural or man-made items (trash/graffiti, crow
picking up garbage). They could also draw a map of where they are, and where features are in the area. Crows and Hunter Activity 35 minutes Friday Concepts: Allow campers to bond as a group and explore how crows communicate in their roosts. Learning Objectives: Campers will be able to explain some pieces of how and why crows communicate in their roosts. Materials:
• Open space • 3x hula hoops or any object to mark locations on the floor • Masking tape would work to mark the floor, if inside. • Prize for the most elaborate/dramatic crow death
Process:
1. Gather campers in a circle, ask questions about communication and roosts to get campers thinking a. When crows roost, there is a ton of cawing, why might this be? b. Why do all the crows in an area roost in the same place? c. Why do crows need to talk?
2. Explain the rules of the game a. Show the campers where the 3 roosts are on the ground b. Explain boundaries and safety c. Explain how all students need to be kind when talking
3. Select a “hunter” a. Have all students close their eyes b. Ask students to raise their hands if they want to be the hunter c. Tap on one student’s head to designate them as the hunter d. All the other students are crows
4. Campers mill about freely in the center – the hunter must kill a crow a. Crows (and the hunter who hides amongst the crows) can caw and flap wings for higher energy levels
i. No communicating through human language though hand signals and suggesting caws are fine b. The hunter kills a crow by looking in their eyes and winking
i. The crow then pretends to die (dramatically for higher energy levels) 5. As soon as a crow dies, all the other crows (and the hunter who is pretending to be a crow) run quickly to the
hula hoop (roost) closest to them and then must choose to eliminate one person a. Each roost (of 3) gets 3-5 minutes to pick one person to “banish” that is currently in a different roost
(this way, the students in the roosts feel more aligned instead of fighting) i. Students can talk as humans during this period ii. Once they’ve decided, students pick a speaker to share out their decision

Created by UW Bothell Office of Research – Draft form Thursday, July 18, 2019 Contact Sarah Verlinde with questions: [email protected]
1. It’s key to monitor the discussions so that students vote fairly, and run the election if needed
b. In later rounds when there are fewer crows, roosts will have to be removed so there are enough students in each roost, until there’s only one roost
i. Maintain about 4-6 campers per roosts ii. Note – the roosts each round change depending on what hula hoops the crows are closest to
when a death happens, they simply run to the closest roost. c. The roosts declare who they’ve decided to banish
i. The banished campers cannot speak to the crows but can stay involved by watching the game and guessing amongst other banished crows
ii. If the hunter is banished, the roost that banished him wins! iii. If the hunter is not banished, the game continues for another round
d. The hunter wins when if they make it to the end with only one crow left (easy prey) 6. Possible modifications:
a. The number of roosts will have to be changed depending on the number of campers such that there are 4-6 campers in each roost at the beginning of the game
Bird Beak Buffet Introduction Lesson 10 minutes Friday Concepts: Student will learn about how beak shape can help reveal what a bird eats and how it eats. Learning Objectives Campers will be able to explain how beak shape and diet are connected by reviewing photos of lots of beak types. Materials
• PowerPoint Slides – Bird Beak Buffet: How do birds eat? • Projector/screen
Process:
1. Work through the slides that cover what the beak is for, Darwin and his finch observations, and compare/contrast two finch beaks.
2. Make sure to stop slides after the Begin Activity! slide. This is where students will begin the Bird Beak Buffet Activity. The next slides show the answers to the activity.
Bird Beak Buffet Activity 40 minutes Monday Concepts: Student will learn about how beak shape can help reveal what a bird eats and how it eats.
Learning Objectives: Campers will be able to explain how beak shape and diet are connected by trying certain tasks with the right/wrong tool, and how it may apply to birds. Materials:
• Chop sticks • Tweezers • Tongs

Created by UW Bothell Office of Research – Draft form Thursday, July 18, 2019 Contact Sarah Verlinde with questions: [email protected]
• Pipette • Beads • Pipe cleaners • Ping pong balls • Foam block • Container of dirt • Container of water • Skinny necked container
Process:
1. Teacher prep before the lesson: a. Stick beads in the foam block (this will be the insects in tree bark) b. Put pipe cleaners in the container of dirt, making sure just a small portion are showing (this will be
worms in the dirt) c. Put ping pong balls in container of water (this will be fish in the water) d. Fill the thin necked container with water (think water bottle) ((this will be the flower with nectar))
2. Give students the tweezers, a pipette, chopsticks and tongs. 3. In groups have the students go to each food station and try to retrieve the item from the container (or “eat”!)
a. Students should discuss in the group why they think which “beak” works best in the situation 4. Once every group has gone to each station show them beak pictures and have them guess based on their
activity what that bird eats. Once they have guessed, tell them the answer and have the students explain why the guessed what they did.
5. On the Bird beaks, no two are exactly alike have students discuss why different birds have different beaks. This can be a more open-ended discussion. Have students make comments on the different bird beaks shown and what uses they think the beaks have! Make sure the students support their ideas with what they have learned previously.
6. What do corvid beaks tell you? What do you think corvids eat?
Bird Feeder Activity 45 minutes Friday Concepts: Campers will connect their knowledge on how birds create a bird feeder. Learning Objectives Campers will be able to explain how different birds eat and what they eat Materials
• Crafting foam sheets in bright colors (at least 7”x7” large) • Pencils • Scissors • Wax paper 12” square sheet (minimum) • Newspaper for stuffing – about 4 sheets/student • White glue • Foam brush • Small container for holding glue • Twine 3ft/student • Colored beads x10-16/student • Ziplock sandwich bags (1/student) • Large bag of bird seed (3/4 cup/student)

Created by UW Bothell Office of Research – Draft form Thursday, July 18, 2019 Contact Sarah Verlinde with questions: [email protected]
Process: http://www.birdsandblooms.com/backyard-projects/diy-tin-can-flower-bird-feeder/
1. Teacher Prep: Fill up bird seed bags before the day starts. 2. Run twine around edge of can add colored beads (about 6-8 per student). Create loop with twine to hang on nail
or branch at home. We recommend this step first because the project will be done while you wait for the paint to dry. You won’t have to wait for the paint to dry, and then come back and spend another 15 minutes to finish it. We found it helpful to tie the last bead onto the twine so the beads stayed in place (small peachy orange bead on the bottom.
3. To make the foam flower:
a. Paint foam to desired color (we painted foam, because we only had black foam, but this step is not needed if you have color foam!)
b. Place foam front side down. Place can on the back side of foam and trace with a pencil. Remove can and draw petals on the back side of foam. Students can adjust if their drawing doesn’t come out well the first time.

Created by UW Bothell Office of Research – Draft form Thursday, July 18, 2019 Contact Sarah Verlinde with questions: [email protected]
c. Cut out foam flower d. Cut hole in middle about a quarter size (inside can outline) by folding in half and trimming out inside
hole.
e. From center, make cuts to the edge of traced-can line (should look like rays).
4. Glue foam to can
This step is a tiny bit challenging and we recommend:

Created by UW Bothell Office of Research – Draft form Thursday, July 18, 2019 Contact Sarah Verlinde with questions: [email protected]
a. Add white glue to foam “rays” and push the glued “rays” to the inside of the can.
b. Add wax paper to the inside of the can to prevent the newspaper from sticking to the foam flower. A
plastic bag could also work.
c. Fill can up with dense crumpled-up newspaper while glue dries, pressing the foam against the tin edges.
d. Allow glue to dry for about 1 hour, upside down, on top of wax paper/newsprint, weighed down.

Created by UW Bothell Office of Research – Draft form Thursday, July 18, 2019 Contact Sarah Verlinde with questions: [email protected]
5. Send students home with sandwich bag of bird seed to fill up when they get home. Recommend they put it
under an overhang just out of the direct rain, since bird feeder is not water proof.
Nature Journaling Time/Open Art Time 45 minutes Friday Concepts: Students will have an open time to have their own creative moment. Learning Objectives Students can take their own initiative to work on their own art project or write another story in their journal. See bonus activities in the last section if you need to provide more structure (origami, watercolor doodles, make a map, etc.). Materials
• Nature Journal • Assorted Paint Brushes • Water container/trays, one/table • Black thin permanent markers • Watercolor sets, one/table • 9x13 Watercolor paper (cold press, economy) –1 sheet/student • Pens/pencils

Created by UW Bothell Office of Research – Draft form Thursday, July 18, 2019 Contact Sarah Verlinde with questions: [email protected]
• Markers • Other art supplies leftover to use up • Wax paper (18”/student) • Paper towels or cloth rags
Process: 1. Students have this time to be as creative as they want in their nature journals! 2. Students can:
a. Write a story/poem i. Write types learn up on board: Haiku, Acrostic, Rhyming Couplets AABB
b. Draw something they observed on a nature walk c. Draw something using an art technique/types they learned
i. Remind them of the techniques they learned (put on board) 1. Sketching: hatching, cross-hatching, stippling, outline with pen/color, blending 2. Watercolor: wet wash, wet-on-wet, wet-on-dry, outline with pen 3. Frottage: what can they make? 4. Stenciling 5. Using negative space in design
ii. Remind them of the art terms/themes they learned (put on board) 1. Surrealism 2. Tribal/Native American Prints 3. Traditional patters: gingham, plaid, polka dot, herringbone, etc. 4. Animal prints: giraffe, cow, cheetah, leopard, peacock, etc.
d. Make a map of a place they enjoy e. Write about their favorite camp experience
3. If there are leftover watercolor paper students can watercolor 4. If students have any activities they did not finish they can use this time to complete their projects 5. If students are stuck on what to do reference previous activities for inspiration 6. If students are completely stuck, have them work through the extra activities in the back of curriculum.
Crow Skits – Good Morning Ameri-Caw from a Crow’s Perspective 75 minutes Friday 50 minutes prep, 25 minutes performance Concepts: Have students bring all the concepts learned in the course together to make short crow skits Learning Objectives: Campers will be able to bring different concepts together to create a narrative and fun performance. Have students take the perspective of a crow/raven (and other acting guest corvids) to share their perspective on life, but personified. Materials:
• Print out F-Good Morning Americaw prompts, 1/class. Cut on dotted lines • Leftover Props from Wednesday Crow and Raven Myth Skits • Markers • Paint and or Foam brushes • White board • Dry erase markers • Construction paper • Dowel rods x20-30/class • Masking tape
Created by UW Bothell Office of Research – Draft form Thursday, July 18, 2019 Contact Sarah Verlinde with questions: [email protected]
• Clear tape • White glue • Acrylic paints • Feathers • Butcher paper to make reporting desk/set, about 9’
Process:
1. Print out sketch prompts list: F-Good Morning Americaw prompts. Cut out prompts, and assign groups, giving them their cut-out prompt.
2. Assign students a type of news story they will cover, each group has to do 3 skits at five minutes each. The skits should be different from each other
a. For example, Group 1 does a weather forecast, breaking news story and a cooking show b. Keep in mind these skits should relate to human interactions with crows, think about issues like global
warming, pollution, habitat loss etc. 3. Have students group up and write a short skit script, having them keep in mind what sort of props they will need
for their story. a. Encourage them to make cool props like masks/desk props, think about a news story
4. Have students create their props and practice their skits with them 5. Have students come up to the front of the class and preform their skits
Closing Circle 14 minutes Friday Concepts: Students will reflect on what they learned that day
Learning Objectives:
Campers will be able to share something that they learned, share their favorite thing that they learned/did
Materials: • Nature journal • Passing object
Process:
1. Students will sit in a circle and reflect on what they learned that day in their journals (5min) 2. Students will go around and share their favorite thing they learned or activity they did
Raffle 1 minute Friday Process:
1. Have students write their name on a piece of paper, fold in half, and put into a bowl/container 2. Items available for raffle include
a. The crow plush passing toy 3. Draw a number from the other half of the tickets and call the student up, students can refuse an item and have
their number put back or take the item and have their number removed from the bowl
Created by UW Bothell Office of Research – Draft form Thursday, July 18, 2019 Contact Sarah Verlinde with questions: [email protected]
EXTRA: Activities See PowerPoint slides titled Extra Lessons.ppt for ideas and instructions.
• Home map activity • Crow Collage Silhouette • Origami Crows
https://www.thesprucecrafts.com/make-an-origami-crow-for-halloween-4097036
• Library Walk, Draw and Native Art Walk through the UWB/CC library in two groups or more (one group per leader) to view the Native American art on display.
• Crowman: This game is just like hangman. The students see the lines and guess the word without drawing a whole crow figure! The words must be related to corvids. (no slide)