Catlike Coding › Unity › Tutorials › Scriptable Render Pipeline · Catlike Coding › Unity...
29
Catlike Coding › Unity › Tutorials › Scriptable Render Pipeline Custom Pipeline Taking Control of Rendering Create a pipeline asset and instance. Cull, filter, sort, render. Keep memory clean. Provide a good editing experience. This is the first installment of a tutorial series covering Unity's scriptable render pipeline. This tutorial assumes you've gone through the Basics series first, and the Procedural Grid tutorial. The first few parts of the Rendering series are also useful. This tutorial is made with Unity 2018.3.0f2. What about the other SRP series? I have another tutorial series covering the scriptable render pipeline. It is made for Unity 2019 and later, while this one uses the experimental SRP API which only works with Unity 2018. The other series takes a di!erent and more modern approach but will cover at lot of the same topics. It's still useful to work through this series if you don't want to wait until the new one has caught up with it. The birth of a new render pipeline.
Transcript of Catlike Coding › Unity › Tutorials › Scriptable Render Pipeline · Catlike Coding › Unity...

Catlike Coding › Unity › Tutorials › Scriptable Render Pipeline
Custom Pipeline Taking Control of Rendering
Create a pipeline asset and instance.Cull, filter, sort, render.Keep memory clean.Provide a good editing experience.
This is the first installment of a tutorial series covering Unity's scriptable renderpipeline. This tutorial assumes you've gone through the Basics series first, and theProcedural Grid tutorial. The first few parts of the Rendering series are also useful.
This tutorial is made with Unity 2018.3.0f2.
What about the other SRP series?
I have another tutorial series covering the scriptable render pipeline. It is made for Unity2019 and later, while this one uses the experimental SRP API which only works withUnity 2018. The other series takes a di!erent and more modern approach but will coverat lot of the same topics. It's still useful to work through this series if you don't want towait until the new one has caught up with it.
The birth of a new render pipeline.
1 Creating a Pipeline
To render anything, Unity has to determine what shapes have to be drawn, where,when, and with what settings. This can get very complex, depending on how manye!ects are involved. Lights, shadows, transparency, image e!ects, volumetric e!ects,and so on all have to be dealt with in the correct order to arrive at the final image.This process is known as a render pipeline.
Unity 2017 supports two predefined render pipelines, one for forward rendering andone for deferred rendering. It also still supports an older deferred renderingapproach introduced in Unity 5. These pipelines are fixed. You are able to enable,disable, or override certain parts of the pipelines, but it's not possible to drasticallydeviate from their design.
Unity 2018 added support for scriptable render pipelines, making it possible todesign pipelines from scratch, though you still have to rely on Unity for manyindividual steps, like culling. Unity 2018 introduced two new pipelines made with thisnew approach, the lightweight pipeline and the high-definition pipeline. Bothpipelines are still in the preview stage and the scriptable render pipeline API is stillmarked as experimental technology. But at this point it is stable enough for us to goahead and create our own pipeline.
In this tutorial we will setup a minimal render pipeline that draws unlit shapes. Oncethat's working, we can extend our pipeline in later tutorials, adding lighting,shadows, and more advanced features.
1.1 Project Setup
Open Unity 2018 and create a new project. I'm using Unity 2018.2.9f1, but any2018.2 version or higher should also work. Create a standard 3D project, withanalytics disabled. We'll create our own pipeline, so don't select one of the pipelineoptions.
Once the project is open, go the package manager via Window / Package Managerand remove all the packages that were included by default, as we won't need them.Only keep the Package Manager UI, which cannot be removed.

Starting project.
We're going to work in linear color space, but Unity 2018 still uses gamma space asthe default. So go to the player settings via Edit / Project Settings / Player and switchColor Space in the Other Settings section to Linear.
Linear color space.
We'll need a few simple materials to test our pipeline. I've created four materials.First, a default standard opaque material with a red albedo. Second, the samematerial but with Rendering Mode set to Transparent and a blue albedo withdecreased alpha. Third, a material using the Unlit/Color shader with its color set toyellow. And finally a material using the Unlit/Transparent shader without anychanges, so it appears solid white.
Test materials.
Fill the scene with a few objects, making use of all four materials.
Scene displaying four materials.

1.2 Pipeline Asset
Currently, Unity uses the default forward rendering pipeline. To use a custompipeline, we have to select one in the graphics settings, which can be found via Edit /Project Settings / Graphics.
Using the default pipeline.
To setup our own pipeline, we have to assign a pipeline asset to the ScriptableRender Pipeline Settings field. Such assets have to extend RenderPipelineAsset, whichis a ScriptableObject type.
Create a new script for our custom pipeline asset. We'll simply name our pipeline MyPipeline. Its asset type will thus be MyPipelineAsset and it has to extendRenderPipelineAsset, which is defined in the UnityEngine.Experimental.Renderingnamespace.
using UnityEngine;using UnityEngine.Experimental.Rendering;
public class MyPipelineAsset : RenderPipelineAsset {}
Will it always be in the experimental namespace?
It will move out of the experimental namespace at some point, either toUnityEngine.Rendering or to another namespace. When that happens, it's just a matterof updating the using statement, unless the API also gets changed.
The main purpose of the pipeline asset is to give Unity a way to get a hold of apipeline object instance that is responsible for rendering. The asset itself is just ahandle and a place to store pipeline settings. We don't have any settings yet, so allwe have to do is give Unity a way to get our pipeline object instance. This is done byoverriding the InternalCreatePipeline method. But we haven't defined our pipelineobject type yet, so at this point we'll just return null.
The return type of InternalCreatePipeline is IRenderPipeline. The I prefix of the typename indicates that it is an interface type.

public class MyPipelineAsset : RenderPipelineAsset {
protected override IRenderPipeline InternalCreatePipeline () { return null; }}
What's an interface?
An interface is like a class, except that it defines a functionality contract withoutproviding an implementation of it. It only defines properties, events, indexers, andmethod signatures, which are all public by definition. Any type that extends an interfaceis required to contain implementations of what the interface defines. The convention isto prefix interface types names with an I.
Because interfaces do not contain concrete implementations, it is possible for classesand even structs to extend more than one interface. If multiple interfaces happen todefined the same thing, they just agree that the functionality should be there. This is notpossible with classes—even when abstract—because that could lead to conflictingimplementations.
Now we need to add an asset of this type to our project. To make that possible, adda CreateAssetMenu attribute to MyPipelineAsset.
[CreateAssetMenu]public class MyPipelineAsset : RenderPipelineAsset {}
That puts an entry in the Asset / Create menu. Let's be tidy and put it in a Renderingsubmenu. We do this by setting the menuName property of the attribute toRendering/My Pipeline. The property can be set directly after the attribute type,within round brackets.
[CreateAssetMenu(menuName = "Rendering/My Pipeline")]public class MyPipelineAsset : RenderPipelineAsset {}
Use the new menu item to add the asset to the project, naming it My Pipeline.
Pipeline asset and its script.

Then assign it to Scriptable Render Pipeline Settings.
Asset in use.
We have now replaced the default pipeline, which changes a few things. First, a lot ofoptions have disappeared from the graphics settings, which Unity also mentions inan info panel. Second, as we've bypassed the default pipeline without providing avalid replacement, nothing gets rendered anymore. The game window, scenewindow, and material previews are no longer functional, although the scene windowstill shows the skybox. If you open the frame debugger—via Window / Analysis /Frame Debugger—and enable it, you will see that indeed nothing gets drawn in thegame window.
1.3 Pipeline Instance
To create a valid pipeline, we have to provide an object instance that implementsIRenderPipeline and is responsible for the rendering process. So create a class forthat, naming it MyPipeline.
using UnityEngine;using UnityEngine.Experimental.Rendering;
public class MyPipeline : IRenderPipeline {}
Although we can implement IRenderPipeline ourselves, it is more convenient toextend the abstract RenderPipeline class instead. That type already provides a basicimplementation of IRenderPipeline that we can build on.
public class MyPipeline : RenderPipeline {}
Now we can return a new instance of MyPipeline in InternalCreatePipeline. This meansthat we technically have a valid pipeline, although it still doesn't render anything.
protected override IRenderPipeline InternalCreatePipeline () { return new MyPipeline(); }

2 Rendering
The pipeline object takes care of rendering each frame. All Unity does is invoke thepipeline's Render method with a context and the cameras that are active. This is donefor the game window, but also for the scene window and material previews in theeditor. It is up to us to configure things appropriately, figure out what needs to berendered, and do everything in the correct order.
2.1 Context
RenderPipeline contains an implementation of the Render method defined in theIRenderPipeline interface. Its first argument is the render context, which is aScriptableRenderContext struct, acting as a facade for native code. Its secondargument is an array containing all cameras that need to be rendered.
RenderPipeline.Render doesn't draw anything, but checks whether the pipeline objectis valid to use for rendering. If not, it will raise an exception. We will override thismethod and invoke the base implementation, to keep this check.
public class MyPipeline : RenderPipeline {
public override void Render ( ScriptableRenderContext renderContext, Camera[] cameras ) { base.Render(renderContext, cameras); }}
It is through the render context that we issue commands to the Unity engine torender things and control render state. One of the simplest examples is drawing theskybox, which can be done by invoking the DrawSkyBox method.
base.Render(renderContext, cameras);
renderContext.DrawSkybox();
DrawSkybox requires a camera as a argument. We'll simply use the first element ofcameras.
renderContext.DrawSkybox(cameras[0]);
We still don't see the skybox appear in the game window. That's because thecommands that we issue to the context are bu!ered. The actual works happens afterwe submit it for execution, via the Submit method.

renderContext.DrawSkybox(cameras[0]);
renderContext.Submit();
The skybox finally appears in the game window, and you can also see it appear in theframe debugger.
Frame debugger showing skybox gets drawn.
2.2 Cameras
We are supplied with an array of cameras, because there can exist multiple in thescene that all have to be rendered. Example uses for multiple-camera setups aresplit-screen multiplayer, mini maps, and rear-view mirrors. Each camera needs to behandled separately.
We won't worry about multi-camera support for our pipeline at this point. We'llsimply create an alternative Render method that acts on a single camera. Have it drawthe skybox and then submit. So we submit per camera.
void Render (ScriptableRenderContext context, Camera camera) { context.DrawSkybox(camera);
context.Submit(); }
Invoke the new method for each element of the cameras array. I use a foreach loop inthis case, as Unity's pipelines also use this approach to loop through the cameras.
public override void Render ( ScriptableRenderContext renderContext, Camera[] cameras ) { base.Render(renderContext, cameras);
//renderContext.DrawSkybox(cameras[0]);
//renderContext.Submit();
foreach (var camera in cameras) { Render(renderContext, camera); } }

How does foreach work?
foreach (var e in a) { … } works likefor (int i = 0; i < a.Length; a++) { var e = a[i]; … } assuming that a is anarray. The only functional di!erence is that we do not have access to the iterator variablei.
When a isn't an array but something else that is enumerable, then iterators come intoplay and you might end up with temporary object creation, which is best avoided. Butusing foreach with arrays is safe.
The use of var to define the element variable is common, so I use it as well. Its type isthe element type of a.
Note that the orientation of the camera currently doesn't a!ect how the skybox getsrendered. We pass the camera to DrawSkybox, but that's only used to determinewhether the skybox should be drawn at all, which is controlled via the camera clearflags.
To correctly render the skybox—and the entire scene—we have to setup the view-projection matrix. This transformation matrix combines the camera's position andorientation—the view matrix— with the camera's perspective or orthographicprojection—the projection matrix. You can see this matrix in the frame debugger. Itis unity_MatrixVP, one of the shader properties used when something is drawn.
At the moment, the unity_MatrixVP matrix is always the same. We have to apply thecamera's properties to the context, via the SetupCameraProperties method. That setsup the matrix as well as some other properties.
void Render (ScriptableRenderContext context, Camera camera) { context.SetupCameraProperties(camera);
context.DrawSkybox(camera);
context.Submit(); }
Now the skybox gets rendered correctly, taking the camera properties into account,both in the game window and in the scene window.
2.3 Command Bu!ers

The context delays the actual rendering until we submit it. Before that, we configureit and add commands to it for later execution. Some tasks—like drawing the skybox—can be issued via a dedicated method, but other commands have to be issuedindirectly, via a separate command bu!er.
A command bu!er can be created by instantiating a new CommandBuffer object, whichis defined in the UnityEngine.Rendering namespace. Command bu!ers already existedbefore the scriptable rendering pipeline was added, so they aren't experimental.Create such a bu!er before we draw the skybox.
using UnityEngine;using UnityEngine.Rendering;using UnityEngine.Experimental.Rendering;
public class MyPipeline : RenderPipeline {
…
void Render (ScriptableRenderContext context, Camera camera) { context.SetupCameraProperties(camera);
var buffer = new CommandBuffer();
context.DrawSkybox(camera);
context.Submit(); }}
We can instruct the context to execute the bu!er via its ExecuteCommandBuffer method.Once again, this doesn't immediately execute the commands, but copies them to theinternal bu!er of the context.
var buffer = new CommandBuffer(); context.ExecuteCommandBuffer(buffer);
Command bu!ers claim resources to store their commands at the native level of theUnity engine. If we no longer need these resources, it is best to release themimmediately. This can be done by invoking the bu!er's Release method, directly afterinvoking ExecuteCommandBuffer.
var buffer = new CommandBuffer(); context.ExecuteCommandBuffer(buffer); buffer.Release();
Executing an empty command bu!er does nothing. We added it so that we can clearthe render target, to make sure that rendering isn't influenced by what was drawnearlier. This is possible via a command bu!er, but not directly via the context.

A clear command can be added to the bu!er by invoking ClearRenderTarget. Itrequires three arguments: two booleans and a color. The first argument controlswhether the depth information is cleared, the second whether the color is cleared,and the third is the clear color, if used. For example, let's clear the depth data,ignore color data, and use Color.clear as the clear color.
var buffer = new CommandBuffer(); buffer.ClearRenderTarget(true, false, Color.clear); context.ExecuteCommandBuffer(buffer); buffer.Release();
The frame debugger will now show us that a command bu!er get executed, whichclears the render target. In this case, it indicated that Z and stencil get cleared. Zrefers to the depth bu!er, and the stencil bu!er always gets cleared.
Clearing the depth and stencil bu!ers.
What gets cleared is configured per camera, via its clear flags and background color.We can use those instead of hard-coding how we clear the render target.
CameraClearFlags clearFlags = camera.clearFlags; buffer.ClearRenderTarget( (clearFlags & CameraClearFlags.Depth) != 0, (clearFlags & CameraClearFlags.Color) != 0, camera.backgroundColor );
How do the clear flags work?
CameraClearFlags is an enumeration that can be used as a set of bit flags. Each bit ofthe value is used to indicate whether a certain feature is enabled or not.
To extract a bit flag from the entire value, combine the value with the desired flag usingthe bitwise AND operator &. If the result is not zero, then the flag is set.
Because we haven't given the command bu!er a name, the debugger displays thedefault name, which is Unnamed command bu!er. Let's use the camera's nameinstead, by assigning it to the bu!er's name property. We'll use object initializersyntax to do this.

var buffer = new CommandBuffer { name = camera.name };
Using camera name for the command bu!er.
How does object initializer syntax work?
We could've also written buffer.name = camera.name; as a separate statement afterinvoking the constructor. But when creating a new object, you can append a code blockto the constructor's invocation. Then you can set the object's fields and properties in theblock, without having to reference the object instance explicitly. Also, it makes explicitthat the instances should only be used after those fields and properties have been set.Besides that, it makes initialization possible where only a single statement is allowed,without requiring constructors with many parameter variants.
Note that we omitted the empty parameter list of the constructor invocation, which isallowed when object initializer syntax is used.
2.4 Culling
We're able to render the skybox, but not yet any of the objects that we put in thescene. Rather than rendering every object, we're only going to render those that thecamera can see. We do that by starting with all renderers in the scene and thenculling those that fall outside of the view frustum of the camera.
What are renderers?
It are components attached to game objects that turn them into something that can berendered. Typically, a MeshRenderer component.

Figuring out what can be culled requires us to keep track of multiple camera settingsand matrices, for which we can use the ScriptableCullingParameters struct. Instead offilling it ourselves, we can delegate that work to the staticCullResults.GetCullingParameters method. It takes a camera as input and produces theculling parameters as output. However, it doesn't return the parameters struct.Instead, we have to supply it as a second output parameter, writing out in front of it.
void Render (ScriptableRenderContext context, Camera camera) { ScriptableCullingParameters cullingParameters; CullResults.GetCullingParameters(camera, out cullingParameters);
… }
Why do we have to write out?
Structs are value types, so they're treated like simple values. They aren't objects with anidentity, with variables and fields only holding references to their location in memory. Sopassing the struct as an argument provides a method with a copy of that value. Themethod can change the copy, but that has no e!ect on the value that was copied.
When a struct parameter is defined as an output parameter, it acts like an objectreference, but pointing to the place on the memory stack where the argument resides.When the method changes that argument, it a!ects that value, not a copy.
The out keyword tells us that the method is responsible for correctly setting theparameter, replacing the previous value.
Besides the output parameter, GetCullingParameters also returns whether it was ableto create valid parameters. Not all camera settings are valid, resulting in degenerateresults that cannot be used for culling. So if it fails, we have nothing to render andcan exit from Render.
if (!CullResults.GetCullingParameters(camera, out cullingParameters)) { return; }
Once we have the culling parameters, we can use them to cull. This is done byinvoking the static CullResults.Cull method with both the culling parameters and thecontext as arguments. The result is a CullResults struct, which contains informationabout what is visible.

In this case, we have to supply the culling parameters as a reference parameter, bywriting ref in front of it.
if (!CullResults.GetCullingParameters(camera, out cullingParameters)) { return; }
CullResults cull = CullResults.Cull(ref cullingParameters, context);
Why do we have to write ref?
It works just like out, except in this case the method is not required to assign somethingto the value. And whoever invokes the method is responsible for properly initializing thevalue first. So it can be used for input, and optionally for output.
Why is ScriptableCullingParameters a struct?
It's probably an optimization attempt, the idea being that you can create multipleparameter structs without having to worry about memory allocations. However,ScriptableCullingParameters is very large for a struct, which is why a referenceparameter is used here, again for performance reasons. Maybe it started small but grewinto a huge struct over time. Reusable object instances might be a better approach now,but we have to work with whatever Unity Technologies decides to use.
2.5 Drawing
Once we know what is visible, we can move on to rendering those shapes. This isdone by invoking DrawRenderers on the context, with cull.visibleRenderers as anargument, telling it which renderers to use. Besides that, we have to supply drawsettings and filter settings. Both are structs—DrawRendererSettings andFilterRenderersSettings—for which we'll initially use their default values. The drawsettings have to be passed as a reference.
buffer.Release();
var drawSettings = new DrawRendererSettings();
var filterSettings = new FilterRenderersSettings();
context.DrawRenderers( cull.visibleRenderers, ref drawSettings, filterSettings );
context.DrawSkybox(camera);

Why FilterRenderersSettings and not FilterRendererSettings?
No idea. Maybe it's a typo.
We're not seeing any objects yet, because the default filter settings include nothing.We can instead include everything by providing true as an argument for theFilterRenderersSettings constructor. This tells it to initialize itself so it includeseverything.
var filterSettings = new FilterRenderersSettings(true);
Also, we have to configure the draw settings by providing its constructor with thecamera and a shader pass as arguments. The camera is used to setup sorting andculling layers, while the pass controls which shader pass is used for rendering.
The shader pass is identified via a string, which has to be wrapped in a ShaderPassNamestruct. As we're only supporting unlit materials in our pipeline, we'll use Unity'sdefault unlit pass, identified with SRPDefaultUnlit.
var drawSettings = new DrawRendererSettings( camera, new ShaderPassName("SRPDefaultUnlit") );
Opaque spheres are visible.
We see the opaque unlit shapes appear, but not the transparent ones. However, theframe debugger indicates that the unlit shapes get drawn too.
All unlit renderers are drawn.

They do get drawn, but because the transparent shader pass does not write to thedepth bu!er they end up getting drawn over by the skybox. The solution is to delaydrawing transparent renderers until after the skybox.
First, limit the draw before the skybox to only the opaque renderers. This is done bysetting the renderQueueRange of the filter settings to RenderQueueRange.opaque, whichcovers the render queues from 0 up to and including 2500.
var filterSettings = new FilterRenderersSettings(true) { renderQueueRange = RenderQueueRange.opaque };
Only opaque renderers are drawn.
Next, change the queue range to RenderQueueRange.transparent—from 2501 up to andincluding 5000—after rendering the skybox, and render again.
var filterSettings = new FilterRenderersSettings(true) { renderQueueRange = RenderQueueRange.opaque };
context.DrawRenderers( cull.visibleRenderers, ref drawSettings, filterSettings );
context.DrawSkybox(camera);
filterSettings.renderQueueRange = RenderQueueRange.transparent; context.DrawRenderers( cull.visibleRenderers, ref drawSettings, filterSettings );
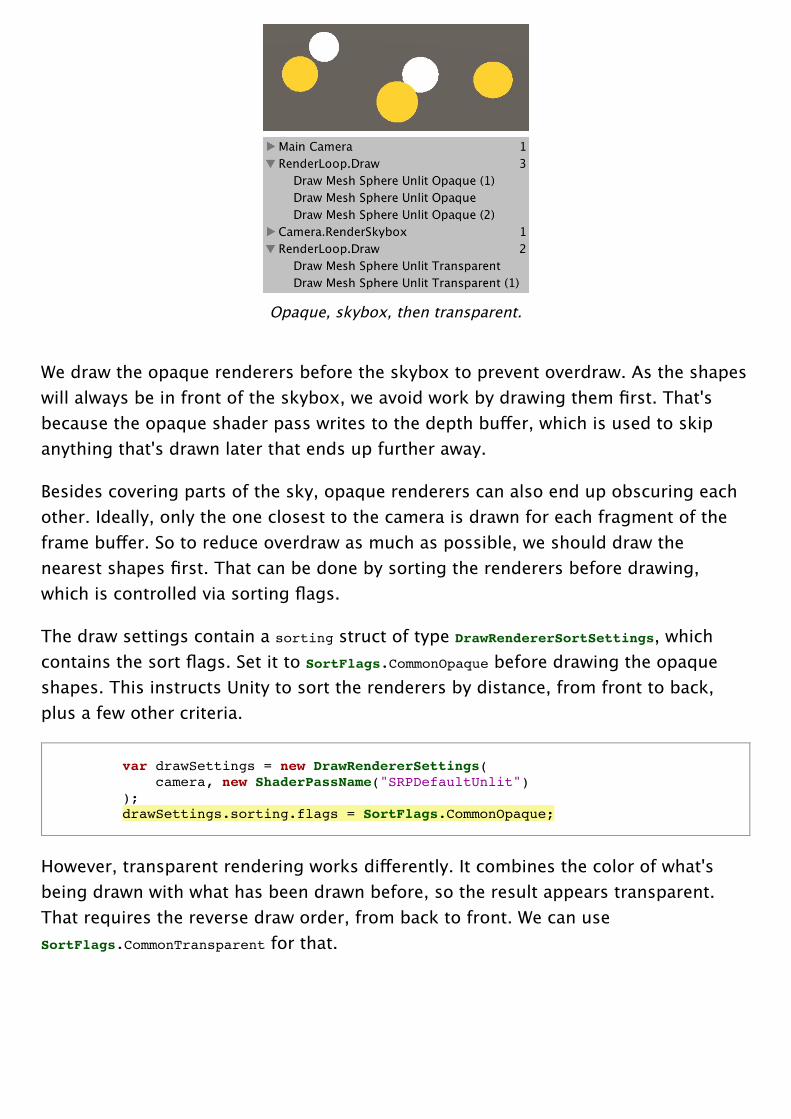
Opaque, skybox, then transparent.
We draw the opaque renderers before the skybox to prevent overdraw. As the shapeswill always be in front of the skybox, we avoid work by drawing them first. That'sbecause the opaque shader pass writes to the depth bu!er, which is used to skipanything that's drawn later that ends up further away.
Besides covering parts of the sky, opaque renderers can also end up obscuring eachother. Ideally, only the one closest to the camera is drawn for each fragment of theframe bu!er. So to reduce overdraw as much as possible, we should draw thenearest shapes first. That can be done by sorting the renderers before drawing,which is controlled via sorting flags.
The draw settings contain a sorting struct of type DrawRendererSortSettings, whichcontains the sort flags. Set it to SortFlags.CommonOpaque before drawing the opaqueshapes. This instructs Unity to sort the renderers by distance, from front to back,plus a few other criteria.
var drawSettings = new DrawRendererSettings( camera, new ShaderPassName("SRPDefaultUnlit") ); drawSettings.sorting.flags = SortFlags.CommonOpaque;
However, transparent rendering works di!erently. It combines the color of what'sbeing drawn with what has been drawn before, so the result appears transparent.That requires the reverse draw order, from back to front. We can useSortFlags.CommonTransparent for that.

context.DrawSkybox(camera);
drawSettings.sorting.flags = SortFlags.CommonTransparent; filterSettings.renderQueueRange = RenderQueueRange.transparent; context.DrawRenderers( cull.visibleRenderers, ref drawSettings, filterSettings );
Our pipeline is now able to render both opaque and transparent unlit objectscorrectly.

3 Polishing
Being able to render correctly is only part of having a functional pipeline. There areother things to consider, such as whether it is fast enough, doesn't allocateunneeded temporary objects, and integrates well with the Unity editor.
3.1 Memory Allocations
Let's check whether our pipeline behaves well in terms of memory management, or ifit allocates memory every frame, which will trigger frequent memory garbagecollection runs. This is done by opening the profiler via Window / Analysis / Profilerand inspecting the CPU Usage data in Hierarchy mode. While you can do this in playmode in the editor, it is also a good idea to profile a build, by making sure you createa development build and having it attach to the profiler automatically, although deepprofiling isn't possible in that case.
Sort by GC Alloc and you'll see that memory indeed gets allocated each frame. Someof it is out of our control, but quite a few bytes are allocated inside our pipeline'sRender method.
It turns out that culling allocates the most memory. The reason for this is thatalthough CullResults is a struct, it contains three lists, which are objects. Each timewe ask for a new cull result, we end up allocating memory for new lists. So there isn'tmuch benefit to CullResults being a struct.
Fortunately, CullResults has an alternative Cull method that accepts a struct as areference parameter, instead of returning a new one. That makes it possible to reusethe lists. All we have to do is turn cull into a field and provide it as an additionalargument to CullResults.Cull, instead of assigning to it.
CullResults cull;
…
void Render (ScriptableRenderContext context, Camera camera) { …
//CullResults cull = CullResults.Cull(ref cullingParameters, context); CullResults.Cull(ref cullingParameters, context, ref cull); … }

Another source of continuous memory allocation is our use of the camera's nameproperty. Each time we get its value, it fetches the name data from native code,which necessitates the creation of a new string, which is an object. So let's alwaysname our command bu!er Render Camera instead.
var buffer = new CommandBuffer() { name = "Render Camera" };
Using a constant bu!er name.
Finally, the command bu!er itself is an object too. Fortunately, we can create acommand bu!er once and reuse it. Replace the local variable with a cameraBufferfield. Thanks to the object initialization syntax, we can create a named commandbu!er as its default value. The only other change is that we have to clear thecommand bu!er instead of releasing it, for which we can use its Clear method.
CommandBuffer cameraBuffer = new CommandBuffer { name = "Render Camera" };
…
void Render (ScriptableRenderContext context, Camera camera) { …
//var buffer = new CommandBuffer() { // name = "Render Camera" //}; cameraBuffer.ClearRenderTarget(true, false, Color.clear); context.ExecuteCommandBuffer(cameraBuffer); //buffer.Release(); cameraBuffer.Clear();
… }
After these changes our pipeline no longer creates temporary objects every frame.
3.2 Frame Debugger Sampling

Another thing that we can do is improve the data shown by the frame debugger.Unity's pipelines display a nested hierarchy of events, but ours are all at the rootlevel. We can build a hierarchy by using our command bu!er to begin and endprofiler samples.
Let's start by invoking BeginSample right before ClearRenderTarget, immediatelyfollowed by an invocation of EndSample. Each sample must have both a begin and anend, and both must be provided with the exact same name. Besides that, I havefound that it is best to use the same name as the command bu!er that defines thesampling. The command bu!er's name often gets used anyway.
cameraBuffer.BeginSample("Render Camera"); cameraBuffer.ClearRenderTarget(true, false, Color.clear); cameraBuffer.EndSample("Render Camera"); context.ExecuteCommandBuffer(cameraBuffer); cameraBuffer.Clear();
Sampling creates a hierarchy.
We now see a Render Camera level nested inside the original Render Camera of thecommand bu!er, which in turn contains the clear operation. But it is possible to go astep further, nesting all other actions related to the camera inside it as well. Thisrequires us to delay the ending of the sample until right before we submit thecontext. So we have to insert an additional ExecuteCommandBuffer at that point, onlycontaining the instruction to end the sample. Use the same command bu!er for this,again clearing it after we are done.
cameraBuffer.BeginSample("Render Camera"); cameraBuffer.ClearRenderTarget(true, false, Color.clear); //cameraBuffer.EndSample("Render Camera"); context.ExecuteCommandBuffer(cameraBuffer); cameraBuffer.Clear();
…
cameraBuffer.EndSample("Render Camera"); context.ExecuteCommandBuffer(cameraBuffer); cameraBuffer.Clear();
context.Submit();

Nested sampling.
This looks good, except that the clear action gets nested inside a redundant RenderCamera level, while all other actions are directly below the root level. I'm not surewhy this happens, but it can be avoided by beginning the sample after clearing.
//cameraBuffer.BeginSample("Render Camera"); cameraBuffer.ClearRenderTarget(true, false, Color.clear); cameraBuffer.BeginSample("Render Camera"); context.ExecuteCommandBuffer(cameraBuffer); cameraBuffer.Clear();
No redundant nesting.
3.3 Rendering the Default Pipeline
Because our pipeline only supports unlit shaders, objects that use di!erent shadersare not rendered, making them invisible. While this is correct, it hides the fact thatsome objects use the wrong shader. It would be nice if we visualized those objectswith Unity's error shader, so they show up as obviously incorrect magenta shapes.Let's add a dedicated DrawDefaultPipeline method for this, with a context and acamera parameter. We'll invoke it at the end, after drawing the transparent shapes.

void Render (ScriptableRenderContext context, Camera camera) { …
drawSettings.sorting.flags = SortFlags.CommonTransparent; filterSettings.renderQueueRange = RenderQueueRange.transparent; context.DrawRenderers( cull.visibleRenderers, ref drawSettings, filterSettings );
DrawDefaultPipeline(context, camera);
cameraBuffer.EndSample("Render Camera"); context.ExecuteCommandBuffer(cameraBuffer); cameraBuffer.Clear();
context.Submit(); }
void DrawDefaultPipeline(ScriptableRenderContext context, Camera camera) {}
Unity's default surface shader has a ForwardBase pass that is used as the firstforward rendering pass. We can use this to identify objects that have a material thatworks with the default pipeline. Select that pass via new draw settings and use thatfor rendering, together with new default filter settings. We don't care about sortingor separating opaque and transparent renderers, because they're invalid anyway.
void DrawDefaultPipeline(ScriptableRenderContext context, Camera camera) { var drawSettings = new DrawRendererSettings( camera, new ShaderPassName("ForwardBase") ); var filterSettings = new FilterRenderersSettings(true); context.DrawRenderers( cull.visibleRenderers, ref drawSettings, filterSettings ); }
Rendering forward base pass.
The objects that use the default shader now show up. They're also visible in theframe debugger.

Everything gets drawn.
Because our pipeline does not support a forward base pass they do not get renderedcorrectly. The necessary data isn't setup, so everything that depends on lighting endsup as black. Instead, we should render them with an error shader. To do this, weneed an error material. Add a field for that. Then, at the start of DrawDefaultPipeline,create the error material if it doesn't already exist. This is done by retrieving theHidden/InternalErrorShader via Shader.Find, then creating a new material with thatshader. Also, set the material's hide flags to HideFlags.HideAndDontSave so it doesn'tshow up in the project window and doesn't get saved along with all other assets.
Material errorMaterial;
…
void DrawDefaultPipeline(ScriptableRenderContext context, Camera camera) { if (errorMaterial == null) { Shader errorShader = Shader.Find("Hidden/InternalErrorShader"); errorMaterial = new Material(errorShader) { hideFlags = HideFlags.HideAndDontSave }; } … }
One option of the draw settings is to override the material used when rendering, byinvoking SetOverrideMaterial. Its first parameter is the material to use. Its secondparameter is the index of the pass of the material's shader to be used for rendering.As the error shader only has a single pass, use zero.
var drawSettings = new DrawRendererSettings( camera, new ShaderPassName("ForwardBase") ); drawSettings.SetOverrideMaterial(errorMaterial, 0);

Using the error shader.
Objects that use an unsupported material now clearly show up as incorrect. But thisis only true for materials of Unity's default pipeline, whose shaders have a ForwardBasepass. There are other built-in shaders that we can identify with di!erent passes,specifically PrepassBase, Always, Vertex, VertexLMRGBM, and VertexLM.
Fortunately, it is possible to add multiple passes to the draw settings, by invokingSetShaderPassName. The name is the second parameter of this method. Its firstparameter is an index that controls the order in which the passes are drawn. Wedon't care about that, so any order is fine. The pass provided via the constructoralways has index zero, just increment the index for additional passes.
var drawSettings = new DrawRendererSettings( camera, new ShaderPassName("ForwardBase") ); drawSettings.SetShaderPassName(1, new ShaderPassName("PrepassBase")); drawSettings.SetShaderPassName(2, new ShaderPassName("Always")); drawSettings.SetShaderPassName(3, new ShaderPassName("Vertex")); drawSettings.SetShaderPassName(4, new ShaderPassName("VertexLMRGBM")); drawSettings.SetShaderPassName(5, new ShaderPassName("VertexLM")); drawSettings.SetOverrideMaterial(errorMaterial, 0);
That covers all shaders provided by Unity up to this point, which should be su"cientto help point out the use of incorrect materials when creating a scene. But we onlyneed to bother doing this during development, not in a build. So let's only invokeDrawDefaultPipeline in the editor. One way to do this is by adding a Conditionalattribute to the method.

3.4 Conditional Code Execution
The Conditional attribute is defined in the System.Diagnostics namespace. We can usethat namespace, but it unfortunately also contains a Debug type, which conflicts withUnityEngine.Debug. As we only need the attribute, we can avoid the conflict by usingan alias. Instead of using the entire namespace, we use a specific type and assign itto a valid type name. In this case, we'll define Conditional as an alias forSystem.Diagnostics.ConditionalAttribute.
using UnityEngine;using UnityEngine.Rendering;using UnityEngine.Experimental.Rendering;using Conditional = System.Diagnostics.ConditionalAttribute;
Add the attribute to our method. It requires a string argument that specifies asymbol. If the symbol is defined during compilation, then the method invocation getsincluded as normal. But if the symbol is not defined, then the invocation of thismethod—including all its arguments—are omitted. It would be as if theDrawDefaultPipeline(context, camera); code didn't exist during compilation.
To only include the invocation when compiling for the Unity editor, we have to relyon the UNITY_EDITOR symbol.
[Conditional("UNITY_EDITOR")] void DrawDefaultPipeline(ScriptableRenderContext context, Camera camera) { … }
We can go a step further and also include the invocation in development builds, onlyexcluding it from release builds. To do so, add an additional conditional with theDEVELOPMENT_BUILD symbol.
[Conditional("DEVELOPMENT_BUILD"), Conditional("UNITY_EDITOR")] void DrawDefaultPipeline(ScriptableRenderContext context, Camera camera) { … }
3.5 UI in Scene Window
One thing that we haven't considered up to this point is Unity's in-game UI. To testit, add a UI element to the scene, for example a single button, via GameObject / UI /Button. That creates a canvas with a button it it, plus an event system.

It turns out that the UI gets rendered in the game window, without us having to doanything. Unity takes care of it for us. The frame debugger shows that the UI getsrendered separately, as an overlay.
UI gets drawn in screen space.
At least, that's the case when the canvas is set to render in screen space. When set torender in world space, the UI gets rendered along with the other transparent objects.
UI in world space.
Although the UI works in the game window, it doesn't show up the scene window.The UI always exists in world space in the scene window, but we have to manuallyinject it into the scene. Adding the UI is done by invoking the staticScriptableRenderContext.EmitWorldGeometryForSceneView method, with the currentcamera as an argument. This must be done before culling.

if (!CullResults.GetCullingParameters(camera, out cullingParameters)) { return; }
ScriptableRenderContext.EmitWorldGeometryForSceneView(camera);
CullResults.Cull(ref cullingParameters, context, ref cull);
But this also adds the UI a second time in the game window. To prevent that, wemust only emit the UI geometry when rendering the scene window. This is the casewhen the cameraType of the camera is equal to CameraType.SceneView.
if (camera.cameraType == CameraType.SceneView) { ScriptableRenderContext.EmitWorldGeometryForSceneView(camera); }
This works, but only in the editor. Conditional compilation makes sure that theEmitWorldGeometryForSceneView doesn't exist when compiling for a build, which meansthat we now get a compiler error when trying to build. To make it work again, wehave to make the code that invokes EmitWorldGeometryForSceneView conditional as well.That is done by putting the code in between #if and #endif statements. The #ifstatement requires a symbol, just like the Conditional attribute. By usingUNITY_EDITOR, the code to only get included when compiling for the editor.
void Render (ScriptableRenderContext context, Camera camera) { ScriptableCullingParameters cullingParameters; if (!CullResults.GetCullingParameters(camera, out cullingParameters)) { return; }
#if UNITY_EDITOR if (camera.cameraType == CameraType.SceneView) { ScriptableRenderContext.EmitWorldGeometryForSceneView(camera); }#endif
CullResults.Cull(ref cullingParameters, context, ref cull);
… }
The next tutorial is Custom Shaders.
repository

Enjoying the tutorials? Are they useful? Want more?
Please support me on Patreon!
Or make a direct donation!
made by Jasper Flick


![[Pipeline] Inspecting Pipeline Installation](https://static.fdocuments.in/doc/165x107/55cf8d045503462b1391543e/pipeline-inspecting-pipeline-installation.jpg)