Cataract User Guide Web
29
© 2014
description
Cataract User Guide
Transcript of Cataract User Guide Web

© 2014

CATARACT | CREDITS!!!!SOFTWARE DEVELOPMENT:!!Thomas Hennebert | www.glitchmachines.com!!Ivo Ivanov | www.glitchmachines.com !!!!SOUND DESIGN & BETA TESTING TEAM:!!Ivo Ivanov | www.glitchmachines.com!!Thomas Hennebert | www.glitchmachines.com!!Nicholas Yochum | https://soundcloud.com/nicholasyochumsounddesign!!Daed | http://soundcloud.com/daed!!Matt "Subjex" Debliqui | https://soundcloud.com/subjex!!!!AUDIO DEMOS AND TUTORIAL VIDEOS:!!Ivo Ivanov | www.ivanovsound.com!!!!PRODUCT GRAPHICS: !!Valentin Rodriguez | DMAS3 | www.dmas3.com!!!!GLITCHMACHINES ® | CATARACT | USER GUIDE V 1.0 © 2014 www.glitchmachines.com
!!!!!! !!!!!!!!!!!!!!!!!!!!!!!!!!!!!!!This symbol refers to important technical info!
This symbol refers to a tip, idea or side note!
!!
GLITCHMACHINES ® | CATARACT | USER GUIDE V 1.0 © 2014 www.glitchmachines.com
• Legal!
• System Requirements!
• Features!
• Setup!
• Cataract Description!
• Quick Start Guide!
• Cataract Usage Examples!
• Plugin Overview!
• Detailed Breakdown!

LEGAL:!!\\\ We need your support to be able to continue to bring you new products. Please do not share this software illegally. Contrary to popular belief, it affects us directly! \\\!!For full Terms & Conditions, please refer to the EULA (End User License Agreement) located in the DOCS folder with this product.!!For Multi-User Site License terms and pricing, please contact us.!!Glitchmachines ® | San Francisco | California | USA!!!SYSTEM REQUIREMENTS:!!• ! Broadband Internet connection for product download!• ! Display with minimum 1024X768 screen resolution!• ! VST/AU host such as Ableton Live, Logic Pro, etc.!• ! Approximately 1 GB of hard drive space!• ! Mac OS X 10.7 or higher (PPC not supported)!• ! Windows Vista or higher!• ! Minimum 2 GB RAM!• ! CPU with SSE2 support!• ! Minimum recommended CPU: Core 2 Duo, 2GHz!!FEATURES:!!• ! 2 monophonic scanner modules with dual sample slots!• ! Integrated modulation and scan sequencers!• ! 2 LFOs per scanner with dedicated modulation matrix!• ! 1 Multi-mode filter per scanner!• ! 1 Delay effect per scanner!• ! 3-Band graphic EQ per scanner!• ! Extensive global and per-scanner randomization tools!• ! Morphing section with dedicated X-MOD LFO!• ! Dynamic color-coded user interface!• ! Sample pack with over 130 new loops and 200 new sound effects!• ! Presets from Ivo Ivanov, Nicholas Yochum and Daed!• ! Cross-platform compatibility (PC/Mac – VST/AU 32bit & 64bit)!!
GLITCHMACHINES ® | CATARACT | USER GUIDE V 1.0 © 2014 www.glitchmachines.com
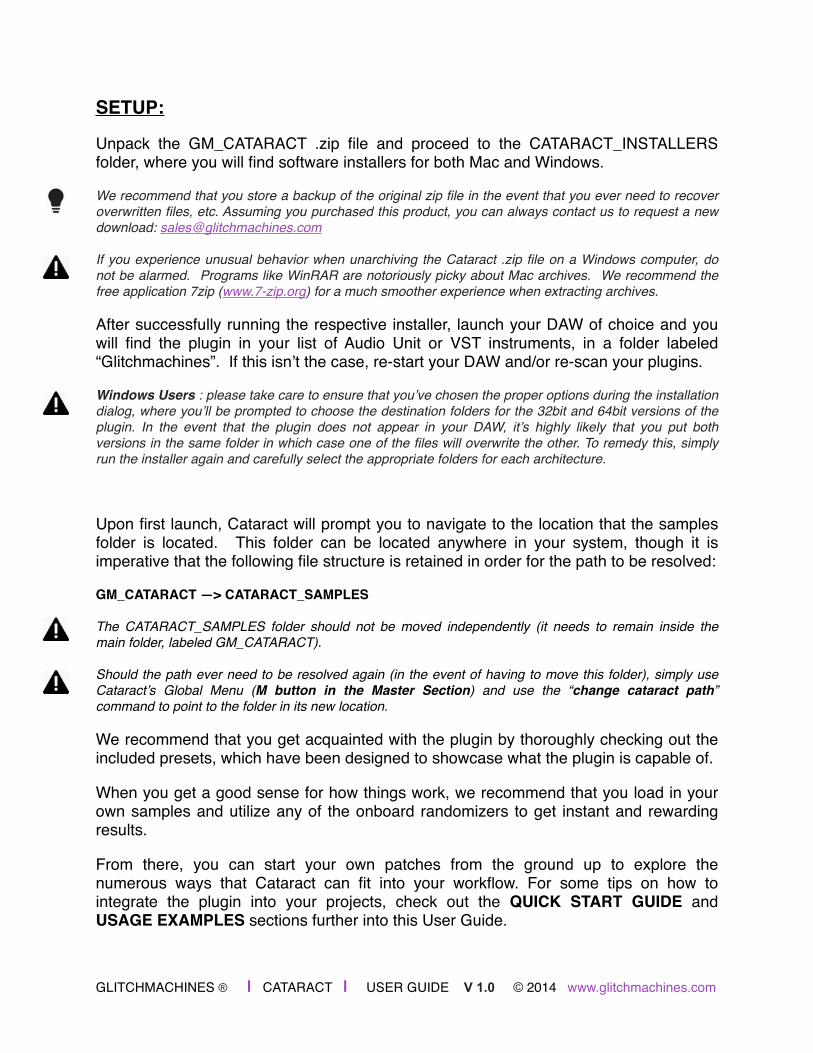
SETUP:!
Unpack the GM_CATARACT .zip file and proceed to the CATARACT_INSTALLERS folder, where you will find software installers for both Mac and Windows.!
We recommend that you store a backup of the original zip file in the event that you ever need to recover overwritten files, etc. Assuming you purchased this product, you can always contact us to request a new download: [email protected]!
If you experience unusual behavior when unarchiving the Cataract .zip file on a Windows computer, do not be alarmed. Programs like WinRAR are notoriously picky about Mac archives. We recommend the free application 7zip (www.7-zip.org) for a much smoother experience when extracting archives.!
After successfully running the respective installer, launch your DAW of choice and you will find the plugin in your list of Audio Unit or VST instruments, in a folder labeled “Glitchmachines”. If this isn’t the case, re-start your DAW and/or re-scan your plugins.!
Windows Users : please take care to ensure that you’ve chosen the proper options during the installation dialog, where you’ll be prompted to choose the destination folders for the 32bit and 64bit versions of the plugin. In the event that the plugin does not appear in your DAW, it’s highly likely that you put both versions in the same folder in which case one of the files will overwrite the other. To remedy this, simply run the installer again and carefully select the appropriate folders for each architecture.!
!Upon first launch, Cataract will prompt you to navigate to the location that the samples folder is located. This folder can be located anywhere in your system, though it is imperative that the following file structure is retained in order for the path to be resolved: !
GM_CATARACT —> CATARACT_SAMPLES!
The CATARACT_SAMPLES folder should not be moved independently (it needs to remain inside the main folder, labeled GM_CATARACT). !
Should the path ever need to be resolved again (in the event of having to move this folder), simply use Cataract’s Global Menu (M button in the Master Section) and use the “change cataract path” command to point to the folder in its new location.!
We recommend that you get acquainted with the plugin by thoroughly checking out the included presets, which have been designed to showcase what the plugin is capable of. !
When you get a good sense for how things work, we recommend that you load in your own samples and utilize any of the onboard randomizers to get instant and rewarding results. !
From there, you can start your own patches from the ground up to explore the numerous ways that Cataract can fit into your workflow. For some tips on how to integrate the plugin into your projects, check out the QUICK START GUIDE and USAGE EXAMPLES sections further into this User Guide.!
GLITCHMACHINES ® | CATARACT | USER GUIDE V 1.0 © 2014 www.glitchmachines.com

CATARACT DESCRIPTION:!
!Cataract is a Segment Multiplexer plugin geared toward electronic music production and experimental sound design. Cataract features an arsenal of sample scanners with integrated modulation sequencers and morphing functions. This makes it possible to construct architecturally complex patterns ranging from nuanced percussive articulations to intricate particle sound effects and all out generative hyper glitch chaos.!!Infinitely transform your audio files with Cataract’s extensive randomization and modulation options. Warp pitched samples into parallax melodies or redistribute loop segments into generative polyrhythms. Whether you are sculpting articulate percussion patterns for an electronic music EP or designing high-tech cyborg effects for a sci-fi game, Cataract will give your projects a unique cutting-edge twist.!!Cataract features a dynamic, color-coded user interface that simplifies navigation and streamlines functionality. One of the plugin’s highlights is the ability to step-sequence nearly every parameter, making it possible to coordinate extremely expressive and detailed patterns. Synchronize tightly with your hosts’s clock, use your MIDI keyboard to improvise complex pattern variations in real time, or sequence precise parameter changes from within your favorite DAW. You can even utilize Cataract’s GEN functions to set up completely generative evolving phrases.!!Cataract includes two scanners, each of which are equipped with two sample slots. Each scanner includes two LFOs, a multimode filter, a multimode delay effect, a scan sequencer with windowing and dedicated LFO, a 3-Band graphic EQ, four dedicated randomizers, five MIDI triggered save states and a dedicated modulation matrix. Globally, Cataract features a crossfade-style morph section with its own dedicated X-MOD LFO, as well as three percentage-based randomizers that facilitate consistently compelling results with relative ease.!!To get you started, we included a collection of presets and over 130 new loops by sound designers Ivo Ivanov, Nicholas Yochum and Daed. In the interest of maximizing Cataract’s broad potential, we’ve also included a sample pack consisting of 200 brand new Foley and synth sound effects exclusively designed for this plugin by Ivo Ivanov.!!When you’re ready to extend the plugin’s sonic palette, check out our numerous Macropacks, Libraries and FREE Nanopacks which will provide you with exciting new aural landscapes to traverse. Of course, Cataract also works with all of your existing samples. No matter what you throw at it, Cataract will inspire creativity and exploration.!!!!!GLITCHMACHINES ® | CATARACT | USER GUIDE V 1.0 © 2014 www.glitchmachines.com

QUICK START GUIDE: !!!This is an example of how to go about generating an evolving loop with Cataract. It is intended as a step-by-step guide that will give you the basic knowledge you need to get started using the plugin.!!Note that we focused on making Cataract a versatile instrument that offers many workflow possibilities. These are just some basics to help you get a feel for some of the plugin’s capabilities.!!!Before you begin, turn on the transport in your DAW (i.e. activate “Playback”).!!!!1. START WITH ONE SCANNER MODULE :!!• Pick 2 loops from the Cataract Loops folder and load them into the 2 slots of the blue
Scanner module (left) (drag them onto the slots or choosing them from the menu).!!• Having 2 slots for one scanner allows you to apply the same set of modulations to 2
different sound sources. This is useful when making tightly synced rhythmic variations.!!• With the default settings you should only hear the first sound play synced to one bar.
Adjust the number of divisions and the scan rate in the scan section until you find the results pleasing. Now move the morph knob in the scanner’s Global section (next to the scan section) to check how the 2nd sample sounds with these same settings. If ok, return the morph knob to its original position (fully counter-clockwise).!!
• Now we want to bring some randomness to this loop : set the LFO1 to square wave and its rate synced to 1/4. !!
• In the mod matrix set the amount of LFO1 to Scan Wave to about 80%. With these settings, the scan wave will alternate between saw up and random every 1/4, hopefully presenting you with some interesting variations.!!
• Enable the « G » toggle next to the scanner morph knob to make it alternate randomly between the 2 sample slots (the bottom parameter must stay on « ALT » for this).!!
• You can either stop here or turn this loop into a generative drill chaos patch by activating the « G » button attached to the gate knob and activating the « LOOP » toggle in the Scan section.!!!!
GLITCHMACHINES ® | CATARACT | USER GUIDE V 1.0 © 2014 www.glitchmachines.com
2. ADD THE SECOND SCANNER MODULE :!!!!• Switch to the green scanner controls by clicking one of its sample slots.!!• Right-click on the blue scanner’s first waveform slot and select copy from the menu.!!• Right click on the green scanner first waveform slot and select paste from the menu. !!• You should now have the same sample in both slots. Repeat the same process to
copy the sample in the second slot from Scanner 1 to Scanner 2. Now you have the same source sounds for both modules.!!
• Repeat the same process as we did for the first scanner settings but try to tweak some parameters to yield different results. To hear the output of the second scanner, move the main morph knob at the top center of the UI to its maximum value (fully clockwise).!!
• Once you wind up with another loop in the same spirit as the first one, you can make it even more complex by tweaking the filter and delay effects (optionally turn on the GEN mode for some parameters for even crazier results).!!
• Now click on the « SEQ » button at the bottom left of the UI to bring up the modulation sequencer window. !!
• Click on the « REC » button below the SEQ button and tweak the the scan rate knob of the green scanner module. You should see the sequence draw itself in the sequencer window. If you one bar sounds too repetitive you can either stretch the length of the sequence by selecting « 8 bars » in the sequence rate box or by setting the sequence play mode to « ??? » .!!
• Toggle off the « REC » button. Now click on the Global ratio knob for the green scanner to bring its sequence to focus in the sequencer window. !!
• Click on the « ACTIVE » toggle in the sequencer window and manually draw a sequence until it sounds interesting.!!
• Reset your DAW transport to make sure everything is properly synced (this will retrigger all modulations and sequences).!!!!!!!!
GLITCHMACHINES ® | CATARACT | USER GUIDE V 1.0 © 2014 www.glitchmachines.com
3. BLEND BOTH TOGETHER :!!• Set the main Morph knob (at the top center of the panel) to its minimum value (fully
counter clock wise).!!• In the same section, set the upper « DEPTH » knob to 100% and the upper rate knob
to a low value (5-15%).!!• In the same section, move the lower depth knob to about 20%!!• Set the lower rate knob to 2 Bars (« S » toggle next to it must be on in order for the
LFO to be in Sync mode and display the possible divisions) and the lower waveform to « RANDOM » .!!
• Resample about a minute of the resulting audio in your DAW and edit to your liking.!!!!!4. INDUCE CHAOS :!!• To ensure you don’t lose any settings, save your current settings as a preset.!!• Now have fun with the randomizers : you can first try to randomize only the loaded
samples using the global « ?SMP » randomizer. !!• Then you can adjust the random amount using the dedicated slider and try various
randomizers (at the individual scanner level or overarching global level)!!• Generally speaking, higher percentage values will yield more intense results, while
lower percentage values will yield more distinct and evocative results.!!• Keep in mind that you’ll probably want to tweak the settings after randomizing. This
allows you to “dial back” the parameters until you reach a point of interest. In particular, we recommend dialing back Modulation Matrix parameters until you feel “in control” of the patch. At that point you can easily introduce new elements/layers by carefully and individually increasing the values of certain parameters in the matrix.!!!
This was just a basic overview of some interesting functions and a certain workflow, but there is much more to explore. Due to the overall complexity of the plugin, we highly recommend that you invest some time into reading this User Guide in its entirety. !!If you don’t take the time to understand the plugin’s nuances, there is a high probability that you’ll miss out on critical knowledge that would help you gain the most rewarding results!!!
GLITCHMACHINES ® | CATARACT | USER GUIDE V 1.0 © 2014 www.glitchmachines.com
USAGE EXAMPLES: !!Cataract can be integrated into your workflow in a variety of useful ways. We have compiled the following list to give you some ideas about how to get started:!!!Textures & Particles:!• Set the gate parameters for each scanner to a short value!• Modulate the filter and delay modules to induce particles and other textural elements!• Randomize with high percentage values (75% and higher) !!Generative Layers:!• Load random selection of samples into scanners!• Use many randomized sequencers and “G” buttons on multiple parameters!• Use the filter module to help the sounds fit in the mix!• Bounce out long regions of the results and edit to taste!!Percussive Layers:!• Same as above except sync all possible parameters for less random results!• Use drum loops or percussion sounds instead of random samples!!Randomized Effects:!• Globally randomize “ALL” with shorter percentage settings (5%-25%)!• Use different samples in each slots for tonal variation!• Sculpt with Graphic EQ to dial in sweet spots for each loaded sample!• Bounce results to disc and edit out snippets!!Fills:!• Load drum loops into scanners!• Heavily modulate Morph parameters!• Modulate scan sections for variations!• Program save states, then orchestrate them precisely from within your DAW!• Bounce results to disc and edit out snippets!!Drones:!• Load sustained & longer samples into scanners!• Modulate morph knobs with smooth random setting!• Use the delay module with a higher feedback setting!• Scan through the samples quickly with a smaller gate or slowly with the WNDW on!!Melodic Sequences:!• Similar to drones but pick samples with more melodic or resonant characteristics!• Use the sequencers on the Ratios to make short melodic lines!!
GLITCHMACHINES ® | CATARACT | USER GUIDE V 1.0 © 2014 www.glitchmachines.com

CATARACT PLUGIN OVERVIEW:!
!COLOR CODING:!!Cataract features a dynamic, color coded interface. The 4 colors are designated to the following sections and functions:!
!BLUE: Scanner Module 1 and all associated parameters!GREEN: Scanner Module 2 and all associated parameters!YELLOW: Morph Section and all associated parameters!FUCHSIA : All parameters that are being modulated by the sequencer!!GRAY : All parameters that are in GEN mode!!
Any knob or button associated with a parameter in GEN mode will be deactivated !
GLITCHMACHINES ® | CATARACT | USER GUIDE V 1.0 © 2014 www.glitchmachines.com
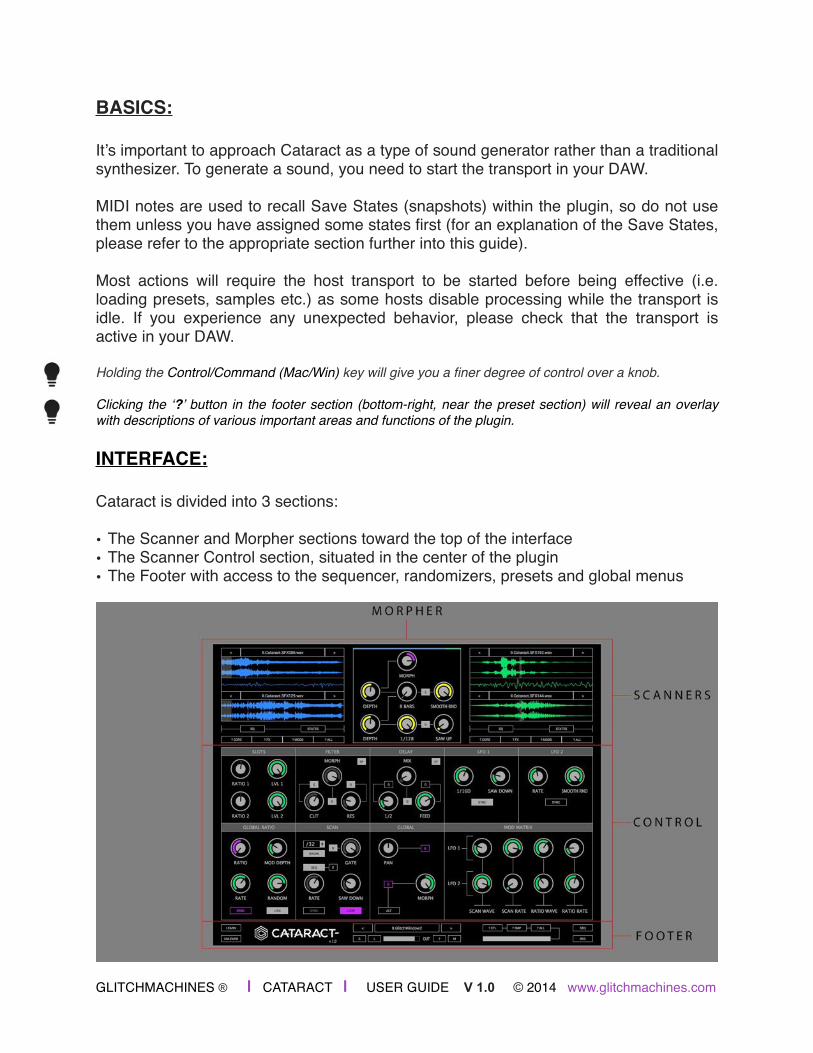
BASICS:!!It’s important to approach Cataract as a type of sound generator rather than a traditional synthesizer. To generate a sound, you need to start the transport in your DAW. !!MIDI notes are used to recall Save States (snapshots) within the plugin, so do not use them unless you have assigned some states first (for an explanation of the Save States, please refer to the appropriate section further into this guide). !!Most actions will require the host transport to be started before being effective (i.e. loading presets, samples etc.) as some hosts disable processing while the transport is idle. If you experience any unexpected behavior, please check that the transport is active in your DAW.!!Holding the Control/Command (Mac/Win) key will give you a finer degree of control over a knob. !!Clicking the ‘?’ button in the footer section (bottom-right, near the preset section) will reveal an overlay with descriptions of various important areas and functions of the plugin.!!INTERFACE:!!Cataract is divided into 3 sections:!!• The Scanner and Morpher sections toward the top of the interface!• The Scanner Control section, situated in the center of the plugin!• The Footer with access to the sequencer, randomizers, presets and global menus!
GLITCHMACHINES ® | CATARACT | USER GUIDE V 1.0 © 2014 www.glitchmachines.com

SCANNERS:!
!Clicking on any of the scanner’s waveform displays will make the respective scanner “active”. All of the parameters in the control section will update to coincide with the active scanner. You can easily verify which scanner’s controls are active by referring to the color coding diagram above.!!File Handling: !!To load a sample (wav or aiff file), click on the tab above the waveform display. This will activate a dialog from which you can navigate to a desired audio file on your hard drive. Alternatively you can either drag files directly onto the waveform area from your Finder/Explorer (or even straight from some host’s browsers - for example Ableton Live).!!Once an initial file is loaded into a slot, you can switch between samples in the currently selected folder by using the navigational arrows located at each side of the file name. You can also copy / paste samples across slots by right-clicking on the waveform view and choosing the appropriate option from the popup menu.!!Visual Feedback:!!The oscilloscope in the middle of each scanner responds to the consolidated output signal of the associated scanner.!
GLITCHMACHINES ® | CATARACT | USER GUIDE V 1.0 © 2014 www.glitchmachines.com
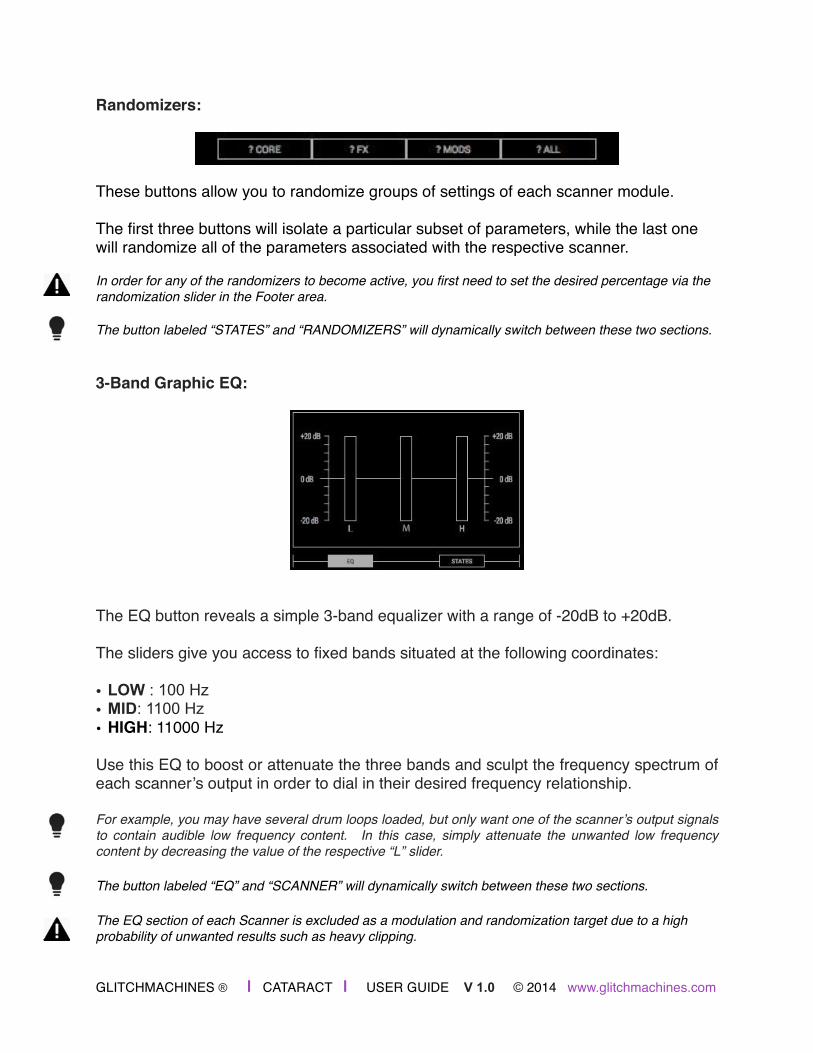
Randomizers:!
These buttons allow you to randomize groups of settings of each scanner module.!!The first three buttons will isolate a particular subset of parameters, while the last one will randomize all of the parameters associated with the respective scanner.!!In order for any of the randomizers to become active, you first need to set the desired percentage via the randomization slider in the Footer area.!!The button labeled “STATES” and “RANDOMIZERS” will dynamically switch between these two sections.!!!3-Band Graphic EQ:!
!The EQ button reveals a simple 3-band equalizer with a range of -20dB to +20dB.!!The sliders give you access to fixed bands situated at the following coordinates:!!• LOW : 100 Hz • MID: 1100 Hz • HIGH: 11000 Hz!!Use this EQ to boost or attenuate the three bands and sculpt the frequency spectrum of each scanner’s output in order to dial in their desired frequency relationship. !!For example, you may have several drum loops loaded, but only want one of the scanner’s output signals to contain audible low frequency content. In this case, simply attenuate the unwanted low frequency content by decreasing the value of the respective “L” slider.!!The button labeled “EQ” and “SCANNER” will dynamically switch between these two sections.!!The EQ section of each Scanner is excluded as a modulation and randomization target due to a high probability of unwanted results such as heavy clipping.!
GLITCHMACHINES ® | CATARACT | USER GUIDE V 1.0 © 2014 www.glitchmachines.com

State Slots :!
!State slots provide a straight forward yet powerful way to store setting variations for each scanner module that can then be triggered via MIDI from your controller keyboard or from within your DAW. This makes it possible to improvise parameter variations in real time or coordinate precise parameter changes from within your MIDI sequencer. !!Each Scanner has its own set of 5 dedicated State Slots. For example, you can recall state 4 in Scanner 1 while the Scanner 2 would still be in state 2.!!To store the current state of a scanner module into a slot, simply right-click the desired slot. You can then recall this state either by left-clicking on the slot, or by sending a MIDI note to the plugin (either via a MIDI controller or via your DAW sequencer). !!The MIDI notes are mapped in a way that is octave independent : they will work throughout the entire MIDI key range. The first 5 notes of any octave trigger the states of Scanner 1 (C to E), while the 5 next notes (F to A) trigger the states of Scanner 2. The plugin can parse two notes at the same time so that you can layer state changes on both scanners simultaneously. !!There are a few things to keep in mind to ensure proper functionality:!!If this feature isn’t useful to you, Cataract is designed so that you can simply forget about these state slots. They are not shown by default and saving a preset without assigning the state slots will simply save the current settings. The only thing to remember in that case is to avoid sending MIDI notes to the plugin as these would trigger the states, thereby losing your current parameter settings.!!What CAN be saved in a state slot : !
• all parameters for the target scanner !• all scan sequence data!!
What CAN NOT saved in a state slot : !• samples*!• Parameter sequences**!• Morph section and output gain!!
The scan sequence data is autosaved in the currently selected slot. If you modify the sequence even without right-clicking the slot, it will be kept in memory (while any controls moved but not saved by a right click will be forgotten). In case you run into trouble, remember that you can copy paste the scan sequence data across slots and even across scanners.!!* the controls will change but if you change the samples they will be applied to the last loaded sounds instead of recalling the previous ones.!!** you can only store one parameter sequence per parameter per preset.!
GLITCHMACHINES ® | CATARACT | USER GUIDE V 1.0 © 2014 www.glitchmachines.com
MORPHER:!
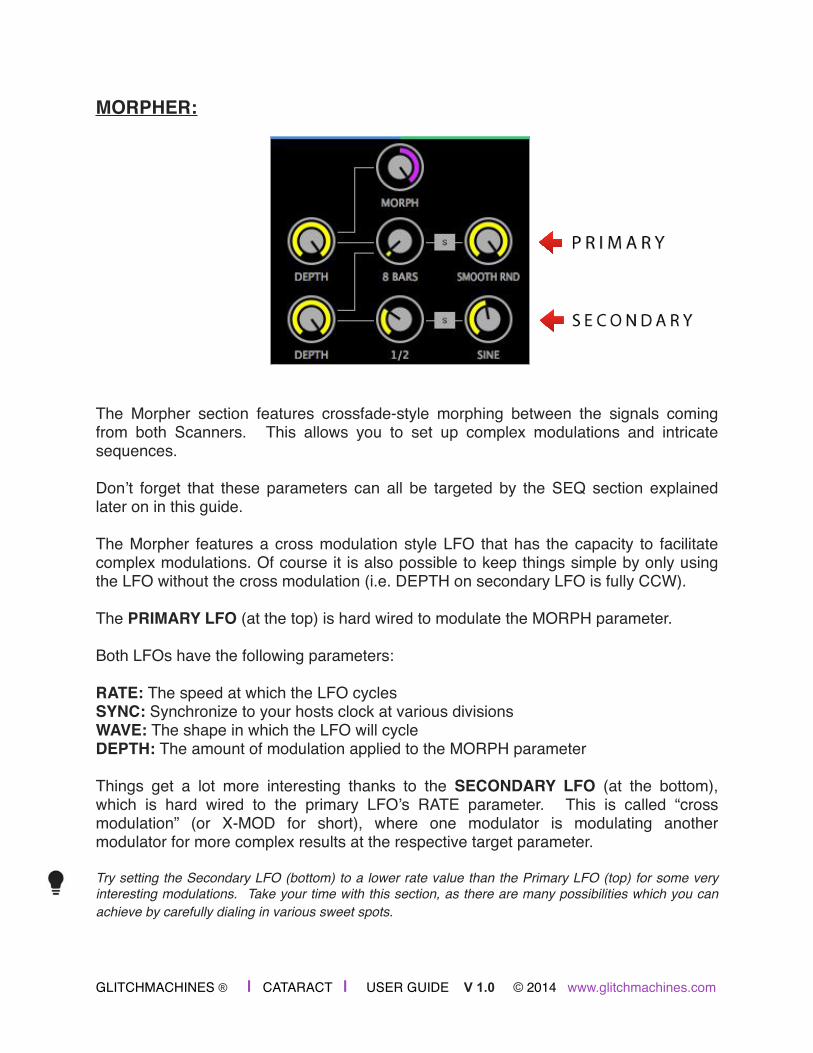
!The Morpher section features crossfade-style morphing between the signals coming from both Scanners. This allows you to set up complex modulations and intricate sequences. !!Don’t forget that these parameters can all be targeted by the SEQ section explained later on in this guide.!!The Morpher features a cross modulation style LFO that has the capacity to facilitate complex modulations. Of course it is also possible to keep things simple by only using the LFO without the cross modulation (i.e. DEPTH on secondary LFO is fully CCW).!!The PRIMARY LFO (at the top) is hard wired to modulate the MORPH parameter.!!Both LFOs have the following parameters:!!RATE: The speed at which the LFO cycles!SYNC: Synchronize to your hosts clock at various divisions!WAVE: The shape in which the LFO will cycle!DEPTH: The amount of modulation applied to the MORPH parameter!!Things get a lot more interesting thanks to the SECONDARY LFO (at the bottom), which is hard wired to the primary LFO’s RATE parameter. This is called “cross modulation” (or X-MOD for short), where one modulator is modulating another modulator for more complex results at the respective target parameter. !!Try setting the Secondary LFO (bottom) to a lower rate value than the Primary LFO (top) for some very interesting modulations. Take your time with this section, as there are many possibilities which you can achieve by carefully dialing in various sweet spots. !!GLITCHMACHINES ® | CATARACT | USER GUIDE V 1.0 © 2014 www.glitchmachines.com

SCANNER CONTROL:!
!Clicking on any of the scanner’s waveform displays will make the respective scanner “active”. All of the parameters in the control section will update to coincide with the active scanner. You can easily verify which scanner’s controls are active by referring to the color coding diagram above.!!Slots Section : !!!!!!!!!!!!!This section contains controls for the individual sample slots within a Scanner. !!Here you can adjust the playback speed (RATIO) and output level for each sample.!!Ratio : a proportion of the regular audio file’s speed:!!
• 2 = double speed and pitch is octave higher!• 0.5 = half speed!• 0 = stop!
GLITCHMACHINES ® | CATARACT | USER GUIDE V 1.0 © 2014 www.glitchmachines.com

Scan Section : !!!!!!!!!!!!!!!This is the most significant section of the controls and can be considered to be the “heart” of the plugin since its settings play the most fundamental role in the process.!!At the bottom of the Scan section are controls corresponding to parameters of the dedicated LFO :!!Rate: changes the rate at which the LFO cycles!Sync: synchronizes the LFO to your host at various divisions!Waveform: changes the shape of the LFO wave!!In standard operation, Cataract scans through the samples loaded into the Scanners by using this LFO : the output of the LFO is mapped to the segments positions, so the currently playing segment is determined by the LFO output. By default the LFO waveform is set to saw up, so that it will scan in normal playback order (from the first segment to the last). !!This setup is similar to a traditional “sample slicer” concept. !!For example, with the LFO rate set to one bar, the segments will be triggered so that the whole sample fits into one bar. Switching to saw down will do the same thing, but it will play the segments in reverse order. !!Things get more interesting when you try other LFO waveforms like Sine wave to control the scan and of course the Random and Smooth Random waves are available if you want to make things more generative.!!• Random Wave: will generate a new random value on each cycle!!• Smooth Random Wave: will interpolate between two random values across a cycle!!!GLITCHMACHINES ® | CATARACT | USER GUIDE V 1.0 © 2014 www.glitchmachines.com
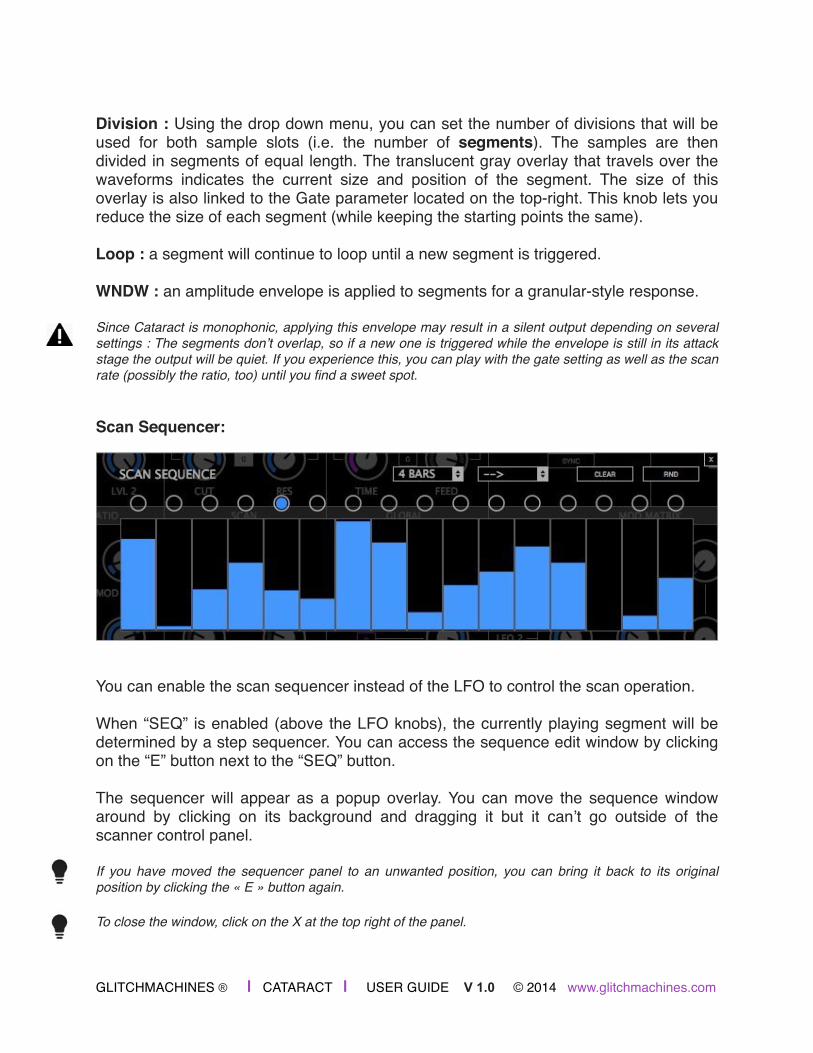
!Division : Using the drop down menu, you can set the number of divisions that will be used for both sample slots (i.e. the number of segments). The samples are then divided in segments of equal length. The translucent gray overlay that travels over the waveforms indicates the current size and position of the segment. The size of this overlay is also linked to the Gate parameter located on the top-right. This knob lets you reduce the size of each segment (while keeping the starting points the same). !!Loop : a segment will continue to loop until a new segment is triggered.!!WNDW : an amplitude envelope is applied to segments for a granular-style response.!!Since Cataract is monophonic, applying this envelope may result in a silent output depending on several settings : The segments don’t overlap, so if a new one is triggered while the envelope is still in its attack stage the output will be quiet. If you experience this, you can play with the gate setting as well as the scan rate (possibly the ratio, too) until you find a sweet spot.!!!Scan Sequencer:!
!You can enable the scan sequencer instead of the LFO to control the scan operation. !!When “SEQ” is enabled (above the LFO knobs), the currently playing segment will be determined by a step sequencer. You can access the sequence edit window by clicking on the “E” button next to the “SEQ” button. !!The sequencer will appear as a popup overlay. You can move the sequence window around by clicking on its background and dragging it but it can’t go outside of the scanner control panel. !!If you have moved the sequencer panel to an unwanted position, you can bring it back to its original position by clicking the « E » button again. !!To close the window, click on the X at the top right of the panel. !!GLITCHMACHINES ® | CATARACT | USER GUIDE V 1.0 © 2014 www.glitchmachines.com

!To draw a sequence, simply drag your mouse over the 16 steps. You can randomize or clear the sequence using the buttons at the top right. Steps are equipped with round indicators, providing visual feedback of the current step.!!The sequence can operate at 4 different rates : !!• 1 Bar!• 2 Bars!• 4 Bars!• 8 Bars!!!!!!!You can also set the playback order of the sequence : !!• Forward —>!• Backward <—!• Random ???!!!!!!!!!By right clicking on the steps, you can bring up a popup menu with the following options:!!• Copy/paste the sequence !• Generate a ramp up or !• Invert the current steps!!!!!!!Warning : the sequence is automatically saved in the currently selected state slot as you write it even if no state is saved in the slot.!!If you change the rate of the sequence, it is recommended to restart the transport in your host to make everything sync properly (otherwise it will still be in sync, but the currently playing step may be offset).!!GLITCHMACHINES ® | CATARACT | USER GUIDE V 1.0 © 2014 www.glitchmachines.com

!Gen Mode :!!In the scan section, you may have noticed the “G” toggle attached to the gate control. !!G stands for “Gen Mode”. You’ll find similar Gen toggles in the effects and global section. Use these to give a more generative edge to your sound.!!When Gen Mode is enabled for a parameter, the attached parameter will be bypassed and a random value will be generated on each new segment trigger. !!Gen overrides any automation or parameter sequence!!!!!Global Ratio section :!!!!!!!!!!!!!!!Here you can adjust the playback speed for both sample slots simultaneously.!!This section has a built-in modulation LFO with dedicated mod depth, rate and waveform controls. !!Link: When the “LINK” toggle at the bottom right is engaged, this LFO will be retriggered each time a new segment is triggered.!!!As for all LFOs in Cataract, the current value of the target parameter is used as a base offset for the modulated signal, and the range is set by the mod depth. For full range, set the depth to 100% and the target control to its minimum value.!!!!GLITCHMACHINES ® | CATARACT | USER GUIDE V 1.0 © 2014 www.glitchmachines.com

!Global Section :!!!!!!!!!!!!!!Pan: Adjusts the panoramic position of the output signal of the scanner module.!!Morph: Crossfades between the 2 sample slots inside the Scanner.!!If you enable the Gen mode on this parameter, the results will depend of the bottom toggle (“ALT/INT”)!!ALT: on each new segment trigger, playback will alternate between both samples!!INT: on each new segment trigger, playback will blend (morph) both slots at random!!!!LFO 1 & LFO 2:!
!At the right side of the controls panel, you’ll find 2 additional LFOs, along with a modulation matrix.!!These LFOs allow you to build more complex modulation layers on top of the Scan and Ratio LFOs. !!Both LFOs features the same set of standard controls as the dedicated ones (rate/sync/wave).!
GLITCHMACHINES ® | CATARACT | USER GUIDE V 1.0 © 2014 www.glitchmachines.com
Mod Matrix : !
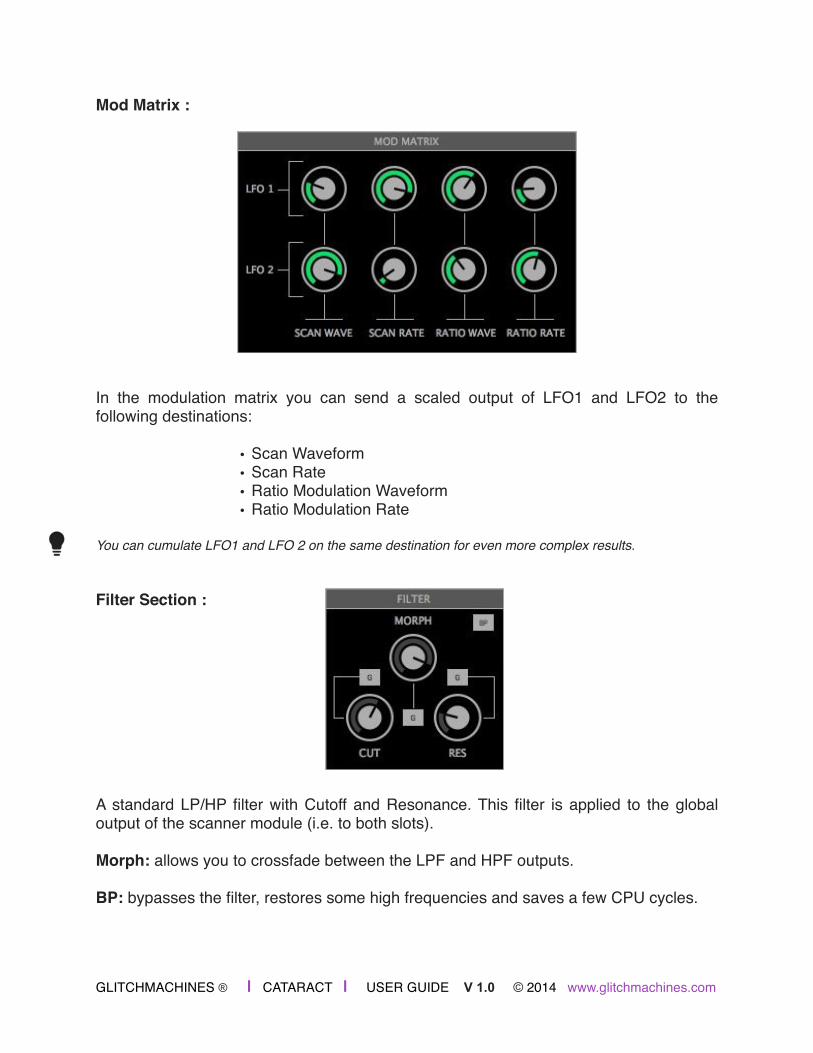
!In the modulation matrix you can send a scaled output of LFO1 and LFO2 to the following destinations:!!
• Scan Waveform!• Scan Rate!• Ratio Modulation Waveform!• Ratio Modulation Rate!!
You can cumulate LFO1 and LFO 2 on the same destination for even more complex results.!!!Filter Section :!!!!!!!!!!!A standard LP/HP filter with Cutoff and Resonance. This filter is applied to the global output of the scanner module (i.e. to both slots). !!Morph: allows you to crossfade between the LPF and HPF outputs. !!BP: bypasses the filter, restores some high frequencies and saves a few CPU cycles.!!!GLITCHMACHINES ® | CATARACT | USER GUIDE V 1.0 © 2014 www.glitchmachines.com
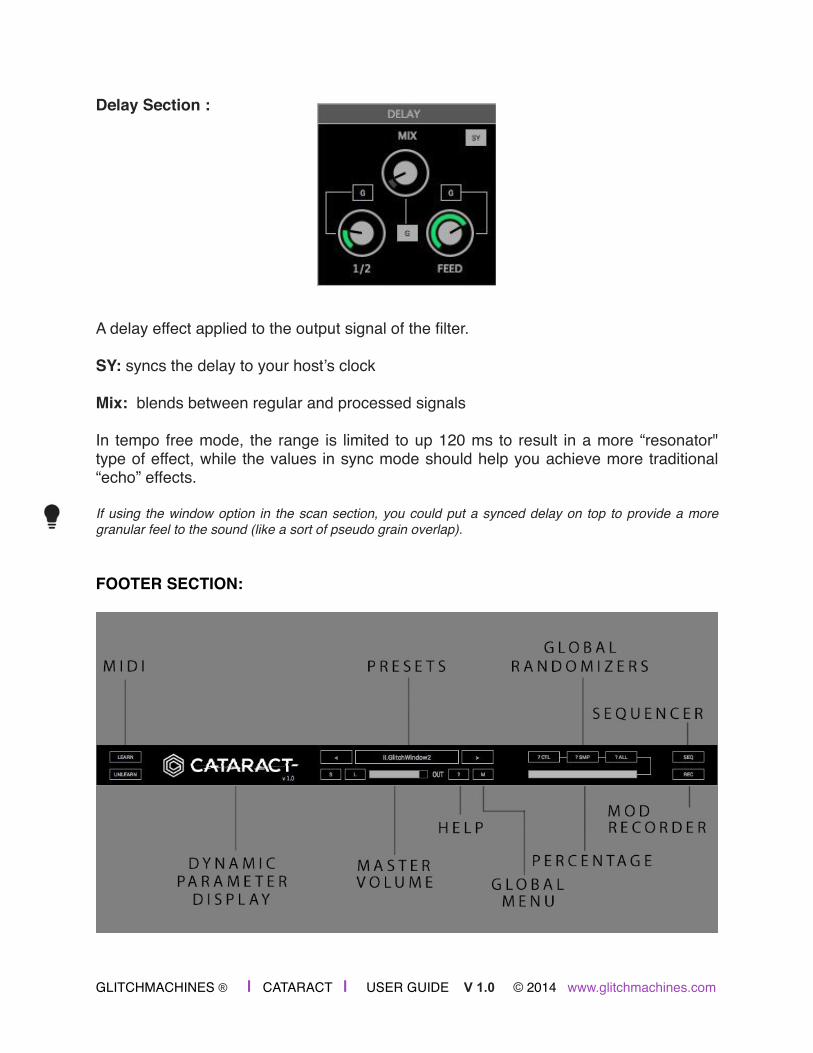
Delay Section :!!!!!!!!!!!!A delay effect applied to the output signal of the filter.!!SY: syncs the delay to your host’s clock!!Mix: blends between regular and processed signals!!In tempo free mode, the range is limited to up 120 ms to result in a more “resonator" type of effect, while the values in sync mode should help you achieve more traditional “echo” effects. !!If using the window option in the scan section, you could put a synced delay on top to provide a more granular feel to the sound (like a sort of pseudo grain overlap). !!!FOOTER SECTION:!
GLITCHMACHINES ® | CATARACT | USER GUIDE V 1.0 © 2014 www.glitchmachines.com

MIDI Learn: To assign a knob to a MIDI controller, click on «Learn». Then once learn mode is active (while the button is on), move the control you wish to assign on the plugin interface, then move a control on your MIDI controller and the parameter will be bound to that control.!!MIDI Unlearn: To unlearn a parameter, toggle the «Unlearn» switch on, move the parameter you wish to disconnect on the plugin and it will no longer respond to MIDI CCs.!!You need to properly configure MIDI in your DAW to be routed to the Cataract plugin. Please refer to your DAW documentation for information on this subject.!
MIDI mappings are saved in a preferences file when the plugin is closed, so they will still be present when relaunching it, but they can be overridden if you open a project in your host with different mappings as they are also saved in the project state.!
CC 22 is hard wired to the Clear All Sequences global menu command and unavailable for MIDI learn !Dynamic Parameter Display:!
!!The area behind the Cataract logo doubles as a parameter value display. This section will switch dynamically to display the currently affected parameter. Once a parameter is no longer being adjusted, the logo will reappear. !
Presets:!
You can navigate through the presets either by accessing the drop-down menu, or by using the navigational arrows to increment/decrement though the list. !
S: Opens a dialog box that will let you save the current preset on your hard drive using the extension “.ctp”. !
L: Loads a preset stored somewhere else other than the default folder.!
!Only the presets saved in the default preset folder (where the dialog box opens by default) will appear in the menu.!
GLITCHMACHINES ® | CATARACT | USER GUIDE V 1.0 © 2014 www.glitchmachines.com

Help Overlay:!
!
!The Help Overlay consists of a series of panels that outline the core functions of the plugin. This section is a handy resource when you quickly need a reminder about the functionality of a particular section.!
Use the < > arrows to navigate through the panels and the X button to exit.!
!!!
GLITCHMACHINES ® | CATARACT | USER GUIDE V 1.0 © 2014 www.glitchmachines.com

Global Menu:!
!!!!The Global Menu gives you access to several useful options that affect various important settings:!
!Init All Controls: initializes all of the plugin’s parameters to their default values!
Clear All Sequences: clears and resets all internal sequencers simultaneously!
Open Presets Folder: navigates to Cataract’s default presets folder!
Change Cataract Path: In the event of the presets not loading correctly, you may need to resolve the file path to the samples folder. This option will pull up your OS file browser, from where you need to navigate to the GM_CATARACT folder. !
It is imperative that you select the outer folder labeled GM_CATARACT. The CATARACT_SAMPLES folder needs to reside inside this main folder in order for the file hierarchy to be correct. You can move the outer folder and its contents to any location in your system as long as this path is maintained. !Save Consolidated Preset: This is the way to save presets if you want to move them from a computer to another. When saving a preset that way, Cataract will copy the 4 samples used to a special folder in the CATARACT_SAMPLES folder name USER_SAMPLES, and the preset will use relative paths instead of absolute paths to reference the samples. Moving the presets is then a matter of moving the actual preset file as well as the USER_SAMPLES folder to the other computer.!
Clear MIDI Mappings: clears all MIDI mappings made to Cataract’s parameters.!
Show Log File: In the event of a crash, you can provide us with this log in order to give us a more detailed impression of what may have gone wrong. Simply attach it to an email and send it to us along with a brief description of the problem: SUPPORT!
GLITCHMACHINES ® | CATARACT | USER GUIDE V 1.0 © 2014 www.glitchmachines.com
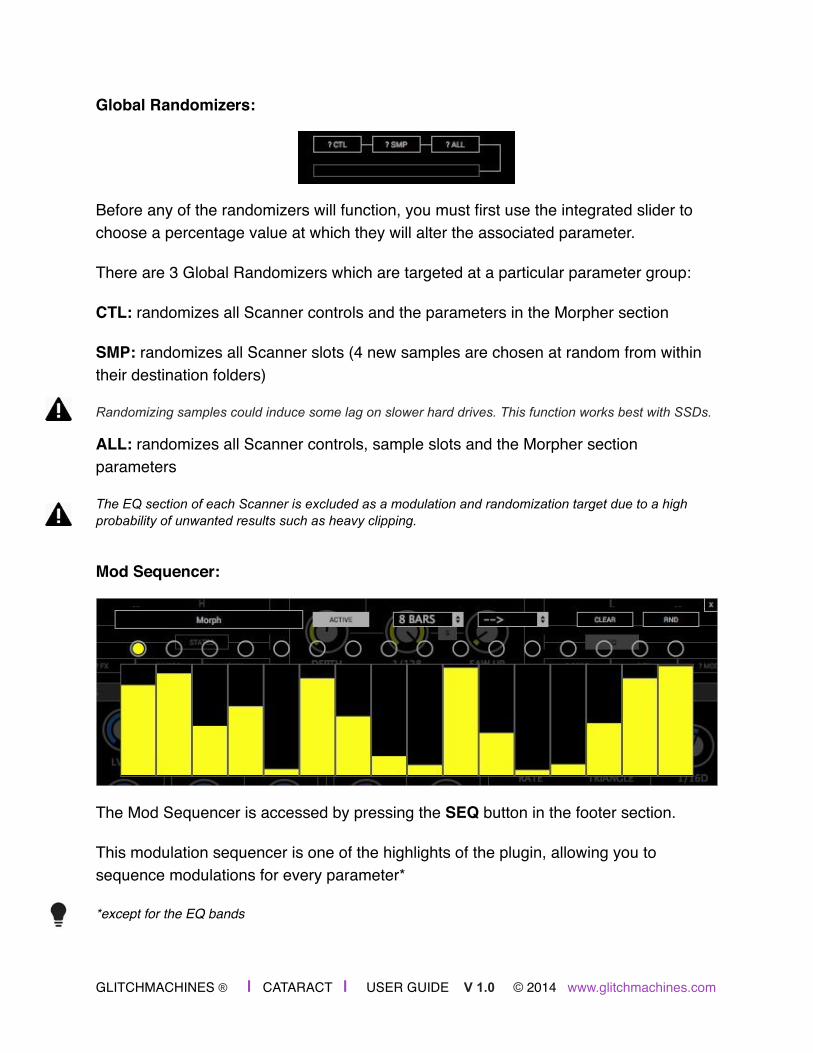
Global Randomizers:!
Before any of the randomizers will function, you must first use the integrated slider to choose a percentage value at which they will alter the associated parameter.!
There are 3 Global Randomizers which are targeted at a particular parameter group:!
CTL: randomizes all Scanner controls and the parameters in the Morpher section!
SMP: randomizes all Scanner slots (4 new samples are chosen at random from within their destination folders)!
Randomizing samples could induce some lag on slower hard drives. This function works best with SSDs. !ALL: randomizes all Scanner controls, sample slots and the Morpher section parameters!
The EQ section of each Scanner is excluded as a modulation and randomization target due to a high probability of unwanted results such as heavy clipping. !!Mod Sequencer:!
The Mod Sequencer is accessed by pressing the SEQ button in the footer section. !
This modulation sequencer is one of the highlights of the plugin, allowing you to sequence modulations for every parameter*!
*except for the EQ bands!
GLITCHMACHINES ® | CATARACT | USER GUIDE V 1.0 © 2014 www.glitchmachines.com

Functionally, this sequencer is identical to the Scan Sequencer, though here you must activate a sequence with the ACTIVE button before it will become functional. !
The floating sequencer panel can be dragged to any location within the plugin’s interface. Should the panel wind up in an unwanted position, simply click the SEQ button again to place it in back in its default position.!
The panel also features a dropdown menu with every possible destination parameter. Note that all of these parameters have been color coded to coincide with their respective sections.!
To assign a parameter as a SEQ target, simply click on the desired knob or button on the plugin’s interface or choose the desired parameter from the menu.!
Any parameters that have been designated as a target by this sequencer will be highlighted in a FUCHSIA color both on the user interface and in the target menu.!
You will also find checkmarks next to every active parameter in the drop down menu. !
!Real-Time Mod Recorder: !
Pressing the REC button in the footer activates real-time recording of your parameter changes. This allows you to capture any parameter changes made in real time. The changes you make will continually be updated in the sequencer until REC is disabled.
GLITCHMACHINES ® | CATARACT | USER GUIDE V 1.0 © 2014 www.glitchmachines.com


![Overview of Congenital, Senile and Metabolic Cataractrelated cataract [7] and metabolic cataract [8]. Congenital & Senile Cataract Cataract is a clouding of the eye’s natural lens](https://static.fdocuments.in/doc/165x107/5f361b7a353bcc123d74d127/overview-of-congenital-senile-and-metabolic-cataract-related-cataract-7-and-metabolic.jpg)