Catalyst 4.7 Tutorials
437
Catalyst Tutorials Release 4.7 March 2002 All updated documentation for the latest release of Catalyst is available at the Accelrys website documentation library: http://www.accelrys.com/doc/life/index.html 9685 Scranton Road San Diego, CA 92121-3752 858/799-5000 Fax: 858/799-5100
Transcript of Catalyst 4.7 Tutorials

Catalyst Tutorials
Release 4.7 March 2002
All updated documentation for the latest release of Catalyst is available at the Accelrys website documentation library:
http://www.accelrys.com/doc/life/index.html
9685 Scranton RoadSan Diego, CA 92121-3752
858/799-5000 Fax: 858/799-5100


Copyright*
This document is copyright © 2001-2002, Accelrys Incorporated. All rights reserved. Except as permitted under the United States Copyright Act of 1976, no part of this publication may be reproduced or distributed in any form or by any means or stored in a database retrieval system without the prior written permission of Accelrys Inc.
The software described in this document is furnished under a license and may be used or copied only in accordance with the terms of such license.
Restricted Rights Legend
Use, duplication, or disclosure by the Government is subject to restrictions as in subparagraph (c)(1)(ii) of the Rights in Technical Data and Computer Software clause at DFAR 252.227–7013 or subparagraphs (c)(1) and (2) of the Commercial Computer Software—Restricted Rights clause at FAR 52.227-19, as applicable, and any successor rules and regulations.
Trademark Acknowledgments
Catalyst, Cerius2, Discover, Insight II, and QUANTA are registered trademarks of Accelrys Inc. Biograf, Biosym, Cerius, CHARMm, Open Force Field, NMRgraf, Polygraf, QMW, Quantum Mechanics Workbench, WebLab, and the Biosym, MSI, Molecular Simulations and Accelrys marks are trademarks of Accelrys Inc.
IRIS, IRIX, and Silicon Graphics are trademarks of Silicon Graphics, Inc. AIX, Risc System/6000, and IBM are registered trademarks of International Business Machines, Inc. UNIX is a registered trademark, licensed exclusively by X/Open Company, Ltd. PostScript is a trademark of Adobe Systems, Inc. The X-Window system is a trademark of the Massachusetts Institute of Technology. NSF is a trademark of Sun Microsystems, Inc. FLEXlm is a trademark of Highland Software, Inc. Red Hat is a registered trademark of Red Hat, Inc. Linux is a registered trademark of Linus Torvalds.
Permission to Reprint, Acknowledgments, and ReferencesAccelrys Inc. usually grants permission to republish or reprint material copyrighted by Accelrys Inc., provided that requests are first received in writing and that the required copyright credit line is used. For information published in documentation, the format is “Reprinted with permis-sion from Document-name, Month Year, Accelrys Inc., San Diego.” For example:
Reprinted with permission from Catalyst Tutorials, March 2002, Accelrys Inc., San Diego.
*U.S. version of Copyright Page

Requests should be submitted to Accelrys Scientific Support, either through electronic mail to [email protected] or in writing to:
Accelrys Scientific Support and Customer Service9685 Scranton RoadSan Diego, CA 92121-3752
To print photographs or files of computational results (figures and/or data) obtained using Accelrys software, acknowledge the source in the format:
Computational results obtained using software programs from Accelrys Inc.—dynamics calculations were done with the Discover® program, using the CFF91 forcefield, ab initio calculations were done with the DMol program, and graphi-cal displays were printed out from the Cerius2 molecular modeling system.
To reference an Accelrys publication in another publication, no author should be specified and Accelrys Inc.. should be considered the publisher. For example:
Catalyst Tutorials, March 2002. San Diego: Accelrys Inc., 2002.

Catalyst Tutorials/March 2002 i
Contents
1. Simple Tasks to Introduce Catalyst 1
Window management . . . . . . . . . . . . . . . . . . . . . . . . . . . . . 2Moving a window . . . . . . . . . . . . . . . . . . . . . . . . . . . . . 2Moving a window to a new location . . . . . . . . . . . . . . . 3Bringing a window to the front . . . . . . . . . . . . . . . . . . . 4Resizing a window . . . . . . . . . . . . . . . . . . . . . . . . . . . . 5
Catalyst operating directories . . . . . . . . . . . . . . . . . . . . . . . 6Starting Catalyst. . . . . . . . . . . . . . . . . . . . . . . . . . . . . . . . . . 7
Loading the training data . . . . . . . . . . . . . . . . . . . . . . . 8Catalyst windows . . . . . . . . . . . . . . . . . . . . . . . . . . . . . . . . 8General Catalyst mouse usage . . . . . . . . . . . . . . . . . . . . . . 10Opening a workbench . . . . . . . . . . . . . . . . . . . . . . . . . . . . 10
Opening an empty workbench . . . . . . . . . . . . . . . . . . 12Closing a workbench . . . . . . . . . . . . . . . . . . . . . . . . . . 12Dragging an object and dropping it on
a workbench . . . . . . . . . . . . . . . . . . . . . . . . . . . . . 12Bringing objects into the workspace . . . . . . . . . . . . . . . . . 13
Dropping an object into a workspace . . . . . . . . . . . . . 14Bringing another object into the workbench . . . . . . . . 14
Moving objects . . . . . . . . . . . . . . . . . . . . . . . . . . . . . . . . . . 16To move one object in the workspace . . . . . . . . . . . . . 16To scroll the workspace . . . . . . . . . . . . . . . . . . . . . . . . 17
Zooming the view of molecules . . . . . . . . . . . . . . . . . . . . . 18To zoom molecules in and out . . . . . . . . . . . . . . . . . . . 19To make all displayed objects fit in the workspace . . . 20
Rotating an object . . . . . . . . . . . . . . . . . . . . . . . . . . . . . . . 21To rotate an object in one plane . . . . . . . . . . . . . . . . . . 21To rotate an object in 3D . . . . . . . . . . . . . . . . . . . . . . . 22
Changing views and styles . . . . . . . . . . . . . . . . . . . . . . . . 23To change views . . . . . . . . . . . . . . . . . . . . . . . . . . . . . 23To change 3D styles . . . . . . . . . . . . . . . . . . . . . . . . . . . 26
Changing the parameters of a workbench . . . . . . . . . . . . . 28To change the workspace layout for
an open workbench. . . . . . . . . . . . . . . . . . . . . . . . 29Setting parameters for new workbenches . . . . . . . . . . 30

ii Catalyst Tutorials/March 2002
Leaving a workbench . . . . . . . . . . . . . . . . . . . . . . . . . . . . . 37Iconifying, reopening, and disposing of
a workbench . . . . . . . . . . . . . . . . . . . . . . . . . . . . . . 37Help in Catalyst . . . . . . . . . . . . . . . . . . . . . . . . . . . . . . . . . 39Using the context-sensitive Help system . . . . . . . . . . . . . . 40Using the on-line Help system . . . . . . . . . . . . . . . . . . . . . . 40
Getting Help . . . . . . . . . . . . . . . . . . . . . . . . . . . . . . . . . 41Using the index for the on-line Help system . . . . . . . . 42Printing pages from the on-line Help system . . . . . . . . 42Leaving the on-line Help system . . . . . . . . . . . . . . . . . 43
Summary . . . . . . . . . . . . . . . . . . . . . . . . . . . . . . . . . . . . . . . 45
2. Introduction to Hypotheses 47
Examining two ready-made hypotheses . . . . . . . . . . . . . . . 48Display a substructure hypothesis . . . . . . . . . . . . . . . . 48Display a hypothesis that has chemical functions . . . . 51
Using hypotheses . . . . . . . . . . . . . . . . . . . . . . . . . . . . . . . . 54Using a hypothesis to search a database. . . . . . . . . . . . 54Fitting a molecule to a hypothesis . . . . . . . . . . . . . . . . 57Using a hypothesis to estimate the activity
of compounds . . . . . . . . . . . . . . . . . . . . . . . . . . . . 61Summary . . . . . . . . . . . . . . . . . . . . . . . . . . . . . . . . . . . . . . . 65
3. Building Molecules 67
Using the view compound workbench . . . . . . . . . . . . . . . . 67Opening the workbench . . . . . . . . . . . . . . . . . . . . . . . . 68
General rules for building molecules . . . . . . . . . . . . . . . . . 71Selecting atoms and groups in the periodic table . . . . . 71Placing atoms and groups in the workspaces . . . . . . . . 71Selecting and changing bond types and styles . . . . . . . 72Adding a bond between two atoms . . . . . . . . . . . . . . . 73Practicing molecule building skills . . . . . . . . . . . . . . . . 74Placing the first atom . . . . . . . . . . . . . . . . . . . . . . . . . . 74Adding atoms in the 2D workspace . . . . . . . . . . . . . . . 75Changing the element of an existing atom . . . . . . . . . . 76Deselecting everything . . . . . . . . . . . . . . . . . . . . . . . . . 76Adding atoms in the 3D workspace . . . . . . . . . . . . . . . 77Keyboard shortcuts for element selection. . . . . . . . . . . 79Building molecules summary . . . . . . . . . . . . . . . . . . . . 80Changing bond styles and adding bonds . . . . . . . . . . . 80Add some groups . . . . . . . . . . . . . . . . . . . . . . . . . . . . . 83Use the erase tool to correct mistakes . . . . . . . . . . . . . . 85Keyboard Shortcuts for bond selection. . . . . . . . . . . . . 86
Selecting and deselecting in the workspace . . . . . . . . . . . . 87Select a single item . . . . . . . . . . . . . . . . . . . . . . . . . . . . 87

Catalyst Tutorials/March 2002 iii
Select multiple atoms and bonds (Extend Select) . . . . 87Select multiple atoms and bonds that are
grouped together (Region Select) . . . . . . . . . . . . . 87Select everything . . . . . . . . . . . . . . . . . . . . . . . . . . . . . 88Deselect all selected items . . . . . . . . . . . . . . . . . . . . . . 88Deselect some, but not all selected atoms
and bonds (Extend Deselect). . . . . . . . . . . . . . . . . 88Building a sample molecule . . . . . . . . . . . . . . . . . . . . . . . . 88
To build baclofen . . . . . . . . . . . . . . . . . . . . . . . . . . . . . 89Tidy up the structures in both 2d and 3d workspaces. 92Save the molecule to the shelf . . . . . . . . . . . . . . . . . . . 93
Using the tools in the View Compound workbench . . . . . 95Minimize the 3D structure. . . . . . . . . . . . . . . . . . . . . . 96Flip the 2D molecule . . . . . . . . . . . . . . . . . . . . . . . . . . 97Orient the 3D molecule to the 2D molecule. . . . . . . . . 98Change stereochemistry . . . . . . . . . . . . . . . . . . . . . . . 98Change the chirality of a chiral atom. . . . . . . . . . . . . . 99Change the stereochemistry at a double bond. . . . . . 100Aromatizing and de-aromatizing rings . . . . . . . . . . . 102Protonate atoms and convert ions to
neutral atoms . . . . . . . . . . . . . . . . . . . . . . . . . . . 104Oxidation and reduction . . . . . . . . . . . . . . . . . . . . . . . . . 105
Dynamic modeling . . . . . . . . . . . . . . . . . . . . . . . . . . 106Moving atoms and bonds in the 2D workspace . . . . 112Measuring atomic distances, angles, and
dihedral angles . . . . . . . . . . . . . . . . . . . . . . . . . . 113Building a peptide . . . . . . . . . . . . . . . . . . . . . . . . . . . . . . 117
Build the peptide glu-ala-pro . . . . . . . . . . . . . . . . . . 117
4. Building Hypotheses and Searching Databases 123
Different methods for building hypotheses . . . . . . . . . . . 124Building a substructure hypothesis and searching
a database with it. . . . . . . . . . . . . . . . . . . . . . . . . . . . 125Building the substructure hypothesis . . . . . . . . . . . . 126
Searching a database with the hypothesis . . . . . . . . . . . . 135Saving a compound to the shelf . . . . . . . . . . . . . . . . 137Sorting the entries in the report by name
or molecular weight . . . . . . . . . . . . . . . . . . . . . . 138Reports . . . . . . . . . . . . . . . . . . . . . . . . . . . . . . . . . . . 140
Building a hypothesis with the feature dictionary . . . . . . 142Building a beta-adrenergic agonist hypothesis . . . . . 142Using the feature dictionary to add functions
and fragments to a hypothesis . . . . . . . . . . . . . . 143Linking functions together with a distance constraint 149Adding a fragment to the hypothesis . . . . . . . . . . . . 152

iv Catalyst Tutorials/March 2002
Linking the parts of the hypothesis together . . . . . . . 154Finishing the hypothesis . . . . . . . . . . . . . . . . . . . . . . . 155Searching the database for beta-adrenergic agonists . 156
Building a sophisticated hypothesis for D2 agonists. . . . . 157Placing the basic amine, the acceptor, and
an aromatic ring . . . . . . . . . . . . . . . . . . . . . . . . . . 159Joining the features with distance constraints . . . . . . 161Making a least-squares plane around the phenyl
and adding an acceptor vector to the amine . . . . 164Constraining the angle of the amine lone pair
to the plane of the ring . . . . . . . . . . . . . . . . . . . . . 172Adding a torsion constraint between the
acceptor vectors . . . . . . . . . . . . . . . . . . . . . . . . . . 174Using the Find command . . . . . . . . . . . . . . . . . . . . . . . . . 175Summary . . . . . . . . . . . . . . . . . . . . . . . . . . . . . . . . . . . . . . 179
5. Organizing Your Data 181
Using labs . . . . . . . . . . . . . . . . . . . . . . . . . . . . . . . . . . . . . 181Creating labs . . . . . . . . . . . . . . . . . . . . . . . . . . . . . . . . 182Moving objects to lab . . . . . . . . . . . . . . . . . . . . . . . . . 183Tidying a lab or shelf and displaying the icons
in different ways . . . . . . . . . . . . . . . . . . . . . . . . . 184Changing the name of an object . . . . . . . . . . . . . . . . . 185
Getting data in and out of Catalyst . . . . . . . . . . . . . . . . . . 186Saving your data (StockroomDB) . . . . . . . . . . . . . . . . 187Determining which databases appear in
the Stockroom . . . . . . . . . . . . . . . . . . . . . . . . . . . 189Exporting objects . . . . . . . . . . . . . . . . . . . . . . . . . . . . 189Disposing of objects . . . . . . . . . . . . . . . . . . . . . . . . . . 192Importing objects . . . . . . . . . . . . . . . . . . . . . . . . . . . . 193Printing data from Catalyst . . . . . . . . . . . . . . . . . . . . 196Printing the contents of a workspace . . . . . . . . . . . . . 196
Managing 1D data in Catalyst. . . . . . . . . . . . . . . . . . . . . . 200The stockroom property dictionary . . . . . . . . . . . . . . 200Entering 1D data using the View Database
workbench . . . . . . . . . . . . . . . . . . . . . . . . . . . . . . 203Sorting and selectively viewing your data
using 1D constraints. . . . . . . . . . . . . . . . . . . . . . . 205Summary . . . . . . . . . . . . . . . . . . . . . . . . . . . . . . . . . . . . . . 208
6. Generating Conformational Models 209
Fast and best quality conformer generation . . . . . . . . . . . 209Fast conformer generation . . . . . . . . . . . . . . . . . . . . . 210Best conformer generation . . . . . . . . . . . . . . . . . . . . . 210

Catalyst Tutorials/March 2002 v
Generating conformational models interactively or in the background . . . . . . . . . . . . . . . . . . . . . . . . . 211
Generating and displaying conformational models. . . . . 212Generating conformers interactively . . . . . . . . . . . . . 212Examine the conformers . . . . . . . . . . . . . . . . . . . . . . 215Displaying, registering, unregistering, and deleting
individual conformers . . . . . . . . . . . . . . . . . . . . 218Generating a conformational model in
the background . . . . . . . . . . . . . . . . . . . . . . . . . . 220Monitoring the background process . . . . . . . . . . . . . 223Retrieving the conformers . . . . . . . . . . . . . . . . . . . . . 224Cleaning up the background process . . . . . . . . . . . . 225
Summary . . . . . . . . . . . . . . . . . . . . . . . . . . . . . . . . . . . . . 226
7. Generating a Hypothesis 229
Introduction . . . . . . . . . . . . . . . . . . . . . . . . . . . . . . . . . . . 229Background on the data used in this example. . . . . . 229
Generating a hypothesis . . . . . . . . . . . . . . . . . . . . . . . . . 230Entering the training set molecules . . . . . . . . . . . . . . 230Checking structures . . . . . . . . . . . . . . . . . . . . . . . . . . 233Checking function mapping . . . . . . . . . . . . . . . . . . . 237Generating conformational exercise models,
if needed . . . . . . . . . . . . . . . . . . . . . . . . . . . . . . . 239Using the Generate Hypothesis workbench . . . . . . . 239Adding activity data to your training set spreadsheet 241Setting up to run hypothesis generation . . . . . . . . . . 243Using control parameters . . . . . . . . . . . . . . . . . . . . . 245Running hypothesis generation. . . . . . . . . . . . . . . . . 248Monitoring and managing data for a
background task . . . . . . . . . . . . . . . . . . . . . . . . . 252Using the hypothesis generation log file . . . . . . . . . . 252Evaluating the quality of a hypothesis . . . . . . . . . . . 253Using the hypothesis to fit and estimate the
activity of training set compounds . . . . . . . . . . . 255Comparing multiple molecules to a hypothesis
simultaneously . . . . . . . . . . . . . . . . . . . . . . . . . . 257Using the hypothesis to fit and estimate the
activity of compounds from outside the training set . . . . . . . . . . . . . . . . . . . . . . . . . . . . . 259
Hypotheses clustering . . . . . . . . . . . . . . . . . . . . . . . . 266Hypotheses merging . . . . . . . . . . . . . . . . . . . . . . . . . 268
Summary . . . . . . . . . . . . . . . . . . . . . . . . . . . . . . . . . . . . . 273

vi Catalyst Tutorials/March 2002
8. Generating Common Features Hypotheses 275
Experiment . . . . . . . . . . . . . . . . . . . . . . . . . . . . . . . . . . . . 276Analysis. . . . . . . . . . . . . . . . . . . . . . . . . . . . . . . . . . . . . . . 282Summary . . . . . . . . . . . . . . . . . . . . . . . . . . . . . . . . . . . . . . 287
9. Shape Based Search 289
Solving the problem . . . . . . . . . . . . . . . . . . . . . . . . . . . . . 289Nature of the experiment . . . . . . . . . . . . . . . . . . . . . . 289Creating a Hypothesis from a
bound conformation. . . . . . . . . . . . . . . . . . . . . . . 290Creating a Shape Query . . . . . . . . . . . . . . . . . . . . . . . 294Creating a shape/hypothesis query . . . . . . . . . . . . . . 295Searching the sample database . . . . . . . . . . . . . . . . . . 298
Summary . . . . . . . . . . . . . . . . . . . . . . . . . . . . . . . . . . . . . . 304
10. Building Databases 305
Lesson elements . . . . . . . . . . . . . . . . . . . . . . . . . . . . . . . . 305Before you start building databases . . . . . . . . . . . . . . . . . 305Input file formats. . . . . . . . . . . . . . . . . . . . . . . . . . . . . . . . 306Building a multiconformer database . . . . . . . . . . . . . . . . . 306
Prepare Catalyst for the lesson . . . . . . . . . . . . . . . . . . 307Run the tutorial . . . . . . . . . . . . . . . . . . . . . . . . . . . . . . . . . 310
Testing the database . . . . . . . . . . . . . . . . . . . . . . . . . . 319Adding property data to the database . . . . . . . . . . . . . . . 320Creating composite databases . . . . . . . . . . . . . . . . . . . . . . 323Summary . . . . . . . . . . . . . . . . . . . . . . . . . . . . . . . . . . . . . . 325
11. The Exclude/OR QuickTool 327
Catalyst’s default POS IONIZABLE feature . . . . . . . . . . . 328Constructing a heteroaromatic hypothesis . . . . . . . . . . . . 333Modifying the default POSITIVE
IONIZABLE feature . . . . . . . . . . . . . . . . . . . . . . . . . . 338Summary . . . . . . . . . . . . . . . . . . . . . . . . . . . . . . . . . . . . . . 343
12. Customizing functions 345
Customizing a function . . . . . . . . . . . . . . . . . . . . . . . . . . . 346Creating a vectorized function . . . . . . . . . . . . . . . . . . . . . 359Creating a “NOT” function . . . . . . . . . . . . . . . . . . . . . . . . 365

Catalyst Tutorials/March 2002 vii
Working with peptides . . . . . . . . . . . . . . . . . . . . . . . . . . 370Creating fragments . . . . . . . . . . . . . . . . . . . . . . . . . . . . . 378
13. Understanding HypoGen output 385
HypoGen output . . . . . . . . . . . . . . . . . . . . . . . . . . . . . . . 385Summary . . . . . . . . . . . . . . . . . . . . . . . . . . . . . . . . . . . . . 398
14. Building Partial Match Queries 399
Part 1. Creating a “leave-one-out” hypothesis . . . . . . . . 399Part 2. Searching a database with a partial-match query . 402Part 3. Creating a complex query with the
Exclude/OR QuickTool . . . . . . . . . . . . . . . . . . . . . . . 403
15. Building a Database of a Combinatorial Library 407
Part 1. Creating a database from an RG file using catDBLibrary . . . . . . . . . . . . . . . . . . . . . . . . . . 409
Part 2. Creating a database from an RG file using an enumerated library . . . . . . . . . . . . . . . . . . . . . . . . 412
Part 3. Comparing the conformational models in the two databases . . . . . . . . . . . . . . . . . . . . . . . . . 414
Summary . . . . . . . . . . . . . . . . . . . . . . . . . . . . . . . . . . . . . 415Appendix: Additional catDBLibrary Notes and Options 416
Sequence Numbers for Compounds Generated by catDBLibrary . . . . . . . . . . . . . . . . . . . . . . . . . 416
Segmenting Databases for Large Libraries into Separate Database Builds . . . . . . . . . . . . . . . . . . 417
Building a Database in Multiple Runs. . . . . . . . . . . . 418Appending Molecules from the Error File
to the Database . . . . . . . . . . . . . . . . . . . . . . . . . . 418
Index 421

viii Catalyst Tutorials/March 2002

Catalyst Tutorials/March 2002 1
1 Simple Tasks to Introduce Catalyst
The Catalyst training exercises are tutorials intended for you to work through at your workstation. The tutorials assume only that you know how to log in to your workstation and open a shell window; all other actions necessary for the successful operation of Catalyst are described. If you do not know how to log in, see your system administrator before continuing.
This exercise describes the basic skills required for using Catalyst, starting with brief descriptions of mouse operations and simple window management functions on the platforms on which Cata-lyst is supported. You also learn how to start Catalyst and install the training data. Once Catalyst is up and running, you practice opening and closing workbenches, bringing objects into work-benches, moving and rotating objects in the workspace, and dis-playing molecules in different views and styles. You also learn how to specify the display settings for open workbenches and how to leave workbenches. Finally, use of the on-line Help sys-tem, which provides a comprehensive description of Catalyst operations, is described.
Note
Note
Timesaving tips and special information are presented as notes.
Things you should be particularly careful about are presented as warnings.

2 Catalyst Tutorials/March 2002
Simple Tasks to Introduce Catalyst
Window management
Note
Moving a window
UNIX windows on Silicon Graphics machines have an anatomy controlled by the Motif window manager. The important parts and descriptions of how to interact with them follow.
Assume that you are using a 3-button mouse in the right-handed configuration.
♦ Double-click the window menu button with the left mouse but-ton to remove the window and kills any process running in the window.
♦ Move the cursor to the title bar, hold the left mouse button down, and drag the cursor to move the window around on the screen
♦ Click the iconify window button with the left mouse button to temporarily hide the window as an icon on your desktop.
Log into your computer and open a UNIX shell window.
On a Silicon Graphics workstation, have your system manager show you how to bring up a shell window; the procedure varies depending on how your system is configured.

Window management
Catalyst Tutorials/March 2002 3
♦ Click the full screen toggle button with the left mouse button to expand the window to fill the screen or to reduce the window to its original size.
Moving a window to a new location
Note
,
An outline of the window appears.
The window outline moves with it.
The window moves to the new location.
Unless otherwise specified, “click” means a mouse-click with the left button on a right-handed mouse.
Move the cursor into the title bar of your shell window
Press and hold down the left mouse button.
While keeping the mouse button pressed down, move the cursor.
Release the mouse button when the window outline is in the location you want.

4 Catalyst Tutorials/March 2002
Simple Tasks to Introduce Catalyst
Bringing a window to the front
When the cursor is over a border it turns into a horizontal arrow (if it is over the left or right border) or a vertical arrow (if it is over a top or bottom border).
The window pops to the front.
Alternatively, move the cursor over the border, and the cur-sor changes to an edge cursor (shown below). Hold down the center mouse button and drag the window to a new location.
Open a second window and move it so it partially overlaps the shell window.
Move the cursor to the inside edge of any of the visible bor-ders of the window that is partially covered.
Edge Cursors
Click the mouse once.
Window management
Catalyst Tutorials/March 2002 5
Resizing a window
A window can be resized by dragging any of its borders or corners to a new location.
The cursor turns into a horizontal arrow.
An outline of the window appears.
The left edge of the window outline moves with the cursor. Release the mouse button when the window is the size you want.
The cursor turns into a corner cursor.
Move the cursor to the inside left border.
Press down the left mouse button.
Keep the mouse button pressed down and drag the left bor-der of the window to a new location.
Move the cursor to the inside edge of a corner of the win-dow.

6 Catalyst Tutorials/March 2002
Simple Tasks to Introduce Catalyst
The corner of the window outline moves with the cursor.
All Catalyst windows can be moved, brought to the front, and resized in the same way as described for shell windows. Unlike UNIX shell windows, Catalyst windows cannot be removed, and Catalyst pro-cesses are not killed, by double clicking on the window menu button.
Catalyst operating directories
When Catalyst is started for the first time in a directory, you are given the option of installing training data. If you choose to install it, Catalyst copies the files and directories needed for the tutorials into a subdirectory called cattrain that is created under your current directory. When Catalyst finishes starting up, the Stock-room will contain a number of molecules and hypotheses, a data-base called Sample, and the Stockroom database. If you chose not to install the training data, the Stockroom will contain only an empty Stockroom after start-up.
Catalyst is designed to be run from a single operating directory. When you start Catalyst, a subdirectory named catdata is cre-ated (under your current directory) in which your Stockroom database and supporting files are written. Subsequent Catalyst
Corner Cursor
Keep the mouse button pressed down and drag the corner of the window to a new location.
Release the mouse button when the window is the size you want.

Starting Catalyst
Catalyst Tutorials/March 2002 7
sessions will read the files in the catdata subdirectory in order to regenerate your last saved Stockroom. Therefore, it is important to run Catalyst in the same operating directory each time if you expect to continue with your previous data. Stockroom databases were designed to accommodate up to 1000 molecules. If you expect to have more compounds than this, you should consider subdividing them into projects, each with a different operating directory.
Note
Tools are provided within Catalyst to assist in organizing your project data. For example, you can import, export, and dispose of molecules and other objects. In this way, your Stockroom can be modified and updated to reflect changing project needs.
Note
Starting Catalyst
Under the default operating environment, alphanumeric (1D) data saved in a Catalyst session is automatically routed to an Oracle data table. Multiple Stockroom databases mean multiple data tables in your Oracle database. These data tables remain in Oracle until removed manually using the CatDB Delete_DB procedure.
Before you start Catalyst for the first time, you should consult with your system manager about disk space and an appropriate Catalyst operating directory. You should allow for enough disk space for comfortable operation. Typical requirements for normal usage are 100 to 200 megabytes.
Start Catalyst by going to a UNIX shell window and typing:
> catalyst
then press the Enter key.

8 Catalyst Tutorials/March 2002
Simple Tasks to Introduce Catalyst
Loading the training data
After Catalyst has started, a control panel appears asking if you want to install the training files.
Catalyst copies the training files to a subdirectory called cattrain.
After about a minute, the Catalyst Stockroom window appears on your screen. The Stockroom contains objects such as databases, mole-cules, and hypotheses, and a button for each of the Catalyst work-benches.
Catalyst windows
The top level Catalyst window is the Catalyst Stockroom win-dow, which appears as Catalyst is getting started. From this window, you can launch workbench windows
Click the Install button.

Catalyst windows
Catalyst Tutorials/March 2002 9
When you point the mouse to a tool button (or an object) in the Catalyst Stockroom, a simple description of the button (or the object) shows in the status window.
Catalyst Toolbar The Catalyst toolbar contains buttons that access (from left to right) the View Compound workbench, View Database work-bench, View Hypothesis workbench, and Hypothesis Genera-tion workbench. These four buttons are called Instrument Buttons. The Exit button allows you to close the Catalyst pro-gram.
Using Catalyst Windows Catalyst windows are similar to shell windows, but not exactly the same.
♦ Similarities between Catalyst and shell windows
Moving and resizing. The title bar and borders of Catalyst win-dows and shell windows (see the illustration above) act in the same way.
Expanding. The Full Screen Toggle button (see the illustration above) acts in the same way.
CatalystToolbar
StatusWindow

10 Catalyst Tutorials/March 2002
Simple Tasks to Introduce Catalyst
♦ Differences between Catalyst and shell windows
Iconifying. To represent all Catalyst windows with one icon, use the Iconify button on the Catalyst Stockroom. To iconify one Catalyst workbench, select the Iconify Workbench com-mand from the Workbench menu. The icon appears in the Cat-alyst Stockroom or in the lab from which the workbench was opened.
Closing. Click Exit in the Stockroom to leave Catalyst and remove all Catalyst windows. (The Window Menu Button on Catalyst windows, shown in the illustration above, displays a menu that does not include the Close and Quit commands available in the same menu for shell windows.)
General Catalyst mouse usage
While operating in Catalyst windows, you will most often use your mouse for selecting objects, either one at a time or together in groups. Click the mouse to select individual objects or the first of multiple objects. Click the middle mouse button for selecting multiple objects (extend selecting). If your mouse lacks a middle button, hold the <Shift> key down and click the mouse button to extend-select. Right-clicking is reserved for special functions such as rotating molecules in 2D or 3D.
Opening a workbench
Catalyst provides several different ways to open workbenches:
Catalyst Tool Bar
Instrument Buttons

Opening a workbench
Catalyst Tutorials/March 2002 11
♦ Click an instrument button in the Stockroom. Click the appro-priate instrument button in the Stockroom and that workbench is opened.
♦ Drag and drop an object on an instrument button in the Stockroom. Press the left mouse button down on an object in the Stockroom (or another lab) and keep the button depressed while you move the cursor. The cursor changes into a shape that represents the type of object being dragged. Release the mouse button over the appropriate instrument. When the workbench opens, its shelf contains the object icon that was dropped on it and, if a single object was involved, the object itself appears in the workbench window. If more than one object was selected and dragged to an instrument, the object icons will appear in the shelf of the workbench but no object will appear in the workbench window.
♦ Double-click an object. Double-click an object on the shelf of the Stockroom or a lab to open a new workbench that is appro-priate for viewing the object. For example, double-clicking on a molecule opens a View Compound workbench, while double-clicking on a hypothesis opens a View Hypothesis workbench.
♦ Select an object and select Open from the Data menu. Select an object in the Stockroom by clicking once with the mouse. From the Data menu, select Open. Catalyst opens a new work-bench that is appropriate for viewing the object.
Note
♦ Reopen iconified workbench. To open an iconified work-bench, either double-click on its icon in the Stockroom, or select the icon and then select the Open command from the Data menu.
To select a command from a menu, first click on the name of the menu. When the menu appears, click on the command you want. If you decide not to execute any of the commands, Click outside the menu.

12 Catalyst Tutorials/March 2002
Simple Tasks to Introduce Catalyst
Opening an empty workbench
The workbench comes up empty. The Periodic Table (described in Lesson 3) also appears on your screen.
Closing a workbench
Dragging an object and dropping it on a workbench
click the View Compound instrument button in the Stock-room.
Dispose of the workbench by selecting the Dispose of Workbench command from the Workbench menu.
In the Stockroom click on MolecA so that only it is selected, then press and hold down the left mouse button over its icon.

Bringing objects into the workspace
Catalyst Tutorials/March 2002 13
The cursor turns into a small flask, indicating that a compound is being dragged.
The View Compound workbench appears with the MolecA icon on its shelf and MolecA displayed in the 2D and 3D drawing windows.
Bringing objects into the workspace
You should now have a View Compound workbench including two workspaces (a light gray 2D workspace and a gray 3D work-space) with MolecA on its shelf. (A shelf is the window above the 2D/3D workspace in the workbench window.) In this section you will learn how to bring other objects into the workbench and into the workspaces.
Keeping the left button depressed, move the cursor over the View Compound workbench button in the Stockroom.
Release the mouse button over the workbench button.

14 Catalyst Tutorials/March 2002
Simple Tasks to Introduce Catalyst
Dropping an object into a workspace
You can drag any object from the shelf of a workbench and drop it in a workspace to display it.
That is, move the cursor over MolecA on the shelf. Press down the left mouse button. Keep the button pressed down while you move the cur-sor over any part of either workspace.
The molecule appears in both workspaces.
Note
Bringing another object into the workbench
You can drag and drop an object from the Stockroom or other labs into a workbench. You can drop the incoming object on the shelf or on one of the workspaces. If a single object is involved, its icon will appear on the shelf and the object will be added to the workspaces. If multiple objects are dropped in, their icons will
Select Clear Display from the Edit menu.
Drag MolecA from the workbench shelf (the cursor changes into a flask shape) and drop it in either workspace.
Release the mouse button.
To remove an object from a Catalyst window, first select it, then choose the Data/Dispose from Workbench command.

Bringing objects into the workspace
Catalyst Tutorials/March 2002 15
appear on the shelf, but the objects will not be added to the work-spaces.
The MolecB icon appears on the shelf of the workbench, and MolecB appears in both workspaces.
MolecC appears on the shelf and in both of the workspaces.
To bring several objects into a workbench simultaneously, extend- select the objects on the Stockroom shelf, and then drag and drop them onto the workbench.
Note
Clear the display by selecting Clear Display from the Edit menu.
Drag MolecB from the Stockroom and drop it on the shelf of the workbench as follows:
In the Stockroom, press and hold down the left mouse button on MolecB. Keeping the button depressed, move the cursor onto the shelf of the View Compound workbench. Release the mouse button.
Now drag and drop MolecC from the Stockroom into either workspace of the View Compound workbench.
When you drag an object from the Stockroom to a workbench, a copy of the object appears in the workbench and the original remains in the Stockroom.

16 Catalyst Tutorials/March 2002
Simple Tasks to Introduce Catalyst
Moving objects
You can move a single object in either the 2D or 3D workspace. If multiple objects are displayed in either workspace, you can move just one object, or you can move all objects together.
To move one object in the workspace
To move a molecule in either the 2D or 3D workspace, drag it by an unselected atom or bond in the direction you want to move it.
The cursor turns into a hand.
The molecule moves with it.
To remove an object from a Catalyst workbench window, first select it, then select the Data/Dispose from Workbench command.
Move the cursor over an atom or bond in MolecC in the workspace.
Press and hold down the left mouse button on an unselected atom or bond (one that is not highlighted).
Keeping the mouse button depressed, slowly move the cur-sor.
Moving objects
Catalyst Tutorials/March 2002 17
Note
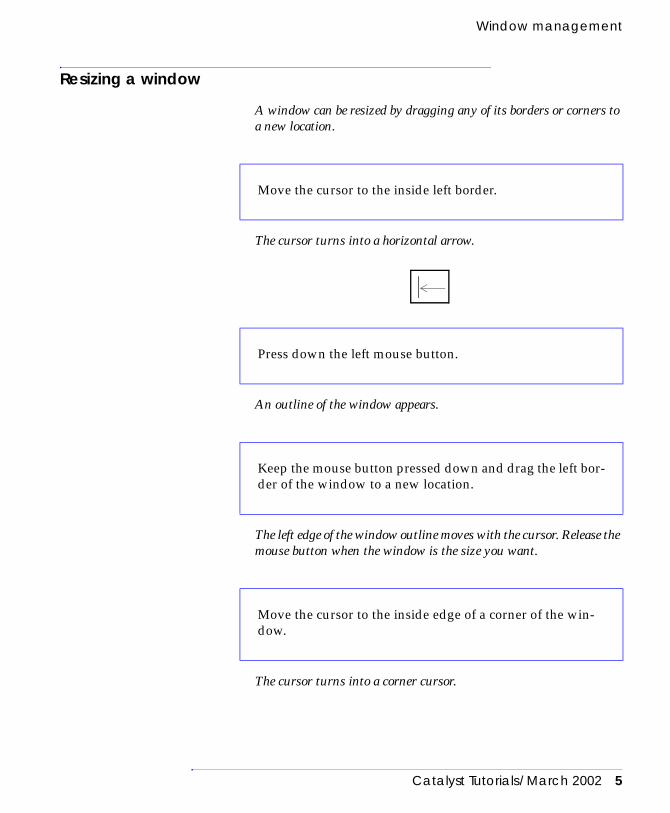
To scroll the workspace
You can use the scroll arrows on a workspace’s borders to move the display image vertically or horizontally. Scrolling has the same effect as moving all the objects in the workspace together.
All molecules in the selected workspace follow the cursor.
If you drag a compound by a selected atom or bond, you will end up changing the shape of the molecule in 2D, since you will move only the selected parts of the molecule.
When the molecule is where you want it, release the mouse button.
Press and hold down the left mouse button over any of the scroll arrows. Wait for the scroll arrow to highlight in solid blue.
Keep the mouse button pressed down while you slowly move the cursor.

18 Catalyst Tutorials/March 2002
Simple Tasks to Introduce Catalyst
Note
Zooming the view of molecules
To magnify or shrink objects in the workspace, use the zoom arrows at the corners of each workspace, or use the Fit All and Tile Objects tools in the Toolbox
The more molecules that are displayed, or the bigger they are, the slower they respond to the cursor movement. Also, 3D molecules displayed in the spacefilling style move more slowly than molecules in other styles.
Zooming the view of molecules
Catalyst Tutorials/March 2002 19
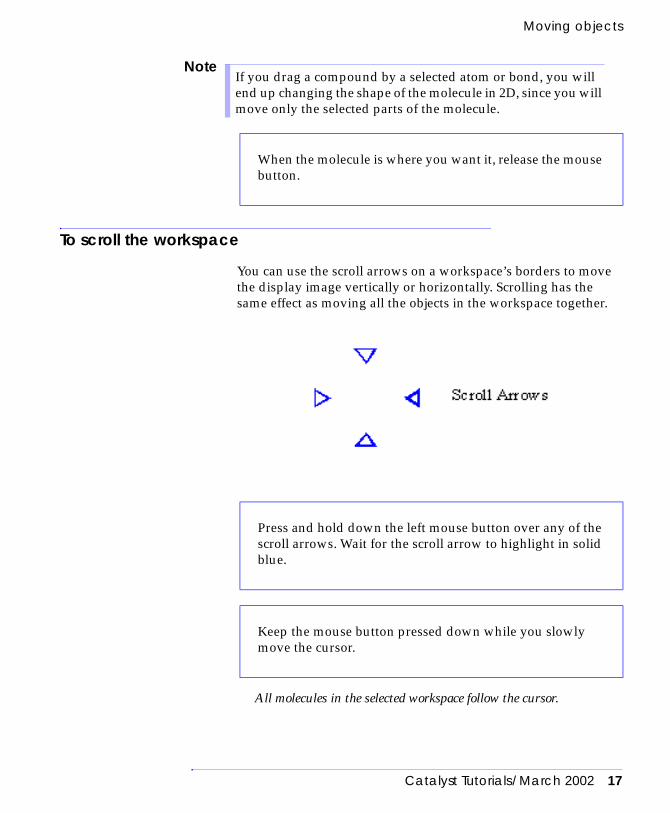
To zoom molecules in and out
Note
Clear the workspace using the Clear Display command on the Edit menu.
Drop MolecA into the workspace.
Press and hold down the left mouse button on any of the zoom arrows in either workspace. Wait for the zoom arrow to highlight in solid blue.
Slowly move the cursor up the screen to make the images in the workspace bigger, or move the cursor down the screen to shrink them.
Release the mouse button when the workspace is at the magnification you want.
The movement of the molecules in the workspace may lag behind the cursor, so wait for the molecules to catch up with the cursor before you release the mouse button.

20 Catalyst Tutorials/March 2002
Simple Tasks to Introduce Catalyst
To make all displayed objects fit in the workspace
The 3D workspace updates so that the displayed molecule fits com-pletely in the workspace.
Note
Zoom the 3D workspace so that the displayed molecule is too large to fit.
Select the Fit All tool in the Toolbox (see graphic above).
Before selecting the Fit All or Tile Objects tool, make certain that the correct workspace is selected by checking whether the 2D or 3D tool is highlighted in the Toolbox. If necessary, you can click on the 2D tool to select the 2D workspace, or click on the 3D tool to select the 3D workspace.
If you have anything selected in the workspace, deselect everything now by clicking on the Deselect tool.

Rotating an object
Catalyst Tutorials/March 2002 21
Rotating an object
An object can be rotated in the plane of the screen in either work-space, and it can be rotated in three dimensions in the 3D work-space. You can think of rotating an object in 3D as grabbing a clear sphere, represented by a blue ring, around it. You can grab the surface of the sphere with the cursor and rotate the sphere to whatever view of the molecule you want. Or you can rotate an object in the plane of the screen.
To rotate an object in one plane
An object can be rotated about the z axis, which is perpendicular to the screen, in either workspace.
Note
Ensure that you have one molecule displayed in your work-space.
If you have multiple molecules in the workspace, select the Clear Display command from the Edit menu, and then drag and drop a molecule into the workspace.
Move the cursor to a position in the 3D workspace that is not over the molecule.
The cursor must be in a position that is outside of an imaginary circle that encloses the molecule.

22 Catalyst Tutorials/March 2002
Simple Tasks to Introduce Catalyst
The cursor turns into a hand, and a circle with a solid blue border appears around the molecule.
As you move the cursor, the molecule follows by pivoting about the z axis.
To rotate an object in 3D
An object can also be rotated in the 3D workspace so that it can be viewed from any angle.
Press and hold down the right mouse button.
Move the cursor around outside the circle.
Release the mouse button when you have rotated the mole-cule to your satisfaction.
Use the same technique to rotate the molecule in the 2D workspace.
Move the cursor to a position over the molecule in the 3D workspace.
Press and hold down the right mouse button.

Changing views and styles
Catalyst Tutorials/March 2002 23
A double-lined blue ring appears around the molecule in the work-space.
Changing views and styles
The View Compound workbench allows you to display mole-cules in both 2D and 3D simultaneously. You can display the 2D model either in color or in monochrome, and you can display the 3D model in a variety of styles such as wireframe, ball and tube, and spacefilling. You can also choose whether or not to view atom labels, chirality labels, and hydrogens in either or both the 2D and 3D workspaces.
To change views
Move the cursor around inside the circle and notice that the molecule moves as you move the cursor.
Clear the workspace by selecting Clear Display from the Edit menu.
Drop MolecA into the workspace.
Click View in the menu bar.

24 Catalyst Tutorials/March 2002
Simple Tasks to Introduce Catalyst
The View menu appears.
A submenu appears, listing the choices 2D and 3D.
Note
The 3D workspace updates to show labels for atoms in the molecule.
Click the Atom Labels command.
Each of these choices is a toggle. When a toggle is switched on, the menu selection has a small check mark to its left. When a toggle is switched off, the check mark is not visible.
Select 3D from the submenu.
Changing views and styles
Catalyst Tutorials/March 2002 25
.
Note
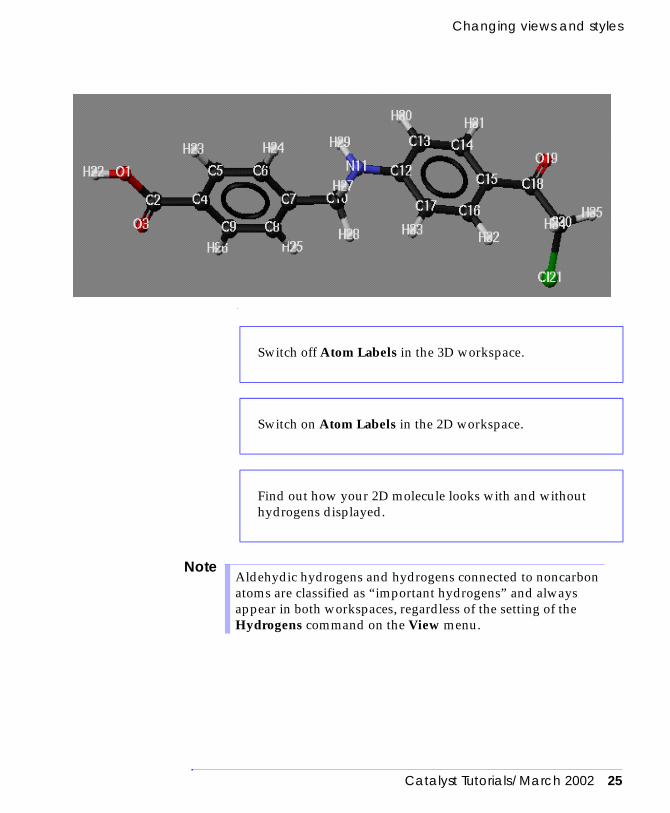
Switch off Atom Labels in the 3D workspace.
Switch on Atom Labels in the 2D workspace.
Find out how your 2D molecule looks with and without hydrogens displayed.
Aldehydic hydrogens and hydrogens connected to noncarbon atoms are classified as “important hydrogens” and always appear in both workspaces, regardless of the setting of the Hydrogens command on the View menu.

26 Catalyst Tutorials/March 2002
Simple Tasks to Introduce Catalyst
Note
To change 3D styles
You can use the choices on the Style menu to change the style of your molecule in the 3D workspace.
The list of available styles appears. When you select a style from the menu, the molecules in the 3D workspace are displayed in that style.
Use the 2D Monochrome command in the View menu to display the atoms in the 2D workspace in monochrome and then in color.
Use the Compound Names command in the View menu to display the name of the molecule in the workspaces.
You can use the Chirality Labels command in the View menu to switch on and off the labels at stereocenters. However, MolecA has no stereogenic centers.
Click Style in the menu bar.

Changing views and styles
Catalyst Tutorials/March 2002 27
Spacefilling and the Ball and Tube styles are shown below.
Try rotating the molecule using each of the styles in the menu, except for 3D Constraint Appearance and 3D Geo-metric Objects, which apply only to hypotheses.

28 Catalyst Tutorials/March 2002
Simple Tasks to Introduce Catalyst
Changing the parameters of a workbench
You can change the layout of the workspaces in your workbench. For example, you can have only a 3D workspace or a large 3D workspace with a small 2D inset in the top right hand corner. You can specify the workspace layout for a single workbench or you can set the default for future workbenches. You can also specify the default style (such as ball and tube) and default views (such as atom labels on) for new workbenches.
Ball and Tube
Spacefilling

Changing the parameters of a workbench
Catalyst Tutorials/March 2002 29
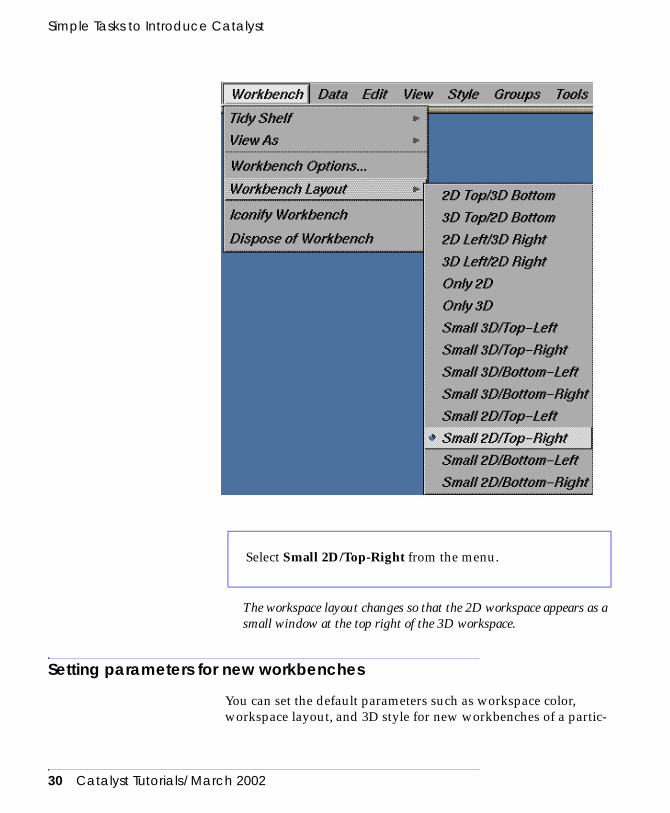
To change the workspace layout for an open workbench
Select the Workbench Layout command from the Work-bench menu.
2D Left/3D RightLayout
Small 2D/Top-RightLayout
30 Catalyst Tutorials/March 2002
Simple Tasks to Introduce Catalyst
The workspace layout changes so that the 2D workspace appears as a small window at the top right of the 3D workspace.
Setting parameters for new workbenches
You can set the default parameters such as workspace color, workspace layout, and 3D style for new workbenches of a partic-
Select Small 2D/Top-Right from the menu.

Changing the parameters of a workbench
Catalyst Tutorials/March 2002 31
ular type by using the Workbench Preferences control panels from the Stockroom. In this part of the exercise, you will learn how to set the background colors for your View Compound workspaces.
The buttons and input boxes in this control panel controls the appear-ance of any View Compound workbench you open in the future. There are similar control boxes for the other Catalyst workbenches.
Open the View Compound Options control panel by select-ing Workbench Preferences from the Preferences menu in the Stockroom and sliding over to View Compound in the submenu (not shown).

32 Catalyst Tutorials/March 2002
Simple Tasks to Introduce Catalyst
The Background Color control panel appears. You can use the Background Color control panel to set the color (hue) for the work-spaces. You can also set the saturation and brightness value for the color. Whatever color you set here will be used as the background color
Notice the fields in the Workspace Colors section.
Select either the 2D Background... or 3D Background... but-tons, to pick a new background color for 2D or 3D work-spaces.

Changing the parameters of a workbench
Catalyst Tutorials/March 2002 33
for all future View Compound workbenches. When you select the 2D Background... button, you can set the color for the 2D workspace in all future View Compound workbenches.
For example, click on a red, and the selected red appears in the New Color box toward the bottom of the control panel.
Select a color by clicking in the color wheel.
Brightness
Original
Color Wheel Scale
ColorNew Color

34 Catalyst Tutorials/March 2002
Simple Tasks to Introduce Catalyst
Not only does the brightness of the color in the New Color field change, but the whole color wheel changes to the selected brightness.
You can alternatively use the sliders to change the H (hue), S (satura-tion), and V (brightness) values of the new color. Use of the sliders gives you more control over the fine tuning of these values.
You can use the R (red), G (green), and B (blue) sliders to specify exactly how much red, green, and blue you want in the color. The
Change the brightness of the new color by clicking some-where in the brightness scale.
Brightness Scale

Changing the parameters of a workbench
Catalyst Tutorials/March 2002 35
maximum is 1, and 0 is the minimum. Setting a value of 1 for each of R, G, and B gives white; specifying a value of 0 for each of R, G, and B gives black. A value of 1 for R and 0 for each of G and B gives pure red.
These settings should give a lavender color.
Notice how the values in the R, G, and B fields change as the bright-ness changes. Finally, leave the brightness value at about 0.8; it does not have to be exact.
The saturation field, labelled S, lets you change the saturation of the predominant color. Basically this lets you change the shade of the main color. In this case, the predominant color is blue.
Notice that the value in the blue (B) field stays constant, while the val-
Click on a slider and drag the mouse to set the colors to 0.5 red, 0.5 green, and 0.8 blue.
Drag the brightness value slider, labelled V, back and forth to see how the brightness changes.
Try moving the S slider back and forth.

36 Catalyst Tutorials/March 2002
Simple Tasks to Introduce Catalyst
ues in the red (R) and green (G) fields increase or decrease inversely to the value of the saturation.
The Hue (H) field allows you to pick a color.
The values of the R, G, and B fields change too, but the values in the S and V field remain constant.
The selected color should appear in the Workspace Colors section of the View Compound Preferences control panel.
Note
The View Compound Preferences control panel disappears. No changes occur in any existing View Compound workbenches, but the
Finally, leave the S value at about 0.5.
Drag the H slider back and forth to see how the color in the New Color field changes.
Use the H slider to pick a color that you think would look good as a background color.
Click OK in the Background Color control panel.
To reset the values in the View Compound Preferences control panel to what they were before you opened the control panel, Click the Reset button.
Click the OK button.

Leaving a workbench
Catalyst Tutorials/March 2002 37
changes you selected will apply to all new View Compound work-benches.
There are many other color and control preferences in Catalyst that you can set. Most of them can be specified in the Global Preferences control panel (shown on the following page) that is also available from the Preferences menu. See Catalyst Help for details.
Leaving a workbench
When you are ready to leave a workbench, you can either dispose of it or iconify it. If you dispose of it, it disappears completely and any unsaved changes are lost. If you iconify it, you can open and use it again later in the session.
Iconifying, reopening, and disposing of a workbench
Catalyst removes the workbench window and represents it with an icon on the shelf of the Stockroom.
From the Workbench menu of the open View Compound workbench, select the Iconify Workbench command.
Iconified WorkbenchViewed as a Small Icon
Iconified WorkbenchViewed as a Name

38 Catalyst Tutorials/March 2002
Simple Tasks to Introduce Catalyst

Help in Catalyst
Catalyst Tutorials/March 2002 39
Note
When the workbench reopens, it contains the same objects on the shelf and in the workspace as it did when it was iconified, but it does not have any control panels that might have been open.
Note
Catalyst dismisses the workbench. If it contains any unsaved changes, a control panel appears asking if you really want to dispose of the workbench. If this happens to you now, continue with disposal of the workbench.
Help in Catalyst
There are two kinds of help available in Catalyst, context-sensi-tive help and on-line help. Context-sensitive help gives limited information about object icons you encounter as you work with
The workbench icon is in the Stockroom because that is where you opened it. If you had opened the workbench from some other lab, the iconified form would be found there.
Open the iconified workbench by double-clicking on the icon of the workbench in the Stockroom, or by selecting the icon and then selecting the Open command from the Data menu.
Iconifying workbenches is a good way to reduce the number of windows on your screen when you are switching between workbenches. However, certain Save and Dispose operations require that all iconified workbenches are closed. Therefore, you should not iconify workbenches unless you really intend to use them again in the near future.
Now remove the workbench by selecting the Dispose of Workbench command from the Workbench menu.

40 Catalyst Tutorials/March 2002
Simple Tasks to Introduce Catalyst
the program. On-line help is a source of in-depth information about all aspects of Catalyst. Both help systems are available within the Catalyst interface.
Using the context-sensitive Help system
All workbenches and stockrooms within Catalyst have a status window at the bottom in which information will appear as the cursor is moved over an object’s icon.
Note that the full name of this workbench appears in the status win-dow. This name is updated as you slide the cursor across the different workbench icons that are available.
Using the on-line Help system
Catalyst has an extensive on-line help system with a comprehen-sive index. You can use Help to get information about any part of
Move the cursor over the icon representing the View Com-pound workbench (upper left) in the Stockroom.
Slide the cursor to the Mk-1a icon and note the information slot indicates that compound “Mk-1a” consists of 1 Frag (a 2D picture) and 87 Confs (the number of different conform-ers stored in the model).
Slide the cursor to the Stockroom DB database icon and note that the information slot tells you how many com-pounds are stored in this database.
Using the on-line Help system
Catalyst Tutorials/March 2002 41
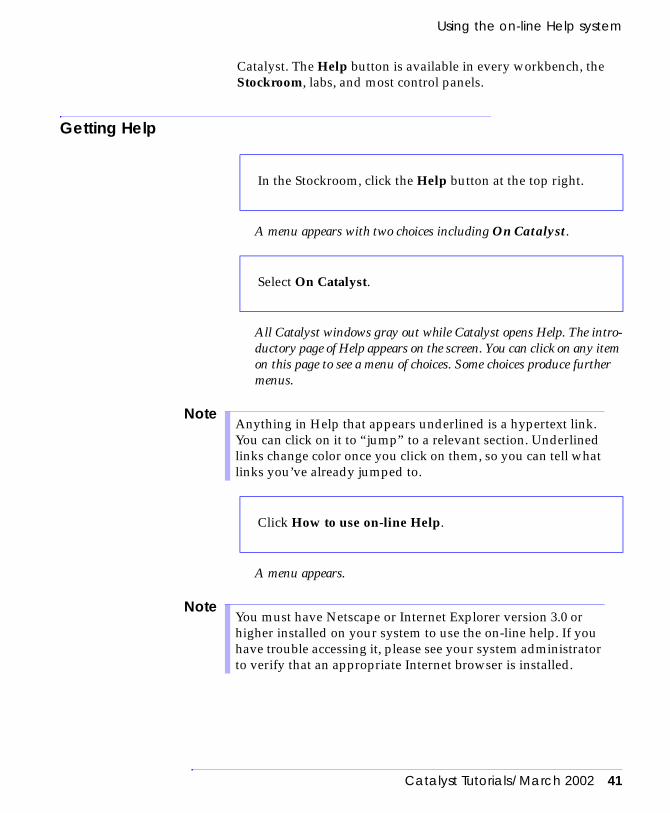
Catalyst. The Help button is available in every workbench, the Stockroom, labs, and most control panels.
Getting Help
A menu appears with two choices including On Catalyst.
All Catalyst windows gray out while Catalyst opens Help. The intro-ductory page of Help appears on the screen. You can click on any item on this page to see a menu of choices. Some choices produce further menus.
Note
A menu appears.
Note
In the Stockroom, click the Help button at the top right.
Select On Catalyst.
Anything in Help that appears underlined is a hypertext link. You can click on it to “jump” to a relevant section. Underlined links change color once you click on them, so you can tell what links you’ve already jumped to.
Click How to use on-line Help.
You must have Netscape or Internet Explorer version 3.0 or higher installed on your system to use the on-line help. If you have trouble accessing it, please see your system administrator to verify that an appropriate Internet browser is installed.

42 Catalyst Tutorials/March 2002
Simple Tasks to Introduce Catalyst
Using the index for the on-line Help system
You can access an index for Help by selecting any letter in the Index section.
Suppose, for example, that you want to know how to rotate mole-cules. You could look this up either under R for Rotating or under M for Molecules.
Printing pages from the on-line Help system
You can print out pages from Help.
<printername> is the name of the printer you want to print out the Help pages on. Note there is no space between the -P option and the name of the printer.
Leave the other choices as they are, unless you are sure you need to change them.
On the page you want to print, select the File/Print com-mand
In the resulting control panel, fill in the Print Command: field by entering:
> lpr -P<printername>
Toggle Greyscale on.
Click Print.

Using the on-line Help system
Catalyst Tutorials/March 2002 43
The pages are sent to the printer queue, and will be printed out when they reach the top of the queue.
Leaving the on-line Help system
After you have read the information you need, you can iconify Help to free up the screen space. Then when you need more infor-mation, you can restore the icon. It is often helpful to leave Help either at the introductory screen or on an index page.
The process of reducing windows to icons and expanding the icons back to windows is controlled by the window system on your machine, not by Catalyst. If the following instructions do not work for you, see your system administrator for help.
The window disappears, and an icon representing the window appears. You might need to hunt for it on your screen. The icon may
If Help is currently displaying any page other than an index page, jump to the index by selecting the Go/Home com-mand and clicking index.
Move the cursor into the top right corner of the window that displays the on-line help system.
Click the Iconify button.

44 Catalyst Tutorials/March 2002
Simple Tasks to Introduce Catalyst
look different on different computers. The following picture shows one example of what the icon might look like.
When you are ready to exit Help, select Exit on the File menu.
Note
To return to Help, you must restore the window. You can usually do this by either clicking or double-clicking on the icon.
For now, leave Help in its iconified form.
When you click any Help button in the Catalyst interface, Catalyst opens Help at the introductory page. If Help is already open at the introductory page, nothing further happens. If Help has been iconified at the introductory page, Catalyst pops the icon open.
If Help is already open at any other page, or has been iconified at any other page, Catalyst opens a new Help session and a second window to display the introductory page. This uses additional memory unnecessarily. Remember to use your existing Help session.

Summary
Catalyst Tutorials/March 2002 45
Summary
In this exercise you learned some of the basic skills you need for using the Catalyst drug discovery system. You learned how to open workbenches, how to take objects into workbenches, how to rotate, zoom and move objects in the workspace, how to display objects in different styles and views, how to specify parameters for workbenches, how to leave workbenches, and how to use the on-line help system to find information about Catalyst.

46 Catalyst Tutorials/March 2002
Simple Tasks to Introduce Catalyst

Catalyst Tutorials/March 2002 47
2 Introduction to Hypotheses
One critical task in the drug discovery process is building a model of the characteristics of the drug you are trying to develop. In Cat-alyst, this type of model is called a hypothesis. A Catalyst hypothe-sis is a set of characteristics that distinguishes a set of molecules. Catalyst provides several ways to build a hypothesis. If you have a set of compounds that have been assayed for a particular activ-ity, Catalyst can generate a hypothesis that represents the activity of those compounds. For example, if you are looking for a refined ACE inhibitor and you know the structures and activities of 20 compounds that exhibit inhibition of ACE, you can use Catalyst to generate a hypothesis that represents the structure-activity relationships of those 20 compounds and correlates their struc-tures with ACE inhibition.
Hypotheses can contain an arbitrary set of 3D data, 2D (topologi-cal) data, 1D (scalar) parameters, and constraint descriptions. You can build a hypothesis by assembling substructures and chemical functions. For example, if experimental evidence suggests that a particular inhibitor has a set of chemical functions located at cer-tain positions, you can build a model of those functions in the specified positions.
If you suspect that a drug should contain a particular substruc-ture or some variation of a substructure, you can build a hypothe-sis of that substructure and express the possible variations. For example, the substructure might contain a phenyl ring with either nitrogen, oxygen, or fluorine at the 4-position.
This exercise introduces you to what hypotheses look like. Then it shows you how to use a hypothesis to search a database for par-ticular types of compounds, how to interpret how well a candi-date molecule fits a hypothesis, and how to use the hypothesis to estimate the activity of a compound.
In this exercise, you work with hypotheses that have already been built. In later exercises you will learn how to build hypotheses
48 Catalyst Tutorials/March 2002
Introduction to Hypotheses
interactively (in the View Hypothesis workbench) and how to generate them automatically from a set of lead compounds (in the Generate Hypothesis workbench).
Examining two ready-made hypotheses
In this section, you will display two different hypotheses that have been made for you. They have different types of characteris-tics. One of these hypotheses represents a chemical substructure, and the other represents a set of chemical functions (such as hydrogen bond acceptors and donors) with precise 3D locations.
Display a substructure hypothesis
When you use a hypothesis to represent a substructure, you can define the substructure in precise terms (such as a phenyl ring with two amine substituents) or general terms (such as a carbon chain with a halogen substituent at the first carbon, either a nitro-gen or oxygen at the second carbon, and any substituent at the third carbon). You will now examine a hypothesis that uses pre-cise terms to define a substructure for a generic barbiturate. According to Goodman and Gilman’s Pharmacological Basis of Thera-peutics (Eighth Edition, p. 358), the structure for a generic barbitu-rate is:

Examining two ready-made hypotheses
Catalyst Tutorials/March 2002 49
Although the 2D workspace displays hypotheses, you cannot use the 2D workspace to build or modify hypotheses in the View Hypothesis workbench. Thus, you may want to change the layout of the workspace to Only 3D.
Catalyst displays them as shown in the illustration that follows. Note particularly the mauve atom with the label {O, S}10. This represents an atom that can be either sulfur or oxygen. The brackets { } indicate an atom specification.
Open the View Hypothesis workbench by dragging the hypothesis BarbHypo and dropping it on the View Hypothesis workbench button in the Stockroom.
Toggle on atom labels in 3D with the View/Atom Labels/3D command.

50 Catalyst Tutorials/March 2002
Introduction to Hypotheses
Note
This model or hypothesis represents the generic class of barbitu-rates. It matches any compound that contains the structure shown. For example, it matches or represents, these compounds.
In a hypothesis, any atom displayed in mauve represents an atom that can be a range of elements.

Examining two ready-made hypotheses
Catalyst Tutorials/March 2002 51
Display a hypothesis that has chemical functions
You have seen an example of a hypothesis that represents a sub-structure. You will now examine a hypothesis that represents a collection of chemical functions.
You see three groups of different colored spheres, with smaller colored spheres within them:
Note
Clear the workbench by selecting the Clear Display com-mand from the Edit menu.
Drag Hypo1 from the Stockroom into the workspace of the View Hypothesis workbench.
If you cannot see the small sphere within each of the colored spheres, display the hypothesis in mesh style by selecting the Mesh option from the 3D Constraints command on the Style menu. Select the Solid option from the 3D Geometric Objects command on the Style menu.
52 Catalyst Tutorials/March 2002
Introduction to Hypotheses
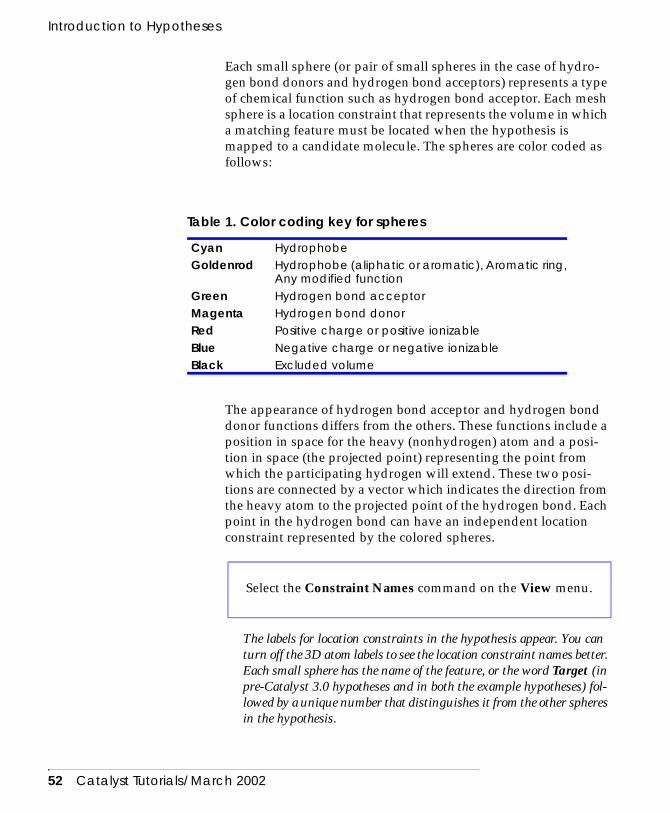
Each small sphere (or pair of small spheres in the case of hydro-gen bond donors and hydrogen bond acceptors) represents a type of chemical function such as hydrogen bond acceptor. Each mesh sphere is a location constraint that represents the volume in which a matching feature must be located when the hypothesis is mapped to a candidate molecule. The spheres are color coded as follows:
The appearance of hydrogen bond acceptor and hydrogen bond donor functions differs from the others. These functions include a position in space for the heavy (nonhydrogen) atom and a posi-tion in space (the projected point) representing the point from which the participating hydrogen will extend. These two posi-tions are connected by a vector which indicates the direction from the heavy atom to the projected point of the hydrogen bond. Each point in the hydrogen bond can have an independent location constraint represented by the colored spheres.
The labels for location constraints in the hypothesis appear. You can turn off the 3D atom labels to see the location constraint names better. Each small sphere has the name of the feature, or the word Target (in pre-Catalyst 3.0 hypotheses and in both the example hypotheses) fol-lowed by a unique number that distinguishes it from the other spheres in the hypothesis.
Table 1. Color coding key for spheres
Cyan HydrophobeGoldenrod Hydrophobe (aliphatic or aromatic), Aromatic ring,
Any modified functionGreen Hydrogen bond acceptorMagenta Hydrogen bond donorRed Positive charge or positive ionizableBlue Negative charge or negative ionizableBlack Excluded volume
Select the Constraint Names command on the View menu.

Examining two ready-made hypotheses
Catalyst Tutorials/March 2002 53
This hypothesis consists of one hydrogen bond donor, one hydrogen bond acceptor, and one negative ionizable group. The hypothesis rep-resents any compound that has at least one group that can act as a hydrogen bond donor, at least one group that can act as a hydrogen bond acceptor (with each of these functions located and oriented in the direction indicated by the hypothesis), and at least one group that can be negatively ionized. The 3D relationships of the functions relative to each other are defined by the locations and radii of the location con-straints.
Two examples of compounds represented by this hypothesis appear in the illustration that follows. The circles identify the groups of atoms that provide the chemical functions that the hypothesis contains. Each molecule matches the hypothesis only if the chemical functions in the molecule have the same 3D arrangement relative to each other as the corresponding functions in the hypothesis.
You can change the display styles of hypotheses in the 3D workspace, just as you can change the display style of molecules.
Try each of the options of the 3D Constraints command on the Style menu and see how the appearance changes.

54 Catalyst Tutorials/March 2002
Introduction to Hypotheses
Using hypotheses
After you build or generate a hypothesis that models the key characteristics of the type of molecule for which you are search-ing, you can use the hypothesis in the following ways:
♦ Search for other known molecules that have the same charac-teristics. You can search a database for compounds that have the same characteristics as the hypothesis.
♦ See how well other molecules fit those characteristics. If you have a candidate molecule, you can find how well it matches the characteristics of the hypothesis.
♦ Estimate the activity of a molecule based on how well it fits the characteristics of the hypothesis. If you generated the hypothe-sis from a set of active compounds, you can estimate the activ-ity of other compounds based on how well they match the characteristics of the hypothesis.
You will now practice using a hypothesis in each of these ways.
Using a hypothesis to search a database
If you recall, the hypothesis BarbHypo represents the generic structure of barbiturates. You will now use the hypothesis to find
Switch off the function labels using the Constraint Names command of the View menu.
Iconify the workbench with the Iconify Workbench com-mand from the Workbench menu.
Using hypotheses
Catalyst Tutorials/March 2002 55
out if the sample database, Sample, contains any compounds that have the structure of barbiturates.
Details of the View Database workbench and how to use it are dis-cussed in a later exercise. The important thing to notice now is the report area.
Catalyst displays a control panel indicating the progress of the search. When the search is finished, the report area displays the names of the compounds that matched the hypothesis.
Catalyst brings up the Hit Mappings Row control panel with the compound in its 3D workspace. The parts of the molecule that match the hypothesis appear in a mesh-type style as shown in the illustra-tion.
Open the View Database workbench with the hypothesis BarbHypo and the database Sample on the shelf by first selecting BarbHypo in the Stockroom, then extend-select-ing the Sample database to select it also. Then drag the selected objects and drop them onto the View Database workbench button in the Stockroom.
From the Tools menu select the Fast Flexible Search Data-bases/Spreadsheets command.
To display the first compound from the spreadsheet in the report area, double-click on the row number immediately to the left of the compound name.

56 Catalyst Tutorials/March 2002
Introduction to Hypotheses
You can see that each one contains the substructure of a generic bar-biturate.
Display each compound in the spreadsheet in turn by dou-ble-clicking on its row number.
When you have finished, click Cancel to close the Hit Map-pings Row control panel. Then close the View Database workbench by selecting the Dispose of Workbench com-mand from the Workbench menu.

Using hypotheses
Catalyst Tutorials/March 2002 57
You can search a database with any type of hypothesis. If you like, you can practice searching the Sample database with Hypo1, which con-tains functions and location constraints. The process of searching a database with a hypothesis is always the same, regardless of the com-position of the hypothesis; you should be able to do other searches without further instructions.
Fitting a molecule to a hypothesis
Earlier you displayed the hypothesis, Hypo1. It consists of a hydrogen bond donor, hydrogen bond acceptor, and a negative ionizable function. Each of these chemical functions has one or two associated location constraints, which indicate the allowable tolerance for the position of matching features. Since the functions all have location constraints, they have fixed 3D relationships with respect to the other functions with location constraints.
You will now learn how to use the Compare/Fit and the Estimate Activity commands to find how well a molecule fits a hypothesis that has location constraints.
Select Perform Dispose in the confirmation box.
Open the previously iconified View Hypothesis work-bench by double-clicking on its icon in the Stockroom; if there is no iconified View Hypothesis workbench, open a new one.
Drag hypothesis Hypo1 and molecule MolecA to the View Hypothesis workbench, if they are not already on the shelf.

58 Catalyst Tutorials/March 2002
Introduction to Hypotheses
After a brief pause, MolecA and Hypo1 appear in the workspace. The Compare/Fit control panel appears.
If the View Hypothesis workspace is not empty, clear it now by selecting Clear Display from the Edit menu.
Select both MolecA and Hypo1. From the Style menu, select 3D Constraints and then select Mesh. From the Tools menu, select the Compare/Fit command.
Assure that the default settings in the Compare/Fit control panel match those in the illustration below.

Using hypotheses
Catalyst Tutorials/March 2002 59

60 Catalyst Tutorials/March 2002
Introduction to Hypotheses
The workbench grays out as the conformational space of the molecule is searched, and then Catalyst displays the optimally fitting conformer mapped to the hypothesis as shown in the illustration that follows the labelled diagram of the Compare/Fit control panel.
The hydrogen bond donor function is mapped to the secondary amine, the hydrogen bond acceptor function is mapped to the carbonyl oxy-gen, and the negative ionizable function is mapped to the carboxylic acid group.
Click the Compare button at the bottom of the Compare/Fit control panel.
Examine the way the conformer fits the hypothesis.

Using hypotheses
Catalyst Tutorials/March 2002 61
The larger the number in this box, the better the fit.
Using a hypothesis to estimate the activity of compounds
If you have a set of compounds that all exhibit activity for the same assay, you can generate a hypothesis representing the struc-ture-activity characteristics of the compounds as a set. You can then use the hypothesis to estimate the activities for other com-pounds.
For this example, you will use a hypothesis generated from a set of angiotensin II antagonists. You will use this hypothesis to esti-mate the angiotensin II antagonist activity of two compounds, based on how well they fit the generated hypothesis.
Look at the Fit entry box in the Compare/Fit control panel.
Rotate the molecule (right mouse button) to view it from different angles, and the hypothesis rotates with it.
When you have finished, dispose of the workbench.
Open a View Hypothesis workbench by dragging and dropping ang-IIHypo and molecules Mk-1e and Mk-1a from the Stockroom onto the View Hypothesis instrument in the Stockroom.
62 Catalyst Tutorials/March 2002
Introduction to Hypotheses
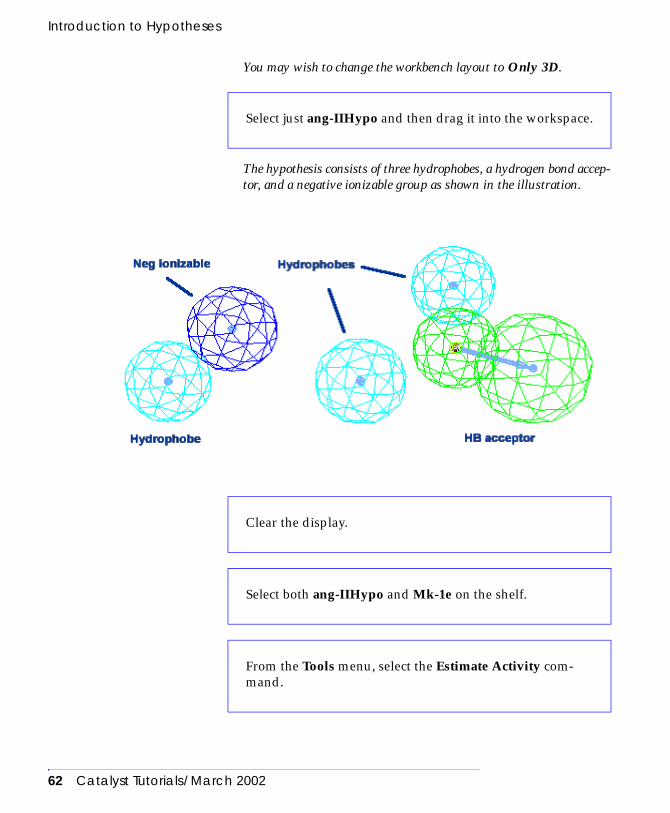
You may wish to change the workbench layout to Only 3D.
The hypothesis consists of three hydrophobes, a hydrogen bond accep-tor, and a negative ionizable group as shown in the illustration.
Select just ang-IIHypo and then drag it into the workspace.
Clear the display.
Select both ang-IIHypo and Mk-1e on the shelf.
From the Tools menu, select the Estimate Activity com-mand.

Using hypotheses
Catalyst Tutorials/March 2002 63
As with the Compare/Fit command, the Compare/Fit control panel is displayed. Catalyst searches the conformational space of the mole-cule, considering all mappings, to find the best fit of the molecule to the hypothesis. When processing is finished, the molecule is displayed mapped to the hypothesis as shown in the illustration that follows. In the Compare/Fit control panel you will notice that both the Fit and the Estimate boxes now have values. The Estimate field contains the estimated angiotensin II inhibitory activity of Mk-1e. For infor-maion on fit calculations, please see Catalyst’s on-line Help.
Examine the way the molecule fits the hypothesis, rotating the molecule so that you can see which parts of the molecule map to the functions.

64 Catalyst Tutorials/March 2002
Introduction to Hypotheses
The value in the Estimate entry box for Mk-1a is much greater than that for Mk-1e, because Mk-1a fits fewer features of the hypothesis. In fact, the experimentally measured activity of Mk-1a is much less than that of Mk-1e.
You can use the Estimate Activity menu item to help you decide how to modify compounds to increase their estimated activities. You can test your ideas by modifying the molecule in the View Compound
ang-IIHypo Mappedto Mk-1e
Neg Ionizable
HB Acceptor
Hydrophobes
Hydrophobes
Clear the display and estimate the activity of the Mk-1a molecule with the hypothesis.
Close the workbench.

Summary
Catalyst Tutorials/March 2002 65
workbench and then estimating the activity of the modified molecule.
Summary
In this exercise you learned what a hypothesis is and how to use it in drug discovery. You used a hypothesis to search a database, you fitted a compound to a hypothesis, and you learned how a hypothesis can be used to estimate the activity of a compound.
In later chapters you will learn how to build and generate a hypothesis. Lesson 4 teaches you how to build hypotheses inter-actively in the View Hypothesis workbench, and Lesson 7 teaches you how to generate a hypothesis automatically from a set of lead compounds in the Generate Hypothesis workbench.

66 Catalyst Tutorials/March 2002
Introduction to Hypotheses

Catalyst Tutorials/March 2002 67
3 Building Molecules
In this exercise you will learn how to build molecules in the View Compound workbench. First you will learn and practice the gen-eral principles, next you will build a sample drug molecule, and then you will practice using the tools available in the workbench. Finally, you will learn a shortcut for building peptides.
After you have built a molecule, you can convert it to a hypothe-sis with which you can search a database (Lesson 4), generate a conformational model for it (Lesson 6), and use it as one of the input compounds for automatically generating a hypothesis (Les-son 7).
Using the view compound workbench
The View Compound workbench is for
♦ Building and editing molecules
♦ Changing atom types
♦ Changing bond types and styles
♦ Changing chirality
♦ Generating standard structures
♦ Aromatizing and de-aromatizing rings
♦ Changing the oxidation state of specific atoms
♦ Ionizing and deionizing ionizable groups
♦ Using the Compare/Fit command with two molecules
♦ Measuring interatomic distances, angles, and torsions.
♦ Dynamic modeling

68 Catalyst Tutorials/March 2002
Building Molecules
Opening the workbench
In addition to the View Compound workbench, a condensed version of the Periodic Table appears the first time you open a View Com-pound workbench. It remains on the screen until you leave Catalyst. The Periodic Table is for selecting atoms or groups for constructing your molecule.
Open the View Compound workbench by clicking the View Compound Workbench button in the Stockroom.

Using the view compound workbench
Catalyst Tutorials/March 2002 69
Click the Expand button (as shown below) at the left side of the Periodic Table to display the full-size Periodic Table.

70 Catalyst Tutorials/March 2002
Building Molecules
Expanded Periodic Table
Reduce the Periodic Table to its condensed version by click-ing the Condense button at the bottom left of the table.

General rules for building molecules
Catalyst Tutorials/March 2002 71
General rules for building molecules
This section presents the general rules for building molecules; these are followed by instructions to help you practice using these rules.
Selecting atoms and groups in the periodic table
Use the Periodic Table to select which atom or group to add to your molecule, or to change the identity of existing atoms in your molecule. What happens when you select something in the Peri-odic Table depends on whether or not any atoms are selected in the workspace.
♦ If nothing is selected in the workspace. When you select an element or group in the Periodic Table, you are choosing the next atom or group to add to your molecule. When you select an element in the Periodic Table, it becomes highlighted. When you select a group from any of the menus in the Periodic Table, the name of the group appears at the right side of the con-densed Periodic Table or in the middle of the full sized Peri-odic Table. The selected element or group is the currently active choice. The next time you add a component to a molecule or the workspace, it will be the currently active element or group.
♦ If one or more atoms are selected in a molecule in the work-space. When you select an element or choose a group in the Periodic Table, the selected atoms in the workspace change to the chosen element or group unless it is chemically unreason-able. Whatever was previously selected and highlighted in the Periodic Table remains selected and highlighted.
Note
Placing atoms and groups in the workspaces
You can build your molecule in either the 2D or 3D workspace or both. Whatever you do in one workspace automatically happens
It is recommended that you leave C selected in the Periodic Table all the time to make drawing the most convenient.

72 Catalyst Tutorials/March 2002
Building Molecules
in the other workspace, too. You can switch between workspaces as you work. Some tasks are easier to do in the 2D workspace while others are easier to do in the 3D workspace.
If the workspaces are completely empty, clicking the first time in either workspace adds whatever element or group is selected in the Periodic Table to them. After adding the initial atom or group, add new atoms or groups as follows:
♦ Placing atoms and groups in the 2D workspace. Select the atom to which you want to connect the next atom or group. A “rubber band” extends from the selected atom to the mouse cursor. The rubber band follows the cursor as you move it around in the 2D workspace. Click anywhere in the 2D work-space. A new atom or group appears connected to the previ-ously selected atom. The paradigm for adding atoms in the 2D workspace is analogous to sketching a molecule on a piece of paper.
♦ Placing atoms and groups in the 3D workspace. Select the hydrogen which is to be replaced by the next atom or group. The selected hydrogen automatically changes to whatever element or group is selected in the Periodic Table. The paradigm for adding atoms in the 3D workspace is analogous to plugging together plastic models.
Selecting and changing bond types and styles
The procedure for using the Bond Type and 2D Bond Style tools is similar to that used for selecting elements and groups in the Periodic Table. Each time a new bond is formed, the type of the bond is determined by the selected and highlighted Bond Type tool; the 2D style is determined by the selected and highlighted 2D Bond Style tool. To change the type or style of existing bonds, select the bonds to change, then select the appropriate Bond Type or 2D Bond Style tools in the Toolbox. Your changes will be mir-rored in the 3D window.

General rules for building molecules
Catalyst Tutorials/March 2002 73
.
Adding a bond between two atoms
To add a bond between two atoms (for example, to close a ring), do one of the following:

74 Catalyst Tutorials/March 2002
Building Molecules
♦ In either the 2D or 3D workspace, extend select the atoms to be at either end of the intended bond, and then select the Bond Type tool that you want from the Toolbox.
♦ In the 2D workspace, select one of the atoms. The rubber band extends from the selected atom to the cursor. Click on another atom to form a bond between the two atoms.
Practicing molecule building skills
Before you begin, it is useful to remember that if you click on the background in either workspace, you will add another atom or group to the workspace. If you do this by accident, you can erase the selected items you just created by clicking on the Erase tool near the bottom of the Toolbox.
Placing the first atom
Methane appears in both workspaces. The carbon atom is highlighted and selected.
Ensure the workspace is empty. If not, clear the display by selecting Clear Display from the Edit menu.
If not already selected, select C in the Periodic Table to make carbon the currently active element.
Click in the 2D workspace.

General rules for building molecules
Catalyst Tutorials/March 2002 75
Note
Methane appears in both workspaces. This is exactly what happened when you clicked in the empty 2D workspace. Once the workspace is no longer empty, different things happen depending on whether you click in the 2D or 3D workspace.
Adding atoms in the 2D workspace
A rubber band extends from the selected carbon atom and follows the movement of the cursor
.
Another carbon atom appears, connected to the first by a single bond. The new atom appears in both workspaces. The newly added carbon and bond are highlighted (selected), and a rubber band runs from the
Catalyst always adds (or removes) the necessary hydrogen atoms to fulfill valency requirements. By default, the 3D workspace shows hydrogen atoms. Also by default, the 2D workspace does not show hydrogens except for “important” hydrogens (aldehydic hydrogens or hydrogens connected to a noncarbon atom). You can change these defaults by using the Hydrogens command in the View menu.
Clear the display.
Click in the 3D workspace.
Move the cursor about in the 2D workspace.
Click anywhere in the 2D workspace.

76 Catalyst Tutorials/March 2002
Building Molecules
atom to the cursor.
Changing the element of an existing atom
When one or more atoms are selected in the workspace, if you click on an element or group in the Periodic Table, the selected atoms turn into the element or group you clicked on.
Catalyst changes the selected carbon into an oxygen. In the Periodic Table, carbon remains the currently active choice for the next atom to be added.
Deselecting everything
Bonds, atoms, and objects that are selected appear highlighted in the workspace. If only one thing (such as one atom or one bond) is selected, you can deselect it by clicking on it. You can deselect everything in the workspace, by clicking on the Deselect tool (the arrow on the upper left of the Toolbox).
Add another carbon by clicking anywhere in the 2D work-space.
Check to see that the newly-added carbon atom is still selected.
In the Periodic Table, select O.

General rules for building molecules
Catalyst Tutorials/March 2002 77
Adding atoms in the 3D workspace
To add an atom in the 3D workspace, click on a hydrogen atom, and it will change into the currently selected atom or group in the Periodic Table.
To rotate, move the cursor over the molecule, press down the right mouse button, and hold the button down while you move the cursor.
Check to see that the oxygen is highlighted.
Deselect the oxygen by clicking on the Deselect tool.
If necessary, rotate the molecule in the 3D workspace so you can see the hydrogens on the carbon next to the oxygen.
Click on one of the hydrogens attached to the carbon bound to the oxygen.

78 Catalyst Tutorials/March 2002
Building Molecules
It changes to carbon. The newly added carbon is highlighted.
The selected carbon atom turns into a bromine atom. Carbon remains the currently active choice in the Periodic Table.
Add another carbon by clicking on one of the hydrogens on the newly added carbon.
In the Periodic Table select Br.

General rules for building molecules
Catalyst Tutorials/March 2002 79
Keyboard shortcuts for element selection
With the cursor in either the 2D or 3D workspace, you can use keystrokes (as an alternative to the mouse) to select or change the most commonly used elements. The keyboard shortcuts for Peri-odic Table selections are shown in the table that follows. Select the atom to be changed and then press a key to change it. In addi-tion, the currently selected element in the Periodic Table can be changed by pressing a key shown in Table 2 when nothing is selected in the workspace.
Table 2. Keybord shortcuts for Periodic Table selections
Periodic Table selection Equivalent keystrokes
Carbon c Nitrogen n Oxygen o Fluorine f Phosphorus p Sulfur s Hydrogen h

80 Catalyst Tutorials/March 2002
Building Molecules
Building molecules summary
To add a new atom in the 2D workspace, first select the atom to which you want to connect the new atom or group, then click somewhere in the workspace. To add a new atom in the 3D work-space, simply click on the hydrogen to be replaced by the new atom or group. To change the identity of atoms, select them in the workspace, and then select the element or group you want to change them to from the Periodic Table. Instead of selecting from the Periodic Table, you can use a keyboard shortcut.
Changing bond styles and adding bonds
So far, all the bonds you have built have been single, exocyclic bonds. Each time a new bond is formed, the type of bond is deter-mined by the selected Bond Type tool. The 2D bond style is deter-mined by the selected 2D Bond Style tool.
You may have noticed that as atoms are added, the bond attach-ing the new atom remains selected. This behavior facilitates changing bond types. For example, to change from the default single bond type, as atoms are added you can just click on the Bond Type tool you want. To change the type or style of existing bonds, select the bonds to change (by clicking on them), then select the appropriate Bond Type or 2D Bond Style tools in the Toolbox (by clicking on it).
Change the bond between the carbon bearing the bromine substituent and the carbon with the oxygen substituent to a double bond by selecting the single bond, and then clicking on the Double Bond tool in the Toolbox.

General rules for building molecules
Catalyst Tutorials/March 2002 81
To change the geometric orientation of a double bond that is not in a ring, select the bond, then select the Set Stereochemistry tool in the Toolbox, and select the Toggle Cis-Trans tool from the menu. This toggle will not succeed if the double bond is endocyclic.
To extend the molecule slightly and add a bond for forming a ring, add another carbon to the methyl carbon, and also add another carbon to the carbon bearing the bromine sub-stituent.

82 Catalyst Tutorials/March 2002
Building Molecules
A single bond appears between the two selected carbons.
Wait while the command generates a standard 3D structure.
To add a bridge between the two terminal carbons, select both carbons. Extend-select the second carbon to add it to the first selection. Use the right mouse button to rotate the molecule, if necessary.
Select the Single Bond tool in the Toolbox.
Select Generate Standard 3D from the Tools menu to tidy up the 3D molecule.

General rules for building molecules
Catalyst Tutorials/March 2002 83
Add some groups
So far you have practiced adding and changing single atoms. You can also use the Periodic Table to choose groups to add to your molecule.
Finally, select 2D Beautify from the Tools menu to tidy up the 2D molecule.
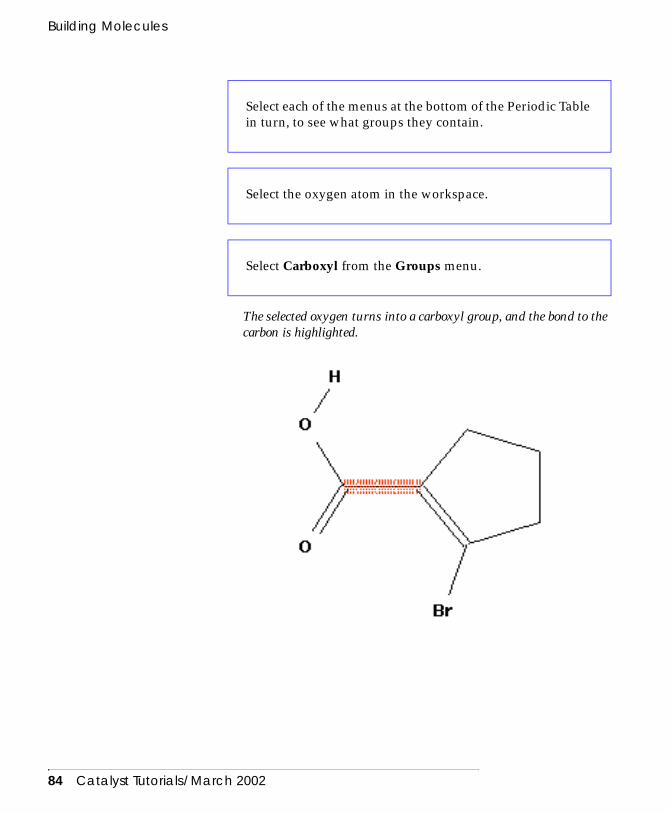
84 Catalyst Tutorials/March 2002
Building Molecules
The selected oxygen turns into a carboxyl group, and the bond to the carbon is highlighted.
Select each of the menus at the bottom of the Periodic Table in turn, to see what groups they contain.
Select the oxygen atom in the workspace.
Select Carboxyl from the Groups menu.

General rules for building molecules
Catalyst Tutorials/March 2002 85
Use the erase tool to correct mistakes
You will now practice making a mistake so you can see how to fix it. Suppose that you want to add a cyclohexane group to a mole-cule but you forget that more than one atom is selected..
The selected oxygen atoms turn into cyclohexyl groups, so you have multiple cyclohexyl groups, which is not what you wanted.
All the selected atoms disappear. In this case, if you want to recover the carboxyl group, use the region selection technique in the 2D win-dow to select both cyclohexyl groups and then the Erase tool. If the cyclohexyl groups are obscured by the rest of the structure, use the 2D Beautify command in the Tools menu before attempting to select them. This will leave you with a methyl group which you can select and replace with a carboxyl from the Groups menu.
Throughout these instructions, you have been adding carbon atoms to the workspace, and where necessary, changing the ele-ment type of existing atoms. Similarly, you have added single bonds and, where necessary, changed the bond type of existing bonds to other types.
Select all atoms of the carboxyl group using the region selec-tion technique (press the mouse button down near the group and sweep the box that appears over all three atoms).
Choose Cyclohexyl from the Rings menu in the Periodic Table.
To delete the newly added, unwanted atoms, select them with the region selection technique and then select the Erase tool below the bond types in the Toolbox.

86 Catalyst Tutorials/March 2002
Building Molecules
Selecting elements and groups besides carbon
You can also select elements and groups other than carbon to add to the workspace. To do this, make sure no atoms are selected in the workspace, then select the element or group to add in the Periodic Table. This changes the currently active choice in the Periodic Table and selects a different element or group with which to draw. For example, to specify that the next atom to be added must be a nitrogen atom, make sure no atoms are selected in the workspace, and then click on nitrogen in the Periodic Table.
Changing the default bond type
Similarly, you can change the default bond type with which to draw. To do this, make sure no bonds are selected in the work-space, then click on the appropriate Bond Type tool in the Tool-box. For example, to specify that the next bond you create is a double bond, select the Double Bond tool in the Toolbox. How-ever, it is generally easier to create your molecule by adding car-bon atoms and single bonds and then changing existing atoms and bonds to other elements and bond types as necessary.
Keyboard Shortcuts for bond selection
With the cursor in either the 2D or 3D workspace, you can also use keystrokes to select or change bond types according to the table below. Select the bond to be changed and then press a key to change it. In addition, the currently selected bond type in the Toolbox can be changed by pressing a key when nothing is selected in the workspace.
Toolbox Selection Equivalent Keystroke
Single Bond - (hyphen) Double Bond = (equal sign)
Triple Bond # (number sign)

Selecting and deselecting in the workspace
Catalyst Tutorials/March 2002 87
Selecting and deselecting in the workspace
This section consolidates information about the different ways of selecting and deselecting components in workspaces. Try each one.
Select a single item
You click on any atom or bond to select it and deselect everything else. There are three exceptions to this rule:
♦ If the item being clicked on is already selected, it is deselected.
♦ If an atom is already selected and you click on another atom in the 2D workspace, a bond between the two atoms is added, if it is chemically possible.
♦ If you click on a hydrogen in the 2D or 3D workspace, the hydrogen changes to the currently active element or group in the Periodic Table. To select a hydrogen in the 2D or 3D work-space without changing its identity, use extend-select or use Region Select (see below).
Select multiple atoms and bonds (Extend Select)
Use the middle mouse button to click on the items to be selected. The middle button is really a toggle: the first click selects and the second deselects, but it does not affect the selection state of other objects.
Select multiple atoms and bonds that are grouped together (Region Select)
Press the mouse button and hold it down while you move the cursor to the opposite corner of a rectangular region. When you release the button, everything inside the region is selected, regardless of whether it was previously selected or unselected. If you draw out the rectangle with the middle button, the items inside the rectangle will be toggled, which means they will be

88 Catalyst Tutorials/March 2002
Building Molecules
selected if they were previously unselected, or deselected if they were previously selected.
Select everything
Use the Select All command on the Edit menu to select all objects in the workspace.
Deselect all selected items
If only one atom or bond is selected, you can click on it to deselect it. However, if several things are selected, when you click on one of the selected items, it remains selected and everything else becomes deselected.
To deselect everything in the View Compound workbench, click on the Deselect tool. You can also draw out a rectangular region of the empty background with the mouse (in either workspace) to deselect everything.
Deselect some, but not all selected atoms and bonds (Extend Deselect)
Middle-click on a selected item to deselect it without affecting the selection state of anything else.
Building a sample molecule
Now you will draw a molecule, Baclofen, a muscle relaxant useful in the treatment of flexor or extensor spasms. The exercise leads you through one way of building Baclofen. After you have built the molecule, you will know how to use many of the tools avail-able in this workbench.

Building a sample molecule
Catalyst Tutorials/March 2002 89
To build baclofen
Start with a clear display.
Make sure carbon is selected in the Periodic Table and Sin-gle Bond is the currently selected bond type.
Click in either workspace to place a carbon atom.
From the Aromatics menu in the Periodic Table, select Phe-nyl to convert the selected carbon to a phenyl ring.
In the 3D workspace, click on one of the hydrogens to change it to a carbon.
Extend the side chain by two more carbons, using either the 2D or 3D workspace. This should give you a phenyl ring with a propyl side chain. The terminal carbon of the side chain is still highlighted.

90 Catalyst Tutorials/March 2002
Building Molecules
The selected carbon turns into a carboxyl group. Carbon is still selected in the Periodic Table.
Either click on one of the hydrogens attached to the alpha carbon in the 3D workspace to convert that hydrogen to a carbon, or select the alpha carbon in the 2D workspace, and then click in the background of the 2D workspace to place the new carbon.
The illustration below shows what you should have in your work-space. (Note that your 2D representation of the molecule may not look tidy like the illustration.)
From the Groups menu in the Periodic Table, select Car-boxyl.
Add a carbon to the benzylic carbon.
Attach another carbon to the newly-added carbon.

Building a sample molecule
Catalyst Tutorials/March 2002 91
The selected carbon atom turns into a nitrogen atom with two hydro-gens attached.
The last thing to add is the chlorine substituent on the phenyl ring.
Either click on one of the hydrogens attached to the para carbon in the 3D workspace to convert that hydrogen to a carbon, or select the para carbon in the 2D workspace, and then click in the background of the 2D workspace to place the new carbon.
Click N in the Periodic Table (or type n).
Deselect everything by clicking on the Deselect tool.
Add a carbon atom to the para carbon in the phenyl ring.
Select Cl in the Periodic Table.

92 Catalyst Tutorials/March 2002
Building Molecules
The newly added carbon atom turns into a chlorine atom. Use the Fit Contents to Window tool in the Toolbox, if necessary.
Tidy up the structures in both 2d and 3d workspaces
This command generates structures with correct bond lengths and angles, staggers chain geometry where possible, and avoids signifi-cant van der Waals overlaps. The command also attempts to generate a structure that is easy to visualize, so it tends to produce extended structures that are not necessarily those with the lowest energies.
Finally, deselect everything by clicking on the Deselect tool.
From the Tools menu in the workbench, select the Generate Standard 3D command.

Building a sample molecule
Catalyst Tutorials/March 2002 93
This may result in overlaying the carboxyl and amine hydrogens. If it does, you can get a less cluttered 2D structure by reorienting one of these groups. Select either benzylic bond by clicking the bond; then click on the knurl closest to the functional group. The group reorients itself away from the overlying group.
Save the molecule to the shelf
The Save To Lab As control panel appears.
If you want to see the molecule in a different orientation, rotate the molecule using the right mouse button.
From the Tools menu in the workbench, select the 2D Beau-tify command to clean up the 2D molecule.
From the Data menu, select the Save To Lab As command.

94 Catalyst Tutorials/March 2002
Building Molecules
.
A flask icon with the name Baclofen appears on the shelf of the work-bench and in the Stockroom.
Click the Name field, and then type Baclofen.
Click the Save button.

Using the tools in the View Compound workbench
Catalyst Tutorials/March 2002 95
Note
Note
Using the tools in the View Compound workbench
You now use the Baclofen molecule to practice using the tools and utilities in the workbench. In general, the tools are provided through commands in the Tools menu or tools in the Toolbox. The View Compound workbench enables you to do the follow-ing:
♦ Generate a reasonable structure for the 3D model with the Gen-erate Standard 3D command
♦ Generate with the 3D Minimize command a structure for the 3D model that represents the closest local energy minimum
♦ Clean up the 2D model with the 2D Beautify command
♦ Rotate the 2D model either vertically or horizontally with the Flip 2D command
♦ Align the 3D model as closely as possible with the 2D model using the Orient 3D to 2D command
♦ Change stereochemistry with the Set Stereochemistry tool in the Toolbox
Each time you save an object such as a molecule, it appears in the Stockroom (or another lab if you pick a particular lab by selecting from the Lab menu) as well as on the shelf of the workbench in which you are working. The Save As Local Object command saves the compound only to the current workbench. Local objects are deleted when the workbench they are saved in is disposed of. Local objects are intended only for temporary use.
When you save an object to the shelf, it is not saved to disk. To save your objects to disk, you must dispose of the View Compound workbench and select Save StockroomDB from the Data menu in the Stockroom. The various ways to write information to disk will be discussed further in Lesson 5.

96 Catalyst Tutorials/March 2002
Building Molecules
♦ Aromatize or de-aromatize a ring
♦ Change the oxidation state of specific atoms
♦ Ionize and deionize ionizable groups
♦ Dynamically model ring flipping and bond rotation
♦ Move atoms in the 2D model
♦ Measure interatomic distances, bond angles, and dihedral angles
♦ Generate a conformational model (Lesson 6)
Minimize the 3D structure
You can use the 3D Minimize command in the Tools menu to generate and display a 3D conformer that corresponds to an energy minimum based on the current 3D structure of the mole-cule. Note that this command finds a conformer corresponding to a local energy minimum for the existing structure. It does not nec-essarily find the conformer with the global energy minimum.
A busy cursor is displayed while minimization is in process.Watch the 3D workspace closely. You’ll see the molecule adjusting in the work-space as the minimization proceeds. When the minimization has fin-ished, the busy cursor disappears.
Note
Ensure that the workspace contains Baclofen.
From the Tools menu, select 3D Minimize.
If a molecule has more than 50 atoms, a Busy control panel appears and offers you the opportunity to stop the process if you want to.

Using the tools in the View Compound workbench
Catalyst Tutorials/March 2002 97
You can see the energy of the molecule both before and after minimi-zation.
Note
Flip the 2D molecule
In the 3D workspace, you can rotate the molecule to view it from any angle. In the 2D workspace, you can only rotate the molecule in one plane. However, Catalyst allows you to flip the 2D mole-cule either horizontally or vertically to enable you to display it in any 2D orientation.
Look in the status window. It reports the energy of the mol-ecule after minimization.
Open the History window by selecting History from the Windows menu.
Click Cancel to close the window.
To minimize a large molecule into a local minimum, continue minimizing until the reported energy value becomes constant.
Ensure that the workspace contains Baclofen.

98 Catalyst Tutorials/March 2002
Building Molecules
Orient the 3D molecule to the 2D molecule
You can use the Orient 3D to 2D command in the Tools menu to display the 3D molecule so that it is oriented to the 2D drawing. This command does not change the shape of the 3D molecule, but rotates it until it is aligned as similarly as possible to the 2D mole-cule.
The 3D workspace displays the 3D molecule so that it is aligned in the same orientation as the 2D molecule.
Change stereochemistry
When Catalyst encounters a chiral atom, it assigns R or S stere-ochemistry according to the Cahn-Ingold-Prelog rules. You can use the Set Stereochemistry tool in the Toolbox to change the ste-reochemistry of a molecule. You can change the chirality of a chiral atom, you can change axial to equatorial bonds in a ring and vice versa, and you can change cis double bonds to trans, and vice versa.
In the Tools menu, use the submenu of the Flip 2D com-mand to flip the 2D molecule first horizontally, and then vertically.
Ensure that the workspace contains Baclofen.
From the Tools menu select the Orient 3D to 2D command.

Using the tools in the View Compound workbench
Catalyst Tutorials/March 2002 99
Change the chirality of a chiral atom
You can identify the chiral carbons by their labels.
You should see one carbon identified either as S or R. If not, use the Chirality labels command in the View menu to switch on chirality labels in both the 2D and 3D workspaces.
Select the chiral carbon.

100 Catalyst Tutorials/March 2002
Building Molecules
If the selected carbon was R, Catalyst changes it to S, and vice versa. You see the molecule in the 3D workspace adjusting to the change in chirality. You can also use the Set R Chirality tool and the Set S Chirality tool to specify chirality.
Note
If applied to a chiral atom, the Toggle Known-Unknown tool sets the stereochemistry to known (if was previously unknown) or to unknown (if it was previously known). When you switch the stere-ochemistry of a chiral atom from known to unknown, the atom is assigned the stereochemistry that is currently displayed but a ? (ques-tion mark) appears next to the label.
Change the stereochemistry at a double bond
You can use the Toggle Cis-Trans tool to convert a double bond from cis to trans and vice versa.
Select the Set Stereochemistry tool in the Toolbox.
From the menu that appears, select the Toggle R-S tool.
If the geometry at an atom is distorted, the atom cannot be assigneed a known stereochemistry.
From the menu that appears, select the Toggle Known-Unknown tool.

Using the tools in the View Compound workbench
Catalyst Tutorials/March 2002 101
Baclofen does not have any double bonds, so you will add one for this exercise.
If the bond had a cis configuration, it changes to trans, and vice versa. The 3D workspace updates to show the changes.When you have fin-ished experimenting with the Toggle Cis-Trans tool, delete the pro-penyl substituent to return your molecule to the proper topology for Baclofen.
To delete atoms and bonds, select them using region selection and then click on the Erase tool in the Toolbox.
Ensure that Baclofen appears in the workspace.
Add an n-propyl side chain to the phenyl ring by adding a carbon substituent to the ring, and then while the newly added carbon is still selected, choose n-Propyl from the Ali-phatics menu in the Periodic Table.
Convert the middle bond in the propyl side chain to a dou-ble bond by selecting the bond, and then selecting the Dou-ble Bond tool in the Toolbox (or press the = key on the keyboard).
Select the Toggle Cis-Trans tool from the Stereochemistry menu in the Toolbox.

102 Catalyst Tutorials/March 2002
Building Molecules
Aromatizing and de-aromatizing rings
Catalyst allows you to convert an aliphatic ring to an aromatic one (if it is possible) and vice versa. To aromatize an aliphatic ring, select any bond in the ring, and then select the Aromatize command under Chemistry in the Tools menu. To de-aromatize a ring, select any bond in the aromatic ring and then select the Sin-gle Bond tool in the Toolbox.
Turning the aromatic ring into an aliphatic ring
To change the selected bond into a single bond, Catalyst must also change all the other bonds in the ring to single bonds.
The newly formed cyclohexane is planar, which is not a reasonable geometry.
Ensure that Baclofen appears in the workspace.
Select any bond in the aromatic ring.
Select the Single Bond tool in the Toolbox.
Therefore, from the Tools menu, select the 3D Minimize command. Wait while Catalyst minimizes the molecule.

Using the tools in the View Compound workbench
Catalyst Tutorials/March 2002 103
Changing the axial-equa-torial configuration
Note
You can switch between the axial and equatorial positions with this tool.
Turning the aliphatic ring into an aromatic ring
You can change an aliphatic ring into an aromatic ring as follows:
The ring is changed to an aromatic ring, but it might look rather dis-torted in 3D.
Select the chlorinated carbon and select the Set Stere-ochemistry tool in the Toolbox.
Catalyst can become confused about the assignment of axial or equitorial substituents during this procedure. If so, a question mark will appear on the ring atom in question. This ambiguity is removed using the Axial-Equatorial tool.
Select the Toggle Axial-Equatorial tool in the Stereochem-istry menu in the Toolbox.
Select any bond or carbon in the ring.
From the Tools menu select the Aromatize command under Chemistry.
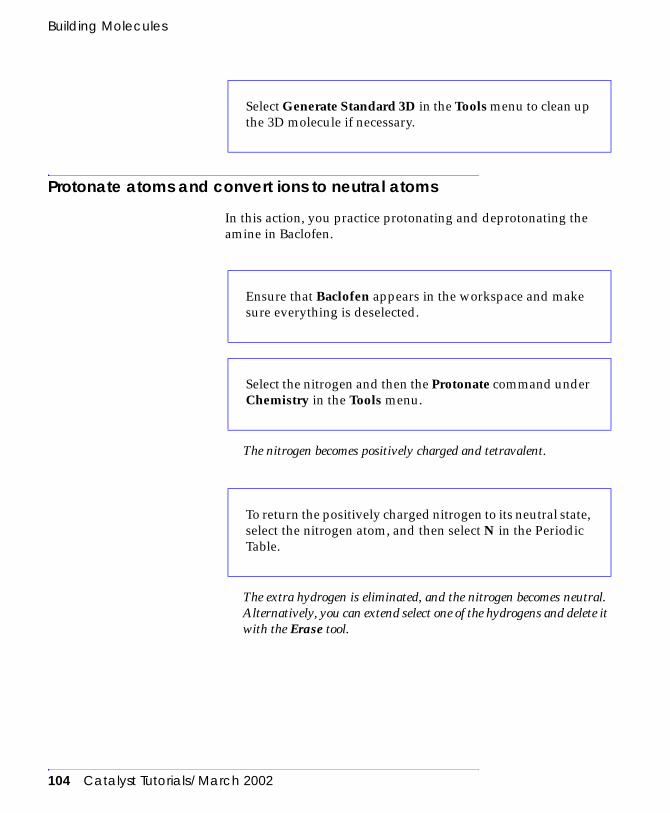
104 Catalyst Tutorials/March 2002
Building Molecules
Protonate atoms and convert ions to neutral atoms
In this action, you practice protonating and deprotonating the amine in Baclofen.
The nitrogen becomes positively charged and tetravalent.
The extra hydrogen is eliminated, and the nitrogen becomes neutral. Alternatively, you can extend select one of the hydrogens and delete it with the Erase tool.
Select Generate Standard 3D in the Tools menu to clean up the 3D molecule if necessary.
Ensure that Baclofen appears in the workspace and make sure everything is deselected.
Select the nitrogen and then the Protonate command under Chemistry in the Tools menu.
To return the positively charged nitrogen to its neutral state, select the nitrogen atom, and then select N in the Periodic Table.

Oxidation and reduction
Catalyst Tutorials/March 2002 105
The selected hydrogen disappears. The oxygen now has a negative charge of one.
The oxygen returns to its uncharged state.
Oxidation and reduction
You can use Catalyst’s automatic oxidation and reduction tools to change the oxidation state of certain atoms. The commands are currently implemented for metals, sulfur, phosphorus, and ele-ments below them in the periodic table. Oxidation of nitrogen is supported, but reduction of oxidized nitrogen is not. The follow-ing steps employ a modified Baclofen for practicing with the oxi-dation and reduction tools.
Deselect everything, then extend-select the hydrogen con-nected to the oxygen in the carboxyl group in Baclofen.
Click the Erase tool in the Toolbox.
To return the charged oxygen to O (its neutral state), select the negatively charged oxygen, and in the Periodic Table select O.
Change the nitrogen in Baclofen to a sulfur and leave it selected.

106 Catalyst Tutorials/March 2002
Building Molecules
A double bonded oxygen appears attached to the sulfur atom, which is now in the oxidation state of a sulfoxide.
Note
Dynamic modeling
You can dynamically model molecules in the 3D workspace either by flipping rings or rotating single bonds.
Select Chemistry from the Tools menu and slide the cursor to the right and down to Oxidize.
Select the sulfur again and repeat this operation to generate sulfur in the sulfone oxidation state.
Select the sulfur again, then select Reduce under Chemistry in the Tools menu. Repeat this sequence to get to the thiol oxidation state.
Under some conditions, it is possible to confuse Catalyst with sulfur and phosphorus oxidation states. You may encounter sulfur with two double-bonded oxygens and a positive charge that resists the Oxidize and Reduce commands. If this happens, just delete the oxygens by selecting them and clicking on the Erase tool. Then, with the sulfur selected, select S on the Periodic Table to straighten out the valence.
Clear the workspace when you are done so that you can bring in a fresh copy of Baclofen for the next exercise.

Oxidation and reduction
Catalyst Tutorials/March 2002 107
Dynamically flipping a ring
The shape of aromatic rings is always planar, so you cannot flip aro-matic rings. To practice ring flipping, you should convert the aromatic ring in Baclofen to a saturated ring with known stereochemistry.
When the ring is de-aromatized, the substituted carbons in the ring have distorted geometries.
Catalyst highlights the carbon and displays it with a knurl. If you cannot see the knurl, rotate the molecule until you can. You can think of a knurl as a knob that can be turned.
Drag Baclofen into the workspace.
De-aromatize the phenyl ring by selecting a bond in the ring, then select the Single Bond tool.
Use the 3D Minimize command in the Tools menu to min-imize the molecule and clean up the distorted geometries.
Select the chlorinated carbon in the ring.

108 Catalyst Tutorials/March 2002
Building Molecules
Note
The cursor turns into a hand. The selected atom moves with the cur-sor. The rest of the ring adjusts its shape in response to the movement. In this way, you can flip the ring. Catalyst calculates restoring forces as the molecule changes shape, attempting to maintain preferred bond angles and bond lengths.
Note
When an atom is highlighted, the knurl appears only if the atom can be moved. Nonbridgehead atoms in nonaromatic rings can usually be moved.
Click the knurl and slowly drag it up or down orthogonally away from the selected atom. Be sure to move the cursor slowly.
The Van der Waals command in the Modeling menu is toggled on by default, so Catalyst includes van der Waals forces in its calculation of restoring forces. Toggling the Van der Waals command off removes them from the calculation in dynamic modeling.
When you have finished flipping the ring, release the mouse button and wait for the molecule to finish adjusting.

Oxidation and reduction
Catalyst Tutorials/March 2002 109
Rotating a single bond In the 3D workspace you can rotate groups around a single bond with the calculation of restoring forces enabled or disabled. When you select Dynamic Bond Rotations from the Modeling menu (the button next to it is highlighted indicating that the command is turned on), Catalyst calculates restoring forces so that all atoms in a molecule are considered in response to a bond rotation. When you turn the Dynamic Bond Rotations command off (by clicking on it when the highlighted box is visible), restoring forces are not calculated during bond rotation. Atoms attached to the rotating end of the bond move appropriately, but the rest of the molecule remains unchanged. That is, rotations take place independently of energy considerations.
You can rotate any exocyclic single bond not attached to a terminus atom such as a halogen or hydrogen.
To see the spatial relationships of the atoms of the molecule in a more dramatic way, select Spacefilling from the Style menu. Deselect the chlorinated carbon in the ring and select it again to see the knurl. Flip the ring back and forth.
Convert the six-carbon ring to an aromatic ring and clean it up with Generate Standard 3D.
Ensure that Baclofen appears in the workspace.
To see the effects of bond rotation most clearly here, select the single bond between the carbons alpha and beta to the carboxyl carbon as shown in the following illustration.

110 Catalyst Tutorials/March 2002
Building Molecules
The bond becomes highlighted and two knurls appear.
NoteWhen a bond is selected, knurls appear at the rotatable ends if it can be rotated. If the bond cannot be rotated, no knurls appear.
In the Modeling menu, ensure that Dynamic Bond Rota-tion is toggled off.

Oxidation and reduction
Catalyst Tutorials/March 2002 111
The part of the molecule attached to the end of the bond closest to the knurl you selected rotates as you move the cursor.
So far you have seen rigid rotation where only the part of the mole-cule connected to the rotating end of the bond moves. Now you will try dynamic rotation, where the whole molecule adjusts to the rota-tion.
You might need to move the cursor more slowly this time. Bond rota-
With the cursor in the 3D workspace, press the mouse but-ton down over one of the knurls.
Slowly move the cursor away orthogonal to the knurl, and the cursor turns into a hand.
Try rotating the bond in the other direction.
Try rotating the other knurl.
Click on Dynamic Bond Rotation in the Modeling menu to toggle the command on.
Rotate one of the knurls.

112 Catalyst Tutorials/March 2002
Building Molecules
tion occurs as before, but other parts of the molecule adjust to the rota-tion. Catalyst calculates all force field restoring forces as the molecule changes shape, including preferred bond angles, bond lengths, and torsional forces. Notice how the amine and carboxyl group try to avoid one another.
Note
Moving atoms and bonds in the 2D workspace
You can move atoms and bonds in the 2D workspace to customize your drawing or make a perspective drawing. The 2D workspace shows only a schematic of the molecule, so there is no corre-sponding change in the 3D model when you move atoms or bonds in the 2D workspace.
As with ring-flipping, when the Van der Waals force in the Modeling menu is selected, Catalyst also includes van der Waals forces in the restoring forces.
Ensure that Baclofen is in the workspace.
In the 2D workspace, select the nitrogen atom. Drag the atom to a different location.
Deselect the selected atom.
Select the carboxyl group using region selection.

Oxidation and reduction
Catalyst Tutorials/March 2002 113
All the selected atoms and bonds move with it.
Practice moving atoms and bonds; particularly practice moving some atoms and bonds that are not connected to each other.
Measuring atomic distances, angles, and dihedral angles
You can use the Measure tool in the Toolbox to measure distances between connected atoms and nonconnected atoms, and to mea-sure bond angles, out-of-plane angles, and dihedral angles.
When you select the Measure tool in the Toolbox, Catalyst mea-sures angles and distances according to the rules in the following table. From the Windows menu, open the History Window to see all of the measurements performed by Measure.
In general, select atoms in the correct order to make use of the results of the Measure tool. Select all the atoms or bonds that are required to give the measurement you want, and disregard the additional measurements.
Click and drag the cursor over any of the selected items
When you have finished, clean up the 2D molecule with the 2D Beautify command in the Tools menu.

114 Catalyst Tutorials/March 2002
Building Molecules
Note
What You Select What the Measure Tool Reports
In History Window In Status Area1 bond Bond length and location of atoms Bond length2 contiguous bonds
(Select bond A, then bond B.)
Length of A, locations of atoms
Length of B
A-B angle
A-B angle
3 contiguous bonds
(Select bond A, then bond B, then bond C.)
Length of A, locations of all atoms
Length of B
Length of C
A-B angle
B-C angle
A-B-C dihedral or out-of- plane angle
A-B-C dihedral
or out-of-plane angle
Any number of noncontiguous bonds A warning that measurements cannot be given for noncontiguous bonds
2 atoms Distance between the atoms Distance between atoms
3 atoms
(Select atom a, then atom b, then atom c)
Distance between a and b
Distance between b and c
a-b-c angle
a-b-c angle
4 atoms
(Select atom a, then b, then c, then d)
Distance between a and b
Distance between b and c
Distance between c and d
a-b-c angle
b-c-d angle
a-b-c-d dihedral or out-of-plane angle
a-b-c-d dihedral or out-of-plane angle
More than 4 atoms A warning that the last four atoms will be used in the measurement, then the measurements for 4 atoms as above
a-b-c-d dihedral angle
The ruler gives measurements for atoms and bonds as displayed in the 3D workspace, even if you make the selections in the 2D workspace.

Oxidation and reduction
Catalyst Tutorials/March 2002 115
Practice using the measure tool
Make sure that Baclofen appears in the workspace.
Find the distance between the chlorine and the nitrogen atom
H
O
NH
H
Cl O
Distance is?
Measure the O-C=O bond angle.

116 Catalyst Tutorials/March 2002
Building Molecules
H
O
NH
H
Cl O
Angle is?
Find the dihedral (or torsion) angle between the nitrogen and the carbon in the ring that is connected to the side chain. Remember to select the atoms or bonds in the correct order.
N
Dihedral angle is?
Cl

Building a peptide
Catalyst Tutorials/March 2002 117
Building a peptide
You have learned the general rules for building molecules in the View Compound workbench. One additional thing you should know is a shortcut for building peptides. The Amino Acids menu in the Periodic Table provides templates of the 20 α-amino acids found in proteins.
When you select one of these amino acids and place it in the workspace, it appears in the aldehydic form. You can replace the aldehydic hydrogen by another amino acid to form a peptide link. In this way you can build peptides from N terminus to C termi-nus.
In Lesson 6 you will generate conformers for a peptide, and then in Lesson 7 you will generate a hypothesis from a set of different peptides. Here are steps for building one of the peptides, glu-ala-pro, that you will be using in the later exercises. After working through these steps, you should be familiar with the general prin-ciples for building any peptide.
Build the peptide glu-ala-pro
The carbon changes to the aldehydic form of glutamic acid.You can easily link peptides together by converting the aldehydic hydrogen to another amino acid.
Clear the View Compound workspace and then place a car-bon in it.
In the Periodic Table, select Glutamyl from the Amino Acids menu.

118 Catalyst Tutorials/March 2002
Building Molecules
The final amino acid to add is proline.
Select the aldehydic hydrogen.
Use the region selection technique or the middle mouse but-ton to select a hydrogen in the 2D or 3D workspace without changing it to whatever is selected in the Periodic Table.
Aldehydic Hydrogen
In the Amino Acids menu of the Periodic Table select Ala-nyl, and the selected hydrogen in the workspace converts to alanyl. Use the Fit to Window tool to center your work.
Region select the aldehydic hydrogen of the alanyl group.

Building a peptide
Catalyst Tutorials/March 2002 119
Aldehydic Hydrogen
In the Amino Acids menu of the Periodic Table, select Pro-lyl.
Use region selection to select the aldehydic hydrogen on the prolyl.

120 Catalyst Tutorials/March 2002
Building Molecules
Aldehydic Hydrogen
Then select O on the Periodic Table to convert the aldehyde to an acid.
Select Generate Standard 3D from the Tools menu to gen-erate a standard 3D structure for your peptide.
You can also select 2D Beautify from the Tools menu to clean up the 2D display..

Building a peptide
Catalyst Tutorials/March 2002 121
Note
In Lesson 6 you will need two copies of the molecule to try the two modes of conformer generation.
Select the Save To Lab As.... command from the Data menu to save your peptide to the shelf as glu-ala-pro.
Some Catalyst subsystems are case sensitive. It is important not to have two compounds with the same names in different cases (for example, glu and Glu) in Catalyst at the same time. Because in Lesson 7 peptides have all lowercase names, glu-ala-pro must be saved with all lowercase characters.
Save it again, but give it the name a-glu-ala-pro.
Dispose of the View Compound workbench.

122 Catalyst Tutorials/March 2002
Building Molecules
In this exercise you learned how to build and modify molecules in the View Compound workbench, and you learned how to use the tools and utilities of the workbench. The next exercise describes how to build and modify hypotheses in the View Hypothesis workbench.

Catalyst Tutorials/March 2002 123
4 Building Hypotheses and Searching Databases
Catalyst allows you to build a model representing the distin-guishing chemical features of a class of compounds. This model is called a hypothesis. Catalyst provides two ways to create a hypoth-esis:
♦ Automatically generate a chemical feature-based hypothesis from a set of compounds with respect to a type of activity. You can do this in the Generate Hypothesis workbench, which is discussed in Lesson 7.
♦ Build a hypothesis by assembling substructures and chemical functions, and then specify geometric constraints between them. You can do this in the View Hypothesis workbench, which is discussed in this chapter.
You can construct a hypothesis by assembling components from known data; for example, atomic coordinates available from X-ray crystallography data.
You can express the characteristics of a hypothesis in a variety of ways. For example, you could specify that the hypothesis con-tains a collection of particular chemical substructures, or a collec-tion of chemical functions such as hydrogen bond donors and hydrophobic groups, or any combination of substructures and chemical functions. You can specify the distances, angles and/or torsions between items in a hypothesis, the preferred location for a chemical feature, and you can specify the range of possible ele-ments for atoms in a substructure. You also can specify excluded volumes. After you have built the hypothesis, you can search a database with it to find any compounds in the database that match the hypothesis.
In this exercise you will learn how to build hypotheses in the View Hypothesis workbench and how to search a database for compounds that fit the characteristics of the hypothesis. Later on,

124 Catalyst Tutorials/March 2002
Building Hypotheses and Searching Databases
in Lesson 7, you will learn how to use the Generate Hypothesis workbench to automatically generate a hypothesis that contains the distinguishing characteristics of a set of compounds relevant to a type of activity.
This lesson includes:
♦ A description of the different ways to build a hypothesis inter-actively
♦ Instructions for building a substructure hypothesis and search-ing a database with it
♦ Instructions for building a hypothesis by using the Feature Dic-tionary
♦ Instructions for building a sophisticated hypothesis for D2 ago-nists
♦ A description of how to use the Find command to search a data-base for compounds with particular names
Different methods for building hypotheses
The View Hypothesis workbench provides several ways for you to build hypotheses:
♦ Convert a molecule to a hypothesis. You can bring a molecule into the View Hypothesis workbench and convert it into a hypothesis. This method provides a way of building a hypoth-esis consisting of any chemical topology that is required.
♦ Add items from the Feature Dictionary. You can pick features from the Feature Dictionary and place them in the workspace (similar to the way you pick elements or substructures from the Periodic Table in the View Compound workbench). This method allows you to build a hypothesis from a set of pre-defined building blocks. The building blocks include many types of chemical groups, such as phenyl rings or carboxylates, and also chemical functions such as hydrogen bond donors or positively charged groups.
♦ Use a template molecule to place functions. You may want to build a hypothesis that represents the chemical features, rather

Building a substructure hypothesis and searching a database with it
Catalyst Tutorials/March 2002 125
than the specific topology, of a particular molecule. For exam-ple, you may have a compound that has three hydrophobic groups, and you want to build a hypothesis that has the same spatial relationships as the hydrophobic groups in your com-pound. To do this, you can bring a specific conformer into the View Hypothesis workbench to serve as a template and request Catalyst to identify the locations of the chemical functions in the molecule. Then you can place functions at those locations.
You can add distance, angle, and/or torsion constraints between fragments and functions to specify geometric interrelationships, and you can add location constraints to restrict the 3D spatial arrangement. Additionally, you can set specifications for atoms and bonds. For example, you can specify that a particular atom can be any halogen, and that a particular bond can be a double or an aromatic bond. You also can set weights on features and place excluded volumes.
This exercise leads you through examples of the first two meth-ods described above for building hypotheses. The third method, addressed in Lesson 9 , is a more complex procedure. Catalyst also provides a graphical editor, called the Exclude/OR editor, for expanding or describing limitations to queries. This is a very powerful feature, and its use will be introduced here and described more fully in Lesson 11.
Building a substructure hypothesis and searching a database with it
In Catalyst, you can search a chemical database for compounds that fit certain criteria. The search criteria are expressed as hypotheses. For example, you can search for compounds that con-tain a particular substructure or topology.
In this part of the exercise you will build a hypothesis of 2,4-dis-ubstituted benzoic acids in the View Hypothesis workbench, and then use it to search a database for compounds that contain a 2,4-disubstituted benzoic acid substructure. In order to convert a molecule into a hypothesis, you must have a molecule. There are several ways to bring a molecule into the View Hypothesis work-bench:
126 Catalyst Tutorials/March 2002
Building Hypotheses and Searching Databases
♦ You can import it from a file (as discussed in Lesson 5).
♦ You can build it in the View Compound workbench and then drag and drop it into this workbench (as discussed in Lesson 2).
♦ You can use the View Compound QuickTool.
Building the substructure hypothesis
The following instructions employ the View Compound Quick-Tool to give you some experience in using it. A QuickTool is a version of a workbench that can be quickly opened to create or edit a molecule or hypothesis and then bring the object back into the parent workbench.
Open the View Hypothesis workbench by clicking on the View Hypothesis button in the Stockroom. Change the Workbench Layout to Only 3D.

Building a substructure hypothesis and searching a database with it
Catalyst Tutorials/March 2002 127
This workbench has a structure similar to the View Compound workbench. It has a shelf, a Toolbox, a workspace (composed of a 2D and/or 3D workspace), and a Status Area. Notice the View Com-pound QuickTool button to the left of the workspace below the Tool-box. You will now use the View Compound QuickTool to sketch a substituted benzoic acid molecule.
QuickTool
Shelf Menus
Workspace
Toolbox

128 Catalyst Tutorials/March 2002
Building Hypotheses and Searching Databases
The View Compound QuickTool is a version of the View Com-pound workbench that has no shelf. Whatever you build here is auto-matically transferred to the parent View Hypothesis workbench when you return from the View Compound QuickTool.
You can either draw it from scratch or select the appropriate groups from the Periodic Table.
You will find Phenyl under the Aromatics menu and Carboxyl under the Groups menu in the Periodic Table.
Click once on the View Compound QuickTool button to open it.
Draw a molecule of benzoic acid with two methyl substitu-ents on the phenyl ring ortho and para to the carboxyl sub-stituent.

Building a substructure hypothesis and searching a database with it
Catalyst Tutorials/March 2002 129
The molecule appears highlighted in the workspace in the View Hypothesis workbench and there is a Local-1 icon for it on the shelf.
Your molecule now is ready to be converted into a preliminary hypoth-esis.
Note
Convert the molecule to a hypothesis
Catalyst converts the molecule to a hypothesis, which appears without a circle in the aromatic ring. Your structure is now a hypothesis rep-resenting a collection of structural features. You will refine this hypothesis to represent compounds that contain 2,4-disubstituted benzoic acid, where the substituents at the 2 and 4 positions can be any one of carbon, nitrogen, or oxygen, but nothing else. None of the other three positions in the ring will be allowed to have substituents.
When you are finished, select the Return from QuickTool command in the QuickTool menu.
A local object is a temporary form of an object that is useful only in the workbench where it was created; you cannot drag one to a different workbench unless you first save it to the shelf. You can clear the screen without losing your hypothesis completely, because the local hypothesis will still be on the shelf and can be copied or dragged into the workspace. You also can drag local objects to QuickTools to modify them.
Select the Convert Molecule to Hypothesis tool from the Toolbox.
130 Catalyst Tutorials/March 2002
Building Hypotheses and Searching Databases
Use the atom specifica-tion editor to specify elements for an atom
The hydrogen count is set to “anything” (represented by an asterisk, as you will see in a moment), and the hydrogens on these methyls dis-appear.
Note
Two Atom Specification Editor control panels appear, one for each of the selected atoms. Each shows a segment of the Periodic Table, with the C button selected and highlighted.
Select the two methyl substituent carbons and click on Reset Hydrogen Count in the Tools menu.
You cannot select parts of a hypothesis in the 2D workspace. You must use the 3D workspace for all interactions with hypotheses.
Next, select the Atom Specification tool in the Toolbox.

Building a substructure hypothesis and searching a database with it
Catalyst Tutorials/March 2002 131
Catalyst displays an expanded version of the Atom Specification Editor control panel containing all the possible constraints that you can specify for the atom.
To see what other options you can specify for the selected atom, click the Expand button (the bottom-left one) on the control panels.
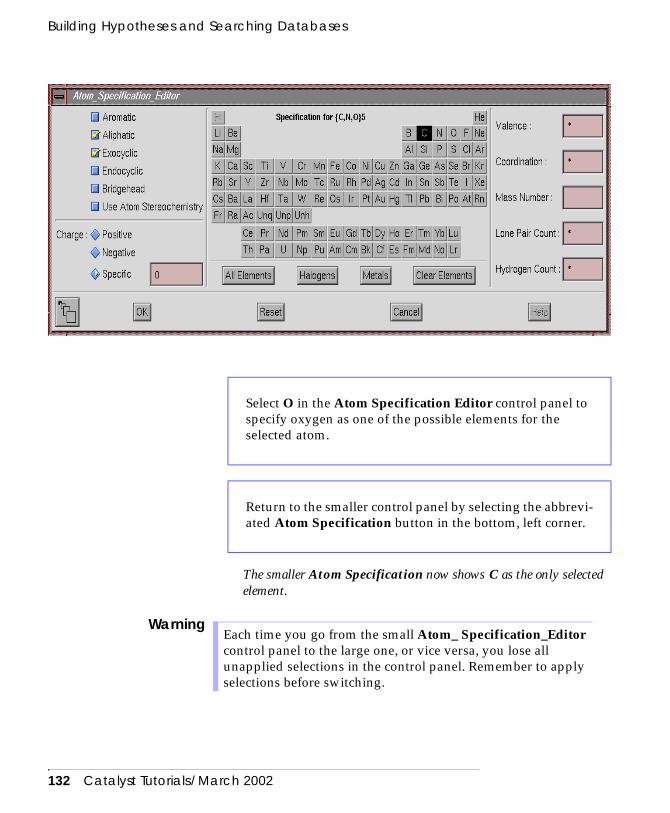
132 Catalyst Tutorials/March 2002
Building Hypotheses and Searching Databases
The smaller Atom Specification now shows C as the only selected element.
Warning
Select O in the Atom Specification Editor control panel to specify oxygen as one of the possible elements for the selected atom.
Return to the smaller control panel by selecting the abbrevi-ated Atom Specification button in the bottom, left corner.
Each time you go from the small Atom_ Specification_Editor control panel to the large one, or vice versa, you lose all unapplied selections in the control panel. Remember to apply selections before switching.

Building a substructure hypothesis and searching a database with it
Catalyst Tutorials/March 2002 133
Note
The control panel disappears, and the black carbon atom in the work-space has changed to a brownish-mauve color. This color indicates that the atom can be one of several elements.
Note
The mauve colored atom has the label {C, N, O}n where n is the atom number. This label tells you that this atom can be carbon, nitrogen, or
To specify the set of possible elements for your atom, click on each element in the set. Since you want the atom to be a carbon, oxygen, or nitrogen, click the N button to add nitro-gen to the specification and the O button to add oxygen.
Each element button acts as a toggle. If it is not highlighted, and therefore unselected, it becomes highlighted and selected when you click on it, and vice versa.
To specify that the unshared Lone Pair Count can be any value, replace the 0 with an * (asterisk) in this box. Click the OK button.
The asterisk is a “wild card” symbol that specifies any value. You can be more specific by using numbers, such as 0,1 to specify none or one. (Multiple values are separated by commas.)
Now repeat the previous two steps for the second atom.
Switch on atom labels with the Atom Labels/3D command of the View menu.

134 Catalyst Tutorials/March 2002
Building Hypotheses and Searching Databases
oxygen.
Note
Save the hypothesis
You can now use the hypothesis to search a database for compounds that contain a benzoic acid group with substituents at the 2,4 posi-tions on the phenyl ring, where the substituents are connected to the ring by a carbon, nitrogen, or oxygen atom.
Iconifying workbenches simplifies operation of Catalyst by minimiz-ing the number of open windows.
In a hypothesis, the label for each atom consists of a set of curly braces { } enclosing the list of elements for that atom. If an atom can be only one element, only that element appears in the list. If an atom can be several elements, the first three elements appear in the list. Additional elements are indicated by ellipsis points (...). Each atom also has a number for identification purposes. (The numbers on your atoms may not match those shown; they depend upon how you constructed the molecule.)
Save your hypothesis with the name CarbPheHypo. Use the Save To Lab As... command in the Data menu.
Select Iconify Workbench from the Workbench menu to shrink the workbench to an icon.

Searching a database with the hypothesis
Catalyst Tutorials/March 2002 135
Note
Searching a database with the hypothesis
You can use the View Database workbench to search a database for compounds that match a hypothesis.
The View Database workbench opens with the hypothesis CarbPheHypo and the database Sample highlighted on the shelf.
You should only iconify workbenches you intend to use again. Iconified workbenches interfere with some disposal operations so it is important to keep track of which ones you are using and where they are.
In the shelf of the Stockroom, extend-select the hypothesis CarbPheHypo and the database Sample.
Drag and drop CarbPheHypo and Sample onto the View Database button in the Stockroom.
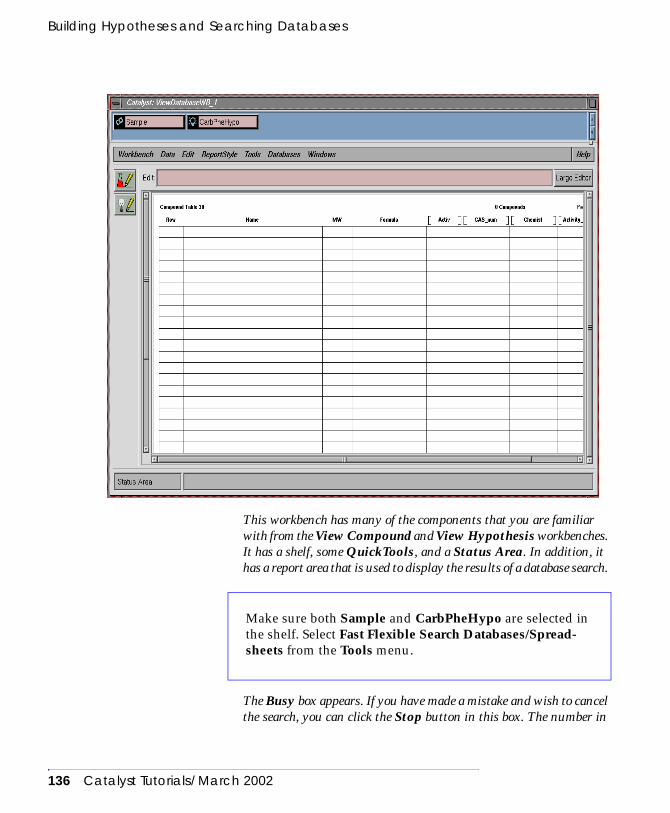
136 Catalyst Tutorials/March 2002
Building Hypotheses and Searching Databases
This workbench has many of the components that you are familiar with from the View Compound and View Hypothesis workbenches. It has a shelf, some QuickTools, and a Status Area. In addition, it has a report area that is used to display the results of a database search.
The Busy box appears. If you have made a mistake and wish to cancel the search, you can click the Stop button in this box. The number in
Shelf
ReportQuickTools
Menus
Scrolls within a PageScrolls between Pa
Area
Edit Box
Make sure both Sample and CarbPheHypo are selected in the shelf. Select Fast Flexible Search Databases/Spread-sheets from the Tools menu.

Searching a database with the hypothesis
Catalyst Tutorials/March 2002 137
parentheses is the value specified for Max Search Hits in the Work-bench Options control panel. The numbers above the slider refer to the number of hits found as the search progresses.
When the search is over, the Busy box disappears. Names of com-pounds appear in the report area. The Status Area shows the total number of hits (compounds that match your searching criteria). You can use the scroll bar at the right to scroll up and down the list of com-pounds in the report, if necessary. A local spreadsheet containing the hits appears on the shelf.
Note
A dashed line outlines the cell containing the row number, and the selected compound appears in the 3D workspace of the Hit Mappings Row control panel. The parts of the compound that match the hypoth-esis appear in a mesh style.
Saving a compound to the shelf
After you have displayed a database compound in the work-space, you can save it to the shelf just as you normally save com-pounds to the shelf. When you click the Save To Lab As.... button, the Save To Lab As... control panel appears. When you click Save,
The default maximum number of hits is 300. To change the default maximum, set the value of the Max Search Hits field in the Workbench Options control panel available from the Workbench menu. This setting is operative only for the current workbench. You can set Max Search Hits globally from the Workbench Preferences command on the Preferences menu in the Stockroom. Thereafter any View Database workbench you open will be governed by this setting.
Display one of the compounds in the report by double-click-ing on the cell containing the row number.

138 Catalyst Tutorials/March 2002
Building Hypotheses and Searching Databases
an icon representing the compound appears on the workbench shelf and in the Stockroom.
Note
Sorting the entries in the report by name or molecular weight
This workbench has a command in the Tool menu for sorting the report rows by property (name or molecular weight, for example).
After you have displayed one of the compounds from the database in the workspace, save it to the shelf.
The molecule is saved with all of its conformers from the database.
Click the Cancel button to remove the Hit Mappings Row control panel.
Select the Sort by Property command from the Tools menu to display the Sort by Property control panel.

Searching a database with the hypothesis
Catalyst Tutorials/March 2002 139

140 Catalyst Tutorials/March 2002
Building Hypotheses and Searching Databases
By default, the entries will be sorted in increasing numerical or alpha-betical order. If you want the entries to be sorted by decreasing molec-ular weight, select the 9,8,7,6... toggle.
When the sorting operation has finished, the report updates to show the entries sorted by molecular weight.
Reports
You can also view search results in report styles that include 2D and/or 3D structures for each of the hits. Catalyst provides sev-eral different report forms on the ReportStyle menu.
Catalyst displays a 2D and 3D representation of each compound as well as values for the following properties: compound name, molecu-lar weight, formula, CAS registry number, activity, and estimated activity. A value for each property is displayed if contained in the database. Otherwise, a horizontal line is drawn through the input field (e.g., CAS number).
Click on the letter next to molecular weight (MolWt).
Click the Sort button.
Cancel the Sort by Property control panel.
Select the 2D3D-Compound form from the ReportStyle menu.

Searching a database with the hypothesis
Catalyst Tutorials/March 2002 141
Note
Each time you select one, the report area changes to reflect the new report style.
When you dispose of a View Database workbench, all local spread-sheets that were created to hold the results of searches are lost. To make a local spreadsheet permanent, save it with the Save Report to Lab as Spreadsheet command from the Data menu. Saved spreadsheets can be exported and used as input for programs that read tab-delim-ited text files. Spreadsheets can be searched along with installed Cat-alyst databases with a single search command.
The names of the forms suggest their content and display. For example, Four-Per-Page displays four molecules and data on one page. All forms except Structure-Activity-View are designed to print properly on an 8.5 by 11-inch page. Structure-Activity-View has been optimized for viewing nine compounds and associated data at a time on screen.
Try some of the other report forms.
Select the Data/Print command to print out a copy of the report.
In the Print control panel, under Print From:, click the Report button, type in the name of the printer on the net, and then click the Print button.
Dispose of the View Database workbench.
142 Catalyst Tutorials/March 2002
Building Hypotheses and Searching Databases
Note
Your search results also can be turned into a Catalyst database that can be installed in any Catalyst session and searched using the same tools demonstrated in this exercise. Creating Catalyst databases will be covered in Lesson 10.
Building a hypothesis with the feature dictionary
So far in this exercise you have learned how to build a hypothesis by converting a molecule into a hypothesis and then modifying the hypothesis. Then you used the hypothesis to search a data-base. You will now practice building by assembling functions and fragments from the Feature Dictionary.
Building a beta-adrenergic agonist hypothesis
You will build a hypothesis that represents the active site of a β-adrenergic receptor. β-adrenergic agonists are used to relieve asthma and as cardiac stimulants. The information in this exam-ple is drawn from “Identification of Two Serine Residues Involved in Agonist Activation of the β-Adrenergic Receptor,” by Strader et al., J. Biol. Chem. 264, 13572-13578, (1989). The paper reports the identification of three amino acids in the β-adrenergic receptor to which agonists can bind. These sites are the carboxy-late side chain of aspartate 113, which can interact with a posi-tively charged group, and the hydroxyl groups in serines 204 and 207, which can each form a hydrogen bond. A compound that can bind to the receptor in all three places would be a good candidate to test as a β-adrenergic agonist. The following figure shows a diagrammatic representation of the receptor and the three bind-ing sites.
The 3D representations showing how the query maps to the database hit are computed during display and cannot therefore be saved.

Building a hypothesis with the feature dictionary
Catalyst Tutorials/March 2002 143
You will create a hypothesis that has
♦ Either an OH, NH, or SH group to interact with the hydroxyl in Ser-204.
♦ A hydrogen bond donor to interact with the hydroxyl in Ser-207.
♦ A group that can be positively charged to interact with the neg-atively charged carboxylate in Asp-113.
Using the feature dictionary to add functions and fragments to a hypothesis
Note
Open your iconified View Hypothesis workbench from the Stockroom, or, if you do not have one, open a View Hypoth-esis QuickTool.
All workbenches have a Windows menu. This provides easy access to all open lab windows and iconified workbenches. You should see your iconified View Hypothesis workbench listed in this menu.
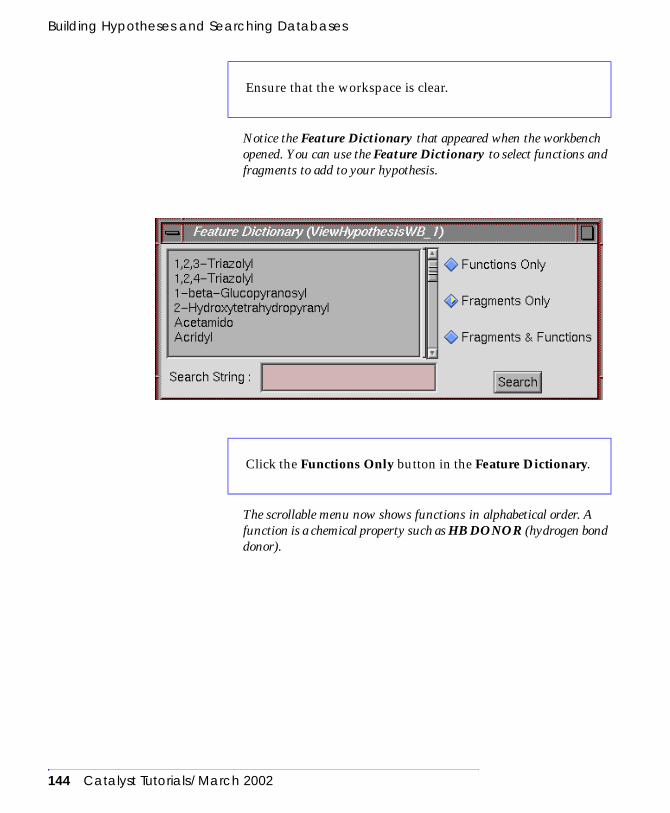
144 Catalyst Tutorials/March 2002
Building Hypotheses and Searching Databases
Notice the Feature Dictionary that appeared when the workbench opened. You can use the Feature Dictionary to select functions and fragments to add to your hypothesis.
The scrollable menu now shows functions in alphabetical order. A function is a chemical property such as HB DONOR (hydrogen bond donor).
Ensure that the workspace is clear.
Click the Functions Only button in the Feature Dictionary.

Building a hypothesis with the feature dictionary
Catalyst Tutorials/March 2002 145
The scrollable menu now shows fragments in alphabetical order. A fragment is a framework of chemical components or substructure—for example, Amine Basic or Carboxyl.
The scrollable menu now shows first functions and then fragments in alphabetical order.
Adding a function The first thing you will add is a positive ionizable function, which rep-resents any group that is either positively charged or can become pos-itively charged (through protonation at physiological pH) and thus can interact with the negatively charged carboxylate of the Asp-113.
Click the Fragments Only button.
Click the Fragments & Functions button.

146 Catalyst Tutorials/March 2002
Building Hypotheses and Searching Databases
The Feature Dictionary scrolls to POS IONIZABLE and high-lights it.
A small, highlighted, blue sphere appears. (You might not be able to see that the sphere is blue while it is highlighted.) This sphere is a pos-itive ionizable function.
In the Search String field, type
> POS I
and then click the Search button, or press the < Enter > key.
Click in the 3D workspace.
Click the Deselect tool so that you can see the previously-selected function or fragment more easily.

Building a hypothesis with the feature dictionary
Catalyst Tutorials/March 2002 147
Now you will add a hydrogen bond donor.
Note
A hydrogen bond donor function appears as two spheres connected by an arrow.
The sphere at the origin of the arrow is outlined by a yellow grid; this represents the heavy atom location. The sphere at the end of the arrow represents the projected point where the heavy atom of the receptor is located. The arrow represents the directionality of the receptor bond, as shown below.
Select HB DONOR in the Feature Dictionary. Use the scroll bar to find the function if it is not already visible.
When you make a selection in the Feature Dictionary, it has no effect on anything that is selected in the workspace in this workbench.
Click in an empty part of the 3D workspace.
Deselect the function by clicking on the Deselect tool.
To display labels for the heavy atom sphere, use the Atom Labels/3D command in the View menu. To see the labels on the other hypothesis parts, use the Geometric Object Names command in the View menu.

148 Catalyst Tutorials/March 2002
Building Hypotheses and Searching Databases
Notice that it moves independently of the positive ionizable function. This is because it is a separate hypothesis. You will learn how to merge separate hypotheses later. For this exercise, you will simplify the hydrogen bond donor by removing the vectorized projected point.
Try moving and rotating the newly added function.
Select the projected point and click the Erase tool so that the objects on your screen look like the following figure.

Building a hypothesis with the feature dictionary
Catalyst Tutorials/March 2002 149
Linking functions together with a distance constraint
Since the point of this exercise is to create one hypothesis with multiple characteristics, you will now link the two hypotheses. Catalyst provides two ways to merge separate hypotheses into one hypothesis:
♦ Add a distance constraint between two hypotheses.
♦ Select all hypotheses to be merged, and then select the Merge tool.
First, you will practice adding a distance constraint.
Select the heavy atom part of the hydrogen bond donor function and extend select the positive ionizable function in the workspace.

150 Catalyst Tutorials/March 2002
Building Hypotheses and Searching Databases
A selected distance constraint appears between the two functions, and the Constraint Tolerance control panel appears.
Double click in the entry box to select the text, then type the new text.
In the Toolbox, select the Set Constraint Tolerance tool.
To specify that the distance between the hydrogen bond donor and the positive ionizable function is between 2 and 10 angstroms inclusive, enter a value of 2 for the Constraint Minimum and 10 for the Constraint Maximum.

Building a hypothesis with the feature dictionary
Catalyst Tutorials/March 2002 151
The control panel disappears. The line between the positive ionizable function and the hydrogen bond donor indicates that there is a dis-tance constraint between them.
Note
Suppose you have changed your mind and you want the maximum distance between the two functions to be 8 angstroms.
Note that the control panel remains. The label for the distance con-
Click OK.
Select the Constraint Tolerances command in the View menu to display the value you specified for the distance range.
Constraint Names turns on the names of constraints; if both the Constraint Tolerances and Constraint Names commands are toggled on, you will see both the names of constraints and the values specified for them.
With the constraint selected, click the Set Constraint Toler-ance tool again.
In the Constraint Tolerance control panel for Distance-1, enter a value of 8 in the Constraint Maximum field.
Click the Apply button

152 Catalyst Tutorials/March 2002
Building Hypotheses and Searching Databases
straint changes in the workspace to show the new range.
Note
The label on the distance constraint updates again. This time the con-trol panel disappears.
You’ll notice that they move together now. When you added the dis-tance constraint between them, they became joined as one hypothesis.
Note
Adding a fragment to the hypothesis
So far you have created a hypothesis containing
♦ A hydrogen bond donor (to interact with Ser-207).
♦ A positive ionizable function (to interact with Asp-113), as shown in the figure.
Many control panels in Catalyst have an OK and an Apply button. Apply always implements the selected choices in the control panel, but it does not dismiss the control panel. OK always implements the selected choices in the control panel and closes the control panel.
Enter 6 in the Constraint Minimum field.
Click OK in the control panel.
Try moving and rotating either the positive ionizable func-tion or the hydrogen bond donor.
When you change the value of a distance constraint, the items that are connected by the distance constraint do not move, regardless of the value of the distance between them.

Building a hypothesis with the feature dictionary
Catalyst Tutorials/March 2002 153
Now you must add another group to interact with Ser-204. What you need is another hydrogen bond donor. However, in order to practice using the Atom Specification Editor control panel and to demonstrate that you can mix and match functions and fragments from the Feature Dictionary, you will explicitly add a hydroxyl group, and then change the specification for the oxygen atom to be oxygen, sulfur, or nitrogen.
A highlighted alcohol group appears. It consists of a hydrogen atom
Make sure that the Fragments Only button is selected in the Feature Dictionary.
Find and select Hydroxyl in the Feature Dictionary.
Click in the 3D workspace.

154 Catalyst Tutorials/March 2002
Building Hypotheses and Searching Databases
attached to an oxygen atom.
The hydrogen appears in white and the oxygen in red, as they do in the View Compound workbench.
Next you use the Atom Specification Editor control panel (as you learned earlier in this exercise) to specify that the oxygen atom can be oxygen, nitrogen, or sulfur.
Linking the parts of the hypothesis together
The chemical fragment is a separate object from the hypothesis that contains the hydrogen bond donor and the positive ionizable function. Earlier you learned how to connect two separate hypotheses by adding a distance constraint between them. Now you will learn another way of joining separate hypotheses.
Deselect it with the Deselect tool.
Select the O atom, then select the Atom Specification tool in the Toolbox. In the control panel, select the elements (N and S) to be included in the list of possible elements for the selected atom and set the lone pair count to * (allows any count). When you have selected the appropriate elements, click OK.
Select everything in the workspace with the Select All com-mand in the Edit menu.
click the Merge button from the Toolbox.

Building a hypothesis with the feature dictionary
Catalyst Tutorials/March 2002 155
You may see the hypotheses move slightly, or you may see no visible change.
Notice that everything moves or rotates with it, since all the compo-nents have been merged into one hypothesis.
Note
Finishing the hypothesis
You still need to add the final distance constraints to ensure that the positive ionizable function, the hydrogen bond donor, and the {O, N, S} atom are located within reasonable distances of each other as appropriate for β-adrenergic agonists.
Use the Set Constraints tool to accomplish this.
Try moving or rotating the brownish-mauve atom.
The Merge tool combines all selected hypotheses into a single hypothesis.
Specify a minimum of 2 and a maximum of 3 angstroms for the distance range between the hydrogen bond donor and the {O, N, S} atom.
Specify a minimum of 4 and a maximum of 7.2 angstroms for the distance range between the positive ionizable func-tion and the {O, N, S} atom.

156 Catalyst Tutorials/March 2002
Building Hypotheses and Searching Databases
Your hypothesis should be similar to the one shown below, if Atom labels, Geometric Object Names, and Constraint Names are switched on, and Constraint Tolerance is selected. (All these com-mands are on the View menu.)
Searching the database for beta-adrenergic agonists
You have created and saved a hypothesis that represents a generic β-adrenergic agonist. Use the View Database workbench to search the Sample database for compounds that match your new hypothesis, as you learned earlier in this exercise.
Save the hypothesis with a name such as BetaAdrHypo.

Building a sophisticated hypothesis for D2 agonists
Catalyst Tutorials/March 2002 157
Building a sophisticated hypothesis for D2 agonists
The hallmark of a good structure-activity hypothesis is that it suc-cessfully discriminates between subtly different types of activity, e.g., discriminating receptor subtypes (β-1 versus β-2), discrimi-nating agonists from antagonists, discriminating between a chiral molecule that is active and its inactive enantiomer. The very sim-ple “pharmacophore” hypothesis you just developed for β-2 ago-nists does not possess these properties.
Among other things, this model ignored any orientation-depen-dence of the interactions between the elements of the ligand and the side-chains of the receptor. In this section, you will build a sophisticated model for D2 agonism (from the work of Seeman et al., Mol. Pharm. 28:391-399, 1985), which specifically includes the orientation of the meta-hydroxyl group that functions as a hydro-gen bond acceptor, the orientation of the lone pair on the basic amine that also forms a hydrogen bond to the receptor, and the orientation of the plane of the phenyl ring that probably interacts with the receptor via π-stacking. You will see that adding these components yields a hypothesis with all the attributes cited above.
According to the Seeman model, the basic amine and the meta-hydroxyl in dopamine form directed hydrogen bonds with the

158 Catalyst Tutorials/March 2002
Building Hypotheses and Searching Databases
receptor. Both hydrogen bonds form characteristic angles relative to the plane of the aromatic ring, as well as to one another. In their model, the atoms of these acceptors should be separated by approximately 8 angstroms.
The steps below outline how to build this hypothesis in Catalyst. In following them you will compare each intermediate result against a test database of D1 and D2 agonists and antagonists. At each step you will discover that your hypothesis becomes steadily more discriminating for D2 agonists. Here is an overview of the procedure:
Place a basic amine, a hydrogen bond acceptor, and an aro-matic ring in the View Hypothesis workspace.
Join these with distance constraints.
Make a least-squares plane around the ring, and place an acceptor vector on the amine.
Constrain the angle of the amine lone pair relative to the plane of the ring.
Constrain the torsion angle of the amine lone pair and the other acceptor.
Building a sophisticated hypothesis for D2 agonists
Catalyst Tutorials/March 2002 159
Placing the basic amine, the acceptor, and an aromatic ring
A highlighted basic amine fragment appears.
You can see that the basic amine is symbolized by an opaque blue sphere surrounded by a yellow grid.
The actual location to click does not matter, since you will specify the interfeature distance with a distance constraint. You will see a phenyl hypothesis in the workspace, with hydrogens attached to all but one carbon.
In the View Hypothesis workbench, turn off Atom Labels, Constraint Names, Geometric Object Names, and Con-straint Tolerances. Clear the workspace for a fresh start.
In the Feature Dictionary, select Fragments Only.
Find and select Amine Basic. Click once in the empty View Hypothesis workspace.
Click the Deselect tool.
Return to the Feature Dictionary, find and select Phenyl, and click in the View Hypothesis workspace.

160 Catalyst Tutorials/March 2002
Building Hypotheses and Searching Databases
Do not worry about deselecting the bonds and the hydrogens; execut-ing Reset Hydrogen Count ensures that this phenyl will map to any phenyl, whether pendant or embedded in a larger structure such as a naphthyl.
Your workspace should now look like the illustration below.
Set all hydrogen counts to anything by selecting Reset Hydrogen Count on the Tools menu.
Finally, click Functions Only in the Feature Dictionary, and select HB ACCEPTOR.
Click in an empty area in the workspace to deposit an accep-tor.

Building a sophisticated hypothesis for D2 agonists
Catalyst Tutorials/March 2002 161
Joining the features with distance constraints
The transparent blue sphere inside the phenyl ring represents its center.
These distances were obtained from characteristic distances of (–)-apomorphine, a rigid, potent D2-agonist.
Note
Select that sphere, extend select the heavy atom of the acceptor, and then select Define Constraint from the Con-straints menu.
Select Distance to display the Constraint Tolerance control panel. Enter the values 1.8 and 3.9 angstroms, and then click OK.
You can use the Set Constraint Tolerance tool to accomplish this also.
Select the transparent blue sphere inside the phenyl ring again, extend select the basic amine, and add a distance con-straint here using the values 4.2 to 6.3 Å.

162 Catalyst Tutorials/March 2002
Building Hypotheses and Searching Databases
The hypothesis should look like the illustration below.
Finally, add a distance constraint between the acceptor’s heavy atom and the basic amine, using distance values of 5.7 to 7.8 Å.
Use the Save To Lab As... command to save the hypothesis as D2-agonist-1. Turn on the Constraint Tolerances (View menu).

Building a sophisticated hypothesis for D2 agonists
Catalyst Tutorials/March 2002 163
The hits are displayed in the report area.
Note
This is the name of a property in one of the report style’s variable fields. Catalyst displays the Change Report Property control panel containing a list of all available properties.
Note
Close the View Hypothesis workbench and drag the new hypothesis from the Stockroom to the View Database workbench.
Search the database Sample with the D2-agonist-1 hypoth-esis.
The following steps require the use of Oracle. See Lesson 5 for more information on using Oracle.
Double-click Activ.
Each report style can contain both fixed fields and variable fields (denoted by square brackets in the Compound-Table report style and by a small rectangular icon in other report styles). Properties and their associated values that appear in fixed fields are always displayed. In the report styles that come with Catalyst, properties such as compound name and molecular weight are fixed for most styles. You can replace properties in variable fields with other properties selected from the Change Report Property control panel.

164 Catalyst Tutorials/March 2002
Building Hypotheses and Searching Databases
Catalyst displays the names of all of the hits as well as the available IC50 and activity type values. Notice that this first D2-agonist-1 hypothesis is not very selective in that in addition to several D2 ago-nists, it finds many other compounds as well.
Making a least-squares plane around the phenyl and adding an acceptor vector to the amine
You will see a mesh object (representing the plane of the phenyl ring) appear coplanar with the phenyl ring.
Click the P icon next to IC50 and then click the Change but-ton to substitute IC50 values for activity values in your report.
In the same way, double-click the CAS_num field, and change it to Activity_type.
Select D2-agonist-1 on the shelf and drag and drop it on the View Hypothesis QuickTool.
Region select the phenyl ring. From the Constraints menu, select Define Geometric Object, and then select Best-Fit Plane from its submenu.
Rotate the object to see how it looks from many directions.
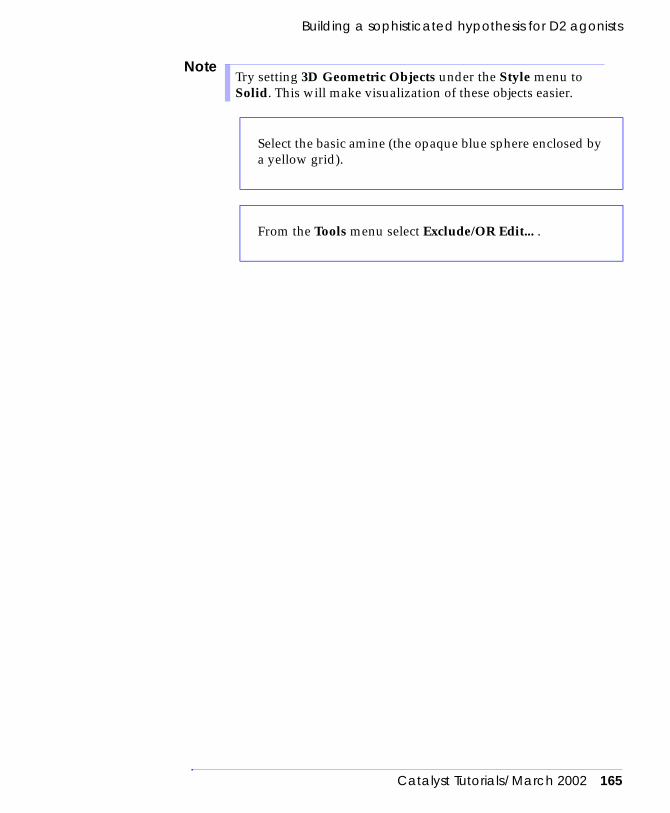
Building a sophisticated hypothesis for D2 agonists
Catalyst Tutorials/March 2002 165
NoteTry setting 3D Geometric Objects under the Style menu to Solid. This will make visualization of these objects easier.
Select the basic amine (the opaque blue sphere enclosed by a yellow grid).
From the Tools menu select Exclude/OR Edit... .

166 Catalyst Tutorials/March 2002
Building Hypotheses and Searching Databases
A control panel with four small windows appears.
In it, you will see objects defining tertiary and secondary aliphatic amines in the upper left and right windows. If the windows are too small, make them bigger by dragging the upper border while holding down the mouse button.
As indicated by the horizontal slider bar, there is a third column to the right that contains a primary aliphatic amine object (click in the open area of the slider bar to see this column). Taken together, these objects make up the definition of Amine Basic.
You will modify this definition by adding a hydrogen bond acceptor

Building a sophisticated hypothesis for D2 agonists
Catalyst Tutorials/March 2002 167
vector to the unshared electron pair on the nitrogen in each object.
A green and white cone (representing the direction of the lone pair on that nitrogen) appears. Do not worry about the direction of the cone; it will be controlled by the addition of a constraint in the next step.
The Exclude/OR editor control panel should now look like the illus-tration below.
Select the nitrogen of the tertiary amine.
From the Constraints menu select Define Geometric Object, and then select Hydrogen Bond Acceptor from its submenu.
Repeat this procedure for the other two columns so that all three objects have cones.

168 Catalyst Tutorials/March 2002
Building Hypotheses and Searching Databases
Next, you need to tell Catalyst how to associate the changes to your modified Amine Basic object.
The Association Editor control panel appears.
Select Set Associations from the Tools menu.

Building a sophisticated hypothesis for D2 agonists
Catalyst Tutorials/March 2002 169
You will see the object representing the basic amine in the upper left (small sphere) and the three amine definition objects.
Yellow lines appear linking the Amine Basic object to the nitrogen atoms of the amine definition objects.
Click the Amine Basic object to show what associations Cat-alyst knows about so far.

170 Catalyst Tutorials/March 2002
Building Hypotheses and Searching Databases
The Amine Basic icon grows a vector indicating that it now repre-sents the three types of amine including hydrogen bond acceptor cones.
Now select one of the hydrogen bond acceptor cones and extend select the other two.
Click the Add Association button.

Building a sophisticated hypothesis for D2 agonists
Catalyst Tutorials/March 2002 171
If the association is correct, you will see yellow lines appear which connect the vector and the cones.
Note
You are ready to return to the View Hypothesis workbench.
The View Hypothesis QuickTool now displays your modified hypothesis, but the distance constraints between the Amine Basic and other objects have been disrupted. You need to re-establish these distance constraints now.
Verify this by clicking on the vector.
The projected points are automatically associated when you made the cone association. If you click on the projected point sphere, yellow lines connecting these spheres will appear.
Click Return in the Association Editor control panel and then select Return from QuickTool from the QuickTool menu.
Toggle on Constraint Tolerances from the View menu so you can see the distance constraint labels.
Re-establish a distance constraint between the centroid of the phenyl and the heavy atom of the Amine Basic (4.2 -6.3 Å) and between the Amine Basic and the HB acceptor heavy atom (5.7 - 7.8 Å).

172 Catalyst Tutorials/March 2002
Building Hypotheses and Searching Databases
Constraining the angle of the amine lone pair to the plane of the ring
The query should now look like the figure below.
Select any part of the solid plane, and you will see the plane highlighted.
Extend-select the vector (cone) off of the Amine Basic. From the Constraints menu, select Define Constraint, and then select Angle from its submenu.
In the control panel that appears, specify 20 to 30 degrees as the range values for this angle.
Select Return from QuickTool from the QuickTool menu and save the new local hypothesis with the name D2-ago-nist-2 by first selecting the local icon and then using the Save To Lab As... command.

Building a sophisticated hypothesis for D2 agonists
Catalyst Tutorials/March 2002 173
Note
You will see that while the search continues to return D2 agonists as hits, other molecules are being filtered out.
Note
The appearance of the vectors in this query does not imply specific inter-vector angles, just the fact that they are present.
With D2-agonist-2 selected, search the database Sample again.
At this point there is no enantioselectivity, as both isomers of ADTN and apomorphine are returned as hits. This is because the hypothesis is using only angle and distance constraints, which are inherently nonchiral and can never distinguish enantiomers. To achieve enantioselectivity, you must use a signed torsion constraint between the lone pair vectors.

174 Catalyst Tutorials/March 2002
Building Hypotheses and Searching Databases
Adding a torsion constraint between the acceptor vectors
Note
Drop the hypothesis D2-agonist-2 on the View Hypothesis QuickTool.
Select the vector cone on the basic amine and the vector arrow on the hydrogen bond acceptor. From the Con-straints menu, select Define Constraint, and then select Torsion from its submenu. Specify a range of –10 to 0 degrees in the Constraint Tolerance control panel.
Return from the QuickTool and save the new local hypoth-esis as D2-agonist-3.
With D2-agonist-3 selected, search the Sample database to verify that this hypothesis is now relatively selective for D2 agonists.
Change the torsion constraint specification for the D2-agonist-3 hypothesis from –10.0 to +10.0 degrees, and verify that the enantiomer (–)-ADTN of the D2 agonist (+)-ADTN is retrieved by your altered hypothesis.

Using the Find command
Catalyst Tutorials/March 2002 175
Using the Find command
You have learned how to use the View Database workbench to search a database for compounds that contain particular functions or substructures. Sometimes you may want to browse a database or spreadsheet to see everything that it contains. In that case, you can use the Browse Databases/Spreadsheets command from the Tools menu in the View Database workbench.
You also can search through a database for compounds by name, or a subset of the letters in their name with the Find command. For example, you might want to see all compounds whose names contain the string benzoic or hydroxy. You can do this in any work-bench—just select Find from the Data menu.
Catalyst displays the Find control panel.
Select the Data/Find command in any workbench.

176 Catalyst Tutorials/March 2002
Building Hypotheses and Searching Databases

Using the Find command
Catalyst Tutorials/March 2002 177
Notice that Catalyst grays out all choices except Compounds under Look for because the database called Sample contains only com-pounds.
The cursor turns into a stopwatch while the search is in progress. If the search takes long enough, a Busy box appears giving you the opportunity to stop the search. After a few seconds the name of the first compound with a name containing 1 in the database appears in the Object Name box. Below it in information boxes, Catalyst dis-plays the name of the object’s source database, the object’s type, and which of the total number located is currently loaded.
Notice that Catalyst updates the information boxes with data on the
In the Find item field, enter a 1 to search for all compounds that have a 1 in their name. Make certain that the Substring button for Match is selected.
Select the icon representing Sample.
Click the Find button.
To display the current object, click Show.
To see the next compound in the database that has a 1 in its name, click to the right of the slider bar.

178 Catalyst Tutorials/March 2002
Building Hypotheses and Searching Databases
next object.
The control panel disappears.
Note
Note
Try the Forward button to step through the list of hits auto-matically; you can halt at any time by clicking the Stop but-ton.
To save a copy of a molecule to the shelf, click the Save To Shelf button.
When you have finished, click Cancel.
You can browse through a database with the Find command to see what is in it by entering a % (percent sign) in the Find item field. The % sign matches all name strings in the database, and therefore returns all compounds in the database as hits. The maximum number of hits is controlled by the Max Find Hits field in the Global Preferences control panel.
Searching for strings is not case sensitive.
When you have finished, close your workbenches.
In the Stockroom, select the Save StockroomDB command from the Data menu to save the work done in your Catalyst session.

Summary
Catalyst Tutorials/March 2002 179
Summary
In this exercise you learned how to use the View Hypothesis workbench to build hypotheses interactively. You learned how to convert molecules to hypotheses and how to assemble functions and fragments from the Feature Dictionary. You can combine these methods to build hypotheses that consist of one or more converted molecules with some additional fragments or func-tions. There is one more method for interactively building hypotheses, which involves mapping functions to a template mol-ecule.
You practiced searching the database with your hypotheses, you learned how to modify your hypothesis iteratively using the View Hypothesis QuickTool, and you learned how to use the Find command to search a database for compounds that have cer-tain strings in their names.
As well as building a hypothesis interactively in the View Hypothesis workbench, you can use the Generate Hypothesis workbench to generate a hypothesis automatically that represents the distinguishing characteristics of a set of compounds tested in a common assay. You will learn how to do this in Lesson 7.
By now you may have noticed that your Stockroom is getting full, so next you will learn how to organize your objects in labs, and you will learn how to get data into and out of Catalyst.

180 Catalyst Tutorials/March 2002
Building Hypotheses and Searching Databases

Catalyst Tutorials/March 2002 181
5 Organizing Your Data
Now that you have learned how to create molecules and hypothe-ses, it is time to learn how to use labs to organize your objects within Catalyst, how to get data in and out of Catalyst, and how to use Catalyst to store the “1D” data (activity data for different assays, or text data such as the name of the chemist who synthe-sized the molecule) associated with your molecules.
Using labs
You can use labs to organize your data. A lab is analogous to a box or a folder that can contain many objects, including other labs. The Stockroom is a lab, but it is the “top” lab, so it cannot be stored in any other lab.
Note
Using labs to store your data can help you keep the Stockroom organized. For example, if you have a hundred different objects, you can store them in various labs, and then store the labs in the Stockroom, rather than having a hundred objects sitting on the shelf in your Stockroom.
It is a good idea to store all the molecules, hypotheses, and spreadsheets that relate to a particular project in one lab. If there are many such objects, you can create labs within labs to further
Catalyst Stockroom databases were designed to handle up to about 1000 molecules without difficulty. These database are disk-based and provide efficient storage for 3D compounds and data without encumbering large amounts of computer memory. Larger compound collections should either be stored in Catalyst Corporate databases (see Lesson 9) or divided into subsets of less than 1000 and handled in separate Stockroom databases.

182 Catalyst Tutorials/March 2002
Organizing Your Data
organize your data. The one type of Catalyst object that can only be kept in the Stockroom is a database; the Stockroom is the only place in which you can install or de-install databases.
Creating labs
You will now create a lab.
The CreateLab control panel appears.
The control panel disappears, and an icon for Lab1 appears on the shelf of the Stockroom.
From the Data menu in the Stockroom, select the Create Lab... command.
Type in the name for the lab. Call it Lab1.
Click the Create button.
Open the lab either by selecting it and then selecting the Open command from the Data menu, or by double-clicking the lab icon.

Using labs
Catalyst Tutorials/March 2002 183
Moving objects to lab
You can use the drag and drop technique to move objects such as molecules, hypotheses, and spreadsheets from one lab to another. When you first opened Catalyst at the start of Lesson 1, the Stock-room contained several objects for you to use in that exercise. These objects are now cluttering up the Stockroom, so you can move them to a lab to clean up the Stockroom shelf. You can move one object at a time, or you can extend select multiple objects and move them all at once.
Make sure that the shelf of the Stockroom and the shelf of Lab1 do not completely overlap because you will want to select objects in each.
In the shelf of the Stockroom, select the object MolecA,and extend-select MolecB, MolecC, Hypo1, BarbHypo, and ang-IIHypo.

184 Catalyst Tutorials/March 2002
Organizing Your Data
All the selected objects appear in Lab1. They no longer appear in the shelf of the Stockroom.
Note
The lab closes, and the icon for the lab remains in the Stockroom.
Note
Tidying a lab or shelf and displaying the icons in different ways
By now your Stockroom might be looking fairly messy.
Click any of the selected icons and drag the items to the shelf of Lab1.
When you drag and drop an object from the shelf of one lab to another, the object moves to the new lab since it is changing its permanent storage location. This is different from what happens when you drag and drop an object into a workbench; for workbenches the original object remains in its storage location in the Stockroom or lab and a sample appears on the workbench shelf.
Iconify the lab by selecting the Iconify command from its Lab menu.
Catalyst stores the size and location of the lab before it was iconified and opens to those dimensions when you next reopen the lab. If you want to preserve the dimensions between Catalyst sessions, be sure to use the Save StockroomDB command on the Data menu.
Tidy the Stockroom with the Tidy Lab command on the Lab menu.

Using labs
Catalyst Tutorials/March 2002 185
Note
Changing the name of an object
You can change the name of any compound or hypothesis on the shelf by editing the name. You will practice by changing the name of Hypo1 to TestHypo.
You can tidy the shelf of any lab by using the Tidy Lab command on the Lab menu or tidy the shelf of a workbench with the Tidy Shelf command on the Workbench menu. These commands arrange the icons in different ways depending on which of the options you choose from the submenu. The by Object Name option arranges the icons alphabetically by name; by Object Type orders molecules, hypotheses, databases, labs, and spreadsheets into their respective groups; and by Object Location packs the icons attempting to eliminate empty spaces. All three options try to arrange icons in full rows on the shelf according to the size of the window. For example, if you adjust the window size to allow horizontal placement of three icons, Tidy Lab rearranges all icons in three columns within the window. You can also place individual icons at different locations within the window by dragging and dropping.
Try each of the options of the Tidy Lab and View As com-mands in the Lab menu to see the different ways you can display icons in the shelf.
Open Lab1.
Click at the right end of the name of Hypo1 in the icon on the shelf.

186 Catalyst Tutorials/March 2002
Organizing Your Data
Note
The cursor turns to a stopwatch briefly while Catalyst registers the new name.
Note
Note
Getting data in and out of Catalyst
The StockroomDB contains all the molecules, hypotheses, labs, and spreadsheets that have been saved to the shelf in your current Catalyst session. You can save all these objects to disk by saving the StockroomDB. You also can save individual molecules, hypotheses, and spreadsheets to separate files outside of Catalyst by exporting them, and you can bring them into Catalyst by
Change the name of the object to TestHypo.
Use either the <Backspace> key or the <Delete> key (depending on your keyboard; try them both and see which works) to erase letters. Use the left arrow and right arrow keys to move the cursor backward and forward through the letters, or simply click where you want the cursor to be.
When you have entered the new name, press the <Enter> (or <Return>) key.
If you change the name of an object that appears in one or more workbenches, the object is renamed everywhere (that is, in the lab where it is stored and in all the workbenches in which it appears).
Catalyst will not permit duplicate names for the same object type. If you try to rename an object when an object of the same type and having that name already exists, an Alert box warns you that the name will not be changed.

Getting data in and out of Catalyst
Catalyst Tutorials/March 2002 187
importing them. You can delete individual objects from the cur-rent Catalyst session. You also can print the contents of a work-space or spreadsheet to a printer, or save them to a file on disk.
Note
Saving your data (StockroomDB)
The StockroomDB appears as a database icon in the Stockroom. You can search the StockroomDB in the View Database work-bench or use the Find command, just as you can search any other database.
You can save the StockroomDB either by using the Save Stock-roomDB command in the Stockroom Data menu, or when you exit Catalyst. These are very similar operations, except that you must save on exiting to preserve any customizations of your user interface that you made with Global Preferences command in the Instrument menu.
When you start Catalyst again, the Stockroom contains all the molecules, hypotheses, spreadsheets, databases, and labs that it contained when the StockroomDB was last saved in a previous Catalyst session. Each lab also contains the same objects.
Currently, your Stockroom has some labs and additional objects that it did not have when you started this session of Catalyst. You will now save the StockroomDB and exit Catalyst, then come back into it, to see that all your objects were saved.
Catalyst supports copy and paste with ISIS and HyperChem when running on SGI workstations. This can be used as an alternate way to get molecules in and out of Catalyst. Details for these procedures are available in Catalyst’s on-line Help. Another way to get molecules in and out of Catalyst is to cut and paste SMILES (Simplified Molecular Input Line Entry System) strings. This is not covered in the tutorial, but is discussed in detail in Catalyst’s on-line Help. You can use the Help index to look up SMILES: copying and pasting.
Open or dispose of any iconified workbenches.

188 Catalyst Tutorials/March 2002
Organizing Your Data
These must be closed before the StockroomDB can be saved.
Note
The cursor turns into a stopwatch while saving is in progress. This command saves all the molecules, hypotheses, and spreadsheets along with the current lab hierarchy to a file on disk.
A control panel appears asking if you want to save your work.
However, if you had made changes since saving the StockroomDB, or you changed some global preferences and you wanted to save the changes, you should select Save and Exit. Catalyst disappears.
Note
To dispose of an iconified workbench, you can select the workbench icon in the Stockroom, then from the Data menu select the Dispose from Shelf command.
Save the StockroomDB by selecting Save StockroomDB from the Data menu in the Stockroom.
Exit from Catalyst by clicking the Exit button in the Stock-room.
Since you have just saved the StockroomDB you do not need to save your work again, so select No Save and Exit.
You do not need to use the Save StockroomDB command prior to exiting Catalyst because you can save the StockroomDB as part of the exit process. However, it is a good policy to save the StockroomDB whenever you have made significant changes.

Getting data in and out of Catalyst
Catalyst Tutorials/March 2002 189
Catalyst opens; the Stockroom contains everything that it contained when you last saved the StockroomDB.
Note
Determining which databases appear in the Stockroom
When Catalyst starts, it displays all databases in the Stockroom that were previously installed. You can install or de-install data-bases by using the Install Database and Deinstall Database com-mands from the Databases menu in the Stockroom.
Exporting objects
You can save individual molecules, hypotheses, and spreadsheets to disk by exporting them. You will now practice exporting the molecules MolecA, MolecB, and MolecC. However, first you need to rename them because there may already be files for MolecA, MolecB, and MolecC in your directory, which were put there by the program that set up your directory for training.
Wait a minute and start Catalyst up again, making sure that you start Catalyst in the same directory you were in before.
All of the processes connected to Catalyst require a short but finite time to shut down. If you encounter an error message saying that another Catalyst session is already running in your operating directory, you may not have allowed enough time for a proper shutdown of the last session.
Open Lab1 if it is not already open.
Rename the molecule MolecA to MolA, rename MolecB to MolB, and rename MolecC to MolC.

190 Catalyst Tutorials/March 2002
Organizing Your Data
Remember that you must press the Enter key after making a name change.
Note
The Export Data control panel appears.
Extend-select MolA, MolB, and MolC on the shelf of Lab1.
You can export any compound, hypothesis, or spreadsheet, except a local object, from the shelf of any lab or workbench. Local objects are temporary versions that result from special workbench operations and can be identified by an L in the icon.
From the Data menu, select the Export command.

Getting data in and out of Catalyst
Catalyst Tutorials/March 2002 191
The Export Items field shows the name and kind of the objects to be exported and the full file name that will appear on your disk. The default file name is the name of the object with an appropriate exten-sion for the export format chosen.
You may change the name as appropriate. The Export As popup list lets you choose to export a molecule as a Catalyst compound file (CPD), Catalyst topology file (TPL), SMILES topology file (SMI), MDL MOL or Sketch file (MOL or SKC), HyperChem compound file (HIN), MacroModel compound file (MMOD), or SYBYL molecule file (MOL2).
CPD and TPL are Catalyst’s proprietary ASCII formats for writing molecules to a text file. CPD has certain advantages over TPL and is recommended. The TPL format will eventually be phased out, but it is
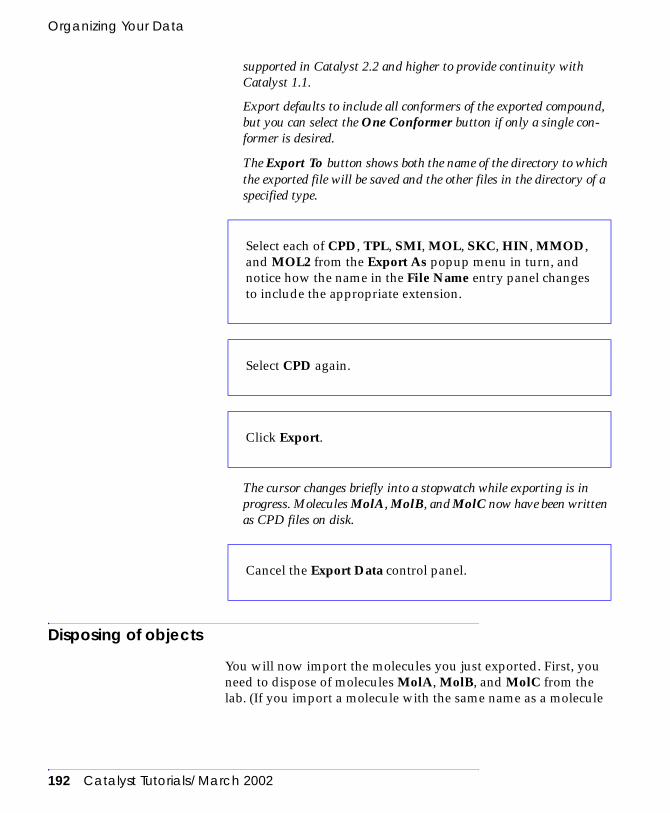
192 Catalyst Tutorials/March 2002
Organizing Your Data
supported in Catalyst 2.2 and higher to provide continuity with Catalyst 1.1.
Export defaults to include all conformers of the exported compound, but you can select the One Conformer button if only a single con-former is desired.
The Export To button shows both the name of the directory to which the exported file will be saved and the other files in the directory of a specified type.
The cursor changes briefly into a stopwatch while exporting is in progress. Molecules MolA, MolB, and MolC now have been written as CPD files on disk.
Disposing of objects
You will now import the molecules you just exported. First, you need to dispose of molecules MolA, MolB, and MolC from the lab. (If you import a molecule with the same name as a molecule
Select each of CPD, TPL, SMI, MOL, SKC, HIN, MMOD, and MOL2 from the Export As popup menu in turn, and notice how the name in the File Name entry panel changes to include the appropriate extension.
Select CPD again.
Click Export.
Cancel the Export Data control panel.

Getting data in and out of Catalyst
Catalyst Tutorials/March 2002 193
already in the lab, Catalyst will prompt you to rename the imported molecule.)
The selected molecules disappear from your session.
Note
Importing objects
You can import molecules, hypotheses, and spreadsheets into Catalyst individually or in groups. You can import any object that was previously exported from a Catalyst session (except spread-sheets with non-StockroomDB compounds exported in SPST for-mat). You also can import compound files from other sources that are written in CPD, TPL, SMI, MOL, SKC, HIN, MMOD, MOL2, or CHM formats.
The Import Data control panel appears, with a list of directories on the left and files on the right.
Select molecules MolA, MolB, and MolC in the shelf of Lab1.
Select the Dispose from StockroomDB command in the Data menu.
If you dispose of an object from the Stockroom or other lab, the object disappears from the lab and from any workbenches in which it appears. However, if you dispose of an object from a workbench shelf, it is removed from that workbench, but remains in the lab where it is permanently stored, and it also remains on any other workbench shelves where it appears.
From the Data menu of the Lab1, select Import.

194 Catalyst Tutorials/March 2002
Organizing Your Data
All three compounds are selected for import indicated by the high-lighting in the File Type field.
Select MolA.cpd first, then hold down the < Shift > key and select MolC.cpd in the list of files.

Getting data in and out of Catalyst
Catalyst Tutorials/March 2002 195
Note
The cursor turns into a stopwatch while the compounds are being imported. The compounds MolA, MolB, and MolC appear on the shelf in Lab1.
Holding down the shift key selects all files between the first and last selected files. Holding down the control key selects individual files independent of their order. You can set the File Type to Compounds by clicking on the button titled All Files and selecting the appropriate choice. Only files with compound extensions are listed. This is useful when your directory includes large numbers of files of different types.
Click the Import button.
Cancel the control panel.

196 Catalyst Tutorials/March 2002
Organizing Your Data
Note
Printing data from Catalyst
You can print the contents of a workspace or report by using the Print command in the workbench Data menus. The Print com-mand allows you to do the following:
♦ Print the image displayed in a workspace of any workbench on a color or black and white printer.
♦ Write the image displayed in a workspace as either a raster or PostScript file.
♦ Print the contents of a report in the View Database or Generate Hypothesis workbench on a black and white or color printer.
♦ Write the contents of a report in the View Database or Generate Hypothesis workbenches to a file.
Printing the contents of a workspace
Now you will practice printing the contents of a 3D workspace. For a full discussion of the printing options, see on-line Help. Look up Print command: description in the Help index.
When sending the contents of a workspace to a printer with the Print command, you can print the displayed objects or the dis-played screen image (raster or bit map). The Objects option pro-duces a high-resolution object display image, and the Screen Dump option produces raster (screen dump) image. If your workbench has two workspaces, select the appropriate one (by clicking on the Select 2D or Select 3D tool in the Toolbox) before you print it. You can print only the images in one workspace at a time.
The Objects option produces a printout at the resolution of your printer, but colors and shadings are “flat-shaded.” That is, the shading is not smooth and spheres will appear faceted on the
If you attempt to import a file that has no file type extension or an unknown file type extension, an Unknown File Type Alert box appears, prompting you to select one of the supported file types. If you select MOL, for example, Catalyst will attempt to import the file as an MDL MOL file.

Getting data in and out of Catalyst
Catalyst Tutorials/March 2002 197
printed page. The background is white, and any text (such as atom labels or compound names) appears in black. Text prints clearly; the pan and zoom widgets do not appear in the printed copy. The Objects option usually gives a sharper and better image, although it does not look exactly like the image on the screen. This option also produces the best results when printing the contents of the 2D workspace.
In the following steps, you will print an image of MolA in the 3D workspace of a View Compound workbench. To do this part of the exercise, you must know the name and location of a PostScript printer to which your computer can send data. You can specify a default printer in the Global Preferences control panel so that its name appears automatically when you open the Print control panel. If you are not sure of the name of a suitable printer, ask your system administrator to help. Printers must be networked with your computer and properly specified for Print commands from Catalyst to work.
MolA is displayed in the workspace.
You can print only the contents of one workspace at a time.
The Print control panel appears.
Drag and drop MolA onto the View Compound work-bench button in the Stockroom to open the workbench.
If your workbench has two workspaces, select the appropri-ate workspace (by selecting either the 2D or 3D workspace button in the Toolbox) before you print it.
From the Data menu, select the Print command.

198 Catalyst Tutorials/March 2002
Organizing Your Data
Note
Note
Ensure that Workspace is selected as the Print From mode.
Workspace refers to the graphic area of a Catalyst workbench; Report refers to the tabular report areas of View Database and Generate Hypothesis workbenches.
Ensure that Objects is selected for Print Scene As.
Objects refers to the molecules, hypotheses, and other objects that appear in the graphics area of the workbench. Screen Dump refers to all pixels displayed in the graphics area including its background.

Getting data in and out of Catalyst
Catalyst Tutorials/March 2002 199
Note
Note
If you do not know the name of such a printer, ask your system admin-istrator.
Note
The control panel disappears from the screen, and the cursor turns into a stopwatch while Catalyst sends the data to the printer. The data is now in the print queue and will be printed out when it reaches the top of the queue.
Ensure that All is selected as the Pages mode.
You can select which pages to print here. Multiple pages are meaningful only when printing the contents of a report.
Ensure that Copies is set to 1, and Border is set to On.
When on, Border places a bold line rectangle around your image.
In the Printer entry panel next to Destination, enter the name of a printer that your computer can access.
When printing to a file, you should choose EPS if you intend to submit the file later to a program expecting encapsulated PostScript input. Otherwise, the format is standard PostScript. Standard PostScript is most useful if you intend to send the file directly to a PostScript printer.
Click Print.

200 Catalyst Tutorials/March 2002
Organizing Your Data
Managing 1D data in Catalyst
Catalyst provides many capabilities for managing your 1D (prop-erty) data:
♦ In your StockroomDB (appropriate for dozens to about one thousand compounds, which only you will use).
♦ In a database of any size, which you create yourself for use by you and your project team.
♦ In a corporate database, which your company maintains for use by everyone.
In this exercise, you will use property data in your StockroomDB.
The stockroom property dictionary
Note
The examples of 1D data you will use here are values for a prop-erty called RGD_IC50 (the binding affinity to the RGD receptor, also known as Fibrinogen GPIIb/IIIa receptor); Chemist, the last name of the chemist who synthesized the molecule; and Notebook_page.
First, you need to define the three new properties in the Property Dictionary for the StockroomDB.
Close the View Compound workbench.
This section requires the use of Oracle.
In your Stockroom, select StockroomDB and from the Databases menu select Edit Property Dictionary.

Managing 1D data in Catalyst
Catalyst Tutorials/March 2002 201
In the Edit Property Dictionary control panel that appears, you will see a list of properties that are predefined for your Stock-roomDB. You will now define three new properties, RGD_IC50, Notebook_page, and Chemist.
You will now see it at the top of the list.
Your Property Dictionary should now look like:.
Select Add in the Edit Property Dictionary control panel. In the Property Name field, type RGD_IC50. In the descrip-tion field, type a full description of the protocol used here (for example, displacement of 3H-107260).
Next to Type, select Real because the values for this prop-erty are real numbers such as 50.2 or 1.27.
Finally, select Add to add this property to your Property Dictionary.
Repeat this procedure, creating properties called Notebook_page (of Integer type for whole numbers) and Chemist (of String type for textual data).

202 Catalyst Tutorials/March 2002
Organizing Your Data
Click Cancel to dismiss the control panel.
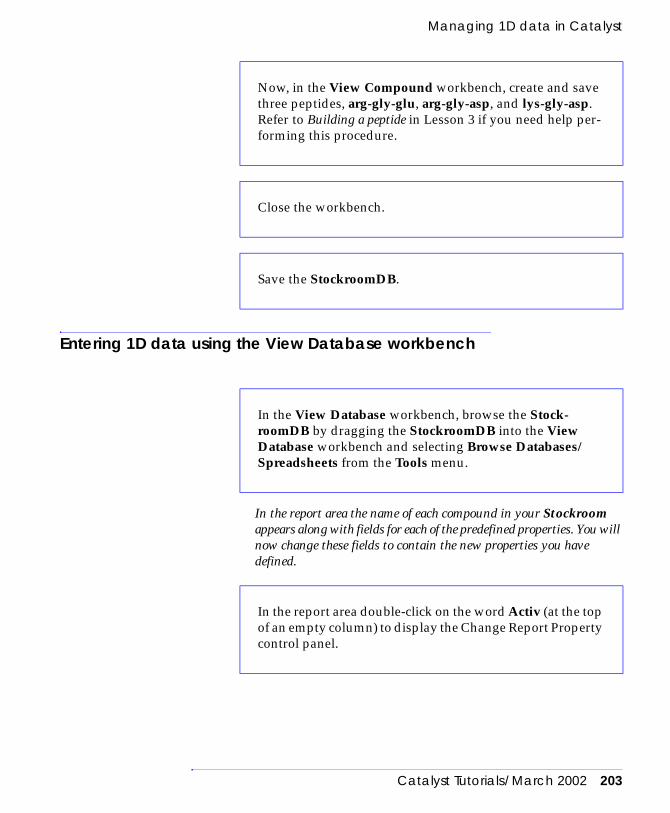
Managing 1D data in Catalyst
Catalyst Tutorials/March 2002 203
Entering 1D data using the View Database workbench
In the report area the name of each compound in your Stockroom appears along with fields for each of the predefined properties. You will now change these fields to contain the new properties you have defined.
Now, in the View Compound workbench, create and save three peptides, arg-gly-glu, arg-gly-asp, and lys-gly-asp. Refer to Building a peptide in Lesson 3 if you need help per-forming this procedure.
Close the workbench.
Save the StockroomDB.
In the View Database workbench, browse the Stock-roomDB by dragging the StockroomDB into the View Database workbench and selecting Browse Databases/Spreadsheets from the Tools menu.
In the report area double-click on the word Activ (at the top of an empty column) to display the Change Report Property control panel.

204 Catalyst Tutorials/March 2002
Organizing Your Data
The Chemist property is already present in the default report format.
Note
Click on the P next to RGD_IC50, and then select Change.
In the same way, change CAS_num to Notebook_page_number.
Clear the report area by selecting Clear All Report Rows from the Edit menu.
Build a spreadsheet from arg-gly-glu, arg-gly-asp, and lys-gly-asp by dragging their icons over the report area of the View Database workbench.
Enter property data into cells by clicking in a cell, and enter-ing the value in the Edit entry panel above the report area (not in the cell in the report). click in the Edit entry panel and delete any existing value before typing the new value.
When you click in the Edit entry panel, the cursor changes to a blinking vertical one, indicating that you can make changes. If you take the cursor out of the Edit entry panel, you must move it back in again and click before you can make any changes to an entry.
Press the < Enter> or the <Return > key on the keyboard.

Managing 1D data in Catalyst
Catalyst Tutorials/March 2002 205
You will see the entered value in the cell, with a gray background. This gray color indicates the cell is “dirty”—meaning that the value has not been permanently recorded in the database. The entry point is automatically shifted to the next cell in the column.
You must now permanently record these data in your StockroomDB. This requires two steps—first saving the spreadsheet, then commit-ting the result to the database.
This permanently records your new data, and the modified cells now are displayed with a white background to reflect this.
Sorting and selectively viewing your data using 1D constraints
Catalyst allows you to view these data in an organized way. For example, you can view this list of molecules, sorted by affinity.
To save this report as a spreadsheet, under the Data menu select Save Report to Lab as Spreadsheet. Enter a name for the spreadsheet, and click Save.
Select the saved spreadsheet on the shelf. Then select Com-mit 1D Changes To Database from the Databases menu.
Select Sort By Property from the Tools menu to display the Property Dictionary control panel.
Select the RGD_IC50 property by clicking on the P next to it. Then, leaving other settings on their default values, select OK.
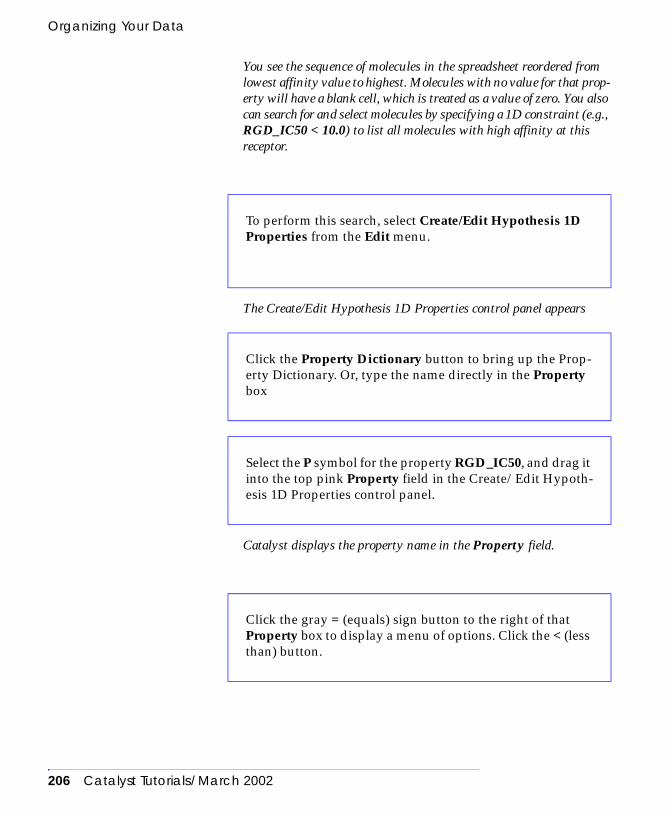
206 Catalyst Tutorials/March 2002
Organizing Your Data
You see the sequence of molecules in the spreadsheet reordered from lowest affinity value to highest. Molecules with no value for that prop-erty will have a blank cell, which is treated as a value of zero. You also can search for and select molecules by specifying a 1D constraint (e.g., RGD_IC50 < 10.0) to list all molecules with high affinity at this receptor.
The Create/Edit Hypothesis 1D Properties control panel appears
Catalyst displays the property name in the Property field.
To perform this search, select Create/Edit Hypothesis 1D Properties from the Edit menu.
Click the Property Dictionary button to bring up the Prop-erty Dictionary. Or, type the name directly in the Property box
Select the P symbol for the property RGD_IC50, and drag it into the top pink Property field in the Create/Edit Hypoth-esis 1D Properties control panel.
Click the gray = (equals) sign button to the right of that Property box to display a menu of options. Click the < (less than) button.

Managing 1D data in Catalyst
Catalyst Tutorials/March 2002 207
You now see a local hypothesis on the shelf, representing the query, “Find all molecules that bind to the RGD receptor at better than 10 nM”, or equivalently, “Find all molecules where RGD_IC50 < 10.0”.
You now see molecules listed that satisfy the constraints of the query.
One handy relational operator is the ≈ (approximately equal to), which can be used with text fields to find matches on subsets of the text. For example, Chemist ≈ Wood returns all molecules synthe-sized by Woodward, Woodburn, Woodley, etc.
For example, you can find all molecules recorded in a certain range of notebook pages.
The molecules matching the notebook page number search specifica-
Finally, in the Max box enter a threshold value of 10.0, and click Save.
Select the local hypothesis, and search your StockroomDB.
Experiment with other types of 1D constraints.
You may also specify a range of values.
To do this, specify that the Notebook_page_number is between, for example, 1000001 and 1000999. In this case, choose the Notebook_page_number property, and enter in the Min field (to the left of Property) the value 1000001, and in the Max field the value 1000999.
208 Catalyst Tutorials/March 2002
Organizing Your Data
tion are displayed in the report.
Summary
In this exercise you learned how to use labs to organize your data, how to save all your work, how to export and import objects, and how to print the contents of a workspace.
Close the workbench and save your StockroomDB.
Catalyst Tutorials/March 2002 209
6 Generating Conformational Models
Catalyst can generate a conformational model that represents the flexibility of a molecule. The conformational model emphasizes coverage and consists of a representative set of conformers taken from the range of energetically reasonable conformations of the molecule. You can use the conformational model for estimating the activity of a compound, for fitting the compound to a hypothesis, and in hypothesis generation. After you have generated a confor-mational model for a molecule, you can also view and delete indi-vidual conformers.
This exercise describes the different ways Catalyst generates con-formers, and then leads you through the process of generating con-formational models for the peptide glu-ala-pro. This is one of the molecules that makes up the set of active compounds for which you will generate a hypothesis in Lesson 7.
Fast and best quality conformer generation
Catalyst provides two types of conformational analysis: fast and best quality. Both methods emphasize broad coverage of conforma-tional space, and each has certain advantages. Both methods auto-matically build only as many conformers as required for adequate coverage, up to a user-specifiable maximum. The following lists describe the strengths and weaknesses of the two methods for gen-erating conformational models:

210 Catalyst Tutorials/March 2002
Generating Conformational Models
Fast conformer generation
♦ Fast conformational analysis is the method of choice for database generation, because the tolerances in a database query can be adjusted to minimize the effect of incomplete conformational coverage.
♦ Faster throughput makes generation of very large databases con-taining more than 100,000 compounds practical on relatively inexpensive machines. An Indy equipped with a 150MHz R4400 processor can build roughly 8-10 thousand models consisting of 30 conformers each in one cpu-day.
♦ Fast conformational analysis is a good place to start if you want a reasonable conformational model quickly.
♦ The results of fast conformer generation can be used as input for best generation, if improvement of the conformational model is required.
♦ Fast generation includes a relatively superficial treatment of flex-ible rings.
Best conformer generation
♦ This method provides the best conformational coverage possible within Catalyst.
♦ Best conformational analysis is the method of choice if the con-formational models are to be used for hypothesis generation.
♦ Best conformer generation considers the arrangement in space of chemical features rather than simply the arrangement of atoms.
♦ Best conformational analysis provides the most comprehensive treatment of flexible ring systems and is the method of choice for these systems.
Conformational analysis in Catalyst stops automatically when the conformational difference criteria can no longer be met. Thus, only a few conformers will be generated for small rigid molecules, while many will be generated for large flexible compounds. This is partic-ularly important for database building, where a more efficient rep-

Generating conformational models interactively or in the background
Catalyst Tutorials/March 2002 211
resentation translates to a smaller and more rapidly searched database.
Best conformer generation should always be used if the goal is to use Catalyst to build a hypothesis automatically from a training set of molecules. While there is no limit to the number of conformers you can request from a best generation run, the hypothesis genera-tor will accept only 255 conformers. Therefore, the most efficient way to use best conformer generation is to specify 255 as the maxi-mum number of conformers and to let Catalyst decide how many below this number are needed on a molecule-by-molecule basis. For database building with fast conformer generation, a setting of 50 for the maximum number of conformers is a good generation time/coverage trade-off.
Generating conformational models interactively or in the background
You can generate conformational models interactively in Catalyst one compound at a time. However, you cannot use your Catalyst session for anything else until the generation process has finished. Generation of conformational models for multiple molecules must be done as a background process.
When you generate conformational models as a background pro-cess on your machine, the process does not tie up the Catalyst inter-face. You can continue to use your Catalyst session while the process is running, although you might experience some degrada-tion in performance. If you exit from your current Catalyst session while a background process is running, the background process is not affected.
We recommend that you run conformer generation interactively only when you want a single model for special purposes and don’t want to consume Hypo tokens.
If your network permits, the ideal situation is to run a background job on a remote machine. That way, your local Catalyst session experiences no performance degradation at all. Catalyst provides the job controls necessary for all of these methods of operation.

212 Catalyst Tutorials/March 2002
Generating Conformational Models
Generating and displaying conformational models
You should use the View Compound workbench to generate a con-formational model of a compound. After generating conformers, you can display them in the workspace. You can also use a “fast for-ward” button that rapidly cycles through each conformer in the set.
In the following instructions you will first learn how to generate conformers interactively and display them. Then you will learn how to generate conformers in a background process.
Note
Generating conformers interactively
These instructions use the glu-ala-pro molecule that you built in Lesson 3. If your current session of Catalyst does not contain this compound, you can import it from the cattrain subdirectory (which Catalyst created in your current directory when you installed the training files for these tutorials).
It is possible to generate a conformational model using the View Hypothesis workbench, but you can only work in the foreground and Catalyst cannot be used for anything else until the conformation generation is finished.
Open a View Compound workbench with glu-ala-pro in its shelf. Select glu-ala-pro in the Stockroom, and then drag and drop it on the View Compound workbench button in the Stockroom.
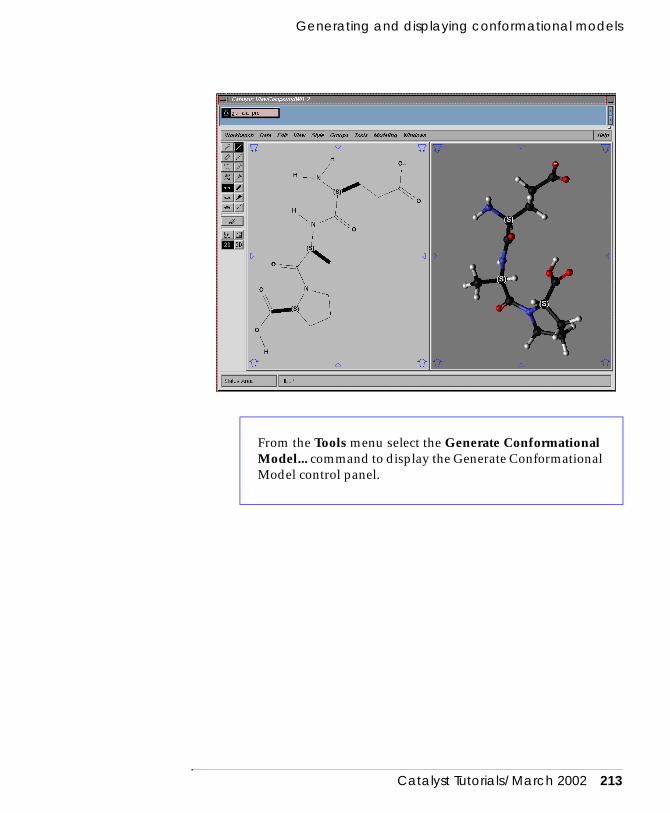
Generating and displaying conformational models
Catalyst Tutorials/March 2002 213
From the Tools menu select the Generate Conformational Model... command to display the Generate Conformational Model control panel.
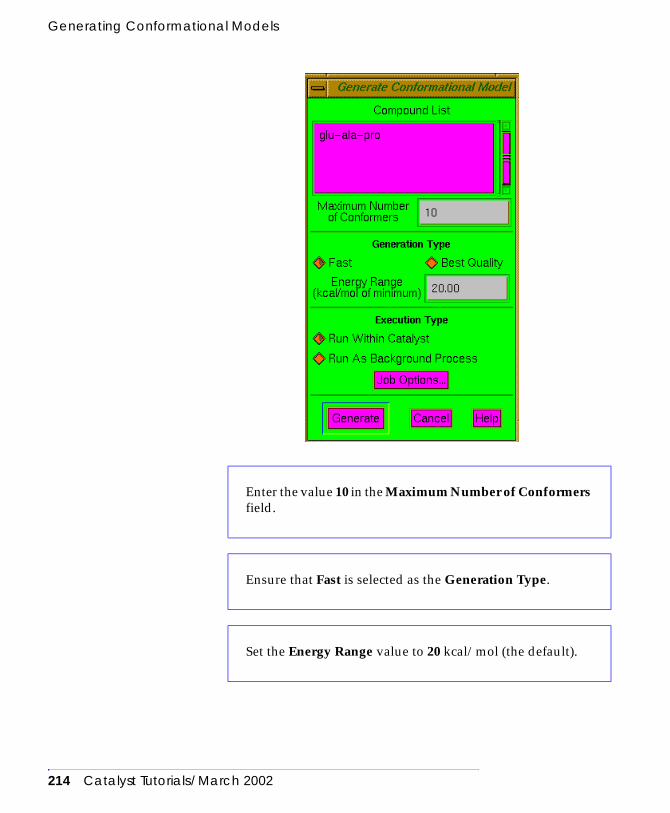
214 Catalyst Tutorials/March 2002
Generating Conformational Models
Enter the value 10 in the Maximum Number of Conformers field.
Ensure that Fast is selected as the Generation Type.
Set the Energy Range value to 20 kcal/mol (the default).

Generating and displaying conformational models
Catalyst Tutorials/March 2002 215
The cursor turns into a stopwatch while Catalyst generates the con-formers. A Busy dialog box will appear, providing an opportunity to stop the process if you made a mistake.
Note
Examine the conformers
The Show Conformational Model control panel appears.
Ensure that Run Within Catalyst is selected as the Execu-tion Type.
Click the Generate button.
Catalyst automatically saves the generated conformers with the compound for which they were generated (but does not save the StockroomDB to disk). However, you see no visible change in the workbench except for an update in the Status Area showing the number of conformers produced.
With glu-ala-pro selected, select Show Conformational Model... from the Tools menu.

216 Catalyst Tutorials/March 2002
Generating Conformational Models

Generating and displaying conformational models
Catalyst Tutorials/March 2002 217
Note
At the bottom of the control panel you will find a series of video control buttons that can be used to cycle through conformers one at a time or automatically. The center button is a stop button. The buttons with a single arrow display one conformer at a time, and those with double arrows correspond to “fast forward” and “fast reverse” buttons that cycle automatically beginning with the current conformer.
The total number of conformers is shown in the Num box, and the energy of a conformer relative to the first unregistered conformer in the list is shown in the Conf Energy box. The energy of the first unregis-tered conformer, the lowest found during the conformational search, is set to 0. On the right of the control panel is the Flat selection list. A flat is a 2D structure created and stored for each compound constructed in Catalyst. Typically, you will find a single flat for each compound; it is used whenever the compound is displayed as a 2D drawing.
Each conformer is displayed in sequence. You can stop at any time by selecting the center button.
A scrollable list of conformer names is in the upper left of the control panel. Each generated conformer is preceded by the letter U (for unregistered conformer). The conformer created when you drew the molecule is labeled by the letter E (for edit conformer). To select a conformer for viewing, click on the U or E, and the 3D conformer appears in the viewing portion of the control panel.
Select three atoms in an area of the conformer you wish to hold constant during the playback.
Click the Forward button.

218 Catalyst Tutorials/March 2002
Generating Conformational Models
Displaying, registering, unregistering, and deleting individual conformers
The 3D conformer will appear in the display portion of the control panel. You can manipulate the view of this molecule just as you can in a workbench.
You cannot modify or save a conformer in this control panel. For these operations, you must first add the conformer to the View Compound workspace.
The selected conformer appears in the workspace of the View Com-pound workbench.
Note
There are different types of conformers in Catalyst. The first time you
Select a conformer to display.
Hold down the right mouse button on the molecule and rotate it.
Select a conformer in the list of conformers.
Click the Add to View button.
Each time you select Add to View, the selected conformer is added to the workspace. If you do not want the new conformer shown on top of the existing display you should clear the workspace first. Once in the workspace, the conformer can be operated on with all of the View Compound workbench tools.

Generating and displaying conformational models
Catalyst Tutorials/March 2002 219
draw or import a molecule, Catalyst creates an edit (E) conformer. This conformer may be distorted or of arbitrarily high energy and is therefore not used directly for conformational analysis, Compare/Fit operations, or hypothesis generation. The E conformer is used for display purposes and as a source of molecular topology for starting conformational anal-ysis. Conformers automatically generated by Catalyst (U confs) during either fast or best conformational analysis obey the energy threshold specified during generation, and collectively become Catalyst’s internal conformational model. This model is used throughout the Catalyst sys-tem.
It is possible to force Catalyst to use individual conformers for analysis by first registering the conformers (R confs). For example, you may have a 3D conformation determined by X-ray or NMR methods. Regis-tration allows you to include this conformation in a Catalyst analysis.
The name of the selected conformer appears in the Name box below the Conformers listbox in the Show Conformational Model control panel.
The symbol in the scrollable list changes from a U (unregistered) to an R (registered).
The symbol changes back to a U.
Select a conformer in the list of conformers, for example conf9.
Click the Register Confs button.
Select conf9 again. Then click the Unregister Confs button.

220 Catalyst Tutorials/March 2002
Generating Conformational Models
You can also delete conformations..
You see that the selected conformer name disappears from the list of con-formers.
Note
Generating a conformational model in the background
So far in this exercise you have learned how to generate a confor-mational model interactively and how to display, register, unregis-ter, and delete conformers. When you generate a conformational model interactively, the Catalyst interface is unavailable to you until conformer generation has finished. This could be a problem if the process takes more than a couple of minutes.
However, if you generate the conformational model as a back-ground process, you can continue using the Catalyst interface while the conformer generation process takes place. You will now learn how to generate a conformational model as a background process
Select a conformer to delete, such as conf7.
Click the Dispose Conf/Flat button.
Close the control panel by clicking the Cancel button.
Because Catalyst creates a conformer for any non-Catalyst structure that is imported, these conformers are of the unregistered (U) kind.

Generating and displaying conformational models
Catalyst Tutorials/March 2002 221
.
The Job Options control panel appears, which you can use to specify which host machine the background job is to run on, when it is to start, the names of the process and operating directories, and whether to queue the job after an already-running job.
The Process Name and Local and Remote Directory boxes should have default values, which you can leave as they are. The process name is the name that Catalyst uses to identify the background job. The local direc-tory is a directory that Catalyst creates in the operating directory on your host and the remote directory is a directory Catalyst creates on the specified remote machine, if you are running the job remotely.
Select the Generate Conformational Model... command from the Tools menu to display the Generate Conforma-tional Model control panel.
Enter 100 in the Maximum Number of Conformers box.
Select Best Quality as the generation type.
Set the Energy Range to 15.
Select Run as Background Process as the execution type.
Click Job Options....

222 Catalyst Tutorials/March 2002
Generating Conformational Models
.
The Queue After field allows you to specify that the background pro-cess must start when a previous job finishes. However, in this case there are no previous jobs, so leave the Queue After field as it is.
Note
Note
The Job Options control panel disappears.
The control panel grays out while Catalyst prepares for the background job. This preparation includes creating a directory and writing some files to it. A control panel informs you that the setup is completed. Since
Make sure that Start Time is set to now (the default value).
Start time is the time at which the background process will start. You can enter values such as 2:10 pm or 15:30. If the value is now, the process starts as soon as you select Generate in the Generate Conformational Model control panel.
Make sure that Where to Execute is set to Locally.
If you run the process locally, it runs on the machine you are using now. You can run it remotely on another machine to which you have access and which is enabled to run Catalyst. The conformer generation process may slow other processes on the same machine.
Click OK.
In the Generate Conformational Model control panel click Generate.
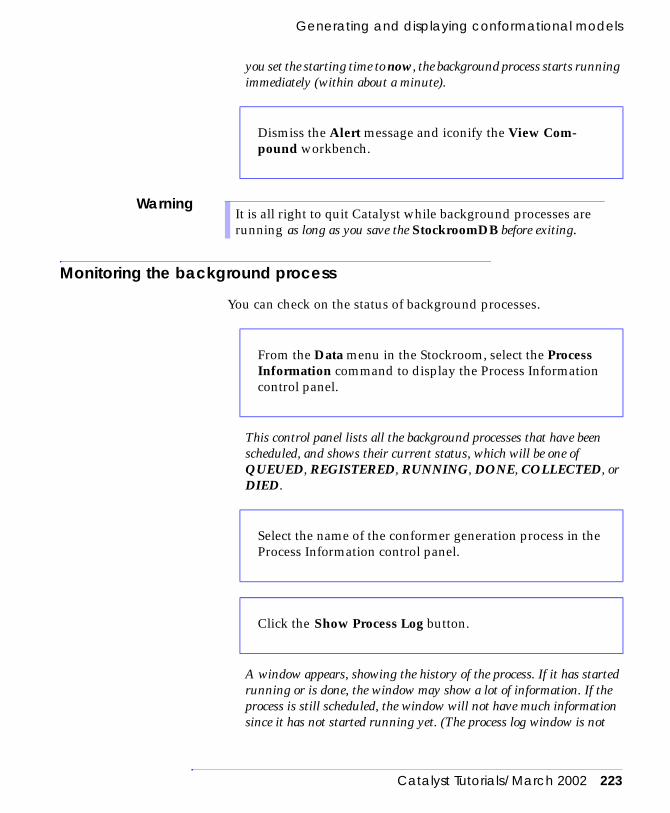
Generating and displaying conformational models
Catalyst Tutorials/March 2002 223
you set the starting time to now, the background process starts running immediately (within about a minute).
Warning
Monitoring the background process
You can check on the status of background processes.
This control panel lists all the background processes that have been scheduled, and shows their current status, which will be one of QUEUED, REGISTERED, RUNNING, DONE, COLLECTED, or DIED.
A window appears, showing the history of the process. If it has started running or is done, the window may show a lot of information. If the process is still scheduled, the window will not have much information since it has not started running yet. (The process log window is not
Dismiss the Alert message and iconify the View Com-pound workbench.
It is all right to quit Catalyst while background processes are running as long as you save the StockroomDB before exiting.
From the Data menu in the Stockroom, select the Process Information command to display the Process Information control panel.
Select the name of the conformer generation process in the Process Information control panel.
Click the Show Process Log button.
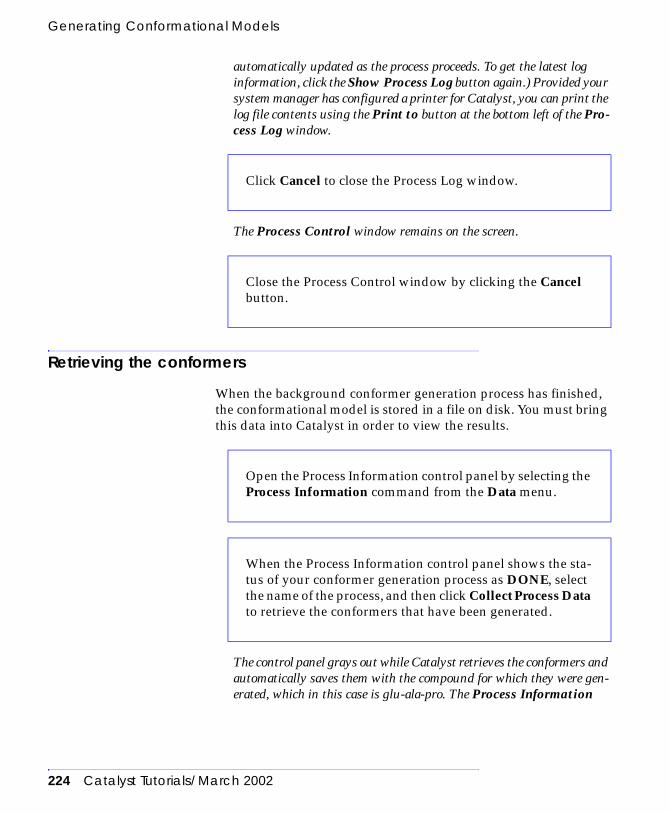
224 Catalyst Tutorials/March 2002
Generating Conformational Models
automatically updated as the process proceeds. To get the latest log information, click the Show Process Log button again.) Provided your system manager has configured a printer for Catalyst, you can print the log file contents using the Print to button at the bottom left of the Pro-cess Log window.
The Process Control window remains on the screen.
Retrieving the conformers
When the background conformer generation process has finished, the conformational model is stored in a file on disk. You must bring this data into Catalyst in order to view the results.
The control panel grays out while Catalyst retrieves the conformers and automatically saves them with the compound for which they were gen-erated, which in this case is glu-ala-pro. The Process Information
Click Cancel to close the Process Log window.
Close the Process Control window by clicking the Cancel button.
Open the Process Information control panel by selecting the Process Information command from the Data menu.
When the Process Information control panel shows the sta-tus of your conformer generation process as DONE, select the name of the process, and then click Collect Process Data to retrieve the conformers that have been generated.

Generating and displaying conformational models
Catalyst Tutorials/March 2002 225
control panel now shows the status as COLLECTED.
If you do not have it for any reason, open another one and drag and drop glu-ala-pro into it.
Cleaning up the background process
When a Catalyst process runs in the background, Catalyst creates temporary files on disk on both the local and remote machines to hold the results of the process. When the job is complete, the files on the remote machine are erased and those on the local machine remain. Conformation generation jobs represent a lot of work and can consume over a week of computer time depending on the size and complexity of the molecules involved. It is therefore prudent to consider the security of this hard won data. After collecting the data and saving your StockroomDB, you have a copy of the data in Catalyst and a second copy, as individual cpd files, in the local directory. The cleanup process will erase this second copy of your data. Provided your system backup procedures are robust, this will not present a problem should something catastrophic happen to your StockroomDB. However, if you are not certain about your system backup procedures (check with your system manager) or simply want to have the individual cpd files on disk, don’t do the cleanup.
Close the Process Information control panel by clicking the Cancel button.
Open your iconified View Compound workbench.
Click the glu-ala-pro icon in the lab where it is saved. Check the Status Area to see that the molecule’s conformational model now has 101 conformers (100 + 1 edit conformer).

226 Catalyst Tutorials/March 2002
Generating Conformational Models
Warning
Catalyst cleans up the process data and removes all files that were cre-ated by the background process.
Summary
In this exercise you learned what best and fast conformer genera-tion are, how to generate conformational models both interactively
Do not rename or move this directory before attempting the cleanup. That will cause the Clean Process Data procedure to fail leaving you with unwanted entries in the Process Information control panel that are difficult to remove.
After collecting your process data, close all workbench win-dows and click Data/Save Stockroom DB to save your work to disk.
Open the Process Information control panel if it is not already open.
Select the name of the process in the control panel.
Click the Clean Process Data button.
Close the Process Information control panel by clicking the Cancel button.

Summary
Catalyst Tutorials/March 2002 227
and as a background process, and how to display, register, unregis-ter, and delete conformers.

228 Catalyst Tutorials/March 2002
Generating Conformational Models

Catalyst Tutorials/March 2002 229
7 Generating a Hypothesis
Introduction
You can use the Generate Hypothesis workbench to prepare data and then set up a hypothesis generation process. This exercise uses procedures learned in the previous lessons and introduces the func-tionality of the Generate Hypothesis workbench. The exercise cov-ers how to:
♦ Enter your training set of compounds (Lesson 3 and Lesson 5)
♦ Generate conformational models (Lesson 6)
♦ Enter data in a spreadsheet
♦ Set up control parameters for hypothesis generation
♦ Prepare for running the process in the background
♦ Evaluate your hypothesis and the associated output data
♦ Use the hypothesis to estimate activities of lead compounds
♦ Cluster hypotheses
♦ Merge hypotheses
Note
Background on the data used in this example
Inhibition of the angiotensin converting enzyme (ACE) has been shown to be an effective method for treating hypertension in most
Catalyst is designed to use molecules no larger or more feature rich than tetrapeptides. It will attempt to run with more complicated molecules, but the results are unlikely to be satisfactory.

230 Catalyst Tutorials/March 2002
Generating a Hypothesis
patients with high blood pressure. Non-peptide small-molecule ACE inhibitors were invented nearly simultaneously at E. R. Squibb & Sons (captopril) and at Merck (enalapril) during the 1970s. Each accounted for over $1 billion in sales annually for sev-eral years. It is interesting that, although both companies had access to the same structure-activity information, development of a final drug occurred along distinctly different paths. This exercise illustrates how Catalyst can be used to generate a hypothesis based on the di- and tripeptide data available at the beginning of the ACE project at Squibb. The resulting hypothesis strongly suggests how to develop a non-peptide ACE inhibitor.
In Lesson 6 you learned how to build one member of the training set, and generate a set of conformers for it. In this exercise, you will enter the structures of the rest of the 20 di- and tripeptides, along with activity data for each. A set of conformational models for each antagonist can be generated (or you can use the conformer models provided), and then a hypothesis representing the essence of this structure-activity data will be generated. The usefulness of this hypothesis then will be investigated by determining how well mol-ecules within and outside of the training set fit the constraints.
Generating a hypothesis
Entering the training set molecules
First, you need to enter structures for each peptide that will be used in the hypothesis generation process. You can draw them individu-ally in the View Compound workbench, as described in Lesson 3, or you can import them from files that are provided for you in the directory exercise7. We will import the structures in this lesson.
Create a lab called ace with the Create Lab command under the Data menu in the Stockroom.

Generating a hypothesis
Catalyst Tutorials/March 2002 231
The ACE lab icon appears on the Stockroom shelf.
The Import Data control panel appears, showing the directories and files in your operating directory.
(If you had wanted to generate your own conformers, you would have selected the input directory.)
The list of training set molecules are displayed in Table 3 on page 232 ..
Note
In the control panel that appears, name the lab ACE.
Double-click the ACE lab to open the lab.
Select Import from the Data menu in your lab.
In the Import control panel select cattrain and then exercise7 from the Directory menu.
Because you will use the conformers already available, select the confs directory.
In large directories with many types of files you can reduce the number of files to review by using the File Type drop-down menu. To see only compound files, select Compounds from the menu, for example.

232 Catalyst Tutorials/March 2002
Generating a Hypothesis
Note
When you are finished, you should have 25 compounds in your lab; 20 of these will be used for your training set.
Hypothesis descriptions in CHM language have a .chm extension to their file names. Molecule descriptions in the CHM language are called CPD files and carry a .cpd extension to their file names. This file type supersedes the topology file (TPL) format that carries the .tpl extension used in previous versions of Catalyst. Catalyst 2.2 and higher can import and export both kinds of molecule files, but conversion to the newer CPD format is recommended (see Lesson 5). For this example, we have provided the training set molecules in CPD format. The file names are identical to the compound names in the table except for the .cpd extension.
Use the group import method you learned in Lesson 5 to import all of the training set molecules. <Shift>-click and <Ctrl>-click to select the .cpd files listed in Table 3 to import them all automatically.
Table 3 Training Set for ACE Inhibitors
Compound Activity Uncertainty
ala-gly 2.5e+06 3ala-his 9e+06 3ala-leu 1.6e+06 3ala-pro 270000 3ala-val 300000 3arg-ala-pro 16000 3glu-ala-pro 360000 3gly-asp 9.2e+06 3gly-glu 5.4e+06 3gly-lys 5.4e+06 3gly-phe 450000 3ile-pro 150000 3ile-tyr 3700 3leu-ala-pro 2300 3

Generating a hypothesis
Catalyst Tutorials/March 2002 233
Checking structures
Alternatively, you could have opened an empty Hypothesis Generation workbench first, and then dragged your compounds directly to its report area.
nleu-ala-pro 700 3phe-ala-pro 4200 3phe-pro-pro 78000 3pro-pro 7.5e+06 3val-pro 420000 3val-trp 1700 3
Table 3 Training Set for ACE Inhibitors
Compound Activity Uncertainty
Although the structures provided in the training set are correct, the following verification steps are very important when this procedure is used for lead compounds previously unchecked within Catalyst. The activity data in this table will be used to create a training set spreadsheet. See Adding activity data to your training set spreadsheet on page 241 for more information.
To open a Hypothesis Workbench, use the Select All com-mand from the Edit menu of the lab and select all your training-set molecules. Then drag them to the Generate Hypothesis button in the Stockroom. After the workbench appears, drag all the molecule icons from its shelf into the report area.
Remove any compounds not in the training set by selecting the row number and using Clear Select Report Rows from the Edit menu.

234 Catalyst Tutorials/March 2002
Generating a Hypothesis
The panel adjustment button is a tiny square on the right side between two adjacent frames in a Catalyst window.
.
You will use the data in the tabular report for generating the ACE hypothesis later in this exercise, so save it as a spread-sheet named ace to the ACE lab using the Save Report To Lab As Spreadsheet command on the Data menu.
Select Structure-Activity-24 from the ReportStyle menu and then click the full screen toggle button (Maximize) in the upper right corner of the window.
Click the panel adjustment button at the upper right to adjust the viewing area so that you can see all 20 structures.
Visually check the structures individually for the correct structure and stereochemistry. Use the scroll bars if your screen is too small to see all the structures.

Generating a hypothesis
Catalyst Tutorials/March 2002 235
If any structures are incorrect, find their icons on the shelf and drag them to a View Compound workbench, and mod-ify them as needed.

236 Catalyst Tutorials/March 2002
Generating a Hypothesis
Note
You can save the compound to the same name only if you have made no changes in topology; otherwise choose a new name. The changes are saved in both the “sample” in the workbench and in the original mole-cule in the lab.
Note
The importance of structural accuracy of the molecules cannot be overemphasized. Be sure that stereocenters are assigned properly, because Catalyst reads the stereocenter flags during the hypothesis generation process. Hypothesis generation will be useful only if the input structures are valid.
In the View Compound workbench, use the Generate Stan-dard 3D, 3D Minimize, and 2D Beautify commands on the Tools menu to change the existing topology into a correct representation.
Select Chirality Labels command on the View menu and check the topological and stereochemical accuracy of the structure.
Save any modified compounds with the Save To Lab As command on the Data menu.
If the molecule you have changed had no conformational model, you have lost nothing by correcting the structure. However, if you correct a mistake after having generated a conformational model, the conformational model generation process must be repeated on the corrected structure. Thus, it is much more efficient to find structural mistakes before generating conformers.
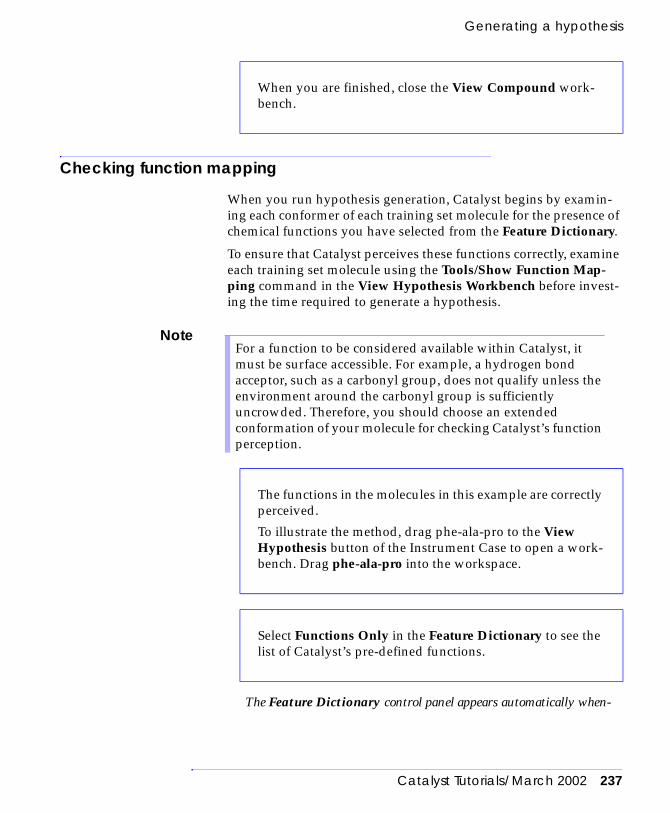
Generating a hypothesis
Catalyst Tutorials/March 2002 237
Checking function mapping
When you run hypothesis generation, Catalyst begins by examin-ing each conformer of each training set molecule for the presence of chemical functions you have selected from the Feature Dictionary.
To ensure that Catalyst perceives these functions correctly, examine each training set molecule using the Tools/Show Function Map-ping command in the View Hypothesis Workbench before invest-ing the time required to generate a hypothesis.
Note
The Feature Dictionary control panel appears automatically when-
When you are finished, close the View Compound work-bench.
For a function to be considered available within Catalyst, it must be surface accessible. For example, a hydrogen bond acceptor, such as a carbonyl group, does not qualify unless the environment around the carbonyl group is sufficiently uncrowded. Therefore, you should choose an extended conformation of your molecule for checking Catalyst’s function perception.
The functions in the molecules in this example are correctly perceived.
To illustrate the method, drag phe-ala-pro to the View Hypothesis button of the Instrument Case to open a work-bench. Drag phe-ala-pro into the workspace.
Select Functions Only in the Feature Dictionary to see the list of Catalyst’s pre-defined functions.

238 Catalyst Tutorials/March 2002
Generating a Hypothesis
ever you open a View Hypothesis workbench.
The status area in the lower left corner of the workbench identifies which hydrogen-bond acceptor is being displayed and the total number found (e.g., "2/9" means that the second feature of 9 that were found is dis-played). The one displayed is identified on the molecule by a colored vec-tor.
An HB Acceptor control panel, with which you can step through all the hydrogen-bond acceptors in this molecule as perceived by Catalyst, appears at the lower right of the workbench..
In this way, you can step through each different kind of function in the dictionary and see how Catalyst is perceiving the important functional-ity in your molecule.
Note
Although function mapping accuracy is not a necessary condition for proceeding to conformational model generation, it is important for hypothesis generation. It is good general practice to check each training set member for correct function mapping before generating hypotheses.
Select HB ACCEPTOR and then the Show Function Map-ping command from the Tools menu.
Select HB DONOR in the Feature Dictionary and repeat the process to observe each hydrogen bond donor function on the molecule that meets Catalyst’s definition.
For the peptides in this example, Catalyst’s perceptions are adequate. However, you might encounter unusual functional groups in other molecules that are not correctly identified by Catalyst. For these cases, you can create a modified function definition (using the Exclude/OR editor; see Lesson 11) that will recognize the functional group correctly.

Generating a hypothesis
Catalyst Tutorials/March 2002 239
Generating conformational exercise models, if needed
If your training set molecules do not have conformational models, or you have edited any of them, prepare a set of Best quality conformational models for them.
This step is not needed for this tutorial if you have followed the instruc-tions so far.
Note
Using the Generate Hypothesis workbench
One of the primary features of the Generate Hypothesis workbench is the report area (similar to the View Database workbench), which allows you to enter data for hypothesis generation and to display the results.
See Lesson 6 for a discussion of the procedure for conformational model generation. The molecules in the confs directory already have conformational models generated by Catalyst. Molecules in the input structures directory do not have conformers. To check on the status of conformers for a molecule, place the cursor over a molecule icon on the lab or workbench shelf and note the number reported in the Status Area. Catalyst does not perform hypothesis generation in the absence of valid conformational models because insufficient information would be available for building useful hypotheses.
If you have an iconified Generate Hypothesis workbench from earlier in the exercise, double-click its icon on the shelf or select its name from the Windows menu in the ACE lab. If not, double-click the ace spreadsheet to open a new one.
After the workbench appears, select Hypothesis-Data from the ReportStyle menu.

240 Catalyst Tutorials/March 2002
Generating a Hypothesis
The data columns in the report area are
♦ Name (entered automatically by Catalyst when the compound is dragged into the spreadsheet)
♦ Activ (input value typed in, representing the compound’s tested activ-ity)
♦ Uncert (set to 3.0 by default as compounds are added, representing the ratio range of uncertainty in the activity value)
♦ Color (display color of molecule)
♦ Estimate (output value representing the estimated activity of the com-pound based on the hypothesis)
♦ Error (output value representing the ratio of the actual activity to the activity estimated by the hypothesis)
♦ MolWt (the calculated molecular weight)
♦ Principal and MaxOmitFeat (used in hypothesis generation with the Common Features Only button in the Generate Hypothesis control panel).
If necessary, use the horizontal scroll bar to see data cells that are not visible.
Headers of variable columns in the tabular report are in square brackets and can be changed manually, to permit the display of other data you may have in your database.
The Change Report Property control panel appears. Whatever property name you choose from the list in this panel is displayed in the column heading of the report, and the appropriate data values appear in the cells of that column.
To practice changing the type of data displayed in one of the fields (columns), double-click on the MolWt header.

Generating a hypothesis
Catalyst Tutorials/March 2002 241
Note
Entries in reports/spreadsheets can be sorted in ascending or descend-ing order according to values in any data field using the Sort by Prop-erty command in the Tools menu.
Adding activity data to your training set spreadsheet
Your ace spreadsheet should still be in the report area..
Select CAS_num and then click the Change button. The col-umn heading changes to CAS_num. Change it back to MolWt.
The column entitled Activ is the default property used by the hypothesis generation process. You can change the property used in hypothesis generation by clicking the Set Activity button located just above the column. For example, you may have two different activity measures for your training set molecules. By changing the property column name and clicking the Set Activity button between hypothesis generation runs, you can generate hypotheses for each set of activity data.
The spreadsheet is page oriented. Use the scroll bar on the right to scroll up and down the page. If you have more than one page of compounds, use the left-hand scroll bar to scroll up and down the pages.
If they are not in alphabetical order as in the table, select Sort by Property from the Tools menu.
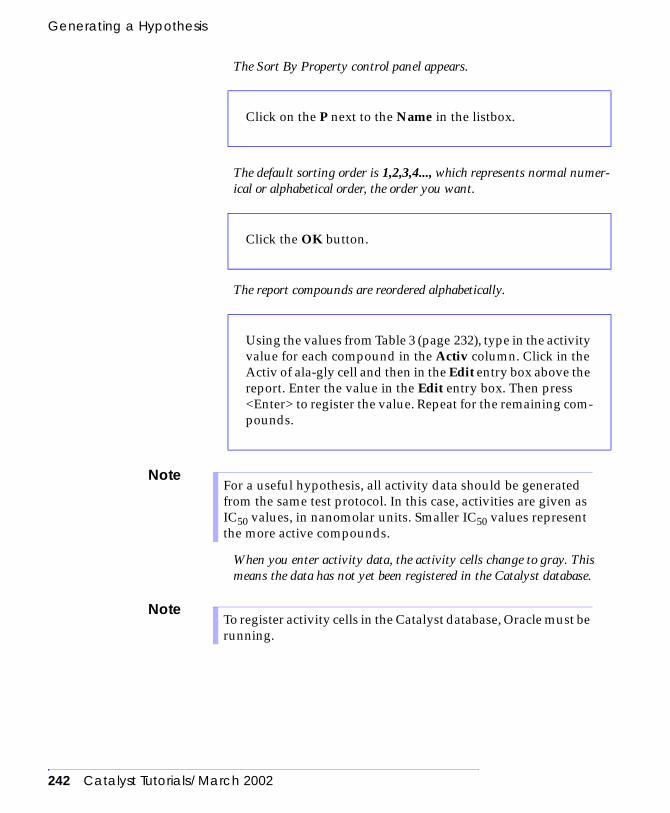
242 Catalyst Tutorials/March 2002
Generating a Hypothesis
The Sort By Property control panel appears.
The default sorting order is 1,2,3,4..., which represents normal numer-ical or alphabetical order, the order you want.
The report compounds are reordered alphabetically.
Note
When you enter activity data, the activity cells change to gray. This means the data has not yet been registered in the Catalyst database.
Note
Click on the P next to the Name in the listbox.
Click the OK button.
Using the values from Table 3 (page 232), type in the activity value for each compound in the Activ column. Click in the Activ of ala-gly cell and then in the Edit entry box above the report. Enter the value in the Edit entry box. Then press <Enter> to register the value. Repeat for the remaining com-pounds.
For a useful hypothesis, all activity data should be generated from the same test protocol. In this case, activities are given as IC50 values, in nanomolar units. Smaller IC50 values represent the more active compounds.
To register activity cells in the Catalyst database, Oracle must be running.
Generating a hypothesis
Catalyst Tutorials/March 2002 243
After a few seconds, the changes are made to the database and you will notice the activity data cells are no longer gray.
The Estimate and Error columns (the calculated data columns) are reserved for Catalyst to write output data.
If you wish, you can write the spreadsheet to disk as a separate text file.
Note
Setting up to run hypothesis generation
This section describes how to set up automatic hypothesis genera-tion.
Select Save Report to Lab as Spreadsheet from the Data menu. Save your spreadsheet to your ACE lab as ace. If prompted, go ahead and write over the previously saved spreadsheet.
With the spreadsheet selected on the shelf, select Commit 1D Changes To Database from the Data menu.
Spreadsheets are time stamped, as are database’s 1D and 2D/3D components. When databases are updated with different 1D values or 2D/3D values, the values in a spreadsheet with an earlier time stamp are out of date. When you attempt to use old spreadsheets, you will receive a message reminding you that changes have been made to the database’s 1D component since the spreadsheet was last saved, or that changes were made to the 2D/3D component and the spreadsheet is no longer valid.
Select the ace spreadsheet on the shelf and then select Gen-erate Hypothesis from the Tools menu.

244 Catalyst Tutorials/March 2002
Generating a Hypothesis
The Generate Hypothesis control panel appears.
The Input Spreadsheet text box contains the name of the spreadsheet (ace).
Make sure the settings in the Generate Hypothesis control panel are as illustrated.
(To add functions to the Selected Function Definitions list-box, select them one at a time from the Dictionary listbox and click the Add button.).

Generating a hypothesis
Catalyst Tutorials/March 2002 245
The Feature Dictionary list contains the general chemical functions in Catalyst. Definitions of these functions are available in Catblalyst on-line help.
Typically, with a new training set you should select all functions that appear in your molecules (up to a maximum of five) and let Catalyst decide which to use in building the best hypothesis. However, in this exercise, you will use only HB ACCEPTOR, HYDROPHOBIC, and NEG IONIZABLE functions, because our goal is to generate a hypoth-esis that suggests how to construct nonpeptidic molecules that could function as ACE inhibitors. If you allow Catalyst to use five of the default functions, you will generate hypotheses more suitable for designing peptides than nonpeptides.
The selected functions appear in the Selected Function Definitions listbox with default min and max values for how many instances of the function are allowed in the hypothesis. You can change the individual functions’ min and max values with the Feature Editor control panel, which is opened by clicking the Edit button. However, in this example you will leave the min and max settings at their default values.
Setting the Total Features Min value to 5 forces Catalyst to search for five-feature hypotheses. For molecules larger than dipeptides, Catalyst often finds five-feature hypotheses automatically, but for smaller mole-cules, three- or four-feature hypotheses might be in the majority. Hypotheses with more features are more likely to be stereospecific and generally more restrictive.
Using control parameters
Hypothesis generation evaluates multiple hypotheses, attempting to identify ones that optimally fit the structures and the experimen-tal activity data supplied. By clicking the More Hypothesis Options button, you gain access to a number of controls over how hypothesis generation will be carried out. For standard hypothesis generation, the active options are Spacing, MinPoints, MinSub-setPoints and WeightVariation, which are described below. The Common Features Only button responds to the additional options shown in the More Hypothesis Options control panel. For an explanation of these, see the HipHop User’s Reference or select definitions of options under Common Features Only hypothesis generation in the index of Catalyst’s on-line Help.

246 Catalyst Tutorials/March 2002
Generating a Hypothesis
♦ Weight Variation. This parameter controls how large a range of function weights the hypothesis generator will explore during the hypothesis generation. The weight of a function represents the orders of magnitude of activity explained by that function. Catalyst attempts to keep this value close to 2. You can increase the probability that weights larger or smaller than 2 will be used

Generating a hypothesis
Catalyst Tutorials/March 2002 247
by increasing this value. However, the default value is recom-mended as a starting point for all data sets.
♦ Spacing. This control parameter lets you specify the minimum distance between actual feature locations in molecules in the training set used for identifying candidate hypotheses. For exam-ple, for a negative charge feature this location is the position of the charged atom in a conformer. The default is 297 picometers (2.97 angstroms), which prevents both of the oxygens in a car-boxyl group from simultaneously being assigned as hydrogen bond acceptors. The default value works well for most medium to large molecules, but might cause problems with small mole-cules that do not have many features. If you are interested in hypotheses where features are close together, you should set this parameter to a small number such as 5 picometers.
♦ MinPoints. This parameter controls the minimum number of location constraints required for any hypothesis. The default value (4) is the minimum number of points necessary to distin-guish between stereoisomers and is suitable for most molecules you will encounter. However, for very small rigid molecules that have few chemical features, you might need to set this value to 3.
NoteIf MinPoints or MinSubsetPoints (described below) is set too high for your training set, the hypothesis run will terminate within 30 minutes returning only the null hypothesis in the log file. If this happens, you should re-examine your training set and experiment with a lower setting for MinPoints or MinSubsetPoints. For example, if the hypothesis generation run gives only the null hypothesis when both MinPoints and MinSubsetPoints are set to 4, you should try changing the setting for MinSubsetPoints to 3. If your training set contains small rigid molecules that have no more than 4 features in one of its most active compounds, hypotheses cannot be generated unless the value of the MinSubsetPoints parameter is lowered to 3. You might even have to lower the value of MinPoints to 3 and MinSubsetPoints to 2 in order to generate hypotheses from a training set in which the most active lead has only 3 features. To generate hypotheses from such a training set, all of the other compounds among the top ten most active must have at least 2 features in common.

248 Catalyst Tutorials/March 2002
Generating a Hypothesis
♦ MinSubsetPoints. This parameter is for defining the regions of hypothesis space that are most likely to be relevant to your train-ing set. The assumption is that good hypotheses will map most of the chemical features present in the most active compounds in the set. Roughly speaking, these are the compounds whose activ-ities are within a power of ten of the most active molecules. Thus, to be considered, a hypothesis must map the number of chemical features specified by the MinSubsetPoints parameter in all of these compounds. For example, if the features of your most active molecule include one negative charge, two hydrophobes, and two hydrogen bond acceptors, for a hypothesis to be identi-fied, at least one set of 4 (the default value of MinSubsetPoints) of these features must be common across the rest of the most active molecules. The default value works well for most training sets, but if the molecules are small, rigid, and have few features, you might need to set this value to 3.
The default parameter values are appropriate for an initial run for data sets where the activity span is approximately 4-5 orders of magnitude. After you have an initial hypothesis you can experi-ment with alternative hypotheses, adjusting the control parameters to modify the importance of various characteristics.
Running hypothesis generation
You can generate a hypothesis only as a background task. There are several ways to set up to run a hypothesis generation process, with different impacts on your interactive Catalyst session.
♦ Run in the background on a different machine on your network. There is no impact on your interactive session, but it impacts the remote machine.
♦ Run in the background on your machine at a later time, when there is no interactive session. There is no impact on your inter-active session.
♦ Run in the background on your machine while using Catalyst interactively. This method shares the computational power of the machine between background and interactive tasks, so most interactive operations will be noticeably slower.

Generating a hypothesis
Catalyst Tutorials/March 2002 249
You can set up any of these methods and manage the output data from within Catalyst. Run time depends on the number of com-pounds in the training set, the number of functions used, and the number of conformers in each model. This section will describe how you set up to generate a hypothesis as a background process.
Note
Click the Job Options button in the Generate Hypothesis control panel and select the run location, either on your home machine, or on another licensed machine on the net-work.
If your system administrator has completed your network configuration, you should see the names of machines available on your network in the scrollable box under Job Options. When you click on a name, the Remote Host text box shows the selected host. You must also click the Run Remotely on button to enable the host choice.
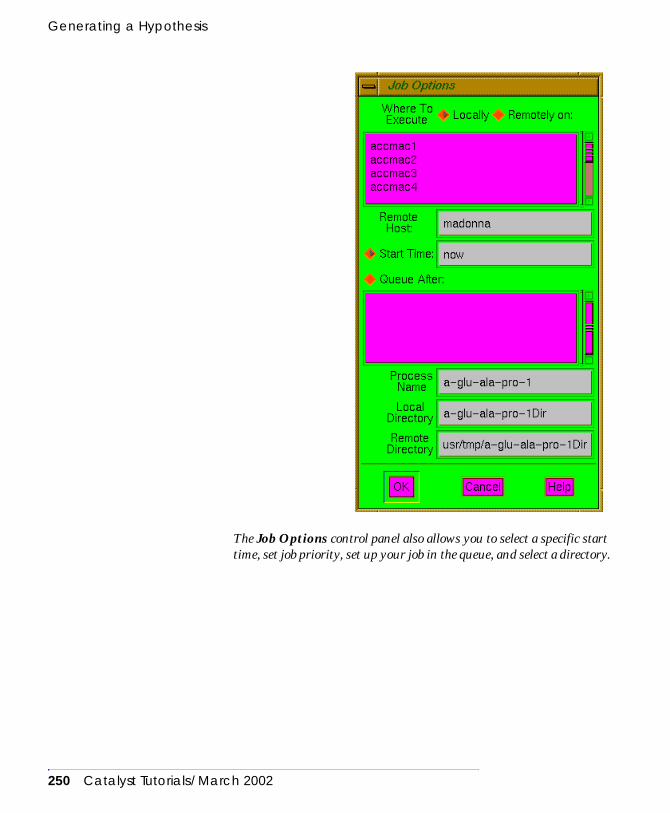
250 Catalyst Tutorials/March 2002
Generating a Hypothesis
The Job Options control panel also allows you to select a specific start time, set job priority, set up your job in the queue, and select a directory.

Generating a hypothesis
Catalyst Tutorials/March 2002 251
Note
If everything has been set up and specified properly, an Alert box will report that the job has set up successfully. Hypothesis generation requires CPU time; the length of time needed for this process depends on the amount of input data and the kind of machine running the job. More lead compounds and larger conformational models, as well as more functions to be considered, require proportionately more process-ing time to generate a hypothesis.
Note
Set the date and time to start the run to whatever is convenient; the program recognizes most date and time formats. Unless a date is specified, “today” is the default. If you have only one computer, and a background job is already running, its name will appear in the scrollable box under the Queue After toggle. You can use this toggle to instruct your computer to run your new job after a currently scheduled job has completed. In this exercise, you will run hypothesis generation in the background on your own machine. Therefore, you need not change anything in this control panel.
Select Cancel to return to the main control panel.
Start hypothesis generation by selecting Generate at the bottom of the Generate Hypothesis control panel.
If there is insufficient virtual memory (RAM and swap space) to complete hypothesis generation, the job will die and a message will be written to /usr/adm/SYSLOG that the job was killed due to insufficient swap space. If this happens, there are two options: you can run the job on a machine with more virtual memory or you can alter your training set.
You can now close your workbench and save your Stock-roomDB.

252 Catalyst Tutorials/March 2002
Generating a Hypothesis
Monitoring and managing data for a background task
You can monitor the status of hypothesis generation from the Pro-cess Information window. This is located in the Stockroom in the Data menu. See Lesson 6.
Using the hypothesis generation log file
The hypothesis generation log file is a snapshot of the progress of the generation process. Select Show Process Log in the Process Information control panel to view the log file. The initial section includes a listing of the control parameter settings and the limita-tions set on the number of functions. Next is a table describing the functions that are included in the hypothesis, with their associated weights, tolerances, and coordinates, and then a table of distances between functions.
The next section of the log file is a table with a row of information about each member of the training set. In columns from left to right you see the Name of the compound, the value of its Fit to the hypothesis, which conformer was used in the fit (Cnf), and whether a mirror image was used (Enan); a - in the column indi-cates that a mirror image was used. The Mapping columns indicate the hypothesis functions that mapped for each compound; the numbers identify a particular instance of a feature on the conformer providing the optimum fit, and an asterisk means that it was not mapped.
The Est column is the estimated activity based on the hypothesis and should be compared to the Act, experimental activity, column. The Error column shows the ratio of estimated activity to measured activity (or the ratio of Act/Est, if that gives a number greater than 1, in which case the number is negative). Finally, the uncertainty (Unc) value column is on the right.
At the bottom of the log file is the total cost of the hypothesis and the various cost components. These are the numbers used by the hypothesis generator to rank different hypotheses. Their derivation and interpretation are beyond the scope of this document. For example, the difference between the total cost of a hypothesis and that of the null hypothesis, which is given at the end of the log file

Generating a hypothesis
Catalyst Tutorials/March 2002 253
(not shown), roughly correlates with significance. The larger the difference, the greater the significance of the hypothesis.
RMS and Correl are measures of the regression derived by Catalyst in fitting the estimated activity to the measured activity.
The cost factor Config is a measure of the magnitude of the hypoth-esis space for a given training set. If the Config value exceeds 17, there are more degrees of freedom in your training set than Catalyst can properly deal with and the hypothesis results may not be use-ful.
Hypothesis generation is an iterative process that proceeds through 4-6 major cycles called phases. During major intervals in each phase, Catalyst writes the 10 lowest cost, different hypotheses to disk and updates the log file accordingly. You can monitor what is happening by looking at the log file as the run proceeds. Just before information on the first hypothesis appears, you will find a line that says “Best records in pass n” where n = 0-6. The ten best hypotheses up to that point in the processing are described following this line.
For more information on interpreting data in the log file, see Lesson 13.
Evaluating the quality of a hypothesis
Catalyst hypothesis cost analysis, combined with the multiple hypothesis output, permits recommended evaluation criteria and guidelines to be defined, as follows:
♦ Catalyst tries to map all functions in a hypothesis to one of the two most active training set molecules. You will rarely see a hypothesis where this is not true.
♦ Any other molecule in the most active set should map to at least all but one function in the hypothesis. Catalyst defines the most active set as those compounds meeting the following condition:
Activity/Uncertainty ≤ Activity of most active compound x Uncertainty
In cases where not all functions map and the compound activity is badly underestimated (the error is much larger than the uncer-tainty), you may find that Best Fit Compare (described below) will map all of the functions and return a better estimate of activ-

254 Catalyst Tutorials/March 2002
Generating a Hypothesis
ity. This is because hypothesis generation uses only Fast Fit pro-cedures and is totally dependent on the quality of the conformational models.
♦ The lowest cost hypothesis is considered to be the best. However, hypotheses with costs within 10-15 of the lowest cost hypothesis should be considered good candidates for visual analysis. You will find that many of the ten hypotheses reported for typical training sets fall within this range.
Note
♦ Among the ten reported hypotheses, you may find two or more for which the best rigid fit to the most active training set molecule happens with the same conformer. Sometimes these hypotheses differ only by the direction of a single hydrogen bond acceptor or donor. However, occasionally these hypotheses possess different sets of functions and, by superimposing them, you may be able to construct a six-feature hypothesis that will be very specific. Check the log file for which conformers of the most active train-ing set molecule fit each hypothesis.
♦ Check the Config cost factor. If this value is greater than 17, there are too many degrees of freedom in the training set for hypothe-sis generation to handle well and the hypotheses may not be use-ful.
♦ Evaluate all the hypotheses visually using Fast Fit Compare operations with the most active compound. Good hypotheses should map this compound in a chemically reasonable way.
♦ Pick some hard test cases, typically two training set compounds with different chirality and much different activity (>10 fold) and test each hypothesis for its ability to discriminate between these.
♦ Try the same kind of test with compounds from outside the train-ing set. Those hypotheses that survive these tests are likely to have the best predictive value.
The units of cost are binary bits. Hypothesis costs are calculated according to the number of bits required to completely describe a hypothesis. Simpler hypotheses require fewer bits for a complete description, and the assumption is made that simpler hypotheses are better.

Generating a hypothesis
Catalyst Tutorials/March 2002 255
Using the hypothesis to fit and estimate the activity of training set compounds
Catalyst provides for visual and quantitative estimation of good-ness-of-fit. The ability to see how each molecule in the training set fits to the hypothesis can be useful for understanding the chemical “meaning” of the hypothesis.
When your hypothesis run reaches the DONE state, you are ready to bring the results into Catalyst.
The hypotheses and molecule should be visible on the workbench shelf.
Now you estimate activity.
From the ACE lab Data menu, select the Process Informa-tion command.
Click the Collect Process Data button in the Process Infor-mation control panel to bring the hypotheses into your ACE lab.
Select and drag the hypothesis icons to the View Hypothe-sis workbench button in the Instrument Case.
When the workbench opens, drag the compound nleu-ala-pro to the workbench shelf.
With nleu-ala-pro and the first hypothesis selected, select Estimate Activity from the Tools menu.

256 Catalyst Tutorials/March 2002
Generating a Hypothesis
After about a minute the molecule should appear in the workspace superimposed on the hypothesis and a number for the estimated activity appears in the Estimate text box of the Compare/Fit control panel. Above this box, you will see the calculated Fit number, and below it the relative energy of the conformer used in the fit.
Note
The conformer chosen for this fit is shown in the Conf text box near the top of the Compare/Fit control panel.
You can get a visual impression of which functions map better than oth-ers. The Estimate value indicates how active the molecule is estimated to be, and how well the molecule matches to the hypothesis.
Compare operations return up to 100 mappings that can be viewed using the slider and fast forward/reverse display buttons at the bottom of the Compare/Fit control panel.
Note that the Conf, Fit, Estimate and Conf Energy boxes are updated for each new mapping. The best mappings are listed first.
Compare also returns up to 12 different conformers that fit more or less well to a given mapping
The energy value displayed is the number of Kcal/mol above the estimated global minimum found in the nleu-ala-pro conformational model.
Rotate the combination and note how the binding functions in your molecule map to the hypothesis features.
Click on the gray area of the slider to see the second map-ping.

Generating a hypothesis
Catalyst Tutorials/March 2002 257
.
The slider now allows you to cycle through the different conformers that fit this mapping.
Since two of the stereocenters have been reversed in this molecule, it should no longer fit the hypotheses very well. The better hypotheses will discriminate between these two isomers by at least a factor of 100.
Comparing multiple molecules to a hypothesis simultaneously
The Generate Hypothesis workbench can be used to visualize how multiple molecules overlay to a single hypothesis. Complete con-trol over which molecules are compared, Fast Fit or Best Fit, and color coding is available. In this section, you will learn how to make use of this feature
Find a mapping you like where the number of confs is > 1 in the box beneath the Mappings button. Click the Mappings/Conf button and select Confs.
Repeat the “Estimate Activity” process (the four steps pre-vious to this one) with each of the 10 hypotheses.
Import nleu-Rala-Rpro from the cattrain/exercise7/confs directory.
Try estimating activities with your favorite subset of hypotheses.

258 Catalyst Tutorials/March 2002
Generating a Hypothesis
.
This is the same operation you performed when the spreadsheet was cre-ated.
Note
The selected compounds are added one after another to the view area mapped to the same hypothesis. The mappings shown are the best Fast Fit for each compound. After all compounds have appeared, a Overlay Legend control panel appears.
Select one of the ACE hypotheses and several of the training set compounds and drag them to the Generate Hypothesis workbench icon.
When the workbench opens, select the compounds on the shelf and drag them to the report area.
You can drag the spreadsheet to this report area if you want to examine the entire training set.
Select the hypothesis on the shelf and drag it to the Current Hypothesis box.
Extend-Select several of the compounds in the report by clicking in the row number cell for each compound.
Select Show Selected Compounds/Mappings from the Tools menu.

Generating a hypothesis
Catalyst Tutorials/March 2002 259
Note
Note
Using the hypothesis to fit and estimate the activity of compounds from outside the training set
The use of a hypothesis to estimate the activity of other compounds with similar receptor binding behavior is a powerful concept. A useful hypothesis allows you to test prospective synthetic targets and thereby assess which are most likely to possess desirable activ-
You can control which compounds are visible by clicking on the Hide toggle boxes next to each compound in the Overlay Legend control panel. You can also change the display color of each compound by clicking on the small triangle next to the color bar. If you want to display a fit other than the best Fast Fit, click on the diamond shaped button next to the compound of interest and then click the Compare/Fit button to summon the Compare/Fit control panel.
Almost any display combination is possible using the Overlay Legend control panel. If the 3D window background color is set to white (Workbench Options under the Workbench menu), you can make excellent transparencies by printing to a color printer on your network.

260 Catalyst Tutorials/March 2002
Generating a Hypothesis
ities before actually committing to synthesis. In this section you will test captopril, enantiocaptopril, and succinyl-proline for fit to the ACE hypotheses.
Draw the following structures in the View Compound workbench and save them to your lab, or import conforma-tional models of them from the cattrain/exercise7/confs directory (they are named captopril.cpd, enalopril.cpd, enantiocaptopril.cpd and succ-pro.cpd).

Generating a hypothesis
Catalyst Tutorials/March 2002 261
Captopril is an active ACE inhibitor characterized by the presence of an important sulfhydryl group and a very small size. The enantiomer of captopril is totally inactive as an ACE inhibitor.
The estimated activities for captopril will be quite high because a Zinc-binding interaction was not included in the Feature Dictionary and thus Catalyst does not know how important such an interaction is for activity. However, you should see mappings that are similar to nleu-ala-pro, except for the absence of the side chain hydrophobic interaction.
Note
For a good hypothesis, the difference in the predicted activities will be larger for a 5 kcal energy range than for a 20 kcal range.
Succinyl-proline was a seminal compound in the development of capto-pril. This was the first non-peptide small molecule to show specific
Perform a BEST fit/compare with these molecules and your best ACE hypotheses.
For the hypotheses that map captopril properly, try a BEST fit/compare with enantiocaptopril. Does it fit as well as cap-topril?
It is likely that enantiocaptopril must assume a relatively high-energy conformation to bind effectively with the ACE receptor. You can test for this by using Best Fit Compare while specifying a low value for Energy Limit. Best Fit Compare is then constrained to explore only conformations that fall within a narrow range above the lowest-energy conformation in the model.
Set Energy Limit in the Compare/Fit control panel to 5 kcal and select Best Fit Compare for both captopril and enantio-captopril.

262 Catalyst Tutorials/March 2002
Generating a Hypothesis
activity as an inhibitor of the ACE enzyme. It was modeled after succi-nyl-Phe which had been reported to be a specific inhibitor of carboxypep-tidase, an enzyme related to ACE. Succinyl-proline should map to the hypothesis in a way similar to nleu-ala-pro.
Enalapril came from the ACE inhibitor project at Merck. It was modeled to resemble the products resulting from enzymatic cleavage of the pen-ultimate peptide bond in phe-ala-pro. Enalapril should map to the hypothesis in a way similar to phe-ala-pro. Before you can estimate the activity of these compounds, you must obtain a conformational model for each.
See Lesson 6 for details on how to generate conformational models. Alternatively, import the models provided from the cattrain/exercise7/confs directory.
Succ-pro should map to the best hypothesis with the proline mapping the same way as in nleu-ala-pro, and the side chain carboxyl mapping to the same hydrogen bond acceptor as the nLeu side chain amide carbo-nyl group. You should see unmapped functions; it is likely that a hydro-phobe that normally maps to the ala side chain in nleu-ala-pro will be missing. Thus, your hypothesis is providing a distinct and testable sug-gestion on how to improve the activity of succ-pro.
Drag succ-pro and enalapril into a View Compound work-bench and generate conformational models for each one using Fast generation, with the maximum number of con-formers set to 250
With the new conformational models, drag the two mole-cules to the View Hypothesis workbench and perform a Best Fit Compare with your best hypothesis.
Try a BEST compare/fit with enalapril.

Generating a hypothesis
Catalyst Tutorials/March 2002 263
Enalapril is a difficult case for these hypotheses because the function definition for hydrophobe used to build them does not recognize the ala-nyl methyl in enalapril as a legitimate hydrophobe and will not map to it.
In enalapril, this methyl is a near neighbor to a basic nitrogen and is thus disqualified by Catalyst’s rules as a potential hydrophobe. It is rea-sonable to postulate that at the enzyme active site, this nitrogen may not be protonated and the methyl group may behave as it seems to in nleu-ala-pro, but it is not reasonable to do this by hindsight analysis.
Thus, for this exercise, you will give away one mapping interaction. However, there are four others that should map in a way similar to nleu-ala-pro. With the very best hypotheses, you may see enalapril lining up so well that the Ala methyl group actually extends into the proper hydrophobe sphere even though it does not map (no blue mapping point).
Note
You may find two or more hypotheses in your generated set for which the same conformer of nleu-ala-pro maps as the optimum fit for Fast Fit Compare. You can see this by looking at the conformer number for this compound, representing the optimum fit to each hypothesis, in the log file. If this is true for two hypotheses with different sets of functions, you will be able to superimpose the features they have in common using a hypothesis Compare process. As an example, let’s assume you find two such hypotheses with the following features:
Hydrophobic Hydrophobic Hydrophobic HB Acceptor HB Acceptor
Neg Ionizable Hydrophobic Hydrophobic HB Acceptor HB Acceptor
The hypothesis Compare/Fit control panel appears.
You can overcome the enalapril difficulty by customizing the definition of hydrophobe to include enalapril-like methyls, but this is a topic for one of the advanced exercises.
Select both hypotheses and select Compare/Fit... from the Tools menu.

264 Catalyst Tutorials/March 2002
Generating a Hypothesis
.
The hypotheses will be displayed mapped together. You should see four functions very closely superimposed, and two that are not. You can cre-ate a six-feature hypothesis from this overlay.
Select the Neg Ionizable functions (blue spheres) of both hypotheses and tether them together by selecting the Tether Objects tool in the Toolbox
Select Compare.
Hide the location constraint spheres by selecting Invisible under 3D Constraints from the Style menu.
Generating a hypothesis
Catalyst Tutorials/March 2002 265
Note
How does it compare to your previous best hypothesis?
The six-function hypothesis is missing the regression data structure needed to enable automatic calculation of estimated activities. You can create the data structure by using the Regress Hypothesis command in the Generate Hypothesis workbench Tools menu.
When the command has finished processing, a 2D graph showing the new regression line appears and a local hypothesis icon (with an L indi-
Carefully select one of each pair of matching functions and erase it.
Make sure you get both ends of the extra hydrogen bond acceptor.
Extend-select the remaining six functions and merge them into a single hypothesis with the Merge tool in the Toolbox. Render the location constraint spheres visible and save your new hypothesis under a new name.
Now try the Compare operations you did before with this very selective six-feature hypothesis.
Drag the hypothesis and the training set spreadsheet to the Generate Hypothesis workbench.
With both the hypothesis and the spreadsheet icons selected, select Regress Hypothesis from the Tools menu.
266 Catalyst Tutorials/March 2002
Generating a Hypothesis
cating that it is local) appears on the shelf.
You can now use it with the Compare/Fit... command to provide esti-mated activities for compounds.
Hypotheses clustering
You now have 10 hypotheses automatically generated using the hypothesis generation command from the above exercise.
In the following exercise, you can use the hypotheses you obtained from the hypothesis generation, or you can import them from the directory exercise 7/hypo in cattrain.
The Cluster Hypotheses control panel appears.
More information on clustering method options appears in Catalyst’s
Save this hypothesis with a new name.
Start up the Catalyst interface if it is not already running. Import the 10 hypotheses named ace.i.chm (where i ranges from 1 to 10) from cattrain.
If the 10 hypotheses are not already selected, extend-select them and drag them onto the View Hypothesis workbench.
Extend-select the 10 hypotheses from the shelf if they are not already selected. Go to the Tools menu and issue the Cluster Hypotheses command.

Generating a hypothesis
Catalyst Tutorials/March 2002 267
on-line Help..
The results of the clustering are written to a local file named hypoClusterResult_i.txt (where i is a number).
A control panel opens showing the log file as well.
Looking at the table, you should notice that the cluster numbers resem-
Click the Cluster button to execute the command.

268 Catalyst Tutorials/March 2002
Generating a Hypothesis
ble a horizontal dendrogram.
You may choose to study the hypotheses in the same cluster and see what features are common to them. You can also take a hypothesis from each cluster and investigate the differences between them.
Hypotheses merging
In the following exercise, you will work with the case of two clus-ters. You will use one hypothesis, ace.1, from the first cluster, and one hypothesis, ace.3, from the second cluster.
The two hypotheses are sampled to the graphics area and the Merge
Close the control panel by clicking Cancel.
Start up the Catalyst interface if it is not already running. Import the hypotheses named ace.1.chm and ace.3.chm from cattrain if they are not already in the Stockroom.
Extend-select ace.1 and ace.3 from the interface and drag them onto the View Hypothesis workbench.
Extend-select ace.1 and ace.3 from the shelf, if they are not already selected. Go to the Tools menu and select the Merge Hypotheses/Features command.

Generating a hypothesis
Catalyst Tutorials/March 2002 269
Hypotheses/Features control panel opens.
If you watch the workspace you will see:
(1) the two hypotheses displayed oriented together;
(2) a newly merged hypothesis appearing; and
(3) the original two hypotheses disappearing
A large light blue (cyan) sphere appears.The final appearance should be:.
The larger cyan sphere represents the merged hydrophobic group with a tolerance value that circumscribes the tolerance values (spheres) of the
Change the Distance Tolerance to 1.6, leave the New Con-straint Tolerance set to Merge, and select the Merge com-mand.

270 Catalyst Tutorials/March 2002
Generating a Hypothesis
two hydrophobic groups from the two original hypotheses.
About 1.64 angstroms appears in the status area.
The original selection of 1.6 angstroms for the Distance Tolerance is not large enough to cause the negative ionizable groups to merge. The next step is to merge them together.
The hypothesis merged1 is sampled to the graphics area and the Merge
Select the Save to Lab As command to save the merged hypothesis to the lab. Give the merged hypothesis a name, for example, merged1.
Extend-select the two negative ionizable groups, that is the two spheres in darker blue.
Use the Measure Selection icon tool (ruler) to measure the distance between the groups.
Select the Clear Display command.
Select the hypothesis merge1 from the shelf, then go to the Tools menu and select the Merge Hypotheses/Features command.

Generating a hypothesis
Catalyst Tutorials/March 2002 271
Hypotheses/Features control panel opens.
The two darker spheres merge into a larger sphere circumscribing the two original spheres and the center of the sphere at the average of the centers of the original two spheres..
The larger blue sphere represents the merged negative ionizable group with a tolerance value that circumscribes the tolerance values (spheres) of the two negative ionizable groups from the original hypothesis
Change the Distance Tolerance to 1.65, leave the New Con-straint Tolerance set to Merge, and execute the Merge com-mand.

272 Catalyst Tutorials/March 2002
Generating a Hypothesis
merged1.
The Merge Hypotheses command can also be issued from the Com-pare/Fit control panel.
The Compare/Fit control panel opens.
The two hypotheses are rotated to show the first mapping.
Save the new hypothesis to the lab with the Save to Lab As command. Give the new hypothesis a name, for example, merged2.
Start up the Catalyst interface if it is not already running. Import the hypotheses named ace.1.chm and ace.3.chm from cattrain if they are not already in the Stockroom.
Extend-select ace.1 and ace.3 from the interface and drag them onto the View Hypothesis workbench.
Extend-select ace.1 and ace.3 from the shelf, if they are not already selected. Go to the Tools menu and issue the Com-pare/Fit command.
Click the Compare button.
Click the Merge button in the Compare/Fit control panel.

Summary
Catalyst Tutorials/March 2002 273
The Merge Hypotheses/Features control panel opens.
You can scroll through the mappings returned from the Compare/Fit command using the slider or the forward and back buttons in the Com-pare/Fit control panel and repeat the merging process.
Summary
In this exercise you have learned how to generate a hypothesis to explain the behavior of a set of molecules exhibiting similar bind-ing activity. You also have learned how hypothesis generation oper-
Change the Distance Tolerance to 1.65, leave the New Con-straint Tolerance set to Merge, and click the Merge button in the Merge Hypotheses/Features control panel.
The newly merged hypotheses appears. The two original hypotheses are not cleared from the graphics area when the Merge Hypotheses command is issued from the Compare/Fit control panel.
Double-click on the large dark blue sphere to select the newly merged hypothesis. Select the Save to Lab As com-mand and give the new hypothesis a name, for example merged3.
Again, double-click on the large dark blue sphere to select the newly merged hypothesis. Click the Erase Selection icon tool (eraser) and clear the merged hypotheses from the graphics area.

274 Catalyst Tutorials/March 2002
Generating a Hypothesis
ates, how to read a hypothesis generation log file and how to analyze the resulting hypotheses. You also learned how hypotheses can be used to estimate the activities of other molecules and to pro-mote ideas for further investigations. You are now prepared to try Catalyst on a training set of your own compounds.
In the final few exercises, you learned how to cluster hypotheses using the Cluster Hypotheses command. You also learned how to use the Merge Hypotheses/Features command to merge two hypotheses into one and merge similar features in one hypothesis.

Catalyst Tutorials/March 2002 275
8 Generating Common Features Hypotheses
Common features hypothesis generation is designed specifically for finding the chemical features shared by a set of compounds and for providing the compounds’ relative alignments with a hypothesis expressing these common features. Such data provide convenient starting points for 3D QSAR methods like C2•MFA or other field analysis techniques. Common features hypotheses can also be useful for stimulating ideas about structure-activity when one has only a few molecules that have similar activity but dis-similar and/or flexible structures. Additionally, you can use com-mon features hypotheses to search databases to get more data from which you can generate more hypotheses.
In contrast to Catalyst hypothesis generation, where the current limit is five, common features hypothesis generation in Catalyst can handle up to ten chemical features at one time. However, the common features method does not take into account relative bio-logical activity data. Therefore, common features hypotheses are not intended for predicting activities among molecules.
To generate common features hypotheses from the user interface, click the Common Features Only button in the Generate Hypothesis control panel. To use common features hypotheses generation from the command line, execute the hipHop com-mand.
This exercise demonstrates the usefulness of common features hypothesis generation for finding chemical features shared by a set of HIV protease inhibitors. HIV protease is one of the most studied enzymes in recent history. There are more than 25 public domain X-ray crystallography structures of the enzyme with an embedded inhibitor. We will use six of these to provide enzyme-bound conformation coordinates for common features hypothesis generation.

276 Catalyst Tutorials/March 2002
Generating Common Features Hypotheses
Experiment
The molecules for this exercise are single-conformer structure coordinates derived from the Brookhaven Protein Data Bank files. The compounds have been extracted from 9hvp, 7hvp, 1sbg, 1aaq, 1hef, and 1hiv and are identified by their company identification numbers as supplied in the Brookhaven Protein Data Bank files. Two dimensional structures of the compounds are shown in Figure 1.
Figure 1. Molecules for Lesson 8
Experiment
Catalyst Tutorials/March 2002 277
Because the biologically relevant conformations of these com-pounds were determined in the X-ray studies, there is no need to build their conformational models for use with hypothesis gener-ation. The questions addressed by this exercise are “Which chem-ical features do these six molecules have in common?” and “What are the relative alignments of these molecules to the common fea-ture set?”
During common features hypothesis generation, all of the possi-ble chemical feature-based hypotheses possessing ten or fewer features are identified and ranked according to an estimate of their relative selectivity. The most selective are given the highest numerical rank. (For detailed information, see the HipHop User’s Guide in Catalyst’s on-line Help.)
When compound data appear in the spreadsheet, you are ready to add values in the Principal and MaxOmitFeat columns. Common fea-tures hypothesis generation uses values in these columns to determine which molecules should be considered when building hypothesis space and which molecules should map to all or some of the features in the final hypotheses.
In the Principal column, a value of 2 ensures that all of the chemical features in the compound will be considered in building hypothesis space. A value of 1 ensures that features will be considered when gen-erating hypotheses and that at least one mapping for each generated hypothesis will be found unless the Misses or CompleteMisses options are used. A value of 0 means the compound will be ignored completely. (This value is for situations when you do not want to
Open a Generate Hypothesis workbench and import all of the compounds (.cpd files) from the cattrain/exercise8 directory so that your workbench shelf contains the follow-ing: A74704-9hvp, JG365-7hvp, SB203386-sbg, SKBVa-aaq, SKF108738-hef, and U75875-hiv.
Extend-select and drag all of the compound icons to the report area.

278 Catalyst Tutorials/March 2002
Generating Common Features Hypotheses
remove the compound from the spreadsheet file, and you also do not want the compound to contribute information to generated hypothe-ses.) In this exercise, we assume that all compounds are equally active and choose SB203386-sbg as the principal compound because it is the smallest inhibitor.
To remind yourself how to enter values in a spreadsheet, see “Entering 1D data using the View Database workbench” in Lesson 5.
The MaxOmitFeat column specifies how many hypothesis features must map to the chemical features in each compound. A 0 in this col-umn forces mapping of all features, a 1 means that all but one feature must map, and a 2 allows hypotheses to which no compound features map. You can use these settings to increase or decrease the amount of bias in your experiments.
Note
Put a 2 in the Principal column for SB203386-sbg and a 1 in this column for the remaining compounds.
In this experiment, because we have no reason to prefer one compound over another, put a 2 in the MaxOmitFeat col-umn for each compound.
There are several other options you can manipulate to control the nature of common features hypotheses (and the use of some of them is demonstrated below). Access to these options is through the More Hypothesis Options... button in the Generate Hypothesis control panel. A full discussion of each can be found in Catalyst’s on-line Help in the HipHop User’s Guide.
Select the Save Report To Lab As Spreadsheet... command from the Data menu and save the spreadsheet as phiv.

Experiment
Catalyst Tutorials/March 2002 279
Note
Because we have chosen to allow hypotheses for which some com-pounds need not map to any feature, we must change the default val-ues for the Misses and CompleteMisses options. These settings control how many molecules in the training set can map incompletely to a hypothesis. The Misses option lets you specify the number of mol-ecules in your input set that do not have to map to all features in gen-erated hypotheses. The CompleteMisses option lets you specify the number of molecules in your input set that do not have to map to any feature in a given hypothesis. Because we have set the MaxOmitFeat column in the spreadsheet to allow each lead to be a complete miss, for consistency we need to set the CompleteMisses option to something other than the default of 0.
Here you use a value of 2 for CompleteMisses because it permits hypotheses that do not map any features of two of the training set mol-ecules, and because higher values would allow hypotheses that are
With the phiv spreadsheet icon selected, select Generate Hypothesis from the Tools menu to open the Generate Hypothesis control panel.
Click the Common Features Only button.
Common Features Only instructs Catalyst to execute HipHop instead of the more thorough HypoGen procedure for hypothesis generation.
Click the More Hypothesis Options... button to open the More Hypothesis Options control panel.
280 Catalyst Tutorials/March 2002
Generating Common Features Hypotheses
unlikely to be relevant.
The default of 1 for the Misses option means that hypotheses that fail to map completely to more than one training set compound will be dis-allowed. This is too restrictive considering that we are permitting two complete misses, both of which also count as misses.
The FeatureMisses option controls the number of training set mole-cules that are permitted to fail to map to a specific hypothesis feature. A complete miss automatically counts as a feature miss; therefore, for this run, the FeatureMisses option must be set to at least 2.
There are several other options that can be set in this control panel, but we will use their default values for this experiment.
Set the value for CompleteMisses to 2.
Set the Misses value to 3.
Set FeatureMisses to 2.
Select OK to close the control panel.
In the Generate Hypothesis control panel type a name for output hypotheses in the Output Hypothesis text box.

Experiment
Catalyst Tutorials/March 2002 281
Since there are few positive and no negative ionizable groups in these molecules, HB ACCEPTOR, HB DONOR, and HYDROPHOBIC are logical choices. An interesting alternative would be HYDROPHOBIC aliphatic and RING AROMATIC instead of HYDROPHOBIC. These choices would treat aliphatic hydrophobic groups normally, but aromatic rings would be mapped as vector (two-point) features instead of as the usual centroid single-point feature.
See “Running hypothesis generation” in Lesson 7 for detailed infor-mation.
You can monitor the progress of the job by selecting Process Infor-mation... From the Data menu in the Stockroom or any lab. See “Monitoring and managing data for a background task” in Lesson 7 for additional information.
Under Dictionary select the HB ACCEPTOR, HB DONOR, and HYDROPHOBIC functions for the run if they are not already present in the Selected Function Definitions panel (Click on the feature name and then click on the Add but-ton.).
Use the Job Options section of the Generate Hypothesis workbench to set up the job for local or remote execution.
Click the Generate button to start processing.
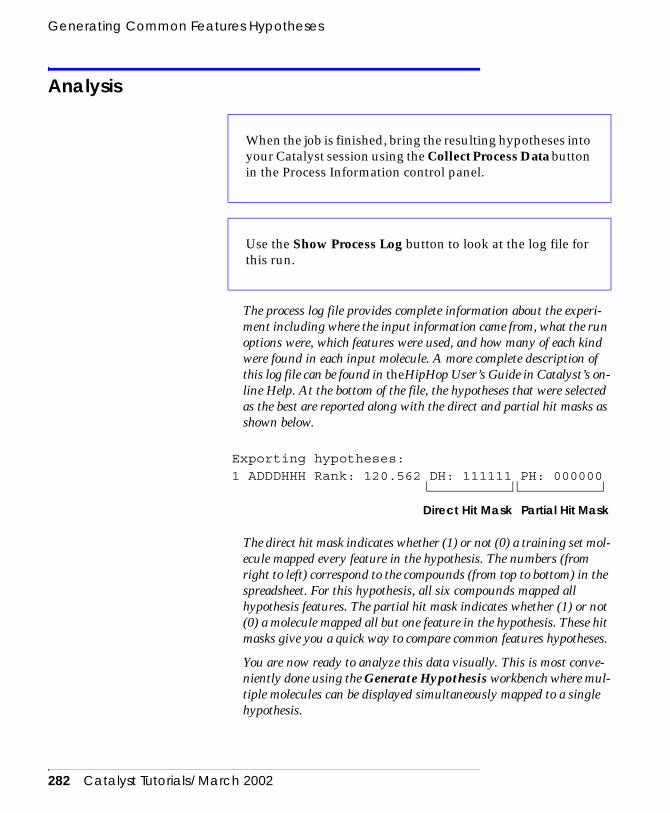
282 Catalyst Tutorials/March 2002
Generating Common Features Hypotheses
Analysis
The process log file provides complete information about the experi-ment including where the input information came from, what the run options were, which features were used, and how many of each kind were found in each input molecule. A more complete description of this log file can be found in theHipHop User’s Guide in Catalyst’s on-line Help. At the bottom of the file, the hypotheses that were selected as the best are reported along with the direct and partial hit masks as shown below.
The direct hit mask indicates whether (1) or not (0) a training set mol-ecule mapped every feature in the hypothesis. The numbers (from right to left) correspond to the compounds (from top to bottom) in the spreadsheet. For this hypothesis, all six compounds mapped all hypothesis features. The partial hit mask indicates whether (1) or not (0) a molecule mapped all but one feature in the hypothesis. These hit masks give you a quick way to compare common features hypotheses.
You are now ready to analyze this data visually. This is most conve-niently done using the Generate Hypothesis workbench where mul-tiple molecules can be displayed simultaneously mapped to a single hypothesis.
When the job is finished, bring the resulting hypotheses into your Catalyst session using the Collect Process Data button in the Process Information control panel.
Use the Show Process Log button to look at the log file for this run.
Exporting hypotheses:1 ADDDHHH Rank: 120.562 DH: 111111 PH: 000000
Direct Hit Mask Partial Hit Mask

Analysis
Catalyst Tutorials/March 2002 283
The easiest way to extend-select all the compounds is to click the row number of the first compound you want to select, then <Shift>-click the row number of the last compound.
Note
Catalyst aligns each molecule in the lead set and overlays them on the
Extend select the hypotheses and the phiv spreadsheet and drag and drop them on the Generate Hypothesis work-bench button in the Stockroom.
When the workbench is open, click the icon for the hypoth-esis with the name that ends with .01 (indicating that it is the hypothesis with the highest rank) and drag it to the Current Hypothesis box above the report area on the right.
Drag the phiv spreadsheet icon to the report area to load the lead compounds.
Extend-select all of the compound row numbers in the report area.
Select Show Selected Compounds/Mappings from the Tools menu.
There is a shortcut that combines the previous two steps: when selecting the last compound, double-click on its row number to execute the Show Selected Compounds/Mappings command.
284 Catalyst Tutorials/March 2002
Generating Common Features Hypotheses
common features hypothesis. Each compound appears in the color shown in the spreadsheet.
At this point, a lot of data is present on the screen. You can simplify the display by hiding all but one of the compounds.
In this way, you can get a good idea of how each compound aligns to a common features hypothesis.
Alignments resulting from hypothesis generation with the Common Features Only button should be reasonable, but any individual alignment might not be the best possible one for a given compound. If you see one you don’t feel comfortable with, you can experiment using the Compare/Fit... command to see if a better alignment is possible.
Note
Click the Hide buttons in the Overlay Legend control panel until all but SB203386-sbg disappear from the screen.
With this compound as a starting point, try adding back each of the hidden compounds by clicking on their respec-tive Hide buttons again.
In hypotheses with five or more features, the Compare/Fit... command must perform intensive processing. You can speed up execution time by setting Max Omitted Features-FAST in the Global Preferences control panel to 0.
In the Overlay Legend control panel, click on the Row but-ton next to the name of the compound for which you seek a better alignment. Then select the Compare/Fit button to dis-play the Compare/Fit control panel.

Analysis
Catalyst Tutorials/March 2002 285
NoteThe Compare button in the Compare/Fit control panel and the Common Features Only button in the Generate Hypothesis control panel invoke processes that follow different rules for determining fits. ♦ Common Features Only uses the values you put in the Max-
OmitFeat column in your input spreadsheet and the values for the Misses, CompleteMisses and FeatureMisses options in the More Hypothesis Options control panel when you set up common features hypothesis generation.
♦ Compare uses the settings specified in the Max Omitted Features-FAST and Max Omitted Features-BEST text boxes in the Global Preferences control panel. In general for a mol-ecule that is a direct hit (indicated by a 1 in the direct hit mask in the common features hypothesis log file), you should set the value in the Max Omitted Features-FAST and Max Omitted Features-BEST text boxes to 0. Similarly, for a molecule that is a partial hit (indicated by a 1 in the partial hit mask in the log file), you should specify a 1 in these two text boxes. For detailed information on hypothesis log files and hit masks, see “Log Files” in the HipHop User’s Guide in Catalyst’s on-line Help.
Make only SKF108738-hef visible by clicking on the Hide button next to its name in the Overlay Legend control panel so that the Hide button is solid black.
Suppress the display of the other compounds by clicking on their respective Hide buttons so that they are black circles.

286 Catalyst Tutorials/March 2002
Generating Common Features Hypotheses
You can safely ignore any alert messages Catalyst displays after you select the Compare button.
Note
Also in the Overlay Legend control panel, select the Row button for SKF108738-hef, and then select the Compare/Fit button to display the Compare/Fit control panel.
Select Global Preferences... from the Preferences menu to display the Global Preferences control panel. Under Com-pare, click in the Max Omitted Features-FAST text box. Use the < Backspace > or < Delete > key to remove the existing value and type in 2. Select the OK button to make your change take effect and close the Global Preferences control panel.
In the Compare/Fit control panel, make certain that Fast Fit and Find Best Conf are selected, and then select the Com-pare button to see other possible mappings for this com-pound.
Since common features hypothesis generation does not use activity values, you will see N/A in the Estimate text box after you have executed Fast Fit by selecting the Compare button in the Compare/Fit control panel. However, you can use the value that appears in the Fit text box as a guide to estimate equivalence among alternative fits. A larger value in the Fit text box indicates a better fit; the numbers are logarithmic. When you are satisfied with the alignments for each molecule, you can export them for further study with other programs

Summary
Catalyst Tutorials/March 2002 287
You can export the alignments in SYBYL MOL2 or MDL SD format.
Note
You can now import the SD file into Cerius2 or some other program for further study.
Summary
In this exercise, you have learned how to set up and run a com-mon features hypothesis generation to find molecular alignments. You have also learned how to analyze common features hypothe-sis data and how to export molecular alignments for use with other programs. Common features hypothesis generation can also be invoked from the UNIX command line. There are several addi-tional options available from the command line to assist you in getting the results you want. See the HipHop User’s Guide in Catalyst’s on-line Help for detailed information.
Display all of the molecules mapped to the hypothesis by clicking on their respective Hide buttons.
Select Export Workbench Alignments... from the Data menu to display the Export Alignment control panel.
Select the Database structure-data file (SD) button and export alignments to the directory of your choice.
The Export Workbench Alignments... command ensures that the exact relative alignment you see in the workbench is written to disk. Other export procedures in Catalyst do not preserve relative alignments.

288 Catalyst Tutorials/March 2002
Generating Common Features Hypotheses
Catalyst Tutorials/March 2002 289
9 Shape Based Search
This lesson shows how to build a hypothesis using the mapping information of an active molecule, how to use this same molecule to generate a shape query, and how to build a query that contains both the shape and hypothesis. The lesson shows how each of these queries can be used to search a database for other potential lead compounds.
This lesson is divided into four parts:
♦ Creating a Hypothesis from a bound conformation (page 290)
♦ Creating a Shape Query (page 294)
♦ Creating a shape/hypothesis query (page 295)
♦ Searching the sample database (page 298)
Solving the problem
Chemical features and the shape of a molecule are both known to contribute to biological activity. Of course, in order for a molecule to be active it must possess the appropriate chemical features for binding, but it also must have the correct shape to fit into the active site. In this exercise you will search a database using both the chemical (pharmacophore) and spatial (shape) information to uncover new leads.
Nature of the experiment
Methotrexate is known to be a cytostatic (cell-growth-restraining) agent. In this tutorial lesson you use the bound conformation of this compound to create an appropriate pharmacophore and
290 Catalyst Tutorials/March 2002
Shape Based Search
shape query for searching a database for other possible cytostatic agents. You search the database using:
1. The shape only
2. The pharmacophore (known as a hypothesis in Catalyst)
3. The combined queries.
The combined search (3) should give a very low percentage of false positives. The bound conformation of Methotrexate (to Dihydrofolate Reductase) was taken from the Brookhaven National Laboratory Protein Data Bank (reference 1DRE).
Creating a Hypothesis from a bound conformation
Setting up the hypothesis
To import the compound methotrexate.cpd, go to the Data menu and select import. Select the cattrain directory and scroll through the file list until you find methotrexate.cpd. Highlight methotrexate.cpd by clicking it with the mouse, and then select import in the control panel. After methotr-exate appears in your stockroom, close the control panel by clicking Cancel.
Drag the compound into the View Hypothesis Workbench.
In the Workbench menu select only 3D under Workbench Layout.

Solving the problem
Catalyst Tutorials/March 2002 291
This makes it easier to create the hypothesis.
Adding chemical features
This is the first chemical feature of the hypothesis.
Select Functions Only from the Feature Dictionary.
Click HB ACCEPTOR in the Feature Dictionary. Then go to the Tools menu and select Show Function Mapping.
Scroll through the different mappings using the arrow keys in the Function Mapping control panel. When you find the noncarboxyl oxygen mapped with a straight projection point as shown below, click the Add Function button.

292 Catalyst Tutorials/March 2002
Shape Based Search
Creating the hypothesis
Now that all the chemical features have been added, you are ready to create the hypothesis. To do this you must delete the molecule.
Repeat the previous step for HB DONOR and select the two Amino Hydrogens as shown below. Then repeat the same step for HYDROPHOBIC and select the aromatic ring as shown below.
Remove the mapping dialog by clicking Cancel.

Solving the problem
Catalyst Tutorials/March 2002 293
Now you must add location constraints to each Function (including the projected points).
The resulting hypothesis should look like the figure below.
Double-click on any atom in the molecule (highlighting the entire molecule) and click the Erase Selection button.
Using the left mouse button, click the rear HBond center. Once it is highlighted, go to the Constraints menu and choose Define Constraint and then choose Location. Click OK to accept the default constraints.
Now repeat this step for the projection point.
Repeat the previous step for the remaining features.
294 Catalyst Tutorials/March 2002
Shape Based Search
Warning
The MethoCF Hypothesis should now appear in the Stockroom.
Creating a Shape Query
Converting the methotrexate molecules to a shape query
It is important to add a weight or location constraint to each feature before merging. If you do not do this, Catalyst will not record a separate function for each, and you will see strange results, such as negative fit values, in the future.
Go to the Edit menu and choose Select All , then click the Merge Features into One Hypothesis button in the toolbox.
Choose Save to Lab as under the Data menu. In the name box, type MethoCF (for Methotrexate chemical features).
Close the WorkBench by going to the Workbench menu and selecting Dispose of Workbench.
Drag the methotrexate compound into the View Hypothe-sis Workbench. Select the whole molecule by choosing Select All from the Edit menu.

Solving the problem
Catalyst Tutorials/March 2002 295
The MethoShape query should now appear in the Stockroom.
Creating a shape/hypothesis query
Creating a shape query that is aligned properly to the hypothesis
Click the Convert Molecule to Shape button, then click OK for the default tolerances.
Go to the Data menu and select Save To Lab As.... In the Name box, type MethoShape (for Methotrexate shape). Click Save.
Dispose of the WorkBench as before.
Extend-select both the methotrexate molecule and the MethoCF hypothesis and drag them both to the View Hypothesis workbench.
Go to the Tools menu and select the Compare/Fit com-mand. In the Compare/Fit control panel, select Fast Fit and This Conf, then select Compare.

296 Catalyst Tutorials/March 2002
Shape Based Search
Since this is the bound conformer, we want to be sure that the Compare/Fit operation is done using this conformation.
Create the shape/hypothesis query
After the compare operation is complete, click Cancel to close the control panel.
Double-click on any atom in the molecule to highlight the entire molecule, then click the Convert Molecule to Shape button.
Accept the default tolerances in the Shape Tolerance control panel.
Go to the Edit menu and choose Select All, then click the Merge Features into One Hypothesis button.
Go to the Data menu and select Save to Lab as. In the name box, type MethoShapeCF (for Methotrexate shape and chemical features).

Solving the problem
Catalyst Tutorials/March 2002 297
The merged hypothesis should look like:
The MethoShapeCF query should now appear in the Stockroom.
Since you have done quite a lot of work by now, it is a good idea to save the stockroom.
Close the WorkBench as before.
Go to the Data menu and choose Save the Stockroom.

298 Catalyst Tutorials/March 2002
Shape Based Search
Searching the sample database
Search using the methotrexate shape
After a while, a list of compounds appears in the spreadsheet. This is a list of the compounds in the Sample database that fit the shape requirements of Methotrexate. There should be 22 hits or 27.2% of the total number of compounds in the database (81 compounds). Of these 22 hits, 5 are known to be cytostatic: methotrexate, methasquin, R0-24-5531, 543-U-76, and 1944-U-88. The rest of the compounds have either unknown activity or are known not to be cytostatic. For an example of a compound that fits the methotrexate shape well, but lacks the chemical features see compound 1192-U-90.
If the Sample databases does not appear in your stockroom, select the Database/Install Database command. Choose the database called Sample.bdb, and then click the Install but-ton.
Extend-select the Sample database, MethoCF, Meth-oShapeCF, and MethoShape and drag them to the View Database workbench.
Extend-select Sample and MethoShape, then go to the Tools menu and select Fast Flexible Search Databases/Spreadsheets.
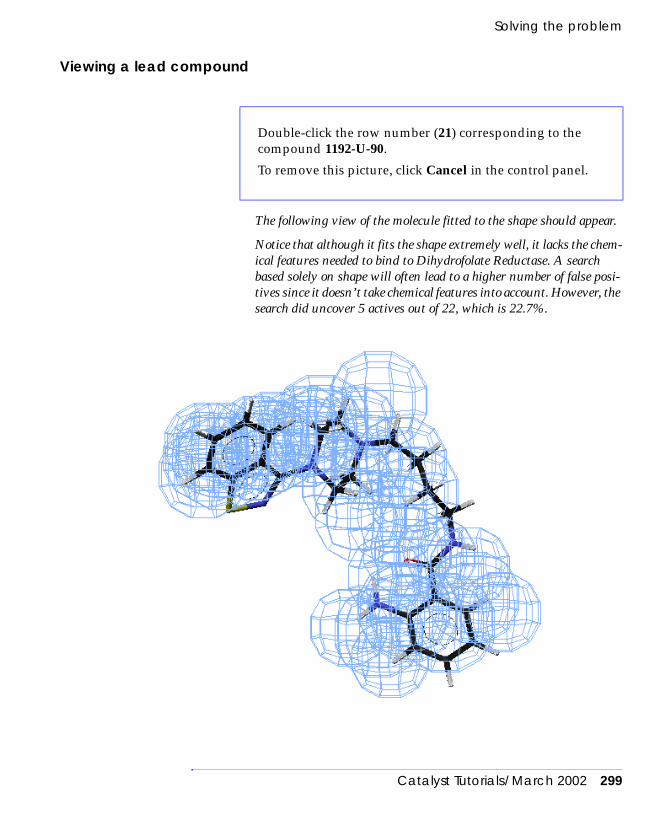
Solving the problem
Catalyst Tutorials/March 2002 299
Viewing a lead compound
The following view of the molecule fitted to the shape should appear.
Notice that although it fits the shape extremely well, it lacks the chem-ical features needed to bind to Dihydrofolate Reductase. A search based solely on shape will often lead to a higher number of false posi-tives since it doesn’t take chemical features into account. However, the search did uncover 5 actives out of 22, which is 22.7%.
Double-click the row number (21) corresponding to the compound 1192-U-90.
To remove this picture, click Cancel in the control panel.

300 Catalyst Tutorials/March 2002
Shape Based Search
Search using methotrexate chemical features (hypothesis)
Again, a list of hits appears in the spreadsheet. Only 13.5% (11) of the compounds in the database fit the methotrexate hypothesis. Of the 11 hits, 4 (36.4%) are known to be active: methotrexate, methasquin, R0-24-5531, and 543-U-76. Compound A-10255-J is a good example of molecule that fits the chemical features well but has a shape that likely will not fit into the active site.
Click MethoCF, then extend-select the Sample database. With both of these objects selected, go to the Tools menu and select Fast Flexible Search Databases/Spreadsheets.
Repeat the view a lead compound step on page 299 to view compound A-10255-J.

Solving the problem
Catalyst Tutorials/March 2002 301
Search using methotrexate chemical features and shape
Although this search appears to produce no false positives, it may be too restrictive since it finds very few compounds. In such a situation, it may be reasonable to relax the constraints a bit in order to find more possibilities. There are several ways to make the hypothesis less restrictive: you can relax the object tolerances in the hypothesis, the tolerances in the shape query, or the similarity constraint of the shape.
Extend-select the Sample and MethoShapeCF and search the database as above. There are only two hits, both of which are known to be active.

302 Catalyst Tutorials/March 2002
Shape Based Search
Relaxing the shape constraints
ShapeCFRelaxed should now appear in the Stockroom.
Search Sample with the relaxed query
Double-click on MethoShapeCF to open a View Hypothe-sis workbench. Drag the hypothesis into the display area and single-click anywhere on the shape portion of the query. Select Set Shape Query Tolerances under the Con-straints menu. In the Shape Tolerance control panel, change the Minimum Similarity Tolerance to 0.45 (the default is 0.50).
Click OK to record the change. Save the new hypothesis as ShapeCFRelaxed.
Select Dispose of Workbench under the Workbench menu.
Select ShapeCFRelaxed and drag it into the View Database workbench. If you no longer have your View Database workbench, extend-select ShapeCFRelaxed and Sample and drag them into a new View Database workbench.
Extend-select the Sample database and ShapeCFRelaxed and search the database as above.

Solving the problem
Catalyst Tutorials/March 2002 303
All of the hits except for one are known to be active. The only molecule that isn’t known is Fenofibryl-Glucuronide.
Notice how well fenofibryl glucoronide fits both the shape and the hypothesis. Based on this information, it is possible that this is cyto-static but simply has not been tested yet. Therefore, the method has selected a very likely candidate for a new cytostatic agent.
Using the same method as before, inspect Fenofibryl-Glucu-ronide.

304 Catalyst Tutorials/March 2002
Shape Based Search
You have successfully completed this exercise!
Summary
In this lesson you learned how to:
♦ Build a hypothesis using the mapping information of a bound conformer
♦ Build a shape query
♦ Build a merged shape and hypothesis query that is in an appro-priate alignment
♦ Search a database using each type of query
Click Cancel to exit the Hits Mapping box if it is still open, and dispose of the View Database workbench as before.

Catalyst Tutorials/March 2002 305
10 Building Databases
This tutorial describes how to build multiconformer Catalyst databases using the catDB utility program. and some of its com-monly employed options.
For a detailed description of how to build databases with catDB or with Catalyst, see Building Databases in Catalyst’s on-line Help, which also contains detailed information on maintaining databases and troubleshooting common problems.
For descriptions of all catDB commands, please see catDB Database Management in Catalyst’s on-line Help. Or, type catDB help at the UNIX prompts.
Lesson elements
Building a multiconformer database on page 306 describes the construction of databases including topological, 3D, and shape based information. Adding property data to the database on page 320 illustrates the use of biological property data in Catalyst (1D information) using Oracle. Creating composite databases on page 323 introduces composite databases, which can be used with millions of compounds.
Before you start building databases
To work through the database-building exercises in this tutorial, you need access to a machine on which you can stop and start the Catalyst 2D/3D server catDisk. This is because catDisk buffers certain data-base information in memory to maximize performance. Stopping and starting the server forces the catDisk server to read information from updated files.

306 Catalyst Tutorials/March 2002
Building Databases
Please ask your system administrator to recommend a suitable machine on which to run the exercises. If Catalyst is used by several users, you would probably not want to affect their work by changing things on your main database server.
Input file formats
The non-Catalyst input formats that catDB can read are SMILES, MOL, and SD files. All specify molecular topology; SD files spec-ify 1D (property) data as well.
This tutorial shows you how to build two databases from a single input file and how to merge these databases to form a single data-base.
The tutorial uses a small number of compounds to minimize com-putation time, but the techniques illustrated are directly applica-ble to databases of thousands of molecules.
Building a multiconformer database
The strategy for building a multiconformer database is:
♦ Build the conformational models in parallel
♦ Merge the database segments into a single database
♦ Add the 1D data
♦ Build the 2D and 3D searching indexes
The conformer-generation algorithms of Catalyst are optimized to span the possible geometric arrangements of the pharmacophores of target molecules. A particular sequence of conformers is gener-
Access the file (ex9.sd) in the cattrain subdirectory if you have installed the training materials in the directory in which you are currently running Catalyst. Otherwise, use the path to the system copy: $CATALYST_TRAIN/ex9.sd.

Building a multiconformer database
Catalyst Tutorials/March 2002 307
ated and on occasion, Catalyst may not succeed in obtaining promising conformers in a reasonable time and will move on to the next molecule. Any problematic structures are best resolved by iteratively appending such structures to the database after it is built.
You may use multiple CPUs or machines to build a database. Use the command:
> catDB help
to learn more about this option. Note that if you build a database in parallel, the order of compounds in the database may not be the same as that of the input file.
Prepare Catalyst for the lesson
The first task is the generation of conformational models for each mol-ecule in the database. We recommend that you specify up to 100 FAST conformers per molecule; the catDB program will build a conforma-tional model composed of fewer than 100 conformers if it provides ade-quate coverage for the conformational space. At this level of conformational analysis, building a multiconformer database should require roughly one R4400 CPU-day per 10,000 molecules averaging 30 conformers each, although the actual time is dependent on the size and the flexibility of the compounds in the database.
Note
Generate conformational models for your molecules
Large molecules (those with molecular weights over 800) may require the catDB program to consume large amounts of memory (more than 64 megabytes). Conformer generation may not be satisfactory for molecules larger or more complicated than tetrapeptides.
308 Catalyst Tutorials/March 2002
Building Databases
Note
You must be free to stop and start the catDisk server on the machine you intend to use. For the purpose of illustration, we will assume that this workstation is named your_machine. To find out what actual machine name you should use, log on to the machine your system administrator recommended and enter at the UNIX prompt:
> hostname
Your machine’s name appears on the screen. Use this name every-where that your_machine is specified below.
These tutorials also assume that your current working directory is /home/DB. To determine the pathway that you will use in the tutorials, enter at the UNIX prompt:
> pwd
Use the reported pathway as you work through the tutorial to replace /home/DB wherever it appears in the tutorial below.
You can stop the catDisk server by putting your cursor in the window where the server is running and pressing the <Ctrl> and <c> keys simultaneously. If the catDisk process is running in the background, you must stop the process with the UNIX command:
For the purpose of this exercise you will build a 20-compound multiconformer database. However, the principles demonstrated apply to constructing multiconformer databases containing thousands of compounds. The input data is provided in a single SD file (ex9.sd). The SD file also contains a collection of property data for the compounds.
Identify the machine you plan to use
For now, make sure the catDisk server is not running.

Building a multiconformer database
Catalyst Tutorials/March 2002 309
> killall catDisk
Note
First log in to your_machine and change your current directory to /home/DB. Then enter at the UNIX prompt:
> df .
For this tutorial you will need only around 4 MB of disk space. When building larger databases, you will typically need around 10 KB per compound (depending on the compounds and the number of conform-ers generated).
This exercise uses an input file containing 200 compounds. When building larger databases, as a rule of thumb, you can partition the job into conveniently sized portions. To illustrate how this is accom-plished, you will build your database in two 10-compound pieces and then merge them into a single database.
When building databases, the number of compounds per chunk or por-tion can be chosen according to available compute resources and your own preferences. If you have a machine that can be dedicated to the task, you may build databases of 50,000 to 100,000 or more com-pounds in a single operation. Databases built in this manner typically require several days of computational effort while Catalyst builds and indexes conformational models. In the event of an unforeseen circum-stance, such as insufficient disk space or computer downtime, compu-tational effort may be lost with this approach. However, building databases in a single operation streamlines the overall database build-ing procedure, removing the need to merge database components. Alternatively, you may build databases in portions and combine the portions as appropriate. This approach is flexible and minimizes the risk of a loss of computational effort due to unforeseen circumstances.
The killall command does not work on the IBM platform. You should issue a ps -ef | grep catDisk command to obtain the PID number of all the catDisk executable. After receiving the PIDs, issue a kill -9 (PID#) for each catDisk process.
Check that sufficient disk space is available.
310 Catalyst Tutorials/March 2002
Building Databases
Run the tutorial
You will see the following output and sequence of prompts. Your answers are indicated in bold type:
catDB version 4.7 (342)-----------------------------------------------------Licensed by Accelrys to42:99999:1:ACCELRYS TEST LICENSE COMPANY-----------------------------------------------------NLS: 3 Token(s) for CAT_INFO Checked Out using MSI_TokenR FeatureDefault configuration:! Copyright © 1991-2000! All Rights Reserved! Catalyst(TM) Database Configuration fileDatabase Name = ExampleDB-part1catDB version = 4.7 (342)Database ID = (not reserved yet)!Conformational Models:host = localhostpath = /home/DB/!1D Data:host = localhost
Copy the input .sd file to your current working directory by entering at the UNIX prompt:
> cp $CATALYST_TRAIN/ex9.sd ExampleDB.sd
To construct the two database configuration (.bdb) files that are needed for this example, use the catDB command with the CONFIG option.
Enter at the UNIX prompt:
> catDB CONFIG ExampleDB-part1.bdb

Run the tutorial
Catalyst Tutorials/March 2002 311
server = ora3!2D Index:host = localhostpath = /home/DB/!3D Index:host = localhostpath = /home/DB/!Feature Dictionary:host = localhostpath = /home/DB/Do you want to use the default configuration shown above? [y] nConformational models host [localhost] localhostConformational models path [/home/DB/] You are running in 1D free mode.Database has 1D data? [n] nDatabase has 2D index? [y] y2D Index host [localhost] localhost2D Index path [/home/DB/] Database has 3D index? [y] y3D Index host [localhost] localhost3D Index path [/home/DB/] Use the default database feature dictionary? [y] yFeature dictionary host [localhost] localhostFeature dictionary path [/home/DB/] Database has 4D shape index? [n] n! Copyright © 1991-2000! All Rights Reserved! Catalyst(TM) Database Configuration fileDatabase Name = ExampleDB-part1catDB version = 4.7 (342)Database ID = 0!Conformational Models:host = localhostpath = /home/DB/!2D Index:host = localhostpath = /home/DB/!3D Index:host = localhostpath = /home/DB/!

312 Catalyst Tutorials/March 2002
Building Databases
Feature Dictionary:host = localhostpath = /home/DB/Is this correct? [y/n] y
Your configuration file should look like:
! Copyright © 1991-2000! All Rights Reserved! Catalyst(TM) database configuration file.database = ExampleDB-part1catDB version = 4.7 (342)id = 0!Compounds:host = localhostpath = /home/DB/!2D Index:host = localhostpath = /home/DB/!3D Index:host = localhostpath = /home/DB/!Dictionary:host = localhostpath = /home/DB/
As indicated above, do not accept the defaults provided, enter your_machine as the conformational model host (in place of localhost), enter the conformational model path (if different from /home/DB), and answer n (no) to the ques-tions concerning 1D data and shape indices.
Remember to accept this configuration by answering y (yes) to the final prompt.

Run the tutorial
Catalyst Tutorials/March 2002 313
You are now ready to build your first 10-compound database segment with the commands that follow.
Note
The startafter and stopafter options control the portion of the SD file to be computed by each catDB process. The maxconfs option sets the maximum number of conformers that Catalyst will use in gener-ating a conformational model for a given molecule. The AllowNFS option may be included to allow catDB to use disks that are not local to the host computer. (Descriptions of these and other catDB options are available by typing catDB help at the UNIX prompt.) The back-slash (\) allows you to continue a command on the next line.
Repeat this process to construct your second database con-figuration file, ExampleDB-part2.bdb:
> catDB config exampleDB-part2.bdb
Enter the following command to start constructing the data-base:
> catDB SD ExampleDB.sd ExampleDB-part1.bdb max-confs=100 startafter=’$0’ \stopafter=’$10’ AllowNFS
The backslash (\) means “continue this command on the next line.” You can either enter the entire command on one line (without the backslash) or enter the command on two lines, as above. Be sure not to type anything other than a <return> after the backslash.

314 Catalyst Tutorials/March 2002
Building Databases
Note
When this first segment is complete you can build the second set of conformer models.
Alternatively, the two catDB jobs may be run concurrently on differ-ent workstations (It is important that you use separate working direc-tories for each catDB process if you use this approach.) In addition, catDB’s Hosts and Hostsfile options may be used to construct con-former databases using multiple CPUs. These options enable catDB to efficiently manage the allocation of conformer-building tasks to spe-cific CPUs by itself.
Note that the StartCref option is used to insure that the second data-base’s unique identifiers ("crefs") do not overlap with the first data-base.
When using SD files, it is advisable to check the entry format for the compound name in the file to be used. If the compound name is provided as a property field (identified by < > symbols) in the SD file, a .Catalyst parameter (see below) is required to identify the name in the database. By default Catalyst uses the compound name in the header of each compound entry.
importMOL.realCompoundNameProperty=NAME
Here, for example, the NAME property defines the compound name, and the compound name in the header of the compounds will be ignored. In this tutorial no action is required, because the supplied SD file contains compound names in compound headers
When this first segment is complete you can build the sec-ond with the following command:
> catDB SD ExampleDB.sd ExampleDB-part2.bdb max-confs=100 startafter=’$10’ \stopafter=’$20’ StartCref=11 AllowNFS

Run the tutorial
Catalyst Tutorials/March 2002 315
Note
Once both of the database segments have been built, it is time to merge them into a single piece corresponding to the original SD file.
As before, do not accept the default configuration; accept the defaults for the conformational models host, the conformational models path, and the 1D (property) database components. Answer yes to the ques-tions about 2D and 3D indexes.
The configuration file, ExampleDB.bdb,should look like:
! Copyright © 1991-2000! All Rights Reserved! Catalyst(TM) database configuration file.database = ExampleDBcatDB version = 4.7 (342)id = 0!Compounds:host = localhostpath = /home/DB/!2D Index:host = localhostpath = /home/DB/!3D Index:host = localhostpath = /home/DB/!Dictionary:host = localhost
It is possible for one of your database construction jobs to be interrupted by normal system maintenance or an unexpected system failure. This is covered in “Stopping and Restarting Database Construction” in Catalyst’s on-line Help.
To prepare for the merging process, construct a new data-base configuration file named ExampleDB.bdb using the catDB CONFIG command:
> catDB CONFIG ExampleDB.bdb

316 Catalyst Tutorials/March 2002
Building Databases
path = /home/DB/
The no1D option is used to prevent the generation of property data. (Property data are discussed in Part 2 of this tutorial.)
You should now reconfigure the database to enable 4d filtering. This will include a shape-based index in the database. This is done using the catDB RECONFIG option.
Answer the prompts as follows:
iris32 203% catDB RECONFIG ExampleDB.bdbcatDB version 4.7 (342)-----------------------------------------------------Licensed by Accelrys to 42:99999:1:ACCELRYS TEST LICENSE COMPANY-----------------------------------------------------
NLS: 3 Token(s) for CAT_INFO Checked Out using MSI_TokenR FeatureCurrent database configuration:! Copyright © 1991-2000! All Rights Reserved! Catalyst(TM) Database Configuration fileDatabase Name = ExampleDBcatDB version = 4.7 (342)Database ID = 0!Conformational Models:host = localhost
Use this command to merge the parts of the database:
> catDB MERGE ExampleDB.bdb dblist=ExampleDB-part1,ExampleDB-part2 no1D AllowNFS
Enter this command at the UNIX prompt:
> catDB RECONFIG ExampleDB.bdb

Run the tutorial
Catalyst Tutorials/March 2002 317
path = /home/DB/!2D Index:host = localhostpath = /home/DB/!3D Index:host = localhostpath = /home/DB/!Feature Dictionary:host = localhostpath = /home/DB/Do you want to change the database name? [y/n]: nDo you want to change the Conformer database host or location? [y/n]: nDo you want to change the 2D Index host or location? [y/n]: nDo you want to change the 3D Index host or location? [y/n]: nDo you want to change the Feature Dictionary host or location? [y/n]: nDo you want the ExampleDB database to have 4D Shapes indexing? [y/n]: yEnter the host running the Catalyst server: [local-host]: Enter path for the 4D index: [/home/DB/]: Does ExampleDB database have biological (1D) data? [y/n]: n
The default database identification number for a database without 1D data is 0, do you want to set the data-base id number to something other than 0?If you are not clear what this means, you should say no. [y/n] n
Modifying configuration file ExampleDB.bdbIt will be copied to ExampleDB.bdb.old as backup.Creating new configuration file ExampleDB.bdb.
At this point, restart the catDisk server program, which provides database services to Catalyst and Catalyst’s component utilities. (It was shut down at the beginning of the tutorial so that memory-buff-

318 Catalyst Tutorials/March 2002
Building Databases
ered information for the component database would not interfere with database construction.)
Now generate shape information for the database.
Now test to ensure that database was created successfully.
This should produce output similar to the following:
Information about the database ’ExampleDB’, ID = 0.===================================================================Conformer database /home/DB/ExampleDB.0.0bdb Version 1 Number of Compounds 20ExampleDB database does not have a 1D componentExampleDB database has 2D filteringExampleDB database has 3D filtering====================================================================
Enter at the UNIX prompt:
> catDisk catD-4.7 >& catDisk.log &
Enter at the UNIX prompt:
> catShape generate ExampleDB.bdb
Enter at the UNIX prompt:
> catDB INFO ExampleDB.bdb

Run the tutorial
Catalyst Tutorials/March 2002 319
Testing the database
At this point your database is ready for general use by the scien-tists within your company.
To verify this, let’s load this database into a Catalyst session and browse it.
Important
Start Catalyst if it is not already running.
Using the Install Database command in the Databases menu in the Stockroom, load your new database.
Drop the ExampleDB icon onto the View Database button in the Instrument Case.
Browse the database by dropping its icon on the report area of the workbench.
Double-click the row numbers in the spreadsheet to inspect the molecules in the database.
When you are finished testing, exit Catalyst without saving changes; otherwise you won’t be able to restart the catDisk server later.

320 Catalyst Tutorials/March 2002
Building Databases
Adding property data to the database
Property (1D) data may be stored in a Catalyst database through the use of an Oracle relational database. This section of the tuto-rial shows you how to store property data in a database and requires that Oracle be installed and accessible to Catalyst. (Please see Using Oracle from Catalyst.). (If you do not have access to Oracle, skip this section and go on to Part 3 of this tutorial, begin-ning on page 323.) The ExampleDB.bdb database constructed in Part 1 allows topological, pharmacophore and shape-based searches.
Identify the available properties contained in the input datafiles.
The string being searched for is > < (the greater-than, space, space, less-than characters). In this example the SD file contains two prop-erties, IC50 and CAS_number. To have these properties included in your 1D database, you need to construct a property dictionary file, which catDB will use when creating the 1D database.
!property name type schema reference special description!=============================================================================ic50 float specific quick_ref null ic50 activity valuescas_number string specific quick_ref null cas registry number
Note
Enter at the UNIX prompt:
> grep "> <" ExampleDB.sd | sort -u
Using a text editor, create a file named DB.bpd containing the information shown below.
See Catalyst’s on-line Help for how to use the catDB BPD command to construct property dictionary files.

Adding property data to the database
Catalyst Tutorials/March 2002 321
As before, you can stop the catDisk server by placing your cursor in the window where the server is running and pressing the <Ctrl> and <c> keys simultaneously. If the catDisk process is running in the background, you can stop the process by entering at the UNIX prompt:
> killall catDisk
Now make room for these properties in your database
You will be prompted for an Oracle account username and password at this point. Please see your system administrator if you don’t have this information.
The final step in constructing the 1D component of the database is to load the property data from the original SD file.
Make sure that catDisk server is not running.
Now reconfigure ExampleDB.bdb to have biological (1D) data:
> catDB RECONFIG ExampleDB.bdb allowNFS
Once the property dictionary file has been constructed, cre-ate the default 1D data with this command:
> catDB CREATE_1D ExampleDB.bdb propdict=DB.bpd AllowNFS

322 Catalyst Tutorials/March 2002
Building Databases
You will be prompted for an Oracle name and password.
catDB prints a warning such as "4841854: cannot find compound 4841854" for each compound that is found in the .sd file but not in the database. Several will be listed, since we used only 20 of the 200 com-pounds.
You have now finished reconfiguring and updating the database.
The database now contains conformational, topological, and property information on input compounds. Verify the contents of your data-base.
You will be prompted for an Oracle name and password.
You will see output indicating that the database has 2D and 3D indi-ces and that it possesses 1D properties.
To confirm that propery information has been installed in the data-base, you can use the catSearch utility to output columns of proper-
To load the property data enter the command:
> catDB SD_UPDATE ExampleDB.sd ExampleDB.bdb
Restart your local catDisk server to facilitate interaction with the new database:
> catDisk catD-4.7 >& catDisk.log &
Obtain key statistics on the database with the catDB INFO command:
> catDB INFO ExampleDB.bdb Detail

Creating composite databases
Catalyst Tutorials/March 2002 323
ties.
Again you will be prompted for an Oracle name and password.
Creating composite databases
Composite databases facilitate the use of very large Catalyst data-bases. Composite databases efficiently encapsulate information that would require multi-gigabyte files in a single database con-figuration. In addition, composite databases allow flexibility in the assembly of database libraries: additions and modifications to the database can be made by updating relevant components, rather than by modifying the database as a whole.
Within Catalyst, composite databases function as standard Cata-lyst databases. Composite databases, for example, are installed using the Databases/Install Database menu item and viewed using the Database workbench. When searched, composite data-base represent the union of properties defined by their compo-nents.
Configuring a composite database
To illustrate the construction of a composite database, we will combine the two smaller databases generated in Part 1 of this tutorial. It is nec-essary, therefore, to have completed Part 1 before following these steps. The catDB MULTI_CONFIG option is used to generate the compos-ite database.
Use the following UNIX command to list 1D data to the file ExampleDB.spst. You can enter more or use a text editor to examine the contents of this file.
> catSearch ExampleDB.bdb -spst ExampleDB.spst -browse

324 Catalyst Tutorials/March 2002
Building Databases
You will see the following output and sequences of prompts. Your answers are indicated in bold type.
catDB version 4.7 (330)Default configuration:! Copyright c. 1991-2000! All Rights Reserved! Catalyst(TM) Database Configuration file}Database Name = ExampleCompositeDBcatDB version = 4.7 (330)}composite database
Database List:file = $CATALYST_WCONF/databases/Sample.bdbDo you want to use the default configuration shown above? [y]n Please enter the full path name of the data-base(enter . to exit):/home/DB/ExampleDB-part1.bdbPlease enter the full path name of the data-base(enter . to exit):}/home/DB/ExampleDB-part2.bdbPlease enter the full path name of the data-base(enter . to exit):.
The resulting composite database, ExampleCompositeDB.bdb, can be installed and used in Catalyst just like a typical Catalyst database. The catDB MULTI_CONFIG command requires that the full path of member databases be entered and that these databases be con-structed prior to their inclusion in a composite database.
Reconfiguring a composite database
You can use the catDB MULTI_RECONFIG command to reorganize the components of a composite database. For example, to remove the ExampleDB-part1.bdb from ExampleCompositeDB.bdb, enter at the
Enter at the UNIX prompt:
> catDB MULTI_CONFIG ExampleCompositeDB.bdb

Summary
Catalyst Tutorials/March 2002 325
UNIX prompt:
> catDB MULTI_RECONFIG ExampleCompositeDB.bdb
catDB version 4.7 (330)NLS: 3 Token(s) for CAT_INFO Checked Out using MSI_TokenR FeatureCurrent entry:/home/DB/ExampleDB-part1.bdbContinue, Modify, Delete, Insert or Exit(enter C,M,D,I,.)DCurrent entry:/home/DB/ExampleDB-part2.bdbContinue, Modify, Delete, Insert or Exit(enter C,M,D,I,.).
Again, use . to exit the catDB dialog.
Summary
In this exercise you learned how to build a multiconformer Cata-lyst database. In the process of building the database you exer-cised a limited number of the options available with the catDB program.

326 Catalyst Tutorials/March 2002
Building Databases

Catalyst Tutorials/March 2002 327
11 The Exclude/OR QuickTool
At the View Hypothesis workbench level, a hypothesis is a set of features, each of which must be satisfied for the hypothesis to be satisfied as a whole. You can think of a logical AND associating each of the individual features in a hypothesis such that the hypothesis is satisfied when Feature A AND Feature B AND Feature C AND Feature D are satisfied. In the View Hypothesis work-bench, you cannot see the underlying structure of the individual features. For example, a POS IONIZABLE feature can be satisfied by several different chemical groups but in the View Hypothesis workbench, you have no control over the individual groups that satisfy the POS IONIZABLE feature itself, only that it must indeed be satisfied in order to satisfy the overall hypothesis.
Catalyst’s Exclude/OR QuickTool operates on the individual fea-tures of a hypothesis. It provides the means by which the under-lying components of these features can be controlled and edited. For example, with it you can specify the chemical groups that will satisfy the POS IONIZABLE feature in a particular hypothesis. The default POS IONIZABLE feature is satisfied by any primary, secondary, or tertiary basic amine, guanidines, or amidines. These in turn can be thought of as associated by a logical OR such that the POS IONIZABLE feature is satisfied by a primary basic amine OR a secondary basic amine OR a tertiary basic amine OR a guanidine OR a positively charged center. In addition, you can specify exclusions. For example, you can specify that the POS IONIZABLE feature can be satisfied by any primary amine EXCEPT aniline OR any amidine EXCEPT when part of a guani-dine.
Like other Catalyst features, those created with the Exclude/OR QuickTool can be used for manual query construction, function mapping, and automatic hypothesis generation. To be used with function mapping and automatic hypothesis generation, the fea-ture must first be added to Catalyst’s Feature Dictionary.

328 Catalyst Tutorials/March 2002
The Exclude/OR QuickTool
To demonstrate how to use the Exclude/OR QuickTool, this exer-cise includes three interrelated tasks. First, we will examine Cata-lyst’s default POS IONIZABLE feature in detail to become familiar with the layout of the Exclude/OR QuickTool. Next, we will construct a hypothesis to identify structures that include a hetero-aromatic group, and we will then use the hypothesis to search a database. Finally, we will extend the default POS IONIZ-ABLE feature to include structures containing imidazole and pyridine rings. Then we will add it to the Feature Dictionary and use the Show Function Mapping command to verify the new definition.
Catalyst’s default POS IONIZABLE feature
Examination of Catalyst’s default POS IONIZABLE feature will serve to introduce the layout of the Exclude/OR QuickTool. In Catalyst, a POS IONIZABLE is defined as a primary basic amine OR secondary basic amine OR tertiary basic amine OR amidine OR guanidine OR a positively charged center, as shown on the middle row of the illustration below:

Catalyst’s default POS IONIZABLE feature
Catalyst Tutorials/March 2002 329
The definition is slightly more complex than the middle row of the illustration indicates. Two of the groups are allowed only if they are not part of a specific larger structure (in the bottom row):
♦ A primary amidine satisfies the POS IONIZABLE feature only if it is not part of a guanidine, because guanidine itself is part of the definition.
♦ A positive charge satisfies the POS IONIZABLE feature only if it is not directly bonded to a negatively charged center. This is to avoid including structures such as a nitro group, which are represented within Catalyst as charge separated species.
Now that we know how the POS IONIZABLE feature is defined, let’s take a look at it in the Exclude/OR QuickTool.

330 Catalyst Tutorials/March 2002
The Exclude/OR QuickTool
\
Open a View Hypothesis workbench.
Select POS IONIZABLE from the Feature Dictionary and add it to the View Hypothesis workspace by clicking any-where in it.
Select Exclude/OR Edit... from the Tools menu to open the Exclude/OR QuickTool shown in the illustration that fol-lows.

Catalyst’s default POS IONIZABLE feature
Catalyst Tutorials/March 2002 331
The Exclude/OR QuickTool consists of columns of 3D workspaces, two of which are visible at any given time. The window at the top of each column shows one of the groups that satisfies the feature. In this step the Exclude/OR QuickTool opens with a primary basic amine in the top window of the first column and a secondary basic amine in the top window of the second column. The bottom window in each column is for an exclusion to the group above it. Although only two columns are shown at once, the complete definition can include as many fea-tures (columns) as you want. In addition, each individual feature (col-umn) can contain as many exclusions as you want, although only one is displayed at a time. When you add more alternative features and exclusions, you can use the scroll bars to view the different windows.

332 Catalyst Tutorials/March 2002
The Exclude/OR QuickTool
Note
The windows update to show you the rest of the POS IONIZABLE definition.
As you scroll through the definition, you’ll see that the exclusion win-dow beneath the primary amidine displays a guanidine with a part of the structure in the Dots style. This dotted portion shows one possible mapping of the amidine to the guanidine. The definitions in this col-umn mean that a primary amidine satisfies the POS IONIZABLE feature definition only if it is not a part of a guanidine.
For an exclusion to be valid, the entire topology of the allowed group must be a proper substructure of the topology of the excluded group. For example, you could allow one phenyl ring but exclude it when it occurs as part of a napthalene.
Each window in the Exclude/OR QuickTool is essentially a View Hypothesis workbench, with a couple of minor exceptions. There is no Convert Molecule to Hypothesis tool; when a molecule is dragged into any of the windows, it is automatically converted to a hypothesis. In addition, location constraints, geometric constraints, and excluded volumes cannot be used in the QuickTool, they must be added in the View Hypothesis workbench.
Click in the area to the right of the scroll bar at the bottom of the Exclude/OR QuickTool.
Continue to click to the right of the scroll bar at the bottom of the Exclude/OR QuickTool to browse the definition .
Select Return from QuickTool from the QuickTool menu and then Dispose of Workbench from the Workbench menu.

Constructing a heteroaromatic hypothesis
Catalyst Tutorials/March 2002 333
Constructing a heteroaromatic hypothesis
To demonstrate how to use the Exclude/OR QuickTool, we will construct a hypothesis that identifies structures that include at least one heteroaromatic group. A heteroaromatic group will be defined as any of following: 1,2,3-triazolyl, 1,2,4-triazolyl, furyl, imidazolyl, pyrazolyl, pyridyl, pyrimidinyl, pyrrolyl, or tetra-zolyl groups. In addition, we will associate each of these groups via the centroid of the aromatic ring. The hypothesis will then be used to search a database.
The Exclude/OR QuickTool opens with the selected fragment in the upper left window.
Resetting the hydrogen count generalizes the hypothesis to include compounds containing a substituted 1,2,3-triazolyl. As added, the 1,2,3-Triazolyl query would have been satisfied only by structures containing the unsubstituted 1,2,3-triazolyl group itself.
Open a View Hypothesis workbench.
Select the 1,2,3-Triazolyl fragment in the Feature Dictionary and add it to the View Hypothesis workspace by clicking anywhere in it.
Select Exclude/OR Edit... from the Tools menu.
Select the 1,2,3-Triazolyl fragment in the upper left window using Select All under the Edit menu. Then select Reset Hydrogen Count from the Tools menu.

334 Catalyst Tutorials/March 2002
The Exclude/OR QuickTool
\
The point constraint that is added at the centroid (shown in the illus-tration that follows) of the selected atoms will be used to associate the individual constituents of the heteroaromatic feature with each other.
To continue adding definitions, we need to add another column to the QuickTool.
An empty column appears on the right side of the QuickTool.
With the atoms of the 1,2,3-Triazolyl fragment still selected, select Define Geometric Object from the Constraints menu and Centroid from its submenu.
Select 1,2,4-Triazolyl from the Feature Dictionary and add it to the upper right window. Then select Reset Hydrogen Count from the Tools menu.
Select Append OR Column from the Edit menu.

Constructing a heteroaromatic hypothesis
Catalyst Tutorials/March 2002 335
Create new OR columns for each of the following fragments from the Feature Dictionary:
furyl
imidazolyl
pyrazolyl
pyridyl
pyrimidinyl
pyrrolyl
tetrazolyl
Be sure to reset the hydrogen count and add a centroid con-straint to each new fragment.
Select Set Associations... from the Tools menu to display the Association Editor shown below.
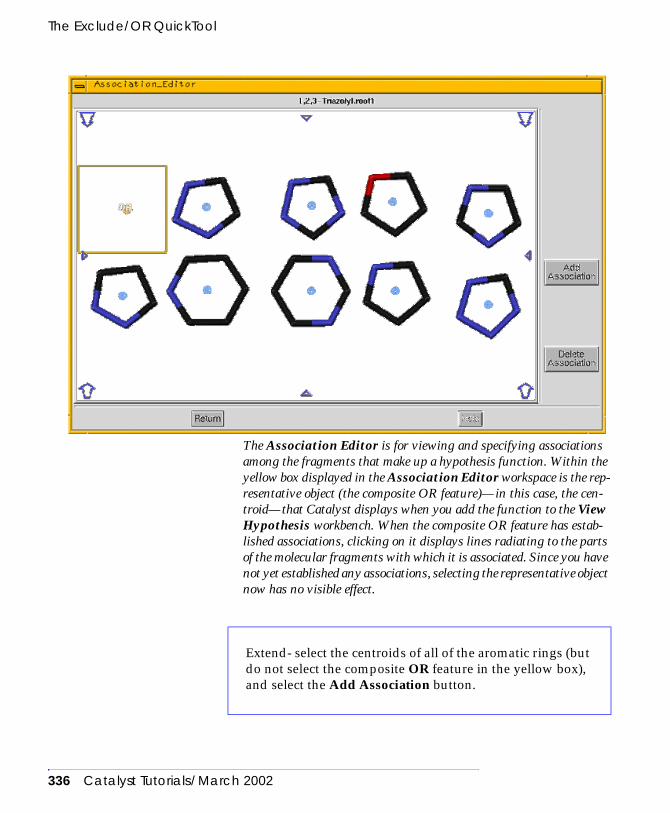
336 Catalyst Tutorials/March 2002
The Exclude/OR QuickTool
The Association Editor is for viewing and specifying associations among the fragments that make up a hypothesis function. Within the yellow box displayed in the Association Editor workspace is the rep-resentative object (the composite OR feature)—in this case, the cen-troid—that Catalyst displays when you add the function to the View Hypothesis workbench. When the composite OR feature has estab-lished associations, clicking on it displays lines radiating to the parts of the molecular fragments with which it is associated. Since you have not yet established any associations, selecting the representative object now has no visible effect.
Extend- select the centroids of all of the aromatic rings (but do not select the composite OR feature in the yellow box), and select the Add Association button.

Constructing a heteroaromatic hypothesis
Catalyst Tutorials/March 2002 337
Selecting the composite OR feature now displays lines connecting it to the centroids of all of the constituent aromatic fragments
The Exclude/OR QuickTool closes, revealing the composite OR fea-ture (small blue sphere) in the parent View Hypothesis workbench.
To verify that our new Heteroaromatic hypothesis identifies struc-tures containing a heteroaromatic group, we will use it to search Sample database
Click the Return button in the Association Editor.
Select Return from QuickTool from the QuickTool menu.
Select the composite OR feature, then select Save To Lab As... from the Data menu, and save the composite OR fea-ture with a recognizable name such as Heteroaromatic.

338 Catalyst Tutorials/March 2002
The Exclude/OR QuickTool
.
Catalyst returns, as hits, those compounds in the database that include a heteroaromatic group as defined in the hypothesis. You can double-click on the row number of any of these to see how the hit sat-isfies the hypothesis.
Modifying the default POSITIVE IONIZABLE feature
In Catalyst, the function definitions for manual hypothesis con-struction, hypothesis generation, function mapping, and so on, are themselves hypotheses.
As such, you can modify or even completely redefine them as you see fit. If, for example, you are dissatisfied with Catalyst’s default POS IONIZABLE feature because it does not recognize pyridyl and imidazolyl groups, you can easily modify it to do so as shown in the following procedure.
Drag the Heteroaromatic hypothesis and Sample database to a View Database workbench.
With both icons selected, select Fast Flexible Search Data-bases/Spreadsheets from the Tools menu.
Dispose of the View Database workbench when you have finished viewing the compounds that match your hypothe-sis.
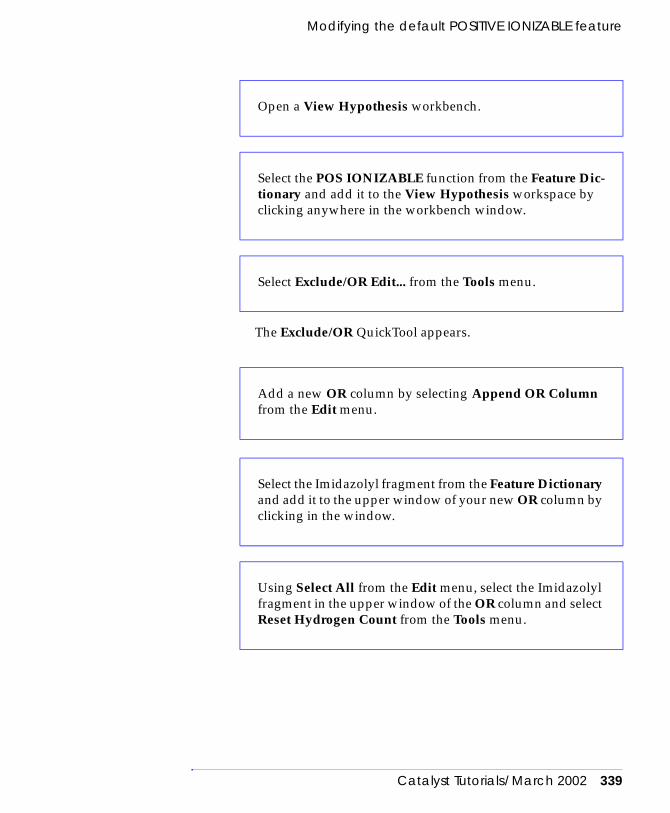
Modifying the default POSITIVE IONIZABLE feature
Catalyst Tutorials/March 2002 339
The Exclude/OR QuickTool appears.
Open a View Hypothesis workbench.
Select the POS IONIZABLE function from the Feature Dic-tionary and add it to the View Hypothesis workspace by clicking anywhere in the workbench window.
Select Exclude/OR Edit... from the Tools menu.
Add a new OR column by selecting Append OR Column from the Edit menu.
Select the Imidazolyl fragment from the Feature Dictionary and add it to the upper window of your new OR column by clicking in the window.
Using Select All from the Edit menu, select the Imidazolyl fragment in the upper window of the OR column and select Reset Hydrogen Count from the Tools menu.

340 Catalyst Tutorials/March 2002
The Exclude/OR QuickTool
Notice that there are no lines to the imidazolyl or pyridyl fragments.
With the Imidazolyl fragment still selected, select Define Geometric Object from the Constraints menu and Cen-troid from its submenu.
Add a Pyridyl fragment as you did for Imidazolyl in the last four steps.
Select Set Associations... from the Tools menu.
Select the composite OR feature in the yellow box to display the currently associated parts of the hypothesis definition.
Extend-select all the atoms and points that are currently associated, but not the composite OR feature.
Extend-select the centroids of the pyridyl and imidazolyl fragments.
Select the Add Association button.

Modifying the default POSITIVE IONIZABLE feature
Catalyst Tutorials/March 2002 341
You have edited the POS IONIZABLE function to recognize pyridyl and imidazolyl rings. To use this new feature for function mapping, hypothesis generation, and so on, you must add it to the Feature Dic-tionary.
The Register_Dictionary_Feature control panel appears.
POS IONIZABLE is reserved for the default Catalyst function.
Now that our new function is available in the Feature Dictionary, let’s verify that it recognizes the new components.
Click the button at the bottom of the Association Editor and then select Return from QuickTool from the Exclude/OR QuickTool menu.
Select the new feature in the View Hypothesis workbench.
Select Add to Dictionary... from the Tools menu.
Give the feature a new name by typing it in the Name text box.
Select the Function toggle to the right of the name (only function definitions can be used for hypothesis generation), and select the OK button.

342 Catalyst Tutorials/March 2002
The Exclude/OR QuickTool
After a pause Catalyst displays No mapping in the Status Area.
After a pause Catalyst displays Mapping 1/3 in the Status Area at the bottom left of the window and a small magenta sphere appears at the centroid of the imidazole ring of Mk-1a as shown in the illus-tration below:
Select Clear Display from the Edit menu of the View Hypothesis workbench.
Drag the molecule Mk-1a from the Stockroom to the View Hypothesis workbench and drop it on the workspace.
Select Catalyst’s default POS IONIZABLE feature from the Feature Dictionary and select Show Function Mapping... from the Tools menu.
Now select your modified feature from the Feature Dictio-nary and select Show Function Mapping from the Tools menu.

Summary
Catalyst Tutorials/March 2002 343
The mapping sphere moves to the centroid of the pyridine ring. We have now verified that our new feature recognizes imidazole and pyri-dine rings.
Note
Summary
In this tutorial we have learned the basic layout and function of Catalyst’s Exclude/OR QuickTool. We have used it to define a new heteroaromatic feature with which we searched the Sample database. We also learned how to modify the definition of Cata-lyst’s default POS IONIZABLE feature and verified the new defi-nition using the Show Function Mapping command.
Click the Forward button in the Function Mapping control panel
Some mappings might derive purely from symmetry. For instance, pyridine shows two mappings, but because of symmetry these mappings are identical.

344 Catalyst Tutorials/March 2002
The Exclude/OR QuickTool

Catalyst Tutorials/March 2002 345
12 Customizing functions
In Catalyst, molecules are analyzed as ensembles of chemical func-tions (hydrogen bond donors, acceptors, hydrophobic areas, etc.). These functions are accessible from a feature dictionary. Each func-tion consists of a collection of fragments that express the same chemical behavior. A function can include several fragments (con-nected via OR statements) and can also include several exclusions (fragments that would otherwise fit the definition, except that they are specifically excluded).
The default version of the Feature Dictionary is effective in most situations. However, molecules may not map as expected, occasion-ally because the fragment is not included in the definition of the function, sometimes because exclusions are improperly defined for a specific series of molecules.
To map a set of molecules properly, you can use the functions as they are described in the Feature Dictionary, create new functions, or customize existing functions. One goal of function customization is to allow Catalyst to consider known SAR data within one or sev-eral series of molecules. Another goal is to create specific functions that recognize specific molecular groups when searching a data-base.
The aim of this lesson is to illustrate the creation and customization of chemical functions in the dictionary. These customized functions and fragments are intended for use in both hypothesis generation (HypoGen and HipHop) and database searches.
Note
This lesson covers the following topics:
♦ Customizing a function
♦ Creating a vectorized function
This tutorial lesson is designed for advanced user who are familiar with common Catalyst operations.

346 Catalyst Tutorials/March 2002
Customizing functions
♦ Creating a “NOT” function
♦ Working with peptides
♦ Creating fragments
Customizing a function
In this exercise we will extend the definition of a hydrogen-bond acceptor by adding fluorine as an acceptor, excluding alcohols, and excluding some specific heteroatoms belonging to the sugar moiety.
Including a new fragment in a definition
A blue arrow appears in the Workspace.
This opens the Exclude/OR editor.
In the View Compound Workbench, build fluoromethane (CH3F). Save to Lab.
Open the View Hypothesis Workbench and put CH3F on the shelf.
From the Feature Dictionary, select HB ACCEPTOR and click in the workspace of the View Hypothesis Workbench.
From the Tools menu, select Exclude/OR Edit….
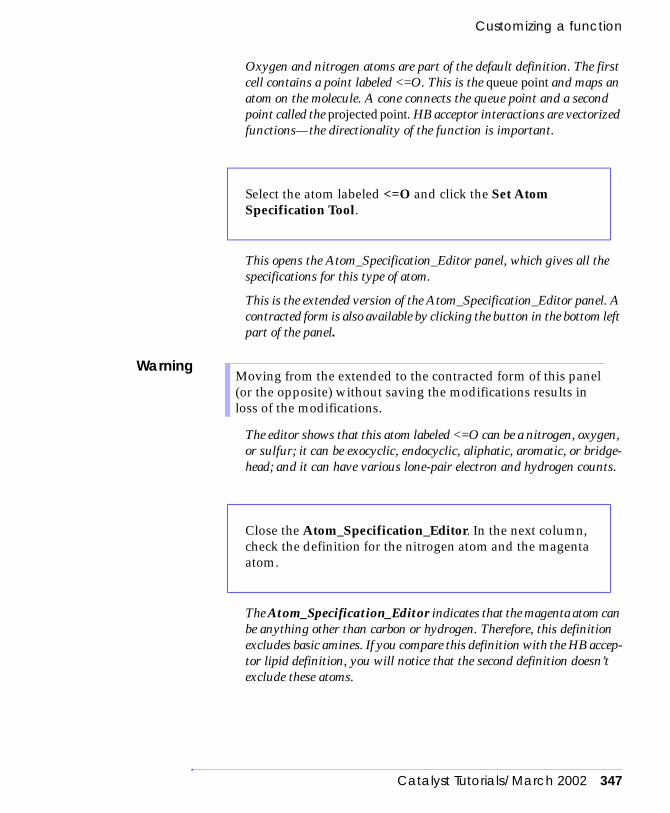
Customizing a function
Catalyst Tutorials/March 2002 347
Oxygen and nitrogen atoms are part of the default definition. The first cell contains a point labeled <=O. This is the queue point and maps an atom on the molecule. A cone connects the queue point and a second point called the projected point. HB acceptor interactions are vectorized functions—the directionality of the function is important.
This opens the Atom_Specification_Editor panel, which gives all the specifications for this type of atom.
This is the extended version of the Atom_Specification_Editor panel. A contracted form is also available by clicking the button in the bottom left part of the panel.
Warning
The editor shows that this atom labeled <=O can be a nitrogen, oxygen, or sulfur; it can be exocyclic, endocyclic, aliphatic, aromatic, or bridge-head; and it can have various lone-pair electron and hydrogen counts.
The Atom_Specification_Editor indicates that the magenta atom can be anything other than carbon or hydrogen. Therefore, this definition excludes basic amines. If you compare this definition with the HB accep-tor lipid definition, you will notice that the second definition doesn’t exclude these atoms.
Select the atom labeled <=O and click the Set Atom Specification Tool.
Moving from the extended to the contracted form of this panel (or the opposite) without saving the modifications results in loss of the modifications.
Close the Atom_Specification_Editor. In the next column, check the definition for the nitrogen atom and the magenta atom.

348 Catalyst Tutorials/March 2002
Customizing functions
A new column is appended. (If you use the scroll bar at the bottom of the Exclude/OR_QuickTool window and that new column does not con-tain any object, the new column is removed.)
CH3F can be manipulated as a 3D modeLeaving the CH3F fragment as it is would result in fluorine being recognized as a HB acceptor in CH3F only.
Note
Close the Atom_Specification_Editor. From the Edit menu, select Append OR column.
Drop CH3F into the new OR cell in the first row.
Select the carbon atom and select the Atom_Specification_Editor from the tool bar.
Check the boxes corresponding to exocyclic, endocyclic, bridgehead, aromatic, and aliphatic types. Highlight carbon as the atom type and set the hydrogen count to * (anything). Click OK to finish.
At this stage you have to think carefully about all the possible situations in which you want the function to be expressed, in order to make the definition more or less specific.

Customizing a function
Catalyst Tutorials/March 2002 349
A cone is added to the fluorine atom. There is no need to define an ori-entation for this cone.
In the Exclude/OR Editor, all the fragments are associated. The next step consists in associating the newly defined fragment to the definition.
When you click the blue arrow, yellow lines are displayed between the arrow and the cones of both the oxygen and the nitrogen. When you click any of the end points of the blue arrow, yellow lines appear between these points and the corresponding point on the fragments. No line exists between the arrow or its points and CH3F fragment, since it is still not part of the HB acceptor definition.
A new fragment is added to the definition by selecting a fragment already belonging to the definition and the new fragment. Then set the association between the two selected fragments.
For vectorized functions (hydrogen-bond donors, hydrogen-bond accep-tors, ring aromatics, and any newly created vectorized function), it is not necessary to select the end points and add associations from them. Selecting the cone includes the two end points in the association.
Now when you click the blue arrow, a yellow line is drawn between the arrow and the fluorine cone. The same happens when you click one of the end points of the blue arrow.
Select the fluorine atom and from the Constraints/Define Geometric Object menu, select Hydrogen Bond Acceptor.
From the Tools menu, select Set Associations.
Select the cone of oxygen and extend-select (with the mid-dle mouse button) the cone of fluorine. Click Add Associa-tion.

350 Catalyst Tutorials/March 2002
Customizing functions
If something has been incorrectly defined (incorrect association for example), the Exclude/OR editor will not let you exit.
Once the Exclude/OR editor is closed, you see a blue arrow in the work-space of the View Hypothesis Workbench.
This opens Register Dictionary Feature control panel that allows you to add the new function to the dictionary. The function can be entered either in the Function area of the dictionary or in the Fragment area. By default, new entries are entered as fragments.
The new function is now listed in the Feature Dictionary. We will test the new function by doing some function mapping.
Select Return.
In the QuickTool menu, click Return from QuickTool.
Select all components of the new function (blue arrow and end points) and in the Tools menu, click Add to Dictio-nary….
Click the blue button next to Function. Enter HBA-F in the Name entry box to give the function a name. Click OK.

Customizing a function
Catalyst Tutorials/March 2002 351
Excluding a fragment from a definition
The Exclude/OR editor also allows you to exclude fragments from a given definition. The exclusion can be general (excluding a chem-ical group from the function) or more specific (for example, exclud-ing a specific atom in a given series of molecules).
As mentioned previously, the first row in the Exclude/OR editor contains all the global OR statements. The definition of exclusions must obey the following rule: exclusions constitute sub-ensem-bles of the OR statements defined in the first row of the Exclude/OR editor.
This has a direct consequence on the way excluded fragments must be placed in the exclusion part of the editor.
Considering the HBA-F function for example, there are three col-umns; one for N, O, S, a second one for some specific nitrogen atoms, and a third one specific to fluorine atoms. Therefore, exclud-ing some specific oxygen atom from the HBA-F definition requires the fragment to be placed in the “oxygen” column. Placing it in another column results in an error message:
The feature ‘fragment-1.root’ is an inconsistent exclu-sion specification for the “allowed” feature in its current form.
Excluding alcohols from the HBA-F definition
In this example, we will use the HBA-F function that we have built so far. This function still recognizes alcohols as HB acceptors (which is cor-
First, close all the active workbenches and save the Stock-roomDB.
Open a new View Hypothesis Workbench, drag CH3F to it, and compare the mapping obtained with the default HB acceptor function and HBA-F.
352 Catalyst Tutorials/March 2002
Customizing functions
rect), but the goal here is to customize it so that alcohols only express their HB donor character.
A blue arrow is displayed in the Workspace.
A dotted sphere appears on top of the oxygen atom.
The contracted form of this panel is displayed. Since you only want to
In the View Compound Workbench, build methanol (CH3OH) and Save it to Lab.
Open a View Hypothesis Workbench.
In the Feature Dictionary Window, select HBA-F and click in the workspace of the View Hypothesis Workbench.
Select the arrow of HBF-A from the Tools menu. Then open the Exclude/OR Editor.
Drag and drop the CH3OH fragment into the first Exclusion cell (1st column, 2nd row).
As shown before, select the carbon atom and open the Atom_Specification_Editor panel.

Customizing a function
Catalyst Tutorials/March 2002 353
consider alcohols, you only need to highlight the carbon atom in the mini periodic table. Including nitrogen atoms would result in excluding oximes from the definition.
This is to consider both pure sp3 oxygen atoms (for which the lone pair count is 2) and phenol or enol hydroxyl groups (for which the lone pair count is 1). An alternative would have been to specify 1,2 in the Lone Pair Count entry box.
The oxygen atom is highlighted, which indicates that it is the atom to be excluded from the hydrogen-bond acceptor definition. If there were mul-tiple hydrogen-bond acceptors in the fragment, the correct atom could be highlighted by using the Exclusion Mapping scroll bar below the cell.
Since you have modified the global definition for O, N, S, this “frag-ment” is no longer attached to the definition.
Warning
Now, reassociate the modified fragment with the definition.
Select the carbon atom only (under Specification for) and turn on all the options on the left side of the panel. Set the Hydrogen Count to *. Click OK.
Select the oxygen atom and open the Atom_Specification_Editor control panel.
Set the Lone pair count to *.
This constitutes a general rule: every modification made to an existing fragment (defining an exclusion, changing the definition) disconnects the fragment from the definition.

354 Catalyst Tutorials/March 2002
Customizing functions
Only two lines link the arrow and the fragments. The <=O fragment is no longer connected.
Excluding specific heteroatoms from a substructure
From the Tools menu, select Set Associations….
Click the blue arrow.
Using the same procedure as before, reassociate the <=O fragment to the HBA-F function.
Check that the fragment is reassociated to the function by clicking on the blue arrow.
Return from the QuickTool and Add the function to the Dic-tionary. Test it to see how it maps alcohols. Compare this to how HBA-F maps to alcohols.
In a View Compound Workbench, draw the molecule shown below. Save it as Sugar. (Note: The numbers in the illustration are included to help you identify the ring atoms later in this exercise.)
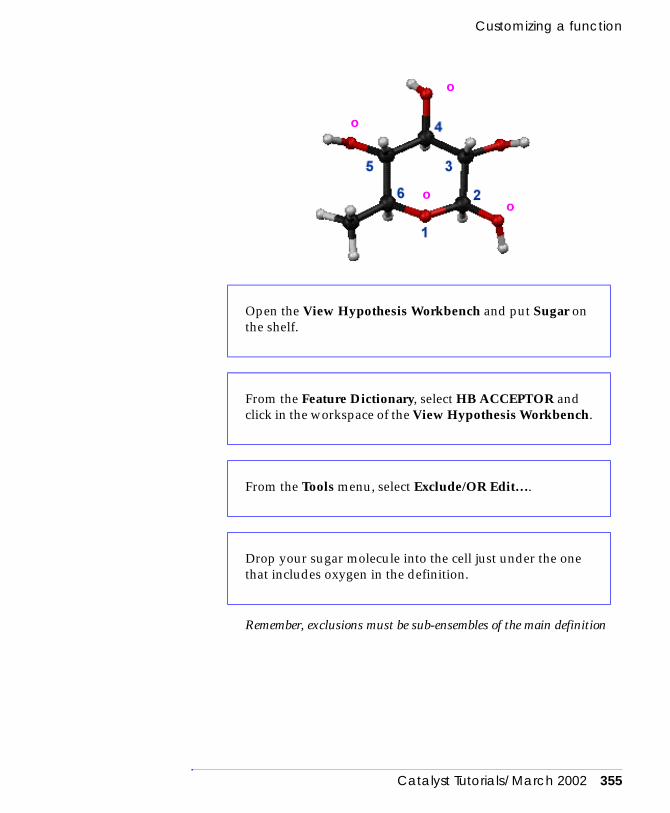
Customizing a function
Catalyst Tutorials/March 2002 355
Remember, exclusions must be sub-ensembles of the main definition
o
o
oo
Open the View Hypothesis Workbench and put Sugar on the shelf.
From the Feature Dictionary, select HB ACCEPTOR and click in the workspace of the View Hypothesis Workbench.
From the Tools menu, select Exclude/OR Edit….
Drop your sugar molecule into the cell just under the one that includes oxygen in the definition.

356 Catalyst Tutorials/March 2002
Customizing functions
At the bottom of each exclusion cell, there are exclusion mapping scroll buttons that are used to define precisely the atom(s) that will be excluded from the definition. The selected atom is highlighted with dots.
Note
If another atom should be excluded in the fragment, a new exclusion cell must be created.
This creates a new exclusion cell. The first cell is now above the new empty exclusion cell and is out of sight.
As you did in the two previous examples, set the carbon atom of the methyl group to aliphatic, exocyclic, endocyclic, aromatic, and the hydrogen count to * (anything).
Only one atom at a time can be excluded from the function definition in an exclusion cell.
Use an Exclusion Mapping scroll button to highlight the hydroxyl group in position 2. To see the atoms more clearly, use the blue arrows in the corners of the cell to zoom the image.
From the Edit menu, select Append Excluding Entry.

Customizing a function
Catalyst Tutorials/March 2002 357
The databases are indexed using the default functions. Therefore any structural modifications will make the new function less efficient when included in search queries.
Modifying an existing two-point function
In hypothesis generation, the use of vectorized functions (HB acceptors, HB donors, ring aromatic) complicates the problem, since alignment on the two points of the function is required. In
Repeat these steps (drop the sugar in the cell, set the appro-priate atom types, and the other steps above). Use the Exclusion Mapping scroll bar to highlight the hydroxyl group in position 5. After you have completed these tasks, check the two exclusion cells using the scroll bar on the left.
Using the same method as before, reassociate the oxygen (<=O) to the definition.
Once the association is done, exit the QuickTool by clicking Return from Quick Tool in the QuickTool menu.
In the workspace, select the arrow and the two points, and from the Tools menu, select Add to Dictionary. Remember to save it as a function.
Now compare the mapping of this customized function to the mapping of the default HB acceptor function.

358 Catalyst Tutorials/March 2002
Customizing functions
database searches, the search time increases when multiple vector-ized features are part of the query. In some training sets, it is impos-sible to properly align molecules on some donors or acceptors, because of the geometry of the ligand. These interactions may con-verge and interact with a common point on the protein. Therefore, a vectorized function may be considered too restrictive. In other situ-ations, there is absolutely no information about the directionality of such an interaction, and a point interaction locating a donor or an acceptor site on the ligand should be sufficient.
To take into account these two possible situations, you can easily create HB donor, HB acceptor, or any vectorized feature consisting of either the projected point or the queue point. You can customize an existing function and consider only the projected or the queue point.
We will illustrate this approach with the default hydrogen-bond accep-tor function.
A blue arrow appears in the Workspace.
Both the queue point and the arrow are removed.
Open the View Hypothesis Workbench.
From the Feature Dictionary, select HB ACCEPTOR and click in the workspace of the View Hypothesis Workbench.
Select the queue point labeled <=O and erase it (with the Eraser, or by clicking the Backspace key).

Creating a vectorized function
Catalyst Tutorials/March 2002 359
Hydrogen-bond acceptors are mapped as before, but instead of a vector, there is just one sphere.
Creating a vectorized function
Catalyst allows you to create and use functions that make no real chemical sense. This type of function can be a purely geometrical function and is used mainly to force the alignment of some groups or chains in molecules during hypothesis generation. The example that follows illustrates this approach.
HMGCoA-reductase inhibitors consist of a long sidechain common to all the molecules, resulting from the opening of a lactone ring and of a smaller, mostly hydrophobic, variable part. It is this vari-able part that is responsible for the large activity range of these molecules.
The problem with the sidechain of these molecules is that it is flexi-ble and polyfunctionalized; one can identify three hydrogen-bond donor sites (with all possible orientations), four hydrogen-bond acceptors (with all possible orientations), and one negative ioniz-able function. Because the hypothesis generator is limited to gener-ating hypotheses that contain a maximum of five functions, we do not want too many functions to be wasted on this common sidechain. However, we do want this chain to be correctly aligned for all the molecules.
The strategy applied here is to create a function consisting of a vec-tor linking two centroid points. Each centroid is defined using func-tional groups, so that, because of the inter-feature spacing parameter, all the features defined here—centroid and vector—are purely geometric features. The mapping of the resulting function is independent of the conformation of the flexible chain.
Select the sphere representing the projected point and from the Tools menu, click Add to Dictionary…. Save the func-tion as HBA-PP and test it.
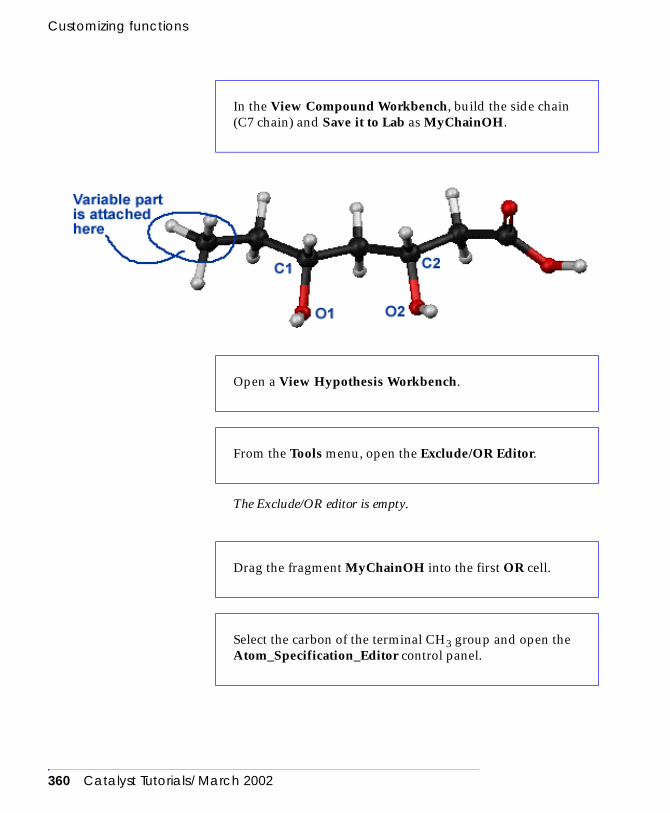
360 Catalyst Tutorials/March 2002
Customizing functions
The Exclude/OR editor is empty.
In the View Compound Workbench, build the side chain (C7 chain) and Save it to Lab as MyChainOH.
Open a View Hypothesis Workbench.
From the Tools menu, open the Exclude/OR Editor.
Drag the fragment MyChainOH into the first OR cell.
Select the carbon of the terminal CH3 group and open the Atom_Specification_Editor control panel.

Creating a vectorized function
Catalyst Tutorials/March 2002 361
Note
The Association Editor shows the fragment with the vector. Within the yellow box, the OR sphere has no vector.
Select all the options from the left part of this panel, select the carbon atom only, and set the Hydrogen Count to *. Click OK.
Select C1; using the Atom_Specification_Editor, make sure “Use Atom Stereochemistry” is not selected. Then repeat for C2.
This will allow any stereochemical arrangement to map.
On the chain, select the two hydroxyl groups and the mid-dle methylene, and from the Constraints/Define Geomet-ric Object menu, select Centroid. Repeat for the carboxyl end, using the two oxygen atoms and the sp2 carbon.
Select the centroid built from the two hydroxyl groups and extend-select the centroid built from the carboxyl function. From the Constraints/Define Geometric Object menu, select Vector.
From the Tools menu, click Set Associations….
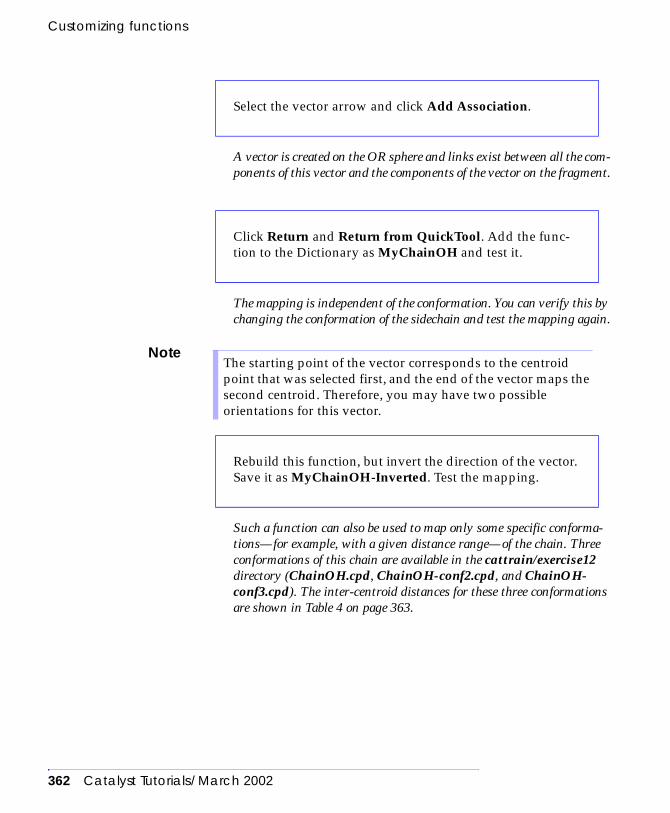
362 Catalyst Tutorials/March 2002
Customizing functions
A vector is created on the OR sphere and links exist between all the com-ponents of this vector and the components of the vector on the fragment.
The mapping is independent of the conformation. You can verify this by changing the conformation of the sidechain and test the mapping again.
Note
Such a function can also be used to map only some specific conforma-tions—for example, with a given distance range—of the chain. Three conformations of this chain are available in the cattrain/exercise12 directory (ChainOH.cpd, ChainOH-conf2.cpd, and ChainOH-conf3.cpd). The inter-centroid distances for these three conformations are shown in Table 4 on page 363.
Select the vector arrow and click Add Association.
Click Return and Return from QuickTool. Add the func-tion to the Dictionary as MyChainOH and test it.
The starting point of the vector corresponds to the centroid point that was selected first, and the end of the vector maps the second centroid. Therefore, you may have two possible orientations for this vector.
Rebuild this function, but invert the direction of the vector. Save it as MyChainOH-Inverted. Test the mapping.

Creating a vectorized function
Catalyst Tutorials/March 2002 363
Note
This opens the Constraint Tolerance control panel.
This setting is to specifically recognize ChainOH-CONF3.
Only ChainOH-CONF3 is mapped by the function.
Table 4 Inter-centroid distances
Compound Distance Torsion
ChainOH 3.75 102.14ChainOH-conf2 3.73 -1.36ChainOH-conf3 2.73 -128.87
ChainOH-conf3 is an impossible conformation (for steric reasons). However, we will use it to illustrate this exercise. The torsion measured here is O1–C1–C2–O2.
Open the Exclude/OR Editor and build the vector as described previously; this time, however, build the vector without the distance constraint. Before setting the associa-tions, select the two ends of the vector, and from the Con-straints/Define Constraint menu, select Distance.
Set the Starting Torsion to 2.5 Å and the Ending Torsion to 3.0 Å. Click Apply. Click OK.
Set the Associations, save and add the function to the Dic-tionary. Name it Chain-CONF3. Test the mapping using the three different conformations.
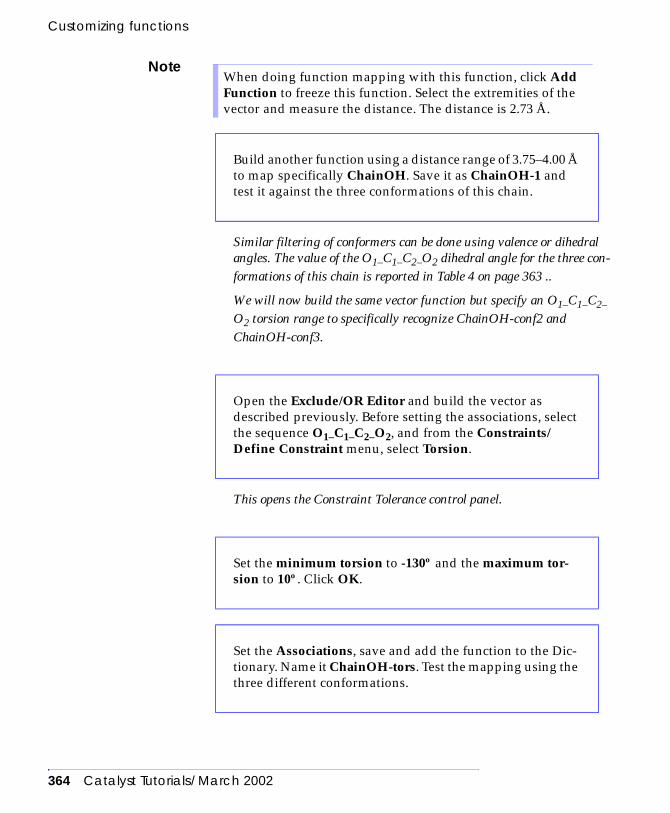
364 Catalyst Tutorials/March 2002
Customizing functions
Note
Similar filtering of conformers can be done using valence or dihedral angles. The value of the O1–C1–C2–O2 dihedral angle for the three con-formations of this chain is reported in Table 4 on page 363 ..
We will now build the same vector function but specify an O1–C1–C2–O2 torsion range to specifically recognize ChainOH-conf2 and ChainOH-conf3.
This opens the Constraint Tolerance control panel.
When doing function mapping with this function, click Add Function to freeze this function. Select the extremities of the vector and measure the distance. The distance is 2.73 Å.
Build another function using a distance range of 3.75–4.00 Å to map specifically ChainOH. Save it as ChainOH-1 and test it against the three conformations of this chain.
Open the Exclude/OR Editor and build the vector as described previously. Before setting the associations, select the sequence O1–C1–C2–O2, and from the Constraints/Define Constraint menu, select Torsion.
Set the minimum torsion to -130º and the maximum tor-sion to 10º. Click OK.
Set the Associations, save and add the function to the Dic-tionary. Name it ChainOH-tors. Test the mapping using the three different conformations.

Creating a “NOT” function
Catalyst Tutorials/March 2002 365
This function recognizes the vector existing between the two centroids only if the torsion constraint fixed for atoms O1–C1–C2–O2 is satisfied. Therefore, only ChainOH-conf2 and ChainOH-conf3 are mapped by the function.
Creating a “NOT” function
Often, corporate databases contain large sets of molecules belong-ing to the same class. This is also true of the public databases included with Accelrys software (WDI, ACD, NCI, and other data-bases). Retrieving compounds belonging to a given structural fam-ily may not be of interest since their action on the target would only constitute a side-effect of their main pharmacological action.
In this exercise, we will build NOT queries based on the beta-lac-tam and cephalosporine backbones and incorporate them into the angiotensin II hypothesis. The underlying idea is that we do not want to retrieve any beta-lactam or cephalosporine molecules as potential angiotensin II inhibitors..
Open a View Hypothesis Workbench.

366 Catalyst Tutorials/March 2002
Customizing functions
The penicillinyl fragment is selected.
The Penicillinyl fragment is displayed.
This allows any possible substitution of the carbon atoms on the bicyclic ring
From the Feature Dictionary, select Fragments only.
In the Search String field, enter Peni.
Click in the Workspace of the View Hypothesis Workbench.
Remove all the exocyclic atoms (the COOH group, the gem-dimethyl, and amide functions) with the eraser.
Select the entire fragment and from the Tools menu, select Reset Hydrogen Count.
Select the sulfur atom and from the Tool bar, open the Atom_Specification_Editor
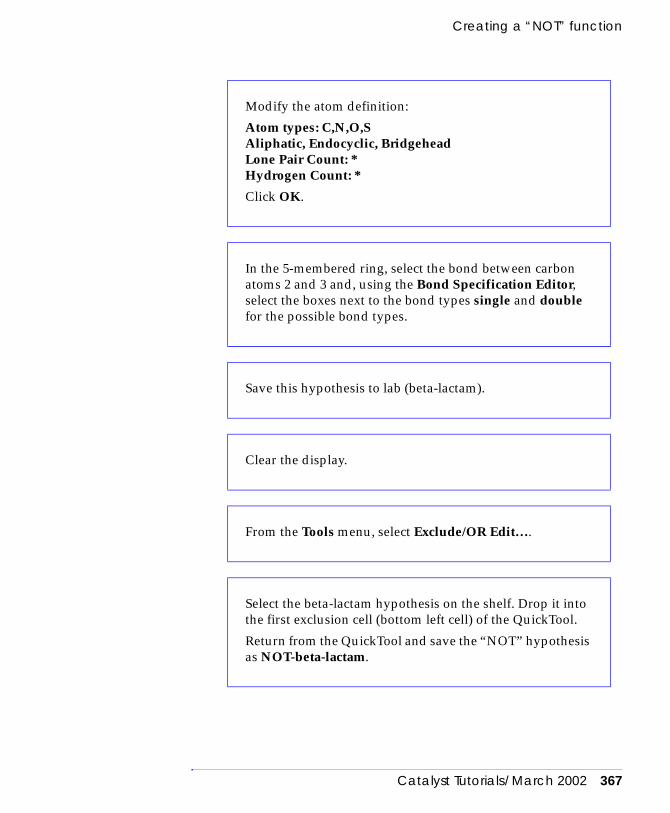
Creating a “NOT” function
Catalyst Tutorials/March 2002 367
Modify the atom definition:
Atom types: C,N,O,SAliphatic, Endocyclic, BridgeheadLone Pair Count: *Hydrogen Count: *
Click OK.
In the 5-membered ring, select the bond between carbon atoms 2 and 3 and, using the Bond Specification Editor, select the boxes next to the bond types single and double for the possible bond types.
Save this hypothesis to lab (beta-lactam).
Clear the display.
From the Tools menu, select Exclude/OR Edit….
Select the beta-lactam hypothesis on the shelf. Drop it into the first exclusion cell (bottom left cell) of the QuickTool.
Return from the QuickTool and save the “NOT” hypothesis as NOT-beta-lactam.

368 Catalyst Tutorials/March 2002
Customizing functions
Note
Merging the NOT hypotheses
Using the NOT hypotheses in a search
In this section you will first search a database using the angiotensin II query. Then you will filter the search results using the NOT query that you just created. By doing this, you will remove all the unwanted mol-
The “NOT’ editor doesn’t accept multiple substructures to be placed with the same Exclude/OR Editor. Adding a second substructure to exclude (e.g., cephalosporine skeleton) to the Exclude/OR Editor changes its name to OR and none of the substructures are excluded.
Prepare a NOT function for the cephalosporine skeleton. In the 6-membered ring, define the C3-C4 bond as single or double. Save it as NOT-cephalo.
Clear the display, then drag the NOT hypotheses into a View Hypothesis Workbench.
Drag the two NOT hypotheses into the workspace (their 3D location is not important).
Select everything and merge the hypotheses with the Merge Features button in the Toolbar.
Save the new hypothesis to Lab as Not-antibio.
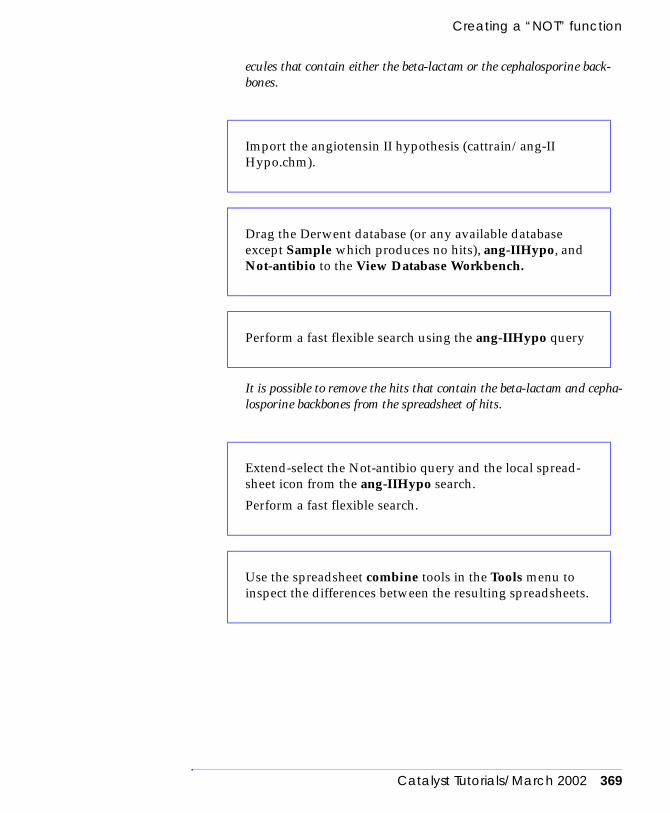
Creating a “NOT” function
Catalyst Tutorials/March 2002 369
ecules that contain either the beta-lactam or the cephalosporine back-bones.
It is possible to remove the hits that contain the beta-lactam and cepha-losporine backbones from the spreadsheet of hits.
Import the angiotensin II hypothesis (cattrain/ang-II Hypo.chm).
Drag the Derwent database (or any available database except Sample which produces no hits), ang-IIHypo, and Not-antibio to the View Database Workbench.
Perform a fast flexible search using the ang-IIHypo query
Extend-select the Not-antibio query and the local spread-sheet icon from the ang-IIHypo search.
Perform a fast flexible search.
Use the spreadsheet combine tools in the Tools menu to inspect the differences between the resulting spreadsheets.

370 Catalyst Tutorials/March 2002
Customizing functions
Note
Working with peptides
Amino acids and peptides mainly express their chemical diversity through the functional groups present on their more or less flexible sidechains. The backbone also presents hydrogen-bond donor and acceptor groups (the peptide bond). To focus only on the diverse part of peptides—the side chains—it is interesting to develop hydrogen-bond donor and acceptor functions that do not recog-nize:
♦ The backbone elements.
♦ Capping groups that are often used for synthetic reasons.
Excluding the backbone elements
You could define exclusions for every single amino acid, thus pro-ducing a very complex function. An alternative is to use a fragment representing the backbone of an amino acid and to represent all possible substitutions, hydrogen counts, and lone pair count pat-terns for the amino acids and peptides.
In addition, the exception made by glycine (no sidechain) and pro-line (cyclic amino acid) should also be considered. The illustration below shows the fragment to use and, considering different repre-sentative configurations, all the options you have to consider in order to properly and specifically map the amino acids.
It is also possible to merge the two NOT hypotheses and the angiotensin II hypothesis into one hypothesis so that only one search is necessary. However, each NOT hypothesis adds a value of 1.0 to the fit value. Thus, molecules that produced a slightly negative fit value using the angiotensin II hypothesis alone are now retrieved, since 2.0 (1.0 for each NOT hypothesis) is added to the overall fit value. The minimum fit value can be set to 2.0 (Edit/Create/Edit Hypothesis 1D Properties) to prevent this behavior.

Working with peptides
Catalyst Tutorials/March 2002 371
We illustrate this type of exclusion with the HB acceptor function. A similar procedure can be used with the HB donor function.
In the View Compound Workbench, build the fragment CH3–CO–CH2–NH2 and save it to Lab as PeptideBackbone.

372 Catalyst Tutorials/March 2002
Customizing functions
Open the View Hypothesis Workbench, select the HB ACCEPTOR function, click in the Workspace and open the Exclude/OR QuickTool.
Drop the PeptideBackbone fragment into the first exclusion cell.
On the fragment, select the carbon atom of the methyl group and open the Atom_Specification_Editor panel.
Give the following specifications for this atom:
Atom types: Aliphatic, Exocyclic, Endocyclic, BridgeheadAtom type: Nitrogen and OxygenLone pair count: 0,1Hydrogen count: 0,1
Click OK.
On the fragment, select the carbon atom of the methylene (CH2) group and open the Atom_Specification_Editor panel. Give the following specifications for this atom:
Atom types: Aliphatic, Exocyclic, Endocyclic, BridgeheadAtom type: CarbonLone pair count: 0Hydrogen count: 1,2
Click OK.

Working with peptides
Catalyst Tutorials/March 2002 373
This excludes this atom from the hydrogen-bond acceptor definition.
The second atom to exclude is the carbonyl oxygen atom. Since you can exclude only one atom per exclusion cell, you have to repeat the same operation:
A new exclusion cell is created under the first one.
On the fragment, select the nitrogen atom and open the Atom_Specification_Editor panel. Give the following spec-ifications for this atom:
Atom types: Aliphatic, Exocyclic, Endocyclic, BridgeheadAtom type: NitrogenLone pair count: 0,1Hydrogen count: 0,1,2
Click OK.
Select the N–C bond and open the Bond_Specification_Editor.
Give the following specifications for this bond:
Exocyclic, Endocyclic, and Single Bond.
Click OK
Use the Exclusion Mapping arrow to select the mauve atom.
From the Edit menu in the Exclude/OR Quick Tool, click Append Excluding Entry.

374 Catalyst Tutorials/March 2002
Customizing functions
This excludes this atom from the hydrogen-bond acceptor definition.
Capping groups
For synthetic and stability reasons, peptides are always synthesized with some small chemical groups (“capping” groups) at their N and C ends. So we should customize the feature dictionary so that these groups are not mapped during hypothesis generation.
Put the PeptideBackbone fragment into the new exclusion cell and set the atom and bond specifications for the same atoms and bond as you did before.
Using the Exclusion Mapping arrow, highlight the sp2 oxy-gen atom.
Using the previously described method, use the Association_Editor to reassociate the oxygen atom to the hydrogen-bond acceptor definition.
Save the function and add it to the dictionary (HBA-Pep-tides).
Build a few peptides and test the mapping of this function.

Working with peptides
Catalyst Tutorials/March 2002 375
To prevent the carbonyl of the AmideCTer cap group from being mapped by the HB acceptor function, you have to make only a small modification to the HBA-Peptides function that you already created. This modification concerns the atom specification for the methyl group of the PeptideBackbone fragment.
This is to allow primary amides to be part of the definition.
In the Feature Dictionary panel, select the HBA-Peptides function by dragging it to the View Hypothesis Workbench. Open the Exclude/OR editor. In each exclusion cell, select the magenta atom and open the Atom_Specification_Edi-tor. In the Hydrogen Count text box, enter 0,1,2. In each exclusion cell, check that the mapping is done properly. Check that the associations are still set.

376 Catalyst Tutorials/March 2002
Customizing functions
HBA-PeptidesCtercap excludes the backbone and the C-terminal carbo-nyl oxygen atoms. The two carbonyl oxygen atoms on the sidechains of Asn and Gln are still mapped. HBA-Peptides maps the C-terminal amide carbonyl group.
Excluding the carbonyl oxygen atom of the CBz capping group
Save this function and add it to the dictionary as HBA-Pep-tidesCtercap.
Build an Ala–Asn–Gln tripeptide and, on the C end (Gln residue), replace the aldehyde hydrogen with an NH2 group to turn it into an amide. Test the mapping of this pep-tide with the HBA-PeptidesCtercap function. Compare it with the mapping of the HBA-Peptides function.
In the View Compound Workbench, build a benzamide (Bz N-terminal cap) and a CBz fragment (CBz N-terminal cap) as a carbamate. Save them to Lab.
Open a View Hypothesis Workbench, select the HBA-Pep-tidesCtercap function, and open the Exclude/OR editor.
Add a new exclusion cell and drag the benzamide fragment into it.

Working with peptides
Catalyst Tutorials/March 2002 377
This allows the program to consider the ABz and Bz capping groups.
Excluding the two oxygen atoms from CBz requires adding two more exclusion cells (one to exclude the sp2 oxygen atom, the other one to exclude the sp3 oxygen atom).
It may appear that using an acetamide fragment instead of the benza-mide and the CBz fragments and making the atom specification for the
Select the nitrogen atom and open the Atom_Specification_Editor. Give the following specifications:
Atom types: Aliphatic, Exocyclic, endocyclic, BridgeheadAtom type: Nitrogen Lone pair count: 0Hydrogen count: 0,1
On the phenyl ring, select the carbons in the α and α’ posi-tions of the amide function and set their hydrogen counts to *.
Using the exclusion mapping scroll bar, highlight the oxy-gen atom and set the associations.
Add two new exclusion cells and drop the CBz-carbamate fragment into each cell. In each cell select the nitrogen atom and, using the Atom_Specification_Editor, give the same specifications as for the benzamide fragment. In each cell, properly define the atom to exclude. Set the association and return from the QuickTool. Save the function and add it to the dictionary.

378 Catalyst Tutorials/March 2002
Customizing functions
CH3 group large enough would have been a quicker way of excluding these groups. However, the definition would not be specific enough, and the carbonyl groups on the sidechains of Asn and Gln would also have been excluded.
\
None of these functions map the backbone carbonyl oxygen atoms, but the HBA-Peptides function maps the carbonyl group of the capping groups. The two last functions become much more restrictive.
Creating fragments
Fragments can be used to build molecules (in the View Compound Workbench) or hypotheses (in the View Hypothesis Workbench).
Fragments to build molecules.
In the View Compound Workbench, molecules can be built using the atoms from the periodic table or from the menus (Aliphatic, Amino Acids, and other fragments). You can use the User menu to quickly add custom fragments while building molecules.
In this exercise, you will learn how to add the two isomers of the following fragments to the User menu in order to use them for building molecules.
Save the function (HBA-Peptides-NCcaps) and add it to the dictionary.
In the View Compound QuickTool of the View Hypothesis Workbench, drag the Ala–Asn–Gln peptide and block each end with the correct capping group. Return from the Quick-Tool and compare the mapping of these three functions (HBA-Peptides, HBA-PeptidesCtercap, and HBA-Pep-tides-NCcaps) on the peptide.

Creating fragments
Catalyst Tutorials/March 2002 379
Note
Fragments listed in the menus are defined in ASCII files and are hypothesis files (.chm extension). A file corresponds to each menu (Aliphatics.chm, Groups.chm, etc.). User-defined fragments are stored in the User.chm file (which is empty by default).
This exercise consists of building the two isomers of 3-methyl qui-nuclidyl, exporting them to the disk and adding them to a local User.chm file.
Rules for the definition of fragments in this User.chm file are:
♦ Even though it is a .chm file, the format in this file is the same as for compound files (.cpd).
♦ One atom in this fragment (first atom in the list) constitutes the attachment point so that this fragment can be used in substitu-tions.
♦ The first atom in the atom list should never be a hydrogen atom.
♦ The first atom in the atom list must have a hydrogen count differ-ent from 0.
♦ When building a fragment, make sure that the first atom you build is the attachment point atom and continue editing the mol-ecule from this atom (moving the atoms around in the User.chm file will result in a bad structure).
♦ When multiple fragments are stored in this file, there is a one line separator between the fragments
.
Quinuclidinyl fragments are often used in muscarinic agonists and antagonists. The sidechain is often attached to the position 3 of the piperidine ring.
Open a View Compound Workbench and click in the work-space to add a carbon atom.
Turn atom labels on using the View/Atom Labels/2D com-mand.

380 Catalyst Tutorials/March 2002
Customizing functions
This is to check that the label of this carbon atom remains C1.
Build the rest of the molecule. Optimize the 2D and opti-mize the 3D molecule.
Save the molecule (mention its chirality, R-quinuclidinyl for example).
Invert the chirality, optimize, and save as another molecule.
Export the two molecules as CPD files.
Exit Catalyst.
Using your favorite text editor create a file called User.chm in the same directory where you are running Catalyst.

Creating fragments
Catalyst Tutorials/March 2002 381
You should see the two fragments (R-quinuclidinyl and S-quinuclidi-nyl) listed among the menu items.
Paste the contents of the R-quinuclidinyl file into the User.chm file.
Replace all instances of fragment-1 with the name “R-quinuclidinyl.”
Make sure there is a blank line at the end of the file. Paste in the contents of the S-quinuclidinyl file after the blank line.
Replace all instances of fragment-1 (as you did for R-quinuclidinyl) with the name “S-quinuclidinyl.”
Save the User.chm file and exit your text editor.
Start Catalyst and open a View Compound Workbench.
Click the User pulldown menu in the Periodic Table control panel.

382 Catalyst Tutorials/March 2002
Customizing functions
The fragment is displayed and its chirality is correct.
The methyl is changed into the S-quinuclidinyl fragment.
The attachment points can also be part of a ring system.
Select the R-quinuclidinyl fragment and click in the Work-space
Clear the display and, from the Groups pulldown menu, select Acetamido and click in the workspace.
Select the carbon atom of the methyl group and, from the User menu, select the S-quinuclidinyl fragment.
Build the two following fragments (make sure that the atoms shown by an arrow are labeled C1) and add them to the User.chm file.

Creating fragments
Catalyst Tutorials/March 2002 383
The global User.chm file is found in the $CATALYST_CONF directory. If you have write permissions in this directory, you can move your local User.chm file here so that other users could also have access to it.
In a new Catalyst session, open a View Compound Work-bench, select Acetamido from the Groups pulldown menu and replace the carbon atom of the methyl group with each fragment. Compare with the results when you used the R and S quinuclidinyl fragments.

384 Catalyst Tutorials/March 2002
Customizing functions

Catalyst Tutorials/March 2002 385
13 Understanding HypoGen output
The HypoGen algorithm generates output files that can be a useful source of information. The information can help you understand how HypoGen views your data and can be used to determine the likelihood of finding successful pharmacophores based on the cost parameters.
This exercise is designed for advanced users. It is intended for users that are familiar with running HypoGen and UNIX shell com-mands. It covers how to:
♦ Interpret the HypoGen full file (see page 386)
♦ Interpret the HypoGen log file (see page 390)
♦ Interpret the cost parameters in the output files (see page 394)
♦ Validate HypoGen results using catScramble (see page 397)
HypoGen output
This exercise is based on the HypoGen run from Lesson 7. It describes the output files that were generated. If you no longer have the run directory or output files, you should still be able to get a full understanding of the tutorial.
A job can be monitored from the Process Information control panel (accessed from the Data menu). Selecting the process and clicking Show Process Log shows the log file. This log file is updated as the job is being processed. Running a hypothesis generation job (Hypo-Gen or HipHop) creates a directory on the disk. The results of the background process are stored in this directory. This directory con-tains the files shown in Table 5on page 386.

386 Catalyst Tutorials/March 2002
Understanding HypoGen output
Interpreting the HypoGen full file
The .full file helps you to understand how the job is processed. Only the top part is of interest for understanding the mechanism of selecting hypotheses.
Table 5 HypoGen and HipHop files
file type HypoGen HipHop function
catHypo.cmd yes yes UNIX command executed by the program to run catHypo
.chm files yes yes Hypothesis files. CatHypo returns the 10 “best” hypotheses.
.cpd file yes yes Compounds multiple-conformer files. Can be deleted when the job is done.
.debug -- yes Equivalent of the .full file in catHypo. dict.chm yes yes Dictionary used for hypothesis generation.
Contains only the functions defined in the Generate Hypothesis panel.
feat.lst yes yes List of the functions used in the hypothesis gen-eration process.
.full yes yes Full log file. This file is important in the analysis.getresults.jrnl yes yes A journal file used by Catalyst during import..hypos -- yes ASCII file describing the hypotheses (coordi-
nates). leads.spst yes yes Spreadsheet of molecules and activities/
uncertainties. Each molecule is listed in this spreadsheet
.log yes yes Log file. Results are printed to this file.
.stderrout yes yes Journal file checking that the job runs smoothly. Can be used for debugging
Open a UNIX shell and change directory (cd) to the process directory (for example, HypoACE-1Dir) where the Hypo-Gen process ran, or is currently running for lesson 7. In the UNIX shell, type:
> more *.full

HypoGen output
Catalyst Tutorials/March 2002 387
nleu-ala-proNegIonizable avg. hits = 1 HYDROPHOBIC avg. hits = 2.69128 HBA avg. hits = 6.00671 finished 0 lead number of configs = 8383 number of insertions = 8088val-trp NegIonizable avg. hits = 1 HYDROPHOBIC avg. hits = 2.82653 HBA avg. hits = 4.71429 finished 1 lead number of configs = 1979 number of insertions = 1939leu-ala-pro NegIonizable avg. hits = 1 HYDROPHOBIC avg. hits = 2.52903 HBA avg. hits = 5.84516 finished 2 lead number of configs = 4591 number of insertions = 0ile-tyr NegIonizable avg. hits = 1 HYDROPHOBIC avg. hits = 2.9127 HBA avg. hits = 6.69841 finished 3 lead number of configs = 4605 number of insertions = 0phe-ala-pro NegIonizable avg. hits = 1 HYDROPHOBIC avg. hits = 2.43617 HBA avg. hits = 5.70745 finished 4 lead number of configs = 4983 number of insertions = 0
The program analyzes the set of “active “ molecules first. An active molecule is a molecule with an activity falling into the activity’s uncertainty range of the most active molecule in the training set (smallest value in the Activ column). Starting with the most active molecules, the program performs a function mapping on each con-former, using the functions you selected in the Generate Hypothe-sis control panel. The average value for each function is returned (total number of mappings among the entire conformational model/number of conformations). These average values are summed, and the result must be higher or equal to the MinPoint parameter defined in the Generate Hypothesis control panel. If this is not true, the program stops.
The program explores the hypothesis space that is accessible to the most active molecule. The number of configs value describes the number of hypotheses that can be generated from the molecule. The number of insertions has the same significance, but all the redundant hypotheses have been removed.
This counting is repeated for every active molecule. For the remain-ing “active” molecules, the configs/insertions have to be sub-ensembles of the configs/insertions found for the most active molecule.
( 00 NegI HYDR HYDR HYDR ) TElems = 0 ( 00 NegI HYDR HYDR HBA ) TElems = 0 ( 00 HYDR HYDR HYDR HBA ) TElems = 0 ( NegI HYDR HYDR HYDR HBA ) TElems = 292 ( 00 NegI HYDR HBA HBA ) TElems = 0 ( 00 HYDR HYDR HBA HBA ) TElems = 0 ( NegI HYDR HYDR HBA HBA ) TElems = 540

388 Catalyst Tutorials/March 2002
Understanding HypoGen output
( HYDR HYDR HYDR HBA HBA ) TElems = 823 ( 00 HYDR HBA HBA HBA ) TElems = 0
A list of all the possible combinations of functions (pharmacoph-ores) is printed out. These pharmacophores follow the following rules:
♦ Only pharmacophores with a maximum of seven points can be considered.
♦ Among all these pharmacophores, only those satisfying the user parameters (for example, Min and Max Total Feature) are counted.
gly-asp NegIonizable avg. hits = 2 HYDROPHOBIC avg. hits = 0 HBA avg. hits = 8.55844 finished 0 lead number of configs = 0 number of insertions = 0ala-his NegIonizable avg. hits = 1 HYDROPHOBIC avg. hits = 0 HBA avg. hits = 5.59732 finished 1 lead number of configs = 0 number of insertions = 0pro-pro NegIonizable avg. hits = 1 HYDROPHOBIC avg. hits = 1 HBA avg. hits = 4.59184 finished 2 lead number of configs = 0 number of insertions = 0gly-lys NegIonizable avg. hits = 1 HYDROPHOBIC avg. hits = 0 HBA avg. hits = 5.46995 finished 3 lead number of configs = 0 number of insertions = 0gly-glu NegIonizable avg. hits = 2 HYDROPHOBIC avg. hits = 0 HBA avg. hits = 8.60952 finished 4 lead number of configs = 0 number of insertions = 0ala-gly NegIonizable avg. hits = 1 HYDROPHOBIC avg. hits = 0 HBA avg. hits = 5.72222 finished 5 lead number of configs = 0 number of insertions = 0
As was done for active molecules, function mapping is done for the inactive molecules. Inactive molecules are considered only if:
♦ There is a 3.5 order of magnitude difference in activity relative to the active molecules. This difference can be changed using the .Catalyst parameter GenerateHypo.inactive.spread.
♦ There are a minimum of 3 inactive molecules.
Total bins containing 0 inactive molecules = 1655Total bins containing 1 inactive molecules = 0Total bins containing 2 inactive molecules = 0Total bins containing 3 inactive molecules = 0Total bins containing 4 inactive molecules = 0Total bins containing 5 inactive molecules = 0Total bins containing 6 inactive molecules = 0( NegI HYDR HYDR HYDR HBA ) TElems = 292 ( NegI HYDR HYDR HBA HBA ) TElems = 540

HypoGen output
Catalyst Tutorials/March 2002 389
( HYDR HYDR HYDR HBA HBA ) TElems = 823
The program tries to eliminate all hypotheses that cannot discrimi-nate active from inactive molecules (the rule is that inactive mole-cules cannot map all the functions of the hypotheses).
A bin is a hypothesis. It looks for bins (hypotheses) that contain 0 inactive molecules, then for bins that contain 1 inactive molecule, and similarly up to n inactive molecules (n = number of inactive molecules found by the program. Only those bins that fit no more than half the inactive molecules and satisfy the user parameters are listed and constitute the starting point for the optimization phase.
Hypotheses are ranked by cost. The cost function is described later in this lesson. Catalyst calculates the cost for a theoretical ideal hypothesis (Fixed cost). One of its components, Config, is equal to the Entropy parameter that describes the complexity of the hypoth-esis space to explore. The number is the exponent to the base 2 of the number of models Catalyst will attempt to optimize during the run.
For example, an entropy of 10.9972 means that the program has to analyze 2 10.9972 = 2044 hypotheses, a number that corresponds to the total remaining hypotheses after elimination of those that can-not discriminate between active and inactive molecules.
As a general rule, if this number is less than 18, a thorough analysis of all models is carried out. If higher, Catalyst truncates the list and some models are not considered. The Entropy number also corre-lates with run time and resources used. An entropy of 17 means the run time could be several days and memory requirements could exceed 120 MB. In general, if the run generates an entropy of 18 or more, serious consideration should be given to modifying the train-ing set before proceeding.
Fixed Cost: totalcost=79.0896 RMS=0 correl=0 Cost components: Error=67.2721 Weight=1.12491 Config=10.6926 Mapping=0 Started.... Summary of feature definition hit statistics: HBA hits/lead: mean= 5.93 stddev= 1.37 HYDROPHOBIC hits/lead: mean= 1.47 stddev= 1.13 NegIonizable hits/lead: mean= 1.15 stddev= 0.37 Entropy of hypothesis space: 10.6926
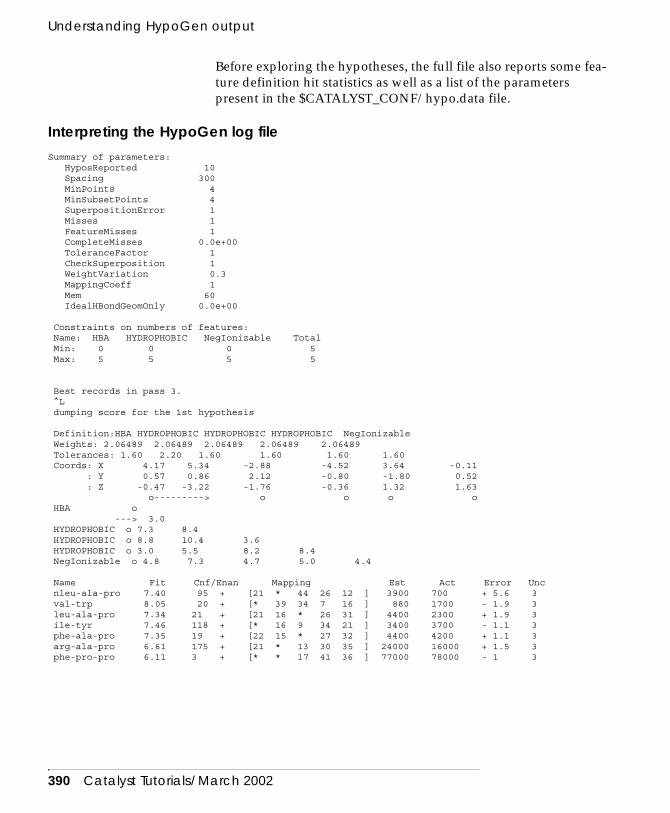
390 Catalyst Tutorials/March 2002
Understanding HypoGen output
Before exploring the hypotheses, the full file also reports some fea-ture definition hit statistics as well as a list of the parameters present in the $CATALYST_CONF/hypo.data file.
Interpreting the HypoGen log fileSummary of parameters: HyposReported 10 Spacing 300 MinPoints 4 MinSubsetPoints 4 SuperpositionError 1 Misses 1 FeatureMisses 1 CompleteMisses 0.0e+00 ToleranceFactor 1 CheckSuperposition 1 WeightVariation 0.3 MappingCoeff 1 Mem 60 IdealHBondGeomOnly 0.0e+00 Constraints on numbers of features: Name: HBA HYDROPHOBIC NegIonizable Total Min: 0 0 0 5 Max: 5 5 5 5 Best records in pass 3. ^L dumping score for the 1st hypothesis Definition:HBA HYDROPHOBIC HYDROPHOBIC HYDROPHOBIC NegIonizable Weights: 2.06489 2.06489 2.06489 2.06489 2.06489 Tolerances: 1.60 2.20 1.60 1.60 1.60 1.60 Coords: X 4.17 5.34 -2.88 -4.52 3.64 -0.11 : Y 0.57 0.86 2.12 -0.80 -1.80 0.52 : Z -0.47 -3.22 -1.76 -0.36 1.32 1.63 o---------> o o o o HBA o ---> 3.0 HYDROPHOBIC o 7.3 8.4 HYDROPHOBIC o 8.8 10.4 3.6 HYDROPHOBIC o 3.0 5.5 8.2 8.4 NegIonizable o 4.8 7.3 4.7 5.0 4.4 Name Fit Cnf/Enan Mapping Est Act Error Unc nleu-ala-pro 7.40 95 + [21 * 44 26 12 ] 3900 700 + 5.6 3 val-trp 8.05 20 + [* 39 34 7 16 ] 880 1700 - 1.9 3 leu-ala-pro 7.34 21 + [21 16 * 26 31 ] 4400 2300 + 1.9 3 ile-tyr 7.46 118 + [* 16 9 34 21 ] 3400 3700 - 1.1 3 phe-ala-pro 7.35 19 + [22 15 * 27 32 ] 4400 4200 + 1.1 3 arg-ala-pro 6.61 175 + [21 * 13 30 35 ] 24000 16000 + 1.5 3 phe-pro-pro 6.11 3 + [* * 17 41 36 ] 77000 78000 - 1 3

HypoGen output
Catalyst Tutorials/March 2002 391
ile-pro 5.99 26 + [* 9 16 * 21 ] 100000 50000 - 1.5 3 ala-pro 4.76 5 + [1 * * 17 12 ] 1.7e+06 270000 + 6.3 3 ala-val 5.45 44 + [1 * * 17 12 ] 350000 300000 + 1.2 3 glu-ala-pro 5.96 106 + [17 * * 22 27 ] 110000 360000 - 3.3 3 val-pro 5.67 21 + [1 * * 7 18 ] 210000 420000 - 2 3 gly-phe 5.45 22 + [1 22 * * 9 ] 350000 450000 - 1.3 3 ala-leu 5.36 41 + [1 * * 20 12 ] 430000 1.6e+06 - 3.7 3 ala-gly 4.11 14 + [1 * * * 12 ] 7.7e+06 2.5e+06 + 3.1 3 gly-glu 4.13 119 + [1 * * * 20 ] 7.3e+06 5.4e+06 + 1.3 3 gly-lys 4.13 32 + [1 * * * 9 ] 7.3e+06 5.4e+06 + 1.4 3 pro-pro 4.80 34 + [1 * * 21 16 ] 1.6e+06 7.5e+06 - 4.8 3 ala-his 4.11 65 + [19 * * * 24 ] 7.7e+06 9.0e+06 - 1.2 3 gly-asp 4.13 144 + [1 * * * 17 ] 7.3e+06 9.2e+06 - 1.3 3 totalcost=85.4421 RMS=0.795575 correl=0.958807 Cost components: Error=73.6015 Weight=1.148 Config=10.6926 Mapping=0 Fixed Cost: totalcost=79.0896 RMS=0 correl=0 Cost components: Error=67.2721 Weight=1.12491 Config=10.6926 Mapping=0
The hypothesis generation log file is a snapshot of the progress of the generation process. The initial section includes a listing of the control parameter settings and the limitations set on the number of functions. Next is a table describing the functions that are included in the hypothesis, with their associated weights, tolerances, and coordinates, and then a table of distances between functions.
The next section of the log file is a table with a row of information about each member of the training set. In columns from left to right you see the Name of the compound, the value of its Fit to the hypothesis, which conformer was used in the fit (Cnf), and whether a mirror image was used (Enan); a - in the column indi-cates that a mirror image was used. The Mapping columns indicate the hypothesis functions that mapped for each compound; the numbers identify a particular instance of a feature on the conformer providing the optimum fit, and an asterisk means that it was not mapped.
The Est column is the estimated activity based on the hypothesis and should be compared to the Act, experimental activity, column. The Error column shows the ratio of estimated activity to measured activity (or the ratio of Act/Est, if that gives a number greater than 1, in which case the number is negative). Finally, the uncertainty (Unc) value column is on the right.
At the bottom of the hypothesis description is the total cost of the hypothesis and its various components. Fixed cost and null cost are also reported in the log file.

392 Catalyst Tutorials/March 2002
Understanding HypoGen output
These two parameters are computed at the beginning phase of automated hypothesis generation and represent the cost of two the-oretical hypotheses, one in which the error cost is minimal (all com-pounds fall along a line of slope =1), and one in which the error cost is high (all compounds fall along a line of slope = 0). These models can be considered the upper and lower bounds for the training set. Their cost values are useful guides for estimating the chances for a successful experiment and are available within 15 minutes of the start of the run. Because these experiments can easily require days of run time, it is useful to estimate the probability of success before investing the time. The ideal hypothesis cost (fixed cost) is reported in the .full file found in the hypothesis generation directory. This value tends to be 70–100 bits.
The null hypothesis cost is reported in the .log file found in the same directory and is usually higher than the fixed cost. What is important is the difference between these two costs. The greater the difference, the higher the probability for finding useful models.
Notice how nleu–ala–pro maps to the features of each hypothesis (look in the mapping section). In the mapping section, each column corre-sponds to a function: the first column corresponds to the first function, the second column to the second one, and so on). When the function is mapped, a number (that is, the atom number) appears in the corre-sponding column; when the function is not mapped, a * sign appears in the corresponding column)
Using your favorite text editor, open the *.log file.
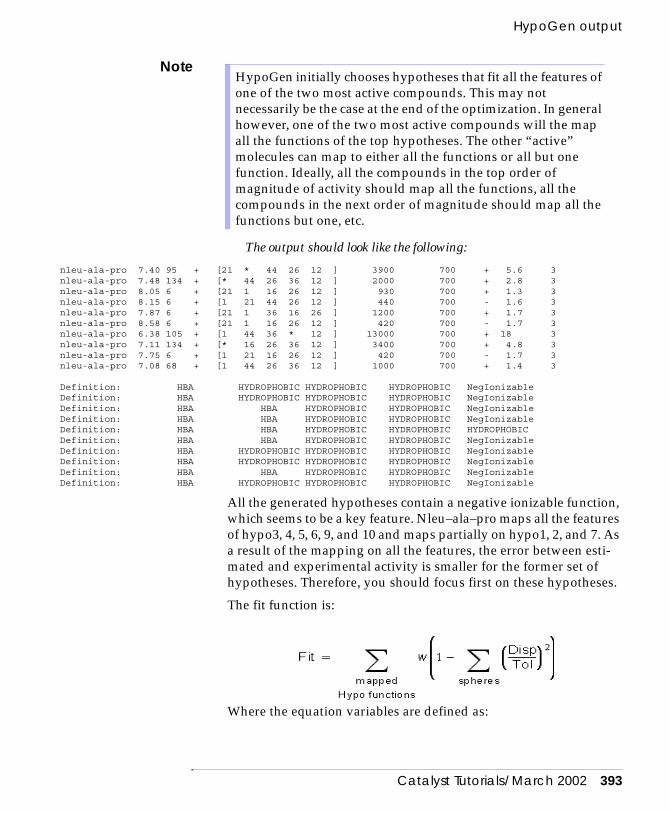
HypoGen output
Catalyst Tutorials/March 2002 393
Note
The output should look like the following:
nleu-ala-pro 7.40 95 + [21 * 44 26 12 ] 3900 700 + 5.6 3nleu-ala-pro 7.48 134 + [* 44 26 36 12 ] 2000 700 + 2.8 3nleu-ala-pro 8.05 6 + [21 1 16 26 12 ] 930 700 + 1.3 3nleu-ala-pro 8.15 6 + [1 21 44 26 12 ] 440 700 - 1.6 3nleu-ala-pro 7.87 6 + [21 1 36 16 26 ] 1200 700 + 1.7 3nleu-ala-pro 8.58 6 + [21 1 16 26 12 ] 420 700 - 1.7 3nleu-ala-pro 6.38 105 + [1 44 36 * 12 ] 13000 700 + 18 3nleu-ala-pro 7.11 134 + [* 16 26 36 12 ] 3400 700 + 4.8 3nleu-ala-pro 7.75 6 + [1 21 16 26 12 ] 420 700 - 1.7 3nleu-ala-pro 7.08 68 + [1 44 26 36 12 ] 1000 700 + 1.4 3
Definition: HBA HYDROPHOBIC HYDROPHOBIC HYDROPHOBIC NegIonizableDefinition: HBA HYDROPHOBIC HYDROPHOBIC HYDROPHOBIC NegIonizableDefinition: HBA HBA HYDROPHOBIC HYDROPHOBIC NegIonizableDefinition: HBA HBA HYDROPHOBIC HYDROPHOBIC NegIonizableDefinition: HBA HBA HYDROPHOBIC HYDROPHOBIC HYDROPHOBICDefinition: HBA HBA HYDROPHOBIC HYDROPHOBIC NegIonizableDefinition: HBA HYDROPHOBIC HYDROPHOBIC HYDROPHOBIC NegIonizableDefinition: HBA HYDROPHOBIC HYDROPHOBIC HYDROPHOBIC NegIonizableDefinition: HBA HBA HYDROPHOBIC HYDROPHOBIC NegIonizableDefinition: HBA HYDROPHOBIC HYDROPHOBIC HYDROPHOBIC NegIonizable
All the generated hypotheses contain a negative ionizable function, which seems to be a key feature. Nleu–ala–pro maps all the features of hypo3, 4, 5, 6, 9, and 10 and maps partially on hypo1, 2, and 7. As a result of the mapping on all the features, the error between esti-mated and experimental activity is smaller for the former set of hypotheses. Therefore, you should focus first on these hypotheses.
The fit function is:
Where the equation variables are defined as:
HypoGen initially chooses hypotheses that fit all the features of one of the two most active compounds. This may not necessarily be the case at the end of the optimization. In general however, one of the two most active compounds will the map all the functions of the top hypotheses. The other “active” molecules can map to either all the functions or all but one function. Ideally, all the compounds in the top order of magnitude of activity should map all the functions, all the compounds in the next order of magnitude should map all the functions but one, etc.

394 Catalyst Tutorials/March 2002
Understanding HypoGen output
And w = adaptively determined weight of the hypothesis function.
The fit function does not only check if the function is mapped or not; it also contains a distance term which measures the distance that separates the function on the molecule from the centroid of the hypothesis function. Both terms are used to calculate the geometric fit value.
Note
The best hypotheses will generally map all the features of the most active compound. In this case, hypotheses 3, 4, 5, 6, 9, and 10 would warrant further analysis. See Evaluating the quality of a hypothesis in Lesson 7 for an explanation of assessing quality.
Note
Interpreting the cost parameters in the output files
During an automated hypothesis generation run, Catalyst consid-ers and discards many thousands of models. It distinguishes between alternatives by applying a cost analysis. The overall assumption is based on Occam’s razor; that is, that between other-wise equivalent alternatives, the simplest model is best.
Since a distance check is made for the calculation of the fit value, it is possible that a molecule mapping four out of five features of a hypothesis can present a higher fit value than a molecule mapping to all five features of this hypothesis.
Multi-blob features are treated differently during the calculation depending on the value of the compare.Scaled.MultiBlob.FeatureErrors.Catalyst parameter. See Fit Value in Catalyst’s on-line Help.

HypoGen output
Catalyst Tutorials/March 2002 395
Simplicity is defined using the minimum description length princi-ple from information theory. The simplest model is that which can be fully described using the tersest language. Catalyst uses bits for language, so the program assigns costs to hypotheses in terms of the number of bits required to describe them fully. The overall cost of a hypothesis is calculated by summing three cost factors, a weight cost, an error cost, and a configuration cost. These are quali-tatively defined as:
Weight cost: A value that increases in a Gaussian form as the feature weight in a model deviates from an idealized value of 2.0. This cost factor favors hypotheses in which the feature weights are close to 2. The standard deviation of this parameter is given by the weight varia-tion parameter.
Error cost: A value that increases as the rms difference between estimated and measured activities for the training set molecules increases. This cost factor is designed to favor models for which the correlation between estimated and measured activities is better. The standard deviation of this parameter is given by the uncertainty parameter.
Configuration cost: A fixed cost that depends on the complexity of the hypothesis space being optimized. It is equal to the entropy of the hypothesis space. This parameter is constant among all the hypotheses.
Note
Other printed parameters are the rms and the correlation:
RMS: The rms factor represents the deviation of the log (estimated activi-ties) from the log (measured activities) normalized by the log (uncertainties). This parameter indicates the quality of “prediction” for the training set.
Correl: Linear regression derived from the geometric fit index.
In terms of hypothesis significance, what really matters is the mag-nitude of the difference between the cost of any returned hypothe-sis and the cost of the null hypothesis. In general, if this difference is greater than 60 bits, there is an excellent chance the model repre-sents a true correlation. Since most returned hypotheses are higher in cost than the fixed cost model, a difference between fixed cost and null cost of 70 or more is necessary to achieve the 60 bit differ-ence. If a returned hypothesis has a cost that differs from the null
Among these three terms, the error cost factor has the greatest effect in establishing hypothesis cost.

396 Catalyst Tutorials/March 2002
Understanding HypoGen output
hypothesis by 40–60 bits, there is a high probability it has a 75–90% chance of representing a true correlation in the data. As the differ-ence becomes less than 40 bits, the likelihood of the hypothesis rep-resenting a true correlation in the data rapidly drops below 50%. Under these conditions, it may be difficult to find a model that can be shown to be predictive. In the extreme situation where the fixed and null cost difference is small (< 20), there is little chance of suc-ceeding, and you should reconsider the training set before proceed-ing.
For further discussion regarding the cost functions, see the on-line help for Catalyst, accessed by selecting the Help/On Catalyst... command from the menubar of the Stockroom window.
Remember
The output should look like this:
totalcost=85.4421 RMS=0.795575 correl=0.958807 totalcost=79.0896 RMS=0 correl=0 totalcost=86.1128 RMS=0.83625 correl=0.954384 totalcost=79.0896 RMS=0 correl=0 totalcost=86.201 RMS=0.841495 correl=0.953799 totalcost=79.0896 RMS=0 correl=0 totalcost=86.855 RMS=0.881189 correl=0.9492 totalcost=79.0896 RMS=0 correl=0 totalcost=87.2312 RMS=0.90078 correl=0.946867 totalcost=79.0896 RMS=0 correl=0 totalcost=88.1336 RMS=0.948255 correl=0.940953 totalcost=79.0896 RMS=0 correl=0 totalcost=89.1084 RMS=0.99424 correl=0.93491 totalcost=79.0896 RMS=0 correl=0 totalcost=90.0526 RMS=1.04155 correl=0.928311 totalcost=79.0896 RMS=0 correl=0 totalcost=90.5025 RMS=1.06213 correl=0.925341
The goal of hypothesis generation is to generate a set of hypotheses with total costs as close as possible to the fixed cost
From the same UNIX shell used before, type the following command:
> grep totalcost *.log

HypoGen output
Catalyst Tutorials/March 2002 397
totalcost=79.0896 RMS=0 correl=0 totalcost=92.0149 RMS=1.09547 correl=0.920625 totalcost=79.0896 RMS=0 correl=0 totalcost=145.69 RMS=2.80032 correl=0
The first line represents the total cost of the first hypothesis.
The second line represents the cost of the fixed hypothesis.
The last line represents the null cost.
Here, all the hypotheses have a total cost close to the cost of the fixed hypothesis. The difference between the fixed and the null cost is 66 bits. Therefore, the probability that the cost difference of any hypothesis with the null hypothesis to be higher than 60 is small. However, due do the low cost range between the first and the tenth hypothesis (7.89 bits), the cost range between these hypotheses and the null hypothesis varies between 59.8 and 51.95 bits. Therefore, we can expect that for all these hypotheses, there is a 75–90% chance of representing a true correlation in the data. The general guidelines discussed here were derived from randomized statistical studies. It is also possible for you to perform similar studies for your specific datasets.
Validation using the catScramble program
You can perform statistical validation to assess the significance of a hypothesis. The validation procedure described here is based on Fischer's randomization test. The goal of this type of validation is to check whether there is a strong correlation between the chemical structures and the biological activity.
This test is based on a random reassignment of activity values among the molecules of the training set. Hypothesis generation is run on the newly generated "random" spreadsheets.
Random reassignment of activity values is done via a program called catScramble. Using the initial spreadsheet, it generates a user-defined number of spreadsheets (depending on the level of statistical significance you want to achieve). In these random spreadsheets, the active molecules can be active or inactive or have an intermediate level of activity.
Every generated spreadsheet should be submitted to HypoGen using the same experimental conditions (functions, parameters) as the initial run.
398 Catalyst Tutorials/March 2002
Understanding HypoGen output
After HypoGen is finished with all runs, a statistical confidence level can be assigned, based on the results. The first step is to count the number of hypotheses generated from the randomized run that have a total cost value lower than the total cost of the hypothesis under investigation. The statistical significance can be calculated:
Significance = [1 - (1+x)/y] * 100
Where x = total number of hypotheses having a total cost lower than HypoX, and y = total number of Hypogen runs (initial + ran-dom runs).
19 random spreadsheets (or 19 HypoGen runs) have to be gener-ated if you want to achieve a 95% confidence level.49 random spreadsheets (or 49 HypoGen runs) have to be gener-ated if you want to achieve a 98% confidence level.99 random spreadsheets have to be generated if you want to achieve a 99% confidence level.
Summary
In this exercise you learned the importance of the HypoGen output files. You learned how to use the information to assess the likeli-hood of success, and how to perform randomized tests to assign a statistical significance to your hypotheses.

Catalyst Tutorials/March 2002 399
14 Building Partial Match Queries
This tutorial illustrates the steps required to create a partial-match query; i.e., a query where not all the features need to be mapped by a compound in order for it to be a hit. It shows how to create simple “leave-one-out” permutations of existing queries and also how to create more complicated queries using the Exclude/OR tool. The Sample database is then searched with the queries to demonstrate their use.
This tutorial assumes enough familiarity with Catalyst that you know how to import hypotheses and databases, know how to search databases with hypotheses, and have some experience with the Exclude/OR tool.
Part 1. Creating a “leave-one-out” hypothesis
In this section, a partial-match query will be built from the angio-tensin II hypothesis described in earlier tutorials. When the Sample database is searched by this query there are no hits. So we will “loosen” the query by allowing specific partial matches.
Loading the query
If it is not already in the stockroom, import the angiotensin II hypothesis (ang-IIHypo) from the cattrain directory. Open the hypothesis in the View Hypothesis workbench.

400 Catalyst Tutorials/March 2002
Building Partial Match Queries
Selecting required features
When you create a partial-match query you can specify features that must be present, i.e., required features. Required features are specified by selecting them before going on to the next stage. These features are dealt with intact, so if you want to make a two-point feature (such as a hydrogen-bond donor) required, you can select any combination of the blobs or points of that feature, and Catalyst marks the entire feature as required.
When you create a partial-match query by this method, a “leave-one-out” mechanism is used on any features that are not marked as required. In this example, we have only two features that are not required, and so molecules will match the resultant query if either of these (in addition to the required features) is mapped. If we had three features that were not required, a compound that matched any two of these three would be a hit. That is, a compound must match all but one of the non-required features.
Creating the partial-match query
Display Constraint Names (see the View menu), to facili-tate identification of the various features.
Select the hydrogen-bond acceptor and the two leftmost hydrophobes (HYDROPHOBIC_3.11 and HYDROPHOBIC_4.11). You can select either the blobs or the whole feature, whatever you find easier.
Select the Tools/Create partial query menu item to generate the partial-match query.

Part 1. Creating a “leave-one-out” hypothesis
Catalyst Tutorials/March 2002 401
Examining the partial-match query
The Exclude/OR QuickTool opens, and the query is represented by a set of possible complete hypotheses. The query will match a com-pound that maps onto any of the possible combinations shown in the top row of the Exclude/OR tool (i.e., it is the logical OR of the queries). For this example, the query contains two possible combi-nations of the blobs. Both contain the required features (two hydro-phobes and the hydrogen-bond acceptor) and one of the two features that were not selected (the other hydrophobe or the nega-tive ionizable point).
Select the Data/Save To Lab As menu item, name the new hypothesis partial-match, and click Save.
Drag the new query to the display area. The new query is represented by two blue spheres (the required hydro-phobes) and a vector-based feature (the hydrogen-bond acceptor). A partial query is represented in the View Hypothesis workbench by any required points; but if there are no required features, then an orange sphere labelled OR is used to represent the query.
To examine what the new query represents, click any fea-ture on the screen and select the Tools/Exclude/OR Edit menu item.
Return from the Exclude/OR QuickTool using Return from QuickTool on the QuickTool menu. Close the View Hypothesis workbench.

402 Catalyst Tutorials/March 2002
Building Partial Match Queries
Part 2. Searching a database with a partial-match query
Now that the query has been created, it can be used like any other query.
Performing the query
Viewing the results
The Hit Mappings control panel appears, showing the molecule aligned to the three required features and the negative ionizable point. This molecule has only a single mapping to this hypothesis.
View comp13 in the same way (or simply click the slider to advance to the next compound). You can see that this molecule matches the three required features and the hydrophobe. The molecule does not contain a negative ionizable group but it does match the partial query.
Drag the new query and the Sample database (you may need to install this first) onto the View Database work-bench. Assure that both the Sample and the partial-match icons are selected, and choose the Tools/Fast Flexible Search Databases/Spreadsheets menu item.
After a short while, a list of 17 hits is returned. Double-click the first row number (1) to view the comp1 compound.
Part 3. Creating a complex query with the Exclude/OR QuickTool
Catalyst Tutorials/March 2002 403
Saving the results
Part 3. Creating a complex query with the Exclude/OR QuickTool
You can use the Create partial query option to generate partial-match queries from other queries using the required features and the “leave-one-out” mechanism described above.
To generate more complicated queries, you can use the Exclude/OR tool. Using this method you must generate all the different permu-tations of features that you desire and then use the Exclude/OR tool to combine them. You can, if you want, combine conceptually unre-lated queries into a single query, which is an easy way to screen a database against sets of pharmacophores in a single search and hit-list.
Although you can generate extremely detailed hypotheses this way, we will manually generate a hypothesis identical to that produced above, to validate the results of the search.
Creating one partial-match possibility
Close the Hit Mappings control panel by clicking Cancel. Save the spreadsheet by selecting the Save Report To Lab As Spreadsheet menu item, and close the View Database workbench.
Open the ang-IIHypo hypothesis in the View Hypothesis workbench. Turn on Constraint Names labels as before.

404 Catalyst Tutorials/March 2002
Building Partial Match Queries
Creating the other partial-match possibility
Combining the two components into one query
Select the negative ionizable point and blob by dragging a selection box over the feature. Delete this feature by clicking the eraser tool on the toolbar. Select the Data/Save To Lab As menu item and name this new hypothesis ang-II-noneg.
Clear the View Hypothesis display (Edit/Clear Display menu item). Again bring the original ang-IIHypo hypothe-sis into the View Hypothesis workbench and turn on con-straint-name labels.
Now select the lower-right hydrophobe, HYDROPHOBIC_2.11 (both the point and the blob) and delete this feature. Save as ang-II-nohydroph.
Clear the display again and open the Exclude/OR quick tool (from the Tools menu).
From the shelf of the View Hypothesis workbench, select ang-II-noneg and drag it into the top left window of the Exclude/OR QuickTool. Next, select the ang-II-nohydroph query from the shelf and drag it into the top right window.
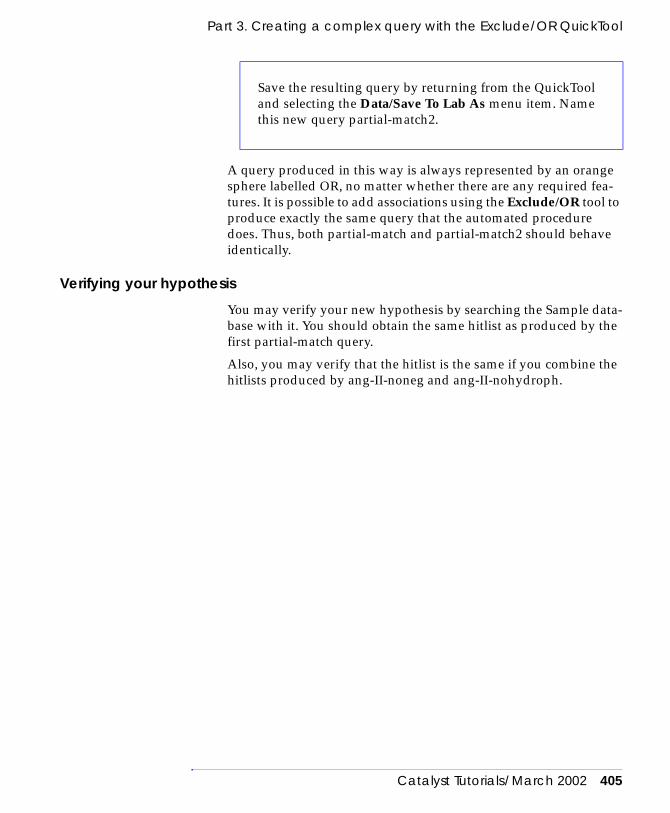
Part 3. Creating a complex query with the Exclude/OR QuickTool
Catalyst Tutorials/March 2002 405
A query produced in this way is always represented by an orange sphere labelled OR, no matter whether there are any required fea-tures. It is possible to add associations using the Exclude/OR tool to produce exactly the same query that the automated procedure does. Thus, both partial-match and partial-match2 should behave identically.
Verifying your hypothesis
You may verify your new hypothesis by searching the Sample data-base with it. You should obtain the same hitlist as produced by the first partial-match query.
Also, you may verify that the hitlist is the same if you combine the hitlists produced by ang-II-noneg and ang-II-nohydroph.
Save the resulting query by returning from the QuickTool and selecting the Data/Save To Lab As menu item. Name this new query partial-match2.

406 Catalyst Tutorials/March 2002
Building Partial Match Queries

Catalyst Tutorials/March 2002 407
15 Building a Database of a Combinatorial Library
This tutorial illustrates the steps required to build a database using catDBLibrary. catDBLibrary is a catalyst module for the rapid con-struction of databases of combinatorial libraries. To leverage the combinatorial nature of the database, catDBLibrary first generates conformational models of the constituent building blocks. The con-formers of the building blocks are then used repeatedly to assemble conformers of the library molecules.
The input for catDBLibrary is an MDL RG file, specifically those created by the Cerius2 Analog Builder. RG files specify a core struc-ture with attachment points, and several R Groups to be connected to the core. Currently catDBLibrary operates on R groups with sin-gle attachment points. See Figure 1.

Catalyst Tutorials/March 2002 408
.
Figure 1 RG File SchematicsType A RG files are supported by catDBLibrary.Type B RG files (where one substituent has an attachment) are not supported.Type C RG files(where one substituent has two attachments) are not supported.
This tutorial demonstrates the construction of a database from an RG file using catDBLibrary. The result is a Catalyst database that may be used in database searching operations (see Lesson 4). For comparison, you will also construct a Catalyst database by enumer-ating the RG file and then using catDB in its standard mode. Since it takes advantage of the reduncancies found in combinatorial libraries, catDBLibrary is significantly faster than the standard catDB method. This tutorial illustrates the effective similarity of the databases made by the standard catDB and catDBLibrary methods with example database searches.

Part 1. Creating a database from an RG file using catDBLibrary
Catalyst Tutorials/March 2002 409
Part 1. Creating a database from an RG file using catDBLibrary
If you are unfamiliar with constructing Catalyst databases, you may wish to review Lesson 10. The following steps assume you are building databases on a local disk (not NFS mounted) with ade-quate disk space. See Lesson 10 for more details.
Copying tutorial files
Configuring a bdb file
The first step to create the Catalyst database is to configure a bdb file. To do this, use the catDB command with the CONFIG option, as follows:
You will see the following output and sequence of prompts, your answers are indicated in bold type.
Copy the tutorial files into a directory. If you installed the training materials into the current directory, use this com-mand:
> cp cattrain/exercise15/* .
Otherwise, use this command:
> cp $CATALYST_TRAIN/exercise15/* .
Enter at the UNIX prompt:
> catDB CONFIG Library1.bdb

Part 1. Creating a database from an RG file using catDBLibrary
Catalyst Tutorials/March 2002 410
Note
catDB version 4.7 (485)----------------------------------------------License_Holder <v2001.09>tested successfully for42:99999:1:ACCELRYS TEST LICENSE COMPANY.---------------------------------------------------CAT_INFO <v2001.09> (3 copies of MSI_TokenR)checked out successfully for42:99999:1:ACCELRYS TEST LICENSE COMPANY.
Successfully opened file ~/.Catalyst (/home/DB/.Cata-lyst).Default configuration:! Copyright © 1991-2000! All Rights Reserved! Catalyst(TM) Database Configuration file Database Name = Library1 catDB version = 4.7 (481) Database ID = (not reserved yet)! Conformational Models: host = localhost path = /home/DB/! 1D Data: host = localhost server = ora3! 2D Index: host = localhost path = /home/DB/! 3D Index: host = localhost path = /home/DB/! Feature Dictionary: host = localhost path = /home/DB/Do you want to use the default configuration shown above? [y] nConformational models host [localhost] <ENTER>
For simplicity, in this example you will not build indices or an Oracle component.You would answer “Yes” to the relevant indexing questions to build a database with optimal search performance.
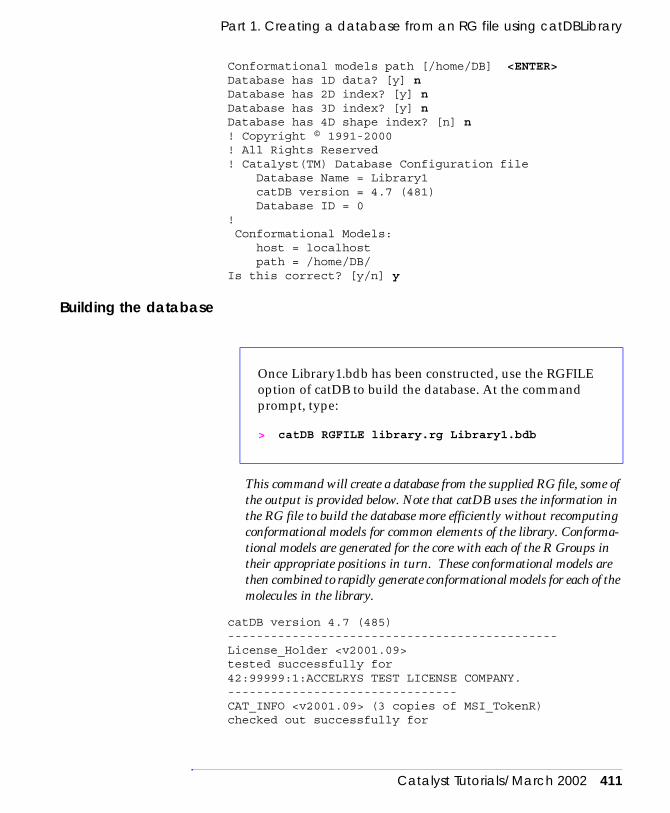
Part 1. Creating a database from an RG file using catDBLibrary
Catalyst Tutorials/March 2002 411
Conformational models path [/home/DB] <ENTER>Database has 1D data? [y] nDatabase has 2D index? [y] nDatabase has 3D index? [y] nDatabase has 4D shape index? [n] n! Copyright © 1991-2000! All Rights Reserved! Catalyst(TM) Database Configuration file Database Name = Library1 catDB version = 4.7 (481) Database ID = 0! Conformational Models: host = localhost path = /home/DB/Is this correct? [y/n] y
Building the database
This command will create a database from the supplied RG file, some of the output is provided below. Note that catDB uses the information in the RG file to build the database more efficiently without recomputing conformational models for common elements of the library. Conforma-tional models are generated for the core with each of the R Groups in their appropriate positions in turn. These conformational models are then combined to rapidly generate conformational models for each of the molecules in the library.
catDB version 4.7 (485)----------------------------------------------License_Holder <v2001.09>tested successfully for42:99999:1:ACCELRYS TEST LICENSE COMPANY.--------------------------------CAT_INFO <v2001.09> (3 copies of MSI_TokenR)checked out successfully for
Once Library1.bdb has been constructed, use the RGFILE option of catDB to build the database. At the command prompt, type:
> catDB RGFILE library.rg Library1.bdb

Part 2. Creating a database from an RG file using an enumerated library
Catalyst Tutorials/March 2002 412
42:99999:1:ACCELRYS TEST LICENSE COMPANY.
Successfully opened file ~/.Catalyst (/home/DB/.Cata-lyst).
CAT_DBLIBRARY <v2001.09> (1 copy)checked out successfully for42:99999:1:ACCELRYS TEST LICENSE COMPANY.
You will see lines of output for each conformer gener-ated.
Slave 1: exiting.462839: RPC server stopped464479: RPC server stopped
The database construction will finish when the last conformational model is built (you are not building the indices in this tutorial).
Note
Part 2. Creating a database from an RG file using an enumerated library
In this part of the tutorial, you shall build a database from an SD file which was created by the Analog Builder module of Cerius2. If you wish, you can recreate this file yourself: Using Cerius2, import the RG file library.rg using the Analog Builder, Enumerate and export an SD file containing the library molecules.
The number of compounds appended to a database by catDB in RGFILE mode is controlled by the .Catalyst parameter “catDB.compoundBufferSize.” When building large (approximately 100,000 compounds) databases from RGFILES, the append process can compete for CPU resources with the conformation generation process. In these circumstances, increasing this parameter from its default value will increase performance; e.g., add the following line to your .Catalyst file:
> catDB.compoundBufferSize=200

Part 2. Creating a database from an RG file using an enumerated library
Catalyst Tutorials/March 2002 413
Configuring a new database
You should see the following output (truncated for brevity). Notice that each compound is built individually. catDB does not make any use of the fact that this is a combinatorial library.
catDB version 4.7 (485)-----------------------------------------------License_Holder <v2001.09>tested successfully for42:99999:1:ACCELRYS TEST LICENSE COMPANY. ----------------------------------------------CAT_INFO <v2001.09> (3 copies of MSI_TokenR)checked out successfully for42:99999:1:ACCELRYS TEST LICENSE COMPANY.RPC program number: 1073741829Dispatcher: Running in process 463588Dispatcher: Starting slave 1 on localhost, local_pid=464253
<snip>
Slave 1: exiting.464253: RPC server stopped463588: RPC server stopped
The database construction will finish when the last conformational model is built.
To build the database from the SD file, configure a new data-base named Library2. To do this issue the command:
> catDB CONFIG Library2.bdb
Then answer the questions as shown in part 1.
Now create the database from the SD file using the com-mand:
> catDB SD library.sd Library2.bdb

414 Catalyst Tutorials/March 2002
Building a Database of a Combinatorial Library
Part 3. Comparing the conformational models in the two databases
The algorithm for constructing conformational models from SD files and RG files are different, so the conformational models gener-ated by these approaches will also be different. It is interesting to examine the effect of these differences using database search results. In this part of the tutorial you will search both databases using a common hypothesis, and see how the hit-lists differ.
When searching databases, catDisk must be running on the machine specified in the bdb file, this machine must have the disk containing the databases physically attached to it (you cannot run the server over NFS). Ensure that catDisk is running on the local host, (see Lesson 10).
Starting the interface
Installing the databases
Start the catalyst user interface by issuing the command:
> catalyst
When the user interface has loaded, install the databases by selecting Install Database… from the Databases menu. Go to the current directory by typing $PWD in the File Name box, then press [Enter]. Click Library1.bdb and extend select (hold down shift, then click) Library2.bdb and click Install. Click Cancel to close the dialog box.

Summary
Catalyst Tutorials/March 2002 415
Searching the database
Summary
With the example library in this tutorial you should see an approxi-mately six-fold difference in the execution times between catDB with an enumerated library (i.e., SD) and catDBLibrary (i.e., RGFILE) modes. With an R10000 195 MHz CPU system, catDBLi-
Drag these databases into the View Database Workbench There may be a short delay while the databases are opened.
If Hypo1 exists in the stockroom, drag it to the View Data-base Workbench. Otherwise, selecting Import… from the Data menu in the View Database Workbench. In the Import Data control panel, select cattrain from the directory list. Select Hypo1, then click OK.
Search the Library1 database with the query using Fast Flexible Search Databases/Spreadsheets from the Tools menu (the warning “Databases ‘Library1’ has no 1D compo-nent” can be ignored).
Search the second database in the same way. Inspect the resulting spreadsheets. You should notice that the majority of hit compounds are in both hit lists. Note, however, that some molecules only appear in one of the spreadsheets. This is because the conformational models are different, but have a large degree of overlap.

416 Catalyst Tutorials/March 2002
Building a Database of a Combinatorial Library
brary can process around 25-50,000 compounds in ten hours, although actual build times depend on the size and flexibility of the compounds in the database.
Appendix: Additional catDBLibrary Notes and Options
The majority of options for controlling Catalyst database building with catDB are also applicable to catDBLibrary (i.e., catDB RGFile). For example, the startafter, stopafter and maxconfs options work in the same way in catDBLibrary mode as in normal catDB mode. Note, however, that the FAST and BEST method options are ignored by catDBLibrary. catDBLibrary is based on a new algo-rithm for combinatorial libraries, as discussed in the first section of the tutorial. For typical libraries, the conformer models generated by catDBLibrary is of equivalent quality to the FAST method of standard catDB.
Sequence Numbers for Compounds Generated by catDBLibrary
The following equations are based on three RG positions. It is straightforward to extend the equations for more general cases.
Assume that the core structure has three RG positions labeled as A, B and C, and the R groups on A, B and C are
Ri(A), Rj(B) and Rk(C), (i=1,2,…nA, j=1,2,…nB, and k=1,2,….nC)
The corresponding sequence number (where the compound appears in the library) can be calculated as follow:
N(i, j, k) = (i-1)nBnC + (j-1)nC + k
For each sequence number N, one can use a similar procedure to determine the R group indexes i, j and k, for the corresponding library molecule. If the numbers of R groups for each RG position is greater than 1, the following equations can be used:
i = 1 + N/( nBnC ) (truncated after the decimal point, i.e., only take the integer)

Appendix: Additional catDBLibrary Notes and Options
Catalyst Tutorials/March 2002 417
j = 1 + (N - (i-1) nBnC )/nCk = N - (i-1) nBnC - (j-1) nC
If an R group position contains only one R group, ignore this group and apply the same equations to determine the R group indexes.
Segmenting Databases for Large Libraries into Separate Database Builds
Database size depends on the flexibility of compounds and the number of conformers that are stored in the database. If a combina-torial library exceeds approximately 300,000 compounds, the file size of .0bdb file may exceed the 2 GB maximum file size that can be handled by catDB. Accordingly, you may build the database in multiple segments using the same input RG file. The startafter and stopafter can be used for this purpose.
Shown below are the steps to build a 200k library in two chunks:
You can run the two jobs on two different machines if desired. You can use each database separately, or you can create a composite database combining the two databases.
Define two database configuration files, for instance combi01.bdb and combi02.bdb, by using the catDB config. (see also Lesson 10 for using catDB).
Run catDB RGFile for each chunk as follows:
> catDB RGFile <MyRGFile>.rg combi01.bdb startafter=’$0’ stopafter=’$100000’
> catDB RGFile <MyRGFile>.rg combi02.bdb startafter=’$100000’, stopafter=’$200000’

418 Catalyst Tutorials/March 2002
Building a Database of a Combinatorial Library
Building a Database in Multiple Runs
If desired, database building may be stopped and restarted. The stop, restart commands and startafter and stopafter options pro-vide the necessary functionality.
You can stop a running catDBLibrary job with a stop file using the following command:
> touch <MyLibrary>.bdb.stop
The job can be restarted from the same run directory as a normal catDB run, for instance, as follow
> catDB RGFile <MyRGFile>.rg <MyLibrary>.bdb append
Using the startafter and stopafter options, you would proceed as follows:
> catDB RGFile <MyRGFile>.rg <MyLibrary>.bdb star-tafter=’$0’ stopafter=’$xxxx’
> catDB RGFile <MyRGFile>.rg <MyLibrary>.bdb star-tafter=’$xxxx’ stopafter=’$yyyy’ append
> catDB RGFile <MyRGFile>.rg <MyLibrary>.bdb star-tafter=’$yyyy’ stopafter=’$zzzz’ append
where xxxx, yyyy and zzzz are sequence numbers of library mole-cules at which the catDBLibrary run should start or stop, and xxxx < yyyy < zzzz.
Appending Molecules from the Error File to the Database
In some cases, catDBLibrary does not generate any conformers for some library molecules, and those molecules are exported to the catDB error SD file. The catDB SD option can be used to recover the molecules and append the conformer models to the .0bdb file by the following command:
> catDB SD <MyLibrary>_err0.sd <MyLibrary>.bdb append existingconfs=discard

Appendix: Additional catDBLibrary Notes and Options
Catalyst Tutorials/March 2002 419
where <MyLibrary>_err0.sd is the error SD file. If you have several runs for the same database, there may be several error SD files that can be consolidated into one. Since the 3D coordinates in the error SD file are usually not sensible, the option existingconfs=discard forces catDB to discard the existing con-formers.

420 Catalyst Tutorials/March 2002
Building a Database of a Combinatorial Library

Catalyst Tutorials/March 2002 421
1D data managing 2002D Beautify 83, 85, 93, 952D molecule 973D Constraints 513D Geometric Objects 513D Minimize 95, 1023D relationships 53, 57
AACE inhibitor 47activity, estimating 57, 62adding
atoms in 2D workspace 75atoms in 3D workspace 77bond between two atoms 73chemical features to hypotheses 291distance, angle, and/or torsion constraints
125elements and groups (besides carbon) to
the workspace 86fragments to molecular definitions 346property data to a database 305
amino acids 117analysis, hypothesis 282Aromatize 102aromatizing and de-aromatizing rings 102aromatizing rings 67atom specification 49atom types, changing 67Axial-Equatorial tool 103
Bbarbiturate 48bond angles 96, 113bond rotation 96bond styles, changing 67, 72Bond Type tools 72bond types, changing 67, 72
bond, adding between atoms 73bound conformation, creating a hypothesis
from 290building
database in multiple runs 418hypotheses 65molecules 71, 88, 117, 378partial-match queries 399peptide 117
CCatalyst
getting data in and out of 186Help 39hypothesis generation 275starting up 7
catDB error SD file 418catDB method 408catDBLibrary
advanced options 416errors generating conformers for library
molecules 418method 408stop a running job 418using to construct datatabases 407
changingatom types 67bond styles 67, 72bond types 67, 72chirality 67, 99default bond type 86element of an existing atom 76oxidation state of specified atoms 67stereochemistry 98
chemical features, adding to hypotheses 291chemical functions 51, 345chiral atom 99Chirality Labels 99chirality, changing 67, 99Clear Display 74clustering hypotheses 266
Index

422 Catalyst Tutorials/March 2002
color coding spheres 52combinatorial libraries 407common features hypotheses, generating 275Compare/Fit 57composite databases, creating 305configuration cost 395conformational models 209
generating and displaying 212generating interactively or in the
background 211conformer generation 209conformers, filtering 364contraints, adding to hypotheses 125Correl 395cost factors (parameters), hypothesis 395creating
composite databases 305fragments 378hypotheses 292hypothesis from a bound conformation 290NOT functions 365shape query that is aligned to a hypothesis
295vectorized funtions 359
customizing molecules 345
Ddata
import/export 186loading training data 8
databases 305adding property data to 305appending molecules of error file to 418building in multiple runs 418building preparations 305composite 305merging 417multiconformer 306searching 407segmenting 417testing 319
de-aromatizing a phenyl ring 107de-aromatizing rings 67defining molecular functions 346Deselect tool 76dihedral angles 96, 113
directories 6disconnecting fragments from molecular
definitions 353Double Bond tool 80, 86Dynamic Bond Rotations 109dynamic modeling 67, 106
Eediting molecules 67Erase tool 74error cost 395estimating compound activity using
hypothesis 61estimating, activity 57, 62Exclude/OR 327Exclude/OR tool, using to perform queries
399excluded volume 52excluding
backbone elements from functions 370fragments from molecular definitions 351
FFeature Dictionary 142, 345filtering, conformers 364Find command 175Fit to Window tool 92fitting molecule to hypothesis 57Flip 2D 95formats, input file 306fragments
adding to molecular definitions 346creating 378disconnecting from molecular definitions
353excluding from molecular definitions 351
functionscustomizing 345excluding backbone elements 370modifying 357NOT 365vectorized 349

Catalyst Tutorials/March 2002 423
GGenerate Hypothesis workbench 48generating, conformers 209
HHelp, on-line 41Hit Mappings Row 55hydrogen bond acceptor 52, 53, 60, 62hydrogen bond donor 52, 53, 60hydrophobe 52, 62
aromatic ring 52HypoGen
full file 386log file 390output 385
hypothesesadding chemical features to 291adding constraints to 125analysis 282building 65, 124building substrucutre hypotheses 125clustering 266common features 275converting molecules into 124cost factors (parameters) 395creating 292
a "leave-one-out" query 399D2 agonists 157database searching 125, 135estimating the activity of compounds with
61evaluating quality 253examining 48experiment 276Feature Dictionary 142fitting a molecule to 57fitting molecule to 63generating 229, 230generating common features 275heteroaromatic 333introduction 47mapped 52merging 268using 54validating statistical significance 397verifying 405
hypothesis files (.chm extensions) 379
Iinput file formats 306interatomic distances 67, 96ionizable groups 67
Kkeyboard shortcuts 79, 86
Double Bond tool 86Single Bond tool 86Triple Bond tool 86
knurl 93, 107
Llabs 181leave-one-out hypothesis, creating 399leave-one-out query permutations 399libraries, combinatorial 407
Mmapped hypothesis 52mapping molecules 345MaxOmitFeat column, in hypothesis
generation spreadsheet 277Measure tool 113merging hypotheses 268models, conformational 209modifying, functions 357molecular definitions
adding fragments to 346disconnecting fragments from 353excluding fragments from 351
molecular functions, defining 346molecules
building 67, 71, 378building a peptide 117building a sample 88customizing 345editing 67fitting to hypothesis 63mapping 345zooming in on 18
424 Catalyst Tutorials/March 2002
mousebuttons 10selecting objects with 10using 10
multiconformer database, building 305
Nnegative charge 52negative ionizable 52negative ionizable function 60negative ionizable group 53, 62NOT
functions 365hypotheses, using in a search 368queries 365
Oobjects
moving 16rotating 21
on-line Help 41operating directories 6optimally fitting conformer 60Orient 3D to 2D 95, 98out-of-plane angles 113output, HypoGen 385oxidation and reduction 105oxidation state 67Oxidize 106
Pparameters, workbench 28partial-match queries 399
building 399required features 400
peptide, building 117Periodic Table 68
selecting atoms and groups in 71POS IONIZABLE 328, 338positive charge 52positive ionizable 52Principal column, in hypothesis generation
spreadsheet 277
property data, adding to a database 305protonate atoms 104
Qqueries
"leave-one-out" permutations 399complex
using Create partial query option 403using Exclude/OR tool 403
creatingshape query 294shape query that is aligned to a
hypothesis 295NOT 365partial-match 399
required features 400searching 399using the Exclude/OR tool 399
RReduce 106RG files 407ring flipping 96rings, aromatizing and de-aromatizing 67RMS factor 395rotating objects 21
Ssearch, shape-based 289searching
databases 407queries 399using the NOT hypothesis 368
Set R Chirality tool 100Set S Chirality tool 100Set Stereochemistry 95Set Stereochemistry tool 81, 95shape query, creating 294shape/hypothesis query 295shape/hypothesis query, creating 295simple tasks 1Single Bond tool 82spheres, color coding 52
Catalyst Tutorials/March 2002 425
Standard 3D 82, 92, 95standard structures 67statistical significance, validating in a
hypothesis 397stereochemistry, changing 98styles 23
Ttemplate molecule 124Toggle Cis-Trans tool 81Toggle Known-Unknown tool 100tool
2D Bond Style 72Axial-Equatorial 103Bond Type 72Deselect 76Double Bond 86Double bond 80Erase 74Exclude/OR 399Fit to Window 92keyboard shortcuts 86Measure 113Set R Chirality 100Set S Chirality 100Set Stereochemistry 81, 95Single Bond 82Toggle Cis-Trans 81Toggle Known-Unknown 100
UUser.chm file 379
Vvalidating, hypothesis statistical significance
397Van der Waals forces 108vectorized functions 349
creating 359verifying, hypotheses 405View Hypothesis workbench 48views 23
Wwindows
bringing a window to the front 4Catalyst windows 8managing 2moving 2resizing 5
workbenchleaving a workbench 37opening a new workbench 12opening a workbench 10parameters 28view compound workbench 67view compound workbench tools 95
workspace 13, 16, 17making objects fit 20selecting and deselecting 87
Zzooming 18