CASTLE ITTER PLAYTEST v0.3 APRIL 2016 - Front...
24
Transcript of CASTLE ITTER PLAYTEST v0.3 APRIL 2016 - Front...
CASTLE ITTER PLAYTEST v0.3 APRIL 2016
CONTENTS
PAGE 2 Introduction PAGE 5
Setup
PAGE 6 Counters and Cards PAGE 7
Playing the Game
PAGE 8 Defender Actions
PAGE 14 Defender Attributes
PAGE 16 SS Cards
PAGE 21 Ending the Game, Increasing Difficulty, References
DigitalCapricornStudios
CREDITS
CREATED BY David Thompson ART & GRAPHIC DESIGN David Thompson
PROOFREADING Ted Davies
PLAYTESTERS Compiling list…
A single player, skirmish-level, castle defense game set in WWII.
45 minutes ages: 12+ 1 player
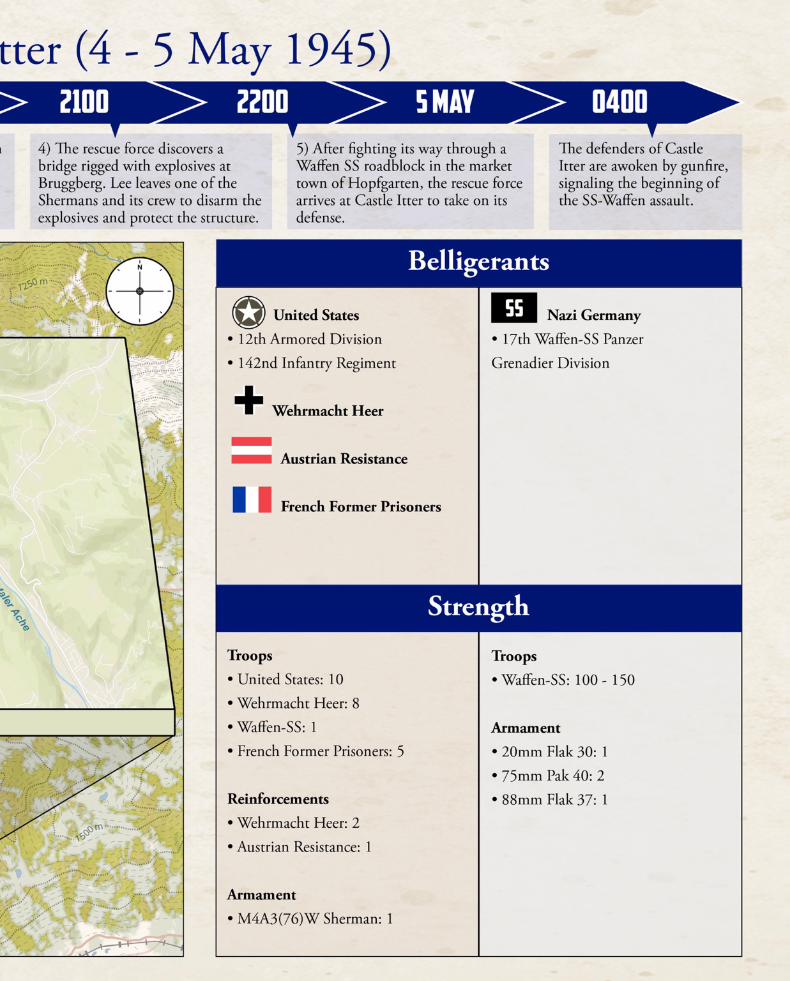
In Castle Itter, you take control of a makeshift force that is defending a medieval castle, nestled in the Austrian countryside from, a Waffen-SS assault. The force consists of an American tank crew and infantrymen, Wehrmacht infantrymen, a former SS officer, French prisoners, and an Austrian resistance fighter.
Object of the Game The goal of Castle Itter is to last until reinforcements from the 142nd Infantry Regiment arrive. In the game, this is represented by playing through a deck of SS cards.
Game play examples in this rulebook are placed in gray tone boxes.
Designer notes in this rulebook are placed in light beige tone boxes.
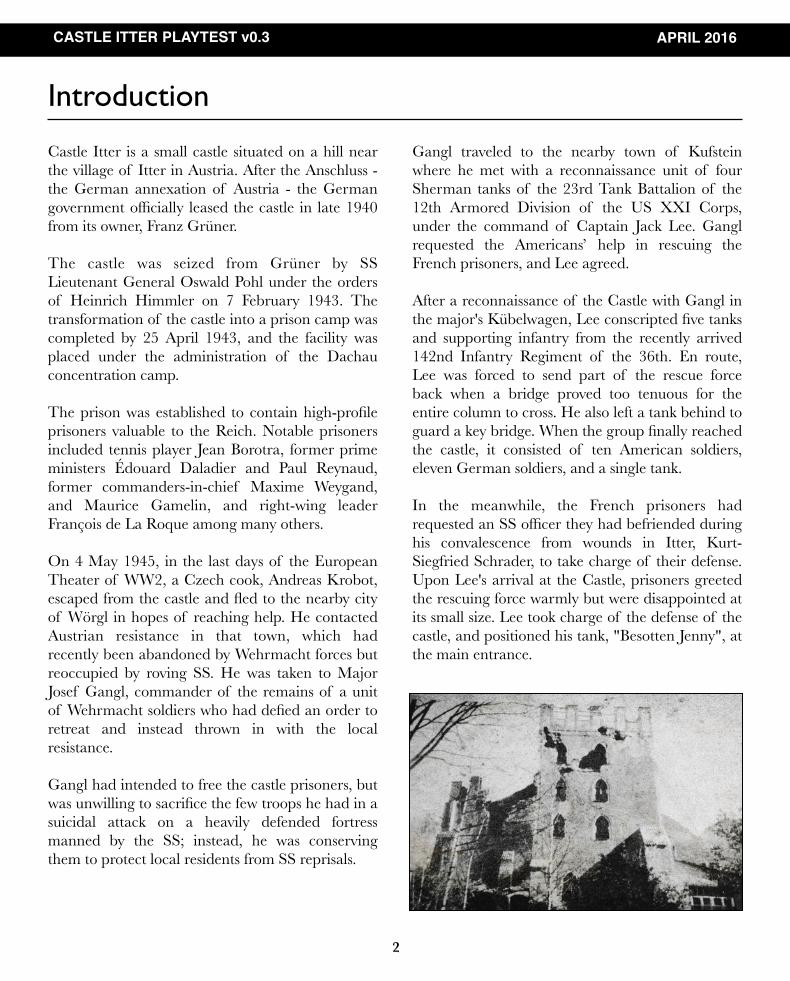
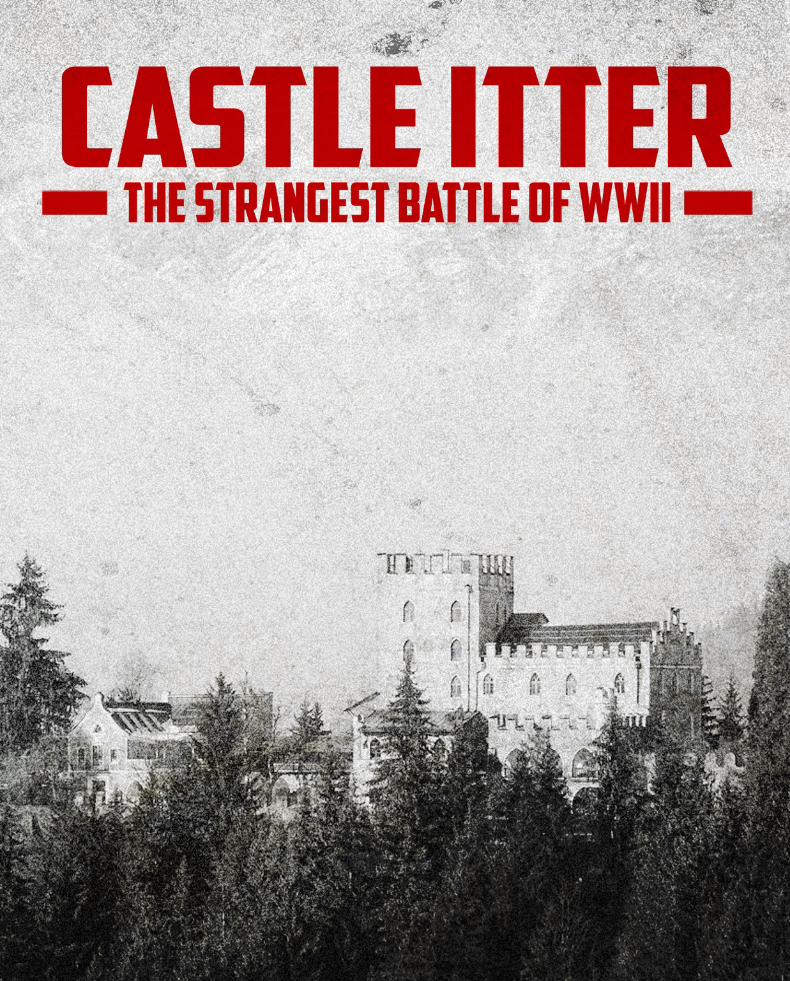
Castle Itter is a small castle situated on a hill near the village of Itter in Austria. After the Anschluss -the German annexation of Austria - the German government officially leased the castle in late 1940 from its owner, Franz Grüner.
The castle was seized from Grüner by SS Lieutenant General Oswald Pohl under the orders of Heinrich Himmler on 7 February 1943. The transformation of the castle into a prison camp was completed by 25 April 1943, and the facility was placed under the administration of the Dachau concentration camp.
The prison was established to contain high-profile prisoners valuable to the Reich. Notable prisoners included tennis player Jean Borotra, former prime ministers Édouard Daladier and Paul Reynaud, former commanders-in-chief Maxime Weygand, and Maurice Gamelin, and right-wing leader François de La Roque among many others.
On 4 May 1945, in the last days of the European Theater of WW2, a Czech cook, Andreas Krobot, escaped from the castle and fled to the nearby city of Wörgl in hopes of reaching help. He contacted Austrian resistance in that town, which had recently been abandoned by Wehrmacht forces but reoccupied by roving SS. He was taken to Major Josef Gangl, commander of the remains of a unit of Wehrmacht soldiers who had defied an order to retreat and instead thrown in with the local resistance.
Gangl had intended to free the castle prisoners, but was unwilling to sacrifice the few troops he had in a suicidal attack on a heavily defended fortress manned by the SS; instead, he was conserving them to protect local residents from SS reprisals.
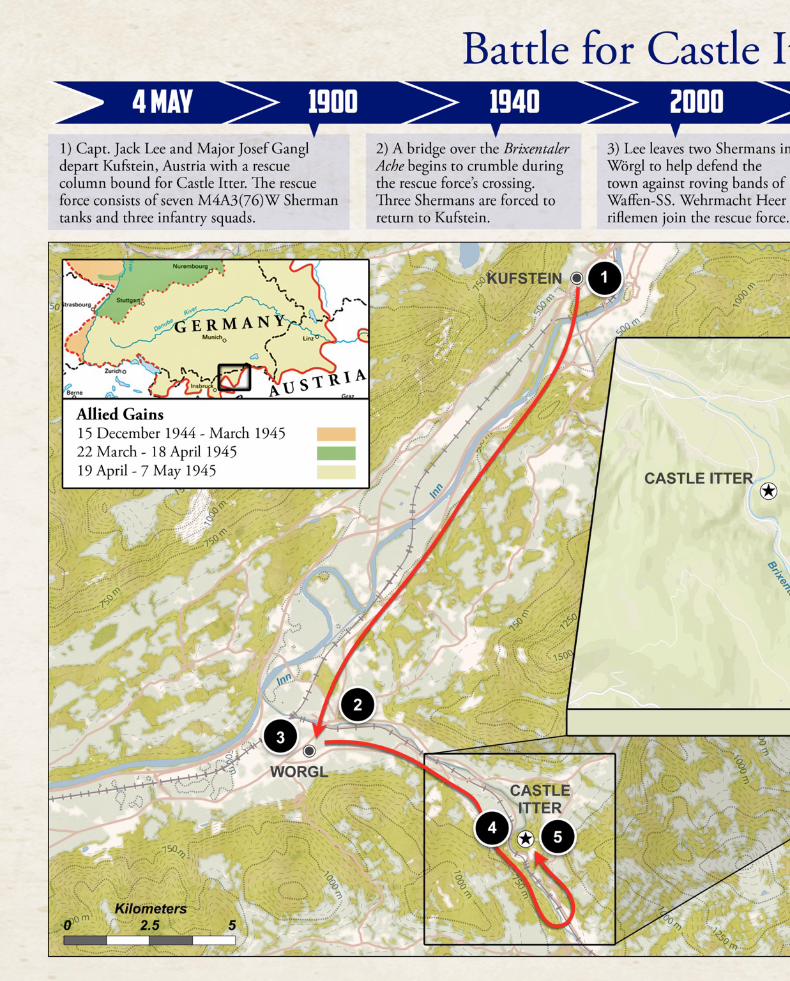
Gangl traveled to the nearby town of Kufstein where he met with a reconnaissance unit of four Sherman tanks of the 23rd Tank Battalion of the 12th Armored Division of the US XXI Corps, under the command of Captain Jack Lee. Gangl requested the Americans’ help in rescuing the French prisoners, and Lee agreed.
After a reconnaissance of the Castle with Gangl in the major's Kübelwagen, Lee conscripted five tanks and supporting infantry from the recently arrived 142nd Infantry Regiment of the 36th. En route, Lee was forced to send part of the rescue force back when a bridge proved too tenuous for the entire column to cross. He also left a tank behind to guard a key bridge. When the group finally reached the castle, it consisted of ten American soldiers, eleven German soldiers, and a single tank.
In the meanwhile, the French prisoners had requested an SS officer they had befriended during his convalescence from wounds in Itter, Kurt-Siegfried Schrader, to take charge of their defense. Upon Lee's arrival at the Castle, prisoners greeted the rescuing force warmly but were disappointed at its small size. Lee took charge of the defense of the castle, and positioned his tank, "Besotten Jenny", at the main entrance.
CASTLE ITTER PLAYTEST v0.3 APRIL 2016
Introduction
2
CASTLE ITTER PLAYTEST v0.1 MARCH 2016
3
CASTLE ITTER PLAYTEST v0.1 MARCH 2016
3
CASTLE ITTER PLAYTEST v0.3 APRIL 2016
Setup Illustration and Components
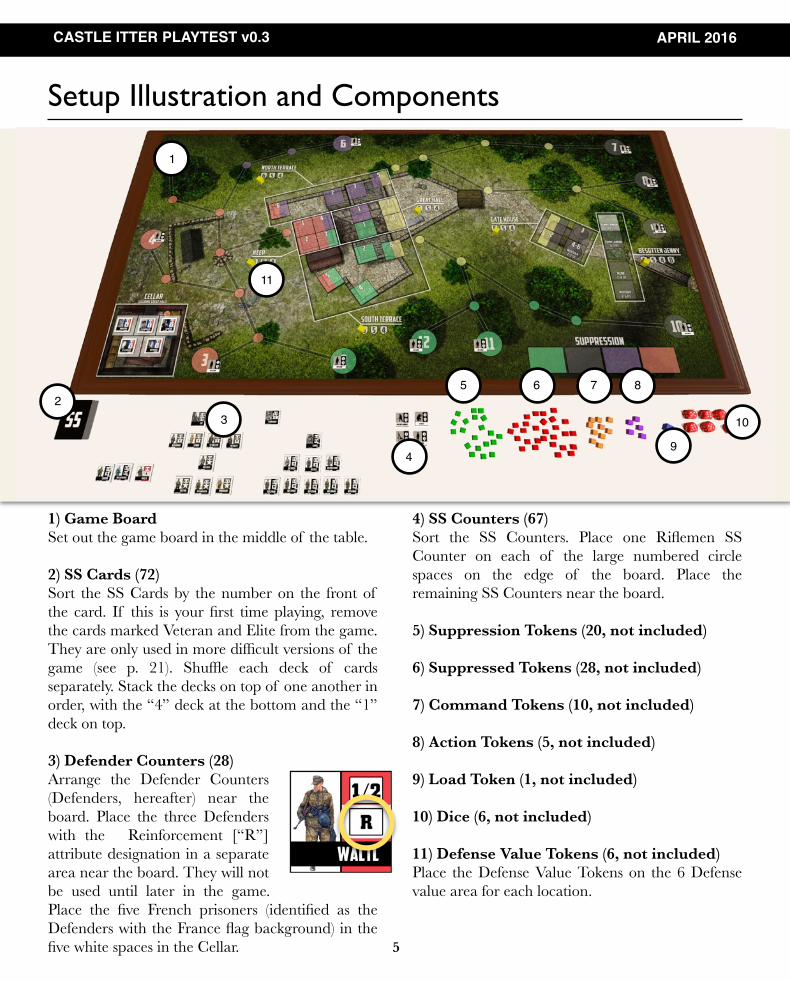
1) Game Board Set out the game board in the middle of the table.
2) SS Cards (72) Sort the SS Cards by the number on the front of the card. If this is your first time playing, remove the cards marked Veteran and Elite from the game. They are only used in more difficult versions of the game (see p. 21). Shuffle each deck of cards separately. Stack the decks on top of one another in order, with the “4” deck at the bottom and the “1” deck on top.
3) Defender Counters (28) Arrange the Defender Counters (Defenders, hereafter) near the board. Place the three Defenders with the Reinforcement [“R”] attribute designation in a separate area near the board. They will not be used until later in the game. Place the five French prisoners (identified as the Defenders with the France flag background) in the five white spaces in the Cellar.
4) SS Counters (67) Sort the SS Counters. Place one Riflemen SS Counter on each of the large numbered circle spaces on the edge of the board. Place the remaining SS Counters near the board.
5) Suppression Tokens (20, not included)
6) Suppressed Tokens (28, not included)
7) Command Tokens (10, not included)
8) Action Tokens (5, not included)
9) Load Token (1, not included)
10) Dice (6, not included)
11) Defense Value Tokens (6, not included) Place the Defense Value Tokens on the 6 Defense value area for each location.
1
23
4
10
5
5
9
6 7 8
11
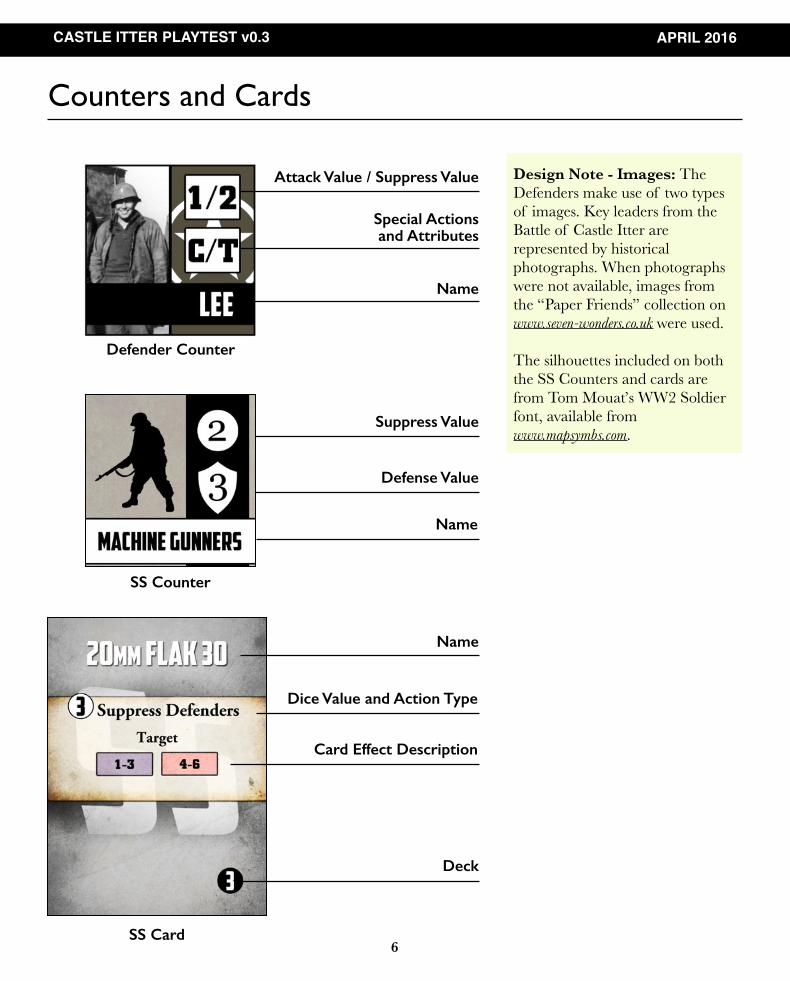
Special Actions and Attributes
Name
Suppress Value
Defense Value
Name
Dice Value and Action Type
Card Effect Description
Deck
CASTLE ITTER PLAYTEST v0.3 APRIL 2016
Counters and Cards
Defender Counter
SS Counter
6SS Card
Design Note - Images: The Defenders make use of two types of images. Key leaders from the Battle of Castle Itter are represented by historical photographs. When photographs were not available, images from the “Paper Friends” collection on www.seven-wonders.co.uk were used.
The silhouettes included on both the SS Counters and cards are from Tom Mouat’s WW2 Soldier font, available from www.mapsymbs.com.
Attack Value / Suppress Value
Name
Game Overview During a game of Castle Itter, you take the role of the force that defended the castle from 0400 - 1600 on 5 May 1945. The goal of the game is to last until the SS deck is depleted, without allowing SS Counters to reach the castle. Additionally, you score points for each Defender that becomes a casualty - the lower your score at the end of the game, the better.
Castle Itter is divided into turns. Each turn consists of the following: • Take five actions with Defenders. • Play three SS cards.
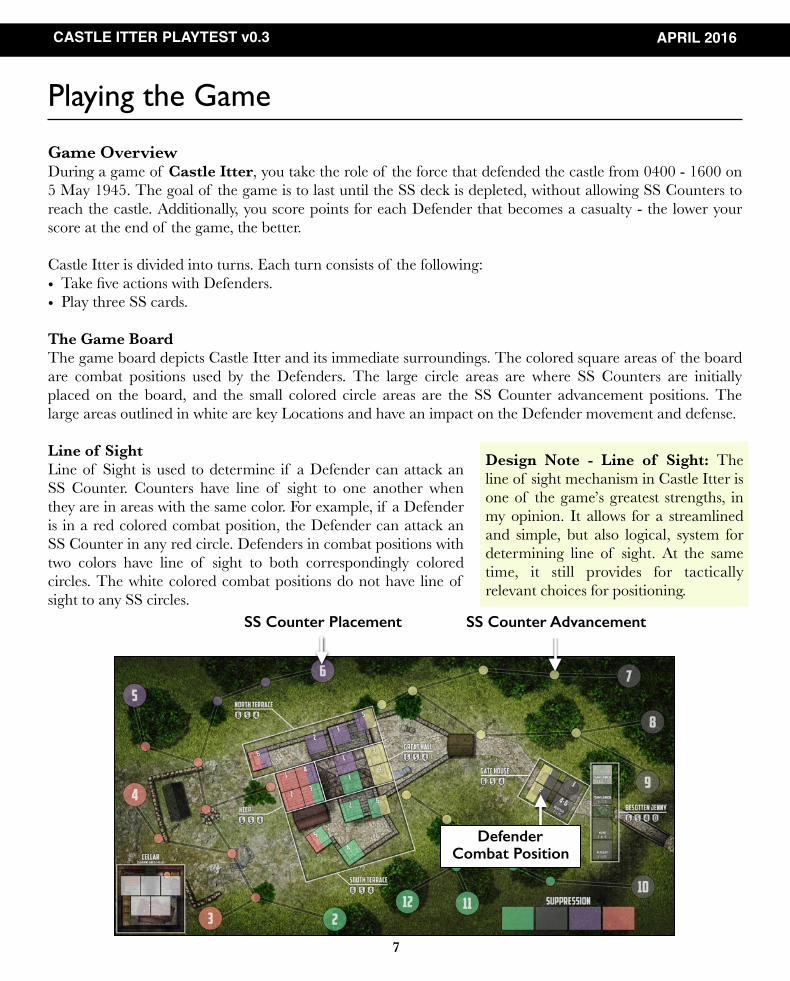
The Game Board The game board depicts Castle Itter and its immediate surroundings. The colored square areas of the board are combat positions used by the Defenders. The large circle areas are where SS Counters are initially placed on the board, and the small colored circle areas are the SS Counter advancement positions. The large areas outlined in white are key Locations and have an impact on the Defender movement and defense.
Line of Sight Line of Sight is used to determine if a Defender can attack an SS Counter. Counters have line of sight to one another when they are in areas with the same color. For example, if a Defender is in a red colored combat position, the Defender can attack an SS Counter in any red circle. Defenders in combat positions with two colors have line of sight to both correspondingly colored circles. The white colored combat positions do not have line of sight to any SS circles.
CASTLE ITTER PLAYTEST v0.3 APRIL 2016
Playing the Game
SS Counter Placement
Design Note - Line of Sight: The line of sight mechanism in Castle Itter is one of the game’s greatest strengths, in my opinion. It allows for a streamlined and simple, but also logical, system for determining line of sight. At the same time, it still provides for tactically relevant choices for positioning.
7
SS Counter Advancement
Defender Combat Position
During each turn you take five actions with your Defenders. You can only take one action with a Defender on a turn. When you take an action with a Defender, place an Action token on the Defender. The actions include:
[Actions that Exhaust a Defender] • Attack • Suppress • Move within a location (Free Action) • Move to a new location • Special Actions (Command and Escape)
[Actions that do not Exhaust a Defender] • Recover • Remove suppression
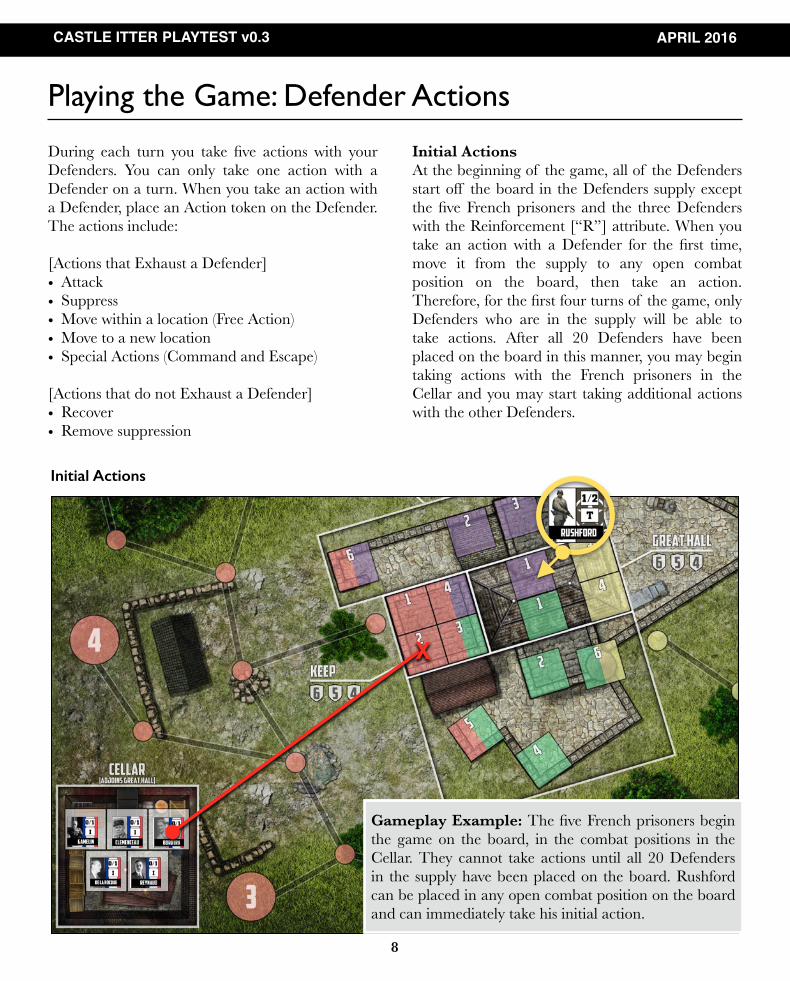
Initial Actions At the beginning of the game, all of the Defenders start off the board in the Defenders supply except the five French prisoners and the three Defenders with the Reinforcement [“R”] attribute. When you take an action with a Defender for the first time, move it from the supply to any open combat position on the board, then take an action. Therefore, for the first four turns of the game, only Defenders who are in the supply will be able to take actions. After all 20 Defenders have been placed on the board in this manner, you may begin taking actions with the French prisoners in the Cellar and you may start taking additional actions with the other Defenders.
CASTLE ITTER PLAYTEST v0.3 APRIL 2016
8
Playing the Game: Defender Actions
Initial Actions
Gameplay Example: The five French prisoners begin the game on the board, in the combat positions in the Cellar. They cannot take actions until all 20 Defenders in the supply have been placed on the board. Rushford can be placed in any open combat position on the board and can immediately take his initial action.
X
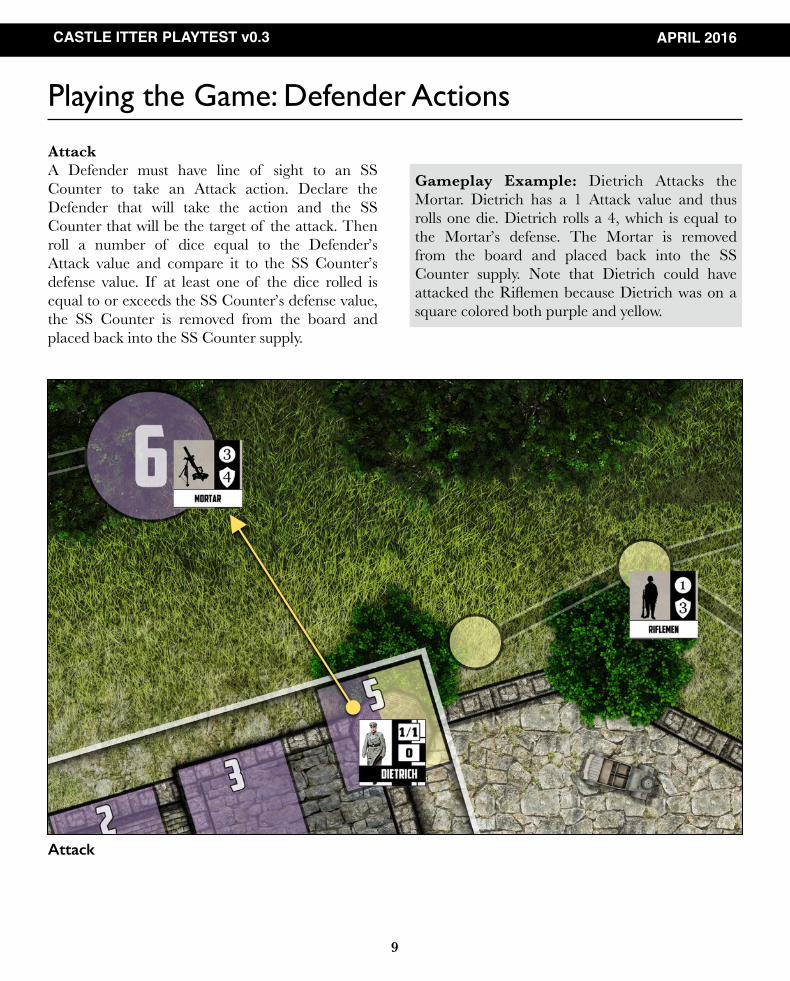
Attack A Defender must have line of sight to an SS Counter to take an Attack action. Declare the Defender that will take the action and the SS Counter that will be the target of the attack. Then roll a number of dice equal to the Defender’s Attack value and compare it to the SS Counter’s defense value. If at least one of the dice rolled is equal to or exceeds the SS Counter’s defense value, the SS Counter is removed from the board and placed back into the SS Counter supply.
Gameplay Example: Dietrich Attacks the Mortar. Dietrich has a 1 Attack value and thus rolls one die. Dietrich rolls a 4, which is equal to the Mortar’s defense. The Mortar is removed from the board and placed back into the SS Counter supply. Note that Dietrich could have attacked the Riflemen because Dietrich was on a square colored both purple and yellow.
CASTLE ITTER PLAYTEST v0.3 APRIL 2016
9
Playing the Game: Defender Actions
Attack
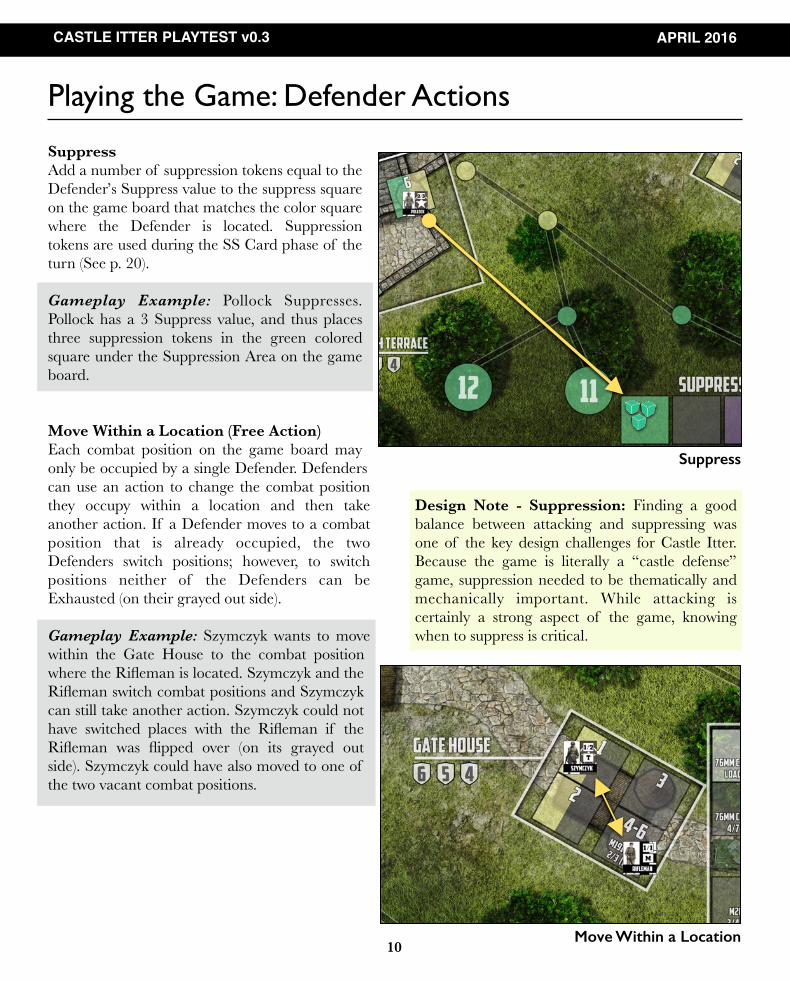
Suppress Add a number of suppression tokens equal to the Defender’s Suppress value to the suppress square on the game board that matches the color square where the Defender is located. Suppression tokens are used during the SS Card phase of the turn (See p. 20).
Gameplay Example: Pollock Suppresses. Pollock has a 3 Suppress value, and thus places three suppression tokens in the green colored square under the Suppression Area on the game board.
Move Within a Location (Free Action) Each combat position on the game board may only be occupied by a single Defender. Defenders can use an action to change the combat position they occupy within a location and then take another action. If a Defender moves to a combat position that is already occupied, the two Defenders switch positions; however, to switch positions neither of the Defenders can be Exhausted (on their grayed out side).
Gameplay Example: Szymczyk wants to move within the Gate House to the combat position where the Rifleman is located. Szymczyk and the Rifleman switch combat positions and Szymczyk can still take another action. Szymczyk could not have switched places with the Rifleman if the Rifleman was flipped over (on its grayed out side). Szymczyk could have also moved to one of the two vacant combat positions.
CASTLE ITTER PLAYTEST v0.3 APRIL 2016
Playing the Game: Defender Actions
Design Note - Suppression: Finding a good balance between attacking and suppressing was one of the key design challenges for Castle Itter. Because the game is literally a “castle defense” game, suppression needed to be thematically and mechanically important. While attacking is certainly a strong aspect of the game, knowing when to suppress is critical.
Move Within a Location10
Suppress
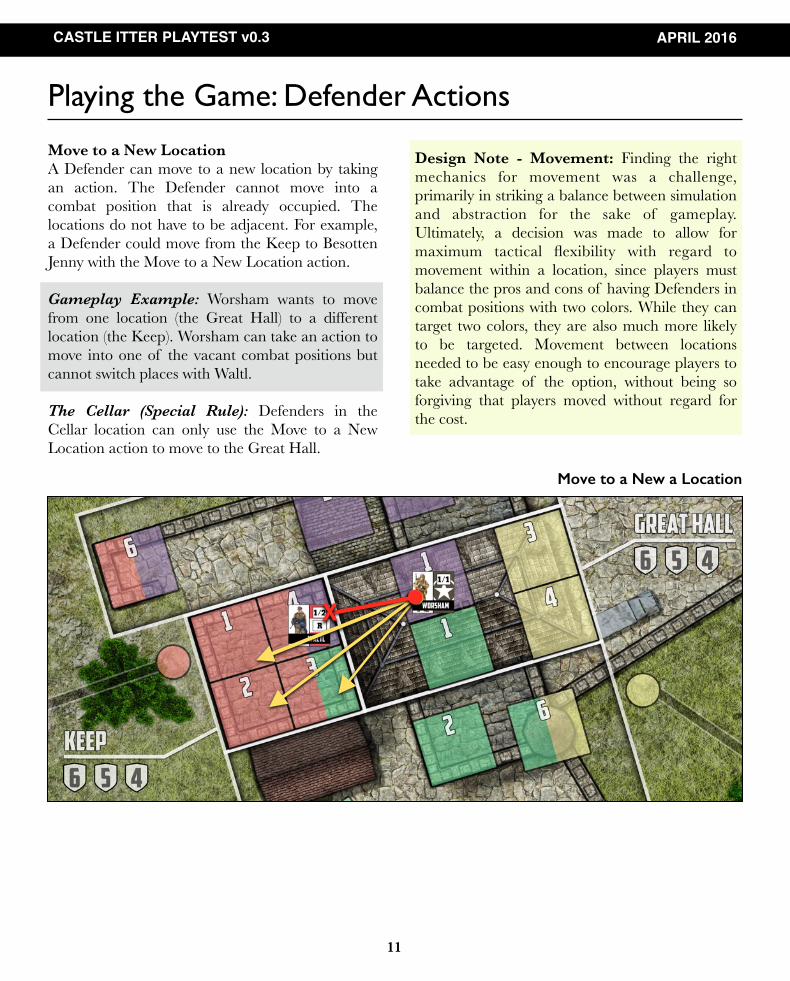
Move to a New Location A Defender can move to a new location by taking an action. The Defender cannot move into a combat position that is already occupied. The locations do not have to be adjacent. For example, a Defender could move from the Keep to Besotten Jenny with the Move to a New Location action.
Gameplay Example: Worsham wants to move from one location (the Great Hall) to a different location (the Keep). Worsham can take an action to move into one of the vacant combat positions but cannot switch places with Waltl.
The Cellar (Special Rule): Defenders in the Cellar location can only use the Move to a New Location action to move to the Great Hall.
CASTLE ITTER PLAYTEST v0.3 APRIL 2016
Playing the Game: Defender Actions
X
Move to a New a Location
11
Design Note - Movement: Finding the right mechanics for movement was a challenge, primarily in striking a balance between simulation and abstraction for the sake of gameplay. Ultimately, a decision was made to allow for maximum tactical flexibility with regard to movement within a location, since players must balance the pros and cons of having Defenders in combat positions with two colors. While they can target two colors, they are also much more likely to be targeted. Movement between locations needed to be easy enough to encourage players to take advantage of the option, without being so forgiving that players moved without regard for the cost.
Recover Defenders that are flipped to their grayed out side are Exhausted and cannot take most actions. Using the Recover action flips a Defender back over and allows it to be used for actions once again. Remember that a Defender can only be used for one action each turn. Therefore, a Defender cannot take a Recover action and then a second action in the same turn.
Remove Suppression When a Defender has a Suppressed token on it, it cannot take any action other than the Remove Suppression action. When a Defender takes the Remove Suppression action, remove the Suppressed token and place it back into the supply.
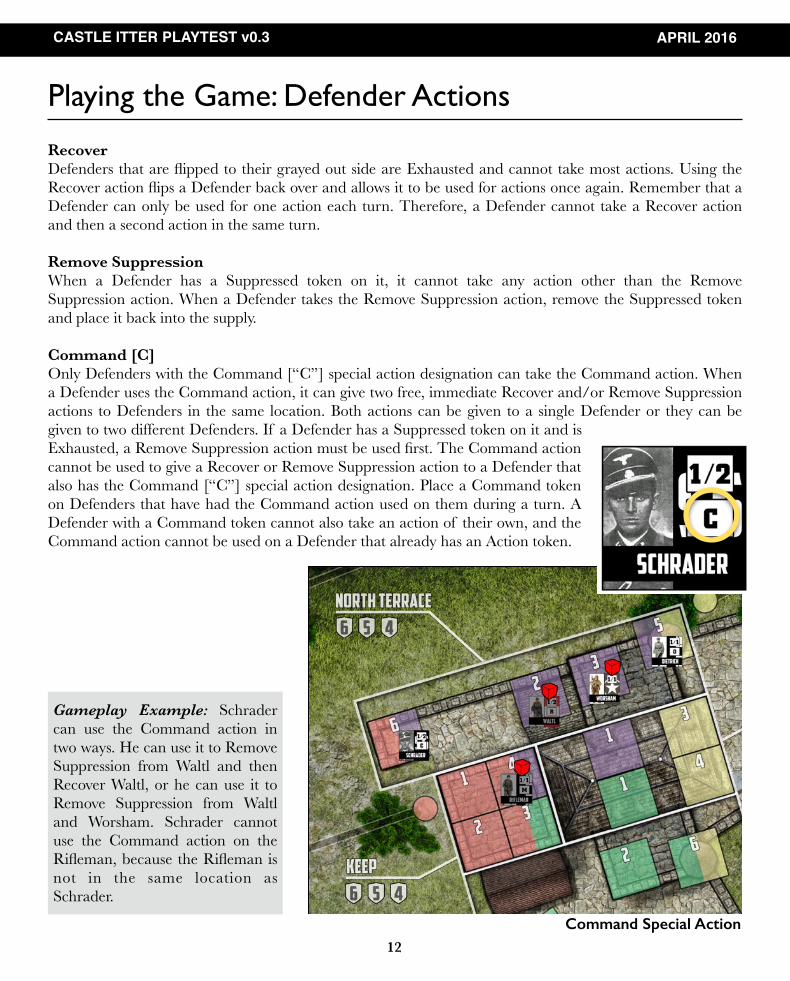
Command [C] Only Defenders with the Command [“C”] special action designation can take the Command action. When a Defender uses the Command action, it can give two free, immediate Recover and/or Remove Suppression actions to Defenders in the same location. Both actions can be given to a single Defender or they can be given to two different Defenders. If a Defender has a Suppressed token on it and is Exhausted, a Remove Suppression action must be used first. The Command action cannot be used to give a Recover or Remove Suppression action to a Defender that also has the Command [“C”] special action designation. Place a Command token on Defenders that have had the Command action used on them during a turn. A Defender with a Command token cannot also take an action of their own, and the Command action cannot be used on a Defender that already has an Action token.
CASTLE ITTER PLAYTEST v0.3 APRIL 2016
Playing the Game: Defender Actions
12Command Special Action
Gameplay Example: Schrader can use the Command action in two ways. He can use it to Remove Suppression from Waltl and then Recover Waltl, or he can use it to Remove Suppression from Waltl and Worsham. Schrader cannot use the Command action on the Rifleman, because the Rifleman is not in the same location as Schrader.
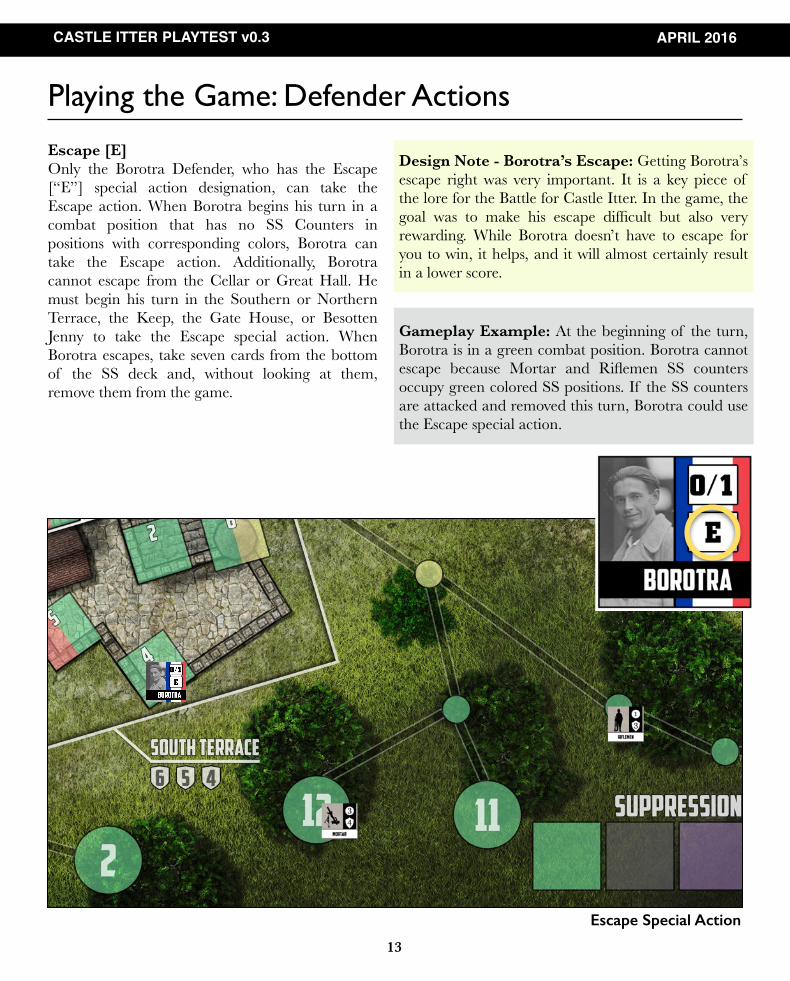
Escape [E] Only the Borotra Defender, who has the Escape [“E”] special action designation, can take the Escape action. When Borotra begins his turn in a combat position that has no SS Counters in positions with corresponding colors, Borotra can take the Escape action. Additionally, Borotra cannot escape from the Cellar or Great Hall. He must begin his turn in the Southern or Northern Terrace, the Keep, the Gate House, or Besotten Jenny to take the Escape special action. When Borotra escapes, take seven cards from the bottom of the SS deck and, without looking at them, remove them from the game.
Gameplay Example: At the beginning of the turn, Borotra is in a green combat position. Borotra cannot escape because Mortar and Riflemen SS counters occupy green colored SS positions. If the SS counters are attacked and removed this turn, Borotra could use the Escape special action.
CASTLE ITTER PLAYTEST v0.3 APRIL 2016
13
Playing the Game: Defender Actions
Escape Special Action
Design Note - Borotra’s Escape: Getting Borotra’s escape right was very important. It is a key piece of the lore for the Battle for Castle Itter. In the game, the goal was to make his escape difficult but also very rewarding. While Borotra doesn’t have to escape for you to win, it helps, and it will almost certainly result in a lower score.
Some Defenders have special attributes. These attributes are not treated as actions. Instead, they are special conditions that are always in effect. Attributes include:
• Inspire [I] • Low Morale [M] • Wehrmacht Officer [O] • Reinforcements [R] • Tank Crew [T]
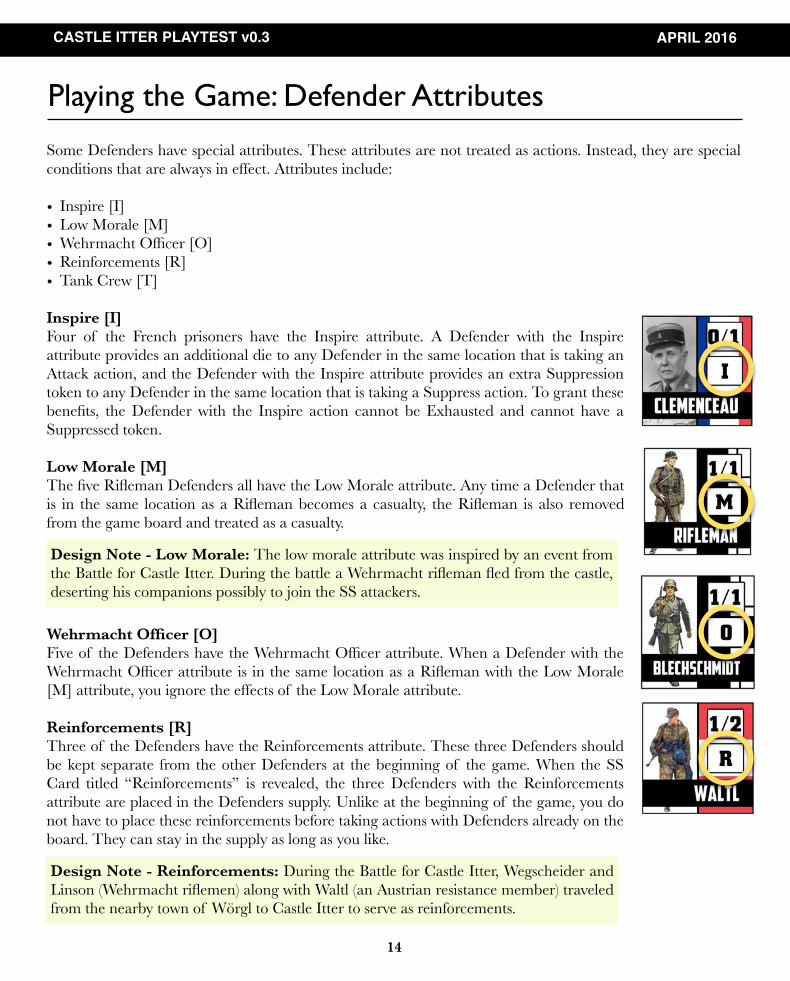
Inspire [I] Four of the French prisoners have the Inspire attribute. A Defender with the Inspire attribute provides an additional die to any Defender in the same location that is taking an Attack action, and the Defender with the Inspire attribute provides an extra Suppression token to any Defender in the same location that is taking a Suppress action. To grant these benefits, the Defender with the Inspire action cannot be Exhausted and cannot have a Suppressed token.
Low Morale [M] The five Rifleman Defenders all have the Low Morale attribute. Any time a Defender that is in the same location as a Rifleman becomes a casualty, the Rifleman is also removed from the game board and treated as a casualty.
Wehrmacht Officer [O] Five of the Defenders have the Wehrmacht Officer attribute. When a Defender with the Wehrmacht Officer attribute is in the same location as a Rifleman with the Low Morale [M] attribute, you ignore the effects of the Low Morale attribute.
Reinforcements [R] Three of the Defenders have the Reinforcements attribute. These three Defenders should be kept separate from the other Defenders at the beginning of the game. When the SS Card titled “Reinforcements” is revealed, the three Defenders with the Reinforcements attribute are placed in the Defenders supply. Unlike at the beginning of the game, you do not have to place these reinforcements before taking actions with Defenders already on the board. They can stay in the supply as long as you like.
CASTLE ITTER PLAYTEST v0.3 APRIL 2016
Playing the Game: Defender Attributes
Design Note - Low Morale: The low morale attribute was inspired by an event from the Battle for Castle Itter. During the battle a Wehrmacht rifleman fled from the castle, deserting his companions possibly to join the SS attackers.
Design Note - Reinforcements: During the Battle for Castle Itter, Wegscheider and Linson (Wehrmacht riflemen) along with Waltl (an Austrian resistance member) traveled from the nearby town of Wörgl to Castle Itter to serve as reinforcements.
14
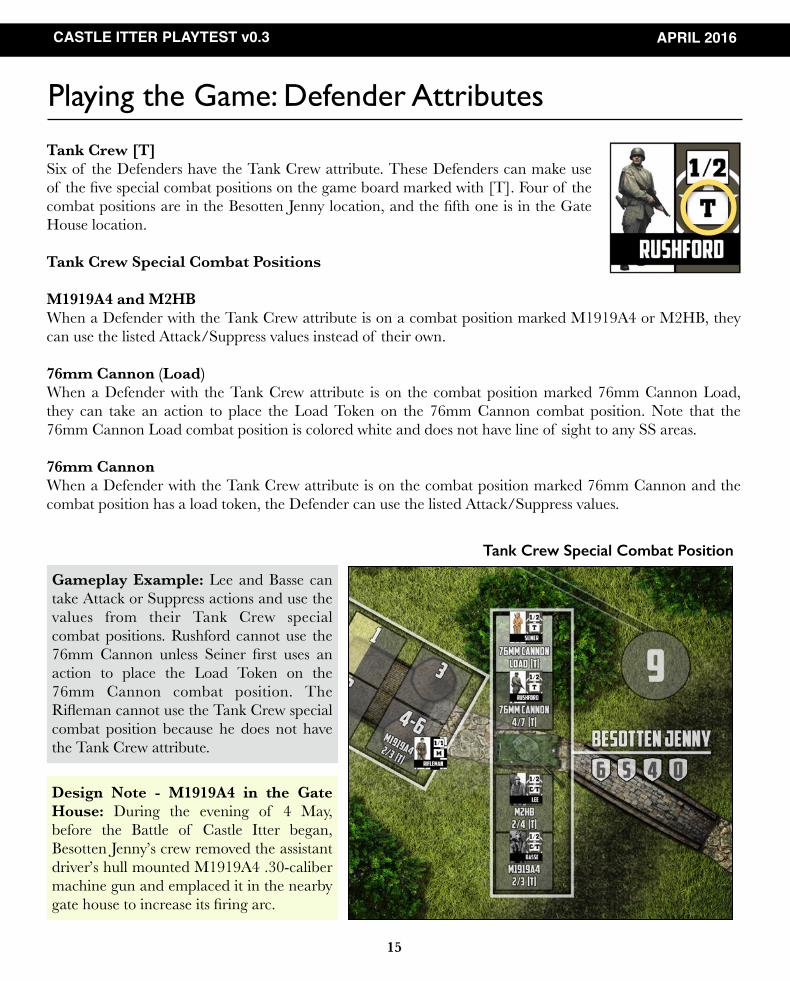
Tank Crew [T] Six of the Defenders have the Tank Crew attribute. These Defenders can make use of the five special combat positions on the game board marked with [T]. Four of the combat positions are in the Besotten Jenny location, and the fifth one is in the Gate House location.
Tank Crew Special Combat Positions
M1919A4 and M2HB When a Defender with the Tank Crew attribute is on a combat position marked M1919A4 or M2HB, they can use the listed Attack/Suppress values instead of their own.
76mm Cannon (Load) When a Defender with the Tank Crew attribute is on the combat position marked 76mm Cannon Load, they can take an action to place the Load Token on the 76mm Cannon combat position. Note that the 76mm Cannon Load combat position is colored white and does not have line of sight to any SS areas.
76mm Cannon When a Defender with the Tank Crew attribute is on the combat position marked 76mm Cannon and the combat position has a load token, the Defender can use the listed Attack/Suppress values.
CASTLE ITTER PLAYTEST v0.3 APRIL 2016
15
Playing the Game: Defender Attributes
Design Note - M1919A4 in the Gate House: During the evening of 4 May, before the Battle of Castle Itter began, Besotten Jenny’s crew removed the assistant driver’s hull mounted M1919A4 .30-caliber machine gun and emplaced it in the nearby gate house to increase its firing arc.
Gameplay Example: Lee and Basse can take Attack or Suppress actions and use the values from their Tank Crew special combat positions. Rushford cannot use the 76mm Cannon unless Seiner first uses an action to place the Load Token on the 76mm Cannon combat position. The Rifleman cannot use the Tank Crew special combat position because he does not have the Tank Crew attribute.
Tank Crew Special Combat Position
CASTLE ITTER PLAYTEST v0.3 APRIL 2016
Playing the Game: SS Cards
Once you have completed your five Defender actions for the turn, remove all the Action and Command tokens you placed on Defenders during the turn. Then reveal three SS Cards from the SS deck, one at a time, resolving the effect of each one before moving to the next. After all three SS Cards have been resolved, the turn is over and the next turn begins with five new Defender actions.
There are four different categories of SS Cards, based on the card effect:
• Attacking Defenders • Attacking a Location • Placing SS Counters • Suppressing Defenders
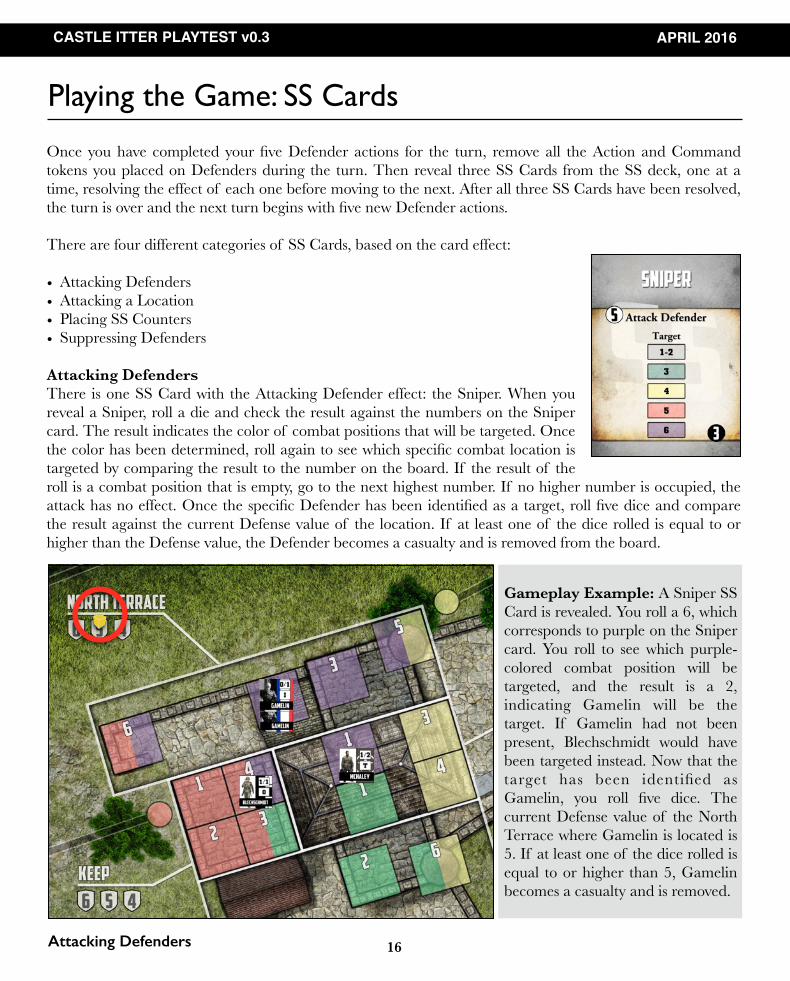
Attacking Defenders There is one SS Card with the Attacking Defender effect: the Sniper. When you reveal a Sniper, roll a die and check the result against the numbers on the Sniper card. The result indicates the color of combat positions that will be targeted. Once the color has been determined, roll again to see which specific combat location is targeted by comparing the result to the number on the board. If the result of the roll is a combat position that is empty, go to the next highest number. If no higher number is occupied, the attack has no effect. Once the specific Defender has been identified as a target, roll five dice and compare the result against the current Defense value of the location. If at least one of the dice rolled is equal to or higher than the Defense value, the Defender becomes a casualty and is removed from the board.
16
Gameplay Example: A Sniper SS Card is revealed. You roll a 6, which corresponds to purple on the Sniper card. You roll to see which purple-colored combat position will be targeted, and the result is a 2, indicating Gamelin will be the target. If Gamelin had not been present, Blechschmidt would have been targeted instead. Now that the target has been identified as Gamelin, you roll five dice. The current Defense value of the North Terrace where Gamelin is located is 5. If at least one of the dice rolled is equal to or higher than 5, Gamelin becomes a casualty and is removed.
Attacking Defenders
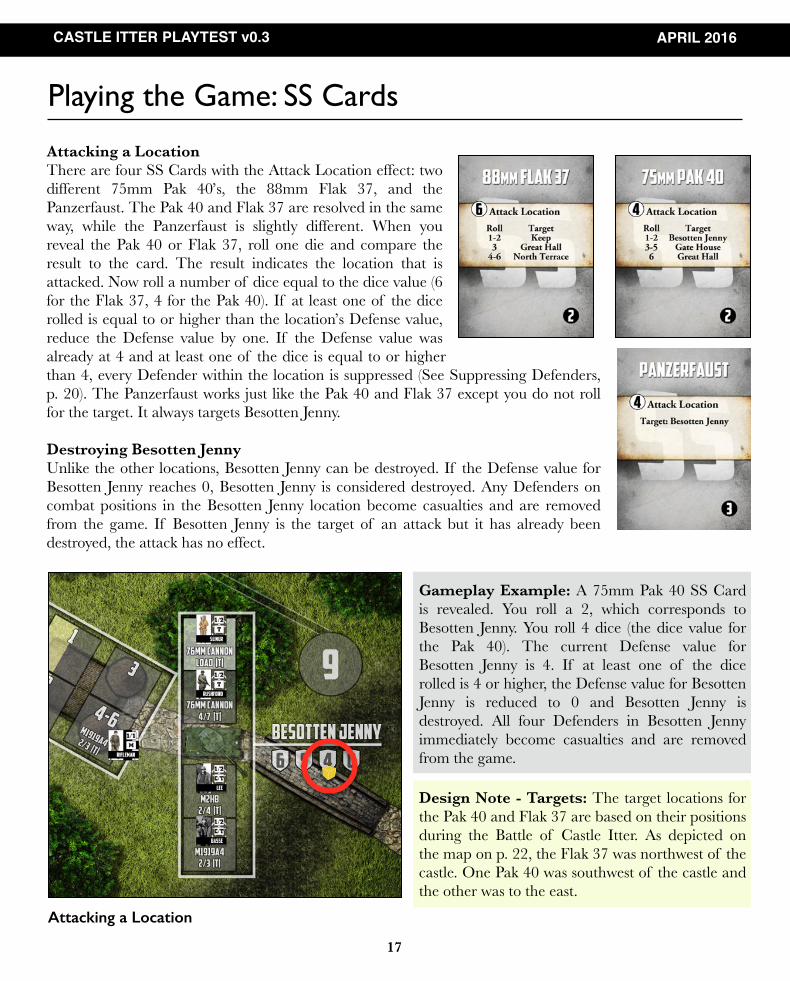
Attacking a Location There are four SS Cards with the Attack Location effect: two different 75mm Pak 40’s, the 88mm Flak 37, and the Panzerfaust. The Pak 40 and Flak 37 are resolved in the same way, while the Panzerfaust is slightly different. When you reveal the Pak 40 or Flak 37, roll one die and compare the result to the card. The result indicates the location that is attacked. Now roll a number of dice equal to the dice value (6 for the Flak 37, 4 for the Pak 40). If at least one of the dice rolled is equal to or higher than the location’s Defense value, reduce the Defense value by one. If the Defense value was already at 4 and at least one of the dice is equal to or higher than 4, every Defender within the location is suppressed (See Suppressing Defenders, p. 20). The Panzerfaust works just like the Pak 40 and Flak 37 except you do not roll for the target. It always targets Besotten Jenny.
Destroying Besotten Jenny Unlike the other locations, Besotten Jenny can be destroyed. If the Defense value for Besotten Jenny reaches 0, Besotten Jenny is considered destroyed. Any Defenders on combat positions in the Besotten Jenny location become casualties and are removed from the game. If Besotten Jenny is the target of an attack but it has already been destroyed, the attack has no effect.
CASTLE ITTER PLAYTEST v0.3 APRIL 2016
17
Gameplay Example: A 75mm Pak 40 SS Card is revealed. You roll a 2, which corresponds to Besotten Jenny. You roll 4 dice (the dice value for the Pak 40). The current Defense value for Besotten Jenny is 4. If at least one of the dice rolled is 4 or higher, the Defense value for Besotten Jenny is reduced to 0 and Besotten Jenny is destroyed. All four Defenders in Besotten Jenny immediately become casualties and are removed from the game.
Playing the Game: SS Cards
Attacking a Location
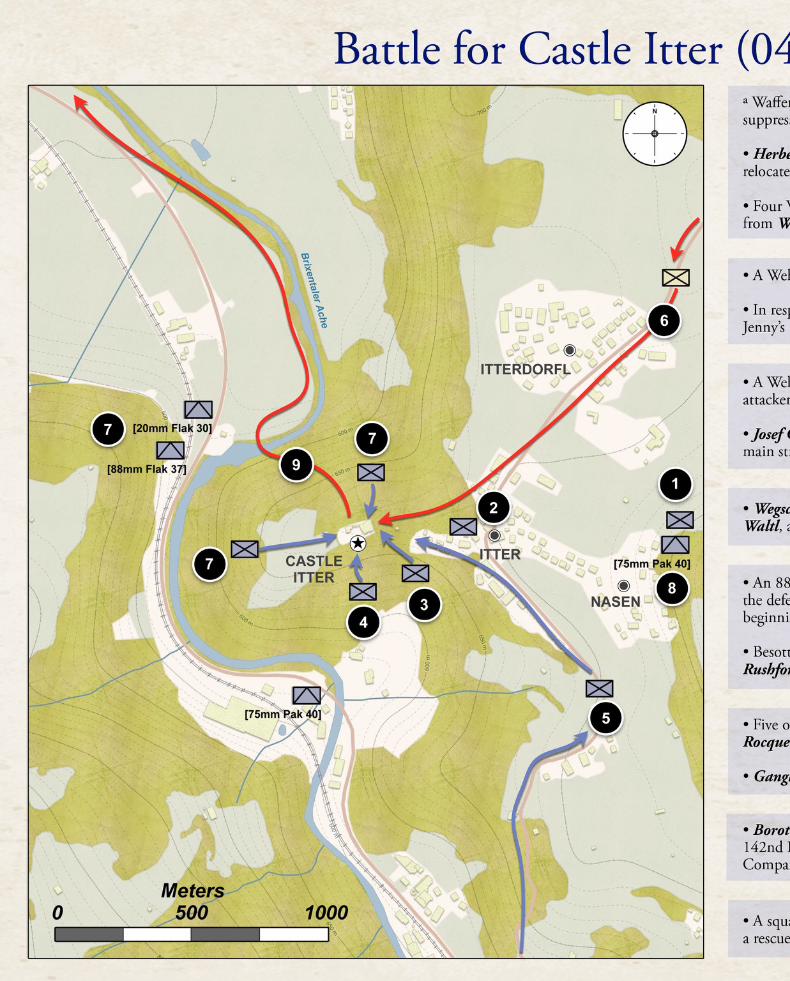
Design Note - Targets: The target locations for the Pak 40 and Flak 37 are based on their positions during the Battle of Castle Itter. As depicted on the map on p. 22, the Flak 37 was northwest of the castle. One Pak 40 was southwest of the castle and the other was to the east.
CASTLE ITTER PLAYTEST v0.3 APRIL 2016
18
Playing the Game: SS Cards
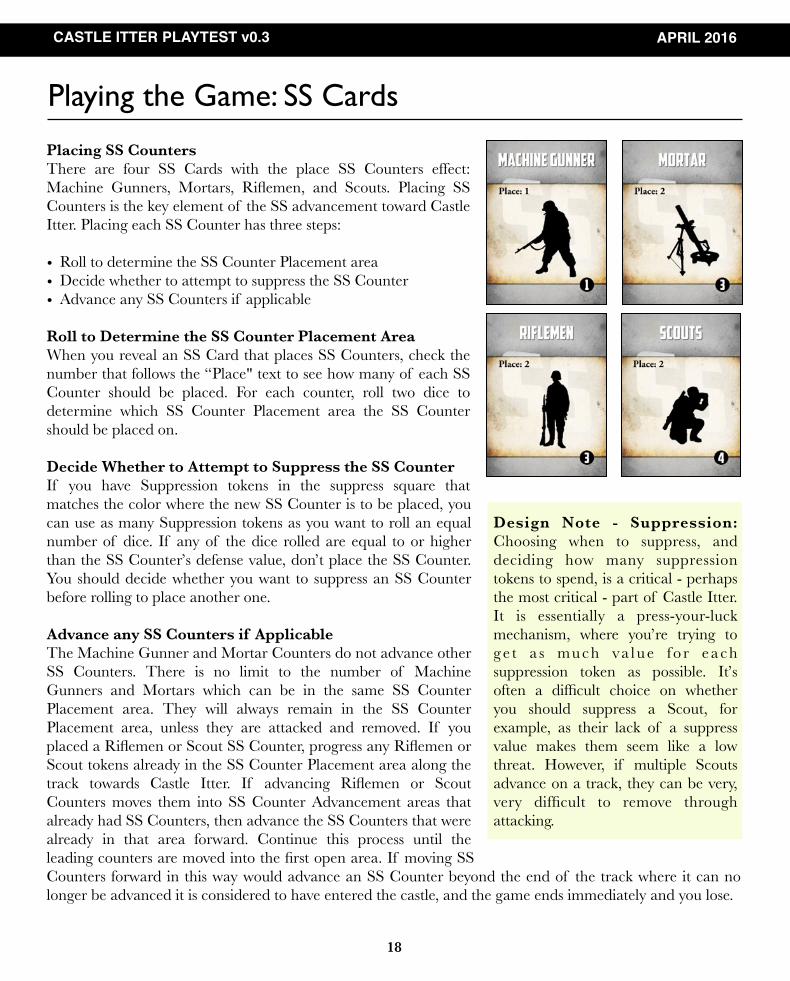
Placing SS Counters There are four SS Cards with the place SS Counters effect: Machine Gunners, Mortars, Riflemen, and Scouts. Placing SS Counters is the key element of the SS advancement toward Castle Itter. Placing each SS Counter has three steps:
• Roll to determine the SS Counter Placement area • Decide whether to attempt to suppress the SS Counter • Advance any SS Counters if applicable
Roll to Determine the SS Counter Placement Area When you reveal an SS Card that places SS Counters, check the number that follows the “Place" text to see how many of each SS Counter should be placed. For each counter, roll two dice to determine which SS Counter Placement area the SS Counter should be placed on.
Decide Whether to Attempt to Suppress the SS Counter If you have Suppression tokens in the suppress square that matches the color where the new SS Counter is to be placed, you can use as many Suppression tokens as you want to roll an equal number of dice. If any of the dice rolled are equal to or higher than the SS Counter’s defense value, don’t place the SS Counter. You should decide whether you want to suppress an SS Counter before rolling to place another one.
Advance any SS Counters if Applicable The Machine Gunner and Mortar Counters do not advance other SS Counters. There is no limit to the number of Machine Gunners and Mortars which can be in the same SS Counter Placement area. They will always remain in the SS Counter Placement area, unless they are attacked and removed. If you placed a Riflemen or Scout SS Counter, progress any Riflemen or Scout tokens already in the SS Counter Placement area along the track towards Castle Itter. If advancing Riflemen or Scout Counters moves them into SS Counter Advancement areas that already had SS Counters, then advance the SS Counters that were already in that area forward. Continue this process until the leading counters are moved into the first open area. If moving SS Counters forward in this way would advance an SS Counter beyond the end of the track where it can no longer be advanced it is considered to have entered the castle, and the game ends immediately and you lose.
Design Note - Suppression: Choosing when to suppress, and deciding how many suppression tokens to spend, is a critical - perhaps the most critical - part of Castle Itter. It is essentially a press-your-luck mechanism, where you’re trying to g e t a s mu ch va l u e fo r e a ch suppression token as possible. It’s often a difficult choice on whether you should suppress a Scout, for example, as their lack of a suppress value makes them seem like a low threat. However, if multiple Scouts advance on a track, they can be very, very difficult to remove through attacking.

CASTLE ITTER PLAYTEST v0.3 APRIL 2016
Playing the Game: SS Cards
Gameplay Example: A Riflemen Card is revealed with “Place: 2.” You roll two dice and the result is 11. A Riflemen Counter should be placed in the “11” SS Counter Placement area. You decide not to suppress the Riflemen and place it. For the second Riflemen, you roll the dice again and get a 9. You decide to try to suppress the Riflemen because there are already Riflemen and Scouts on the track. You choose to use two Suppression tokens from the gray colored suppression square. This allows you to roll two dice. Because the Riflemen has a Defense value of 3, you need to roll a 3 or higher to suppress the Riflemen and keep the counter from being placed. You roll two 1’s. You place the Riflemen counter and advance the Riflemen and Scout Counters forward on the track.
19
SS Counter Placement
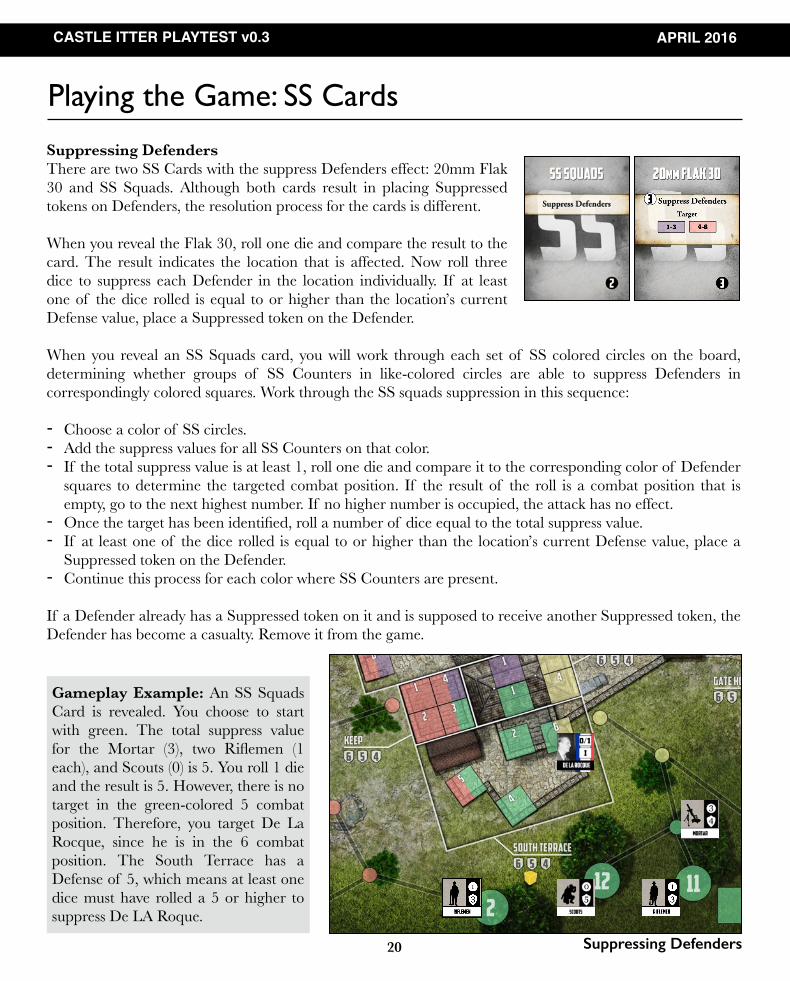
Suppressing Defenders There are two SS Cards with the suppress Defenders effect: 20mm Flak 30 and SS Squads. Although both cards result in placing Suppressed tokens on Defenders, the resolution process for the cards is different.
When you reveal the Flak 30, roll one die and compare the result to the card. The result indicates the location that is affected. Now roll three dice to suppress each Defender in the location individually. If at least one of the dice rolled is equal to or higher than the location’s current Defense value, place a Suppressed token on the Defender.
When you reveal an SS Squads card, you will work through each set of SS colored circles on the board, determining whether groups of SS Counters in like-colored circles are able to suppress Defenders in correspondingly colored squares. Work through the SS squads suppression in this sequence:
- Choose a color of SS circles. - Add the suppress values for all SS Counters on that color. - If the total suppress value is at least 1, roll one die and compare it to the corresponding color of Defender
squares to determine the targeted combat position. If the result of the roll is a combat position that is empty, go to the next highest number. If no higher number is occupied, the attack has no effect.
- Once the target has been identified, roll a number of dice equal to the total suppress value. - If at least one of the dice rolled is equal to or higher than the location’s current Defense value, place a
Suppressed token on the Defender. - Continue this process for each color where SS Counters are present.
If a Defender already has a Suppressed token on it and is supposed to receive another Suppressed token, the Defender has become a casualty. Remove it from the game.
CASTLE ITTER PLAYTEST v0.3 APRIL 2016
20
Playing the Game: SS Cards
Gameplay Example: An SS Squads Card is revealed. You choose to start with green. The total suppress value for the Mortar (3), two Riflemen (1 each), and Scouts (0) is 5. You roll 1 die and the result is 5. However, there is no target in the green-colored 5 combat position. Therefore, you target De La Rocque, since he is in the 6 combat position. The South Terrace has a Defense of 5, which means at least one dice must have rolled a 5 or higher to suppress De LA Roque.
Suppressing Defenders
Ending the Game
You Win if the last SS Card is resolved and no SS Counter advanced beyond the end of the track into the castle.
You Lose if an SS Counter advances beyond the end of the track.
Score: The goal in Castle Itter is to score as few points as possible. For each French prisoner Defender that became a casualty during the game, you score 3 points. For each other Defender that became a casualty, you score 1 point.
Increasing the Difficulty
Once you have beaten the normal version of Castle Itter, you can try the game with increased difficulty. To play the game at the Veteran level, leave in the six SS cards marked “Veteran" when sorting the SS Cards during setup. To play the game at the Elite level, leave in the six SS Cards marked "Veteran" and the six SS Cards marked “Elite" when sorting the SS Cards during setup.
Additional Reading on the Topic
• The definitive book on the topic of the Battle of Castle Itter is "The Last Battle," by Stephen Harding. • BBC article on the battle (includes a brief interview with Stephen Harding). The Austrian castle where
Nazis lost to German-US force • French language article on the battle: “Le jour le plus dingue: comment des GIs se sont alliés à des soldats
de la Wehrmacht pour libérer des Français en mai 1945” • German language article on the battle: “Als Wehrmacht und Amerikaner gemeinsam gegen die SS
kämpften”
Castle Itter Scenarios for other Games
• ASL scenario included in Rally Point #4 - Ruins of the Reich. (2009) • Memoir 44 scenario. (2014) • ASL scenario and a Heroes of Normandie scenario in Yaah! Magazine #4. (2015)
CASTLE ITTER PLAYTEST v0.3 APRIL 2016
21
Ending the Game and Increased Difficulty
References and Additional Resources
CASTLE ITTER PLAYTEST v0.1 MARCH 2016
3
CASTLE ITTER PLAYTEST v0.1 MARCH 2016
3